$page = array(
"Page" => array(
"id" => "1",
"parent_id" => null,
"controller" => "home",
"title_eng" => "Home",
"title_hrv" => "Naslovnica",
"lft" => "1",
"rght" => "56"
),
"PageContent" => array(
array()
)
)
$pageContents = array()
$pageContent = array(
"id" => "1",
"name" => "home_who_we_are",
"page_id" => "1",
"content_eng" => "<p>
Miniature collectors, modellers, tabletop wargamers, young or old(er) people who care deeply for miniature figurines and tabletop wargaming. On this site you can find out a bit more about our <a href="../../activities">activities</a>, get introduced to the <a href="../../games">games</a> that are played in the <a href="../../about_us">club</a> and meet our <a href="../../members">members</a>.</p>
<p>
<a href="http://img.photobucket.com/albums/v467/demonn/piracy.jpg" target="_blank"><img alt="Click for enlarged picture" src="http://img.photobucket.com/albums/v467/demonn/piracy.jpg" width="300" /></a></p>
",
"content_hrv" => "<p>
Minijaturisti, maketari, igrači, veliki i mali ljudi koji koji gaje posebnu ljubav za minijaturne figurice i stolno-strateške igre. Na ovim stranicama možete pročitati nešto više o našim <a href="../../activities">aktivnostima</a>, upoznati se s <a href="../../games">aktualnim igrama</a> u <a href="../../about_us">udruzi</a> i našim <a href="../../members">članovima</a>, te pogledati kako to <a href="../../galleries">izgleda</a> kad se veselo društvo prihvati minijatura!</p>
<p>
<a href="http://img.photobucket.com/albums/v467/demonn/piratluk.jpg" target="_blank"><img alt="Click for enlarged picture" src="http://img.photobucket.com/albums/v467/demonn/piratluk.jpg" width="300" /></a></p>
<p>
<strong>POMOGNITE RADU UDRUGE!</strong></p>
<p>
U znak zahvale za Vaše donacije, uz određene iznose dobivate i jednu ili više naših publikacija. Za više informacija obratite nam se na ums.agram@gmail.com.</p>
<p>
Uz donaciju od 20,00€ dobivate Monografiju - Naših prvih 18 godina.</p>
<p>
<a href="https://hosting.photobucket.com/95288841-8654-4bf7-8fc9-a4aa78dce87f/ea3a184b-1b71-4bb9-9981-c917845e82d6.jpg" target="_blank"><img alt="Click for enlarged picture" src="https://hosting.photobucket.com/95288841-8654-4bf7-8fc9-a4aa78dce87f/ea3a184b-1b71-4bb9-9981-c917845e82d6.jpg" width="300" /></a></p>
<p>
Uz donaciju od 25,00€ dobivate jednu od:<br />
- Bojanje minijatura za početnike, II izdanje<br />
ILI<br />
- Minijaturizam u doba Corone<br />
ILI<br />
- Minijaturizam u doba nakon Corone</p>
<p>
<a href="https://hosting.photobucket.com/95288841-8654-4bf7-8fc9-a4aa78dce87f/cefd62b9-b656-440a-9155-054ec12d1c7a.jpg" target="_blank"><img alt="Click for enlarged picture" src="https://hosting.photobucket.com/95288841-8654-4bf7-8fc9-a4aa78dce87f/cefd62b9-b656-440a-9155-054ec12d1c7a.jpg" width="300" /></a><br />
<br />
Uz donaciju od 40,00€ dobivate:<br />
- Izrada prostornih maketa za početnike<br />
ILI<br />
- Minijaturizam u doba Corone<br />
I<br />
- Minijaturizam u doba nakon Corone</p>
<p>
<a href="https://hosting.photobucket.com/95288841-8654-4bf7-8fc9-a4aa78dce87f/0f10bde3-1b1f-47fa-afcc-ce2bf5fe9600.jpg" target="_blank"><img alt="Click for enlarged picture" src="https://hosting.photobucket.com/95288841-8654-4bf7-8fc9-a4aa78dce87f/0f10bde3-1b1f-47fa-afcc-ce2bf5fe9600.jpg" width="300" /></a></p>
<p>
</p>
<p>
Uz donaciju od 60,00€ dobivate:<br />
- Izrada prostornih maketa za početnike<br />
I<br />
- Bojanje minijatura za početnike, II izdanje</p>
<p>
<a href="https://hosting.photobucket.com/95288841-8654-4bf7-8fc9-a4aa78dce87f/f5e23efc-fb31-4a1c-831b-7c6a4fae824f.jpg" target="_blank"><img alt="Click for enlarged picture" src="https://hosting.photobucket.com/95288841-8654-4bf7-8fc9-a4aa78dce87f/f5e23efc-fb31-4a1c-831b-7c6a4fae824f.jpg" width="300" /></a></p>
<p>
</p>
<p>
Uz donaciju od 100,00€ i više dobivate:<br />
SVIH PET NAŠIH KNJIGA!</p>
<p>
<a href="https://hosting.photobucket.com/95288841-8654-4bf7-8fc9-a4aa78dce87f/7f84fdfb-08b9-4e8f-9fcc-f8d2142e13d5.jpg" target="_blank"><img alt="Click for enlarged picture" src="https://hosting.photobucket.com/95288841-8654-4bf7-8fc9-a4aa78dce87f/7f84fdfb-08b9-4e8f-9fcc-f8d2142e13d5.jpg" width="300" /></a></p>",
"description" => "<p>Tekst o Agramu na početnoj stranici.</p>"
)
AppController::_getPageContents() - APP/app_controller.php, line 143
AppController::_setCommonData() - APP/app_controller.php, line 120
AppController::beforeRender() - APP/app_controller.php, line 80
Controller::render() - CORE/cake/libs/controller/controller.php, line 863
Dispatcher::_invoke() - CORE/cake/dispatcher.php, line 207
Dispatcher::dispatch() - CORE/cake/dispatcher.php, line 171
[main] - APP/webroot/index.php, line 86
Notice (8): Undefined index: title_dok [APP/views/layouts/default.ctp, line 14]
if (Configure::read() > 0) { include ($___viewFn);
$___viewFn = "/home/martin/apps/agram/app/views/layouts/default.ctp"
$___dataForView = array(
"lang" => "dok",
"otherLangs" => array(
"eng",
"hrv"
),
"globalNav" => array(
array(),
array(),
array(),
array(),
array(),
array(),
array(),
array(),
array(),
array(),
array(),
array(),
array(),
array(),
array(),
array(),
array(),
array(),
array(),
array(),
array(),
array(),
array(),
array(),
array(),
array(),
array()
),
"breadCrumbs" => array(
array()
),
"pageContents" => array(
"home_who_we_are" => null
),
"userData" => null,
"announcements" => array(
array(),
array(),
array()
),
"content_for_layout" => "<div id="leftColumn">
<h2>latest_announcements</h2>
<div class="announcement workshop_announcement">
<h3><pre class="cake-debug"><a href="javascript:void(0);" onclick="document.getElementById('cakeErr2-trace').style.display = (document.getElementById('cakeErr2-trace').style.display == 'none' ? '' : 'none');"><b>Notice</b> (8)</a>: Undefined index: title_dok [<b>APP/views/home/index.ctp</b>, line <b>7</b>]<div id="cakeErr2-trace" class="cake-stack-trace" style="display: none;"><a href="javascript:void(0);" onclick="document.getElementById('cakeErr2-code').style.display = (document.getElementById('cakeErr2-code').style.display == 'none' ? '' : 'none')">Code</a> | <a href="javascript:void(0);" onclick="document.getElementById('cakeErr2-context').style.display = (document.getElementById('cakeErr2-context').style.display == 'none' ? '' : 'none')">Context</a><div id="cakeErr2-code" class="cake-code-dump" style="display: none;"><pre><code><span style="color: #000000"></span></code>
<code><span style="color: #000000"> if (Configure::read() > 0) {</span></code>
<span class="code-highlight"><code><span style="color: #000000"> include ($___viewFn);</span></code></span></pre></div><pre id="cakeErr2-context" class="cake-context" style="display: none;">$___viewFn = "/home/martin/apps/agram/app/views/home/index.ctp"
$___dataForView = array(
"lang" => "dok",
"otherLangs" => array(
"eng",
"hrv"
),
"globalNav" => array(
array(),
array(),
array(),
array(),
array(),
array(),
array(),
array(),
array(),
array(),
array(),
array(),
array(),
array(),
array(),
array(),
array(),
array(),
array(),
array(),
array(),
array(),
array(),
array(),
array(),
array(),
array()
),
"breadCrumbs" => array(
array()
),
"pageContents" => array(
"home_who_we_are" => null
),
"userData" => null,
"announcements" => array(
array(),
array(),
array()
)
)
$loadHelpers = true
$cached = false
$form = FormHelper
FormHelper::$helpers = array
FormHelper::$fieldset = array
FormHelper::$__options = array
FormHelper::$fields = array
FormHelper::$requestType = NULL
FormHelper::$defaultModel = NULL
FormHelper::$_inputDefaults = array
FormHelper::$_lastAction = ""
FormHelper::$base = ""
FormHelper::$webroot = "/"
FormHelper::$theme = NULL
FormHelper::$here = "/dok"
FormHelper::$params = array
FormHelper::$action = "index"
FormHelper::$plugin = NULL
FormHelper::$data = NULL
FormHelper::$namedArgs = NULL
FormHelper::$argSeparator = NULL
FormHelper::$validationErrors = NULL
FormHelper::$tags = array
FormHelper::$__tainted = NULL
FormHelper::$__cleaned = NULL
FormHelper::$Html = HtmlHelper object
$text = TextHelper
TextHelper::$helpers = NULL
TextHelper::$base = ""
TextHelper::$webroot = "/"
TextHelper::$theme = NULL
TextHelper::$here = "/dok"
TextHelper::$params = array
TextHelper::$action = "index"
TextHelper::$plugin = NULL
TextHelper::$data = NULL
TextHelper::$namedArgs = NULL
TextHelper::$argSeparator = NULL
TextHelper::$validationErrors = NULL
TextHelper::$tags = array
TextHelper::$__tainted = NULL
TextHelper::$__cleaned = NULL
$stringer = StringerHelper
StringerHelper::$helpers = array
StringerHelper::$base = ""
StringerHelper::$webroot = "/"
StringerHelper::$theme = NULL
StringerHelper::$here = "/dok"
StringerHelper::$params = array
StringerHelper::$action = "index"
StringerHelper::$plugin = NULL
StringerHelper::$data = NULL
StringerHelper::$namedArgs = NULL
StringerHelper::$argSeparator = NULL
StringerHelper::$validationErrors = NULL
StringerHelper::$tags = array
StringerHelper::$__tainted = NULL
StringerHelper::$__cleaned = NULL
StringerHelper::$Html = HtmlHelper object
StringerHelper::$Link = LinkHelper object
StringerHelper::$Text = TextHelper object
$menu = MenuHelper
MenuHelper::$helpers = array
MenuHelper::$base = ""
MenuHelper::$webroot = "/"
MenuHelper::$theme = NULL
MenuHelper::$here = "/dok"
MenuHelper::$params = array
MenuHelper::$action = "index"
MenuHelper::$plugin = NULL
MenuHelper::$data = NULL
MenuHelper::$namedArgs = NULL
MenuHelper::$argSeparator = NULL
MenuHelper::$validationErrors = NULL
MenuHelper::$tags = array
MenuHelper::$__tainted = NULL
MenuHelper::$__cleaned = NULL
MenuHelper::$Link = LinkHelper object
$session = SessionHelper
SessionHelper::$helpers = array
SessionHelper::$__active = true
SessionHelper::$valid = false
SessionHelper::$error = false
SessionHelper::$_userAgent = "f9a8355d006790ee743ededbb1f6e3bd"
SessionHelper::$path = "/"
SessionHelper::$lastError = NULL
SessionHelper::$security = "medium"
SessionHelper::$time = 1773395484
SessionHelper::$sessionTime = 1773407484
SessionHelper::$cookieLifeTime = false
SessionHelper::$watchKeys = array
SessionHelper::$id = NULL
SessionHelper::$host = NULL
SessionHelper::$timeout = NULL
SessionHelper::$base = ""
SessionHelper::$webroot = "/"
SessionHelper::$here = "/dok"
SessionHelper::$params = array
SessionHelper::$action = "index"
SessionHelper::$data = NULL
SessionHelper::$theme = NULL
SessionHelper::$plugin = NULL
$html = HtmlHelper
HtmlHelper::$tags = array
HtmlHelper::$_crumbs = array
HtmlHelper::$__includedScripts = array
HtmlHelper::$_scriptBlockOptions = array
HtmlHelper::$__docTypes = array
HtmlHelper::$helpers = NULL
HtmlHelper::$base = ""
HtmlHelper::$webroot = "/"
HtmlHelper::$theme = NULL
HtmlHelper::$here = "/dok"
HtmlHelper::$params = array
HtmlHelper::$action = "index"
HtmlHelper::$plugin = NULL
HtmlHelper::$data = NULL
HtmlHelper::$namedArgs = NULL
HtmlHelper::$argSeparator = NULL
HtmlHelper::$validationErrors = NULL
HtmlHelper::$__tainted = NULL
HtmlHelper::$__cleaned = NULL
$link = LinkHelper
LinkHelper::$helpers = array
LinkHelper::$lang = NULL
LinkHelper::$defaultLang = NULL
LinkHelper::$base = ""
LinkHelper::$webroot = "/"
LinkHelper::$theme = NULL
LinkHelper::$here = "/dok"
LinkHelper::$params = array
LinkHelper::$action = "index"
LinkHelper::$plugin = NULL
LinkHelper::$data = NULL
LinkHelper::$namedArgs = NULL
LinkHelper::$argSeparator = NULL
LinkHelper::$validationErrors = NULL
LinkHelper::$tags = array
LinkHelper::$__tainted = NULL
LinkHelper::$__cleaned = NULL
LinkHelper::$Html = HtmlHelper object
LinkHelper::$Session = SessionHelper object
$lang = "dok"
$otherLangs = array(
"eng",
"hrv"
)
$globalNav = array(
array(
"Page" => array()
),
array(
"Page" => array()
),
array(
"Page" => array()
),
array(
"Page" => array()
),
array(
"Page" => array()
),
array(
"Page" => array()
),
array(
"Page" => array()
),
array(
"Page" => array()
),
array(
"Page" => array()
),
array(
"Page" => array()
),
array(
"Page" => array()
),
array(
"Page" => array()
),
array(
"Page" => array()
),
array(
"Page" => array()
),
array(
"Page" => array()
),
array(
"Page" => array()
),
array(
"Page" => array()
),
array(
"Page" => array()
),
array(
"Page" => array()
),
array(
"Page" => array()
),
array(
"Page" => array()
),
array(
"Page" => array()
),
array(
"Page" => array()
),
array(
"Page" => array()
),
array(
"Page" => array()
),
array(
"Page" => array()
),
array(
"Page" => array()
)
)
$breadCrumbs = array(
array(
"Page" => array()
)
)
$pageContents = array(
"home_who_we_are" => null
)
$userData = null
$announcements = array(
array(
"Announcement" => array()
),
array(
"Announcement" => array()
),
array(
"Announcement" => array()
)
)
$announcement = array(
"Announcement" => array(
"id" => "4_80",
"class" => "workshop_announcement",
"controller" => "workshop_announcements",
"mask_eng" => "ExhibitionB2B",
"mask_hrv" => "IzložbaB2B",
"title_hrv" => "Back to Basics Radionice za najmlađe na Izložbi minijatura i maketa Agram 2026",
"title_eng" => "Back to Basics Workshops @ Exhibition of Miniatures and Tabletop Scenery Agram 2026",
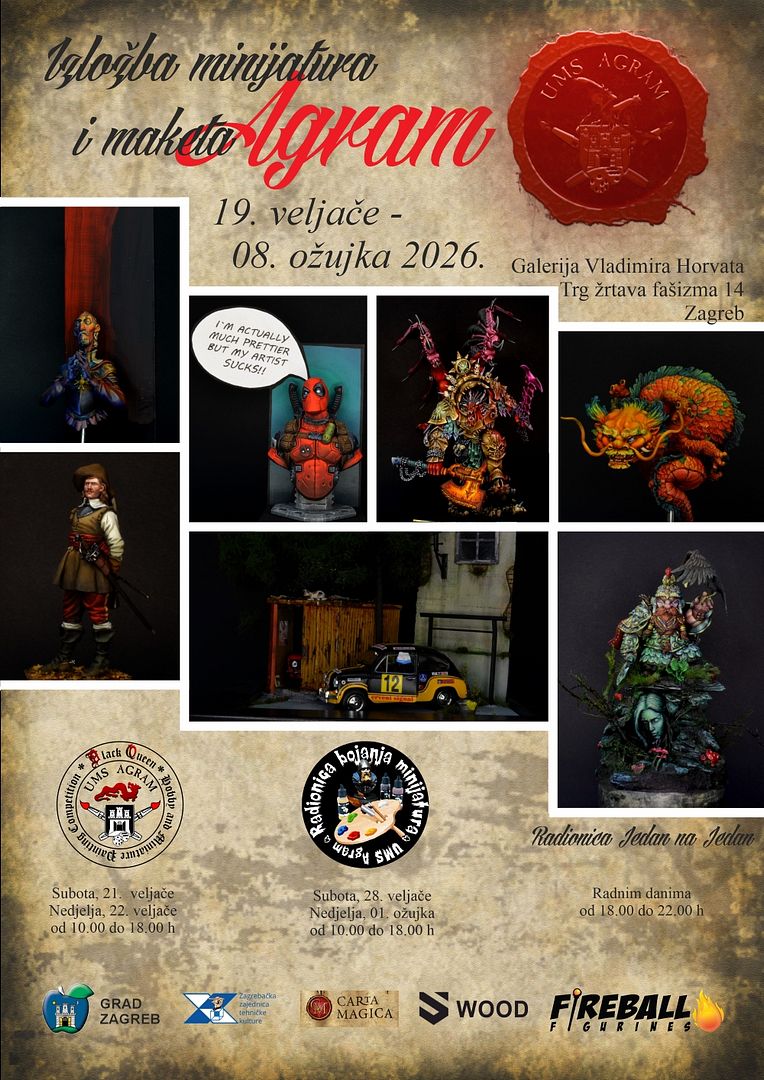
"content_hrv" => "<p>
Tijekom na&scaron;e Izložbe minijatura i maketa Agram 2026 svakog radnog dana od 17:00 do 18:00 organizirat ćemo i <strong>Back to Basics radionice bojanja minijatura za najmlađe</strong> (8+).&nbsp;</p>
<p>
<a href="https://hosting.photobucket.com/95288841-8654-4bf7-8fc9-a4aa78dce87f/f73b7e94-5adc-4afb-838b-b479ea8886fd.jpg" target="_blank"><img alt="Click for enlarged picture" src="https://hosting.photobucket.com/95288841-8654-4bf7-8fc9-a4aa78dce87f/f73b7e94-5adc-4afb-838b-b479ea8886fd.jpg" width="600" /></a></p>
<p>
<strong>ULAZ BESPLATAN!</strong></p>
<p>
Radionice (trajanja cca 1h ) su prigodne za najmlađe korisnike jer se samo koriste bazične tehnike, alati i materijali a omogućava lak&scaron;i pristup minijaturizmu i maketarstvu fokusiranjem na zabavni proces izrade za razliku od uobičajenog inzistiranja na i&scaron;čekivanje krajnjeg rezultata koji najče&scaron;će donosi stres mlađim polaznicima.</p>
<p>
U svakom od termina po četiri polaznika će moći obojati i sastaviti vlastitu figuru (koju onda nose doma).</p>
",
"content_eng" => "<p>
During our Exhibition of Miniatures and Tabletop Scenery Agram 2026, every weekday from 5:00 PM to 6:00 PM, we will also organize <strong>Back to Basics miniature painting workshops for the youngest (8+)</strong>.</p>
<p>
<a href="https://hosting.photobucket.com/95288841-8654-4bf7-8fc9-a4aa78dce87f/f73b7e94-5adc-4afb-838b-b479ea8886fd.jpg" target="_blank"><img alt="Click for enlarged picture" src="https://hosting.photobucket.com/95288841-8654-4bf7-8fc9-a4aa78dce87f/f73b7e94-5adc-4afb-838b-b479ea8886fd.jpg" width="600" /></a></p>
<p>
<strong>FREE ENTRY! </strong></p>
<p>
The workshops (lasting approx. 1 hour) are suitable for the youngest users because they only use basic techniques, tools and materials and provide an easier approach to miniaturism and model making by focusing on the fun process of making, as opposed to the usual insistence on waiting for the final result, which most often brings stress to younger participants.</p>
<p>
In each session, four participants will be able to color and assemble their own figure (which they then take home).</p>
",
"created" => "2026-02-17 07:57:52",
"first_name" => "Krunoslav",
"last_name" => "Belinić",
"first_name_mask" => "krunoslav",
"last_name_mask" => "belinic",
"start" => null,
"end" => null
)
)</pre><pre class="stack-trace">include - APP/views/home/index.ctp, line 7
View::_render() - CORE/cake/libs/view/view.php, line 736
View::render() - CORE/cake/libs/view/view.php, line 431
Controller::render() - CORE/cake/libs/controller/controller.php, line 909
Dispatcher::_invoke() - CORE/cake/dispatcher.php, line 207
Dispatcher::dispatch() - CORE/cake/dispatcher.php, line 171
[main] - APP/webroot/index.php, line 86</pre></div></pre><pre class="cake-debug"><a href="javascript:void(0);" onclick="document.getElementById('cakeErr3-trace').style.display = (document.getElementById('cakeErr3-trace').style.display == 'none' ? '' : 'none');"><b>Notice</b> (8)</a>: Undefined index: mask_dok [<b>APP/views/home/index.ctp</b>, line <b>10</b>]<div id="cakeErr3-trace" class="cake-stack-trace" style="display: none;"><a href="javascript:void(0);" onclick="document.getElementById('cakeErr3-code').style.display = (document.getElementById('cakeErr3-code').style.display == 'none' ? '' : 'none')">Code</a> | <a href="javascript:void(0);" onclick="document.getElementById('cakeErr3-context').style.display = (document.getElementById('cakeErr3-context').style.display == 'none' ? '' : 'none')">Context</a><div id="cakeErr3-code" class="cake-code-dump" style="display: none;"><pre><code><span style="color: #000000"></span></code>
<code><span style="color: #000000"> if (Configure::read() > 0) {</span></code>
<span class="code-highlight"><code><span style="color: #000000"> include ($___viewFn);</span></code></span></pre></div><pre id="cakeErr3-context" class="cake-context" style="display: none;">$___viewFn = "/home/martin/apps/agram/app/views/home/index.ctp"
$___dataForView = array(
"lang" => "dok",
"otherLangs" => array(
"eng",
"hrv"
),
"globalNav" => array(
array(),
array(),
array(),
array(),
array(),
array(),
array(),
array(),
array(),
array(),
array(),
array(),
array(),
array(),
array(),
array(),
array(),
array(),
array(),
array(),
array(),
array(),
array(),
array(),
array(),
array(),
array()
),
"breadCrumbs" => array(
array()
),
"pageContents" => array(
"home_who_we_are" => null
),
"userData" => null,
"announcements" => array(
array(),
array(),
array()
)
)
$loadHelpers = true
$cached = false
$form = FormHelper
FormHelper::$helpers = array
FormHelper::$fieldset = array
FormHelper::$__options = array
FormHelper::$fields = array
FormHelper::$requestType = NULL
FormHelper::$defaultModel = NULL
FormHelper::$_inputDefaults = array
FormHelper::$_lastAction = ""
FormHelper::$base = ""
FormHelper::$webroot = "/"
FormHelper::$theme = NULL
FormHelper::$here = "/dok"
FormHelper::$params = array
FormHelper::$action = "index"
FormHelper::$plugin = NULL
FormHelper::$data = NULL
FormHelper::$namedArgs = NULL
FormHelper::$argSeparator = NULL
FormHelper::$validationErrors = NULL
FormHelper::$tags = array
FormHelper::$__tainted = NULL
FormHelper::$__cleaned = NULL
FormHelper::$Html = HtmlHelper object
$text = TextHelper
TextHelper::$helpers = NULL
TextHelper::$base = ""
TextHelper::$webroot = "/"
TextHelper::$theme = NULL
TextHelper::$here = "/dok"
TextHelper::$params = array
TextHelper::$action = "index"
TextHelper::$plugin = NULL
TextHelper::$data = NULL
TextHelper::$namedArgs = NULL
TextHelper::$argSeparator = NULL
TextHelper::$validationErrors = NULL
TextHelper::$tags = array
TextHelper::$__tainted = NULL
TextHelper::$__cleaned = NULL
$stringer = StringerHelper
StringerHelper::$helpers = array
StringerHelper::$base = ""
StringerHelper::$webroot = "/"
StringerHelper::$theme = NULL
StringerHelper::$here = "/dok"
StringerHelper::$params = array
StringerHelper::$action = "index"
StringerHelper::$plugin = NULL
StringerHelper::$data = NULL
StringerHelper::$namedArgs = NULL
StringerHelper::$argSeparator = NULL
StringerHelper::$validationErrors = NULL
StringerHelper::$tags = array
StringerHelper::$__tainted = NULL
StringerHelper::$__cleaned = NULL
StringerHelper::$Html = HtmlHelper object
StringerHelper::$Link = LinkHelper object
StringerHelper::$Text = TextHelper object
$menu = MenuHelper
MenuHelper::$helpers = array
MenuHelper::$base = ""
MenuHelper::$webroot = "/"
MenuHelper::$theme = NULL
MenuHelper::$here = "/dok"
MenuHelper::$params = array
MenuHelper::$action = "index"
MenuHelper::$plugin = NULL
MenuHelper::$data = NULL
MenuHelper::$namedArgs = NULL
MenuHelper::$argSeparator = NULL
MenuHelper::$validationErrors = NULL
MenuHelper::$tags = array
MenuHelper::$__tainted = NULL
MenuHelper::$__cleaned = NULL
MenuHelper::$Link = LinkHelper object
$session = SessionHelper
SessionHelper::$helpers = array
SessionHelper::$__active = true
SessionHelper::$valid = false
SessionHelper::$error = false
SessionHelper::$_userAgent = "f9a8355d006790ee743ededbb1f6e3bd"
SessionHelper::$path = "/"
SessionHelper::$lastError = NULL
SessionHelper::$security = "medium"
SessionHelper::$time = 1773395484
SessionHelper::$sessionTime = 1773407484
SessionHelper::$cookieLifeTime = false
SessionHelper::$watchKeys = array
SessionHelper::$id = NULL
SessionHelper::$host = NULL
SessionHelper::$timeout = NULL
SessionHelper::$base = ""
SessionHelper::$webroot = "/"
SessionHelper::$here = "/dok"
SessionHelper::$params = array
SessionHelper::$action = "index"
SessionHelper::$data = NULL
SessionHelper::$theme = NULL
SessionHelper::$plugin = NULL
$html = HtmlHelper
HtmlHelper::$tags = array
HtmlHelper::$_crumbs = array
HtmlHelper::$__includedScripts = array
HtmlHelper::$_scriptBlockOptions = array
HtmlHelper::$__docTypes = array
HtmlHelper::$helpers = NULL
HtmlHelper::$base = ""
HtmlHelper::$webroot = "/"
HtmlHelper::$theme = NULL
HtmlHelper::$here = "/dok"
HtmlHelper::$params = array
HtmlHelper::$action = "index"
HtmlHelper::$plugin = NULL
HtmlHelper::$data = NULL
HtmlHelper::$namedArgs = NULL
HtmlHelper::$argSeparator = NULL
HtmlHelper::$validationErrors = NULL
HtmlHelper::$__tainted = NULL
HtmlHelper::$__cleaned = NULL
$link = LinkHelper
LinkHelper::$helpers = array
LinkHelper::$lang = NULL
LinkHelper::$defaultLang = NULL
LinkHelper::$base = ""
LinkHelper::$webroot = "/"
LinkHelper::$theme = NULL
LinkHelper::$here = "/dok"
LinkHelper::$params = array
LinkHelper::$action = "index"
LinkHelper::$plugin = NULL
LinkHelper::$data = NULL
LinkHelper::$namedArgs = NULL
LinkHelper::$argSeparator = NULL
LinkHelper::$validationErrors = NULL
LinkHelper::$tags = array
LinkHelper::$__tainted = NULL
LinkHelper::$__cleaned = NULL
LinkHelper::$Html = HtmlHelper object
LinkHelper::$Session = SessionHelper object
$lang = "dok"
$otherLangs = array(
"eng",
"hrv"
)
$globalNav = array(
array(
"Page" => array()
),
array(
"Page" => array()
),
array(
"Page" => array()
),
array(
"Page" => array()
),
array(
"Page" => array()
),
array(
"Page" => array()
),
array(
"Page" => array()
),
array(
"Page" => array()
),
array(
"Page" => array()
),
array(
"Page" => array()
),
array(
"Page" => array()
),
array(
"Page" => array()
),
array(
"Page" => array()
),
array(
"Page" => array()
),
array(
"Page" => array()
),
array(
"Page" => array()
),
array(
"Page" => array()
),
array(
"Page" => array()
),
array(
"Page" => array()
),
array(
"Page" => array()
),
array(
"Page" => array()
),
array(
"Page" => array()
),
array(
"Page" => array()
),
array(
"Page" => array()
),
array(
"Page" => array()
),
array(
"Page" => array()
),
array(
"Page" => array()
)
)
$breadCrumbs = array(
array(
"Page" => array()
)
)
$pageContents = array(
"home_who_we_are" => null
)
$userData = null
$announcements = array(
array(
"Announcement" => array()
),
array(
"Announcement" => array()
),
array(
"Announcement" => array()
)
)
$announcement = array(
"Announcement" => array(
"id" => "4_80",
"class" => "workshop_announcement",
"controller" => "workshop_announcements",
"mask_eng" => "ExhibitionB2B",
"mask_hrv" => "IzložbaB2B",
"title_hrv" => "Back to Basics Radionice za najmlađe na Izložbi minijatura i maketa Agram 2026",
"title_eng" => "Back to Basics Workshops @ Exhibition of Miniatures and Tabletop Scenery Agram 2026",
"content_hrv" => "<p>
Tijekom na&scaron;e Izložbe minijatura i maketa Agram 2026 svakog radnog dana od 17:00 do 18:00 organizirat ćemo i <strong>Back to Basics radionice bojanja minijatura za najmlađe</strong> (8+).&nbsp;</p>
<p>
<a href="https://hosting.photobucket.com/95288841-8654-4bf7-8fc9-a4aa78dce87f/f73b7e94-5adc-4afb-838b-b479ea8886fd.jpg" target="_blank"><img alt="Click for enlarged picture" src="https://hosting.photobucket.com/95288841-8654-4bf7-8fc9-a4aa78dce87f/f73b7e94-5adc-4afb-838b-b479ea8886fd.jpg" width="600" /></a></p>
<p>
<strong>ULAZ BESPLATAN!</strong></p>
<p>
Radionice (trajanja cca 1h ) su prigodne za najmlađe korisnike jer se samo koriste bazične tehnike, alati i materijali a omogućava lak&scaron;i pristup minijaturizmu i maketarstvu fokusiranjem na zabavni proces izrade za razliku od uobičajenog inzistiranja na i&scaron;čekivanje krajnjeg rezultata koji najče&scaron;će donosi stres mlađim polaznicima.</p>
<p>
U svakom od termina po četiri polaznika će moći obojati i sastaviti vlastitu figuru (koju onda nose doma).</p>
",
"content_eng" => "<p>
During our Exhibition of Miniatures and Tabletop Scenery Agram 2026, every weekday from 5:00 PM to 6:00 PM, we will also organize <strong>Back to Basics miniature painting workshops for the youngest (8+)</strong>.</p>
<p>
<a href="https://hosting.photobucket.com/95288841-8654-4bf7-8fc9-a4aa78dce87f/f73b7e94-5adc-4afb-838b-b479ea8886fd.jpg" target="_blank"><img alt="Click for enlarged picture" src="https://hosting.photobucket.com/95288841-8654-4bf7-8fc9-a4aa78dce87f/f73b7e94-5adc-4afb-838b-b479ea8886fd.jpg" width="600" /></a></p>
<p>
<strong>FREE ENTRY! </strong></p>
<p>
The workshops (lasting approx. 1 hour) are suitable for the youngest users because they only use basic techniques, tools and materials and provide an easier approach to miniaturism and model making by focusing on the fun process of making, as opposed to the usual insistence on waiting for the final result, which most often brings stress to younger participants.</p>
<p>
In each session, four participants will be able to color and assemble their own figure (which they then take home).</p>
",
"created" => "2026-02-17 07:57:52",
"first_name" => "Krunoslav",
"last_name" => "Belinić",
"first_name_mask" => "krunoslav",
"last_name_mask" => "belinic",
"start" => null,
"end" => null
)
)</pre><pre class="stack-trace">include - APP/views/home/index.ctp, line 10
View::_render() - CORE/cake/libs/view/view.php, line 736
View::render() - CORE/cake/libs/view/view.php, line 431
Controller::render() - CORE/cake/libs/controller/controller.php, line 909
Dispatcher::_invoke() - CORE/cake/dispatcher.php, line 207
Dispatcher::dispatch() - CORE/cake/dispatcher.php, line 171
[main] - APP/webroot/index.php, line 86</pre></div></pre><a href="/dok/workshop_announcements/2026/02/17" class="readMore"></a></h3>
<span class="details">
17<span class="superscript">th</span> February 2026, post_details_1 <a href="/dok/members/krunoslav.belinic">Krunoslav Belinić</a> post_details_2 <a href="/dok/workshop_announcements">category_workshop_announcements</a> </span>
<pre class="cake-debug"><a href="javascript:void(0);" onclick="document.getElementById('cakeErr4-trace').style.display = (document.getElementById('cakeErr4-trace').style.display == 'none' ? '' : 'none');"><b>Notice</b> (8)</a>: Undefined index: content_dok [<b>APP/views/home/index.ctp</b>, line <b>32</b>]<div id="cakeErr4-trace" class="cake-stack-trace" style="display: none;"><a href="javascript:void(0);" onclick="document.getElementById('cakeErr4-code').style.display = (document.getElementById('cakeErr4-code').style.display == 'none' ? '' : 'none')">Code</a> | <a href="javascript:void(0);" onclick="document.getElementById('cakeErr4-context').style.display = (document.getElementById('cakeErr4-context').style.display == 'none' ? '' : 'none')">Context</a><div id="cakeErr4-code" class="cake-code-dump" style="display: none;"><pre><code><span style="color: #000000"></span></code>
<code><span style="color: #000000"> if (Configure::read() > 0) {</span></code>
<span class="code-highlight"><code><span style="color: #000000"> include ($___viewFn);</span></code></span></pre></div><pre id="cakeErr4-context" class="cake-context" style="display: none;">$___viewFn = "/home/martin/apps/agram/app/views/home/index.ctp"
$___dataForView = array(
"lang" => "dok",
"otherLangs" => array(
"eng",
"hrv"
),
"globalNav" => array(
array(),
array(),
array(),
array(),
array(),
array(),
array(),
array(),
array(),
array(),
array(),
array(),
array(),
array(),
array(),
array(),
array(),
array(),
array(),
array(),
array(),
array(),
array(),
array(),
array(),
array(),
array()
),
"breadCrumbs" => array(
array()
),
"pageContents" => array(
"home_who_we_are" => null
),
"userData" => null,
"announcements" => array(
array(),
array(),
array()
)
)
$loadHelpers = true
$cached = false
$form = FormHelper
FormHelper::$helpers = array
FormHelper::$fieldset = array
FormHelper::$__options = array
FormHelper::$fields = array
FormHelper::$requestType = NULL
FormHelper::$defaultModel = NULL
FormHelper::$_inputDefaults = array
FormHelper::$_lastAction = ""
FormHelper::$base = ""
FormHelper::$webroot = "/"
FormHelper::$theme = NULL
FormHelper::$here = "/dok"
FormHelper::$params = array
FormHelper::$action = "index"
FormHelper::$plugin = NULL
FormHelper::$data = NULL
FormHelper::$namedArgs = NULL
FormHelper::$argSeparator = NULL
FormHelper::$validationErrors = NULL
FormHelper::$tags = array
FormHelper::$__tainted = NULL
FormHelper::$__cleaned = NULL
FormHelper::$Html = HtmlHelper object
$text = TextHelper
TextHelper::$helpers = NULL
TextHelper::$base = ""
TextHelper::$webroot = "/"
TextHelper::$theme = NULL
TextHelper::$here = "/dok"
TextHelper::$params = array
TextHelper::$action = "index"
TextHelper::$plugin = NULL
TextHelper::$data = NULL
TextHelper::$namedArgs = NULL
TextHelper::$argSeparator = NULL
TextHelper::$validationErrors = NULL
TextHelper::$tags = array
TextHelper::$__tainted = NULL
TextHelper::$__cleaned = NULL
$stringer = StringerHelper
StringerHelper::$helpers = array
StringerHelper::$base = ""
StringerHelper::$webroot = "/"
StringerHelper::$theme = NULL
StringerHelper::$here = "/dok"
StringerHelper::$params = array
StringerHelper::$action = "index"
StringerHelper::$plugin = NULL
StringerHelper::$data = NULL
StringerHelper::$namedArgs = NULL
StringerHelper::$argSeparator = NULL
StringerHelper::$validationErrors = NULL
StringerHelper::$tags = array
StringerHelper::$__tainted = NULL
StringerHelper::$__cleaned = NULL
StringerHelper::$Html = HtmlHelper object
StringerHelper::$Link = LinkHelper object
StringerHelper::$Text = TextHelper object
$menu = MenuHelper
MenuHelper::$helpers = array
MenuHelper::$base = ""
MenuHelper::$webroot = "/"
MenuHelper::$theme = NULL
MenuHelper::$here = "/dok"
MenuHelper::$params = array
MenuHelper::$action = "index"
MenuHelper::$plugin = NULL
MenuHelper::$data = NULL
MenuHelper::$namedArgs = NULL
MenuHelper::$argSeparator = NULL
MenuHelper::$validationErrors = NULL
MenuHelper::$tags = array
MenuHelper::$__tainted = NULL
MenuHelper::$__cleaned = NULL
MenuHelper::$Link = LinkHelper object
$session = SessionHelper
SessionHelper::$helpers = array
SessionHelper::$__active = true
SessionHelper::$valid = false
SessionHelper::$error = false
SessionHelper::$_userAgent = "f9a8355d006790ee743ededbb1f6e3bd"
SessionHelper::$path = "/"
SessionHelper::$lastError = NULL
SessionHelper::$security = "medium"
SessionHelper::$time = 1773395484
SessionHelper::$sessionTime = 1773407484
SessionHelper::$cookieLifeTime = false
SessionHelper::$watchKeys = array
SessionHelper::$id = NULL
SessionHelper::$host = NULL
SessionHelper::$timeout = NULL
SessionHelper::$base = ""
SessionHelper::$webroot = "/"
SessionHelper::$here = "/dok"
SessionHelper::$params = array
SessionHelper::$action = "index"
SessionHelper::$data = NULL
SessionHelper::$theme = NULL
SessionHelper::$plugin = NULL
$html = HtmlHelper
HtmlHelper::$tags = array
HtmlHelper::$_crumbs = array
HtmlHelper::$__includedScripts = array
HtmlHelper::$_scriptBlockOptions = array
HtmlHelper::$__docTypes = array
HtmlHelper::$helpers = NULL
HtmlHelper::$base = ""
HtmlHelper::$webroot = "/"
HtmlHelper::$theme = NULL
HtmlHelper::$here = "/dok"
HtmlHelper::$params = array
HtmlHelper::$action = "index"
HtmlHelper::$plugin = NULL
HtmlHelper::$data = NULL
HtmlHelper::$namedArgs = NULL
HtmlHelper::$argSeparator = NULL
HtmlHelper::$validationErrors = NULL
HtmlHelper::$__tainted = NULL
HtmlHelper::$__cleaned = NULL
$link = LinkHelper
LinkHelper::$helpers = array
LinkHelper::$lang = "dok"
LinkHelper::$defaultLang = "hrv"
LinkHelper::$base = ""
LinkHelper::$webroot = "/"
LinkHelper::$theme = NULL
LinkHelper::$here = "/dok"
LinkHelper::$params = array
LinkHelper::$action = "index"
LinkHelper::$plugin = NULL
LinkHelper::$data = NULL
LinkHelper::$namedArgs = NULL
LinkHelper::$argSeparator = NULL
LinkHelper::$validationErrors = NULL
LinkHelper::$tags = array
LinkHelper::$__tainted = NULL
LinkHelper::$__cleaned = NULL
LinkHelper::$Html = HtmlHelper object
LinkHelper::$Session = SessionHelper object
$lang = "dok"
$otherLangs = array(
"eng",
"hrv"
)
$globalNav = array(
array(
"Page" => array()
),
array(
"Page" => array()
),
array(
"Page" => array()
),
array(
"Page" => array()
),
array(
"Page" => array()
),
array(
"Page" => array()
),
array(
"Page" => array()
),
array(
"Page" => array()
),
array(
"Page" => array()
),
array(
"Page" => array()
),
array(
"Page" => array()
),
array(
"Page" => array()
),
array(
"Page" => array()
),
array(
"Page" => array()
),
array(
"Page" => array()
),
array(
"Page" => array()
),
array(
"Page" => array()
),
array(
"Page" => array()
),
array(
"Page" => array()
),
array(
"Page" => array()
),
array(
"Page" => array()
),
array(
"Page" => array()
),
array(
"Page" => array()
),
array(
"Page" => array()
),
array(
"Page" => array()
),
array(
"Page" => array()
),
array(
"Page" => array()
)
)
$breadCrumbs = array(
array(
"Page" => array()
)
)
$pageContents = array(
"home_who_we_are" => null
)
$userData = null
$announcements = array(
array(
"Announcement" => array()
),
array(
"Announcement" => array()
),
array(
"Announcement" => array()
)
)
$announcement = array(
"Announcement" => array(
"id" => "4_80",
"class" => "workshop_announcement",
"controller" => "workshop_announcements",
"mask_eng" => "ExhibitionB2B",
"mask_hrv" => "IzložbaB2B",
"title_hrv" => "Back to Basics Radionice za najmlađe na Izložbi minijatura i maketa Agram 2026",
"title_eng" => "Back to Basics Workshops @ Exhibition of Miniatures and Tabletop Scenery Agram 2026",
"content_hrv" => "<p>
Tijekom na&scaron;e Izložbe minijatura i maketa Agram 2026 svakog radnog dana od 17:00 do 18:00 organizirat ćemo i <strong>Back to Basics radionice bojanja minijatura za najmlađe</strong> (8+).&nbsp;</p>
<p>
<a href="https://hosting.photobucket.com/95288841-8654-4bf7-8fc9-a4aa78dce87f/f73b7e94-5adc-4afb-838b-b479ea8886fd.jpg" target="_blank"><img alt="Click for enlarged picture" src="https://hosting.photobucket.com/95288841-8654-4bf7-8fc9-a4aa78dce87f/f73b7e94-5adc-4afb-838b-b479ea8886fd.jpg" width="600" /></a></p>
<p>
<strong>ULAZ BESPLATAN!</strong></p>
<p>
Radionice (trajanja cca 1h ) su prigodne za najmlađe korisnike jer se samo koriste bazične tehnike, alati i materijali a omogućava lak&scaron;i pristup minijaturizmu i maketarstvu fokusiranjem na zabavni proces izrade za razliku od uobičajenog inzistiranja na i&scaron;čekivanje krajnjeg rezultata koji najče&scaron;će donosi stres mlađim polaznicima.</p>
<p>
U svakom od termina po četiri polaznika će moći obojati i sastaviti vlastitu figuru (koju onda nose doma).</p>
",
"content_eng" => "<p>
During our Exhibition of Miniatures and Tabletop Scenery Agram 2026, every weekday from 5:00 PM to 6:00 PM, we will also organize <strong>Back to Basics miniature painting workshops for the youngest (8+)</strong>.</p>
<p>
<a href="https://hosting.photobucket.com/95288841-8654-4bf7-8fc9-a4aa78dce87f/f73b7e94-5adc-4afb-838b-b479ea8886fd.jpg" target="_blank"><img alt="Click for enlarged picture" src="https://hosting.photobucket.com/95288841-8654-4bf7-8fc9-a4aa78dce87f/f73b7e94-5adc-4afb-838b-b479ea8886fd.jpg" width="600" /></a></p>
<p>
<strong>FREE ENTRY! </strong></p>
<p>
The workshops (lasting approx. 1 hour) are suitable for the youngest users because they only use basic techniques, tools and materials and provide an easier approach to miniaturism and model making by focusing on the fun process of making, as opposed to the usual insistence on waiting for the final result, which most often brings stress to younger participants.</p>
<p>
In each session, four participants will be able to color and assemble their own figure (which they then take home).</p>
",
"created" => "2026-02-17 07:57:52",
"first_name" => "Krunoslav",
"last_name" => "Belinić",
"first_name_mask" => "krunoslav",
"last_name_mask" => "belinic",
"start" => null,
"end" => null
)
)
$member = array(
"first_name" => "Krunoslav",
"last_name" => "Belinić",
"first_name_mask" => "krunoslav",
"last_name_mask" => "belinic"
)
$dateCreated = "2026-02-17 07:57:52"</pre><pre class="stack-trace">include - APP/views/home/index.ctp, line 32
View::_render() - CORE/cake/libs/view/view.php, line 736
View::render() - CORE/cake/libs/view/view.php, line 431
Controller::render() - CORE/cake/libs/controller/controller.php, line 909
Dispatcher::_invoke() - CORE/cake/dispatcher.php, line 207
Dispatcher::dispatch() - CORE/cake/dispatcher.php, line 171
[main] - APP/webroot/index.php, line 86</pre></div></pre><pre class="cake-debug"><a href="javascript:void(0);" onclick="document.getElementById('cakeErr5-trace').style.display = (document.getElementById('cakeErr5-trace').style.display == 'none' ? '' : 'none');"><b>Notice</b> (8)</a>: Undefined index: title_dok [<b>APP/views/home/index.ctp</b>, line <b>34</b>]<div id="cakeErr5-trace" class="cake-stack-trace" style="display: none;"><a href="javascript:void(0);" onclick="document.getElementById('cakeErr5-code').style.display = (document.getElementById('cakeErr5-code').style.display == 'none' ? '' : 'none')">Code</a> | <a href="javascript:void(0);" onclick="document.getElementById('cakeErr5-context').style.display = (document.getElementById('cakeErr5-context').style.display == 'none' ? '' : 'none')">Context</a><div id="cakeErr5-code" class="cake-code-dump" style="display: none;"><pre><code><span style="color: #000000"></span></code>
<code><span style="color: #000000"> if (Configure::read() > 0) {</span></code>
<span class="code-highlight"><code><span style="color: #000000"> include ($___viewFn);</span></code></span></pre></div><pre id="cakeErr5-context" class="cake-context" style="display: none;">$___viewFn = "/home/martin/apps/agram/app/views/home/index.ctp"
$___dataForView = array(
"lang" => "dok",
"otherLangs" => array(
"eng",
"hrv"
),
"globalNav" => array(
array(),
array(),
array(),
array(),
array(),
array(),
array(),
array(),
array(),
array(),
array(),
array(),
array(),
array(),
array(),
array(),
array(),
array(),
array(),
array(),
array(),
array(),
array(),
array(),
array(),
array(),
array()
),
"breadCrumbs" => array(
array()
),
"pageContents" => array(
"home_who_we_are" => null
),
"userData" => null,
"announcements" => array(
array(),
array(),
array()
)
)
$loadHelpers = true
$cached = false
$form = FormHelper
FormHelper::$helpers = array
FormHelper::$fieldset = array
FormHelper::$__options = array
FormHelper::$fields = array
FormHelper::$requestType = NULL
FormHelper::$defaultModel = NULL
FormHelper::$_inputDefaults = array
FormHelper::$_lastAction = ""
FormHelper::$base = ""
FormHelper::$webroot = "/"
FormHelper::$theme = NULL
FormHelper::$here = "/dok"
FormHelper::$params = array
FormHelper::$action = "index"
FormHelper::$plugin = NULL
FormHelper::$data = NULL
FormHelper::$namedArgs = NULL
FormHelper::$argSeparator = NULL
FormHelper::$validationErrors = NULL
FormHelper::$tags = array
FormHelper::$__tainted = NULL
FormHelper::$__cleaned = NULL
FormHelper::$Html = HtmlHelper object
$text = TextHelper
TextHelper::$helpers = NULL
TextHelper::$base = ""
TextHelper::$webroot = "/"
TextHelper::$theme = NULL
TextHelper::$here = "/dok"
TextHelper::$params = array
TextHelper::$action = "index"
TextHelper::$plugin = NULL
TextHelper::$data = NULL
TextHelper::$namedArgs = NULL
TextHelper::$argSeparator = NULL
TextHelper::$validationErrors = NULL
TextHelper::$tags = array
TextHelper::$__tainted = NULL
TextHelper::$__cleaned = NULL
$stringer = StringerHelper
StringerHelper::$helpers = array
StringerHelper::$base = ""
StringerHelper::$webroot = "/"
StringerHelper::$theme = NULL
StringerHelper::$here = "/dok"
StringerHelper::$params = array
StringerHelper::$action = "index"
StringerHelper::$plugin = NULL
StringerHelper::$data = NULL
StringerHelper::$namedArgs = NULL
StringerHelper::$argSeparator = NULL
StringerHelper::$validationErrors = NULL
StringerHelper::$tags = array
StringerHelper::$__tainted = NULL
StringerHelper::$__cleaned = NULL
StringerHelper::$Html = HtmlHelper object
StringerHelper::$Link = LinkHelper object
StringerHelper::$Text = TextHelper object
$menu = MenuHelper
MenuHelper::$helpers = array
MenuHelper::$base = ""
MenuHelper::$webroot = "/"
MenuHelper::$theme = NULL
MenuHelper::$here = "/dok"
MenuHelper::$params = array
MenuHelper::$action = "index"
MenuHelper::$plugin = NULL
MenuHelper::$data = NULL
MenuHelper::$namedArgs = NULL
MenuHelper::$argSeparator = NULL
MenuHelper::$validationErrors = NULL
MenuHelper::$tags = array
MenuHelper::$__tainted = NULL
MenuHelper::$__cleaned = NULL
MenuHelper::$Link = LinkHelper object
$session = SessionHelper
SessionHelper::$helpers = array
SessionHelper::$__active = true
SessionHelper::$valid = false
SessionHelper::$error = false
SessionHelper::$_userAgent = "f9a8355d006790ee743ededbb1f6e3bd"
SessionHelper::$path = "/"
SessionHelper::$lastError = NULL
SessionHelper::$security = "medium"
SessionHelper::$time = 1773395484
SessionHelper::$sessionTime = 1773407484
SessionHelper::$cookieLifeTime = false
SessionHelper::$watchKeys = array
SessionHelper::$id = NULL
SessionHelper::$host = NULL
SessionHelper::$timeout = NULL
SessionHelper::$base = ""
SessionHelper::$webroot = "/"
SessionHelper::$here = "/dok"
SessionHelper::$params = array
SessionHelper::$action = "index"
SessionHelper::$data = NULL
SessionHelper::$theme = NULL
SessionHelper::$plugin = NULL
$html = HtmlHelper
HtmlHelper::$tags = array
HtmlHelper::$_crumbs = array
HtmlHelper::$__includedScripts = array
HtmlHelper::$_scriptBlockOptions = array
HtmlHelper::$__docTypes = array
HtmlHelper::$helpers = NULL
HtmlHelper::$base = ""
HtmlHelper::$webroot = "/"
HtmlHelper::$theme = NULL
HtmlHelper::$here = "/dok"
HtmlHelper::$params = array
HtmlHelper::$action = "index"
HtmlHelper::$plugin = NULL
HtmlHelper::$data = NULL
HtmlHelper::$namedArgs = NULL
HtmlHelper::$argSeparator = NULL
HtmlHelper::$validationErrors = NULL
HtmlHelper::$__tainted = NULL
HtmlHelper::$__cleaned = NULL
$link = LinkHelper
LinkHelper::$helpers = array
LinkHelper::$lang = "dok"
LinkHelper::$defaultLang = "hrv"
LinkHelper::$base = ""
LinkHelper::$webroot = "/"
LinkHelper::$theme = NULL
LinkHelper::$here = "/dok"
LinkHelper::$params = array
LinkHelper::$action = "index"
LinkHelper::$plugin = NULL
LinkHelper::$data = NULL
LinkHelper::$namedArgs = NULL
LinkHelper::$argSeparator = NULL
LinkHelper::$validationErrors = NULL
LinkHelper::$tags = array
LinkHelper::$__tainted = NULL
LinkHelper::$__cleaned = NULL
LinkHelper::$Html = HtmlHelper object
LinkHelper::$Session = SessionHelper object
$lang = "dok"
$otherLangs = array(
"eng",
"hrv"
)
$globalNav = array(
array(
"Page" => array()
),
array(
"Page" => array()
),
array(
"Page" => array()
),
array(
"Page" => array()
),
array(
"Page" => array()
),
array(
"Page" => array()
),
array(
"Page" => array()
),
array(
"Page" => array()
),
array(
"Page" => array()
),
array(
"Page" => array()
),
array(
"Page" => array()
),
array(
"Page" => array()
),
array(
"Page" => array()
),
array(
"Page" => array()
),
array(
"Page" => array()
),
array(
"Page" => array()
),
array(
"Page" => array()
),
array(
"Page" => array()
),
array(
"Page" => array()
),
array(
"Page" => array()
),
array(
"Page" => array()
),
array(
"Page" => array()
),
array(
"Page" => array()
),
array(
"Page" => array()
),
array(
"Page" => array()
),
array(
"Page" => array()
),
array(
"Page" => array()
)
)
$breadCrumbs = array(
array(
"Page" => array()
)
)
$pageContents = array(
"home_who_we_are" => null
)
$userData = null
$announcements = array(
array(
"Announcement" => array()
),
array(
"Announcement" => array()
),
array(
"Announcement" => array()
)
)
$announcement = array(
"Announcement" => array(
"id" => "4_80",
"class" => "workshop_announcement",
"controller" => "workshop_announcements",
"mask_eng" => "ExhibitionB2B",
"mask_hrv" => "IzložbaB2B",
"title_hrv" => "Back to Basics Radionice za najmlađe na Izložbi minijatura i maketa Agram 2026",
"title_eng" => "Back to Basics Workshops @ Exhibition of Miniatures and Tabletop Scenery Agram 2026",
"content_hrv" => "<p>
Tijekom na&scaron;e Izložbe minijatura i maketa Agram 2026 svakog radnog dana od 17:00 do 18:00 organizirat ćemo i <strong>Back to Basics radionice bojanja minijatura za najmlađe</strong> (8+).&nbsp;</p>
<p>
<a href="https://hosting.photobucket.com/95288841-8654-4bf7-8fc9-a4aa78dce87f/f73b7e94-5adc-4afb-838b-b479ea8886fd.jpg" target="_blank"><img alt="Click for enlarged picture" src="https://hosting.photobucket.com/95288841-8654-4bf7-8fc9-a4aa78dce87f/f73b7e94-5adc-4afb-838b-b479ea8886fd.jpg" width="600" /></a></p>
<p>
<strong>ULAZ BESPLATAN!</strong></p>
<p>
Radionice (trajanja cca 1h ) su prigodne za najmlađe korisnike jer se samo koriste bazične tehnike, alati i materijali a omogućava lak&scaron;i pristup minijaturizmu i maketarstvu fokusiranjem na zabavni proces izrade za razliku od uobičajenog inzistiranja na i&scaron;čekivanje krajnjeg rezultata koji najče&scaron;će donosi stres mlađim polaznicima.</p>
<p>
U svakom od termina po četiri polaznika će moći obojati i sastaviti vlastitu figuru (koju onda nose doma).</p>
",
"content_eng" => "<p>
During our Exhibition of Miniatures and Tabletop Scenery Agram 2026, every weekday from 5:00 PM to 6:00 PM, we will also organize <strong>Back to Basics miniature painting workshops for the youngest (8+)</strong>.</p>
<p>
<a href="https://hosting.photobucket.com/95288841-8654-4bf7-8fc9-a4aa78dce87f/f73b7e94-5adc-4afb-838b-b479ea8886fd.jpg" target="_blank"><img alt="Click for enlarged picture" src="https://hosting.photobucket.com/95288841-8654-4bf7-8fc9-a4aa78dce87f/f73b7e94-5adc-4afb-838b-b479ea8886fd.jpg" width="600" /></a></p>
<p>
<strong>FREE ENTRY! </strong></p>
<p>
The workshops (lasting approx. 1 hour) are suitable for the youngest users because they only use basic techniques, tools and materials and provide an easier approach to miniaturism and model making by focusing on the fun process of making, as opposed to the usual insistence on waiting for the final result, which most often brings stress to younger participants.</p>
<p>
In each session, four participants will be able to color and assemble their own figure (which they then take home).</p>
",
"created" => "2026-02-17 07:57:52",
"first_name" => "Krunoslav",
"last_name" => "Belinić",
"first_name_mask" => "krunoslav",
"last_name_mask" => "belinic",
"start" => null,
"end" => null
)
)
$member = array(
"first_name" => "Krunoslav",
"last_name" => "Belinić",
"first_name_mask" => "krunoslav",
"last_name_mask" => "belinic"
)
$dateCreated = "2026-02-17 07:57:52"</pre><pre class="stack-trace">include - APP/views/home/index.ctp, line 34
View::_render() - CORE/cake/libs/view/view.php, line 736
View::render() - CORE/cake/libs/view/view.php, line 431
Controller::render() - CORE/cake/libs/controller/controller.php, line 909
Dispatcher::_invoke() - CORE/cake/dispatcher.php, line 207
Dispatcher::dispatch() - CORE/cake/dispatcher.php, line 171
[main] - APP/webroot/index.php, line 86</pre></div></pre><pre class="cake-debug"><a href="javascript:void(0);" onclick="document.getElementById('cakeErr6-trace').style.display = (document.getElementById('cakeErr6-trace').style.display == 'none' ? '' : 'none');"><b>Notice</b> (8)</a>: Undefined index: mask_dok [<b>APP/views/home/index.ctp</b>, line <b>37</b>]<div id="cakeErr6-trace" class="cake-stack-trace" style="display: none;"><a href="javascript:void(0);" onclick="document.getElementById('cakeErr6-code').style.display = (document.getElementById('cakeErr6-code').style.display == 'none' ? '' : 'none')">Code</a> | <a href="javascript:void(0);" onclick="document.getElementById('cakeErr6-context').style.display = (document.getElementById('cakeErr6-context').style.display == 'none' ? '' : 'none')">Context</a><div id="cakeErr6-code" class="cake-code-dump" style="display: none;"><pre><code><span style="color: #000000"></span></code>
<code><span style="color: #000000"> if (Configure::read() > 0) {</span></code>
<span class="code-highlight"><code><span style="color: #000000"> include ($___viewFn);</span></code></span></pre></div><pre id="cakeErr6-context" class="cake-context" style="display: none;">$___viewFn = "/home/martin/apps/agram/app/views/home/index.ctp"
$___dataForView = array(
"lang" => "dok",
"otherLangs" => array(
"eng",
"hrv"
),
"globalNav" => array(
array(),
array(),
array(),
array(),
array(),
array(),
array(),
array(),
array(),
array(),
array(),
array(),
array(),
array(),
array(),
array(),
array(),
array(),
array(),
array(),
array(),
array(),
array(),
array(),
array(),
array(),
array()
),
"breadCrumbs" => array(
array()
),
"pageContents" => array(
"home_who_we_are" => null
),
"userData" => null,
"announcements" => array(
array(),
array(),
array()
)
)
$loadHelpers = true
$cached = false
$form = FormHelper
FormHelper::$helpers = array
FormHelper::$fieldset = array
FormHelper::$__options = array
FormHelper::$fields = array
FormHelper::$requestType = NULL
FormHelper::$defaultModel = NULL
FormHelper::$_inputDefaults = array
FormHelper::$_lastAction = ""
FormHelper::$base = ""
FormHelper::$webroot = "/"
FormHelper::$theme = NULL
FormHelper::$here = "/dok"
FormHelper::$params = array
FormHelper::$action = "index"
FormHelper::$plugin = NULL
FormHelper::$data = NULL
FormHelper::$namedArgs = NULL
FormHelper::$argSeparator = NULL
FormHelper::$validationErrors = NULL
FormHelper::$tags = array
FormHelper::$__tainted = NULL
FormHelper::$__cleaned = NULL
FormHelper::$Html = HtmlHelper object
$text = TextHelper
TextHelper::$helpers = NULL
TextHelper::$base = ""
TextHelper::$webroot = "/"
TextHelper::$theme = NULL
TextHelper::$here = "/dok"
TextHelper::$params = array
TextHelper::$action = "index"
TextHelper::$plugin = NULL
TextHelper::$data = NULL
TextHelper::$namedArgs = NULL
TextHelper::$argSeparator = NULL
TextHelper::$validationErrors = NULL
TextHelper::$tags = array
TextHelper::$__tainted = NULL
TextHelper::$__cleaned = NULL
$stringer = StringerHelper
StringerHelper::$helpers = array
StringerHelper::$base = ""
StringerHelper::$webroot = "/"
StringerHelper::$theme = NULL
StringerHelper::$here = "/dok"
StringerHelper::$params = array
StringerHelper::$action = "index"
StringerHelper::$plugin = NULL
StringerHelper::$data = NULL
StringerHelper::$namedArgs = NULL
StringerHelper::$argSeparator = NULL
StringerHelper::$validationErrors = NULL
StringerHelper::$tags = array
StringerHelper::$__tainted = NULL
StringerHelper::$__cleaned = NULL
StringerHelper::$Html = HtmlHelper object
StringerHelper::$Link = LinkHelper object
StringerHelper::$Text = TextHelper object
$menu = MenuHelper
MenuHelper::$helpers = array
MenuHelper::$base = ""
MenuHelper::$webroot = "/"
MenuHelper::$theme = NULL
MenuHelper::$here = "/dok"
MenuHelper::$params = array
MenuHelper::$action = "index"
MenuHelper::$plugin = NULL
MenuHelper::$data = NULL
MenuHelper::$namedArgs = NULL
MenuHelper::$argSeparator = NULL
MenuHelper::$validationErrors = NULL
MenuHelper::$tags = array
MenuHelper::$__tainted = NULL
MenuHelper::$__cleaned = NULL
MenuHelper::$Link = LinkHelper object
$session = SessionHelper
SessionHelper::$helpers = array
SessionHelper::$__active = true
SessionHelper::$valid = false
SessionHelper::$error = false
SessionHelper::$_userAgent = "f9a8355d006790ee743ededbb1f6e3bd"
SessionHelper::$path = "/"
SessionHelper::$lastError = NULL
SessionHelper::$security = "medium"
SessionHelper::$time = 1773395484
SessionHelper::$sessionTime = 1773407484
SessionHelper::$cookieLifeTime = false
SessionHelper::$watchKeys = array
SessionHelper::$id = NULL
SessionHelper::$host = NULL
SessionHelper::$timeout = NULL
SessionHelper::$base = ""
SessionHelper::$webroot = "/"
SessionHelper::$here = "/dok"
SessionHelper::$params = array
SessionHelper::$action = "index"
SessionHelper::$data = NULL
SessionHelper::$theme = NULL
SessionHelper::$plugin = NULL
$html = HtmlHelper
HtmlHelper::$tags = array
HtmlHelper::$_crumbs = array
HtmlHelper::$__includedScripts = array
HtmlHelper::$_scriptBlockOptions = array
HtmlHelper::$__docTypes = array
HtmlHelper::$helpers = NULL
HtmlHelper::$base = ""
HtmlHelper::$webroot = "/"
HtmlHelper::$theme = NULL
HtmlHelper::$here = "/dok"
HtmlHelper::$params = array
HtmlHelper::$action = "index"
HtmlHelper::$plugin = NULL
HtmlHelper::$data = NULL
HtmlHelper::$namedArgs = NULL
HtmlHelper::$argSeparator = NULL
HtmlHelper::$validationErrors = NULL
HtmlHelper::$__tainted = NULL
HtmlHelper::$__cleaned = NULL
$link = LinkHelper
LinkHelper::$helpers = array
LinkHelper::$lang = "dok"
LinkHelper::$defaultLang = "hrv"
LinkHelper::$base = ""
LinkHelper::$webroot = "/"
LinkHelper::$theme = NULL
LinkHelper::$here = "/dok"
LinkHelper::$params = array
LinkHelper::$action = "index"
LinkHelper::$plugin = NULL
LinkHelper::$data = NULL
LinkHelper::$namedArgs = NULL
LinkHelper::$argSeparator = NULL
LinkHelper::$validationErrors = NULL
LinkHelper::$tags = array
LinkHelper::$__tainted = NULL
LinkHelper::$__cleaned = NULL
LinkHelper::$Html = HtmlHelper object
LinkHelper::$Session = SessionHelper object
$lang = "dok"
$otherLangs = array(
"eng",
"hrv"
)
$globalNav = array(
array(
"Page" => array()
),
array(
"Page" => array()
),
array(
"Page" => array()
),
array(
"Page" => array()
),
array(
"Page" => array()
),
array(
"Page" => array()
),
array(
"Page" => array()
),
array(
"Page" => array()
),
array(
"Page" => array()
),
array(
"Page" => array()
),
array(
"Page" => array()
),
array(
"Page" => array()
),
array(
"Page" => array()
),
array(
"Page" => array()
),
array(
"Page" => array()
),
array(
"Page" => array()
),
array(
"Page" => array()
),
array(
"Page" => array()
),
array(
"Page" => array()
),
array(
"Page" => array()
),
array(
"Page" => array()
),
array(
"Page" => array()
),
array(
"Page" => array()
),
array(
"Page" => array()
),
array(
"Page" => array()
),
array(
"Page" => array()
),
array(
"Page" => array()
)
)
$breadCrumbs = array(
array(
"Page" => array()
)
)
$pageContents = array(
"home_who_we_are" => null
)
$userData = null
$announcements = array(
array(
"Announcement" => array()
),
array(
"Announcement" => array()
),
array(
"Announcement" => array()
)
)
$announcement = array(
"Announcement" => array(
"id" => "4_80",
"class" => "workshop_announcement",
"controller" => "workshop_announcements",
"mask_eng" => "ExhibitionB2B",
"mask_hrv" => "IzložbaB2B",
"title_hrv" => "Back to Basics Radionice za najmlađe na Izložbi minijatura i maketa Agram 2026",
"title_eng" => "Back to Basics Workshops @ Exhibition of Miniatures and Tabletop Scenery Agram 2026",
"content_hrv" => "<p>
Tijekom na&scaron;e Izložbe minijatura i maketa Agram 2026 svakog radnog dana od 17:00 do 18:00 organizirat ćemo i <strong>Back to Basics radionice bojanja minijatura za najmlađe</strong> (8+).&nbsp;</p>
<p>
<a href="https://hosting.photobucket.com/95288841-8654-4bf7-8fc9-a4aa78dce87f/f73b7e94-5adc-4afb-838b-b479ea8886fd.jpg" target="_blank"><img alt="Click for enlarged picture" src="https://hosting.photobucket.com/95288841-8654-4bf7-8fc9-a4aa78dce87f/f73b7e94-5adc-4afb-838b-b479ea8886fd.jpg" width="600" /></a></p>
<p>
<strong>ULAZ BESPLATAN!</strong></p>
<p>
Radionice (trajanja cca 1h ) su prigodne za najmlađe korisnike jer se samo koriste bazične tehnike, alati i materijali a omogućava lak&scaron;i pristup minijaturizmu i maketarstvu fokusiranjem na zabavni proces izrade za razliku od uobičajenog inzistiranja na i&scaron;čekivanje krajnjeg rezultata koji najče&scaron;će donosi stres mlađim polaznicima.</p>
<p>
U svakom od termina po četiri polaznika će moći obojati i sastaviti vlastitu figuru (koju onda nose doma).</p>
",
"content_eng" => "<p>
During our Exhibition of Miniatures and Tabletop Scenery Agram 2026, every weekday from 5:00 PM to 6:00 PM, we will also organize <strong>Back to Basics miniature painting workshops for the youngest (8+)</strong>.</p>
<p>
<a href="https://hosting.photobucket.com/95288841-8654-4bf7-8fc9-a4aa78dce87f/f73b7e94-5adc-4afb-838b-b479ea8886fd.jpg" target="_blank"><img alt="Click for enlarged picture" src="https://hosting.photobucket.com/95288841-8654-4bf7-8fc9-a4aa78dce87f/f73b7e94-5adc-4afb-838b-b479ea8886fd.jpg" width="600" /></a></p>
<p>
<strong>FREE ENTRY! </strong></p>
<p>
The workshops (lasting approx. 1 hour) are suitable for the youngest users because they only use basic techniques, tools and materials and provide an easier approach to miniaturism and model making by focusing on the fun process of making, as opposed to the usual insistence on waiting for the final result, which most often brings stress to younger participants.</p>
<p>
In each session, four participants will be able to color and assemble their own figure (which they then take home).</p>
",
"created" => "2026-02-17 07:57:52",
"first_name" => "Krunoslav",
"last_name" => "Belinić",
"first_name_mask" => "krunoslav",
"last_name_mask" => "belinic",
"start" => null,
"end" => null
)
)
$member = array(
"first_name" => "Krunoslav",
"last_name" => "Belinić",
"first_name_mask" => "krunoslav",
"last_name_mask" => "belinic"
)
$dateCreated = "2026-02-17 07:57:52"</pre><pre class="stack-trace">include - APP/views/home/index.ctp, line 37
View::_render() - CORE/cake/libs/view/view.php, line 736
View::render() - CORE/cake/libs/view/view.php, line 431
Controller::render() - CORE/cake/libs/controller/controller.php, line 909
Dispatcher::_invoke() - CORE/cake/dispatcher.php, line 207
Dispatcher::dispatch() - CORE/cake/dispatcher.php, line 171
[main] - APP/webroot/index.php, line 86</pre></div></pre> </div>
<div class="announcement workshop_announcement">
<h3><a href="/dok/workshop_announcements/2026/02/17" class="readMore"></a></h3>
<span class="details">
17<span class="superscript">th</span> February 2026, post_details_1 <a href="/dok/members/krunoslav.belinic">Krunoslav Belinić</a> post_details_2 <a href="/dok/workshop_announcements">category_workshop_announcements</a> </span>
</div>
<div class="announcement workshop_announcement">
<h3><a href="/dok/workshop_announcements/2026/02/06" class="readMore"></a></h3>
<span class="details">
6<span class="superscript">th</span> February 2026, post_details_1 <a href="/dok/members/marko.paunovic">Marko Paunović</a> post_details_2 <a href="/dok/workshop_announcements">category_workshop_announcements</a> </span>
</div>
<p><a href="/dok/announcements">all_announcements</a></p>
</div>
<div id="middleColumn">
<!--<div id="hotStuff">
hot_tournaments<br/></div>-->
<div id="hotSponsor">
</div><h2>latest_articles</h2>
<ul class="latest">
<li>
<pre class="cake-debug"><a href="javascript:void(0);" onclick="document.getElementById('cakeErr7-trace').style.display = (document.getElementById('cakeErr7-trace').style.display == 'none' ? '' : 'none');"><b>Notice</b> (8)</a>: Undefined index: title_dok [<b>APP/views/elements/latestArticles.ctp</b>, line <b>7</b>]<div id="cakeErr7-trace" class="cake-stack-trace" style="display: none;"><a href="javascript:void(0);" onclick="document.getElementById('cakeErr7-code').style.display = (document.getElementById('cakeErr7-code').style.display == 'none' ? '' : 'none')">Code</a> | <a href="javascript:void(0);" onclick="document.getElementById('cakeErr7-context').style.display = (document.getElementById('cakeErr7-context').style.display == 'none' ? '' : 'none')">Context</a><div id="cakeErr7-code" class="cake-code-dump" style="display: none;"><pre><code><span style="color: #000000"></span></code>
<code><span style="color: #000000"> if (Configure::read() > 0) {</span></code>
<span class="code-highlight"><code><span style="color: #000000"> include ($___viewFn);</span></code></span></pre></div><pre id="cakeErr7-context" class="cake-context" style="display: none;">$___viewFn = "/home/martin/apps/agram/app/views/elements/latestArticles.ctp"
$___dataForView = array(
"lang" => "dok",
"otherLangs" => array(
"eng",
"hrv"
),
"globalNav" => array(
array(),
array(),
array(),
array(),
array(),
array(),
array(),
array(),
array(),
array(),
array(),
array(),
array(),
array(),
array(),
array(),
array(),
array(),
array(),
array(),
array(),
array(),
array(),
array(),
array(),
array(),
array()
),
"breadCrumbs" => array(
array()
),
"pageContents" => array(
"home_who_we_are" => null
),
"userData" => null,
"announcements" => array(
array(),
array(),
array()
),
"cache" => array(
"time" => "+1 day",
"key" => "dok"
),
"form" => FormHelper
FormHelper::$helpers = array
FormHelper::$fieldset = array
FormHelper::$__options = array
FormHelper::$fields = array
FormHelper::$requestType = NULL
FormHelper::$defaultModel = NULL
FormHelper::$_inputDefaults = array
FormHelper::$_lastAction = ""
FormHelper::$base = ""
FormHelper::$webroot = "/"
FormHelper::$theme = NULL
FormHelper::$here = "/dok"
FormHelper::$params = array
FormHelper::$action = "index"
FormHelper::$plugin = NULL
FormHelper::$data = NULL
FormHelper::$namedArgs = NULL
FormHelper::$argSeparator = NULL
FormHelper::$validationErrors = NULL
FormHelper::$tags = array
FormHelper::$__tainted = NULL
FormHelper::$__cleaned = NULL
FormHelper::$Html = HtmlHelper object,
"text" => TextHelper
TextHelper::$helpers = NULL
TextHelper::$base = ""
TextHelper::$webroot = "/"
TextHelper::$theme = NULL
TextHelper::$here = "/dok"
TextHelper::$params = array
TextHelper::$action = "index"
TextHelper::$plugin = NULL
TextHelper::$data = NULL
TextHelper::$namedArgs = NULL
TextHelper::$argSeparator = NULL
TextHelper::$validationErrors = NULL
TextHelper::$tags = array
TextHelper::$__tainted = NULL
TextHelper::$__cleaned = NULL,
"stringer" => StringerHelper
StringerHelper::$helpers = array
StringerHelper::$base = ""
StringerHelper::$webroot = "/"
StringerHelper::$theme = NULL
StringerHelper::$here = "/dok"
StringerHelper::$params = array
StringerHelper::$action = "index"
StringerHelper::$plugin = NULL
StringerHelper::$data = NULL
StringerHelper::$namedArgs = NULL
StringerHelper::$argSeparator = NULL
StringerHelper::$validationErrors = NULL
StringerHelper::$tags = array
StringerHelper::$__tainted = NULL
StringerHelper::$__cleaned = NULL
StringerHelper::$Html = HtmlHelper object
StringerHelper::$Link = LinkHelper object
StringerHelper::$Text = TextHelper object,
"menu" => MenuHelper
MenuHelper::$helpers = array
MenuHelper::$base = ""
MenuHelper::$webroot = "/"
MenuHelper::$theme = NULL
MenuHelper::$here = "/dok"
MenuHelper::$params = array
MenuHelper::$action = "index"
MenuHelper::$plugin = NULL
MenuHelper::$data = NULL
MenuHelper::$namedArgs = NULL
MenuHelper::$argSeparator = NULL
MenuHelper::$validationErrors = NULL
MenuHelper::$tags = array
MenuHelper::$__tainted = NULL
MenuHelper::$__cleaned = NULL
MenuHelper::$Link = LinkHelper object,
"session" => SessionHelper
SessionHelper::$helpers = array
SessionHelper::$__active = true
SessionHelper::$valid = false
SessionHelper::$error = false
SessionHelper::$_userAgent = "f9a8355d006790ee743ededbb1f6e3bd"
SessionHelper::$path = "/"
SessionHelper::$lastError = NULL
SessionHelper::$security = "medium"
SessionHelper::$time = 1773314240
SessionHelper::$sessionTime = 1773326240
SessionHelper::$cookieLifeTime = false
SessionHelper::$watchKeys = array
SessionHelper::$id = NULL
SessionHelper::$host = NULL
SessionHelper::$timeout = NULL
SessionHelper::$base = ""
SessionHelper::$webroot = "/"
SessionHelper::$here = "/dok"
SessionHelper::$params = array
SessionHelper::$action = "index"
SessionHelper::$data = NULL
SessionHelper::$theme = NULL
SessionHelper::$plugin = NULL,
"html" => HtmlHelper
HtmlHelper::$tags = array
HtmlHelper::$_crumbs = array
HtmlHelper::$__includedScripts = array
HtmlHelper::$_scriptBlockOptions = array
HtmlHelper::$__docTypes = array
HtmlHelper::$helpers = NULL
HtmlHelper::$base = ""
HtmlHelper::$webroot = "/"
HtmlHelper::$theme = NULL
HtmlHelper::$here = "/dok"
HtmlHelper::$params = array
HtmlHelper::$action = "index"
HtmlHelper::$plugin = NULL
HtmlHelper::$data = NULL
HtmlHelper::$namedArgs = NULL
HtmlHelper::$argSeparator = NULL
HtmlHelper::$validationErrors = NULL
HtmlHelper::$__tainted = NULL
HtmlHelper::$__cleaned = NULL,
"link" => LinkHelper
LinkHelper::$helpers = array
LinkHelper::$lang = "dok"
LinkHelper::$defaultLang = "hrv"
LinkHelper::$base = ""
LinkHelper::$webroot = "/"
LinkHelper::$theme = NULL
LinkHelper::$here = "/dok"
LinkHelper::$params = array
LinkHelper::$action = "index"
LinkHelper::$plugin = NULL
LinkHelper::$data = NULL
LinkHelper::$namedArgs = NULL
LinkHelper::$argSeparator = NULL
LinkHelper::$validationErrors = NULL
LinkHelper::$tags = array
LinkHelper::$__tainted = NULL
LinkHelper::$__cleaned = NULL
LinkHelper::$Html = HtmlHelper object
LinkHelper::$Session = SessionHelper object
)
$loadHelpers = false
$cached = false
$loadedHelpers = array()
$lang = "dok"
$otherLangs = array(
"eng",
"hrv"
)
$globalNav = array(
array(
"Page" => array()
),
array(
"Page" => array()
),
array(
"Page" => array()
),
array(
"Page" => array()
),
array(
"Page" => array()
),
array(
"Page" => array()
),
array(
"Page" => array()
),
array(
"Page" => array()
),
array(
"Page" => array()
),
array(
"Page" => array()
),
array(
"Page" => array()
),
array(
"Page" => array()
),
array(
"Page" => array()
),
array(
"Page" => array()
),
array(
"Page" => array()
),
array(
"Page" => array()
),
array(
"Page" => array()
),
array(
"Page" => array()
),
array(
"Page" => array()
),
array(
"Page" => array()
),
array(
"Page" => array()
),
array(
"Page" => array()
),
array(
"Page" => array()
),
array(
"Page" => array()
),
array(
"Page" => array()
),
array(
"Page" => array()
),
array(
"Page" => array()
)
)
$breadCrumbs = array(
array(
"Page" => array()
)
)
$pageContents = array(
"home_who_we_are" => null
)
$userData = null
$announcements = array(
array(
"Announcement" => array()
),
array(
"Announcement" => array()
),
array(
"Announcement" => array()
)
)
$cache = array(
"time" => "+1 day",
"key" => "dok"
)
$form = FormHelper
FormHelper::$helpers = array
FormHelper::$fieldset = array
FormHelper::$__options = array
FormHelper::$fields = array
FormHelper::$requestType = NULL
FormHelper::$defaultModel = NULL
FormHelper::$_inputDefaults = array
FormHelper::$_lastAction = ""
FormHelper::$base = ""
FormHelper::$webroot = "/"
FormHelper::$theme = NULL
FormHelper::$here = "/dok"
FormHelper::$params = array
FormHelper::$action = "index"
FormHelper::$plugin = NULL
FormHelper::$data = NULL
FormHelper::$namedArgs = NULL
FormHelper::$argSeparator = NULL
FormHelper::$validationErrors = NULL
FormHelper::$tags = array
FormHelper::$__tainted = NULL
FormHelper::$__cleaned = NULL
FormHelper::$Html = HtmlHelper object
$text = TextHelper
TextHelper::$helpers = NULL
TextHelper::$base = ""
TextHelper::$webroot = "/"
TextHelper::$theme = NULL
TextHelper::$here = "/dok"
TextHelper::$params = array
TextHelper::$action = "index"
TextHelper::$plugin = NULL
TextHelper::$data = NULL
TextHelper::$namedArgs = NULL
TextHelper::$argSeparator = NULL
TextHelper::$validationErrors = NULL
TextHelper::$tags = array
TextHelper::$__tainted = NULL
TextHelper::$__cleaned = NULL
$stringer = StringerHelper
StringerHelper::$helpers = array
StringerHelper::$base = ""
StringerHelper::$webroot = "/"
StringerHelper::$theme = NULL
StringerHelper::$here = "/dok"
StringerHelper::$params = array
StringerHelper::$action = "index"
StringerHelper::$plugin = NULL
StringerHelper::$data = NULL
StringerHelper::$namedArgs = NULL
StringerHelper::$argSeparator = NULL
StringerHelper::$validationErrors = NULL
StringerHelper::$tags = array
StringerHelper::$__tainted = NULL
StringerHelper::$__cleaned = NULL
StringerHelper::$Html = HtmlHelper object
StringerHelper::$Link = LinkHelper object
StringerHelper::$Text = TextHelper object
$menu = MenuHelper
MenuHelper::$helpers = array
MenuHelper::$base = ""
MenuHelper::$webroot = "/"
MenuHelper::$theme = NULL
MenuHelper::$here = "/dok"
MenuHelper::$params = array
MenuHelper::$action = "index"
MenuHelper::$plugin = NULL
MenuHelper::$data = NULL
MenuHelper::$namedArgs = NULL
MenuHelper::$argSeparator = NULL
MenuHelper::$validationErrors = NULL
MenuHelper::$tags = array
MenuHelper::$__tainted = NULL
MenuHelper::$__cleaned = NULL
MenuHelper::$Link = LinkHelper object
$session = SessionHelper
SessionHelper::$helpers = array
SessionHelper::$__active = true
SessionHelper::$valid = false
SessionHelper::$error = false
SessionHelper::$_userAgent = "f9a8355d006790ee743ededbb1f6e3bd"
SessionHelper::$path = "/"
SessionHelper::$lastError = NULL
SessionHelper::$security = "medium"
SessionHelper::$time = 1773314240
SessionHelper::$sessionTime = 1773326240
SessionHelper::$cookieLifeTime = false
SessionHelper::$watchKeys = array
SessionHelper::$id = NULL
SessionHelper::$host = NULL
SessionHelper::$timeout = NULL
SessionHelper::$base = ""
SessionHelper::$webroot = "/"
SessionHelper::$here = "/dok"
SessionHelper::$params = array
SessionHelper::$action = "index"
SessionHelper::$data = NULL
SessionHelper::$theme = NULL
SessionHelper::$plugin = NULL
$html = HtmlHelper
HtmlHelper::$tags = array
HtmlHelper::$_crumbs = array
HtmlHelper::$__includedScripts = array
HtmlHelper::$_scriptBlockOptions = array
HtmlHelper::$__docTypes = array
HtmlHelper::$helpers = NULL
HtmlHelper::$base = ""
HtmlHelper::$webroot = "/"
HtmlHelper::$theme = NULL
HtmlHelper::$here = "/dok"
HtmlHelper::$params = array
HtmlHelper::$action = "index"
HtmlHelper::$plugin = NULL
HtmlHelper::$data = NULL
HtmlHelper::$namedArgs = NULL
HtmlHelper::$argSeparator = NULL
HtmlHelper::$validationErrors = NULL
HtmlHelper::$__tainted = NULL
HtmlHelper::$__cleaned = NULL
$link = LinkHelper
LinkHelper::$helpers = array
LinkHelper::$lang = "dok"
LinkHelper::$defaultLang = "hrv"
LinkHelper::$base = ""
LinkHelper::$webroot = "/"
LinkHelper::$theme = NULL
LinkHelper::$here = "/dok"
LinkHelper::$params = array
LinkHelper::$action = "index"
LinkHelper::$plugin = NULL
LinkHelper::$data = NULL
LinkHelper::$namedArgs = NULL
LinkHelper::$argSeparator = NULL
LinkHelper::$validationErrors = NULL
LinkHelper::$tags = array
LinkHelper::$__tainted = NULL
LinkHelper::$__cleaned = NULL
LinkHelper::$Html = HtmlHelper object
LinkHelper::$Session = SessionHelper object
$articles = array(
array(
"Article" => array(),
"Member" => array()
),
array(
"Article" => array(),
"Member" => array()
),
array(
"Article" => array(),
"Member" => array()
),
array(
"Article" => array(),
"Member" => array()
),
array(
"Article" => array(),
"Member" => array()
)
)
$article = array(
"Article" => array(
"id" => "496",
"member_id" => "35",
"title_eng" => "Exhibition of Miniatures and Tabletop Scenery 2026",
"title_hrv" => "Izložba minijatura i maketa Agram 2026",
"mask_eng" => "exhibition_of_miniatures_and_tabletop_scenery_2026",
"mask_hrv" => "izlozba_minijatura_i_maketa_agram_2026",
"content_eng" => "<p>
<a href=" https://hosting.photobucket.com/95288841-8654-4bf7-8fc9-a4aa78dce87f/dc756f84-867d-4df4-acd8-5d43775cafc2.jpg
" target="_blank"> <img alt="Click for enlarged picture" src="
https://hosting.photobucket.com/95288841-8654-4bf7-8fc9-a4aa78dce87f/dc756f84-867d-4df4-acd8-5d43775cafc2.jpg" width="600" /> </a></p>
<p>
<strong>The exhibition of miniatures and models &quot;Agram 2026&quot;</strong> was held this year from 19.2. to 08.03. 2026. The exhibition was set up on Wednesday 18.2. and was attended by a large number of members and friends of the Association who exhibited their works.</p>
<p>
&nbsp;</p>
<p>
<a href=" https://hosting.photobucket.com/95288841-8654-4bf7-8fc9-a4aa78dce87f/8529d6d4-76ea-4872-a9e6-748e04223a4e.jpg
" target="_blank"> <img alt="Click for enlarged picture" src="
https://hosting.photobucket.com/95288841-8654-4bf7-8fc9-a4aa78dce87f/8529d6d4-76ea-4872-a9e6-748e04223a4e.jpg
" width="600" /> </a></p>
<p>
<a href=" https://hosting.photobucket.com/95288841-8654-4bf7-8fc9-a4aa78dce87f/f3038937-f001-4ceb-b725-a330fcd64cee.jpg
" target="_blank"> <img alt="Click for enlarged picture" src="
https://hosting.photobucket.com/95288841-8654-4bf7-8fc9-a4aa78dce87f/f3038937-f001-4ceb-b725-a330fcd64cee.jpg
" width="600" /> </a></p>
<p>
<a href=" https://hosting.photobucket.com/95288841-8654-4bf7-8fc9-a4aa78dce87f/3575379e-e068-49e2-9d4d-c9a49531fdc2.jpg
" target="_blank"> <img alt="Click for enlarged picture" src="
https://hosting.photobucket.com/95288841-8654-4bf7-8fc9-a4aa78dce87f/3575379e-e068-49e2-9d4d-c9a49531fdc2.jpg" width="600" /> </a></p>
<p>
<a href=" https://hosting.photobucket.com/95288841-8654-4bf7-8fc9-a4aa78dce87f/e51713c7-2add-4f8f-ae37-e6eba25badff.jpg
" target="_blank"> <img alt="Click for enlarged picture" src="
https://hosting.photobucket.com/95288841-8654-4bf7-8fc9-a4aa78dce87f/e51713c7-2add-4f8f-ae37-e6eba25badff.jpg" width="600" /> </a></p>
<p>
<a href=" https://hosting.photobucket.com/95288841-8654-4bf7-8fc9-a4aa78dce87f/9c0bb546-50a8-483d-aeab-ab3b2ce9f094.jpg
" target="_blank"> <img alt="Click for enlarged picture" src="
https://hosting.photobucket.com/95288841-8654-4bf7-8fc9-a4aa78dce87f/9c0bb546-50a8-483d-aeab-ab3b2ce9f094.jpg" width="600" /> </a></p>
<p>
The opening of the Exhibition took place on Thursday, February 19, 2026, starting at 6:00 PM. The exhibition was organized on the occasion of our twenty-third birthday.</p>
<p>
&nbsp;</p>
<p>
<a href=" https://hosting.photobucket.com/95288841-8654-4bf7-8fc9-a4aa78dce87f/71c7bfc2-1ffc-43b9-9d5a-53e009f6b86d.jpg
" target="_blank"> <img alt="Click for enlarged picture" src="
https://hosting.photobucket.com/95288841-8654-4bf7-8fc9-a4aa78dce87f/71c7bfc2-1ffc-43b9-9d5a-53e009f6b86d.jpg" width="600" /> </a></p>
<p>
<a href=" https://hosting.photobucket.com/95288841-8654-4bf7-8fc9-a4aa78dce87f/007b4701-1d7c-4a67-a599-0539a2aa3191.jpg
" target="_blank"> <img alt="Click for enlarged picture" src="
https://hosting.photobucket.com/95288841-8654-4bf7-8fc9-a4aa78dce87f/007b4701-1d7c-4a67-a599-0539a2aa3191.jpg" width="600" /> </a></p>
<p>
<a href=" https://hosting.photobucket.com/95288841-8654-4bf7-8fc9-a4aa78dce87f/2c8090e2-8b95-4368-bb48-98876d680e15.jpg
" target="_blank"> <img alt="Click for enlarged picture" src="
https://hosting.photobucket.com/95288841-8654-4bf7-8fc9-a4aa78dce87f/2c8090e2-8b95-4368-bb48-98876d680e15.jpg" width="600" /> </a></p>
<p>
<a href=" https://hosting.photobucket.com/95288841-8654-4bf7-8fc9-a4aa78dce87f/375768ad-a8bb-49bf-9845-e46c896ba7ec.jpg
" target="_blank"> <img alt="Click for enlarged picture" src="
https://hosting.photobucket.com/95288841-8654-4bf7-8fc9-a4aa78dce87f/375768ad-a8bb-49bf-9845-e46c896ba7ec.jpg" width="600" /> </a></p>
<p>
<a href=" https://hosting.photobucket.com/95288841-8654-4bf7-8fc9-a4aa78dce87f/a93de974-4ccb-4876-85b0-4d066ae402b3.jpg
" target="_blank"> <img alt="Click for enlarged picture" src="
https://hosting.photobucket.com/95288841-8654-4bf7-8fc9-a4aa78dce87f/a93de974-4ccb-4876-85b0-4d066ae402b3.jpg" width="600" /> </a></p>
<p>
<a href=" https://hosting.photobucket.com/95288841-8654-4bf7-8fc9-a4aa78dce87f/d323ccc9-1b9a-4cb2-8adf-7019b0e217f4.jpg
" target="_blank"> <img alt="Click for enlarged picture" src="
https://hosting.photobucket.com/95288841-8654-4bf7-8fc9-a4aa78dce87f/d323ccc9-1b9a-4cb2-8adf-7019b0e217f4.jpg" width="600" /> </a></p>
<p>
<a href=" https://hosting.photobucket.com/95288841-8654-4bf7-8fc9-a4aa78dce87f/a5a66447-2d76-47ae-866d-4d512ef469a5.jpg
" target="_blank"> <img alt="Click for enlarged picture" src="
https://hosting.photobucket.com/95288841-8654-4bf7-8fc9-a4aa78dce87f/a5a66447-2d76-47ae-866d-4d512ef469a5.jpg" width="600" /> </a></p>
<p>
<a href=" https://hosting.photobucket.com/95288841-8654-4bf7-8fc9-a4aa78dce87f/3e7bcfc9-ba02-4f94-a6c3-79dfaea3639e.jpg
" target="_blank"> <img alt="Click for enlarged picture" src="
https://hosting.photobucket.com/95288841-8654-4bf7-8fc9-a4aa78dce87f/3e7bcfc9-ba02-4f94-a6c3-79dfaea3639e.jpg" width="600" /> </a></p>
<p>
<a href=" https://hosting.photobucket.com/95288841-8654-4bf7-8fc9-a4aa78dce87f/24e79466-4a9e-4b10-970c-caad235d260d.jpg
" target="_blank"> <img alt="Click for enlarged picture" src="
https://hosting.photobucket.com/95288841-8654-4bf7-8fc9-a4aa78dce87f/24e79466-4a9e-4b10-970c-caad235d260d.jpg" width="600" /> </a></p>
<p>
As always, the Exhibition presented a cross-section of the work of the Association, its members, participants of its courses and workshops, and members of the Miniature Painters Croatia FB group. In a large number of showcases, there were numerous miniatures for tabletop strategy games, board games, and an entire showcase was dedicated to award-winning exhibits from previous miniature competitions. Several showcases were dedicated to projects that the Association has been implementing for 23 years, such as the UMS &bdquo;Agram&ldquo; Library and Reading Room, the Workshop for Making Spatial Models and the Miniature Painting Workshop, as well as new ones such as the Agram Group Build, the Agram Lego Section and the Back to Basics painting workshop for the youngest.</p>
<p>
<a href=" https://hosting.photobucket.com/95288841-8654-4bf7-8fc9-a4aa78dce87f/fca84936-af71-44d3-9a4c-faeb26163899.jpg
" target="_blank"> <img alt="Click for enlarged picture" src="
https://hosting.photobucket.com/95288841-8654-4bf7-8fc9-a4aa78dce87f/fca84936-af71-44d3-9a4c-faeb26163899.jpg" width="600" /> </a></p>
<p>
<a href=" https://hosting.photobucket.com/95288841-8654-4bf7-8fc9-a4aa78dce87f/459bc5ac-8702-46f9-93b4-547deaabdef4.jpg
" target="_blank"> <img alt="Click for enlarged picture" src="
https://hosting.photobucket.com/95288841-8654-4bf7-8fc9-a4aa78dce87f/459bc5ac-8702-46f9-93b4-547deaabdef4.jpg" width="600" /> </a></p>
<p>
<a href=" https://hosting.photobucket.com/95288841-8654-4bf7-8fc9-a4aa78dce87f/91a04363-b2ef-4635-a046-7edf25ce7808.jpg
" target="_blank"> <img alt="Click for enlarged picture" src="
https://hosting.photobucket.com/95288841-8654-4bf7-8fc9-a4aa78dce87f/91a04363-b2ef-4635-a046-7edf25ce7808.jpg" width="600" /> </a></p>
<p>
<a href=" https://hosting.photobucket.com/95288841-8654-4bf7-8fc9-a4aa78dce87f/73256af5-fd5d-40b5-95e1-120e49c9be87.jpg
" target="_blank"> <img alt="Click for enlarged picture" src="
https://hosting.photobucket.com/95288841-8654-4bf7-8fc9-a4aa78dce87f/73256af5-fd5d-40b5-95e1-120e49c9be87.jpg" width="600" /> </a></p>
<p>
<a href=" https://hosting.photobucket.com/95288841-8654-4bf7-8fc9-a4aa78dce87f/979f9be5-23f3-4df9-91dc-ab71d6a10d64.jpg
" target="_blank"> <img alt="Click for enlarged picture" src="
https://hosting.photobucket.com/95288841-8654-4bf7-8fc9-a4aa78dce87f/979f9be5-23f3-4df9-91dc-ab71d6a10d64.jpg" width="600" /> </a></p>
<p>
<a href=" https://hosting.photobucket.com/95288841-8654-4bf7-8fc9-a4aa78dce87f/d0ff4379-183a-47b9-a740-9ddc283ebc29.jpg
" target="_blank"> <img alt="Click for enlarged picture" src="
https://hosting.photobucket.com/95288841-8654-4bf7-8fc9-a4aa78dce87f/d0ff4379-183a-47b9-a740-9ddc283ebc29.jpg" width="600" /> </a></p>
<p>
<a href=" https://hosting.photobucket.com/95288841-8654-4bf7-8fc9-a4aa78dce87f/4333e95e-bbbd-4f47-aaea-38a9c99e54d8.jpg
" target="_blank"> <img alt="Click for enlarged picture" src="
https://hosting.photobucket.com/95288841-8654-4bf7-8fc9-a4aa78dce87f/4333e95e-bbbd-4f47-aaea-38a9c99e54d8.jpg" width="600" /> </a></p>
<p>
<a href=" https://hosting.photobucket.com/95288841-8654-4bf7-8fc9-a4aa78dce87f/1372f8a2-b222-48ee-ae45-a90b5a354ef7.jpg
" target="_blank"> <img alt="Click for enlarged picture" src="
https://hosting.photobucket.com/95288841-8654-4bf7-8fc9-a4aa78dce87f/1372f8a2-b222-48ee-ae45-a90b5a354ef7.jpg" width="600" /> </a></p>
<p>
<a href=" https://hosting.photobucket.com/95288841-8654-4bf7-8fc9-a4aa78dce87f/6a1b4fd1-d982-4b06-9c5f-3cd40d6bf10a.jpg
" target="_blank"> <img alt="Click for enlarged picture" src="
https://hosting.photobucket.com/95288841-8654-4bf7-8fc9-a4aa78dce87f/6a1b4fd1-d982-4b06-9c5f-3cd40d6bf10a.jpg" width="600" /> </a></p>
<p>
<a href=" https://hosting.photobucket.com/95288841-8654-4bf7-8fc9-a4aa78dce87f/c2ec45e1-e0f3-463a-b254-cb2a38b53e14.jpg
" target="_blank"> <img alt="Click for enlarged picture" src="
https://hosting.photobucket.com/95288841-8654-4bf7-8fc9-a4aa78dce87f/c2ec45e1-e0f3-463a-b254-cb2a38b53e14.jpg" width="600" /> </a></p>
<p>
<a href=" https://hosting.photobucket.com/95288841-8654-4bf7-8fc9-a4aa78dce87f/17553b9a-0592-4f6a-a097-3f1a97e161f3.jpg
" target="_blank"> <img alt="Click for enlarged picture" src="
https://hosting.photobucket.com/95288841-8654-4bf7-8fc9-a4aa78dce87f/17553b9a-0592-4f6a-a097-3f1a97e161f3.jpg" width="600" /> </a></p>
<p>
<a href=" https://hosting.photobucket.com/95288841-8654-4bf7-8fc9-a4aa78dce87f/8658bd6b-dff2-4d24-8473-928d44d44480.jpg
" target="_blank"> <img alt="Click for enlarged picture" src="
https://hosting.photobucket.com/95288841-8654-4bf7-8fc9-a4aa78dce87f/8658bd6b-dff2-4d24-8473-928d44d44480.jpg" width="600" /> </a></p>
<p>
<a href=" https://hosting.photobucket.com/95288841-8654-4bf7-8fc9-a4aa78dce87f/ecab0ea7-f75b-4e31-a520-d088ad39fa17.jpg
" target="_blank"> <img alt="Click for enlarged picture" src="
https://hosting.photobucket.com/95288841-8654-4bf7-8fc9-a4aa78dce87f/ecab0ea7-f75b-4e31-a520-d088ad39fa17.jpg" width="600" /> </a></p>
<p>
<a href=" https://hosting.photobucket.com/95288841-8654-4bf7-8fc9-a4aa78dce87f/9495a2f5-8a82-41f2-abf4-9ade3db41d87.jpg
" target="_blank"> <img alt="Click for enlarged picture" src="
https://hosting.photobucket.com/95288841-8654-4bf7-8fc9-a4aa78dce87f/9495a2f5-8a82-41f2-abf4-9ade3db41d87.jpg" width="600" /> </a></p>
<p>
<a href=" https://hosting.photobucket.com/95288841-8654-4bf7-8fc9-a4aa78dce87f/362cc6fd-a5dd-474b-9b9f-aeab27d6dcfa.jpg
" target="_blank"> <img alt="Click for enlarged picture" src="
https://hosting.photobucket.com/95288841-8654-4bf7-8fc9-a4aa78dce87f/362cc6fd-a5dd-474b-9b9f-aeab27d6dcfa.jpg" width="600" /> </a></p>
<p>
It was a special honor for us to host our guest exhibitor, Ninoslav Luk, a miniaturist from Poreč, who introduced himself to us with his collection of historical dioramas.</p>
<p>
<a href=" https://hosting.photobucket.com/95288841-8654-4bf7-8fc9-a4aa78dce87f/ba1353de-e2bd-4340-9121-9056e287ed4a.jpg
" target="_blank"> <img alt="Click for enlarged picture" src="
https://hosting.photobucket.com/95288841-8654-4bf7-8fc9-a4aa78dce87f/ba1353de-e2bd-4340-9121-9056e287ed4a.jpg" width="600" /> </a></p>
<p>
<a href=" https://hosting.photobucket.com/95288841-8654-4bf7-8fc9-a4aa78dce87f/cea18506-1b50-4e5b-955c-0b9ca02d7826.jpg
" target="_blank"> <img alt="Click for enlarged picture" src="
https://hosting.photobucket.com/95288841-8654-4bf7-8fc9-a4aa78dce87f/cea18506-1b50-4e5b-955c-0b9ca02d7826.jpg" width="600" /> </a></p>
<p>
<a href=" https://hosting.photobucket.com/95288841-8654-4bf7-8fc9-a4aa78dce87f/1be85b41-e3b6-4536-b141-cd0da6eb38c1.jpg
" target="_blank"> <img alt="Click for enlarged picture" src="
https://hosting.photobucket.com/95288841-8654-4bf7-8fc9-a4aa78dce87f/1be85b41-e3b6-4536-b141-cd0da6eb38c1.jpg" width="600" /> </a></p>
<p>
<a href=" https://hosting.photobucket.com/95288841-8654-4bf7-8fc9-a4aa78dce87f/9e93b87d-ff3c-4b7b-8f06-5f9d3464a134.jpg
" target="_blank"> <img alt="Click for enlarged picture" src="
https://hosting.photobucket.com/95288841-8654-4bf7-8fc9-a4aa78dce87f/9e93b87d-ff3c-4b7b-8f06-5f9d3464a134.jpg" width="600" /> </a></p>
<p>
During the first weekend of the Exhibition, 21-22.02., we held the 18th annual international miniature painting competition <strong>Black Queen Hobby and Miniature Painting Competition</strong>!</p>
<p>
<a href=" https://hosting.photobucket.com/95288841-8654-4bf7-8fc9-a4aa78dce87f/3056fb09-f66c-4dea-80a8-a4e72407429a.jpg
" target="_blank"> <img alt="Click for enlarged picture" src="
https://hosting.photobucket.com/95288841-8654-4bf7-8fc9-a4aa78dce87f/3056fb09-f66c-4dea-80a8-a4e72407429a.jpg" width="600" /> </a></p>
<p>
As contestants arrived and registered for the competition, our hardworking staff photographed all the exhibits before sorting them into categories and carefully placing them in glass cases. There was no shortage of morning neccessities like coffe and doughnuts.</p>
<p>
&lt;</p>
<p>
<a href=" https://hosting.photobucket.com/95288841-8654-4bf7-8fc9-a4aa78dce87f/1118089c-2b46-4a2c-b17d-dc92b66d1ffc.jpg
" target="_blank"> <img alt="Click for enlarged picture" src="
https://hosting.photobucket.com/95288841-8654-4bf7-8fc9-a4aa78dce87f/1118089c-2b46-4a2c-b17d-dc92b66d1ffc.jpg" width="600" /> </a></p>
<p>
<a href=" https://hosting.photobucket.com/95288841-8654-4bf7-8fc9-a4aa78dce87f/9fd3c272-9a69-4532-a09d-36497a20a820.jpg
" target="_blank"> <img alt="Click for enlarged picture" src="
https://hosting.photobucket.com/95288841-8654-4bf7-8fc9-a4aa78dce87f/9fd3c272-9a69-4532-a09d-36497a20a820.jpg" width="600" /> </a></p>
<p>
<a href=" https://hosting.photobucket.com/95288841-8654-4bf7-8fc9-a4aa78dce87f/86995e80-c502-45fb-80f5-c8fda27da3f9.jpg
" target="_blank"> <img alt="Click for enlarged picture" src="
https://hosting.photobucket.com/95288841-8654-4bf7-8fc9-a4aa78dce87f/86995e80-c502-45fb-80f5-c8fda27da3f9.jpg" width="600" /> </a></p>
<p>
By noon, all the display cases were full and the competition could officially begin.</p>
<p>
<a href=" https://hosting.photobucket.com/95288841-8654-4bf7-8fc9-a4aa78dce87f/bce59a4f-c3e3-4708-a3d6-25e81a894c24.jpg
" target="_blank"> <img alt="Click for enlarged picture" src="
https://hosting.photobucket.com/95288841-8654-4bf7-8fc9-a4aa78dce87f/bce59a4f-c3e3-4708-a3d6-25e81a894c24.jpg" width="600" /> </a></p>
<p>
<a href=" https://hosting.photobucket.com/95288841-8654-4bf7-8fc9-a4aa78dce87f/16a0a094-01aa-4e52-82cf-fdab00d74711.jpg
" target="_blank"> <img alt="Click for enlarged picture" src="
https://hosting.photobucket.com/95288841-8654-4bf7-8fc9-a4aa78dce87f/16a0a094-01aa-4e52-82cf-fdab00d74711.jpg" width="600" /> </a></p>
<p>
<a href=" https://hosting.photobucket.com/95288841-8654-4bf7-8fc9-a4aa78dce87f/0d3f4042-ff77-48d0-b332-add0fd08f7c3.jpg
" target="_blank"> <img alt="Click for enlarged picture" src="
https://hosting.photobucket.com/95288841-8654-4bf7-8fc9-a4aa78dce87f/0d3f4042-ff77-48d0-b332-add0fd08f7c3.jpg" width="600" /> </a></p>
<p>
<a href=" https://hosting.photobucket.com/95288841-8654-4bf7-8fc9-a4aa78dce87f/3711baf8-93f2-434a-aea9-a95288ca04dd.jpg
" target="_blank"> <img alt="Click for enlarged picture" src="
https://hosting.photobucket.com/95288841-8654-4bf7-8fc9-a4aa78dce87f/3711baf8-93f2-434a-aea9-a95288ca04dd.jpg" width="600" /> </a></p>
<p>
<a href=" https://hosting.photobucket.com/95288841-8654-4bf7-8fc9-a4aa78dce87f/53113b97-ec06-4409-95ba-95a5ad3f9720.jpg
" target="_blank"> <img alt="Click for enlarged picture" src="
https://hosting.photobucket.com/95288841-8654-4bf7-8fc9-a4aa78dce87f/53113b97-ec06-4409-95ba-95a5ad3f9720.jpg" width="600" /> </a></p>
<p>
<a href=" https://hosting.photobucket.com/95288841-8654-4bf7-8fc9-a4aa78dce87f/ab127858-193d-4976-bdb2-e27302722fca.jpg
" target="_blank"> <img alt="Click for enlarged picture" src="
https://hosting.photobucket.com/95288841-8654-4bf7-8fc9-a4aa78dce87f/ab127858-193d-4976-bdb2-e27302722fca.jpg" width="600" /> </a></p>
<p>
<a href=" https://hosting.photobucket.com/95288841-8654-4bf7-8fc9-a4aa78dce87f/3735af11-3fb6-4772-a8ff-5e0ff6ddf03a.jpg
" target="_blank"> <img alt="Click for enlarged picture" src="
https://hosting.photobucket.com/95288841-8654-4bf7-8fc9-a4aa78dce87f/3735af11-3fb6-4772-a8ff-5e0ff6ddf03a.jpg" width="600" /> </a></p>
<p>
<strong>Back To Basics workshops for the young at the Black Queen</strong></p>
<p>
This year, throughout the weekend, we organized miniature painting workshops for the youngest, who were able to paint one of our own miniatures designed specifically for this program for the first time!</p>
<p>
<a href=" https://hosting.photobucket.com/95288841-8654-4bf7-8fc9-a4aa78dce87f/6999be0c-8cc6-4947-a423-9427a2299724.jpg
" target="_blank"> <img alt="Click for enlarged picture" src="
https://hosting.photobucket.com/95288841-8654-4bf7-8fc9-a4aa78dce87f/6999be0c-8cc6-4947-a423-9427a2299724.jpg" width="600" /> </a></p>
<p>
<a href="https://hosting.photobucket.com/95288841-8654-4bf7-8fc9-a4aa78dce87f/835b05a5-f171-49df-afa6-da0692b89074.jpg" target="_blank"><img alt="Click for enlarged picture" src="https://hosting.photobucket.com/95288841-8654-4bf7-8fc9-a4aa78dce87f/835b05a5-f171-49df-afa6-da0692b89074.jpg" width="600" /></a></p>
<p>
<a href=" https://hosting.photobucket.com/95288841-8654-4bf7-8fc9-a4aa78dce87f/ef5dde13-84ee-4ea0-b9f3-28aaf703ef6d.jpg
" target="_blank"> <img alt="Click for enlarged picture" src="
https://hosting.photobucket.com/95288841-8654-4bf7-8fc9-a4aa78dce87f/ef5dde13-84ee-4ea0-b9f3-28aaf703ef6d.jpg" width="600" /> </a></p>
<p>
<strong>SELLERS&#39; COURT</strong></p>
<p>
During the weekend we hosted our sponsors with their sales stands: Swood.si and Carta Magica.</p>
<p>
<a href=" https://hosting.photobucket.com/95288841-8654-4bf7-8fc9-a4aa78dce87f/5ee9a49f-a387-435a-9110-572402b7191d.jpg
" target="_blank"> <img alt="Click for enlarged picture" src="
https://hosting.photobucket.com/95288841-8654-4bf7-8fc9-a4aa78dce87f/5ee9a49f-a387-435a-9110-572402b7191d.jpg" width="600" /> </a></p>
<p>
<a href=" https://hosting.photobucket.com/95288841-8654-4bf7-8fc9-a4aa78dce87f/47cf600f-b1eb-4655-bf06-305f6f21d5d2.jpg
" target="_blank"> <img alt="Click for enlarged picture" src="
https://hosting.photobucket.com/95288841-8654-4bf7-8fc9-a4aa78dce87f/47cf600f-b1eb-4655-bf06-305f6f21d5d2.jpg" width="600" /> </a></p>
<p>
<strong>MINIATURE PAINTING WORKSHOPS</strong></p>
<p>
The ZZTK premises allow workshops to be held during the weekend in the cinema hall in the basement, so we also organized demonstration workshops during the weekend. The lecturers&#39; work was recorded with a camera and projected onto the projection screen in the hall. Many thanks to our domestic and international lecturers: Anže Zorko (SLO), doc.dr.sc. Winton Afrić (CRO), Ivan Knezović (UMS Agram) and Petar Knezoviću (CRO).</p>
<p>
<a href=" https://hosting.photobucket.com/95288841-8654-4bf7-8fc9-a4aa78dce87f/e8d835be-ec99-49d7-bc9b-086e38573d1a.jpg
" target="_blank"> <img alt="Click for enlarged picture" src="
https://hosting.photobucket.com/95288841-8654-4bf7-8fc9-a4aa78dce87f/e8d835be-ec99-49d7-bc9b-086e38573d1a.jpg" width="600" /> </a></p>
<p>
<a href=" https://hosting.photobucket.com/95288841-8654-4bf7-8fc9-a4aa78dce87f/f3eba4c1-4637-4da9-8360-75f430355af4.jpg" target="_blank"> <img alt="Click for enlarged picture" src="
https://hosting.photobucket.com/95288841-8654-4bf7-8fc9-a4aa78dce87f/f3eba4c1-4637-4da9-8360-75f430355af4.jpg" width="600" /> </a></p>
<p>
<a href=" https://hosting.photobucket.com/95288841-8654-4bf7-8fc9-a4aa78dce87f/ef523854-4030-4579-aa38-403afda86c91.jpg
" target="_blank"> <img alt="Click for enlarged picture" src="
https://hosting.photobucket.com/95288841-8654-4bf7-8fc9-a4aa78dce87f/ef523854-4030-4579-aa38-403afda86c91.jpg" width="600" /> </a></p>
<p>
<a href=" https://hosting.photobucket.com/95288841-8654-4bf7-8fc9-a4aa78dce87f/dd0943c2-f4a8-40c3-b641-f6dcdd200380.jpg
" target="_blank"> <img alt="Click for enlarged picture" src="
https://hosting.photobucket.com/95288841-8654-4bf7-8fc9-a4aa78dce87f/dd0943c2-f4a8-40c3-b641-f6dcdd200380.jpg" width="600" /> </a></p>
<p>
<a href=" https://hosting.photobucket.com/95288841-8654-4bf7-8fc9-a4aa78dce87f/08b1626a-f6c7-43c9-b718-3e9a41b55ca6.jpg
" target="_blank"> <img alt="Click for enlarged picture" src="
https://hosting.photobucket.com/95288841-8654-4bf7-8fc9-a4aa78dce87f/08b1626a-f6c7-43c9-b718-3e9a41b55ca6.jpg" width="600" /> </a></p>
<p>
<a href=" https://hosting.photobucket.com/95288841-8654-4bf7-8fc9-a4aa78dce87f/91aca7f3-1af6-486d-b174-65079a63a1ea.jpg
" target="_blank"> <img alt="Click for enlarged picture" src="
https://hosting.photobucket.com/95288841-8654-4bf7-8fc9-a4aa78dce87f/91aca7f3-1af6-486d-b174-65079a63a1ea.jpg" width="600" /> </a></p>
<p>
<a href=" https://hosting.photobucket.com/95288841-8654-4bf7-8fc9-a4aa78dce87f/3821f2fb-fbe7-4096-adbc-7d8c981a3b56.jpg
" target="_blank"> <img alt="Click for enlarged picture" src="
https://hosting.photobucket.com/95288841-8654-4bf7-8fc9-a4aa78dce87f/3821f2fb-fbe7-4096-adbc-7d8c981a3b56.jpg" width="600" /> </a></p>
<p>
<a href=" https://hosting.photobucket.com/95288841-8654-4bf7-8fc9-a4aa78dce87f/2c7bb3c5-c0ec-4a96-b6bd-6a90ce5ce154.jpg
" target="_blank"> <img alt="Click for enlarged picture" src="
https://hosting.photobucket.com/95288841-8654-4bf7-8fc9-a4aa78dce87f/2c7bb3c5-c0ec-4a96-b6bd-6a90ce5ce154.jpg" width="600" /> </a></p>
<p>
<a href=" https://hosting.photobucket.com/95288841-8654-4bf7-8fc9-a4aa78dce87f/b646f4ee-21aa-4d12-8db3-6d33351d5aeb.jpg
" target="_blank"> <img alt="Click for enlarged picture" src="
https://hosting.photobucket.com/95288841-8654-4bf7-8fc9-a4aa78dce87f/b646f4ee-21aa-4d12-8db3-6d33351d5aeb.jpg" width="600" /> </a></p>
<p>
<a href=" https://hosting.photobucket.com/95288841-8654-4bf7-8fc9-a4aa78dce87f/fb5efc01-32cc-4119-90e3-188f51b30237.jpg
" target="_blank"> <img alt="Click for enlarged picture" src="
https://hosting.photobucket.com/95288841-8654-4bf7-8fc9-a4aa78dce87f/fb5efc01-32cc-4119-90e3-188f51b30237.jpg" width="600" /> </a></p>
<p>
<strong>SPEED PAINTING COMPETITION</strong></p>
<p>
We organized a speed painting competition on Sunday afternoon. Participants had 60 minutes to paint one wizrad, a miniature of our own design and production.</p>
<p>
<a href=" https://hosting.photobucket.com/95288841-8654-4bf7-8fc9-a4aa78dce87f/106417a6-a047-4e0d-9f81-87858806052f.jpg
" target="_blank"> <img alt="Click for enlarged picture" src="
https://hosting.photobucket.com/95288841-8654-4bf7-8fc9-a4aa78dce87f/106417a6-a047-4e0d-9f81-87858806052f.jpg" width="600" /> </a></p>
<p>
<a href=" https://hosting.photobucket.com/95288841-8654-4bf7-8fc9-a4aa78dce87f/ac6853c7-6e34-4e07-a996-8d7d12744b67.jpg
" target="_blank"> <img alt="Click for enlarged picture" src="
https://hosting.photobucket.com/95288841-8654-4bf7-8fc9-a4aa78dce87f/ac6853c7-6e34-4e07-a996-8d7d12744b67.jpg" width="600" /> </a></p>
<p>
<a href=" https://hosting.photobucket.com/95288841-8654-4bf7-8fc9-a4aa78dce87f/ccb155fa-52c5-4a99-9515-f69a6836dce7.jpg
" target="_blank"> <img alt="Click for enlarged picture" src="
https://hosting.photobucket.com/95288841-8654-4bf7-8fc9-a4aa78dce87f/ccb155fa-52c5-4a99-9515-f69a6836dce7.jpg" width="600" /> </a></p>
<p>
<a href=" https://hosting.photobucket.com/95288841-8654-4bf7-8fc9-a4aa78dce87f/a29fedd0-97ea-45b1-85f9-7ea62188b2b2.jpg
" target="_blank"><img alt="Click for enlarged picture" src="
https://hosting.photobucket.com/95288841-8654-4bf7-8fc9-a4aa78dce87f/a29fedd0-97ea-45b1-85f9-7ea62188b2b2.jpg" width="600" /></a></p>
<p>
With that, we came to the very end of this wonderful weekend and all that was left was the awarding of prizes and recognition to the winners.</p>
<p>
<a href=" https://hosting.photobucket.com/95288841-8654-4bf7-8fc9-a4aa78dce87f/046ca4c8-0ae7-415e-abd3-e131d580c3ad.jpg
" target="_blank"> <img alt="Click for enlarged picture" src="
https://hosting.photobucket.com/95288841-8654-4bf7-8fc9-a4aa78dce87f/046ca4c8-0ae7-415e-abd3-e131d580c3ad.jpg" width="600" /> </a></p>
<p>
<a href=" https://hosting.photobucket.com/95288841-8654-4bf7-8fc9-a4aa78dce87f/cec0dcef-7acb-4a77-89de-271ed5410672.jpg
" target="_blank"> <img alt="Click for enlarged picture" src="
https://hosting.photobucket.com/95288841-8654-4bf7-8fc9-a4aa78dce87f/cec0dcef-7acb-4a77-89de-271ed5410672.jpg" width="600" /> </a></p>
<p>
<a href=" https://hosting.photobucket.com/95288841-8654-4bf7-8fc9-a4aa78dce87f/a495a5fc-31a2-4979-a970-0fa22c334354.jpg
" target="_blank"> <img alt="Click for enlarged picture" src="
https://hosting.photobucket.com/95288841-8654-4bf7-8fc9-a4aa78dce87f/a495a5fc-31a2-4979-a970-0fa22c334354.jpg" width="600" /> </a></p>
<p>
<strong>AGRAM ARENA &ndash; Leaving Asphodel Necropolis28 Campaign</strong></p>
<p>
During the weekend of February 21-22, we held a new international competition, Agram Arena! This time it was the turn of the tabletop strategy game Necropolis28, for which our members designed a two-day campaign. Each participant created their own gang of soldiers, and the vast majority also created their own boards.</p>
<p>
<a href=" https://hosting.photobucket.com/95288841-8654-4bf7-8fc9-a4aa78dce87f/ac69b182-4bfc-4575-a6d3-fb3c8baba342.jpg
" target="_blank"> <img alt="Click for enlarged picture" src="
https://hosting.photobucket.com/95288841-8654-4bf7-8fc9-a4aa78dce87f/ac69b182-4bfc-4575-a6d3-fb3c8baba342.jpg" width="600" /> </a></p>
<p>
<a href=" https://hosting.photobucket.com/95288841-8654-4bf7-8fc9-a4aa78dce87f/289fed7b-e058-42d8-ba2d-cbd0463e98da.jpg
" target="_blank"> <img alt="Click for enlarged picture" src="
https://hosting.photobucket.com/95288841-8654-4bf7-8fc9-a4aa78dce87f/289fed7b-e058-42d8-ba2d-cbd0463e98da.jpg" width="600" /> </a></p>
<p>
<a href=" https://hosting.photobucket.com/95288841-8654-4bf7-8fc9-a4aa78dce87f/d92ebbee-859d-4441-8386-3d760b20b7a7.jpg
" target="_blank"> <img alt="Click for enlarged picture" src="
https://hosting.photobucket.com/95288841-8654-4bf7-8fc9-a4aa78dce87f/d92ebbee-859d-4441-8386-3d760b20b7a7.jpg" width="600" /> </a></p>
<p>
<a href=" https://hosting.photobucket.com/95288841-8654-4bf7-8fc9-a4aa78dce87f/09c59798-7871-425e-a075-3ca1cd91768a.jpg
" target="_blank"> <img alt="Click for enlarged picture" src="
https://hosting.photobucket.com/95288841-8654-4bf7-8fc9-a4aa78dce87f/09c59798-7871-425e-a075-3ca1cd91768a.jpg" width="600" /> </a></p>
<p>
<a href=" https://hosting.photobucket.com/95288841-8654-4bf7-8fc9-a4aa78dce87f/b2f3edc8-5a23-4552-9a2a-4027b286f327.jpg
" target="_blank"> <img alt="Click for enlarged picture" src="
https://hosting.photobucket.com/95288841-8654-4bf7-8fc9-a4aa78dce87f/b2f3edc8-5a23-4552-9a2a-4027b286f327.jpg" width="600" /> </a></p>
<p>
<a href=" https://hosting.photobucket.com/95288841-8654-4bf7-8fc9-a4aa78dce87f/2a9f43ac-b531-4746-b7bb-ac5a3356aab0.jpg
" target="_blank"> <img alt="Click for enlarged picture" src="
https://hosting.photobucket.com/95288841-8654-4bf7-8fc9-a4aa78dce87f/2a9f43ac-b531-4746-b7bb-ac5a3356aab0.jpg" width="600" /> </a></p>
<p>
<strong>EVENTS ON WEEKDAYS DURING THE EXHIBITION </strong></p>
<p>
Over the next two weeks, our volunteers held open miniature painting workshops on weekdays from 4:00 PM to 8:00 PM. Miniature painting workstations were set up where our visitors could paint miniatures we had prepared (or their own if they had brought them) using our materials and tools.</p>
<p>
<a href=" https://hosting.photobucket.com/95288841-8654-4bf7-8fc9-a4aa78dce87f/6edf7765-42b5-417a-820f-fa5d907179a7.jpg
" target="_blank"> <img alt="Click for enlarged picture" src="
https://hosting.photobucket.com/95288841-8654-4bf7-8fc9-a4aa78dce87f/6edf7765-42b5-417a-820f-fa5d907179a7.jpg" width="600" /> </a></p>
<p>
<a href=" https://hosting.photobucket.com/95288841-8654-4bf7-8fc9-a4aa78dce87f/c084ebe2-f57b-4519-9b31-29bdc1155887.jpg
" target="_blank"> <img alt="Click for enlarged picture" src="
https://hosting.photobucket.com/95288841-8654-4bf7-8fc9-a4aa78dce87f/c084ebe2-f57b-4519-9b31-29bdc1155887.jpg" width="600" /> </a></p>
<p>
<a href=" https://hosting.photobucket.com/95288841-8654-4bf7-8fc9-a4aa78dce87f/37ff2272-f9b0-4b16-a363-1e6f6688c866.jpg
" target="_blank"> <img alt="Click for enlarged picture" src="
https://hosting.photobucket.com/95288841-8654-4bf7-8fc9-a4aa78dce87f/37ff2272-f9b0-4b16-a363-1e6f6688c866.jpg" width="600" /> </a></p>
<p>
<a href=" https://hosting.photobucket.com/95288841-8654-4bf7-8fc9-a4aa78dce87f/5f4f7968-ff50-4a01-98da-6ce8562930b4.jpg
" target="_blank"> <img alt="Click for enlarged picture" src="
https://hosting.photobucket.com/95288841-8654-4bf7-8fc9-a4aa78dce87f/5f4f7968-ff50-4a01-98da-6ce8562930b4.jpg" width="600" /> </a></p>
<p>
<a href=" https://hosting.photobucket.com/95288841-8654-4bf7-8fc9-a4aa78dce87f/cbb45319-d488-483c-bf9d-9af29852fc74.jpg
" target="_blank"> <img alt="Click for enlarged picture" src="
https://hosting.photobucket.com/95288841-8654-4bf7-8fc9-a4aa78dce87f/cbb45319-d488-483c-bf9d-9af29852fc74.jpg" width="600" /> </a></p>
<p>
<a href=" https://hosting.photobucket.com/95288841-8654-4bf7-8fc9-a4aa78dce87f/3dcca26c-d549-4af3-812a-a4a81b9a2310.jpg
" target="_blank"> <img alt="Click for enlarged picture" src="
https://hosting.photobucket.com/95288841-8654-4bf7-8fc9-a4aa78dce87f/3dcca26c-d549-4af3-812a-a4a81b9a2310.jpg" width="600" /> </a></p>
<p>
<a href=" https://hosting.photobucket.com/95288841-8654-4bf7-8fc9-a4aa78dce87f/4adf0fb6-3eab-4b40-b32d-d03eab4a9892.jpg
" target="_blank"> <img alt="Click for enlarged picture" src="
https://hosting.photobucket.com/95288841-8654-4bf7-8fc9-a4aa78dce87f/4adf0fb6-3eab-4b40-b32d-d03eab4a9892.jpg" width="600" /> </a></p>
<p>
<a href=" https://hosting.photobucket.com/95288841-8654-4bf7-8fc9-a4aa78dce87f/4732b58a-9a65-4d1c-a7d5-25513d34b108.jpg
" target="_blank"> <img alt="Click for enlarged picture" src="
https://hosting.photobucket.com/95288841-8654-4bf7-8fc9-a4aa78dce87f/4732b58a-9a65-4d1c-a7d5-25513d34b108.jpg" width="600" /> </a></p>
<p>
<a href=" https://hosting.photobucket.com/95288841-8654-4bf7-8fc9-a4aa78dce87f/274be330-31d5-4e25-95db-ec2f423a003c.jpg
" target="_blank"> <img alt="Click for enlarged picture" src="
https://hosting.photobucket.com/95288841-8654-4bf7-8fc9-a4aa78dce87f/274be330-31d5-4e25-95db-ec2f423a003c.jpg" width="600" /> </a></p>
<p>
<a href=" https://hosting.photobucket.com/95288841-8654-4bf7-8fc9-a4aa78dce87f/8e7b0a80-0f46-4d70-9789-a46976c713d2.jpg
" target="_blank"> <img alt="Click for enlarged picture" src="
https://hosting.photobucket.com/95288841-8654-4bf7-8fc9-a4aa78dce87f/8e7b0a80-0f46-4d70-9789-a46976c713d2.jpg" width="600" /> </a></p>
<p>
<a href=" https://hosting.photobucket.com/95288841-8654-4bf7-8fc9-a4aa78dce87f/8bbd4e96-b911-4f26-80fe-b1c57f29027b.jpg
" target="_blank"> <img alt="Click for enlarged picture" src="
https://hosting.photobucket.com/95288841-8654-4bf7-8fc9-a4aa78dce87f/8bbd4e96-b911-4f26-80fe-b1c57f29027b.jpg" width="600" /> </a></p>
<p>
<a href=" https://hosting.photobucket.com/95288841-8654-4bf7-8fc9-a4aa78dce87f/203a27be-8f10-459d-89b9-befb6b636b74.jpg
" target="_blank"> <img alt="Click for enlarged picture" src="
https://hosting.photobucket.com/95288841-8654-4bf7-8fc9-a4aa78dce87f/203a27be-8f10-459d-89b9-befb6b636b74.jpg" width="600" /> </a></p>
<p>
<a href=" https://hosting.photobucket.com/95288841-8654-4bf7-8fc9-a4aa78dce87f/5dc4358f-19d8-475f-a4af-9c29e9ed18d7.jpg
" target="_blank"> <img alt="Click for enlarged picture" src="
https://hosting.photobucket.com/95288841-8654-4bf7-8fc9-a4aa78dce87f/5dc4358f-19d8-475f-a4af-9c29e9ed18d7.jpg" width="600" /> </a></p>
<p>
<strong>BACK TO BASICS MINIATURE PAINTING WORKSHOPS FOR YOUNG</strong></p>
<p>
On weekdays from 17:00 to 18:00, we held our new workshops for the youngest, in which our youngest participants painted their first miniatures.</p>
<p>
<a href=" https://hosting.photobucket.com/95288841-8654-4bf7-8fc9-a4aa78dce87f/948af139-8fb5-4e28-a27c-404466e70d05.jpg
" target="_blank"> <img alt="Click for enlarged picture" src="
https://hosting.photobucket.com/95288841-8654-4bf7-8fc9-a4aa78dce87f/948af139-8fb5-4e28-a27c-404466e70d05.jpg" width="600" /> </a></p>
<p>
<a href=" https://hosting.photobucket.com/95288841-8654-4bf7-8fc9-a4aa78dce87f/bb3e20c2-bb21-4a3d-863a-74de08261467.jpg
" target="_blank"> <img alt="Click for enlarged picture" src="
https://hosting.photobucket.com/95288841-8654-4bf7-8fc9-a4aa78dce87f/bb3e20c2-bb21-4a3d-863a-74de08261467.jpg" width="600" /> </a></p>
<p>
<a href=" https://hosting.photobucket.com/95288841-8654-4bf7-8fc9-a4aa78dce87f/7316c760-98e3-4e3f-9261-d138aa7a5a6a.jpg
" target="_blank"> <img alt="Click for enlarged picture" src="
https://hosting.photobucket.com/95288841-8654-4bf7-8fc9-a4aa78dce87f/7316c760-98e3-4e3f-9261-d138aa7a5a6a.jpg" width="600" /> </a></p>
<p>
<a href=" https://hosting.photobucket.com/95288841-8654-4bf7-8fc9-a4aa78dce87f/68934b39-3d1f-4f43-b967-14b73c41a39e.jpg
" target="_blank"> <img alt="Click for enlarged picture" src="
https://hosting.photobucket.com/95288841-8654-4bf7-8fc9-a4aa78dce87f/68934b39-3d1f-4f43-b967-14b73c41a39e.jpg" width="600" /> </a></p>
<p>
<a href=" https://hosting.photobucket.com/95288841-8654-4bf7-8fc9-a4aa78dce87f/46125bce-a28d-494f-873a-3aeabdc1d6c2.jpg
" target="_blank"> <img alt="Click for enlarged picture" src="
https://hosting.photobucket.com/95288841-8654-4bf7-8fc9-a4aa78dce87f/46125bce-a28d-494f-873a-3aeabdc1d6c2.jpg" width="600" /> </a></p>
<p>
<a href=" https://hosting.photobucket.com/95288841-8654-4bf7-8fc9-a4aa78dce87f/3c58e0ad-77a9-44c8-b6bf-d9a55c514d43.jpg
" target="_blank"> <img alt="Click for enlarged picture" src="
https://hosting.photobucket.com/95288841-8654-4bf7-8fc9-a4aa78dce87f/3c58e0ad-77a9-44c8-b6bf-d9a55c514d43.jpg" width="600" /> </a></p>
<p>
<a href=" https://hosting.photobucket.com/95288841-8654-4bf7-8fc9-a4aa78dce87f/f891f0f0-051b-40ee-9676-cb03b0a9811b.jpg
" target="_blank"> <img alt="Click for enlarged picture" src="
https://hosting.photobucket.com/95288841-8654-4bf7-8fc9-a4aa78dce87f/f891f0f0-051b-40ee-9676-cb03b0a9811b.jpg" width="600" /> </a></p>
<p>
<strong>AGRAM LEGO SECTION lecture: FW-14b &ndash; An F1 racecar for the future</strong></p>
<p>
On Wednesday, February 25, 2026, as part of the activities of our Agram Lego Section, our resident mechanical engineer Marko Paunović gave a lecture on the topic of the F1 racecar from 1992. Admission to the lecture was free, and upon completion, a LEGO model of the racecar was made by members of the Lego section</p>
<p>
<a href=" https://hosting.photobucket.com/95288841-8654-4bf7-8fc9-a4aa78dce87f/b2e14b1c-daa4-4314-8685-184377bc7e28.jpg
" target="_blank"> <img alt="Click for enlarged picture" src="
https://hosting.photobucket.com/95288841-8654-4bf7-8fc9-a4aa78dce87f/b2e14b1c-daa4-4314-8685-184377bc7e28.jpg" width="600" /> </a></p>
<p>
<a href=" https://hosting.photobucket.com/95288841-8654-4bf7-8fc9-a4aa78dce87f/31fb439a-77d3-4418-83ff-66c3af279cca.jpg" target="_blank"> <img alt="Click for enlarged picture" src="
https://hosting.photobucket.com/95288841-8654-4bf7-8fc9-a4aa78dce87f/31fb439a-77d3-4418-83ff-66c3af279cca.jpg" width="600" /> </a></p>
<p>
<a href=" https://hosting.photobucket.com/95288841-8654-4bf7-8fc9-a4aa78dce87f/bfcaf282-6be8-4b52-a3ed-c91137457876.jpg
" target="_blank"> <img alt="Click for enlarged picture" src="
https://hosting.photobucket.com/95288841-8654-4bf7-8fc9-a4aa78dce87f/bfcaf282-6be8-4b52-a3ed-c91137457876.jpg" width="600" /> </a></p>
<p>
<a href=" https://hosting.photobucket.com/95288841-8654-4bf7-8fc9-a4aa78dce87f/ce70fc61-9e1a-4169-aaad-8b67417656c0.jpg
" target="_blank"> <img alt="Click for enlarged picture" src="
https://hosting.photobucket.com/95288841-8654-4bf7-8fc9-a4aa78dce87f/ce70fc61-9e1a-4169-aaad-8b67417656c0.jpg" width="600" /> </a></p>
<p>
<a href=" https://hosting.photobucket.com/95288841-8654-4bf7-8fc9-a4aa78dce87f/94ca0e36-8710-458d-8194-9f71299f4d74.jpg
" target="_blank"> <img alt="Click for enlarged picture" src="
https://hosting.photobucket.com/95288841-8654-4bf7-8fc9-a4aa78dce87f/94ca0e36-8710-458d-8194-9f71299f4d74.jpg" width="600" /> </a></p>
<p>
<a href=" https://hosting.photobucket.com/95288841-8654-4bf7-8fc9-a4aa78dce87f/c6771f72-7191-4ca3-a792-3bb1ab3897b1.jpg
" target="_blank"> <img alt="Click for enlarged picture" src="
https://hosting.photobucket.com/95288841-8654-4bf7-8fc9-a4aa78dce87f/c6771f72-7191-4ca3-a792-3bb1ab3897b1.jpg" width="600" /> </a></p>
<p>
<a href=" https://hosting.photobucket.com/95288841-8654-4bf7-8fc9-a4aa78dce87f/c8fcfcb6-09f2-4398-a2fb-fa5065771e01.jpg
" target="_blank"> <img alt="Click for enlarged picture" src="
https://hosting.photobucket.com/95288841-8654-4bf7-8fc9-a4aa78dce87f/c8fcfcb6-09f2-4398-a2fb-fa5065771e01.jpg" width="600" /> </a></p>
<p>
<a href=" https://hosting.photobucket.com/95288841-8654-4bf7-8fc9-a4aa78dce87f/d7e187a8-d5b1-433b-b30d-091e54dcdddf.jpg
" target="_blank"> <img alt="Click for enlarged picture" src="
https://hosting.photobucket.com/95288841-8654-4bf7-8fc9-a4aa78dce87f/d7e187a8-d5b1-433b-b30d-091e54dcdddf.jpg" width="600" /> </a></p>
<p>
During the second weekend of the Exhibition, 28.02.-01.03., we organized a <strong>MINIATURE PAINTING WORKSHOP - Grimdark</strong>.</p>
<p>
The workshop was held over two days (the entire weekend) and participants painted up to three different figures for the game Trench Crusade. The focus of these lectures was on painting the popular grimdark style minis. The workshop presented paints and equipment, figure preparation, several miniature painting techniques from basic to advanced, and techniques and tricks for quickly and efficiently painting larger quantities of figures at once. Water-based acrylic paints were used as part of the workshop.</p>
<p>
<a href=" https://hosting.photobucket.com/95288841-8654-4bf7-8fc9-a4aa78dce87f/733d94b2-8e8d-4a4e-accd-b9168e32577e.jpg
" target="_blank"> <img alt="Click for enlarged picture" src="
https://hosting.photobucket.com/95288841-8654-4bf7-8fc9-a4aa78dce87f/733d94b2-8e8d-4a4e-accd-b9168e32577e.jpg
" width="600" /> </a></p>
<p>
<a href=" https://hosting.photobucket.com/95288841-8654-4bf7-8fc9-a4aa78dce87f/41020062-45b9-41cd-a357-fa23a389f390.jpg
" target="_blank"> <img alt="Click for enlarged picture" src="
https://hosting.photobucket.com/95288841-8654-4bf7-8fc9-a4aa78dce87f/41020062-45b9-41cd-a357-fa23a389f390.jpg
" width="600" /> </a></p>
<p>
<a href=" https://hosting.photobucket.com/95288841-8654-4bf7-8fc9-a4aa78dce87f/0c07cc55-596d-494d-972b-cd6a0dd6b8b7.jpg
" target="_blank"> <img alt="Click for enlarged picture" src="
https://hosting.photobucket.com/95288841-8654-4bf7-8fc9-a4aa78dce87f/0c07cc55-596d-494d-972b-cd6a0dd6b8b7.jpg" width="600" /> </a></p>
<p>
<a href=" https://hosting.photobucket.com/95288841-8654-4bf7-8fc9-a4aa78dce87f/c17dd356-08b1-48e1-b895-6296aed7f818.jpg
" target="_blank"> <img alt="Click for enlarged picture" src="
https://hosting.photobucket.com/95288841-8654-4bf7-8fc9-a4aa78dce87f/c17dd356-08b1-48e1-b895-6296aed7f818.jpg" width="600" /> </a></p>
<p>
On Wednesday 04.03.2026. the annual <strong>session of the Assembly</strong> was held, where we determined the guidelines for work in 2026.</p>
<p>
,</p>
<p>
<a href=" https://hosting.photobucket.com/95288841-8654-4bf7-8fc9-a4aa78dce87f/59484bd0-7edc-4aed-a04e-ae42900ba3e6.jpg
" target="_blank"> <img alt="Click for enlarged picture" src="
https://hosting.photobucket.com/95288841-8654-4bf7-8fc9-a4aa78dce87f/59484bd0-7edc-4aed-a04e-ae42900ba3e6.jpg
" width="600" /> </a></p>
<p>
On Sunday 08.03.2026. The exhibition was over, our exhibits safely stored, and the Gallery cleaned.</p>
<p>
<a href=" https://hosting.photobucket.com/95288841-8654-4bf7-8fc9-a4aa78dce87f/98af4280-0956-4cdb-b4a9-da40e3a5a44a.jpg
" target="_blank"> <img alt="Click for enlarged picture" src="
https://hosting.photobucket.com/95288841-8654-4bf7-8fc9-a4aa78dce87f/98af4280-0956-4cdb-b4a9-da40e3a5a44a.jpg" width="600" /> </a></p>
<p>
<a href=" https://hosting.photobucket.com/95288841-8654-4bf7-8fc9-a4aa78dce87f/3259b35e-1fc2-4a99-a3c5-c7984958d72b.jpg
" target="_blank"> <img alt="Click for enlarged picture" src="
https://hosting.photobucket.com/95288841-8654-4bf7-8fc9-a4aa78dce87f/3259b35e-1fc2-4a99-a3c5-c7984958d72b.jpg" width="600" /> </a></p>
<p>
The most important part of every year when holding this Exhibition is the social aspect, the socializing of our members both among themselves and with our international friends who visit us! With these few photos from our joint gatherings, we greet you until next year!</p>
<p>
<a href=" https://hosting.photobucket.com/95288841-8654-4bf7-8fc9-a4aa78dce87f/b9168e23-79b2-4d81-8a7d-7534062881a7.jpg
" target="_blank"> <img alt="Click for enlarged picture" src="
https://hosting.photobucket.com/95288841-8654-4bf7-8fc9-a4aa78dce87f/b9168e23-79b2-4d81-8a7d-7534062881a7.jpg " width="600" /> </a></p>
<p>
<a href=" https://hosting.photobucket.com/95288841-8654-4bf7-8fc9-a4aa78dce87f/edff925e-916c-4d78-953e-210abf3753d4.jpg
" target="_blank"> <img alt="Click for enlarged picture" src="
https://hosting.photobucket.com/95288841-8654-4bf7-8fc9-a4aa78dce87f/edff925e-916c-4d78-953e-210abf3753d4.jpg " width="600" /> </a></p>
<p>
<a href=" https://hosting.photobucket.com/95288841-8654-4bf7-8fc9-a4aa78dce87f/8bcb48fa-466b-43f8-8a4b-f15f6794b21e.jpg
" target="_blank"> <img alt="Click for enlarged picture" src="
https://hosting.photobucket.com/95288841-8654-4bf7-8fc9-a4aa78dce87f/8bcb48fa-466b-43f8-8a4b-f15f6794b21e.jpg" width="600" /> </a></p>
",
"content_hrv" => "<p>
<a href=" https://hosting.photobucket.com/95288841-8654-4bf7-8fc9-a4aa78dce87f/dc756f84-867d-4df4-acd8-5d43775cafc2.jpg
" target="_blank"> <img alt="Click for enlarged picture" src="
https://hosting.photobucket.com/95288841-8654-4bf7-8fc9-a4aa78dce87f/dc756f84-867d-4df4-acd8-5d43775cafc2.jpg" width="600" /> </a></p>
<p>
<strong>Izložba minijatura i maketa &quot;Agram 2026&quot;</strong> održala se ove godine od 19.2. do 08.03. Postavljanje izložbe je održano u srijedu 18.2. i sudjelovao je velik broj članova kao i prijatelja Udruge koji su izlagali svoje radove.</p>
<p>
<a href=" https://hosting.photobucket.com/95288841-8654-4bf7-8fc9-a4aa78dce87f/8529d6d4-76ea-4872-a9e6-748e04223a4e.jpg
" target="_blank"> <img alt="Click for enlarged picture" src="
https://hosting.photobucket.com/95288841-8654-4bf7-8fc9-a4aa78dce87f/8529d6d4-76ea-4872-a9e6-748e04223a4e.jpg
" width="600" /> </a></p>
<p>
<a href=" https://hosting.photobucket.com/95288841-8654-4bf7-8fc9-a4aa78dce87f/f3038937-f001-4ceb-b725-a330fcd64cee.jpg
" target="_blank"> <img alt="Click for enlarged picture" src="
https://hosting.photobucket.com/95288841-8654-4bf7-8fc9-a4aa78dce87f/f3038937-f001-4ceb-b725-a330fcd64cee.jpg
" width="600" /> </a></p>
<p>
<a href=" https://hosting.photobucket.com/95288841-8654-4bf7-8fc9-a4aa78dce87f/3575379e-e068-49e2-9d4d-c9a49531fdc2.jpg
" target="_blank"> <img alt="Click for enlarged picture" src="
https://hosting.photobucket.com/95288841-8654-4bf7-8fc9-a4aa78dce87f/3575379e-e068-49e2-9d4d-c9a49531fdc2.jpg" width="600" /> </a></p>
<p>
<a href=" https://hosting.photobucket.com/95288841-8654-4bf7-8fc9-a4aa78dce87f/e51713c7-2add-4f8f-ae37-e6eba25badff.jpg
" target="_blank"> <img alt="Click for enlarged picture" src="
https://hosting.photobucket.com/95288841-8654-4bf7-8fc9-a4aa78dce87f/e51713c7-2add-4f8f-ae37-e6eba25badff.jpg" width="600" /> </a></p>
<p>
<a href=" https://hosting.photobucket.com/95288841-8654-4bf7-8fc9-a4aa78dce87f/9c0bb546-50a8-483d-aeab-ab3b2ce9f094.jpg
" target="_blank"> <img alt="Click for enlarged picture" src="
https://hosting.photobucket.com/95288841-8654-4bf7-8fc9-a4aa78dce87f/9c0bb546-50a8-483d-aeab-ab3b2ce9f094.jpg" width="600" /> </a></p>
<p>
Otvorenje Izložbe održalo se u četvrtak, 19.2.2026. s početkom u 18:00h. Izložba je organizirana povodom na&scaron;eg dvadeset trećeg rođendana.</p>
<p>
<a href=" https://hosting.photobucket.com/95288841-8654-4bf7-8fc9-a4aa78dce87f/71c7bfc2-1ffc-43b9-9d5a-53e009f6b86d.jpg
" target="_blank"> <img alt="Click for enlarged picture" src="
https://hosting.photobucket.com/95288841-8654-4bf7-8fc9-a4aa78dce87f/71c7bfc2-1ffc-43b9-9d5a-53e009f6b86d.jpg" width="600" /> </a></p>
<p>
<a href=" https://hosting.photobucket.com/95288841-8654-4bf7-8fc9-a4aa78dce87f/007b4701-1d7c-4a67-a599-0539a2aa3191.jpg
" target="_blank"> <img alt="Click for enlarged picture" src="
https://hosting.photobucket.com/95288841-8654-4bf7-8fc9-a4aa78dce87f/007b4701-1d7c-4a67-a599-0539a2aa3191.jpg" width="600" /> </a></p>
<p>
<a href=" https://hosting.photobucket.com/95288841-8654-4bf7-8fc9-a4aa78dce87f/2c8090e2-8b95-4368-bb48-98876d680e15.jpg
" target="_blank"> <img alt="Click for enlarged picture" src="
https://hosting.photobucket.com/95288841-8654-4bf7-8fc9-a4aa78dce87f/2c8090e2-8b95-4368-bb48-98876d680e15.jpg" width="600" /> </a></p>
<p>
<a href=" https://hosting.photobucket.com/95288841-8654-4bf7-8fc9-a4aa78dce87f/375768ad-a8bb-49bf-9845-e46c896ba7ec.jpg
" target="_blank"> <img alt="Click for enlarged picture" src="
https://hosting.photobucket.com/95288841-8654-4bf7-8fc9-a4aa78dce87f/375768ad-a8bb-49bf-9845-e46c896ba7ec.jpg" width="600" /> </a></p>
<p>
<a href=" https://hosting.photobucket.com/95288841-8654-4bf7-8fc9-a4aa78dce87f/a93de974-4ccb-4876-85b0-4d066ae402b3.jpg
" target="_blank"> <img alt="Click for enlarged picture" src="
https://hosting.photobucket.com/95288841-8654-4bf7-8fc9-a4aa78dce87f/a93de974-4ccb-4876-85b0-4d066ae402b3.jpg" width="600" /> </a></p>
<p>
<a href=" https://hosting.photobucket.com/95288841-8654-4bf7-8fc9-a4aa78dce87f/d323ccc9-1b9a-4cb2-8adf-7019b0e217f4.jpg
" target="_blank"> <img alt="Click for enlarged picture" src="
https://hosting.photobucket.com/95288841-8654-4bf7-8fc9-a4aa78dce87f/d323ccc9-1b9a-4cb2-8adf-7019b0e217f4.jpg" width="600" /> </a></p>
<p>
<a href=" https://hosting.photobucket.com/95288841-8654-4bf7-8fc9-a4aa78dce87f/a5a66447-2d76-47ae-866d-4d512ef469a5.jpg
" target="_blank"> <img alt="Click for enlarged picture" src="
https://hosting.photobucket.com/95288841-8654-4bf7-8fc9-a4aa78dce87f/a5a66447-2d76-47ae-866d-4d512ef469a5.jpg" width="600" /> </a></p>
<p>
<a href=" https://hosting.photobucket.com/95288841-8654-4bf7-8fc9-a4aa78dce87f/3e7bcfc9-ba02-4f94-a6c3-79dfaea3639e.jpg
" target="_blank"> <img alt="Click for enlarged picture" src="
https://hosting.photobucket.com/95288841-8654-4bf7-8fc9-a4aa78dce87f/3e7bcfc9-ba02-4f94-a6c3-79dfaea3639e.jpg" width="600" /> </a></p>
<p>
<a href=" https://hosting.photobucket.com/95288841-8654-4bf7-8fc9-a4aa78dce87f/24e79466-4a9e-4b10-970c-caad235d260d.jpg
" target="_blank"> <img alt="Click for enlarged picture" src="
https://hosting.photobucket.com/95288841-8654-4bf7-8fc9-a4aa78dce87f/24e79466-4a9e-4b10-970c-caad235d260d.jpg" width="600" /> </a></p>
<p>
Kao i uvijek, Izložba je prikazivala presjek rada Udruge, njenih članova, polaznika njenih tečajeva i radionica te članova FB grupe Miniature Painters Croatia. U velikom broju vitrina na&scaron;le su se brojne minijature za stolne strate&scaron;ke igre, igre na tabli, a cijela jedna vitrina posvećena je nagrađenim izlo&scaron;cima sa prethodnih minijaturističkih natjecanja. Nekoliko vitrina bilo je posvećeno projektima koje Udruga već 23 godinu provodi poput Knjižnice i čitaonice UMS &bdquo;Agram&ldquo;, Radionice za izradu prostornih maketa i Radionice bojanja minijatura, ali i novih poput Agram Group Build, Agram Lego Sekcije i Back to Basics radionica bojanja za najmlađe.</p>
<p>
<a href=" https://hosting.photobucket.com/95288841-8654-4bf7-8fc9-a4aa78dce87f/fca84936-af71-44d3-9a4c-faeb26163899.jpg
" target="_blank"> <img alt="Click for enlarged picture" src="
https://hosting.photobucket.com/95288841-8654-4bf7-8fc9-a4aa78dce87f/fca84936-af71-44d3-9a4c-faeb26163899.jpg" width="600" /> </a></p>
<p>
<a href=" https://hosting.photobucket.com/95288841-8654-4bf7-8fc9-a4aa78dce87f/459bc5ac-8702-46f9-93b4-547deaabdef4.jpg
" target="_blank"> <img alt="Click for enlarged picture" src="
https://hosting.photobucket.com/95288841-8654-4bf7-8fc9-a4aa78dce87f/459bc5ac-8702-46f9-93b4-547deaabdef4.jpg" width="600" /> </a></p>
<p>
<a href=" https://hosting.photobucket.com/95288841-8654-4bf7-8fc9-a4aa78dce87f/91a04363-b2ef-4635-a046-7edf25ce7808.jpg
" target="_blank"> <img alt="Click for enlarged picture" src="
https://hosting.photobucket.com/95288841-8654-4bf7-8fc9-a4aa78dce87f/91a04363-b2ef-4635-a046-7edf25ce7808.jpg" width="600" /> </a></p>
<p>
<a href=" https://hosting.photobucket.com/95288841-8654-4bf7-8fc9-a4aa78dce87f/73256af5-fd5d-40b5-95e1-120e49c9be87.jpg
" target="_blank"> <img alt="Click for enlarged picture" src="
https://hosting.photobucket.com/95288841-8654-4bf7-8fc9-a4aa78dce87f/73256af5-fd5d-40b5-95e1-120e49c9be87.jpg" width="600" /> </a></p>
<p>
<a href=" https://hosting.photobucket.com/95288841-8654-4bf7-8fc9-a4aa78dce87f/979f9be5-23f3-4df9-91dc-ab71d6a10d64.jpg
" target="_blank"> <img alt="Click for enlarged picture" src="
https://hosting.photobucket.com/95288841-8654-4bf7-8fc9-a4aa78dce87f/979f9be5-23f3-4df9-91dc-ab71d6a10d64.jpg" width="600" /> </a></p>
<p>
<a href=" https://hosting.photobucket.com/95288841-8654-4bf7-8fc9-a4aa78dce87f/d0ff4379-183a-47b9-a740-9ddc283ebc29.jpg
" target="_blank"> <img alt="Click for enlarged picture" src="
https://hosting.photobucket.com/95288841-8654-4bf7-8fc9-a4aa78dce87f/d0ff4379-183a-47b9-a740-9ddc283ebc29.jpg" width="600" /> </a></p>
<p>
<a href=" https://hosting.photobucket.com/95288841-8654-4bf7-8fc9-a4aa78dce87f/4333e95e-bbbd-4f47-aaea-38a9c99e54d8.jpg
" target="_blank"> <img alt="Click for enlarged picture" src="
https://hosting.photobucket.com/95288841-8654-4bf7-8fc9-a4aa78dce87f/4333e95e-bbbd-4f47-aaea-38a9c99e54d8.jpg" width="600" /> </a></p>
<p>
<a href=" https://hosting.photobucket.com/95288841-8654-4bf7-8fc9-a4aa78dce87f/1372f8a2-b222-48ee-ae45-a90b5a354ef7.jpg
" target="_blank"> <img alt="Click for enlarged picture" src="
https://hosting.photobucket.com/95288841-8654-4bf7-8fc9-a4aa78dce87f/1372f8a2-b222-48ee-ae45-a90b5a354ef7.jpg" width="600" /> </a></p>
<p>
<a href=" https://hosting.photobucket.com/95288841-8654-4bf7-8fc9-a4aa78dce87f/6a1b4fd1-d982-4b06-9c5f-3cd40d6bf10a.jpg
" target="_blank"> <img alt="Click for enlarged picture" src="
https://hosting.photobucket.com/95288841-8654-4bf7-8fc9-a4aa78dce87f/6a1b4fd1-d982-4b06-9c5f-3cd40d6bf10a.jpg" width="600" /> </a></p>
<p>
<a href=" https://hosting.photobucket.com/95288841-8654-4bf7-8fc9-a4aa78dce87f/c2ec45e1-e0f3-463a-b254-cb2a38b53e14.jpg
" target="_blank"> <img alt="Click for enlarged picture" src="
https://hosting.photobucket.com/95288841-8654-4bf7-8fc9-a4aa78dce87f/c2ec45e1-e0f3-463a-b254-cb2a38b53e14.jpg" width="600" /> </a></p>
<p>
<a href=" https://hosting.photobucket.com/95288841-8654-4bf7-8fc9-a4aa78dce87f/17553b9a-0592-4f6a-a097-3f1a97e161f3.jpg
" target="_blank"> <img alt="Click for enlarged picture" src="
https://hosting.photobucket.com/95288841-8654-4bf7-8fc9-a4aa78dce87f/17553b9a-0592-4f6a-a097-3f1a97e161f3.jpg" width="600" /> </a></p>
<p>
<a href=" https://hosting.photobucket.com/95288841-8654-4bf7-8fc9-a4aa78dce87f/8658bd6b-dff2-4d24-8473-928d44d44480.jpg
" target="_blank"> <img alt="Click for enlarged picture" src="
https://hosting.photobucket.com/95288841-8654-4bf7-8fc9-a4aa78dce87f/8658bd6b-dff2-4d24-8473-928d44d44480.jpg" width="600" /> </a></p>
<p>
<a href=" https://hosting.photobucket.com/95288841-8654-4bf7-8fc9-a4aa78dce87f/ecab0ea7-f75b-4e31-a520-d088ad39fa17.jpg
" target="_blank"> <img alt="Click for enlarged picture" src="
https://hosting.photobucket.com/95288841-8654-4bf7-8fc9-a4aa78dce87f/ecab0ea7-f75b-4e31-a520-d088ad39fa17.jpg" width="600" /> </a></p>
<p>
<a href=" https://hosting.photobucket.com/95288841-8654-4bf7-8fc9-a4aa78dce87f/9495a2f5-8a82-41f2-abf4-9ade3db41d87.jpg
" target="_blank"> <img alt="Click for enlarged picture" src="
https://hosting.photobucket.com/95288841-8654-4bf7-8fc9-a4aa78dce87f/9495a2f5-8a82-41f2-abf4-9ade3db41d87.jpg" width="600" /> </a></p>
<p>
<a href=" https://hosting.photobucket.com/95288841-8654-4bf7-8fc9-a4aa78dce87f/362cc6fd-a5dd-474b-9b9f-aeab27d6dcfa.jpg
" target="_blank"> <img alt="Click for enlarged picture" src="
https://hosting.photobucket.com/95288841-8654-4bf7-8fc9-a4aa78dce87f/362cc6fd-a5dd-474b-9b9f-aeab27d6dcfa.jpg" width="600" /> </a></p>
<p>
Posebna čast nam je bila ugostiti na&scaron;eg gosta izlagača, Ninoslava Luka minijaturista iz Poreča koji nam se predstavio svojom kolekcijom povijesnih diorama.</p>
<p>
<a href=" https://hosting.photobucket.com/95288841-8654-4bf7-8fc9-a4aa78dce87f/ba1353de-e2bd-4340-9121-9056e287ed4a.jpg
" target="_blank"> <img alt="Click for enlarged picture" src="
https://hosting.photobucket.com/95288841-8654-4bf7-8fc9-a4aa78dce87f/ba1353de-e2bd-4340-9121-9056e287ed4a.jpg" width="600" /> </a></p>
<p>
<a href=" https://hosting.photobucket.com/95288841-8654-4bf7-8fc9-a4aa78dce87f/cea18506-1b50-4e5b-955c-0b9ca02d7826.jpg
" target="_blank"> <img alt="Click for enlarged picture" src="
https://hosting.photobucket.com/95288841-8654-4bf7-8fc9-a4aa78dce87f/cea18506-1b50-4e5b-955c-0b9ca02d7826.jpg" width="600" /> </a></p>
<p>
<a href=" https://hosting.photobucket.com/95288841-8654-4bf7-8fc9-a4aa78dce87f/1be85b41-e3b6-4536-b141-cd0da6eb38c1.jpg
" target="_blank"> <img alt="Click for enlarged picture" src="
https://hosting.photobucket.com/95288841-8654-4bf7-8fc9-a4aa78dce87f/1be85b41-e3b6-4536-b141-cd0da6eb38c1.jpg" width="600" /> </a></p>
<p>
<a href=" https://hosting.photobucket.com/95288841-8654-4bf7-8fc9-a4aa78dce87f/9e93b87d-ff3c-4b7b-8f06-5f9d3464a134.jpg
" target="_blank"> <img alt="Click for enlarged picture" src="
https://hosting.photobucket.com/95288841-8654-4bf7-8fc9-a4aa78dce87f/9e93b87d-ff3c-4b7b-8f06-5f9d3464a134.jpg" width="600" /> </a></p>
<p>
Tijekom prvog vikenda Izložbe, 21.-22.02.,održali smo 20. godi&scaron;nje međunarodno natjecanje u bojanju minijatura <strong>Black Queen Hobby and Miniature Painting Competition</strong>!</p>
<p>
<a href=" https://hosting.photobucket.com/95288841-8654-4bf7-8fc9-a4aa78dce87f/3056fb09-f66c-4dea-80a8-a4e72407429a.jpg
" target="_blank"> <img alt="Click for enlarged picture" src="
https://hosting.photobucket.com/95288841-8654-4bf7-8fc9-a4aa78dce87f/3056fb09-f66c-4dea-80a8-a4e72407429a.jpg" width="600" /> </a></p>
<p>
Kako su natjecatelji pristizali i prijavljivali se na natjecanje, na&scaron;e vrijedno osoblje je fotografiralo sve izlo&scaron;ke prije nego li su ih rasporedili po kategorijama i pažljivo ih postavili u staklene vitrine. Niti jutarnja okrijepa nije usfalila zahvaljujući na&scaron;im revnim volonterima.</p>
<p>
<a href=" https://hosting.photobucket.com/95288841-8654-4bf7-8fc9-a4aa78dce87f/1118089c-2b46-4a2c-b17d-dc92b66d1ffc.jpg
" target="_blank"> <img alt="Click for enlarged picture" src="
https://hosting.photobucket.com/95288841-8654-4bf7-8fc9-a4aa78dce87f/1118089c-2b46-4a2c-b17d-dc92b66d1ffc.jpg" width="600" /> </a></p>
<p>
<a href=" https://hosting.photobucket.com/95288841-8654-4bf7-8fc9-a4aa78dce87f/9fd3c272-9a69-4532-a09d-36497a20a820.jpg
" target="_blank"> <img alt="Click for enlarged picture" src="
https://hosting.photobucket.com/95288841-8654-4bf7-8fc9-a4aa78dce87f/9fd3c272-9a69-4532-a09d-36497a20a820.jpg" width="600" /> </a></p>
<p>
<a href=" https://hosting.photobucket.com/95288841-8654-4bf7-8fc9-a4aa78dce87f/86995e80-c502-45fb-80f5-c8fda27da3f9.jpg
" target="_blank"> <img alt="Click for enlarged picture" src="
https://hosting.photobucket.com/95288841-8654-4bf7-8fc9-a4aa78dce87f/86995e80-c502-45fb-80f5-c8fda27da3f9.jpg" width="600" /> </a></p>
<p>
U podne, sve vitrine su bile pune i natjecanje je moglo službeno početi.</p>
<p>
<a href=" https://hosting.photobucket.com/95288841-8654-4bf7-8fc9-a4aa78dce87f/bce59a4f-c3e3-4708-a3d6-25e81a894c24.jpg
" target="_blank"> <img alt="Click for enlarged picture" src="
https://hosting.photobucket.com/95288841-8654-4bf7-8fc9-a4aa78dce87f/bce59a4f-c3e3-4708-a3d6-25e81a894c24.jpg" width="600" /> </a></p>
<p>
<a href=" https://hosting.photobucket.com/95288841-8654-4bf7-8fc9-a4aa78dce87f/16a0a094-01aa-4e52-82cf-fdab00d74711.jpg
" target="_blank"> <img alt="Click for enlarged picture" src="
https://hosting.photobucket.com/95288841-8654-4bf7-8fc9-a4aa78dce87f/16a0a094-01aa-4e52-82cf-fdab00d74711.jpg" width="600" /> </a></p>
<p>
<a href=" https://hosting.photobucket.com/95288841-8654-4bf7-8fc9-a4aa78dce87f/0d3f4042-ff77-48d0-b332-add0fd08f7c3.jpg
" target="_blank"> <img alt="Click for enlarged picture" src="
https://hosting.photobucket.com/95288841-8654-4bf7-8fc9-a4aa78dce87f/0d3f4042-ff77-48d0-b332-add0fd08f7c3.jpg" width="600" /> </a></p>
<p>
<a href=" https://hosting.photobucket.com/95288841-8654-4bf7-8fc9-a4aa78dce87f/3711baf8-93f2-434a-aea9-a95288ca04dd.jpg
" target="_blank"> <img alt="Click for enlarged picture" src="
https://hosting.photobucket.com/95288841-8654-4bf7-8fc9-a4aa78dce87f/3711baf8-93f2-434a-aea9-a95288ca04dd.jpg" width="600" /> </a></p>
<p>
<a href=" https://hosting.photobucket.com/95288841-8654-4bf7-8fc9-a4aa78dce87f/53113b97-ec06-4409-95ba-95a5ad3f9720.jpg
" target="_blank"> <img alt="Click for enlarged picture" src="
https://hosting.photobucket.com/95288841-8654-4bf7-8fc9-a4aa78dce87f/53113b97-ec06-4409-95ba-95a5ad3f9720.jpg" width="600" /> </a></p>
<p>
<a href=" https://hosting.photobucket.com/95288841-8654-4bf7-8fc9-a4aa78dce87f/ab127858-193d-4976-bdb2-e27302722fca.jpg
" target="_blank"> <img alt="Click for enlarged picture" src="
https://hosting.photobucket.com/95288841-8654-4bf7-8fc9-a4aa78dce87f/ab127858-193d-4976-bdb2-e27302722fca.jpg" width="600" /> </a></p>
<p>
<a href=" https://hosting.photobucket.com/95288841-8654-4bf7-8fc9-a4aa78dce87f/3735af11-3fb6-4772-a8ff-5e0ff6ddf03a.jpg
" target="_blank"> <img alt="Click for enlarged picture" src="
https://hosting.photobucket.com/95288841-8654-4bf7-8fc9-a4aa78dce87f/3735af11-3fb6-4772-a8ff-5e0ff6ddf03a.jpg" width="600" /> </a></p>
<p>
<strong>Back To Basics radionice za najmlađe na Black Queen</strong></p>
<p>
Ove godine smo tijekom cijelog vikenda organizirali radionice bojanja minijatura za najmlađe koji su mogli po prvi puta obojati neku od na&scaron;ih vlastitih minijatura osmi&scaron;ljenih upravo za ovaj program!</p>
<p>
<a href=" https://hosting.photobucket.com/95288841-8654-4bf7-8fc9-a4aa78dce87f/6999be0c-8cc6-4947-a423-9427a2299724.jpg
" target="_blank"> <img alt="Click for enlarged picture" src="
https://hosting.photobucket.com/95288841-8654-4bf7-8fc9-a4aa78dce87f/6999be0c-8cc6-4947-a423-9427a2299724.jpg" width="600" /> </a></p>
<p>
<a href="https://hosting.photobucket.com/95288841-8654-4bf7-8fc9-a4aa78dce87f/835b05a5-f171-49df-afa6-da0692b89074.jpg" target="_blank"><img alt="Click for enlarged picture" src="https://hosting.photobucket.com/95288841-8654-4bf7-8fc9-a4aa78dce87f/835b05a5-f171-49df-afa6-da0692b89074.jpg" width="600" /></a></p>
<p>
<a href=" https://hosting.photobucket.com/95288841-8654-4bf7-8fc9-a4aa78dce87f/ef5dde13-84ee-4ea0-b9f3-28aaf703ef6d.jpg
" target="_blank"> <img alt="Click for enlarged picture" src="
https://hosting.photobucket.com/95288841-8654-4bf7-8fc9-a4aa78dce87f/ef5dde13-84ee-4ea0-b9f3-28aaf703ef6d.jpg" width="600" /> </a></p>
<p>
<strong>PRODAJNI KUTAK</strong></p>
<p>
Tijekom vikenda ugostili smo na&scaron;e sponzore sa njihovim prodajnim &scaron;tandovima: Swood.si i Carta Magica.</p>
<p>
<a href=" https://hosting.photobucket.com/95288841-8654-4bf7-8fc9-a4aa78dce87f/5ee9a49f-a387-435a-9110-572402b7191d.jpg
" target="_blank"> <img alt="Click for enlarged picture" src="
https://hosting.photobucket.com/95288841-8654-4bf7-8fc9-a4aa78dce87f/5ee9a49f-a387-435a-9110-572402b7191d.jpg" width="600" /> </a></p>
<p>
<a href=" https://hosting.photobucket.com/95288841-8654-4bf7-8fc9-a4aa78dce87f/47cf600f-b1eb-4655-bf06-305f6f21d5d2.jpg
" target="_blank"> <img alt="Click for enlarged picture" src="
https://hosting.photobucket.com/95288841-8654-4bf7-8fc9-a4aa78dce87f/47cf600f-b1eb-4655-bf06-305f6f21d5d2.jpg" width="600" /> </a></p>
<p>
<strong>OGLEDNE RADIONICE BOJANJA MINIJATURA</strong></p>
<p>
Prostor ZZTK omogućuje održavanje radionica tijekom vikenda u kino dvorani u podrumu, stoga smo tijekom vikenda organizirali i ogledne radionice. Rad predavača snimao se kamerom i projicirao na projekcijsko platno u dvorani. Veliko hvala na&scaron;im domaćim i inozemnim predavačima: Anžetu Zorku (SLO), doc.dr.sc. Wintonu Afriću (HR), Ivanu Knezoviću (UMS Agram) i Petru Knezoviću (HR).</p>
<p>
<a href=" https://hosting.photobucket.com/95288841-8654-4bf7-8fc9-a4aa78dce87f/e8d835be-ec99-49d7-bc9b-086e38573d1a.jpg
" target="_blank"> <img alt="Click for enlarged picture" src="
https://hosting.photobucket.com/95288841-8654-4bf7-8fc9-a4aa78dce87f/e8d835be-ec99-49d7-bc9b-086e38573d1a.jpg" width="600" /> </a></p>
<p>
<a href=" https://hosting.photobucket.com/95288841-8654-4bf7-8fc9-a4aa78dce87f/f3eba4c1-4637-4da9-8360-75f430355af4.jpg" target="_blank"> <img alt="Click for enlarged picture" src="
https://hosting.photobucket.com/95288841-8654-4bf7-8fc9-a4aa78dce87f/f3eba4c1-4637-4da9-8360-75f430355af4.jpg" width="600" /> </a></p>
<p>
<a href=" https://hosting.photobucket.com/95288841-8654-4bf7-8fc9-a4aa78dce87f/ef523854-4030-4579-aa38-403afda86c91.jpg
" target="_blank"> <img alt="Click for enlarged picture" src="
https://hosting.photobucket.com/95288841-8654-4bf7-8fc9-a4aa78dce87f/ef523854-4030-4579-aa38-403afda86c91.jpg" width="600" /> </a></p>
<p>
<a href=" https://hosting.photobucket.com/95288841-8654-4bf7-8fc9-a4aa78dce87f/dd0943c2-f4a8-40c3-b641-f6dcdd200380.jpg
" target="_blank"> <img alt="Click for enlarged picture" src="
https://hosting.photobucket.com/95288841-8654-4bf7-8fc9-a4aa78dce87f/dd0943c2-f4a8-40c3-b641-f6dcdd200380.jpg" width="600" /> </a></p>
<p>
<a href=" https://hosting.photobucket.com/95288841-8654-4bf7-8fc9-a4aa78dce87f/08b1626a-f6c7-43c9-b718-3e9a41b55ca6.jpg
" target="_blank"> <img alt="Click for enlarged picture" src="
https://hosting.photobucket.com/95288841-8654-4bf7-8fc9-a4aa78dce87f/08b1626a-f6c7-43c9-b718-3e9a41b55ca6.jpg" width="600" /> </a></p>
<p>
<a href=" https://hosting.photobucket.com/95288841-8654-4bf7-8fc9-a4aa78dce87f/91aca7f3-1af6-486d-b174-65079a63a1ea.jpg
" target="_blank"> <img alt="Click for enlarged picture" src="
https://hosting.photobucket.com/95288841-8654-4bf7-8fc9-a4aa78dce87f/91aca7f3-1af6-486d-b174-65079a63a1ea.jpg" width="600" /> </a></p>
<p>
<a href=" https://hosting.photobucket.com/95288841-8654-4bf7-8fc9-a4aa78dce87f/3821f2fb-fbe7-4096-adbc-7d8c981a3b56.jpg
" target="_blank"> <img alt="Click for enlarged picture" src="
https://hosting.photobucket.com/95288841-8654-4bf7-8fc9-a4aa78dce87f/3821f2fb-fbe7-4096-adbc-7d8c981a3b56.jpg" width="600" /> </a></p>
<p>
<a href=" https://hosting.photobucket.com/95288841-8654-4bf7-8fc9-a4aa78dce87f/2c7bb3c5-c0ec-4a96-b6bd-6a90ce5ce154.jpg
" target="_blank"> <img alt="Click for enlarged picture" src="
https://hosting.photobucket.com/95288841-8654-4bf7-8fc9-a4aa78dce87f/2c7bb3c5-c0ec-4a96-b6bd-6a90ce5ce154.jpg" width="600" /> </a></p>
<p>
<a href=" https://hosting.photobucket.com/95288841-8654-4bf7-8fc9-a4aa78dce87f/b646f4ee-21aa-4d12-8db3-6d33351d5aeb.jpg
" target="_blank"> <img alt="Click for enlarged picture" src="
https://hosting.photobucket.com/95288841-8654-4bf7-8fc9-a4aa78dce87f/b646f4ee-21aa-4d12-8db3-6d33351d5aeb.jpg" width="600" /> </a></p>
<p>
<a href=" https://hosting.photobucket.com/95288841-8654-4bf7-8fc9-a4aa78dce87f/fb5efc01-32cc-4119-90e3-188f51b30237.jpg
" target="_blank"> <img alt="Click for enlarged picture" src="
https://hosting.photobucket.com/95288841-8654-4bf7-8fc9-a4aa78dce87f/fb5efc01-32cc-4119-90e3-188f51b30237.jpg" width="600" /> </a></p>
<p>
<strong>NATJECANJE U BRZOM BOJANJU MINIJATURA</strong></p>
<p>
U nedjelju, 22.2. smo organizirali natjecanje u brzom bojanju minijatura. Po prvi puta smo koristili minijature koje su na&scaron; dizajn. Sudionici su imali 60 minuta vremena da obojaju og čarobnjaka.</p>
<p>
<a href=" https://hosting.photobucket.com/95288841-8654-4bf7-8fc9-a4aa78dce87f/106417a6-a047-4e0d-9f81-87858806052f.jpg
" target="_blank"> <img alt="Click for enlarged picture" src="
https://hosting.photobucket.com/95288841-8654-4bf7-8fc9-a4aa78dce87f/106417a6-a047-4e0d-9f81-87858806052f.jpg" width="600" /> </a></p>
<p>
<a href=" https://hosting.photobucket.com/95288841-8654-4bf7-8fc9-a4aa78dce87f/ac6853c7-6e34-4e07-a996-8d7d12744b67.jpg
" target="_blank"> <img alt="Click for enlarged picture" src="
https://hosting.photobucket.com/95288841-8654-4bf7-8fc9-a4aa78dce87f/ac6853c7-6e34-4e07-a996-8d7d12744b67.jpg" width="600" /> </a></p>
<p>
<a href=" https://hosting.photobucket.com/95288841-8654-4bf7-8fc9-a4aa78dce87f/ccb155fa-52c5-4a99-9515-f69a6836dce7.jpg
" target="_blank"> <img alt="Click for enlarged picture" src="
https://hosting.photobucket.com/95288841-8654-4bf7-8fc9-a4aa78dce87f/ccb155fa-52c5-4a99-9515-f69a6836dce7.jpg" width="600" /> </a></p>
<p>
<a href=" https://hosting.photobucket.com/95288841-8654-4bf7-8fc9-a4aa78dce87f/a29fedd0-97ea-45b1-85f9-7ea62188b2b2.jpg
" target="_blank"><img alt="Click for enlarged picture" src="
https://hosting.photobucket.com/95288841-8654-4bf7-8fc9-a4aa78dce87f/a29fedd0-97ea-45b1-85f9-7ea62188b2b2.jpg" width="600" /></a></p>
<p>
S time smo do&scaron;li do samoga kraja ovog predivnog vikenda i sve &scaron;to je preostalo je bila podjela nagrada i priznanja pobjednicima.</p>
<p>
<a href=" https://hosting.photobucket.com/95288841-8654-4bf7-8fc9-a4aa78dce87f/046ca4c8-0ae7-415e-abd3-e131d580c3ad.jpg
" target="_blank"> <img alt="Click for enlarged picture" src="
https://hosting.photobucket.com/95288841-8654-4bf7-8fc9-a4aa78dce87f/046ca4c8-0ae7-415e-abd3-e131d580c3ad.jpg" width="600" /> </a></p>
<p>
<a href=" https://hosting.photobucket.com/95288841-8654-4bf7-8fc9-a4aa78dce87f/cec0dcef-7acb-4a77-89de-271ed5410672.jpg
" target="_blank"> <img alt="Click for enlarged picture" src="
https://hosting.photobucket.com/95288841-8654-4bf7-8fc9-a4aa78dce87f/cec0dcef-7acb-4a77-89de-271ed5410672.jpg" width="600" /> </a></p>
<p>
<a href=" https://hosting.photobucket.com/95288841-8654-4bf7-8fc9-a4aa78dce87f/a495a5fc-31a2-4979-a970-0fa22c334354.jpg
" target="_blank"> <img alt="Click for enlarged picture" src="
https://hosting.photobucket.com/95288841-8654-4bf7-8fc9-a4aa78dce87f/a495a5fc-31a2-4979-a970-0fa22c334354.jpg" width="600" /> </a></p>
<p>
<strong>AGRAM ARENA &ndash; Leaving Asphodel Necropolis28 kampanja</strong></p>
<p>
Tijekom vikenda 21.-22.2. održali smo i novo međunarodno natjecanje Agram Arena! Ovoga puta na redu je bila stolna strate&scaron;ka igra Necropolis 28 za koju su na&scaron;i članovi osmislili dvodnevnu kampanju. Svaki sudionik je izradio svoju bandu vojnika, a velika većina i svoje vlastite table.</p>
<p>
<a href=" https://hosting.photobucket.com/95288841-8654-4bf7-8fc9-a4aa78dce87f/ac69b182-4bfc-4575-a6d3-fb3c8baba342.jpg
" target="_blank"> <img alt="Click for enlarged picture" src="
https://hosting.photobucket.com/95288841-8654-4bf7-8fc9-a4aa78dce87f/ac69b182-4bfc-4575-a6d3-fb3c8baba342.jpg" width="600" /> </a></p>
<p>
<a href=" https://hosting.photobucket.com/95288841-8654-4bf7-8fc9-a4aa78dce87f/289fed7b-e058-42d8-ba2d-cbd0463e98da.jpg
" target="_blank"> <img alt="Click for enlarged picture" src="
https://hosting.photobucket.com/95288841-8654-4bf7-8fc9-a4aa78dce87f/289fed7b-e058-42d8-ba2d-cbd0463e98da.jpg" width="600" /> </a></p>
<p>
<a href=" https://hosting.photobucket.com/95288841-8654-4bf7-8fc9-a4aa78dce87f/d92ebbee-859d-4441-8386-3d760b20b7a7.jpg
" target="_blank"> <img alt="Click for enlarged picture" src="
https://hosting.photobucket.com/95288841-8654-4bf7-8fc9-a4aa78dce87f/d92ebbee-859d-4441-8386-3d760b20b7a7.jpg" width="600" /> </a></p>
<p>
<a href=" https://hosting.photobucket.com/95288841-8654-4bf7-8fc9-a4aa78dce87f/09c59798-7871-425e-a075-3ca1cd91768a.jpg
" target="_blank"> <img alt="Click for enlarged picture" src="
https://hosting.photobucket.com/95288841-8654-4bf7-8fc9-a4aa78dce87f/09c59798-7871-425e-a075-3ca1cd91768a.jpg" width="600" /> </a></p>
<p>
<a href=" https://hosting.photobucket.com/95288841-8654-4bf7-8fc9-a4aa78dce87f/b2f3edc8-5a23-4552-9a2a-4027b286f327.jpg
" target="_blank"> <img alt="Click for enlarged picture" src="
https://hosting.photobucket.com/95288841-8654-4bf7-8fc9-a4aa78dce87f/b2f3edc8-5a23-4552-9a2a-4027b286f327.jpg" width="600" /> </a></p>
<p>
<a href=" https://hosting.photobucket.com/95288841-8654-4bf7-8fc9-a4aa78dce87f/2a9f43ac-b531-4746-b7bb-ac5a3356aab0.jpg
" target="_blank"> <img alt="Click for enlarged picture" src="
https://hosting.photobucket.com/95288841-8654-4bf7-8fc9-a4aa78dce87f/2a9f43ac-b531-4746-b7bb-ac5a3356aab0.jpg" width="600" /> </a></p>
<p>
<strong>DOGAĐANJA RADNIM DANIMA ZA VRIJEME IZLOŽBE</strong></p>
<p>
Tijekom naredna dva tjedna, na&scaron;i volonteri su radnim danima od 16:00 do 20:00, držali otvorene radionice bojanja minijatura. Postavljene su radne stanice za bojanje minijatura na kojoj su na&scaron;i posjetitelji mogli bojati minijature koje smo priredili (ili svoje ukoliko su ih donijeli) koristeći na&scaron;e materijale i alate.</p>
<p>
<a href=" https://hosting.photobucket.com/95288841-8654-4bf7-8fc9-a4aa78dce87f/6edf7765-42b5-417a-820f-fa5d907179a7.jpg
" target="_blank"> <img alt="Click for enlarged picture" src="
https://hosting.photobucket.com/95288841-8654-4bf7-8fc9-a4aa78dce87f/6edf7765-42b5-417a-820f-fa5d907179a7.jpg" width="600" /> </a></p>
<p>
<a href=" https://hosting.photobucket.com/95288841-8654-4bf7-8fc9-a4aa78dce87f/c084ebe2-f57b-4519-9b31-29bdc1155887.jpg
" target="_blank"> <img alt="Click for enlarged picture" src="
https://hosting.photobucket.com/95288841-8654-4bf7-8fc9-a4aa78dce87f/c084ebe2-f57b-4519-9b31-29bdc1155887.jpg" width="600" /> </a></p>
<p>
<a href=" https://hosting.photobucket.com/95288841-8654-4bf7-8fc9-a4aa78dce87f/37ff2272-f9b0-4b16-a363-1e6f6688c866.jpg
" target="_blank"> <img alt="Click for enlarged picture" src="
https://hosting.photobucket.com/95288841-8654-4bf7-8fc9-a4aa78dce87f/37ff2272-f9b0-4b16-a363-1e6f6688c866.jpg" width="600" /> </a></p>
<p>
<a href=" https://hosting.photobucket.com/95288841-8654-4bf7-8fc9-a4aa78dce87f/5f4f7968-ff50-4a01-98da-6ce8562930b4.jpg
" target="_blank"> <img alt="Click for enlarged picture" src="
https://hosting.photobucket.com/95288841-8654-4bf7-8fc9-a4aa78dce87f/5f4f7968-ff50-4a01-98da-6ce8562930b4.jpg" width="600" /> </a></p>
<p>
<a href=" https://hosting.photobucket.com/95288841-8654-4bf7-8fc9-a4aa78dce87f/cbb45319-d488-483c-bf9d-9af29852fc74.jpg
" target="_blank"> <img alt="Click for enlarged picture" src="
https://hosting.photobucket.com/95288841-8654-4bf7-8fc9-a4aa78dce87f/cbb45319-d488-483c-bf9d-9af29852fc74.jpg" width="600" /> </a></p>
<p>
<a href=" https://hosting.photobucket.com/95288841-8654-4bf7-8fc9-a4aa78dce87f/3dcca26c-d549-4af3-812a-a4a81b9a2310.jpg
" target="_blank"> <img alt="Click for enlarged picture" src="
https://hosting.photobucket.com/95288841-8654-4bf7-8fc9-a4aa78dce87f/3dcca26c-d549-4af3-812a-a4a81b9a2310.jpg" width="600" /> </a></p>
<p>
<a href=" https://hosting.photobucket.com/95288841-8654-4bf7-8fc9-a4aa78dce87f/4adf0fb6-3eab-4b40-b32d-d03eab4a9892.jpg
" target="_blank"> <img alt="Click for enlarged picture" src="
https://hosting.photobucket.com/95288841-8654-4bf7-8fc9-a4aa78dce87f/4adf0fb6-3eab-4b40-b32d-d03eab4a9892.jpg" width="600" /> </a></p>
<p>
<a href=" https://hosting.photobucket.com/95288841-8654-4bf7-8fc9-a4aa78dce87f/4732b58a-9a65-4d1c-a7d5-25513d34b108.jpg
" target="_blank"> <img alt="Click for enlarged picture" src="
https://hosting.photobucket.com/95288841-8654-4bf7-8fc9-a4aa78dce87f/4732b58a-9a65-4d1c-a7d5-25513d34b108.jpg" width="600" /> </a></p>
<p>
<a href=" https://hosting.photobucket.com/95288841-8654-4bf7-8fc9-a4aa78dce87f/274be330-31d5-4e25-95db-ec2f423a003c.jpg
" target="_blank"> <img alt="Click for enlarged picture" src="
https://hosting.photobucket.com/95288841-8654-4bf7-8fc9-a4aa78dce87f/274be330-31d5-4e25-95db-ec2f423a003c.jpg" width="600" /> </a></p>
<p>
<a href=" https://hosting.photobucket.com/95288841-8654-4bf7-8fc9-a4aa78dce87f/8e7b0a80-0f46-4d70-9789-a46976c713d2.jpg
" target="_blank"> <img alt="Click for enlarged picture" src="
https://hosting.photobucket.com/95288841-8654-4bf7-8fc9-a4aa78dce87f/8e7b0a80-0f46-4d70-9789-a46976c713d2.jpg" width="600" /> </a></p>
<p>
<a href=" https://hosting.photobucket.com/95288841-8654-4bf7-8fc9-a4aa78dce87f/8bbd4e96-b911-4f26-80fe-b1c57f29027b.jpg
" target="_blank"> <img alt="Click for enlarged picture" src="
https://hosting.photobucket.com/95288841-8654-4bf7-8fc9-a4aa78dce87f/8bbd4e96-b911-4f26-80fe-b1c57f29027b.jpg" width="600" /> </a></p>
<p>
<a href=" https://hosting.photobucket.com/95288841-8654-4bf7-8fc9-a4aa78dce87f/203a27be-8f10-459d-89b9-befb6b636b74.jpg
" target="_blank"> <img alt="Click for enlarged picture" src="
https://hosting.photobucket.com/95288841-8654-4bf7-8fc9-a4aa78dce87f/203a27be-8f10-459d-89b9-befb6b636b74.jpg" width="600" /> </a></p>
<p>
<a href=" https://hosting.photobucket.com/95288841-8654-4bf7-8fc9-a4aa78dce87f/5dc4358f-19d8-475f-a4af-9c29e9ed18d7.jpg
" target="_blank"> <img alt="Click for enlarged picture" src="
https://hosting.photobucket.com/95288841-8654-4bf7-8fc9-a4aa78dce87f/5dc4358f-19d8-475f-a4af-9c29e9ed18d7.jpg" width="600" /> </a></p>
<p>
<strong>BACK TO BASICS RADIONICE ZA NAJMLAĐE</strong></p>
<p>
Radnim danima od 17:00 do 18:00 održavali smo na&scaron;e nove radionice za najmlađe u kojima su na&scaron;i najmlađi polaznici bojali svoje prve minijature.</p>
<p>
<a href=" https://hosting.photobucket.com/95288841-8654-4bf7-8fc9-a4aa78dce87f/948af139-8fb5-4e28-a27c-404466e70d05.jpg
" target="_blank"> <img alt="Click for enlarged picture" src="
https://hosting.photobucket.com/95288841-8654-4bf7-8fc9-a4aa78dce87f/948af139-8fb5-4e28-a27c-404466e70d05.jpg" width="600" /> </a></p>
<p>
<a href=" https://hosting.photobucket.com/95288841-8654-4bf7-8fc9-a4aa78dce87f/bb3e20c2-bb21-4a3d-863a-74de08261467.jpg
" target="_blank"> <img alt="Click for enlarged picture" src="
https://hosting.photobucket.com/95288841-8654-4bf7-8fc9-a4aa78dce87f/bb3e20c2-bb21-4a3d-863a-74de08261467.jpg" width="600" /> </a></p>
<p>
<a href=" https://hosting.photobucket.com/95288841-8654-4bf7-8fc9-a4aa78dce87f/7316c760-98e3-4e3f-9261-d138aa7a5a6a.jpg
" target="_blank"> <img alt="Click for enlarged picture" src="
https://hosting.photobucket.com/95288841-8654-4bf7-8fc9-a4aa78dce87f/7316c760-98e3-4e3f-9261-d138aa7a5a6a.jpg" width="600" /> </a></p>
<p>
<a href=" https://hosting.photobucket.com/95288841-8654-4bf7-8fc9-a4aa78dce87f/68934b39-3d1f-4f43-b967-14b73c41a39e.jpg
" target="_blank"> <img alt="Click for enlarged picture" src="
https://hosting.photobucket.com/95288841-8654-4bf7-8fc9-a4aa78dce87f/68934b39-3d1f-4f43-b967-14b73c41a39e.jpg" width="600" /> </a></p>
<p>
<a href=" https://hosting.photobucket.com/95288841-8654-4bf7-8fc9-a4aa78dce87f/46125bce-a28d-494f-873a-3aeabdc1d6c2.jpg
" target="_blank"> <img alt="Click for enlarged picture" src="
https://hosting.photobucket.com/95288841-8654-4bf7-8fc9-a4aa78dce87f/46125bce-a28d-494f-873a-3aeabdc1d6c2.jpg" width="600" /> </a></p>
<p>
<a href=" https://hosting.photobucket.com/95288841-8654-4bf7-8fc9-a4aa78dce87f/3c58e0ad-77a9-44c8-b6bf-d9a55c514d43.jpg
" target="_blank"> <img alt="Click for enlarged picture" src="
https://hosting.photobucket.com/95288841-8654-4bf7-8fc9-a4aa78dce87f/3c58e0ad-77a9-44c8-b6bf-d9a55c514d43.jpg" width="600" /> </a></p>
<p>
<a href=" https://hosting.photobucket.com/95288841-8654-4bf7-8fc9-a4aa78dce87f/f891f0f0-051b-40ee-9676-cb03b0a9811b.jpg
" target="_blank"> <img alt="Click for enlarged picture" src="
https://hosting.photobucket.com/95288841-8654-4bf7-8fc9-a4aa78dce87f/f891f0f0-051b-40ee-9676-cb03b0a9811b.jpg" width="600" /> </a></p>
<p>
<strong>AGRAM LEGO SEKCIJA predavanje: FW-14b &ndash; Bolid F1 za budućnost</strong></p>
<p>
U srijedu 25.2.2026. u sklopu aktivnosti na&scaron;e Agram Lego Sekcije, na&scaron; dežurni strojar Marko Paunović je održao predavanje na temu bolida Formule 1 iz 1992.. Ulaz na predavanje je bio besplatan, a po zavr&scaron;etku su LEGO maketu bolida izradili članovi Lego sekcije</p>
<p>
<a href=" https://hosting.photobucket.com/95288841-8654-4bf7-8fc9-a4aa78dce87f/b2e14b1c-daa4-4314-8685-184377bc7e28.jpg
" target="_blank"> <img alt="Click for enlarged picture" src="
https://hosting.photobucket.com/95288841-8654-4bf7-8fc9-a4aa78dce87f/b2e14b1c-daa4-4314-8685-184377bc7e28.jpg" width="600" /> </a></p>
<p>
<a href=" https://hosting.photobucket.com/95288841-8654-4bf7-8fc9-a4aa78dce87f/31fb439a-77d3-4418-83ff-66c3af279cca.jpg" target="_blank"> <img alt="Click for enlarged picture" src="
https://hosting.photobucket.com/95288841-8654-4bf7-8fc9-a4aa78dce87f/31fb439a-77d3-4418-83ff-66c3af279cca.jpg" width="600" /> </a></p>
<p>
<a href=" https://hosting.photobucket.com/95288841-8654-4bf7-8fc9-a4aa78dce87f/bfcaf282-6be8-4b52-a3ed-c91137457876.jpg
" target="_blank"> <img alt="Click for enlarged picture" src="
https://hosting.photobucket.com/95288841-8654-4bf7-8fc9-a4aa78dce87f/bfcaf282-6be8-4b52-a3ed-c91137457876.jpg" width="600" /> </a></p>
<p>
<a href=" https://hosting.photobucket.com/95288841-8654-4bf7-8fc9-a4aa78dce87f/ce70fc61-9e1a-4169-aaad-8b67417656c0.jpg
" target="_blank"> <img alt="Click for enlarged picture" src="
https://hosting.photobucket.com/95288841-8654-4bf7-8fc9-a4aa78dce87f/ce70fc61-9e1a-4169-aaad-8b67417656c0.jpg" width="600" /> </a></p>
<p>
<a href=" https://hosting.photobucket.com/95288841-8654-4bf7-8fc9-a4aa78dce87f/94ca0e36-8710-458d-8194-9f71299f4d74.jpg
" target="_blank"> <img alt="Click for enlarged picture" src="
https://hosting.photobucket.com/95288841-8654-4bf7-8fc9-a4aa78dce87f/94ca0e36-8710-458d-8194-9f71299f4d74.jpg" width="600" /> </a></p>
<p>
<a href=" https://hosting.photobucket.com/95288841-8654-4bf7-8fc9-a4aa78dce87f/c6771f72-7191-4ca3-a792-3bb1ab3897b1.jpg
" target="_blank"> <img alt="Click for enlarged picture" src="
https://hosting.photobucket.com/95288841-8654-4bf7-8fc9-a4aa78dce87f/c6771f72-7191-4ca3-a792-3bb1ab3897b1.jpg" width="600" /> </a></p>
<p>
<a href=" https://hosting.photobucket.com/95288841-8654-4bf7-8fc9-a4aa78dce87f/c8fcfcb6-09f2-4398-a2fb-fa5065771e01.jpg
" target="_blank"> <img alt="Click for enlarged picture" src="
https://hosting.photobucket.com/95288841-8654-4bf7-8fc9-a4aa78dce87f/c8fcfcb6-09f2-4398-a2fb-fa5065771e01.jpg" width="600" /> </a></p>
<p>
<a href=" https://hosting.photobucket.com/95288841-8654-4bf7-8fc9-a4aa78dce87f/d7e187a8-d5b1-433b-b30d-091e54dcdddf.jpg
" target="_blank"> <img alt="Click for enlarged picture" src="
https://hosting.photobucket.com/95288841-8654-4bf7-8fc9-a4aa78dce87f/d7e187a8-d5b1-433b-b30d-091e54dcdddf.jpg" width="600" /> </a></p>
<p>
Tijekom drugog vikenda Izložbe, 28.02.-01.03., organizirali smo <strong>RADIONICU BOJANJA MINIJATURA &ndash; Grimdark stil</strong>.</p>
<p>
Radionica se provodila kroz dva dana (cijeli vikend) i polaznici su bojali tri različite figure za igru Trench Crusade. Fokus ovih predavanja bilo je bojenje popularnim Grimdark stilom. Na radionici su bile predstavljene boje i pribor, priprema figura, nekoliko tehnika bojenja minijatura od osnovnih do naprednijih, te tehnike i trikovi za brzo i efikasno bojenje većih količina figura odjednom. U sklopu radionice kori&scaron;tene su akrilne boje na bazi vode.</p>
<p>
<a href=" https://hosting.photobucket.com/95288841-8654-4bf7-8fc9-a4aa78dce87f/733d94b2-8e8d-4a4e-accd-b9168e32577e.jpg
" target="_blank"> <img alt="Click for enlarged picture" src="
https://hosting.photobucket.com/95288841-8654-4bf7-8fc9-a4aa78dce87f/733d94b2-8e8d-4a4e-accd-b9168e32577e.jpg
" width="600" /> </a></p>
<p>
<a href=" https://hosting.photobucket.com/95288841-8654-4bf7-8fc9-a4aa78dce87f/41020062-45b9-41cd-a357-fa23a389f390.jpg
" target="_blank"> <img alt="Click for enlarged picture" src="
https://hosting.photobucket.com/95288841-8654-4bf7-8fc9-a4aa78dce87f/41020062-45b9-41cd-a357-fa23a389f390.jpg
" width="600" /> </a></p>
<p>
<a href=" https://hosting.photobucket.com/95288841-8654-4bf7-8fc9-a4aa78dce87f/0c07cc55-596d-494d-972b-cd6a0dd6b8b7.jpg
" target="_blank"> <img alt="Click for enlarged picture" src="
https://hosting.photobucket.com/95288841-8654-4bf7-8fc9-a4aa78dce87f/0c07cc55-596d-494d-972b-cd6a0dd6b8b7.jpg" width="600" /> </a></p>
<p>
<a href=" https://hosting.photobucket.com/95288841-8654-4bf7-8fc9-a4aa78dce87f/c17dd356-08b1-48e1-b895-6296aed7f818.jpg
" target="_blank"> <img alt="Click for enlarged picture" src="
https://hosting.photobucket.com/95288841-8654-4bf7-8fc9-a4aa78dce87f/c17dd356-08b1-48e1-b895-6296aed7f818.jpg" width="600" /> </a></p>
<p>
U srijedu 04.03.2026. održana je godi&scaron;nja <strong>sjednica Skup&scaron;tine</strong> na kojoj smo odredili smjernice rada u 2026.</p>
<p>
<a href=" https://hosting.photobucket.com/95288841-8654-4bf7-8fc9-a4aa78dce87f/59484bd0-7edc-4aed-a04e-ae42900ba3e6.jpg
" target="_blank"> <img alt="Click for enlarged picture" src="
https://hosting.photobucket.com/95288841-8654-4bf7-8fc9-a4aa78dce87f/59484bd0-7edc-4aed-a04e-ae42900ba3e6.jpg
" width="600" /> </a></p>
<p>
U nedjelju 08.03.2026. Izložba je zavr&scaron;ena, na&scaron;i eksponati sigurno spremljeni, a Galerija poči&scaron;ćena.</p>
<p>
<a href=" https://hosting.photobucket.com/95288841-8654-4bf7-8fc9-a4aa78dce87f/98af4280-0956-4cdb-b4a9-da40e3a5a44a.jpg
" target="_blank"> <img alt="Click for enlarged picture" src="
https://hosting.photobucket.com/95288841-8654-4bf7-8fc9-a4aa78dce87f/98af4280-0956-4cdb-b4a9-da40e3a5a44a.jpg" width="600" /> </a></p>
<p>
<a href=" https://hosting.photobucket.com/95288841-8654-4bf7-8fc9-a4aa78dce87f/3259b35e-1fc2-4a99-a3c5-c7984958d72b.jpg
" target="_blank"> <img alt="Click for enlarged picture" src="
https://hosting.photobucket.com/95288841-8654-4bf7-8fc9-a4aa78dce87f/3259b35e-1fc2-4a99-a3c5-c7984958d72b.jpg" width="600" /> </a></p>
<p>
Najbitniji dio svake godine prilikom održavanja ove Izložbe je socijalni aspekt, druženje na&scaron;ih članova kako međusobno tako i sa na&scaron;im međunarodnim prijateljima koji nas posjećuju! Uz ovih par fotografija sa zajedničkih druženja, pozdravljamo vas do sljedeće godine!</p>
<p>
<a href=" https://hosting.photobucket.com/95288841-8654-4bf7-8fc9-a4aa78dce87f/b9168e23-79b2-4d81-8a7d-7534062881a7.jpg
" target="_blank"> <img alt="Click for enlarged picture" src="
https://hosting.photobucket.com/95288841-8654-4bf7-8fc9-a4aa78dce87f/b9168e23-79b2-4d81-8a7d-7534062881a7.jpg " width="600" /> </a></p>
<p>
<a href=" https://hosting.photobucket.com/95288841-8654-4bf7-8fc9-a4aa78dce87f/edff925e-916c-4d78-953e-210abf3753d4.jpg
" target="_blank"> <img alt="Click for enlarged picture" src="
https://hosting.photobucket.com/95288841-8654-4bf7-8fc9-a4aa78dce87f/edff925e-916c-4d78-953e-210abf3753d4.jpg " width="600" /> </a></p>
<p>
<a href=" https://hosting.photobucket.com/95288841-8654-4bf7-8fc9-a4aa78dce87f/8bcb48fa-466b-43f8-8a4b-f15f6794b21e.jpg
" target="_blank"> <img alt="Click for enlarged picture" src="
https://hosting.photobucket.com/95288841-8654-4bf7-8fc9-a4aa78dce87f/8bcb48fa-466b-43f8-8a4b-f15f6794b21e.jpg" width="600" /> </a></p>
",
"created" => "2026-03-12 08:54:10",
"modified" => "2026-03-12 08:58:37"
),
"Member" => array(
"id" => "35",
"group_id" => "1",
"first_name" => "Marko",
"last_name" => "Paunović",
"first_name_mask" => "marko",
"last_name_mask" => "paunovic",
"username" => "marko",
"password" => "*****",
"born" => "2033-03-07 20:35:00",
"created" => "2009-06-02 20:37:03"
)
)</pre><pre class="stack-trace">include - APP/views/elements/latestArticles.ctp, line 7
View::_render() - CORE/cake/libs/view/view.php, line 736
View::element() - CORE/cake/libs/view/view.php, line 397
include - APP/views/home/index.ctp, line 49
View::_render() - CORE/cake/libs/view/view.php, line 736
View::render() - CORE/cake/libs/view/view.php, line 431
Controller::render() - CORE/cake/libs/controller/controller.php, line 909
Dispatcher::_invoke() - CORE/cake/dispatcher.php, line 207
Dispatcher::dispatch() - CORE/cake/dispatcher.php, line 171
[main] - APP/webroot/index.php, line 86</pre></div></pre><pre class="cake-debug"><a href="javascript:void(0);" onclick="document.getElementById('cakeErr8-trace').style.display = (document.getElementById('cakeErr8-trace').style.display == 'none' ? '' : 'none');"><b>Notice</b> (8)</a>: Undefined index: mask_dok [<b>APP/views/elements/latestArticles.ctp</b>, line <b>10</b>]<div id="cakeErr8-trace" class="cake-stack-trace" style="display: none;"><a href="javascript:void(0);" onclick="document.getElementById('cakeErr8-code').style.display = (document.getElementById('cakeErr8-code').style.display == 'none' ? '' : 'none')">Code</a> | <a href="javascript:void(0);" onclick="document.getElementById('cakeErr8-context').style.display = (document.getElementById('cakeErr8-context').style.display == 'none' ? '' : 'none')">Context</a><div id="cakeErr8-code" class="cake-code-dump" style="display: none;"><pre><code><span style="color: #000000"></span></code>
<code><span style="color: #000000"> if (Configure::read() > 0) {</span></code>
<span class="code-highlight"><code><span style="color: #000000"> include ($___viewFn);</span></code></span></pre></div><pre id="cakeErr8-context" class="cake-context" style="display: none;">$___viewFn = "/home/martin/apps/agram/app/views/elements/latestArticles.ctp"
$___dataForView = array(
"lang" => "dok",
"otherLangs" => array(
"eng",
"hrv"
),
"globalNav" => array(
array(),
array(),
array(),
array(),
array(),
array(),
array(),
array(),
array(),
array(),
array(),
array(),
array(),
array(),
array(),
array(),
array(),
array(),
array(),
array(),
array(),
array(),
array(),
array(),
array(),
array(),
array()
),
"breadCrumbs" => array(
array()
),
"pageContents" => array(
"home_who_we_are" => null
),
"userData" => null,
"announcements" => array(
array(),
array(),
array()
),
"cache" => array(
"time" => "+1 day",
"key" => "dok"
),
"form" => FormHelper
FormHelper::$helpers = array
FormHelper::$fieldset = array
FormHelper::$__options = array
FormHelper::$fields = array
FormHelper::$requestType = NULL
FormHelper::$defaultModel = NULL
FormHelper::$_inputDefaults = array
FormHelper::$_lastAction = ""
FormHelper::$base = ""
FormHelper::$webroot = "/"
FormHelper::$theme = NULL
FormHelper::$here = "/dok"
FormHelper::$params = array
FormHelper::$action = "index"
FormHelper::$plugin = NULL
FormHelper::$data = NULL
FormHelper::$namedArgs = NULL
FormHelper::$argSeparator = NULL
FormHelper::$validationErrors = NULL
FormHelper::$tags = array
FormHelper::$__tainted = NULL
FormHelper::$__cleaned = NULL
FormHelper::$Html = HtmlHelper object,
"text" => TextHelper
TextHelper::$helpers = NULL
TextHelper::$base = ""
TextHelper::$webroot = "/"
TextHelper::$theme = NULL
TextHelper::$here = "/dok"
TextHelper::$params = array
TextHelper::$action = "index"
TextHelper::$plugin = NULL
TextHelper::$data = NULL
TextHelper::$namedArgs = NULL
TextHelper::$argSeparator = NULL
TextHelper::$validationErrors = NULL
TextHelper::$tags = array
TextHelper::$__tainted = NULL
TextHelper::$__cleaned = NULL,
"stringer" => StringerHelper
StringerHelper::$helpers = array
StringerHelper::$base = ""
StringerHelper::$webroot = "/"
StringerHelper::$theme = NULL
StringerHelper::$here = "/dok"
StringerHelper::$params = array
StringerHelper::$action = "index"
StringerHelper::$plugin = NULL
StringerHelper::$data = NULL
StringerHelper::$namedArgs = NULL
StringerHelper::$argSeparator = NULL
StringerHelper::$validationErrors = NULL
StringerHelper::$tags = array
StringerHelper::$__tainted = NULL
StringerHelper::$__cleaned = NULL
StringerHelper::$Html = HtmlHelper object
StringerHelper::$Link = LinkHelper object
StringerHelper::$Text = TextHelper object,
"menu" => MenuHelper
MenuHelper::$helpers = array
MenuHelper::$base = ""
MenuHelper::$webroot = "/"
MenuHelper::$theme = NULL
MenuHelper::$here = "/dok"
MenuHelper::$params = array
MenuHelper::$action = "index"
MenuHelper::$plugin = NULL
MenuHelper::$data = NULL
MenuHelper::$namedArgs = NULL
MenuHelper::$argSeparator = NULL
MenuHelper::$validationErrors = NULL
MenuHelper::$tags = array
MenuHelper::$__tainted = NULL
MenuHelper::$__cleaned = NULL
MenuHelper::$Link = LinkHelper object,
"session" => SessionHelper
SessionHelper::$helpers = array
SessionHelper::$__active = true
SessionHelper::$valid = false
SessionHelper::$error = false
SessionHelper::$_userAgent = "f9a8355d006790ee743ededbb1f6e3bd"
SessionHelper::$path = "/"
SessionHelper::$lastError = NULL
SessionHelper::$security = "medium"
SessionHelper::$time = 1773314240
SessionHelper::$sessionTime = 1773326240
SessionHelper::$cookieLifeTime = false
SessionHelper::$watchKeys = array
SessionHelper::$id = NULL
SessionHelper::$host = NULL
SessionHelper::$timeout = NULL
SessionHelper::$base = ""
SessionHelper::$webroot = "/"
SessionHelper::$here = "/dok"
SessionHelper::$params = array
SessionHelper::$action = "index"
SessionHelper::$data = NULL
SessionHelper::$theme = NULL
SessionHelper::$plugin = NULL,
"html" => HtmlHelper
HtmlHelper::$tags = array
HtmlHelper::$_crumbs = array
HtmlHelper::$__includedScripts = array
HtmlHelper::$_scriptBlockOptions = array
HtmlHelper::$__docTypes = array
HtmlHelper::$helpers = NULL
HtmlHelper::$base = ""
HtmlHelper::$webroot = "/"
HtmlHelper::$theme = NULL
HtmlHelper::$here = "/dok"
HtmlHelper::$params = array
HtmlHelper::$action = "index"
HtmlHelper::$plugin = NULL
HtmlHelper::$data = NULL
HtmlHelper::$namedArgs = NULL
HtmlHelper::$argSeparator = NULL
HtmlHelper::$validationErrors = NULL
HtmlHelper::$__tainted = NULL
HtmlHelper::$__cleaned = NULL,
"link" => LinkHelper
LinkHelper::$helpers = array
LinkHelper::$lang = "dok"
LinkHelper::$defaultLang = "hrv"
LinkHelper::$base = ""
LinkHelper::$webroot = "/"
LinkHelper::$theme = NULL
LinkHelper::$here = "/dok"
LinkHelper::$params = array
LinkHelper::$action = "index"
LinkHelper::$plugin = NULL
LinkHelper::$data = NULL
LinkHelper::$namedArgs = NULL
LinkHelper::$argSeparator = NULL
LinkHelper::$validationErrors = NULL
LinkHelper::$tags = array
LinkHelper::$__tainted = NULL
LinkHelper::$__cleaned = NULL
LinkHelper::$Html = HtmlHelper object
LinkHelper::$Session = SessionHelper object
)
$loadHelpers = false
$cached = false
$loadedHelpers = array()
$lang = "dok"
$otherLangs = array(
"eng",
"hrv"
)
$globalNav = array(
array(
"Page" => array()
),
array(
"Page" => array()
),
array(
"Page" => array()
),
array(
"Page" => array()
),
array(
"Page" => array()
),
array(
"Page" => array()
),
array(
"Page" => array()
),
array(
"Page" => array()
),
array(
"Page" => array()
),
array(
"Page" => array()
),
array(
"Page" => array()
),
array(
"Page" => array()
),
array(
"Page" => array()
),
array(
"Page" => array()
),
array(
"Page" => array()
),
array(
"Page" => array()
),
array(
"Page" => array()
),
array(
"Page" => array()
),
array(
"Page" => array()
),
array(
"Page" => array()
),
array(
"Page" => array()
),
array(
"Page" => array()
),
array(
"Page" => array()
),
array(
"Page" => array()
),
array(
"Page" => array()
),
array(
"Page" => array()
),
array(
"Page" => array()
)
)
$breadCrumbs = array(
array(
"Page" => array()
)
)
$pageContents = array(
"home_who_we_are" => null
)
$userData = null
$announcements = array(
array(
"Announcement" => array()
),
array(
"Announcement" => array()
),
array(
"Announcement" => array()
)
)
$cache = array(
"time" => "+1 day",
"key" => "dok"
)
$form = FormHelper
FormHelper::$helpers = array
FormHelper::$fieldset = array
FormHelper::$__options = array
FormHelper::$fields = array
FormHelper::$requestType = NULL
FormHelper::$defaultModel = NULL
FormHelper::$_inputDefaults = array
FormHelper::$_lastAction = ""
FormHelper::$base = ""
FormHelper::$webroot = "/"
FormHelper::$theme = NULL
FormHelper::$here = "/dok"
FormHelper::$params = array
FormHelper::$action = "index"
FormHelper::$plugin = NULL
FormHelper::$data = NULL
FormHelper::$namedArgs = NULL
FormHelper::$argSeparator = NULL
FormHelper::$validationErrors = NULL
FormHelper::$tags = array
FormHelper::$__tainted = NULL
FormHelper::$__cleaned = NULL
FormHelper::$Html = HtmlHelper object
$text = TextHelper
TextHelper::$helpers = NULL
TextHelper::$base = ""
TextHelper::$webroot = "/"
TextHelper::$theme = NULL
TextHelper::$here = "/dok"
TextHelper::$params = array
TextHelper::$action = "index"
TextHelper::$plugin = NULL
TextHelper::$data = NULL
TextHelper::$namedArgs = NULL
TextHelper::$argSeparator = NULL
TextHelper::$validationErrors = NULL
TextHelper::$tags = array
TextHelper::$__tainted = NULL
TextHelper::$__cleaned = NULL
$stringer = StringerHelper
StringerHelper::$helpers = array
StringerHelper::$base = ""
StringerHelper::$webroot = "/"
StringerHelper::$theme = NULL
StringerHelper::$here = "/dok"
StringerHelper::$params = array
StringerHelper::$action = "index"
StringerHelper::$plugin = NULL
StringerHelper::$data = NULL
StringerHelper::$namedArgs = NULL
StringerHelper::$argSeparator = NULL
StringerHelper::$validationErrors = NULL
StringerHelper::$tags = array
StringerHelper::$__tainted = NULL
StringerHelper::$__cleaned = NULL
StringerHelper::$Html = HtmlHelper object
StringerHelper::$Link = LinkHelper object
StringerHelper::$Text = TextHelper object
$menu = MenuHelper
MenuHelper::$helpers = array
MenuHelper::$base = ""
MenuHelper::$webroot = "/"
MenuHelper::$theme = NULL
MenuHelper::$here = "/dok"
MenuHelper::$params = array
MenuHelper::$action = "index"
MenuHelper::$plugin = NULL
MenuHelper::$data = NULL
MenuHelper::$namedArgs = NULL
MenuHelper::$argSeparator = NULL
MenuHelper::$validationErrors = NULL
MenuHelper::$tags = array
MenuHelper::$__tainted = NULL
MenuHelper::$__cleaned = NULL
MenuHelper::$Link = LinkHelper object
$session = SessionHelper
SessionHelper::$helpers = array
SessionHelper::$__active = true
SessionHelper::$valid = false
SessionHelper::$error = false
SessionHelper::$_userAgent = "f9a8355d006790ee743ededbb1f6e3bd"
SessionHelper::$path = "/"
SessionHelper::$lastError = NULL
SessionHelper::$security = "medium"
SessionHelper::$time = 1773314240
SessionHelper::$sessionTime = 1773326240
SessionHelper::$cookieLifeTime = false
SessionHelper::$watchKeys = array
SessionHelper::$id = NULL
SessionHelper::$host = NULL
SessionHelper::$timeout = NULL
SessionHelper::$base = ""
SessionHelper::$webroot = "/"
SessionHelper::$here = "/dok"
SessionHelper::$params = array
SessionHelper::$action = "index"
SessionHelper::$data = NULL
SessionHelper::$theme = NULL
SessionHelper::$plugin = NULL
$html = HtmlHelper
HtmlHelper::$tags = array
HtmlHelper::$_crumbs = array
HtmlHelper::$__includedScripts = array
HtmlHelper::$_scriptBlockOptions = array
HtmlHelper::$__docTypes = array
HtmlHelper::$helpers = NULL
HtmlHelper::$base = ""
HtmlHelper::$webroot = "/"
HtmlHelper::$theme = NULL
HtmlHelper::$here = "/dok"
HtmlHelper::$params = array
HtmlHelper::$action = "index"
HtmlHelper::$plugin = NULL
HtmlHelper::$data = NULL
HtmlHelper::$namedArgs = NULL
HtmlHelper::$argSeparator = NULL
HtmlHelper::$validationErrors = NULL
HtmlHelper::$__tainted = NULL
HtmlHelper::$__cleaned = NULL
$link = LinkHelper
LinkHelper::$helpers = array
LinkHelper::$lang = "dok"
LinkHelper::$defaultLang = "hrv"
LinkHelper::$base = ""
LinkHelper::$webroot = "/"
LinkHelper::$theme = NULL
LinkHelper::$here = "/dok"
LinkHelper::$params = array
LinkHelper::$action = "index"
LinkHelper::$plugin = NULL
LinkHelper::$data = NULL
LinkHelper::$namedArgs = NULL
LinkHelper::$argSeparator = NULL
LinkHelper::$validationErrors = NULL
LinkHelper::$tags = array
LinkHelper::$__tainted = NULL
LinkHelper::$__cleaned = NULL
LinkHelper::$Html = HtmlHelper object
LinkHelper::$Session = SessionHelper object
$articles = array(
array(
"Article" => array(),
"Member" => array()
),
array(
"Article" => array(),
"Member" => array()
),
array(
"Article" => array(),
"Member" => array()
),
array(
"Article" => array(),
"Member" => array()
),
array(
"Article" => array(),
"Member" => array()
)
)
$article = array(
"Article" => array(
"id" => "496",
"member_id" => "35",
"title_eng" => "Exhibition of Miniatures and Tabletop Scenery 2026",
"title_hrv" => "Izložba minijatura i maketa Agram 2026",
"mask_eng" => "exhibition_of_miniatures_and_tabletop_scenery_2026",
"mask_hrv" => "izlozba_minijatura_i_maketa_agram_2026",
"content_eng" => "<p>
<a href=" https://hosting.photobucket.com/95288841-8654-4bf7-8fc9-a4aa78dce87f/dc756f84-867d-4df4-acd8-5d43775cafc2.jpg
" target="_blank"> <img alt="Click for enlarged picture" src="
https://hosting.photobucket.com/95288841-8654-4bf7-8fc9-a4aa78dce87f/dc756f84-867d-4df4-acd8-5d43775cafc2.jpg" width="600" /> </a></p>
<p>
<strong>The exhibition of miniatures and models &quot;Agram 2026&quot;</strong> was held this year from 19.2. to 08.03. 2026. The exhibition was set up on Wednesday 18.2. and was attended by a large number of members and friends of the Association who exhibited their works.</p>
<p>
&nbsp;</p>
<p>
<a href=" https://hosting.photobucket.com/95288841-8654-4bf7-8fc9-a4aa78dce87f/8529d6d4-76ea-4872-a9e6-748e04223a4e.jpg
" target="_blank"> <img alt="Click for enlarged picture" src="
https://hosting.photobucket.com/95288841-8654-4bf7-8fc9-a4aa78dce87f/8529d6d4-76ea-4872-a9e6-748e04223a4e.jpg
" width="600" /> </a></p>
<p>
<a href=" https://hosting.photobucket.com/95288841-8654-4bf7-8fc9-a4aa78dce87f/f3038937-f001-4ceb-b725-a330fcd64cee.jpg
" target="_blank"> <img alt="Click for enlarged picture" src="
https://hosting.photobucket.com/95288841-8654-4bf7-8fc9-a4aa78dce87f/f3038937-f001-4ceb-b725-a330fcd64cee.jpg
" width="600" /> </a></p>
<p>
<a href=" https://hosting.photobucket.com/95288841-8654-4bf7-8fc9-a4aa78dce87f/3575379e-e068-49e2-9d4d-c9a49531fdc2.jpg
" target="_blank"> <img alt="Click for enlarged picture" src="
https://hosting.photobucket.com/95288841-8654-4bf7-8fc9-a4aa78dce87f/3575379e-e068-49e2-9d4d-c9a49531fdc2.jpg" width="600" /> </a></p>
<p>
<a href=" https://hosting.photobucket.com/95288841-8654-4bf7-8fc9-a4aa78dce87f/e51713c7-2add-4f8f-ae37-e6eba25badff.jpg
" target="_blank"> <img alt="Click for enlarged picture" src="
https://hosting.photobucket.com/95288841-8654-4bf7-8fc9-a4aa78dce87f/e51713c7-2add-4f8f-ae37-e6eba25badff.jpg" width="600" /> </a></p>
<p>
<a href=" https://hosting.photobucket.com/95288841-8654-4bf7-8fc9-a4aa78dce87f/9c0bb546-50a8-483d-aeab-ab3b2ce9f094.jpg
" target="_blank"> <img alt="Click for enlarged picture" src="
https://hosting.photobucket.com/95288841-8654-4bf7-8fc9-a4aa78dce87f/9c0bb546-50a8-483d-aeab-ab3b2ce9f094.jpg" width="600" /> </a></p>
<p>
The opening of the Exhibition took place on Thursday, February 19, 2026, starting at 6:00 PM. The exhibition was organized on the occasion of our twenty-third birthday.</p>
<p>
&nbsp;</p>
<p>
<a href=" https://hosting.photobucket.com/95288841-8654-4bf7-8fc9-a4aa78dce87f/71c7bfc2-1ffc-43b9-9d5a-53e009f6b86d.jpg
" target="_blank"> <img alt="Click for enlarged picture" src="
https://hosting.photobucket.com/95288841-8654-4bf7-8fc9-a4aa78dce87f/71c7bfc2-1ffc-43b9-9d5a-53e009f6b86d.jpg" width="600" /> </a></p>
<p>
<a href=" https://hosting.photobucket.com/95288841-8654-4bf7-8fc9-a4aa78dce87f/007b4701-1d7c-4a67-a599-0539a2aa3191.jpg
" target="_blank"> <img alt="Click for enlarged picture" src="
https://hosting.photobucket.com/95288841-8654-4bf7-8fc9-a4aa78dce87f/007b4701-1d7c-4a67-a599-0539a2aa3191.jpg" width="600" /> </a></p>
<p>
<a href=" https://hosting.photobucket.com/95288841-8654-4bf7-8fc9-a4aa78dce87f/2c8090e2-8b95-4368-bb48-98876d680e15.jpg
" target="_blank"> <img alt="Click for enlarged picture" src="
https://hosting.photobucket.com/95288841-8654-4bf7-8fc9-a4aa78dce87f/2c8090e2-8b95-4368-bb48-98876d680e15.jpg" width="600" /> </a></p>
<p>
<a href=" https://hosting.photobucket.com/95288841-8654-4bf7-8fc9-a4aa78dce87f/375768ad-a8bb-49bf-9845-e46c896ba7ec.jpg
" target="_blank"> <img alt="Click for enlarged picture" src="
https://hosting.photobucket.com/95288841-8654-4bf7-8fc9-a4aa78dce87f/375768ad-a8bb-49bf-9845-e46c896ba7ec.jpg" width="600" /> </a></p>
<p>
<a href=" https://hosting.photobucket.com/95288841-8654-4bf7-8fc9-a4aa78dce87f/a93de974-4ccb-4876-85b0-4d066ae402b3.jpg
" target="_blank"> <img alt="Click for enlarged picture" src="
https://hosting.photobucket.com/95288841-8654-4bf7-8fc9-a4aa78dce87f/a93de974-4ccb-4876-85b0-4d066ae402b3.jpg" width="600" /> </a></p>
<p>
<a href=" https://hosting.photobucket.com/95288841-8654-4bf7-8fc9-a4aa78dce87f/d323ccc9-1b9a-4cb2-8adf-7019b0e217f4.jpg
" target="_blank"> <img alt="Click for enlarged picture" src="
https://hosting.photobucket.com/95288841-8654-4bf7-8fc9-a4aa78dce87f/d323ccc9-1b9a-4cb2-8adf-7019b0e217f4.jpg" width="600" /> </a></p>
<p>
<a href=" https://hosting.photobucket.com/95288841-8654-4bf7-8fc9-a4aa78dce87f/a5a66447-2d76-47ae-866d-4d512ef469a5.jpg
" target="_blank"> <img alt="Click for enlarged picture" src="
https://hosting.photobucket.com/95288841-8654-4bf7-8fc9-a4aa78dce87f/a5a66447-2d76-47ae-866d-4d512ef469a5.jpg" width="600" /> </a></p>
<p>
<a href=" https://hosting.photobucket.com/95288841-8654-4bf7-8fc9-a4aa78dce87f/3e7bcfc9-ba02-4f94-a6c3-79dfaea3639e.jpg
" target="_blank"> <img alt="Click for enlarged picture" src="
https://hosting.photobucket.com/95288841-8654-4bf7-8fc9-a4aa78dce87f/3e7bcfc9-ba02-4f94-a6c3-79dfaea3639e.jpg" width="600" /> </a></p>
<p>
<a href=" https://hosting.photobucket.com/95288841-8654-4bf7-8fc9-a4aa78dce87f/24e79466-4a9e-4b10-970c-caad235d260d.jpg
" target="_blank"> <img alt="Click for enlarged picture" src="
https://hosting.photobucket.com/95288841-8654-4bf7-8fc9-a4aa78dce87f/24e79466-4a9e-4b10-970c-caad235d260d.jpg" width="600" /> </a></p>
<p>
As always, the Exhibition presented a cross-section of the work of the Association, its members, participants of its courses and workshops, and members of the Miniature Painters Croatia FB group. In a large number of showcases, there were numerous miniatures for tabletop strategy games, board games, and an entire showcase was dedicated to award-winning exhibits from previous miniature competitions. Several showcases were dedicated to projects that the Association has been implementing for 23 years, such as the UMS &bdquo;Agram&ldquo; Library and Reading Room, the Workshop for Making Spatial Models and the Miniature Painting Workshop, as well as new ones such as the Agram Group Build, the Agram Lego Section and the Back to Basics painting workshop for the youngest.</p>
<p>
<a href=" https://hosting.photobucket.com/95288841-8654-4bf7-8fc9-a4aa78dce87f/fca84936-af71-44d3-9a4c-faeb26163899.jpg
" target="_blank"> <img alt="Click for enlarged picture" src="
https://hosting.photobucket.com/95288841-8654-4bf7-8fc9-a4aa78dce87f/fca84936-af71-44d3-9a4c-faeb26163899.jpg" width="600" /> </a></p>
<p>
<a href=" https://hosting.photobucket.com/95288841-8654-4bf7-8fc9-a4aa78dce87f/459bc5ac-8702-46f9-93b4-547deaabdef4.jpg
" target="_blank"> <img alt="Click for enlarged picture" src="
https://hosting.photobucket.com/95288841-8654-4bf7-8fc9-a4aa78dce87f/459bc5ac-8702-46f9-93b4-547deaabdef4.jpg" width="600" /> </a></p>
<p>
<a href=" https://hosting.photobucket.com/95288841-8654-4bf7-8fc9-a4aa78dce87f/91a04363-b2ef-4635-a046-7edf25ce7808.jpg
" target="_blank"> <img alt="Click for enlarged picture" src="
https://hosting.photobucket.com/95288841-8654-4bf7-8fc9-a4aa78dce87f/91a04363-b2ef-4635-a046-7edf25ce7808.jpg" width="600" /> </a></p>
<p>
<a href=" https://hosting.photobucket.com/95288841-8654-4bf7-8fc9-a4aa78dce87f/73256af5-fd5d-40b5-95e1-120e49c9be87.jpg
" target="_blank"> <img alt="Click for enlarged picture" src="
https://hosting.photobucket.com/95288841-8654-4bf7-8fc9-a4aa78dce87f/73256af5-fd5d-40b5-95e1-120e49c9be87.jpg" width="600" /> </a></p>
<p>
<a href=" https://hosting.photobucket.com/95288841-8654-4bf7-8fc9-a4aa78dce87f/979f9be5-23f3-4df9-91dc-ab71d6a10d64.jpg
" target="_blank"> <img alt="Click for enlarged picture" src="
https://hosting.photobucket.com/95288841-8654-4bf7-8fc9-a4aa78dce87f/979f9be5-23f3-4df9-91dc-ab71d6a10d64.jpg" width="600" /> </a></p>
<p>
<a href=" https://hosting.photobucket.com/95288841-8654-4bf7-8fc9-a4aa78dce87f/d0ff4379-183a-47b9-a740-9ddc283ebc29.jpg
" target="_blank"> <img alt="Click for enlarged picture" src="
https://hosting.photobucket.com/95288841-8654-4bf7-8fc9-a4aa78dce87f/d0ff4379-183a-47b9-a740-9ddc283ebc29.jpg" width="600" /> </a></p>
<p>
<a href=" https://hosting.photobucket.com/95288841-8654-4bf7-8fc9-a4aa78dce87f/4333e95e-bbbd-4f47-aaea-38a9c99e54d8.jpg
" target="_blank"> <img alt="Click for enlarged picture" src="
https://hosting.photobucket.com/95288841-8654-4bf7-8fc9-a4aa78dce87f/4333e95e-bbbd-4f47-aaea-38a9c99e54d8.jpg" width="600" /> </a></p>
<p>
<a href=" https://hosting.photobucket.com/95288841-8654-4bf7-8fc9-a4aa78dce87f/1372f8a2-b222-48ee-ae45-a90b5a354ef7.jpg
" target="_blank"> <img alt="Click for enlarged picture" src="
https://hosting.photobucket.com/95288841-8654-4bf7-8fc9-a4aa78dce87f/1372f8a2-b222-48ee-ae45-a90b5a354ef7.jpg" width="600" /> </a></p>
<p>
<a href=" https://hosting.photobucket.com/95288841-8654-4bf7-8fc9-a4aa78dce87f/6a1b4fd1-d982-4b06-9c5f-3cd40d6bf10a.jpg
" target="_blank"> <img alt="Click for enlarged picture" src="
https://hosting.photobucket.com/95288841-8654-4bf7-8fc9-a4aa78dce87f/6a1b4fd1-d982-4b06-9c5f-3cd40d6bf10a.jpg" width="600" /> </a></p>
<p>
<a href=" https://hosting.photobucket.com/95288841-8654-4bf7-8fc9-a4aa78dce87f/c2ec45e1-e0f3-463a-b254-cb2a38b53e14.jpg
" target="_blank"> <img alt="Click for enlarged picture" src="
https://hosting.photobucket.com/95288841-8654-4bf7-8fc9-a4aa78dce87f/c2ec45e1-e0f3-463a-b254-cb2a38b53e14.jpg" width="600" /> </a></p>
<p>
<a href=" https://hosting.photobucket.com/95288841-8654-4bf7-8fc9-a4aa78dce87f/17553b9a-0592-4f6a-a097-3f1a97e161f3.jpg
" target="_blank"> <img alt="Click for enlarged picture" src="
https://hosting.photobucket.com/95288841-8654-4bf7-8fc9-a4aa78dce87f/17553b9a-0592-4f6a-a097-3f1a97e161f3.jpg" width="600" /> </a></p>
<p>
<a href=" https://hosting.photobucket.com/95288841-8654-4bf7-8fc9-a4aa78dce87f/8658bd6b-dff2-4d24-8473-928d44d44480.jpg
" target="_blank"> <img alt="Click for enlarged picture" src="
https://hosting.photobucket.com/95288841-8654-4bf7-8fc9-a4aa78dce87f/8658bd6b-dff2-4d24-8473-928d44d44480.jpg" width="600" /> </a></p>
<p>
<a href=" https://hosting.photobucket.com/95288841-8654-4bf7-8fc9-a4aa78dce87f/ecab0ea7-f75b-4e31-a520-d088ad39fa17.jpg
" target="_blank"> <img alt="Click for enlarged picture" src="
https://hosting.photobucket.com/95288841-8654-4bf7-8fc9-a4aa78dce87f/ecab0ea7-f75b-4e31-a520-d088ad39fa17.jpg" width="600" /> </a></p>
<p>
<a href=" https://hosting.photobucket.com/95288841-8654-4bf7-8fc9-a4aa78dce87f/9495a2f5-8a82-41f2-abf4-9ade3db41d87.jpg
" target="_blank"> <img alt="Click for enlarged picture" src="
https://hosting.photobucket.com/95288841-8654-4bf7-8fc9-a4aa78dce87f/9495a2f5-8a82-41f2-abf4-9ade3db41d87.jpg" width="600" /> </a></p>
<p>
<a href=" https://hosting.photobucket.com/95288841-8654-4bf7-8fc9-a4aa78dce87f/362cc6fd-a5dd-474b-9b9f-aeab27d6dcfa.jpg
" target="_blank"> <img alt="Click for enlarged picture" src="
https://hosting.photobucket.com/95288841-8654-4bf7-8fc9-a4aa78dce87f/362cc6fd-a5dd-474b-9b9f-aeab27d6dcfa.jpg" width="600" /> </a></p>
<p>
It was a special honor for us to host our guest exhibitor, Ninoslav Luk, a miniaturist from Poreč, who introduced himself to us with his collection of historical dioramas.</p>
<p>
<a href=" https://hosting.photobucket.com/95288841-8654-4bf7-8fc9-a4aa78dce87f/ba1353de-e2bd-4340-9121-9056e287ed4a.jpg
" target="_blank"> <img alt="Click for enlarged picture" src="
https://hosting.photobucket.com/95288841-8654-4bf7-8fc9-a4aa78dce87f/ba1353de-e2bd-4340-9121-9056e287ed4a.jpg" width="600" /> </a></p>
<p>
<a href=" https://hosting.photobucket.com/95288841-8654-4bf7-8fc9-a4aa78dce87f/cea18506-1b50-4e5b-955c-0b9ca02d7826.jpg
" target="_blank"> <img alt="Click for enlarged picture" src="
https://hosting.photobucket.com/95288841-8654-4bf7-8fc9-a4aa78dce87f/cea18506-1b50-4e5b-955c-0b9ca02d7826.jpg" width="600" /> </a></p>
<p>
<a href=" https://hosting.photobucket.com/95288841-8654-4bf7-8fc9-a4aa78dce87f/1be85b41-e3b6-4536-b141-cd0da6eb38c1.jpg
" target="_blank"> <img alt="Click for enlarged picture" src="
https://hosting.photobucket.com/95288841-8654-4bf7-8fc9-a4aa78dce87f/1be85b41-e3b6-4536-b141-cd0da6eb38c1.jpg" width="600" /> </a></p>
<p>
<a href=" https://hosting.photobucket.com/95288841-8654-4bf7-8fc9-a4aa78dce87f/9e93b87d-ff3c-4b7b-8f06-5f9d3464a134.jpg
" target="_blank"> <img alt="Click for enlarged picture" src="
https://hosting.photobucket.com/95288841-8654-4bf7-8fc9-a4aa78dce87f/9e93b87d-ff3c-4b7b-8f06-5f9d3464a134.jpg" width="600" /> </a></p>
<p>
During the first weekend of the Exhibition, 21-22.02., we held the 18th annual international miniature painting competition <strong>Black Queen Hobby and Miniature Painting Competition</strong>!</p>
<p>
<a href=" https://hosting.photobucket.com/95288841-8654-4bf7-8fc9-a4aa78dce87f/3056fb09-f66c-4dea-80a8-a4e72407429a.jpg
" target="_blank"> <img alt="Click for enlarged picture" src="
https://hosting.photobucket.com/95288841-8654-4bf7-8fc9-a4aa78dce87f/3056fb09-f66c-4dea-80a8-a4e72407429a.jpg" width="600" /> </a></p>
<p>
As contestants arrived and registered for the competition, our hardworking staff photographed all the exhibits before sorting them into categories and carefully placing them in glass cases. There was no shortage of morning neccessities like coffe and doughnuts.</p>
<p>
&lt;</p>
<p>
<a href=" https://hosting.photobucket.com/95288841-8654-4bf7-8fc9-a4aa78dce87f/1118089c-2b46-4a2c-b17d-dc92b66d1ffc.jpg
" target="_blank"> <img alt="Click for enlarged picture" src="
https://hosting.photobucket.com/95288841-8654-4bf7-8fc9-a4aa78dce87f/1118089c-2b46-4a2c-b17d-dc92b66d1ffc.jpg" width="600" /> </a></p>
<p>
<a href=" https://hosting.photobucket.com/95288841-8654-4bf7-8fc9-a4aa78dce87f/9fd3c272-9a69-4532-a09d-36497a20a820.jpg
" target="_blank"> <img alt="Click for enlarged picture" src="
https://hosting.photobucket.com/95288841-8654-4bf7-8fc9-a4aa78dce87f/9fd3c272-9a69-4532-a09d-36497a20a820.jpg" width="600" /> </a></p>
<p>
<a href=" https://hosting.photobucket.com/95288841-8654-4bf7-8fc9-a4aa78dce87f/86995e80-c502-45fb-80f5-c8fda27da3f9.jpg
" target="_blank"> <img alt="Click for enlarged picture" src="
https://hosting.photobucket.com/95288841-8654-4bf7-8fc9-a4aa78dce87f/86995e80-c502-45fb-80f5-c8fda27da3f9.jpg" width="600" /> </a></p>
<p>
By noon, all the display cases were full and the competition could officially begin.</p>
<p>
<a href=" https://hosting.photobucket.com/95288841-8654-4bf7-8fc9-a4aa78dce87f/bce59a4f-c3e3-4708-a3d6-25e81a894c24.jpg
" target="_blank"> <img alt="Click for enlarged picture" src="
https://hosting.photobucket.com/95288841-8654-4bf7-8fc9-a4aa78dce87f/bce59a4f-c3e3-4708-a3d6-25e81a894c24.jpg" width="600" /> </a></p>
<p>
<a href=" https://hosting.photobucket.com/95288841-8654-4bf7-8fc9-a4aa78dce87f/16a0a094-01aa-4e52-82cf-fdab00d74711.jpg
" target="_blank"> <img alt="Click for enlarged picture" src="
https://hosting.photobucket.com/95288841-8654-4bf7-8fc9-a4aa78dce87f/16a0a094-01aa-4e52-82cf-fdab00d74711.jpg" width="600" /> </a></p>
<p>
<a href=" https://hosting.photobucket.com/95288841-8654-4bf7-8fc9-a4aa78dce87f/0d3f4042-ff77-48d0-b332-add0fd08f7c3.jpg
" target="_blank"> <img alt="Click for enlarged picture" src="
https://hosting.photobucket.com/95288841-8654-4bf7-8fc9-a4aa78dce87f/0d3f4042-ff77-48d0-b332-add0fd08f7c3.jpg" width="600" /> </a></p>
<p>
<a href=" https://hosting.photobucket.com/95288841-8654-4bf7-8fc9-a4aa78dce87f/3711baf8-93f2-434a-aea9-a95288ca04dd.jpg
" target="_blank"> <img alt="Click for enlarged picture" src="
https://hosting.photobucket.com/95288841-8654-4bf7-8fc9-a4aa78dce87f/3711baf8-93f2-434a-aea9-a95288ca04dd.jpg" width="600" /> </a></p>
<p>
<a href=" https://hosting.photobucket.com/95288841-8654-4bf7-8fc9-a4aa78dce87f/53113b97-ec06-4409-95ba-95a5ad3f9720.jpg
" target="_blank"> <img alt="Click for enlarged picture" src="
https://hosting.photobucket.com/95288841-8654-4bf7-8fc9-a4aa78dce87f/53113b97-ec06-4409-95ba-95a5ad3f9720.jpg" width="600" /> </a></p>
<p>
<a href=" https://hosting.photobucket.com/95288841-8654-4bf7-8fc9-a4aa78dce87f/ab127858-193d-4976-bdb2-e27302722fca.jpg
" target="_blank"> <img alt="Click for enlarged picture" src="
https://hosting.photobucket.com/95288841-8654-4bf7-8fc9-a4aa78dce87f/ab127858-193d-4976-bdb2-e27302722fca.jpg" width="600" /> </a></p>
<p>
<a href=" https://hosting.photobucket.com/95288841-8654-4bf7-8fc9-a4aa78dce87f/3735af11-3fb6-4772-a8ff-5e0ff6ddf03a.jpg
" target="_blank"> <img alt="Click for enlarged picture" src="
https://hosting.photobucket.com/95288841-8654-4bf7-8fc9-a4aa78dce87f/3735af11-3fb6-4772-a8ff-5e0ff6ddf03a.jpg" width="600" /> </a></p>
<p>
<strong>Back To Basics workshops for the young at the Black Queen</strong></p>
<p>
This year, throughout the weekend, we organized miniature painting workshops for the youngest, who were able to paint one of our own miniatures designed specifically for this program for the first time!</p>
<p>
<a href=" https://hosting.photobucket.com/95288841-8654-4bf7-8fc9-a4aa78dce87f/6999be0c-8cc6-4947-a423-9427a2299724.jpg
" target="_blank"> <img alt="Click for enlarged picture" src="
https://hosting.photobucket.com/95288841-8654-4bf7-8fc9-a4aa78dce87f/6999be0c-8cc6-4947-a423-9427a2299724.jpg" width="600" /> </a></p>
<p>
<a href="https://hosting.photobucket.com/95288841-8654-4bf7-8fc9-a4aa78dce87f/835b05a5-f171-49df-afa6-da0692b89074.jpg" target="_blank"><img alt="Click for enlarged picture" src="https://hosting.photobucket.com/95288841-8654-4bf7-8fc9-a4aa78dce87f/835b05a5-f171-49df-afa6-da0692b89074.jpg" width="600" /></a></p>
<p>
<a href=" https://hosting.photobucket.com/95288841-8654-4bf7-8fc9-a4aa78dce87f/ef5dde13-84ee-4ea0-b9f3-28aaf703ef6d.jpg
" target="_blank"> <img alt="Click for enlarged picture" src="
https://hosting.photobucket.com/95288841-8654-4bf7-8fc9-a4aa78dce87f/ef5dde13-84ee-4ea0-b9f3-28aaf703ef6d.jpg" width="600" /> </a></p>
<p>
<strong>SELLERS&#39; COURT</strong></p>
<p>
During the weekend we hosted our sponsors with their sales stands: Swood.si and Carta Magica.</p>
<p>
<a href=" https://hosting.photobucket.com/95288841-8654-4bf7-8fc9-a4aa78dce87f/5ee9a49f-a387-435a-9110-572402b7191d.jpg
" target="_blank"> <img alt="Click for enlarged picture" src="
https://hosting.photobucket.com/95288841-8654-4bf7-8fc9-a4aa78dce87f/5ee9a49f-a387-435a-9110-572402b7191d.jpg" width="600" /> </a></p>
<p>
<a href=" https://hosting.photobucket.com/95288841-8654-4bf7-8fc9-a4aa78dce87f/47cf600f-b1eb-4655-bf06-305f6f21d5d2.jpg
" target="_blank"> <img alt="Click for enlarged picture" src="
https://hosting.photobucket.com/95288841-8654-4bf7-8fc9-a4aa78dce87f/47cf600f-b1eb-4655-bf06-305f6f21d5d2.jpg" width="600" /> </a></p>
<p>
<strong>MINIATURE PAINTING WORKSHOPS</strong></p>
<p>
The ZZTK premises allow workshops to be held during the weekend in the cinema hall in the basement, so we also organized demonstration workshops during the weekend. The lecturers&#39; work was recorded with a camera and projected onto the projection screen in the hall. Many thanks to our domestic and international lecturers: Anže Zorko (SLO), doc.dr.sc. Winton Afrić (CRO), Ivan Knezović (UMS Agram) and Petar Knezoviću (CRO).</p>
<p>
<a href=" https://hosting.photobucket.com/95288841-8654-4bf7-8fc9-a4aa78dce87f/e8d835be-ec99-49d7-bc9b-086e38573d1a.jpg
" target="_blank"> <img alt="Click for enlarged picture" src="
https://hosting.photobucket.com/95288841-8654-4bf7-8fc9-a4aa78dce87f/e8d835be-ec99-49d7-bc9b-086e38573d1a.jpg" width="600" /> </a></p>
<p>
<a href=" https://hosting.photobucket.com/95288841-8654-4bf7-8fc9-a4aa78dce87f/f3eba4c1-4637-4da9-8360-75f430355af4.jpg" target="_blank"> <img alt="Click for enlarged picture" src="
https://hosting.photobucket.com/95288841-8654-4bf7-8fc9-a4aa78dce87f/f3eba4c1-4637-4da9-8360-75f430355af4.jpg" width="600" /> </a></p>
<p>
<a href=" https://hosting.photobucket.com/95288841-8654-4bf7-8fc9-a4aa78dce87f/ef523854-4030-4579-aa38-403afda86c91.jpg
" target="_blank"> <img alt="Click for enlarged picture" src="
https://hosting.photobucket.com/95288841-8654-4bf7-8fc9-a4aa78dce87f/ef523854-4030-4579-aa38-403afda86c91.jpg" width="600" /> </a></p>
<p>
<a href=" https://hosting.photobucket.com/95288841-8654-4bf7-8fc9-a4aa78dce87f/dd0943c2-f4a8-40c3-b641-f6dcdd200380.jpg
" target="_blank"> <img alt="Click for enlarged picture" src="
https://hosting.photobucket.com/95288841-8654-4bf7-8fc9-a4aa78dce87f/dd0943c2-f4a8-40c3-b641-f6dcdd200380.jpg" width="600" /> </a></p>
<p>
<a href=" https://hosting.photobucket.com/95288841-8654-4bf7-8fc9-a4aa78dce87f/08b1626a-f6c7-43c9-b718-3e9a41b55ca6.jpg
" target="_blank"> <img alt="Click for enlarged picture" src="
https://hosting.photobucket.com/95288841-8654-4bf7-8fc9-a4aa78dce87f/08b1626a-f6c7-43c9-b718-3e9a41b55ca6.jpg" width="600" /> </a></p>
<p>
<a href=" https://hosting.photobucket.com/95288841-8654-4bf7-8fc9-a4aa78dce87f/91aca7f3-1af6-486d-b174-65079a63a1ea.jpg
" target="_blank"> <img alt="Click for enlarged picture" src="
https://hosting.photobucket.com/95288841-8654-4bf7-8fc9-a4aa78dce87f/91aca7f3-1af6-486d-b174-65079a63a1ea.jpg" width="600" /> </a></p>
<p>
<a href=" https://hosting.photobucket.com/95288841-8654-4bf7-8fc9-a4aa78dce87f/3821f2fb-fbe7-4096-adbc-7d8c981a3b56.jpg
" target="_blank"> <img alt="Click for enlarged picture" src="
https://hosting.photobucket.com/95288841-8654-4bf7-8fc9-a4aa78dce87f/3821f2fb-fbe7-4096-adbc-7d8c981a3b56.jpg" width="600" /> </a></p>
<p>
<a href=" https://hosting.photobucket.com/95288841-8654-4bf7-8fc9-a4aa78dce87f/2c7bb3c5-c0ec-4a96-b6bd-6a90ce5ce154.jpg
" target="_blank"> <img alt="Click for enlarged picture" src="
https://hosting.photobucket.com/95288841-8654-4bf7-8fc9-a4aa78dce87f/2c7bb3c5-c0ec-4a96-b6bd-6a90ce5ce154.jpg" width="600" /> </a></p>
<p>
<a href=" https://hosting.photobucket.com/95288841-8654-4bf7-8fc9-a4aa78dce87f/b646f4ee-21aa-4d12-8db3-6d33351d5aeb.jpg
" target="_blank"> <img alt="Click for enlarged picture" src="
https://hosting.photobucket.com/95288841-8654-4bf7-8fc9-a4aa78dce87f/b646f4ee-21aa-4d12-8db3-6d33351d5aeb.jpg" width="600" /> </a></p>
<p>
<a href=" https://hosting.photobucket.com/95288841-8654-4bf7-8fc9-a4aa78dce87f/fb5efc01-32cc-4119-90e3-188f51b30237.jpg
" target="_blank"> <img alt="Click for enlarged picture" src="
https://hosting.photobucket.com/95288841-8654-4bf7-8fc9-a4aa78dce87f/fb5efc01-32cc-4119-90e3-188f51b30237.jpg" width="600" /> </a></p>
<p>
<strong>SPEED PAINTING COMPETITION</strong></p>
<p>
We organized a speed painting competition on Sunday afternoon. Participants had 60 minutes to paint one wizrad, a miniature of our own design and production.</p>
<p>
<a href=" https://hosting.photobucket.com/95288841-8654-4bf7-8fc9-a4aa78dce87f/106417a6-a047-4e0d-9f81-87858806052f.jpg
" target="_blank"> <img alt="Click for enlarged picture" src="
https://hosting.photobucket.com/95288841-8654-4bf7-8fc9-a4aa78dce87f/106417a6-a047-4e0d-9f81-87858806052f.jpg" width="600" /> </a></p>
<p>
<a href=" https://hosting.photobucket.com/95288841-8654-4bf7-8fc9-a4aa78dce87f/ac6853c7-6e34-4e07-a996-8d7d12744b67.jpg
" target="_blank"> <img alt="Click for enlarged picture" src="
https://hosting.photobucket.com/95288841-8654-4bf7-8fc9-a4aa78dce87f/ac6853c7-6e34-4e07-a996-8d7d12744b67.jpg" width="600" /> </a></p>
<p>
<a href=" https://hosting.photobucket.com/95288841-8654-4bf7-8fc9-a4aa78dce87f/ccb155fa-52c5-4a99-9515-f69a6836dce7.jpg
" target="_blank"> <img alt="Click for enlarged picture" src="
https://hosting.photobucket.com/95288841-8654-4bf7-8fc9-a4aa78dce87f/ccb155fa-52c5-4a99-9515-f69a6836dce7.jpg" width="600" /> </a></p>
<p>
<a href=" https://hosting.photobucket.com/95288841-8654-4bf7-8fc9-a4aa78dce87f/a29fedd0-97ea-45b1-85f9-7ea62188b2b2.jpg
" target="_blank"><img alt="Click for enlarged picture" src="
https://hosting.photobucket.com/95288841-8654-4bf7-8fc9-a4aa78dce87f/a29fedd0-97ea-45b1-85f9-7ea62188b2b2.jpg" width="600" /></a></p>
<p>
With that, we came to the very end of this wonderful weekend and all that was left was the awarding of prizes and recognition to the winners.</p>
<p>
<a href=" https://hosting.photobucket.com/95288841-8654-4bf7-8fc9-a4aa78dce87f/046ca4c8-0ae7-415e-abd3-e131d580c3ad.jpg
" target="_blank"> <img alt="Click for enlarged picture" src="
https://hosting.photobucket.com/95288841-8654-4bf7-8fc9-a4aa78dce87f/046ca4c8-0ae7-415e-abd3-e131d580c3ad.jpg" width="600" /> </a></p>
<p>
<a href=" https://hosting.photobucket.com/95288841-8654-4bf7-8fc9-a4aa78dce87f/cec0dcef-7acb-4a77-89de-271ed5410672.jpg
" target="_blank"> <img alt="Click for enlarged picture" src="
https://hosting.photobucket.com/95288841-8654-4bf7-8fc9-a4aa78dce87f/cec0dcef-7acb-4a77-89de-271ed5410672.jpg" width="600" /> </a></p>
<p>
<a href=" https://hosting.photobucket.com/95288841-8654-4bf7-8fc9-a4aa78dce87f/a495a5fc-31a2-4979-a970-0fa22c334354.jpg
" target="_blank"> <img alt="Click for enlarged picture" src="
https://hosting.photobucket.com/95288841-8654-4bf7-8fc9-a4aa78dce87f/a495a5fc-31a2-4979-a970-0fa22c334354.jpg" width="600" /> </a></p>
<p>
<strong>AGRAM ARENA &ndash; Leaving Asphodel Necropolis28 Campaign</strong></p>
<p>
During the weekend of February 21-22, we held a new international competition, Agram Arena! This time it was the turn of the tabletop strategy game Necropolis28, for which our members designed a two-day campaign. Each participant created their own gang of soldiers, and the vast majority also created their own boards.</p>
<p>
<a href=" https://hosting.photobucket.com/95288841-8654-4bf7-8fc9-a4aa78dce87f/ac69b182-4bfc-4575-a6d3-fb3c8baba342.jpg
" target="_blank"> <img alt="Click for enlarged picture" src="
https://hosting.photobucket.com/95288841-8654-4bf7-8fc9-a4aa78dce87f/ac69b182-4bfc-4575-a6d3-fb3c8baba342.jpg" width="600" /> </a></p>
<p>
<a href=" https://hosting.photobucket.com/95288841-8654-4bf7-8fc9-a4aa78dce87f/289fed7b-e058-42d8-ba2d-cbd0463e98da.jpg
" target="_blank"> <img alt="Click for enlarged picture" src="
https://hosting.photobucket.com/95288841-8654-4bf7-8fc9-a4aa78dce87f/289fed7b-e058-42d8-ba2d-cbd0463e98da.jpg" width="600" /> </a></p>
<p>
<a href=" https://hosting.photobucket.com/95288841-8654-4bf7-8fc9-a4aa78dce87f/d92ebbee-859d-4441-8386-3d760b20b7a7.jpg
" target="_blank"> <img alt="Click for enlarged picture" src="
https://hosting.photobucket.com/95288841-8654-4bf7-8fc9-a4aa78dce87f/d92ebbee-859d-4441-8386-3d760b20b7a7.jpg" width="600" /> </a></p>
<p>
<a href=" https://hosting.photobucket.com/95288841-8654-4bf7-8fc9-a4aa78dce87f/09c59798-7871-425e-a075-3ca1cd91768a.jpg
" target="_blank"> <img alt="Click for enlarged picture" src="
https://hosting.photobucket.com/95288841-8654-4bf7-8fc9-a4aa78dce87f/09c59798-7871-425e-a075-3ca1cd91768a.jpg" width="600" /> </a></p>
<p>
<a href=" https://hosting.photobucket.com/95288841-8654-4bf7-8fc9-a4aa78dce87f/b2f3edc8-5a23-4552-9a2a-4027b286f327.jpg
" target="_blank"> <img alt="Click for enlarged picture" src="
https://hosting.photobucket.com/95288841-8654-4bf7-8fc9-a4aa78dce87f/b2f3edc8-5a23-4552-9a2a-4027b286f327.jpg" width="600" /> </a></p>
<p>
<a href=" https://hosting.photobucket.com/95288841-8654-4bf7-8fc9-a4aa78dce87f/2a9f43ac-b531-4746-b7bb-ac5a3356aab0.jpg
" target="_blank"> <img alt="Click for enlarged picture" src="
https://hosting.photobucket.com/95288841-8654-4bf7-8fc9-a4aa78dce87f/2a9f43ac-b531-4746-b7bb-ac5a3356aab0.jpg" width="600" /> </a></p>
<p>
<strong>EVENTS ON WEEKDAYS DURING THE EXHIBITION </strong></p>
<p>
Over the next two weeks, our volunteers held open miniature painting workshops on weekdays from 4:00 PM to 8:00 PM. Miniature painting workstations were set up where our visitors could paint miniatures we had prepared (or their own if they had brought them) using our materials and tools.</p>
<p>
<a href=" https://hosting.photobucket.com/95288841-8654-4bf7-8fc9-a4aa78dce87f/6edf7765-42b5-417a-820f-fa5d907179a7.jpg
" target="_blank"> <img alt="Click for enlarged picture" src="
https://hosting.photobucket.com/95288841-8654-4bf7-8fc9-a4aa78dce87f/6edf7765-42b5-417a-820f-fa5d907179a7.jpg" width="600" /> </a></p>
<p>
<a href=" https://hosting.photobucket.com/95288841-8654-4bf7-8fc9-a4aa78dce87f/c084ebe2-f57b-4519-9b31-29bdc1155887.jpg
" target="_blank"> <img alt="Click for enlarged picture" src="
https://hosting.photobucket.com/95288841-8654-4bf7-8fc9-a4aa78dce87f/c084ebe2-f57b-4519-9b31-29bdc1155887.jpg" width="600" /> </a></p>
<p>
<a href=" https://hosting.photobucket.com/95288841-8654-4bf7-8fc9-a4aa78dce87f/37ff2272-f9b0-4b16-a363-1e6f6688c866.jpg
" target="_blank"> <img alt="Click for enlarged picture" src="
https://hosting.photobucket.com/95288841-8654-4bf7-8fc9-a4aa78dce87f/37ff2272-f9b0-4b16-a363-1e6f6688c866.jpg" width="600" /> </a></p>
<p>
<a href=" https://hosting.photobucket.com/95288841-8654-4bf7-8fc9-a4aa78dce87f/5f4f7968-ff50-4a01-98da-6ce8562930b4.jpg
" target="_blank"> <img alt="Click for enlarged picture" src="
https://hosting.photobucket.com/95288841-8654-4bf7-8fc9-a4aa78dce87f/5f4f7968-ff50-4a01-98da-6ce8562930b4.jpg" width="600" /> </a></p>
<p>
<a href=" https://hosting.photobucket.com/95288841-8654-4bf7-8fc9-a4aa78dce87f/cbb45319-d488-483c-bf9d-9af29852fc74.jpg
" target="_blank"> <img alt="Click for enlarged picture" src="
https://hosting.photobucket.com/95288841-8654-4bf7-8fc9-a4aa78dce87f/cbb45319-d488-483c-bf9d-9af29852fc74.jpg" width="600" /> </a></p>
<p>
<a href=" https://hosting.photobucket.com/95288841-8654-4bf7-8fc9-a4aa78dce87f/3dcca26c-d549-4af3-812a-a4a81b9a2310.jpg
" target="_blank"> <img alt="Click for enlarged picture" src="
https://hosting.photobucket.com/95288841-8654-4bf7-8fc9-a4aa78dce87f/3dcca26c-d549-4af3-812a-a4a81b9a2310.jpg" width="600" /> </a></p>
<p>
<a href=" https://hosting.photobucket.com/95288841-8654-4bf7-8fc9-a4aa78dce87f/4adf0fb6-3eab-4b40-b32d-d03eab4a9892.jpg
" target="_blank"> <img alt="Click for enlarged picture" src="
https://hosting.photobucket.com/95288841-8654-4bf7-8fc9-a4aa78dce87f/4adf0fb6-3eab-4b40-b32d-d03eab4a9892.jpg" width="600" /> </a></p>
<p>
<a href=" https://hosting.photobucket.com/95288841-8654-4bf7-8fc9-a4aa78dce87f/4732b58a-9a65-4d1c-a7d5-25513d34b108.jpg
" target="_blank"> <img alt="Click for enlarged picture" src="
https://hosting.photobucket.com/95288841-8654-4bf7-8fc9-a4aa78dce87f/4732b58a-9a65-4d1c-a7d5-25513d34b108.jpg" width="600" /> </a></p>
<p>
<a href=" https://hosting.photobucket.com/95288841-8654-4bf7-8fc9-a4aa78dce87f/274be330-31d5-4e25-95db-ec2f423a003c.jpg
" target="_blank"> <img alt="Click for enlarged picture" src="
https://hosting.photobucket.com/95288841-8654-4bf7-8fc9-a4aa78dce87f/274be330-31d5-4e25-95db-ec2f423a003c.jpg" width="600" /> </a></p>
<p>
<a href=" https://hosting.photobucket.com/95288841-8654-4bf7-8fc9-a4aa78dce87f/8e7b0a80-0f46-4d70-9789-a46976c713d2.jpg
" target="_blank"> <img alt="Click for enlarged picture" src="
https://hosting.photobucket.com/95288841-8654-4bf7-8fc9-a4aa78dce87f/8e7b0a80-0f46-4d70-9789-a46976c713d2.jpg" width="600" /> </a></p>
<p>
<a href=" https://hosting.photobucket.com/95288841-8654-4bf7-8fc9-a4aa78dce87f/8bbd4e96-b911-4f26-80fe-b1c57f29027b.jpg
" target="_blank"> <img alt="Click for enlarged picture" src="
https://hosting.photobucket.com/95288841-8654-4bf7-8fc9-a4aa78dce87f/8bbd4e96-b911-4f26-80fe-b1c57f29027b.jpg" width="600" /> </a></p>
<p>
<a href=" https://hosting.photobucket.com/95288841-8654-4bf7-8fc9-a4aa78dce87f/203a27be-8f10-459d-89b9-befb6b636b74.jpg
" target="_blank"> <img alt="Click for enlarged picture" src="
https://hosting.photobucket.com/95288841-8654-4bf7-8fc9-a4aa78dce87f/203a27be-8f10-459d-89b9-befb6b636b74.jpg" width="600" /> </a></p>
<p>
<a href=" https://hosting.photobucket.com/95288841-8654-4bf7-8fc9-a4aa78dce87f/5dc4358f-19d8-475f-a4af-9c29e9ed18d7.jpg
" target="_blank"> <img alt="Click for enlarged picture" src="
https://hosting.photobucket.com/95288841-8654-4bf7-8fc9-a4aa78dce87f/5dc4358f-19d8-475f-a4af-9c29e9ed18d7.jpg" width="600" /> </a></p>
<p>
<strong>BACK TO BASICS MINIATURE PAINTING WORKSHOPS FOR YOUNG</strong></p>
<p>
On weekdays from 17:00 to 18:00, we held our new workshops for the youngest, in which our youngest participants painted their first miniatures.</p>
<p>
<a href=" https://hosting.photobucket.com/95288841-8654-4bf7-8fc9-a4aa78dce87f/948af139-8fb5-4e28-a27c-404466e70d05.jpg
" target="_blank"> <img alt="Click for enlarged picture" src="
https://hosting.photobucket.com/95288841-8654-4bf7-8fc9-a4aa78dce87f/948af139-8fb5-4e28-a27c-404466e70d05.jpg" width="600" /> </a></p>
<p>
<a href=" https://hosting.photobucket.com/95288841-8654-4bf7-8fc9-a4aa78dce87f/bb3e20c2-bb21-4a3d-863a-74de08261467.jpg
" target="_blank"> <img alt="Click for enlarged picture" src="
https://hosting.photobucket.com/95288841-8654-4bf7-8fc9-a4aa78dce87f/bb3e20c2-bb21-4a3d-863a-74de08261467.jpg" width="600" /> </a></p>
<p>
<a href=" https://hosting.photobucket.com/95288841-8654-4bf7-8fc9-a4aa78dce87f/7316c760-98e3-4e3f-9261-d138aa7a5a6a.jpg
" target="_blank"> <img alt="Click for enlarged picture" src="
https://hosting.photobucket.com/95288841-8654-4bf7-8fc9-a4aa78dce87f/7316c760-98e3-4e3f-9261-d138aa7a5a6a.jpg" width="600" /> </a></p>
<p>
<a href=" https://hosting.photobucket.com/95288841-8654-4bf7-8fc9-a4aa78dce87f/68934b39-3d1f-4f43-b967-14b73c41a39e.jpg
" target="_blank"> <img alt="Click for enlarged picture" src="
https://hosting.photobucket.com/95288841-8654-4bf7-8fc9-a4aa78dce87f/68934b39-3d1f-4f43-b967-14b73c41a39e.jpg" width="600" /> </a></p>
<p>
<a href=" https://hosting.photobucket.com/95288841-8654-4bf7-8fc9-a4aa78dce87f/46125bce-a28d-494f-873a-3aeabdc1d6c2.jpg
" target="_blank"> <img alt="Click for enlarged picture" src="
https://hosting.photobucket.com/95288841-8654-4bf7-8fc9-a4aa78dce87f/46125bce-a28d-494f-873a-3aeabdc1d6c2.jpg" width="600" /> </a></p>
<p>
<a href=" https://hosting.photobucket.com/95288841-8654-4bf7-8fc9-a4aa78dce87f/3c58e0ad-77a9-44c8-b6bf-d9a55c514d43.jpg
" target="_blank"> <img alt="Click for enlarged picture" src="
https://hosting.photobucket.com/95288841-8654-4bf7-8fc9-a4aa78dce87f/3c58e0ad-77a9-44c8-b6bf-d9a55c514d43.jpg" width="600" /> </a></p>
<p>
<a href=" https://hosting.photobucket.com/95288841-8654-4bf7-8fc9-a4aa78dce87f/f891f0f0-051b-40ee-9676-cb03b0a9811b.jpg
" target="_blank"> <img alt="Click for enlarged picture" src="
https://hosting.photobucket.com/95288841-8654-4bf7-8fc9-a4aa78dce87f/f891f0f0-051b-40ee-9676-cb03b0a9811b.jpg" width="600" /> </a></p>
<p>
<strong>AGRAM LEGO SECTION lecture: FW-14b &ndash; An F1 racecar for the future</strong></p>
<p>
On Wednesday, February 25, 2026, as part of the activities of our Agram Lego Section, our resident mechanical engineer Marko Paunović gave a lecture on the topic of the F1 racecar from 1992. Admission to the lecture was free, and upon completion, a LEGO model of the racecar was made by members of the Lego section</p>
<p>
<a href=" https://hosting.photobucket.com/95288841-8654-4bf7-8fc9-a4aa78dce87f/b2e14b1c-daa4-4314-8685-184377bc7e28.jpg
" target="_blank"> <img alt="Click for enlarged picture" src="
https://hosting.photobucket.com/95288841-8654-4bf7-8fc9-a4aa78dce87f/b2e14b1c-daa4-4314-8685-184377bc7e28.jpg" width="600" /> </a></p>
<p>
<a href=" https://hosting.photobucket.com/95288841-8654-4bf7-8fc9-a4aa78dce87f/31fb439a-77d3-4418-83ff-66c3af279cca.jpg" target="_blank"> <img alt="Click for enlarged picture" src="
https://hosting.photobucket.com/95288841-8654-4bf7-8fc9-a4aa78dce87f/31fb439a-77d3-4418-83ff-66c3af279cca.jpg" width="600" /> </a></p>
<p>
<a href=" https://hosting.photobucket.com/95288841-8654-4bf7-8fc9-a4aa78dce87f/bfcaf282-6be8-4b52-a3ed-c91137457876.jpg
" target="_blank"> <img alt="Click for enlarged picture" src="
https://hosting.photobucket.com/95288841-8654-4bf7-8fc9-a4aa78dce87f/bfcaf282-6be8-4b52-a3ed-c91137457876.jpg" width="600" /> </a></p>
<p>
<a href=" https://hosting.photobucket.com/95288841-8654-4bf7-8fc9-a4aa78dce87f/ce70fc61-9e1a-4169-aaad-8b67417656c0.jpg
" target="_blank"> <img alt="Click for enlarged picture" src="
https://hosting.photobucket.com/95288841-8654-4bf7-8fc9-a4aa78dce87f/ce70fc61-9e1a-4169-aaad-8b67417656c0.jpg" width="600" /> </a></p>
<p>
<a href=" https://hosting.photobucket.com/95288841-8654-4bf7-8fc9-a4aa78dce87f/94ca0e36-8710-458d-8194-9f71299f4d74.jpg
" target="_blank"> <img alt="Click for enlarged picture" src="
https://hosting.photobucket.com/95288841-8654-4bf7-8fc9-a4aa78dce87f/94ca0e36-8710-458d-8194-9f71299f4d74.jpg" width="600" /> </a></p>
<p>
<a href=" https://hosting.photobucket.com/95288841-8654-4bf7-8fc9-a4aa78dce87f/c6771f72-7191-4ca3-a792-3bb1ab3897b1.jpg
" target="_blank"> <img alt="Click for enlarged picture" src="
https://hosting.photobucket.com/95288841-8654-4bf7-8fc9-a4aa78dce87f/c6771f72-7191-4ca3-a792-3bb1ab3897b1.jpg" width="600" /> </a></p>
<p>
<a href=" https://hosting.photobucket.com/95288841-8654-4bf7-8fc9-a4aa78dce87f/c8fcfcb6-09f2-4398-a2fb-fa5065771e01.jpg
" target="_blank"> <img alt="Click for enlarged picture" src="
https://hosting.photobucket.com/95288841-8654-4bf7-8fc9-a4aa78dce87f/c8fcfcb6-09f2-4398-a2fb-fa5065771e01.jpg" width="600" /> </a></p>
<p>
<a href=" https://hosting.photobucket.com/95288841-8654-4bf7-8fc9-a4aa78dce87f/d7e187a8-d5b1-433b-b30d-091e54dcdddf.jpg
" target="_blank"> <img alt="Click for enlarged picture" src="
https://hosting.photobucket.com/95288841-8654-4bf7-8fc9-a4aa78dce87f/d7e187a8-d5b1-433b-b30d-091e54dcdddf.jpg" width="600" /> </a></p>
<p>
During the second weekend of the Exhibition, 28.02.-01.03., we organized a <strong>MINIATURE PAINTING WORKSHOP - Grimdark</strong>.</p>
<p>
The workshop was held over two days (the entire weekend) and participants painted up to three different figures for the game Trench Crusade. The focus of these lectures was on painting the popular grimdark style minis. The workshop presented paints and equipment, figure preparation, several miniature painting techniques from basic to advanced, and techniques and tricks for quickly and efficiently painting larger quantities of figures at once. Water-based acrylic paints were used as part of the workshop.</p>
<p>
<a href=" https://hosting.photobucket.com/95288841-8654-4bf7-8fc9-a4aa78dce87f/733d94b2-8e8d-4a4e-accd-b9168e32577e.jpg
" target="_blank"> <img alt="Click for enlarged picture" src="
https://hosting.photobucket.com/95288841-8654-4bf7-8fc9-a4aa78dce87f/733d94b2-8e8d-4a4e-accd-b9168e32577e.jpg
" width="600" /> </a></p>
<p>
<a href=" https://hosting.photobucket.com/95288841-8654-4bf7-8fc9-a4aa78dce87f/41020062-45b9-41cd-a357-fa23a389f390.jpg
" target="_blank"> <img alt="Click for enlarged picture" src="
https://hosting.photobucket.com/95288841-8654-4bf7-8fc9-a4aa78dce87f/41020062-45b9-41cd-a357-fa23a389f390.jpg
" width="600" /> </a></p>
<p>
<a href=" https://hosting.photobucket.com/95288841-8654-4bf7-8fc9-a4aa78dce87f/0c07cc55-596d-494d-972b-cd6a0dd6b8b7.jpg
" target="_blank"> <img alt="Click for enlarged picture" src="
https://hosting.photobucket.com/95288841-8654-4bf7-8fc9-a4aa78dce87f/0c07cc55-596d-494d-972b-cd6a0dd6b8b7.jpg" width="600" /> </a></p>
<p>
<a href=" https://hosting.photobucket.com/95288841-8654-4bf7-8fc9-a4aa78dce87f/c17dd356-08b1-48e1-b895-6296aed7f818.jpg
" target="_blank"> <img alt="Click for enlarged picture" src="
https://hosting.photobucket.com/95288841-8654-4bf7-8fc9-a4aa78dce87f/c17dd356-08b1-48e1-b895-6296aed7f818.jpg" width="600" /> </a></p>
<p>
On Wednesday 04.03.2026. the annual <strong>session of the Assembly</strong> was held, where we determined the guidelines for work in 2026.</p>
<p>
,</p>
<p>
<a href=" https://hosting.photobucket.com/95288841-8654-4bf7-8fc9-a4aa78dce87f/59484bd0-7edc-4aed-a04e-ae42900ba3e6.jpg
" target="_blank"> <img alt="Click for enlarged picture" src="
https://hosting.photobucket.com/95288841-8654-4bf7-8fc9-a4aa78dce87f/59484bd0-7edc-4aed-a04e-ae42900ba3e6.jpg
" width="600" /> </a></p>
<p>
On Sunday 08.03.2026. The exhibition was over, our exhibits safely stored, and the Gallery cleaned.</p>
<p>
<a href=" https://hosting.photobucket.com/95288841-8654-4bf7-8fc9-a4aa78dce87f/98af4280-0956-4cdb-b4a9-da40e3a5a44a.jpg
" target="_blank"> <img alt="Click for enlarged picture" src="
https://hosting.photobucket.com/95288841-8654-4bf7-8fc9-a4aa78dce87f/98af4280-0956-4cdb-b4a9-da40e3a5a44a.jpg" width="600" /> </a></p>
<p>
<a href=" https://hosting.photobucket.com/95288841-8654-4bf7-8fc9-a4aa78dce87f/3259b35e-1fc2-4a99-a3c5-c7984958d72b.jpg
" target="_blank"> <img alt="Click for enlarged picture" src="
https://hosting.photobucket.com/95288841-8654-4bf7-8fc9-a4aa78dce87f/3259b35e-1fc2-4a99-a3c5-c7984958d72b.jpg" width="600" /> </a></p>
<p>
The most important part of every year when holding this Exhibition is the social aspect, the socializing of our members both among themselves and with our international friends who visit us! With these few photos from our joint gatherings, we greet you until next year!</p>
<p>
<a href=" https://hosting.photobucket.com/95288841-8654-4bf7-8fc9-a4aa78dce87f/b9168e23-79b2-4d81-8a7d-7534062881a7.jpg
" target="_blank"> <img alt="Click for enlarged picture" src="
https://hosting.photobucket.com/95288841-8654-4bf7-8fc9-a4aa78dce87f/b9168e23-79b2-4d81-8a7d-7534062881a7.jpg " width="600" /> </a></p>
<p>
<a href=" https://hosting.photobucket.com/95288841-8654-4bf7-8fc9-a4aa78dce87f/edff925e-916c-4d78-953e-210abf3753d4.jpg
" target="_blank"> <img alt="Click for enlarged picture" src="
https://hosting.photobucket.com/95288841-8654-4bf7-8fc9-a4aa78dce87f/edff925e-916c-4d78-953e-210abf3753d4.jpg " width="600" /> </a></p>
<p>
<a href=" https://hosting.photobucket.com/95288841-8654-4bf7-8fc9-a4aa78dce87f/8bcb48fa-466b-43f8-8a4b-f15f6794b21e.jpg
" target="_blank"> <img alt="Click for enlarged picture" src="
https://hosting.photobucket.com/95288841-8654-4bf7-8fc9-a4aa78dce87f/8bcb48fa-466b-43f8-8a4b-f15f6794b21e.jpg" width="600" /> </a></p>
",
"content_hrv" => "<p>
<a href=" https://hosting.photobucket.com/95288841-8654-4bf7-8fc9-a4aa78dce87f/dc756f84-867d-4df4-acd8-5d43775cafc2.jpg
" target="_blank"> <img alt="Click for enlarged picture" src="
https://hosting.photobucket.com/95288841-8654-4bf7-8fc9-a4aa78dce87f/dc756f84-867d-4df4-acd8-5d43775cafc2.jpg" width="600" /> </a></p>
<p>
<strong>Izložba minijatura i maketa &quot;Agram 2026&quot;</strong> održala se ove godine od 19.2. do 08.03. Postavljanje izložbe je održano u srijedu 18.2. i sudjelovao je velik broj članova kao i prijatelja Udruge koji su izlagali svoje radove.</p>
<p>
<a href=" https://hosting.photobucket.com/95288841-8654-4bf7-8fc9-a4aa78dce87f/8529d6d4-76ea-4872-a9e6-748e04223a4e.jpg
" target="_blank"> <img alt="Click for enlarged picture" src="
https://hosting.photobucket.com/95288841-8654-4bf7-8fc9-a4aa78dce87f/8529d6d4-76ea-4872-a9e6-748e04223a4e.jpg
" width="600" /> </a></p>
<p>
<a href=" https://hosting.photobucket.com/95288841-8654-4bf7-8fc9-a4aa78dce87f/f3038937-f001-4ceb-b725-a330fcd64cee.jpg
" target="_blank"> <img alt="Click for enlarged picture" src="
https://hosting.photobucket.com/95288841-8654-4bf7-8fc9-a4aa78dce87f/f3038937-f001-4ceb-b725-a330fcd64cee.jpg
" width="600" /> </a></p>
<p>
<a href=" https://hosting.photobucket.com/95288841-8654-4bf7-8fc9-a4aa78dce87f/3575379e-e068-49e2-9d4d-c9a49531fdc2.jpg
" target="_blank"> <img alt="Click for enlarged picture" src="
https://hosting.photobucket.com/95288841-8654-4bf7-8fc9-a4aa78dce87f/3575379e-e068-49e2-9d4d-c9a49531fdc2.jpg" width="600" /> </a></p>
<p>
<a href=" https://hosting.photobucket.com/95288841-8654-4bf7-8fc9-a4aa78dce87f/e51713c7-2add-4f8f-ae37-e6eba25badff.jpg
" target="_blank"> <img alt="Click for enlarged picture" src="
https://hosting.photobucket.com/95288841-8654-4bf7-8fc9-a4aa78dce87f/e51713c7-2add-4f8f-ae37-e6eba25badff.jpg" width="600" /> </a></p>
<p>
<a href=" https://hosting.photobucket.com/95288841-8654-4bf7-8fc9-a4aa78dce87f/9c0bb546-50a8-483d-aeab-ab3b2ce9f094.jpg
" target="_blank"> <img alt="Click for enlarged picture" src="
https://hosting.photobucket.com/95288841-8654-4bf7-8fc9-a4aa78dce87f/9c0bb546-50a8-483d-aeab-ab3b2ce9f094.jpg" width="600" /> </a></p>
<p>
Otvorenje Izložbe održalo se u četvrtak, 19.2.2026. s početkom u 18:00h. Izložba je organizirana povodom na&scaron;eg dvadeset trećeg rođendana.</p>
<p>
<a href=" https://hosting.photobucket.com/95288841-8654-4bf7-8fc9-a4aa78dce87f/71c7bfc2-1ffc-43b9-9d5a-53e009f6b86d.jpg
" target="_blank"> <img alt="Click for enlarged picture" src="
https://hosting.photobucket.com/95288841-8654-4bf7-8fc9-a4aa78dce87f/71c7bfc2-1ffc-43b9-9d5a-53e009f6b86d.jpg" width="600" /> </a></p>
<p>
<a href=" https://hosting.photobucket.com/95288841-8654-4bf7-8fc9-a4aa78dce87f/007b4701-1d7c-4a67-a599-0539a2aa3191.jpg
" target="_blank"> <img alt="Click for enlarged picture" src="
https://hosting.photobucket.com/95288841-8654-4bf7-8fc9-a4aa78dce87f/007b4701-1d7c-4a67-a599-0539a2aa3191.jpg" width="600" /> </a></p>
<p>
<a href=" https://hosting.photobucket.com/95288841-8654-4bf7-8fc9-a4aa78dce87f/2c8090e2-8b95-4368-bb48-98876d680e15.jpg
" target="_blank"> <img alt="Click for enlarged picture" src="
https://hosting.photobucket.com/95288841-8654-4bf7-8fc9-a4aa78dce87f/2c8090e2-8b95-4368-bb48-98876d680e15.jpg" width="600" /> </a></p>
<p>
<a href=" https://hosting.photobucket.com/95288841-8654-4bf7-8fc9-a4aa78dce87f/375768ad-a8bb-49bf-9845-e46c896ba7ec.jpg
" target="_blank"> <img alt="Click for enlarged picture" src="
https://hosting.photobucket.com/95288841-8654-4bf7-8fc9-a4aa78dce87f/375768ad-a8bb-49bf-9845-e46c896ba7ec.jpg" width="600" /> </a></p>
<p>
<a href=" https://hosting.photobucket.com/95288841-8654-4bf7-8fc9-a4aa78dce87f/a93de974-4ccb-4876-85b0-4d066ae402b3.jpg
" target="_blank"> <img alt="Click for enlarged picture" src="
https://hosting.photobucket.com/95288841-8654-4bf7-8fc9-a4aa78dce87f/a93de974-4ccb-4876-85b0-4d066ae402b3.jpg" width="600" /> </a></p>
<p>
<a href=" https://hosting.photobucket.com/95288841-8654-4bf7-8fc9-a4aa78dce87f/d323ccc9-1b9a-4cb2-8adf-7019b0e217f4.jpg
" target="_blank"> <img alt="Click for enlarged picture" src="
https://hosting.photobucket.com/95288841-8654-4bf7-8fc9-a4aa78dce87f/d323ccc9-1b9a-4cb2-8adf-7019b0e217f4.jpg" width="600" /> </a></p>
<p>
<a href=" https://hosting.photobucket.com/95288841-8654-4bf7-8fc9-a4aa78dce87f/a5a66447-2d76-47ae-866d-4d512ef469a5.jpg
" target="_blank"> <img alt="Click for enlarged picture" src="
https://hosting.photobucket.com/95288841-8654-4bf7-8fc9-a4aa78dce87f/a5a66447-2d76-47ae-866d-4d512ef469a5.jpg" width="600" /> </a></p>
<p>
<a href=" https://hosting.photobucket.com/95288841-8654-4bf7-8fc9-a4aa78dce87f/3e7bcfc9-ba02-4f94-a6c3-79dfaea3639e.jpg
" target="_blank"> <img alt="Click for enlarged picture" src="
https://hosting.photobucket.com/95288841-8654-4bf7-8fc9-a4aa78dce87f/3e7bcfc9-ba02-4f94-a6c3-79dfaea3639e.jpg" width="600" /> </a></p>
<p>
<a href=" https://hosting.photobucket.com/95288841-8654-4bf7-8fc9-a4aa78dce87f/24e79466-4a9e-4b10-970c-caad235d260d.jpg
" target="_blank"> <img alt="Click for enlarged picture" src="
https://hosting.photobucket.com/95288841-8654-4bf7-8fc9-a4aa78dce87f/24e79466-4a9e-4b10-970c-caad235d260d.jpg" width="600" /> </a></p>
<p>
Kao i uvijek, Izložba je prikazivala presjek rada Udruge, njenih članova, polaznika njenih tečajeva i radionica te članova FB grupe Miniature Painters Croatia. U velikom broju vitrina na&scaron;le su se brojne minijature za stolne strate&scaron;ke igre, igre na tabli, a cijela jedna vitrina posvećena je nagrađenim izlo&scaron;cima sa prethodnih minijaturističkih natjecanja. Nekoliko vitrina bilo je posvećeno projektima koje Udruga već 23 godinu provodi poput Knjižnice i čitaonice UMS &bdquo;Agram&ldquo;, Radionice za izradu prostornih maketa i Radionice bojanja minijatura, ali i novih poput Agram Group Build, Agram Lego Sekcije i Back to Basics radionica bojanja za najmlađe.</p>
<p>
<a href=" https://hosting.photobucket.com/95288841-8654-4bf7-8fc9-a4aa78dce87f/fca84936-af71-44d3-9a4c-faeb26163899.jpg
" target="_blank"> <img alt="Click for enlarged picture" src="
https://hosting.photobucket.com/95288841-8654-4bf7-8fc9-a4aa78dce87f/fca84936-af71-44d3-9a4c-faeb26163899.jpg" width="600" /> </a></p>
<p>
<a href=" https://hosting.photobucket.com/95288841-8654-4bf7-8fc9-a4aa78dce87f/459bc5ac-8702-46f9-93b4-547deaabdef4.jpg
" target="_blank"> <img alt="Click for enlarged picture" src="
https://hosting.photobucket.com/95288841-8654-4bf7-8fc9-a4aa78dce87f/459bc5ac-8702-46f9-93b4-547deaabdef4.jpg" width="600" /> </a></p>
<p>
<a href=" https://hosting.photobucket.com/95288841-8654-4bf7-8fc9-a4aa78dce87f/91a04363-b2ef-4635-a046-7edf25ce7808.jpg
" target="_blank"> <img alt="Click for enlarged picture" src="
https://hosting.photobucket.com/95288841-8654-4bf7-8fc9-a4aa78dce87f/91a04363-b2ef-4635-a046-7edf25ce7808.jpg" width="600" /> </a></p>
<p>
<a href=" https://hosting.photobucket.com/95288841-8654-4bf7-8fc9-a4aa78dce87f/73256af5-fd5d-40b5-95e1-120e49c9be87.jpg
" target="_blank"> <img alt="Click for enlarged picture" src="
https://hosting.photobucket.com/95288841-8654-4bf7-8fc9-a4aa78dce87f/73256af5-fd5d-40b5-95e1-120e49c9be87.jpg" width="600" /> </a></p>
<p>
<a href=" https://hosting.photobucket.com/95288841-8654-4bf7-8fc9-a4aa78dce87f/979f9be5-23f3-4df9-91dc-ab71d6a10d64.jpg
" target="_blank"> <img alt="Click for enlarged picture" src="
https://hosting.photobucket.com/95288841-8654-4bf7-8fc9-a4aa78dce87f/979f9be5-23f3-4df9-91dc-ab71d6a10d64.jpg" width="600" /> </a></p>
<p>
<a href=" https://hosting.photobucket.com/95288841-8654-4bf7-8fc9-a4aa78dce87f/d0ff4379-183a-47b9-a740-9ddc283ebc29.jpg
" target="_blank"> <img alt="Click for enlarged picture" src="
https://hosting.photobucket.com/95288841-8654-4bf7-8fc9-a4aa78dce87f/d0ff4379-183a-47b9-a740-9ddc283ebc29.jpg" width="600" /> </a></p>
<p>
<a href=" https://hosting.photobucket.com/95288841-8654-4bf7-8fc9-a4aa78dce87f/4333e95e-bbbd-4f47-aaea-38a9c99e54d8.jpg
" target="_blank"> <img alt="Click for enlarged picture" src="
https://hosting.photobucket.com/95288841-8654-4bf7-8fc9-a4aa78dce87f/4333e95e-bbbd-4f47-aaea-38a9c99e54d8.jpg" width="600" /> </a></p>
<p>
<a href=" https://hosting.photobucket.com/95288841-8654-4bf7-8fc9-a4aa78dce87f/1372f8a2-b222-48ee-ae45-a90b5a354ef7.jpg
" target="_blank"> <img alt="Click for enlarged picture" src="
https://hosting.photobucket.com/95288841-8654-4bf7-8fc9-a4aa78dce87f/1372f8a2-b222-48ee-ae45-a90b5a354ef7.jpg" width="600" /> </a></p>
<p>
<a href=" https://hosting.photobucket.com/95288841-8654-4bf7-8fc9-a4aa78dce87f/6a1b4fd1-d982-4b06-9c5f-3cd40d6bf10a.jpg
" target="_blank"> <img alt="Click for enlarged picture" src="
https://hosting.photobucket.com/95288841-8654-4bf7-8fc9-a4aa78dce87f/6a1b4fd1-d982-4b06-9c5f-3cd40d6bf10a.jpg" width="600" /> </a></p>
<p>
<a href=" https://hosting.photobucket.com/95288841-8654-4bf7-8fc9-a4aa78dce87f/c2ec45e1-e0f3-463a-b254-cb2a38b53e14.jpg
" target="_blank"> <img alt="Click for enlarged picture" src="
https://hosting.photobucket.com/95288841-8654-4bf7-8fc9-a4aa78dce87f/c2ec45e1-e0f3-463a-b254-cb2a38b53e14.jpg" width="600" /> </a></p>
<p>
<a href=" https://hosting.photobucket.com/95288841-8654-4bf7-8fc9-a4aa78dce87f/17553b9a-0592-4f6a-a097-3f1a97e161f3.jpg
" target="_blank"> <img alt="Click for enlarged picture" src="
https://hosting.photobucket.com/95288841-8654-4bf7-8fc9-a4aa78dce87f/17553b9a-0592-4f6a-a097-3f1a97e161f3.jpg" width="600" /> </a></p>
<p>
<a href=" https://hosting.photobucket.com/95288841-8654-4bf7-8fc9-a4aa78dce87f/8658bd6b-dff2-4d24-8473-928d44d44480.jpg
" target="_blank"> <img alt="Click for enlarged picture" src="
https://hosting.photobucket.com/95288841-8654-4bf7-8fc9-a4aa78dce87f/8658bd6b-dff2-4d24-8473-928d44d44480.jpg" width="600" /> </a></p>
<p>
<a href=" https://hosting.photobucket.com/95288841-8654-4bf7-8fc9-a4aa78dce87f/ecab0ea7-f75b-4e31-a520-d088ad39fa17.jpg
" target="_blank"> <img alt="Click for enlarged picture" src="
https://hosting.photobucket.com/95288841-8654-4bf7-8fc9-a4aa78dce87f/ecab0ea7-f75b-4e31-a520-d088ad39fa17.jpg" width="600" /> </a></p>
<p>
<a href=" https://hosting.photobucket.com/95288841-8654-4bf7-8fc9-a4aa78dce87f/9495a2f5-8a82-41f2-abf4-9ade3db41d87.jpg
" target="_blank"> <img alt="Click for enlarged picture" src="
https://hosting.photobucket.com/95288841-8654-4bf7-8fc9-a4aa78dce87f/9495a2f5-8a82-41f2-abf4-9ade3db41d87.jpg" width="600" /> </a></p>
<p>
<a href=" https://hosting.photobucket.com/95288841-8654-4bf7-8fc9-a4aa78dce87f/362cc6fd-a5dd-474b-9b9f-aeab27d6dcfa.jpg
" target="_blank"> <img alt="Click for enlarged picture" src="
https://hosting.photobucket.com/95288841-8654-4bf7-8fc9-a4aa78dce87f/362cc6fd-a5dd-474b-9b9f-aeab27d6dcfa.jpg" width="600" /> </a></p>
<p>
Posebna čast nam je bila ugostiti na&scaron;eg gosta izlagača, Ninoslava Luka minijaturista iz Poreča koji nam se predstavio svojom kolekcijom povijesnih diorama.</p>
<p>
<a href=" https://hosting.photobucket.com/95288841-8654-4bf7-8fc9-a4aa78dce87f/ba1353de-e2bd-4340-9121-9056e287ed4a.jpg
" target="_blank"> <img alt="Click for enlarged picture" src="
https://hosting.photobucket.com/95288841-8654-4bf7-8fc9-a4aa78dce87f/ba1353de-e2bd-4340-9121-9056e287ed4a.jpg" width="600" /> </a></p>
<p>
<a href=" https://hosting.photobucket.com/95288841-8654-4bf7-8fc9-a4aa78dce87f/cea18506-1b50-4e5b-955c-0b9ca02d7826.jpg
" target="_blank"> <img alt="Click for enlarged picture" src="
https://hosting.photobucket.com/95288841-8654-4bf7-8fc9-a4aa78dce87f/cea18506-1b50-4e5b-955c-0b9ca02d7826.jpg" width="600" /> </a></p>
<p>
<a href=" https://hosting.photobucket.com/95288841-8654-4bf7-8fc9-a4aa78dce87f/1be85b41-e3b6-4536-b141-cd0da6eb38c1.jpg
" target="_blank"> <img alt="Click for enlarged picture" src="
https://hosting.photobucket.com/95288841-8654-4bf7-8fc9-a4aa78dce87f/1be85b41-e3b6-4536-b141-cd0da6eb38c1.jpg" width="600" /> </a></p>
<p>
<a href=" https://hosting.photobucket.com/95288841-8654-4bf7-8fc9-a4aa78dce87f/9e93b87d-ff3c-4b7b-8f06-5f9d3464a134.jpg
" target="_blank"> <img alt="Click for enlarged picture" src="
https://hosting.photobucket.com/95288841-8654-4bf7-8fc9-a4aa78dce87f/9e93b87d-ff3c-4b7b-8f06-5f9d3464a134.jpg" width="600" /> </a></p>
<p>
Tijekom prvog vikenda Izložbe, 21.-22.02.,održali smo 20. godi&scaron;nje međunarodno natjecanje u bojanju minijatura <strong>Black Queen Hobby and Miniature Painting Competition</strong>!</p>
<p>
<a href=" https://hosting.photobucket.com/95288841-8654-4bf7-8fc9-a4aa78dce87f/3056fb09-f66c-4dea-80a8-a4e72407429a.jpg
" target="_blank"> <img alt="Click for enlarged picture" src="
https://hosting.photobucket.com/95288841-8654-4bf7-8fc9-a4aa78dce87f/3056fb09-f66c-4dea-80a8-a4e72407429a.jpg" width="600" /> </a></p>
<p>
Kako su natjecatelji pristizali i prijavljivali se na natjecanje, na&scaron;e vrijedno osoblje je fotografiralo sve izlo&scaron;ke prije nego li su ih rasporedili po kategorijama i pažljivo ih postavili u staklene vitrine. Niti jutarnja okrijepa nije usfalila zahvaljujući na&scaron;im revnim volonterima.</p>
<p>
<a href=" https://hosting.photobucket.com/95288841-8654-4bf7-8fc9-a4aa78dce87f/1118089c-2b46-4a2c-b17d-dc92b66d1ffc.jpg
" target="_blank"> <img alt="Click for enlarged picture" src="
https://hosting.photobucket.com/95288841-8654-4bf7-8fc9-a4aa78dce87f/1118089c-2b46-4a2c-b17d-dc92b66d1ffc.jpg" width="600" /> </a></p>
<p>
<a href=" https://hosting.photobucket.com/95288841-8654-4bf7-8fc9-a4aa78dce87f/9fd3c272-9a69-4532-a09d-36497a20a820.jpg
" target="_blank"> <img alt="Click for enlarged picture" src="
https://hosting.photobucket.com/95288841-8654-4bf7-8fc9-a4aa78dce87f/9fd3c272-9a69-4532-a09d-36497a20a820.jpg" width="600" /> </a></p>
<p>
<a href=" https://hosting.photobucket.com/95288841-8654-4bf7-8fc9-a4aa78dce87f/86995e80-c502-45fb-80f5-c8fda27da3f9.jpg
" target="_blank"> <img alt="Click for enlarged picture" src="
https://hosting.photobucket.com/95288841-8654-4bf7-8fc9-a4aa78dce87f/86995e80-c502-45fb-80f5-c8fda27da3f9.jpg" width="600" /> </a></p>
<p>
U podne, sve vitrine su bile pune i natjecanje je moglo službeno početi.</p>
<p>
<a href=" https://hosting.photobucket.com/95288841-8654-4bf7-8fc9-a4aa78dce87f/bce59a4f-c3e3-4708-a3d6-25e81a894c24.jpg
" target="_blank"> <img alt="Click for enlarged picture" src="
https://hosting.photobucket.com/95288841-8654-4bf7-8fc9-a4aa78dce87f/bce59a4f-c3e3-4708-a3d6-25e81a894c24.jpg" width="600" /> </a></p>
<p>
<a href=" https://hosting.photobucket.com/95288841-8654-4bf7-8fc9-a4aa78dce87f/16a0a094-01aa-4e52-82cf-fdab00d74711.jpg
" target="_blank"> <img alt="Click for enlarged picture" src="
https://hosting.photobucket.com/95288841-8654-4bf7-8fc9-a4aa78dce87f/16a0a094-01aa-4e52-82cf-fdab00d74711.jpg" width="600" /> </a></p>
<p>
<a href=" https://hosting.photobucket.com/95288841-8654-4bf7-8fc9-a4aa78dce87f/0d3f4042-ff77-48d0-b332-add0fd08f7c3.jpg
" target="_blank"> <img alt="Click for enlarged picture" src="
https://hosting.photobucket.com/95288841-8654-4bf7-8fc9-a4aa78dce87f/0d3f4042-ff77-48d0-b332-add0fd08f7c3.jpg" width="600" /> </a></p>
<p>
<a href=" https://hosting.photobucket.com/95288841-8654-4bf7-8fc9-a4aa78dce87f/3711baf8-93f2-434a-aea9-a95288ca04dd.jpg
" target="_blank"> <img alt="Click for enlarged picture" src="
https://hosting.photobucket.com/95288841-8654-4bf7-8fc9-a4aa78dce87f/3711baf8-93f2-434a-aea9-a95288ca04dd.jpg" width="600" /> </a></p>
<p>
<a href=" https://hosting.photobucket.com/95288841-8654-4bf7-8fc9-a4aa78dce87f/53113b97-ec06-4409-95ba-95a5ad3f9720.jpg
" target="_blank"> <img alt="Click for enlarged picture" src="
https://hosting.photobucket.com/95288841-8654-4bf7-8fc9-a4aa78dce87f/53113b97-ec06-4409-95ba-95a5ad3f9720.jpg" width="600" /> </a></p>
<p>
<a href=" https://hosting.photobucket.com/95288841-8654-4bf7-8fc9-a4aa78dce87f/ab127858-193d-4976-bdb2-e27302722fca.jpg
" target="_blank"> <img alt="Click for enlarged picture" src="
https://hosting.photobucket.com/95288841-8654-4bf7-8fc9-a4aa78dce87f/ab127858-193d-4976-bdb2-e27302722fca.jpg" width="600" /> </a></p>
<p>
<a href=" https://hosting.photobucket.com/95288841-8654-4bf7-8fc9-a4aa78dce87f/3735af11-3fb6-4772-a8ff-5e0ff6ddf03a.jpg
" target="_blank"> <img alt="Click for enlarged picture" src="
https://hosting.photobucket.com/95288841-8654-4bf7-8fc9-a4aa78dce87f/3735af11-3fb6-4772-a8ff-5e0ff6ddf03a.jpg" width="600" /> </a></p>
<p>
<strong>Back To Basics radionice za najmlađe na Black Queen</strong></p>
<p>
Ove godine smo tijekom cijelog vikenda organizirali radionice bojanja minijatura za najmlađe koji su mogli po prvi puta obojati neku od na&scaron;ih vlastitih minijatura osmi&scaron;ljenih upravo za ovaj program!</p>
<p>
<a href=" https://hosting.photobucket.com/95288841-8654-4bf7-8fc9-a4aa78dce87f/6999be0c-8cc6-4947-a423-9427a2299724.jpg
" target="_blank"> <img alt="Click for enlarged picture" src="
https://hosting.photobucket.com/95288841-8654-4bf7-8fc9-a4aa78dce87f/6999be0c-8cc6-4947-a423-9427a2299724.jpg" width="600" /> </a></p>
<p>
<a href="https://hosting.photobucket.com/95288841-8654-4bf7-8fc9-a4aa78dce87f/835b05a5-f171-49df-afa6-da0692b89074.jpg" target="_blank"><img alt="Click for enlarged picture" src="https://hosting.photobucket.com/95288841-8654-4bf7-8fc9-a4aa78dce87f/835b05a5-f171-49df-afa6-da0692b89074.jpg" width="600" /></a></p>
<p>
<a href=" https://hosting.photobucket.com/95288841-8654-4bf7-8fc9-a4aa78dce87f/ef5dde13-84ee-4ea0-b9f3-28aaf703ef6d.jpg
" target="_blank"> <img alt="Click for enlarged picture" src="
https://hosting.photobucket.com/95288841-8654-4bf7-8fc9-a4aa78dce87f/ef5dde13-84ee-4ea0-b9f3-28aaf703ef6d.jpg" width="600" /> </a></p>
<p>
<strong>PRODAJNI KUTAK</strong></p>
<p>
Tijekom vikenda ugostili smo na&scaron;e sponzore sa njihovim prodajnim &scaron;tandovima: Swood.si i Carta Magica.</p>
<p>
<a href=" https://hosting.photobucket.com/95288841-8654-4bf7-8fc9-a4aa78dce87f/5ee9a49f-a387-435a-9110-572402b7191d.jpg
" target="_blank"> <img alt="Click for enlarged picture" src="
https://hosting.photobucket.com/95288841-8654-4bf7-8fc9-a4aa78dce87f/5ee9a49f-a387-435a-9110-572402b7191d.jpg" width="600" /> </a></p>
<p>
<a href=" https://hosting.photobucket.com/95288841-8654-4bf7-8fc9-a4aa78dce87f/47cf600f-b1eb-4655-bf06-305f6f21d5d2.jpg
" target="_blank"> <img alt="Click for enlarged picture" src="
https://hosting.photobucket.com/95288841-8654-4bf7-8fc9-a4aa78dce87f/47cf600f-b1eb-4655-bf06-305f6f21d5d2.jpg" width="600" /> </a></p>
<p>
<strong>OGLEDNE RADIONICE BOJANJA MINIJATURA</strong></p>
<p>
Prostor ZZTK omogućuje održavanje radionica tijekom vikenda u kino dvorani u podrumu, stoga smo tijekom vikenda organizirali i ogledne radionice. Rad predavača snimao se kamerom i projicirao na projekcijsko platno u dvorani. Veliko hvala na&scaron;im domaćim i inozemnim predavačima: Anžetu Zorku (SLO), doc.dr.sc. Wintonu Afriću (HR), Ivanu Knezoviću (UMS Agram) i Petru Knezoviću (HR).</p>
<p>
<a href=" https://hosting.photobucket.com/95288841-8654-4bf7-8fc9-a4aa78dce87f/e8d835be-ec99-49d7-bc9b-086e38573d1a.jpg
" target="_blank"> <img alt="Click for enlarged picture" src="
https://hosting.photobucket.com/95288841-8654-4bf7-8fc9-a4aa78dce87f/e8d835be-ec99-49d7-bc9b-086e38573d1a.jpg" width="600" /> </a></p>
<p>
<a href=" https://hosting.photobucket.com/95288841-8654-4bf7-8fc9-a4aa78dce87f/f3eba4c1-4637-4da9-8360-75f430355af4.jpg" target="_blank"> <img alt="Click for enlarged picture" src="
https://hosting.photobucket.com/95288841-8654-4bf7-8fc9-a4aa78dce87f/f3eba4c1-4637-4da9-8360-75f430355af4.jpg" width="600" /> </a></p>
<p>
<a href=" https://hosting.photobucket.com/95288841-8654-4bf7-8fc9-a4aa78dce87f/ef523854-4030-4579-aa38-403afda86c91.jpg
" target="_blank"> <img alt="Click for enlarged picture" src="
https://hosting.photobucket.com/95288841-8654-4bf7-8fc9-a4aa78dce87f/ef523854-4030-4579-aa38-403afda86c91.jpg" width="600" /> </a></p>
<p>
<a href=" https://hosting.photobucket.com/95288841-8654-4bf7-8fc9-a4aa78dce87f/dd0943c2-f4a8-40c3-b641-f6dcdd200380.jpg
" target="_blank"> <img alt="Click for enlarged picture" src="
https://hosting.photobucket.com/95288841-8654-4bf7-8fc9-a4aa78dce87f/dd0943c2-f4a8-40c3-b641-f6dcdd200380.jpg" width="600" /> </a></p>
<p>
<a href=" https://hosting.photobucket.com/95288841-8654-4bf7-8fc9-a4aa78dce87f/08b1626a-f6c7-43c9-b718-3e9a41b55ca6.jpg
" target="_blank"> <img alt="Click for enlarged picture" src="
https://hosting.photobucket.com/95288841-8654-4bf7-8fc9-a4aa78dce87f/08b1626a-f6c7-43c9-b718-3e9a41b55ca6.jpg" width="600" /> </a></p>
<p>
<a href=" https://hosting.photobucket.com/95288841-8654-4bf7-8fc9-a4aa78dce87f/91aca7f3-1af6-486d-b174-65079a63a1ea.jpg
" target="_blank"> <img alt="Click for enlarged picture" src="
https://hosting.photobucket.com/95288841-8654-4bf7-8fc9-a4aa78dce87f/91aca7f3-1af6-486d-b174-65079a63a1ea.jpg" width="600" /> </a></p>
<p>
<a href=" https://hosting.photobucket.com/95288841-8654-4bf7-8fc9-a4aa78dce87f/3821f2fb-fbe7-4096-adbc-7d8c981a3b56.jpg
" target="_blank"> <img alt="Click for enlarged picture" src="
https://hosting.photobucket.com/95288841-8654-4bf7-8fc9-a4aa78dce87f/3821f2fb-fbe7-4096-adbc-7d8c981a3b56.jpg" width="600" /> </a></p>
<p>
<a href=" https://hosting.photobucket.com/95288841-8654-4bf7-8fc9-a4aa78dce87f/2c7bb3c5-c0ec-4a96-b6bd-6a90ce5ce154.jpg
" target="_blank"> <img alt="Click for enlarged picture" src="
https://hosting.photobucket.com/95288841-8654-4bf7-8fc9-a4aa78dce87f/2c7bb3c5-c0ec-4a96-b6bd-6a90ce5ce154.jpg" width="600" /> </a></p>
<p>
<a href=" https://hosting.photobucket.com/95288841-8654-4bf7-8fc9-a4aa78dce87f/b646f4ee-21aa-4d12-8db3-6d33351d5aeb.jpg
" target="_blank"> <img alt="Click for enlarged picture" src="
https://hosting.photobucket.com/95288841-8654-4bf7-8fc9-a4aa78dce87f/b646f4ee-21aa-4d12-8db3-6d33351d5aeb.jpg" width="600" /> </a></p>
<p>
<a href=" https://hosting.photobucket.com/95288841-8654-4bf7-8fc9-a4aa78dce87f/fb5efc01-32cc-4119-90e3-188f51b30237.jpg
" target="_blank"> <img alt="Click for enlarged picture" src="
https://hosting.photobucket.com/95288841-8654-4bf7-8fc9-a4aa78dce87f/fb5efc01-32cc-4119-90e3-188f51b30237.jpg" width="600" /> </a></p>
<p>
<strong>NATJECANJE U BRZOM BOJANJU MINIJATURA</strong></p>
<p>
U nedjelju, 22.2. smo organizirali natjecanje u brzom bojanju minijatura. Po prvi puta smo koristili minijature koje su na&scaron; dizajn. Sudionici su imali 60 minuta vremena da obojaju og čarobnjaka.</p>
<p>
<a href=" https://hosting.photobucket.com/95288841-8654-4bf7-8fc9-a4aa78dce87f/106417a6-a047-4e0d-9f81-87858806052f.jpg
" target="_blank"> <img alt="Click for enlarged picture" src="
https://hosting.photobucket.com/95288841-8654-4bf7-8fc9-a4aa78dce87f/106417a6-a047-4e0d-9f81-87858806052f.jpg" width="600" /> </a></p>
<p>
<a href=" https://hosting.photobucket.com/95288841-8654-4bf7-8fc9-a4aa78dce87f/ac6853c7-6e34-4e07-a996-8d7d12744b67.jpg
" target="_blank"> <img alt="Click for enlarged picture" src="
https://hosting.photobucket.com/95288841-8654-4bf7-8fc9-a4aa78dce87f/ac6853c7-6e34-4e07-a996-8d7d12744b67.jpg" width="600" /> </a></p>
<p>
<a href=" https://hosting.photobucket.com/95288841-8654-4bf7-8fc9-a4aa78dce87f/ccb155fa-52c5-4a99-9515-f69a6836dce7.jpg
" target="_blank"> <img alt="Click for enlarged picture" src="
https://hosting.photobucket.com/95288841-8654-4bf7-8fc9-a4aa78dce87f/ccb155fa-52c5-4a99-9515-f69a6836dce7.jpg" width="600" /> </a></p>
<p>
<a href=" https://hosting.photobucket.com/95288841-8654-4bf7-8fc9-a4aa78dce87f/a29fedd0-97ea-45b1-85f9-7ea62188b2b2.jpg
" target="_blank"><img alt="Click for enlarged picture" src="
https://hosting.photobucket.com/95288841-8654-4bf7-8fc9-a4aa78dce87f/a29fedd0-97ea-45b1-85f9-7ea62188b2b2.jpg" width="600" /></a></p>
<p>
S time smo do&scaron;li do samoga kraja ovog predivnog vikenda i sve &scaron;to je preostalo je bila podjela nagrada i priznanja pobjednicima.</p>
<p>
<a href=" https://hosting.photobucket.com/95288841-8654-4bf7-8fc9-a4aa78dce87f/046ca4c8-0ae7-415e-abd3-e131d580c3ad.jpg
" target="_blank"> <img alt="Click for enlarged picture" src="
https://hosting.photobucket.com/95288841-8654-4bf7-8fc9-a4aa78dce87f/046ca4c8-0ae7-415e-abd3-e131d580c3ad.jpg" width="600" /> </a></p>
<p>
<a href=" https://hosting.photobucket.com/95288841-8654-4bf7-8fc9-a4aa78dce87f/cec0dcef-7acb-4a77-89de-271ed5410672.jpg
" target="_blank"> <img alt="Click for enlarged picture" src="
https://hosting.photobucket.com/95288841-8654-4bf7-8fc9-a4aa78dce87f/cec0dcef-7acb-4a77-89de-271ed5410672.jpg" width="600" /> </a></p>
<p>
<a href=" https://hosting.photobucket.com/95288841-8654-4bf7-8fc9-a4aa78dce87f/a495a5fc-31a2-4979-a970-0fa22c334354.jpg
" target="_blank"> <img alt="Click for enlarged picture" src="
https://hosting.photobucket.com/95288841-8654-4bf7-8fc9-a4aa78dce87f/a495a5fc-31a2-4979-a970-0fa22c334354.jpg" width="600" /> </a></p>
<p>
<strong>AGRAM ARENA &ndash; Leaving Asphodel Necropolis28 kampanja</strong></p>
<p>
Tijekom vikenda 21.-22.2. održali smo i novo međunarodno natjecanje Agram Arena! Ovoga puta na redu je bila stolna strate&scaron;ka igra Necropolis 28 za koju su na&scaron;i članovi osmislili dvodnevnu kampanju. Svaki sudionik je izradio svoju bandu vojnika, a velika većina i svoje vlastite table.</p>
<p>
<a href=" https://hosting.photobucket.com/95288841-8654-4bf7-8fc9-a4aa78dce87f/ac69b182-4bfc-4575-a6d3-fb3c8baba342.jpg
" target="_blank"> <img alt="Click for enlarged picture" src="
https://hosting.photobucket.com/95288841-8654-4bf7-8fc9-a4aa78dce87f/ac69b182-4bfc-4575-a6d3-fb3c8baba342.jpg" width="600" /> </a></p>
<p>
<a href=" https://hosting.photobucket.com/95288841-8654-4bf7-8fc9-a4aa78dce87f/289fed7b-e058-42d8-ba2d-cbd0463e98da.jpg
" target="_blank"> <img alt="Click for enlarged picture" src="
https://hosting.photobucket.com/95288841-8654-4bf7-8fc9-a4aa78dce87f/289fed7b-e058-42d8-ba2d-cbd0463e98da.jpg" width="600" /> </a></p>
<p>
<a href=" https://hosting.photobucket.com/95288841-8654-4bf7-8fc9-a4aa78dce87f/d92ebbee-859d-4441-8386-3d760b20b7a7.jpg
" target="_blank"> <img alt="Click for enlarged picture" src="
https://hosting.photobucket.com/95288841-8654-4bf7-8fc9-a4aa78dce87f/d92ebbee-859d-4441-8386-3d760b20b7a7.jpg" width="600" /> </a></p>
<p>
<a href=" https://hosting.photobucket.com/95288841-8654-4bf7-8fc9-a4aa78dce87f/09c59798-7871-425e-a075-3ca1cd91768a.jpg
" target="_blank"> <img alt="Click for enlarged picture" src="
https://hosting.photobucket.com/95288841-8654-4bf7-8fc9-a4aa78dce87f/09c59798-7871-425e-a075-3ca1cd91768a.jpg" width="600" /> </a></p>
<p>
<a href=" https://hosting.photobucket.com/95288841-8654-4bf7-8fc9-a4aa78dce87f/b2f3edc8-5a23-4552-9a2a-4027b286f327.jpg
" target="_blank"> <img alt="Click for enlarged picture" src="
https://hosting.photobucket.com/95288841-8654-4bf7-8fc9-a4aa78dce87f/b2f3edc8-5a23-4552-9a2a-4027b286f327.jpg" width="600" /> </a></p>
<p>
<a href=" https://hosting.photobucket.com/95288841-8654-4bf7-8fc9-a4aa78dce87f/2a9f43ac-b531-4746-b7bb-ac5a3356aab0.jpg
" target="_blank"> <img alt="Click for enlarged picture" src="
https://hosting.photobucket.com/95288841-8654-4bf7-8fc9-a4aa78dce87f/2a9f43ac-b531-4746-b7bb-ac5a3356aab0.jpg" width="600" /> </a></p>
<p>
<strong>DOGAĐANJA RADNIM DANIMA ZA VRIJEME IZLOŽBE</strong></p>
<p>
Tijekom naredna dva tjedna, na&scaron;i volonteri su radnim danima od 16:00 do 20:00, držali otvorene radionice bojanja minijatura. Postavljene su radne stanice za bojanje minijatura na kojoj su na&scaron;i posjetitelji mogli bojati minijature koje smo priredili (ili svoje ukoliko su ih donijeli) koristeći na&scaron;e materijale i alate.</p>
<p>
<a href=" https://hosting.photobucket.com/95288841-8654-4bf7-8fc9-a4aa78dce87f/6edf7765-42b5-417a-820f-fa5d907179a7.jpg
" target="_blank"> <img alt="Click for enlarged picture" src="
https://hosting.photobucket.com/95288841-8654-4bf7-8fc9-a4aa78dce87f/6edf7765-42b5-417a-820f-fa5d907179a7.jpg" width="600" /> </a></p>
<p>
<a href=" https://hosting.photobucket.com/95288841-8654-4bf7-8fc9-a4aa78dce87f/c084ebe2-f57b-4519-9b31-29bdc1155887.jpg
" target="_blank"> <img alt="Click for enlarged picture" src="
https://hosting.photobucket.com/95288841-8654-4bf7-8fc9-a4aa78dce87f/c084ebe2-f57b-4519-9b31-29bdc1155887.jpg" width="600" /> </a></p>
<p>
<a href=" https://hosting.photobucket.com/95288841-8654-4bf7-8fc9-a4aa78dce87f/37ff2272-f9b0-4b16-a363-1e6f6688c866.jpg
" target="_blank"> <img alt="Click for enlarged picture" src="
https://hosting.photobucket.com/95288841-8654-4bf7-8fc9-a4aa78dce87f/37ff2272-f9b0-4b16-a363-1e6f6688c866.jpg" width="600" /> </a></p>
<p>
<a href=" https://hosting.photobucket.com/95288841-8654-4bf7-8fc9-a4aa78dce87f/5f4f7968-ff50-4a01-98da-6ce8562930b4.jpg
" target="_blank"> <img alt="Click for enlarged picture" src="
https://hosting.photobucket.com/95288841-8654-4bf7-8fc9-a4aa78dce87f/5f4f7968-ff50-4a01-98da-6ce8562930b4.jpg" width="600" /> </a></p>
<p>
<a href=" https://hosting.photobucket.com/95288841-8654-4bf7-8fc9-a4aa78dce87f/cbb45319-d488-483c-bf9d-9af29852fc74.jpg
" target="_blank"> <img alt="Click for enlarged picture" src="
https://hosting.photobucket.com/95288841-8654-4bf7-8fc9-a4aa78dce87f/cbb45319-d488-483c-bf9d-9af29852fc74.jpg" width="600" /> </a></p>
<p>
<a href=" https://hosting.photobucket.com/95288841-8654-4bf7-8fc9-a4aa78dce87f/3dcca26c-d549-4af3-812a-a4a81b9a2310.jpg
" target="_blank"> <img alt="Click for enlarged picture" src="
https://hosting.photobucket.com/95288841-8654-4bf7-8fc9-a4aa78dce87f/3dcca26c-d549-4af3-812a-a4a81b9a2310.jpg" width="600" /> </a></p>
<p>
<a href=" https://hosting.photobucket.com/95288841-8654-4bf7-8fc9-a4aa78dce87f/4adf0fb6-3eab-4b40-b32d-d03eab4a9892.jpg
" target="_blank"> <img alt="Click for enlarged picture" src="
https://hosting.photobucket.com/95288841-8654-4bf7-8fc9-a4aa78dce87f/4adf0fb6-3eab-4b40-b32d-d03eab4a9892.jpg" width="600" /> </a></p>
<p>
<a href=" https://hosting.photobucket.com/95288841-8654-4bf7-8fc9-a4aa78dce87f/4732b58a-9a65-4d1c-a7d5-25513d34b108.jpg
" target="_blank"> <img alt="Click for enlarged picture" src="
https://hosting.photobucket.com/95288841-8654-4bf7-8fc9-a4aa78dce87f/4732b58a-9a65-4d1c-a7d5-25513d34b108.jpg" width="600" /> </a></p>
<p>
<a href=" https://hosting.photobucket.com/95288841-8654-4bf7-8fc9-a4aa78dce87f/274be330-31d5-4e25-95db-ec2f423a003c.jpg
" target="_blank"> <img alt="Click for enlarged picture" src="
https://hosting.photobucket.com/95288841-8654-4bf7-8fc9-a4aa78dce87f/274be330-31d5-4e25-95db-ec2f423a003c.jpg" width="600" /> </a></p>
<p>
<a href=" https://hosting.photobucket.com/95288841-8654-4bf7-8fc9-a4aa78dce87f/8e7b0a80-0f46-4d70-9789-a46976c713d2.jpg
" target="_blank"> <img alt="Click for enlarged picture" src="
https://hosting.photobucket.com/95288841-8654-4bf7-8fc9-a4aa78dce87f/8e7b0a80-0f46-4d70-9789-a46976c713d2.jpg" width="600" /> </a></p>
<p>
<a href=" https://hosting.photobucket.com/95288841-8654-4bf7-8fc9-a4aa78dce87f/8bbd4e96-b911-4f26-80fe-b1c57f29027b.jpg
" target="_blank"> <img alt="Click for enlarged picture" src="
https://hosting.photobucket.com/95288841-8654-4bf7-8fc9-a4aa78dce87f/8bbd4e96-b911-4f26-80fe-b1c57f29027b.jpg" width="600" /> </a></p>
<p>
<a href=" https://hosting.photobucket.com/95288841-8654-4bf7-8fc9-a4aa78dce87f/203a27be-8f10-459d-89b9-befb6b636b74.jpg
" target="_blank"> <img alt="Click for enlarged picture" src="
https://hosting.photobucket.com/95288841-8654-4bf7-8fc9-a4aa78dce87f/203a27be-8f10-459d-89b9-befb6b636b74.jpg" width="600" /> </a></p>
<p>
<a href=" https://hosting.photobucket.com/95288841-8654-4bf7-8fc9-a4aa78dce87f/5dc4358f-19d8-475f-a4af-9c29e9ed18d7.jpg
" target="_blank"> <img alt="Click for enlarged picture" src="
https://hosting.photobucket.com/95288841-8654-4bf7-8fc9-a4aa78dce87f/5dc4358f-19d8-475f-a4af-9c29e9ed18d7.jpg" width="600" /> </a></p>
<p>
<strong>BACK TO BASICS RADIONICE ZA NAJMLAĐE</strong></p>
<p>
Radnim danima od 17:00 do 18:00 održavali smo na&scaron;e nove radionice za najmlađe u kojima su na&scaron;i najmlađi polaznici bojali svoje prve minijature.</p>
<p>
<a href=" https://hosting.photobucket.com/95288841-8654-4bf7-8fc9-a4aa78dce87f/948af139-8fb5-4e28-a27c-404466e70d05.jpg
" target="_blank"> <img alt="Click for enlarged picture" src="
https://hosting.photobucket.com/95288841-8654-4bf7-8fc9-a4aa78dce87f/948af139-8fb5-4e28-a27c-404466e70d05.jpg" width="600" /> </a></p>
<p>
<a href=" https://hosting.photobucket.com/95288841-8654-4bf7-8fc9-a4aa78dce87f/bb3e20c2-bb21-4a3d-863a-74de08261467.jpg
" target="_blank"> <img alt="Click for enlarged picture" src="
https://hosting.photobucket.com/95288841-8654-4bf7-8fc9-a4aa78dce87f/bb3e20c2-bb21-4a3d-863a-74de08261467.jpg" width="600" /> </a></p>
<p>
<a href=" https://hosting.photobucket.com/95288841-8654-4bf7-8fc9-a4aa78dce87f/7316c760-98e3-4e3f-9261-d138aa7a5a6a.jpg
" target="_blank"> <img alt="Click for enlarged picture" src="
https://hosting.photobucket.com/95288841-8654-4bf7-8fc9-a4aa78dce87f/7316c760-98e3-4e3f-9261-d138aa7a5a6a.jpg" width="600" /> </a></p>
<p>
<a href=" https://hosting.photobucket.com/95288841-8654-4bf7-8fc9-a4aa78dce87f/68934b39-3d1f-4f43-b967-14b73c41a39e.jpg
" target="_blank"> <img alt="Click for enlarged picture" src="
https://hosting.photobucket.com/95288841-8654-4bf7-8fc9-a4aa78dce87f/68934b39-3d1f-4f43-b967-14b73c41a39e.jpg" width="600" /> </a></p>
<p>
<a href=" https://hosting.photobucket.com/95288841-8654-4bf7-8fc9-a4aa78dce87f/46125bce-a28d-494f-873a-3aeabdc1d6c2.jpg
" target="_blank"> <img alt="Click for enlarged picture" src="
https://hosting.photobucket.com/95288841-8654-4bf7-8fc9-a4aa78dce87f/46125bce-a28d-494f-873a-3aeabdc1d6c2.jpg" width="600" /> </a></p>
<p>
<a href=" https://hosting.photobucket.com/95288841-8654-4bf7-8fc9-a4aa78dce87f/3c58e0ad-77a9-44c8-b6bf-d9a55c514d43.jpg
" target="_blank"> <img alt="Click for enlarged picture" src="
https://hosting.photobucket.com/95288841-8654-4bf7-8fc9-a4aa78dce87f/3c58e0ad-77a9-44c8-b6bf-d9a55c514d43.jpg" width="600" /> </a></p>
<p>
<a href=" https://hosting.photobucket.com/95288841-8654-4bf7-8fc9-a4aa78dce87f/f891f0f0-051b-40ee-9676-cb03b0a9811b.jpg
" target="_blank"> <img alt="Click for enlarged picture" src="
https://hosting.photobucket.com/95288841-8654-4bf7-8fc9-a4aa78dce87f/f891f0f0-051b-40ee-9676-cb03b0a9811b.jpg" width="600" /> </a></p>
<p>
<strong>AGRAM LEGO SEKCIJA predavanje: FW-14b &ndash; Bolid F1 za budućnost</strong></p>
<p>
U srijedu 25.2.2026. u sklopu aktivnosti na&scaron;e Agram Lego Sekcije, na&scaron; dežurni strojar Marko Paunović je održao predavanje na temu bolida Formule 1 iz 1992.. Ulaz na predavanje je bio besplatan, a po zavr&scaron;etku su LEGO maketu bolida izradili članovi Lego sekcije</p>
<p>
<a href=" https://hosting.photobucket.com/95288841-8654-4bf7-8fc9-a4aa78dce87f/b2e14b1c-daa4-4314-8685-184377bc7e28.jpg
" target="_blank"> <img alt="Click for enlarged picture" src="
https://hosting.photobucket.com/95288841-8654-4bf7-8fc9-a4aa78dce87f/b2e14b1c-daa4-4314-8685-184377bc7e28.jpg" width="600" /> </a></p>
<p>
<a href=" https://hosting.photobucket.com/95288841-8654-4bf7-8fc9-a4aa78dce87f/31fb439a-77d3-4418-83ff-66c3af279cca.jpg" target="_blank"> <img alt="Click for enlarged picture" src="
https://hosting.photobucket.com/95288841-8654-4bf7-8fc9-a4aa78dce87f/31fb439a-77d3-4418-83ff-66c3af279cca.jpg" width="600" /> </a></p>
<p>
<a href=" https://hosting.photobucket.com/95288841-8654-4bf7-8fc9-a4aa78dce87f/bfcaf282-6be8-4b52-a3ed-c91137457876.jpg
" target="_blank"> <img alt="Click for enlarged picture" src="
https://hosting.photobucket.com/95288841-8654-4bf7-8fc9-a4aa78dce87f/bfcaf282-6be8-4b52-a3ed-c91137457876.jpg" width="600" /> </a></p>
<p>
<a href=" https://hosting.photobucket.com/95288841-8654-4bf7-8fc9-a4aa78dce87f/ce70fc61-9e1a-4169-aaad-8b67417656c0.jpg
" target="_blank"> <img alt="Click for enlarged picture" src="
https://hosting.photobucket.com/95288841-8654-4bf7-8fc9-a4aa78dce87f/ce70fc61-9e1a-4169-aaad-8b67417656c0.jpg" width="600" /> </a></p>
<p>
<a href=" https://hosting.photobucket.com/95288841-8654-4bf7-8fc9-a4aa78dce87f/94ca0e36-8710-458d-8194-9f71299f4d74.jpg
" target="_blank"> <img alt="Click for enlarged picture" src="
https://hosting.photobucket.com/95288841-8654-4bf7-8fc9-a4aa78dce87f/94ca0e36-8710-458d-8194-9f71299f4d74.jpg" width="600" /> </a></p>
<p>
<a href=" https://hosting.photobucket.com/95288841-8654-4bf7-8fc9-a4aa78dce87f/c6771f72-7191-4ca3-a792-3bb1ab3897b1.jpg
" target="_blank"> <img alt="Click for enlarged picture" src="
https://hosting.photobucket.com/95288841-8654-4bf7-8fc9-a4aa78dce87f/c6771f72-7191-4ca3-a792-3bb1ab3897b1.jpg" width="600" /> </a></p>
<p>
<a href=" https://hosting.photobucket.com/95288841-8654-4bf7-8fc9-a4aa78dce87f/c8fcfcb6-09f2-4398-a2fb-fa5065771e01.jpg
" target="_blank"> <img alt="Click for enlarged picture" src="
https://hosting.photobucket.com/95288841-8654-4bf7-8fc9-a4aa78dce87f/c8fcfcb6-09f2-4398-a2fb-fa5065771e01.jpg" width="600" /> </a></p>
<p>
<a href=" https://hosting.photobucket.com/95288841-8654-4bf7-8fc9-a4aa78dce87f/d7e187a8-d5b1-433b-b30d-091e54dcdddf.jpg
" target="_blank"> <img alt="Click for enlarged picture" src="
https://hosting.photobucket.com/95288841-8654-4bf7-8fc9-a4aa78dce87f/d7e187a8-d5b1-433b-b30d-091e54dcdddf.jpg" width="600" /> </a></p>
<p>
Tijekom drugog vikenda Izložbe, 28.02.-01.03., organizirali smo <strong>RADIONICU BOJANJA MINIJATURA &ndash; Grimdark stil</strong>.</p>
<p>
Radionica se provodila kroz dva dana (cijeli vikend) i polaznici su bojali tri različite figure za igru Trench Crusade. Fokus ovih predavanja bilo je bojenje popularnim Grimdark stilom. Na radionici su bile predstavljene boje i pribor, priprema figura, nekoliko tehnika bojenja minijatura od osnovnih do naprednijih, te tehnike i trikovi za brzo i efikasno bojenje većih količina figura odjednom. U sklopu radionice kori&scaron;tene su akrilne boje na bazi vode.</p>
<p>
<a href=" https://hosting.photobucket.com/95288841-8654-4bf7-8fc9-a4aa78dce87f/733d94b2-8e8d-4a4e-accd-b9168e32577e.jpg
" target="_blank"> <img alt="Click for enlarged picture" src="
https://hosting.photobucket.com/95288841-8654-4bf7-8fc9-a4aa78dce87f/733d94b2-8e8d-4a4e-accd-b9168e32577e.jpg
" width="600" /> </a></p>
<p>
<a href=" https://hosting.photobucket.com/95288841-8654-4bf7-8fc9-a4aa78dce87f/41020062-45b9-41cd-a357-fa23a389f390.jpg
" target="_blank"> <img alt="Click for enlarged picture" src="
https://hosting.photobucket.com/95288841-8654-4bf7-8fc9-a4aa78dce87f/41020062-45b9-41cd-a357-fa23a389f390.jpg
" width="600" /> </a></p>
<p>
<a href=" https://hosting.photobucket.com/95288841-8654-4bf7-8fc9-a4aa78dce87f/0c07cc55-596d-494d-972b-cd6a0dd6b8b7.jpg
" target="_blank"> <img alt="Click for enlarged picture" src="
https://hosting.photobucket.com/95288841-8654-4bf7-8fc9-a4aa78dce87f/0c07cc55-596d-494d-972b-cd6a0dd6b8b7.jpg" width="600" /> </a></p>
<p>
<a href=" https://hosting.photobucket.com/95288841-8654-4bf7-8fc9-a4aa78dce87f/c17dd356-08b1-48e1-b895-6296aed7f818.jpg
" target="_blank"> <img alt="Click for enlarged picture" src="
https://hosting.photobucket.com/95288841-8654-4bf7-8fc9-a4aa78dce87f/c17dd356-08b1-48e1-b895-6296aed7f818.jpg" width="600" /> </a></p>
<p>
U srijedu 04.03.2026. održana je godi&scaron;nja <strong>sjednica Skup&scaron;tine</strong> na kojoj smo odredili smjernice rada u 2026.</p>
<p>
<a href=" https://hosting.photobucket.com/95288841-8654-4bf7-8fc9-a4aa78dce87f/59484bd0-7edc-4aed-a04e-ae42900ba3e6.jpg
" target="_blank"> <img alt="Click for enlarged picture" src="
https://hosting.photobucket.com/95288841-8654-4bf7-8fc9-a4aa78dce87f/59484bd0-7edc-4aed-a04e-ae42900ba3e6.jpg
" width="600" /> </a></p>
<p>
U nedjelju 08.03.2026. Izložba je zavr&scaron;ena, na&scaron;i eksponati sigurno spremljeni, a Galerija poči&scaron;ćena.</p>
<p>
<a href=" https://hosting.photobucket.com/95288841-8654-4bf7-8fc9-a4aa78dce87f/98af4280-0956-4cdb-b4a9-da40e3a5a44a.jpg
" target="_blank"> <img alt="Click for enlarged picture" src="
https://hosting.photobucket.com/95288841-8654-4bf7-8fc9-a4aa78dce87f/98af4280-0956-4cdb-b4a9-da40e3a5a44a.jpg" width="600" /> </a></p>
<p>
<a href=" https://hosting.photobucket.com/95288841-8654-4bf7-8fc9-a4aa78dce87f/3259b35e-1fc2-4a99-a3c5-c7984958d72b.jpg
" target="_blank"> <img alt="Click for enlarged picture" src="
https://hosting.photobucket.com/95288841-8654-4bf7-8fc9-a4aa78dce87f/3259b35e-1fc2-4a99-a3c5-c7984958d72b.jpg" width="600" /> </a></p>
<p>
Najbitniji dio svake godine prilikom održavanja ove Izložbe je socijalni aspekt, druženje na&scaron;ih članova kako međusobno tako i sa na&scaron;im međunarodnim prijateljima koji nas posjećuju! Uz ovih par fotografija sa zajedničkih druženja, pozdravljamo vas do sljedeće godine!</p>
<p>
<a href=" https://hosting.photobucket.com/95288841-8654-4bf7-8fc9-a4aa78dce87f/b9168e23-79b2-4d81-8a7d-7534062881a7.jpg
" target="_blank"> <img alt="Click for enlarged picture" src="
https://hosting.photobucket.com/95288841-8654-4bf7-8fc9-a4aa78dce87f/b9168e23-79b2-4d81-8a7d-7534062881a7.jpg " width="600" /> </a></p>
<p>
<a href=" https://hosting.photobucket.com/95288841-8654-4bf7-8fc9-a4aa78dce87f/edff925e-916c-4d78-953e-210abf3753d4.jpg
" target="_blank"> <img alt="Click for enlarged picture" src="
https://hosting.photobucket.com/95288841-8654-4bf7-8fc9-a4aa78dce87f/edff925e-916c-4d78-953e-210abf3753d4.jpg " width="600" /> </a></p>
<p>
<a href=" https://hosting.photobucket.com/95288841-8654-4bf7-8fc9-a4aa78dce87f/8bcb48fa-466b-43f8-8a4b-f15f6794b21e.jpg
" target="_blank"> <img alt="Click for enlarged picture" src="
https://hosting.photobucket.com/95288841-8654-4bf7-8fc9-a4aa78dce87f/8bcb48fa-466b-43f8-8a4b-f15f6794b21e.jpg" width="600" /> </a></p>
",
"created" => "2026-03-12 08:54:10",
"modified" => "2026-03-12 08:58:37"
),
"Member" => array(
"id" => "35",
"group_id" => "1",
"first_name" => "Marko",
"last_name" => "Paunović",
"first_name_mask" => "marko",
"last_name_mask" => "paunovic",
"username" => "marko",
"password" => "*****",
"born" => "2033-03-07 20:35:00",
"created" => "2009-06-02 20:37:03"
)
)</pre><pre class="stack-trace">include - APP/views/elements/latestArticles.ctp, line 10
View::_render() - CORE/cake/libs/view/view.php, line 736
View::element() - CORE/cake/libs/view/view.php, line 397
include - APP/views/home/index.ctp, line 49
View::_render() - CORE/cake/libs/view/view.php, line 736
View::render() - CORE/cake/libs/view/view.php, line 431
Controller::render() - CORE/cake/libs/controller/controller.php, line 909
Dispatcher::_invoke() - CORE/cake/dispatcher.php, line 207
Dispatcher::dispatch() - CORE/cake/dispatcher.php, line 171
[main] - APP/webroot/index.php, line 86</pre></div></pre><a href="/dok/articles/2026/03/12" class="readMore"></a>
<span class="details"> <pre style="display: none;">
array(2) {
["Article"]=>
array(10) {
["id"]=>
string(3) "496"
["member_id"]=>
string(2) "35"
["title_eng"]=>
string(50) "Exhibition of Miniatures and Tabletop Scenery 2026"
["title_hrv"]=>
string(39) "Izložba minijatura i maketa Agram 2026"
["mask_eng"]=>
string(50) "exhibition_of_miniatures_and_tabletop_scenery_2026"
["mask_hrv"]=>
string(38) "izlozba_minijatura_i_maketa_agram_2026"
["content_eng"]=>
string(42359) "<p>
<a href=" https://hosting.photobucket.com/95288841-8654-4bf7-8fc9-a4aa78dce87f/dc756f84-867d-4df4-acd8-5d43775cafc2.jpg
" target="_blank"> <img alt="Click for enlarged picture" src="
https://hosting.photobucket.com/95288841-8654-4bf7-8fc9-a4aa78dce87f/dc756f84-867d-4df4-acd8-5d43775cafc2.jpg" width="600" /> </a></p>
<p>
<strong>The exhibition of miniatures and models "Agram 2026"</strong> was held this year from 19.2. to 08.03. 2026. The exhibition was set up on Wednesday 18.2. and was attended by a large number of members and friends of the Association who exhibited their works.</p>
<p>
</p>
<p>
<a href=" https://hosting.photobucket.com/95288841-8654-4bf7-8fc9-a4aa78dce87f/8529d6d4-76ea-4872-a9e6-748e04223a4e.jpg
" target="_blank"> <img alt="Click for enlarged picture" src="
https://hosting.photobucket.com/95288841-8654-4bf7-8fc9-a4aa78dce87f/8529d6d4-76ea-4872-a9e6-748e04223a4e.jpg
" width="600" /> </a></p>
<p>
<a href=" https://hosting.photobucket.com/95288841-8654-4bf7-8fc9-a4aa78dce87f/f3038937-f001-4ceb-b725-a330fcd64cee.jpg
" target="_blank"> <img alt="Click for enlarged picture" src="
https://hosting.photobucket.com/95288841-8654-4bf7-8fc9-a4aa78dce87f/f3038937-f001-4ceb-b725-a330fcd64cee.jpg
" width="600" /> </a></p>
<p>
<a href=" https://hosting.photobucket.com/95288841-8654-4bf7-8fc9-a4aa78dce87f/3575379e-e068-49e2-9d4d-c9a49531fdc2.jpg
" target="_blank"> <img alt="Click for enlarged picture" src="
https://hosting.photobucket.com/95288841-8654-4bf7-8fc9-a4aa78dce87f/3575379e-e068-49e2-9d4d-c9a49531fdc2.jpg" width="600" /> </a></p>
<p>
<a href=" https://hosting.photobucket.com/95288841-8654-4bf7-8fc9-a4aa78dce87f/e51713c7-2add-4f8f-ae37-e6eba25badff.jpg
" target="_blank"> <img alt="Click for enlarged picture" src="
https://hosting.photobucket.com/95288841-8654-4bf7-8fc9-a4aa78dce87f/e51713c7-2add-4f8f-ae37-e6eba25badff.jpg" width="600" /> </a></p>
<p>
<a href=" https://hosting.photobucket.com/95288841-8654-4bf7-8fc9-a4aa78dce87f/9c0bb546-50a8-483d-aeab-ab3b2ce9f094.jpg
" target="_blank"> <img alt="Click for enlarged picture" src="
https://hosting.photobucket.com/95288841-8654-4bf7-8fc9-a4aa78dce87f/9c0bb546-50a8-483d-aeab-ab3b2ce9f094.jpg" width="600" /> </a></p>
<p>
The opening of the Exhibition took place on Thursday, February 19, 2026, starting at 6:00 PM. The exhibition was organized on the occasion of our twenty-third birthday.</p>
<p>
</p>
<p>
<a href=" https://hosting.photobucket.com/95288841-8654-4bf7-8fc9-a4aa78dce87f/71c7bfc2-1ffc-43b9-9d5a-53e009f6b86d.jpg
" target="_blank"> <img alt="Click for enlarged picture" src="
https://hosting.photobucket.com/95288841-8654-4bf7-8fc9-a4aa78dce87f/71c7bfc2-1ffc-43b9-9d5a-53e009f6b86d.jpg" width="600" /> </a></p>
<p>
<a href=" https://hosting.photobucket.com/95288841-8654-4bf7-8fc9-a4aa78dce87f/007b4701-1d7c-4a67-a599-0539a2aa3191.jpg
" target="_blank"> <img alt="Click for enlarged picture" src="
https://hosting.photobucket.com/95288841-8654-4bf7-8fc9-a4aa78dce87f/007b4701-1d7c-4a67-a599-0539a2aa3191.jpg" width="600" /> </a></p>
<p>
<a href=" https://hosting.photobucket.com/95288841-8654-4bf7-8fc9-a4aa78dce87f/2c8090e2-8b95-4368-bb48-98876d680e15.jpg
" target="_blank"> <img alt="Click for enlarged picture" src="
https://hosting.photobucket.com/95288841-8654-4bf7-8fc9-a4aa78dce87f/2c8090e2-8b95-4368-bb48-98876d680e15.jpg" width="600" /> </a></p>
<p>
<a href=" https://hosting.photobucket.com/95288841-8654-4bf7-8fc9-a4aa78dce87f/375768ad-a8bb-49bf-9845-e46c896ba7ec.jpg
" target="_blank"> <img alt="Click for enlarged picture" src="
https://hosting.photobucket.com/95288841-8654-4bf7-8fc9-a4aa78dce87f/375768ad-a8bb-49bf-9845-e46c896ba7ec.jpg" width="600" /> </a></p>
<p>
<a href=" https://hosting.photobucket.com/95288841-8654-4bf7-8fc9-a4aa78dce87f/a93de974-4ccb-4876-85b0-4d066ae402b3.jpg
" target="_blank"> <img alt="Click for enlarged picture" src="
https://hosting.photobucket.com/95288841-8654-4bf7-8fc9-a4aa78dce87f/a93de974-4ccb-4876-85b0-4d066ae402b3.jpg" width="600" /> </a></p>
<p>
<a href=" https://hosting.photobucket.com/95288841-8654-4bf7-8fc9-a4aa78dce87f/d323ccc9-1b9a-4cb2-8adf-7019b0e217f4.jpg
" target="_blank"> <img alt="Click for enlarged picture" src="
https://hosting.photobucket.com/95288841-8654-4bf7-8fc9-a4aa78dce87f/d323ccc9-1b9a-4cb2-8adf-7019b0e217f4.jpg" width="600" /> </a></p>
<p>
<a href=" https://hosting.photobucket.com/95288841-8654-4bf7-8fc9-a4aa78dce87f/a5a66447-2d76-47ae-866d-4d512ef469a5.jpg
" target="_blank"> <img alt="Click for enlarged picture" src="
https://hosting.photobucket.com/95288841-8654-4bf7-8fc9-a4aa78dce87f/a5a66447-2d76-47ae-866d-4d512ef469a5.jpg" width="600" /> </a></p>
<p>
<a href=" https://hosting.photobucket.com/95288841-8654-4bf7-8fc9-a4aa78dce87f/3e7bcfc9-ba02-4f94-a6c3-79dfaea3639e.jpg
" target="_blank"> <img alt="Click for enlarged picture" src="
https://hosting.photobucket.com/95288841-8654-4bf7-8fc9-a4aa78dce87f/3e7bcfc9-ba02-4f94-a6c3-79dfaea3639e.jpg" width="600" /> </a></p>
<p>
<a href=" https://hosting.photobucket.com/95288841-8654-4bf7-8fc9-a4aa78dce87f/24e79466-4a9e-4b10-970c-caad235d260d.jpg
" target="_blank"> <img alt="Click for enlarged picture" src="
https://hosting.photobucket.com/95288841-8654-4bf7-8fc9-a4aa78dce87f/24e79466-4a9e-4b10-970c-caad235d260d.jpg" width="600" /> </a></p>
<p>
As always, the Exhibition presented a cross-section of the work of the Association, its members, participants of its courses and workshops, and members of the Miniature Painters Croatia FB group. In a large number of showcases, there were numerous miniatures for tabletop strategy games, board games, and an entire showcase was dedicated to award-winning exhibits from previous miniature competitions. Several showcases were dedicated to projects that the Association has been implementing for 23 years, such as the UMS „Agram“ Library and Reading Room, the Workshop for Making Spatial Models and the Miniature Painting Workshop, as well as new ones such as the Agram Group Build, the Agram Lego Section and the Back to Basics painting workshop for the youngest.</p>
<p>
<a href=" https://hosting.photobucket.com/95288841-8654-4bf7-8fc9-a4aa78dce87f/fca84936-af71-44d3-9a4c-faeb26163899.jpg
" target="_blank"> <img alt="Click for enlarged picture" src="
https://hosting.photobucket.com/95288841-8654-4bf7-8fc9-a4aa78dce87f/fca84936-af71-44d3-9a4c-faeb26163899.jpg" width="600" /> </a></p>
<p>
<a href=" https://hosting.photobucket.com/95288841-8654-4bf7-8fc9-a4aa78dce87f/459bc5ac-8702-46f9-93b4-547deaabdef4.jpg
" target="_blank"> <img alt="Click for enlarged picture" src="
https://hosting.photobucket.com/95288841-8654-4bf7-8fc9-a4aa78dce87f/459bc5ac-8702-46f9-93b4-547deaabdef4.jpg" width="600" /> </a></p>
<p>
<a href=" https://hosting.photobucket.com/95288841-8654-4bf7-8fc9-a4aa78dce87f/91a04363-b2ef-4635-a046-7edf25ce7808.jpg
" target="_blank"> <img alt="Click for enlarged picture" src="
https://hosting.photobucket.com/95288841-8654-4bf7-8fc9-a4aa78dce87f/91a04363-b2ef-4635-a046-7edf25ce7808.jpg" width="600" /> </a></p>
<p>
<a href=" https://hosting.photobucket.com/95288841-8654-4bf7-8fc9-a4aa78dce87f/73256af5-fd5d-40b5-95e1-120e49c9be87.jpg
" target="_blank"> <img alt="Click for enlarged picture" src="
https://hosting.photobucket.com/95288841-8654-4bf7-8fc9-a4aa78dce87f/73256af5-fd5d-40b5-95e1-120e49c9be87.jpg" width="600" /> </a></p>
<p>
<a href=" https://hosting.photobucket.com/95288841-8654-4bf7-8fc9-a4aa78dce87f/979f9be5-23f3-4df9-91dc-ab71d6a10d64.jpg
" target="_blank"> <img alt="Click for enlarged picture" src="
https://hosting.photobucket.com/95288841-8654-4bf7-8fc9-a4aa78dce87f/979f9be5-23f3-4df9-91dc-ab71d6a10d64.jpg" width="600" /> </a></p>
<p>
<a href=" https://hosting.photobucket.com/95288841-8654-4bf7-8fc9-a4aa78dce87f/d0ff4379-183a-47b9-a740-9ddc283ebc29.jpg
" target="_blank"> <img alt="Click for enlarged picture" src="
https://hosting.photobucket.com/95288841-8654-4bf7-8fc9-a4aa78dce87f/d0ff4379-183a-47b9-a740-9ddc283ebc29.jpg" width="600" /> </a></p>
<p>
<a href=" https://hosting.photobucket.com/95288841-8654-4bf7-8fc9-a4aa78dce87f/4333e95e-bbbd-4f47-aaea-38a9c99e54d8.jpg
" target="_blank"> <img alt="Click for enlarged picture" src="
https://hosting.photobucket.com/95288841-8654-4bf7-8fc9-a4aa78dce87f/4333e95e-bbbd-4f47-aaea-38a9c99e54d8.jpg" width="600" /> </a></p>
<p>
<a href=" https://hosting.photobucket.com/95288841-8654-4bf7-8fc9-a4aa78dce87f/1372f8a2-b222-48ee-ae45-a90b5a354ef7.jpg
" target="_blank"> <img alt="Click for enlarged picture" src="
https://hosting.photobucket.com/95288841-8654-4bf7-8fc9-a4aa78dce87f/1372f8a2-b222-48ee-ae45-a90b5a354ef7.jpg" width="600" /> </a></p>
<p>
<a href=" https://hosting.photobucket.com/95288841-8654-4bf7-8fc9-a4aa78dce87f/6a1b4fd1-d982-4b06-9c5f-3cd40d6bf10a.jpg
" target="_blank"> <img alt="Click for enlarged picture" src="
https://hosting.photobucket.com/95288841-8654-4bf7-8fc9-a4aa78dce87f/6a1b4fd1-d982-4b06-9c5f-3cd40d6bf10a.jpg" width="600" /> </a></p>
<p>
<a href=" https://hosting.photobucket.com/95288841-8654-4bf7-8fc9-a4aa78dce87f/c2ec45e1-e0f3-463a-b254-cb2a38b53e14.jpg
" target="_blank"> <img alt="Click for enlarged picture" src="
https://hosting.photobucket.com/95288841-8654-4bf7-8fc9-a4aa78dce87f/c2ec45e1-e0f3-463a-b254-cb2a38b53e14.jpg" width="600" /> </a></p>
<p>
<a href=" https://hosting.photobucket.com/95288841-8654-4bf7-8fc9-a4aa78dce87f/17553b9a-0592-4f6a-a097-3f1a97e161f3.jpg
" target="_blank"> <img alt="Click for enlarged picture" src="
https://hosting.photobucket.com/95288841-8654-4bf7-8fc9-a4aa78dce87f/17553b9a-0592-4f6a-a097-3f1a97e161f3.jpg" width="600" /> </a></p>
<p>
<a href=" https://hosting.photobucket.com/95288841-8654-4bf7-8fc9-a4aa78dce87f/8658bd6b-dff2-4d24-8473-928d44d44480.jpg
" target="_blank"> <img alt="Click for enlarged picture" src="
https://hosting.photobucket.com/95288841-8654-4bf7-8fc9-a4aa78dce87f/8658bd6b-dff2-4d24-8473-928d44d44480.jpg" width="600" /> </a></p>
<p>
<a href=" https://hosting.photobucket.com/95288841-8654-4bf7-8fc9-a4aa78dce87f/ecab0ea7-f75b-4e31-a520-d088ad39fa17.jpg
" target="_blank"> <img alt="Click for enlarged picture" src="
https://hosting.photobucket.com/95288841-8654-4bf7-8fc9-a4aa78dce87f/ecab0ea7-f75b-4e31-a520-d088ad39fa17.jpg" width="600" /> </a></p>
<p>
<a href=" https://hosting.photobucket.com/95288841-8654-4bf7-8fc9-a4aa78dce87f/9495a2f5-8a82-41f2-abf4-9ade3db41d87.jpg
" target="_blank"> <img alt="Click for enlarged picture" src="
https://hosting.photobucket.com/95288841-8654-4bf7-8fc9-a4aa78dce87f/9495a2f5-8a82-41f2-abf4-9ade3db41d87.jpg" width="600" /> </a></p>
<p>
<a href=" https://hosting.photobucket.com/95288841-8654-4bf7-8fc9-a4aa78dce87f/362cc6fd-a5dd-474b-9b9f-aeab27d6dcfa.jpg
" target="_blank"> <img alt="Click for enlarged picture" src="
https://hosting.photobucket.com/95288841-8654-4bf7-8fc9-a4aa78dce87f/362cc6fd-a5dd-474b-9b9f-aeab27d6dcfa.jpg" width="600" /> </a></p>
<p>
It was a special honor for us to host our guest exhibitor, Ninoslav Luk, a miniaturist from Poreč, who introduced himself to us with his collection of historical dioramas.</p>
<p>
<a href=" https://hosting.photobucket.com/95288841-8654-4bf7-8fc9-a4aa78dce87f/ba1353de-e2bd-4340-9121-9056e287ed4a.jpg
" target="_blank"> <img alt="Click for enlarged picture" src="
https://hosting.photobucket.com/95288841-8654-4bf7-8fc9-a4aa78dce87f/ba1353de-e2bd-4340-9121-9056e287ed4a.jpg" width="600" /> </a></p>
<p>
<a href=" https://hosting.photobucket.com/95288841-8654-4bf7-8fc9-a4aa78dce87f/cea18506-1b50-4e5b-955c-0b9ca02d7826.jpg
" target="_blank"> <img alt="Click for enlarged picture" src="
https://hosting.photobucket.com/95288841-8654-4bf7-8fc9-a4aa78dce87f/cea18506-1b50-4e5b-955c-0b9ca02d7826.jpg" width="600" /> </a></p>
<p>
<a href=" https://hosting.photobucket.com/95288841-8654-4bf7-8fc9-a4aa78dce87f/1be85b41-e3b6-4536-b141-cd0da6eb38c1.jpg
" target="_blank"> <img alt="Click for enlarged picture" src="
https://hosting.photobucket.com/95288841-8654-4bf7-8fc9-a4aa78dce87f/1be85b41-e3b6-4536-b141-cd0da6eb38c1.jpg" width="600" /> </a></p>
<p>
<a href=" https://hosting.photobucket.com/95288841-8654-4bf7-8fc9-a4aa78dce87f/9e93b87d-ff3c-4b7b-8f06-5f9d3464a134.jpg
" target="_blank"> <img alt="Click for enlarged picture" src="
https://hosting.photobucket.com/95288841-8654-4bf7-8fc9-a4aa78dce87f/9e93b87d-ff3c-4b7b-8f06-5f9d3464a134.jpg" width="600" /> </a></p>
<p>
During the first weekend of the Exhibition, 21-22.02., we held the 18th annual international miniature painting competition <strong>Black Queen Hobby and Miniature Painting Competition</strong>!</p>
<p>
<a href=" https://hosting.photobucket.com/95288841-8654-4bf7-8fc9-a4aa78dce87f/3056fb09-f66c-4dea-80a8-a4e72407429a.jpg
" target="_blank"> <img alt="Click for enlarged picture" src="
https://hosting.photobucket.com/95288841-8654-4bf7-8fc9-a4aa78dce87f/3056fb09-f66c-4dea-80a8-a4e72407429a.jpg" width="600" /> </a></p>
<p>
As contestants arrived and registered for the competition, our hardworking staff photographed all the exhibits before sorting them into categories and carefully placing them in glass cases. There was no shortage of morning neccessities like coffe and doughnuts.</p>
<p>
<</p>
<p>
<a href=" https://hosting.photobucket.com/95288841-8654-4bf7-8fc9-a4aa78dce87f/1118089c-2b46-4a2c-b17d-dc92b66d1ffc.jpg
" target="_blank"> <img alt="Click for enlarged picture" src="
https://hosting.photobucket.com/95288841-8654-4bf7-8fc9-a4aa78dce87f/1118089c-2b46-4a2c-b17d-dc92b66d1ffc.jpg" width="600" /> </a></p>
<p>
<a href=" https://hosting.photobucket.com/95288841-8654-4bf7-8fc9-a4aa78dce87f/9fd3c272-9a69-4532-a09d-36497a20a820.jpg
" target="_blank"> <img alt="Click for enlarged picture" src="
https://hosting.photobucket.com/95288841-8654-4bf7-8fc9-a4aa78dce87f/9fd3c272-9a69-4532-a09d-36497a20a820.jpg" width="600" /> </a></p>
<p>
<a href=" https://hosting.photobucket.com/95288841-8654-4bf7-8fc9-a4aa78dce87f/86995e80-c502-45fb-80f5-c8fda27da3f9.jpg
" target="_blank"> <img alt="Click for enlarged picture" src="
https://hosting.photobucket.com/95288841-8654-4bf7-8fc9-a4aa78dce87f/86995e80-c502-45fb-80f5-c8fda27da3f9.jpg" width="600" /> </a></p>
<p>
By noon, all the display cases were full and the competition could officially begin.</p>
<p>
<a href=" https://hosting.photobucket.com/95288841-8654-4bf7-8fc9-a4aa78dce87f/bce59a4f-c3e3-4708-a3d6-25e81a894c24.jpg
" target="_blank"> <img alt="Click for enlarged picture" src="
https://hosting.photobucket.com/95288841-8654-4bf7-8fc9-a4aa78dce87f/bce59a4f-c3e3-4708-a3d6-25e81a894c24.jpg" width="600" /> </a></p>
<p>
<a href=" https://hosting.photobucket.com/95288841-8654-4bf7-8fc9-a4aa78dce87f/16a0a094-01aa-4e52-82cf-fdab00d74711.jpg
" target="_blank"> <img alt="Click for enlarged picture" src="
https://hosting.photobucket.com/95288841-8654-4bf7-8fc9-a4aa78dce87f/16a0a094-01aa-4e52-82cf-fdab00d74711.jpg" width="600" /> </a></p>
<p>
<a href=" https://hosting.photobucket.com/95288841-8654-4bf7-8fc9-a4aa78dce87f/0d3f4042-ff77-48d0-b332-add0fd08f7c3.jpg
" target="_blank"> <img alt="Click for enlarged picture" src="
https://hosting.photobucket.com/95288841-8654-4bf7-8fc9-a4aa78dce87f/0d3f4042-ff77-48d0-b332-add0fd08f7c3.jpg" width="600" /> </a></p>
<p>
<a href=" https://hosting.photobucket.com/95288841-8654-4bf7-8fc9-a4aa78dce87f/3711baf8-93f2-434a-aea9-a95288ca04dd.jpg
" target="_blank"> <img alt="Click for enlarged picture" src="
https://hosting.photobucket.com/95288841-8654-4bf7-8fc9-a4aa78dce87f/3711baf8-93f2-434a-aea9-a95288ca04dd.jpg" width="600" /> </a></p>
<p>
<a href=" https://hosting.photobucket.com/95288841-8654-4bf7-8fc9-a4aa78dce87f/53113b97-ec06-4409-95ba-95a5ad3f9720.jpg
" target="_blank"> <img alt="Click for enlarged picture" src="
https://hosting.photobucket.com/95288841-8654-4bf7-8fc9-a4aa78dce87f/53113b97-ec06-4409-95ba-95a5ad3f9720.jpg" width="600" /> </a></p>
<p>
<a href=" https://hosting.photobucket.com/95288841-8654-4bf7-8fc9-a4aa78dce87f/ab127858-193d-4976-bdb2-e27302722fca.jpg
" target="_blank"> <img alt="Click for enlarged picture" src="
https://hosting.photobucket.com/95288841-8654-4bf7-8fc9-a4aa78dce87f/ab127858-193d-4976-bdb2-e27302722fca.jpg" width="600" /> </a></p>
<p>
<a href=" https://hosting.photobucket.com/95288841-8654-4bf7-8fc9-a4aa78dce87f/3735af11-3fb6-4772-a8ff-5e0ff6ddf03a.jpg
" target="_blank"> <img alt="Click for enlarged picture" src="
https://hosting.photobucket.com/95288841-8654-4bf7-8fc9-a4aa78dce87f/3735af11-3fb6-4772-a8ff-5e0ff6ddf03a.jpg" width="600" /> </a></p>
<p>
<strong>Back To Basics workshops for the young at the Black Queen</strong></p>
<p>
This year, throughout the weekend, we organized miniature painting workshops for the youngest, who were able to paint one of our own miniatures designed specifically for this program for the first time!</p>
<p>
<a href=" https://hosting.photobucket.com/95288841-8654-4bf7-8fc9-a4aa78dce87f/6999be0c-8cc6-4947-a423-9427a2299724.jpg
" target="_blank"> <img alt="Click for enlarged picture" src="
https://hosting.photobucket.com/95288841-8654-4bf7-8fc9-a4aa78dce87f/6999be0c-8cc6-4947-a423-9427a2299724.jpg" width="600" /> </a></p>
<p>
<a href="https://hosting.photobucket.com/95288841-8654-4bf7-8fc9-a4aa78dce87f/835b05a5-f171-49df-afa6-da0692b89074.jpg" target="_blank"><img alt="Click for enlarged picture" src="https://hosting.photobucket.com/95288841-8654-4bf7-8fc9-a4aa78dce87f/835b05a5-f171-49df-afa6-da0692b89074.jpg" width="600" /></a></p>
<p>
<a href=" https://hosting.photobucket.com/95288841-8654-4bf7-8fc9-a4aa78dce87f/ef5dde13-84ee-4ea0-b9f3-28aaf703ef6d.jpg
" target="_blank"> <img alt="Click for enlarged picture" src="
https://hosting.photobucket.com/95288841-8654-4bf7-8fc9-a4aa78dce87f/ef5dde13-84ee-4ea0-b9f3-28aaf703ef6d.jpg" width="600" /> </a></p>
<p>
<strong>SELLERS' COURT</strong></p>
<p>
During the weekend we hosted our sponsors with their sales stands: Swood.si and Carta Magica.</p>
<p>
<a href=" https://hosting.photobucket.com/95288841-8654-4bf7-8fc9-a4aa78dce87f/5ee9a49f-a387-435a-9110-572402b7191d.jpg
" target="_blank"> <img alt="Click for enlarged picture" src="
https://hosting.photobucket.com/95288841-8654-4bf7-8fc9-a4aa78dce87f/5ee9a49f-a387-435a-9110-572402b7191d.jpg" width="600" /> </a></p>
<p>
<a href=" https://hosting.photobucket.com/95288841-8654-4bf7-8fc9-a4aa78dce87f/47cf600f-b1eb-4655-bf06-305f6f21d5d2.jpg
" target="_blank"> <img alt="Click for enlarged picture" src="
https://hosting.photobucket.com/95288841-8654-4bf7-8fc9-a4aa78dce87f/47cf600f-b1eb-4655-bf06-305f6f21d5d2.jpg" width="600" /> </a></p>
<p>
<strong>MINIATURE PAINTING WORKSHOPS</strong></p>
<p>
The ZZTK premises allow workshops to be held during the weekend in the cinema hall in the basement, so we also organized demonstration workshops during the weekend. The lecturers' work was recorded with a camera and projected onto the projection screen in the hall. Many thanks to our domestic and international lecturers: Anže Zorko (SLO), doc.dr.sc. Winton Afrić (CRO), Ivan Knezović (UMS Agram) and Petar Knezoviću (CRO).</p>
<p>
<a href=" https://hosting.photobucket.com/95288841-8654-4bf7-8fc9-a4aa78dce87f/e8d835be-ec99-49d7-bc9b-086e38573d1a.jpg
" target="_blank"> <img alt="Click for enlarged picture" src="
https://hosting.photobucket.com/95288841-8654-4bf7-8fc9-a4aa78dce87f/e8d835be-ec99-49d7-bc9b-086e38573d1a.jpg" width="600" /> </a></p>
<p>
<a href=" https://hosting.photobucket.com/95288841-8654-4bf7-8fc9-a4aa78dce87f/f3eba4c1-4637-4da9-8360-75f430355af4.jpg" target="_blank"> <img alt="Click for enlarged picture" src="
https://hosting.photobucket.com/95288841-8654-4bf7-8fc9-a4aa78dce87f/f3eba4c1-4637-4da9-8360-75f430355af4.jpg" width="600" /> </a></p>
<p>
<a href=" https://hosting.photobucket.com/95288841-8654-4bf7-8fc9-a4aa78dce87f/ef523854-4030-4579-aa38-403afda86c91.jpg
" target="_blank"> <img alt="Click for enlarged picture" src="
https://hosting.photobucket.com/95288841-8654-4bf7-8fc9-a4aa78dce87f/ef523854-4030-4579-aa38-403afda86c91.jpg" width="600" /> </a></p>
<p>
<a href=" https://hosting.photobucket.com/95288841-8654-4bf7-8fc9-a4aa78dce87f/dd0943c2-f4a8-40c3-b641-f6dcdd200380.jpg
" target="_blank"> <img alt="Click for enlarged picture" src="
https://hosting.photobucket.com/95288841-8654-4bf7-8fc9-a4aa78dce87f/dd0943c2-f4a8-40c3-b641-f6dcdd200380.jpg" width="600" /> </a></p>
<p>
<a href=" https://hosting.photobucket.com/95288841-8654-4bf7-8fc9-a4aa78dce87f/08b1626a-f6c7-43c9-b718-3e9a41b55ca6.jpg
" target="_blank"> <img alt="Click for enlarged picture" src="
https://hosting.photobucket.com/95288841-8654-4bf7-8fc9-a4aa78dce87f/08b1626a-f6c7-43c9-b718-3e9a41b55ca6.jpg" width="600" /> </a></p>
<p>
<a href=" https://hosting.photobucket.com/95288841-8654-4bf7-8fc9-a4aa78dce87f/91aca7f3-1af6-486d-b174-65079a63a1ea.jpg
" target="_blank"> <img alt="Click for enlarged picture" src="
https://hosting.photobucket.com/95288841-8654-4bf7-8fc9-a4aa78dce87f/91aca7f3-1af6-486d-b174-65079a63a1ea.jpg" width="600" /> </a></p>
<p>
<a href=" https://hosting.photobucket.com/95288841-8654-4bf7-8fc9-a4aa78dce87f/3821f2fb-fbe7-4096-adbc-7d8c981a3b56.jpg
" target="_blank"> <img alt="Click for enlarged picture" src="
https://hosting.photobucket.com/95288841-8654-4bf7-8fc9-a4aa78dce87f/3821f2fb-fbe7-4096-adbc-7d8c981a3b56.jpg" width="600" /> </a></p>
<p>
<a href=" https://hosting.photobucket.com/95288841-8654-4bf7-8fc9-a4aa78dce87f/2c7bb3c5-c0ec-4a96-b6bd-6a90ce5ce154.jpg
" target="_blank"> <img alt="Click for enlarged picture" src="
https://hosting.photobucket.com/95288841-8654-4bf7-8fc9-a4aa78dce87f/2c7bb3c5-c0ec-4a96-b6bd-6a90ce5ce154.jpg" width="600" /> </a></p>
<p>
<a href=" https://hosting.photobucket.com/95288841-8654-4bf7-8fc9-a4aa78dce87f/b646f4ee-21aa-4d12-8db3-6d33351d5aeb.jpg
" target="_blank"> <img alt="Click for enlarged picture" src="
https://hosting.photobucket.com/95288841-8654-4bf7-8fc9-a4aa78dce87f/b646f4ee-21aa-4d12-8db3-6d33351d5aeb.jpg" width="600" /> </a></p>
<p>
<a href=" https://hosting.photobucket.com/95288841-8654-4bf7-8fc9-a4aa78dce87f/fb5efc01-32cc-4119-90e3-188f51b30237.jpg
" target="_blank"> <img alt="Click for enlarged picture" src="
https://hosting.photobucket.com/95288841-8654-4bf7-8fc9-a4aa78dce87f/fb5efc01-32cc-4119-90e3-188f51b30237.jpg" width="600" /> </a></p>
<p>
<strong>SPEED PAINTING COMPETITION</strong></p>
<p>
We organized a speed painting competition on Sunday afternoon. Participants had 60 minutes to paint one wizrad, a miniature of our own design and production.</p>
<p>
<a href=" https://hosting.photobucket.com/95288841-8654-4bf7-8fc9-a4aa78dce87f/106417a6-a047-4e0d-9f81-87858806052f.jpg
" target="_blank"> <img alt="Click for enlarged picture" src="
https://hosting.photobucket.com/95288841-8654-4bf7-8fc9-a4aa78dce87f/106417a6-a047-4e0d-9f81-87858806052f.jpg" width="600" /> </a></p>
<p>
<a href=" https://hosting.photobucket.com/95288841-8654-4bf7-8fc9-a4aa78dce87f/ac6853c7-6e34-4e07-a996-8d7d12744b67.jpg
" target="_blank"> <img alt="Click for enlarged picture" src="
https://hosting.photobucket.com/95288841-8654-4bf7-8fc9-a4aa78dce87f/ac6853c7-6e34-4e07-a996-8d7d12744b67.jpg" width="600" /> </a></p>
<p>
<a href=" https://hosting.photobucket.com/95288841-8654-4bf7-8fc9-a4aa78dce87f/ccb155fa-52c5-4a99-9515-f69a6836dce7.jpg
" target="_blank"> <img alt="Click for enlarged picture" src="
https://hosting.photobucket.com/95288841-8654-4bf7-8fc9-a4aa78dce87f/ccb155fa-52c5-4a99-9515-f69a6836dce7.jpg" width="600" /> </a></p>
<p>
<a href=" https://hosting.photobucket.com/95288841-8654-4bf7-8fc9-a4aa78dce87f/a29fedd0-97ea-45b1-85f9-7ea62188b2b2.jpg
" target="_blank"><img alt="Click for enlarged picture" src="
https://hosting.photobucket.com/95288841-8654-4bf7-8fc9-a4aa78dce87f/a29fedd0-97ea-45b1-85f9-7ea62188b2b2.jpg" width="600" /></a></p>
<p>
With that, we came to the very end of this wonderful weekend and all that was left was the awarding of prizes and recognition to the winners.</p>
<p>
<a href=" https://hosting.photobucket.com/95288841-8654-4bf7-8fc9-a4aa78dce87f/046ca4c8-0ae7-415e-abd3-e131d580c3ad.jpg
" target="_blank"> <img alt="Click for enlarged picture" src="
https://hosting.photobucket.com/95288841-8654-4bf7-8fc9-a4aa78dce87f/046ca4c8-0ae7-415e-abd3-e131d580c3ad.jpg" width="600" /> </a></p>
<p>
<a href=" https://hosting.photobucket.com/95288841-8654-4bf7-8fc9-a4aa78dce87f/cec0dcef-7acb-4a77-89de-271ed5410672.jpg
" target="_blank"> <img alt="Click for enlarged picture" src="
https://hosting.photobucket.com/95288841-8654-4bf7-8fc9-a4aa78dce87f/cec0dcef-7acb-4a77-89de-271ed5410672.jpg" width="600" /> </a></p>
<p>
<a href=" https://hosting.photobucket.com/95288841-8654-4bf7-8fc9-a4aa78dce87f/a495a5fc-31a2-4979-a970-0fa22c334354.jpg
" target="_blank"> <img alt="Click for enlarged picture" src="
https://hosting.photobucket.com/95288841-8654-4bf7-8fc9-a4aa78dce87f/a495a5fc-31a2-4979-a970-0fa22c334354.jpg" width="600" /> </a></p>
<p>
<strong>AGRAM ARENA – Leaving Asphodel Necropolis28 Campaign</strong></p>
<p>
During the weekend of February 21-22, we held a new international competition, Agram Arena! This time it was the turn of the tabletop strategy game Necropolis28, for which our members designed a two-day campaign. Each participant created their own gang of soldiers, and the vast majority also created their own boards.</p>
<p>
<a href=" https://hosting.photobucket.com/95288841-8654-4bf7-8fc9-a4aa78dce87f/ac69b182-4bfc-4575-a6d3-fb3c8baba342.jpg
" target="_blank"> <img alt="Click for enlarged picture" src="
https://hosting.photobucket.com/95288841-8654-4bf7-8fc9-a4aa78dce87f/ac69b182-4bfc-4575-a6d3-fb3c8baba342.jpg" width="600" /> </a></p>
<p>
<a href=" https://hosting.photobucket.com/95288841-8654-4bf7-8fc9-a4aa78dce87f/289fed7b-e058-42d8-ba2d-cbd0463e98da.jpg
" target="_blank"> <img alt="Click for enlarged picture" src="
https://hosting.photobucket.com/95288841-8654-4bf7-8fc9-a4aa78dce87f/289fed7b-e058-42d8-ba2d-cbd0463e98da.jpg" width="600" /> </a></p>
<p>
<a href=" https://hosting.photobucket.com/95288841-8654-4bf7-8fc9-a4aa78dce87f/d92ebbee-859d-4441-8386-3d760b20b7a7.jpg
" target="_blank"> <img alt="Click for enlarged picture" src="
https://hosting.photobucket.com/95288841-8654-4bf7-8fc9-a4aa78dce87f/d92ebbee-859d-4441-8386-3d760b20b7a7.jpg" width="600" /> </a></p>
<p>
<a href=" https://hosting.photobucket.com/95288841-8654-4bf7-8fc9-a4aa78dce87f/09c59798-7871-425e-a075-3ca1cd91768a.jpg
" target="_blank"> <img alt="Click for enlarged picture" src="
https://hosting.photobucket.com/95288841-8654-4bf7-8fc9-a4aa78dce87f/09c59798-7871-425e-a075-3ca1cd91768a.jpg" width="600" /> </a></p>
<p>
<a href=" https://hosting.photobucket.com/95288841-8654-4bf7-8fc9-a4aa78dce87f/b2f3edc8-5a23-4552-9a2a-4027b286f327.jpg
" target="_blank"> <img alt="Click for enlarged picture" src="
https://hosting.photobucket.com/95288841-8654-4bf7-8fc9-a4aa78dce87f/b2f3edc8-5a23-4552-9a2a-4027b286f327.jpg" width="600" /> </a></p>
<p>
<a href=" https://hosting.photobucket.com/95288841-8654-4bf7-8fc9-a4aa78dce87f/2a9f43ac-b531-4746-b7bb-ac5a3356aab0.jpg
" target="_blank"> <img alt="Click for enlarged picture" src="
https://hosting.photobucket.com/95288841-8654-4bf7-8fc9-a4aa78dce87f/2a9f43ac-b531-4746-b7bb-ac5a3356aab0.jpg" width="600" /> </a></p>
<p>
<strong>EVENTS ON WEEKDAYS DURING THE EXHIBITION </strong></p>
<p>
Over the next two weeks, our volunteers held open miniature painting workshops on weekdays from 4:00 PM to 8:00 PM. Miniature painting workstations were set up where our visitors could paint miniatures we had prepared (or their own if they had brought them) using our materials and tools.</p>
<p>
<a href=" https://hosting.photobucket.com/95288841-8654-4bf7-8fc9-a4aa78dce87f/6edf7765-42b5-417a-820f-fa5d907179a7.jpg
" target="_blank"> <img alt="Click for enlarged picture" src="
https://hosting.photobucket.com/95288841-8654-4bf7-8fc9-a4aa78dce87f/6edf7765-42b5-417a-820f-fa5d907179a7.jpg" width="600" /> </a></p>
<p>
<a href=" https://hosting.photobucket.com/95288841-8654-4bf7-8fc9-a4aa78dce87f/c084ebe2-f57b-4519-9b31-29bdc1155887.jpg
" target="_blank"> <img alt="Click for enlarged picture" src="
https://hosting.photobucket.com/95288841-8654-4bf7-8fc9-a4aa78dce87f/c084ebe2-f57b-4519-9b31-29bdc1155887.jpg" width="600" /> </a></p>
<p>
<a href=" https://hosting.photobucket.com/95288841-8654-4bf7-8fc9-a4aa78dce87f/37ff2272-f9b0-4b16-a363-1e6f6688c866.jpg
" target="_blank"> <img alt="Click for enlarged picture" src="
https://hosting.photobucket.com/95288841-8654-4bf7-8fc9-a4aa78dce87f/37ff2272-f9b0-4b16-a363-1e6f6688c866.jpg" width="600" /> </a></p>
<p>
<a href=" https://hosting.photobucket.com/95288841-8654-4bf7-8fc9-a4aa78dce87f/5f4f7968-ff50-4a01-98da-6ce8562930b4.jpg
" target="_blank"> <img alt="Click for enlarged picture" src="
https://hosting.photobucket.com/95288841-8654-4bf7-8fc9-a4aa78dce87f/5f4f7968-ff50-4a01-98da-6ce8562930b4.jpg" width="600" /> </a></p>
<p>
<a href=" https://hosting.photobucket.com/95288841-8654-4bf7-8fc9-a4aa78dce87f/cbb45319-d488-483c-bf9d-9af29852fc74.jpg
" target="_blank"> <img alt="Click for enlarged picture" src="
https://hosting.photobucket.com/95288841-8654-4bf7-8fc9-a4aa78dce87f/cbb45319-d488-483c-bf9d-9af29852fc74.jpg" width="600" /> </a></p>
<p>
<a href=" https://hosting.photobucket.com/95288841-8654-4bf7-8fc9-a4aa78dce87f/3dcca26c-d549-4af3-812a-a4a81b9a2310.jpg
" target="_blank"> <img alt="Click for enlarged picture" src="
https://hosting.photobucket.com/95288841-8654-4bf7-8fc9-a4aa78dce87f/3dcca26c-d549-4af3-812a-a4a81b9a2310.jpg" width="600" /> </a></p>
<p>
<a href=" https://hosting.photobucket.com/95288841-8654-4bf7-8fc9-a4aa78dce87f/4adf0fb6-3eab-4b40-b32d-d03eab4a9892.jpg
" target="_blank"> <img alt="Click for enlarged picture" src="
https://hosting.photobucket.com/95288841-8654-4bf7-8fc9-a4aa78dce87f/4adf0fb6-3eab-4b40-b32d-d03eab4a9892.jpg" width="600" /> </a></p>
<p>
<a href=" https://hosting.photobucket.com/95288841-8654-4bf7-8fc9-a4aa78dce87f/4732b58a-9a65-4d1c-a7d5-25513d34b108.jpg
" target="_blank"> <img alt="Click for enlarged picture" src="
https://hosting.photobucket.com/95288841-8654-4bf7-8fc9-a4aa78dce87f/4732b58a-9a65-4d1c-a7d5-25513d34b108.jpg" width="600" /> </a></p>
<p>
<a href=" https://hosting.photobucket.com/95288841-8654-4bf7-8fc9-a4aa78dce87f/274be330-31d5-4e25-95db-ec2f423a003c.jpg
" target="_blank"> <img alt="Click for enlarged picture" src="
https://hosting.photobucket.com/95288841-8654-4bf7-8fc9-a4aa78dce87f/274be330-31d5-4e25-95db-ec2f423a003c.jpg" width="600" /> </a></p>
<p>
<a href=" https://hosting.photobucket.com/95288841-8654-4bf7-8fc9-a4aa78dce87f/8e7b0a80-0f46-4d70-9789-a46976c713d2.jpg
" target="_blank"> <img alt="Click for enlarged picture" src="
https://hosting.photobucket.com/95288841-8654-4bf7-8fc9-a4aa78dce87f/8e7b0a80-0f46-4d70-9789-a46976c713d2.jpg" width="600" /> </a></p>
<p>
<a href=" https://hosting.photobucket.com/95288841-8654-4bf7-8fc9-a4aa78dce87f/8bbd4e96-b911-4f26-80fe-b1c57f29027b.jpg
" target="_blank"> <img alt="Click for enlarged picture" src="
https://hosting.photobucket.com/95288841-8654-4bf7-8fc9-a4aa78dce87f/8bbd4e96-b911-4f26-80fe-b1c57f29027b.jpg" width="600" /> </a></p>
<p>
<a href=" https://hosting.photobucket.com/95288841-8654-4bf7-8fc9-a4aa78dce87f/203a27be-8f10-459d-89b9-befb6b636b74.jpg
" target="_blank"> <img alt="Click for enlarged picture" src="
https://hosting.photobucket.com/95288841-8654-4bf7-8fc9-a4aa78dce87f/203a27be-8f10-459d-89b9-befb6b636b74.jpg" width="600" /> </a></p>
<p>
<a href=" https://hosting.photobucket.com/95288841-8654-4bf7-8fc9-a4aa78dce87f/5dc4358f-19d8-475f-a4af-9c29e9ed18d7.jpg
" target="_blank"> <img alt="Click for enlarged picture" src="
https://hosting.photobucket.com/95288841-8654-4bf7-8fc9-a4aa78dce87f/5dc4358f-19d8-475f-a4af-9c29e9ed18d7.jpg" width="600" /> </a></p>
<p>
<strong>BACK TO BASICS MINIATURE PAINTING WORKSHOPS FOR YOUNG</strong></p>
<p>
On weekdays from 17:00 to 18:00, we held our new workshops for the youngest, in which our youngest participants painted their first miniatures.</p>
<p>
<a href=" https://hosting.photobucket.com/95288841-8654-4bf7-8fc9-a4aa78dce87f/948af139-8fb5-4e28-a27c-404466e70d05.jpg
" target="_blank"> <img alt="Click for enlarged picture" src="
https://hosting.photobucket.com/95288841-8654-4bf7-8fc9-a4aa78dce87f/948af139-8fb5-4e28-a27c-404466e70d05.jpg" width="600" /> </a></p>
<p>
<a href=" https://hosting.photobucket.com/95288841-8654-4bf7-8fc9-a4aa78dce87f/bb3e20c2-bb21-4a3d-863a-74de08261467.jpg
" target="_blank"> <img alt="Click for enlarged picture" src="
https://hosting.photobucket.com/95288841-8654-4bf7-8fc9-a4aa78dce87f/bb3e20c2-bb21-4a3d-863a-74de08261467.jpg" width="600" /> </a></p>
<p>
<a href=" https://hosting.photobucket.com/95288841-8654-4bf7-8fc9-a4aa78dce87f/7316c760-98e3-4e3f-9261-d138aa7a5a6a.jpg
" target="_blank"> <img alt="Click for enlarged picture" src="
https://hosting.photobucket.com/95288841-8654-4bf7-8fc9-a4aa78dce87f/7316c760-98e3-4e3f-9261-d138aa7a5a6a.jpg" width="600" /> </a></p>
<p>
<a href=" https://hosting.photobucket.com/95288841-8654-4bf7-8fc9-a4aa78dce87f/68934b39-3d1f-4f43-b967-14b73c41a39e.jpg
" target="_blank"> <img alt="Click for enlarged picture" src="
https://hosting.photobucket.com/95288841-8654-4bf7-8fc9-a4aa78dce87f/68934b39-3d1f-4f43-b967-14b73c41a39e.jpg" width="600" /> </a></p>
<p>
<a href=" https://hosting.photobucket.com/95288841-8654-4bf7-8fc9-a4aa78dce87f/46125bce-a28d-494f-873a-3aeabdc1d6c2.jpg
" target="_blank"> <img alt="Click for enlarged picture" src="
https://hosting.photobucket.com/95288841-8654-4bf7-8fc9-a4aa78dce87f/46125bce-a28d-494f-873a-3aeabdc1d6c2.jpg" width="600" /> </a></p>
<p>
<a href=" https://hosting.photobucket.com/95288841-8654-4bf7-8fc9-a4aa78dce87f/3c58e0ad-77a9-44c8-b6bf-d9a55c514d43.jpg
" target="_blank"> <img alt="Click for enlarged picture" src="
https://hosting.photobucket.com/95288841-8654-4bf7-8fc9-a4aa78dce87f/3c58e0ad-77a9-44c8-b6bf-d9a55c514d43.jpg" width="600" /> </a></p>
<p>
<a href=" https://hosting.photobucket.com/95288841-8654-4bf7-8fc9-a4aa78dce87f/f891f0f0-051b-40ee-9676-cb03b0a9811b.jpg
" target="_blank"> <img alt="Click for enlarged picture" src="
https://hosting.photobucket.com/95288841-8654-4bf7-8fc9-a4aa78dce87f/f891f0f0-051b-40ee-9676-cb03b0a9811b.jpg" width="600" /> </a></p>
<p>
<strong>AGRAM LEGO SECTION lecture: FW-14b – An F1 racecar for the future</strong></p>
<p>
On Wednesday, February 25, 2026, as part of the activities of our Agram Lego Section, our resident mechanical engineer Marko Paunović gave a lecture on the topic of the F1 racecar from 1992. Admission to the lecture was free, and upon completion, a LEGO model of the racecar was made by members of the Lego section</p>
<p>
<a href=" https://hosting.photobucket.com/95288841-8654-4bf7-8fc9-a4aa78dce87f/b2e14b1c-daa4-4314-8685-184377bc7e28.jpg
" target="_blank"> <img alt="Click for enlarged picture" src="
https://hosting.photobucket.com/95288841-8654-4bf7-8fc9-a4aa78dce87f/b2e14b1c-daa4-4314-8685-184377bc7e28.jpg" width="600" /> </a></p>
<p>
<a href=" https://hosting.photobucket.com/95288841-8654-4bf7-8fc9-a4aa78dce87f/31fb439a-77d3-4418-83ff-66c3af279cca.jpg" target="_blank"> <img alt="Click for enlarged picture" src="
https://hosting.photobucket.com/95288841-8654-4bf7-8fc9-a4aa78dce87f/31fb439a-77d3-4418-83ff-66c3af279cca.jpg" width="600" /> </a></p>
<p>
<a href=" https://hosting.photobucket.com/95288841-8654-4bf7-8fc9-a4aa78dce87f/bfcaf282-6be8-4b52-a3ed-c91137457876.jpg
" target="_blank"> <img alt="Click for enlarged picture" src="
https://hosting.photobucket.com/95288841-8654-4bf7-8fc9-a4aa78dce87f/bfcaf282-6be8-4b52-a3ed-c91137457876.jpg" width="600" /> </a></p>
<p>
<a href=" https://hosting.photobucket.com/95288841-8654-4bf7-8fc9-a4aa78dce87f/ce70fc61-9e1a-4169-aaad-8b67417656c0.jpg
" target="_blank"> <img alt="Click for enlarged picture" src="
https://hosting.photobucket.com/95288841-8654-4bf7-8fc9-a4aa78dce87f/ce70fc61-9e1a-4169-aaad-8b67417656c0.jpg" width="600" /> </a></p>
<p>
<a href=" https://hosting.photobucket.com/95288841-8654-4bf7-8fc9-a4aa78dce87f/94ca0e36-8710-458d-8194-9f71299f4d74.jpg
" target="_blank"> <img alt="Click for enlarged picture" src="
https://hosting.photobucket.com/95288841-8654-4bf7-8fc9-a4aa78dce87f/94ca0e36-8710-458d-8194-9f71299f4d74.jpg" width="600" /> </a></p>
<p>
<a href=" https://hosting.photobucket.com/95288841-8654-4bf7-8fc9-a4aa78dce87f/c6771f72-7191-4ca3-a792-3bb1ab3897b1.jpg
" target="_blank"> <img alt="Click for enlarged picture" src="
https://hosting.photobucket.com/95288841-8654-4bf7-8fc9-a4aa78dce87f/c6771f72-7191-4ca3-a792-3bb1ab3897b1.jpg" width="600" /> </a></p>
<p>
<a href=" https://hosting.photobucket.com/95288841-8654-4bf7-8fc9-a4aa78dce87f/c8fcfcb6-09f2-4398-a2fb-fa5065771e01.jpg
" target="_blank"> <img alt="Click for enlarged picture" src="
https://hosting.photobucket.com/95288841-8654-4bf7-8fc9-a4aa78dce87f/c8fcfcb6-09f2-4398-a2fb-fa5065771e01.jpg" width="600" /> </a></p>
<p>
<a href=" https://hosting.photobucket.com/95288841-8654-4bf7-8fc9-a4aa78dce87f/d7e187a8-d5b1-433b-b30d-091e54dcdddf.jpg
" target="_blank"> <img alt="Click for enlarged picture" src="
https://hosting.photobucket.com/95288841-8654-4bf7-8fc9-a4aa78dce87f/d7e187a8-d5b1-433b-b30d-091e54dcdddf.jpg" width="600" /> </a></p>
<p>
During the second weekend of the Exhibition, 28.02.-01.03., we organized a <strong>MINIATURE PAINTING WORKSHOP - Grimdark</strong>.</p>
<p>
The workshop was held over two days (the entire weekend) and participants painted up to three different figures for the game Trench Crusade. The focus of these lectures was on painting the popular grimdark style minis. The workshop presented paints and equipment, figure preparation, several miniature painting techniques from basic to advanced, and techniques and tricks for quickly and efficiently painting larger quantities of figures at once. Water-based acrylic paints were used as part of the workshop.</p>
<p>
<a href=" https://hosting.photobucket.com/95288841-8654-4bf7-8fc9-a4aa78dce87f/733d94b2-8e8d-4a4e-accd-b9168e32577e.jpg
" target="_blank"> <img alt="Click for enlarged picture" src="
https://hosting.photobucket.com/95288841-8654-4bf7-8fc9-a4aa78dce87f/733d94b2-8e8d-4a4e-accd-b9168e32577e.jpg
" width="600" /> </a></p>
<p>
<a href=" https://hosting.photobucket.com/95288841-8654-4bf7-8fc9-a4aa78dce87f/41020062-45b9-41cd-a357-fa23a389f390.jpg
" target="_blank"> <img alt="Click for enlarged picture" src="
https://hosting.photobucket.com/95288841-8654-4bf7-8fc9-a4aa78dce87f/41020062-45b9-41cd-a357-fa23a389f390.jpg
" width="600" /> </a></p>
<p>
<a href=" https://hosting.photobucket.com/95288841-8654-4bf7-8fc9-a4aa78dce87f/0c07cc55-596d-494d-972b-cd6a0dd6b8b7.jpg
" target="_blank"> <img alt="Click for enlarged picture" src="
https://hosting.photobucket.com/95288841-8654-4bf7-8fc9-a4aa78dce87f/0c07cc55-596d-494d-972b-cd6a0dd6b8b7.jpg" width="600" /> </a></p>
<p>
<a href=" https://hosting.photobucket.com/95288841-8654-4bf7-8fc9-a4aa78dce87f/c17dd356-08b1-48e1-b895-6296aed7f818.jpg
" target="_blank"> <img alt="Click for enlarged picture" src="
https://hosting.photobucket.com/95288841-8654-4bf7-8fc9-a4aa78dce87f/c17dd356-08b1-48e1-b895-6296aed7f818.jpg" width="600" /> </a></p>
<p>
On Wednesday 04.03.2026. the annual <strong>session of the Assembly</strong> was held, where we determined the guidelines for work in 2026.</p>
<p>
,</p>
<p>
<a href=" https://hosting.photobucket.com/95288841-8654-4bf7-8fc9-a4aa78dce87f/59484bd0-7edc-4aed-a04e-ae42900ba3e6.jpg
" target="_blank"> <img alt="Click for enlarged picture" src="
https://hosting.photobucket.com/95288841-8654-4bf7-8fc9-a4aa78dce87f/59484bd0-7edc-4aed-a04e-ae42900ba3e6.jpg
" width="600" /> </a></p>
<p>
On Sunday 08.03.2026. The exhibition was over, our exhibits safely stored, and the Gallery cleaned.</p>
<p>
<a href=" https://hosting.photobucket.com/95288841-8654-4bf7-8fc9-a4aa78dce87f/98af4280-0956-4cdb-b4a9-da40e3a5a44a.jpg
" target="_blank"> <img alt="Click for enlarged picture" src="
https://hosting.photobucket.com/95288841-8654-4bf7-8fc9-a4aa78dce87f/98af4280-0956-4cdb-b4a9-da40e3a5a44a.jpg" width="600" /> </a></p>
<p>
<a href=" https://hosting.photobucket.com/95288841-8654-4bf7-8fc9-a4aa78dce87f/3259b35e-1fc2-4a99-a3c5-c7984958d72b.jpg
" target="_blank"> <img alt="Click for enlarged picture" src="
https://hosting.photobucket.com/95288841-8654-4bf7-8fc9-a4aa78dce87f/3259b35e-1fc2-4a99-a3c5-c7984958d72b.jpg" width="600" /> </a></p>
<p>
The most important part of every year when holding this Exhibition is the social aspect, the socializing of our members both among themselves and with our international friends who visit us! With these few photos from our joint gatherings, we greet you until next year!</p>
<p>
<a href=" https://hosting.photobucket.com/95288841-8654-4bf7-8fc9-a4aa78dce87f/b9168e23-79b2-4d81-8a7d-7534062881a7.jpg
" target="_blank"> <img alt="Click for enlarged picture" src="
https://hosting.photobucket.com/95288841-8654-4bf7-8fc9-a4aa78dce87f/b9168e23-79b2-4d81-8a7d-7534062881a7.jpg " width="600" /> </a></p>
<p>
<a href=" https://hosting.photobucket.com/95288841-8654-4bf7-8fc9-a4aa78dce87f/edff925e-916c-4d78-953e-210abf3753d4.jpg
" target="_blank"> <img alt="Click for enlarged picture" src="
https://hosting.photobucket.com/95288841-8654-4bf7-8fc9-a4aa78dce87f/edff925e-916c-4d78-953e-210abf3753d4.jpg " width="600" /> </a></p>
<p>
<a href=" https://hosting.photobucket.com/95288841-8654-4bf7-8fc9-a4aa78dce87f/8bcb48fa-466b-43f8-8a4b-f15f6794b21e.jpg
" target="_blank"> <img alt="Click for enlarged picture" src="
https://hosting.photobucket.com/95288841-8654-4bf7-8fc9-a4aa78dce87f/8bcb48fa-466b-43f8-8a4b-f15f6794b21e.jpg" width="600" /> </a></p>
"
["content_hrv"]=>
string(42265) "<p>
<a href=" https://hosting.photobucket.com/95288841-8654-4bf7-8fc9-a4aa78dce87f/dc756f84-867d-4df4-acd8-5d43775cafc2.jpg
" target="_blank"> <img alt="Click for enlarged picture" src="
https://hosting.photobucket.com/95288841-8654-4bf7-8fc9-a4aa78dce87f/dc756f84-867d-4df4-acd8-5d43775cafc2.jpg" width="600" /> </a></p>
<p>
<strong>Izložba minijatura i maketa "Agram 2026"</strong> održala se ove godine od 19.2. do 08.03. Postavljanje izložbe je održano u srijedu 18.2. i sudjelovao je velik broj članova kao i prijatelja Udruge koji su izlagali svoje radove.</p>
<p>
<a href=" https://hosting.photobucket.com/95288841-8654-4bf7-8fc9-a4aa78dce87f/8529d6d4-76ea-4872-a9e6-748e04223a4e.jpg
" target="_blank"> <img alt="Click for enlarged picture" src="
https://hosting.photobucket.com/95288841-8654-4bf7-8fc9-a4aa78dce87f/8529d6d4-76ea-4872-a9e6-748e04223a4e.jpg
" width="600" /> </a></p>
<p>
<a href=" https://hosting.photobucket.com/95288841-8654-4bf7-8fc9-a4aa78dce87f/f3038937-f001-4ceb-b725-a330fcd64cee.jpg
" target="_blank"> <img alt="Click for enlarged picture" src="
https://hosting.photobucket.com/95288841-8654-4bf7-8fc9-a4aa78dce87f/f3038937-f001-4ceb-b725-a330fcd64cee.jpg
" width="600" /> </a></p>
<p>
<a href=" https://hosting.photobucket.com/95288841-8654-4bf7-8fc9-a4aa78dce87f/3575379e-e068-49e2-9d4d-c9a49531fdc2.jpg
" target="_blank"> <img alt="Click for enlarged picture" src="
https://hosting.photobucket.com/95288841-8654-4bf7-8fc9-a4aa78dce87f/3575379e-e068-49e2-9d4d-c9a49531fdc2.jpg" width="600" /> </a></p>
<p>
<a href=" https://hosting.photobucket.com/95288841-8654-4bf7-8fc9-a4aa78dce87f/e51713c7-2add-4f8f-ae37-e6eba25badff.jpg
" target="_blank"> <img alt="Click for enlarged picture" src="
https://hosting.photobucket.com/95288841-8654-4bf7-8fc9-a4aa78dce87f/e51713c7-2add-4f8f-ae37-e6eba25badff.jpg" width="600" /> </a></p>
<p>
<a href=" https://hosting.photobucket.com/95288841-8654-4bf7-8fc9-a4aa78dce87f/9c0bb546-50a8-483d-aeab-ab3b2ce9f094.jpg
" target="_blank"> <img alt="Click for enlarged picture" src="
https://hosting.photobucket.com/95288841-8654-4bf7-8fc9-a4aa78dce87f/9c0bb546-50a8-483d-aeab-ab3b2ce9f094.jpg" width="600" /> </a></p>
<p>
Otvorenje Izložbe održalo se u četvrtak, 19.2.2026. s početkom u 18:00h. Izložba je organizirana povodom našeg dvadeset trećeg rođendana.</p>
<p>
<a href=" https://hosting.photobucket.com/95288841-8654-4bf7-8fc9-a4aa78dce87f/71c7bfc2-1ffc-43b9-9d5a-53e009f6b86d.jpg
" target="_blank"> <img alt="Click for enlarged picture" src="
https://hosting.photobucket.com/95288841-8654-4bf7-8fc9-a4aa78dce87f/71c7bfc2-1ffc-43b9-9d5a-53e009f6b86d.jpg" width="600" /> </a></p>
<p>
<a href=" https://hosting.photobucket.com/95288841-8654-4bf7-8fc9-a4aa78dce87f/007b4701-1d7c-4a67-a599-0539a2aa3191.jpg
" target="_blank"> <img alt="Click for enlarged picture" src="
https://hosting.photobucket.com/95288841-8654-4bf7-8fc9-a4aa78dce87f/007b4701-1d7c-4a67-a599-0539a2aa3191.jpg" width="600" /> </a></p>
<p>
<a href=" https://hosting.photobucket.com/95288841-8654-4bf7-8fc9-a4aa78dce87f/2c8090e2-8b95-4368-bb48-98876d680e15.jpg
" target="_blank"> <img alt="Click for enlarged picture" src="
https://hosting.photobucket.com/95288841-8654-4bf7-8fc9-a4aa78dce87f/2c8090e2-8b95-4368-bb48-98876d680e15.jpg" width="600" /> </a></p>
<p>
<a href=" https://hosting.photobucket.com/95288841-8654-4bf7-8fc9-a4aa78dce87f/375768ad-a8bb-49bf-9845-e46c896ba7ec.jpg
" target="_blank"> <img alt="Click for enlarged picture" src="
https://hosting.photobucket.com/95288841-8654-4bf7-8fc9-a4aa78dce87f/375768ad-a8bb-49bf-9845-e46c896ba7ec.jpg" width="600" /> </a></p>
<p>
<a href=" https://hosting.photobucket.com/95288841-8654-4bf7-8fc9-a4aa78dce87f/a93de974-4ccb-4876-85b0-4d066ae402b3.jpg
" target="_blank"> <img alt="Click for enlarged picture" src="
https://hosting.photobucket.com/95288841-8654-4bf7-8fc9-a4aa78dce87f/a93de974-4ccb-4876-85b0-4d066ae402b3.jpg" width="600" /> </a></p>
<p>
<a href=" https://hosting.photobucket.com/95288841-8654-4bf7-8fc9-a4aa78dce87f/d323ccc9-1b9a-4cb2-8adf-7019b0e217f4.jpg
" target="_blank"> <img alt="Click for enlarged picture" src="
https://hosting.photobucket.com/95288841-8654-4bf7-8fc9-a4aa78dce87f/d323ccc9-1b9a-4cb2-8adf-7019b0e217f4.jpg" width="600" /> </a></p>
<p>
<a href=" https://hosting.photobucket.com/95288841-8654-4bf7-8fc9-a4aa78dce87f/a5a66447-2d76-47ae-866d-4d512ef469a5.jpg
" target="_blank"> <img alt="Click for enlarged picture" src="
https://hosting.photobucket.com/95288841-8654-4bf7-8fc9-a4aa78dce87f/a5a66447-2d76-47ae-866d-4d512ef469a5.jpg" width="600" /> </a></p>
<p>
<a href=" https://hosting.photobucket.com/95288841-8654-4bf7-8fc9-a4aa78dce87f/3e7bcfc9-ba02-4f94-a6c3-79dfaea3639e.jpg
" target="_blank"> <img alt="Click for enlarged picture" src="
https://hosting.photobucket.com/95288841-8654-4bf7-8fc9-a4aa78dce87f/3e7bcfc9-ba02-4f94-a6c3-79dfaea3639e.jpg" width="600" /> </a></p>
<p>
<a href=" https://hosting.photobucket.com/95288841-8654-4bf7-8fc9-a4aa78dce87f/24e79466-4a9e-4b10-970c-caad235d260d.jpg
" target="_blank"> <img alt="Click for enlarged picture" src="
https://hosting.photobucket.com/95288841-8654-4bf7-8fc9-a4aa78dce87f/24e79466-4a9e-4b10-970c-caad235d260d.jpg" width="600" /> </a></p>
<p>
Kao i uvijek, Izložba je prikazivala presjek rada Udruge, njenih članova, polaznika njenih tečajeva i radionica te članova FB grupe Miniature Painters Croatia. U velikom broju vitrina našle su se brojne minijature za stolne strateške igre, igre na tabli, a cijela jedna vitrina posvećena je nagrađenim izlošcima sa prethodnih minijaturističkih natjecanja. Nekoliko vitrina bilo je posvećeno projektima koje Udruga već 23 godinu provodi poput Knjižnice i čitaonice UMS „Agram“, Radionice za izradu prostornih maketa i Radionice bojanja minijatura, ali i novih poput Agram Group Build, Agram Lego Sekcije i Back to Basics radionica bojanja za najmlađe.</p>
<p>
<a href=" https://hosting.photobucket.com/95288841-8654-4bf7-8fc9-a4aa78dce87f/fca84936-af71-44d3-9a4c-faeb26163899.jpg
" target="_blank"> <img alt="Click for enlarged picture" src="
https://hosting.photobucket.com/95288841-8654-4bf7-8fc9-a4aa78dce87f/fca84936-af71-44d3-9a4c-faeb26163899.jpg" width="600" /> </a></p>
<p>
<a href=" https://hosting.photobucket.com/95288841-8654-4bf7-8fc9-a4aa78dce87f/459bc5ac-8702-46f9-93b4-547deaabdef4.jpg
" target="_blank"> <img alt="Click for enlarged picture" src="
https://hosting.photobucket.com/95288841-8654-4bf7-8fc9-a4aa78dce87f/459bc5ac-8702-46f9-93b4-547deaabdef4.jpg" width="600" /> </a></p>
<p>
<a href=" https://hosting.photobucket.com/95288841-8654-4bf7-8fc9-a4aa78dce87f/91a04363-b2ef-4635-a046-7edf25ce7808.jpg
" target="_blank"> <img alt="Click for enlarged picture" src="
https://hosting.photobucket.com/95288841-8654-4bf7-8fc9-a4aa78dce87f/91a04363-b2ef-4635-a046-7edf25ce7808.jpg" width="600" /> </a></p>
<p>
<a href=" https://hosting.photobucket.com/95288841-8654-4bf7-8fc9-a4aa78dce87f/73256af5-fd5d-40b5-95e1-120e49c9be87.jpg
" target="_blank"> <img alt="Click for enlarged picture" src="
https://hosting.photobucket.com/95288841-8654-4bf7-8fc9-a4aa78dce87f/73256af5-fd5d-40b5-95e1-120e49c9be87.jpg" width="600" /> </a></p>
<p>
<a href=" https://hosting.photobucket.com/95288841-8654-4bf7-8fc9-a4aa78dce87f/979f9be5-23f3-4df9-91dc-ab71d6a10d64.jpg
" target="_blank"> <img alt="Click for enlarged picture" src="
https://hosting.photobucket.com/95288841-8654-4bf7-8fc9-a4aa78dce87f/979f9be5-23f3-4df9-91dc-ab71d6a10d64.jpg" width="600" /> </a></p>
<p>
<a href=" https://hosting.photobucket.com/95288841-8654-4bf7-8fc9-a4aa78dce87f/d0ff4379-183a-47b9-a740-9ddc283ebc29.jpg
" target="_blank"> <img alt="Click for enlarged picture" src="
https://hosting.photobucket.com/95288841-8654-4bf7-8fc9-a4aa78dce87f/d0ff4379-183a-47b9-a740-9ddc283ebc29.jpg" width="600" /> </a></p>
<p>
<a href=" https://hosting.photobucket.com/95288841-8654-4bf7-8fc9-a4aa78dce87f/4333e95e-bbbd-4f47-aaea-38a9c99e54d8.jpg
" target="_blank"> <img alt="Click for enlarged picture" src="
https://hosting.photobucket.com/95288841-8654-4bf7-8fc9-a4aa78dce87f/4333e95e-bbbd-4f47-aaea-38a9c99e54d8.jpg" width="600" /> </a></p>
<p>
<a href=" https://hosting.photobucket.com/95288841-8654-4bf7-8fc9-a4aa78dce87f/1372f8a2-b222-48ee-ae45-a90b5a354ef7.jpg
" target="_blank"> <img alt="Click for enlarged picture" src="
https://hosting.photobucket.com/95288841-8654-4bf7-8fc9-a4aa78dce87f/1372f8a2-b222-48ee-ae45-a90b5a354ef7.jpg" width="600" /> </a></p>
<p>
<a href=" https://hosting.photobucket.com/95288841-8654-4bf7-8fc9-a4aa78dce87f/6a1b4fd1-d982-4b06-9c5f-3cd40d6bf10a.jpg
" target="_blank"> <img alt="Click for enlarged picture" src="
https://hosting.photobucket.com/95288841-8654-4bf7-8fc9-a4aa78dce87f/6a1b4fd1-d982-4b06-9c5f-3cd40d6bf10a.jpg" width="600" /> </a></p>
<p>
<a href=" https://hosting.photobucket.com/95288841-8654-4bf7-8fc9-a4aa78dce87f/c2ec45e1-e0f3-463a-b254-cb2a38b53e14.jpg
" target="_blank"> <img alt="Click for enlarged picture" src="
https://hosting.photobucket.com/95288841-8654-4bf7-8fc9-a4aa78dce87f/c2ec45e1-e0f3-463a-b254-cb2a38b53e14.jpg" width="600" /> </a></p>
<p>
<a href=" https://hosting.photobucket.com/95288841-8654-4bf7-8fc9-a4aa78dce87f/17553b9a-0592-4f6a-a097-3f1a97e161f3.jpg
" target="_blank"> <img alt="Click for enlarged picture" src="
https://hosting.photobucket.com/95288841-8654-4bf7-8fc9-a4aa78dce87f/17553b9a-0592-4f6a-a097-3f1a97e161f3.jpg" width="600" /> </a></p>
<p>
<a href=" https://hosting.photobucket.com/95288841-8654-4bf7-8fc9-a4aa78dce87f/8658bd6b-dff2-4d24-8473-928d44d44480.jpg
" target="_blank"> <img alt="Click for enlarged picture" src="
https://hosting.photobucket.com/95288841-8654-4bf7-8fc9-a4aa78dce87f/8658bd6b-dff2-4d24-8473-928d44d44480.jpg" width="600" /> </a></p>
<p>
<a href=" https://hosting.photobucket.com/95288841-8654-4bf7-8fc9-a4aa78dce87f/ecab0ea7-f75b-4e31-a520-d088ad39fa17.jpg
" target="_blank"> <img alt="Click for enlarged picture" src="
https://hosting.photobucket.com/95288841-8654-4bf7-8fc9-a4aa78dce87f/ecab0ea7-f75b-4e31-a520-d088ad39fa17.jpg" width="600" /> </a></p>
<p>
<a href=" https://hosting.photobucket.com/95288841-8654-4bf7-8fc9-a4aa78dce87f/9495a2f5-8a82-41f2-abf4-9ade3db41d87.jpg
" target="_blank"> <img alt="Click for enlarged picture" src="
https://hosting.photobucket.com/95288841-8654-4bf7-8fc9-a4aa78dce87f/9495a2f5-8a82-41f2-abf4-9ade3db41d87.jpg" width="600" /> </a></p>
<p>
<a href=" https://hosting.photobucket.com/95288841-8654-4bf7-8fc9-a4aa78dce87f/362cc6fd-a5dd-474b-9b9f-aeab27d6dcfa.jpg
" target="_blank"> <img alt="Click for enlarged picture" src="
https://hosting.photobucket.com/95288841-8654-4bf7-8fc9-a4aa78dce87f/362cc6fd-a5dd-474b-9b9f-aeab27d6dcfa.jpg" width="600" /> </a></p>
<p>
Posebna čast nam je bila ugostiti našeg gosta izlagača, Ninoslava Luka minijaturista iz Poreča koji nam se predstavio svojom kolekcijom povijesnih diorama.</p>
<p>
<a href=" https://hosting.photobucket.com/95288841-8654-4bf7-8fc9-a4aa78dce87f/ba1353de-e2bd-4340-9121-9056e287ed4a.jpg
" target="_blank"> <img alt="Click for enlarged picture" src="
https://hosting.photobucket.com/95288841-8654-4bf7-8fc9-a4aa78dce87f/ba1353de-e2bd-4340-9121-9056e287ed4a.jpg" width="600" /> </a></p>
<p>
<a href=" https://hosting.photobucket.com/95288841-8654-4bf7-8fc9-a4aa78dce87f/cea18506-1b50-4e5b-955c-0b9ca02d7826.jpg
" target="_blank"> <img alt="Click for enlarged picture" src="
https://hosting.photobucket.com/95288841-8654-4bf7-8fc9-a4aa78dce87f/cea18506-1b50-4e5b-955c-0b9ca02d7826.jpg" width="600" /> </a></p>
<p>
<a href=" https://hosting.photobucket.com/95288841-8654-4bf7-8fc9-a4aa78dce87f/1be85b41-e3b6-4536-b141-cd0da6eb38c1.jpg
" target="_blank"> <img alt="Click for enlarged picture" src="
https://hosting.photobucket.com/95288841-8654-4bf7-8fc9-a4aa78dce87f/1be85b41-e3b6-4536-b141-cd0da6eb38c1.jpg" width="600" /> </a></p>
<p>
<a href=" https://hosting.photobucket.com/95288841-8654-4bf7-8fc9-a4aa78dce87f/9e93b87d-ff3c-4b7b-8f06-5f9d3464a134.jpg
" target="_blank"> <img alt="Click for enlarged picture" src="
https://hosting.photobucket.com/95288841-8654-4bf7-8fc9-a4aa78dce87f/9e93b87d-ff3c-4b7b-8f06-5f9d3464a134.jpg" width="600" /> </a></p>
<p>
Tijekom prvog vikenda Izložbe, 21.-22.02.,održali smo 20. godišnje međunarodno natjecanje u bojanju minijatura <strong>Black Queen Hobby and Miniature Painting Competition</strong>!</p>
<p>
<a href=" https://hosting.photobucket.com/95288841-8654-4bf7-8fc9-a4aa78dce87f/3056fb09-f66c-4dea-80a8-a4e72407429a.jpg
" target="_blank"> <img alt="Click for enlarged picture" src="
https://hosting.photobucket.com/95288841-8654-4bf7-8fc9-a4aa78dce87f/3056fb09-f66c-4dea-80a8-a4e72407429a.jpg" width="600" /> </a></p>
<p>
Kako su natjecatelji pristizali i prijavljivali se na natjecanje, naše vrijedno osoblje je fotografiralo sve izloške prije nego li su ih rasporedili po kategorijama i pažljivo ih postavili u staklene vitrine. Niti jutarnja okrijepa nije usfalila zahvaljujući našim revnim volonterima.</p>
<p>
<a href=" https://hosting.photobucket.com/95288841-8654-4bf7-8fc9-a4aa78dce87f/1118089c-2b46-4a2c-b17d-dc92b66d1ffc.jpg
" target="_blank"> <img alt="Click for enlarged picture" src="
https://hosting.photobucket.com/95288841-8654-4bf7-8fc9-a4aa78dce87f/1118089c-2b46-4a2c-b17d-dc92b66d1ffc.jpg" width="600" /> </a></p>
<p>
<a href=" https://hosting.photobucket.com/95288841-8654-4bf7-8fc9-a4aa78dce87f/9fd3c272-9a69-4532-a09d-36497a20a820.jpg
" target="_blank"> <img alt="Click for enlarged picture" src="
https://hosting.photobucket.com/95288841-8654-4bf7-8fc9-a4aa78dce87f/9fd3c272-9a69-4532-a09d-36497a20a820.jpg" width="600" /> </a></p>
<p>
<a href=" https://hosting.photobucket.com/95288841-8654-4bf7-8fc9-a4aa78dce87f/86995e80-c502-45fb-80f5-c8fda27da3f9.jpg
" target="_blank"> <img alt="Click for enlarged picture" src="
https://hosting.photobucket.com/95288841-8654-4bf7-8fc9-a4aa78dce87f/86995e80-c502-45fb-80f5-c8fda27da3f9.jpg" width="600" /> </a></p>
<p>
U podne, sve vitrine su bile pune i natjecanje je moglo službeno početi.</p>
<p>
<a href=" https://hosting.photobucket.com/95288841-8654-4bf7-8fc9-a4aa78dce87f/bce59a4f-c3e3-4708-a3d6-25e81a894c24.jpg
" target="_blank"> <img alt="Click for enlarged picture" src="
https://hosting.photobucket.com/95288841-8654-4bf7-8fc9-a4aa78dce87f/bce59a4f-c3e3-4708-a3d6-25e81a894c24.jpg" width="600" /> </a></p>
<p>
<a href=" https://hosting.photobucket.com/95288841-8654-4bf7-8fc9-a4aa78dce87f/16a0a094-01aa-4e52-82cf-fdab00d74711.jpg
" target="_blank"> <img alt="Click for enlarged picture" src="
https://hosting.photobucket.com/95288841-8654-4bf7-8fc9-a4aa78dce87f/16a0a094-01aa-4e52-82cf-fdab00d74711.jpg" width="600" /> </a></p>
<p>
<a href=" https://hosting.photobucket.com/95288841-8654-4bf7-8fc9-a4aa78dce87f/0d3f4042-ff77-48d0-b332-add0fd08f7c3.jpg
" target="_blank"> <img alt="Click for enlarged picture" src="
https://hosting.photobucket.com/95288841-8654-4bf7-8fc9-a4aa78dce87f/0d3f4042-ff77-48d0-b332-add0fd08f7c3.jpg" width="600" /> </a></p>
<p>
<a href=" https://hosting.photobucket.com/95288841-8654-4bf7-8fc9-a4aa78dce87f/3711baf8-93f2-434a-aea9-a95288ca04dd.jpg
" target="_blank"> <img alt="Click for enlarged picture" src="
https://hosting.photobucket.com/95288841-8654-4bf7-8fc9-a4aa78dce87f/3711baf8-93f2-434a-aea9-a95288ca04dd.jpg" width="600" /> </a></p>
<p>
<a href=" https://hosting.photobucket.com/95288841-8654-4bf7-8fc9-a4aa78dce87f/53113b97-ec06-4409-95ba-95a5ad3f9720.jpg
" target="_blank"> <img alt="Click for enlarged picture" src="
https://hosting.photobucket.com/95288841-8654-4bf7-8fc9-a4aa78dce87f/53113b97-ec06-4409-95ba-95a5ad3f9720.jpg" width="600" /> </a></p>
<p>
<a href=" https://hosting.photobucket.com/95288841-8654-4bf7-8fc9-a4aa78dce87f/ab127858-193d-4976-bdb2-e27302722fca.jpg
" target="_blank"> <img alt="Click for enlarged picture" src="
https://hosting.photobucket.com/95288841-8654-4bf7-8fc9-a4aa78dce87f/ab127858-193d-4976-bdb2-e27302722fca.jpg" width="600" /> </a></p>
<p>
<a href=" https://hosting.photobucket.com/95288841-8654-4bf7-8fc9-a4aa78dce87f/3735af11-3fb6-4772-a8ff-5e0ff6ddf03a.jpg
" target="_blank"> <img alt="Click for enlarged picture" src="
https://hosting.photobucket.com/95288841-8654-4bf7-8fc9-a4aa78dce87f/3735af11-3fb6-4772-a8ff-5e0ff6ddf03a.jpg" width="600" /> </a></p>
<p>
<strong>Back To Basics radionice za najmlađe na Black Queen</strong></p>
<p>
Ove godine smo tijekom cijelog vikenda organizirali radionice bojanja minijatura za najmlađe koji su mogli po prvi puta obojati neku od naših vlastitih minijatura osmišljenih upravo za ovaj program!</p>
<p>
<a href=" https://hosting.photobucket.com/95288841-8654-4bf7-8fc9-a4aa78dce87f/6999be0c-8cc6-4947-a423-9427a2299724.jpg
" target="_blank"> <img alt="Click for enlarged picture" src="
https://hosting.photobucket.com/95288841-8654-4bf7-8fc9-a4aa78dce87f/6999be0c-8cc6-4947-a423-9427a2299724.jpg" width="600" /> </a></p>
<p>
<a href="https://hosting.photobucket.com/95288841-8654-4bf7-8fc9-a4aa78dce87f/835b05a5-f171-49df-afa6-da0692b89074.jpg" target="_blank"><img alt="Click for enlarged picture" src="https://hosting.photobucket.com/95288841-8654-4bf7-8fc9-a4aa78dce87f/835b05a5-f171-49df-afa6-da0692b89074.jpg" width="600" /></a></p>
<p>
<a href=" https://hosting.photobucket.com/95288841-8654-4bf7-8fc9-a4aa78dce87f/ef5dde13-84ee-4ea0-b9f3-28aaf703ef6d.jpg
" target="_blank"> <img alt="Click for enlarged picture" src="
https://hosting.photobucket.com/95288841-8654-4bf7-8fc9-a4aa78dce87f/ef5dde13-84ee-4ea0-b9f3-28aaf703ef6d.jpg" width="600" /> </a></p>
<p>
<strong>PRODAJNI KUTAK</strong></p>
<p>
Tijekom vikenda ugostili smo naše sponzore sa njihovim prodajnim štandovima: Swood.si i Carta Magica.</p>
<p>
<a href=" https://hosting.photobucket.com/95288841-8654-4bf7-8fc9-a4aa78dce87f/5ee9a49f-a387-435a-9110-572402b7191d.jpg
" target="_blank"> <img alt="Click for enlarged picture" src="
https://hosting.photobucket.com/95288841-8654-4bf7-8fc9-a4aa78dce87f/5ee9a49f-a387-435a-9110-572402b7191d.jpg" width="600" /> </a></p>
<p>
<a href=" https://hosting.photobucket.com/95288841-8654-4bf7-8fc9-a4aa78dce87f/47cf600f-b1eb-4655-bf06-305f6f21d5d2.jpg
" target="_blank"> <img alt="Click for enlarged picture" src="
https://hosting.photobucket.com/95288841-8654-4bf7-8fc9-a4aa78dce87f/47cf600f-b1eb-4655-bf06-305f6f21d5d2.jpg" width="600" /> </a></p>
<p>
<strong>OGLEDNE RADIONICE BOJANJA MINIJATURA</strong></p>
<p>
Prostor ZZTK omogućuje održavanje radionica tijekom vikenda u kino dvorani u podrumu, stoga smo tijekom vikenda organizirali i ogledne radionice. Rad predavača snimao se kamerom i projicirao na projekcijsko platno u dvorani. Veliko hvala našim domaćim i inozemnim predavačima: Anžetu Zorku (SLO), doc.dr.sc. Wintonu Afriću (HR), Ivanu Knezoviću (UMS Agram) i Petru Knezoviću (HR).</p>
<p>
<a href=" https://hosting.photobucket.com/95288841-8654-4bf7-8fc9-a4aa78dce87f/e8d835be-ec99-49d7-bc9b-086e38573d1a.jpg
" target="_blank"> <img alt="Click for enlarged picture" src="
https://hosting.photobucket.com/95288841-8654-4bf7-8fc9-a4aa78dce87f/e8d835be-ec99-49d7-bc9b-086e38573d1a.jpg" width="600" /> </a></p>
<p>
<a href=" https://hosting.photobucket.com/95288841-8654-4bf7-8fc9-a4aa78dce87f/f3eba4c1-4637-4da9-8360-75f430355af4.jpg" target="_blank"> <img alt="Click for enlarged picture" src="
https://hosting.photobucket.com/95288841-8654-4bf7-8fc9-a4aa78dce87f/f3eba4c1-4637-4da9-8360-75f430355af4.jpg" width="600" /> </a></p>
<p>
<a href=" https://hosting.photobucket.com/95288841-8654-4bf7-8fc9-a4aa78dce87f/ef523854-4030-4579-aa38-403afda86c91.jpg
" target="_blank"> <img alt="Click for enlarged picture" src="
https://hosting.photobucket.com/95288841-8654-4bf7-8fc9-a4aa78dce87f/ef523854-4030-4579-aa38-403afda86c91.jpg" width="600" /> </a></p>
<p>
<a href=" https://hosting.photobucket.com/95288841-8654-4bf7-8fc9-a4aa78dce87f/dd0943c2-f4a8-40c3-b641-f6dcdd200380.jpg
" target="_blank"> <img alt="Click for enlarged picture" src="
https://hosting.photobucket.com/95288841-8654-4bf7-8fc9-a4aa78dce87f/dd0943c2-f4a8-40c3-b641-f6dcdd200380.jpg" width="600" /> </a></p>
<p>
<a href=" https://hosting.photobucket.com/95288841-8654-4bf7-8fc9-a4aa78dce87f/08b1626a-f6c7-43c9-b718-3e9a41b55ca6.jpg
" target="_blank"> <img alt="Click for enlarged picture" src="
https://hosting.photobucket.com/95288841-8654-4bf7-8fc9-a4aa78dce87f/08b1626a-f6c7-43c9-b718-3e9a41b55ca6.jpg" width="600" /> </a></p>
<p>
<a href=" https://hosting.photobucket.com/95288841-8654-4bf7-8fc9-a4aa78dce87f/91aca7f3-1af6-486d-b174-65079a63a1ea.jpg
" target="_blank"> <img alt="Click for enlarged picture" src="
https://hosting.photobucket.com/95288841-8654-4bf7-8fc9-a4aa78dce87f/91aca7f3-1af6-486d-b174-65079a63a1ea.jpg" width="600" /> </a></p>
<p>
<a href=" https://hosting.photobucket.com/95288841-8654-4bf7-8fc9-a4aa78dce87f/3821f2fb-fbe7-4096-adbc-7d8c981a3b56.jpg
" target="_blank"> <img alt="Click for enlarged picture" src="
https://hosting.photobucket.com/95288841-8654-4bf7-8fc9-a4aa78dce87f/3821f2fb-fbe7-4096-adbc-7d8c981a3b56.jpg" width="600" /> </a></p>
<p>
<a href=" https://hosting.photobucket.com/95288841-8654-4bf7-8fc9-a4aa78dce87f/2c7bb3c5-c0ec-4a96-b6bd-6a90ce5ce154.jpg
" target="_blank"> <img alt="Click for enlarged picture" src="
https://hosting.photobucket.com/95288841-8654-4bf7-8fc9-a4aa78dce87f/2c7bb3c5-c0ec-4a96-b6bd-6a90ce5ce154.jpg" width="600" /> </a></p>
<p>
<a href=" https://hosting.photobucket.com/95288841-8654-4bf7-8fc9-a4aa78dce87f/b646f4ee-21aa-4d12-8db3-6d33351d5aeb.jpg
" target="_blank"> <img alt="Click for enlarged picture" src="
https://hosting.photobucket.com/95288841-8654-4bf7-8fc9-a4aa78dce87f/b646f4ee-21aa-4d12-8db3-6d33351d5aeb.jpg" width="600" /> </a></p>
<p>
<a href=" https://hosting.photobucket.com/95288841-8654-4bf7-8fc9-a4aa78dce87f/fb5efc01-32cc-4119-90e3-188f51b30237.jpg
" target="_blank"> <img alt="Click for enlarged picture" src="
https://hosting.photobucket.com/95288841-8654-4bf7-8fc9-a4aa78dce87f/fb5efc01-32cc-4119-90e3-188f51b30237.jpg" width="600" /> </a></p>
<p>
<strong>NATJECANJE U BRZOM BOJANJU MINIJATURA</strong></p>
<p>
U nedjelju, 22.2. smo organizirali natjecanje u brzom bojanju minijatura. Po prvi puta smo koristili minijature koje su naš dizajn. Sudionici su imali 60 minuta vremena da obojaju og čarobnjaka.</p>
<p>
<a href=" https://hosting.photobucket.com/95288841-8654-4bf7-8fc9-a4aa78dce87f/106417a6-a047-4e0d-9f81-87858806052f.jpg
" target="_blank"> <img alt="Click for enlarged picture" src="
https://hosting.photobucket.com/95288841-8654-4bf7-8fc9-a4aa78dce87f/106417a6-a047-4e0d-9f81-87858806052f.jpg" width="600" /> </a></p>
<p>
<a href=" https://hosting.photobucket.com/95288841-8654-4bf7-8fc9-a4aa78dce87f/ac6853c7-6e34-4e07-a996-8d7d12744b67.jpg
" target="_blank"> <img alt="Click for enlarged picture" src="
https://hosting.photobucket.com/95288841-8654-4bf7-8fc9-a4aa78dce87f/ac6853c7-6e34-4e07-a996-8d7d12744b67.jpg" width="600" /> </a></p>
<p>
<a href=" https://hosting.photobucket.com/95288841-8654-4bf7-8fc9-a4aa78dce87f/ccb155fa-52c5-4a99-9515-f69a6836dce7.jpg
" target="_blank"> <img alt="Click for enlarged picture" src="
https://hosting.photobucket.com/95288841-8654-4bf7-8fc9-a4aa78dce87f/ccb155fa-52c5-4a99-9515-f69a6836dce7.jpg" width="600" /> </a></p>
<p>
<a href=" https://hosting.photobucket.com/95288841-8654-4bf7-8fc9-a4aa78dce87f/a29fedd0-97ea-45b1-85f9-7ea62188b2b2.jpg
" target="_blank"><img alt="Click for enlarged picture" src="
https://hosting.photobucket.com/95288841-8654-4bf7-8fc9-a4aa78dce87f/a29fedd0-97ea-45b1-85f9-7ea62188b2b2.jpg" width="600" /></a></p>
<p>
S time smo došli do samoga kraja ovog predivnog vikenda i sve što je preostalo je bila podjela nagrada i priznanja pobjednicima.</p>
<p>
<a href=" https://hosting.photobucket.com/95288841-8654-4bf7-8fc9-a4aa78dce87f/046ca4c8-0ae7-415e-abd3-e131d580c3ad.jpg
" target="_blank"> <img alt="Click for enlarged picture" src="
https://hosting.photobucket.com/95288841-8654-4bf7-8fc9-a4aa78dce87f/046ca4c8-0ae7-415e-abd3-e131d580c3ad.jpg" width="600" /> </a></p>
<p>
<a href=" https://hosting.photobucket.com/95288841-8654-4bf7-8fc9-a4aa78dce87f/cec0dcef-7acb-4a77-89de-271ed5410672.jpg
" target="_blank"> <img alt="Click for enlarged picture" src="
https://hosting.photobucket.com/95288841-8654-4bf7-8fc9-a4aa78dce87f/cec0dcef-7acb-4a77-89de-271ed5410672.jpg" width="600" /> </a></p>
<p>
<a href=" https://hosting.photobucket.com/95288841-8654-4bf7-8fc9-a4aa78dce87f/a495a5fc-31a2-4979-a970-0fa22c334354.jpg
" target="_blank"> <img alt="Click for enlarged picture" src="
https://hosting.photobucket.com/95288841-8654-4bf7-8fc9-a4aa78dce87f/a495a5fc-31a2-4979-a970-0fa22c334354.jpg" width="600" /> </a></p>
<p>
<strong>AGRAM ARENA – Leaving Asphodel Necropolis28 kampanja</strong></p>
<p>
Tijekom vikenda 21.-22.2. održali smo i novo međunarodno natjecanje Agram Arena! Ovoga puta na redu je bila stolna strateška igra Necropolis 28 za koju su naši članovi osmislili dvodnevnu kampanju. Svaki sudionik je izradio svoju bandu vojnika, a velika većina i svoje vlastite table.</p>
<p>
<a href=" https://hosting.photobucket.com/95288841-8654-4bf7-8fc9-a4aa78dce87f/ac69b182-4bfc-4575-a6d3-fb3c8baba342.jpg
" target="_blank"> <img alt="Click for enlarged picture" src="
https://hosting.photobucket.com/95288841-8654-4bf7-8fc9-a4aa78dce87f/ac69b182-4bfc-4575-a6d3-fb3c8baba342.jpg" width="600" /> </a></p>
<p>
<a href=" https://hosting.photobucket.com/95288841-8654-4bf7-8fc9-a4aa78dce87f/289fed7b-e058-42d8-ba2d-cbd0463e98da.jpg
" target="_blank"> <img alt="Click for enlarged picture" src="
https://hosting.photobucket.com/95288841-8654-4bf7-8fc9-a4aa78dce87f/289fed7b-e058-42d8-ba2d-cbd0463e98da.jpg" width="600" /> </a></p>
<p>
<a href=" https://hosting.photobucket.com/95288841-8654-4bf7-8fc9-a4aa78dce87f/d92ebbee-859d-4441-8386-3d760b20b7a7.jpg
" target="_blank"> <img alt="Click for enlarged picture" src="
https://hosting.photobucket.com/95288841-8654-4bf7-8fc9-a4aa78dce87f/d92ebbee-859d-4441-8386-3d760b20b7a7.jpg" width="600" /> </a></p>
<p>
<a href=" https://hosting.photobucket.com/95288841-8654-4bf7-8fc9-a4aa78dce87f/09c59798-7871-425e-a075-3ca1cd91768a.jpg
" target="_blank"> <img alt="Click for enlarged picture" src="
https://hosting.photobucket.com/95288841-8654-4bf7-8fc9-a4aa78dce87f/09c59798-7871-425e-a075-3ca1cd91768a.jpg" width="600" /> </a></p>
<p>
<a href=" https://hosting.photobucket.com/95288841-8654-4bf7-8fc9-a4aa78dce87f/b2f3edc8-5a23-4552-9a2a-4027b286f327.jpg
" target="_blank"> <img alt="Click for enlarged picture" src="
https://hosting.photobucket.com/95288841-8654-4bf7-8fc9-a4aa78dce87f/b2f3edc8-5a23-4552-9a2a-4027b286f327.jpg" width="600" /> </a></p>
<p>
<a href=" https://hosting.photobucket.com/95288841-8654-4bf7-8fc9-a4aa78dce87f/2a9f43ac-b531-4746-b7bb-ac5a3356aab0.jpg
" target="_blank"> <img alt="Click for enlarged picture" src="
https://hosting.photobucket.com/95288841-8654-4bf7-8fc9-a4aa78dce87f/2a9f43ac-b531-4746-b7bb-ac5a3356aab0.jpg" width="600" /> </a></p>
<p>
<strong>DOGAĐANJA RADNIM DANIMA ZA VRIJEME IZLOŽBE</strong></p>
<p>
Tijekom naredna dva tjedna, naši volonteri su radnim danima od 16:00 do 20:00, držali otvorene radionice bojanja minijatura. Postavljene su radne stanice za bojanje minijatura na kojoj su naši posjetitelji mogli bojati minijature koje smo priredili (ili svoje ukoliko su ih donijeli) koristeći naše materijale i alate.</p>
<p>
<a href=" https://hosting.photobucket.com/95288841-8654-4bf7-8fc9-a4aa78dce87f/6edf7765-42b5-417a-820f-fa5d907179a7.jpg
" target="_blank"> <img alt="Click for enlarged picture" src="
https://hosting.photobucket.com/95288841-8654-4bf7-8fc9-a4aa78dce87f/6edf7765-42b5-417a-820f-fa5d907179a7.jpg" width="600" /> </a></p>
<p>
<a href=" https://hosting.photobucket.com/95288841-8654-4bf7-8fc9-a4aa78dce87f/c084ebe2-f57b-4519-9b31-29bdc1155887.jpg
" target="_blank"> <img alt="Click for enlarged picture" src="
https://hosting.photobucket.com/95288841-8654-4bf7-8fc9-a4aa78dce87f/c084ebe2-f57b-4519-9b31-29bdc1155887.jpg" width="600" /> </a></p>
<p>
<a href=" https://hosting.photobucket.com/95288841-8654-4bf7-8fc9-a4aa78dce87f/37ff2272-f9b0-4b16-a363-1e6f6688c866.jpg
" target="_blank"> <img alt="Click for enlarged picture" src="
https://hosting.photobucket.com/95288841-8654-4bf7-8fc9-a4aa78dce87f/37ff2272-f9b0-4b16-a363-1e6f6688c866.jpg" width="600" /> </a></p>
<p>
<a href=" https://hosting.photobucket.com/95288841-8654-4bf7-8fc9-a4aa78dce87f/5f4f7968-ff50-4a01-98da-6ce8562930b4.jpg
" target="_blank"> <img alt="Click for enlarged picture" src="
https://hosting.photobucket.com/95288841-8654-4bf7-8fc9-a4aa78dce87f/5f4f7968-ff50-4a01-98da-6ce8562930b4.jpg" width="600" /> </a></p>
<p>
<a href=" https://hosting.photobucket.com/95288841-8654-4bf7-8fc9-a4aa78dce87f/cbb45319-d488-483c-bf9d-9af29852fc74.jpg
" target="_blank"> <img alt="Click for enlarged picture" src="
https://hosting.photobucket.com/95288841-8654-4bf7-8fc9-a4aa78dce87f/cbb45319-d488-483c-bf9d-9af29852fc74.jpg" width="600" /> </a></p>
<p>
<a href=" https://hosting.photobucket.com/95288841-8654-4bf7-8fc9-a4aa78dce87f/3dcca26c-d549-4af3-812a-a4a81b9a2310.jpg
" target="_blank"> <img alt="Click for enlarged picture" src="
https://hosting.photobucket.com/95288841-8654-4bf7-8fc9-a4aa78dce87f/3dcca26c-d549-4af3-812a-a4a81b9a2310.jpg" width="600" /> </a></p>
<p>
<a href=" https://hosting.photobucket.com/95288841-8654-4bf7-8fc9-a4aa78dce87f/4adf0fb6-3eab-4b40-b32d-d03eab4a9892.jpg
" target="_blank"> <img alt="Click for enlarged picture" src="
https://hosting.photobucket.com/95288841-8654-4bf7-8fc9-a4aa78dce87f/4adf0fb6-3eab-4b40-b32d-d03eab4a9892.jpg" width="600" /> </a></p>
<p>
<a href=" https://hosting.photobucket.com/95288841-8654-4bf7-8fc9-a4aa78dce87f/4732b58a-9a65-4d1c-a7d5-25513d34b108.jpg
" target="_blank"> <img alt="Click for enlarged picture" src="
https://hosting.photobucket.com/95288841-8654-4bf7-8fc9-a4aa78dce87f/4732b58a-9a65-4d1c-a7d5-25513d34b108.jpg" width="600" /> </a></p>
<p>
<a href=" https://hosting.photobucket.com/95288841-8654-4bf7-8fc9-a4aa78dce87f/274be330-31d5-4e25-95db-ec2f423a003c.jpg
" target="_blank"> <img alt="Click for enlarged picture" src="
https://hosting.photobucket.com/95288841-8654-4bf7-8fc9-a4aa78dce87f/274be330-31d5-4e25-95db-ec2f423a003c.jpg" width="600" /> </a></p>
<p>
<a href=" https://hosting.photobucket.com/95288841-8654-4bf7-8fc9-a4aa78dce87f/8e7b0a80-0f46-4d70-9789-a46976c713d2.jpg
" target="_blank"> <img alt="Click for enlarged picture" src="
https://hosting.photobucket.com/95288841-8654-4bf7-8fc9-a4aa78dce87f/8e7b0a80-0f46-4d70-9789-a46976c713d2.jpg" width="600" /> </a></p>
<p>
<a href=" https://hosting.photobucket.com/95288841-8654-4bf7-8fc9-a4aa78dce87f/8bbd4e96-b911-4f26-80fe-b1c57f29027b.jpg
" target="_blank"> <img alt="Click for enlarged picture" src="
https://hosting.photobucket.com/95288841-8654-4bf7-8fc9-a4aa78dce87f/8bbd4e96-b911-4f26-80fe-b1c57f29027b.jpg" width="600" /> </a></p>
<p>
<a href=" https://hosting.photobucket.com/95288841-8654-4bf7-8fc9-a4aa78dce87f/203a27be-8f10-459d-89b9-befb6b636b74.jpg
" target="_blank"> <img alt="Click for enlarged picture" src="
https://hosting.photobucket.com/95288841-8654-4bf7-8fc9-a4aa78dce87f/203a27be-8f10-459d-89b9-befb6b636b74.jpg" width="600" /> </a></p>
<p>
<a href=" https://hosting.photobucket.com/95288841-8654-4bf7-8fc9-a4aa78dce87f/5dc4358f-19d8-475f-a4af-9c29e9ed18d7.jpg
" target="_blank"> <img alt="Click for enlarged picture" src="
https://hosting.photobucket.com/95288841-8654-4bf7-8fc9-a4aa78dce87f/5dc4358f-19d8-475f-a4af-9c29e9ed18d7.jpg" width="600" /> </a></p>
<p>
<strong>BACK TO BASICS RADIONICE ZA NAJMLAĐE</strong></p>
<p>
Radnim danima od 17:00 do 18:00 održavali smo naše nove radionice za najmlađe u kojima su naši najmlađi polaznici bojali svoje prve minijature.</p>
<p>
<a href=" https://hosting.photobucket.com/95288841-8654-4bf7-8fc9-a4aa78dce87f/948af139-8fb5-4e28-a27c-404466e70d05.jpg
" target="_blank"> <img alt="Click for enlarged picture" src="
https://hosting.photobucket.com/95288841-8654-4bf7-8fc9-a4aa78dce87f/948af139-8fb5-4e28-a27c-404466e70d05.jpg" width="600" /> </a></p>
<p>
<a href=" https://hosting.photobucket.com/95288841-8654-4bf7-8fc9-a4aa78dce87f/bb3e20c2-bb21-4a3d-863a-74de08261467.jpg
" target="_blank"> <img alt="Click for enlarged picture" src="
https://hosting.photobucket.com/95288841-8654-4bf7-8fc9-a4aa78dce87f/bb3e20c2-bb21-4a3d-863a-74de08261467.jpg" width="600" /> </a></p>
<p>
<a href=" https://hosting.photobucket.com/95288841-8654-4bf7-8fc9-a4aa78dce87f/7316c760-98e3-4e3f-9261-d138aa7a5a6a.jpg
" target="_blank"> <img alt="Click for enlarged picture" src="
https://hosting.photobucket.com/95288841-8654-4bf7-8fc9-a4aa78dce87f/7316c760-98e3-4e3f-9261-d138aa7a5a6a.jpg" width="600" /> </a></p>
<p>
<a href=" https://hosting.photobucket.com/95288841-8654-4bf7-8fc9-a4aa78dce87f/68934b39-3d1f-4f43-b967-14b73c41a39e.jpg
" target="_blank"> <img alt="Click for enlarged picture" src="
https://hosting.photobucket.com/95288841-8654-4bf7-8fc9-a4aa78dce87f/68934b39-3d1f-4f43-b967-14b73c41a39e.jpg" width="600" /> </a></p>
<p>
<a href=" https://hosting.photobucket.com/95288841-8654-4bf7-8fc9-a4aa78dce87f/46125bce-a28d-494f-873a-3aeabdc1d6c2.jpg
" target="_blank"> <img alt="Click for enlarged picture" src="
https://hosting.photobucket.com/95288841-8654-4bf7-8fc9-a4aa78dce87f/46125bce-a28d-494f-873a-3aeabdc1d6c2.jpg" width="600" /> </a></p>
<p>
<a href=" https://hosting.photobucket.com/95288841-8654-4bf7-8fc9-a4aa78dce87f/3c58e0ad-77a9-44c8-b6bf-d9a55c514d43.jpg
" target="_blank"> <img alt="Click for enlarged picture" src="
https://hosting.photobucket.com/95288841-8654-4bf7-8fc9-a4aa78dce87f/3c58e0ad-77a9-44c8-b6bf-d9a55c514d43.jpg" width="600" /> </a></p>
<p>
<a href=" https://hosting.photobucket.com/95288841-8654-4bf7-8fc9-a4aa78dce87f/f891f0f0-051b-40ee-9676-cb03b0a9811b.jpg
" target="_blank"> <img alt="Click for enlarged picture" src="
https://hosting.photobucket.com/95288841-8654-4bf7-8fc9-a4aa78dce87f/f891f0f0-051b-40ee-9676-cb03b0a9811b.jpg" width="600" /> </a></p>
<p>
<strong>AGRAM LEGO SEKCIJA predavanje: FW-14b – Bolid F1 za budućnost</strong></p>
<p>
U srijedu 25.2.2026. u sklopu aktivnosti naše Agram Lego Sekcije, naš dežurni strojar Marko Paunović je održao predavanje na temu bolida Formule 1 iz 1992.. Ulaz na predavanje je bio besplatan, a po završetku su LEGO maketu bolida izradili članovi Lego sekcije</p>
<p>
<a href=" https://hosting.photobucket.com/95288841-8654-4bf7-8fc9-a4aa78dce87f/b2e14b1c-daa4-4314-8685-184377bc7e28.jpg
" target="_blank"> <img alt="Click for enlarged picture" src="
https://hosting.photobucket.com/95288841-8654-4bf7-8fc9-a4aa78dce87f/b2e14b1c-daa4-4314-8685-184377bc7e28.jpg" width="600" /> </a></p>
<p>
<a href=" https://hosting.photobucket.com/95288841-8654-4bf7-8fc9-a4aa78dce87f/31fb439a-77d3-4418-83ff-66c3af279cca.jpg" target="_blank"> <img alt="Click for enlarged picture" src="
https://hosting.photobucket.com/95288841-8654-4bf7-8fc9-a4aa78dce87f/31fb439a-77d3-4418-83ff-66c3af279cca.jpg" width="600" /> </a></p>
<p>
<a href=" https://hosting.photobucket.com/95288841-8654-4bf7-8fc9-a4aa78dce87f/bfcaf282-6be8-4b52-a3ed-c91137457876.jpg
" target="_blank"> <img alt="Click for enlarged picture" src="
https://hosting.photobucket.com/95288841-8654-4bf7-8fc9-a4aa78dce87f/bfcaf282-6be8-4b52-a3ed-c91137457876.jpg" width="600" /> </a></p>
<p>
<a href=" https://hosting.photobucket.com/95288841-8654-4bf7-8fc9-a4aa78dce87f/ce70fc61-9e1a-4169-aaad-8b67417656c0.jpg
" target="_blank"> <img alt="Click for enlarged picture" src="
https://hosting.photobucket.com/95288841-8654-4bf7-8fc9-a4aa78dce87f/ce70fc61-9e1a-4169-aaad-8b67417656c0.jpg" width="600" /> </a></p>
<p>
<a href=" https://hosting.photobucket.com/95288841-8654-4bf7-8fc9-a4aa78dce87f/94ca0e36-8710-458d-8194-9f71299f4d74.jpg
" target="_blank"> <img alt="Click for enlarged picture" src="
https://hosting.photobucket.com/95288841-8654-4bf7-8fc9-a4aa78dce87f/94ca0e36-8710-458d-8194-9f71299f4d74.jpg" width="600" /> </a></p>
<p>
<a href=" https://hosting.photobucket.com/95288841-8654-4bf7-8fc9-a4aa78dce87f/c6771f72-7191-4ca3-a792-3bb1ab3897b1.jpg
" target="_blank"> <img alt="Click for enlarged picture" src="
https://hosting.photobucket.com/95288841-8654-4bf7-8fc9-a4aa78dce87f/c6771f72-7191-4ca3-a792-3bb1ab3897b1.jpg" width="600" /> </a></p>
<p>
<a href=" https://hosting.photobucket.com/95288841-8654-4bf7-8fc9-a4aa78dce87f/c8fcfcb6-09f2-4398-a2fb-fa5065771e01.jpg
" target="_blank"> <img alt="Click for enlarged picture" src="
https://hosting.photobucket.com/95288841-8654-4bf7-8fc9-a4aa78dce87f/c8fcfcb6-09f2-4398-a2fb-fa5065771e01.jpg" width="600" /> </a></p>
<p>
<a href=" https://hosting.photobucket.com/95288841-8654-4bf7-8fc9-a4aa78dce87f/d7e187a8-d5b1-433b-b30d-091e54dcdddf.jpg
" target="_blank"> <img alt="Click for enlarged picture" src="
https://hosting.photobucket.com/95288841-8654-4bf7-8fc9-a4aa78dce87f/d7e187a8-d5b1-433b-b30d-091e54dcdddf.jpg" width="600" /> </a></p>
<p>
Tijekom drugog vikenda Izložbe, 28.02.-01.03., organizirali smo <strong>RADIONICU BOJANJA MINIJATURA – Grimdark stil</strong>.</p>
<p>
Radionica se provodila kroz dva dana (cijeli vikend) i polaznici su bojali tri različite figure za igru Trench Crusade. Fokus ovih predavanja bilo je bojenje popularnim Grimdark stilom. Na radionici su bile predstavljene boje i pribor, priprema figura, nekoliko tehnika bojenja minijatura od osnovnih do naprednijih, te tehnike i trikovi za brzo i efikasno bojenje većih količina figura odjednom. U sklopu radionice korištene su akrilne boje na bazi vode.</p>
<p>
<a href=" https://hosting.photobucket.com/95288841-8654-4bf7-8fc9-a4aa78dce87f/733d94b2-8e8d-4a4e-accd-b9168e32577e.jpg
" target="_blank"> <img alt="Click for enlarged picture" src="
https://hosting.photobucket.com/95288841-8654-4bf7-8fc9-a4aa78dce87f/733d94b2-8e8d-4a4e-accd-b9168e32577e.jpg
" width="600" /> </a></p>
<p>
<a href=" https://hosting.photobucket.com/95288841-8654-4bf7-8fc9-a4aa78dce87f/41020062-45b9-41cd-a357-fa23a389f390.jpg
" target="_blank"> <img alt="Click for enlarged picture" src="
https://hosting.photobucket.com/95288841-8654-4bf7-8fc9-a4aa78dce87f/41020062-45b9-41cd-a357-fa23a389f390.jpg
" width="600" /> </a></p>
<p>
<a href=" https://hosting.photobucket.com/95288841-8654-4bf7-8fc9-a4aa78dce87f/0c07cc55-596d-494d-972b-cd6a0dd6b8b7.jpg
" target="_blank"> <img alt="Click for enlarged picture" src="
https://hosting.photobucket.com/95288841-8654-4bf7-8fc9-a4aa78dce87f/0c07cc55-596d-494d-972b-cd6a0dd6b8b7.jpg" width="600" /> </a></p>
<p>
<a href=" https://hosting.photobucket.com/95288841-8654-4bf7-8fc9-a4aa78dce87f/c17dd356-08b1-48e1-b895-6296aed7f818.jpg
" target="_blank"> <img alt="Click for enlarged picture" src="
https://hosting.photobucket.com/95288841-8654-4bf7-8fc9-a4aa78dce87f/c17dd356-08b1-48e1-b895-6296aed7f818.jpg" width="600" /> </a></p>
<p>
U srijedu 04.03.2026. održana je godišnja <strong>sjednica Skupštine</strong> na kojoj smo odredili smjernice rada u 2026.</p>
<p>
<a href=" https://hosting.photobucket.com/95288841-8654-4bf7-8fc9-a4aa78dce87f/59484bd0-7edc-4aed-a04e-ae42900ba3e6.jpg
" target="_blank"> <img alt="Click for enlarged picture" src="
https://hosting.photobucket.com/95288841-8654-4bf7-8fc9-a4aa78dce87f/59484bd0-7edc-4aed-a04e-ae42900ba3e6.jpg
" width="600" /> </a></p>
<p>
U nedjelju 08.03.2026. Izložba je završena, naši eksponati sigurno spremljeni, a Galerija počišćena.</p>
<p>
<a href=" https://hosting.photobucket.com/95288841-8654-4bf7-8fc9-a4aa78dce87f/98af4280-0956-4cdb-b4a9-da40e3a5a44a.jpg
" target="_blank"> <img alt="Click for enlarged picture" src="
https://hosting.photobucket.com/95288841-8654-4bf7-8fc9-a4aa78dce87f/98af4280-0956-4cdb-b4a9-da40e3a5a44a.jpg" width="600" /> </a></p>
<p>
<a href=" https://hosting.photobucket.com/95288841-8654-4bf7-8fc9-a4aa78dce87f/3259b35e-1fc2-4a99-a3c5-c7984958d72b.jpg
" target="_blank"> <img alt="Click for enlarged picture" src="
https://hosting.photobucket.com/95288841-8654-4bf7-8fc9-a4aa78dce87f/3259b35e-1fc2-4a99-a3c5-c7984958d72b.jpg" width="600" /> </a></p>
<p>
Najbitniji dio svake godine prilikom održavanja ove Izložbe je socijalni aspekt, druženje naših članova kako međusobno tako i sa našim međunarodnim prijateljima koji nas posjećuju! Uz ovih par fotografija sa zajedničkih druženja, pozdravljamo vas do sljedeće godine!</p>
<p>
<a href=" https://hosting.photobucket.com/95288841-8654-4bf7-8fc9-a4aa78dce87f/b9168e23-79b2-4d81-8a7d-7534062881a7.jpg
" target="_blank"> <img alt="Click for enlarged picture" src="
https://hosting.photobucket.com/95288841-8654-4bf7-8fc9-a4aa78dce87f/b9168e23-79b2-4d81-8a7d-7534062881a7.jpg " width="600" /> </a></p>
<p>
<a href=" https://hosting.photobucket.com/95288841-8654-4bf7-8fc9-a4aa78dce87f/edff925e-916c-4d78-953e-210abf3753d4.jpg
" target="_blank"> <img alt="Click for enlarged picture" src="
https://hosting.photobucket.com/95288841-8654-4bf7-8fc9-a4aa78dce87f/edff925e-916c-4d78-953e-210abf3753d4.jpg " width="600" /> </a></p>
<p>
<a href=" https://hosting.photobucket.com/95288841-8654-4bf7-8fc9-a4aa78dce87f/8bcb48fa-466b-43f8-8a4b-f15f6794b21e.jpg
" target="_blank"> <img alt="Click for enlarged picture" src="
https://hosting.photobucket.com/95288841-8654-4bf7-8fc9-a4aa78dce87f/8bcb48fa-466b-43f8-8a4b-f15f6794b21e.jpg" width="600" /> </a></p>
"
["created"]=>
string(19) "2026-03-12 08:54:10"
["modified"]=>
string(19) "2026-03-12 08:58:37"
}
["Member"]=>
array(10) {
["id"]=>
string(2) "35"
["group_id"]=>
string(1) "1"
["first_name"]=>
string(5) "Marko"
["last_name"]=>
string(9) "Paunović"
["first_name_mask"]=>
string(5) "marko"
["last_name_mask"]=>
string(8) "paunovic"
["username"]=>
string(5) "marko"
["password"]=>
string(40) "3bd37b326d19d1880d3b93a4b32e8fb3a90fa122"
["born"]=>
string(19) "2033-03-07 20:35:00"
["created"]=>
string(19) "2009-06-02 20:37:03"
}
}
</pre>
<a href="/dok/members/marko.paunovic">Marko Paunović</a>, 12<span class="superscript">nd</span> March 2026</span>
</li>
<li>
<a href="/dok/articles/2026/03/05" class="readMore"></a>
<span class="details"> <pre style="display: none;">
array(2) {
["Article"]=>
array(10) {
["id"]=>
string(3) "495"
["member_id"]=>
string(2) "35"
["title_eng"]=>
string(53) "Miniature Painting Workshop - Grimdark Trench Crusade"
["title_hrv"]=>
string(59) "Radionica bojanja minijatura - Grimdark stil Trench Crusade"
["mask_eng"]=>
string(53) "miniature_painting_workshop_-_grimdark_trench_crusade"
["mask_hrv"]=>
string(59) "radionica_bojanja_minijatura_-_grimdark_stil_trench_crusade"
["content_eng"]=>
string(2880) "<p>
<a href="https://hosting.photobucket.com/95288841-8654-4bf7-8fc9-a4aa78dce87f/d6bd52bf-5585-41ad-a5f0-39ea8eba78af.jpg" target="_blank"><img alt="Click for enlarged picture" src="https://hosting.photobucket.com/95288841-8654-4bf7-8fc9-a4aa78dce87f/d6bd52bf-5585-41ad-a5f0-39ea8eba78af.jpg" width="600" /></a></p>
<p>
<a href="https://hosting.photobucket.com/95288841-8654-4bf7-8fc9-a4aa78dce87f/d894975c-ea8f-4cc4-9f8c-8e87324723b1.jpg" target="_blank"><img alt="Click for enlarged picture" src="https://hosting.photobucket.com/95288841-8654-4bf7-8fc9-a4aa78dce87f/d894975c-ea8f-4cc4-9f8c-8e87324723b1.jpg" width="600" /></a></p>
<p>
<a href="https://hosting.photobucket.com/95288841-8654-4bf7-8fc9-a4aa78dce87f/f72b74ba-1c23-4bfb-9feb-568dc5df1a6a.jpg" target="_blank"><img alt="Click for enlarged picture" src="https://hosting.photobucket.com/95288841-8654-4bf7-8fc9-a4aa78dce87f/f72b74ba-1c23-4bfb-9feb-568dc5df1a6a.jpg" width="600" /></a></p>
<p>
<a href="https://hosting.photobucket.com/95288841-8654-4bf7-8fc9-a4aa78dce87f/40167cf3-b290-41d4-ac8a-212d19fe7f0a.jpg" target="_blank"><img alt="Click for enlarged picture" src="https://hosting.photobucket.com/95288841-8654-4bf7-8fc9-a4aa78dce87f/40167cf3-b290-41d4-ac8a-212d19fe7f0a.jpg" width="600" /></a></p>
<p>
<a href="https://hosting.photobucket.com/95288841-8654-4bf7-8fc9-a4aa78dce87f/cfbd68f1-bc70-4943-8f7b-69716084f638.jpg" target="_blank"><img alt="Click for enlarged picture" src="https://hosting.photobucket.com/95288841-8654-4bf7-8fc9-a4aa78dce87f/cfbd68f1-bc70-4943-8f7b-69716084f638.jpg" width="600" /></a></p>
<p>
<a href="https://hosting.photobucket.com/95288841-8654-4bf7-8fc9-a4aa78dce87f/cef3712c-57f1-435e-80b7-a35b4620c5f9.jpg" target="_blank"><img alt="Click for enlarged picture" src="https://hosting.photobucket.com/95288841-8654-4bf7-8fc9-a4aa78dce87f/cef3712c-57f1-435e-80b7-a35b4620c5f9.jpg" width="600" /></a></p>
<p>
<a href="https://hosting.photobucket.com/95288841-8654-4bf7-8fc9-a4aa78dce87f/f72b74ba-1c23-4bfb-9feb-568dc5df1a6a.jpg" target="_blank"><img alt="Click for enlarged picture" src="https://hosting.photobucket.com/95288841-8654-4bf7-8fc9-a4aa78dce87f/f72b74ba-1c23-4bfb-9feb-568dc5df1a6a.jpg" width="600" /></a></p>
<p>
<a href="https://hosting.photobucket.com/95288841-8654-4bf7-8fc9-a4aa78dce87f/6b6285a7-e08b-482e-9343-74e8d08bbca4.jpg" target="_blank"><img alt="Click for enlarged picture" src="https://hosting.photobucket.com/95288841-8654-4bf7-8fc9-a4aa78dce87f/6b6285a7-e08b-482e-9343-74e8d08bbca4.jpg" width="600" /></a></p>
<p>
<a href="https://hosting.photobucket.com/95288841-8654-4bf7-8fc9-a4aa78dce87f/1be59454-f3ac-4f70-9550-60c9101d7e44.png" target="_blank"><img alt="Click for enlarged picture" src="https://hosting.photobucket.com/95288841-8654-4bf7-8fc9-a4aa78dce87f/1be59454-f3ac-4f70-9550-60c9101d7e44.png" width="600" /></a></p>
"
["content_hrv"]=>
string(4135) "<p>
<a href="https://hosting.photobucket.com/95288841-8654-4bf7-8fc9-a4aa78dce87f/d6bd52bf-5585-41ad-a5f0-39ea8eba78af.jpg" target="_blank"><img alt="Click for enlarged picture" src="https://hosting.photobucket.com/95288841-8654-4bf7-8fc9-a4aa78dce87f/d6bd52bf-5585-41ad-a5f0-39ea8eba78af.jpg" width="600" /></a></p>
<p>
Radionica se provodila kroz dva dana (cijeli vikend) i polaznici su bojali tri različite figure za igru Trench Crusade (prema izboru). Fokus ovih predavanja bilo je bojenje više minijatura odjednom prepoznatljivim GRIMDARK stilom, no znanja s radionice jednako su primjenjiva i na bojenje vojski za boardgame igre te kolekcija figura za pen&paper rpg-ove. Na radionici su bile predstavljene boje i pribor, priprema figura, nekoliko tehnika bojenja minijatura od osnovnih do naprednijih, te tehnike i trikovi za brzo i efikasno bojenje većih količina figura odjednom. U sklopu radionice bile su korištene akrilne boje na bazi vode te uljni efekti jednostavni za korištenje. Predavanja su prilagođena tako da voditelji posveti jednako vrijeme svim polaznicima i može se prilagoditi svim kategorijama minijaturista (od početnika do malo naprednijih).</p>
<p>
<a href="https://hosting.photobucket.com/95288841-8654-4bf7-8fc9-a4aa78dce87f/d894975c-ea8f-4cc4-9f8c-8e87324723b1.jpg" target="_blank"><img alt="Click for enlarged picture" src="https://hosting.photobucket.com/95288841-8654-4bf7-8fc9-a4aa78dce87f/d894975c-ea8f-4cc4-9f8c-8e87324723b1.jpg" width="600" /></a></p>
<p>
<a href="https://hosting.photobucket.com/95288841-8654-4bf7-8fc9-a4aa78dce87f/f72b74ba-1c23-4bfb-9feb-568dc5df1a6a.jpg" target="_blank"><img alt="Click for enlarged picture" src="https://hosting.photobucket.com/95288841-8654-4bf7-8fc9-a4aa78dce87f/f72b74ba-1c23-4bfb-9feb-568dc5df1a6a.jpg" width="600" /></a></p>
<p>
<a href="https://hosting.photobucket.com/95288841-8654-4bf7-8fc9-a4aa78dce87f/40167cf3-b290-41d4-ac8a-212d19fe7f0a.jpg" target="_blank"><img alt="Click for enlarged picture" src="https://hosting.photobucket.com/95288841-8654-4bf7-8fc9-a4aa78dce87f/40167cf3-b290-41d4-ac8a-212d19fe7f0a.jpg" width="600" /></a></p>
<p>
<a href="https://hosting.photobucket.com/95288841-8654-4bf7-8fc9-a4aa78dce87f/cfbd68f1-bc70-4943-8f7b-69716084f638.jpg" target="_blank"><img alt="Click for enlarged picture" src="https://hosting.photobucket.com/95288841-8654-4bf7-8fc9-a4aa78dce87f/cfbd68f1-bc70-4943-8f7b-69716084f638.jpg" width="600" /></a></p>
<p>
Radionica je uključivalai sljedeće tematske cjeline:<br />
1. Planiranje i priprema te sastavljanje minijatura<br />
2. Obrada minijatura prije bojanja<br />
3. Osnovne grimdark stila i izbor boja<br />
4. Osnovne boje<br />
5. Tehnike shadinga i highlighta<br />
6. Naknadno podizanje gotovog paintjoba na višu razinu, uljni efekti</p>
<p>
<a href="https://hosting.photobucket.com/95288841-8654-4bf7-8fc9-a4aa78dce87f/cef3712c-57f1-435e-80b7-a35b4620c5f9.jpg" target="_blank"><img alt="Click for enlarged picture" src="https://hosting.photobucket.com/95288841-8654-4bf7-8fc9-a4aa78dce87f/cef3712c-57f1-435e-80b7-a35b4620c5f9.jpg" width="600" /></a></p>
<p>
<a href="https://hosting.photobucket.com/95288841-8654-4bf7-8fc9-a4aa78dce87f/f72b74ba-1c23-4bfb-9feb-568dc5df1a6a.jpg" target="_blank"><img alt="Click for enlarged picture" src="https://hosting.photobucket.com/95288841-8654-4bf7-8fc9-a4aa78dce87f/f72b74ba-1c23-4bfb-9feb-568dc5df1a6a.jpg" width="600" /></a></p>
<p>
<a href="https://hosting.photobucket.com/95288841-8654-4bf7-8fc9-a4aa78dce87f/6b6285a7-e08b-482e-9343-74e8d08bbca4.jpg" target="_blank"><img alt="Click for enlarged picture" src="https://hosting.photobucket.com/95288841-8654-4bf7-8fc9-a4aa78dce87f/6b6285a7-e08b-482e-9343-74e8d08bbca4.jpg" width="600" /></a></p>
<p>
<a href="https://hosting.photobucket.com/95288841-8654-4bf7-8fc9-a4aa78dce87f/1be59454-f3ac-4f70-9550-60c9101d7e44.png" target="_blank"><img alt="Click for enlarged picture" src="https://hosting.photobucket.com/95288841-8654-4bf7-8fc9-a4aa78dce87f/1be59454-f3ac-4f70-9550-60c9101d7e44.png" width="600" /></a></p>
"
["created"]=>
string(19) "2026-03-05 20:23:04"
["modified"]=>
string(19) "2026-03-05 20:23:04"
}
["Member"]=>
array(10) {
["id"]=>
string(2) "35"
["group_id"]=>
string(1) "1"
["first_name"]=>
string(5) "Marko"
["last_name"]=>
string(9) "Paunović"
["first_name_mask"]=>
string(5) "marko"
["last_name_mask"]=>
string(8) "paunovic"
["username"]=>
string(5) "marko"
["password"]=>
string(40) "3bd37b326d19d1880d3b93a4b32e8fb3a90fa122"
["born"]=>
string(19) "2033-03-07 20:35:00"
["created"]=>
string(19) "2009-06-02 20:37:03"
}
}
</pre>
<a href="/dok/members/marko.paunovic">Marko Paunović</a>, 5<span class="superscript">th</span> March 2026</span>
</li>
<li>
<a href="/dok/articles/2026/02/26" class="readMore"></a>
<span class="details"> <pre style="display: none;">
array(2) {
["Article"]=>
array(10) {
["id"]=>
string(3) "494"
["member_id"]=>
string(2) "64"
["title_eng"]=>
string(35) "AGRAM LEGO SECTION - F1 car: FW14b "
["title_hrv"]=>
string(51) "AGRAM LEGO SEKCIJA - FW14b - F1 bolid za budućnost"
["mask_eng"]=>
string(33) "agram_lego_section_-_f1_car_fw14b"
["mask_hrv"]=>
string(50) "agram_lego_sekcija_-_fw14b_-_f1_bolid_za_buducnost"
["content_eng"]=>
string(2839) "<p style="margin: 0px 0px 10px; padding: 0px; border: 0px; outline: 0px; vertical-align: baseline; background-image: initial; background-position: initial; background-size: initial; background-repeat: initial; background-attachment: initial; background-origin: initial; background-clip: initial; position: relative; float: none; clear: both; color: rgb(0, 0, 0); font-family: Verdana, sans-serif;">
<a href="https://hosting.photobucket.com/95288841-8654-4bf7-8fc9-a4aa78dce87f/1ef40d9f-2e5d-499f-80f7-6b4d72af83f9.jpg" style="font-family: Arial, Verdana, sans-serif;" target="_blank"><img alt="Click for enlarged picture" src="https://hosting.photobucket.com/95288841-8654-4bf7-8fc9-a4aa78dce87f/1ef40d9f-2e5d-499f-80f7-6b4d72af83f9.jpg" width="600" /></a></p>
<p>
<iframe allowfullscreen="" frameborder="0" height="360" src="https://www.youtube.com/embed/LzYP6Hx5nsI?si=jmjVIidV2ZvsAz6F" width="600"></iframe></p>
<p>
<a href="https://hosting.photobucket.com/95288841-8654-4bf7-8fc9-a4aa78dce87f/3141a84f-b80f-429d-9635-98cf9c5fd3ba.jpg" target="_blank"><img alt="Click for enlarged picture" src="https://hosting.photobucket.com/95288841-8654-4bf7-8fc9-a4aa78dce87f/3141a84f-b80f-429d-9635-98cf9c5fd3ba.jpg" width="600" /></a></p>
<p>
<a href="https://hosting.photobucket.com/95288841-8654-4bf7-8fc9-a4aa78dce87f/b0ae7518-4d6c-4af7-85a4-e2c1e5fd52cc.jpg" target="_blank"><img alt="Click for enlarged picture" src="https://hosting.photobucket.com/95288841-8654-4bf7-8fc9-a4aa78dce87f/b0ae7518-4d6c-4af7-85a4-e2c1e5fd52cc.jpg" width="600" /></a></p>
<p>
<a href="https://hosting.photobucket.com/95288841-8654-4bf7-8fc9-a4aa78dce87f/bc98e558-a4db-4676-840b-c67e052f2049.jpg" target="_blank"><img alt="Click for enlarged picture" src="https://hosting.photobucket.com/95288841-8654-4bf7-8fc9-a4aa78dce87f/bc98e558-a4db-4676-840b-c67e052f2049.jpg" width="600" /></a></p>
<p>
<a href="https://hosting.photobucket.com/95288841-8654-4bf7-8fc9-a4aa78dce87f/c992673a-0b69-4b12-b7d4-cf3dcfe87462.jpg" target="_blank"><img alt="Click for enlarged picture" src="https://hosting.photobucket.com/95288841-8654-4bf7-8fc9-a4aa78dce87f/c992673a-0b69-4b12-b7d4-cf3dcfe87462.jpg" width="600" /></a></p>
<p>
<a href="https://hosting.photobucket.com/95288841-8654-4bf7-8fc9-a4aa78dce87f/a5b3c4dd-9d89-423e-b1d9-3324eb88815c.jpg" target="_blank"><img alt="Click for enlarged picture" src="https://hosting.photobucket.com/95288841-8654-4bf7-8fc9-a4aa78dce87f/a5b3c4dd-9d89-423e-b1d9-3324eb88815c.jpg" width="600" /></a></p>
<p>
<a href="https://hosting.photobucket.com/95288841-8654-4bf7-8fc9-a4aa78dce87f/6c83d1bd-a307-4cdf-9e09-f2615d2688c4.jpg" target="_blank"><img alt="Click for enlarged picture" src="https://hosting.photobucket.com/95288841-8654-4bf7-8fc9-a4aa78dce87f/6c83d1bd-a307-4cdf-9e09-f2615d2688c4.jpg" width="600" /></a></p>"
["content_hrv"]=>
string(4213) "<p style="margin: 0px 0px 10px; padding: 0px; border: 0px; outline: 0px; vertical-align: baseline; background-image: initial; background-position: initial; background-size: initial; background-repeat: initial; background-attachment: initial; background-origin: initial; background-clip: initial; position: relative; float: none; clear: both; color: rgb(0, 0, 0); font-family: Verdana, sans-serif;">
U srijedu 25.2. u sklopu naše Izložbe minijatura i maketa Agram 2026, naša Agram Lego Sekcija je odradila svoj četvrti projekt. Nakon Hogwartsa u 2024. te Leonarda i Orient Expressa u 2025., prvi projekt u 2026. bio je bolid Formule 1 sa početka 1990-ih. </p>
<p>
<a href="https://hosting.photobucket.com/95288841-8654-4bf7-8fc9-a4aa78dce87f/1ef40d9f-2e5d-499f-80f7-6b4d72af83f9.jpg" target="_blank"><img alt="Click for enlarged picture" src="https://hosting.photobucket.com/95288841-8654-4bf7-8fc9-a4aa78dce87f/1ef40d9f-2e5d-499f-80f7-6b4d72af83f9.jpg" width="600" /></a></p>
<p>
Kao što je već tradicija kod naše Lego Sekcije, prije izgradnje modela, valjalo se malo educirati o temi. Ovoga puta naš dežurni strojar Marko Paunović održao je predavanje o bolidu FW14b, pobjedničkom bolidu iz 1992. tima Williams s kojim su postali svjetski konstruktorski prvaci, a kojeg je Nigel Mansel vozio do svjetske titule. U svojem predavanju, Marko je obradio teme aerodinamike, aktivnog ovjesa, mjenjača na volanu te ostalih inovacija koje je ovaj bolid uspješno instalirao. </p>
<p>
<iframe allowfullscreen="" frameborder="0" height="360" src="https://www.youtube.com/embed/LzYP6Hx5nsI?si=jmjVIidV2ZvsAz6F" width="600"></iframe></p>
<p>
Ulaz na predavanje bio je besplatan, a prijave nisu bile potrebne!</p>
<p>
<a href="https://hosting.photobucket.com/95288841-8654-4bf7-8fc9-a4aa78dce87f/3141a84f-b80f-429d-9635-98cf9c5fd3ba.jpg" target="_blank"><img alt="Click for enlarged picture" src="https://hosting.photobucket.com/95288841-8654-4bf7-8fc9-a4aa78dce87f/3141a84f-b80f-429d-9635-98cf9c5fd3ba.jpg" width="600" /></a></p>
<p>
<a href="https://hosting.photobucket.com/95288841-8654-4bf7-8fc9-a4aa78dce87f/b0ae7518-4d6c-4af7-85a4-e2c1e5fd52cc.jpg" target="_blank"><img alt="Click for enlarged picture" src="https://hosting.photobucket.com/95288841-8654-4bf7-8fc9-a4aa78dce87f/b0ae7518-4d6c-4af7-85a4-e2c1e5fd52cc.jpg" width="600" /></a></p>
<p>
<span style="color: rgb(0, 0, 0); font-family: Verdana, sans-serif;">Izrada makete je rezervirana za članove Agram Lego Sekcije. </span></p>
<p>
<a href="https://hosting.photobucket.com/95288841-8654-4bf7-8fc9-a4aa78dce87f/bc98e558-a4db-4676-840b-c67e052f2049.jpg" target="_blank"><img alt="Click for enlarged picture" src="https://hosting.photobucket.com/95288841-8654-4bf7-8fc9-a4aa78dce87f/bc98e558-a4db-4676-840b-c67e052f2049.jpg" width="600" /></a></p>
<p>
<a href="https://hosting.photobucket.com/95288841-8654-4bf7-8fc9-a4aa78dce87f/c992673a-0b69-4b12-b7d4-cf3dcfe87462.jpg" target="_blank"><img alt="Click for enlarged picture" src="https://hosting.photobucket.com/95288841-8654-4bf7-8fc9-a4aa78dce87f/c992673a-0b69-4b12-b7d4-cf3dcfe87462.jpg" width="600" /></a></p>
<p>
<a href="https://hosting.photobucket.com/95288841-8654-4bf7-8fc9-a4aa78dce87f/a5b3c4dd-9d89-423e-b1d9-3324eb88815c.jpg" target="_blank"><img alt="Click for enlarged picture" src="https://hosting.photobucket.com/95288841-8654-4bf7-8fc9-a4aa78dce87f/a5b3c4dd-9d89-423e-b1d9-3324eb88815c.jpg" width="600" /></a></p>
<p>
<span style="color: rgb(0, 0, 0); font-family: Verdana, sans-serif;">Ukoliko se želite uključiti u sljedeće projekte, javite se za više informacija na ums.agram@gmail.com .</span></p>
<p>
<a href="https://hosting.photobucket.com/95288841-8654-4bf7-8fc9-a4aa78dce87f/6c83d1bd-a307-4cdf-9e09-f2615d2688c4.jpg" target="_blank"><img alt="Click for enlarged picture" src="https://hosting.photobucket.com/95288841-8654-4bf7-8fc9-a4aa78dce87f/6c83d1bd-a307-4cdf-9e09-f2615d2688c4.jpg" width="600" /></a></p>
<p>
Sljedeći projekt bit će u travnju, a tema će biti Gospodar Prstenova. Očekuju vas pregršt zabavnih predavanja.<br />
<br />
Vidimo se!</p>
"
["created"]=>
string(19) "2026-02-26 13:32:17"
["modified"]=>
string(19) "2026-02-26 13:32:17"
}
["Member"]=>
array(10) {
["id"]=>
string(2) "64"
["group_id"]=>
string(1) "1"
["first_name"]=>
string(9) "Krunoslav"
["last_name"]=>
string(8) "Belinić"
["first_name_mask"]=>
string(9) "krunoslav"
["last_name_mask"]=>
string(7) "belinic"
["username"]=>
string(5) "Kruno"
["password"]=>
string(40) "eb3fda45fbec0258e90d809803b10491c548b22f"
["born"]=>
string(19) "2015-01-18 09:19:00"
["created"]=>
string(19) "2015-01-18 09:20:39"
}
}
</pre>
<a href="/dok/members/krunoslav.belinic">Krunoslav Belinić</a>, 26<span class="superscript">th</span> February 2026</span>
</li>
<li>
<a href="/dok/articles/2026/02/25" class="readMore"></a>
<span class="details"> <pre style="display: none;">
array(2) {
["Article"]=>
array(10) {
["id"]=>
string(3) "493"
["member_id"]=>
string(2) "64"
["title_eng"]=>
string(51) "Gallery of winning entries of Black Queen H&MPC2026"
["title_hrv"]=>
string(54) "Galerija pobjedničkih radova na Black Queen H&MPC2026"
["mask_eng"]=>
string(50) "gallery_of_winning_entries_of_black_queen_hmpc2026"
["mask_hrv"]=>
string(52) "galerija_pobjednickih_radova_na_black_queen_hmpc2026"
["content_eng"]=>
string(12503) "<p>
<strong>BEST OF SHOW</strong> & 1. place <strong>MASTERCLASS - IVAN KNEZOVIĆ</strong></p>
<p>
<a href="https://hosting.photobucket.com/95288841-8654-4bf7-8fc9-a4aa78dce87f/8949b562-8f41-4a80-aab2-f22784b3ba6c.jpg" target="_blank"><img alt="Click for enlarged picture" src="https://hosting.photobucket.com/95288841-8654-4bf7-8fc9-a4aa78dce87f/8949b562-8f41-4a80-aab2-f22784b3ba6c.jpg" width="600" /></a></p>
<p>
2. place <strong>MASTERCLASS </strong><strong>- ANŽE ZORKO</strong></p>
<p>
<a href="https://hosting.photobucket.com/95288841-8654-4bf7-8fc9-a4aa78dce87f/ae622692-061b-49cd-984e-0b93c47c12a9.jpg" target="_blank"><img alt="Click for enlarged picture" src="https://hosting.photobucket.com/95288841-8654-4bf7-8fc9-a4aa78dce87f/ae622692-061b-49cd-984e-0b93c47c12a9.jpg" width="600" /></a></p>
<p>
3. place <strong>MASTERCLASS </strong><strong>- ANA POLANŠĆAK</strong></p>
<p>
<a href="https://hosting.photobucket.com/95288841-8654-4bf7-8fc9-a4aa78dce87f/f33188f9-7799-4375-8e74-e1d946f874cd.jpg" target="_blank"><img alt="Click for enlarged picture" src="https://hosting.photobucket.com/95288841-8654-4bf7-8fc9-a4aa78dce87f/f33188f9-7799-4375-8e74-e1d946f874cd.jpg" width="600" /></a></p>
<p>
<strong>BEST DISPLAY </strong><strong>- MARKO PAUNOVIĆ</strong></p>
<p>
<a href="https://hosting.photobucket.com/95288841-8654-4bf7-8fc9-a4aa78dce87f/3f5d890e-529a-4fcb-9c86-221bd6fc2e57.jpg" target="_blank"><img alt="Click for enlarged picture" src="https://hosting.photobucket.com/95288841-8654-4bf7-8fc9-a4aa78dce87f/3f5d890e-529a-4fcb-9c86-221bd6fc2e57.jpg" width="600" /></a></p>
<p>
<strong>BEST OF FANTASY</strong> & <strong>PEOPLE'S CHOICE </strong><strong>- IVAN KNEZOVIĆ</strong></p>
<p>
<a href="https://hosting.photobucket.com/95288841-8654-4bf7-8fc9-a4aa78dce87f/c89aa7cf-f050-4aa4-bf5d-c31abe70165e.jpg" target="_blank"><img alt="Click for enlarged picture" src="https://hosting.photobucket.com/95288841-8654-4bf7-8fc9-a4aa78dce87f/c89aa7cf-f050-4aa4-bf5d-c31abe70165e.jpg" width="600" /></a></p>
<p>
<strong>BEST OF HISTORICAL </strong><strong>- NINOSLAV LUK</strong></p>
<p>
<a href="https://hosting.photobucket.com/95288841-8654-4bf7-8fc9-a4aa78dce87f/b2751730-af2e-42c6-a33c-30890f8d3a26.jpg" target="_blank"><img alt="Click for enlarged picture" src="https://hosting.photobucket.com/95288841-8654-4bf7-8fc9-a4aa78dce87f/b2751730-af2e-42c6-a33c-30890f8d3a26.jpg" width="600" /></a></p>
<p>
<strong>BEST SCULPT </strong><strong>- MONIKA BEŠENIĆ</strong></p>
<p>
<a href="https://hosting.photobucket.com/95288841-8654-4bf7-8fc9-a4aa78dce87f/7e5a7d8d-cea4-4e51-8bfc-6b67a4c12f05.jpg" target="_blank"><img alt="Click for enlarged picture" src="https://hosting.photobucket.com/95288841-8654-4bf7-8fc9-a4aa78dce87f/7e5a7d8d-cea4-4e51-8bfc-6b67a4c12f05.jpg" width="600" /></a></p>
<p>
1.place<strong>SINGLE MINIATURE </strong><strong>- VLADIMIR MATIĆ-KURILJEV</strong></p>
<p>
<a href="https://hosting.photobucket.com/95288841-8654-4bf7-8fc9-a4aa78dce87f/f4828224-9bde-4e65-8a6d-1af3f312503a.jpg" target="_blank"><img alt="Click for enlarged picture" src="https://hosting.photobucket.com/95288841-8654-4bf7-8fc9-a4aa78dce87f/f4828224-9bde-4e65-8a6d-1af3f312503a.jpg" width="600" /></a></p>
<p>
2.place<strong>SINGLE MINIATURE </strong><strong>- ANA POLANŠĆAK</strong></p>
<p>
<a href="https://hosting.photobucket.com/95288841-8654-4bf7-8fc9-a4aa78dce87f/cb9380c7-f7ee-406a-bccf-9a86477bed82.jpg" target="_blank"><img alt="Click for enlarged picture" src="https://hosting.photobucket.com/95288841-8654-4bf7-8fc9-a4aa78dce87f/cb9380c7-f7ee-406a-bccf-9a86477bed82.jpg" width="600" /></a></p>
<p>
3.place<strong>SINGLE MINIATURE - ADAM SKENDŽIĆ</strong></p>
<p>
<a href="https://hosting.photobucket.com/95288841-8654-4bf7-8fc9-a4aa78dce87f/a5f80a51-27d4-4040-952e-b04eb5bf4c99.jpg" target="_blank"><img alt="Click for enlarged picture" src="https://hosting.photobucket.com/95288841-8654-4bf7-8fc9-a4aa78dce87f/a5f80a51-27d4-4040-952e-b04eb5bf4c99.jpg" width="600" /></a></p>
<p>
1.place<strong>LARGE/MOUNTED MINIATURE - SEBASTIAN SOGARD</strong></p>
<p>
<a href="https://hosting.photobucket.com/95288841-8654-4bf7-8fc9-a4aa78dce87f/1f8e3547-5113-488b-9983-c3c592add875.jpg" target="_blank"><img alt="Click for enlarged picture" src="https://hosting.photobucket.com/95288841-8654-4bf7-8fc9-a4aa78dce87f/1f8e3547-5113-488b-9983-c3c592add875.jpg" width="600" /></a></p>
<p>
2.place<strong>LARGE/MOUNTED MINIATURE - JURE CUKAR</strong></p>
<p>
<a href="https://hosting.photobucket.com/95288841-8654-4bf7-8fc9-a4aa78dce87f/de5778ba-d672-4d24-8e6e-f9f1ac993c26.jpg" target="_blank"><img alt="Click for enlarged picture" src="https://hosting.photobucket.com/95288841-8654-4bf7-8fc9-a4aa78dce87f/de5778ba-d672-4d24-8e6e-f9f1ac993c26.jpg" width="600" /></a></p>
<p>
3.place<strong>LARGE/MOUNTED MINIATURE - ANA POLANŠĆAK</strong></p>
<p>
<a href="https://hosting.photobucket.com/95288841-8654-4bf7-8fc9-a4aa78dce87f/58d2d738-55f2-495d-bd44-cf8d023e0142.jpg" target="_blank"><img alt="Click for enlarged picture" src="https://hosting.photobucket.com/95288841-8654-4bf7-8fc9-a4aa78dce87f/58d2d738-55f2-495d-bd44-cf8d023e0142.jpg" width="600" /></a></p>
<p>
1.place<strong>UNIT / SQUAD </strong><strong>- IVAN KNEZOVIĆ</strong></p>
<p>
<a href="https://hosting.photobucket.com/95288841-8654-4bf7-8fc9-a4aa78dce87f/b77d9055-d0c4-4803-8e3f-0bf295c3d5d0.jpg" target="_blank"><img alt="Click for enlarged picture" src="https://hosting.photobucket.com/95288841-8654-4bf7-8fc9-a4aa78dce87f/b77d9055-d0c4-4803-8e3f-0bf295c3d5d0.jpg" width="600" /></a></p>
<p>
2.place<strong>UNIT / SQUAD - MILAN RADACSI</strong></p>
<p>
<a href="https://hosting.photobucket.com/95288841-8654-4bf7-8fc9-a4aa78dce87f/1a6d64f2-a293-4a81-b974-1696d8bb5972.jpg" target="_blank"><img alt="Click for enlarged picture" src="https://hosting.photobucket.com/95288841-8654-4bf7-8fc9-a4aa78dce87f/1a6d64f2-a293-4a81-b974-1696d8bb5972.jpg" width="600" /></a></p>
<p>
3.place<strong>UNIT / SQUAD - MAKSIMILIJAN ŠPRUNG</strong></p>
<p>
<a href="https://hosting.photobucket.com/95288841-8654-4bf7-8fc9-a4aa78dce87f/0b0ae61f-c140-4c35-b58c-a0813c15d83a.jpg" target="_blank"><img alt="Click for enlarged picture" src="https://hosting.photobucket.com/95288841-8654-4bf7-8fc9-a4aa78dce87f/0b0ae61f-c140-4c35-b58c-a0813c15d83a.jpg" width="600" /></a></p>
<p>
1.place<strong>VEHICLE / MONSTER - MAKSIMILIJAN ŠPRUNG</strong></p>
<p>
<a href="https://hosting.photobucket.com/95288841-8654-4bf7-8fc9-a4aa78dce87f/34dbfff5-b8db-478d-a13d-3698c0490a95.jpg" target="_blank"><img alt="Click for enlarged picture" src="https://hosting.photobucket.com/95288841-8654-4bf7-8fc9-a4aa78dce87f/34dbfff5-b8db-478d-a13d-3698c0490a95.jpg" width="600" /></a></p>
<p>
2.place<strong>VEHICLE / MONSTER - MARIO GRGUREV</strong></p>
<p>
<a href="https://hosting.photobucket.com/95288841-8654-4bf7-8fc9-a4aa78dce87f/387e5e88-4f80-4bb9-9b30-f7241369de41.jpg" target="_blank"><img alt="Click for enlarged picture" src="https://hosting.photobucket.com/95288841-8654-4bf7-8fc9-a4aa78dce87f/387e5e88-4f80-4bb9-9b30-f7241369de41.jpg" width="600" /></a></p>
<p>
3.place<strong>VEHICLE / MONSTER - MARKO PAUNOVIĆ</strong></p>
<p>
<a href="https://hosting.photobucket.com/95288841-8654-4bf7-8fc9-a4aa78dce87f/8c2034d2-cae0-4bc2-bdd9-eab85b71db7b.jpg" target="_blank"><img alt="Click for enlarged picture" src="https://hosting.photobucket.com/95288841-8654-4bf7-8fc9-a4aa78dce87f/8c2034d2-cae0-4bc2-bdd9-eab85b71db7b.jpg" width="600" /></a></p>
<p>
1.place<strong>OPEN - PETAR KNEZOVIĆ</strong></p>
<p>
<a href="https://hosting.photobucket.com/95288841-8654-4bf7-8fc9-a4aa78dce87f/7e2723b8-421d-4d59-b2ab-5b5abf4a067a.jpg" target="_blank"><img alt="Click for enlarged picture" src="https://hosting.photobucket.com/95288841-8654-4bf7-8fc9-a4aa78dce87f/7e2723b8-421d-4d59-b2ab-5b5abf4a067a.jpg" width="600" /></a></p>
<p>
2.place<strong>OPEN - FILIP KNEZOVIĆ</strong></p>
<p>
<a href="https://hosting.photobucket.com/95288841-8654-4bf7-8fc9-a4aa78dce87f/2bcd6dc0-6d54-44fd-b660-4f6862e2551f.jpg" target="_blank"><img alt="Click for enlarged picture" src="https://hosting.photobucket.com/95288841-8654-4bf7-8fc9-a4aa78dce87f/2bcd6dc0-6d54-44fd-b660-4f6862e2551f.jpg" width="600" /></a></p>
<p>
3.place<strong>OPEN - DINO TEREK</strong></p>
<p>
<a href="https://hosting.photobucket.com/95288841-8654-4bf7-8fc9-a4aa78dce87f/fe807e70-9250-49f9-8458-56b2ee4b0fad.jpg" target="_blank"><img alt="Click for enlarged picture" src="https://hosting.photobucket.com/95288841-8654-4bf7-8fc9-a4aa78dce87f/fe807e70-9250-49f9-8458-56b2ee4b0fad.jpg" width="600" /></a></p>
<p>
1.place<strong>DIORAMA / DUEL - MARKO PAUNOVIĆ</strong></p>
<p>
<a href="https://hosting.photobucket.com/95288841-8654-4bf7-8fc9-a4aa78dce87f/a7f3bd4c-74cd-48ff-ac00-2d884c6c4770.jpg" target="_blank"><img alt="Click for enlarged picture" src="https://hosting.photobucket.com/95288841-8654-4bf7-8fc9-a4aa78dce87f/a7f3bd4c-74cd-48ff-ac00-2d884c6c4770.jpg" width="600" /></a></p>
<p>
2.place<strong>DIORAMA / DUEL - VLADIMIR MATIĆ-KURILJEV</strong></p>
<p>
<a href="https://hosting.photobucket.com/95288841-8654-4bf7-8fc9-a4aa78dce87f/1218bbec-f68d-40e4-a8ae-66e57c949846.jpg" target="_blank"><img alt="Click for enlarged picture" src="https://hosting.photobucket.com/95288841-8654-4bf7-8fc9-a4aa78dce87f/1218bbec-f68d-40e4-a8ae-66e57c949846.jpg" width="600" /></a></p>
<p>
3.place<strong>DIORAMA / DUEL - JURE CUKAR</strong></p>
<p>
<a href="https://hosting.photobucket.com/95288841-8654-4bf7-8fc9-a4aa78dce87f/4ad5c251-dd03-471f-8ff2-3526507e4aa7.jpg" target="_blank"><img alt="Click for enlarged picture" src="https://hosting.photobucket.com/95288841-8654-4bf7-8fc9-a4aa78dce87f/4ad5c251-dd03-471f-8ff2-3526507e4aa7.jpg" width="600" /></a></p>
<p>
1.place<strong>BUST - MARKO PAUNOVIĆ</strong></p>
<p>
<a href="https://hosting.photobucket.com/95288841-8654-4bf7-8fc9-a4aa78dce87f/daaa9dff-9d7c-4696-b8d9-7ce0c311012a.jpg" target="_blank"><img alt="Click for enlarged picture" src="https://hosting.photobucket.com/95288841-8654-4bf7-8fc9-a4aa78dce87f/daaa9dff-9d7c-4696-b8d9-7ce0c311012a.jpg" width="600" /></a></p>
<p>
2.place<strong>BUST - ANŽE ZORKO</strong></p>
<p>
<a href="https://hosting.photobucket.com/95288841-8654-4bf7-8fc9-a4aa78dce87f/e11e4893-05f4-49df-a758-720b188c5917.jpg" target="_blank"><img alt="Click for enlarged picture" src="https://hosting.photobucket.com/95288841-8654-4bf7-8fc9-a4aa78dce87f/e11e4893-05f4-49df-a758-720b188c5917.jpg" width="600" /></a></p>
<p>
3.place<strong>BUST </strong><strong>- IVAN KNEZOVIĆ</strong></p>
<p>
<a href="https://hosting.photobucket.com/95288841-8654-4bf7-8fc9-a4aa78dce87f/d2435198-c290-43bf-a2fe-e8e592dabd7f.jpg" target="_blank"><img alt="Click for enlarged picture" src="https://hosting.photobucket.com/95288841-8654-4bf7-8fc9-a4aa78dce87f/d2435198-c290-43bf-a2fe-e8e592dabd7f.jpg" width="600" /></a></p>
<p>
1.place<strong>JUNIOR - ELANOR GRAŠIĆ</strong></p>
<p>
<a href="https://hosting.photobucket.com/95288841-8654-4bf7-8fc9-a4aa78dce87f/f0bbb346-9821-43dc-a463-e507fb1b87ee.jpg" target="_blank"><img alt="Click for enlarged picture" src="https://hosting.photobucket.com/95288841-8654-4bf7-8fc9-a4aa78dce87f/f0bbb346-9821-43dc-a463-e507fb1b87ee.jpg" width="600" /></a></p>
<p>
2.place<strong>JUNIOR - LUKA ŠEGINA</strong></p>
<p>
<a href="https://hosting.photobucket.com/95288841-8654-4bf7-8fc9-a4aa78dce87f/1829eee3-80f3-48de-a013-bada8c612e76.jpg" target="_blank"><img alt="Click for enlarged picture" src="https://hosting.photobucket.com/95288841-8654-4bf7-8fc9-a4aa78dce87f/1829eee3-80f3-48de-a013-bada8c612e76.jpg" width="600" /></a></p>
<p>
3.place<strong>JUNIOR - SOFIJA MARASOVIĆ</strong></p>
<p>
<a href="https://hosting.photobucket.com/95288841-8654-4bf7-8fc9-a4aa78dce87f/bdf02300-4634-46b3-a659-6a8a9183177e.jpg" target="_blank"><img alt="Click for enlarged picture" src="https://hosting.photobucket.com/95288841-8654-4bf7-8fc9-a4aa78dce87f/bdf02300-4634-46b3-a659-6a8a9183177e.jpg" width="600" /></a></p>
<p>
You can see all the entries in the gallery on our <a href="https://www.facebook.com/BlackQueenHMPC/posts/pfbid02gCGwwc8vTLFJDs1MFmbxc8NKZv1oni7uykTLKmomFSM1APfKrGRNtCkr2a6HTGQrl">social networks</a>.</p>
"
["content_hrv"]=>
string(12719) "<p>
<strong>BEST OF SHOW</strong> & 1. mjesto <strong>MASTERCLASS - IVAN KNEZOVIĆ</strong></p>
<p>
<a href="https://hosting.photobucket.com/95288841-8654-4bf7-8fc9-a4aa78dce87f/8949b562-8f41-4a80-aab2-f22784b3ba6c.jpg" target="_blank"><img alt="Click for enlarged picture" src="https://hosting.photobucket.com/95288841-8654-4bf7-8fc9-a4aa78dce87f/8949b562-8f41-4a80-aab2-f22784b3ba6c.jpg" width="600" /></a></p>
<p>
2. mjesto <strong>MASTERCLASS </strong><strong>- ANŽE ZORKO</strong></p>
<p>
<a href="https://hosting.photobucket.com/95288841-8654-4bf7-8fc9-a4aa78dce87f/ae622692-061b-49cd-984e-0b93c47c12a9.jpg" target="_blank"><img alt="Click for enlarged picture" src="https://hosting.photobucket.com/95288841-8654-4bf7-8fc9-a4aa78dce87f/ae622692-061b-49cd-984e-0b93c47c12a9.jpg" width="600" /></a></p>
<p>
3. mjesto <strong>MASTERCLASS </strong><strong>- ANA POLANŠĆAK</strong></p>
<p>
<a href="https://hosting.photobucket.com/95288841-8654-4bf7-8fc9-a4aa78dce87f/f33188f9-7799-4375-8e74-e1d946f874cd.jpg" target="_blank"><img alt="Click for enlarged picture" src="https://hosting.photobucket.com/95288841-8654-4bf7-8fc9-a4aa78dce87f/f33188f9-7799-4375-8e74-e1d946f874cd.jpg" width="600" /></a></p>
<p>
<strong>BEST DISPLAY </strong><strong>- MARKO PAUNOVIĆ</strong></p>
<p>
<a href="https://hosting.photobucket.com/95288841-8654-4bf7-8fc9-a4aa78dce87f/3f5d890e-529a-4fcb-9c86-221bd6fc2e57.jpg" target="_blank"><img alt="Click for enlarged picture" src="https://hosting.photobucket.com/95288841-8654-4bf7-8fc9-a4aa78dce87f/3f5d890e-529a-4fcb-9c86-221bd6fc2e57.jpg" width="600" /></a></p>
<p>
<strong>BEST OF FANTASY</strong> & <strong>PEOPLE'S CHOICE </strong><strong>- IVAN KNEZOVIĆ</strong></p>
<p>
<a href="https://hosting.photobucket.com/95288841-8654-4bf7-8fc9-a4aa78dce87f/c89aa7cf-f050-4aa4-bf5d-c31abe70165e.jpg" target="_blank"><img alt="Click for enlarged picture" src="https://hosting.photobucket.com/95288841-8654-4bf7-8fc9-a4aa78dce87f/c89aa7cf-f050-4aa4-bf5d-c31abe70165e.jpg" width="600" /></a></p>
<p>
<strong>BEST OF HISTORICAL </strong><strong>- NINOSLAV LUK</strong></p>
<p>
<a href="https://hosting.photobucket.com/95288841-8654-4bf7-8fc9-a4aa78dce87f/b2751730-af2e-42c6-a33c-30890f8d3a26.jpg" target="_blank"><img alt="Click for enlarged picture" src="https://hosting.photobucket.com/95288841-8654-4bf7-8fc9-a4aa78dce87f/b2751730-af2e-42c6-a33c-30890f8d3a26.jpg" width="600" /></a></p>
<p>
<strong>BEST SCULPT </strong><strong>- MONIKA BEŠENIĆ</strong></p>
<p>
<a href="https://hosting.photobucket.com/95288841-8654-4bf7-8fc9-a4aa78dce87f/7e5a7d8d-cea4-4e51-8bfc-6b67a4c12f05.jpg" target="_blank"><img alt="Click for enlarged picture" src="https://hosting.photobucket.com/95288841-8654-4bf7-8fc9-a4aa78dce87f/7e5a7d8d-cea4-4e51-8bfc-6b67a4c12f05.jpg" width="600" /></a></p>
<p>
1.mjesto <strong>SINGLE MINIATURE </strong><strong>- VLADIMIR MATIĆ-KURILJEV</strong></p>
<p>
<a href="https://hosting.photobucket.com/95288841-8654-4bf7-8fc9-a4aa78dce87f/f4828224-9bde-4e65-8a6d-1af3f312503a.jpg" target="_blank"><img alt="Click for enlarged picture" src="https://hosting.photobucket.com/95288841-8654-4bf7-8fc9-a4aa78dce87f/f4828224-9bde-4e65-8a6d-1af3f312503a.jpg" width="600" /></a></p>
<p>
2.mjesto <strong>SINGLE MINIATURE </strong><strong>- ANA POLANŠĆAK</strong></p>
<p>
<a href="https://hosting.photobucket.com/95288841-8654-4bf7-8fc9-a4aa78dce87f/cb9380c7-f7ee-406a-bccf-9a86477bed82.jpg" target="_blank"><img alt="Click for enlarged picture" src="https://hosting.photobucket.com/95288841-8654-4bf7-8fc9-a4aa78dce87f/cb9380c7-f7ee-406a-bccf-9a86477bed82.jpg" width="600" /></a></p>
<p>
3.mjesto <strong>SINGLE MINIATURE - ADAM SKENDŽIĆ</strong></p>
<p>
<a href="https://hosting.photobucket.com/95288841-8654-4bf7-8fc9-a4aa78dce87f/a5f80a51-27d4-4040-952e-b04eb5bf4c99.jpg" target="_blank"><img alt="Click for enlarged picture" src="https://hosting.photobucket.com/95288841-8654-4bf7-8fc9-a4aa78dce87f/a5f80a51-27d4-4040-952e-b04eb5bf4c99.jpg" width="600" /></a></p>
<p>
1.mjesto <strong>LARGE/MOUNTED MINIATURE - SEBASTIAN SOGARD</strong></p>
<p>
<a href="https://hosting.photobucket.com/95288841-8654-4bf7-8fc9-a4aa78dce87f/1f8e3547-5113-488b-9983-c3c592add875.jpg" target="_blank"><img alt="Click for enlarged picture" src="https://hosting.photobucket.com/95288841-8654-4bf7-8fc9-a4aa78dce87f/1f8e3547-5113-488b-9983-c3c592add875.jpg" width="600" /></a></p>
<p>
2.mjesto <strong>LARGE/MOUNTED MINIATURE - JURE CUKAR</strong></p>
<p>
<a href="https://hosting.photobucket.com/95288841-8654-4bf7-8fc9-a4aa78dce87f/de5778ba-d672-4d24-8e6e-f9f1ac993c26.jpg" target="_blank"><img alt="Click for enlarged picture" src="https://hosting.photobucket.com/95288841-8654-4bf7-8fc9-a4aa78dce87f/de5778ba-d672-4d24-8e6e-f9f1ac993c26.jpg" width="600" /></a></p>
<p>
3.mjesto <strong>LARGE/MOUNTED MINIATURE - ANA POLANŠĆAK</strong></p>
<p>
<a href="https://hosting.photobucket.com/95288841-8654-4bf7-8fc9-a4aa78dce87f/58d2d738-55f2-495d-bd44-cf8d023e0142.jpg" target="_blank"><img alt="Click for enlarged picture" src="https://hosting.photobucket.com/95288841-8654-4bf7-8fc9-a4aa78dce87f/58d2d738-55f2-495d-bd44-cf8d023e0142.jpg" width="600" /></a></p>
<p>
1.mjesto <strong>UNIT / SQUAD </strong><strong>- IVAN KNEZOVIĆ</strong></p>
<p>
<a href="https://hosting.photobucket.com/95288841-8654-4bf7-8fc9-a4aa78dce87f/b77d9055-d0c4-4803-8e3f-0bf295c3d5d0.jpg" target="_blank"><img alt="Click for enlarged picture" src="https://hosting.photobucket.com/95288841-8654-4bf7-8fc9-a4aa78dce87f/b77d9055-d0c4-4803-8e3f-0bf295c3d5d0.jpg" width="600" /></a></p>
<p>
2.mjesto <strong>UNIT / SQUAD - MILAN RADACSI</strong></p>
<p>
<a href="https://hosting.photobucket.com/95288841-8654-4bf7-8fc9-a4aa78dce87f/1a6d64f2-a293-4a81-b974-1696d8bb5972.jpg" target="_blank"><img alt="Click for enlarged picture" src="https://hosting.photobucket.com/95288841-8654-4bf7-8fc9-a4aa78dce87f/1a6d64f2-a293-4a81-b974-1696d8bb5972.jpg" width="600" /></a></p>
<p>
3.mjesto <strong>UNIT / SQUAD - MAKSIMILIJAN ŠPRUNG</strong></p>
<p>
<a href="https://hosting.photobucket.com/95288841-8654-4bf7-8fc9-a4aa78dce87f/0b0ae61f-c140-4c35-b58c-a0813c15d83a.jpg" target="_blank"><img alt="Click for enlarged picture" src="https://hosting.photobucket.com/95288841-8654-4bf7-8fc9-a4aa78dce87f/0b0ae61f-c140-4c35-b58c-a0813c15d83a.jpg" width="600" /></a></p>
<p>
1.mjesto <strong>VEHICLE / MONSTER - MAKSIMILIJAN ŠPRUNG</strong></p>
<p>
<a href="https://hosting.photobucket.com/95288841-8654-4bf7-8fc9-a4aa78dce87f/34dbfff5-b8db-478d-a13d-3698c0490a95.jpg" target="_blank"><img alt="Click for enlarged picture" src="https://hosting.photobucket.com/95288841-8654-4bf7-8fc9-a4aa78dce87f/34dbfff5-b8db-478d-a13d-3698c0490a95.jpg" width="600" /></a></p>
<p>
2.mjesto <strong>VEHICLE / MONSTER - MARIO GRGUREV</strong></p>
<p>
<a href="https://hosting.photobucket.com/95288841-8654-4bf7-8fc9-a4aa78dce87f/387e5e88-4f80-4bb9-9b30-f7241369de41.jpg" target="_blank"><img alt="Click for enlarged picture" src="https://hosting.photobucket.com/95288841-8654-4bf7-8fc9-a4aa78dce87f/387e5e88-4f80-4bb9-9b30-f7241369de41.jpg" width="600" /></a></p>
<p>
3.mjesto <strong>VEHICLE / MONSTER - MARKO PAUNOVIĆ</strong></p>
<p>
<a href="https://hosting.photobucket.com/95288841-8654-4bf7-8fc9-a4aa78dce87f/8c2034d2-cae0-4bc2-bdd9-eab85b71db7b.jpg" target="_blank"><img alt="Click for enlarged picture" src="https://hosting.photobucket.com/95288841-8654-4bf7-8fc9-a4aa78dce87f/8c2034d2-cae0-4bc2-bdd9-eab85b71db7b.jpg" width="600" /></a></p>
<p>
1.mjesto <strong>OPEN - PETAR KNEZOVIĆ</strong></p>
<p>
<a href="https://hosting.photobucket.com/95288841-8654-4bf7-8fc9-a4aa78dce87f/7e2723b8-421d-4d59-b2ab-5b5abf4a067a.jpg" target="_blank"><img alt="Click for enlarged picture" src="https://hosting.photobucket.com/95288841-8654-4bf7-8fc9-a4aa78dce87f/7e2723b8-421d-4d59-b2ab-5b5abf4a067a.jpg" width="600" /></a></p>
<p>
2.mjesto <strong>OPEN - FILIP KNEZOVIĆ</strong></p>
<p>
<a href="https://hosting.photobucket.com/95288841-8654-4bf7-8fc9-a4aa78dce87f/2bcd6dc0-6d54-44fd-b660-4f6862e2551f.jpg" target="_blank"><img alt="Click for enlarged picture" src="https://hosting.photobucket.com/95288841-8654-4bf7-8fc9-a4aa78dce87f/2bcd6dc0-6d54-44fd-b660-4f6862e2551f.jpg" width="600" /></a></p>
<p>
3.mjesto <strong>OPEN - DINO TEREK</strong></p>
<p>
<a href="https://hosting.photobucket.com/95288841-8654-4bf7-8fc9-a4aa78dce87f/fe807e70-9250-49f9-8458-56b2ee4b0fad.jpg" target="_blank"><img alt="Click for enlarged picture" src="https://hosting.photobucket.com/95288841-8654-4bf7-8fc9-a4aa78dce87f/fe807e70-9250-49f9-8458-56b2ee4b0fad.jpg" width="600" /></a></p>
<p>
1.mjesto <strong>DIORAMA / DUEL - MARKO PAUNOVIĆ</strong></p>
<p>
<a href="https://hosting.photobucket.com/95288841-8654-4bf7-8fc9-a4aa78dce87f/a7f3bd4c-74cd-48ff-ac00-2d884c6c4770.jpg" target="_blank"><img alt="Click for enlarged picture" src="https://hosting.photobucket.com/95288841-8654-4bf7-8fc9-a4aa78dce87f/a7f3bd4c-74cd-48ff-ac00-2d884c6c4770.jpg" width="600" /></a></p>
<p>
2.mjesto <strong>DIORAMA / DUEL - VLADIMIR MATIĆ-KURILJEV</strong></p>
<p>
<a href="https://hosting.photobucket.com/95288841-8654-4bf7-8fc9-a4aa78dce87f/1218bbec-f68d-40e4-a8ae-66e57c949846.jpg" target="_blank"><img alt="Click for enlarged picture" src="https://hosting.photobucket.com/95288841-8654-4bf7-8fc9-a4aa78dce87f/1218bbec-f68d-40e4-a8ae-66e57c949846.jpg" width="600" /></a></p>
<p>
3.mjesto <strong>DIORAMA / DUEL - JURE CUKAR</strong></p>
<p>
<a href="https://hosting.photobucket.com/95288841-8654-4bf7-8fc9-a4aa78dce87f/4ad5c251-dd03-471f-8ff2-3526507e4aa7.jpg" target="_blank"><img alt="Click for enlarged picture" src="https://hosting.photobucket.com/95288841-8654-4bf7-8fc9-a4aa78dce87f/4ad5c251-dd03-471f-8ff2-3526507e4aa7.jpg" width="600" /></a></p>
<p>
1.mjesto <strong>BUST - MARKO PAUNOVIĆ</strong></p>
<p>
<a href="https://hosting.photobucket.com/95288841-8654-4bf7-8fc9-a4aa78dce87f/daaa9dff-9d7c-4696-b8d9-7ce0c311012a.jpg" target="_blank"><img alt="Click for enlarged picture" src="https://hosting.photobucket.com/95288841-8654-4bf7-8fc9-a4aa78dce87f/daaa9dff-9d7c-4696-b8d9-7ce0c311012a.jpg" width="600" /></a></p>
<p>
2.mjesto <strong>BUST - ANŽE ZORKO</strong></p>
<p>
<a href="https://hosting.photobucket.com/95288841-8654-4bf7-8fc9-a4aa78dce87f/e11e4893-05f4-49df-a758-720b188c5917.jpg" target="_blank"><img alt="Click for enlarged picture" src="https://hosting.photobucket.com/95288841-8654-4bf7-8fc9-a4aa78dce87f/e11e4893-05f4-49df-a758-720b188c5917.jpg" width="600" /></a></p>
<p>
3.mjesto <strong>BUST </strong><strong>- IVAN KNEZOVIĆ</strong></p>
<p>
<a href="https://hosting.photobucket.com/95288841-8654-4bf7-8fc9-a4aa78dce87f/d2435198-c290-43bf-a2fe-e8e592dabd7f.jpg" target="_blank"><img alt="Click for enlarged picture" src="https://hosting.photobucket.com/95288841-8654-4bf7-8fc9-a4aa78dce87f/d2435198-c290-43bf-a2fe-e8e592dabd7f.jpg" width="600" /></a></p>
<p>
1.mjesto <strong>JUNIOR - ELANOR GRAŠIĆ</strong></p>
<p>
<a href="https://hosting.photobucket.com/95288841-8654-4bf7-8fc9-a4aa78dce87f/f0bbb346-9821-43dc-a463-e507fb1b87ee.jpg" target="_blank"><img alt="Click for enlarged picture" src="https://hosting.photobucket.com/95288841-8654-4bf7-8fc9-a4aa78dce87f/f0bbb346-9821-43dc-a463-e507fb1b87ee.jpg" width="600" /></a></p>
<p>
2.mjesto <strong>JUNIOR - LUKA ŠEGINA</strong></p>
<p>
<a href="https://hosting.photobucket.com/95288841-8654-4bf7-8fc9-a4aa78dce87f/1829eee3-80f3-48de-a013-bada8c612e76.jpg" target="_blank"><img alt="Click for enlarged picture" src="https://hosting.photobucket.com/95288841-8654-4bf7-8fc9-a4aa78dce87f/1829eee3-80f3-48de-a013-bada8c612e76.jpg" width="600" /></a></p>
<p>
3.mjesto <strong>JUNIOR - SOFIJA MARASOVIĆ</strong></p>
<p>
<a href="https://hosting.photobucket.com/95288841-8654-4bf7-8fc9-a4aa78dce87f/bdf02300-4634-46b3-a659-6a8a9183177e.jpg" target="_blank"><img alt="Click for enlarged picture" src="https://hosting.photobucket.com/95288841-8654-4bf7-8fc9-a4aa78dce87f/bdf02300-4634-46b3-a659-6a8a9183177e.jpg" width="600" /></a></p>
<p>
Sve radove možete pogledati u galeriji na našim <a href="https://www.facebook.com/BlackQueenHMPC/posts/pfbid02gCGwwc8vTLFJDs1MFmbxc8NKZv1oni7uykTLKmomFSM1APfKrGRNtCkr2a6HTGQrl">socijalnim mrežama</a>.</p>
"
["created"]=>
string(19) "2026-02-25 09:03:55"
["modified"]=>
string(19) "2026-02-28 05:54:18"
}
["Member"]=>
array(10) {
["id"]=>
string(2) "64"
["group_id"]=>
string(1) "1"
["first_name"]=>
string(9) "Krunoslav"
["last_name"]=>
string(8) "Belinić"
["first_name_mask"]=>
string(9) "krunoslav"
["last_name_mask"]=>
string(7) "belinic"
["username"]=>
string(5) "Kruno"
["password"]=>
string(40) "eb3fda45fbec0258e90d809803b10491c548b22f"
["born"]=>
string(19) "2015-01-18 09:19:00"
["created"]=>
string(19) "2015-01-18 09:20:39"
}
}
</pre>
<a href="/dok/members/krunoslav.belinic">Krunoslav Belinić</a>, 25<span class="superscript">th</span> February 2026</span>
</li>
<li>
<a href="/dok/articles/2026/01/19" class="readMore"></a>
<span class="details"> <pre style="display: none;">
array(2) {
["Article"]=>
array(10) {
["id"]=>
string(3) "492"
["member_id"]=>
string(2) "35"
["title_eng"]=>
string(27) "SFRJ 1986 v2 Diorama part 5"
["title_hrv"]=>
string(29) "Diorama SFRJ 1986 v2– dio 5"
["mask_eng"]=>
string(27) "sfrj_1986_v2_diorama_part_5"
["mask_hrv"]=>
string(26) "diorama_sfrj_1986_v2_dio_5"
["content_eng"]=>
string(3653) "<p>
<em>In this series of articles, we will follow my work on a new diorama, another in the 1986 series. This time I have again decided to use a former country. Another version of the SFRY 1986.</em></p>
<p>
<a href=" https://hosting.photobucket.com/95288841-8654-4bf7-8fc9-a4aa78dce87f/ff4272e9-997f-49b7-b214-6f7605ca87c5.jpg
" target="_blank"> <img alt="Click for enlarged picture" src=" https://hosting.photobucket.com/95288841-8654-4bf7-8fc9-a4aa78dce87f/ff4272e9-997f-49b7-b214-6f7605ca87c5.jpg" width="600" /> </a></p>
<p>
So far I have finished making the base, painting the base, painting the interior of the vehicle and painting the figures. Now it's time to add the vegetation</p>
<p>
<a href=" https://hosting.photobucket.com/95288841-8654-4bf7-8fc9-a4aa78dce87f/70a25828-f5b9-46fd-9b11-c4be1cfaba63.jpg" target="_blank"> <img alt="Click for enlarged picture" src=" https://hosting.photobucket.com/95288841-8654-4bf7-8fc9-a4aa78dce87f/70a25828-f5b9-46fd-9b11-c4be1cfaba63.jpg" width="600" /> </a></p>
<p>
The pines/trees were already fixed to the base before painting, so the first vegetation I added was tall shrubs that filled the volume of the base.</p>
<p>
<a href=" https://hosting.photobucket.com/95288841-8654-4bf7-8fc9-a4aa78dce87f/9f7cb598-1f48-4d88-98e1-396d0a172363.jpg" target="_blank"> <img alt="Click for enlarged picture" src=" https://hosting.photobucket.com/95288841-8654-4bf7-8fc9-a4aa78dce87f/9f7cb598-1f48-4d88-98e1-396d0a172363.jpg" width="600" /> </a></p>
<p>
Then I added lower vegetation like tall grass and lower bushes.</p>
<p>
<a href=" https://hosting.photobucket.com/95288841-8654-4bf7-8fc9-a4aa78dce87f/3fe54784-a94c-4c0f-bf23-701033a73325.jpg" target="_blank"> <img alt="Click for enlarged picture" src=" https://hosting.photobucket.com/95288841-8654-4bf7-8fc9-a4aa78dce87f/3fe54784-a94c-4c0f-bf23-701033a73325.jpg" width="600" /> </a></p>
<p>
Finally, I added some short grass, making sure when I was making the parking lot and path that there was no vegetation in the places where the wheels pass.</p>
<p>
<a href=" https://hosting.photobucket.com/95288841-8654-4bf7-8fc9-a4aa78dce87f/596ce54a-a0cb-4a9b-9406-835a7b348f9a.jpg" target="_blank"> <img alt="Click for enlarged picture" src=" https://hosting.photobucket.com/95288841-8654-4bf7-8fc9-a4aa78dce87f/596ce54a-a0cb-4a9b-9406-835a7b348f9a.jpg" width="600" /> </a></p>
<p>
The paint on the base has just dried up, so next time I'll add the vegetation.</p>
<p>
<a href=" https://hosting.photobucket.com/95288841-8654-4bf7-8fc9-a4aa78dce87f/1d2acabb-7ec7-4f67-bec8-b3b73d5ddf46.jpg" target="_blank"> <img alt="Click for enlarged picture" src=" https://hosting.photobucket.com/95288841-8654-4bf7-8fc9-a4aa78dce87f/1d2acabb-7ec7-4f67-bec8-b3b73d5ddf46.jpg" width="600" /> </a></p>
<p>
When the diorama is turned to the back, the volume of the forest is visible.</p>
<p>
<a href=" https://hosting.photobucket.com/95288841-8654-4bf7-8fc9-a4aa78dce87f/1d2acabb-7ec7-4f67-bec8-b3b73d5ddf46.jpg" target="_blank"> <img alt="Click for enlarged picture" src=" https://hosting.photobucket.com/95288841-8654-4bf7-8fc9-a4aa78dce87f/1d2acabb-7ec7-4f67-bec8-b3b73d5ddf46.jpg" width="600" /> </a></p>
<p>
Before placing the vehicles and miniatures on the base, the diorama looks like this.</p>
<p>
<a href=" https://hosting.photobucket.com/95288841-8654-4bf7-8fc9-a4aa78dce87f/a7ffc2b0-a9bf-4e41-ab2f-0c3021b0447f.jpg" target="_blank"> <img alt="Click for enlarged picture" src=" https://hosting.photobucket.com/95288841-8654-4bf7-8fc9-a4aa78dce87f/a7ffc2b0-a9bf-4e41-ab2f-0c3021b0447f.jpg" width="600" /> </a></p>
"
["content_hrv"]=>
string(3186) "<p>
<em>U ovoj seriji članaka pratit ćemo moj rad na novoj diorami, još jednoj u nizu serijala 1986. Ovaj put sam se opet odlučio za bivšu državu. Druga verzija SFRJ 1986..</em></p>
<p>
<a href=" https://hosting.photobucket.com/95288841-8654-4bf7-8fc9-a4aa78dce87f/ff4272e9-997f-49b7-b214-6f7605ca87c5.jpg
" target="_blank"> <img alt="Click for enlarged picture" src=" https://hosting.photobucket.com/95288841-8654-4bf7-8fc9-a4aa78dce87f/ff4272e9-997f-49b7-b214-6f7605ca87c5.jpg" width="600" /> </a></p>
<p>
Do sada sam završio s izradom baze, bojanjem baze, bojanjem interijera vozila i bojanjem figura. Sada je došlo vrijeme za dodavanje vegetacije</p>
<p>
<a href=" https://hosting.photobucket.com/95288841-8654-4bf7-8fc9-a4aa78dce87f/70a25828-f5b9-46fd-9b11-c4be1cfaba63.jpg" target="_blank"> <img alt="Click for enlarged picture" src=" https://hosting.photobucket.com/95288841-8654-4bf7-8fc9-a4aa78dce87f/70a25828-f5b9-46fd-9b11-c4be1cfaba63.jpg" width="600" /> </a></p>
<p>
Borovi/drveće je već bilo fiksirano na bazu prije bojanja pa je prva sljedeća vegetacija bila visoko žbunje kojim sam popunio volumen baze.</p>
<p>
<a href=" https://hosting.photobucket.com/95288841-8654-4bf7-8fc9-a4aa78dce87f/9f7cb598-1f48-4d88-98e1-396d0a172363.jpg" target="_blank"> <img alt="Click for enlarged picture" src=" https://hosting.photobucket.com/95288841-8654-4bf7-8fc9-a4aa78dce87f/9f7cb598-1f48-4d88-98e1-396d0a172363.jpg" width="600" /> </a></p>
<p>
Potom sam dodao niže raslinje poput visoke trave i nižeg grmlja.</p>
<p>
<a href=" https://hosting.photobucket.com/95288841-8654-4bf7-8fc9-a4aa78dce87f/3fe54784-a94c-4c0f-bf23-701033a73325.jpg" target="_blank"> <img alt="Click for enlarged picture" src=" https://hosting.photobucket.com/95288841-8654-4bf7-8fc9-a4aa78dce87f/3fe54784-a94c-4c0f-bf23-701033a73325.jpg" width="600" /> </a></p>
<p>
Na kraju sam dodao i nisku travu pri čemu sam pazio kad sam radio ugibalište i puteljak da vegetacije ne bude na mjestima gdje prolaze kotači.</p>
<p>
<a href=" https://hosting.photobucket.com/95288841-8654-4bf7-8fc9-a4aa78dce87f/596ce54a-a0cb-4a9b-9406-835a7b348f9a.jpg" target="_blank"> <img alt="Click for enlarged picture" src=" https://hosting.photobucket.com/95288841-8654-4bf7-8fc9-a4aa78dce87f/596ce54a-a0cb-4a9b-9406-835a7b348f9a.jpg" width="600" /> </a></p>
<p>
Kada se dioramu okrene, vidi se volumen vegetacije u šumi. </p>
<p>
<a href="https://hosting.photobucket.com/95288841-8654-4bf7-8fc9-a4aa78dce87f/1d2acabb-7ec7-4f67-bec8-b3b73d5ddf46.jpg" target="_blank"><img alt="Click for enlarged picture" src="https://hosting.photobucket.com/95288841-8654-4bf7-8fc9-a4aa78dce87f/1d2acabb-7ec7-4f67-bec8-b3b73d5ddf46.jpg" width="600" /></a></p>
<p>
Prije postavljanja vozila i minijatura, diorama izgleda ovako:</p>
<p>
<a href="https://hosting.photobucket.com/95288841-8654-4bf7-8fc9-a4aa78dce87f/a7ffc2b0-a9bf-4e41-ab2f-0c3021b0447f.jpg" target="_blank"><img alt="Click for enlarged picture" src="https://hosting.photobucket.com/95288841-8654-4bf7-8fc9-a4aa78dce87f/a7ffc2b0-a9bf-4e41-ab2f-0c3021b0447f.jpg" width="600" /></a></p>
"
["created"]=>
string(19) "2026-01-19 10:46:08"
["modified"]=>
string(19) "2026-01-19 11:00:21"
}
["Member"]=>
array(10) {
["id"]=>
string(2) "35"
["group_id"]=>
string(1) "1"
["first_name"]=>
string(5) "Marko"
["last_name"]=>
string(9) "Paunović"
["first_name_mask"]=>
string(5) "marko"
["last_name_mask"]=>
string(8) "paunovic"
["username"]=>
string(5) "marko"
["password"]=>
string(40) "3bd37b326d19d1880d3b93a4b32e8fb3a90fa122"
["born"]=>
string(19) "2033-03-07 20:35:00"
["created"]=>
string(19) "2009-06-02 20:37:03"
}
}
</pre>
<a href="/dok/members/marko.paunovic">Marko Paunović</a>, 19<span class="superscript">th</span> January 2026</span>
</li>
</ul>
<p><a href="/dok/articles">more_articles</a></p>
<h2>latest_battle_reports</h2>
<ul class="latest">
<li>
<pre class="cake-debug"><a href="javascript:void(0);" onclick="document.getElementById('cakeErr9-trace').style.display = (document.getElementById('cakeErr9-trace').style.display == 'none' ? '' : 'none');"><b>Notice</b> (8)</a>: Undefined index: title_dok [<b>APP/views/elements/latestBattleReports.ctp</b>, line <b>8</b>]<div id="cakeErr9-trace" class="cake-stack-trace" style="display: none;"><a href="javascript:void(0);" onclick="document.getElementById('cakeErr9-code').style.display = (document.getElementById('cakeErr9-code').style.display == 'none' ? '' : 'none')">Code</a> | <a href="javascript:void(0);" onclick="document.getElementById('cakeErr9-context').style.display = (document.getElementById('cakeErr9-context').style.display == 'none' ? '' : 'none')">Context</a><div id="cakeErr9-code" class="cake-code-dump" style="display: none;"><pre><code><span style="color: #000000"></span></code>
<code><span style="color: #000000"> if (Configure::read() > 0) {</span></code>
<span class="code-highlight"><code><span style="color: #000000"> include ($___viewFn);</span></code></span></pre></div><pre id="cakeErr9-context" class="cake-context" style="display: none;">$___viewFn = "/home/martin/apps/agram/app/views/elements/latestBattleReports.ctp"
$___dataForView = array(
"lang" => "dok",
"otherLangs" => array(
"eng",
"hrv"
),
"globalNav" => array(
array(),
array(),
array(),
array(),
array(),
array(),
array(),
array(),
array(),
array(),
array(),
array(),
array(),
array(),
array(),
array(),
array(),
array(),
array(),
array(),
array(),
array(),
array(),
array(),
array(),
array(),
array()
),
"breadCrumbs" => array(
array()
),
"pageContents" => array(
"home_who_we_are" => null
),
"userData" => null,
"announcements" => array(
array(),
array(),
array()
),
"cache" => array(
"time" => "+1 day",
"key" => "dok"
),
"form" => FormHelper
FormHelper::$helpers = array
FormHelper::$fieldset = array
FormHelper::$__options = array
FormHelper::$fields = array
FormHelper::$requestType = NULL
FormHelper::$defaultModel = NULL
FormHelper::$_inputDefaults = array
FormHelper::$_lastAction = ""
FormHelper::$base = ""
FormHelper::$webroot = "/"
FormHelper::$theme = NULL
FormHelper::$here = "/dok"
FormHelper::$params = array
FormHelper::$action = "index"
FormHelper::$plugin = NULL
FormHelper::$data = NULL
FormHelper::$namedArgs = NULL
FormHelper::$argSeparator = NULL
FormHelper::$validationErrors = NULL
FormHelper::$tags = array
FormHelper::$__tainted = NULL
FormHelper::$__cleaned = NULL
FormHelper::$Html = HtmlHelper object,
"text" => TextHelper
TextHelper::$helpers = NULL
TextHelper::$base = ""
TextHelper::$webroot = "/"
TextHelper::$theme = NULL
TextHelper::$here = "/dok"
TextHelper::$params = array
TextHelper::$action = "index"
TextHelper::$plugin = NULL
TextHelper::$data = NULL
TextHelper::$namedArgs = NULL
TextHelper::$argSeparator = NULL
TextHelper::$validationErrors = NULL
TextHelper::$tags = array
TextHelper::$__tainted = NULL
TextHelper::$__cleaned = NULL,
"stringer" => StringerHelper
StringerHelper::$helpers = array
StringerHelper::$base = ""
StringerHelper::$webroot = "/"
StringerHelper::$theme = NULL
StringerHelper::$here = "/dok"
StringerHelper::$params = array
StringerHelper::$action = "index"
StringerHelper::$plugin = NULL
StringerHelper::$data = NULL
StringerHelper::$namedArgs = NULL
StringerHelper::$argSeparator = NULL
StringerHelper::$validationErrors = NULL
StringerHelper::$tags = array
StringerHelper::$__tainted = NULL
StringerHelper::$__cleaned = NULL
StringerHelper::$Html = HtmlHelper object
StringerHelper::$Link = LinkHelper object
StringerHelper::$Text = TextHelper object,
"menu" => MenuHelper
MenuHelper::$helpers = array
MenuHelper::$base = ""
MenuHelper::$webroot = "/"
MenuHelper::$theme = NULL
MenuHelper::$here = "/dok"
MenuHelper::$params = array
MenuHelper::$action = "index"
MenuHelper::$plugin = NULL
MenuHelper::$data = NULL
MenuHelper::$namedArgs = NULL
MenuHelper::$argSeparator = NULL
MenuHelper::$validationErrors = NULL
MenuHelper::$tags = array
MenuHelper::$__tainted = NULL
MenuHelper::$__cleaned = NULL
MenuHelper::$Link = LinkHelper object,
"session" => SessionHelper
SessionHelper::$helpers = array
SessionHelper::$__active = true
SessionHelper::$valid = false
SessionHelper::$error = false
SessionHelper::$_userAgent = "f9a8355d006790ee743ededbb1f6e3bd"
SessionHelper::$path = "/"
SessionHelper::$lastError = NULL
SessionHelper::$security = "medium"
SessionHelper::$time = 1773314240
SessionHelper::$sessionTime = 1773326240
SessionHelper::$cookieLifeTime = false
SessionHelper::$watchKeys = array
SessionHelper::$id = NULL
SessionHelper::$host = NULL
SessionHelper::$timeout = NULL
SessionHelper::$base = ""
SessionHelper::$webroot = "/"
SessionHelper::$here = "/dok"
SessionHelper::$params = array
SessionHelper::$action = "index"
SessionHelper::$data = NULL
SessionHelper::$theme = NULL
SessionHelper::$plugin = NULL,
"html" => HtmlHelper
HtmlHelper::$tags = array
HtmlHelper::$_crumbs = array
HtmlHelper::$__includedScripts = array
HtmlHelper::$_scriptBlockOptions = array
HtmlHelper::$__docTypes = array
HtmlHelper::$helpers = NULL
HtmlHelper::$base = ""
HtmlHelper::$webroot = "/"
HtmlHelper::$theme = NULL
HtmlHelper::$here = "/dok"
HtmlHelper::$params = array
HtmlHelper::$action = "index"
HtmlHelper::$plugin = NULL
HtmlHelper::$data = NULL
HtmlHelper::$namedArgs = NULL
HtmlHelper::$argSeparator = NULL
HtmlHelper::$validationErrors = NULL
HtmlHelper::$__tainted = NULL
HtmlHelper::$__cleaned = NULL,
"link" => LinkHelper
LinkHelper::$helpers = array
LinkHelper::$lang = "dok"
LinkHelper::$defaultLang = "hrv"
LinkHelper::$base = ""
LinkHelper::$webroot = "/"
LinkHelper::$theme = NULL
LinkHelper::$here = "/dok"
LinkHelper::$params = array
LinkHelper::$action = "index"
LinkHelper::$plugin = NULL
LinkHelper::$data = NULL
LinkHelper::$namedArgs = NULL
LinkHelper::$argSeparator = NULL
LinkHelper::$validationErrors = NULL
LinkHelper::$tags = array
LinkHelper::$__tainted = NULL
LinkHelper::$__cleaned = NULL
LinkHelper::$Html = HtmlHelper object
LinkHelper::$Session = SessionHelper object
)
$loadHelpers = false
$cached = false
$loadedHelpers = array()
$lang = "dok"
$otherLangs = array(
"eng",
"hrv"
)
$globalNav = array(
array(
"Page" => array()
),
array(
"Page" => array()
),
array(
"Page" => array()
),
array(
"Page" => array()
),
array(
"Page" => array()
),
array(
"Page" => array()
),
array(
"Page" => array()
),
array(
"Page" => array()
),
array(
"Page" => array()
),
array(
"Page" => array()
),
array(
"Page" => array()
),
array(
"Page" => array()
),
array(
"Page" => array()
),
array(
"Page" => array()
),
array(
"Page" => array()
),
array(
"Page" => array()
),
array(
"Page" => array()
),
array(
"Page" => array()
),
array(
"Page" => array()
),
array(
"Page" => array()
),
array(
"Page" => array()
),
array(
"Page" => array()
),
array(
"Page" => array()
),
array(
"Page" => array()
),
array(
"Page" => array()
),
array(
"Page" => array()
),
array(
"Page" => array()
)
)
$breadCrumbs = array(
array(
"Page" => array()
)
)
$pageContents = array(
"home_who_we_are" => null
)
$userData = null
$announcements = array(
array(
"Announcement" => array()
),
array(
"Announcement" => array()
),
array(
"Announcement" => array()
)
)
$cache = array(
"time" => "+1 day",
"key" => "dok"
)
$form = FormHelper
FormHelper::$helpers = array
FormHelper::$fieldset = array
FormHelper::$__options = array
FormHelper::$fields = array
FormHelper::$requestType = NULL
FormHelper::$defaultModel = NULL
FormHelper::$_inputDefaults = array
FormHelper::$_lastAction = ""
FormHelper::$base = ""
FormHelper::$webroot = "/"
FormHelper::$theme = NULL
FormHelper::$here = "/dok"
FormHelper::$params = array
FormHelper::$action = "index"
FormHelper::$plugin = NULL
FormHelper::$data = NULL
FormHelper::$namedArgs = NULL
FormHelper::$argSeparator = NULL
FormHelper::$validationErrors = NULL
FormHelper::$tags = array
FormHelper::$__tainted = NULL
FormHelper::$__cleaned = NULL
FormHelper::$Html = HtmlHelper object
$text = TextHelper
TextHelper::$helpers = NULL
TextHelper::$base = ""
TextHelper::$webroot = "/"
TextHelper::$theme = NULL
TextHelper::$here = "/dok"
TextHelper::$params = array
TextHelper::$action = "index"
TextHelper::$plugin = NULL
TextHelper::$data = NULL
TextHelper::$namedArgs = NULL
TextHelper::$argSeparator = NULL
TextHelper::$validationErrors = NULL
TextHelper::$tags = array
TextHelper::$__tainted = NULL
TextHelper::$__cleaned = NULL
$stringer = StringerHelper
StringerHelper::$helpers = array
StringerHelper::$base = ""
StringerHelper::$webroot = "/"
StringerHelper::$theme = NULL
StringerHelper::$here = "/dok"
StringerHelper::$params = array
StringerHelper::$action = "index"
StringerHelper::$plugin = NULL
StringerHelper::$data = NULL
StringerHelper::$namedArgs = NULL
StringerHelper::$argSeparator = NULL
StringerHelper::$validationErrors = NULL
StringerHelper::$tags = array
StringerHelper::$__tainted = NULL
StringerHelper::$__cleaned = NULL
StringerHelper::$Html = HtmlHelper object
StringerHelper::$Link = LinkHelper object
StringerHelper::$Text = TextHelper object
$menu = MenuHelper
MenuHelper::$helpers = array
MenuHelper::$base = ""
MenuHelper::$webroot = "/"
MenuHelper::$theme = NULL
MenuHelper::$here = "/dok"
MenuHelper::$params = array
MenuHelper::$action = "index"
MenuHelper::$plugin = NULL
MenuHelper::$data = NULL
MenuHelper::$namedArgs = NULL
MenuHelper::$argSeparator = NULL
MenuHelper::$validationErrors = NULL
MenuHelper::$tags = array
MenuHelper::$__tainted = NULL
MenuHelper::$__cleaned = NULL
MenuHelper::$Link = LinkHelper object
$session = SessionHelper
SessionHelper::$helpers = array
SessionHelper::$__active = true
SessionHelper::$valid = false
SessionHelper::$error = false
SessionHelper::$_userAgent = "f9a8355d006790ee743ededbb1f6e3bd"
SessionHelper::$path = "/"
SessionHelper::$lastError = NULL
SessionHelper::$security = "medium"
SessionHelper::$time = 1773314240
SessionHelper::$sessionTime = 1773326240
SessionHelper::$cookieLifeTime = false
SessionHelper::$watchKeys = array
SessionHelper::$id = NULL
SessionHelper::$host = NULL
SessionHelper::$timeout = NULL
SessionHelper::$base = ""
SessionHelper::$webroot = "/"
SessionHelper::$here = "/dok"
SessionHelper::$params = array
SessionHelper::$action = "index"
SessionHelper::$data = NULL
SessionHelper::$theme = NULL
SessionHelper::$plugin = NULL
$html = HtmlHelper
HtmlHelper::$tags = array
HtmlHelper::$_crumbs = array
HtmlHelper::$__includedScripts = array
HtmlHelper::$_scriptBlockOptions = array
HtmlHelper::$__docTypes = array
HtmlHelper::$helpers = NULL
HtmlHelper::$base = ""
HtmlHelper::$webroot = "/"
HtmlHelper::$theme = NULL
HtmlHelper::$here = "/dok"
HtmlHelper::$params = array
HtmlHelper::$action = "index"
HtmlHelper::$plugin = NULL
HtmlHelper::$data = NULL
HtmlHelper::$namedArgs = NULL
HtmlHelper::$argSeparator = NULL
HtmlHelper::$validationErrors = NULL
HtmlHelper::$__tainted = NULL
HtmlHelper::$__cleaned = NULL
$link = LinkHelper
LinkHelper::$helpers = array
LinkHelper::$lang = "dok"
LinkHelper::$defaultLang = "hrv"
LinkHelper::$base = ""
LinkHelper::$webroot = "/"
LinkHelper::$theme = NULL
LinkHelper::$here = "/dok"
LinkHelper::$params = array
LinkHelper::$action = "index"
LinkHelper::$plugin = NULL
LinkHelper::$data = NULL
LinkHelper::$namedArgs = NULL
LinkHelper::$argSeparator = NULL
LinkHelper::$validationErrors = NULL
LinkHelper::$tags = array
LinkHelper::$__tainted = NULL
LinkHelper::$__cleaned = NULL
LinkHelper::$Html = HtmlHelper object
LinkHelper::$Session = SessionHelper object
$battleReports = array(
array(
"BattleReport" => array(),
"Game" => array(),
"BattleReportExperience" => array()
),
array(
"BattleReport" => array(),
"Game" => array(),
"BattleReportExperience" => array()
),
array(
"BattleReport" => array(),
"Game" => array(),
"BattleReportExperience" => array()
)
)
$battleReport = array(
"BattleReport" => array(
"id" => "16",
"title_eng" => "Kill Team - Blooded vs. Vespid Stingwings",
"title_hrv" => "Kill Team - Blooded vs. Vespid Stingwings",
"mask_eng" => "kill_team_-_blooded_vs_vespid_stingwings",
"mask_hrv" => "kill_team_-_blooded_vs_vespid_stingwings",
"game_id" => "1",
"fought" => "2025-02-28 16:00:00",
"created" => "2025-03-10 08:53:42",
"modified" => "2025-03-10 08:53:42"
),
"Game" => array(
"id" => "1",
"name_eng" => "GW - Warhammer 40.000",
"name_hrv" => "GW - Warhammer 40.000",
"description_eng" => "<p>
In the grim darkness of the far future, there is only war!</p>
<p>
<a href="http://img.photobucket.com/albums/v467/demonn/Agram-Sajt/40k03_zpsc9a73277.jpg" target="_blank"> <img alt="Click for enlarged picture" src="http://img.photobucket.com/albums/v467/demonn/Agram-Sajt/40k03_zpsc9a73277.jpg" width="600" /> </a> </p>
",
"description_hrv" => "<p>
Warhammer 40000 je strate&scaron;ka igra smje&scaron;tena u daleku budućnost Zemlje, u kojoj preuzimate zapovjedni&scaron;tvo nad vojskama minijatura kako bi prikazali oružane sukobe vojski budućnosti.</p>
<p>
Bitke se vode na stolu uobičajenih dimenzija 120 x 180 cm, na koji se zatim postavlja različit teren kako bi se dočarao izgled pravog boji&scaron;ta. Nakon toga, u uobičajenom scenariju, na suprotne strane stola razmje&scaron;taju se dvije vojske minijatura. Strate&scaron;ki dio igre je vrlo važan jer već samim razmje&scaron;tanjem jedinica na stol možete dobiti veći dio bitke.</p>
<p>
Sada, kada va&scaron;i vojnici preko bojnog polja gledaju u mrskog im neprijatelja, spremni ste poslati naredbu za juri&scaron;, ili se ukopati na poziciji i braniti ono &scaron;to je va&scaron;e (va&scaron;u polovicu drvene ploče prekrivene umjetnim terenom). Kako ne bi nastala zbrka na bojnom polju, igra je podijeljena na poteze, a svaki potez je dodatno podijeljen u faze.<br />
&nbsp;</p>
<p>
<a href="http://img.photobucket.com/albums/v467/demonn/Agram-Sajt/40k03_zpsc9a73277.jpg" target="_blank"> <img alt="Click for enlarged picture" src="http://img.photobucket.com/albums/v467/demonn/Agram-Sajt/40k03_zpsc9a73277.jpg" width="600" /> </a> </p>"
),
"BattleReportExperience" => array(
array()
)
)</pre><pre class="stack-trace">include - APP/views/elements/latestBattleReports.ctp, line 8
View::_render() - CORE/cake/libs/view/view.php, line 736
View::element() - CORE/cake/libs/view/view.php, line 397
include - APP/views/home/index.ctp, line 50
View::_render() - CORE/cake/libs/view/view.php, line 736
View::render() - CORE/cake/libs/view/view.php, line 431
Controller::render() - CORE/cake/libs/controller/controller.php, line 909
Dispatcher::_invoke() - CORE/cake/dispatcher.php, line 207
Dispatcher::dispatch() - CORE/cake/dispatcher.php, line 171
[main] - APP/webroot/index.php, line 86</pre></div></pre><pre class="cake-debug"><a href="javascript:void(0);" onclick="document.getElementById('cakeErr10-trace').style.display = (document.getElementById('cakeErr10-trace').style.display == 'none' ? '' : 'none');"><b>Notice</b> (8)</a>: Undefined index: mask_dok [<b>APP/views/elements/latestBattleReports.ctp</b>, line <b>11</b>]<div id="cakeErr10-trace" class="cake-stack-trace" style="display: none;"><a href="javascript:void(0);" onclick="document.getElementById('cakeErr10-code').style.display = (document.getElementById('cakeErr10-code').style.display == 'none' ? '' : 'none')">Code</a> | <a href="javascript:void(0);" onclick="document.getElementById('cakeErr10-context').style.display = (document.getElementById('cakeErr10-context').style.display == 'none' ? '' : 'none')">Context</a><div id="cakeErr10-code" class="cake-code-dump" style="display: none;"><pre><code><span style="color: #000000"></span></code>
<code><span style="color: #000000"> if (Configure::read() > 0) {</span></code>
<span class="code-highlight"><code><span style="color: #000000"> include ($___viewFn);</span></code></span></pre></div><pre id="cakeErr10-context" class="cake-context" style="display: none;">$___viewFn = "/home/martin/apps/agram/app/views/elements/latestBattleReports.ctp"
$___dataForView = array(
"lang" => "dok",
"otherLangs" => array(
"eng",
"hrv"
),
"globalNav" => array(
array(),
array(),
array(),
array(),
array(),
array(),
array(),
array(),
array(),
array(),
array(),
array(),
array(),
array(),
array(),
array(),
array(),
array(),
array(),
array(),
array(),
array(),
array(),
array(),
array(),
array(),
array()
),
"breadCrumbs" => array(
array()
),
"pageContents" => array(
"home_who_we_are" => null
),
"userData" => null,
"announcements" => array(
array(),
array(),
array()
),
"cache" => array(
"time" => "+1 day",
"key" => "dok"
),
"form" => FormHelper
FormHelper::$helpers = array
FormHelper::$fieldset = array
FormHelper::$__options = array
FormHelper::$fields = array
FormHelper::$requestType = NULL
FormHelper::$defaultModel = NULL
FormHelper::$_inputDefaults = array
FormHelper::$_lastAction = ""
FormHelper::$base = ""
FormHelper::$webroot = "/"
FormHelper::$theme = NULL
FormHelper::$here = "/dok"
FormHelper::$params = array
FormHelper::$action = "index"
FormHelper::$plugin = NULL
FormHelper::$data = NULL
FormHelper::$namedArgs = NULL
FormHelper::$argSeparator = NULL
FormHelper::$validationErrors = NULL
FormHelper::$tags = array
FormHelper::$__tainted = NULL
FormHelper::$__cleaned = NULL
FormHelper::$Html = HtmlHelper object,
"text" => TextHelper
TextHelper::$helpers = NULL
TextHelper::$base = ""
TextHelper::$webroot = "/"
TextHelper::$theme = NULL
TextHelper::$here = "/dok"
TextHelper::$params = array
TextHelper::$action = "index"
TextHelper::$plugin = NULL
TextHelper::$data = NULL
TextHelper::$namedArgs = NULL
TextHelper::$argSeparator = NULL
TextHelper::$validationErrors = NULL
TextHelper::$tags = array
TextHelper::$__tainted = NULL
TextHelper::$__cleaned = NULL,
"stringer" => StringerHelper
StringerHelper::$helpers = array
StringerHelper::$base = ""
StringerHelper::$webroot = "/"
StringerHelper::$theme = NULL
StringerHelper::$here = "/dok"
StringerHelper::$params = array
StringerHelper::$action = "index"
StringerHelper::$plugin = NULL
StringerHelper::$data = NULL
StringerHelper::$namedArgs = NULL
StringerHelper::$argSeparator = NULL
StringerHelper::$validationErrors = NULL
StringerHelper::$tags = array
StringerHelper::$__tainted = NULL
StringerHelper::$__cleaned = NULL
StringerHelper::$Html = HtmlHelper object
StringerHelper::$Link = LinkHelper object
StringerHelper::$Text = TextHelper object,
"menu" => MenuHelper
MenuHelper::$helpers = array
MenuHelper::$base = ""
MenuHelper::$webroot = "/"
MenuHelper::$theme = NULL
MenuHelper::$here = "/dok"
MenuHelper::$params = array
MenuHelper::$action = "index"
MenuHelper::$plugin = NULL
MenuHelper::$data = NULL
MenuHelper::$namedArgs = NULL
MenuHelper::$argSeparator = NULL
MenuHelper::$validationErrors = NULL
MenuHelper::$tags = array
MenuHelper::$__tainted = NULL
MenuHelper::$__cleaned = NULL
MenuHelper::$Link = LinkHelper object,
"session" => SessionHelper
SessionHelper::$helpers = array
SessionHelper::$__active = true
SessionHelper::$valid = false
SessionHelper::$error = false
SessionHelper::$_userAgent = "f9a8355d006790ee743ededbb1f6e3bd"
SessionHelper::$path = "/"
SessionHelper::$lastError = NULL
SessionHelper::$security = "medium"
SessionHelper::$time = 1773314240
SessionHelper::$sessionTime = 1773326240
SessionHelper::$cookieLifeTime = false
SessionHelper::$watchKeys = array
SessionHelper::$id = NULL
SessionHelper::$host = NULL
SessionHelper::$timeout = NULL
SessionHelper::$base = ""
SessionHelper::$webroot = "/"
SessionHelper::$here = "/dok"
SessionHelper::$params = array
SessionHelper::$action = "index"
SessionHelper::$data = NULL
SessionHelper::$theme = NULL
SessionHelper::$plugin = NULL,
"html" => HtmlHelper
HtmlHelper::$tags = array
HtmlHelper::$_crumbs = array
HtmlHelper::$__includedScripts = array
HtmlHelper::$_scriptBlockOptions = array
HtmlHelper::$__docTypes = array
HtmlHelper::$helpers = NULL
HtmlHelper::$base = ""
HtmlHelper::$webroot = "/"
HtmlHelper::$theme = NULL
HtmlHelper::$here = "/dok"
HtmlHelper::$params = array
HtmlHelper::$action = "index"
HtmlHelper::$plugin = NULL
HtmlHelper::$data = NULL
HtmlHelper::$namedArgs = NULL
HtmlHelper::$argSeparator = NULL
HtmlHelper::$validationErrors = NULL
HtmlHelper::$__tainted = NULL
HtmlHelper::$__cleaned = NULL,
"link" => LinkHelper
LinkHelper::$helpers = array
LinkHelper::$lang = "dok"
LinkHelper::$defaultLang = "hrv"
LinkHelper::$base = ""
LinkHelper::$webroot = "/"
LinkHelper::$theme = NULL
LinkHelper::$here = "/dok"
LinkHelper::$params = array
LinkHelper::$action = "index"
LinkHelper::$plugin = NULL
LinkHelper::$data = NULL
LinkHelper::$namedArgs = NULL
LinkHelper::$argSeparator = NULL
LinkHelper::$validationErrors = NULL
LinkHelper::$tags = array
LinkHelper::$__tainted = NULL
LinkHelper::$__cleaned = NULL
LinkHelper::$Html = HtmlHelper object
LinkHelper::$Session = SessionHelper object
)
$loadHelpers = false
$cached = false
$loadedHelpers = array()
$lang = "dok"
$otherLangs = array(
"eng",
"hrv"
)
$globalNav = array(
array(
"Page" => array()
),
array(
"Page" => array()
),
array(
"Page" => array()
),
array(
"Page" => array()
),
array(
"Page" => array()
),
array(
"Page" => array()
),
array(
"Page" => array()
),
array(
"Page" => array()
),
array(
"Page" => array()
),
array(
"Page" => array()
),
array(
"Page" => array()
),
array(
"Page" => array()
),
array(
"Page" => array()
),
array(
"Page" => array()
),
array(
"Page" => array()
),
array(
"Page" => array()
),
array(
"Page" => array()
),
array(
"Page" => array()
),
array(
"Page" => array()
),
array(
"Page" => array()
),
array(
"Page" => array()
),
array(
"Page" => array()
),
array(
"Page" => array()
),
array(
"Page" => array()
),
array(
"Page" => array()
),
array(
"Page" => array()
),
array(
"Page" => array()
)
)
$breadCrumbs = array(
array(
"Page" => array()
)
)
$pageContents = array(
"home_who_we_are" => null
)
$userData = null
$announcements = array(
array(
"Announcement" => array()
),
array(
"Announcement" => array()
),
array(
"Announcement" => array()
)
)
$cache = array(
"time" => "+1 day",
"key" => "dok"
)
$form = FormHelper
FormHelper::$helpers = array
FormHelper::$fieldset = array
FormHelper::$__options = array
FormHelper::$fields = array
FormHelper::$requestType = NULL
FormHelper::$defaultModel = NULL
FormHelper::$_inputDefaults = array
FormHelper::$_lastAction = ""
FormHelper::$base = ""
FormHelper::$webroot = "/"
FormHelper::$theme = NULL
FormHelper::$here = "/dok"
FormHelper::$params = array
FormHelper::$action = "index"
FormHelper::$plugin = NULL
FormHelper::$data = NULL
FormHelper::$namedArgs = NULL
FormHelper::$argSeparator = NULL
FormHelper::$validationErrors = NULL
FormHelper::$tags = array
FormHelper::$__tainted = NULL
FormHelper::$__cleaned = NULL
FormHelper::$Html = HtmlHelper object
$text = TextHelper
TextHelper::$helpers = NULL
TextHelper::$base = ""
TextHelper::$webroot = "/"
TextHelper::$theme = NULL
TextHelper::$here = "/dok"
TextHelper::$params = array
TextHelper::$action = "index"
TextHelper::$plugin = NULL
TextHelper::$data = NULL
TextHelper::$namedArgs = NULL
TextHelper::$argSeparator = NULL
TextHelper::$validationErrors = NULL
TextHelper::$tags = array
TextHelper::$__tainted = NULL
TextHelper::$__cleaned = NULL
$stringer = StringerHelper
StringerHelper::$helpers = array
StringerHelper::$base = ""
StringerHelper::$webroot = "/"
StringerHelper::$theme = NULL
StringerHelper::$here = "/dok"
StringerHelper::$params = array
StringerHelper::$action = "index"
StringerHelper::$plugin = NULL
StringerHelper::$data = NULL
StringerHelper::$namedArgs = NULL
StringerHelper::$argSeparator = NULL
StringerHelper::$validationErrors = NULL
StringerHelper::$tags = array
StringerHelper::$__tainted = NULL
StringerHelper::$__cleaned = NULL
StringerHelper::$Html = HtmlHelper object
StringerHelper::$Link = LinkHelper object
StringerHelper::$Text = TextHelper object
$menu = MenuHelper
MenuHelper::$helpers = array
MenuHelper::$base = ""
MenuHelper::$webroot = "/"
MenuHelper::$theme = NULL
MenuHelper::$here = "/dok"
MenuHelper::$params = array
MenuHelper::$action = "index"
MenuHelper::$plugin = NULL
MenuHelper::$data = NULL
MenuHelper::$namedArgs = NULL
MenuHelper::$argSeparator = NULL
MenuHelper::$validationErrors = NULL
MenuHelper::$tags = array
MenuHelper::$__tainted = NULL
MenuHelper::$__cleaned = NULL
MenuHelper::$Link = LinkHelper object
$session = SessionHelper
SessionHelper::$helpers = array
SessionHelper::$__active = true
SessionHelper::$valid = false
SessionHelper::$error = false
SessionHelper::$_userAgent = "f9a8355d006790ee743ededbb1f6e3bd"
SessionHelper::$path = "/"
SessionHelper::$lastError = NULL
SessionHelper::$security = "medium"
SessionHelper::$time = 1773314240
SessionHelper::$sessionTime = 1773326240
SessionHelper::$cookieLifeTime = false
SessionHelper::$watchKeys = array
SessionHelper::$id = NULL
SessionHelper::$host = NULL
SessionHelper::$timeout = NULL
SessionHelper::$base = ""
SessionHelper::$webroot = "/"
SessionHelper::$here = "/dok"
SessionHelper::$params = array
SessionHelper::$action = "index"
SessionHelper::$data = NULL
SessionHelper::$theme = NULL
SessionHelper::$plugin = NULL
$html = HtmlHelper
HtmlHelper::$tags = array
HtmlHelper::$_crumbs = array
HtmlHelper::$__includedScripts = array
HtmlHelper::$_scriptBlockOptions = array
HtmlHelper::$__docTypes = array
HtmlHelper::$helpers = NULL
HtmlHelper::$base = ""
HtmlHelper::$webroot = "/"
HtmlHelper::$theme = NULL
HtmlHelper::$here = "/dok"
HtmlHelper::$params = array
HtmlHelper::$action = "index"
HtmlHelper::$plugin = NULL
HtmlHelper::$data = NULL
HtmlHelper::$namedArgs = NULL
HtmlHelper::$argSeparator = NULL
HtmlHelper::$validationErrors = NULL
HtmlHelper::$__tainted = NULL
HtmlHelper::$__cleaned = NULL
$link = LinkHelper
LinkHelper::$helpers = array
LinkHelper::$lang = "dok"
LinkHelper::$defaultLang = "hrv"
LinkHelper::$base = ""
LinkHelper::$webroot = "/"
LinkHelper::$theme = NULL
LinkHelper::$here = "/dok"
LinkHelper::$params = array
LinkHelper::$action = "index"
LinkHelper::$plugin = NULL
LinkHelper::$data = NULL
LinkHelper::$namedArgs = NULL
LinkHelper::$argSeparator = NULL
LinkHelper::$validationErrors = NULL
LinkHelper::$tags = array
LinkHelper::$__tainted = NULL
LinkHelper::$__cleaned = NULL
LinkHelper::$Html = HtmlHelper object
LinkHelper::$Session = SessionHelper object
$battleReports = array(
array(
"BattleReport" => array(),
"Game" => array(),
"BattleReportExperience" => array()
),
array(
"BattleReport" => array(),
"Game" => array(),
"BattleReportExperience" => array()
),
array(
"BattleReport" => array(),
"Game" => array(),
"BattleReportExperience" => array()
)
)
$battleReport = array(
"BattleReport" => array(
"id" => "16",
"title_eng" => "Kill Team - Blooded vs. Vespid Stingwings",
"title_hrv" => "Kill Team - Blooded vs. Vespid Stingwings",
"mask_eng" => "kill_team_-_blooded_vs_vespid_stingwings",
"mask_hrv" => "kill_team_-_blooded_vs_vespid_stingwings",
"game_id" => "1",
"fought" => "2025-02-28 16:00:00",
"created" => "2025-03-10 08:53:42",
"modified" => "2025-03-10 08:53:42"
),
"Game" => array(
"id" => "1",
"name_eng" => "GW - Warhammer 40.000",
"name_hrv" => "GW - Warhammer 40.000",
"description_eng" => "<p>
In the grim darkness of the far future, there is only war!</p>
<p>
<a href="http://img.photobucket.com/albums/v467/demonn/Agram-Sajt/40k03_zpsc9a73277.jpg" target="_blank"> <img alt="Click for enlarged picture" src="http://img.photobucket.com/albums/v467/demonn/Agram-Sajt/40k03_zpsc9a73277.jpg" width="600" /> </a> </p>
",
"description_hrv" => "<p>
Warhammer 40000 je strate&scaron;ka igra smje&scaron;tena u daleku budućnost Zemlje, u kojoj preuzimate zapovjedni&scaron;tvo nad vojskama minijatura kako bi prikazali oružane sukobe vojski budućnosti.</p>
<p>
Bitke se vode na stolu uobičajenih dimenzija 120 x 180 cm, na koji se zatim postavlja različit teren kako bi se dočarao izgled pravog boji&scaron;ta. Nakon toga, u uobičajenom scenariju, na suprotne strane stola razmje&scaron;taju se dvije vojske minijatura. Strate&scaron;ki dio igre je vrlo važan jer već samim razmje&scaron;tanjem jedinica na stol možete dobiti veći dio bitke.</p>
<p>
Sada, kada va&scaron;i vojnici preko bojnog polja gledaju u mrskog im neprijatelja, spremni ste poslati naredbu za juri&scaron;, ili se ukopati na poziciji i braniti ono &scaron;to je va&scaron;e (va&scaron;u polovicu drvene ploče prekrivene umjetnim terenom). Kako ne bi nastala zbrka na bojnom polju, igra je podijeljena na poteze, a svaki potez je dodatno podijeljen u faze.<br />
&nbsp;</p>
<p>
<a href="http://img.photobucket.com/albums/v467/demonn/Agram-Sajt/40k03_zpsc9a73277.jpg" target="_blank"> <img alt="Click for enlarged picture" src="http://img.photobucket.com/albums/v467/demonn/Agram-Sajt/40k03_zpsc9a73277.jpg" width="600" /> </a> </p>"
),
"BattleReportExperience" => array(
array()
)
)</pre><pre class="stack-trace">include - APP/views/elements/latestBattleReports.ctp, line 11
View::_render() - CORE/cake/libs/view/view.php, line 736
View::element() - CORE/cake/libs/view/view.php, line 397
include - APP/views/home/index.ctp, line 50
View::_render() - CORE/cake/libs/view/view.php, line 736
View::render() - CORE/cake/libs/view/view.php, line 431
Controller::render() - CORE/cake/libs/controller/controller.php, line 909
Dispatcher::_invoke() - CORE/cake/dispatcher.php, line 207
Dispatcher::dispatch() - CORE/cake/dispatcher.php, line 171
[main] - APP/webroot/index.php, line 86</pre></div></pre><a href="/dok/battle_reports/2025/03/10" class="readMore"></a> <span class="details">
<pre class="cake-debug"><a href="javascript:void(0);" onclick="document.getElementById('cakeErr11-trace').style.display = (document.getElementById('cakeErr11-trace').style.display == 'none' ? '' : 'none');"><b>Notice</b> (8)</a>: Undefined index: name_dok [<b>APP/views/elements/latestBattleReports.ctp</b>, line <b>26</b>]<div id="cakeErr11-trace" class="cake-stack-trace" style="display: none;"><a href="javascript:void(0);" onclick="document.getElementById('cakeErr11-code').style.display = (document.getElementById('cakeErr11-code').style.display == 'none' ? '' : 'none')">Code</a> | <a href="javascript:void(0);" onclick="document.getElementById('cakeErr11-context').style.display = (document.getElementById('cakeErr11-context').style.display == 'none' ? '' : 'none')">Context</a><div id="cakeErr11-code" class="cake-code-dump" style="display: none;"><pre><code><span style="color: #000000"></span></code>
<code><span style="color: #000000"> if (Configure::read() > 0) {</span></code>
<span class="code-highlight"><code><span style="color: #000000"> include ($___viewFn);</span></code></span></pre></div><pre id="cakeErr11-context" class="cake-context" style="display: none;">$___viewFn = "/home/martin/apps/agram/app/views/elements/latestBattleReports.ctp"
$___dataForView = array(
"lang" => "dok",
"otherLangs" => array(
"eng",
"hrv"
),
"globalNav" => array(
array(),
array(),
array(),
array(),
array(),
array(),
array(),
array(),
array(),
array(),
array(),
array(),
array(),
array(),
array(),
array(),
array(),
array(),
array(),
array(),
array(),
array(),
array(),
array(),
array(),
array(),
array()
),
"breadCrumbs" => array(
array()
),
"pageContents" => array(
"home_who_we_are" => null
),
"userData" => null,
"announcements" => array(
array(),
array(),
array()
),
"cache" => array(
"time" => "+1 day",
"key" => "dok"
),
"form" => FormHelper
FormHelper::$helpers = array
FormHelper::$fieldset = array
FormHelper::$__options = array
FormHelper::$fields = array
FormHelper::$requestType = NULL
FormHelper::$defaultModel = NULL
FormHelper::$_inputDefaults = array
FormHelper::$_lastAction = ""
FormHelper::$base = ""
FormHelper::$webroot = "/"
FormHelper::$theme = NULL
FormHelper::$here = "/dok"
FormHelper::$params = array
FormHelper::$action = "index"
FormHelper::$plugin = NULL
FormHelper::$data = NULL
FormHelper::$namedArgs = NULL
FormHelper::$argSeparator = NULL
FormHelper::$validationErrors = NULL
FormHelper::$tags = array
FormHelper::$__tainted = NULL
FormHelper::$__cleaned = NULL
FormHelper::$Html = HtmlHelper object,
"text" => TextHelper
TextHelper::$helpers = NULL
TextHelper::$base = ""
TextHelper::$webroot = "/"
TextHelper::$theme = NULL
TextHelper::$here = "/dok"
TextHelper::$params = array
TextHelper::$action = "index"
TextHelper::$plugin = NULL
TextHelper::$data = NULL
TextHelper::$namedArgs = NULL
TextHelper::$argSeparator = NULL
TextHelper::$validationErrors = NULL
TextHelper::$tags = array
TextHelper::$__tainted = NULL
TextHelper::$__cleaned = NULL,
"stringer" => StringerHelper
StringerHelper::$helpers = array
StringerHelper::$base = ""
StringerHelper::$webroot = "/"
StringerHelper::$theme = NULL
StringerHelper::$here = "/dok"
StringerHelper::$params = array
StringerHelper::$action = "index"
StringerHelper::$plugin = NULL
StringerHelper::$data = NULL
StringerHelper::$namedArgs = NULL
StringerHelper::$argSeparator = NULL
StringerHelper::$validationErrors = NULL
StringerHelper::$tags = array
StringerHelper::$__tainted = NULL
StringerHelper::$__cleaned = NULL
StringerHelper::$Html = HtmlHelper object
StringerHelper::$Link = LinkHelper object
StringerHelper::$Text = TextHelper object,
"menu" => MenuHelper
MenuHelper::$helpers = array
MenuHelper::$base = ""
MenuHelper::$webroot = "/"
MenuHelper::$theme = NULL
MenuHelper::$here = "/dok"
MenuHelper::$params = array
MenuHelper::$action = "index"
MenuHelper::$plugin = NULL
MenuHelper::$data = NULL
MenuHelper::$namedArgs = NULL
MenuHelper::$argSeparator = NULL
MenuHelper::$validationErrors = NULL
MenuHelper::$tags = array
MenuHelper::$__tainted = NULL
MenuHelper::$__cleaned = NULL
MenuHelper::$Link = LinkHelper object,
"session" => SessionHelper
SessionHelper::$helpers = array
SessionHelper::$__active = true
SessionHelper::$valid = false
SessionHelper::$error = false
SessionHelper::$_userAgent = "f9a8355d006790ee743ededbb1f6e3bd"
SessionHelper::$path = "/"
SessionHelper::$lastError = NULL
SessionHelper::$security = "medium"
SessionHelper::$time = 1773314240
SessionHelper::$sessionTime = 1773326240
SessionHelper::$cookieLifeTime = false
SessionHelper::$watchKeys = array
SessionHelper::$id = NULL
SessionHelper::$host = NULL
SessionHelper::$timeout = NULL
SessionHelper::$base = ""
SessionHelper::$webroot = "/"
SessionHelper::$here = "/dok"
SessionHelper::$params = array
SessionHelper::$action = "index"
SessionHelper::$data = NULL
SessionHelper::$theme = NULL
SessionHelper::$plugin = NULL,
"html" => HtmlHelper
HtmlHelper::$tags = array
HtmlHelper::$_crumbs = array
HtmlHelper::$__includedScripts = array
HtmlHelper::$_scriptBlockOptions = array
HtmlHelper::$__docTypes = array
HtmlHelper::$helpers = NULL
HtmlHelper::$base = ""
HtmlHelper::$webroot = "/"
HtmlHelper::$theme = NULL
HtmlHelper::$here = "/dok"
HtmlHelper::$params = array
HtmlHelper::$action = "index"
HtmlHelper::$plugin = NULL
HtmlHelper::$data = NULL
HtmlHelper::$namedArgs = NULL
HtmlHelper::$argSeparator = NULL
HtmlHelper::$validationErrors = NULL
HtmlHelper::$__tainted = NULL
HtmlHelper::$__cleaned = NULL,
"link" => LinkHelper
LinkHelper::$helpers = array
LinkHelper::$lang = "dok"
LinkHelper::$defaultLang = "hrv"
LinkHelper::$base = ""
LinkHelper::$webroot = "/"
LinkHelper::$theme = NULL
LinkHelper::$here = "/dok"
LinkHelper::$params = array
LinkHelper::$action = "index"
LinkHelper::$plugin = NULL
LinkHelper::$data = NULL
LinkHelper::$namedArgs = NULL
LinkHelper::$argSeparator = NULL
LinkHelper::$validationErrors = NULL
LinkHelper::$tags = array
LinkHelper::$__tainted = NULL
LinkHelper::$__cleaned = NULL
LinkHelper::$Html = HtmlHelper object
LinkHelper::$Session = SessionHelper object
)
$loadHelpers = false
$cached = false
$loadedHelpers = array()
$lang = "dok"
$otherLangs = array(
"eng",
"hrv"
)
$globalNav = array(
array(
"Page" => array()
),
array(
"Page" => array()
),
array(
"Page" => array()
),
array(
"Page" => array()
),
array(
"Page" => array()
),
array(
"Page" => array()
),
array(
"Page" => array()
),
array(
"Page" => array()
),
array(
"Page" => array()
),
array(
"Page" => array()
),
array(
"Page" => array()
),
array(
"Page" => array()
),
array(
"Page" => array()
),
array(
"Page" => array()
),
array(
"Page" => array()
),
array(
"Page" => array()
),
array(
"Page" => array()
),
array(
"Page" => array()
),
array(
"Page" => array()
),
array(
"Page" => array()
),
array(
"Page" => array()
),
array(
"Page" => array()
),
array(
"Page" => array()
),
array(
"Page" => array()
),
array(
"Page" => array()
),
array(
"Page" => array()
),
array(
"Page" => array()
)
)
$breadCrumbs = array(
array(
"Page" => array()
)
)
$pageContents = array(
"home_who_we_are" => null
)
$userData = null
$announcements = array(
array(
"Announcement" => array()
),
array(
"Announcement" => array()
),
array(
"Announcement" => array()
)
)
$cache = array(
"time" => "+1 day",
"key" => "dok"
)
$form = FormHelper
FormHelper::$helpers = array
FormHelper::$fieldset = array
FormHelper::$__options = array
FormHelper::$fields = array
FormHelper::$requestType = NULL
FormHelper::$defaultModel = NULL
FormHelper::$_inputDefaults = array
FormHelper::$_lastAction = ""
FormHelper::$base = ""
FormHelper::$webroot = "/"
FormHelper::$theme = NULL
FormHelper::$here = "/dok"
FormHelper::$params = array
FormHelper::$action = "index"
FormHelper::$plugin = NULL
FormHelper::$data = NULL
FormHelper::$namedArgs = NULL
FormHelper::$argSeparator = NULL
FormHelper::$validationErrors = NULL
FormHelper::$tags = array
FormHelper::$__tainted = NULL
FormHelper::$__cleaned = NULL
FormHelper::$Html = HtmlHelper object
$text = TextHelper
TextHelper::$helpers = NULL
TextHelper::$base = ""
TextHelper::$webroot = "/"
TextHelper::$theme = NULL
TextHelper::$here = "/dok"
TextHelper::$params = array
TextHelper::$action = "index"
TextHelper::$plugin = NULL
TextHelper::$data = NULL
TextHelper::$namedArgs = NULL
TextHelper::$argSeparator = NULL
TextHelper::$validationErrors = NULL
TextHelper::$tags = array
TextHelper::$__tainted = NULL
TextHelper::$__cleaned = NULL
$stringer = StringerHelper
StringerHelper::$helpers = array
StringerHelper::$base = ""
StringerHelper::$webroot = "/"
StringerHelper::$theme = NULL
StringerHelper::$here = "/dok"
StringerHelper::$params = array
StringerHelper::$action = "index"
StringerHelper::$plugin = NULL
StringerHelper::$data = NULL
StringerHelper::$namedArgs = NULL
StringerHelper::$argSeparator = NULL
StringerHelper::$validationErrors = NULL
StringerHelper::$tags = array
StringerHelper::$__tainted = NULL
StringerHelper::$__cleaned = NULL
StringerHelper::$Html = HtmlHelper object
StringerHelper::$Link = LinkHelper object
StringerHelper::$Text = TextHelper object
$menu = MenuHelper
MenuHelper::$helpers = array
MenuHelper::$base = ""
MenuHelper::$webroot = "/"
MenuHelper::$theme = NULL
MenuHelper::$here = "/dok"
MenuHelper::$params = array
MenuHelper::$action = "index"
MenuHelper::$plugin = NULL
MenuHelper::$data = NULL
MenuHelper::$namedArgs = NULL
MenuHelper::$argSeparator = NULL
MenuHelper::$validationErrors = NULL
MenuHelper::$tags = array
MenuHelper::$__tainted = NULL
MenuHelper::$__cleaned = NULL
MenuHelper::$Link = LinkHelper object
$session = SessionHelper
SessionHelper::$helpers = array
SessionHelper::$__active = true
SessionHelper::$valid = false
SessionHelper::$error = false
SessionHelper::$_userAgent = "f9a8355d006790ee743ededbb1f6e3bd"
SessionHelper::$path = "/"
SessionHelper::$lastError = NULL
SessionHelper::$security = "medium"
SessionHelper::$time = 1773314240
SessionHelper::$sessionTime = 1773326240
SessionHelper::$cookieLifeTime = false
SessionHelper::$watchKeys = array
SessionHelper::$id = NULL
SessionHelper::$host = NULL
SessionHelper::$timeout = NULL
SessionHelper::$base = ""
SessionHelper::$webroot = "/"
SessionHelper::$here = "/dok"
SessionHelper::$params = array
SessionHelper::$action = "index"
SessionHelper::$data = NULL
SessionHelper::$theme = NULL
SessionHelper::$plugin = NULL
$html = HtmlHelper
HtmlHelper::$tags = array
HtmlHelper::$_crumbs = array
HtmlHelper::$__includedScripts = array
HtmlHelper::$_scriptBlockOptions = array
HtmlHelper::$__docTypes = array
HtmlHelper::$helpers = NULL
HtmlHelper::$base = ""
HtmlHelper::$webroot = "/"
HtmlHelper::$theme = NULL
HtmlHelper::$here = "/dok"
HtmlHelper::$params = array
HtmlHelper::$action = "index"
HtmlHelper::$plugin = NULL
HtmlHelper::$data = NULL
HtmlHelper::$namedArgs = NULL
HtmlHelper::$argSeparator = NULL
HtmlHelper::$validationErrors = NULL
HtmlHelper::$__tainted = NULL
HtmlHelper::$__cleaned = NULL
$link = LinkHelper
LinkHelper::$helpers = array
LinkHelper::$lang = "dok"
LinkHelper::$defaultLang = "hrv"
LinkHelper::$base = ""
LinkHelper::$webroot = "/"
LinkHelper::$theme = NULL
LinkHelper::$here = "/dok"
LinkHelper::$params = array
LinkHelper::$action = "index"
LinkHelper::$plugin = NULL
LinkHelper::$data = NULL
LinkHelper::$namedArgs = NULL
LinkHelper::$argSeparator = NULL
LinkHelper::$validationErrors = NULL
LinkHelper::$tags = array
LinkHelper::$__tainted = NULL
LinkHelper::$__cleaned = NULL
LinkHelper::$Html = HtmlHelper object
LinkHelper::$Session = SessionHelper object
$battleReports = array(
array(
"BattleReport" => array(),
"Game" => array(),
"BattleReportExperience" => array()
),
array(
"BattleReport" => array(),
"Game" => array(),
"BattleReportExperience" => array()
),
array(
"BattleReport" => array(),
"Game" => array(),
"BattleReportExperience" => array()
)
)
$battleReport = array(
"BattleReport" => array(
"id" => "16",
"title_eng" => "Kill Team - Blooded vs. Vespid Stingwings",
"title_hrv" => "Kill Team - Blooded vs. Vespid Stingwings",
"mask_eng" => "kill_team_-_blooded_vs_vespid_stingwings",
"mask_hrv" => "kill_team_-_blooded_vs_vespid_stingwings",
"game_id" => "1",
"fought" => "2025-02-28 16:00:00",
"created" => "2025-03-10 08:53:42",
"modified" => "2025-03-10 08:53:42"
),
"Game" => array(
"id" => "1",
"name_eng" => "GW - Warhammer 40.000",
"name_hrv" => "GW - Warhammer 40.000",
"description_eng" => "<p>
In the grim darkness of the far future, there is only war!</p>
<p>
<a href="http://img.photobucket.com/albums/v467/demonn/Agram-Sajt/40k03_zpsc9a73277.jpg" target="_blank"> <img alt="Click for enlarged picture" src="http://img.photobucket.com/albums/v467/demonn/Agram-Sajt/40k03_zpsc9a73277.jpg" width="600" /> </a> </p>
",
"description_hrv" => "<p>
Warhammer 40000 je strate&scaron;ka igra smje&scaron;tena u daleku budućnost Zemlje, u kojoj preuzimate zapovjedni&scaron;tvo nad vojskama minijatura kako bi prikazali oružane sukobe vojski budućnosti.</p>
<p>
Bitke se vode na stolu uobičajenih dimenzija 120 x 180 cm, na koji se zatim postavlja različit teren kako bi se dočarao izgled pravog boji&scaron;ta. Nakon toga, u uobičajenom scenariju, na suprotne strane stola razmje&scaron;taju se dvije vojske minijatura. Strate&scaron;ki dio igre je vrlo važan jer već samim razmje&scaron;tanjem jedinica na stol možete dobiti veći dio bitke.</p>
<p>
Sada, kada va&scaron;i vojnici preko bojnog polja gledaju u mrskog im neprijatelja, spremni ste poslati naredbu za juri&scaron;, ili se ukopati na poziciji i braniti ono &scaron;to je va&scaron;e (va&scaron;u polovicu drvene ploče prekrivene umjetnim terenom). Kako ne bi nastala zbrka na bojnom polju, igra je podijeljena na poteze, a svaki potez je dodatno podijeljen u faze.<br />
&nbsp;</p>
<p>
<a href="http://img.photobucket.com/albums/v467/demonn/Agram-Sajt/40k03_zpsc9a73277.jpg" target="_blank"> <img alt="Click for enlarged picture" src="http://img.photobucket.com/albums/v467/demonn/Agram-Sajt/40k03_zpsc9a73277.jpg" width="600" /> </a> </p>"
),
"BattleReportExperience" => array(
array()
)
)
$memberString = " and "
$battleReportExperience = array(
"id" => "18",
"battle_report_id" => "16",
"member_id" => "96",
"army_id" => "33",
"intro_eng" => "<p>
This Friday, Luka and I had the opportunity to try out the third edition of the famous Warhammer skirmish game Kill Team, and along the way demonstrate the basics that have remained unchanged. Luka played a team of Vespid Stingwings, a highly mobile T&#39;au unit, and I played the Blooded, a traitor squad that used to belong to the Astra Militarum (in my case they were named Glanton&#39;s Gang). The map, measuring 30x22 inches, was organized so that all terrain was outside of our deployment zones, which were 6 inches from the shorter edges. In the middle of the map, in a slight diagonal, 3 points of interest (objectives) are placed. All this resulted in a very symmetrical setup of operatives &ndash; all Vespids and the entire Blooded gang at the beginning of the game were mirrored hidden behind large pieces of terrain. All buildings with doors were 3 inches high, offering the operatives a Vantage point - the ability to keep one hit die as a success, and the well in the very center, 4 inches high, offers an even better Vantage point, where the operatives keep 2 dice.</p>
<p>
<a href="https://hosting.photobucket.com/95288841-8654-4bf7-8fc9-a4aa78dce87f/e4be55ea-8433-47c7-b28a-459533bba4bc.jpg" target="_blank"><img alt="Click for enlarged picture" src="https://hosting.photobucket.com/95288841-8654-4bf7-8fc9-a4aa78dce87f/e4be55ea-8433-47c7-b28a-459533bba4bc.jpg" width="600" /></a></p>
",
"intro_hrv" => "<p>
Ovaj smo petak Luka i ja imali priliku isprobati treću ediciju poznate Warhammer skirmish igre <em>Kill Team</em> te usput demonstrirati osnove koje su ostale nepromijenjene. Luka je igrao tim Vespid Stingwings, jako mobilne T&#39;au jedinice, a ja sam igrao Blooded, izdajnički odred koji je nekad pripadao Astri Militarum (u mojem su slučaju dobili ime <em>Glantonova banda</em>). Mapa, veličine 30x22 inča, bila je organizirana tako da je sav teren bio van na&scaron;ih deployment zona, koje su iznosile 6 inča od kraćih rubova. Nasred mape, u blagoj dijagonali, postavljene su 3 točke interesa (objectives). Sve je ovo rezultiralo jako simetričnom postavom operativaca &ndash; svi su Vespidi i cijela Blooded banda na početku igre bili zrcaljeno skriveni iza velikih komada terena. Sve građevine s vratima bile su visoke 3 inča, &scaron;to je operativcima nudilo Vantage point &ndash; mogućnost da jednu hit-kockicu zadrže kao uspje&scaron;nu, a bu&scaron;otina u samom centru, visoka 4 inča, nudi jo&scaron; bolji Vantage point, gdje operativci zadržavaju 2 kockice.</p>
<p>
<a href="https://hosting.photobucket.com/95288841-8654-4bf7-8fc9-a4aa78dce87f/e4be55ea-8433-47c7-b28a-459533bba4bc.jpg" target="_blank"><img alt="Click for enlarged picture" src="https://hosting.photobucket.com/95288841-8654-4bf7-8fc9-a4aa78dce87f/e4be55ea-8433-47c7-b28a-459533bba4bc.jpg" width="600" /></a></p>
",
"Member" => array(
"id" => "96",
"group_id" => "2",
"first_name" => "Antoni",
"last_name" => "Pastuović",
"first_name_mask" => "antoni",
"last_name_mask" => "pastuovic",
"username" => "antoni",
"password" => "*****",
"born" => "2005-04-04 18:52:00",
"created" => "2019-04-04 18:53:09"
),
"Army" => array(
"id" => "33",
"game_id" => "1",
"army_alignment_id" => null,
"name_eng" => "Imperial Guard",
"name_hrv" => "Imperial Guard",
"description_eng" => "",
"description_hrv" => ""
)
)</pre><pre class="stack-trace">include - APP/views/elements/latestBattleReports.ctp, line 26
View::_render() - CORE/cake/libs/view/view.php, line 736
View::element() - CORE/cake/libs/view/view.php, line 397
include - APP/views/home/index.ctp, line 50
View::_render() - CORE/cake/libs/view/view.php, line 736
View::render() - CORE/cake/libs/view/view.php, line 431
Controller::render() - CORE/cake/libs/controller/controller.php, line 909
Dispatcher::_invoke() - CORE/cake/dispatcher.php, line 207
Dispatcher::dispatch() - CORE/cake/dispatcher.php, line 171
[main] - APP/webroot/index.php, line 86</pre></div></pre><pre class="cake-debug"><a href="javascript:void(0);" onclick="document.getElementById('cakeErr12-trace').style.display = (document.getElementById('cakeErr12-trace').style.display == 'none' ? '' : 'none');"><b>Notice</b> (8)</a>: Undefined index: name_dok [<b>APP/views/elements/latestBattleReports.ctp</b>, line <b>29</b>]<div id="cakeErr12-trace" class="cake-stack-trace" style="display: none;"><a href="javascript:void(0);" onclick="document.getElementById('cakeErr12-code').style.display = (document.getElementById('cakeErr12-code').style.display == 'none' ? '' : 'none')">Code</a> | <a href="javascript:void(0);" onclick="document.getElementById('cakeErr12-context').style.display = (document.getElementById('cakeErr12-context').style.display == 'none' ? '' : 'none')">Context</a><div id="cakeErr12-code" class="cake-code-dump" style="display: none;"><pre><code><span style="color: #000000"></span></code>
<code><span style="color: #000000"> if (Configure::read() > 0) {</span></code>
<span class="code-highlight"><code><span style="color: #000000"> include ($___viewFn);</span></code></span></pre></div><pre id="cakeErr12-context" class="cake-context" style="display: none;">$___viewFn = "/home/martin/apps/agram/app/views/elements/latestBattleReports.ctp"
$___dataForView = array(
"lang" => "dok",
"otherLangs" => array(
"eng",
"hrv"
),
"globalNav" => array(
array(),
array(),
array(),
array(),
array(),
array(),
array(),
array(),
array(),
array(),
array(),
array(),
array(),
array(),
array(),
array(),
array(),
array(),
array(),
array(),
array(),
array(),
array(),
array(),
array(),
array(),
array()
),
"breadCrumbs" => array(
array()
),
"pageContents" => array(
"home_who_we_are" => null
),
"userData" => null,
"announcements" => array(
array(),
array(),
array()
),
"cache" => array(
"time" => "+1 day",
"key" => "dok"
),
"form" => FormHelper
FormHelper::$helpers = array
FormHelper::$fieldset = array
FormHelper::$__options = array
FormHelper::$fields = array
FormHelper::$requestType = NULL
FormHelper::$defaultModel = NULL
FormHelper::$_inputDefaults = array
FormHelper::$_lastAction = ""
FormHelper::$base = ""
FormHelper::$webroot = "/"
FormHelper::$theme = NULL
FormHelper::$here = "/dok"
FormHelper::$params = array
FormHelper::$action = "index"
FormHelper::$plugin = NULL
FormHelper::$data = NULL
FormHelper::$namedArgs = NULL
FormHelper::$argSeparator = NULL
FormHelper::$validationErrors = NULL
FormHelper::$tags = array
FormHelper::$__tainted = NULL
FormHelper::$__cleaned = NULL
FormHelper::$Html = HtmlHelper object,
"text" => TextHelper
TextHelper::$helpers = NULL
TextHelper::$base = ""
TextHelper::$webroot = "/"
TextHelper::$theme = NULL
TextHelper::$here = "/dok"
TextHelper::$params = array
TextHelper::$action = "index"
TextHelper::$plugin = NULL
TextHelper::$data = NULL
TextHelper::$namedArgs = NULL
TextHelper::$argSeparator = NULL
TextHelper::$validationErrors = NULL
TextHelper::$tags = array
TextHelper::$__tainted = NULL
TextHelper::$__cleaned = NULL,
"stringer" => StringerHelper
StringerHelper::$helpers = array
StringerHelper::$base = ""
StringerHelper::$webroot = "/"
StringerHelper::$theme = NULL
StringerHelper::$here = "/dok"
StringerHelper::$params = array
StringerHelper::$action = "index"
StringerHelper::$plugin = NULL
StringerHelper::$data = NULL
StringerHelper::$namedArgs = NULL
StringerHelper::$argSeparator = NULL
StringerHelper::$validationErrors = NULL
StringerHelper::$tags = array
StringerHelper::$__tainted = NULL
StringerHelper::$__cleaned = NULL
StringerHelper::$Html = HtmlHelper object
StringerHelper::$Link = LinkHelper object
StringerHelper::$Text = TextHelper object,
"menu" => MenuHelper
MenuHelper::$helpers = array
MenuHelper::$base = ""
MenuHelper::$webroot = "/"
MenuHelper::$theme = NULL
MenuHelper::$here = "/dok"
MenuHelper::$params = array
MenuHelper::$action = "index"
MenuHelper::$plugin = NULL
MenuHelper::$data = NULL
MenuHelper::$namedArgs = NULL
MenuHelper::$argSeparator = NULL
MenuHelper::$validationErrors = NULL
MenuHelper::$tags = array
MenuHelper::$__tainted = NULL
MenuHelper::$__cleaned = NULL
MenuHelper::$Link = LinkHelper object,
"session" => SessionHelper
SessionHelper::$helpers = array
SessionHelper::$__active = true
SessionHelper::$valid = false
SessionHelper::$error = false
SessionHelper::$_userAgent = "f9a8355d006790ee743ededbb1f6e3bd"
SessionHelper::$path = "/"
SessionHelper::$lastError = NULL
SessionHelper::$security = "medium"
SessionHelper::$time = 1773314240
SessionHelper::$sessionTime = 1773326240
SessionHelper::$cookieLifeTime = false
SessionHelper::$watchKeys = array
SessionHelper::$id = NULL
SessionHelper::$host = NULL
SessionHelper::$timeout = NULL
SessionHelper::$base = ""
SessionHelper::$webroot = "/"
SessionHelper::$here = "/dok"
SessionHelper::$params = array
SessionHelper::$action = "index"
SessionHelper::$data = NULL
SessionHelper::$theme = NULL
SessionHelper::$plugin = NULL,
"html" => HtmlHelper
HtmlHelper::$tags = array
HtmlHelper::$_crumbs = array
HtmlHelper::$__includedScripts = array
HtmlHelper::$_scriptBlockOptions = array
HtmlHelper::$__docTypes = array
HtmlHelper::$helpers = NULL
HtmlHelper::$base = ""
HtmlHelper::$webroot = "/"
HtmlHelper::$theme = NULL
HtmlHelper::$here = "/dok"
HtmlHelper::$params = array
HtmlHelper::$action = "index"
HtmlHelper::$plugin = NULL
HtmlHelper::$data = NULL
HtmlHelper::$namedArgs = NULL
HtmlHelper::$argSeparator = NULL
HtmlHelper::$validationErrors = NULL
HtmlHelper::$__tainted = NULL
HtmlHelper::$__cleaned = NULL,
"link" => LinkHelper
LinkHelper::$helpers = array
LinkHelper::$lang = "dok"
LinkHelper::$defaultLang = "hrv"
LinkHelper::$base = ""
LinkHelper::$webroot = "/"
LinkHelper::$theme = NULL
LinkHelper::$here = "/dok"
LinkHelper::$params = array
LinkHelper::$action = "index"
LinkHelper::$plugin = NULL
LinkHelper::$data = NULL
LinkHelper::$namedArgs = NULL
LinkHelper::$argSeparator = NULL
LinkHelper::$validationErrors = NULL
LinkHelper::$tags = array
LinkHelper::$__tainted = NULL
LinkHelper::$__cleaned = NULL
LinkHelper::$Html = HtmlHelper object
LinkHelper::$Session = SessionHelper object
)
$loadHelpers = false
$cached = false
$loadedHelpers = array()
$lang = "dok"
$otherLangs = array(
"eng",
"hrv"
)
$globalNav = array(
array(
"Page" => array()
),
array(
"Page" => array()
),
array(
"Page" => array()
),
array(
"Page" => array()
),
array(
"Page" => array()
),
array(
"Page" => array()
),
array(
"Page" => array()
),
array(
"Page" => array()
),
array(
"Page" => array()
),
array(
"Page" => array()
),
array(
"Page" => array()
),
array(
"Page" => array()
),
array(
"Page" => array()
),
array(
"Page" => array()
),
array(
"Page" => array()
),
array(
"Page" => array()
),
array(
"Page" => array()
),
array(
"Page" => array()
),
array(
"Page" => array()
),
array(
"Page" => array()
),
array(
"Page" => array()
),
array(
"Page" => array()
),
array(
"Page" => array()
),
array(
"Page" => array()
),
array(
"Page" => array()
),
array(
"Page" => array()
),
array(
"Page" => array()
)
)
$breadCrumbs = array(
array(
"Page" => array()
)
)
$pageContents = array(
"home_who_we_are" => null
)
$userData = null
$announcements = array(
array(
"Announcement" => array()
),
array(
"Announcement" => array()
),
array(
"Announcement" => array()
)
)
$cache = array(
"time" => "+1 day",
"key" => "dok"
)
$form = FormHelper
FormHelper::$helpers = array
FormHelper::$fieldset = array
FormHelper::$__options = array
FormHelper::$fields = array
FormHelper::$requestType = NULL
FormHelper::$defaultModel = NULL
FormHelper::$_inputDefaults = array
FormHelper::$_lastAction = ""
FormHelper::$base = ""
FormHelper::$webroot = "/"
FormHelper::$theme = NULL
FormHelper::$here = "/dok"
FormHelper::$params = array
FormHelper::$action = "index"
FormHelper::$plugin = NULL
FormHelper::$data = NULL
FormHelper::$namedArgs = NULL
FormHelper::$argSeparator = NULL
FormHelper::$validationErrors = NULL
FormHelper::$tags = array
FormHelper::$__tainted = NULL
FormHelper::$__cleaned = NULL
FormHelper::$Html = HtmlHelper object
$text = TextHelper
TextHelper::$helpers = NULL
TextHelper::$base = ""
TextHelper::$webroot = "/"
TextHelper::$theme = NULL
TextHelper::$here = "/dok"
TextHelper::$params = array
TextHelper::$action = "index"
TextHelper::$plugin = NULL
TextHelper::$data = NULL
TextHelper::$namedArgs = NULL
TextHelper::$argSeparator = NULL
TextHelper::$validationErrors = NULL
TextHelper::$tags = array
TextHelper::$__tainted = NULL
TextHelper::$__cleaned = NULL
$stringer = StringerHelper
StringerHelper::$helpers = array
StringerHelper::$base = ""
StringerHelper::$webroot = "/"
StringerHelper::$theme = NULL
StringerHelper::$here = "/dok"
StringerHelper::$params = array
StringerHelper::$action = "index"
StringerHelper::$plugin = NULL
StringerHelper::$data = NULL
StringerHelper::$namedArgs = NULL
StringerHelper::$argSeparator = NULL
StringerHelper::$validationErrors = NULL
StringerHelper::$tags = array
StringerHelper::$__tainted = NULL
StringerHelper::$__cleaned = NULL
StringerHelper::$Html = HtmlHelper object
StringerHelper::$Link = LinkHelper object
StringerHelper::$Text = TextHelper object
$menu = MenuHelper
MenuHelper::$helpers = array
MenuHelper::$base = ""
MenuHelper::$webroot = "/"
MenuHelper::$theme = NULL
MenuHelper::$here = "/dok"
MenuHelper::$params = array
MenuHelper::$action = "index"
MenuHelper::$plugin = NULL
MenuHelper::$data = NULL
MenuHelper::$namedArgs = NULL
MenuHelper::$argSeparator = NULL
MenuHelper::$validationErrors = NULL
MenuHelper::$tags = array
MenuHelper::$__tainted = NULL
MenuHelper::$__cleaned = NULL
MenuHelper::$Link = LinkHelper object
$session = SessionHelper
SessionHelper::$helpers = array
SessionHelper::$__active = true
SessionHelper::$valid = false
SessionHelper::$error = false
SessionHelper::$_userAgent = "f9a8355d006790ee743ededbb1f6e3bd"
SessionHelper::$path = "/"
SessionHelper::$lastError = NULL
SessionHelper::$security = "medium"
SessionHelper::$time = 1773314240
SessionHelper::$sessionTime = 1773326240
SessionHelper::$cookieLifeTime = false
SessionHelper::$watchKeys = array
SessionHelper::$id = NULL
SessionHelper::$host = NULL
SessionHelper::$timeout = NULL
SessionHelper::$base = ""
SessionHelper::$webroot = "/"
SessionHelper::$here = "/dok"
SessionHelper::$params = array
SessionHelper::$action = "index"
SessionHelper::$data = NULL
SessionHelper::$theme = NULL
SessionHelper::$plugin = NULL
$html = HtmlHelper
HtmlHelper::$tags = array
HtmlHelper::$_crumbs = array
HtmlHelper::$__includedScripts = array
HtmlHelper::$_scriptBlockOptions = array
HtmlHelper::$__docTypes = array
HtmlHelper::$helpers = NULL
HtmlHelper::$base = ""
HtmlHelper::$webroot = "/"
HtmlHelper::$theme = NULL
HtmlHelper::$here = "/dok"
HtmlHelper::$params = array
HtmlHelper::$action = "index"
HtmlHelper::$plugin = NULL
HtmlHelper::$data = NULL
HtmlHelper::$namedArgs = NULL
HtmlHelper::$argSeparator = NULL
HtmlHelper::$validationErrors = NULL
HtmlHelper::$__tainted = NULL
HtmlHelper::$__cleaned = NULL
$link = LinkHelper
LinkHelper::$helpers = array
LinkHelper::$lang = "dok"
LinkHelper::$defaultLang = "hrv"
LinkHelper::$base = ""
LinkHelper::$webroot = "/"
LinkHelper::$theme = NULL
LinkHelper::$here = "/dok"
LinkHelper::$params = array
LinkHelper::$action = "index"
LinkHelper::$plugin = NULL
LinkHelper::$data = NULL
LinkHelper::$namedArgs = NULL
LinkHelper::$argSeparator = NULL
LinkHelper::$validationErrors = NULL
LinkHelper::$tags = array
LinkHelper::$__tainted = NULL
LinkHelper::$__cleaned = NULL
LinkHelper::$Html = HtmlHelper object
LinkHelper::$Session = SessionHelper object
$battleReports = array(
array(
"BattleReport" => array(),
"Game" => array(),
"BattleReportExperience" => array()
),
array(
"BattleReport" => array(),
"Game" => array(),
"BattleReportExperience" => array()
),
array(
"BattleReport" => array(),
"Game" => array(),
"BattleReportExperience" => array()
)
)
$battleReport = array(
"BattleReport" => array(
"id" => "16",
"title_eng" => "Kill Team - Blooded vs. Vespid Stingwings",
"title_hrv" => "Kill Team - Blooded vs. Vespid Stingwings",
"mask_eng" => "kill_team_-_blooded_vs_vespid_stingwings",
"mask_hrv" => "kill_team_-_blooded_vs_vespid_stingwings",
"game_id" => "1",
"fought" => "2025-02-28 16:00:00",
"created" => "2025-03-10 08:53:42",
"modified" => "2025-03-10 08:53:42"
),
"Game" => array(
"id" => "1",
"name_eng" => "GW - Warhammer 40.000",
"name_hrv" => "GW - Warhammer 40.000",
"description_eng" => "<p>
In the grim darkness of the far future, there is only war!</p>
<p>
<a href="http://img.photobucket.com/albums/v467/demonn/Agram-Sajt/40k03_zpsc9a73277.jpg" target="_blank"> <img alt="Click for enlarged picture" src="http://img.photobucket.com/albums/v467/demonn/Agram-Sajt/40k03_zpsc9a73277.jpg" width="600" /> </a> </p>
",
"description_hrv" => "<p>
Warhammer 40000 je strate&scaron;ka igra smje&scaron;tena u daleku budućnost Zemlje, u kojoj preuzimate zapovjedni&scaron;tvo nad vojskama minijatura kako bi prikazali oružane sukobe vojski budućnosti.</p>
<p>
Bitke se vode na stolu uobičajenih dimenzija 120 x 180 cm, na koji se zatim postavlja različit teren kako bi se dočarao izgled pravog boji&scaron;ta. Nakon toga, u uobičajenom scenariju, na suprotne strane stola razmje&scaron;taju se dvije vojske minijatura. Strate&scaron;ki dio igre je vrlo važan jer već samim razmje&scaron;tanjem jedinica na stol možete dobiti veći dio bitke.</p>
<p>
Sada, kada va&scaron;i vojnici preko bojnog polja gledaju u mrskog im neprijatelja, spremni ste poslati naredbu za juri&scaron;, ili se ukopati na poziciji i braniti ono &scaron;to je va&scaron;e (va&scaron;u polovicu drvene ploče prekrivene umjetnim terenom). Kako ne bi nastala zbrka na bojnom polju, igra je podijeljena na poteze, a svaki potez je dodatno podijeljen u faze.<br />
&nbsp;</p>
<p>
<a href="http://img.photobucket.com/albums/v467/demonn/Agram-Sajt/40k03_zpsc9a73277.jpg" target="_blank"> <img alt="Click for enlarged picture" src="http://img.photobucket.com/albums/v467/demonn/Agram-Sajt/40k03_zpsc9a73277.jpg" width="600" /> </a> </p>"
),
"BattleReportExperience" => array(
array()
)
)
$memberString = " and <a href="/dok/members/antoni.pastuovic">Antoni Pastuović</a> ()"
$battleReportExperience = array(
"id" => "18",
"battle_report_id" => "16",
"member_id" => "96",
"army_id" => "33",
"intro_eng" => "<p>
This Friday, Luka and I had the opportunity to try out the third edition of the famous Warhammer skirmish game Kill Team, and along the way demonstrate the basics that have remained unchanged. Luka played a team of Vespid Stingwings, a highly mobile T&#39;au unit, and I played the Blooded, a traitor squad that used to belong to the Astra Militarum (in my case they were named Glanton&#39;s Gang). The map, measuring 30x22 inches, was organized so that all terrain was outside of our deployment zones, which were 6 inches from the shorter edges. In the middle of the map, in a slight diagonal, 3 points of interest (objectives) are placed. All this resulted in a very symmetrical setup of operatives &ndash; all Vespids and the entire Blooded gang at the beginning of the game were mirrored hidden behind large pieces of terrain. All buildings with doors were 3 inches high, offering the operatives a Vantage point - the ability to keep one hit die as a success, and the well in the very center, 4 inches high, offers an even better Vantage point, where the operatives keep 2 dice.</p>
<p>
<a href="https://hosting.photobucket.com/95288841-8654-4bf7-8fc9-a4aa78dce87f/e4be55ea-8433-47c7-b28a-459533bba4bc.jpg" target="_blank"><img alt="Click for enlarged picture" src="https://hosting.photobucket.com/95288841-8654-4bf7-8fc9-a4aa78dce87f/e4be55ea-8433-47c7-b28a-459533bba4bc.jpg" width="600" /></a></p>
",
"intro_hrv" => "<p>
Ovaj smo petak Luka i ja imali priliku isprobati treću ediciju poznate Warhammer skirmish igre <em>Kill Team</em> te usput demonstrirati osnove koje su ostale nepromijenjene. Luka je igrao tim Vespid Stingwings, jako mobilne T&#39;au jedinice, a ja sam igrao Blooded, izdajnički odred koji je nekad pripadao Astri Militarum (u mojem su slučaju dobili ime <em>Glantonova banda</em>). Mapa, veličine 30x22 inča, bila je organizirana tako da je sav teren bio van na&scaron;ih deployment zona, koje su iznosile 6 inča od kraćih rubova. Nasred mape, u blagoj dijagonali, postavljene su 3 točke interesa (objectives). Sve je ovo rezultiralo jako simetričnom postavom operativaca &ndash; svi su Vespidi i cijela Blooded banda na početku igre bili zrcaljeno skriveni iza velikih komada terena. Sve građevine s vratima bile su visoke 3 inča, &scaron;to je operativcima nudilo Vantage point &ndash; mogućnost da jednu hit-kockicu zadrže kao uspje&scaron;nu, a bu&scaron;otina u samom centru, visoka 4 inča, nudi jo&scaron; bolji Vantage point, gdje operativci zadržavaju 2 kockice.</p>
<p>
<a href="https://hosting.photobucket.com/95288841-8654-4bf7-8fc9-a4aa78dce87f/e4be55ea-8433-47c7-b28a-459533bba4bc.jpg" target="_blank"><img alt="Click for enlarged picture" src="https://hosting.photobucket.com/95288841-8654-4bf7-8fc9-a4aa78dce87f/e4be55ea-8433-47c7-b28a-459533bba4bc.jpg" width="600" /></a></p>
",
"Member" => array(
"id" => "96",
"group_id" => "2",
"first_name" => "Antoni",
"last_name" => "Pastuović",
"first_name_mask" => "antoni",
"last_name_mask" => "pastuovic",
"username" => "antoni",
"password" => "*****",
"born" => "2005-04-04 18:52:00",
"created" => "2019-04-04 18:53:09"
),
"Army" => array(
"id" => "33",
"game_id" => "1",
"army_alignment_id" => null,
"name_eng" => "Imperial Guard",
"name_hrv" => "Imperial Guard",
"description_eng" => "",
"description_hrv" => ""
)
)
$dateFought = "28<span class="superscript">th</span> February 2025"</pre><pre class="stack-trace">include - APP/views/elements/latestBattleReports.ctp, line 29
View::_render() - CORE/cake/libs/view/view.php, line 736
View::element() - CORE/cake/libs/view/view.php, line 397
include - APP/views/home/index.ctp, line 50
View::_render() - CORE/cake/libs/view/view.php, line 736
View::render() - CORE/cake/libs/view/view.php, line 431
Controller::render() - CORE/cake/libs/controller/controller.php, line 909
Dispatcher::_invoke() - CORE/cake/dispatcher.php, line 207
Dispatcher::dispatch() - CORE/cake/dispatcher.php, line 171
[main] - APP/webroot/index.php, line 86</pre></div></pre>28<span class="superscript">th</span> February 2025, , and <a href="/dok/members/antoni.pastuovic">Antoni Pastuović</a> () </span>
</li>
<li>
<a href="/dok/battle_reports/2022/05/09" class="readMore"></a> <span class="details">
22<span class="superscript">nd</span> April 2022, , <a href="/dok/members/borna.plese">Borna Pleše</a> () and <a href="/dok/members/kristijan.kliska">Kristijan Kliska</a> () </span>
</li>
<li>
<a href="/dok/battle_reports/2021/11/26" class="readMore"></a> <span class="details">
17<span class="superscript">th</span> November 2021, , and <a href="/dok/members/nino.marasovic">Nino Marasović</a> () </span>
</li>
</ul>
<p><a href="/dok/battle_reports">more_battle_reports</a></p> <div class="fb-like-box" data-href="http://www.facebook.com/UmsAgram" data-width="200" data-show-faces="true" data-stream="true" data-header="true"></div>
</div>
<div id="rightColumn">
<h2>who_are_we</h2>
<h2>friends_and_sponsors</h2>
<div style="padding-bottom: 10px;">
<a href="http://www.zagreb.hr">
<img src="/img/sponsors/zagreb.png" width="300" alt="Grad Zagreb"/>
</a>
</div>
<div style="padding-bottom: 10px;">
<a href="http://zagrebacka.policija.hr/">
<img src="/img/sponsors/mup.png" width="300" alt="MUP"/>
</a>
</div>
<div style="padding-bottom: 10px;">
<a href="http://www.morh.hr/hr/morh-u-zajednici/kultura/">
<img src="/img/sponsors/morh.png" width="300" alt="MORH"/>
</a>
</div>
<div style="padding-bottom: 10px;">
<a href="http://www.cartamagica.hr">
<img src="/img/sponsors/cartamagica300_zps31870fe8.jpg" width="300" alt="Carta Magica"/>
</a>
</div>
<div style="padding-bottom: 10px;">
<a href="https://gardensofhecate.com/">
<img src="https://hosting.photobucket.com/images/v467/demonn/gardens.jpg" width="300" alt="Gardens"/>
</a>
</div>
<div style="padding-bottom: 10px;">
<a href="http://www.artzumbur.hr/">
<img src="/img/sponsors/zumbur.png" width="300" alt="Art Zumbur"/>
</a>
</div>
<div style="padding-bottom: 10px;">
<a href="https://makete.eu/">
<img src="https://hosting.photobucket.com/images/v467/demonn/Hobbychest.png" width="300" alt="HobbyChest"/>
</a>
</div>
<div style="padding-bottom: 10px;">
<a href="https://www.facebook.com/CherryTreeZagreb">
<img src="https://hosting.photobucket.com/images/v467/demonn/CherryTree.png" width="300" alt="CherryTree"/>
</a>
</div>
<div style="padding-bottom: 10px;">
<a href="https://www.instagram.com/swood.si/">
<img src="https://hosting.photobucket.com/95288841-8654-4bf7-8fc9-a4aa78dce87f/2abbad87-444e-4b3a-b532-5b29efe8e4f2.png" width="300" alt="Swood"/>
</a>
</div>
<div style="padding-bottom: 10px;">
<a href="https://www.fireballfigurines.com/">
<img src="https://hosting.photobucket.com/95288841-8654-4bf7-8fc9-a4aa78dce87f/82c70756-04a1-41bb-b537-e2da018e764e.png" width="300" alt="fireball"/>
</a>
</div>
<div style="padding-bottom: 10px;">
<a href="https://nordlysminiatures.com/">
<img src="https://hosting.photobucket.com/images/v467/demonn/nordlyslogo.png" width="300" alt="nordlys"/>
</a>
</div>
<div style="padding-bottom: 10px;">
<a href="https://www.bestiarumgames.com/">
<img src="https://hosting.photobucket.com/images/v467/demonn/bestiarum.png" width="300" alt="bestiarum"/>
</a>
</div>
<div style="padding-bottom: 10px;">
<a href="https://shop.ramshacklegames.co.uk/">
<img src="https://hosting.photobucket.com/images/v467/demonn/ramshackle.png" width="300" alt="ramshackle"/>
</a>
</div>
<div style="padding-bottom: 10px;">
<a href="https://btb-tutorials.com/">
<img src="https://hosting.photobucket.com/images/v467/demonn/logob2b.png" width="300" alt="b2b"/>
</a>
</div>
<div style="padding-bottom: 10px;">
<a href="https://www.miniatures.si/">
<img src="https://hosting.photobucket.com/images/v467/demonn/logominiatures-si.png" width="300" alt="miniatures-si"/>
</a>
</div>
<div style="padding-bottom: 10px;">
<a href="http://thebigbearminiatures.unas.hu/en/">
<img src="https://hosting.photobucket.com/images/v467/demonn/BigBear.jpg" width="300" alt="bigbear"/>
</a>
</div>
<div style="padding-bottom: 10px;">
<a href="https://www.facebook.com/p/Zone-Miniatures-100063970506568/">
<img src="https://hosting.photobucket.com/images/v467/demonn/ZoneMin.jpg" width="300" alt="zone"/>
</a>
</div>
<div style="padding-bottom: 10px;">
<a href="https://www.mrleesminis.com/">
<img src="/img/sponsors/mrleeminis.jpg" width="300" alt="mrlee"/>
</a>
</div>
<div style="padding-bottom: 10px;">
<a href="https://crecymodels.com/">
<img src="https://hosting.photobucket.com/images/v467/demonn/crecymodels.png" width="300" alt="Crecy"/>
</a>
</div>
<div style="padding-bottom: 10px;">
<a href="https://www.scientificmodels.shop/">
<img src="https://hosting.photobucket.com/images/v467/demonn/scientificmini.png" width="300" alt="Scientific"/>
</a>
</div>
<div style="padding-bottom: 10px;">
<a href="https://www.foundminiatures.com/home">
<img src="https://hosting.photobucket.com/images/v467/demonn/found.png" width="300" alt="Found"/>
</a>
</div>
<div style="padding-bottom: 10px;">
<a href="https://www.mkontraros.com/">
<img src="/img/sponsors/kontraros.jpg" width="300" alt="Kontraros"/>
</a>
</div>
<div style="padding-bottom: 10px;">
<a href="http://www.martinwelberg.nl/">
<img src="https://img.photobucket.com/albums/v467/demonn/sponzori/welberg.jpg" width="300" alt="Welberg"/>
</a>
</div>
<div style="padding-bottom: 10px;">
<a href="https://www.dioramapresepe.com/en/shop/">
<img src="https://img.photobucket.com/albums/v467/demonn/sponzori/dioramapresepe.png" width="300" alt="DioramaPresepe"/>
</a>
<div style="padding-bottom: 10px;">
<a href="https://www.greymountainreviews.co.uk/">
<img src="https://hosting.photobucket.com/images/v467/demonn/GMR.png" width="300" alt="GMR"/>
</a>
</div><div style="padding-bottom: 10px;">
<a href="http://triglav-model.simplesite.com/">
<img src="/img/sponsors/Triglav.jpg" width="300" alt="Triglav Model"/>
</a>
</div>
<div style="padding-bottom: 10px;">
<a href="https://magicomens.com/?utm_medium=referral&utm_source=website&utm_campaign=banner&utm_term=ums-agram&utm_content=organic-hr">
<img src="https://hosting.photobucket.com/images/v467/demonn/magicomens.png" width="300" alt="MagicOmens"/>
</a>
</div>
<div style="padding-bottom: 10px;">
<a href="http://www.hostel-bureau.eu/">
<img src="http://img.photobucket.com/albums/v467/demonn/sponzori/bureau1.jpg" width="300" alt="BureauHostelZagreb"/>
</a>
</div>
<div style="padding-bottom: 10px;">
<a href="https://diyconnect.net/">
<img src="https://img.photobucket.com/albums/v467/demonn/sponzori/DIYconnect.png" width="300" alt="DIYConnect"/>
</a>
</div>
<div style="padding-bottom: 10px;">
<a href="http://www.shop.battlefield-berlin.de/">
<img src="/img/sponsors/BBlogo.jpg" width="300" alt="Battlefieldberlin"/>
</a>
</div>
<div style="padding-bottom: 10px;">
<a href="http://www.cartoonminiatures.com/">
<img src="https://img.photobucket.com/albums/v467/demonn/sponzori/scalebro.png" width="300" alt="Cartoon Miniatures"/>
</a>
</div>
<div style="padding-bottom: 10px">
<a href="http://www.shop.microartstudio.com">
<img src="/img/sponsors/MAS_logo_small.png" width="300" alt="MicroArt Studio"/>
</a>
</div>
<div style="padding-bottom: 10px;">
<a href="https://www.secretweaponminiatures.com/">
<img src="http://img.photobucket.com/albums/v467/demonn/sponzori/SecretWeapon.jpg" width="300" alt="Secret Weapon Miniatures"/>
</a>
</div>
<div style="padding-bottom: 10px;">
<a href="http://www.greenstuffworld.com/en/">
<img src="http://img.photobucket.com/albums/v467/demonn/sponzori/GSW.jpg.png" width="300" alt="GSW"/>
</a>
</div>
<div style="padding-bottom: 10px;">
<a href="http://www.gamersgrass.com/">
<img src="https://img.photobucket.com/albums/v467/demonn/sponzori/gamersgrass.png" width="300" alt="Gamers Grass"/>
</a>
</div>
<div style="padding-bottom: 10px;">
<a href="https://www.facebook.com/pg/UO.Artefakt/about/?ref=page_internal">
<img src="http://img.photobucket.com/albums/v467/demonn/sponzori/artefakt.png" width="300" alt="Artefakt"/>
</a>
</div>
<div style="padding-bottom: 10px;">
<a href="http://www.savageforgedminis.de/">
<img src="http://img.photobucket.com/albums/v467/demonn/sponzori/SFM2015.gif" width="300" alt="Savage Forged Minis"/>
</a>
</div>
<div style="padding-bottom: 10px;">
<a href="http://www.brokentoad.co.uk/">
<img src="http://img.photobucket.com/albums/v467/demonn/sponzori/brokentoad.png" width="300" alt="Ebenezers Emporium"/>
</a>
</div>
<div style="padding-bottom: 10px;">
<a href="http://zealotminiatures.com/">
<img src="http://img.photobucket.com/albums/v467/demonn/sponzori/Zealot.jpg" width="300" alt="Zealot"/>
</a>
</div>
<div style="padding-bottom: 10px;">
<a href="http://www.customeeple.com/">
<img src="http://img.photobucket.com/albums/v467/demonn/sponzori/customeeple02.png" width="300" alt="Customeeple"/>
</a>
</div>
<div style="padding-bottom: 10px;">
<a href="http://www.gamemat.eu/">
<img src="https://img.photobucket.com/albums/v467/demonn/sponzori/gamemat.png" width="300" alt="Gamemat"/>
</a>
</div>
<div style="padding-bottom: 10px;">
<a href="http://www.prvidojam.eu/">
<img src="http://img.photobucket.com/albums/v467/demonn/logoWEBretina21.png" width="300" alt="Prvi dojam"/>
</a>
</div>
<div style="padding-bottom: 10px;">
<a href="http://www.infamyminiatures.com/">
<img src="/img/sponsors/infamyLogo.jpg" width="300" alt="Infamy Miniatures"/>
</a>
</div>
<div style="padding-bottom: 10px;">
<a href="http://www.modeldisplayproducts.co.uk">
<img src="http://img.photobucket.com/albums/v467/demonn/sponzori/MDP.gif" width="300" alt="Wamp"/>
</a>
</div>
<div style="padding-bottom: 10px;">
<a href="http://www.wolfdesign.hr/">
<img src="http://img.photobucket.com/albums/v467/demonn/sponzori/WD01.png" width="300" alt="wolfdesign"/>
</a>
</div>
<div style="padding-bottom: 10px;">
<a href="http://www.wampstore.com/store">
<img src="/img/sponsors/wamp.png" width="300" alt="Wamp"/>
</a>
</div>
<div style="padding-bottom: 10px;">
<a href="http://www.tabletop-world.com/">
<img src="http://img.photobucket.com/albums/v467/demonn/sponzori/ttw.png" width="300" alt="TabletopWorld"/>
</a>
</div>
<div style="padding-bottom: 10px;">
<a href="http://www.figurepaintermagazine.co.uk/">
<img src="/img/sponsors/FPM_Logo300_zps2ff0954a.png" width="300" alt="Figure Painter Magazine"/>
</a>
</div>
<div style="padding-bottom: 10px;">
<a href="http://sciborminiatures.com/">
<img src="http://img.photobucket.com/albums/v467/demonn/sponzori/sciborlogo.jpg" width="300" alt="scibor"/>
</a>
</div>
<div style="padding-bottom: 10px;">
<a href="http://www.mrblackpublications.com//">
<img src="http://img.photobucket.com/albums/v467/demonn/sponzori/mrblackpub-1.jpg" width="300" alt="mrblackpublications"/>
</a>
</div>
<div style="padding-bottom: 10px;">
<a href="http://cro-hobby.com/">
<img src="/img/sponsors/ch1.jpg" width="300" alt="crohobby"/>
</a>
</div>
<div style="padding-bottom: 10px;">
<a href="http://www.leo-modeli.hr/">
<img src="/img/sponsors/leomodeli.png" width="300" alt="Leo Modeli"/>
</a>
</div>
<div style="padding-bottom: 10px;">
<a href="http://www.terriblekidsstuff.com">
<img src="/img/sponsors/terribleKS_logo.png" width="300" alt="Terrible Kids Stuff"/>
</a>
</div>
<div style="padding-bottom: 10px;">
<a href="http://www.scale75.com">
<img src="/img/sponsors/scale75.png" width="300" alt="Scale75"/>
</a>
</div>
<div style="padding-bottom: 10px;">
<a href="http://www.lumos.hr/">
<img src="/img/sponsors/lumos.jpg" width="300" alt="Lumos Hobby & Art"/>
</a>
</div>
<div style="padding-bottom: 10px;">
<a href="http://www.initiativemagazine.co.uk/">
<img src="http://img.photobucket.com/albums/v467/demonn/sponzori/Initiative-Magazine-Logo-Big.png" width="300" alt="Initiative Magazine"/>
</a>
</div>
<div style="padding-bottom: 10px;">
<a href="https://www.kset.org/">
<img src="http://img.photobucket.com/albums/v467/demonn/sponzori/kset_logo.png" width="300" alt="KSET"/>
</a>
</div>
<div style="padding-bottom: 10px;">
<a href="http://www.systemagaming.com/">
<img src="/img/sponsors/systema.gif" width="300" alt="Systema Gaming Scenery"/>
</a>
</div>
<div style="padding-bottom: 10px;">
<a href="http://www.figone.fr/en//">
<img src="/img/sponsors/figone.jpg" width="300" alt="figone"/>
</a>
</div>
<div style="padding-bottom: 10px;">
<a href="http://www.crom.hr">
<img src="/img/sponsors/crom.png" width="300" alt="Crom"/>
</a>
</div>
<div style="padding-bottom: 10px;">
<a href="http://www.kerrandking.co.uk/">
<img src="/img/sponsors/kerr&king.png" width="300" alt="Kerrandking"/>
</a>
</div>
<div style="padding-bottom: 10px;">
<a href="http://www.kabukimodels.com/">
<img src="/img/sponsors/kabuki5.gif" width="300" alt="Kabuki Models"/>
</a>
</div>
<div style="padding-bottom: 10px;">
<a href="http://www.phlegyas-art.com">
<img src="/img/sponsors/bannerPhlegyasArt.jpg" width="300" alt="Phlegyas Art"/>
</a>
</div>
<div style="padding-bottom: 10px;">
<a href="http://www.wyrd-games.net/">
<img src="/img/sponsors/wyrd.jpg" width="300" alt="Wyrd Miniatures"/>
</a>
</div>
<div style="padding-bottom: 10px;">
<a href="http://escenorama.com/en/">
<img src="http://img.photobucket.com/albums/v467/demonn/sponzori/escenorama.jpg" width="300" alt="escenorama"/>
</a>
</div>
<div style="padding-bottom: 10px;">
<a href="http://kromlech.eu/">
<img src="http://img.photobucket.com/albums/v467/demonn/sponzori/kromlech.png" width="300" alt="Kromlech"/>
</a>
</div>
<div style="padding-bottom: 10px;">
<a href="http://www.avatars-of-war.com/">
<img src="http://img.photobucket.com/albums/v467/demonn/sponzori/aow.png" width="300" alt="AOW"/>
</a>
</div>
<div style="padding-bottom: 10px;">
<a href="http://www.shieldwolfminiatures.com/">
<img src="http://img.photobucket.com/albums/v467/demonn/sponzori/shieldwolf.png" width="300" alt="Shieldwolf"/>
</a>
</div>
<div style="padding-bottom: 10px;">
<a href="http://www.uschivdr.com/">
<img src="http://img.photobucket.com/albums/v467/demonn/sponzori/uschi02.jpg" width="300" alt="uschi"/>
</a>
</div>
<div style="padding-bottom: 10px;">
<a href="http://www.hangar18miniatures.com">
<img src="http://img.photobucket.com/albums/v467/demonn/sponzori/hangar18.png" width="300" alt="Hangar 18 Miniatures"/>
</a>
</div>
<div style="padding-bottom: 10px;">
<a href="http://www.fallouthobbies.com/">
<img src="http://img.photobucket.com/albums/v467/demonn/sponzori/FOH.jpg" width="300" alt="FOH"/>
</a>
</div>
<div style="padding-bottom: 10px;">
<a href="https://ebenezers-emporium.squarespace.com">
<img src="http://img.photobucket.com/albums/v467/demonn/sponzori/ebenezer.jpg" width="300" alt="Ebenezers Emporium"/>
</a>
</div>
<div>
<a href="/sponsors">friends_and_sponsors</a>
</div>
</div>",
"scripts_for_layout" => "",
"title_for_layout" => "Home",
"form" => FormHelper
FormHelper::$helpers = array
FormHelper::$fieldset = array
FormHelper::$__options = array
FormHelper::$fields = array
FormHelper::$requestType = NULL
FormHelper::$defaultModel = NULL
FormHelper::$_inputDefaults = array
FormHelper::$_lastAction = ""
FormHelper::$base = ""
FormHelper::$webroot = "/"
FormHelper::$theme = NULL
FormHelper::$here = "/dok"
FormHelper::$params = array
FormHelper::$action = "index"
FormHelper::$plugin = NULL
FormHelper::$data = NULL
FormHelper::$namedArgs = NULL
FormHelper::$argSeparator = NULL
FormHelper::$validationErrors = NULL
FormHelper::$tags = array
FormHelper::$__tainted = NULL
FormHelper::$__cleaned = NULL
FormHelper::$Html = HtmlHelper object,
"text" => TextHelper
TextHelper::$helpers = NULL
TextHelper::$base = ""
TextHelper::$webroot = "/"
TextHelper::$theme = NULL
TextHelper::$here = "/dok"
TextHelper::$params = array
TextHelper::$action = "index"
TextHelper::$plugin = NULL
TextHelper::$data = NULL
TextHelper::$namedArgs = NULL
TextHelper::$argSeparator = NULL
TextHelper::$validationErrors = NULL
TextHelper::$tags = array
TextHelper::$__tainted = NULL
TextHelper::$__cleaned = NULL,
"stringer" => StringerHelper
StringerHelper::$helpers = array
StringerHelper::$base = ""
StringerHelper::$webroot = "/"
StringerHelper::$theme = NULL
StringerHelper::$here = "/dok"
StringerHelper::$params = array
StringerHelper::$action = "index"
StringerHelper::$plugin = NULL
StringerHelper::$data = NULL
StringerHelper::$namedArgs = NULL
StringerHelper::$argSeparator = NULL
StringerHelper::$validationErrors = NULL
StringerHelper::$tags = array
StringerHelper::$__tainted = NULL
StringerHelper::$__cleaned = NULL
StringerHelper::$Html = HtmlHelper object
StringerHelper::$Link = LinkHelper object
StringerHelper::$Text = TextHelper object,
"menu" => MenuHelper
MenuHelper::$helpers = array
MenuHelper::$base = ""
MenuHelper::$webroot = "/"
MenuHelper::$theme = NULL
MenuHelper::$here = "/dok"
MenuHelper::$params = array
MenuHelper::$action = "index"
MenuHelper::$plugin = NULL
MenuHelper::$data = NULL
MenuHelper::$namedArgs = NULL
MenuHelper::$argSeparator = NULL
MenuHelper::$validationErrors = NULL
MenuHelper::$tags = array
MenuHelper::$__tainted = NULL
MenuHelper::$__cleaned = NULL
MenuHelper::$Link = LinkHelper object,
"session" => SessionHelper
SessionHelper::$helpers = array
SessionHelper::$__active = true
SessionHelper::$valid = false
SessionHelper::$error = false
SessionHelper::$_userAgent = "f9a8355d006790ee743ededbb1f6e3bd"
SessionHelper::$path = "/"
SessionHelper::$lastError = NULL
SessionHelper::$security = "medium"
SessionHelper::$time = 1773395484
SessionHelper::$sessionTime = 1773407484
SessionHelper::$cookieLifeTime = false
SessionHelper::$watchKeys = array
SessionHelper::$id = NULL
SessionHelper::$host = NULL
SessionHelper::$timeout = NULL
SessionHelper::$base = ""
SessionHelper::$webroot = "/"
SessionHelper::$here = "/dok"
SessionHelper::$params = array
SessionHelper::$action = "index"
SessionHelper::$data = NULL
SessionHelper::$theme = NULL
SessionHelper::$plugin = NULL,
"html" => HtmlHelper
HtmlHelper::$tags = array
HtmlHelper::$_crumbs = array
HtmlHelper::$__includedScripts = array
HtmlHelper::$_scriptBlockOptions = array
HtmlHelper::$__docTypes = array
HtmlHelper::$helpers = NULL
HtmlHelper::$base = ""
HtmlHelper::$webroot = "/"
HtmlHelper::$theme = NULL
HtmlHelper::$here = "/dok"
HtmlHelper::$params = array
HtmlHelper::$action = "index"
HtmlHelper::$plugin = NULL
HtmlHelper::$data = NULL
HtmlHelper::$namedArgs = NULL
HtmlHelper::$argSeparator = NULL
HtmlHelper::$validationErrors = NULL
HtmlHelper::$__tainted = NULL
HtmlHelper::$__cleaned = NULL,
"link" => LinkHelper
LinkHelper::$helpers = array
LinkHelper::$lang = "dok"
LinkHelper::$defaultLang = "hrv"
LinkHelper::$base = ""
LinkHelper::$webroot = "/"
LinkHelper::$theme = NULL
LinkHelper::$here = "/dok"
LinkHelper::$params = array
LinkHelper::$action = "index"
LinkHelper::$plugin = NULL
LinkHelper::$data = NULL
LinkHelper::$namedArgs = NULL
LinkHelper::$argSeparator = NULL
LinkHelper::$validationErrors = NULL
LinkHelper::$tags = array
LinkHelper::$__tainted = NULL
LinkHelper::$__cleaned = NULL
LinkHelper::$Html = HtmlHelper object
LinkHelper::$Session = SessionHelper object
)
$loadHelpers = false
$cached = true
$loadedHelpers = array()
$lang = "dok"
$otherLangs = array(
"eng",
"hrv"
)
$globalNav = array(
array(
"Page" => array()
),
array(
"Page" => array()
),
array(
"Page" => array()
),
array(
"Page" => array()
),
array(
"Page" => array()
),
array(
"Page" => array()
),
array(
"Page" => array()
),
array(
"Page" => array()
),
array(
"Page" => array()
),
array(
"Page" => array()
),
array(
"Page" => array()
),
array(
"Page" => array()
),
array(
"Page" => array()
),
array(
"Page" => array()
),
array(
"Page" => array()
),
array(
"Page" => array()
),
array(
"Page" => array()
),
array(
"Page" => array()
),
array(
"Page" => array()
),
array(
"Page" => array()
),
array(
"Page" => array()
),
array(
"Page" => array()
),
array(
"Page" => array()
),
array(
"Page" => array()
),
array(
"Page" => array()
),
array(
"Page" => array()
),
array(
"Page" => array()
)
)
$breadCrumbs = array(
array(
"Page" => array()
)
)
$pageContents = array(
"home_who_we_are" => null
)
$userData = null
$announcements = array(
array(
"Announcement" => array()
),
array(
"Announcement" => array()
),
array(
"Announcement" => array()
)
)
$content_for_layout = "<div id="leftColumn">
<h2>latest_announcements</h2>
<div class="announcement workshop_announcement">
<h3><pre class="cake-debug"><a href="javascript:void(0);" onclick="document.getElementById('cakeErr2-trace').style.display = (document.getElementById('cakeErr2-trace').style.display == 'none' ? '' : 'none');"><b>Notice</b> (8)</a>: Undefined index: title_dok [<b>APP/views/home/index.ctp</b>, line <b>7</b>]<div id="cakeErr2-trace" class="cake-stack-trace" style="display: none;"><a href="javascript:void(0);" onclick="document.getElementById('cakeErr2-code').style.display = (document.getElementById('cakeErr2-code').style.display == 'none' ? '' : 'none')">Code</a> | <a href="javascript:void(0);" onclick="document.getElementById('cakeErr2-context').style.display = (document.getElementById('cakeErr2-context').style.display == 'none' ? '' : 'none')">Context</a><div id="cakeErr2-code" class="cake-code-dump" style="display: none;"><pre><code><span style="color: #000000"></span></code>
<code><span style="color: #000000"> if (Configure::read() > 0) {</span></code>
<span class="code-highlight"><code><span style="color: #000000"> include ($___viewFn);</span></code></span></pre></div><pre id="cakeErr2-context" class="cake-context" style="display: none;">$___viewFn = "/home/martin/apps/agram/app/views/home/index.ctp"
$___dataForView = array(
"lang" => "dok",
"otherLangs" => array(
"eng",
"hrv"
),
"globalNav" => array(
array(),
array(),
array(),
array(),
array(),
array(),
array(),
array(),
array(),
array(),
array(),
array(),
array(),
array(),
array(),
array(),
array(),
array(),
array(),
array(),
array(),
array(),
array(),
array(),
array(),
array(),
array()
),
"breadCrumbs" => array(
array()
),
"pageContents" => array(
"home_who_we_are" => null
),
"userData" => null,
"announcements" => array(
array(),
array(),
array()
)
)
$loadHelpers = true
$cached = false
$form = FormHelper
FormHelper::$helpers = array
FormHelper::$fieldset = array
FormHelper::$__options = array
FormHelper::$fields = array
FormHelper::$requestType = NULL
FormHelper::$defaultModel = NULL
FormHelper::$_inputDefaults = array
FormHelper::$_lastAction = ""
FormHelper::$base = ""
FormHelper::$webroot = "/"
FormHelper::$theme = NULL
FormHelper::$here = "/dok"
FormHelper::$params = array
FormHelper::$action = "index"
FormHelper::$plugin = NULL
FormHelper::$data = NULL
FormHelper::$namedArgs = NULL
FormHelper::$argSeparator = NULL
FormHelper::$validationErrors = NULL
FormHelper::$tags = array
FormHelper::$__tainted = NULL
FormHelper::$__cleaned = NULL
FormHelper::$Html = HtmlHelper object
$text = TextHelper
TextHelper::$helpers = NULL
TextHelper::$base = ""
TextHelper::$webroot = "/"
TextHelper::$theme = NULL
TextHelper::$here = "/dok"
TextHelper::$params = array
TextHelper::$action = "index"
TextHelper::$plugin = NULL
TextHelper::$data = NULL
TextHelper::$namedArgs = NULL
TextHelper::$argSeparator = NULL
TextHelper::$validationErrors = NULL
TextHelper::$tags = array
TextHelper::$__tainted = NULL
TextHelper::$__cleaned = NULL
$stringer = StringerHelper
StringerHelper::$helpers = array
StringerHelper::$base = ""
StringerHelper::$webroot = "/"
StringerHelper::$theme = NULL
StringerHelper::$here = "/dok"
StringerHelper::$params = array
StringerHelper::$action = "index"
StringerHelper::$plugin = NULL
StringerHelper::$data = NULL
StringerHelper::$namedArgs = NULL
StringerHelper::$argSeparator = NULL
StringerHelper::$validationErrors = NULL
StringerHelper::$tags = array
StringerHelper::$__tainted = NULL
StringerHelper::$__cleaned = NULL
StringerHelper::$Html = HtmlHelper object
StringerHelper::$Link = LinkHelper object
StringerHelper::$Text = TextHelper object
$menu = MenuHelper
MenuHelper::$helpers = array
MenuHelper::$base = ""
MenuHelper::$webroot = "/"
MenuHelper::$theme = NULL
MenuHelper::$here = "/dok"
MenuHelper::$params = array
MenuHelper::$action = "index"
MenuHelper::$plugin = NULL
MenuHelper::$data = NULL
MenuHelper::$namedArgs = NULL
MenuHelper::$argSeparator = NULL
MenuHelper::$validationErrors = NULL
MenuHelper::$tags = array
MenuHelper::$__tainted = NULL
MenuHelper::$__cleaned = NULL
MenuHelper::$Link = LinkHelper object
$session = SessionHelper
SessionHelper::$helpers = array
SessionHelper::$__active = true
SessionHelper::$valid = false
SessionHelper::$error = false
SessionHelper::$_userAgent = "f9a8355d006790ee743ededbb1f6e3bd"
SessionHelper::$path = "/"
SessionHelper::$lastError = NULL
SessionHelper::$security = "medium"
SessionHelper::$time = 1773395484
SessionHelper::$sessionTime = 1773407484
SessionHelper::$cookieLifeTime = false
SessionHelper::$watchKeys = array
SessionHelper::$id = NULL
SessionHelper::$host = NULL
SessionHelper::$timeout = NULL
SessionHelper::$base = ""
SessionHelper::$webroot = "/"
SessionHelper::$here = "/dok"
SessionHelper::$params = array
SessionHelper::$action = "index"
SessionHelper::$data = NULL
SessionHelper::$theme = NULL
SessionHelper::$plugin = NULL
$html = HtmlHelper
HtmlHelper::$tags = array
HtmlHelper::$_crumbs = array
HtmlHelper::$__includedScripts = array
HtmlHelper::$_scriptBlockOptions = array
HtmlHelper::$__docTypes = array
HtmlHelper::$helpers = NULL
HtmlHelper::$base = ""
HtmlHelper::$webroot = "/"
HtmlHelper::$theme = NULL
HtmlHelper::$here = "/dok"
HtmlHelper::$params = array
HtmlHelper::$action = "index"
HtmlHelper::$plugin = NULL
HtmlHelper::$data = NULL
HtmlHelper::$namedArgs = NULL
HtmlHelper::$argSeparator = NULL
HtmlHelper::$validationErrors = NULL
HtmlHelper::$__tainted = NULL
HtmlHelper::$__cleaned = NULL
$link = LinkHelper
LinkHelper::$helpers = array
LinkHelper::$lang = NULL
LinkHelper::$defaultLang = NULL
LinkHelper::$base = ""
LinkHelper::$webroot = "/"
LinkHelper::$theme = NULL
LinkHelper::$here = "/dok"
LinkHelper::$params = array
LinkHelper::$action = "index"
LinkHelper::$plugin = NULL
LinkHelper::$data = NULL
LinkHelper::$namedArgs = NULL
LinkHelper::$argSeparator = NULL
LinkHelper::$validationErrors = NULL
LinkHelper::$tags = array
LinkHelper::$__tainted = NULL
LinkHelper::$__cleaned = NULL
LinkHelper::$Html = HtmlHelper object
LinkHelper::$Session = SessionHelper object
$lang = "dok"
$otherLangs = array(
"eng",
"hrv"
)
$globalNav = array(
array(
"Page" => array()
),
array(
"Page" => array()
),
array(
"Page" => array()
),
array(
"Page" => array()
),
array(
"Page" => array()
),
array(
"Page" => array()
),
array(
"Page" => array()
),
array(
"Page" => array()
),
array(
"Page" => array()
),
array(
"Page" => array()
),
array(
"Page" => array()
),
array(
"Page" => array()
),
array(
"Page" => array()
),
array(
"Page" => array()
),
array(
"Page" => array()
),
array(
"Page" => array()
),
array(
"Page" => array()
),
array(
"Page" => array()
),
array(
"Page" => array()
),
array(
"Page" => array()
),
array(
"Page" => array()
),
array(
"Page" => array()
),
array(
"Page" => array()
),
array(
"Page" => array()
),
array(
"Page" => array()
),
array(
"Page" => array()
),
array(
"Page" => array()
)
)
$breadCrumbs = array(
array(
"Page" => array()
)
)
$pageContents = array(
"home_who_we_are" => null
)
$userData = null
$announcements = array(
array(
"Announcement" => array()
),
array(
"Announcement" => array()
),
array(
"Announcement" => array()
)
)
$announcement = array(
"Announcement" => array(
"id" => "4_80",
"class" => "workshop_announcement",
"controller" => "workshop_announcements",
"mask_eng" => "ExhibitionB2B",
"mask_hrv" => "IzložbaB2B",
"title_hrv" => "Back to Basics Radionice za najmlađe na Izložbi minijatura i maketa Agram 2026",
"title_eng" => "Back to Basics Workshops @ Exhibition of Miniatures and Tabletop Scenery Agram 2026",
"content_hrv" => "<p>
Tijekom na&scaron;e Izložbe minijatura i maketa Agram 2026 svakog radnog dana od 17:00 do 18:00 organizirat ćemo i <strong>Back to Basics radionice bojanja minijatura za najmlađe</strong> (8+).&nbsp;</p>
<p>
<a href="https://hosting.photobucket.com/95288841-8654-4bf7-8fc9-a4aa78dce87f/f73b7e94-5adc-4afb-838b-b479ea8886fd.jpg" target="_blank"><img alt="Click for enlarged picture" src="https://hosting.photobucket.com/95288841-8654-4bf7-8fc9-a4aa78dce87f/f73b7e94-5adc-4afb-838b-b479ea8886fd.jpg" width="600" /></a></p>
<p>
<strong>ULAZ BESPLATAN!</strong></p>
<p>
Radionice (trajanja cca 1h ) su prigodne za najmlađe korisnike jer se samo koriste bazične tehnike, alati i materijali a omogućava lak&scaron;i pristup minijaturizmu i maketarstvu fokusiranjem na zabavni proces izrade za razliku od uobičajenog inzistiranja na i&scaron;čekivanje krajnjeg rezultata koji najče&scaron;će donosi stres mlađim polaznicima.</p>
<p>
U svakom od termina po četiri polaznika će moći obojati i sastaviti vlastitu figuru (koju onda nose doma).</p>
",
"content_eng" => "<p>
During our Exhibition of Miniatures and Tabletop Scenery Agram 2026, every weekday from 5:00 PM to 6:00 PM, we will also organize <strong>Back to Basics miniature painting workshops for the youngest (8+)</strong>.</p>
<p>
<a href="https://hosting.photobucket.com/95288841-8654-4bf7-8fc9-a4aa78dce87f/f73b7e94-5adc-4afb-838b-b479ea8886fd.jpg" target="_blank"><img alt="Click for enlarged picture" src="https://hosting.photobucket.com/95288841-8654-4bf7-8fc9-a4aa78dce87f/f73b7e94-5adc-4afb-838b-b479ea8886fd.jpg" width="600" /></a></p>
<p>
<strong>FREE ENTRY! </strong></p>
<p>
The workshops (lasting approx. 1 hour) are suitable for the youngest users because they only use basic techniques, tools and materials and provide an easier approach to miniaturism and model making by focusing on the fun process of making, as opposed to the usual insistence on waiting for the final result, which most often brings stress to younger participants.</p>
<p>
In each session, four participants will be able to color and assemble their own figure (which they then take home).</p>
",
"created" => "2026-02-17 07:57:52",
"first_name" => "Krunoslav",
"last_name" => "Belinić",
"first_name_mask" => "krunoslav",
"last_name_mask" => "belinic",
"start" => null,
"end" => null
)
)</pre><pre class="stack-trace">include - APP/views/home/index.ctp, line 7
View::_render() - CORE/cake/libs/view/view.php, line 736
View::render() - CORE/cake/libs/view/view.php, line 431
Controller::render() - CORE/cake/libs/controller/controller.php, line 909
Dispatcher::_invoke() - CORE/cake/dispatcher.php, line 207
Dispatcher::dispatch() - CORE/cake/dispatcher.php, line 171
[main] - APP/webroot/index.php, line 86</pre></div></pre><pre class="cake-debug"><a href="javascript:void(0);" onclick="document.getElementById('cakeErr3-trace').style.display = (document.getElementById('cakeErr3-trace').style.display == 'none' ? '' : 'none');"><b>Notice</b> (8)</a>: Undefined index: mask_dok [<b>APP/views/home/index.ctp</b>, line <b>10</b>]<div id="cakeErr3-trace" class="cake-stack-trace" style="display: none;"><a href="javascript:void(0);" onclick="document.getElementById('cakeErr3-code').style.display = (document.getElementById('cakeErr3-code').style.display == 'none' ? '' : 'none')">Code</a> | <a href="javascript:void(0);" onclick="document.getElementById('cakeErr3-context').style.display = (document.getElementById('cakeErr3-context').style.display == 'none' ? '' : 'none')">Context</a><div id="cakeErr3-code" class="cake-code-dump" style="display: none;"><pre><code><span style="color: #000000"></span></code>
<code><span style="color: #000000"> if (Configure::read() > 0) {</span></code>
<span class="code-highlight"><code><span style="color: #000000"> include ($___viewFn);</span></code></span></pre></div><pre id="cakeErr3-context" class="cake-context" style="display: none;">$___viewFn = "/home/martin/apps/agram/app/views/home/index.ctp"
$___dataForView = array(
"lang" => "dok",
"otherLangs" => array(
"eng",
"hrv"
),
"globalNav" => array(
array(),
array(),
array(),
array(),
array(),
array(),
array(),
array(),
array(),
array(),
array(),
array(),
array(),
array(),
array(),
array(),
array(),
array(),
array(),
array(),
array(),
array(),
array(),
array(),
array(),
array(),
array()
),
"breadCrumbs" => array(
array()
),
"pageContents" => array(
"home_who_we_are" => null
),
"userData" => null,
"announcements" => array(
array(),
array(),
array()
)
)
$loadHelpers = true
$cached = false
$form = FormHelper
FormHelper::$helpers = array
FormHelper::$fieldset = array
FormHelper::$__options = array
FormHelper::$fields = array
FormHelper::$requestType = NULL
FormHelper::$defaultModel = NULL
FormHelper::$_inputDefaults = array
FormHelper::$_lastAction = ""
FormHelper::$base = ""
FormHelper::$webroot = "/"
FormHelper::$theme = NULL
FormHelper::$here = "/dok"
FormHelper::$params = array
FormHelper::$action = "index"
FormHelper::$plugin = NULL
FormHelper::$data = NULL
FormHelper::$namedArgs = NULL
FormHelper::$argSeparator = NULL
FormHelper::$validationErrors = NULL
FormHelper::$tags = array
FormHelper::$__tainted = NULL
FormHelper::$__cleaned = NULL
FormHelper::$Html = HtmlHelper object
$text = TextHelper
TextHelper::$helpers = NULL
TextHelper::$base = ""
TextHelper::$webroot = "/"
TextHelper::$theme = NULL
TextHelper::$here = "/dok"
TextHelper::$params = array
TextHelper::$action = "index"
TextHelper::$plugin = NULL
TextHelper::$data = NULL
TextHelper::$namedArgs = NULL
TextHelper::$argSeparator = NULL
TextHelper::$validationErrors = NULL
TextHelper::$tags = array
TextHelper::$__tainted = NULL
TextHelper::$__cleaned = NULL
$stringer = StringerHelper
StringerHelper::$helpers = array
StringerHelper::$base = ""
StringerHelper::$webroot = "/"
StringerHelper::$theme = NULL
StringerHelper::$here = "/dok"
StringerHelper::$params = array
StringerHelper::$action = "index"
StringerHelper::$plugin = NULL
StringerHelper::$data = NULL
StringerHelper::$namedArgs = NULL
StringerHelper::$argSeparator = NULL
StringerHelper::$validationErrors = NULL
StringerHelper::$tags = array
StringerHelper::$__tainted = NULL
StringerHelper::$__cleaned = NULL
StringerHelper::$Html = HtmlHelper object
StringerHelper::$Link = LinkHelper object
StringerHelper::$Text = TextHelper object
$menu = MenuHelper
MenuHelper::$helpers = array
MenuHelper::$base = ""
MenuHelper::$webroot = "/"
MenuHelper::$theme = NULL
MenuHelper::$here = "/dok"
MenuHelper::$params = array
MenuHelper::$action = "index"
MenuHelper::$plugin = NULL
MenuHelper::$data = NULL
MenuHelper::$namedArgs = NULL
MenuHelper::$argSeparator = NULL
MenuHelper::$validationErrors = NULL
MenuHelper::$tags = array
MenuHelper::$__tainted = NULL
MenuHelper::$__cleaned = NULL
MenuHelper::$Link = LinkHelper object
$session = SessionHelper
SessionHelper::$helpers = array
SessionHelper::$__active = true
SessionHelper::$valid = false
SessionHelper::$error = false
SessionHelper::$_userAgent = "f9a8355d006790ee743ededbb1f6e3bd"
SessionHelper::$path = "/"
SessionHelper::$lastError = NULL
SessionHelper::$security = "medium"
SessionHelper::$time = 1773395484
SessionHelper::$sessionTime = 1773407484
SessionHelper::$cookieLifeTime = false
SessionHelper::$watchKeys = array
SessionHelper::$id = NULL
SessionHelper::$host = NULL
SessionHelper::$timeout = NULL
SessionHelper::$base = ""
SessionHelper::$webroot = "/"
SessionHelper::$here = "/dok"
SessionHelper::$params = array
SessionHelper::$action = "index"
SessionHelper::$data = NULL
SessionHelper::$theme = NULL
SessionHelper::$plugin = NULL
$html = HtmlHelper
HtmlHelper::$tags = array
HtmlHelper::$_crumbs = array
HtmlHelper::$__includedScripts = array
HtmlHelper::$_scriptBlockOptions = array
HtmlHelper::$__docTypes = array
HtmlHelper::$helpers = NULL
HtmlHelper::$base = ""
HtmlHelper::$webroot = "/"
HtmlHelper::$theme = NULL
HtmlHelper::$here = "/dok"
HtmlHelper::$params = array
HtmlHelper::$action = "index"
HtmlHelper::$plugin = NULL
HtmlHelper::$data = NULL
HtmlHelper::$namedArgs = NULL
HtmlHelper::$argSeparator = NULL
HtmlHelper::$validationErrors = NULL
HtmlHelper::$__tainted = NULL
HtmlHelper::$__cleaned = NULL
$link = LinkHelper
LinkHelper::$helpers = array
LinkHelper::$lang = NULL
LinkHelper::$defaultLang = NULL
LinkHelper::$base = ""
LinkHelper::$webroot = "/"
LinkHelper::$theme = NULL
LinkHelper::$here = "/dok"
LinkHelper::$params = array
LinkHelper::$action = "index"
LinkHelper::$plugin = NULL
LinkHelper::$data = NULL
LinkHelper::$namedArgs = NULL
LinkHelper::$argSeparator = NULL
LinkHelper::$validationErrors = NULL
LinkHelper::$tags = array
LinkHelper::$__tainted = NULL
LinkHelper::$__cleaned = NULL
LinkHelper::$Html = HtmlHelper object
LinkHelper::$Session = SessionHelper object
$lang = "dok"
$otherLangs = array(
"eng",
"hrv"
)
$globalNav = array(
array(
"Page" => array()
),
array(
"Page" => array()
),
array(
"Page" => array()
),
array(
"Page" => array()
),
array(
"Page" => array()
),
array(
"Page" => array()
),
array(
"Page" => array()
),
array(
"Page" => array()
),
array(
"Page" => array()
),
array(
"Page" => array()
),
array(
"Page" => array()
),
array(
"Page" => array()
),
array(
"Page" => array()
),
array(
"Page" => array()
),
array(
"Page" => array()
),
array(
"Page" => array()
),
array(
"Page" => array()
),
array(
"Page" => array()
),
array(
"Page" => array()
),
array(
"Page" => array()
),
array(
"Page" => array()
),
array(
"Page" => array()
),
array(
"Page" => array()
),
array(
"Page" => array()
),
array(
"Page" => array()
),
array(
"Page" => array()
),
array(
"Page" => array()
)
)
$breadCrumbs = array(
array(
"Page" => array()
)
)
$pageContents = array(
"home_who_we_are" => null
)
$userData = null
$announcements = array(
array(
"Announcement" => array()
),
array(
"Announcement" => array()
),
array(
"Announcement" => array()
)
)
$announcement = array(
"Announcement" => array(
"id" => "4_80",
"class" => "workshop_announcement",
"controller" => "workshop_announcements",
"mask_eng" => "ExhibitionB2B",
"mask_hrv" => "IzložbaB2B",
"title_hrv" => "Back to Basics Radionice za najmlađe na Izložbi minijatura i maketa Agram 2026",
"title_eng" => "Back to Basics Workshops @ Exhibition of Miniatures and Tabletop Scenery Agram 2026",
"content_hrv" => "<p>
Tijekom na&scaron;e Izložbe minijatura i maketa Agram 2026 svakog radnog dana od 17:00 do 18:00 organizirat ćemo i <strong>Back to Basics radionice bojanja minijatura za najmlađe</strong> (8+).&nbsp;</p>
<p>
<a href="https://hosting.photobucket.com/95288841-8654-4bf7-8fc9-a4aa78dce87f/f73b7e94-5adc-4afb-838b-b479ea8886fd.jpg" target="_blank"><img alt="Click for enlarged picture" src="https://hosting.photobucket.com/95288841-8654-4bf7-8fc9-a4aa78dce87f/f73b7e94-5adc-4afb-838b-b479ea8886fd.jpg" width="600" /></a></p>
<p>
<strong>ULAZ BESPLATAN!</strong></p>
<p>
Radionice (trajanja cca 1h ) su prigodne za najmlađe korisnike jer se samo koriste bazične tehnike, alati i materijali a omogućava lak&scaron;i pristup minijaturizmu i maketarstvu fokusiranjem na zabavni proces izrade za razliku od uobičajenog inzistiranja na i&scaron;čekivanje krajnjeg rezultata koji najče&scaron;će donosi stres mlađim polaznicima.</p>
<p>
U svakom od termina po četiri polaznika će moći obojati i sastaviti vlastitu figuru (koju onda nose doma).</p>
",
"content_eng" => "<p>
During our Exhibition of Miniatures and Tabletop Scenery Agram 2026, every weekday from 5:00 PM to 6:00 PM, we will also organize <strong>Back to Basics miniature painting workshops for the youngest (8+)</strong>.</p>
<p>
<a href="https://hosting.photobucket.com/95288841-8654-4bf7-8fc9-a4aa78dce87f/f73b7e94-5adc-4afb-838b-b479ea8886fd.jpg" target="_blank"><img alt="Click for enlarged picture" src="https://hosting.photobucket.com/95288841-8654-4bf7-8fc9-a4aa78dce87f/f73b7e94-5adc-4afb-838b-b479ea8886fd.jpg" width="600" /></a></p>
<p>
<strong>FREE ENTRY! </strong></p>
<p>
The workshops (lasting approx. 1 hour) are suitable for the youngest users because they only use basic techniques, tools and materials and provide an easier approach to miniaturism and model making by focusing on the fun process of making, as opposed to the usual insistence on waiting for the final result, which most often brings stress to younger participants.</p>
<p>
In each session, four participants will be able to color and assemble their own figure (which they then take home).</p>
",
"created" => "2026-02-17 07:57:52",
"first_name" => "Krunoslav",
"last_name" => "Belinić",
"first_name_mask" => "krunoslav",
"last_name_mask" => "belinic",
"start" => null,
"end" => null
)
)</pre><pre class="stack-trace">include - APP/views/home/index.ctp, line 10
View::_render() - CORE/cake/libs/view/view.php, line 736
View::render() - CORE/cake/libs/view/view.php, line 431
Controller::render() - CORE/cake/libs/controller/controller.php, line 909
Dispatcher::_invoke() - CORE/cake/dispatcher.php, line 207
Dispatcher::dispatch() - CORE/cake/dispatcher.php, line 171
[main] - APP/webroot/index.php, line 86</pre></div></pre><a href="/dok/workshop_announcements/2026/02/17" class="readMore"></a></h3>
<span class="details">
17<span class="superscript">th</span> February 2026, post_details_1 <a href="/dok/members/krunoslav.belinic">Krunoslav Belinić</a> post_details_2 <a href="/dok/workshop_announcements">category_workshop_announcements</a> </span>
<pre class="cake-debug"><a href="javascript:void(0);" onclick="document.getElementById('cakeErr4-trace').style.display = (document.getElementById('cakeErr4-trace').style.display == 'none' ? '' : 'none');"><b>Notice</b> (8)</a>: Undefined index: content_dok [<b>APP/views/home/index.ctp</b>, line <b>32</b>]<div id="cakeErr4-trace" class="cake-stack-trace" style="display: none;"><a href="javascript:void(0);" onclick="document.getElementById('cakeErr4-code').style.display = (document.getElementById('cakeErr4-code').style.display == 'none' ? '' : 'none')">Code</a> | <a href="javascript:void(0);" onclick="document.getElementById('cakeErr4-context').style.display = (document.getElementById('cakeErr4-context').style.display == 'none' ? '' : 'none')">Context</a><div id="cakeErr4-code" class="cake-code-dump" style="display: none;"><pre><code><span style="color: #000000"></span></code>
<code><span style="color: #000000"> if (Configure::read() > 0) {</span></code>
<span class="code-highlight"><code><span style="color: #000000"> include ($___viewFn);</span></code></span></pre></div><pre id="cakeErr4-context" class="cake-context" style="display: none;">$___viewFn = "/home/martin/apps/agram/app/views/home/index.ctp"
$___dataForView = array(
"lang" => "dok",
"otherLangs" => array(
"eng",
"hrv"
),
"globalNav" => array(
array(),
array(),
array(),
array(),
array(),
array(),
array(),
array(),
array(),
array(),
array(),
array(),
array(),
array(),
array(),
array(),
array(),
array(),
array(),
array(),
array(),
array(),
array(),
array(),
array(),
array(),
array()
),
"breadCrumbs" => array(
array()
),
"pageContents" => array(
"home_who_we_are" => null
),
"userData" => null,
"announcements" => array(
array(),
array(),
array()
)
)
$loadHelpers = true
$cached = false
$form = FormHelper
FormHelper::$helpers = array
FormHelper::$fieldset = array
FormHelper::$__options = array
FormHelper::$fields = array
FormHelper::$requestType = NULL
FormHelper::$defaultModel = NULL
FormHelper::$_inputDefaults = array
FormHelper::$_lastAction = ""
FormHelper::$base = ""
FormHelper::$webroot = "/"
FormHelper::$theme = NULL
FormHelper::$here = "/dok"
FormHelper::$params = array
FormHelper::$action = "index"
FormHelper::$plugin = NULL
FormHelper::$data = NULL
FormHelper::$namedArgs = NULL
FormHelper::$argSeparator = NULL
FormHelper::$validationErrors = NULL
FormHelper::$tags = array
FormHelper::$__tainted = NULL
FormHelper::$__cleaned = NULL
FormHelper::$Html = HtmlHelper object
$text = TextHelper
TextHelper::$helpers = NULL
TextHelper::$base = ""
TextHelper::$webroot = "/"
TextHelper::$theme = NULL
TextHelper::$here = "/dok"
TextHelper::$params = array
TextHelper::$action = "index"
TextHelper::$plugin = NULL
TextHelper::$data = NULL
TextHelper::$namedArgs = NULL
TextHelper::$argSeparator = NULL
TextHelper::$validationErrors = NULL
TextHelper::$tags = array
TextHelper::$__tainted = NULL
TextHelper::$__cleaned = NULL
$stringer = StringerHelper
StringerHelper::$helpers = array
StringerHelper::$base = ""
StringerHelper::$webroot = "/"
StringerHelper::$theme = NULL
StringerHelper::$here = "/dok"
StringerHelper::$params = array
StringerHelper::$action = "index"
StringerHelper::$plugin = NULL
StringerHelper::$data = NULL
StringerHelper::$namedArgs = NULL
StringerHelper::$argSeparator = NULL
StringerHelper::$validationErrors = NULL
StringerHelper::$tags = array
StringerHelper::$__tainted = NULL
StringerHelper::$__cleaned = NULL
StringerHelper::$Html = HtmlHelper object
StringerHelper::$Link = LinkHelper object
StringerHelper::$Text = TextHelper object
$menu = MenuHelper
MenuHelper::$helpers = array
MenuHelper::$base = ""
MenuHelper::$webroot = "/"
MenuHelper::$theme = NULL
MenuHelper::$here = "/dok"
MenuHelper::$params = array
MenuHelper::$action = "index"
MenuHelper::$plugin = NULL
MenuHelper::$data = NULL
MenuHelper::$namedArgs = NULL
MenuHelper::$argSeparator = NULL
MenuHelper::$validationErrors = NULL
MenuHelper::$tags = array
MenuHelper::$__tainted = NULL
MenuHelper::$__cleaned = NULL
MenuHelper::$Link = LinkHelper object
$session = SessionHelper
SessionHelper::$helpers = array
SessionHelper::$__active = true
SessionHelper::$valid = false
SessionHelper::$error = false
SessionHelper::$_userAgent = "f9a8355d006790ee743ededbb1f6e3bd"
SessionHelper::$path = "/"
SessionHelper::$lastError = NULL
SessionHelper::$security = "medium"
SessionHelper::$time = 1773395484
SessionHelper::$sessionTime = 1773407484
SessionHelper::$cookieLifeTime = false
SessionHelper::$watchKeys = array
SessionHelper::$id = NULL
SessionHelper::$host = NULL
SessionHelper::$timeout = NULL
SessionHelper::$base = ""
SessionHelper::$webroot = "/"
SessionHelper::$here = "/dok"
SessionHelper::$params = array
SessionHelper::$action = "index"
SessionHelper::$data = NULL
SessionHelper::$theme = NULL
SessionHelper::$plugin = NULL
$html = HtmlHelper
HtmlHelper::$tags = array
HtmlHelper::$_crumbs = array
HtmlHelper::$__includedScripts = array
HtmlHelper::$_scriptBlockOptions = array
HtmlHelper::$__docTypes = array
HtmlHelper::$helpers = NULL
HtmlHelper::$base = ""
HtmlHelper::$webroot = "/"
HtmlHelper::$theme = NULL
HtmlHelper::$here = "/dok"
HtmlHelper::$params = array
HtmlHelper::$action = "index"
HtmlHelper::$plugin = NULL
HtmlHelper::$data = NULL
HtmlHelper::$namedArgs = NULL
HtmlHelper::$argSeparator = NULL
HtmlHelper::$validationErrors = NULL
HtmlHelper::$__tainted = NULL
HtmlHelper::$__cleaned = NULL
$link = LinkHelper
LinkHelper::$helpers = array
LinkHelper::$lang = "dok"
LinkHelper::$defaultLang = "hrv"
LinkHelper::$base = ""
LinkHelper::$webroot = "/"
LinkHelper::$theme = NULL
LinkHelper::$here = "/dok"
LinkHelper::$params = array
LinkHelper::$action = "index"
LinkHelper::$plugin = NULL
LinkHelper::$data = NULL
LinkHelper::$namedArgs = NULL
LinkHelper::$argSeparator = NULL
LinkHelper::$validationErrors = NULL
LinkHelper::$tags = array
LinkHelper::$__tainted = NULL
LinkHelper::$__cleaned = NULL
LinkHelper::$Html = HtmlHelper object
LinkHelper::$Session = SessionHelper object
$lang = "dok"
$otherLangs = array(
"eng",
"hrv"
)
$globalNav = array(
array(
"Page" => array()
),
array(
"Page" => array()
),
array(
"Page" => array()
),
array(
"Page" => array()
),
array(
"Page" => array()
),
array(
"Page" => array()
),
array(
"Page" => array()
),
array(
"Page" => array()
),
array(
"Page" => array()
),
array(
"Page" => array()
),
array(
"Page" => array()
),
array(
"Page" => array()
),
array(
"Page" => array()
),
array(
"Page" => array()
),
array(
"Page" => array()
),
array(
"Page" => array()
),
array(
"Page" => array()
),
array(
"Page" => array()
),
array(
"Page" => array()
),
array(
"Page" => array()
),
array(
"Page" => array()
),
array(
"Page" => array()
),
array(
"Page" => array()
),
array(
"Page" => array()
),
array(
"Page" => array()
),
array(
"Page" => array()
),
array(
"Page" => array()
)
)
$breadCrumbs = array(
array(
"Page" => array()
)
)
$pageContents = array(
"home_who_we_are" => null
)
$userData = null
$announcements = array(
array(
"Announcement" => array()
),
array(
"Announcement" => array()
),
array(
"Announcement" => array()
)
)
$announcement = array(
"Announcement" => array(
"id" => "4_80",
"class" => "workshop_announcement",
"controller" => "workshop_announcements",
"mask_eng" => "ExhibitionB2B",
"mask_hrv" => "IzložbaB2B",
"title_hrv" => "Back to Basics Radionice za najmlađe na Izložbi minijatura i maketa Agram 2026",
"title_eng" => "Back to Basics Workshops @ Exhibition of Miniatures and Tabletop Scenery Agram 2026",
"content_hrv" => "<p>
Tijekom na&scaron;e Izložbe minijatura i maketa Agram 2026 svakog radnog dana od 17:00 do 18:00 organizirat ćemo i <strong>Back to Basics radionice bojanja minijatura za najmlađe</strong> (8+).&nbsp;</p>
<p>
<a href="https://hosting.photobucket.com/95288841-8654-4bf7-8fc9-a4aa78dce87f/f73b7e94-5adc-4afb-838b-b479ea8886fd.jpg" target="_blank"><img alt="Click for enlarged picture" src="https://hosting.photobucket.com/95288841-8654-4bf7-8fc9-a4aa78dce87f/f73b7e94-5adc-4afb-838b-b479ea8886fd.jpg" width="600" /></a></p>
<p>
<strong>ULAZ BESPLATAN!</strong></p>
<p>
Radionice (trajanja cca 1h ) su prigodne za najmlađe korisnike jer se samo koriste bazične tehnike, alati i materijali a omogućava lak&scaron;i pristup minijaturizmu i maketarstvu fokusiranjem na zabavni proces izrade za razliku od uobičajenog inzistiranja na i&scaron;čekivanje krajnjeg rezultata koji najče&scaron;će donosi stres mlađim polaznicima.</p>
<p>
U svakom od termina po četiri polaznika će moći obojati i sastaviti vlastitu figuru (koju onda nose doma).</p>
",
"content_eng" => "<p>
During our Exhibition of Miniatures and Tabletop Scenery Agram 2026, every weekday from 5:00 PM to 6:00 PM, we will also organize <strong>Back to Basics miniature painting workshops for the youngest (8+)</strong>.</p>
<p>
<a href="https://hosting.photobucket.com/95288841-8654-4bf7-8fc9-a4aa78dce87f/f73b7e94-5adc-4afb-838b-b479ea8886fd.jpg" target="_blank"><img alt="Click for enlarged picture" src="https://hosting.photobucket.com/95288841-8654-4bf7-8fc9-a4aa78dce87f/f73b7e94-5adc-4afb-838b-b479ea8886fd.jpg" width="600" /></a></p>
<p>
<strong>FREE ENTRY! </strong></p>
<p>
The workshops (lasting approx. 1 hour) are suitable for the youngest users because they only use basic techniques, tools and materials and provide an easier approach to miniaturism and model making by focusing on the fun process of making, as opposed to the usual insistence on waiting for the final result, which most often brings stress to younger participants.</p>
<p>
In each session, four participants will be able to color and assemble their own figure (which they then take home).</p>
",
"created" => "2026-02-17 07:57:52",
"first_name" => "Krunoslav",
"last_name" => "Belinić",
"first_name_mask" => "krunoslav",
"last_name_mask" => "belinic",
"start" => null,
"end" => null
)
)
$member = array(
"first_name" => "Krunoslav",
"last_name" => "Belinić",
"first_name_mask" => "krunoslav",
"last_name_mask" => "belinic"
)
$dateCreated = "2026-02-17 07:57:52"</pre><pre class="stack-trace">include - APP/views/home/index.ctp, line 32
View::_render() - CORE/cake/libs/view/view.php, line 736
View::render() - CORE/cake/libs/view/view.php, line 431
Controller::render() - CORE/cake/libs/controller/controller.php, line 909
Dispatcher::_invoke() - CORE/cake/dispatcher.php, line 207
Dispatcher::dispatch() - CORE/cake/dispatcher.php, line 171
[main] - APP/webroot/index.php, line 86</pre></div></pre><pre class="cake-debug"><a href="javascript:void(0);" onclick="document.getElementById('cakeErr5-trace').style.display = (document.getElementById('cakeErr5-trace').style.display == 'none' ? '' : 'none');"><b>Notice</b> (8)</a>: Undefined index: title_dok [<b>APP/views/home/index.ctp</b>, line <b>34</b>]<div id="cakeErr5-trace" class="cake-stack-trace" style="display: none;"><a href="javascript:void(0);" onclick="document.getElementById('cakeErr5-code').style.display = (document.getElementById('cakeErr5-code').style.display == 'none' ? '' : 'none')">Code</a> | <a href="javascript:void(0);" onclick="document.getElementById('cakeErr5-context').style.display = (document.getElementById('cakeErr5-context').style.display == 'none' ? '' : 'none')">Context</a><div id="cakeErr5-code" class="cake-code-dump" style="display: none;"><pre><code><span style="color: #000000"></span></code>
<code><span style="color: #000000"> if (Configure::read() > 0) {</span></code>
<span class="code-highlight"><code><span style="color: #000000"> include ($___viewFn);</span></code></span></pre></div><pre id="cakeErr5-context" class="cake-context" style="display: none;">$___viewFn = "/home/martin/apps/agram/app/views/home/index.ctp"
$___dataForView = array(
"lang" => "dok",
"otherLangs" => array(
"eng",
"hrv"
),
"globalNav" => array(
array(),
array(),
array(),
array(),
array(),
array(),
array(),
array(),
array(),
array(),
array(),
array(),
array(),
array(),
array(),
array(),
array(),
array(),
array(),
array(),
array(),
array(),
array(),
array(),
array(),
array(),
array()
),
"breadCrumbs" => array(
array()
),
"pageContents" => array(
"home_who_we_are" => null
),
"userData" => null,
"announcements" => array(
array(),
array(),
array()
)
)
$loadHelpers = true
$cached = false
$form = FormHelper
FormHelper::$helpers = array
FormHelper::$fieldset = array
FormHelper::$__options = array
FormHelper::$fields = array
FormHelper::$requestType = NULL
FormHelper::$defaultModel = NULL
FormHelper::$_inputDefaults = array
FormHelper::$_lastAction = ""
FormHelper::$base = ""
FormHelper::$webroot = "/"
FormHelper::$theme = NULL
FormHelper::$here = "/dok"
FormHelper::$params = array
FormHelper::$action = "index"
FormHelper::$plugin = NULL
FormHelper::$data = NULL
FormHelper::$namedArgs = NULL
FormHelper::$argSeparator = NULL
FormHelper::$validationErrors = NULL
FormHelper::$tags = array
FormHelper::$__tainted = NULL
FormHelper::$__cleaned = NULL
FormHelper::$Html = HtmlHelper object
$text = TextHelper
TextHelper::$helpers = NULL
TextHelper::$base = ""
TextHelper::$webroot = "/"
TextHelper::$theme = NULL
TextHelper::$here = "/dok"
TextHelper::$params = array
TextHelper::$action = "index"
TextHelper::$plugin = NULL
TextHelper::$data = NULL
TextHelper::$namedArgs = NULL
TextHelper::$argSeparator = NULL
TextHelper::$validationErrors = NULL
TextHelper::$tags = array
TextHelper::$__tainted = NULL
TextHelper::$__cleaned = NULL
$stringer = StringerHelper
StringerHelper::$helpers = array
StringerHelper::$base = ""
StringerHelper::$webroot = "/"
StringerHelper::$theme = NULL
StringerHelper::$here = "/dok"
StringerHelper::$params = array
StringerHelper::$action = "index"
StringerHelper::$plugin = NULL
StringerHelper::$data = NULL
StringerHelper::$namedArgs = NULL
StringerHelper::$argSeparator = NULL
StringerHelper::$validationErrors = NULL
StringerHelper::$tags = array
StringerHelper::$__tainted = NULL
StringerHelper::$__cleaned = NULL
StringerHelper::$Html = HtmlHelper object
StringerHelper::$Link = LinkHelper object
StringerHelper::$Text = TextHelper object
$menu = MenuHelper
MenuHelper::$helpers = array
MenuHelper::$base = ""
MenuHelper::$webroot = "/"
MenuHelper::$theme = NULL
MenuHelper::$here = "/dok"
MenuHelper::$params = array
MenuHelper::$action = "index"
MenuHelper::$plugin = NULL
MenuHelper::$data = NULL
MenuHelper::$namedArgs = NULL
MenuHelper::$argSeparator = NULL
MenuHelper::$validationErrors = NULL
MenuHelper::$tags = array
MenuHelper::$__tainted = NULL
MenuHelper::$__cleaned = NULL
MenuHelper::$Link = LinkHelper object
$session = SessionHelper
SessionHelper::$helpers = array
SessionHelper::$__active = true
SessionHelper::$valid = false
SessionHelper::$error = false
SessionHelper::$_userAgent = "f9a8355d006790ee743ededbb1f6e3bd"
SessionHelper::$path = "/"
SessionHelper::$lastError = NULL
SessionHelper::$security = "medium"
SessionHelper::$time = 1773395484
SessionHelper::$sessionTime = 1773407484
SessionHelper::$cookieLifeTime = false
SessionHelper::$watchKeys = array
SessionHelper::$id = NULL
SessionHelper::$host = NULL
SessionHelper::$timeout = NULL
SessionHelper::$base = ""
SessionHelper::$webroot = "/"
SessionHelper::$here = "/dok"
SessionHelper::$params = array
SessionHelper::$action = "index"
SessionHelper::$data = NULL
SessionHelper::$theme = NULL
SessionHelper::$plugin = NULL
$html = HtmlHelper
HtmlHelper::$tags = array
HtmlHelper::$_crumbs = array
HtmlHelper::$__includedScripts = array
HtmlHelper::$_scriptBlockOptions = array
HtmlHelper::$__docTypes = array
HtmlHelper::$helpers = NULL
HtmlHelper::$base = ""
HtmlHelper::$webroot = "/"
HtmlHelper::$theme = NULL
HtmlHelper::$here = "/dok"
HtmlHelper::$params = array
HtmlHelper::$action = "index"
HtmlHelper::$plugin = NULL
HtmlHelper::$data = NULL
HtmlHelper::$namedArgs = NULL
HtmlHelper::$argSeparator = NULL
HtmlHelper::$validationErrors = NULL
HtmlHelper::$__tainted = NULL
HtmlHelper::$__cleaned = NULL
$link = LinkHelper
LinkHelper::$helpers = array
LinkHelper::$lang = "dok"
LinkHelper::$defaultLang = "hrv"
LinkHelper::$base = ""
LinkHelper::$webroot = "/"
LinkHelper::$theme = NULL
LinkHelper::$here = "/dok"
LinkHelper::$params = array
LinkHelper::$action = "index"
LinkHelper::$plugin = NULL
LinkHelper::$data = NULL
LinkHelper::$namedArgs = NULL
LinkHelper::$argSeparator = NULL
LinkHelper::$validationErrors = NULL
LinkHelper::$tags = array
LinkHelper::$__tainted = NULL
LinkHelper::$__cleaned = NULL
LinkHelper::$Html = HtmlHelper object
LinkHelper::$Session = SessionHelper object
$lang = "dok"
$otherLangs = array(
"eng",
"hrv"
)
$globalNav = array(
array(
"Page" => array()
),
array(
"Page" => array()
),
array(
"Page" => array()
),
array(
"Page" => array()
),
array(
"Page" => array()
),
array(
"Page" => array()
),
array(
"Page" => array()
),
array(
"Page" => array()
),
array(
"Page" => array()
),
array(
"Page" => array()
),
array(
"Page" => array()
),
array(
"Page" => array()
),
array(
"Page" => array()
),
array(
"Page" => array()
),
array(
"Page" => array()
),
array(
"Page" => array()
),
array(
"Page" => array()
),
array(
"Page" => array()
),
array(
"Page" => array()
),
array(
"Page" => array()
),
array(
"Page" => array()
),
array(
"Page" => array()
),
array(
"Page" => array()
),
array(
"Page" => array()
),
array(
"Page" => array()
),
array(
"Page" => array()
),
array(
"Page" => array()
)
)
$breadCrumbs = array(
array(
"Page" => array()
)
)
$pageContents = array(
"home_who_we_are" => null
)
$userData = null
$announcements = array(
array(
"Announcement" => array()
),
array(
"Announcement" => array()
),
array(
"Announcement" => array()
)
)
$announcement = array(
"Announcement" => array(
"id" => "4_80",
"class" => "workshop_announcement",
"controller" => "workshop_announcements",
"mask_eng" => "ExhibitionB2B",
"mask_hrv" => "IzložbaB2B",
"title_hrv" => "Back to Basics Radionice za najmlađe na Izložbi minijatura i maketa Agram 2026",
"title_eng" => "Back to Basics Workshops @ Exhibition of Miniatures and Tabletop Scenery Agram 2026",
"content_hrv" => "<p>
Tijekom na&scaron;e Izložbe minijatura i maketa Agram 2026 svakog radnog dana od 17:00 do 18:00 organizirat ćemo i <strong>Back to Basics radionice bojanja minijatura za najmlađe</strong> (8+).&nbsp;</p>
<p>
<a href="https://hosting.photobucket.com/95288841-8654-4bf7-8fc9-a4aa78dce87f/f73b7e94-5adc-4afb-838b-b479ea8886fd.jpg" target="_blank"><img alt="Click for enlarged picture" src="https://hosting.photobucket.com/95288841-8654-4bf7-8fc9-a4aa78dce87f/f73b7e94-5adc-4afb-838b-b479ea8886fd.jpg" width="600" /></a></p>
<p>
<strong>ULAZ BESPLATAN!</strong></p>
<p>
Radionice (trajanja cca 1h ) su prigodne za najmlađe korisnike jer se samo koriste bazične tehnike, alati i materijali a omogućava lak&scaron;i pristup minijaturizmu i maketarstvu fokusiranjem na zabavni proces izrade za razliku od uobičajenog inzistiranja na i&scaron;čekivanje krajnjeg rezultata koji najče&scaron;će donosi stres mlađim polaznicima.</p>
<p>
U svakom od termina po četiri polaznika će moći obojati i sastaviti vlastitu figuru (koju onda nose doma).</p>
",
"content_eng" => "<p>
During our Exhibition of Miniatures and Tabletop Scenery Agram 2026, every weekday from 5:00 PM to 6:00 PM, we will also organize <strong>Back to Basics miniature painting workshops for the youngest (8+)</strong>.</p>
<p>
<a href="https://hosting.photobucket.com/95288841-8654-4bf7-8fc9-a4aa78dce87f/f73b7e94-5adc-4afb-838b-b479ea8886fd.jpg" target="_blank"><img alt="Click for enlarged picture" src="https://hosting.photobucket.com/95288841-8654-4bf7-8fc9-a4aa78dce87f/f73b7e94-5adc-4afb-838b-b479ea8886fd.jpg" width="600" /></a></p>
<p>
<strong>FREE ENTRY! </strong></p>
<p>
The workshops (lasting approx. 1 hour) are suitable for the youngest users because they only use basic techniques, tools and materials and provide an easier approach to miniaturism and model making by focusing on the fun process of making, as opposed to the usual insistence on waiting for the final result, which most often brings stress to younger participants.</p>
<p>
In each session, four participants will be able to color and assemble their own figure (which they then take home).</p>
",
"created" => "2026-02-17 07:57:52",
"first_name" => "Krunoslav",
"last_name" => "Belinić",
"first_name_mask" => "krunoslav",
"last_name_mask" => "belinic",
"start" => null,
"end" => null
)
)
$member = array(
"first_name" => "Krunoslav",
"last_name" => "Belinić",
"first_name_mask" => "krunoslav",
"last_name_mask" => "belinic"
)
$dateCreated = "2026-02-17 07:57:52"</pre><pre class="stack-trace">include - APP/views/home/index.ctp, line 34
View::_render() - CORE/cake/libs/view/view.php, line 736
View::render() - CORE/cake/libs/view/view.php, line 431
Controller::render() - CORE/cake/libs/controller/controller.php, line 909
Dispatcher::_invoke() - CORE/cake/dispatcher.php, line 207
Dispatcher::dispatch() - CORE/cake/dispatcher.php, line 171
[main] - APP/webroot/index.php, line 86</pre></div></pre><pre class="cake-debug"><a href="javascript:void(0);" onclick="document.getElementById('cakeErr6-trace').style.display = (document.getElementById('cakeErr6-trace').style.display == 'none' ? '' : 'none');"><b>Notice</b> (8)</a>: Undefined index: mask_dok [<b>APP/views/home/index.ctp</b>, line <b>37</b>]<div id="cakeErr6-trace" class="cake-stack-trace" style="display: none;"><a href="javascript:void(0);" onclick="document.getElementById('cakeErr6-code').style.display = (document.getElementById('cakeErr6-code').style.display == 'none' ? '' : 'none')">Code</a> | <a href="javascript:void(0);" onclick="document.getElementById('cakeErr6-context').style.display = (document.getElementById('cakeErr6-context').style.display == 'none' ? '' : 'none')">Context</a><div id="cakeErr6-code" class="cake-code-dump" style="display: none;"><pre><code><span style="color: #000000"></span></code>
<code><span style="color: #000000"> if (Configure::read() > 0) {</span></code>
<span class="code-highlight"><code><span style="color: #000000"> include ($___viewFn);</span></code></span></pre></div><pre id="cakeErr6-context" class="cake-context" style="display: none;">$___viewFn = "/home/martin/apps/agram/app/views/home/index.ctp"
$___dataForView = array(
"lang" => "dok",
"otherLangs" => array(
"eng",
"hrv"
),
"globalNav" => array(
array(),
array(),
array(),
array(),
array(),
array(),
array(),
array(),
array(),
array(),
array(),
array(),
array(),
array(),
array(),
array(),
array(),
array(),
array(),
array(),
array(),
array(),
array(),
array(),
array(),
array(),
array()
),
"breadCrumbs" => array(
array()
),
"pageContents" => array(
"home_who_we_are" => null
),
"userData" => null,
"announcements" => array(
array(),
array(),
array()
)
)
$loadHelpers = true
$cached = false
$form = FormHelper
FormHelper::$helpers = array
FormHelper::$fieldset = array
FormHelper::$__options = array
FormHelper::$fields = array
FormHelper::$requestType = NULL
FormHelper::$defaultModel = NULL
FormHelper::$_inputDefaults = array
FormHelper::$_lastAction = ""
FormHelper::$base = ""
FormHelper::$webroot = "/"
FormHelper::$theme = NULL
FormHelper::$here = "/dok"
FormHelper::$params = array
FormHelper::$action = "index"
FormHelper::$plugin = NULL
FormHelper::$data = NULL
FormHelper::$namedArgs = NULL
FormHelper::$argSeparator = NULL
FormHelper::$validationErrors = NULL
FormHelper::$tags = array
FormHelper::$__tainted = NULL
FormHelper::$__cleaned = NULL
FormHelper::$Html = HtmlHelper object
$text = TextHelper
TextHelper::$helpers = NULL
TextHelper::$base = ""
TextHelper::$webroot = "/"
TextHelper::$theme = NULL
TextHelper::$here = "/dok"
TextHelper::$params = array
TextHelper::$action = "index"
TextHelper::$plugin = NULL
TextHelper::$data = NULL
TextHelper::$namedArgs = NULL
TextHelper::$argSeparator = NULL
TextHelper::$validationErrors = NULL
TextHelper::$tags = array
TextHelper::$__tainted = NULL
TextHelper::$__cleaned = NULL
$stringer = StringerHelper
StringerHelper::$helpers = array
StringerHelper::$base = ""
StringerHelper::$webroot = "/"
StringerHelper::$theme = NULL
StringerHelper::$here = "/dok"
StringerHelper::$params = array
StringerHelper::$action = "index"
StringerHelper::$plugin = NULL
StringerHelper::$data = NULL
StringerHelper::$namedArgs = NULL
StringerHelper::$argSeparator = NULL
StringerHelper::$validationErrors = NULL
StringerHelper::$tags = array
StringerHelper::$__tainted = NULL
StringerHelper::$__cleaned = NULL
StringerHelper::$Html = HtmlHelper object
StringerHelper::$Link = LinkHelper object
StringerHelper::$Text = TextHelper object
$menu = MenuHelper
MenuHelper::$helpers = array
MenuHelper::$base = ""
MenuHelper::$webroot = "/"
MenuHelper::$theme = NULL
MenuHelper::$here = "/dok"
MenuHelper::$params = array
MenuHelper::$action = "index"
MenuHelper::$plugin = NULL
MenuHelper::$data = NULL
MenuHelper::$namedArgs = NULL
MenuHelper::$argSeparator = NULL
MenuHelper::$validationErrors = NULL
MenuHelper::$tags = array
MenuHelper::$__tainted = NULL
MenuHelper::$__cleaned = NULL
MenuHelper::$Link = LinkHelper object
$session = SessionHelper
SessionHelper::$helpers = array
SessionHelper::$__active = true
SessionHelper::$valid = false
SessionHelper::$error = false
SessionHelper::$_userAgent = "f9a8355d006790ee743ededbb1f6e3bd"
SessionHelper::$path = "/"
SessionHelper::$lastError = NULL
SessionHelper::$security = "medium"
SessionHelper::$time = 1773395484
SessionHelper::$sessionTime = 1773407484
SessionHelper::$cookieLifeTime = false
SessionHelper::$watchKeys = array
SessionHelper::$id = NULL
SessionHelper::$host = NULL
SessionHelper::$timeout = NULL
SessionHelper::$base = ""
SessionHelper::$webroot = "/"
SessionHelper::$here = "/dok"
SessionHelper::$params = array
SessionHelper::$action = "index"
SessionHelper::$data = NULL
SessionHelper::$theme = NULL
SessionHelper::$plugin = NULL
$html = HtmlHelper
HtmlHelper::$tags = array
HtmlHelper::$_crumbs = array
HtmlHelper::$__includedScripts = array
HtmlHelper::$_scriptBlockOptions = array
HtmlHelper::$__docTypes = array
HtmlHelper::$helpers = NULL
HtmlHelper::$base = ""
HtmlHelper::$webroot = "/"
HtmlHelper::$theme = NULL
HtmlHelper::$here = "/dok"
HtmlHelper::$params = array
HtmlHelper::$action = "index"
HtmlHelper::$plugin = NULL
HtmlHelper::$data = NULL
HtmlHelper::$namedArgs = NULL
HtmlHelper::$argSeparator = NULL
HtmlHelper::$validationErrors = NULL
HtmlHelper::$__tainted = NULL
HtmlHelper::$__cleaned = NULL
$link = LinkHelper
LinkHelper::$helpers = array
LinkHelper::$lang = "dok"
LinkHelper::$defaultLang = "hrv"
LinkHelper::$base = ""
LinkHelper::$webroot = "/"
LinkHelper::$theme = NULL
LinkHelper::$here = "/dok"
LinkHelper::$params = array
LinkHelper::$action = "index"
LinkHelper::$plugin = NULL
LinkHelper::$data = NULL
LinkHelper::$namedArgs = NULL
LinkHelper::$argSeparator = NULL
LinkHelper::$validationErrors = NULL
LinkHelper::$tags = array
LinkHelper::$__tainted = NULL
LinkHelper::$__cleaned = NULL
LinkHelper::$Html = HtmlHelper object
LinkHelper::$Session = SessionHelper object
$lang = "dok"
$otherLangs = array(
"eng",
"hrv"
)
$globalNav = array(
array(
"Page" => array()
),
array(
"Page" => array()
),
array(
"Page" => array()
),
array(
"Page" => array()
),
array(
"Page" => array()
),
array(
"Page" => array()
),
array(
"Page" => array()
),
array(
"Page" => array()
),
array(
"Page" => array()
),
array(
"Page" => array()
),
array(
"Page" => array()
),
array(
"Page" => array()
),
array(
"Page" => array()
),
array(
"Page" => array()
),
array(
"Page" => array()
),
array(
"Page" => array()
),
array(
"Page" => array()
),
array(
"Page" => array()
),
array(
"Page" => array()
),
array(
"Page" => array()
),
array(
"Page" => array()
),
array(
"Page" => array()
),
array(
"Page" => array()
),
array(
"Page" => array()
),
array(
"Page" => array()
),
array(
"Page" => array()
),
array(
"Page" => array()
)
)
$breadCrumbs = array(
array(
"Page" => array()
)
)
$pageContents = array(
"home_who_we_are" => null
)
$userData = null
$announcements = array(
array(
"Announcement" => array()
),
array(
"Announcement" => array()
),
array(
"Announcement" => array()
)
)
$announcement = array(
"Announcement" => array(
"id" => "4_80",
"class" => "workshop_announcement",
"controller" => "workshop_announcements",
"mask_eng" => "ExhibitionB2B",
"mask_hrv" => "IzložbaB2B",
"title_hrv" => "Back to Basics Radionice za najmlađe na Izložbi minijatura i maketa Agram 2026",
"title_eng" => "Back to Basics Workshops @ Exhibition of Miniatures and Tabletop Scenery Agram 2026",
"content_hrv" => "<p>
Tijekom na&scaron;e Izložbe minijatura i maketa Agram 2026 svakog radnog dana od 17:00 do 18:00 organizirat ćemo i <strong>Back to Basics radionice bojanja minijatura za najmlađe</strong> (8+).&nbsp;</p>
<p>
<a href="https://hosting.photobucket.com/95288841-8654-4bf7-8fc9-a4aa78dce87f/f73b7e94-5adc-4afb-838b-b479ea8886fd.jpg" target="_blank"><img alt="Click for enlarged picture" src="https://hosting.photobucket.com/95288841-8654-4bf7-8fc9-a4aa78dce87f/f73b7e94-5adc-4afb-838b-b479ea8886fd.jpg" width="600" /></a></p>
<p>
<strong>ULAZ BESPLATAN!</strong></p>
<p>
Radionice (trajanja cca 1h ) su prigodne za najmlađe korisnike jer se samo koriste bazične tehnike, alati i materijali a omogućava lak&scaron;i pristup minijaturizmu i maketarstvu fokusiranjem na zabavni proces izrade za razliku od uobičajenog inzistiranja na i&scaron;čekivanje krajnjeg rezultata koji najče&scaron;će donosi stres mlađim polaznicima.</p>
<p>
U svakom od termina po četiri polaznika će moći obojati i sastaviti vlastitu figuru (koju onda nose doma).</p>
",
"content_eng" => "<p>
During our Exhibition of Miniatures and Tabletop Scenery Agram 2026, every weekday from 5:00 PM to 6:00 PM, we will also organize <strong>Back to Basics miniature painting workshops for the youngest (8+)</strong>.</p>
<p>
<a href="https://hosting.photobucket.com/95288841-8654-4bf7-8fc9-a4aa78dce87f/f73b7e94-5adc-4afb-838b-b479ea8886fd.jpg" target="_blank"><img alt="Click for enlarged picture" src="https://hosting.photobucket.com/95288841-8654-4bf7-8fc9-a4aa78dce87f/f73b7e94-5adc-4afb-838b-b479ea8886fd.jpg" width="600" /></a></p>
<p>
<strong>FREE ENTRY! </strong></p>
<p>
The workshops (lasting approx. 1 hour) are suitable for the youngest users because they only use basic techniques, tools and materials and provide an easier approach to miniaturism and model making by focusing on the fun process of making, as opposed to the usual insistence on waiting for the final result, which most often brings stress to younger participants.</p>
<p>
In each session, four participants will be able to color and assemble their own figure (which they then take home).</p>
",
"created" => "2026-02-17 07:57:52",
"first_name" => "Krunoslav",
"last_name" => "Belinić",
"first_name_mask" => "krunoslav",
"last_name_mask" => "belinic",
"start" => null,
"end" => null
)
)
$member = array(
"first_name" => "Krunoslav",
"last_name" => "Belinić",
"first_name_mask" => "krunoslav",
"last_name_mask" => "belinic"
)
$dateCreated = "2026-02-17 07:57:52"</pre><pre class="stack-trace">include - APP/views/home/index.ctp, line 37
View::_render() - CORE/cake/libs/view/view.php, line 736
View::render() - CORE/cake/libs/view/view.php, line 431
Controller::render() - CORE/cake/libs/controller/controller.php, line 909
Dispatcher::_invoke() - CORE/cake/dispatcher.php, line 207
Dispatcher::dispatch() - CORE/cake/dispatcher.php, line 171
[main] - APP/webroot/index.php, line 86</pre></div></pre> </div>
<div class="announcement workshop_announcement">
<h3><a href="/dok/workshop_announcements/2026/02/17" class="readMore"></a></h3>
<span class="details">
17<span class="superscript">th</span> February 2026, post_details_1 <a href="/dok/members/krunoslav.belinic">Krunoslav Belinić</a> post_details_2 <a href="/dok/workshop_announcements">category_workshop_announcements</a> </span>
</div>
<div class="announcement workshop_announcement">
<h3><a href="/dok/workshop_announcements/2026/02/06" class="readMore"></a></h3>
<span class="details">
6<span class="superscript">th</span> February 2026, post_details_1 <a href="/dok/members/marko.paunovic">Marko Paunović</a> post_details_2 <a href="/dok/workshop_announcements">category_workshop_announcements</a> </span>
</div>
<p><a href="/dok/announcements">all_announcements</a></p>
</div>
<div id="middleColumn">
<!--<div id="hotStuff">
hot_tournaments<br/></div>-->
<div id="hotSponsor">
</div><h2>latest_articles</h2>
<ul class="latest">
<li>
<pre class="cake-debug"><a href="javascript:void(0);" onclick="document.getElementById('cakeErr7-trace').style.display = (document.getElementById('cakeErr7-trace').style.display == 'none' ? '' : 'none');"><b>Notice</b> (8)</a>: Undefined index: title_dok [<b>APP/views/elements/latestArticles.ctp</b>, line <b>7</b>]<div id="cakeErr7-trace" class="cake-stack-trace" style="display: none;"><a href="javascript:void(0);" onclick="document.getElementById('cakeErr7-code').style.display = (document.getElementById('cakeErr7-code').style.display == 'none' ? '' : 'none')">Code</a> | <a href="javascript:void(0);" onclick="document.getElementById('cakeErr7-context').style.display = (document.getElementById('cakeErr7-context').style.display == 'none' ? '' : 'none')">Context</a><div id="cakeErr7-code" class="cake-code-dump" style="display: none;"><pre><code><span style="color: #000000"></span></code>
<code><span style="color: #000000"> if (Configure::read() > 0) {</span></code>
<span class="code-highlight"><code><span style="color: #000000"> include ($___viewFn);</span></code></span></pre></div><pre id="cakeErr7-context" class="cake-context" style="display: none;">$___viewFn = "/home/martin/apps/agram/app/views/elements/latestArticles.ctp"
$___dataForView = array(
"lang" => "dok",
"otherLangs" => array(
"eng",
"hrv"
),
"globalNav" => array(
array(),
array(),
array(),
array(),
array(),
array(),
array(),
array(),
array(),
array(),
array(),
array(),
array(),
array(),
array(),
array(),
array(),
array(),
array(),
array(),
array(),
array(),
array(),
array(),
array(),
array(),
array()
),
"breadCrumbs" => array(
array()
),
"pageContents" => array(
"home_who_we_are" => null
),
"userData" => null,
"announcements" => array(
array(),
array(),
array()
),
"cache" => array(
"time" => "+1 day",
"key" => "dok"
),
"form" => FormHelper
FormHelper::$helpers = array
FormHelper::$fieldset = array
FormHelper::$__options = array
FormHelper::$fields = array
FormHelper::$requestType = NULL
FormHelper::$defaultModel = NULL
FormHelper::$_inputDefaults = array
FormHelper::$_lastAction = ""
FormHelper::$base = ""
FormHelper::$webroot = "/"
FormHelper::$theme = NULL
FormHelper::$here = "/dok"
FormHelper::$params = array
FormHelper::$action = "index"
FormHelper::$plugin = NULL
FormHelper::$data = NULL
FormHelper::$namedArgs = NULL
FormHelper::$argSeparator = NULL
FormHelper::$validationErrors = NULL
FormHelper::$tags = array
FormHelper::$__tainted = NULL
FormHelper::$__cleaned = NULL
FormHelper::$Html = HtmlHelper object,
"text" => TextHelper
TextHelper::$helpers = NULL
TextHelper::$base = ""
TextHelper::$webroot = "/"
TextHelper::$theme = NULL
TextHelper::$here = "/dok"
TextHelper::$params = array
TextHelper::$action = "index"
TextHelper::$plugin = NULL
TextHelper::$data = NULL
TextHelper::$namedArgs = NULL
TextHelper::$argSeparator = NULL
TextHelper::$validationErrors = NULL
TextHelper::$tags = array
TextHelper::$__tainted = NULL
TextHelper::$__cleaned = NULL,
"stringer" => StringerHelper
StringerHelper::$helpers = array
StringerHelper::$base = ""
StringerHelper::$webroot = "/"
StringerHelper::$theme = NULL
StringerHelper::$here = "/dok"
StringerHelper::$params = array
StringerHelper::$action = "index"
StringerHelper::$plugin = NULL
StringerHelper::$data = NULL
StringerHelper::$namedArgs = NULL
StringerHelper::$argSeparator = NULL
StringerHelper::$validationErrors = NULL
StringerHelper::$tags = array
StringerHelper::$__tainted = NULL
StringerHelper::$__cleaned = NULL
StringerHelper::$Html = HtmlHelper object
StringerHelper::$Link = LinkHelper object
StringerHelper::$Text = TextHelper object,
"menu" => MenuHelper
MenuHelper::$helpers = array
MenuHelper::$base = ""
MenuHelper::$webroot = "/"
MenuHelper::$theme = NULL
MenuHelper::$here = "/dok"
MenuHelper::$params = array
MenuHelper::$action = "index"
MenuHelper::$plugin = NULL
MenuHelper::$data = NULL
MenuHelper::$namedArgs = NULL
MenuHelper::$argSeparator = NULL
MenuHelper::$validationErrors = NULL
MenuHelper::$tags = array
MenuHelper::$__tainted = NULL
MenuHelper::$__cleaned = NULL
MenuHelper::$Link = LinkHelper object,
"session" => SessionHelper
SessionHelper::$helpers = array
SessionHelper::$__active = true
SessionHelper::$valid = false
SessionHelper::$error = false
SessionHelper::$_userAgent = "f9a8355d006790ee743ededbb1f6e3bd"
SessionHelper::$path = "/"
SessionHelper::$lastError = NULL
SessionHelper::$security = "medium"
SessionHelper::$time = 1773314240
SessionHelper::$sessionTime = 1773326240
SessionHelper::$cookieLifeTime = false
SessionHelper::$watchKeys = array
SessionHelper::$id = NULL
SessionHelper::$host = NULL
SessionHelper::$timeout = NULL
SessionHelper::$base = ""
SessionHelper::$webroot = "/"
SessionHelper::$here = "/dok"
SessionHelper::$params = array
SessionHelper::$action = "index"
SessionHelper::$data = NULL
SessionHelper::$theme = NULL
SessionHelper::$plugin = NULL,
"html" => HtmlHelper
HtmlHelper::$tags = array
HtmlHelper::$_crumbs = array
HtmlHelper::$__includedScripts = array
HtmlHelper::$_scriptBlockOptions = array
HtmlHelper::$__docTypes = array
HtmlHelper::$helpers = NULL
HtmlHelper::$base = ""
HtmlHelper::$webroot = "/"
HtmlHelper::$theme = NULL
HtmlHelper::$here = "/dok"
HtmlHelper::$params = array
HtmlHelper::$action = "index"
HtmlHelper::$plugin = NULL
HtmlHelper::$data = NULL
HtmlHelper::$namedArgs = NULL
HtmlHelper::$argSeparator = NULL
HtmlHelper::$validationErrors = NULL
HtmlHelper::$__tainted = NULL
HtmlHelper::$__cleaned = NULL,
"link" => LinkHelper
LinkHelper::$helpers = array
LinkHelper::$lang = "dok"
LinkHelper::$defaultLang = "hrv"
LinkHelper::$base = ""
LinkHelper::$webroot = "/"
LinkHelper::$theme = NULL
LinkHelper::$here = "/dok"
LinkHelper::$params = array
LinkHelper::$action = "index"
LinkHelper::$plugin = NULL
LinkHelper::$data = NULL
LinkHelper::$namedArgs = NULL
LinkHelper::$argSeparator = NULL
LinkHelper::$validationErrors = NULL
LinkHelper::$tags = array
LinkHelper::$__tainted = NULL
LinkHelper::$__cleaned = NULL
LinkHelper::$Html = HtmlHelper object
LinkHelper::$Session = SessionHelper object
)
$loadHelpers = false
$cached = false
$loadedHelpers = array()
$lang = "dok"
$otherLangs = array(
"eng",
"hrv"
)
$globalNav = array(
array(
"Page" => array()
),
array(
"Page" => array()
),
array(
"Page" => array()
),
array(
"Page" => array()
),
array(
"Page" => array()
),
array(
"Page" => array()
),
array(
"Page" => array()
),
array(
"Page" => array()
),
array(
"Page" => array()
),
array(
"Page" => array()
),
array(
"Page" => array()
),
array(
"Page" => array()
),
array(
"Page" => array()
),
array(
"Page" => array()
),
array(
"Page" => array()
),
array(
"Page" => array()
),
array(
"Page" => array()
),
array(
"Page" => array()
),
array(
"Page" => array()
),
array(
"Page" => array()
),
array(
"Page" => array()
),
array(
"Page" => array()
),
array(
"Page" => array()
),
array(
"Page" => array()
),
array(
"Page" => array()
),
array(
"Page" => array()
),
array(
"Page" => array()
)
)
$breadCrumbs = array(
array(
"Page" => array()
)
)
$pageContents = array(
"home_who_we_are" => null
)
$userData = null
$announcements = array(
array(
"Announcement" => array()
),
array(
"Announcement" => array()
),
array(
"Announcement" => array()
)
)
$cache = array(
"time" => "+1 day",
"key" => "dok"
)
$form = FormHelper
FormHelper::$helpers = array
FormHelper::$fieldset = array
FormHelper::$__options = array
FormHelper::$fields = array
FormHelper::$requestType = NULL
FormHelper::$defaultModel = NULL
FormHelper::$_inputDefaults = array
FormHelper::$_lastAction = ""
FormHelper::$base = ""
FormHelper::$webroot = "/"
FormHelper::$theme = NULL
FormHelper::$here = "/dok"
FormHelper::$params = array
FormHelper::$action = "index"
FormHelper::$plugin = NULL
FormHelper::$data = NULL
FormHelper::$namedArgs = NULL
FormHelper::$argSeparator = NULL
FormHelper::$validationErrors = NULL
FormHelper::$tags = array
FormHelper::$__tainted = NULL
FormHelper::$__cleaned = NULL
FormHelper::$Html = HtmlHelper object
$text = TextHelper
TextHelper::$helpers = NULL
TextHelper::$base = ""
TextHelper::$webroot = "/"
TextHelper::$theme = NULL
TextHelper::$here = "/dok"
TextHelper::$params = array
TextHelper::$action = "index"
TextHelper::$plugin = NULL
TextHelper::$data = NULL
TextHelper::$namedArgs = NULL
TextHelper::$argSeparator = NULL
TextHelper::$validationErrors = NULL
TextHelper::$tags = array
TextHelper::$__tainted = NULL
TextHelper::$__cleaned = NULL
$stringer = StringerHelper
StringerHelper::$helpers = array
StringerHelper::$base = ""
StringerHelper::$webroot = "/"
StringerHelper::$theme = NULL
StringerHelper::$here = "/dok"
StringerHelper::$params = array
StringerHelper::$action = "index"
StringerHelper::$plugin = NULL
StringerHelper::$data = NULL
StringerHelper::$namedArgs = NULL
StringerHelper::$argSeparator = NULL
StringerHelper::$validationErrors = NULL
StringerHelper::$tags = array
StringerHelper::$__tainted = NULL
StringerHelper::$__cleaned = NULL
StringerHelper::$Html = HtmlHelper object
StringerHelper::$Link = LinkHelper object
StringerHelper::$Text = TextHelper object
$menu = MenuHelper
MenuHelper::$helpers = array
MenuHelper::$base = ""
MenuHelper::$webroot = "/"
MenuHelper::$theme = NULL
MenuHelper::$here = "/dok"
MenuHelper::$params = array
MenuHelper::$action = "index"
MenuHelper::$plugin = NULL
MenuHelper::$data = NULL
MenuHelper::$namedArgs = NULL
MenuHelper::$argSeparator = NULL
MenuHelper::$validationErrors = NULL
MenuHelper::$tags = array
MenuHelper::$__tainted = NULL
MenuHelper::$__cleaned = NULL
MenuHelper::$Link = LinkHelper object
$session = SessionHelper
SessionHelper::$helpers = array
SessionHelper::$__active = true
SessionHelper::$valid = false
SessionHelper::$error = false
SessionHelper::$_userAgent = "f9a8355d006790ee743ededbb1f6e3bd"
SessionHelper::$path = "/"
SessionHelper::$lastError = NULL
SessionHelper::$security = "medium"
SessionHelper::$time = 1773314240
SessionHelper::$sessionTime = 1773326240
SessionHelper::$cookieLifeTime = false
SessionHelper::$watchKeys = array
SessionHelper::$id = NULL
SessionHelper::$host = NULL
SessionHelper::$timeout = NULL
SessionHelper::$base = ""
SessionHelper::$webroot = "/"
SessionHelper::$here = "/dok"
SessionHelper::$params = array
SessionHelper::$action = "index"
SessionHelper::$data = NULL
SessionHelper::$theme = NULL
SessionHelper::$plugin = NULL
$html = HtmlHelper
HtmlHelper::$tags = array
HtmlHelper::$_crumbs = array
HtmlHelper::$__includedScripts = array
HtmlHelper::$_scriptBlockOptions = array
HtmlHelper::$__docTypes = array
HtmlHelper::$helpers = NULL
HtmlHelper::$base = ""
HtmlHelper::$webroot = "/"
HtmlHelper::$theme = NULL
HtmlHelper::$here = "/dok"
HtmlHelper::$params = array
HtmlHelper::$action = "index"
HtmlHelper::$plugin = NULL
HtmlHelper::$data = NULL
HtmlHelper::$namedArgs = NULL
HtmlHelper::$argSeparator = NULL
HtmlHelper::$validationErrors = NULL
HtmlHelper::$__tainted = NULL
HtmlHelper::$__cleaned = NULL
$link = LinkHelper
LinkHelper::$helpers = array
LinkHelper::$lang = "dok"
LinkHelper::$defaultLang = "hrv"
LinkHelper::$base = ""
LinkHelper::$webroot = "/"
LinkHelper::$theme = NULL
LinkHelper::$here = "/dok"
LinkHelper::$params = array
LinkHelper::$action = "index"
LinkHelper::$plugin = NULL
LinkHelper::$data = NULL
LinkHelper::$namedArgs = NULL
LinkHelper::$argSeparator = NULL
LinkHelper::$validationErrors = NULL
LinkHelper::$tags = array
LinkHelper::$__tainted = NULL
LinkHelper::$__cleaned = NULL
LinkHelper::$Html = HtmlHelper object
LinkHelper::$Session = SessionHelper object
$articles = array(
array(
"Article" => array(),
"Member" => array()
),
array(
"Article" => array(),
"Member" => array()
),
array(
"Article" => array(),
"Member" => array()
),
array(
"Article" => array(),
"Member" => array()
),
array(
"Article" => array(),
"Member" => array()
)
)
$article = array(
"Article" => array(
"id" => "496",
"member_id" => "35",
"title_eng" => "Exhibition of Miniatures and Tabletop Scenery 2026",
"title_hrv" => "Izložba minijatura i maketa Agram 2026",
"mask_eng" => "exhibition_of_miniatures_and_tabletop_scenery_2026",
"mask_hrv" => "izlozba_minijatura_i_maketa_agram_2026",
"content_eng" => "<p>
<a href=" https://hosting.photobucket.com/95288841-8654-4bf7-8fc9-a4aa78dce87f/dc756f84-867d-4df4-acd8-5d43775cafc2.jpg
" target="_blank"> <img alt="Click for enlarged picture" src="
https://hosting.photobucket.com/95288841-8654-4bf7-8fc9-a4aa78dce87f/dc756f84-867d-4df4-acd8-5d43775cafc2.jpg" width="600" /> </a></p>
<p>
<strong>The exhibition of miniatures and models &quot;Agram 2026&quot;</strong> was held this year from 19.2. to 08.03. 2026. The exhibition was set up on Wednesday 18.2. and was attended by a large number of members and friends of the Association who exhibited their works.</p>
<p>
&nbsp;</p>
<p>
<a href=" https://hosting.photobucket.com/95288841-8654-4bf7-8fc9-a4aa78dce87f/8529d6d4-76ea-4872-a9e6-748e04223a4e.jpg
" target="_blank"> <img alt="Click for enlarged picture" src="
https://hosting.photobucket.com/95288841-8654-4bf7-8fc9-a4aa78dce87f/8529d6d4-76ea-4872-a9e6-748e04223a4e.jpg
" width="600" /> </a></p>
<p>
<a href=" https://hosting.photobucket.com/95288841-8654-4bf7-8fc9-a4aa78dce87f/f3038937-f001-4ceb-b725-a330fcd64cee.jpg
" target="_blank"> <img alt="Click for enlarged picture" src="
https://hosting.photobucket.com/95288841-8654-4bf7-8fc9-a4aa78dce87f/f3038937-f001-4ceb-b725-a330fcd64cee.jpg
" width="600" /> </a></p>
<p>
<a href=" https://hosting.photobucket.com/95288841-8654-4bf7-8fc9-a4aa78dce87f/3575379e-e068-49e2-9d4d-c9a49531fdc2.jpg
" target="_blank"> <img alt="Click for enlarged picture" src="
https://hosting.photobucket.com/95288841-8654-4bf7-8fc9-a4aa78dce87f/3575379e-e068-49e2-9d4d-c9a49531fdc2.jpg" width="600" /> </a></p>
<p>
<a href=" https://hosting.photobucket.com/95288841-8654-4bf7-8fc9-a4aa78dce87f/e51713c7-2add-4f8f-ae37-e6eba25badff.jpg
" target="_blank"> <img alt="Click for enlarged picture" src="
https://hosting.photobucket.com/95288841-8654-4bf7-8fc9-a4aa78dce87f/e51713c7-2add-4f8f-ae37-e6eba25badff.jpg" width="600" /> </a></p>
<p>
<a href=" https://hosting.photobucket.com/95288841-8654-4bf7-8fc9-a4aa78dce87f/9c0bb546-50a8-483d-aeab-ab3b2ce9f094.jpg
" target="_blank"> <img alt="Click for enlarged picture" src="
https://hosting.photobucket.com/95288841-8654-4bf7-8fc9-a4aa78dce87f/9c0bb546-50a8-483d-aeab-ab3b2ce9f094.jpg" width="600" /> </a></p>
<p>
The opening of the Exhibition took place on Thursday, February 19, 2026, starting at 6:00 PM. The exhibition was organized on the occasion of our twenty-third birthday.</p>
<p>
&nbsp;</p>
<p>
<a href=" https://hosting.photobucket.com/95288841-8654-4bf7-8fc9-a4aa78dce87f/71c7bfc2-1ffc-43b9-9d5a-53e009f6b86d.jpg
" target="_blank"> <img alt="Click for enlarged picture" src="
https://hosting.photobucket.com/95288841-8654-4bf7-8fc9-a4aa78dce87f/71c7bfc2-1ffc-43b9-9d5a-53e009f6b86d.jpg" width="600" /> </a></p>
<p>
<a href=" https://hosting.photobucket.com/95288841-8654-4bf7-8fc9-a4aa78dce87f/007b4701-1d7c-4a67-a599-0539a2aa3191.jpg
" target="_blank"> <img alt="Click for enlarged picture" src="
https://hosting.photobucket.com/95288841-8654-4bf7-8fc9-a4aa78dce87f/007b4701-1d7c-4a67-a599-0539a2aa3191.jpg" width="600" /> </a></p>
<p>
<a href=" https://hosting.photobucket.com/95288841-8654-4bf7-8fc9-a4aa78dce87f/2c8090e2-8b95-4368-bb48-98876d680e15.jpg
" target="_blank"> <img alt="Click for enlarged picture" src="
https://hosting.photobucket.com/95288841-8654-4bf7-8fc9-a4aa78dce87f/2c8090e2-8b95-4368-bb48-98876d680e15.jpg" width="600" /> </a></p>
<p>
<a href=" https://hosting.photobucket.com/95288841-8654-4bf7-8fc9-a4aa78dce87f/375768ad-a8bb-49bf-9845-e46c896ba7ec.jpg
" target="_blank"> <img alt="Click for enlarged picture" src="
https://hosting.photobucket.com/95288841-8654-4bf7-8fc9-a4aa78dce87f/375768ad-a8bb-49bf-9845-e46c896ba7ec.jpg" width="600" /> </a></p>
<p>
<a href=" https://hosting.photobucket.com/95288841-8654-4bf7-8fc9-a4aa78dce87f/a93de974-4ccb-4876-85b0-4d066ae402b3.jpg
" target="_blank"> <img alt="Click for enlarged picture" src="
https://hosting.photobucket.com/95288841-8654-4bf7-8fc9-a4aa78dce87f/a93de974-4ccb-4876-85b0-4d066ae402b3.jpg" width="600" /> </a></p>
<p>
<a href=" https://hosting.photobucket.com/95288841-8654-4bf7-8fc9-a4aa78dce87f/d323ccc9-1b9a-4cb2-8adf-7019b0e217f4.jpg
" target="_blank"> <img alt="Click for enlarged picture" src="
https://hosting.photobucket.com/95288841-8654-4bf7-8fc9-a4aa78dce87f/d323ccc9-1b9a-4cb2-8adf-7019b0e217f4.jpg" width="600" /> </a></p>
<p>
<a href=" https://hosting.photobucket.com/95288841-8654-4bf7-8fc9-a4aa78dce87f/a5a66447-2d76-47ae-866d-4d512ef469a5.jpg
" target="_blank"> <img alt="Click for enlarged picture" src="
https://hosting.photobucket.com/95288841-8654-4bf7-8fc9-a4aa78dce87f/a5a66447-2d76-47ae-866d-4d512ef469a5.jpg" width="600" /> </a></p>
<p>
<a href=" https://hosting.photobucket.com/95288841-8654-4bf7-8fc9-a4aa78dce87f/3e7bcfc9-ba02-4f94-a6c3-79dfaea3639e.jpg
" target="_blank"> <img alt="Click for enlarged picture" src="
https://hosting.photobucket.com/95288841-8654-4bf7-8fc9-a4aa78dce87f/3e7bcfc9-ba02-4f94-a6c3-79dfaea3639e.jpg" width="600" /> </a></p>
<p>
<a href=" https://hosting.photobucket.com/95288841-8654-4bf7-8fc9-a4aa78dce87f/24e79466-4a9e-4b10-970c-caad235d260d.jpg
" target="_blank"> <img alt="Click for enlarged picture" src="
https://hosting.photobucket.com/95288841-8654-4bf7-8fc9-a4aa78dce87f/24e79466-4a9e-4b10-970c-caad235d260d.jpg" width="600" /> </a></p>
<p>
As always, the Exhibition presented a cross-section of the work of the Association, its members, participants of its courses and workshops, and members of the Miniature Painters Croatia FB group. In a large number of showcases, there were numerous miniatures for tabletop strategy games, board games, and an entire showcase was dedicated to award-winning exhibits from previous miniature competitions. Several showcases were dedicated to projects that the Association has been implementing for 23 years, such as the UMS &bdquo;Agram&ldquo; Library and Reading Room, the Workshop for Making Spatial Models and the Miniature Painting Workshop, as well as new ones such as the Agram Group Build, the Agram Lego Section and the Back to Basics painting workshop for the youngest.</p>
<p>
<a href=" https://hosting.photobucket.com/95288841-8654-4bf7-8fc9-a4aa78dce87f/fca84936-af71-44d3-9a4c-faeb26163899.jpg
" target="_blank"> <img alt="Click for enlarged picture" src="
https://hosting.photobucket.com/95288841-8654-4bf7-8fc9-a4aa78dce87f/fca84936-af71-44d3-9a4c-faeb26163899.jpg" width="600" /> </a></p>
<p>
<a href=" https://hosting.photobucket.com/95288841-8654-4bf7-8fc9-a4aa78dce87f/459bc5ac-8702-46f9-93b4-547deaabdef4.jpg
" target="_blank"> <img alt="Click for enlarged picture" src="
https://hosting.photobucket.com/95288841-8654-4bf7-8fc9-a4aa78dce87f/459bc5ac-8702-46f9-93b4-547deaabdef4.jpg" width="600" /> </a></p>
<p>
<a href=" https://hosting.photobucket.com/95288841-8654-4bf7-8fc9-a4aa78dce87f/91a04363-b2ef-4635-a046-7edf25ce7808.jpg
" target="_blank"> <img alt="Click for enlarged picture" src="
https://hosting.photobucket.com/95288841-8654-4bf7-8fc9-a4aa78dce87f/91a04363-b2ef-4635-a046-7edf25ce7808.jpg" width="600" /> </a></p>
<p>
<a href=" https://hosting.photobucket.com/95288841-8654-4bf7-8fc9-a4aa78dce87f/73256af5-fd5d-40b5-95e1-120e49c9be87.jpg
" target="_blank"> <img alt="Click for enlarged picture" src="
https://hosting.photobucket.com/95288841-8654-4bf7-8fc9-a4aa78dce87f/73256af5-fd5d-40b5-95e1-120e49c9be87.jpg" width="600" /> </a></p>
<p>
<a href=" https://hosting.photobucket.com/95288841-8654-4bf7-8fc9-a4aa78dce87f/979f9be5-23f3-4df9-91dc-ab71d6a10d64.jpg
" target="_blank"> <img alt="Click for enlarged picture" src="
https://hosting.photobucket.com/95288841-8654-4bf7-8fc9-a4aa78dce87f/979f9be5-23f3-4df9-91dc-ab71d6a10d64.jpg" width="600" /> </a></p>
<p>
<a href=" https://hosting.photobucket.com/95288841-8654-4bf7-8fc9-a4aa78dce87f/d0ff4379-183a-47b9-a740-9ddc283ebc29.jpg
" target="_blank"> <img alt="Click for enlarged picture" src="
https://hosting.photobucket.com/95288841-8654-4bf7-8fc9-a4aa78dce87f/d0ff4379-183a-47b9-a740-9ddc283ebc29.jpg" width="600" /> </a></p>
<p>
<a href=" https://hosting.photobucket.com/95288841-8654-4bf7-8fc9-a4aa78dce87f/4333e95e-bbbd-4f47-aaea-38a9c99e54d8.jpg
" target="_blank"> <img alt="Click for enlarged picture" src="
https://hosting.photobucket.com/95288841-8654-4bf7-8fc9-a4aa78dce87f/4333e95e-bbbd-4f47-aaea-38a9c99e54d8.jpg" width="600" /> </a></p>
<p>
<a href=" https://hosting.photobucket.com/95288841-8654-4bf7-8fc9-a4aa78dce87f/1372f8a2-b222-48ee-ae45-a90b5a354ef7.jpg
" target="_blank"> <img alt="Click for enlarged picture" src="
https://hosting.photobucket.com/95288841-8654-4bf7-8fc9-a4aa78dce87f/1372f8a2-b222-48ee-ae45-a90b5a354ef7.jpg" width="600" /> </a></p>
<p>
<a href=" https://hosting.photobucket.com/95288841-8654-4bf7-8fc9-a4aa78dce87f/6a1b4fd1-d982-4b06-9c5f-3cd40d6bf10a.jpg
" target="_blank"> <img alt="Click for enlarged picture" src="
https://hosting.photobucket.com/95288841-8654-4bf7-8fc9-a4aa78dce87f/6a1b4fd1-d982-4b06-9c5f-3cd40d6bf10a.jpg" width="600" /> </a></p>
<p>
<a href=" https://hosting.photobucket.com/95288841-8654-4bf7-8fc9-a4aa78dce87f/c2ec45e1-e0f3-463a-b254-cb2a38b53e14.jpg
" target="_blank"> <img alt="Click for enlarged picture" src="
https://hosting.photobucket.com/95288841-8654-4bf7-8fc9-a4aa78dce87f/c2ec45e1-e0f3-463a-b254-cb2a38b53e14.jpg" width="600" /> </a></p>
<p>
<a href=" https://hosting.photobucket.com/95288841-8654-4bf7-8fc9-a4aa78dce87f/17553b9a-0592-4f6a-a097-3f1a97e161f3.jpg
" target="_blank"> <img alt="Click for enlarged picture" src="
https://hosting.photobucket.com/95288841-8654-4bf7-8fc9-a4aa78dce87f/17553b9a-0592-4f6a-a097-3f1a97e161f3.jpg" width="600" /> </a></p>
<p>
<a href=" https://hosting.photobucket.com/95288841-8654-4bf7-8fc9-a4aa78dce87f/8658bd6b-dff2-4d24-8473-928d44d44480.jpg
" target="_blank"> <img alt="Click for enlarged picture" src="
https://hosting.photobucket.com/95288841-8654-4bf7-8fc9-a4aa78dce87f/8658bd6b-dff2-4d24-8473-928d44d44480.jpg" width="600" /> </a></p>
<p>
<a href=" https://hosting.photobucket.com/95288841-8654-4bf7-8fc9-a4aa78dce87f/ecab0ea7-f75b-4e31-a520-d088ad39fa17.jpg
" target="_blank"> <img alt="Click for enlarged picture" src="
https://hosting.photobucket.com/95288841-8654-4bf7-8fc9-a4aa78dce87f/ecab0ea7-f75b-4e31-a520-d088ad39fa17.jpg" width="600" /> </a></p>
<p>
<a href=" https://hosting.photobucket.com/95288841-8654-4bf7-8fc9-a4aa78dce87f/9495a2f5-8a82-41f2-abf4-9ade3db41d87.jpg
" target="_blank"> <img alt="Click for enlarged picture" src="
https://hosting.photobucket.com/95288841-8654-4bf7-8fc9-a4aa78dce87f/9495a2f5-8a82-41f2-abf4-9ade3db41d87.jpg" width="600" /> </a></p>
<p>
<a href=" https://hosting.photobucket.com/95288841-8654-4bf7-8fc9-a4aa78dce87f/362cc6fd-a5dd-474b-9b9f-aeab27d6dcfa.jpg
" target="_blank"> <img alt="Click for enlarged picture" src="
https://hosting.photobucket.com/95288841-8654-4bf7-8fc9-a4aa78dce87f/362cc6fd-a5dd-474b-9b9f-aeab27d6dcfa.jpg" width="600" /> </a></p>
<p>
It was a special honor for us to host our guest exhibitor, Ninoslav Luk, a miniaturist from Poreč, who introduced himself to us with his collection of historical dioramas.</p>
<p>
<a href=" https://hosting.photobucket.com/95288841-8654-4bf7-8fc9-a4aa78dce87f/ba1353de-e2bd-4340-9121-9056e287ed4a.jpg
" target="_blank"> <img alt="Click for enlarged picture" src="
https://hosting.photobucket.com/95288841-8654-4bf7-8fc9-a4aa78dce87f/ba1353de-e2bd-4340-9121-9056e287ed4a.jpg" width="600" /> </a></p>
<p>
<a href=" https://hosting.photobucket.com/95288841-8654-4bf7-8fc9-a4aa78dce87f/cea18506-1b50-4e5b-955c-0b9ca02d7826.jpg
" target="_blank"> <img alt="Click for enlarged picture" src="
https://hosting.photobucket.com/95288841-8654-4bf7-8fc9-a4aa78dce87f/cea18506-1b50-4e5b-955c-0b9ca02d7826.jpg" width="600" /> </a></p>
<p>
<a href=" https://hosting.photobucket.com/95288841-8654-4bf7-8fc9-a4aa78dce87f/1be85b41-e3b6-4536-b141-cd0da6eb38c1.jpg
" target="_blank"> <img alt="Click for enlarged picture" src="
https://hosting.photobucket.com/95288841-8654-4bf7-8fc9-a4aa78dce87f/1be85b41-e3b6-4536-b141-cd0da6eb38c1.jpg" width="600" /> </a></p>
<p>
<a href=" https://hosting.photobucket.com/95288841-8654-4bf7-8fc9-a4aa78dce87f/9e93b87d-ff3c-4b7b-8f06-5f9d3464a134.jpg
" target="_blank"> <img alt="Click for enlarged picture" src="
https://hosting.photobucket.com/95288841-8654-4bf7-8fc9-a4aa78dce87f/9e93b87d-ff3c-4b7b-8f06-5f9d3464a134.jpg" width="600" /> </a></p>
<p>
During the first weekend of the Exhibition, 21-22.02., we held the 18th annual international miniature painting competition <strong>Black Queen Hobby and Miniature Painting Competition</strong>!</p>
<p>
<a href=" https://hosting.photobucket.com/95288841-8654-4bf7-8fc9-a4aa78dce87f/3056fb09-f66c-4dea-80a8-a4e72407429a.jpg
" target="_blank"> <img alt="Click for enlarged picture" src="
https://hosting.photobucket.com/95288841-8654-4bf7-8fc9-a4aa78dce87f/3056fb09-f66c-4dea-80a8-a4e72407429a.jpg" width="600" /> </a></p>
<p>
As contestants arrived and registered for the competition, our hardworking staff photographed all the exhibits before sorting them into categories and carefully placing them in glass cases. There was no shortage of morning neccessities like coffe and doughnuts.</p>
<p>
&lt;</p>
<p>
<a href=" https://hosting.photobucket.com/95288841-8654-4bf7-8fc9-a4aa78dce87f/1118089c-2b46-4a2c-b17d-dc92b66d1ffc.jpg
" target="_blank"> <img alt="Click for enlarged picture" src="
https://hosting.photobucket.com/95288841-8654-4bf7-8fc9-a4aa78dce87f/1118089c-2b46-4a2c-b17d-dc92b66d1ffc.jpg" width="600" /> </a></p>
<p>
<a href=" https://hosting.photobucket.com/95288841-8654-4bf7-8fc9-a4aa78dce87f/9fd3c272-9a69-4532-a09d-36497a20a820.jpg
" target="_blank"> <img alt="Click for enlarged picture" src="
https://hosting.photobucket.com/95288841-8654-4bf7-8fc9-a4aa78dce87f/9fd3c272-9a69-4532-a09d-36497a20a820.jpg" width="600" /> </a></p>
<p>
<a href=" https://hosting.photobucket.com/95288841-8654-4bf7-8fc9-a4aa78dce87f/86995e80-c502-45fb-80f5-c8fda27da3f9.jpg
" target="_blank"> <img alt="Click for enlarged picture" src="
https://hosting.photobucket.com/95288841-8654-4bf7-8fc9-a4aa78dce87f/86995e80-c502-45fb-80f5-c8fda27da3f9.jpg" width="600" /> </a></p>
<p>
By noon, all the display cases were full and the competition could officially begin.</p>
<p>
<a href=" https://hosting.photobucket.com/95288841-8654-4bf7-8fc9-a4aa78dce87f/bce59a4f-c3e3-4708-a3d6-25e81a894c24.jpg
" target="_blank"> <img alt="Click for enlarged picture" src="
https://hosting.photobucket.com/95288841-8654-4bf7-8fc9-a4aa78dce87f/bce59a4f-c3e3-4708-a3d6-25e81a894c24.jpg" width="600" /> </a></p>
<p>
<a href=" https://hosting.photobucket.com/95288841-8654-4bf7-8fc9-a4aa78dce87f/16a0a094-01aa-4e52-82cf-fdab00d74711.jpg
" target="_blank"> <img alt="Click for enlarged picture" src="
https://hosting.photobucket.com/95288841-8654-4bf7-8fc9-a4aa78dce87f/16a0a094-01aa-4e52-82cf-fdab00d74711.jpg" width="600" /> </a></p>
<p>
<a href=" https://hosting.photobucket.com/95288841-8654-4bf7-8fc9-a4aa78dce87f/0d3f4042-ff77-48d0-b332-add0fd08f7c3.jpg
" target="_blank"> <img alt="Click for enlarged picture" src="
https://hosting.photobucket.com/95288841-8654-4bf7-8fc9-a4aa78dce87f/0d3f4042-ff77-48d0-b332-add0fd08f7c3.jpg" width="600" /> </a></p>
<p>
<a href=" https://hosting.photobucket.com/95288841-8654-4bf7-8fc9-a4aa78dce87f/3711baf8-93f2-434a-aea9-a95288ca04dd.jpg
" target="_blank"> <img alt="Click for enlarged picture" src="
https://hosting.photobucket.com/95288841-8654-4bf7-8fc9-a4aa78dce87f/3711baf8-93f2-434a-aea9-a95288ca04dd.jpg" width="600" /> </a></p>
<p>
<a href=" https://hosting.photobucket.com/95288841-8654-4bf7-8fc9-a4aa78dce87f/53113b97-ec06-4409-95ba-95a5ad3f9720.jpg
" target="_blank"> <img alt="Click for enlarged picture" src="
https://hosting.photobucket.com/95288841-8654-4bf7-8fc9-a4aa78dce87f/53113b97-ec06-4409-95ba-95a5ad3f9720.jpg" width="600" /> </a></p>
<p>
<a href=" https://hosting.photobucket.com/95288841-8654-4bf7-8fc9-a4aa78dce87f/ab127858-193d-4976-bdb2-e27302722fca.jpg
" target="_blank"> <img alt="Click for enlarged picture" src="
https://hosting.photobucket.com/95288841-8654-4bf7-8fc9-a4aa78dce87f/ab127858-193d-4976-bdb2-e27302722fca.jpg" width="600" /> </a></p>
<p>
<a href=" https://hosting.photobucket.com/95288841-8654-4bf7-8fc9-a4aa78dce87f/3735af11-3fb6-4772-a8ff-5e0ff6ddf03a.jpg
" target="_blank"> <img alt="Click for enlarged picture" src="
https://hosting.photobucket.com/95288841-8654-4bf7-8fc9-a4aa78dce87f/3735af11-3fb6-4772-a8ff-5e0ff6ddf03a.jpg" width="600" /> </a></p>
<p>
<strong>Back To Basics workshops for the young at the Black Queen</strong></p>
<p>
This year, throughout the weekend, we organized miniature painting workshops for the youngest, who were able to paint one of our own miniatures designed specifically for this program for the first time!</p>
<p>
<a href=" https://hosting.photobucket.com/95288841-8654-4bf7-8fc9-a4aa78dce87f/6999be0c-8cc6-4947-a423-9427a2299724.jpg
" target="_blank"> <img alt="Click for enlarged picture" src="
https://hosting.photobucket.com/95288841-8654-4bf7-8fc9-a4aa78dce87f/6999be0c-8cc6-4947-a423-9427a2299724.jpg" width="600" /> </a></p>
<p>
<a href="https://hosting.photobucket.com/95288841-8654-4bf7-8fc9-a4aa78dce87f/835b05a5-f171-49df-afa6-da0692b89074.jpg" target="_blank"><img alt="Click for enlarged picture" src="https://hosting.photobucket.com/95288841-8654-4bf7-8fc9-a4aa78dce87f/835b05a5-f171-49df-afa6-da0692b89074.jpg" width="600" /></a></p>
<p>
<a href=" https://hosting.photobucket.com/95288841-8654-4bf7-8fc9-a4aa78dce87f/ef5dde13-84ee-4ea0-b9f3-28aaf703ef6d.jpg
" target="_blank"> <img alt="Click for enlarged picture" src="
https://hosting.photobucket.com/95288841-8654-4bf7-8fc9-a4aa78dce87f/ef5dde13-84ee-4ea0-b9f3-28aaf703ef6d.jpg" width="600" /> </a></p>
<p>
<strong>SELLERS&#39; COURT</strong></p>
<p>
During the weekend we hosted our sponsors with their sales stands: Swood.si and Carta Magica.</p>
<p>
<a href=" https://hosting.photobucket.com/95288841-8654-4bf7-8fc9-a4aa78dce87f/5ee9a49f-a387-435a-9110-572402b7191d.jpg
" target="_blank"> <img alt="Click for enlarged picture" src="
https://hosting.photobucket.com/95288841-8654-4bf7-8fc9-a4aa78dce87f/5ee9a49f-a387-435a-9110-572402b7191d.jpg" width="600" /> </a></p>
<p>
<a href=" https://hosting.photobucket.com/95288841-8654-4bf7-8fc9-a4aa78dce87f/47cf600f-b1eb-4655-bf06-305f6f21d5d2.jpg
" target="_blank"> <img alt="Click for enlarged picture" src="
https://hosting.photobucket.com/95288841-8654-4bf7-8fc9-a4aa78dce87f/47cf600f-b1eb-4655-bf06-305f6f21d5d2.jpg" width="600" /> </a></p>
<p>
<strong>MINIATURE PAINTING WORKSHOPS</strong></p>
<p>
The ZZTK premises allow workshops to be held during the weekend in the cinema hall in the basement, so we also organized demonstration workshops during the weekend. The lecturers&#39; work was recorded with a camera and projected onto the projection screen in the hall. Many thanks to our domestic and international lecturers: Anže Zorko (SLO), doc.dr.sc. Winton Afrić (CRO), Ivan Knezović (UMS Agram) and Petar Knezoviću (CRO).</p>
<p>
<a href=" https://hosting.photobucket.com/95288841-8654-4bf7-8fc9-a4aa78dce87f/e8d835be-ec99-49d7-bc9b-086e38573d1a.jpg
" target="_blank"> <img alt="Click for enlarged picture" src="
https://hosting.photobucket.com/95288841-8654-4bf7-8fc9-a4aa78dce87f/e8d835be-ec99-49d7-bc9b-086e38573d1a.jpg" width="600" /> </a></p>
<p>
<a href=" https://hosting.photobucket.com/95288841-8654-4bf7-8fc9-a4aa78dce87f/f3eba4c1-4637-4da9-8360-75f430355af4.jpg" target="_blank"> <img alt="Click for enlarged picture" src="
https://hosting.photobucket.com/95288841-8654-4bf7-8fc9-a4aa78dce87f/f3eba4c1-4637-4da9-8360-75f430355af4.jpg" width="600" /> </a></p>
<p>
<a href=" https://hosting.photobucket.com/95288841-8654-4bf7-8fc9-a4aa78dce87f/ef523854-4030-4579-aa38-403afda86c91.jpg
" target="_blank"> <img alt="Click for enlarged picture" src="
https://hosting.photobucket.com/95288841-8654-4bf7-8fc9-a4aa78dce87f/ef523854-4030-4579-aa38-403afda86c91.jpg" width="600" /> </a></p>
<p>
<a href=" https://hosting.photobucket.com/95288841-8654-4bf7-8fc9-a4aa78dce87f/dd0943c2-f4a8-40c3-b641-f6dcdd200380.jpg
" target="_blank"> <img alt="Click for enlarged picture" src="
https://hosting.photobucket.com/95288841-8654-4bf7-8fc9-a4aa78dce87f/dd0943c2-f4a8-40c3-b641-f6dcdd200380.jpg" width="600" /> </a></p>
<p>
<a href=" https://hosting.photobucket.com/95288841-8654-4bf7-8fc9-a4aa78dce87f/08b1626a-f6c7-43c9-b718-3e9a41b55ca6.jpg
" target="_blank"> <img alt="Click for enlarged picture" src="
https://hosting.photobucket.com/95288841-8654-4bf7-8fc9-a4aa78dce87f/08b1626a-f6c7-43c9-b718-3e9a41b55ca6.jpg" width="600" /> </a></p>
<p>
<a href=" https://hosting.photobucket.com/95288841-8654-4bf7-8fc9-a4aa78dce87f/91aca7f3-1af6-486d-b174-65079a63a1ea.jpg
" target="_blank"> <img alt="Click for enlarged picture" src="
https://hosting.photobucket.com/95288841-8654-4bf7-8fc9-a4aa78dce87f/91aca7f3-1af6-486d-b174-65079a63a1ea.jpg" width="600" /> </a></p>
<p>
<a href=" https://hosting.photobucket.com/95288841-8654-4bf7-8fc9-a4aa78dce87f/3821f2fb-fbe7-4096-adbc-7d8c981a3b56.jpg
" target="_blank"> <img alt="Click for enlarged picture" src="
https://hosting.photobucket.com/95288841-8654-4bf7-8fc9-a4aa78dce87f/3821f2fb-fbe7-4096-adbc-7d8c981a3b56.jpg" width="600" /> </a></p>
<p>
<a href=" https://hosting.photobucket.com/95288841-8654-4bf7-8fc9-a4aa78dce87f/2c7bb3c5-c0ec-4a96-b6bd-6a90ce5ce154.jpg
" target="_blank"> <img alt="Click for enlarged picture" src="
https://hosting.photobucket.com/95288841-8654-4bf7-8fc9-a4aa78dce87f/2c7bb3c5-c0ec-4a96-b6bd-6a90ce5ce154.jpg" width="600" /> </a></p>
<p>
<a href=" https://hosting.photobucket.com/95288841-8654-4bf7-8fc9-a4aa78dce87f/b646f4ee-21aa-4d12-8db3-6d33351d5aeb.jpg
" target="_blank"> <img alt="Click for enlarged picture" src="
https://hosting.photobucket.com/95288841-8654-4bf7-8fc9-a4aa78dce87f/b646f4ee-21aa-4d12-8db3-6d33351d5aeb.jpg" width="600" /> </a></p>
<p>
<a href=" https://hosting.photobucket.com/95288841-8654-4bf7-8fc9-a4aa78dce87f/fb5efc01-32cc-4119-90e3-188f51b30237.jpg
" target="_blank"> <img alt="Click for enlarged picture" src="
https://hosting.photobucket.com/95288841-8654-4bf7-8fc9-a4aa78dce87f/fb5efc01-32cc-4119-90e3-188f51b30237.jpg" width="600" /> </a></p>
<p>
<strong>SPEED PAINTING COMPETITION</strong></p>
<p>
We organized a speed painting competition on Sunday afternoon. Participants had 60 minutes to paint one wizrad, a miniature of our own design and production.</p>
<p>
<a href=" https://hosting.photobucket.com/95288841-8654-4bf7-8fc9-a4aa78dce87f/106417a6-a047-4e0d-9f81-87858806052f.jpg
" target="_blank"> <img alt="Click for enlarged picture" src="
https://hosting.photobucket.com/95288841-8654-4bf7-8fc9-a4aa78dce87f/106417a6-a047-4e0d-9f81-87858806052f.jpg" width="600" /> </a></p>
<p>
<a href=" https://hosting.photobucket.com/95288841-8654-4bf7-8fc9-a4aa78dce87f/ac6853c7-6e34-4e07-a996-8d7d12744b67.jpg
" target="_blank"> <img alt="Click for enlarged picture" src="
https://hosting.photobucket.com/95288841-8654-4bf7-8fc9-a4aa78dce87f/ac6853c7-6e34-4e07-a996-8d7d12744b67.jpg" width="600" /> </a></p>
<p>
<a href=" https://hosting.photobucket.com/95288841-8654-4bf7-8fc9-a4aa78dce87f/ccb155fa-52c5-4a99-9515-f69a6836dce7.jpg
" target="_blank"> <img alt="Click for enlarged picture" src="
https://hosting.photobucket.com/95288841-8654-4bf7-8fc9-a4aa78dce87f/ccb155fa-52c5-4a99-9515-f69a6836dce7.jpg" width="600" /> </a></p>
<p>
<a href=" https://hosting.photobucket.com/95288841-8654-4bf7-8fc9-a4aa78dce87f/a29fedd0-97ea-45b1-85f9-7ea62188b2b2.jpg
" target="_blank"><img alt="Click for enlarged picture" src="
https://hosting.photobucket.com/95288841-8654-4bf7-8fc9-a4aa78dce87f/a29fedd0-97ea-45b1-85f9-7ea62188b2b2.jpg" width="600" /></a></p>
<p>
With that, we came to the very end of this wonderful weekend and all that was left was the awarding of prizes and recognition to the winners.</p>
<p>
<a href=" https://hosting.photobucket.com/95288841-8654-4bf7-8fc9-a4aa78dce87f/046ca4c8-0ae7-415e-abd3-e131d580c3ad.jpg
" target="_blank"> <img alt="Click for enlarged picture" src="
https://hosting.photobucket.com/95288841-8654-4bf7-8fc9-a4aa78dce87f/046ca4c8-0ae7-415e-abd3-e131d580c3ad.jpg" width="600" /> </a></p>
<p>
<a href=" https://hosting.photobucket.com/95288841-8654-4bf7-8fc9-a4aa78dce87f/cec0dcef-7acb-4a77-89de-271ed5410672.jpg
" target="_blank"> <img alt="Click for enlarged picture" src="
https://hosting.photobucket.com/95288841-8654-4bf7-8fc9-a4aa78dce87f/cec0dcef-7acb-4a77-89de-271ed5410672.jpg" width="600" /> </a></p>
<p>
<a href=" https://hosting.photobucket.com/95288841-8654-4bf7-8fc9-a4aa78dce87f/a495a5fc-31a2-4979-a970-0fa22c334354.jpg
" target="_blank"> <img alt="Click for enlarged picture" src="
https://hosting.photobucket.com/95288841-8654-4bf7-8fc9-a4aa78dce87f/a495a5fc-31a2-4979-a970-0fa22c334354.jpg" width="600" /> </a></p>
<p>
<strong>AGRAM ARENA &ndash; Leaving Asphodel Necropolis28 Campaign</strong></p>
<p>
During the weekend of February 21-22, we held a new international competition, Agram Arena! This time it was the turn of the tabletop strategy game Necropolis28, for which our members designed a two-day campaign. Each participant created their own gang of soldiers, and the vast majority also created their own boards.</p>
<p>
<a href=" https://hosting.photobucket.com/95288841-8654-4bf7-8fc9-a4aa78dce87f/ac69b182-4bfc-4575-a6d3-fb3c8baba342.jpg
" target="_blank"> <img alt="Click for enlarged picture" src="
https://hosting.photobucket.com/95288841-8654-4bf7-8fc9-a4aa78dce87f/ac69b182-4bfc-4575-a6d3-fb3c8baba342.jpg" width="600" /> </a></p>
<p>
<a href=" https://hosting.photobucket.com/95288841-8654-4bf7-8fc9-a4aa78dce87f/289fed7b-e058-42d8-ba2d-cbd0463e98da.jpg
" target="_blank"> <img alt="Click for enlarged picture" src="
https://hosting.photobucket.com/95288841-8654-4bf7-8fc9-a4aa78dce87f/289fed7b-e058-42d8-ba2d-cbd0463e98da.jpg" width="600" /> </a></p>
<p>
<a href=" https://hosting.photobucket.com/95288841-8654-4bf7-8fc9-a4aa78dce87f/d92ebbee-859d-4441-8386-3d760b20b7a7.jpg
" target="_blank"> <img alt="Click for enlarged picture" src="
https://hosting.photobucket.com/95288841-8654-4bf7-8fc9-a4aa78dce87f/d92ebbee-859d-4441-8386-3d760b20b7a7.jpg" width="600" /> </a></p>
<p>
<a href=" https://hosting.photobucket.com/95288841-8654-4bf7-8fc9-a4aa78dce87f/09c59798-7871-425e-a075-3ca1cd91768a.jpg
" target="_blank"> <img alt="Click for enlarged picture" src="
https://hosting.photobucket.com/95288841-8654-4bf7-8fc9-a4aa78dce87f/09c59798-7871-425e-a075-3ca1cd91768a.jpg" width="600" /> </a></p>
<p>
<a href=" https://hosting.photobucket.com/95288841-8654-4bf7-8fc9-a4aa78dce87f/b2f3edc8-5a23-4552-9a2a-4027b286f327.jpg
" target="_blank"> <img alt="Click for enlarged picture" src="
https://hosting.photobucket.com/95288841-8654-4bf7-8fc9-a4aa78dce87f/b2f3edc8-5a23-4552-9a2a-4027b286f327.jpg" width="600" /> </a></p>
<p>
<a href=" https://hosting.photobucket.com/95288841-8654-4bf7-8fc9-a4aa78dce87f/2a9f43ac-b531-4746-b7bb-ac5a3356aab0.jpg
" target="_blank"> <img alt="Click for enlarged picture" src="
https://hosting.photobucket.com/95288841-8654-4bf7-8fc9-a4aa78dce87f/2a9f43ac-b531-4746-b7bb-ac5a3356aab0.jpg" width="600" /> </a></p>
<p>
<strong>EVENTS ON WEEKDAYS DURING THE EXHIBITION </strong></p>
<p>
Over the next two weeks, our volunteers held open miniature painting workshops on weekdays from 4:00 PM to 8:00 PM. Miniature painting workstations were set up where our visitors could paint miniatures we had prepared (or their own if they had brought them) using our materials and tools.</p>
<p>
<a href=" https://hosting.photobucket.com/95288841-8654-4bf7-8fc9-a4aa78dce87f/6edf7765-42b5-417a-820f-fa5d907179a7.jpg
" target="_blank"> <img alt="Click for enlarged picture" src="
https://hosting.photobucket.com/95288841-8654-4bf7-8fc9-a4aa78dce87f/6edf7765-42b5-417a-820f-fa5d907179a7.jpg" width="600" /> </a></p>
<p>
<a href=" https://hosting.photobucket.com/95288841-8654-4bf7-8fc9-a4aa78dce87f/c084ebe2-f57b-4519-9b31-29bdc1155887.jpg
" target="_blank"> <img alt="Click for enlarged picture" src="
https://hosting.photobucket.com/95288841-8654-4bf7-8fc9-a4aa78dce87f/c084ebe2-f57b-4519-9b31-29bdc1155887.jpg" width="600" /> </a></p>
<p>
<a href=" https://hosting.photobucket.com/95288841-8654-4bf7-8fc9-a4aa78dce87f/37ff2272-f9b0-4b16-a363-1e6f6688c866.jpg
" target="_blank"> <img alt="Click for enlarged picture" src="
https://hosting.photobucket.com/95288841-8654-4bf7-8fc9-a4aa78dce87f/37ff2272-f9b0-4b16-a363-1e6f6688c866.jpg" width="600" /> </a></p>
<p>
<a href=" https://hosting.photobucket.com/95288841-8654-4bf7-8fc9-a4aa78dce87f/5f4f7968-ff50-4a01-98da-6ce8562930b4.jpg
" target="_blank"> <img alt="Click for enlarged picture" src="
https://hosting.photobucket.com/95288841-8654-4bf7-8fc9-a4aa78dce87f/5f4f7968-ff50-4a01-98da-6ce8562930b4.jpg" width="600" /> </a></p>
<p>
<a href=" https://hosting.photobucket.com/95288841-8654-4bf7-8fc9-a4aa78dce87f/cbb45319-d488-483c-bf9d-9af29852fc74.jpg
" target="_blank"> <img alt="Click for enlarged picture" src="
https://hosting.photobucket.com/95288841-8654-4bf7-8fc9-a4aa78dce87f/cbb45319-d488-483c-bf9d-9af29852fc74.jpg" width="600" /> </a></p>
<p>
<a href=" https://hosting.photobucket.com/95288841-8654-4bf7-8fc9-a4aa78dce87f/3dcca26c-d549-4af3-812a-a4a81b9a2310.jpg
" target="_blank"> <img alt="Click for enlarged picture" src="
https://hosting.photobucket.com/95288841-8654-4bf7-8fc9-a4aa78dce87f/3dcca26c-d549-4af3-812a-a4a81b9a2310.jpg" width="600" /> </a></p>
<p>
<a href=" https://hosting.photobucket.com/95288841-8654-4bf7-8fc9-a4aa78dce87f/4adf0fb6-3eab-4b40-b32d-d03eab4a9892.jpg
" target="_blank"> <img alt="Click for enlarged picture" src="
https://hosting.photobucket.com/95288841-8654-4bf7-8fc9-a4aa78dce87f/4adf0fb6-3eab-4b40-b32d-d03eab4a9892.jpg" width="600" /> </a></p>
<p>
<a href=" https://hosting.photobucket.com/95288841-8654-4bf7-8fc9-a4aa78dce87f/4732b58a-9a65-4d1c-a7d5-25513d34b108.jpg
" target="_blank"> <img alt="Click for enlarged picture" src="
https://hosting.photobucket.com/95288841-8654-4bf7-8fc9-a4aa78dce87f/4732b58a-9a65-4d1c-a7d5-25513d34b108.jpg" width="600" /> </a></p>
<p>
<a href=" https://hosting.photobucket.com/95288841-8654-4bf7-8fc9-a4aa78dce87f/274be330-31d5-4e25-95db-ec2f423a003c.jpg
" target="_blank"> <img alt="Click for enlarged picture" src="
https://hosting.photobucket.com/95288841-8654-4bf7-8fc9-a4aa78dce87f/274be330-31d5-4e25-95db-ec2f423a003c.jpg" width="600" /> </a></p>
<p>
<a href=" https://hosting.photobucket.com/95288841-8654-4bf7-8fc9-a4aa78dce87f/8e7b0a80-0f46-4d70-9789-a46976c713d2.jpg
" target="_blank"> <img alt="Click for enlarged picture" src="
https://hosting.photobucket.com/95288841-8654-4bf7-8fc9-a4aa78dce87f/8e7b0a80-0f46-4d70-9789-a46976c713d2.jpg" width="600" /> </a></p>
<p>
<a href=" https://hosting.photobucket.com/95288841-8654-4bf7-8fc9-a4aa78dce87f/8bbd4e96-b911-4f26-80fe-b1c57f29027b.jpg
" target="_blank"> <img alt="Click for enlarged picture" src="
https://hosting.photobucket.com/95288841-8654-4bf7-8fc9-a4aa78dce87f/8bbd4e96-b911-4f26-80fe-b1c57f29027b.jpg" width="600" /> </a></p>
<p>
<a href=" https://hosting.photobucket.com/95288841-8654-4bf7-8fc9-a4aa78dce87f/203a27be-8f10-459d-89b9-befb6b636b74.jpg
" target="_blank"> <img alt="Click for enlarged picture" src="
https://hosting.photobucket.com/95288841-8654-4bf7-8fc9-a4aa78dce87f/203a27be-8f10-459d-89b9-befb6b636b74.jpg" width="600" /> </a></p>
<p>
<a href=" https://hosting.photobucket.com/95288841-8654-4bf7-8fc9-a4aa78dce87f/5dc4358f-19d8-475f-a4af-9c29e9ed18d7.jpg
" target="_blank"> <img alt="Click for enlarged picture" src="
https://hosting.photobucket.com/95288841-8654-4bf7-8fc9-a4aa78dce87f/5dc4358f-19d8-475f-a4af-9c29e9ed18d7.jpg" width="600" /> </a></p>
<p>
<strong>BACK TO BASICS MINIATURE PAINTING WORKSHOPS FOR YOUNG</strong></p>
<p>
On weekdays from 17:00 to 18:00, we held our new workshops for the youngest, in which our youngest participants painted their first miniatures.</p>
<p>
<a href=" https://hosting.photobucket.com/95288841-8654-4bf7-8fc9-a4aa78dce87f/948af139-8fb5-4e28-a27c-404466e70d05.jpg
" target="_blank"> <img alt="Click for enlarged picture" src="
https://hosting.photobucket.com/95288841-8654-4bf7-8fc9-a4aa78dce87f/948af139-8fb5-4e28-a27c-404466e70d05.jpg" width="600" /> </a></p>
<p>
<a href=" https://hosting.photobucket.com/95288841-8654-4bf7-8fc9-a4aa78dce87f/bb3e20c2-bb21-4a3d-863a-74de08261467.jpg
" target="_blank"> <img alt="Click for enlarged picture" src="
https://hosting.photobucket.com/95288841-8654-4bf7-8fc9-a4aa78dce87f/bb3e20c2-bb21-4a3d-863a-74de08261467.jpg" width="600" /> </a></p>
<p>
<a href=" https://hosting.photobucket.com/95288841-8654-4bf7-8fc9-a4aa78dce87f/7316c760-98e3-4e3f-9261-d138aa7a5a6a.jpg
" target="_blank"> <img alt="Click for enlarged picture" src="
https://hosting.photobucket.com/95288841-8654-4bf7-8fc9-a4aa78dce87f/7316c760-98e3-4e3f-9261-d138aa7a5a6a.jpg" width="600" /> </a></p>
<p>
<a href=" https://hosting.photobucket.com/95288841-8654-4bf7-8fc9-a4aa78dce87f/68934b39-3d1f-4f43-b967-14b73c41a39e.jpg
" target="_blank"> <img alt="Click for enlarged picture" src="
https://hosting.photobucket.com/95288841-8654-4bf7-8fc9-a4aa78dce87f/68934b39-3d1f-4f43-b967-14b73c41a39e.jpg" width="600" /> </a></p>
<p>
<a href=" https://hosting.photobucket.com/95288841-8654-4bf7-8fc9-a4aa78dce87f/46125bce-a28d-494f-873a-3aeabdc1d6c2.jpg
" target="_blank"> <img alt="Click for enlarged picture" src="
https://hosting.photobucket.com/95288841-8654-4bf7-8fc9-a4aa78dce87f/46125bce-a28d-494f-873a-3aeabdc1d6c2.jpg" width="600" /> </a></p>
<p>
<a href=" https://hosting.photobucket.com/95288841-8654-4bf7-8fc9-a4aa78dce87f/3c58e0ad-77a9-44c8-b6bf-d9a55c514d43.jpg
" target="_blank"> <img alt="Click for enlarged picture" src="
https://hosting.photobucket.com/95288841-8654-4bf7-8fc9-a4aa78dce87f/3c58e0ad-77a9-44c8-b6bf-d9a55c514d43.jpg" width="600" /> </a></p>
<p>
<a href=" https://hosting.photobucket.com/95288841-8654-4bf7-8fc9-a4aa78dce87f/f891f0f0-051b-40ee-9676-cb03b0a9811b.jpg
" target="_blank"> <img alt="Click for enlarged picture" src="
https://hosting.photobucket.com/95288841-8654-4bf7-8fc9-a4aa78dce87f/f891f0f0-051b-40ee-9676-cb03b0a9811b.jpg" width="600" /> </a></p>
<p>
<strong>AGRAM LEGO SECTION lecture: FW-14b &ndash; An F1 racecar for the future</strong></p>
<p>
On Wednesday, February 25, 2026, as part of the activities of our Agram Lego Section, our resident mechanical engineer Marko Paunović gave a lecture on the topic of the F1 racecar from 1992. Admission to the lecture was free, and upon completion, a LEGO model of the racecar was made by members of the Lego section</p>
<p>
<a href=" https://hosting.photobucket.com/95288841-8654-4bf7-8fc9-a4aa78dce87f/b2e14b1c-daa4-4314-8685-184377bc7e28.jpg
" target="_blank"> <img alt="Click for enlarged picture" src="
https://hosting.photobucket.com/95288841-8654-4bf7-8fc9-a4aa78dce87f/b2e14b1c-daa4-4314-8685-184377bc7e28.jpg" width="600" /> </a></p>
<p>
<a href=" https://hosting.photobucket.com/95288841-8654-4bf7-8fc9-a4aa78dce87f/31fb439a-77d3-4418-83ff-66c3af279cca.jpg" target="_blank"> <img alt="Click for enlarged picture" src="
https://hosting.photobucket.com/95288841-8654-4bf7-8fc9-a4aa78dce87f/31fb439a-77d3-4418-83ff-66c3af279cca.jpg" width="600" /> </a></p>
<p>
<a href=" https://hosting.photobucket.com/95288841-8654-4bf7-8fc9-a4aa78dce87f/bfcaf282-6be8-4b52-a3ed-c91137457876.jpg
" target="_blank"> <img alt="Click for enlarged picture" src="
https://hosting.photobucket.com/95288841-8654-4bf7-8fc9-a4aa78dce87f/bfcaf282-6be8-4b52-a3ed-c91137457876.jpg" width="600" /> </a></p>
<p>
<a href=" https://hosting.photobucket.com/95288841-8654-4bf7-8fc9-a4aa78dce87f/ce70fc61-9e1a-4169-aaad-8b67417656c0.jpg
" target="_blank"> <img alt="Click for enlarged picture" src="
https://hosting.photobucket.com/95288841-8654-4bf7-8fc9-a4aa78dce87f/ce70fc61-9e1a-4169-aaad-8b67417656c0.jpg" width="600" /> </a></p>
<p>
<a href=" https://hosting.photobucket.com/95288841-8654-4bf7-8fc9-a4aa78dce87f/94ca0e36-8710-458d-8194-9f71299f4d74.jpg
" target="_blank"> <img alt="Click for enlarged picture" src="
https://hosting.photobucket.com/95288841-8654-4bf7-8fc9-a4aa78dce87f/94ca0e36-8710-458d-8194-9f71299f4d74.jpg" width="600" /> </a></p>
<p>
<a href=" https://hosting.photobucket.com/95288841-8654-4bf7-8fc9-a4aa78dce87f/c6771f72-7191-4ca3-a792-3bb1ab3897b1.jpg
" target="_blank"> <img alt="Click for enlarged picture" src="
https://hosting.photobucket.com/95288841-8654-4bf7-8fc9-a4aa78dce87f/c6771f72-7191-4ca3-a792-3bb1ab3897b1.jpg" width="600" /> </a></p>
<p>
<a href=" https://hosting.photobucket.com/95288841-8654-4bf7-8fc9-a4aa78dce87f/c8fcfcb6-09f2-4398-a2fb-fa5065771e01.jpg
" target="_blank"> <img alt="Click for enlarged picture" src="
https://hosting.photobucket.com/95288841-8654-4bf7-8fc9-a4aa78dce87f/c8fcfcb6-09f2-4398-a2fb-fa5065771e01.jpg" width="600" /> </a></p>
<p>
<a href=" https://hosting.photobucket.com/95288841-8654-4bf7-8fc9-a4aa78dce87f/d7e187a8-d5b1-433b-b30d-091e54dcdddf.jpg
" target="_blank"> <img alt="Click for enlarged picture" src="
https://hosting.photobucket.com/95288841-8654-4bf7-8fc9-a4aa78dce87f/d7e187a8-d5b1-433b-b30d-091e54dcdddf.jpg" width="600" /> </a></p>
<p>
During the second weekend of the Exhibition, 28.02.-01.03., we organized a <strong>MINIATURE PAINTING WORKSHOP - Grimdark</strong>.</p>
<p>
The workshop was held over two days (the entire weekend) and participants painted up to three different figures for the game Trench Crusade. The focus of these lectures was on painting the popular grimdark style minis. The workshop presented paints and equipment, figure preparation, several miniature painting techniques from basic to advanced, and techniques and tricks for quickly and efficiently painting larger quantities of figures at once. Water-based acrylic paints were used as part of the workshop.</p>
<p>
<a href=" https://hosting.photobucket.com/95288841-8654-4bf7-8fc9-a4aa78dce87f/733d94b2-8e8d-4a4e-accd-b9168e32577e.jpg
" target="_blank"> <img alt="Click for enlarged picture" src="
https://hosting.photobucket.com/95288841-8654-4bf7-8fc9-a4aa78dce87f/733d94b2-8e8d-4a4e-accd-b9168e32577e.jpg
" width="600" /> </a></p>
<p>
<a href=" https://hosting.photobucket.com/95288841-8654-4bf7-8fc9-a4aa78dce87f/41020062-45b9-41cd-a357-fa23a389f390.jpg
" target="_blank"> <img alt="Click for enlarged picture" src="
https://hosting.photobucket.com/95288841-8654-4bf7-8fc9-a4aa78dce87f/41020062-45b9-41cd-a357-fa23a389f390.jpg
" width="600" /> </a></p>
<p>
<a href=" https://hosting.photobucket.com/95288841-8654-4bf7-8fc9-a4aa78dce87f/0c07cc55-596d-494d-972b-cd6a0dd6b8b7.jpg
" target="_blank"> <img alt="Click for enlarged picture" src="
https://hosting.photobucket.com/95288841-8654-4bf7-8fc9-a4aa78dce87f/0c07cc55-596d-494d-972b-cd6a0dd6b8b7.jpg" width="600" /> </a></p>
<p>
<a href=" https://hosting.photobucket.com/95288841-8654-4bf7-8fc9-a4aa78dce87f/c17dd356-08b1-48e1-b895-6296aed7f818.jpg
" target="_blank"> <img alt="Click for enlarged picture" src="
https://hosting.photobucket.com/95288841-8654-4bf7-8fc9-a4aa78dce87f/c17dd356-08b1-48e1-b895-6296aed7f818.jpg" width="600" /> </a></p>
<p>
On Wednesday 04.03.2026. the annual <strong>session of the Assembly</strong> was held, where we determined the guidelines for work in 2026.</p>
<p>
,</p>
<p>
<a href=" https://hosting.photobucket.com/95288841-8654-4bf7-8fc9-a4aa78dce87f/59484bd0-7edc-4aed-a04e-ae42900ba3e6.jpg
" target="_blank"> <img alt="Click for enlarged picture" src="
https://hosting.photobucket.com/95288841-8654-4bf7-8fc9-a4aa78dce87f/59484bd0-7edc-4aed-a04e-ae42900ba3e6.jpg
" width="600" /> </a></p>
<p>
On Sunday 08.03.2026. The exhibition was over, our exhibits safely stored, and the Gallery cleaned.</p>
<p>
<a href=" https://hosting.photobucket.com/95288841-8654-4bf7-8fc9-a4aa78dce87f/98af4280-0956-4cdb-b4a9-da40e3a5a44a.jpg
" target="_blank"> <img alt="Click for enlarged picture" src="
https://hosting.photobucket.com/95288841-8654-4bf7-8fc9-a4aa78dce87f/98af4280-0956-4cdb-b4a9-da40e3a5a44a.jpg" width="600" /> </a></p>
<p>
<a href=" https://hosting.photobucket.com/95288841-8654-4bf7-8fc9-a4aa78dce87f/3259b35e-1fc2-4a99-a3c5-c7984958d72b.jpg
" target="_blank"> <img alt="Click for enlarged picture" src="
https://hosting.photobucket.com/95288841-8654-4bf7-8fc9-a4aa78dce87f/3259b35e-1fc2-4a99-a3c5-c7984958d72b.jpg" width="600" /> </a></p>
<p>
The most important part of every year when holding this Exhibition is the social aspect, the socializing of our members both among themselves and with our international friends who visit us! With these few photos from our joint gatherings, we greet you until next year!</p>
<p>
<a href=" https://hosting.photobucket.com/95288841-8654-4bf7-8fc9-a4aa78dce87f/b9168e23-79b2-4d81-8a7d-7534062881a7.jpg
" target="_blank"> <img alt="Click for enlarged picture" src="
https://hosting.photobucket.com/95288841-8654-4bf7-8fc9-a4aa78dce87f/b9168e23-79b2-4d81-8a7d-7534062881a7.jpg " width="600" /> </a></p>
<p>
<a href=" https://hosting.photobucket.com/95288841-8654-4bf7-8fc9-a4aa78dce87f/edff925e-916c-4d78-953e-210abf3753d4.jpg
" target="_blank"> <img alt="Click for enlarged picture" src="
https://hosting.photobucket.com/95288841-8654-4bf7-8fc9-a4aa78dce87f/edff925e-916c-4d78-953e-210abf3753d4.jpg " width="600" /> </a></p>
<p>
<a href=" https://hosting.photobucket.com/95288841-8654-4bf7-8fc9-a4aa78dce87f/8bcb48fa-466b-43f8-8a4b-f15f6794b21e.jpg
" target="_blank"> <img alt="Click for enlarged picture" src="
https://hosting.photobucket.com/95288841-8654-4bf7-8fc9-a4aa78dce87f/8bcb48fa-466b-43f8-8a4b-f15f6794b21e.jpg" width="600" /> </a></p>
",
"content_hrv" => "<p>
<a href=" https://hosting.photobucket.com/95288841-8654-4bf7-8fc9-a4aa78dce87f/dc756f84-867d-4df4-acd8-5d43775cafc2.jpg
" target="_blank"> <img alt="Click for enlarged picture" src="
https://hosting.photobucket.com/95288841-8654-4bf7-8fc9-a4aa78dce87f/dc756f84-867d-4df4-acd8-5d43775cafc2.jpg" width="600" /> </a></p>
<p>
<strong>Izložba minijatura i maketa &quot;Agram 2026&quot;</strong> održala se ove godine od 19.2. do 08.03. Postavljanje izložbe je održano u srijedu 18.2. i sudjelovao je velik broj članova kao i prijatelja Udruge koji su izlagali svoje radove.</p>
<p>
<a href=" https://hosting.photobucket.com/95288841-8654-4bf7-8fc9-a4aa78dce87f/8529d6d4-76ea-4872-a9e6-748e04223a4e.jpg
" target="_blank"> <img alt="Click for enlarged picture" src="
https://hosting.photobucket.com/95288841-8654-4bf7-8fc9-a4aa78dce87f/8529d6d4-76ea-4872-a9e6-748e04223a4e.jpg
" width="600" /> </a></p>
<p>
<a href=" https://hosting.photobucket.com/95288841-8654-4bf7-8fc9-a4aa78dce87f/f3038937-f001-4ceb-b725-a330fcd64cee.jpg
" target="_blank"> <img alt="Click for enlarged picture" src="
https://hosting.photobucket.com/95288841-8654-4bf7-8fc9-a4aa78dce87f/f3038937-f001-4ceb-b725-a330fcd64cee.jpg
" width="600" /> </a></p>
<p>
<a href=" https://hosting.photobucket.com/95288841-8654-4bf7-8fc9-a4aa78dce87f/3575379e-e068-49e2-9d4d-c9a49531fdc2.jpg
" target="_blank"> <img alt="Click for enlarged picture" src="
https://hosting.photobucket.com/95288841-8654-4bf7-8fc9-a4aa78dce87f/3575379e-e068-49e2-9d4d-c9a49531fdc2.jpg" width="600" /> </a></p>
<p>
<a href=" https://hosting.photobucket.com/95288841-8654-4bf7-8fc9-a4aa78dce87f/e51713c7-2add-4f8f-ae37-e6eba25badff.jpg
" target="_blank"> <img alt="Click for enlarged picture" src="
https://hosting.photobucket.com/95288841-8654-4bf7-8fc9-a4aa78dce87f/e51713c7-2add-4f8f-ae37-e6eba25badff.jpg" width="600" /> </a></p>
<p>
<a href=" https://hosting.photobucket.com/95288841-8654-4bf7-8fc9-a4aa78dce87f/9c0bb546-50a8-483d-aeab-ab3b2ce9f094.jpg
" target="_blank"> <img alt="Click for enlarged picture" src="
https://hosting.photobucket.com/95288841-8654-4bf7-8fc9-a4aa78dce87f/9c0bb546-50a8-483d-aeab-ab3b2ce9f094.jpg" width="600" /> </a></p>
<p>
Otvorenje Izložbe održalo se u četvrtak, 19.2.2026. s početkom u 18:00h. Izložba je organizirana povodom na&scaron;eg dvadeset trećeg rođendana.</p>
<p>
<a href=" https://hosting.photobucket.com/95288841-8654-4bf7-8fc9-a4aa78dce87f/71c7bfc2-1ffc-43b9-9d5a-53e009f6b86d.jpg
" target="_blank"> <img alt="Click for enlarged picture" src="
https://hosting.photobucket.com/95288841-8654-4bf7-8fc9-a4aa78dce87f/71c7bfc2-1ffc-43b9-9d5a-53e009f6b86d.jpg" width="600" /> </a></p>
<p>
<a href=" https://hosting.photobucket.com/95288841-8654-4bf7-8fc9-a4aa78dce87f/007b4701-1d7c-4a67-a599-0539a2aa3191.jpg
" target="_blank"> <img alt="Click for enlarged picture" src="
https://hosting.photobucket.com/95288841-8654-4bf7-8fc9-a4aa78dce87f/007b4701-1d7c-4a67-a599-0539a2aa3191.jpg" width="600" /> </a></p>
<p>
<a href=" https://hosting.photobucket.com/95288841-8654-4bf7-8fc9-a4aa78dce87f/2c8090e2-8b95-4368-bb48-98876d680e15.jpg
" target="_blank"> <img alt="Click for enlarged picture" src="
https://hosting.photobucket.com/95288841-8654-4bf7-8fc9-a4aa78dce87f/2c8090e2-8b95-4368-bb48-98876d680e15.jpg" width="600" /> </a></p>
<p>
<a href=" https://hosting.photobucket.com/95288841-8654-4bf7-8fc9-a4aa78dce87f/375768ad-a8bb-49bf-9845-e46c896ba7ec.jpg
" target="_blank"> <img alt="Click for enlarged picture" src="
https://hosting.photobucket.com/95288841-8654-4bf7-8fc9-a4aa78dce87f/375768ad-a8bb-49bf-9845-e46c896ba7ec.jpg" width="600" /> </a></p>
<p>
<a href=" https://hosting.photobucket.com/95288841-8654-4bf7-8fc9-a4aa78dce87f/a93de974-4ccb-4876-85b0-4d066ae402b3.jpg
" target="_blank"> <img alt="Click for enlarged picture" src="
https://hosting.photobucket.com/95288841-8654-4bf7-8fc9-a4aa78dce87f/a93de974-4ccb-4876-85b0-4d066ae402b3.jpg" width="600" /> </a></p>
<p>
<a href=" https://hosting.photobucket.com/95288841-8654-4bf7-8fc9-a4aa78dce87f/d323ccc9-1b9a-4cb2-8adf-7019b0e217f4.jpg
" target="_blank"> <img alt="Click for enlarged picture" src="
https://hosting.photobucket.com/95288841-8654-4bf7-8fc9-a4aa78dce87f/d323ccc9-1b9a-4cb2-8adf-7019b0e217f4.jpg" width="600" /> </a></p>
<p>
<a href=" https://hosting.photobucket.com/95288841-8654-4bf7-8fc9-a4aa78dce87f/a5a66447-2d76-47ae-866d-4d512ef469a5.jpg
" target="_blank"> <img alt="Click for enlarged picture" src="
https://hosting.photobucket.com/95288841-8654-4bf7-8fc9-a4aa78dce87f/a5a66447-2d76-47ae-866d-4d512ef469a5.jpg" width="600" /> </a></p>
<p>
<a href=" https://hosting.photobucket.com/95288841-8654-4bf7-8fc9-a4aa78dce87f/3e7bcfc9-ba02-4f94-a6c3-79dfaea3639e.jpg
" target="_blank"> <img alt="Click for enlarged picture" src="
https://hosting.photobucket.com/95288841-8654-4bf7-8fc9-a4aa78dce87f/3e7bcfc9-ba02-4f94-a6c3-79dfaea3639e.jpg" width="600" /> </a></p>
<p>
<a href=" https://hosting.photobucket.com/95288841-8654-4bf7-8fc9-a4aa78dce87f/24e79466-4a9e-4b10-970c-caad235d260d.jpg
" target="_blank"> <img alt="Click for enlarged picture" src="
https://hosting.photobucket.com/95288841-8654-4bf7-8fc9-a4aa78dce87f/24e79466-4a9e-4b10-970c-caad235d260d.jpg" width="600" /> </a></p>
<p>
Kao i uvijek, Izložba je prikazivala presjek rada Udruge, njenih članova, polaznika njenih tečajeva i radionica te članova FB grupe Miniature Painters Croatia. U velikom broju vitrina na&scaron;le su se brojne minijature za stolne strate&scaron;ke igre, igre na tabli, a cijela jedna vitrina posvećena je nagrađenim izlo&scaron;cima sa prethodnih minijaturističkih natjecanja. Nekoliko vitrina bilo je posvećeno projektima koje Udruga već 23 godinu provodi poput Knjižnice i čitaonice UMS &bdquo;Agram&ldquo;, Radionice za izradu prostornih maketa i Radionice bojanja minijatura, ali i novih poput Agram Group Build, Agram Lego Sekcije i Back to Basics radionica bojanja za najmlađe.</p>
<p>
<a href=" https://hosting.photobucket.com/95288841-8654-4bf7-8fc9-a4aa78dce87f/fca84936-af71-44d3-9a4c-faeb26163899.jpg
" target="_blank"> <img alt="Click for enlarged picture" src="
https://hosting.photobucket.com/95288841-8654-4bf7-8fc9-a4aa78dce87f/fca84936-af71-44d3-9a4c-faeb26163899.jpg" width="600" /> </a></p>
<p>
<a href=" https://hosting.photobucket.com/95288841-8654-4bf7-8fc9-a4aa78dce87f/459bc5ac-8702-46f9-93b4-547deaabdef4.jpg
" target="_blank"> <img alt="Click for enlarged picture" src="
https://hosting.photobucket.com/95288841-8654-4bf7-8fc9-a4aa78dce87f/459bc5ac-8702-46f9-93b4-547deaabdef4.jpg" width="600" /> </a></p>
<p>
<a href=" https://hosting.photobucket.com/95288841-8654-4bf7-8fc9-a4aa78dce87f/91a04363-b2ef-4635-a046-7edf25ce7808.jpg
" target="_blank"> <img alt="Click for enlarged picture" src="
https://hosting.photobucket.com/95288841-8654-4bf7-8fc9-a4aa78dce87f/91a04363-b2ef-4635-a046-7edf25ce7808.jpg" width="600" /> </a></p>
<p>
<a href=" https://hosting.photobucket.com/95288841-8654-4bf7-8fc9-a4aa78dce87f/73256af5-fd5d-40b5-95e1-120e49c9be87.jpg
" target="_blank"> <img alt="Click for enlarged picture" src="
https://hosting.photobucket.com/95288841-8654-4bf7-8fc9-a4aa78dce87f/73256af5-fd5d-40b5-95e1-120e49c9be87.jpg" width="600" /> </a></p>
<p>
<a href=" https://hosting.photobucket.com/95288841-8654-4bf7-8fc9-a4aa78dce87f/979f9be5-23f3-4df9-91dc-ab71d6a10d64.jpg
" target="_blank"> <img alt="Click for enlarged picture" src="
https://hosting.photobucket.com/95288841-8654-4bf7-8fc9-a4aa78dce87f/979f9be5-23f3-4df9-91dc-ab71d6a10d64.jpg" width="600" /> </a></p>
<p>
<a href=" https://hosting.photobucket.com/95288841-8654-4bf7-8fc9-a4aa78dce87f/d0ff4379-183a-47b9-a740-9ddc283ebc29.jpg
" target="_blank"> <img alt="Click for enlarged picture" src="
https://hosting.photobucket.com/95288841-8654-4bf7-8fc9-a4aa78dce87f/d0ff4379-183a-47b9-a740-9ddc283ebc29.jpg" width="600" /> </a></p>
<p>
<a href=" https://hosting.photobucket.com/95288841-8654-4bf7-8fc9-a4aa78dce87f/4333e95e-bbbd-4f47-aaea-38a9c99e54d8.jpg
" target="_blank"> <img alt="Click for enlarged picture" src="
https://hosting.photobucket.com/95288841-8654-4bf7-8fc9-a4aa78dce87f/4333e95e-bbbd-4f47-aaea-38a9c99e54d8.jpg" width="600" /> </a></p>
<p>
<a href=" https://hosting.photobucket.com/95288841-8654-4bf7-8fc9-a4aa78dce87f/1372f8a2-b222-48ee-ae45-a90b5a354ef7.jpg
" target="_blank"> <img alt="Click for enlarged picture" src="
https://hosting.photobucket.com/95288841-8654-4bf7-8fc9-a4aa78dce87f/1372f8a2-b222-48ee-ae45-a90b5a354ef7.jpg" width="600" /> </a></p>
<p>
<a href=" https://hosting.photobucket.com/95288841-8654-4bf7-8fc9-a4aa78dce87f/6a1b4fd1-d982-4b06-9c5f-3cd40d6bf10a.jpg
" target="_blank"> <img alt="Click for enlarged picture" src="
https://hosting.photobucket.com/95288841-8654-4bf7-8fc9-a4aa78dce87f/6a1b4fd1-d982-4b06-9c5f-3cd40d6bf10a.jpg" width="600" /> </a></p>
<p>
<a href=" https://hosting.photobucket.com/95288841-8654-4bf7-8fc9-a4aa78dce87f/c2ec45e1-e0f3-463a-b254-cb2a38b53e14.jpg
" target="_blank"> <img alt="Click for enlarged picture" src="
https://hosting.photobucket.com/95288841-8654-4bf7-8fc9-a4aa78dce87f/c2ec45e1-e0f3-463a-b254-cb2a38b53e14.jpg" width="600" /> </a></p>
<p>
<a href=" https://hosting.photobucket.com/95288841-8654-4bf7-8fc9-a4aa78dce87f/17553b9a-0592-4f6a-a097-3f1a97e161f3.jpg
" target="_blank"> <img alt="Click for enlarged picture" src="
https://hosting.photobucket.com/95288841-8654-4bf7-8fc9-a4aa78dce87f/17553b9a-0592-4f6a-a097-3f1a97e161f3.jpg" width="600" /> </a></p>
<p>
<a href=" https://hosting.photobucket.com/95288841-8654-4bf7-8fc9-a4aa78dce87f/8658bd6b-dff2-4d24-8473-928d44d44480.jpg
" target="_blank"> <img alt="Click for enlarged picture" src="
https://hosting.photobucket.com/95288841-8654-4bf7-8fc9-a4aa78dce87f/8658bd6b-dff2-4d24-8473-928d44d44480.jpg" width="600" /> </a></p>
<p>
<a href=" https://hosting.photobucket.com/95288841-8654-4bf7-8fc9-a4aa78dce87f/ecab0ea7-f75b-4e31-a520-d088ad39fa17.jpg
" target="_blank"> <img alt="Click for enlarged picture" src="
https://hosting.photobucket.com/95288841-8654-4bf7-8fc9-a4aa78dce87f/ecab0ea7-f75b-4e31-a520-d088ad39fa17.jpg" width="600" /> </a></p>
<p>
<a href=" https://hosting.photobucket.com/95288841-8654-4bf7-8fc9-a4aa78dce87f/9495a2f5-8a82-41f2-abf4-9ade3db41d87.jpg
" target="_blank"> <img alt="Click for enlarged picture" src="
https://hosting.photobucket.com/95288841-8654-4bf7-8fc9-a4aa78dce87f/9495a2f5-8a82-41f2-abf4-9ade3db41d87.jpg" width="600" /> </a></p>
<p>
<a href=" https://hosting.photobucket.com/95288841-8654-4bf7-8fc9-a4aa78dce87f/362cc6fd-a5dd-474b-9b9f-aeab27d6dcfa.jpg
" target="_blank"> <img alt="Click for enlarged picture" src="
https://hosting.photobucket.com/95288841-8654-4bf7-8fc9-a4aa78dce87f/362cc6fd-a5dd-474b-9b9f-aeab27d6dcfa.jpg" width="600" /> </a></p>
<p>
Posebna čast nam je bila ugostiti na&scaron;eg gosta izlagača, Ninoslava Luka minijaturista iz Poreča koji nam se predstavio svojom kolekcijom povijesnih diorama.</p>
<p>
<a href=" https://hosting.photobucket.com/95288841-8654-4bf7-8fc9-a4aa78dce87f/ba1353de-e2bd-4340-9121-9056e287ed4a.jpg
" target="_blank"> <img alt="Click for enlarged picture" src="
https://hosting.photobucket.com/95288841-8654-4bf7-8fc9-a4aa78dce87f/ba1353de-e2bd-4340-9121-9056e287ed4a.jpg" width="600" /> </a></p>
<p>
<a href=" https://hosting.photobucket.com/95288841-8654-4bf7-8fc9-a4aa78dce87f/cea18506-1b50-4e5b-955c-0b9ca02d7826.jpg
" target="_blank"> <img alt="Click for enlarged picture" src="
https://hosting.photobucket.com/95288841-8654-4bf7-8fc9-a4aa78dce87f/cea18506-1b50-4e5b-955c-0b9ca02d7826.jpg" width="600" /> </a></p>
<p>
<a href=" https://hosting.photobucket.com/95288841-8654-4bf7-8fc9-a4aa78dce87f/1be85b41-e3b6-4536-b141-cd0da6eb38c1.jpg
" target="_blank"> <img alt="Click for enlarged picture" src="
https://hosting.photobucket.com/95288841-8654-4bf7-8fc9-a4aa78dce87f/1be85b41-e3b6-4536-b141-cd0da6eb38c1.jpg" width="600" /> </a></p>
<p>
<a href=" https://hosting.photobucket.com/95288841-8654-4bf7-8fc9-a4aa78dce87f/9e93b87d-ff3c-4b7b-8f06-5f9d3464a134.jpg
" target="_blank"> <img alt="Click for enlarged picture" src="
https://hosting.photobucket.com/95288841-8654-4bf7-8fc9-a4aa78dce87f/9e93b87d-ff3c-4b7b-8f06-5f9d3464a134.jpg" width="600" /> </a></p>
<p>
Tijekom prvog vikenda Izložbe, 21.-22.02.,održali smo 20. godi&scaron;nje međunarodno natjecanje u bojanju minijatura <strong>Black Queen Hobby and Miniature Painting Competition</strong>!</p>
<p>
<a href=" https://hosting.photobucket.com/95288841-8654-4bf7-8fc9-a4aa78dce87f/3056fb09-f66c-4dea-80a8-a4e72407429a.jpg
" target="_blank"> <img alt="Click for enlarged picture" src="
https://hosting.photobucket.com/95288841-8654-4bf7-8fc9-a4aa78dce87f/3056fb09-f66c-4dea-80a8-a4e72407429a.jpg" width="600" /> </a></p>
<p>
Kako su natjecatelji pristizali i prijavljivali se na natjecanje, na&scaron;e vrijedno osoblje je fotografiralo sve izlo&scaron;ke prije nego li su ih rasporedili po kategorijama i pažljivo ih postavili u staklene vitrine. Niti jutarnja okrijepa nije usfalila zahvaljujući na&scaron;im revnim volonterima.</p>
<p>
<a href=" https://hosting.photobucket.com/95288841-8654-4bf7-8fc9-a4aa78dce87f/1118089c-2b46-4a2c-b17d-dc92b66d1ffc.jpg
" target="_blank"> <img alt="Click for enlarged picture" src="
https://hosting.photobucket.com/95288841-8654-4bf7-8fc9-a4aa78dce87f/1118089c-2b46-4a2c-b17d-dc92b66d1ffc.jpg" width="600" /> </a></p>
<p>
<a href=" https://hosting.photobucket.com/95288841-8654-4bf7-8fc9-a4aa78dce87f/9fd3c272-9a69-4532-a09d-36497a20a820.jpg
" target="_blank"> <img alt="Click for enlarged picture" src="
https://hosting.photobucket.com/95288841-8654-4bf7-8fc9-a4aa78dce87f/9fd3c272-9a69-4532-a09d-36497a20a820.jpg" width="600" /> </a></p>
<p>
<a href=" https://hosting.photobucket.com/95288841-8654-4bf7-8fc9-a4aa78dce87f/86995e80-c502-45fb-80f5-c8fda27da3f9.jpg
" target="_blank"> <img alt="Click for enlarged picture" src="
https://hosting.photobucket.com/95288841-8654-4bf7-8fc9-a4aa78dce87f/86995e80-c502-45fb-80f5-c8fda27da3f9.jpg" width="600" /> </a></p>
<p>
U podne, sve vitrine su bile pune i natjecanje je moglo službeno početi.</p>
<p>
<a href=" https://hosting.photobucket.com/95288841-8654-4bf7-8fc9-a4aa78dce87f/bce59a4f-c3e3-4708-a3d6-25e81a894c24.jpg
" target="_blank"> <img alt="Click for enlarged picture" src="
https://hosting.photobucket.com/95288841-8654-4bf7-8fc9-a4aa78dce87f/bce59a4f-c3e3-4708-a3d6-25e81a894c24.jpg" width="600" /> </a></p>
<p>
<a href=" https://hosting.photobucket.com/95288841-8654-4bf7-8fc9-a4aa78dce87f/16a0a094-01aa-4e52-82cf-fdab00d74711.jpg
" target="_blank"> <img alt="Click for enlarged picture" src="
https://hosting.photobucket.com/95288841-8654-4bf7-8fc9-a4aa78dce87f/16a0a094-01aa-4e52-82cf-fdab00d74711.jpg" width="600" /> </a></p>
<p>
<a href=" https://hosting.photobucket.com/95288841-8654-4bf7-8fc9-a4aa78dce87f/0d3f4042-ff77-48d0-b332-add0fd08f7c3.jpg
" target="_blank"> <img alt="Click for enlarged picture" src="
https://hosting.photobucket.com/95288841-8654-4bf7-8fc9-a4aa78dce87f/0d3f4042-ff77-48d0-b332-add0fd08f7c3.jpg" width="600" /> </a></p>
<p>
<a href=" https://hosting.photobucket.com/95288841-8654-4bf7-8fc9-a4aa78dce87f/3711baf8-93f2-434a-aea9-a95288ca04dd.jpg
" target="_blank"> <img alt="Click for enlarged picture" src="
https://hosting.photobucket.com/95288841-8654-4bf7-8fc9-a4aa78dce87f/3711baf8-93f2-434a-aea9-a95288ca04dd.jpg" width="600" /> </a></p>
<p>
<a href=" https://hosting.photobucket.com/95288841-8654-4bf7-8fc9-a4aa78dce87f/53113b97-ec06-4409-95ba-95a5ad3f9720.jpg
" target="_blank"> <img alt="Click for enlarged picture" src="
https://hosting.photobucket.com/95288841-8654-4bf7-8fc9-a4aa78dce87f/53113b97-ec06-4409-95ba-95a5ad3f9720.jpg" width="600" /> </a></p>
<p>
<a href=" https://hosting.photobucket.com/95288841-8654-4bf7-8fc9-a4aa78dce87f/ab127858-193d-4976-bdb2-e27302722fca.jpg
" target="_blank"> <img alt="Click for enlarged picture" src="
https://hosting.photobucket.com/95288841-8654-4bf7-8fc9-a4aa78dce87f/ab127858-193d-4976-bdb2-e27302722fca.jpg" width="600" /> </a></p>
<p>
<a href=" https://hosting.photobucket.com/95288841-8654-4bf7-8fc9-a4aa78dce87f/3735af11-3fb6-4772-a8ff-5e0ff6ddf03a.jpg
" target="_blank"> <img alt="Click for enlarged picture" src="
https://hosting.photobucket.com/95288841-8654-4bf7-8fc9-a4aa78dce87f/3735af11-3fb6-4772-a8ff-5e0ff6ddf03a.jpg" width="600" /> </a></p>
<p>
<strong>Back To Basics radionice za najmlađe na Black Queen</strong></p>
<p>
Ove godine smo tijekom cijelog vikenda organizirali radionice bojanja minijatura za najmlađe koji su mogli po prvi puta obojati neku od na&scaron;ih vlastitih minijatura osmi&scaron;ljenih upravo za ovaj program!</p>
<p>
<a href=" https://hosting.photobucket.com/95288841-8654-4bf7-8fc9-a4aa78dce87f/6999be0c-8cc6-4947-a423-9427a2299724.jpg
" target="_blank"> <img alt="Click for enlarged picture" src="
https://hosting.photobucket.com/95288841-8654-4bf7-8fc9-a4aa78dce87f/6999be0c-8cc6-4947-a423-9427a2299724.jpg" width="600" /> </a></p>
<p>
<a href="https://hosting.photobucket.com/95288841-8654-4bf7-8fc9-a4aa78dce87f/835b05a5-f171-49df-afa6-da0692b89074.jpg" target="_blank"><img alt="Click for enlarged picture" src="https://hosting.photobucket.com/95288841-8654-4bf7-8fc9-a4aa78dce87f/835b05a5-f171-49df-afa6-da0692b89074.jpg" width="600" /></a></p>
<p>
<a href=" https://hosting.photobucket.com/95288841-8654-4bf7-8fc9-a4aa78dce87f/ef5dde13-84ee-4ea0-b9f3-28aaf703ef6d.jpg
" target="_blank"> <img alt="Click for enlarged picture" src="
https://hosting.photobucket.com/95288841-8654-4bf7-8fc9-a4aa78dce87f/ef5dde13-84ee-4ea0-b9f3-28aaf703ef6d.jpg" width="600" /> </a></p>
<p>
<strong>PRODAJNI KUTAK</strong></p>
<p>
Tijekom vikenda ugostili smo na&scaron;e sponzore sa njihovim prodajnim &scaron;tandovima: Swood.si i Carta Magica.</p>
<p>
<a href=" https://hosting.photobucket.com/95288841-8654-4bf7-8fc9-a4aa78dce87f/5ee9a49f-a387-435a-9110-572402b7191d.jpg
" target="_blank"> <img alt="Click for enlarged picture" src="
https://hosting.photobucket.com/95288841-8654-4bf7-8fc9-a4aa78dce87f/5ee9a49f-a387-435a-9110-572402b7191d.jpg" width="600" /> </a></p>
<p>
<a href=" https://hosting.photobucket.com/95288841-8654-4bf7-8fc9-a4aa78dce87f/47cf600f-b1eb-4655-bf06-305f6f21d5d2.jpg
" target="_blank"> <img alt="Click for enlarged picture" src="
https://hosting.photobucket.com/95288841-8654-4bf7-8fc9-a4aa78dce87f/47cf600f-b1eb-4655-bf06-305f6f21d5d2.jpg" width="600" /> </a></p>
<p>
<strong>OGLEDNE RADIONICE BOJANJA MINIJATURA</strong></p>
<p>
Prostor ZZTK omogućuje održavanje radionica tijekom vikenda u kino dvorani u podrumu, stoga smo tijekom vikenda organizirali i ogledne radionice. Rad predavača snimao se kamerom i projicirao na projekcijsko platno u dvorani. Veliko hvala na&scaron;im domaćim i inozemnim predavačima: Anžetu Zorku (SLO), doc.dr.sc. Wintonu Afriću (HR), Ivanu Knezoviću (UMS Agram) i Petru Knezoviću (HR).</p>
<p>
<a href=" https://hosting.photobucket.com/95288841-8654-4bf7-8fc9-a4aa78dce87f/e8d835be-ec99-49d7-bc9b-086e38573d1a.jpg
" target="_blank"> <img alt="Click for enlarged picture" src="
https://hosting.photobucket.com/95288841-8654-4bf7-8fc9-a4aa78dce87f/e8d835be-ec99-49d7-bc9b-086e38573d1a.jpg" width="600" /> </a></p>
<p>
<a href=" https://hosting.photobucket.com/95288841-8654-4bf7-8fc9-a4aa78dce87f/f3eba4c1-4637-4da9-8360-75f430355af4.jpg" target="_blank"> <img alt="Click for enlarged picture" src="
https://hosting.photobucket.com/95288841-8654-4bf7-8fc9-a4aa78dce87f/f3eba4c1-4637-4da9-8360-75f430355af4.jpg" width="600" /> </a></p>
<p>
<a href=" https://hosting.photobucket.com/95288841-8654-4bf7-8fc9-a4aa78dce87f/ef523854-4030-4579-aa38-403afda86c91.jpg
" target="_blank"> <img alt="Click for enlarged picture" src="
https://hosting.photobucket.com/95288841-8654-4bf7-8fc9-a4aa78dce87f/ef523854-4030-4579-aa38-403afda86c91.jpg" width="600" /> </a></p>
<p>
<a href=" https://hosting.photobucket.com/95288841-8654-4bf7-8fc9-a4aa78dce87f/dd0943c2-f4a8-40c3-b641-f6dcdd200380.jpg
" target="_blank"> <img alt="Click for enlarged picture" src="
https://hosting.photobucket.com/95288841-8654-4bf7-8fc9-a4aa78dce87f/dd0943c2-f4a8-40c3-b641-f6dcdd200380.jpg" width="600" /> </a></p>
<p>
<a href=" https://hosting.photobucket.com/95288841-8654-4bf7-8fc9-a4aa78dce87f/08b1626a-f6c7-43c9-b718-3e9a41b55ca6.jpg
" target="_blank"> <img alt="Click for enlarged picture" src="
https://hosting.photobucket.com/95288841-8654-4bf7-8fc9-a4aa78dce87f/08b1626a-f6c7-43c9-b718-3e9a41b55ca6.jpg" width="600" /> </a></p>
<p>
<a href=" https://hosting.photobucket.com/95288841-8654-4bf7-8fc9-a4aa78dce87f/91aca7f3-1af6-486d-b174-65079a63a1ea.jpg
" target="_blank"> <img alt="Click for enlarged picture" src="
https://hosting.photobucket.com/95288841-8654-4bf7-8fc9-a4aa78dce87f/91aca7f3-1af6-486d-b174-65079a63a1ea.jpg" width="600" /> </a></p>
<p>
<a href=" https://hosting.photobucket.com/95288841-8654-4bf7-8fc9-a4aa78dce87f/3821f2fb-fbe7-4096-adbc-7d8c981a3b56.jpg
" target="_blank"> <img alt="Click for enlarged picture" src="
https://hosting.photobucket.com/95288841-8654-4bf7-8fc9-a4aa78dce87f/3821f2fb-fbe7-4096-adbc-7d8c981a3b56.jpg" width="600" /> </a></p>
<p>
<a href=" https://hosting.photobucket.com/95288841-8654-4bf7-8fc9-a4aa78dce87f/2c7bb3c5-c0ec-4a96-b6bd-6a90ce5ce154.jpg
" target="_blank"> <img alt="Click for enlarged picture" src="
https://hosting.photobucket.com/95288841-8654-4bf7-8fc9-a4aa78dce87f/2c7bb3c5-c0ec-4a96-b6bd-6a90ce5ce154.jpg" width="600" /> </a></p>
<p>
<a href=" https://hosting.photobucket.com/95288841-8654-4bf7-8fc9-a4aa78dce87f/b646f4ee-21aa-4d12-8db3-6d33351d5aeb.jpg
" target="_blank"> <img alt="Click for enlarged picture" src="
https://hosting.photobucket.com/95288841-8654-4bf7-8fc9-a4aa78dce87f/b646f4ee-21aa-4d12-8db3-6d33351d5aeb.jpg" width="600" /> </a></p>
<p>
<a href=" https://hosting.photobucket.com/95288841-8654-4bf7-8fc9-a4aa78dce87f/fb5efc01-32cc-4119-90e3-188f51b30237.jpg
" target="_blank"> <img alt="Click for enlarged picture" src="
https://hosting.photobucket.com/95288841-8654-4bf7-8fc9-a4aa78dce87f/fb5efc01-32cc-4119-90e3-188f51b30237.jpg" width="600" /> </a></p>
<p>
<strong>NATJECANJE U BRZOM BOJANJU MINIJATURA</strong></p>
<p>
U nedjelju, 22.2. smo organizirali natjecanje u brzom bojanju minijatura. Po prvi puta smo koristili minijature koje su na&scaron; dizajn. Sudionici su imali 60 minuta vremena da obojaju og čarobnjaka.</p>
<p>
<a href=" https://hosting.photobucket.com/95288841-8654-4bf7-8fc9-a4aa78dce87f/106417a6-a047-4e0d-9f81-87858806052f.jpg
" target="_blank"> <img alt="Click for enlarged picture" src="
https://hosting.photobucket.com/95288841-8654-4bf7-8fc9-a4aa78dce87f/106417a6-a047-4e0d-9f81-87858806052f.jpg" width="600" /> </a></p>
<p>
<a href=" https://hosting.photobucket.com/95288841-8654-4bf7-8fc9-a4aa78dce87f/ac6853c7-6e34-4e07-a996-8d7d12744b67.jpg
" target="_blank"> <img alt="Click for enlarged picture" src="
https://hosting.photobucket.com/95288841-8654-4bf7-8fc9-a4aa78dce87f/ac6853c7-6e34-4e07-a996-8d7d12744b67.jpg" width="600" /> </a></p>
<p>
<a href=" https://hosting.photobucket.com/95288841-8654-4bf7-8fc9-a4aa78dce87f/ccb155fa-52c5-4a99-9515-f69a6836dce7.jpg
" target="_blank"> <img alt="Click for enlarged picture" src="
https://hosting.photobucket.com/95288841-8654-4bf7-8fc9-a4aa78dce87f/ccb155fa-52c5-4a99-9515-f69a6836dce7.jpg" width="600" /> </a></p>
<p>
<a href=" https://hosting.photobucket.com/95288841-8654-4bf7-8fc9-a4aa78dce87f/a29fedd0-97ea-45b1-85f9-7ea62188b2b2.jpg
" target="_blank"><img alt="Click for enlarged picture" src="
https://hosting.photobucket.com/95288841-8654-4bf7-8fc9-a4aa78dce87f/a29fedd0-97ea-45b1-85f9-7ea62188b2b2.jpg" width="600" /></a></p>
<p>
S time smo do&scaron;li do samoga kraja ovog predivnog vikenda i sve &scaron;to je preostalo je bila podjela nagrada i priznanja pobjednicima.</p>
<p>
<a href=" https://hosting.photobucket.com/95288841-8654-4bf7-8fc9-a4aa78dce87f/046ca4c8-0ae7-415e-abd3-e131d580c3ad.jpg
" target="_blank"> <img alt="Click for enlarged picture" src="
https://hosting.photobucket.com/95288841-8654-4bf7-8fc9-a4aa78dce87f/046ca4c8-0ae7-415e-abd3-e131d580c3ad.jpg" width="600" /> </a></p>
<p>
<a href=" https://hosting.photobucket.com/95288841-8654-4bf7-8fc9-a4aa78dce87f/cec0dcef-7acb-4a77-89de-271ed5410672.jpg
" target="_blank"> <img alt="Click for enlarged picture" src="
https://hosting.photobucket.com/95288841-8654-4bf7-8fc9-a4aa78dce87f/cec0dcef-7acb-4a77-89de-271ed5410672.jpg" width="600" /> </a></p>
<p>
<a href=" https://hosting.photobucket.com/95288841-8654-4bf7-8fc9-a4aa78dce87f/a495a5fc-31a2-4979-a970-0fa22c334354.jpg
" target="_blank"> <img alt="Click for enlarged picture" src="
https://hosting.photobucket.com/95288841-8654-4bf7-8fc9-a4aa78dce87f/a495a5fc-31a2-4979-a970-0fa22c334354.jpg" width="600" /> </a></p>
<p>
<strong>AGRAM ARENA &ndash; Leaving Asphodel Necropolis28 kampanja</strong></p>
<p>
Tijekom vikenda 21.-22.2. održali smo i novo međunarodno natjecanje Agram Arena! Ovoga puta na redu je bila stolna strate&scaron;ka igra Necropolis 28 za koju su na&scaron;i članovi osmislili dvodnevnu kampanju. Svaki sudionik je izradio svoju bandu vojnika, a velika većina i svoje vlastite table.</p>
<p>
<a href=" https://hosting.photobucket.com/95288841-8654-4bf7-8fc9-a4aa78dce87f/ac69b182-4bfc-4575-a6d3-fb3c8baba342.jpg
" target="_blank"> <img alt="Click for enlarged picture" src="
https://hosting.photobucket.com/95288841-8654-4bf7-8fc9-a4aa78dce87f/ac69b182-4bfc-4575-a6d3-fb3c8baba342.jpg" width="600" /> </a></p>
<p>
<a href=" https://hosting.photobucket.com/95288841-8654-4bf7-8fc9-a4aa78dce87f/289fed7b-e058-42d8-ba2d-cbd0463e98da.jpg
" target="_blank"> <img alt="Click for enlarged picture" src="
https://hosting.photobucket.com/95288841-8654-4bf7-8fc9-a4aa78dce87f/289fed7b-e058-42d8-ba2d-cbd0463e98da.jpg" width="600" /> </a></p>
<p>
<a href=" https://hosting.photobucket.com/95288841-8654-4bf7-8fc9-a4aa78dce87f/d92ebbee-859d-4441-8386-3d760b20b7a7.jpg
" target="_blank"> <img alt="Click for enlarged picture" src="
https://hosting.photobucket.com/95288841-8654-4bf7-8fc9-a4aa78dce87f/d92ebbee-859d-4441-8386-3d760b20b7a7.jpg" width="600" /> </a></p>
<p>
<a href=" https://hosting.photobucket.com/95288841-8654-4bf7-8fc9-a4aa78dce87f/09c59798-7871-425e-a075-3ca1cd91768a.jpg
" target="_blank"> <img alt="Click for enlarged picture" src="
https://hosting.photobucket.com/95288841-8654-4bf7-8fc9-a4aa78dce87f/09c59798-7871-425e-a075-3ca1cd91768a.jpg" width="600" /> </a></p>
<p>
<a href=" https://hosting.photobucket.com/95288841-8654-4bf7-8fc9-a4aa78dce87f/b2f3edc8-5a23-4552-9a2a-4027b286f327.jpg
" target="_blank"> <img alt="Click for enlarged picture" src="
https://hosting.photobucket.com/95288841-8654-4bf7-8fc9-a4aa78dce87f/b2f3edc8-5a23-4552-9a2a-4027b286f327.jpg" width="600" /> </a></p>
<p>
<a href=" https://hosting.photobucket.com/95288841-8654-4bf7-8fc9-a4aa78dce87f/2a9f43ac-b531-4746-b7bb-ac5a3356aab0.jpg
" target="_blank"> <img alt="Click for enlarged picture" src="
https://hosting.photobucket.com/95288841-8654-4bf7-8fc9-a4aa78dce87f/2a9f43ac-b531-4746-b7bb-ac5a3356aab0.jpg" width="600" /> </a></p>
<p>
<strong>DOGAĐANJA RADNIM DANIMA ZA VRIJEME IZLOŽBE</strong></p>
<p>
Tijekom naredna dva tjedna, na&scaron;i volonteri su radnim danima od 16:00 do 20:00, držali otvorene radionice bojanja minijatura. Postavljene su radne stanice za bojanje minijatura na kojoj su na&scaron;i posjetitelji mogli bojati minijature koje smo priredili (ili svoje ukoliko su ih donijeli) koristeći na&scaron;e materijale i alate.</p>
<p>
<a href=" https://hosting.photobucket.com/95288841-8654-4bf7-8fc9-a4aa78dce87f/6edf7765-42b5-417a-820f-fa5d907179a7.jpg
" target="_blank"> <img alt="Click for enlarged picture" src="
https://hosting.photobucket.com/95288841-8654-4bf7-8fc9-a4aa78dce87f/6edf7765-42b5-417a-820f-fa5d907179a7.jpg" width="600" /> </a></p>
<p>
<a href=" https://hosting.photobucket.com/95288841-8654-4bf7-8fc9-a4aa78dce87f/c084ebe2-f57b-4519-9b31-29bdc1155887.jpg
" target="_blank"> <img alt="Click for enlarged picture" src="
https://hosting.photobucket.com/95288841-8654-4bf7-8fc9-a4aa78dce87f/c084ebe2-f57b-4519-9b31-29bdc1155887.jpg" width="600" /> </a></p>
<p>
<a href=" https://hosting.photobucket.com/95288841-8654-4bf7-8fc9-a4aa78dce87f/37ff2272-f9b0-4b16-a363-1e6f6688c866.jpg
" target="_blank"> <img alt="Click for enlarged picture" src="
https://hosting.photobucket.com/95288841-8654-4bf7-8fc9-a4aa78dce87f/37ff2272-f9b0-4b16-a363-1e6f6688c866.jpg" width="600" /> </a></p>
<p>
<a href=" https://hosting.photobucket.com/95288841-8654-4bf7-8fc9-a4aa78dce87f/5f4f7968-ff50-4a01-98da-6ce8562930b4.jpg
" target="_blank"> <img alt="Click for enlarged picture" src="
https://hosting.photobucket.com/95288841-8654-4bf7-8fc9-a4aa78dce87f/5f4f7968-ff50-4a01-98da-6ce8562930b4.jpg" width="600" /> </a></p>
<p>
<a href=" https://hosting.photobucket.com/95288841-8654-4bf7-8fc9-a4aa78dce87f/cbb45319-d488-483c-bf9d-9af29852fc74.jpg
" target="_blank"> <img alt="Click for enlarged picture" src="
https://hosting.photobucket.com/95288841-8654-4bf7-8fc9-a4aa78dce87f/cbb45319-d488-483c-bf9d-9af29852fc74.jpg" width="600" /> </a></p>
<p>
<a href=" https://hosting.photobucket.com/95288841-8654-4bf7-8fc9-a4aa78dce87f/3dcca26c-d549-4af3-812a-a4a81b9a2310.jpg
" target="_blank"> <img alt="Click for enlarged picture" src="
https://hosting.photobucket.com/95288841-8654-4bf7-8fc9-a4aa78dce87f/3dcca26c-d549-4af3-812a-a4a81b9a2310.jpg" width="600" /> </a></p>
<p>
<a href=" https://hosting.photobucket.com/95288841-8654-4bf7-8fc9-a4aa78dce87f/4adf0fb6-3eab-4b40-b32d-d03eab4a9892.jpg
" target="_blank"> <img alt="Click for enlarged picture" src="
https://hosting.photobucket.com/95288841-8654-4bf7-8fc9-a4aa78dce87f/4adf0fb6-3eab-4b40-b32d-d03eab4a9892.jpg" width="600" /> </a></p>
<p>
<a href=" https://hosting.photobucket.com/95288841-8654-4bf7-8fc9-a4aa78dce87f/4732b58a-9a65-4d1c-a7d5-25513d34b108.jpg
" target="_blank"> <img alt="Click for enlarged picture" src="
https://hosting.photobucket.com/95288841-8654-4bf7-8fc9-a4aa78dce87f/4732b58a-9a65-4d1c-a7d5-25513d34b108.jpg" width="600" /> </a></p>
<p>
<a href=" https://hosting.photobucket.com/95288841-8654-4bf7-8fc9-a4aa78dce87f/274be330-31d5-4e25-95db-ec2f423a003c.jpg
" target="_blank"> <img alt="Click for enlarged picture" src="
https://hosting.photobucket.com/95288841-8654-4bf7-8fc9-a4aa78dce87f/274be330-31d5-4e25-95db-ec2f423a003c.jpg" width="600" /> </a></p>
<p>
<a href=" https://hosting.photobucket.com/95288841-8654-4bf7-8fc9-a4aa78dce87f/8e7b0a80-0f46-4d70-9789-a46976c713d2.jpg
" target="_blank"> <img alt="Click for enlarged picture" src="
https://hosting.photobucket.com/95288841-8654-4bf7-8fc9-a4aa78dce87f/8e7b0a80-0f46-4d70-9789-a46976c713d2.jpg" width="600" /> </a></p>
<p>
<a href=" https://hosting.photobucket.com/95288841-8654-4bf7-8fc9-a4aa78dce87f/8bbd4e96-b911-4f26-80fe-b1c57f29027b.jpg
" target="_blank"> <img alt="Click for enlarged picture" src="
https://hosting.photobucket.com/95288841-8654-4bf7-8fc9-a4aa78dce87f/8bbd4e96-b911-4f26-80fe-b1c57f29027b.jpg" width="600" /> </a></p>
<p>
<a href=" https://hosting.photobucket.com/95288841-8654-4bf7-8fc9-a4aa78dce87f/203a27be-8f10-459d-89b9-befb6b636b74.jpg
" target="_blank"> <img alt="Click for enlarged picture" src="
https://hosting.photobucket.com/95288841-8654-4bf7-8fc9-a4aa78dce87f/203a27be-8f10-459d-89b9-befb6b636b74.jpg" width="600" /> </a></p>
<p>
<a href=" https://hosting.photobucket.com/95288841-8654-4bf7-8fc9-a4aa78dce87f/5dc4358f-19d8-475f-a4af-9c29e9ed18d7.jpg
" target="_blank"> <img alt="Click for enlarged picture" src="
https://hosting.photobucket.com/95288841-8654-4bf7-8fc9-a4aa78dce87f/5dc4358f-19d8-475f-a4af-9c29e9ed18d7.jpg" width="600" /> </a></p>
<p>
<strong>BACK TO BASICS RADIONICE ZA NAJMLAĐE</strong></p>
<p>
Radnim danima od 17:00 do 18:00 održavali smo na&scaron;e nove radionice za najmlađe u kojima su na&scaron;i najmlađi polaznici bojali svoje prve minijature.</p>
<p>
<a href=" https://hosting.photobucket.com/95288841-8654-4bf7-8fc9-a4aa78dce87f/948af139-8fb5-4e28-a27c-404466e70d05.jpg
" target="_blank"> <img alt="Click for enlarged picture" src="
https://hosting.photobucket.com/95288841-8654-4bf7-8fc9-a4aa78dce87f/948af139-8fb5-4e28-a27c-404466e70d05.jpg" width="600" /> </a></p>
<p>
<a href=" https://hosting.photobucket.com/95288841-8654-4bf7-8fc9-a4aa78dce87f/bb3e20c2-bb21-4a3d-863a-74de08261467.jpg
" target="_blank"> <img alt="Click for enlarged picture" src="
https://hosting.photobucket.com/95288841-8654-4bf7-8fc9-a4aa78dce87f/bb3e20c2-bb21-4a3d-863a-74de08261467.jpg" width="600" /> </a></p>
<p>
<a href=" https://hosting.photobucket.com/95288841-8654-4bf7-8fc9-a4aa78dce87f/7316c760-98e3-4e3f-9261-d138aa7a5a6a.jpg
" target="_blank"> <img alt="Click for enlarged picture" src="
https://hosting.photobucket.com/95288841-8654-4bf7-8fc9-a4aa78dce87f/7316c760-98e3-4e3f-9261-d138aa7a5a6a.jpg" width="600" /> </a></p>
<p>
<a href=" https://hosting.photobucket.com/95288841-8654-4bf7-8fc9-a4aa78dce87f/68934b39-3d1f-4f43-b967-14b73c41a39e.jpg
" target="_blank"> <img alt="Click for enlarged picture" src="
https://hosting.photobucket.com/95288841-8654-4bf7-8fc9-a4aa78dce87f/68934b39-3d1f-4f43-b967-14b73c41a39e.jpg" width="600" /> </a></p>
<p>
<a href=" https://hosting.photobucket.com/95288841-8654-4bf7-8fc9-a4aa78dce87f/46125bce-a28d-494f-873a-3aeabdc1d6c2.jpg
" target="_blank"> <img alt="Click for enlarged picture" src="
https://hosting.photobucket.com/95288841-8654-4bf7-8fc9-a4aa78dce87f/46125bce-a28d-494f-873a-3aeabdc1d6c2.jpg" width="600" /> </a></p>
<p>
<a href=" https://hosting.photobucket.com/95288841-8654-4bf7-8fc9-a4aa78dce87f/3c58e0ad-77a9-44c8-b6bf-d9a55c514d43.jpg
" target="_blank"> <img alt="Click for enlarged picture" src="
https://hosting.photobucket.com/95288841-8654-4bf7-8fc9-a4aa78dce87f/3c58e0ad-77a9-44c8-b6bf-d9a55c514d43.jpg" width="600" /> </a></p>
<p>
<a href=" https://hosting.photobucket.com/95288841-8654-4bf7-8fc9-a4aa78dce87f/f891f0f0-051b-40ee-9676-cb03b0a9811b.jpg
" target="_blank"> <img alt="Click for enlarged picture" src="
https://hosting.photobucket.com/95288841-8654-4bf7-8fc9-a4aa78dce87f/f891f0f0-051b-40ee-9676-cb03b0a9811b.jpg" width="600" /> </a></p>
<p>
<strong>AGRAM LEGO SEKCIJA predavanje: FW-14b &ndash; Bolid F1 za budućnost</strong></p>
<p>
U srijedu 25.2.2026. u sklopu aktivnosti na&scaron;e Agram Lego Sekcije, na&scaron; dežurni strojar Marko Paunović je održao predavanje na temu bolida Formule 1 iz 1992.. Ulaz na predavanje je bio besplatan, a po zavr&scaron;etku su LEGO maketu bolida izradili članovi Lego sekcije</p>
<p>
<a href=" https://hosting.photobucket.com/95288841-8654-4bf7-8fc9-a4aa78dce87f/b2e14b1c-daa4-4314-8685-184377bc7e28.jpg
" target="_blank"> <img alt="Click for enlarged picture" src="
https://hosting.photobucket.com/95288841-8654-4bf7-8fc9-a4aa78dce87f/b2e14b1c-daa4-4314-8685-184377bc7e28.jpg" width="600" /> </a></p>
<p>
<a href=" https://hosting.photobucket.com/95288841-8654-4bf7-8fc9-a4aa78dce87f/31fb439a-77d3-4418-83ff-66c3af279cca.jpg" target="_blank"> <img alt="Click for enlarged picture" src="
https://hosting.photobucket.com/95288841-8654-4bf7-8fc9-a4aa78dce87f/31fb439a-77d3-4418-83ff-66c3af279cca.jpg" width="600" /> </a></p>
<p>
<a href=" https://hosting.photobucket.com/95288841-8654-4bf7-8fc9-a4aa78dce87f/bfcaf282-6be8-4b52-a3ed-c91137457876.jpg
" target="_blank"> <img alt="Click for enlarged picture" src="
https://hosting.photobucket.com/95288841-8654-4bf7-8fc9-a4aa78dce87f/bfcaf282-6be8-4b52-a3ed-c91137457876.jpg" width="600" /> </a></p>
<p>
<a href=" https://hosting.photobucket.com/95288841-8654-4bf7-8fc9-a4aa78dce87f/ce70fc61-9e1a-4169-aaad-8b67417656c0.jpg
" target="_blank"> <img alt="Click for enlarged picture" src="
https://hosting.photobucket.com/95288841-8654-4bf7-8fc9-a4aa78dce87f/ce70fc61-9e1a-4169-aaad-8b67417656c0.jpg" width="600" /> </a></p>
<p>
<a href=" https://hosting.photobucket.com/95288841-8654-4bf7-8fc9-a4aa78dce87f/94ca0e36-8710-458d-8194-9f71299f4d74.jpg
" target="_blank"> <img alt="Click for enlarged picture" src="
https://hosting.photobucket.com/95288841-8654-4bf7-8fc9-a4aa78dce87f/94ca0e36-8710-458d-8194-9f71299f4d74.jpg" width="600" /> </a></p>
<p>
<a href=" https://hosting.photobucket.com/95288841-8654-4bf7-8fc9-a4aa78dce87f/c6771f72-7191-4ca3-a792-3bb1ab3897b1.jpg
" target="_blank"> <img alt="Click for enlarged picture" src="
https://hosting.photobucket.com/95288841-8654-4bf7-8fc9-a4aa78dce87f/c6771f72-7191-4ca3-a792-3bb1ab3897b1.jpg" width="600" /> </a></p>
<p>
<a href=" https://hosting.photobucket.com/95288841-8654-4bf7-8fc9-a4aa78dce87f/c8fcfcb6-09f2-4398-a2fb-fa5065771e01.jpg
" target="_blank"> <img alt="Click for enlarged picture" src="
https://hosting.photobucket.com/95288841-8654-4bf7-8fc9-a4aa78dce87f/c8fcfcb6-09f2-4398-a2fb-fa5065771e01.jpg" width="600" /> </a></p>
<p>
<a href=" https://hosting.photobucket.com/95288841-8654-4bf7-8fc9-a4aa78dce87f/d7e187a8-d5b1-433b-b30d-091e54dcdddf.jpg
" target="_blank"> <img alt="Click for enlarged picture" src="
https://hosting.photobucket.com/95288841-8654-4bf7-8fc9-a4aa78dce87f/d7e187a8-d5b1-433b-b30d-091e54dcdddf.jpg" width="600" /> </a></p>
<p>
Tijekom drugog vikenda Izložbe, 28.02.-01.03., organizirali smo <strong>RADIONICU BOJANJA MINIJATURA &ndash; Grimdark stil</strong>.</p>
<p>
Radionica se provodila kroz dva dana (cijeli vikend) i polaznici su bojali tri različite figure za igru Trench Crusade. Fokus ovih predavanja bilo je bojenje popularnim Grimdark stilom. Na radionici su bile predstavljene boje i pribor, priprema figura, nekoliko tehnika bojenja minijatura od osnovnih do naprednijih, te tehnike i trikovi za brzo i efikasno bojenje većih količina figura odjednom. U sklopu radionice kori&scaron;tene su akrilne boje na bazi vode.</p>
<p>
<a href=" https://hosting.photobucket.com/95288841-8654-4bf7-8fc9-a4aa78dce87f/733d94b2-8e8d-4a4e-accd-b9168e32577e.jpg
" target="_blank"> <img alt="Click for enlarged picture" src="
https://hosting.photobucket.com/95288841-8654-4bf7-8fc9-a4aa78dce87f/733d94b2-8e8d-4a4e-accd-b9168e32577e.jpg
" width="600" /> </a></p>
<p>
<a href=" https://hosting.photobucket.com/95288841-8654-4bf7-8fc9-a4aa78dce87f/41020062-45b9-41cd-a357-fa23a389f390.jpg
" target="_blank"> <img alt="Click for enlarged picture" src="
https://hosting.photobucket.com/95288841-8654-4bf7-8fc9-a4aa78dce87f/41020062-45b9-41cd-a357-fa23a389f390.jpg
" width="600" /> </a></p>
<p>
<a href=" https://hosting.photobucket.com/95288841-8654-4bf7-8fc9-a4aa78dce87f/0c07cc55-596d-494d-972b-cd6a0dd6b8b7.jpg
" target="_blank"> <img alt="Click for enlarged picture" src="
https://hosting.photobucket.com/95288841-8654-4bf7-8fc9-a4aa78dce87f/0c07cc55-596d-494d-972b-cd6a0dd6b8b7.jpg" width="600" /> </a></p>
<p>
<a href=" https://hosting.photobucket.com/95288841-8654-4bf7-8fc9-a4aa78dce87f/c17dd356-08b1-48e1-b895-6296aed7f818.jpg
" target="_blank"> <img alt="Click for enlarged picture" src="
https://hosting.photobucket.com/95288841-8654-4bf7-8fc9-a4aa78dce87f/c17dd356-08b1-48e1-b895-6296aed7f818.jpg" width="600" /> </a></p>
<p>
U srijedu 04.03.2026. održana je godi&scaron;nja <strong>sjednica Skup&scaron;tine</strong> na kojoj smo odredili smjernice rada u 2026.</p>
<p>
<a href=" https://hosting.photobucket.com/95288841-8654-4bf7-8fc9-a4aa78dce87f/59484bd0-7edc-4aed-a04e-ae42900ba3e6.jpg
" target="_blank"> <img alt="Click for enlarged picture" src="
https://hosting.photobucket.com/95288841-8654-4bf7-8fc9-a4aa78dce87f/59484bd0-7edc-4aed-a04e-ae42900ba3e6.jpg
" width="600" /> </a></p>
<p>
U nedjelju 08.03.2026. Izložba je zavr&scaron;ena, na&scaron;i eksponati sigurno spremljeni, a Galerija poči&scaron;ćena.</p>
<p>
<a href=" https://hosting.photobucket.com/95288841-8654-4bf7-8fc9-a4aa78dce87f/98af4280-0956-4cdb-b4a9-da40e3a5a44a.jpg
" target="_blank"> <img alt="Click for enlarged picture" src="
https://hosting.photobucket.com/95288841-8654-4bf7-8fc9-a4aa78dce87f/98af4280-0956-4cdb-b4a9-da40e3a5a44a.jpg" width="600" /> </a></p>
<p>
<a href=" https://hosting.photobucket.com/95288841-8654-4bf7-8fc9-a4aa78dce87f/3259b35e-1fc2-4a99-a3c5-c7984958d72b.jpg
" target="_blank"> <img alt="Click for enlarged picture" src="
https://hosting.photobucket.com/95288841-8654-4bf7-8fc9-a4aa78dce87f/3259b35e-1fc2-4a99-a3c5-c7984958d72b.jpg" width="600" /> </a></p>
<p>
Najbitniji dio svake godine prilikom održavanja ove Izložbe je socijalni aspekt, druženje na&scaron;ih članova kako međusobno tako i sa na&scaron;im međunarodnim prijateljima koji nas posjećuju! Uz ovih par fotografija sa zajedničkih druženja, pozdravljamo vas do sljedeće godine!</p>
<p>
<a href=" https://hosting.photobucket.com/95288841-8654-4bf7-8fc9-a4aa78dce87f/b9168e23-79b2-4d81-8a7d-7534062881a7.jpg
" target="_blank"> <img alt="Click for enlarged picture" src="
https://hosting.photobucket.com/95288841-8654-4bf7-8fc9-a4aa78dce87f/b9168e23-79b2-4d81-8a7d-7534062881a7.jpg " width="600" /> </a></p>
<p>
<a href=" https://hosting.photobucket.com/95288841-8654-4bf7-8fc9-a4aa78dce87f/edff925e-916c-4d78-953e-210abf3753d4.jpg
" target="_blank"> <img alt="Click for enlarged picture" src="
https://hosting.photobucket.com/95288841-8654-4bf7-8fc9-a4aa78dce87f/edff925e-916c-4d78-953e-210abf3753d4.jpg " width="600" /> </a></p>
<p>
<a href=" https://hosting.photobucket.com/95288841-8654-4bf7-8fc9-a4aa78dce87f/8bcb48fa-466b-43f8-8a4b-f15f6794b21e.jpg
" target="_blank"> <img alt="Click for enlarged picture" src="
https://hosting.photobucket.com/95288841-8654-4bf7-8fc9-a4aa78dce87f/8bcb48fa-466b-43f8-8a4b-f15f6794b21e.jpg" width="600" /> </a></p>
",
"created" => "2026-03-12 08:54:10",
"modified" => "2026-03-12 08:58:37"
),
"Member" => array(
"id" => "35",
"group_id" => "1",
"first_name" => "Marko",
"last_name" => "Paunović",
"first_name_mask" => "marko",
"last_name_mask" => "paunovic",
"username" => "marko",
"password" => "*****",
"born" => "2033-03-07 20:35:00",
"created" => "2009-06-02 20:37:03"
)
)</pre><pre class="stack-trace">include - APP/views/elements/latestArticles.ctp, line 7
View::_render() - CORE/cake/libs/view/view.php, line 736
View::element() - CORE/cake/libs/view/view.php, line 397
include - APP/views/home/index.ctp, line 49
View::_render() - CORE/cake/libs/view/view.php, line 736
View::render() - CORE/cake/libs/view/view.php, line 431
Controller::render() - CORE/cake/libs/controller/controller.php, line 909
Dispatcher::_invoke() - CORE/cake/dispatcher.php, line 207
Dispatcher::dispatch() - CORE/cake/dispatcher.php, line 171
[main] - APP/webroot/index.php, line 86</pre></div></pre><pre class="cake-debug"><a href="javascript:void(0);" onclick="document.getElementById('cakeErr8-trace').style.display = (document.getElementById('cakeErr8-trace').style.display == 'none' ? '' : 'none');"><b>Notice</b> (8)</a>: Undefined index: mask_dok [<b>APP/views/elements/latestArticles.ctp</b>, line <b>10</b>]<div id="cakeErr8-trace" class="cake-stack-trace" style="display: none;"><a href="javascript:void(0);" onclick="document.getElementById('cakeErr8-code').style.display = (document.getElementById('cakeErr8-code').style.display == 'none' ? '' : 'none')">Code</a> | <a href="javascript:void(0);" onclick="document.getElementById('cakeErr8-context').style.display = (document.getElementById('cakeErr8-context').style.display == 'none' ? '' : 'none')">Context</a><div id="cakeErr8-code" class="cake-code-dump" style="display: none;"><pre><code><span style="color: #000000"></span></code>
<code><span style="color: #000000"> if (Configure::read() > 0) {</span></code>
<span class="code-highlight"><code><span style="color: #000000"> include ($___viewFn);</span></code></span></pre></div><pre id="cakeErr8-context" class="cake-context" style="display: none;">$___viewFn = "/home/martin/apps/agram/app/views/elements/latestArticles.ctp"
$___dataForView = array(
"lang" => "dok",
"otherLangs" => array(
"eng",
"hrv"
),
"globalNav" => array(
array(),
array(),
array(),
array(),
array(),
array(),
array(),
array(),
array(),
array(),
array(),
array(),
array(),
array(),
array(),
array(),
array(),
array(),
array(),
array(),
array(),
array(),
array(),
array(),
array(),
array(),
array()
),
"breadCrumbs" => array(
array()
),
"pageContents" => array(
"home_who_we_are" => null
),
"userData" => null,
"announcements" => array(
array(),
array(),
array()
),
"cache" => array(
"time" => "+1 day",
"key" => "dok"
),
"form" => FormHelper
FormHelper::$helpers = array
FormHelper::$fieldset = array
FormHelper::$__options = array
FormHelper::$fields = array
FormHelper::$requestType = NULL
FormHelper::$defaultModel = NULL
FormHelper::$_inputDefaults = array
FormHelper::$_lastAction = ""
FormHelper::$base = ""
FormHelper::$webroot = "/"
FormHelper::$theme = NULL
FormHelper::$here = "/dok"
FormHelper::$params = array
FormHelper::$action = "index"
FormHelper::$plugin = NULL
FormHelper::$data = NULL
FormHelper::$namedArgs = NULL
FormHelper::$argSeparator = NULL
FormHelper::$validationErrors = NULL
FormHelper::$tags = array
FormHelper::$__tainted = NULL
FormHelper::$__cleaned = NULL
FormHelper::$Html = HtmlHelper object,
"text" => TextHelper
TextHelper::$helpers = NULL
TextHelper::$base = ""
TextHelper::$webroot = "/"
TextHelper::$theme = NULL
TextHelper::$here = "/dok"
TextHelper::$params = array
TextHelper::$action = "index"
TextHelper::$plugin = NULL
TextHelper::$data = NULL
TextHelper::$namedArgs = NULL
TextHelper::$argSeparator = NULL
TextHelper::$validationErrors = NULL
TextHelper::$tags = array
TextHelper::$__tainted = NULL
TextHelper::$__cleaned = NULL,
"stringer" => StringerHelper
StringerHelper::$helpers = array
StringerHelper::$base = ""
StringerHelper::$webroot = "/"
StringerHelper::$theme = NULL
StringerHelper::$here = "/dok"
StringerHelper::$params = array
StringerHelper::$action = "index"
StringerHelper::$plugin = NULL
StringerHelper::$data = NULL
StringerHelper::$namedArgs = NULL
StringerHelper::$argSeparator = NULL
StringerHelper::$validationErrors = NULL
StringerHelper::$tags = array
StringerHelper::$__tainted = NULL
StringerHelper::$__cleaned = NULL
StringerHelper::$Html = HtmlHelper object
StringerHelper::$Link = LinkHelper object
StringerHelper::$Text = TextHelper object,
"menu" => MenuHelper
MenuHelper::$helpers = array
MenuHelper::$base = ""
MenuHelper::$webroot = "/"
MenuHelper::$theme = NULL
MenuHelper::$here = "/dok"
MenuHelper::$params = array
MenuHelper::$action = "index"
MenuHelper::$plugin = NULL
MenuHelper::$data = NULL
MenuHelper::$namedArgs = NULL
MenuHelper::$argSeparator = NULL
MenuHelper::$validationErrors = NULL
MenuHelper::$tags = array
MenuHelper::$__tainted = NULL
MenuHelper::$__cleaned = NULL
MenuHelper::$Link = LinkHelper object,
"session" => SessionHelper
SessionHelper::$helpers = array
SessionHelper::$__active = true
SessionHelper::$valid = false
SessionHelper::$error = false
SessionHelper::$_userAgent = "f9a8355d006790ee743ededbb1f6e3bd"
SessionHelper::$path = "/"
SessionHelper::$lastError = NULL
SessionHelper::$security = "medium"
SessionHelper::$time = 1773314240
SessionHelper::$sessionTime = 1773326240
SessionHelper::$cookieLifeTime = false
SessionHelper::$watchKeys = array
SessionHelper::$id = NULL
SessionHelper::$host = NULL
SessionHelper::$timeout = NULL
SessionHelper::$base = ""
SessionHelper::$webroot = "/"
SessionHelper::$here = "/dok"
SessionHelper::$params = array
SessionHelper::$action = "index"
SessionHelper::$data = NULL
SessionHelper::$theme = NULL
SessionHelper::$plugin = NULL,
"html" => HtmlHelper
HtmlHelper::$tags = array
HtmlHelper::$_crumbs = array
HtmlHelper::$__includedScripts = array
HtmlHelper::$_scriptBlockOptions = array
HtmlHelper::$__docTypes = array
HtmlHelper::$helpers = NULL
HtmlHelper::$base = ""
HtmlHelper::$webroot = "/"
HtmlHelper::$theme = NULL
HtmlHelper::$here = "/dok"
HtmlHelper::$params = array
HtmlHelper::$action = "index"
HtmlHelper::$plugin = NULL
HtmlHelper::$data = NULL
HtmlHelper::$namedArgs = NULL
HtmlHelper::$argSeparator = NULL
HtmlHelper::$validationErrors = NULL
HtmlHelper::$__tainted = NULL
HtmlHelper::$__cleaned = NULL,
"link" => LinkHelper
LinkHelper::$helpers = array
LinkHelper::$lang = "dok"
LinkHelper::$defaultLang = "hrv"
LinkHelper::$base = ""
LinkHelper::$webroot = "/"
LinkHelper::$theme = NULL
LinkHelper::$here = "/dok"
LinkHelper::$params = array
LinkHelper::$action = "index"
LinkHelper::$plugin = NULL
LinkHelper::$data = NULL
LinkHelper::$namedArgs = NULL
LinkHelper::$argSeparator = NULL
LinkHelper::$validationErrors = NULL
LinkHelper::$tags = array
LinkHelper::$__tainted = NULL
LinkHelper::$__cleaned = NULL
LinkHelper::$Html = HtmlHelper object
LinkHelper::$Session = SessionHelper object
)
$loadHelpers = false
$cached = false
$loadedHelpers = array()
$lang = "dok"
$otherLangs = array(
"eng",
"hrv"
)
$globalNav = array(
array(
"Page" => array()
),
array(
"Page" => array()
),
array(
"Page" => array()
),
array(
"Page" => array()
),
array(
"Page" => array()
),
array(
"Page" => array()
),
array(
"Page" => array()
),
array(
"Page" => array()
),
array(
"Page" => array()
),
array(
"Page" => array()
),
array(
"Page" => array()
),
array(
"Page" => array()
),
array(
"Page" => array()
),
array(
"Page" => array()
),
array(
"Page" => array()
),
array(
"Page" => array()
),
array(
"Page" => array()
),
array(
"Page" => array()
),
array(
"Page" => array()
),
array(
"Page" => array()
),
array(
"Page" => array()
),
array(
"Page" => array()
),
array(
"Page" => array()
),
array(
"Page" => array()
),
array(
"Page" => array()
),
array(
"Page" => array()
),
array(
"Page" => array()
)
)
$breadCrumbs = array(
array(
"Page" => array()
)
)
$pageContents = array(
"home_who_we_are" => null
)
$userData = null
$announcements = array(
array(
"Announcement" => array()
),
array(
"Announcement" => array()
),
array(
"Announcement" => array()
)
)
$cache = array(
"time" => "+1 day",
"key" => "dok"
)
$form = FormHelper
FormHelper::$helpers = array
FormHelper::$fieldset = array
FormHelper::$__options = array
FormHelper::$fields = array
FormHelper::$requestType = NULL
FormHelper::$defaultModel = NULL
FormHelper::$_inputDefaults = array
FormHelper::$_lastAction = ""
FormHelper::$base = ""
FormHelper::$webroot = "/"
FormHelper::$theme = NULL
FormHelper::$here = "/dok"
FormHelper::$params = array
FormHelper::$action = "index"
FormHelper::$plugin = NULL
FormHelper::$data = NULL
FormHelper::$namedArgs = NULL
FormHelper::$argSeparator = NULL
FormHelper::$validationErrors = NULL
FormHelper::$tags = array
FormHelper::$__tainted = NULL
FormHelper::$__cleaned = NULL
FormHelper::$Html = HtmlHelper object
$text = TextHelper
TextHelper::$helpers = NULL
TextHelper::$base = ""
TextHelper::$webroot = "/"
TextHelper::$theme = NULL
TextHelper::$here = "/dok"
TextHelper::$params = array
TextHelper::$action = "index"
TextHelper::$plugin = NULL
TextHelper::$data = NULL
TextHelper::$namedArgs = NULL
TextHelper::$argSeparator = NULL
TextHelper::$validationErrors = NULL
TextHelper::$tags = array
TextHelper::$__tainted = NULL
TextHelper::$__cleaned = NULL
$stringer = StringerHelper
StringerHelper::$helpers = array
StringerHelper::$base = ""
StringerHelper::$webroot = "/"
StringerHelper::$theme = NULL
StringerHelper::$here = "/dok"
StringerHelper::$params = array
StringerHelper::$action = "index"
StringerHelper::$plugin = NULL
StringerHelper::$data = NULL
StringerHelper::$namedArgs = NULL
StringerHelper::$argSeparator = NULL
StringerHelper::$validationErrors = NULL
StringerHelper::$tags = array
StringerHelper::$__tainted = NULL
StringerHelper::$__cleaned = NULL
StringerHelper::$Html = HtmlHelper object
StringerHelper::$Link = LinkHelper object
StringerHelper::$Text = TextHelper object
$menu = MenuHelper
MenuHelper::$helpers = array
MenuHelper::$base = ""
MenuHelper::$webroot = "/"
MenuHelper::$theme = NULL
MenuHelper::$here = "/dok"
MenuHelper::$params = array
MenuHelper::$action = "index"
MenuHelper::$plugin = NULL
MenuHelper::$data = NULL
MenuHelper::$namedArgs = NULL
MenuHelper::$argSeparator = NULL
MenuHelper::$validationErrors = NULL
MenuHelper::$tags = array
MenuHelper::$__tainted = NULL
MenuHelper::$__cleaned = NULL
MenuHelper::$Link = LinkHelper object
$session = SessionHelper
SessionHelper::$helpers = array
SessionHelper::$__active = true
SessionHelper::$valid = false
SessionHelper::$error = false
SessionHelper::$_userAgent = "f9a8355d006790ee743ededbb1f6e3bd"
SessionHelper::$path = "/"
SessionHelper::$lastError = NULL
SessionHelper::$security = "medium"
SessionHelper::$time = 1773314240
SessionHelper::$sessionTime = 1773326240
SessionHelper::$cookieLifeTime = false
SessionHelper::$watchKeys = array
SessionHelper::$id = NULL
SessionHelper::$host = NULL
SessionHelper::$timeout = NULL
SessionHelper::$base = ""
SessionHelper::$webroot = "/"
SessionHelper::$here = "/dok"
SessionHelper::$params = array
SessionHelper::$action = "index"
SessionHelper::$data = NULL
SessionHelper::$theme = NULL
SessionHelper::$plugin = NULL
$html = HtmlHelper
HtmlHelper::$tags = array
HtmlHelper::$_crumbs = array
HtmlHelper::$__includedScripts = array
HtmlHelper::$_scriptBlockOptions = array
HtmlHelper::$__docTypes = array
HtmlHelper::$helpers = NULL
HtmlHelper::$base = ""
HtmlHelper::$webroot = "/"
HtmlHelper::$theme = NULL
HtmlHelper::$here = "/dok"
HtmlHelper::$params = array
HtmlHelper::$action = "index"
HtmlHelper::$plugin = NULL
HtmlHelper::$data = NULL
HtmlHelper::$namedArgs = NULL
HtmlHelper::$argSeparator = NULL
HtmlHelper::$validationErrors = NULL
HtmlHelper::$__tainted = NULL
HtmlHelper::$__cleaned = NULL
$link = LinkHelper
LinkHelper::$helpers = array
LinkHelper::$lang = "dok"
LinkHelper::$defaultLang = "hrv"
LinkHelper::$base = ""
LinkHelper::$webroot = "/"
LinkHelper::$theme = NULL
LinkHelper::$here = "/dok"
LinkHelper::$params = array
LinkHelper::$action = "index"
LinkHelper::$plugin = NULL
LinkHelper::$data = NULL
LinkHelper::$namedArgs = NULL
LinkHelper::$argSeparator = NULL
LinkHelper::$validationErrors = NULL
LinkHelper::$tags = array
LinkHelper::$__tainted = NULL
LinkHelper::$__cleaned = NULL
LinkHelper::$Html = HtmlHelper object
LinkHelper::$Session = SessionHelper object
$articles = array(
array(
"Article" => array(),
"Member" => array()
),
array(
"Article" => array(),
"Member" => array()
),
array(
"Article" => array(),
"Member" => array()
),
array(
"Article" => array(),
"Member" => array()
),
array(
"Article" => array(),
"Member" => array()
)
)
$article = array(
"Article" => array(
"id" => "496",
"member_id" => "35",
"title_eng" => "Exhibition of Miniatures and Tabletop Scenery 2026",
"title_hrv" => "Izložba minijatura i maketa Agram 2026",
"mask_eng" => "exhibition_of_miniatures_and_tabletop_scenery_2026",
"mask_hrv" => "izlozba_minijatura_i_maketa_agram_2026",
"content_eng" => "<p>
<a href=" https://hosting.photobucket.com/95288841-8654-4bf7-8fc9-a4aa78dce87f/dc756f84-867d-4df4-acd8-5d43775cafc2.jpg
" target="_blank"> <img alt="Click for enlarged picture" src="
https://hosting.photobucket.com/95288841-8654-4bf7-8fc9-a4aa78dce87f/dc756f84-867d-4df4-acd8-5d43775cafc2.jpg" width="600" /> </a></p>
<p>
<strong>The exhibition of miniatures and models &quot;Agram 2026&quot;</strong> was held this year from 19.2. to 08.03. 2026. The exhibition was set up on Wednesday 18.2. and was attended by a large number of members and friends of the Association who exhibited their works.</p>
<p>
&nbsp;</p>
<p>
<a href=" https://hosting.photobucket.com/95288841-8654-4bf7-8fc9-a4aa78dce87f/8529d6d4-76ea-4872-a9e6-748e04223a4e.jpg
" target="_blank"> <img alt="Click for enlarged picture" src="
https://hosting.photobucket.com/95288841-8654-4bf7-8fc9-a4aa78dce87f/8529d6d4-76ea-4872-a9e6-748e04223a4e.jpg
" width="600" /> </a></p>
<p>
<a href=" https://hosting.photobucket.com/95288841-8654-4bf7-8fc9-a4aa78dce87f/f3038937-f001-4ceb-b725-a330fcd64cee.jpg
" target="_blank"> <img alt="Click for enlarged picture" src="
https://hosting.photobucket.com/95288841-8654-4bf7-8fc9-a4aa78dce87f/f3038937-f001-4ceb-b725-a330fcd64cee.jpg
" width="600" /> </a></p>
<p>
<a href=" https://hosting.photobucket.com/95288841-8654-4bf7-8fc9-a4aa78dce87f/3575379e-e068-49e2-9d4d-c9a49531fdc2.jpg
" target="_blank"> <img alt="Click for enlarged picture" src="
https://hosting.photobucket.com/95288841-8654-4bf7-8fc9-a4aa78dce87f/3575379e-e068-49e2-9d4d-c9a49531fdc2.jpg" width="600" /> </a></p>
<p>
<a href=" https://hosting.photobucket.com/95288841-8654-4bf7-8fc9-a4aa78dce87f/e51713c7-2add-4f8f-ae37-e6eba25badff.jpg
" target="_blank"> <img alt="Click for enlarged picture" src="
https://hosting.photobucket.com/95288841-8654-4bf7-8fc9-a4aa78dce87f/e51713c7-2add-4f8f-ae37-e6eba25badff.jpg" width="600" /> </a></p>
<p>
<a href=" https://hosting.photobucket.com/95288841-8654-4bf7-8fc9-a4aa78dce87f/9c0bb546-50a8-483d-aeab-ab3b2ce9f094.jpg
" target="_blank"> <img alt="Click for enlarged picture" src="
https://hosting.photobucket.com/95288841-8654-4bf7-8fc9-a4aa78dce87f/9c0bb546-50a8-483d-aeab-ab3b2ce9f094.jpg" width="600" /> </a></p>
<p>
The opening of the Exhibition took place on Thursday, February 19, 2026, starting at 6:00 PM. The exhibition was organized on the occasion of our twenty-third birthday.</p>
<p>
&nbsp;</p>
<p>
<a href=" https://hosting.photobucket.com/95288841-8654-4bf7-8fc9-a4aa78dce87f/71c7bfc2-1ffc-43b9-9d5a-53e009f6b86d.jpg
" target="_blank"> <img alt="Click for enlarged picture" src="
https://hosting.photobucket.com/95288841-8654-4bf7-8fc9-a4aa78dce87f/71c7bfc2-1ffc-43b9-9d5a-53e009f6b86d.jpg" width="600" /> </a></p>
<p>
<a href=" https://hosting.photobucket.com/95288841-8654-4bf7-8fc9-a4aa78dce87f/007b4701-1d7c-4a67-a599-0539a2aa3191.jpg
" target="_blank"> <img alt="Click for enlarged picture" src="
https://hosting.photobucket.com/95288841-8654-4bf7-8fc9-a4aa78dce87f/007b4701-1d7c-4a67-a599-0539a2aa3191.jpg" width="600" /> </a></p>
<p>
<a href=" https://hosting.photobucket.com/95288841-8654-4bf7-8fc9-a4aa78dce87f/2c8090e2-8b95-4368-bb48-98876d680e15.jpg
" target="_blank"> <img alt="Click for enlarged picture" src="
https://hosting.photobucket.com/95288841-8654-4bf7-8fc9-a4aa78dce87f/2c8090e2-8b95-4368-bb48-98876d680e15.jpg" width="600" /> </a></p>
<p>
<a href=" https://hosting.photobucket.com/95288841-8654-4bf7-8fc9-a4aa78dce87f/375768ad-a8bb-49bf-9845-e46c896ba7ec.jpg
" target="_blank"> <img alt="Click for enlarged picture" src="
https://hosting.photobucket.com/95288841-8654-4bf7-8fc9-a4aa78dce87f/375768ad-a8bb-49bf-9845-e46c896ba7ec.jpg" width="600" /> </a></p>
<p>
<a href=" https://hosting.photobucket.com/95288841-8654-4bf7-8fc9-a4aa78dce87f/a93de974-4ccb-4876-85b0-4d066ae402b3.jpg
" target="_blank"> <img alt="Click for enlarged picture" src="
https://hosting.photobucket.com/95288841-8654-4bf7-8fc9-a4aa78dce87f/a93de974-4ccb-4876-85b0-4d066ae402b3.jpg" width="600" /> </a></p>
<p>
<a href=" https://hosting.photobucket.com/95288841-8654-4bf7-8fc9-a4aa78dce87f/d323ccc9-1b9a-4cb2-8adf-7019b0e217f4.jpg
" target="_blank"> <img alt="Click for enlarged picture" src="
https://hosting.photobucket.com/95288841-8654-4bf7-8fc9-a4aa78dce87f/d323ccc9-1b9a-4cb2-8adf-7019b0e217f4.jpg" width="600" /> </a></p>
<p>
<a href=" https://hosting.photobucket.com/95288841-8654-4bf7-8fc9-a4aa78dce87f/a5a66447-2d76-47ae-866d-4d512ef469a5.jpg
" target="_blank"> <img alt="Click for enlarged picture" src="
https://hosting.photobucket.com/95288841-8654-4bf7-8fc9-a4aa78dce87f/a5a66447-2d76-47ae-866d-4d512ef469a5.jpg" width="600" /> </a></p>
<p>
<a href=" https://hosting.photobucket.com/95288841-8654-4bf7-8fc9-a4aa78dce87f/3e7bcfc9-ba02-4f94-a6c3-79dfaea3639e.jpg
" target="_blank"> <img alt="Click for enlarged picture" src="
https://hosting.photobucket.com/95288841-8654-4bf7-8fc9-a4aa78dce87f/3e7bcfc9-ba02-4f94-a6c3-79dfaea3639e.jpg" width="600" /> </a></p>
<p>
<a href=" https://hosting.photobucket.com/95288841-8654-4bf7-8fc9-a4aa78dce87f/24e79466-4a9e-4b10-970c-caad235d260d.jpg
" target="_blank"> <img alt="Click for enlarged picture" src="
https://hosting.photobucket.com/95288841-8654-4bf7-8fc9-a4aa78dce87f/24e79466-4a9e-4b10-970c-caad235d260d.jpg" width="600" /> </a></p>
<p>
As always, the Exhibition presented a cross-section of the work of the Association, its members, participants of its courses and workshops, and members of the Miniature Painters Croatia FB group. In a large number of showcases, there were numerous miniatures for tabletop strategy games, board games, and an entire showcase was dedicated to award-winning exhibits from previous miniature competitions. Several showcases were dedicated to projects that the Association has been implementing for 23 years, such as the UMS &bdquo;Agram&ldquo; Library and Reading Room, the Workshop for Making Spatial Models and the Miniature Painting Workshop, as well as new ones such as the Agram Group Build, the Agram Lego Section and the Back to Basics painting workshop for the youngest.</p>
<p>
<a href=" https://hosting.photobucket.com/95288841-8654-4bf7-8fc9-a4aa78dce87f/fca84936-af71-44d3-9a4c-faeb26163899.jpg
" target="_blank"> <img alt="Click for enlarged picture" src="
https://hosting.photobucket.com/95288841-8654-4bf7-8fc9-a4aa78dce87f/fca84936-af71-44d3-9a4c-faeb26163899.jpg" width="600" /> </a></p>
<p>
<a href=" https://hosting.photobucket.com/95288841-8654-4bf7-8fc9-a4aa78dce87f/459bc5ac-8702-46f9-93b4-547deaabdef4.jpg
" target="_blank"> <img alt="Click for enlarged picture" src="
https://hosting.photobucket.com/95288841-8654-4bf7-8fc9-a4aa78dce87f/459bc5ac-8702-46f9-93b4-547deaabdef4.jpg" width="600" /> </a></p>
<p>
<a href=" https://hosting.photobucket.com/95288841-8654-4bf7-8fc9-a4aa78dce87f/91a04363-b2ef-4635-a046-7edf25ce7808.jpg
" target="_blank"> <img alt="Click for enlarged picture" src="
https://hosting.photobucket.com/95288841-8654-4bf7-8fc9-a4aa78dce87f/91a04363-b2ef-4635-a046-7edf25ce7808.jpg" width="600" /> </a></p>
<p>
<a href=" https://hosting.photobucket.com/95288841-8654-4bf7-8fc9-a4aa78dce87f/73256af5-fd5d-40b5-95e1-120e49c9be87.jpg
" target="_blank"> <img alt="Click for enlarged picture" src="
https://hosting.photobucket.com/95288841-8654-4bf7-8fc9-a4aa78dce87f/73256af5-fd5d-40b5-95e1-120e49c9be87.jpg" width="600" /> </a></p>
<p>
<a href=" https://hosting.photobucket.com/95288841-8654-4bf7-8fc9-a4aa78dce87f/979f9be5-23f3-4df9-91dc-ab71d6a10d64.jpg
" target="_blank"> <img alt="Click for enlarged picture" src="
https://hosting.photobucket.com/95288841-8654-4bf7-8fc9-a4aa78dce87f/979f9be5-23f3-4df9-91dc-ab71d6a10d64.jpg" width="600" /> </a></p>
<p>
<a href=" https://hosting.photobucket.com/95288841-8654-4bf7-8fc9-a4aa78dce87f/d0ff4379-183a-47b9-a740-9ddc283ebc29.jpg
" target="_blank"> <img alt="Click for enlarged picture" src="
https://hosting.photobucket.com/95288841-8654-4bf7-8fc9-a4aa78dce87f/d0ff4379-183a-47b9-a740-9ddc283ebc29.jpg" width="600" /> </a></p>
<p>
<a href=" https://hosting.photobucket.com/95288841-8654-4bf7-8fc9-a4aa78dce87f/4333e95e-bbbd-4f47-aaea-38a9c99e54d8.jpg
" target="_blank"> <img alt="Click for enlarged picture" src="
https://hosting.photobucket.com/95288841-8654-4bf7-8fc9-a4aa78dce87f/4333e95e-bbbd-4f47-aaea-38a9c99e54d8.jpg" width="600" /> </a></p>
<p>
<a href=" https://hosting.photobucket.com/95288841-8654-4bf7-8fc9-a4aa78dce87f/1372f8a2-b222-48ee-ae45-a90b5a354ef7.jpg
" target="_blank"> <img alt="Click for enlarged picture" src="
https://hosting.photobucket.com/95288841-8654-4bf7-8fc9-a4aa78dce87f/1372f8a2-b222-48ee-ae45-a90b5a354ef7.jpg" width="600" /> </a></p>
<p>
<a href=" https://hosting.photobucket.com/95288841-8654-4bf7-8fc9-a4aa78dce87f/6a1b4fd1-d982-4b06-9c5f-3cd40d6bf10a.jpg
" target="_blank"> <img alt="Click for enlarged picture" src="
https://hosting.photobucket.com/95288841-8654-4bf7-8fc9-a4aa78dce87f/6a1b4fd1-d982-4b06-9c5f-3cd40d6bf10a.jpg" width="600" /> </a></p>
<p>
<a href=" https://hosting.photobucket.com/95288841-8654-4bf7-8fc9-a4aa78dce87f/c2ec45e1-e0f3-463a-b254-cb2a38b53e14.jpg
" target="_blank"> <img alt="Click for enlarged picture" src="
https://hosting.photobucket.com/95288841-8654-4bf7-8fc9-a4aa78dce87f/c2ec45e1-e0f3-463a-b254-cb2a38b53e14.jpg" width="600" /> </a></p>
<p>
<a href=" https://hosting.photobucket.com/95288841-8654-4bf7-8fc9-a4aa78dce87f/17553b9a-0592-4f6a-a097-3f1a97e161f3.jpg
" target="_blank"> <img alt="Click for enlarged picture" src="
https://hosting.photobucket.com/95288841-8654-4bf7-8fc9-a4aa78dce87f/17553b9a-0592-4f6a-a097-3f1a97e161f3.jpg" width="600" /> </a></p>
<p>
<a href=" https://hosting.photobucket.com/95288841-8654-4bf7-8fc9-a4aa78dce87f/8658bd6b-dff2-4d24-8473-928d44d44480.jpg
" target="_blank"> <img alt="Click for enlarged picture" src="
https://hosting.photobucket.com/95288841-8654-4bf7-8fc9-a4aa78dce87f/8658bd6b-dff2-4d24-8473-928d44d44480.jpg" width="600" /> </a></p>
<p>
<a href=" https://hosting.photobucket.com/95288841-8654-4bf7-8fc9-a4aa78dce87f/ecab0ea7-f75b-4e31-a520-d088ad39fa17.jpg
" target="_blank"> <img alt="Click for enlarged picture" src="
https://hosting.photobucket.com/95288841-8654-4bf7-8fc9-a4aa78dce87f/ecab0ea7-f75b-4e31-a520-d088ad39fa17.jpg" width="600" /> </a></p>
<p>
<a href=" https://hosting.photobucket.com/95288841-8654-4bf7-8fc9-a4aa78dce87f/9495a2f5-8a82-41f2-abf4-9ade3db41d87.jpg
" target="_blank"> <img alt="Click for enlarged picture" src="
https://hosting.photobucket.com/95288841-8654-4bf7-8fc9-a4aa78dce87f/9495a2f5-8a82-41f2-abf4-9ade3db41d87.jpg" width="600" /> </a></p>
<p>
<a href=" https://hosting.photobucket.com/95288841-8654-4bf7-8fc9-a4aa78dce87f/362cc6fd-a5dd-474b-9b9f-aeab27d6dcfa.jpg
" target="_blank"> <img alt="Click for enlarged picture" src="
https://hosting.photobucket.com/95288841-8654-4bf7-8fc9-a4aa78dce87f/362cc6fd-a5dd-474b-9b9f-aeab27d6dcfa.jpg" width="600" /> </a></p>
<p>
It was a special honor for us to host our guest exhibitor, Ninoslav Luk, a miniaturist from Poreč, who introduced himself to us with his collection of historical dioramas.</p>
<p>
<a href=" https://hosting.photobucket.com/95288841-8654-4bf7-8fc9-a4aa78dce87f/ba1353de-e2bd-4340-9121-9056e287ed4a.jpg
" target="_blank"> <img alt="Click for enlarged picture" src="
https://hosting.photobucket.com/95288841-8654-4bf7-8fc9-a4aa78dce87f/ba1353de-e2bd-4340-9121-9056e287ed4a.jpg" width="600" /> </a></p>
<p>
<a href=" https://hosting.photobucket.com/95288841-8654-4bf7-8fc9-a4aa78dce87f/cea18506-1b50-4e5b-955c-0b9ca02d7826.jpg
" target="_blank"> <img alt="Click for enlarged picture" src="
https://hosting.photobucket.com/95288841-8654-4bf7-8fc9-a4aa78dce87f/cea18506-1b50-4e5b-955c-0b9ca02d7826.jpg" width="600" /> </a></p>
<p>
<a href=" https://hosting.photobucket.com/95288841-8654-4bf7-8fc9-a4aa78dce87f/1be85b41-e3b6-4536-b141-cd0da6eb38c1.jpg
" target="_blank"> <img alt="Click for enlarged picture" src="
https://hosting.photobucket.com/95288841-8654-4bf7-8fc9-a4aa78dce87f/1be85b41-e3b6-4536-b141-cd0da6eb38c1.jpg" width="600" /> </a></p>
<p>
<a href=" https://hosting.photobucket.com/95288841-8654-4bf7-8fc9-a4aa78dce87f/9e93b87d-ff3c-4b7b-8f06-5f9d3464a134.jpg
" target="_blank"> <img alt="Click for enlarged picture" src="
https://hosting.photobucket.com/95288841-8654-4bf7-8fc9-a4aa78dce87f/9e93b87d-ff3c-4b7b-8f06-5f9d3464a134.jpg" width="600" /> </a></p>
<p>
During the first weekend of the Exhibition, 21-22.02., we held the 18th annual international miniature painting competition <strong>Black Queen Hobby and Miniature Painting Competition</strong>!</p>
<p>
<a href=" https://hosting.photobucket.com/95288841-8654-4bf7-8fc9-a4aa78dce87f/3056fb09-f66c-4dea-80a8-a4e72407429a.jpg
" target="_blank"> <img alt="Click for enlarged picture" src="
https://hosting.photobucket.com/95288841-8654-4bf7-8fc9-a4aa78dce87f/3056fb09-f66c-4dea-80a8-a4e72407429a.jpg" width="600" /> </a></p>
<p>
As contestants arrived and registered for the competition, our hardworking staff photographed all the exhibits before sorting them into categories and carefully placing them in glass cases. There was no shortage of morning neccessities like coffe and doughnuts.</p>
<p>
&lt;</p>
<p>
<a href=" https://hosting.photobucket.com/95288841-8654-4bf7-8fc9-a4aa78dce87f/1118089c-2b46-4a2c-b17d-dc92b66d1ffc.jpg
" target="_blank"> <img alt="Click for enlarged picture" src="
https://hosting.photobucket.com/95288841-8654-4bf7-8fc9-a4aa78dce87f/1118089c-2b46-4a2c-b17d-dc92b66d1ffc.jpg" width="600" /> </a></p>
<p>
<a href=" https://hosting.photobucket.com/95288841-8654-4bf7-8fc9-a4aa78dce87f/9fd3c272-9a69-4532-a09d-36497a20a820.jpg
" target="_blank"> <img alt="Click for enlarged picture" src="
https://hosting.photobucket.com/95288841-8654-4bf7-8fc9-a4aa78dce87f/9fd3c272-9a69-4532-a09d-36497a20a820.jpg" width="600" /> </a></p>
<p>
<a href=" https://hosting.photobucket.com/95288841-8654-4bf7-8fc9-a4aa78dce87f/86995e80-c502-45fb-80f5-c8fda27da3f9.jpg
" target="_blank"> <img alt="Click for enlarged picture" src="
https://hosting.photobucket.com/95288841-8654-4bf7-8fc9-a4aa78dce87f/86995e80-c502-45fb-80f5-c8fda27da3f9.jpg" width="600" /> </a></p>
<p>
By noon, all the display cases were full and the competition could officially begin.</p>
<p>
<a href=" https://hosting.photobucket.com/95288841-8654-4bf7-8fc9-a4aa78dce87f/bce59a4f-c3e3-4708-a3d6-25e81a894c24.jpg
" target="_blank"> <img alt="Click for enlarged picture" src="
https://hosting.photobucket.com/95288841-8654-4bf7-8fc9-a4aa78dce87f/bce59a4f-c3e3-4708-a3d6-25e81a894c24.jpg" width="600" /> </a></p>
<p>
<a href=" https://hosting.photobucket.com/95288841-8654-4bf7-8fc9-a4aa78dce87f/16a0a094-01aa-4e52-82cf-fdab00d74711.jpg
" target="_blank"> <img alt="Click for enlarged picture" src="
https://hosting.photobucket.com/95288841-8654-4bf7-8fc9-a4aa78dce87f/16a0a094-01aa-4e52-82cf-fdab00d74711.jpg" width="600" /> </a></p>
<p>
<a href=" https://hosting.photobucket.com/95288841-8654-4bf7-8fc9-a4aa78dce87f/0d3f4042-ff77-48d0-b332-add0fd08f7c3.jpg
" target="_blank"> <img alt="Click for enlarged picture" src="
https://hosting.photobucket.com/95288841-8654-4bf7-8fc9-a4aa78dce87f/0d3f4042-ff77-48d0-b332-add0fd08f7c3.jpg" width="600" /> </a></p>
<p>
<a href=" https://hosting.photobucket.com/95288841-8654-4bf7-8fc9-a4aa78dce87f/3711baf8-93f2-434a-aea9-a95288ca04dd.jpg
" target="_blank"> <img alt="Click for enlarged picture" src="
https://hosting.photobucket.com/95288841-8654-4bf7-8fc9-a4aa78dce87f/3711baf8-93f2-434a-aea9-a95288ca04dd.jpg" width="600" /> </a></p>
<p>
<a href=" https://hosting.photobucket.com/95288841-8654-4bf7-8fc9-a4aa78dce87f/53113b97-ec06-4409-95ba-95a5ad3f9720.jpg
" target="_blank"> <img alt="Click for enlarged picture" src="
https://hosting.photobucket.com/95288841-8654-4bf7-8fc9-a4aa78dce87f/53113b97-ec06-4409-95ba-95a5ad3f9720.jpg" width="600" /> </a></p>
<p>
<a href=" https://hosting.photobucket.com/95288841-8654-4bf7-8fc9-a4aa78dce87f/ab127858-193d-4976-bdb2-e27302722fca.jpg
" target="_blank"> <img alt="Click for enlarged picture" src="
https://hosting.photobucket.com/95288841-8654-4bf7-8fc9-a4aa78dce87f/ab127858-193d-4976-bdb2-e27302722fca.jpg" width="600" /> </a></p>
<p>
<a href=" https://hosting.photobucket.com/95288841-8654-4bf7-8fc9-a4aa78dce87f/3735af11-3fb6-4772-a8ff-5e0ff6ddf03a.jpg
" target="_blank"> <img alt="Click for enlarged picture" src="
https://hosting.photobucket.com/95288841-8654-4bf7-8fc9-a4aa78dce87f/3735af11-3fb6-4772-a8ff-5e0ff6ddf03a.jpg" width="600" /> </a></p>
<p>
<strong>Back To Basics workshops for the young at the Black Queen</strong></p>
<p>
This year, throughout the weekend, we organized miniature painting workshops for the youngest, who were able to paint one of our own miniatures designed specifically for this program for the first time!</p>
<p>
<a href=" https://hosting.photobucket.com/95288841-8654-4bf7-8fc9-a4aa78dce87f/6999be0c-8cc6-4947-a423-9427a2299724.jpg
" target="_blank"> <img alt="Click for enlarged picture" src="
https://hosting.photobucket.com/95288841-8654-4bf7-8fc9-a4aa78dce87f/6999be0c-8cc6-4947-a423-9427a2299724.jpg" width="600" /> </a></p>
<p>
<a href="https://hosting.photobucket.com/95288841-8654-4bf7-8fc9-a4aa78dce87f/835b05a5-f171-49df-afa6-da0692b89074.jpg" target="_blank"><img alt="Click for enlarged picture" src="https://hosting.photobucket.com/95288841-8654-4bf7-8fc9-a4aa78dce87f/835b05a5-f171-49df-afa6-da0692b89074.jpg" width="600" /></a></p>
<p>
<a href=" https://hosting.photobucket.com/95288841-8654-4bf7-8fc9-a4aa78dce87f/ef5dde13-84ee-4ea0-b9f3-28aaf703ef6d.jpg
" target="_blank"> <img alt="Click for enlarged picture" src="
https://hosting.photobucket.com/95288841-8654-4bf7-8fc9-a4aa78dce87f/ef5dde13-84ee-4ea0-b9f3-28aaf703ef6d.jpg" width="600" /> </a></p>
<p>
<strong>SELLERS&#39; COURT</strong></p>
<p>
During the weekend we hosted our sponsors with their sales stands: Swood.si and Carta Magica.</p>
<p>
<a href=" https://hosting.photobucket.com/95288841-8654-4bf7-8fc9-a4aa78dce87f/5ee9a49f-a387-435a-9110-572402b7191d.jpg
" target="_blank"> <img alt="Click for enlarged picture" src="
https://hosting.photobucket.com/95288841-8654-4bf7-8fc9-a4aa78dce87f/5ee9a49f-a387-435a-9110-572402b7191d.jpg" width="600" /> </a></p>
<p>
<a href=" https://hosting.photobucket.com/95288841-8654-4bf7-8fc9-a4aa78dce87f/47cf600f-b1eb-4655-bf06-305f6f21d5d2.jpg
" target="_blank"> <img alt="Click for enlarged picture" src="
https://hosting.photobucket.com/95288841-8654-4bf7-8fc9-a4aa78dce87f/47cf600f-b1eb-4655-bf06-305f6f21d5d2.jpg" width="600" /> </a></p>
<p>
<strong>MINIATURE PAINTING WORKSHOPS</strong></p>
<p>
The ZZTK premises allow workshops to be held during the weekend in the cinema hall in the basement, so we also organized demonstration workshops during the weekend. The lecturers&#39; work was recorded with a camera and projected onto the projection screen in the hall. Many thanks to our domestic and international lecturers: Anže Zorko (SLO), doc.dr.sc. Winton Afrić (CRO), Ivan Knezović (UMS Agram) and Petar Knezoviću (CRO).</p>
<p>
<a href=" https://hosting.photobucket.com/95288841-8654-4bf7-8fc9-a4aa78dce87f/e8d835be-ec99-49d7-bc9b-086e38573d1a.jpg
" target="_blank"> <img alt="Click for enlarged picture" src="
https://hosting.photobucket.com/95288841-8654-4bf7-8fc9-a4aa78dce87f/e8d835be-ec99-49d7-bc9b-086e38573d1a.jpg" width="600" /> </a></p>
<p>
<a href=" https://hosting.photobucket.com/95288841-8654-4bf7-8fc9-a4aa78dce87f/f3eba4c1-4637-4da9-8360-75f430355af4.jpg" target="_blank"> <img alt="Click for enlarged picture" src="
https://hosting.photobucket.com/95288841-8654-4bf7-8fc9-a4aa78dce87f/f3eba4c1-4637-4da9-8360-75f430355af4.jpg" width="600" /> </a></p>
<p>
<a href=" https://hosting.photobucket.com/95288841-8654-4bf7-8fc9-a4aa78dce87f/ef523854-4030-4579-aa38-403afda86c91.jpg
" target="_blank"> <img alt="Click for enlarged picture" src="
https://hosting.photobucket.com/95288841-8654-4bf7-8fc9-a4aa78dce87f/ef523854-4030-4579-aa38-403afda86c91.jpg" width="600" /> </a></p>
<p>
<a href=" https://hosting.photobucket.com/95288841-8654-4bf7-8fc9-a4aa78dce87f/dd0943c2-f4a8-40c3-b641-f6dcdd200380.jpg
" target="_blank"> <img alt="Click for enlarged picture" src="
https://hosting.photobucket.com/95288841-8654-4bf7-8fc9-a4aa78dce87f/dd0943c2-f4a8-40c3-b641-f6dcdd200380.jpg" width="600" /> </a></p>
<p>
<a href=" https://hosting.photobucket.com/95288841-8654-4bf7-8fc9-a4aa78dce87f/08b1626a-f6c7-43c9-b718-3e9a41b55ca6.jpg
" target="_blank"> <img alt="Click for enlarged picture" src="
https://hosting.photobucket.com/95288841-8654-4bf7-8fc9-a4aa78dce87f/08b1626a-f6c7-43c9-b718-3e9a41b55ca6.jpg" width="600" /> </a></p>
<p>
<a href=" https://hosting.photobucket.com/95288841-8654-4bf7-8fc9-a4aa78dce87f/91aca7f3-1af6-486d-b174-65079a63a1ea.jpg
" target="_blank"> <img alt="Click for enlarged picture" src="
https://hosting.photobucket.com/95288841-8654-4bf7-8fc9-a4aa78dce87f/91aca7f3-1af6-486d-b174-65079a63a1ea.jpg" width="600" /> </a></p>
<p>
<a href=" https://hosting.photobucket.com/95288841-8654-4bf7-8fc9-a4aa78dce87f/3821f2fb-fbe7-4096-adbc-7d8c981a3b56.jpg
" target="_blank"> <img alt="Click for enlarged picture" src="
https://hosting.photobucket.com/95288841-8654-4bf7-8fc9-a4aa78dce87f/3821f2fb-fbe7-4096-adbc-7d8c981a3b56.jpg" width="600" /> </a></p>
<p>
<a href=" https://hosting.photobucket.com/95288841-8654-4bf7-8fc9-a4aa78dce87f/2c7bb3c5-c0ec-4a96-b6bd-6a90ce5ce154.jpg
" target="_blank"> <img alt="Click for enlarged picture" src="
https://hosting.photobucket.com/95288841-8654-4bf7-8fc9-a4aa78dce87f/2c7bb3c5-c0ec-4a96-b6bd-6a90ce5ce154.jpg" width="600" /> </a></p>
<p>
<a href=" https://hosting.photobucket.com/95288841-8654-4bf7-8fc9-a4aa78dce87f/b646f4ee-21aa-4d12-8db3-6d33351d5aeb.jpg
" target="_blank"> <img alt="Click for enlarged picture" src="
https://hosting.photobucket.com/95288841-8654-4bf7-8fc9-a4aa78dce87f/b646f4ee-21aa-4d12-8db3-6d33351d5aeb.jpg" width="600" /> </a></p>
<p>
<a href=" https://hosting.photobucket.com/95288841-8654-4bf7-8fc9-a4aa78dce87f/fb5efc01-32cc-4119-90e3-188f51b30237.jpg
" target="_blank"> <img alt="Click for enlarged picture" src="
https://hosting.photobucket.com/95288841-8654-4bf7-8fc9-a4aa78dce87f/fb5efc01-32cc-4119-90e3-188f51b30237.jpg" width="600" /> </a></p>
<p>
<strong>SPEED PAINTING COMPETITION</strong></p>
<p>
We organized a speed painting competition on Sunday afternoon. Participants had 60 minutes to paint one wizrad, a miniature of our own design and production.</p>
<p>
<a href=" https://hosting.photobucket.com/95288841-8654-4bf7-8fc9-a4aa78dce87f/106417a6-a047-4e0d-9f81-87858806052f.jpg
" target="_blank"> <img alt="Click for enlarged picture" src="
https://hosting.photobucket.com/95288841-8654-4bf7-8fc9-a4aa78dce87f/106417a6-a047-4e0d-9f81-87858806052f.jpg" width="600" /> </a></p>
<p>
<a href=" https://hosting.photobucket.com/95288841-8654-4bf7-8fc9-a4aa78dce87f/ac6853c7-6e34-4e07-a996-8d7d12744b67.jpg
" target="_blank"> <img alt="Click for enlarged picture" src="
https://hosting.photobucket.com/95288841-8654-4bf7-8fc9-a4aa78dce87f/ac6853c7-6e34-4e07-a996-8d7d12744b67.jpg" width="600" /> </a></p>
<p>
<a href=" https://hosting.photobucket.com/95288841-8654-4bf7-8fc9-a4aa78dce87f/ccb155fa-52c5-4a99-9515-f69a6836dce7.jpg
" target="_blank"> <img alt="Click for enlarged picture" src="
https://hosting.photobucket.com/95288841-8654-4bf7-8fc9-a4aa78dce87f/ccb155fa-52c5-4a99-9515-f69a6836dce7.jpg" width="600" /> </a></p>
<p>
<a href=" https://hosting.photobucket.com/95288841-8654-4bf7-8fc9-a4aa78dce87f/a29fedd0-97ea-45b1-85f9-7ea62188b2b2.jpg
" target="_blank"><img alt="Click for enlarged picture" src="
https://hosting.photobucket.com/95288841-8654-4bf7-8fc9-a4aa78dce87f/a29fedd0-97ea-45b1-85f9-7ea62188b2b2.jpg" width="600" /></a></p>
<p>
With that, we came to the very end of this wonderful weekend and all that was left was the awarding of prizes and recognition to the winners.</p>
<p>
<a href=" https://hosting.photobucket.com/95288841-8654-4bf7-8fc9-a4aa78dce87f/046ca4c8-0ae7-415e-abd3-e131d580c3ad.jpg
" target="_blank"> <img alt="Click for enlarged picture" src="
https://hosting.photobucket.com/95288841-8654-4bf7-8fc9-a4aa78dce87f/046ca4c8-0ae7-415e-abd3-e131d580c3ad.jpg" width="600" /> </a></p>
<p>
<a href=" https://hosting.photobucket.com/95288841-8654-4bf7-8fc9-a4aa78dce87f/cec0dcef-7acb-4a77-89de-271ed5410672.jpg
" target="_blank"> <img alt="Click for enlarged picture" src="
https://hosting.photobucket.com/95288841-8654-4bf7-8fc9-a4aa78dce87f/cec0dcef-7acb-4a77-89de-271ed5410672.jpg" width="600" /> </a></p>
<p>
<a href=" https://hosting.photobucket.com/95288841-8654-4bf7-8fc9-a4aa78dce87f/a495a5fc-31a2-4979-a970-0fa22c334354.jpg
" target="_blank"> <img alt="Click for enlarged picture" src="
https://hosting.photobucket.com/95288841-8654-4bf7-8fc9-a4aa78dce87f/a495a5fc-31a2-4979-a970-0fa22c334354.jpg" width="600" /> </a></p>
<p>
<strong>AGRAM ARENA &ndash; Leaving Asphodel Necropolis28 Campaign</strong></p>
<p>
During the weekend of February 21-22, we held a new international competition, Agram Arena! This time it was the turn of the tabletop strategy game Necropolis28, for which our members designed a two-day campaign. Each participant created their own gang of soldiers, and the vast majority also created their own boards.</p>
<p>
<a href=" https://hosting.photobucket.com/95288841-8654-4bf7-8fc9-a4aa78dce87f/ac69b182-4bfc-4575-a6d3-fb3c8baba342.jpg
" target="_blank"> <img alt="Click for enlarged picture" src="
https://hosting.photobucket.com/95288841-8654-4bf7-8fc9-a4aa78dce87f/ac69b182-4bfc-4575-a6d3-fb3c8baba342.jpg" width="600" /> </a></p>
<p>
<a href=" https://hosting.photobucket.com/95288841-8654-4bf7-8fc9-a4aa78dce87f/289fed7b-e058-42d8-ba2d-cbd0463e98da.jpg
" target="_blank"> <img alt="Click for enlarged picture" src="
https://hosting.photobucket.com/95288841-8654-4bf7-8fc9-a4aa78dce87f/289fed7b-e058-42d8-ba2d-cbd0463e98da.jpg" width="600" /> </a></p>
<p>
<a href=" https://hosting.photobucket.com/95288841-8654-4bf7-8fc9-a4aa78dce87f/d92ebbee-859d-4441-8386-3d760b20b7a7.jpg
" target="_blank"> <img alt="Click for enlarged picture" src="
https://hosting.photobucket.com/95288841-8654-4bf7-8fc9-a4aa78dce87f/d92ebbee-859d-4441-8386-3d760b20b7a7.jpg" width="600" /> </a></p>
<p>
<a href=" https://hosting.photobucket.com/95288841-8654-4bf7-8fc9-a4aa78dce87f/09c59798-7871-425e-a075-3ca1cd91768a.jpg
" target="_blank"> <img alt="Click for enlarged picture" src="
https://hosting.photobucket.com/95288841-8654-4bf7-8fc9-a4aa78dce87f/09c59798-7871-425e-a075-3ca1cd91768a.jpg" width="600" /> </a></p>
<p>
<a href=" https://hosting.photobucket.com/95288841-8654-4bf7-8fc9-a4aa78dce87f/b2f3edc8-5a23-4552-9a2a-4027b286f327.jpg
" target="_blank"> <img alt="Click for enlarged picture" src="
https://hosting.photobucket.com/95288841-8654-4bf7-8fc9-a4aa78dce87f/b2f3edc8-5a23-4552-9a2a-4027b286f327.jpg" width="600" /> </a></p>
<p>
<a href=" https://hosting.photobucket.com/95288841-8654-4bf7-8fc9-a4aa78dce87f/2a9f43ac-b531-4746-b7bb-ac5a3356aab0.jpg
" target="_blank"> <img alt="Click for enlarged picture" src="
https://hosting.photobucket.com/95288841-8654-4bf7-8fc9-a4aa78dce87f/2a9f43ac-b531-4746-b7bb-ac5a3356aab0.jpg" width="600" /> </a></p>
<p>
<strong>EVENTS ON WEEKDAYS DURING THE EXHIBITION </strong></p>
<p>
Over the next two weeks, our volunteers held open miniature painting workshops on weekdays from 4:00 PM to 8:00 PM. Miniature painting workstations were set up where our visitors could paint miniatures we had prepared (or their own if they had brought them) using our materials and tools.</p>
<p>
<a href=" https://hosting.photobucket.com/95288841-8654-4bf7-8fc9-a4aa78dce87f/6edf7765-42b5-417a-820f-fa5d907179a7.jpg
" target="_blank"> <img alt="Click for enlarged picture" src="
https://hosting.photobucket.com/95288841-8654-4bf7-8fc9-a4aa78dce87f/6edf7765-42b5-417a-820f-fa5d907179a7.jpg" width="600" /> </a></p>
<p>
<a href=" https://hosting.photobucket.com/95288841-8654-4bf7-8fc9-a4aa78dce87f/c084ebe2-f57b-4519-9b31-29bdc1155887.jpg
" target="_blank"> <img alt="Click for enlarged picture" src="
https://hosting.photobucket.com/95288841-8654-4bf7-8fc9-a4aa78dce87f/c084ebe2-f57b-4519-9b31-29bdc1155887.jpg" width="600" /> </a></p>
<p>
<a href=" https://hosting.photobucket.com/95288841-8654-4bf7-8fc9-a4aa78dce87f/37ff2272-f9b0-4b16-a363-1e6f6688c866.jpg
" target="_blank"> <img alt="Click for enlarged picture" src="
https://hosting.photobucket.com/95288841-8654-4bf7-8fc9-a4aa78dce87f/37ff2272-f9b0-4b16-a363-1e6f6688c866.jpg" width="600" /> </a></p>
<p>
<a href=" https://hosting.photobucket.com/95288841-8654-4bf7-8fc9-a4aa78dce87f/5f4f7968-ff50-4a01-98da-6ce8562930b4.jpg
" target="_blank"> <img alt="Click for enlarged picture" src="
https://hosting.photobucket.com/95288841-8654-4bf7-8fc9-a4aa78dce87f/5f4f7968-ff50-4a01-98da-6ce8562930b4.jpg" width="600" /> </a></p>
<p>
<a href=" https://hosting.photobucket.com/95288841-8654-4bf7-8fc9-a4aa78dce87f/cbb45319-d488-483c-bf9d-9af29852fc74.jpg
" target="_blank"> <img alt="Click for enlarged picture" src="
https://hosting.photobucket.com/95288841-8654-4bf7-8fc9-a4aa78dce87f/cbb45319-d488-483c-bf9d-9af29852fc74.jpg" width="600" /> </a></p>
<p>
<a href=" https://hosting.photobucket.com/95288841-8654-4bf7-8fc9-a4aa78dce87f/3dcca26c-d549-4af3-812a-a4a81b9a2310.jpg
" target="_blank"> <img alt="Click for enlarged picture" src="
https://hosting.photobucket.com/95288841-8654-4bf7-8fc9-a4aa78dce87f/3dcca26c-d549-4af3-812a-a4a81b9a2310.jpg" width="600" /> </a></p>
<p>
<a href=" https://hosting.photobucket.com/95288841-8654-4bf7-8fc9-a4aa78dce87f/4adf0fb6-3eab-4b40-b32d-d03eab4a9892.jpg
" target="_blank"> <img alt="Click for enlarged picture" src="
https://hosting.photobucket.com/95288841-8654-4bf7-8fc9-a4aa78dce87f/4adf0fb6-3eab-4b40-b32d-d03eab4a9892.jpg" width="600" /> </a></p>
<p>
<a href=" https://hosting.photobucket.com/95288841-8654-4bf7-8fc9-a4aa78dce87f/4732b58a-9a65-4d1c-a7d5-25513d34b108.jpg
" target="_blank"> <img alt="Click for enlarged picture" src="
https://hosting.photobucket.com/95288841-8654-4bf7-8fc9-a4aa78dce87f/4732b58a-9a65-4d1c-a7d5-25513d34b108.jpg" width="600" /> </a></p>
<p>
<a href=" https://hosting.photobucket.com/95288841-8654-4bf7-8fc9-a4aa78dce87f/274be330-31d5-4e25-95db-ec2f423a003c.jpg
" target="_blank"> <img alt="Click for enlarged picture" src="
https://hosting.photobucket.com/95288841-8654-4bf7-8fc9-a4aa78dce87f/274be330-31d5-4e25-95db-ec2f423a003c.jpg" width="600" /> </a></p>
<p>
<a href=" https://hosting.photobucket.com/95288841-8654-4bf7-8fc9-a4aa78dce87f/8e7b0a80-0f46-4d70-9789-a46976c713d2.jpg
" target="_blank"> <img alt="Click for enlarged picture" src="
https://hosting.photobucket.com/95288841-8654-4bf7-8fc9-a4aa78dce87f/8e7b0a80-0f46-4d70-9789-a46976c713d2.jpg" width="600" /> </a></p>
<p>
<a href=" https://hosting.photobucket.com/95288841-8654-4bf7-8fc9-a4aa78dce87f/8bbd4e96-b911-4f26-80fe-b1c57f29027b.jpg
" target="_blank"> <img alt="Click for enlarged picture" src="
https://hosting.photobucket.com/95288841-8654-4bf7-8fc9-a4aa78dce87f/8bbd4e96-b911-4f26-80fe-b1c57f29027b.jpg" width="600" /> </a></p>
<p>
<a href=" https://hosting.photobucket.com/95288841-8654-4bf7-8fc9-a4aa78dce87f/203a27be-8f10-459d-89b9-befb6b636b74.jpg
" target="_blank"> <img alt="Click for enlarged picture" src="
https://hosting.photobucket.com/95288841-8654-4bf7-8fc9-a4aa78dce87f/203a27be-8f10-459d-89b9-befb6b636b74.jpg" width="600" /> </a></p>
<p>
<a href=" https://hosting.photobucket.com/95288841-8654-4bf7-8fc9-a4aa78dce87f/5dc4358f-19d8-475f-a4af-9c29e9ed18d7.jpg
" target="_blank"> <img alt="Click for enlarged picture" src="
https://hosting.photobucket.com/95288841-8654-4bf7-8fc9-a4aa78dce87f/5dc4358f-19d8-475f-a4af-9c29e9ed18d7.jpg" width="600" /> </a></p>
<p>
<strong>BACK TO BASICS MINIATURE PAINTING WORKSHOPS FOR YOUNG</strong></p>
<p>
On weekdays from 17:00 to 18:00, we held our new workshops for the youngest, in which our youngest participants painted their first miniatures.</p>
<p>
<a href=" https://hosting.photobucket.com/95288841-8654-4bf7-8fc9-a4aa78dce87f/948af139-8fb5-4e28-a27c-404466e70d05.jpg
" target="_blank"> <img alt="Click for enlarged picture" src="
https://hosting.photobucket.com/95288841-8654-4bf7-8fc9-a4aa78dce87f/948af139-8fb5-4e28-a27c-404466e70d05.jpg" width="600" /> </a></p>
<p>
<a href=" https://hosting.photobucket.com/95288841-8654-4bf7-8fc9-a4aa78dce87f/bb3e20c2-bb21-4a3d-863a-74de08261467.jpg
" target="_blank"> <img alt="Click for enlarged picture" src="
https://hosting.photobucket.com/95288841-8654-4bf7-8fc9-a4aa78dce87f/bb3e20c2-bb21-4a3d-863a-74de08261467.jpg" width="600" /> </a></p>
<p>
<a href=" https://hosting.photobucket.com/95288841-8654-4bf7-8fc9-a4aa78dce87f/7316c760-98e3-4e3f-9261-d138aa7a5a6a.jpg
" target="_blank"> <img alt="Click for enlarged picture" src="
https://hosting.photobucket.com/95288841-8654-4bf7-8fc9-a4aa78dce87f/7316c760-98e3-4e3f-9261-d138aa7a5a6a.jpg" width="600" /> </a></p>
<p>
<a href=" https://hosting.photobucket.com/95288841-8654-4bf7-8fc9-a4aa78dce87f/68934b39-3d1f-4f43-b967-14b73c41a39e.jpg
" target="_blank"> <img alt="Click for enlarged picture" src="
https://hosting.photobucket.com/95288841-8654-4bf7-8fc9-a4aa78dce87f/68934b39-3d1f-4f43-b967-14b73c41a39e.jpg" width="600" /> </a></p>
<p>
<a href=" https://hosting.photobucket.com/95288841-8654-4bf7-8fc9-a4aa78dce87f/46125bce-a28d-494f-873a-3aeabdc1d6c2.jpg
" target="_blank"> <img alt="Click for enlarged picture" src="
https://hosting.photobucket.com/95288841-8654-4bf7-8fc9-a4aa78dce87f/46125bce-a28d-494f-873a-3aeabdc1d6c2.jpg" width="600" /> </a></p>
<p>
<a href=" https://hosting.photobucket.com/95288841-8654-4bf7-8fc9-a4aa78dce87f/3c58e0ad-77a9-44c8-b6bf-d9a55c514d43.jpg
" target="_blank"> <img alt="Click for enlarged picture" src="
https://hosting.photobucket.com/95288841-8654-4bf7-8fc9-a4aa78dce87f/3c58e0ad-77a9-44c8-b6bf-d9a55c514d43.jpg" width="600" /> </a></p>
<p>
<a href=" https://hosting.photobucket.com/95288841-8654-4bf7-8fc9-a4aa78dce87f/f891f0f0-051b-40ee-9676-cb03b0a9811b.jpg
" target="_blank"> <img alt="Click for enlarged picture" src="
https://hosting.photobucket.com/95288841-8654-4bf7-8fc9-a4aa78dce87f/f891f0f0-051b-40ee-9676-cb03b0a9811b.jpg" width="600" /> </a></p>
<p>
<strong>AGRAM LEGO SECTION lecture: FW-14b &ndash; An F1 racecar for the future</strong></p>
<p>
On Wednesday, February 25, 2026, as part of the activities of our Agram Lego Section, our resident mechanical engineer Marko Paunović gave a lecture on the topic of the F1 racecar from 1992. Admission to the lecture was free, and upon completion, a LEGO model of the racecar was made by members of the Lego section</p>
<p>
<a href=" https://hosting.photobucket.com/95288841-8654-4bf7-8fc9-a4aa78dce87f/b2e14b1c-daa4-4314-8685-184377bc7e28.jpg
" target="_blank"> <img alt="Click for enlarged picture" src="
https://hosting.photobucket.com/95288841-8654-4bf7-8fc9-a4aa78dce87f/b2e14b1c-daa4-4314-8685-184377bc7e28.jpg" width="600" /> </a></p>
<p>
<a href=" https://hosting.photobucket.com/95288841-8654-4bf7-8fc9-a4aa78dce87f/31fb439a-77d3-4418-83ff-66c3af279cca.jpg" target="_blank"> <img alt="Click for enlarged picture" src="
https://hosting.photobucket.com/95288841-8654-4bf7-8fc9-a4aa78dce87f/31fb439a-77d3-4418-83ff-66c3af279cca.jpg" width="600" /> </a></p>
<p>
<a href=" https://hosting.photobucket.com/95288841-8654-4bf7-8fc9-a4aa78dce87f/bfcaf282-6be8-4b52-a3ed-c91137457876.jpg
" target="_blank"> <img alt="Click for enlarged picture" src="
https://hosting.photobucket.com/95288841-8654-4bf7-8fc9-a4aa78dce87f/bfcaf282-6be8-4b52-a3ed-c91137457876.jpg" width="600" /> </a></p>
<p>
<a href=" https://hosting.photobucket.com/95288841-8654-4bf7-8fc9-a4aa78dce87f/ce70fc61-9e1a-4169-aaad-8b67417656c0.jpg
" target="_blank"> <img alt="Click for enlarged picture" src="
https://hosting.photobucket.com/95288841-8654-4bf7-8fc9-a4aa78dce87f/ce70fc61-9e1a-4169-aaad-8b67417656c0.jpg" width="600" /> </a></p>
<p>
<a href=" https://hosting.photobucket.com/95288841-8654-4bf7-8fc9-a4aa78dce87f/94ca0e36-8710-458d-8194-9f71299f4d74.jpg
" target="_blank"> <img alt="Click for enlarged picture" src="
https://hosting.photobucket.com/95288841-8654-4bf7-8fc9-a4aa78dce87f/94ca0e36-8710-458d-8194-9f71299f4d74.jpg" width="600" /> </a></p>
<p>
<a href=" https://hosting.photobucket.com/95288841-8654-4bf7-8fc9-a4aa78dce87f/c6771f72-7191-4ca3-a792-3bb1ab3897b1.jpg
" target="_blank"> <img alt="Click for enlarged picture" src="
https://hosting.photobucket.com/95288841-8654-4bf7-8fc9-a4aa78dce87f/c6771f72-7191-4ca3-a792-3bb1ab3897b1.jpg" width="600" /> </a></p>
<p>
<a href=" https://hosting.photobucket.com/95288841-8654-4bf7-8fc9-a4aa78dce87f/c8fcfcb6-09f2-4398-a2fb-fa5065771e01.jpg
" target="_blank"> <img alt="Click for enlarged picture" src="
https://hosting.photobucket.com/95288841-8654-4bf7-8fc9-a4aa78dce87f/c8fcfcb6-09f2-4398-a2fb-fa5065771e01.jpg" width="600" /> </a></p>
<p>
<a href=" https://hosting.photobucket.com/95288841-8654-4bf7-8fc9-a4aa78dce87f/d7e187a8-d5b1-433b-b30d-091e54dcdddf.jpg
" target="_blank"> <img alt="Click for enlarged picture" src="
https://hosting.photobucket.com/95288841-8654-4bf7-8fc9-a4aa78dce87f/d7e187a8-d5b1-433b-b30d-091e54dcdddf.jpg" width="600" /> </a></p>
<p>
During the second weekend of the Exhibition, 28.02.-01.03., we organized a <strong>MINIATURE PAINTING WORKSHOP - Grimdark</strong>.</p>
<p>
The workshop was held over two days (the entire weekend) and participants painted up to three different figures for the game Trench Crusade. The focus of these lectures was on painting the popular grimdark style minis. The workshop presented paints and equipment, figure preparation, several miniature painting techniques from basic to advanced, and techniques and tricks for quickly and efficiently painting larger quantities of figures at once. Water-based acrylic paints were used as part of the workshop.</p>
<p>
<a href=" https://hosting.photobucket.com/95288841-8654-4bf7-8fc9-a4aa78dce87f/733d94b2-8e8d-4a4e-accd-b9168e32577e.jpg
" target="_blank"> <img alt="Click for enlarged picture" src="
https://hosting.photobucket.com/95288841-8654-4bf7-8fc9-a4aa78dce87f/733d94b2-8e8d-4a4e-accd-b9168e32577e.jpg
" width="600" /> </a></p>
<p>
<a href=" https://hosting.photobucket.com/95288841-8654-4bf7-8fc9-a4aa78dce87f/41020062-45b9-41cd-a357-fa23a389f390.jpg
" target="_blank"> <img alt="Click for enlarged picture" src="
https://hosting.photobucket.com/95288841-8654-4bf7-8fc9-a4aa78dce87f/41020062-45b9-41cd-a357-fa23a389f390.jpg
" width="600" /> </a></p>
<p>
<a href=" https://hosting.photobucket.com/95288841-8654-4bf7-8fc9-a4aa78dce87f/0c07cc55-596d-494d-972b-cd6a0dd6b8b7.jpg
" target="_blank"> <img alt="Click for enlarged picture" src="
https://hosting.photobucket.com/95288841-8654-4bf7-8fc9-a4aa78dce87f/0c07cc55-596d-494d-972b-cd6a0dd6b8b7.jpg" width="600" /> </a></p>
<p>
<a href=" https://hosting.photobucket.com/95288841-8654-4bf7-8fc9-a4aa78dce87f/c17dd356-08b1-48e1-b895-6296aed7f818.jpg
" target="_blank"> <img alt="Click for enlarged picture" src="
https://hosting.photobucket.com/95288841-8654-4bf7-8fc9-a4aa78dce87f/c17dd356-08b1-48e1-b895-6296aed7f818.jpg" width="600" /> </a></p>
<p>
On Wednesday 04.03.2026. the annual <strong>session of the Assembly</strong> was held, where we determined the guidelines for work in 2026.</p>
<p>
,</p>
<p>
<a href=" https://hosting.photobucket.com/95288841-8654-4bf7-8fc9-a4aa78dce87f/59484bd0-7edc-4aed-a04e-ae42900ba3e6.jpg
" target="_blank"> <img alt="Click for enlarged picture" src="
https://hosting.photobucket.com/95288841-8654-4bf7-8fc9-a4aa78dce87f/59484bd0-7edc-4aed-a04e-ae42900ba3e6.jpg
" width="600" /> </a></p>
<p>
On Sunday 08.03.2026. The exhibition was over, our exhibits safely stored, and the Gallery cleaned.</p>
<p>
<a href=" https://hosting.photobucket.com/95288841-8654-4bf7-8fc9-a4aa78dce87f/98af4280-0956-4cdb-b4a9-da40e3a5a44a.jpg
" target="_blank"> <img alt="Click for enlarged picture" src="
https://hosting.photobucket.com/95288841-8654-4bf7-8fc9-a4aa78dce87f/98af4280-0956-4cdb-b4a9-da40e3a5a44a.jpg" width="600" /> </a></p>
<p>
<a href=" https://hosting.photobucket.com/95288841-8654-4bf7-8fc9-a4aa78dce87f/3259b35e-1fc2-4a99-a3c5-c7984958d72b.jpg
" target="_blank"> <img alt="Click for enlarged picture" src="
https://hosting.photobucket.com/95288841-8654-4bf7-8fc9-a4aa78dce87f/3259b35e-1fc2-4a99-a3c5-c7984958d72b.jpg" width="600" /> </a></p>
<p>
The most important part of every year when holding this Exhibition is the social aspect, the socializing of our members both among themselves and with our international friends who visit us! With these few photos from our joint gatherings, we greet you until next year!</p>
<p>
<a href=" https://hosting.photobucket.com/95288841-8654-4bf7-8fc9-a4aa78dce87f/b9168e23-79b2-4d81-8a7d-7534062881a7.jpg
" target="_blank"> <img alt="Click for enlarged picture" src="
https://hosting.photobucket.com/95288841-8654-4bf7-8fc9-a4aa78dce87f/b9168e23-79b2-4d81-8a7d-7534062881a7.jpg " width="600" /> </a></p>
<p>
<a href=" https://hosting.photobucket.com/95288841-8654-4bf7-8fc9-a4aa78dce87f/edff925e-916c-4d78-953e-210abf3753d4.jpg
" target="_blank"> <img alt="Click for enlarged picture" src="
https://hosting.photobucket.com/95288841-8654-4bf7-8fc9-a4aa78dce87f/edff925e-916c-4d78-953e-210abf3753d4.jpg " width="600" /> </a></p>
<p>
<a href=" https://hosting.photobucket.com/95288841-8654-4bf7-8fc9-a4aa78dce87f/8bcb48fa-466b-43f8-8a4b-f15f6794b21e.jpg
" target="_blank"> <img alt="Click for enlarged picture" src="
https://hosting.photobucket.com/95288841-8654-4bf7-8fc9-a4aa78dce87f/8bcb48fa-466b-43f8-8a4b-f15f6794b21e.jpg" width="600" /> </a></p>
",
"content_hrv" => "<p>
<a href=" https://hosting.photobucket.com/95288841-8654-4bf7-8fc9-a4aa78dce87f/dc756f84-867d-4df4-acd8-5d43775cafc2.jpg
" target="_blank"> <img alt="Click for enlarged picture" src="
https://hosting.photobucket.com/95288841-8654-4bf7-8fc9-a4aa78dce87f/dc756f84-867d-4df4-acd8-5d43775cafc2.jpg" width="600" /> </a></p>
<p>
<strong>Izložba minijatura i maketa &quot;Agram 2026&quot;</strong> održala se ove godine od 19.2. do 08.03. Postavljanje izložbe je održano u srijedu 18.2. i sudjelovao je velik broj članova kao i prijatelja Udruge koji su izlagali svoje radove.</p>
<p>
<a href=" https://hosting.photobucket.com/95288841-8654-4bf7-8fc9-a4aa78dce87f/8529d6d4-76ea-4872-a9e6-748e04223a4e.jpg
" target="_blank"> <img alt="Click for enlarged picture" src="
https://hosting.photobucket.com/95288841-8654-4bf7-8fc9-a4aa78dce87f/8529d6d4-76ea-4872-a9e6-748e04223a4e.jpg
" width="600" /> </a></p>
<p>
<a href=" https://hosting.photobucket.com/95288841-8654-4bf7-8fc9-a4aa78dce87f/f3038937-f001-4ceb-b725-a330fcd64cee.jpg
" target="_blank"> <img alt="Click for enlarged picture" src="
https://hosting.photobucket.com/95288841-8654-4bf7-8fc9-a4aa78dce87f/f3038937-f001-4ceb-b725-a330fcd64cee.jpg
" width="600" /> </a></p>
<p>
<a href=" https://hosting.photobucket.com/95288841-8654-4bf7-8fc9-a4aa78dce87f/3575379e-e068-49e2-9d4d-c9a49531fdc2.jpg
" target="_blank"> <img alt="Click for enlarged picture" src="
https://hosting.photobucket.com/95288841-8654-4bf7-8fc9-a4aa78dce87f/3575379e-e068-49e2-9d4d-c9a49531fdc2.jpg" width="600" /> </a></p>
<p>
<a href=" https://hosting.photobucket.com/95288841-8654-4bf7-8fc9-a4aa78dce87f/e51713c7-2add-4f8f-ae37-e6eba25badff.jpg
" target="_blank"> <img alt="Click for enlarged picture" src="
https://hosting.photobucket.com/95288841-8654-4bf7-8fc9-a4aa78dce87f/e51713c7-2add-4f8f-ae37-e6eba25badff.jpg" width="600" /> </a></p>
<p>
<a href=" https://hosting.photobucket.com/95288841-8654-4bf7-8fc9-a4aa78dce87f/9c0bb546-50a8-483d-aeab-ab3b2ce9f094.jpg
" target="_blank"> <img alt="Click for enlarged picture" src="
https://hosting.photobucket.com/95288841-8654-4bf7-8fc9-a4aa78dce87f/9c0bb546-50a8-483d-aeab-ab3b2ce9f094.jpg" width="600" /> </a></p>
<p>
Otvorenje Izložbe održalo se u četvrtak, 19.2.2026. s početkom u 18:00h. Izložba je organizirana povodom na&scaron;eg dvadeset trećeg rođendana.</p>
<p>
<a href=" https://hosting.photobucket.com/95288841-8654-4bf7-8fc9-a4aa78dce87f/71c7bfc2-1ffc-43b9-9d5a-53e009f6b86d.jpg
" target="_blank"> <img alt="Click for enlarged picture" src="
https://hosting.photobucket.com/95288841-8654-4bf7-8fc9-a4aa78dce87f/71c7bfc2-1ffc-43b9-9d5a-53e009f6b86d.jpg" width="600" /> </a></p>
<p>
<a href=" https://hosting.photobucket.com/95288841-8654-4bf7-8fc9-a4aa78dce87f/007b4701-1d7c-4a67-a599-0539a2aa3191.jpg
" target="_blank"> <img alt="Click for enlarged picture" src="
https://hosting.photobucket.com/95288841-8654-4bf7-8fc9-a4aa78dce87f/007b4701-1d7c-4a67-a599-0539a2aa3191.jpg" width="600" /> </a></p>
<p>
<a href=" https://hosting.photobucket.com/95288841-8654-4bf7-8fc9-a4aa78dce87f/2c8090e2-8b95-4368-bb48-98876d680e15.jpg
" target="_blank"> <img alt="Click for enlarged picture" src="
https://hosting.photobucket.com/95288841-8654-4bf7-8fc9-a4aa78dce87f/2c8090e2-8b95-4368-bb48-98876d680e15.jpg" width="600" /> </a></p>
<p>
<a href=" https://hosting.photobucket.com/95288841-8654-4bf7-8fc9-a4aa78dce87f/375768ad-a8bb-49bf-9845-e46c896ba7ec.jpg
" target="_blank"> <img alt="Click for enlarged picture" src="
https://hosting.photobucket.com/95288841-8654-4bf7-8fc9-a4aa78dce87f/375768ad-a8bb-49bf-9845-e46c896ba7ec.jpg" width="600" /> </a></p>
<p>
<a href=" https://hosting.photobucket.com/95288841-8654-4bf7-8fc9-a4aa78dce87f/a93de974-4ccb-4876-85b0-4d066ae402b3.jpg
" target="_blank"> <img alt="Click for enlarged picture" src="
https://hosting.photobucket.com/95288841-8654-4bf7-8fc9-a4aa78dce87f/a93de974-4ccb-4876-85b0-4d066ae402b3.jpg" width="600" /> </a></p>
<p>
<a href=" https://hosting.photobucket.com/95288841-8654-4bf7-8fc9-a4aa78dce87f/d323ccc9-1b9a-4cb2-8adf-7019b0e217f4.jpg
" target="_blank"> <img alt="Click for enlarged picture" src="
https://hosting.photobucket.com/95288841-8654-4bf7-8fc9-a4aa78dce87f/d323ccc9-1b9a-4cb2-8adf-7019b0e217f4.jpg" width="600" /> </a></p>
<p>
<a href=" https://hosting.photobucket.com/95288841-8654-4bf7-8fc9-a4aa78dce87f/a5a66447-2d76-47ae-866d-4d512ef469a5.jpg
" target="_blank"> <img alt="Click for enlarged picture" src="
https://hosting.photobucket.com/95288841-8654-4bf7-8fc9-a4aa78dce87f/a5a66447-2d76-47ae-866d-4d512ef469a5.jpg" width="600" /> </a></p>
<p>
<a href=" https://hosting.photobucket.com/95288841-8654-4bf7-8fc9-a4aa78dce87f/3e7bcfc9-ba02-4f94-a6c3-79dfaea3639e.jpg
" target="_blank"> <img alt="Click for enlarged picture" src="
https://hosting.photobucket.com/95288841-8654-4bf7-8fc9-a4aa78dce87f/3e7bcfc9-ba02-4f94-a6c3-79dfaea3639e.jpg" width="600" /> </a></p>
<p>
<a href=" https://hosting.photobucket.com/95288841-8654-4bf7-8fc9-a4aa78dce87f/24e79466-4a9e-4b10-970c-caad235d260d.jpg
" target="_blank"> <img alt="Click for enlarged picture" src="
https://hosting.photobucket.com/95288841-8654-4bf7-8fc9-a4aa78dce87f/24e79466-4a9e-4b10-970c-caad235d260d.jpg" width="600" /> </a></p>
<p>
Kao i uvijek, Izložba je prikazivala presjek rada Udruge, njenih članova, polaznika njenih tečajeva i radionica te članova FB grupe Miniature Painters Croatia. U velikom broju vitrina na&scaron;le su se brojne minijature za stolne strate&scaron;ke igre, igre na tabli, a cijela jedna vitrina posvećena je nagrađenim izlo&scaron;cima sa prethodnih minijaturističkih natjecanja. Nekoliko vitrina bilo je posvećeno projektima koje Udruga već 23 godinu provodi poput Knjižnice i čitaonice UMS &bdquo;Agram&ldquo;, Radionice za izradu prostornih maketa i Radionice bojanja minijatura, ali i novih poput Agram Group Build, Agram Lego Sekcije i Back to Basics radionica bojanja za najmlađe.</p>
<p>
<a href=" https://hosting.photobucket.com/95288841-8654-4bf7-8fc9-a4aa78dce87f/fca84936-af71-44d3-9a4c-faeb26163899.jpg
" target="_blank"> <img alt="Click for enlarged picture" src="
https://hosting.photobucket.com/95288841-8654-4bf7-8fc9-a4aa78dce87f/fca84936-af71-44d3-9a4c-faeb26163899.jpg" width="600" /> </a></p>
<p>
<a href=" https://hosting.photobucket.com/95288841-8654-4bf7-8fc9-a4aa78dce87f/459bc5ac-8702-46f9-93b4-547deaabdef4.jpg
" target="_blank"> <img alt="Click for enlarged picture" src="
https://hosting.photobucket.com/95288841-8654-4bf7-8fc9-a4aa78dce87f/459bc5ac-8702-46f9-93b4-547deaabdef4.jpg" width="600" /> </a></p>
<p>
<a href=" https://hosting.photobucket.com/95288841-8654-4bf7-8fc9-a4aa78dce87f/91a04363-b2ef-4635-a046-7edf25ce7808.jpg
" target="_blank"> <img alt="Click for enlarged picture" src="
https://hosting.photobucket.com/95288841-8654-4bf7-8fc9-a4aa78dce87f/91a04363-b2ef-4635-a046-7edf25ce7808.jpg" width="600" /> </a></p>
<p>
<a href=" https://hosting.photobucket.com/95288841-8654-4bf7-8fc9-a4aa78dce87f/73256af5-fd5d-40b5-95e1-120e49c9be87.jpg
" target="_blank"> <img alt="Click for enlarged picture" src="
https://hosting.photobucket.com/95288841-8654-4bf7-8fc9-a4aa78dce87f/73256af5-fd5d-40b5-95e1-120e49c9be87.jpg" width="600" /> </a></p>
<p>
<a href=" https://hosting.photobucket.com/95288841-8654-4bf7-8fc9-a4aa78dce87f/979f9be5-23f3-4df9-91dc-ab71d6a10d64.jpg
" target="_blank"> <img alt="Click for enlarged picture" src="
https://hosting.photobucket.com/95288841-8654-4bf7-8fc9-a4aa78dce87f/979f9be5-23f3-4df9-91dc-ab71d6a10d64.jpg" width="600" /> </a></p>
<p>
<a href=" https://hosting.photobucket.com/95288841-8654-4bf7-8fc9-a4aa78dce87f/d0ff4379-183a-47b9-a740-9ddc283ebc29.jpg
" target="_blank"> <img alt="Click for enlarged picture" src="
https://hosting.photobucket.com/95288841-8654-4bf7-8fc9-a4aa78dce87f/d0ff4379-183a-47b9-a740-9ddc283ebc29.jpg" width="600" /> </a></p>
<p>
<a href=" https://hosting.photobucket.com/95288841-8654-4bf7-8fc9-a4aa78dce87f/4333e95e-bbbd-4f47-aaea-38a9c99e54d8.jpg
" target="_blank"> <img alt="Click for enlarged picture" src="
https://hosting.photobucket.com/95288841-8654-4bf7-8fc9-a4aa78dce87f/4333e95e-bbbd-4f47-aaea-38a9c99e54d8.jpg" width="600" /> </a></p>
<p>
<a href=" https://hosting.photobucket.com/95288841-8654-4bf7-8fc9-a4aa78dce87f/1372f8a2-b222-48ee-ae45-a90b5a354ef7.jpg
" target="_blank"> <img alt="Click for enlarged picture" src="
https://hosting.photobucket.com/95288841-8654-4bf7-8fc9-a4aa78dce87f/1372f8a2-b222-48ee-ae45-a90b5a354ef7.jpg" width="600" /> </a></p>
<p>
<a href=" https://hosting.photobucket.com/95288841-8654-4bf7-8fc9-a4aa78dce87f/6a1b4fd1-d982-4b06-9c5f-3cd40d6bf10a.jpg
" target="_blank"> <img alt="Click for enlarged picture" src="
https://hosting.photobucket.com/95288841-8654-4bf7-8fc9-a4aa78dce87f/6a1b4fd1-d982-4b06-9c5f-3cd40d6bf10a.jpg" width="600" /> </a></p>
<p>
<a href=" https://hosting.photobucket.com/95288841-8654-4bf7-8fc9-a4aa78dce87f/c2ec45e1-e0f3-463a-b254-cb2a38b53e14.jpg
" target="_blank"> <img alt="Click for enlarged picture" src="
https://hosting.photobucket.com/95288841-8654-4bf7-8fc9-a4aa78dce87f/c2ec45e1-e0f3-463a-b254-cb2a38b53e14.jpg" width="600" /> </a></p>
<p>
<a href=" https://hosting.photobucket.com/95288841-8654-4bf7-8fc9-a4aa78dce87f/17553b9a-0592-4f6a-a097-3f1a97e161f3.jpg
" target="_blank"> <img alt="Click for enlarged picture" src="
https://hosting.photobucket.com/95288841-8654-4bf7-8fc9-a4aa78dce87f/17553b9a-0592-4f6a-a097-3f1a97e161f3.jpg" width="600" /> </a></p>
<p>
<a href=" https://hosting.photobucket.com/95288841-8654-4bf7-8fc9-a4aa78dce87f/8658bd6b-dff2-4d24-8473-928d44d44480.jpg
" target="_blank"> <img alt="Click for enlarged picture" src="
https://hosting.photobucket.com/95288841-8654-4bf7-8fc9-a4aa78dce87f/8658bd6b-dff2-4d24-8473-928d44d44480.jpg" width="600" /> </a></p>
<p>
<a href=" https://hosting.photobucket.com/95288841-8654-4bf7-8fc9-a4aa78dce87f/ecab0ea7-f75b-4e31-a520-d088ad39fa17.jpg
" target="_blank"> <img alt="Click for enlarged picture" src="
https://hosting.photobucket.com/95288841-8654-4bf7-8fc9-a4aa78dce87f/ecab0ea7-f75b-4e31-a520-d088ad39fa17.jpg" width="600" /> </a></p>
<p>
<a href=" https://hosting.photobucket.com/95288841-8654-4bf7-8fc9-a4aa78dce87f/9495a2f5-8a82-41f2-abf4-9ade3db41d87.jpg
" target="_blank"> <img alt="Click for enlarged picture" src="
https://hosting.photobucket.com/95288841-8654-4bf7-8fc9-a4aa78dce87f/9495a2f5-8a82-41f2-abf4-9ade3db41d87.jpg" width="600" /> </a></p>
<p>
<a href=" https://hosting.photobucket.com/95288841-8654-4bf7-8fc9-a4aa78dce87f/362cc6fd-a5dd-474b-9b9f-aeab27d6dcfa.jpg
" target="_blank"> <img alt="Click for enlarged picture" src="
https://hosting.photobucket.com/95288841-8654-4bf7-8fc9-a4aa78dce87f/362cc6fd-a5dd-474b-9b9f-aeab27d6dcfa.jpg" width="600" /> </a></p>
<p>
Posebna čast nam je bila ugostiti na&scaron;eg gosta izlagača, Ninoslava Luka minijaturista iz Poreča koji nam se predstavio svojom kolekcijom povijesnih diorama.</p>
<p>
<a href=" https://hosting.photobucket.com/95288841-8654-4bf7-8fc9-a4aa78dce87f/ba1353de-e2bd-4340-9121-9056e287ed4a.jpg
" target="_blank"> <img alt="Click for enlarged picture" src="
https://hosting.photobucket.com/95288841-8654-4bf7-8fc9-a4aa78dce87f/ba1353de-e2bd-4340-9121-9056e287ed4a.jpg" width="600" /> </a></p>
<p>
<a href=" https://hosting.photobucket.com/95288841-8654-4bf7-8fc9-a4aa78dce87f/cea18506-1b50-4e5b-955c-0b9ca02d7826.jpg
" target="_blank"> <img alt="Click for enlarged picture" src="
https://hosting.photobucket.com/95288841-8654-4bf7-8fc9-a4aa78dce87f/cea18506-1b50-4e5b-955c-0b9ca02d7826.jpg" width="600" /> </a></p>
<p>
<a href=" https://hosting.photobucket.com/95288841-8654-4bf7-8fc9-a4aa78dce87f/1be85b41-e3b6-4536-b141-cd0da6eb38c1.jpg
" target="_blank"> <img alt="Click for enlarged picture" src="
https://hosting.photobucket.com/95288841-8654-4bf7-8fc9-a4aa78dce87f/1be85b41-e3b6-4536-b141-cd0da6eb38c1.jpg" width="600" /> </a></p>
<p>
<a href=" https://hosting.photobucket.com/95288841-8654-4bf7-8fc9-a4aa78dce87f/9e93b87d-ff3c-4b7b-8f06-5f9d3464a134.jpg
" target="_blank"> <img alt="Click for enlarged picture" src="
https://hosting.photobucket.com/95288841-8654-4bf7-8fc9-a4aa78dce87f/9e93b87d-ff3c-4b7b-8f06-5f9d3464a134.jpg" width="600" /> </a></p>
<p>
Tijekom prvog vikenda Izložbe, 21.-22.02.,održali smo 20. godi&scaron;nje međunarodno natjecanje u bojanju minijatura <strong>Black Queen Hobby and Miniature Painting Competition</strong>!</p>
<p>
<a href=" https://hosting.photobucket.com/95288841-8654-4bf7-8fc9-a4aa78dce87f/3056fb09-f66c-4dea-80a8-a4e72407429a.jpg
" target="_blank"> <img alt="Click for enlarged picture" src="
https://hosting.photobucket.com/95288841-8654-4bf7-8fc9-a4aa78dce87f/3056fb09-f66c-4dea-80a8-a4e72407429a.jpg" width="600" /> </a></p>
<p>
Kako su natjecatelji pristizali i prijavljivali se na natjecanje, na&scaron;e vrijedno osoblje je fotografiralo sve izlo&scaron;ke prije nego li su ih rasporedili po kategorijama i pažljivo ih postavili u staklene vitrine. Niti jutarnja okrijepa nije usfalila zahvaljujući na&scaron;im revnim volonterima.</p>
<p>
<a href=" https://hosting.photobucket.com/95288841-8654-4bf7-8fc9-a4aa78dce87f/1118089c-2b46-4a2c-b17d-dc92b66d1ffc.jpg
" target="_blank"> <img alt="Click for enlarged picture" src="
https://hosting.photobucket.com/95288841-8654-4bf7-8fc9-a4aa78dce87f/1118089c-2b46-4a2c-b17d-dc92b66d1ffc.jpg" width="600" /> </a></p>
<p>
<a href=" https://hosting.photobucket.com/95288841-8654-4bf7-8fc9-a4aa78dce87f/9fd3c272-9a69-4532-a09d-36497a20a820.jpg
" target="_blank"> <img alt="Click for enlarged picture" src="
https://hosting.photobucket.com/95288841-8654-4bf7-8fc9-a4aa78dce87f/9fd3c272-9a69-4532-a09d-36497a20a820.jpg" width="600" /> </a></p>
<p>
<a href=" https://hosting.photobucket.com/95288841-8654-4bf7-8fc9-a4aa78dce87f/86995e80-c502-45fb-80f5-c8fda27da3f9.jpg
" target="_blank"> <img alt="Click for enlarged picture" src="
https://hosting.photobucket.com/95288841-8654-4bf7-8fc9-a4aa78dce87f/86995e80-c502-45fb-80f5-c8fda27da3f9.jpg" width="600" /> </a></p>
<p>
U podne, sve vitrine su bile pune i natjecanje je moglo službeno početi.</p>
<p>
<a href=" https://hosting.photobucket.com/95288841-8654-4bf7-8fc9-a4aa78dce87f/bce59a4f-c3e3-4708-a3d6-25e81a894c24.jpg
" target="_blank"> <img alt="Click for enlarged picture" src="
https://hosting.photobucket.com/95288841-8654-4bf7-8fc9-a4aa78dce87f/bce59a4f-c3e3-4708-a3d6-25e81a894c24.jpg" width="600" /> </a></p>
<p>
<a href=" https://hosting.photobucket.com/95288841-8654-4bf7-8fc9-a4aa78dce87f/16a0a094-01aa-4e52-82cf-fdab00d74711.jpg
" target="_blank"> <img alt="Click for enlarged picture" src="
https://hosting.photobucket.com/95288841-8654-4bf7-8fc9-a4aa78dce87f/16a0a094-01aa-4e52-82cf-fdab00d74711.jpg" width="600" /> </a></p>
<p>
<a href=" https://hosting.photobucket.com/95288841-8654-4bf7-8fc9-a4aa78dce87f/0d3f4042-ff77-48d0-b332-add0fd08f7c3.jpg
" target="_blank"> <img alt="Click for enlarged picture" src="
https://hosting.photobucket.com/95288841-8654-4bf7-8fc9-a4aa78dce87f/0d3f4042-ff77-48d0-b332-add0fd08f7c3.jpg" width="600" /> </a></p>
<p>
<a href=" https://hosting.photobucket.com/95288841-8654-4bf7-8fc9-a4aa78dce87f/3711baf8-93f2-434a-aea9-a95288ca04dd.jpg
" target="_blank"> <img alt="Click for enlarged picture" src="
https://hosting.photobucket.com/95288841-8654-4bf7-8fc9-a4aa78dce87f/3711baf8-93f2-434a-aea9-a95288ca04dd.jpg" width="600" /> </a></p>
<p>
<a href=" https://hosting.photobucket.com/95288841-8654-4bf7-8fc9-a4aa78dce87f/53113b97-ec06-4409-95ba-95a5ad3f9720.jpg
" target="_blank"> <img alt="Click for enlarged picture" src="
https://hosting.photobucket.com/95288841-8654-4bf7-8fc9-a4aa78dce87f/53113b97-ec06-4409-95ba-95a5ad3f9720.jpg" width="600" /> </a></p>
<p>
<a href=" https://hosting.photobucket.com/95288841-8654-4bf7-8fc9-a4aa78dce87f/ab127858-193d-4976-bdb2-e27302722fca.jpg
" target="_blank"> <img alt="Click for enlarged picture" src="
https://hosting.photobucket.com/95288841-8654-4bf7-8fc9-a4aa78dce87f/ab127858-193d-4976-bdb2-e27302722fca.jpg" width="600" /> </a></p>
<p>
<a href=" https://hosting.photobucket.com/95288841-8654-4bf7-8fc9-a4aa78dce87f/3735af11-3fb6-4772-a8ff-5e0ff6ddf03a.jpg
" target="_blank"> <img alt="Click for enlarged picture" src="
https://hosting.photobucket.com/95288841-8654-4bf7-8fc9-a4aa78dce87f/3735af11-3fb6-4772-a8ff-5e0ff6ddf03a.jpg" width="600" /> </a></p>
<p>
<strong>Back To Basics radionice za najmlađe na Black Queen</strong></p>
<p>
Ove godine smo tijekom cijelog vikenda organizirali radionice bojanja minijatura za najmlađe koji su mogli po prvi puta obojati neku od na&scaron;ih vlastitih minijatura osmi&scaron;ljenih upravo za ovaj program!</p>
<p>
<a href=" https://hosting.photobucket.com/95288841-8654-4bf7-8fc9-a4aa78dce87f/6999be0c-8cc6-4947-a423-9427a2299724.jpg
" target="_blank"> <img alt="Click for enlarged picture" src="
https://hosting.photobucket.com/95288841-8654-4bf7-8fc9-a4aa78dce87f/6999be0c-8cc6-4947-a423-9427a2299724.jpg" width="600" /> </a></p>
<p>
<a href="https://hosting.photobucket.com/95288841-8654-4bf7-8fc9-a4aa78dce87f/835b05a5-f171-49df-afa6-da0692b89074.jpg" target="_blank"><img alt="Click for enlarged picture" src="https://hosting.photobucket.com/95288841-8654-4bf7-8fc9-a4aa78dce87f/835b05a5-f171-49df-afa6-da0692b89074.jpg" width="600" /></a></p>
<p>
<a href=" https://hosting.photobucket.com/95288841-8654-4bf7-8fc9-a4aa78dce87f/ef5dde13-84ee-4ea0-b9f3-28aaf703ef6d.jpg
" target="_blank"> <img alt="Click for enlarged picture" src="
https://hosting.photobucket.com/95288841-8654-4bf7-8fc9-a4aa78dce87f/ef5dde13-84ee-4ea0-b9f3-28aaf703ef6d.jpg" width="600" /> </a></p>
<p>
<strong>PRODAJNI KUTAK</strong></p>
<p>
Tijekom vikenda ugostili smo na&scaron;e sponzore sa njihovim prodajnim &scaron;tandovima: Swood.si i Carta Magica.</p>
<p>
<a href=" https://hosting.photobucket.com/95288841-8654-4bf7-8fc9-a4aa78dce87f/5ee9a49f-a387-435a-9110-572402b7191d.jpg
" target="_blank"> <img alt="Click for enlarged picture" src="
https://hosting.photobucket.com/95288841-8654-4bf7-8fc9-a4aa78dce87f/5ee9a49f-a387-435a-9110-572402b7191d.jpg" width="600" /> </a></p>
<p>
<a href=" https://hosting.photobucket.com/95288841-8654-4bf7-8fc9-a4aa78dce87f/47cf600f-b1eb-4655-bf06-305f6f21d5d2.jpg
" target="_blank"> <img alt="Click for enlarged picture" src="
https://hosting.photobucket.com/95288841-8654-4bf7-8fc9-a4aa78dce87f/47cf600f-b1eb-4655-bf06-305f6f21d5d2.jpg" width="600" /> </a></p>
<p>
<strong>OGLEDNE RADIONICE BOJANJA MINIJATURA</strong></p>
<p>
Prostor ZZTK omogućuje održavanje radionica tijekom vikenda u kino dvorani u podrumu, stoga smo tijekom vikenda organizirali i ogledne radionice. Rad predavača snimao se kamerom i projicirao na projekcijsko platno u dvorani. Veliko hvala na&scaron;im domaćim i inozemnim predavačima: Anžetu Zorku (SLO), doc.dr.sc. Wintonu Afriću (HR), Ivanu Knezoviću (UMS Agram) i Petru Knezoviću (HR).</p>
<p>
<a href=" https://hosting.photobucket.com/95288841-8654-4bf7-8fc9-a4aa78dce87f/e8d835be-ec99-49d7-bc9b-086e38573d1a.jpg
" target="_blank"> <img alt="Click for enlarged picture" src="
https://hosting.photobucket.com/95288841-8654-4bf7-8fc9-a4aa78dce87f/e8d835be-ec99-49d7-bc9b-086e38573d1a.jpg" width="600" /> </a></p>
<p>
<a href=" https://hosting.photobucket.com/95288841-8654-4bf7-8fc9-a4aa78dce87f/f3eba4c1-4637-4da9-8360-75f430355af4.jpg" target="_blank"> <img alt="Click for enlarged picture" src="
https://hosting.photobucket.com/95288841-8654-4bf7-8fc9-a4aa78dce87f/f3eba4c1-4637-4da9-8360-75f430355af4.jpg" width="600" /> </a></p>
<p>
<a href=" https://hosting.photobucket.com/95288841-8654-4bf7-8fc9-a4aa78dce87f/ef523854-4030-4579-aa38-403afda86c91.jpg
" target="_blank"> <img alt="Click for enlarged picture" src="
https://hosting.photobucket.com/95288841-8654-4bf7-8fc9-a4aa78dce87f/ef523854-4030-4579-aa38-403afda86c91.jpg" width="600" /> </a></p>
<p>
<a href=" https://hosting.photobucket.com/95288841-8654-4bf7-8fc9-a4aa78dce87f/dd0943c2-f4a8-40c3-b641-f6dcdd200380.jpg
" target="_blank"> <img alt="Click for enlarged picture" src="
https://hosting.photobucket.com/95288841-8654-4bf7-8fc9-a4aa78dce87f/dd0943c2-f4a8-40c3-b641-f6dcdd200380.jpg" width="600" /> </a></p>
<p>
<a href=" https://hosting.photobucket.com/95288841-8654-4bf7-8fc9-a4aa78dce87f/08b1626a-f6c7-43c9-b718-3e9a41b55ca6.jpg
" target="_blank"> <img alt="Click for enlarged picture" src="
https://hosting.photobucket.com/95288841-8654-4bf7-8fc9-a4aa78dce87f/08b1626a-f6c7-43c9-b718-3e9a41b55ca6.jpg" width="600" /> </a></p>
<p>
<a href=" https://hosting.photobucket.com/95288841-8654-4bf7-8fc9-a4aa78dce87f/91aca7f3-1af6-486d-b174-65079a63a1ea.jpg
" target="_blank"> <img alt="Click for enlarged picture" src="
https://hosting.photobucket.com/95288841-8654-4bf7-8fc9-a4aa78dce87f/91aca7f3-1af6-486d-b174-65079a63a1ea.jpg" width="600" /> </a></p>
<p>
<a href=" https://hosting.photobucket.com/95288841-8654-4bf7-8fc9-a4aa78dce87f/3821f2fb-fbe7-4096-adbc-7d8c981a3b56.jpg
" target="_blank"> <img alt="Click for enlarged picture" src="
https://hosting.photobucket.com/95288841-8654-4bf7-8fc9-a4aa78dce87f/3821f2fb-fbe7-4096-adbc-7d8c981a3b56.jpg" width="600" /> </a></p>
<p>
<a href=" https://hosting.photobucket.com/95288841-8654-4bf7-8fc9-a4aa78dce87f/2c7bb3c5-c0ec-4a96-b6bd-6a90ce5ce154.jpg
" target="_blank"> <img alt="Click for enlarged picture" src="
https://hosting.photobucket.com/95288841-8654-4bf7-8fc9-a4aa78dce87f/2c7bb3c5-c0ec-4a96-b6bd-6a90ce5ce154.jpg" width="600" /> </a></p>
<p>
<a href=" https://hosting.photobucket.com/95288841-8654-4bf7-8fc9-a4aa78dce87f/b646f4ee-21aa-4d12-8db3-6d33351d5aeb.jpg
" target="_blank"> <img alt="Click for enlarged picture" src="
https://hosting.photobucket.com/95288841-8654-4bf7-8fc9-a4aa78dce87f/b646f4ee-21aa-4d12-8db3-6d33351d5aeb.jpg" width="600" /> </a></p>
<p>
<a href=" https://hosting.photobucket.com/95288841-8654-4bf7-8fc9-a4aa78dce87f/fb5efc01-32cc-4119-90e3-188f51b30237.jpg
" target="_blank"> <img alt="Click for enlarged picture" src="
https://hosting.photobucket.com/95288841-8654-4bf7-8fc9-a4aa78dce87f/fb5efc01-32cc-4119-90e3-188f51b30237.jpg" width="600" /> </a></p>
<p>
<strong>NATJECANJE U BRZOM BOJANJU MINIJATURA</strong></p>
<p>
U nedjelju, 22.2. smo organizirali natjecanje u brzom bojanju minijatura. Po prvi puta smo koristili minijature koje su na&scaron; dizajn. Sudionici su imali 60 minuta vremena da obojaju og čarobnjaka.</p>
<p>
<a href=" https://hosting.photobucket.com/95288841-8654-4bf7-8fc9-a4aa78dce87f/106417a6-a047-4e0d-9f81-87858806052f.jpg
" target="_blank"> <img alt="Click for enlarged picture" src="
https://hosting.photobucket.com/95288841-8654-4bf7-8fc9-a4aa78dce87f/106417a6-a047-4e0d-9f81-87858806052f.jpg" width="600" /> </a></p>
<p>
<a href=" https://hosting.photobucket.com/95288841-8654-4bf7-8fc9-a4aa78dce87f/ac6853c7-6e34-4e07-a996-8d7d12744b67.jpg
" target="_blank"> <img alt="Click for enlarged picture" src="
https://hosting.photobucket.com/95288841-8654-4bf7-8fc9-a4aa78dce87f/ac6853c7-6e34-4e07-a996-8d7d12744b67.jpg" width="600" /> </a></p>
<p>
<a href=" https://hosting.photobucket.com/95288841-8654-4bf7-8fc9-a4aa78dce87f/ccb155fa-52c5-4a99-9515-f69a6836dce7.jpg
" target="_blank"> <img alt="Click for enlarged picture" src="
https://hosting.photobucket.com/95288841-8654-4bf7-8fc9-a4aa78dce87f/ccb155fa-52c5-4a99-9515-f69a6836dce7.jpg" width="600" /> </a></p>
<p>
<a href=" https://hosting.photobucket.com/95288841-8654-4bf7-8fc9-a4aa78dce87f/a29fedd0-97ea-45b1-85f9-7ea62188b2b2.jpg
" target="_blank"><img alt="Click for enlarged picture" src="
https://hosting.photobucket.com/95288841-8654-4bf7-8fc9-a4aa78dce87f/a29fedd0-97ea-45b1-85f9-7ea62188b2b2.jpg" width="600" /></a></p>
<p>
S time smo do&scaron;li do samoga kraja ovog predivnog vikenda i sve &scaron;to je preostalo je bila podjela nagrada i priznanja pobjednicima.</p>
<p>
<a href=" https://hosting.photobucket.com/95288841-8654-4bf7-8fc9-a4aa78dce87f/046ca4c8-0ae7-415e-abd3-e131d580c3ad.jpg
" target="_blank"> <img alt="Click for enlarged picture" src="
https://hosting.photobucket.com/95288841-8654-4bf7-8fc9-a4aa78dce87f/046ca4c8-0ae7-415e-abd3-e131d580c3ad.jpg" width="600" /> </a></p>
<p>
<a href=" https://hosting.photobucket.com/95288841-8654-4bf7-8fc9-a4aa78dce87f/cec0dcef-7acb-4a77-89de-271ed5410672.jpg
" target="_blank"> <img alt="Click for enlarged picture" src="
https://hosting.photobucket.com/95288841-8654-4bf7-8fc9-a4aa78dce87f/cec0dcef-7acb-4a77-89de-271ed5410672.jpg" width="600" /> </a></p>
<p>
<a href=" https://hosting.photobucket.com/95288841-8654-4bf7-8fc9-a4aa78dce87f/a495a5fc-31a2-4979-a970-0fa22c334354.jpg
" target="_blank"> <img alt="Click for enlarged picture" src="
https://hosting.photobucket.com/95288841-8654-4bf7-8fc9-a4aa78dce87f/a495a5fc-31a2-4979-a970-0fa22c334354.jpg" width="600" /> </a></p>
<p>
<strong>AGRAM ARENA &ndash; Leaving Asphodel Necropolis28 kampanja</strong></p>
<p>
Tijekom vikenda 21.-22.2. održali smo i novo međunarodno natjecanje Agram Arena! Ovoga puta na redu je bila stolna strate&scaron;ka igra Necropolis 28 za koju su na&scaron;i članovi osmislili dvodnevnu kampanju. Svaki sudionik je izradio svoju bandu vojnika, a velika većina i svoje vlastite table.</p>
<p>
<a href=" https://hosting.photobucket.com/95288841-8654-4bf7-8fc9-a4aa78dce87f/ac69b182-4bfc-4575-a6d3-fb3c8baba342.jpg
" target="_blank"> <img alt="Click for enlarged picture" src="
https://hosting.photobucket.com/95288841-8654-4bf7-8fc9-a4aa78dce87f/ac69b182-4bfc-4575-a6d3-fb3c8baba342.jpg" width="600" /> </a></p>
<p>
<a href=" https://hosting.photobucket.com/95288841-8654-4bf7-8fc9-a4aa78dce87f/289fed7b-e058-42d8-ba2d-cbd0463e98da.jpg
" target="_blank"> <img alt="Click for enlarged picture" src="
https://hosting.photobucket.com/95288841-8654-4bf7-8fc9-a4aa78dce87f/289fed7b-e058-42d8-ba2d-cbd0463e98da.jpg" width="600" /> </a></p>
<p>
<a href=" https://hosting.photobucket.com/95288841-8654-4bf7-8fc9-a4aa78dce87f/d92ebbee-859d-4441-8386-3d760b20b7a7.jpg
" target="_blank"> <img alt="Click for enlarged picture" src="
https://hosting.photobucket.com/95288841-8654-4bf7-8fc9-a4aa78dce87f/d92ebbee-859d-4441-8386-3d760b20b7a7.jpg" width="600" /> </a></p>
<p>
<a href=" https://hosting.photobucket.com/95288841-8654-4bf7-8fc9-a4aa78dce87f/09c59798-7871-425e-a075-3ca1cd91768a.jpg
" target="_blank"> <img alt="Click for enlarged picture" src="
https://hosting.photobucket.com/95288841-8654-4bf7-8fc9-a4aa78dce87f/09c59798-7871-425e-a075-3ca1cd91768a.jpg" width="600" /> </a></p>
<p>
<a href=" https://hosting.photobucket.com/95288841-8654-4bf7-8fc9-a4aa78dce87f/b2f3edc8-5a23-4552-9a2a-4027b286f327.jpg
" target="_blank"> <img alt="Click for enlarged picture" src="
https://hosting.photobucket.com/95288841-8654-4bf7-8fc9-a4aa78dce87f/b2f3edc8-5a23-4552-9a2a-4027b286f327.jpg" width="600" /> </a></p>
<p>
<a href=" https://hosting.photobucket.com/95288841-8654-4bf7-8fc9-a4aa78dce87f/2a9f43ac-b531-4746-b7bb-ac5a3356aab0.jpg
" target="_blank"> <img alt="Click for enlarged picture" src="
https://hosting.photobucket.com/95288841-8654-4bf7-8fc9-a4aa78dce87f/2a9f43ac-b531-4746-b7bb-ac5a3356aab0.jpg" width="600" /> </a></p>
<p>
<strong>DOGAĐANJA RADNIM DANIMA ZA VRIJEME IZLOŽBE</strong></p>
<p>
Tijekom naredna dva tjedna, na&scaron;i volonteri su radnim danima od 16:00 do 20:00, držali otvorene radionice bojanja minijatura. Postavljene su radne stanice za bojanje minijatura na kojoj su na&scaron;i posjetitelji mogli bojati minijature koje smo priredili (ili svoje ukoliko su ih donijeli) koristeći na&scaron;e materijale i alate.</p>
<p>
<a href=" https://hosting.photobucket.com/95288841-8654-4bf7-8fc9-a4aa78dce87f/6edf7765-42b5-417a-820f-fa5d907179a7.jpg
" target="_blank"> <img alt="Click for enlarged picture" src="
https://hosting.photobucket.com/95288841-8654-4bf7-8fc9-a4aa78dce87f/6edf7765-42b5-417a-820f-fa5d907179a7.jpg" width="600" /> </a></p>
<p>
<a href=" https://hosting.photobucket.com/95288841-8654-4bf7-8fc9-a4aa78dce87f/c084ebe2-f57b-4519-9b31-29bdc1155887.jpg
" target="_blank"> <img alt="Click for enlarged picture" src="
https://hosting.photobucket.com/95288841-8654-4bf7-8fc9-a4aa78dce87f/c084ebe2-f57b-4519-9b31-29bdc1155887.jpg" width="600" /> </a></p>
<p>
<a href=" https://hosting.photobucket.com/95288841-8654-4bf7-8fc9-a4aa78dce87f/37ff2272-f9b0-4b16-a363-1e6f6688c866.jpg
" target="_blank"> <img alt="Click for enlarged picture" src="
https://hosting.photobucket.com/95288841-8654-4bf7-8fc9-a4aa78dce87f/37ff2272-f9b0-4b16-a363-1e6f6688c866.jpg" width="600" /> </a></p>
<p>
<a href=" https://hosting.photobucket.com/95288841-8654-4bf7-8fc9-a4aa78dce87f/5f4f7968-ff50-4a01-98da-6ce8562930b4.jpg
" target="_blank"> <img alt="Click for enlarged picture" src="
https://hosting.photobucket.com/95288841-8654-4bf7-8fc9-a4aa78dce87f/5f4f7968-ff50-4a01-98da-6ce8562930b4.jpg" width="600" /> </a></p>
<p>
<a href=" https://hosting.photobucket.com/95288841-8654-4bf7-8fc9-a4aa78dce87f/cbb45319-d488-483c-bf9d-9af29852fc74.jpg
" target="_blank"> <img alt="Click for enlarged picture" src="
https://hosting.photobucket.com/95288841-8654-4bf7-8fc9-a4aa78dce87f/cbb45319-d488-483c-bf9d-9af29852fc74.jpg" width="600" /> </a></p>
<p>
<a href=" https://hosting.photobucket.com/95288841-8654-4bf7-8fc9-a4aa78dce87f/3dcca26c-d549-4af3-812a-a4a81b9a2310.jpg
" target="_blank"> <img alt="Click for enlarged picture" src="
https://hosting.photobucket.com/95288841-8654-4bf7-8fc9-a4aa78dce87f/3dcca26c-d549-4af3-812a-a4a81b9a2310.jpg" width="600" /> </a></p>
<p>
<a href=" https://hosting.photobucket.com/95288841-8654-4bf7-8fc9-a4aa78dce87f/4adf0fb6-3eab-4b40-b32d-d03eab4a9892.jpg
" target="_blank"> <img alt="Click for enlarged picture" src="
https://hosting.photobucket.com/95288841-8654-4bf7-8fc9-a4aa78dce87f/4adf0fb6-3eab-4b40-b32d-d03eab4a9892.jpg" width="600" /> </a></p>
<p>
<a href=" https://hosting.photobucket.com/95288841-8654-4bf7-8fc9-a4aa78dce87f/4732b58a-9a65-4d1c-a7d5-25513d34b108.jpg
" target="_blank"> <img alt="Click for enlarged picture" src="
https://hosting.photobucket.com/95288841-8654-4bf7-8fc9-a4aa78dce87f/4732b58a-9a65-4d1c-a7d5-25513d34b108.jpg" width="600" /> </a></p>
<p>
<a href=" https://hosting.photobucket.com/95288841-8654-4bf7-8fc9-a4aa78dce87f/274be330-31d5-4e25-95db-ec2f423a003c.jpg
" target="_blank"> <img alt="Click for enlarged picture" src="
https://hosting.photobucket.com/95288841-8654-4bf7-8fc9-a4aa78dce87f/274be330-31d5-4e25-95db-ec2f423a003c.jpg" width="600" /> </a></p>
<p>
<a href=" https://hosting.photobucket.com/95288841-8654-4bf7-8fc9-a4aa78dce87f/8e7b0a80-0f46-4d70-9789-a46976c713d2.jpg
" target="_blank"> <img alt="Click for enlarged picture" src="
https://hosting.photobucket.com/95288841-8654-4bf7-8fc9-a4aa78dce87f/8e7b0a80-0f46-4d70-9789-a46976c713d2.jpg" width="600" /> </a></p>
<p>
<a href=" https://hosting.photobucket.com/95288841-8654-4bf7-8fc9-a4aa78dce87f/8bbd4e96-b911-4f26-80fe-b1c57f29027b.jpg
" target="_blank"> <img alt="Click for enlarged picture" src="
https://hosting.photobucket.com/95288841-8654-4bf7-8fc9-a4aa78dce87f/8bbd4e96-b911-4f26-80fe-b1c57f29027b.jpg" width="600" /> </a></p>
<p>
<a href=" https://hosting.photobucket.com/95288841-8654-4bf7-8fc9-a4aa78dce87f/203a27be-8f10-459d-89b9-befb6b636b74.jpg
" target="_blank"> <img alt="Click for enlarged picture" src="
https://hosting.photobucket.com/95288841-8654-4bf7-8fc9-a4aa78dce87f/203a27be-8f10-459d-89b9-befb6b636b74.jpg" width="600" /> </a></p>
<p>
<a href=" https://hosting.photobucket.com/95288841-8654-4bf7-8fc9-a4aa78dce87f/5dc4358f-19d8-475f-a4af-9c29e9ed18d7.jpg
" target="_blank"> <img alt="Click for enlarged picture" src="
https://hosting.photobucket.com/95288841-8654-4bf7-8fc9-a4aa78dce87f/5dc4358f-19d8-475f-a4af-9c29e9ed18d7.jpg" width="600" /> </a></p>
<p>
<strong>BACK TO BASICS RADIONICE ZA NAJMLAĐE</strong></p>
<p>
Radnim danima od 17:00 do 18:00 održavali smo na&scaron;e nove radionice za najmlađe u kojima su na&scaron;i najmlađi polaznici bojali svoje prve minijature.</p>
<p>
<a href=" https://hosting.photobucket.com/95288841-8654-4bf7-8fc9-a4aa78dce87f/948af139-8fb5-4e28-a27c-404466e70d05.jpg
" target="_blank"> <img alt="Click for enlarged picture" src="
https://hosting.photobucket.com/95288841-8654-4bf7-8fc9-a4aa78dce87f/948af139-8fb5-4e28-a27c-404466e70d05.jpg" width="600" /> </a></p>
<p>
<a href=" https://hosting.photobucket.com/95288841-8654-4bf7-8fc9-a4aa78dce87f/bb3e20c2-bb21-4a3d-863a-74de08261467.jpg
" target="_blank"> <img alt="Click for enlarged picture" src="
https://hosting.photobucket.com/95288841-8654-4bf7-8fc9-a4aa78dce87f/bb3e20c2-bb21-4a3d-863a-74de08261467.jpg" width="600" /> </a></p>
<p>
<a href=" https://hosting.photobucket.com/95288841-8654-4bf7-8fc9-a4aa78dce87f/7316c760-98e3-4e3f-9261-d138aa7a5a6a.jpg
" target="_blank"> <img alt="Click for enlarged picture" src="
https://hosting.photobucket.com/95288841-8654-4bf7-8fc9-a4aa78dce87f/7316c760-98e3-4e3f-9261-d138aa7a5a6a.jpg" width="600" /> </a></p>
<p>
<a href=" https://hosting.photobucket.com/95288841-8654-4bf7-8fc9-a4aa78dce87f/68934b39-3d1f-4f43-b967-14b73c41a39e.jpg
" target="_blank"> <img alt="Click for enlarged picture" src="
https://hosting.photobucket.com/95288841-8654-4bf7-8fc9-a4aa78dce87f/68934b39-3d1f-4f43-b967-14b73c41a39e.jpg" width="600" /> </a></p>
<p>
<a href=" https://hosting.photobucket.com/95288841-8654-4bf7-8fc9-a4aa78dce87f/46125bce-a28d-494f-873a-3aeabdc1d6c2.jpg
" target="_blank"> <img alt="Click for enlarged picture" src="
https://hosting.photobucket.com/95288841-8654-4bf7-8fc9-a4aa78dce87f/46125bce-a28d-494f-873a-3aeabdc1d6c2.jpg" width="600" /> </a></p>
<p>
<a href=" https://hosting.photobucket.com/95288841-8654-4bf7-8fc9-a4aa78dce87f/3c58e0ad-77a9-44c8-b6bf-d9a55c514d43.jpg
" target="_blank"> <img alt="Click for enlarged picture" src="
https://hosting.photobucket.com/95288841-8654-4bf7-8fc9-a4aa78dce87f/3c58e0ad-77a9-44c8-b6bf-d9a55c514d43.jpg" width="600" /> </a></p>
<p>
<a href=" https://hosting.photobucket.com/95288841-8654-4bf7-8fc9-a4aa78dce87f/f891f0f0-051b-40ee-9676-cb03b0a9811b.jpg
" target="_blank"> <img alt="Click for enlarged picture" src="
https://hosting.photobucket.com/95288841-8654-4bf7-8fc9-a4aa78dce87f/f891f0f0-051b-40ee-9676-cb03b0a9811b.jpg" width="600" /> </a></p>
<p>
<strong>AGRAM LEGO SEKCIJA predavanje: FW-14b &ndash; Bolid F1 za budućnost</strong></p>
<p>
U srijedu 25.2.2026. u sklopu aktivnosti na&scaron;e Agram Lego Sekcije, na&scaron; dežurni strojar Marko Paunović je održao predavanje na temu bolida Formule 1 iz 1992.. Ulaz na predavanje je bio besplatan, a po zavr&scaron;etku su LEGO maketu bolida izradili članovi Lego sekcije</p>
<p>
<a href=" https://hosting.photobucket.com/95288841-8654-4bf7-8fc9-a4aa78dce87f/b2e14b1c-daa4-4314-8685-184377bc7e28.jpg
" target="_blank"> <img alt="Click for enlarged picture" src="
https://hosting.photobucket.com/95288841-8654-4bf7-8fc9-a4aa78dce87f/b2e14b1c-daa4-4314-8685-184377bc7e28.jpg" width="600" /> </a></p>
<p>
<a href=" https://hosting.photobucket.com/95288841-8654-4bf7-8fc9-a4aa78dce87f/31fb439a-77d3-4418-83ff-66c3af279cca.jpg" target="_blank"> <img alt="Click for enlarged picture" src="
https://hosting.photobucket.com/95288841-8654-4bf7-8fc9-a4aa78dce87f/31fb439a-77d3-4418-83ff-66c3af279cca.jpg" width="600" /> </a></p>
<p>
<a href=" https://hosting.photobucket.com/95288841-8654-4bf7-8fc9-a4aa78dce87f/bfcaf282-6be8-4b52-a3ed-c91137457876.jpg
" target="_blank"> <img alt="Click for enlarged picture" src="
https://hosting.photobucket.com/95288841-8654-4bf7-8fc9-a4aa78dce87f/bfcaf282-6be8-4b52-a3ed-c91137457876.jpg" width="600" /> </a></p>
<p>
<a href=" https://hosting.photobucket.com/95288841-8654-4bf7-8fc9-a4aa78dce87f/ce70fc61-9e1a-4169-aaad-8b67417656c0.jpg
" target="_blank"> <img alt="Click for enlarged picture" src="
https://hosting.photobucket.com/95288841-8654-4bf7-8fc9-a4aa78dce87f/ce70fc61-9e1a-4169-aaad-8b67417656c0.jpg" width="600" /> </a></p>
<p>
<a href=" https://hosting.photobucket.com/95288841-8654-4bf7-8fc9-a4aa78dce87f/94ca0e36-8710-458d-8194-9f71299f4d74.jpg
" target="_blank"> <img alt="Click for enlarged picture" src="
https://hosting.photobucket.com/95288841-8654-4bf7-8fc9-a4aa78dce87f/94ca0e36-8710-458d-8194-9f71299f4d74.jpg" width="600" /> </a></p>
<p>
<a href=" https://hosting.photobucket.com/95288841-8654-4bf7-8fc9-a4aa78dce87f/c6771f72-7191-4ca3-a792-3bb1ab3897b1.jpg
" target="_blank"> <img alt="Click for enlarged picture" src="
https://hosting.photobucket.com/95288841-8654-4bf7-8fc9-a4aa78dce87f/c6771f72-7191-4ca3-a792-3bb1ab3897b1.jpg" width="600" /> </a></p>
<p>
<a href=" https://hosting.photobucket.com/95288841-8654-4bf7-8fc9-a4aa78dce87f/c8fcfcb6-09f2-4398-a2fb-fa5065771e01.jpg
" target="_blank"> <img alt="Click for enlarged picture" src="
https://hosting.photobucket.com/95288841-8654-4bf7-8fc9-a4aa78dce87f/c8fcfcb6-09f2-4398-a2fb-fa5065771e01.jpg" width="600" /> </a></p>
<p>
<a href=" https://hosting.photobucket.com/95288841-8654-4bf7-8fc9-a4aa78dce87f/d7e187a8-d5b1-433b-b30d-091e54dcdddf.jpg
" target="_blank"> <img alt="Click for enlarged picture" src="
https://hosting.photobucket.com/95288841-8654-4bf7-8fc9-a4aa78dce87f/d7e187a8-d5b1-433b-b30d-091e54dcdddf.jpg" width="600" /> </a></p>
<p>
Tijekom drugog vikenda Izložbe, 28.02.-01.03., organizirali smo <strong>RADIONICU BOJANJA MINIJATURA &ndash; Grimdark stil</strong>.</p>
<p>
Radionica se provodila kroz dva dana (cijeli vikend) i polaznici su bojali tri različite figure za igru Trench Crusade. Fokus ovih predavanja bilo je bojenje popularnim Grimdark stilom. Na radionici su bile predstavljene boje i pribor, priprema figura, nekoliko tehnika bojenja minijatura od osnovnih do naprednijih, te tehnike i trikovi za brzo i efikasno bojenje većih količina figura odjednom. U sklopu radionice kori&scaron;tene su akrilne boje na bazi vode.</p>
<p>
<a href=" https://hosting.photobucket.com/95288841-8654-4bf7-8fc9-a4aa78dce87f/733d94b2-8e8d-4a4e-accd-b9168e32577e.jpg
" target="_blank"> <img alt="Click for enlarged picture" src="
https://hosting.photobucket.com/95288841-8654-4bf7-8fc9-a4aa78dce87f/733d94b2-8e8d-4a4e-accd-b9168e32577e.jpg
" width="600" /> </a></p>
<p>
<a href=" https://hosting.photobucket.com/95288841-8654-4bf7-8fc9-a4aa78dce87f/41020062-45b9-41cd-a357-fa23a389f390.jpg
" target="_blank"> <img alt="Click for enlarged picture" src="
https://hosting.photobucket.com/95288841-8654-4bf7-8fc9-a4aa78dce87f/41020062-45b9-41cd-a357-fa23a389f390.jpg
" width="600" /> </a></p>
<p>
<a href=" https://hosting.photobucket.com/95288841-8654-4bf7-8fc9-a4aa78dce87f/0c07cc55-596d-494d-972b-cd6a0dd6b8b7.jpg
" target="_blank"> <img alt="Click for enlarged picture" src="
https://hosting.photobucket.com/95288841-8654-4bf7-8fc9-a4aa78dce87f/0c07cc55-596d-494d-972b-cd6a0dd6b8b7.jpg" width="600" /> </a></p>
<p>
<a href=" https://hosting.photobucket.com/95288841-8654-4bf7-8fc9-a4aa78dce87f/c17dd356-08b1-48e1-b895-6296aed7f818.jpg
" target="_blank"> <img alt="Click for enlarged picture" src="
https://hosting.photobucket.com/95288841-8654-4bf7-8fc9-a4aa78dce87f/c17dd356-08b1-48e1-b895-6296aed7f818.jpg" width="600" /> </a></p>
<p>
U srijedu 04.03.2026. održana je godi&scaron;nja <strong>sjednica Skup&scaron;tine</strong> na kojoj smo odredili smjernice rada u 2026.</p>
<p>
<a href=" https://hosting.photobucket.com/95288841-8654-4bf7-8fc9-a4aa78dce87f/59484bd0-7edc-4aed-a04e-ae42900ba3e6.jpg
" target="_blank"> <img alt="Click for enlarged picture" src="
https://hosting.photobucket.com/95288841-8654-4bf7-8fc9-a4aa78dce87f/59484bd0-7edc-4aed-a04e-ae42900ba3e6.jpg
" width="600" /> </a></p>
<p>
U nedjelju 08.03.2026. Izložba je zavr&scaron;ena, na&scaron;i eksponati sigurno spremljeni, a Galerija poči&scaron;ćena.</p>
<p>
<a href=" https://hosting.photobucket.com/95288841-8654-4bf7-8fc9-a4aa78dce87f/98af4280-0956-4cdb-b4a9-da40e3a5a44a.jpg
" target="_blank"> <img alt="Click for enlarged picture" src="
https://hosting.photobucket.com/95288841-8654-4bf7-8fc9-a4aa78dce87f/98af4280-0956-4cdb-b4a9-da40e3a5a44a.jpg" width="600" /> </a></p>
<p>
<a href=" https://hosting.photobucket.com/95288841-8654-4bf7-8fc9-a4aa78dce87f/3259b35e-1fc2-4a99-a3c5-c7984958d72b.jpg
" target="_blank"> <img alt="Click for enlarged picture" src="
https://hosting.photobucket.com/95288841-8654-4bf7-8fc9-a4aa78dce87f/3259b35e-1fc2-4a99-a3c5-c7984958d72b.jpg" width="600" /> </a></p>
<p>
Najbitniji dio svake godine prilikom održavanja ove Izložbe je socijalni aspekt, druženje na&scaron;ih članova kako međusobno tako i sa na&scaron;im međunarodnim prijateljima koji nas posjećuju! Uz ovih par fotografija sa zajedničkih druženja, pozdravljamo vas do sljedeće godine!</p>
<p>
<a href=" https://hosting.photobucket.com/95288841-8654-4bf7-8fc9-a4aa78dce87f/b9168e23-79b2-4d81-8a7d-7534062881a7.jpg
" target="_blank"> <img alt="Click for enlarged picture" src="
https://hosting.photobucket.com/95288841-8654-4bf7-8fc9-a4aa78dce87f/b9168e23-79b2-4d81-8a7d-7534062881a7.jpg " width="600" /> </a></p>
<p>
<a href=" https://hosting.photobucket.com/95288841-8654-4bf7-8fc9-a4aa78dce87f/edff925e-916c-4d78-953e-210abf3753d4.jpg
" target="_blank"> <img alt="Click for enlarged picture" src="
https://hosting.photobucket.com/95288841-8654-4bf7-8fc9-a4aa78dce87f/edff925e-916c-4d78-953e-210abf3753d4.jpg " width="600" /> </a></p>
<p>
<a href=" https://hosting.photobucket.com/95288841-8654-4bf7-8fc9-a4aa78dce87f/8bcb48fa-466b-43f8-8a4b-f15f6794b21e.jpg
" target="_blank"> <img alt="Click for enlarged picture" src="
https://hosting.photobucket.com/95288841-8654-4bf7-8fc9-a4aa78dce87f/8bcb48fa-466b-43f8-8a4b-f15f6794b21e.jpg" width="600" /> </a></p>
",
"created" => "2026-03-12 08:54:10",
"modified" => "2026-03-12 08:58:37"
),
"Member" => array(
"id" => "35",
"group_id" => "1",
"first_name" => "Marko",
"last_name" => "Paunović",
"first_name_mask" => "marko",
"last_name_mask" => "paunovic",
"username" => "marko",
"password" => "*****",
"born" => "2033-03-07 20:35:00",
"created" => "2009-06-02 20:37:03"
)
)</pre><pre class="stack-trace">include - APP/views/elements/latestArticles.ctp, line 10
View::_render() - CORE/cake/libs/view/view.php, line 736
View::element() - CORE/cake/libs/view/view.php, line 397
include - APP/views/home/index.ctp, line 49
View::_render() - CORE/cake/libs/view/view.php, line 736
View::render() - CORE/cake/libs/view/view.php, line 431
Controller::render() - CORE/cake/libs/controller/controller.php, line 909
Dispatcher::_invoke() - CORE/cake/dispatcher.php, line 207
Dispatcher::dispatch() - CORE/cake/dispatcher.php, line 171
[main] - APP/webroot/index.php, line 86</pre></div></pre><a href="/dok/articles/2026/03/12" class="readMore"></a>
<span class="details"> <pre style="display: none;">
array(2) {
["Article"]=>
array(10) {
["id"]=>
string(3) "496"
["member_id"]=>
string(2) "35"
["title_eng"]=>
string(50) "Exhibition of Miniatures and Tabletop Scenery 2026"
["title_hrv"]=>
string(39) "Izložba minijatura i maketa Agram 2026"
["mask_eng"]=>
string(50) "exhibition_of_miniatures_and_tabletop_scenery_2026"
["mask_hrv"]=>
string(38) "izlozba_minijatura_i_maketa_agram_2026"
["content_eng"]=>
string(42359) "<p>
<a href=" https://hosting.photobucket.com/95288841-8654-4bf7-8fc9-a4aa78dce87f/dc756f84-867d-4df4-acd8-5d43775cafc2.jpg
" target="_blank"> <img alt="Click for enlarged picture" src="
https://hosting.photobucket.com/95288841-8654-4bf7-8fc9-a4aa78dce87f/dc756f84-867d-4df4-acd8-5d43775cafc2.jpg" width="600" /> </a></p>
<p>
<strong>The exhibition of miniatures and models "Agram 2026"</strong> was held this year from 19.2. to 08.03. 2026. The exhibition was set up on Wednesday 18.2. and was attended by a large number of members and friends of the Association who exhibited their works.</p>
<p>
</p>
<p>
<a href=" https://hosting.photobucket.com/95288841-8654-4bf7-8fc9-a4aa78dce87f/8529d6d4-76ea-4872-a9e6-748e04223a4e.jpg
" target="_blank"> <img alt="Click for enlarged picture" src="
https://hosting.photobucket.com/95288841-8654-4bf7-8fc9-a4aa78dce87f/8529d6d4-76ea-4872-a9e6-748e04223a4e.jpg
" width="600" /> </a></p>
<p>
<a href=" https://hosting.photobucket.com/95288841-8654-4bf7-8fc9-a4aa78dce87f/f3038937-f001-4ceb-b725-a330fcd64cee.jpg
" target="_blank"> <img alt="Click for enlarged picture" src="
https://hosting.photobucket.com/95288841-8654-4bf7-8fc9-a4aa78dce87f/f3038937-f001-4ceb-b725-a330fcd64cee.jpg
" width="600" /> </a></p>
<p>
<a href=" https://hosting.photobucket.com/95288841-8654-4bf7-8fc9-a4aa78dce87f/3575379e-e068-49e2-9d4d-c9a49531fdc2.jpg
" target="_blank"> <img alt="Click for enlarged picture" src="
https://hosting.photobucket.com/95288841-8654-4bf7-8fc9-a4aa78dce87f/3575379e-e068-49e2-9d4d-c9a49531fdc2.jpg" width="600" /> </a></p>
<p>
<a href=" https://hosting.photobucket.com/95288841-8654-4bf7-8fc9-a4aa78dce87f/e51713c7-2add-4f8f-ae37-e6eba25badff.jpg
" target="_blank"> <img alt="Click for enlarged picture" src="
https://hosting.photobucket.com/95288841-8654-4bf7-8fc9-a4aa78dce87f/e51713c7-2add-4f8f-ae37-e6eba25badff.jpg" width="600" /> </a></p>
<p>
<a href=" https://hosting.photobucket.com/95288841-8654-4bf7-8fc9-a4aa78dce87f/9c0bb546-50a8-483d-aeab-ab3b2ce9f094.jpg
" target="_blank"> <img alt="Click for enlarged picture" src="
https://hosting.photobucket.com/95288841-8654-4bf7-8fc9-a4aa78dce87f/9c0bb546-50a8-483d-aeab-ab3b2ce9f094.jpg" width="600" /> </a></p>
<p>
The opening of the Exhibition took place on Thursday, February 19, 2026, starting at 6:00 PM. The exhibition was organized on the occasion of our twenty-third birthday.</p>
<p>
</p>
<p>
<a href=" https://hosting.photobucket.com/95288841-8654-4bf7-8fc9-a4aa78dce87f/71c7bfc2-1ffc-43b9-9d5a-53e009f6b86d.jpg
" target="_blank"> <img alt="Click for enlarged picture" src="
https://hosting.photobucket.com/95288841-8654-4bf7-8fc9-a4aa78dce87f/71c7bfc2-1ffc-43b9-9d5a-53e009f6b86d.jpg" width="600" /> </a></p>
<p>
<a href=" https://hosting.photobucket.com/95288841-8654-4bf7-8fc9-a4aa78dce87f/007b4701-1d7c-4a67-a599-0539a2aa3191.jpg
" target="_blank"> <img alt="Click for enlarged picture" src="
https://hosting.photobucket.com/95288841-8654-4bf7-8fc9-a4aa78dce87f/007b4701-1d7c-4a67-a599-0539a2aa3191.jpg" width="600" /> </a></p>
<p>
<a href=" https://hosting.photobucket.com/95288841-8654-4bf7-8fc9-a4aa78dce87f/2c8090e2-8b95-4368-bb48-98876d680e15.jpg
" target="_blank"> <img alt="Click for enlarged picture" src="
https://hosting.photobucket.com/95288841-8654-4bf7-8fc9-a4aa78dce87f/2c8090e2-8b95-4368-bb48-98876d680e15.jpg" width="600" /> </a></p>
<p>
<a href=" https://hosting.photobucket.com/95288841-8654-4bf7-8fc9-a4aa78dce87f/375768ad-a8bb-49bf-9845-e46c896ba7ec.jpg
" target="_blank"> <img alt="Click for enlarged picture" src="
https://hosting.photobucket.com/95288841-8654-4bf7-8fc9-a4aa78dce87f/375768ad-a8bb-49bf-9845-e46c896ba7ec.jpg" width="600" /> </a></p>
<p>
<a href=" https://hosting.photobucket.com/95288841-8654-4bf7-8fc9-a4aa78dce87f/a93de974-4ccb-4876-85b0-4d066ae402b3.jpg
" target="_blank"> <img alt="Click for enlarged picture" src="
https://hosting.photobucket.com/95288841-8654-4bf7-8fc9-a4aa78dce87f/a93de974-4ccb-4876-85b0-4d066ae402b3.jpg" width="600" /> </a></p>
<p>
<a href=" https://hosting.photobucket.com/95288841-8654-4bf7-8fc9-a4aa78dce87f/d323ccc9-1b9a-4cb2-8adf-7019b0e217f4.jpg
" target="_blank"> <img alt="Click for enlarged picture" src="
https://hosting.photobucket.com/95288841-8654-4bf7-8fc9-a4aa78dce87f/d323ccc9-1b9a-4cb2-8adf-7019b0e217f4.jpg" width="600" /> </a></p>
<p>
<a href=" https://hosting.photobucket.com/95288841-8654-4bf7-8fc9-a4aa78dce87f/a5a66447-2d76-47ae-866d-4d512ef469a5.jpg
" target="_blank"> <img alt="Click for enlarged picture" src="
https://hosting.photobucket.com/95288841-8654-4bf7-8fc9-a4aa78dce87f/a5a66447-2d76-47ae-866d-4d512ef469a5.jpg" width="600" /> </a></p>
<p>
<a href=" https://hosting.photobucket.com/95288841-8654-4bf7-8fc9-a4aa78dce87f/3e7bcfc9-ba02-4f94-a6c3-79dfaea3639e.jpg
" target="_blank"> <img alt="Click for enlarged picture" src="
https://hosting.photobucket.com/95288841-8654-4bf7-8fc9-a4aa78dce87f/3e7bcfc9-ba02-4f94-a6c3-79dfaea3639e.jpg" width="600" /> </a></p>
<p>
<a href=" https://hosting.photobucket.com/95288841-8654-4bf7-8fc9-a4aa78dce87f/24e79466-4a9e-4b10-970c-caad235d260d.jpg
" target="_blank"> <img alt="Click for enlarged picture" src="
https://hosting.photobucket.com/95288841-8654-4bf7-8fc9-a4aa78dce87f/24e79466-4a9e-4b10-970c-caad235d260d.jpg" width="600" /> </a></p>
<p>
As always, the Exhibition presented a cross-section of the work of the Association, its members, participants of its courses and workshops, and members of the Miniature Painters Croatia FB group. In a large number of showcases, there were numerous miniatures for tabletop strategy games, board games, and an entire showcase was dedicated to award-winning exhibits from previous miniature competitions. Several showcases were dedicated to projects that the Association has been implementing for 23 years, such as the UMS „Agram“ Library and Reading Room, the Workshop for Making Spatial Models and the Miniature Painting Workshop, as well as new ones such as the Agram Group Build, the Agram Lego Section and the Back to Basics painting workshop for the youngest.</p>
<p>
<a href=" https://hosting.photobucket.com/95288841-8654-4bf7-8fc9-a4aa78dce87f/fca84936-af71-44d3-9a4c-faeb26163899.jpg
" target="_blank"> <img alt="Click for enlarged picture" src="
https://hosting.photobucket.com/95288841-8654-4bf7-8fc9-a4aa78dce87f/fca84936-af71-44d3-9a4c-faeb26163899.jpg" width="600" /> </a></p>
<p>
<a href=" https://hosting.photobucket.com/95288841-8654-4bf7-8fc9-a4aa78dce87f/459bc5ac-8702-46f9-93b4-547deaabdef4.jpg
" target="_blank"> <img alt="Click for enlarged picture" src="
https://hosting.photobucket.com/95288841-8654-4bf7-8fc9-a4aa78dce87f/459bc5ac-8702-46f9-93b4-547deaabdef4.jpg" width="600" /> </a></p>
<p>
<a href=" https://hosting.photobucket.com/95288841-8654-4bf7-8fc9-a4aa78dce87f/91a04363-b2ef-4635-a046-7edf25ce7808.jpg
" target="_blank"> <img alt="Click for enlarged picture" src="
https://hosting.photobucket.com/95288841-8654-4bf7-8fc9-a4aa78dce87f/91a04363-b2ef-4635-a046-7edf25ce7808.jpg" width="600" /> </a></p>
<p>
<a href=" https://hosting.photobucket.com/95288841-8654-4bf7-8fc9-a4aa78dce87f/73256af5-fd5d-40b5-95e1-120e49c9be87.jpg
" target="_blank"> <img alt="Click for enlarged picture" src="
https://hosting.photobucket.com/95288841-8654-4bf7-8fc9-a4aa78dce87f/73256af5-fd5d-40b5-95e1-120e49c9be87.jpg" width="600" /> </a></p>
<p>
<a href=" https://hosting.photobucket.com/95288841-8654-4bf7-8fc9-a4aa78dce87f/979f9be5-23f3-4df9-91dc-ab71d6a10d64.jpg
" target="_blank"> <img alt="Click for enlarged picture" src="
https://hosting.photobucket.com/95288841-8654-4bf7-8fc9-a4aa78dce87f/979f9be5-23f3-4df9-91dc-ab71d6a10d64.jpg" width="600" /> </a></p>
<p>
<a href=" https://hosting.photobucket.com/95288841-8654-4bf7-8fc9-a4aa78dce87f/d0ff4379-183a-47b9-a740-9ddc283ebc29.jpg
" target="_blank"> <img alt="Click for enlarged picture" src="
https://hosting.photobucket.com/95288841-8654-4bf7-8fc9-a4aa78dce87f/d0ff4379-183a-47b9-a740-9ddc283ebc29.jpg" width="600" /> </a></p>
<p>
<a href=" https://hosting.photobucket.com/95288841-8654-4bf7-8fc9-a4aa78dce87f/4333e95e-bbbd-4f47-aaea-38a9c99e54d8.jpg
" target="_blank"> <img alt="Click for enlarged picture" src="
https://hosting.photobucket.com/95288841-8654-4bf7-8fc9-a4aa78dce87f/4333e95e-bbbd-4f47-aaea-38a9c99e54d8.jpg" width="600" /> </a></p>
<p>
<a href=" https://hosting.photobucket.com/95288841-8654-4bf7-8fc9-a4aa78dce87f/1372f8a2-b222-48ee-ae45-a90b5a354ef7.jpg
" target="_blank"> <img alt="Click for enlarged picture" src="
https://hosting.photobucket.com/95288841-8654-4bf7-8fc9-a4aa78dce87f/1372f8a2-b222-48ee-ae45-a90b5a354ef7.jpg" width="600" /> </a></p>
<p>
<a href=" https://hosting.photobucket.com/95288841-8654-4bf7-8fc9-a4aa78dce87f/6a1b4fd1-d982-4b06-9c5f-3cd40d6bf10a.jpg
" target="_blank"> <img alt="Click for enlarged picture" src="
https://hosting.photobucket.com/95288841-8654-4bf7-8fc9-a4aa78dce87f/6a1b4fd1-d982-4b06-9c5f-3cd40d6bf10a.jpg" width="600" /> </a></p>
<p>
<a href=" https://hosting.photobucket.com/95288841-8654-4bf7-8fc9-a4aa78dce87f/c2ec45e1-e0f3-463a-b254-cb2a38b53e14.jpg
" target="_blank"> <img alt="Click for enlarged picture" src="
https://hosting.photobucket.com/95288841-8654-4bf7-8fc9-a4aa78dce87f/c2ec45e1-e0f3-463a-b254-cb2a38b53e14.jpg" width="600" /> </a></p>
<p>
<a href=" https://hosting.photobucket.com/95288841-8654-4bf7-8fc9-a4aa78dce87f/17553b9a-0592-4f6a-a097-3f1a97e161f3.jpg
" target="_blank"> <img alt="Click for enlarged picture" src="
https://hosting.photobucket.com/95288841-8654-4bf7-8fc9-a4aa78dce87f/17553b9a-0592-4f6a-a097-3f1a97e161f3.jpg" width="600" /> </a></p>
<p>
<a href=" https://hosting.photobucket.com/95288841-8654-4bf7-8fc9-a4aa78dce87f/8658bd6b-dff2-4d24-8473-928d44d44480.jpg
" target="_blank"> <img alt="Click for enlarged picture" src="
https://hosting.photobucket.com/95288841-8654-4bf7-8fc9-a4aa78dce87f/8658bd6b-dff2-4d24-8473-928d44d44480.jpg" width="600" /> </a></p>
<p>
<a href=" https://hosting.photobucket.com/95288841-8654-4bf7-8fc9-a4aa78dce87f/ecab0ea7-f75b-4e31-a520-d088ad39fa17.jpg
" target="_blank"> <img alt="Click for enlarged picture" src="
https://hosting.photobucket.com/95288841-8654-4bf7-8fc9-a4aa78dce87f/ecab0ea7-f75b-4e31-a520-d088ad39fa17.jpg" width="600" /> </a></p>
<p>
<a href=" https://hosting.photobucket.com/95288841-8654-4bf7-8fc9-a4aa78dce87f/9495a2f5-8a82-41f2-abf4-9ade3db41d87.jpg
" target="_blank"> <img alt="Click for enlarged picture" src="
https://hosting.photobucket.com/95288841-8654-4bf7-8fc9-a4aa78dce87f/9495a2f5-8a82-41f2-abf4-9ade3db41d87.jpg" width="600" /> </a></p>
<p>
<a href=" https://hosting.photobucket.com/95288841-8654-4bf7-8fc9-a4aa78dce87f/362cc6fd-a5dd-474b-9b9f-aeab27d6dcfa.jpg
" target="_blank"> <img alt="Click for enlarged picture" src="
https://hosting.photobucket.com/95288841-8654-4bf7-8fc9-a4aa78dce87f/362cc6fd-a5dd-474b-9b9f-aeab27d6dcfa.jpg" width="600" /> </a></p>
<p>
It was a special honor for us to host our guest exhibitor, Ninoslav Luk, a miniaturist from Poreč, who introduced himself to us with his collection of historical dioramas.</p>
<p>
<a href=" https://hosting.photobucket.com/95288841-8654-4bf7-8fc9-a4aa78dce87f/ba1353de-e2bd-4340-9121-9056e287ed4a.jpg
" target="_blank"> <img alt="Click for enlarged picture" src="
https://hosting.photobucket.com/95288841-8654-4bf7-8fc9-a4aa78dce87f/ba1353de-e2bd-4340-9121-9056e287ed4a.jpg" width="600" /> </a></p>
<p>
<a href=" https://hosting.photobucket.com/95288841-8654-4bf7-8fc9-a4aa78dce87f/cea18506-1b50-4e5b-955c-0b9ca02d7826.jpg
" target="_blank"> <img alt="Click for enlarged picture" src="
https://hosting.photobucket.com/95288841-8654-4bf7-8fc9-a4aa78dce87f/cea18506-1b50-4e5b-955c-0b9ca02d7826.jpg" width="600" /> </a></p>
<p>
<a href=" https://hosting.photobucket.com/95288841-8654-4bf7-8fc9-a4aa78dce87f/1be85b41-e3b6-4536-b141-cd0da6eb38c1.jpg
" target="_blank"> <img alt="Click for enlarged picture" src="
https://hosting.photobucket.com/95288841-8654-4bf7-8fc9-a4aa78dce87f/1be85b41-e3b6-4536-b141-cd0da6eb38c1.jpg" width="600" /> </a></p>
<p>
<a href=" https://hosting.photobucket.com/95288841-8654-4bf7-8fc9-a4aa78dce87f/9e93b87d-ff3c-4b7b-8f06-5f9d3464a134.jpg
" target="_blank"> <img alt="Click for enlarged picture" src="
https://hosting.photobucket.com/95288841-8654-4bf7-8fc9-a4aa78dce87f/9e93b87d-ff3c-4b7b-8f06-5f9d3464a134.jpg" width="600" /> </a></p>
<p>
During the first weekend of the Exhibition, 21-22.02., we held the 18th annual international miniature painting competition <strong>Black Queen Hobby and Miniature Painting Competition</strong>!</p>
<p>
<a href=" https://hosting.photobucket.com/95288841-8654-4bf7-8fc9-a4aa78dce87f/3056fb09-f66c-4dea-80a8-a4e72407429a.jpg
" target="_blank"> <img alt="Click for enlarged picture" src="
https://hosting.photobucket.com/95288841-8654-4bf7-8fc9-a4aa78dce87f/3056fb09-f66c-4dea-80a8-a4e72407429a.jpg" width="600" /> </a></p>
<p>
As contestants arrived and registered for the competition, our hardworking staff photographed all the exhibits before sorting them into categories and carefully placing them in glass cases. There was no shortage of morning neccessities like coffe and doughnuts.</p>
<p>
<</p>
<p>
<a href=" https://hosting.photobucket.com/95288841-8654-4bf7-8fc9-a4aa78dce87f/1118089c-2b46-4a2c-b17d-dc92b66d1ffc.jpg
" target="_blank"> <img alt="Click for enlarged picture" src="
https://hosting.photobucket.com/95288841-8654-4bf7-8fc9-a4aa78dce87f/1118089c-2b46-4a2c-b17d-dc92b66d1ffc.jpg" width="600" /> </a></p>
<p>
<a href=" https://hosting.photobucket.com/95288841-8654-4bf7-8fc9-a4aa78dce87f/9fd3c272-9a69-4532-a09d-36497a20a820.jpg
" target="_blank"> <img alt="Click for enlarged picture" src="
https://hosting.photobucket.com/95288841-8654-4bf7-8fc9-a4aa78dce87f/9fd3c272-9a69-4532-a09d-36497a20a820.jpg" width="600" /> </a></p>
<p>
<a href=" https://hosting.photobucket.com/95288841-8654-4bf7-8fc9-a4aa78dce87f/86995e80-c502-45fb-80f5-c8fda27da3f9.jpg
" target="_blank"> <img alt="Click for enlarged picture" src="
https://hosting.photobucket.com/95288841-8654-4bf7-8fc9-a4aa78dce87f/86995e80-c502-45fb-80f5-c8fda27da3f9.jpg" width="600" /> </a></p>
<p>
By noon, all the display cases were full and the competition could officially begin.</p>
<p>
<a href=" https://hosting.photobucket.com/95288841-8654-4bf7-8fc9-a4aa78dce87f/bce59a4f-c3e3-4708-a3d6-25e81a894c24.jpg
" target="_blank"> <img alt="Click for enlarged picture" src="
https://hosting.photobucket.com/95288841-8654-4bf7-8fc9-a4aa78dce87f/bce59a4f-c3e3-4708-a3d6-25e81a894c24.jpg" width="600" /> </a></p>
<p>
<a href=" https://hosting.photobucket.com/95288841-8654-4bf7-8fc9-a4aa78dce87f/16a0a094-01aa-4e52-82cf-fdab00d74711.jpg
" target="_blank"> <img alt="Click for enlarged picture" src="
https://hosting.photobucket.com/95288841-8654-4bf7-8fc9-a4aa78dce87f/16a0a094-01aa-4e52-82cf-fdab00d74711.jpg" width="600" /> </a></p>
<p>
<a href=" https://hosting.photobucket.com/95288841-8654-4bf7-8fc9-a4aa78dce87f/0d3f4042-ff77-48d0-b332-add0fd08f7c3.jpg
" target="_blank"> <img alt="Click for enlarged picture" src="
https://hosting.photobucket.com/95288841-8654-4bf7-8fc9-a4aa78dce87f/0d3f4042-ff77-48d0-b332-add0fd08f7c3.jpg" width="600" /> </a></p>
<p>
<a href=" https://hosting.photobucket.com/95288841-8654-4bf7-8fc9-a4aa78dce87f/3711baf8-93f2-434a-aea9-a95288ca04dd.jpg
" target="_blank"> <img alt="Click for enlarged picture" src="
https://hosting.photobucket.com/95288841-8654-4bf7-8fc9-a4aa78dce87f/3711baf8-93f2-434a-aea9-a95288ca04dd.jpg" width="600" /> </a></p>
<p>
<a href=" https://hosting.photobucket.com/95288841-8654-4bf7-8fc9-a4aa78dce87f/53113b97-ec06-4409-95ba-95a5ad3f9720.jpg
" target="_blank"> <img alt="Click for enlarged picture" src="
https://hosting.photobucket.com/95288841-8654-4bf7-8fc9-a4aa78dce87f/53113b97-ec06-4409-95ba-95a5ad3f9720.jpg" width="600" /> </a></p>
<p>
<a href=" https://hosting.photobucket.com/95288841-8654-4bf7-8fc9-a4aa78dce87f/ab127858-193d-4976-bdb2-e27302722fca.jpg
" target="_blank"> <img alt="Click for enlarged picture" src="
https://hosting.photobucket.com/95288841-8654-4bf7-8fc9-a4aa78dce87f/ab127858-193d-4976-bdb2-e27302722fca.jpg" width="600" /> </a></p>
<p>
<a href=" https://hosting.photobucket.com/95288841-8654-4bf7-8fc9-a4aa78dce87f/3735af11-3fb6-4772-a8ff-5e0ff6ddf03a.jpg
" target="_blank"> <img alt="Click for enlarged picture" src="
https://hosting.photobucket.com/95288841-8654-4bf7-8fc9-a4aa78dce87f/3735af11-3fb6-4772-a8ff-5e0ff6ddf03a.jpg" width="600" /> </a></p>
<p>
<strong>Back To Basics workshops for the young at the Black Queen</strong></p>
<p>
This year, throughout the weekend, we organized miniature painting workshops for the youngest, who were able to paint one of our own miniatures designed specifically for this program for the first time!</p>
<p>
<a href=" https://hosting.photobucket.com/95288841-8654-4bf7-8fc9-a4aa78dce87f/6999be0c-8cc6-4947-a423-9427a2299724.jpg
" target="_blank"> <img alt="Click for enlarged picture" src="
https://hosting.photobucket.com/95288841-8654-4bf7-8fc9-a4aa78dce87f/6999be0c-8cc6-4947-a423-9427a2299724.jpg" width="600" /> </a></p>
<p>
<a href="https://hosting.photobucket.com/95288841-8654-4bf7-8fc9-a4aa78dce87f/835b05a5-f171-49df-afa6-da0692b89074.jpg" target="_blank"><img alt="Click for enlarged picture" src="https://hosting.photobucket.com/95288841-8654-4bf7-8fc9-a4aa78dce87f/835b05a5-f171-49df-afa6-da0692b89074.jpg" width="600" /></a></p>
<p>
<a href=" https://hosting.photobucket.com/95288841-8654-4bf7-8fc9-a4aa78dce87f/ef5dde13-84ee-4ea0-b9f3-28aaf703ef6d.jpg
" target="_blank"> <img alt="Click for enlarged picture" src="
https://hosting.photobucket.com/95288841-8654-4bf7-8fc9-a4aa78dce87f/ef5dde13-84ee-4ea0-b9f3-28aaf703ef6d.jpg" width="600" /> </a></p>
<p>
<strong>SELLERS' COURT</strong></p>
<p>
During the weekend we hosted our sponsors with their sales stands: Swood.si and Carta Magica.</p>
<p>
<a href=" https://hosting.photobucket.com/95288841-8654-4bf7-8fc9-a4aa78dce87f/5ee9a49f-a387-435a-9110-572402b7191d.jpg
" target="_blank"> <img alt="Click for enlarged picture" src="
https://hosting.photobucket.com/95288841-8654-4bf7-8fc9-a4aa78dce87f/5ee9a49f-a387-435a-9110-572402b7191d.jpg" width="600" /> </a></p>
<p>
<a href=" https://hosting.photobucket.com/95288841-8654-4bf7-8fc9-a4aa78dce87f/47cf600f-b1eb-4655-bf06-305f6f21d5d2.jpg
" target="_blank"> <img alt="Click for enlarged picture" src="
https://hosting.photobucket.com/95288841-8654-4bf7-8fc9-a4aa78dce87f/47cf600f-b1eb-4655-bf06-305f6f21d5d2.jpg" width="600" /> </a></p>
<p>
<strong>MINIATURE PAINTING WORKSHOPS</strong></p>
<p>
The ZZTK premises allow workshops to be held during the weekend in the cinema hall in the basement, so we also organized demonstration workshops during the weekend. The lecturers' work was recorded with a camera and projected onto the projection screen in the hall. Many thanks to our domestic and international lecturers: Anže Zorko (SLO), doc.dr.sc. Winton Afrić (CRO), Ivan Knezović (UMS Agram) and Petar Knezoviću (CRO).</p>
<p>
<a href=" https://hosting.photobucket.com/95288841-8654-4bf7-8fc9-a4aa78dce87f/e8d835be-ec99-49d7-bc9b-086e38573d1a.jpg
" target="_blank"> <img alt="Click for enlarged picture" src="
https://hosting.photobucket.com/95288841-8654-4bf7-8fc9-a4aa78dce87f/e8d835be-ec99-49d7-bc9b-086e38573d1a.jpg" width="600" /> </a></p>
<p>
<a href=" https://hosting.photobucket.com/95288841-8654-4bf7-8fc9-a4aa78dce87f/f3eba4c1-4637-4da9-8360-75f430355af4.jpg" target="_blank"> <img alt="Click for enlarged picture" src="
https://hosting.photobucket.com/95288841-8654-4bf7-8fc9-a4aa78dce87f/f3eba4c1-4637-4da9-8360-75f430355af4.jpg" width="600" /> </a></p>
<p>
<a href=" https://hosting.photobucket.com/95288841-8654-4bf7-8fc9-a4aa78dce87f/ef523854-4030-4579-aa38-403afda86c91.jpg
" target="_blank"> <img alt="Click for enlarged picture" src="
https://hosting.photobucket.com/95288841-8654-4bf7-8fc9-a4aa78dce87f/ef523854-4030-4579-aa38-403afda86c91.jpg" width="600" /> </a></p>
<p>
<a href=" https://hosting.photobucket.com/95288841-8654-4bf7-8fc9-a4aa78dce87f/dd0943c2-f4a8-40c3-b641-f6dcdd200380.jpg
" target="_blank"> <img alt="Click for enlarged picture" src="
https://hosting.photobucket.com/95288841-8654-4bf7-8fc9-a4aa78dce87f/dd0943c2-f4a8-40c3-b641-f6dcdd200380.jpg" width="600" /> </a></p>
<p>
<a href=" https://hosting.photobucket.com/95288841-8654-4bf7-8fc9-a4aa78dce87f/08b1626a-f6c7-43c9-b718-3e9a41b55ca6.jpg
" target="_blank"> <img alt="Click for enlarged picture" src="
https://hosting.photobucket.com/95288841-8654-4bf7-8fc9-a4aa78dce87f/08b1626a-f6c7-43c9-b718-3e9a41b55ca6.jpg" width="600" /> </a></p>
<p>
<a href=" https://hosting.photobucket.com/95288841-8654-4bf7-8fc9-a4aa78dce87f/91aca7f3-1af6-486d-b174-65079a63a1ea.jpg
" target="_blank"> <img alt="Click for enlarged picture" src="
https://hosting.photobucket.com/95288841-8654-4bf7-8fc9-a4aa78dce87f/91aca7f3-1af6-486d-b174-65079a63a1ea.jpg" width="600" /> </a></p>
<p>
<a href=" https://hosting.photobucket.com/95288841-8654-4bf7-8fc9-a4aa78dce87f/3821f2fb-fbe7-4096-adbc-7d8c981a3b56.jpg
" target="_blank"> <img alt="Click for enlarged picture" src="
https://hosting.photobucket.com/95288841-8654-4bf7-8fc9-a4aa78dce87f/3821f2fb-fbe7-4096-adbc-7d8c981a3b56.jpg" width="600" /> </a></p>
<p>
<a href=" https://hosting.photobucket.com/95288841-8654-4bf7-8fc9-a4aa78dce87f/2c7bb3c5-c0ec-4a96-b6bd-6a90ce5ce154.jpg
" target="_blank"> <img alt="Click for enlarged picture" src="
https://hosting.photobucket.com/95288841-8654-4bf7-8fc9-a4aa78dce87f/2c7bb3c5-c0ec-4a96-b6bd-6a90ce5ce154.jpg" width="600" /> </a></p>
<p>
<a href=" https://hosting.photobucket.com/95288841-8654-4bf7-8fc9-a4aa78dce87f/b646f4ee-21aa-4d12-8db3-6d33351d5aeb.jpg
" target="_blank"> <img alt="Click for enlarged picture" src="
https://hosting.photobucket.com/95288841-8654-4bf7-8fc9-a4aa78dce87f/b646f4ee-21aa-4d12-8db3-6d33351d5aeb.jpg" width="600" /> </a></p>
<p>
<a href=" https://hosting.photobucket.com/95288841-8654-4bf7-8fc9-a4aa78dce87f/fb5efc01-32cc-4119-90e3-188f51b30237.jpg
" target="_blank"> <img alt="Click for enlarged picture" src="
https://hosting.photobucket.com/95288841-8654-4bf7-8fc9-a4aa78dce87f/fb5efc01-32cc-4119-90e3-188f51b30237.jpg" width="600" /> </a></p>
<p>
<strong>SPEED PAINTING COMPETITION</strong></p>
<p>
We organized a speed painting competition on Sunday afternoon. Participants had 60 minutes to paint one wizrad, a miniature of our own design and production.</p>
<p>
<a href=" https://hosting.photobucket.com/95288841-8654-4bf7-8fc9-a4aa78dce87f/106417a6-a047-4e0d-9f81-87858806052f.jpg
" target="_blank"> <img alt="Click for enlarged picture" src="
https://hosting.photobucket.com/95288841-8654-4bf7-8fc9-a4aa78dce87f/106417a6-a047-4e0d-9f81-87858806052f.jpg" width="600" /> </a></p>
<p>
<a href=" https://hosting.photobucket.com/95288841-8654-4bf7-8fc9-a4aa78dce87f/ac6853c7-6e34-4e07-a996-8d7d12744b67.jpg
" target="_blank"> <img alt="Click for enlarged picture" src="
https://hosting.photobucket.com/95288841-8654-4bf7-8fc9-a4aa78dce87f/ac6853c7-6e34-4e07-a996-8d7d12744b67.jpg" width="600" /> </a></p>
<p>
<a href=" https://hosting.photobucket.com/95288841-8654-4bf7-8fc9-a4aa78dce87f/ccb155fa-52c5-4a99-9515-f69a6836dce7.jpg
" target="_blank"> <img alt="Click for enlarged picture" src="
https://hosting.photobucket.com/95288841-8654-4bf7-8fc9-a4aa78dce87f/ccb155fa-52c5-4a99-9515-f69a6836dce7.jpg" width="600" /> </a></p>
<p>
<a href=" https://hosting.photobucket.com/95288841-8654-4bf7-8fc9-a4aa78dce87f/a29fedd0-97ea-45b1-85f9-7ea62188b2b2.jpg
" target="_blank"><img alt="Click for enlarged picture" src="
https://hosting.photobucket.com/95288841-8654-4bf7-8fc9-a4aa78dce87f/a29fedd0-97ea-45b1-85f9-7ea62188b2b2.jpg" width="600" /></a></p>
<p>
With that, we came to the very end of this wonderful weekend and all that was left was the awarding of prizes and recognition to the winners.</p>
<p>
<a href=" https://hosting.photobucket.com/95288841-8654-4bf7-8fc9-a4aa78dce87f/046ca4c8-0ae7-415e-abd3-e131d580c3ad.jpg
" target="_blank"> <img alt="Click for enlarged picture" src="
https://hosting.photobucket.com/95288841-8654-4bf7-8fc9-a4aa78dce87f/046ca4c8-0ae7-415e-abd3-e131d580c3ad.jpg" width="600" /> </a></p>
<p>
<a href=" https://hosting.photobucket.com/95288841-8654-4bf7-8fc9-a4aa78dce87f/cec0dcef-7acb-4a77-89de-271ed5410672.jpg
" target="_blank"> <img alt="Click for enlarged picture" src="
https://hosting.photobucket.com/95288841-8654-4bf7-8fc9-a4aa78dce87f/cec0dcef-7acb-4a77-89de-271ed5410672.jpg" width="600" /> </a></p>
<p>
<a href=" https://hosting.photobucket.com/95288841-8654-4bf7-8fc9-a4aa78dce87f/a495a5fc-31a2-4979-a970-0fa22c334354.jpg
" target="_blank"> <img alt="Click for enlarged picture" src="
https://hosting.photobucket.com/95288841-8654-4bf7-8fc9-a4aa78dce87f/a495a5fc-31a2-4979-a970-0fa22c334354.jpg" width="600" /> </a></p>
<p>
<strong>AGRAM ARENA – Leaving Asphodel Necropolis28 Campaign</strong></p>
<p>
During the weekend of February 21-22, we held a new international competition, Agram Arena! This time it was the turn of the tabletop strategy game Necropolis28, for which our members designed a two-day campaign. Each participant created their own gang of soldiers, and the vast majority also created their own boards.</p>
<p>
<a href=" https://hosting.photobucket.com/95288841-8654-4bf7-8fc9-a4aa78dce87f/ac69b182-4bfc-4575-a6d3-fb3c8baba342.jpg
" target="_blank"> <img alt="Click for enlarged picture" src="
https://hosting.photobucket.com/95288841-8654-4bf7-8fc9-a4aa78dce87f/ac69b182-4bfc-4575-a6d3-fb3c8baba342.jpg" width="600" /> </a></p>
<p>
<a href=" https://hosting.photobucket.com/95288841-8654-4bf7-8fc9-a4aa78dce87f/289fed7b-e058-42d8-ba2d-cbd0463e98da.jpg
" target="_blank"> <img alt="Click for enlarged picture" src="
https://hosting.photobucket.com/95288841-8654-4bf7-8fc9-a4aa78dce87f/289fed7b-e058-42d8-ba2d-cbd0463e98da.jpg" width="600" /> </a></p>
<p>
<a href=" https://hosting.photobucket.com/95288841-8654-4bf7-8fc9-a4aa78dce87f/d92ebbee-859d-4441-8386-3d760b20b7a7.jpg
" target="_blank"> <img alt="Click for enlarged picture" src="
https://hosting.photobucket.com/95288841-8654-4bf7-8fc9-a4aa78dce87f/d92ebbee-859d-4441-8386-3d760b20b7a7.jpg" width="600" /> </a></p>
<p>
<a href=" https://hosting.photobucket.com/95288841-8654-4bf7-8fc9-a4aa78dce87f/09c59798-7871-425e-a075-3ca1cd91768a.jpg
" target="_blank"> <img alt="Click for enlarged picture" src="
https://hosting.photobucket.com/95288841-8654-4bf7-8fc9-a4aa78dce87f/09c59798-7871-425e-a075-3ca1cd91768a.jpg" width="600" /> </a></p>
<p>
<a href=" https://hosting.photobucket.com/95288841-8654-4bf7-8fc9-a4aa78dce87f/b2f3edc8-5a23-4552-9a2a-4027b286f327.jpg
" target="_blank"> <img alt="Click for enlarged picture" src="
https://hosting.photobucket.com/95288841-8654-4bf7-8fc9-a4aa78dce87f/b2f3edc8-5a23-4552-9a2a-4027b286f327.jpg" width="600" /> </a></p>
<p>
<a href=" https://hosting.photobucket.com/95288841-8654-4bf7-8fc9-a4aa78dce87f/2a9f43ac-b531-4746-b7bb-ac5a3356aab0.jpg
" target="_blank"> <img alt="Click for enlarged picture" src="
https://hosting.photobucket.com/95288841-8654-4bf7-8fc9-a4aa78dce87f/2a9f43ac-b531-4746-b7bb-ac5a3356aab0.jpg" width="600" /> </a></p>
<p>
<strong>EVENTS ON WEEKDAYS DURING THE EXHIBITION </strong></p>
<p>
Over the next two weeks, our volunteers held open miniature painting workshops on weekdays from 4:00 PM to 8:00 PM. Miniature painting workstations were set up where our visitors could paint miniatures we had prepared (or their own if they had brought them) using our materials and tools.</p>
<p>
<a href=" https://hosting.photobucket.com/95288841-8654-4bf7-8fc9-a4aa78dce87f/6edf7765-42b5-417a-820f-fa5d907179a7.jpg
" target="_blank"> <img alt="Click for enlarged picture" src="
https://hosting.photobucket.com/95288841-8654-4bf7-8fc9-a4aa78dce87f/6edf7765-42b5-417a-820f-fa5d907179a7.jpg" width="600" /> </a></p>
<p>
<a href=" https://hosting.photobucket.com/95288841-8654-4bf7-8fc9-a4aa78dce87f/c084ebe2-f57b-4519-9b31-29bdc1155887.jpg
" target="_blank"> <img alt="Click for enlarged picture" src="
https://hosting.photobucket.com/95288841-8654-4bf7-8fc9-a4aa78dce87f/c084ebe2-f57b-4519-9b31-29bdc1155887.jpg" width="600" /> </a></p>
<p>
<a href=" https://hosting.photobucket.com/95288841-8654-4bf7-8fc9-a4aa78dce87f/37ff2272-f9b0-4b16-a363-1e6f6688c866.jpg
" target="_blank"> <img alt="Click for enlarged picture" src="
https://hosting.photobucket.com/95288841-8654-4bf7-8fc9-a4aa78dce87f/37ff2272-f9b0-4b16-a363-1e6f6688c866.jpg" width="600" /> </a></p>
<p>
<a href=" https://hosting.photobucket.com/95288841-8654-4bf7-8fc9-a4aa78dce87f/5f4f7968-ff50-4a01-98da-6ce8562930b4.jpg
" target="_blank"> <img alt="Click for enlarged picture" src="
https://hosting.photobucket.com/95288841-8654-4bf7-8fc9-a4aa78dce87f/5f4f7968-ff50-4a01-98da-6ce8562930b4.jpg" width="600" /> </a></p>
<p>
<a href=" https://hosting.photobucket.com/95288841-8654-4bf7-8fc9-a4aa78dce87f/cbb45319-d488-483c-bf9d-9af29852fc74.jpg
" target="_blank"> <img alt="Click for enlarged picture" src="
https://hosting.photobucket.com/95288841-8654-4bf7-8fc9-a4aa78dce87f/cbb45319-d488-483c-bf9d-9af29852fc74.jpg" width="600" /> </a></p>
<p>
<a href=" https://hosting.photobucket.com/95288841-8654-4bf7-8fc9-a4aa78dce87f/3dcca26c-d549-4af3-812a-a4a81b9a2310.jpg
" target="_blank"> <img alt="Click for enlarged picture" src="
https://hosting.photobucket.com/95288841-8654-4bf7-8fc9-a4aa78dce87f/3dcca26c-d549-4af3-812a-a4a81b9a2310.jpg" width="600" /> </a></p>
<p>
<a href=" https://hosting.photobucket.com/95288841-8654-4bf7-8fc9-a4aa78dce87f/4adf0fb6-3eab-4b40-b32d-d03eab4a9892.jpg
" target="_blank"> <img alt="Click for enlarged picture" src="
https://hosting.photobucket.com/95288841-8654-4bf7-8fc9-a4aa78dce87f/4adf0fb6-3eab-4b40-b32d-d03eab4a9892.jpg" width="600" /> </a></p>
<p>
<a href=" https://hosting.photobucket.com/95288841-8654-4bf7-8fc9-a4aa78dce87f/4732b58a-9a65-4d1c-a7d5-25513d34b108.jpg
" target="_blank"> <img alt="Click for enlarged picture" src="
https://hosting.photobucket.com/95288841-8654-4bf7-8fc9-a4aa78dce87f/4732b58a-9a65-4d1c-a7d5-25513d34b108.jpg" width="600" /> </a></p>
<p>
<a href=" https://hosting.photobucket.com/95288841-8654-4bf7-8fc9-a4aa78dce87f/274be330-31d5-4e25-95db-ec2f423a003c.jpg
" target="_blank"> <img alt="Click for enlarged picture" src="
https://hosting.photobucket.com/95288841-8654-4bf7-8fc9-a4aa78dce87f/274be330-31d5-4e25-95db-ec2f423a003c.jpg" width="600" /> </a></p>
<p>
<a href=" https://hosting.photobucket.com/95288841-8654-4bf7-8fc9-a4aa78dce87f/8e7b0a80-0f46-4d70-9789-a46976c713d2.jpg
" target="_blank"> <img alt="Click for enlarged picture" src="
https://hosting.photobucket.com/95288841-8654-4bf7-8fc9-a4aa78dce87f/8e7b0a80-0f46-4d70-9789-a46976c713d2.jpg" width="600" /> </a></p>
<p>
<a href=" https://hosting.photobucket.com/95288841-8654-4bf7-8fc9-a4aa78dce87f/8bbd4e96-b911-4f26-80fe-b1c57f29027b.jpg
" target="_blank"> <img alt="Click for enlarged picture" src="
https://hosting.photobucket.com/95288841-8654-4bf7-8fc9-a4aa78dce87f/8bbd4e96-b911-4f26-80fe-b1c57f29027b.jpg" width="600" /> </a></p>
<p>
<a href=" https://hosting.photobucket.com/95288841-8654-4bf7-8fc9-a4aa78dce87f/203a27be-8f10-459d-89b9-befb6b636b74.jpg
" target="_blank"> <img alt="Click for enlarged picture" src="
https://hosting.photobucket.com/95288841-8654-4bf7-8fc9-a4aa78dce87f/203a27be-8f10-459d-89b9-befb6b636b74.jpg" width="600" /> </a></p>
<p>
<a href=" https://hosting.photobucket.com/95288841-8654-4bf7-8fc9-a4aa78dce87f/5dc4358f-19d8-475f-a4af-9c29e9ed18d7.jpg
" target="_blank"> <img alt="Click for enlarged picture" src="
https://hosting.photobucket.com/95288841-8654-4bf7-8fc9-a4aa78dce87f/5dc4358f-19d8-475f-a4af-9c29e9ed18d7.jpg" width="600" /> </a></p>
<p>
<strong>BACK TO BASICS MINIATURE PAINTING WORKSHOPS FOR YOUNG</strong></p>
<p>
On weekdays from 17:00 to 18:00, we held our new workshops for the youngest, in which our youngest participants painted their first miniatures.</p>
<p>
<a href=" https://hosting.photobucket.com/95288841-8654-4bf7-8fc9-a4aa78dce87f/948af139-8fb5-4e28-a27c-404466e70d05.jpg
" target="_blank"> <img alt="Click for enlarged picture" src="
https://hosting.photobucket.com/95288841-8654-4bf7-8fc9-a4aa78dce87f/948af139-8fb5-4e28-a27c-404466e70d05.jpg" width="600" /> </a></p>
<p>
<a href=" https://hosting.photobucket.com/95288841-8654-4bf7-8fc9-a4aa78dce87f/bb3e20c2-bb21-4a3d-863a-74de08261467.jpg
" target="_blank"> <img alt="Click for enlarged picture" src="
https://hosting.photobucket.com/95288841-8654-4bf7-8fc9-a4aa78dce87f/bb3e20c2-bb21-4a3d-863a-74de08261467.jpg" width="600" /> </a></p>
<p>
<a href=" https://hosting.photobucket.com/95288841-8654-4bf7-8fc9-a4aa78dce87f/7316c760-98e3-4e3f-9261-d138aa7a5a6a.jpg
" target="_blank"> <img alt="Click for enlarged picture" src="
https://hosting.photobucket.com/95288841-8654-4bf7-8fc9-a4aa78dce87f/7316c760-98e3-4e3f-9261-d138aa7a5a6a.jpg" width="600" /> </a></p>
<p>
<a href=" https://hosting.photobucket.com/95288841-8654-4bf7-8fc9-a4aa78dce87f/68934b39-3d1f-4f43-b967-14b73c41a39e.jpg
" target="_blank"> <img alt="Click for enlarged picture" src="
https://hosting.photobucket.com/95288841-8654-4bf7-8fc9-a4aa78dce87f/68934b39-3d1f-4f43-b967-14b73c41a39e.jpg" width="600" /> </a></p>
<p>
<a href=" https://hosting.photobucket.com/95288841-8654-4bf7-8fc9-a4aa78dce87f/46125bce-a28d-494f-873a-3aeabdc1d6c2.jpg
" target="_blank"> <img alt="Click for enlarged picture" src="
https://hosting.photobucket.com/95288841-8654-4bf7-8fc9-a4aa78dce87f/46125bce-a28d-494f-873a-3aeabdc1d6c2.jpg" width="600" /> </a></p>
<p>
<a href=" https://hosting.photobucket.com/95288841-8654-4bf7-8fc9-a4aa78dce87f/3c58e0ad-77a9-44c8-b6bf-d9a55c514d43.jpg
" target="_blank"> <img alt="Click for enlarged picture" src="
https://hosting.photobucket.com/95288841-8654-4bf7-8fc9-a4aa78dce87f/3c58e0ad-77a9-44c8-b6bf-d9a55c514d43.jpg" width="600" /> </a></p>
<p>
<a href=" https://hosting.photobucket.com/95288841-8654-4bf7-8fc9-a4aa78dce87f/f891f0f0-051b-40ee-9676-cb03b0a9811b.jpg
" target="_blank"> <img alt="Click for enlarged picture" src="
https://hosting.photobucket.com/95288841-8654-4bf7-8fc9-a4aa78dce87f/f891f0f0-051b-40ee-9676-cb03b0a9811b.jpg" width="600" /> </a></p>
<p>
<strong>AGRAM LEGO SECTION lecture: FW-14b – An F1 racecar for the future</strong></p>
<p>
On Wednesday, February 25, 2026, as part of the activities of our Agram Lego Section, our resident mechanical engineer Marko Paunović gave a lecture on the topic of the F1 racecar from 1992. Admission to the lecture was free, and upon completion, a LEGO model of the racecar was made by members of the Lego section</p>
<p>
<a href=" https://hosting.photobucket.com/95288841-8654-4bf7-8fc9-a4aa78dce87f/b2e14b1c-daa4-4314-8685-184377bc7e28.jpg
" target="_blank"> <img alt="Click for enlarged picture" src="
https://hosting.photobucket.com/95288841-8654-4bf7-8fc9-a4aa78dce87f/b2e14b1c-daa4-4314-8685-184377bc7e28.jpg" width="600" /> </a></p>
<p>
<a href=" https://hosting.photobucket.com/95288841-8654-4bf7-8fc9-a4aa78dce87f/31fb439a-77d3-4418-83ff-66c3af279cca.jpg" target="_blank"> <img alt="Click for enlarged picture" src="
https://hosting.photobucket.com/95288841-8654-4bf7-8fc9-a4aa78dce87f/31fb439a-77d3-4418-83ff-66c3af279cca.jpg" width="600" /> </a></p>
<p>
<a href=" https://hosting.photobucket.com/95288841-8654-4bf7-8fc9-a4aa78dce87f/bfcaf282-6be8-4b52-a3ed-c91137457876.jpg
" target="_blank"> <img alt="Click for enlarged picture" src="
https://hosting.photobucket.com/95288841-8654-4bf7-8fc9-a4aa78dce87f/bfcaf282-6be8-4b52-a3ed-c91137457876.jpg" width="600" /> </a></p>
<p>
<a href=" https://hosting.photobucket.com/95288841-8654-4bf7-8fc9-a4aa78dce87f/ce70fc61-9e1a-4169-aaad-8b67417656c0.jpg
" target="_blank"> <img alt="Click for enlarged picture" src="
https://hosting.photobucket.com/95288841-8654-4bf7-8fc9-a4aa78dce87f/ce70fc61-9e1a-4169-aaad-8b67417656c0.jpg" width="600" /> </a></p>
<p>
<a href=" https://hosting.photobucket.com/95288841-8654-4bf7-8fc9-a4aa78dce87f/94ca0e36-8710-458d-8194-9f71299f4d74.jpg
" target="_blank"> <img alt="Click for enlarged picture" src="
https://hosting.photobucket.com/95288841-8654-4bf7-8fc9-a4aa78dce87f/94ca0e36-8710-458d-8194-9f71299f4d74.jpg" width="600" /> </a></p>
<p>
<a href=" https://hosting.photobucket.com/95288841-8654-4bf7-8fc9-a4aa78dce87f/c6771f72-7191-4ca3-a792-3bb1ab3897b1.jpg
" target="_blank"> <img alt="Click for enlarged picture" src="
https://hosting.photobucket.com/95288841-8654-4bf7-8fc9-a4aa78dce87f/c6771f72-7191-4ca3-a792-3bb1ab3897b1.jpg" width="600" /> </a></p>
<p>
<a href=" https://hosting.photobucket.com/95288841-8654-4bf7-8fc9-a4aa78dce87f/c8fcfcb6-09f2-4398-a2fb-fa5065771e01.jpg
" target="_blank"> <img alt="Click for enlarged picture" src="
https://hosting.photobucket.com/95288841-8654-4bf7-8fc9-a4aa78dce87f/c8fcfcb6-09f2-4398-a2fb-fa5065771e01.jpg" width="600" /> </a></p>
<p>
<a href=" https://hosting.photobucket.com/95288841-8654-4bf7-8fc9-a4aa78dce87f/d7e187a8-d5b1-433b-b30d-091e54dcdddf.jpg
" target="_blank"> <img alt="Click for enlarged picture" src="
https://hosting.photobucket.com/95288841-8654-4bf7-8fc9-a4aa78dce87f/d7e187a8-d5b1-433b-b30d-091e54dcdddf.jpg" width="600" /> </a></p>
<p>
During the second weekend of the Exhibition, 28.02.-01.03., we organized a <strong>MINIATURE PAINTING WORKSHOP - Grimdark</strong>.</p>
<p>
The workshop was held over two days (the entire weekend) and participants painted up to three different figures for the game Trench Crusade. The focus of these lectures was on painting the popular grimdark style minis. The workshop presented paints and equipment, figure preparation, several miniature painting techniques from basic to advanced, and techniques and tricks for quickly and efficiently painting larger quantities of figures at once. Water-based acrylic paints were used as part of the workshop.</p>
<p>
<a href=" https://hosting.photobucket.com/95288841-8654-4bf7-8fc9-a4aa78dce87f/733d94b2-8e8d-4a4e-accd-b9168e32577e.jpg
" target="_blank"> <img alt="Click for enlarged picture" src="
https://hosting.photobucket.com/95288841-8654-4bf7-8fc9-a4aa78dce87f/733d94b2-8e8d-4a4e-accd-b9168e32577e.jpg
" width="600" /> </a></p>
<p>
<a href=" https://hosting.photobucket.com/95288841-8654-4bf7-8fc9-a4aa78dce87f/41020062-45b9-41cd-a357-fa23a389f390.jpg
" target="_blank"> <img alt="Click for enlarged picture" src="
https://hosting.photobucket.com/95288841-8654-4bf7-8fc9-a4aa78dce87f/41020062-45b9-41cd-a357-fa23a389f390.jpg
" width="600" /> </a></p>
<p>
<a href=" https://hosting.photobucket.com/95288841-8654-4bf7-8fc9-a4aa78dce87f/0c07cc55-596d-494d-972b-cd6a0dd6b8b7.jpg
" target="_blank"> <img alt="Click for enlarged picture" src="
https://hosting.photobucket.com/95288841-8654-4bf7-8fc9-a4aa78dce87f/0c07cc55-596d-494d-972b-cd6a0dd6b8b7.jpg" width="600" /> </a></p>
<p>
<a href=" https://hosting.photobucket.com/95288841-8654-4bf7-8fc9-a4aa78dce87f/c17dd356-08b1-48e1-b895-6296aed7f818.jpg
" target="_blank"> <img alt="Click for enlarged picture" src="
https://hosting.photobucket.com/95288841-8654-4bf7-8fc9-a4aa78dce87f/c17dd356-08b1-48e1-b895-6296aed7f818.jpg" width="600" /> </a></p>
<p>
On Wednesday 04.03.2026. the annual <strong>session of the Assembly</strong> was held, where we determined the guidelines for work in 2026.</p>
<p>
,</p>
<p>
<a href=" https://hosting.photobucket.com/95288841-8654-4bf7-8fc9-a4aa78dce87f/59484bd0-7edc-4aed-a04e-ae42900ba3e6.jpg
" target="_blank"> <img alt="Click for enlarged picture" src="
https://hosting.photobucket.com/95288841-8654-4bf7-8fc9-a4aa78dce87f/59484bd0-7edc-4aed-a04e-ae42900ba3e6.jpg
" width="600" /> </a></p>
<p>
On Sunday 08.03.2026. The exhibition was over, our exhibits safely stored, and the Gallery cleaned.</p>
<p>
<a href=" https://hosting.photobucket.com/95288841-8654-4bf7-8fc9-a4aa78dce87f/98af4280-0956-4cdb-b4a9-da40e3a5a44a.jpg
" target="_blank"> <img alt="Click for enlarged picture" src="
https://hosting.photobucket.com/95288841-8654-4bf7-8fc9-a4aa78dce87f/98af4280-0956-4cdb-b4a9-da40e3a5a44a.jpg" width="600" /> </a></p>
<p>
<a href=" https://hosting.photobucket.com/95288841-8654-4bf7-8fc9-a4aa78dce87f/3259b35e-1fc2-4a99-a3c5-c7984958d72b.jpg
" target="_blank"> <img alt="Click for enlarged picture" src="
https://hosting.photobucket.com/95288841-8654-4bf7-8fc9-a4aa78dce87f/3259b35e-1fc2-4a99-a3c5-c7984958d72b.jpg" width="600" /> </a></p>
<p>
The most important part of every year when holding this Exhibition is the social aspect, the socializing of our members both among themselves and with our international friends who visit us! With these few photos from our joint gatherings, we greet you until next year!</p>
<p>
<a href=" https://hosting.photobucket.com/95288841-8654-4bf7-8fc9-a4aa78dce87f/b9168e23-79b2-4d81-8a7d-7534062881a7.jpg
" target="_blank"> <img alt="Click for enlarged picture" src="
https://hosting.photobucket.com/95288841-8654-4bf7-8fc9-a4aa78dce87f/b9168e23-79b2-4d81-8a7d-7534062881a7.jpg " width="600" /> </a></p>
<p>
<a href=" https://hosting.photobucket.com/95288841-8654-4bf7-8fc9-a4aa78dce87f/edff925e-916c-4d78-953e-210abf3753d4.jpg
" target="_blank"> <img alt="Click for enlarged picture" src="
https://hosting.photobucket.com/95288841-8654-4bf7-8fc9-a4aa78dce87f/edff925e-916c-4d78-953e-210abf3753d4.jpg " width="600" /> </a></p>
<p>
<a href=" https://hosting.photobucket.com/95288841-8654-4bf7-8fc9-a4aa78dce87f/8bcb48fa-466b-43f8-8a4b-f15f6794b21e.jpg
" target="_blank"> <img alt="Click for enlarged picture" src="
https://hosting.photobucket.com/95288841-8654-4bf7-8fc9-a4aa78dce87f/8bcb48fa-466b-43f8-8a4b-f15f6794b21e.jpg" width="600" /> </a></p>
"
["content_hrv"]=>
string(42265) "<p>
<a href=" https://hosting.photobucket.com/95288841-8654-4bf7-8fc9-a4aa78dce87f/dc756f84-867d-4df4-acd8-5d43775cafc2.jpg
" target="_blank"> <img alt="Click for enlarged picture" src="
https://hosting.photobucket.com/95288841-8654-4bf7-8fc9-a4aa78dce87f/dc756f84-867d-4df4-acd8-5d43775cafc2.jpg" width="600" /> </a></p>
<p>
<strong>Izložba minijatura i maketa "Agram 2026"</strong> održala se ove godine od 19.2. do 08.03. Postavljanje izložbe je održano u srijedu 18.2. i sudjelovao je velik broj članova kao i prijatelja Udruge koji su izlagali svoje radove.</p>
<p>
<a href=" https://hosting.photobucket.com/95288841-8654-4bf7-8fc9-a4aa78dce87f/8529d6d4-76ea-4872-a9e6-748e04223a4e.jpg
" target="_blank"> <img alt="Click for enlarged picture" src="
https://hosting.photobucket.com/95288841-8654-4bf7-8fc9-a4aa78dce87f/8529d6d4-76ea-4872-a9e6-748e04223a4e.jpg
" width="600" /> </a></p>
<p>
<a href=" https://hosting.photobucket.com/95288841-8654-4bf7-8fc9-a4aa78dce87f/f3038937-f001-4ceb-b725-a330fcd64cee.jpg
" target="_blank"> <img alt="Click for enlarged picture" src="
https://hosting.photobucket.com/95288841-8654-4bf7-8fc9-a4aa78dce87f/f3038937-f001-4ceb-b725-a330fcd64cee.jpg
" width="600" /> </a></p>
<p>
<a href=" https://hosting.photobucket.com/95288841-8654-4bf7-8fc9-a4aa78dce87f/3575379e-e068-49e2-9d4d-c9a49531fdc2.jpg
" target="_blank"> <img alt="Click for enlarged picture" src="
https://hosting.photobucket.com/95288841-8654-4bf7-8fc9-a4aa78dce87f/3575379e-e068-49e2-9d4d-c9a49531fdc2.jpg" width="600" /> </a></p>
<p>
<a href=" https://hosting.photobucket.com/95288841-8654-4bf7-8fc9-a4aa78dce87f/e51713c7-2add-4f8f-ae37-e6eba25badff.jpg
" target="_blank"> <img alt="Click for enlarged picture" src="
https://hosting.photobucket.com/95288841-8654-4bf7-8fc9-a4aa78dce87f/e51713c7-2add-4f8f-ae37-e6eba25badff.jpg" width="600" /> </a></p>
<p>
<a href=" https://hosting.photobucket.com/95288841-8654-4bf7-8fc9-a4aa78dce87f/9c0bb546-50a8-483d-aeab-ab3b2ce9f094.jpg
" target="_blank"> <img alt="Click for enlarged picture" src="
https://hosting.photobucket.com/95288841-8654-4bf7-8fc9-a4aa78dce87f/9c0bb546-50a8-483d-aeab-ab3b2ce9f094.jpg" width="600" /> </a></p>
<p>
Otvorenje Izložbe održalo se u četvrtak, 19.2.2026. s početkom u 18:00h. Izložba je organizirana povodom našeg dvadeset trećeg rođendana.</p>
<p>
<a href=" https://hosting.photobucket.com/95288841-8654-4bf7-8fc9-a4aa78dce87f/71c7bfc2-1ffc-43b9-9d5a-53e009f6b86d.jpg
" target="_blank"> <img alt="Click for enlarged picture" src="
https://hosting.photobucket.com/95288841-8654-4bf7-8fc9-a4aa78dce87f/71c7bfc2-1ffc-43b9-9d5a-53e009f6b86d.jpg" width="600" /> </a></p>
<p>
<a href=" https://hosting.photobucket.com/95288841-8654-4bf7-8fc9-a4aa78dce87f/007b4701-1d7c-4a67-a599-0539a2aa3191.jpg
" target="_blank"> <img alt="Click for enlarged picture" src="
https://hosting.photobucket.com/95288841-8654-4bf7-8fc9-a4aa78dce87f/007b4701-1d7c-4a67-a599-0539a2aa3191.jpg" width="600" /> </a></p>
<p>
<a href=" https://hosting.photobucket.com/95288841-8654-4bf7-8fc9-a4aa78dce87f/2c8090e2-8b95-4368-bb48-98876d680e15.jpg
" target="_blank"> <img alt="Click for enlarged picture" src="
https://hosting.photobucket.com/95288841-8654-4bf7-8fc9-a4aa78dce87f/2c8090e2-8b95-4368-bb48-98876d680e15.jpg" width="600" /> </a></p>
<p>
<a href=" https://hosting.photobucket.com/95288841-8654-4bf7-8fc9-a4aa78dce87f/375768ad-a8bb-49bf-9845-e46c896ba7ec.jpg
" target="_blank"> <img alt="Click for enlarged picture" src="
https://hosting.photobucket.com/95288841-8654-4bf7-8fc9-a4aa78dce87f/375768ad-a8bb-49bf-9845-e46c896ba7ec.jpg" width="600" /> </a></p>
<p>
<a href=" https://hosting.photobucket.com/95288841-8654-4bf7-8fc9-a4aa78dce87f/a93de974-4ccb-4876-85b0-4d066ae402b3.jpg
" target="_blank"> <img alt="Click for enlarged picture" src="
https://hosting.photobucket.com/95288841-8654-4bf7-8fc9-a4aa78dce87f/a93de974-4ccb-4876-85b0-4d066ae402b3.jpg" width="600" /> </a></p>
<p>
<a href=" https://hosting.photobucket.com/95288841-8654-4bf7-8fc9-a4aa78dce87f/d323ccc9-1b9a-4cb2-8adf-7019b0e217f4.jpg
" target="_blank"> <img alt="Click for enlarged picture" src="
https://hosting.photobucket.com/95288841-8654-4bf7-8fc9-a4aa78dce87f/d323ccc9-1b9a-4cb2-8adf-7019b0e217f4.jpg" width="600" /> </a></p>
<p>
<a href=" https://hosting.photobucket.com/95288841-8654-4bf7-8fc9-a4aa78dce87f/a5a66447-2d76-47ae-866d-4d512ef469a5.jpg
" target="_blank"> <img alt="Click for enlarged picture" src="
https://hosting.photobucket.com/95288841-8654-4bf7-8fc9-a4aa78dce87f/a5a66447-2d76-47ae-866d-4d512ef469a5.jpg" width="600" /> </a></p>
<p>
<a href=" https://hosting.photobucket.com/95288841-8654-4bf7-8fc9-a4aa78dce87f/3e7bcfc9-ba02-4f94-a6c3-79dfaea3639e.jpg
" target="_blank"> <img alt="Click for enlarged picture" src="
https://hosting.photobucket.com/95288841-8654-4bf7-8fc9-a4aa78dce87f/3e7bcfc9-ba02-4f94-a6c3-79dfaea3639e.jpg" width="600" /> </a></p>
<p>
<a href=" https://hosting.photobucket.com/95288841-8654-4bf7-8fc9-a4aa78dce87f/24e79466-4a9e-4b10-970c-caad235d260d.jpg
" target="_blank"> <img alt="Click for enlarged picture" src="
https://hosting.photobucket.com/95288841-8654-4bf7-8fc9-a4aa78dce87f/24e79466-4a9e-4b10-970c-caad235d260d.jpg" width="600" /> </a></p>
<p>
Kao i uvijek, Izložba je prikazivala presjek rada Udruge, njenih članova, polaznika njenih tečajeva i radionica te članova FB grupe Miniature Painters Croatia. U velikom broju vitrina našle su se brojne minijature za stolne strateške igre, igre na tabli, a cijela jedna vitrina posvećena je nagrađenim izlošcima sa prethodnih minijaturističkih natjecanja. Nekoliko vitrina bilo je posvećeno projektima koje Udruga već 23 godinu provodi poput Knjižnice i čitaonice UMS „Agram“, Radionice za izradu prostornih maketa i Radionice bojanja minijatura, ali i novih poput Agram Group Build, Agram Lego Sekcije i Back to Basics radionica bojanja za najmlađe.</p>
<p>
<a href=" https://hosting.photobucket.com/95288841-8654-4bf7-8fc9-a4aa78dce87f/fca84936-af71-44d3-9a4c-faeb26163899.jpg
" target="_blank"> <img alt="Click for enlarged picture" src="
https://hosting.photobucket.com/95288841-8654-4bf7-8fc9-a4aa78dce87f/fca84936-af71-44d3-9a4c-faeb26163899.jpg" width="600" /> </a></p>
<p>
<a href=" https://hosting.photobucket.com/95288841-8654-4bf7-8fc9-a4aa78dce87f/459bc5ac-8702-46f9-93b4-547deaabdef4.jpg
" target="_blank"> <img alt="Click for enlarged picture" src="
https://hosting.photobucket.com/95288841-8654-4bf7-8fc9-a4aa78dce87f/459bc5ac-8702-46f9-93b4-547deaabdef4.jpg" width="600" /> </a></p>
<p>
<a href=" https://hosting.photobucket.com/95288841-8654-4bf7-8fc9-a4aa78dce87f/91a04363-b2ef-4635-a046-7edf25ce7808.jpg
" target="_blank"> <img alt="Click for enlarged picture" src="
https://hosting.photobucket.com/95288841-8654-4bf7-8fc9-a4aa78dce87f/91a04363-b2ef-4635-a046-7edf25ce7808.jpg" width="600" /> </a></p>
<p>
<a href=" https://hosting.photobucket.com/95288841-8654-4bf7-8fc9-a4aa78dce87f/73256af5-fd5d-40b5-95e1-120e49c9be87.jpg
" target="_blank"> <img alt="Click for enlarged picture" src="
https://hosting.photobucket.com/95288841-8654-4bf7-8fc9-a4aa78dce87f/73256af5-fd5d-40b5-95e1-120e49c9be87.jpg" width="600" /> </a></p>
<p>
<a href=" https://hosting.photobucket.com/95288841-8654-4bf7-8fc9-a4aa78dce87f/979f9be5-23f3-4df9-91dc-ab71d6a10d64.jpg
" target="_blank"> <img alt="Click for enlarged picture" src="
https://hosting.photobucket.com/95288841-8654-4bf7-8fc9-a4aa78dce87f/979f9be5-23f3-4df9-91dc-ab71d6a10d64.jpg" width="600" /> </a></p>
<p>
<a href=" https://hosting.photobucket.com/95288841-8654-4bf7-8fc9-a4aa78dce87f/d0ff4379-183a-47b9-a740-9ddc283ebc29.jpg
" target="_blank"> <img alt="Click for enlarged picture" src="
https://hosting.photobucket.com/95288841-8654-4bf7-8fc9-a4aa78dce87f/d0ff4379-183a-47b9-a740-9ddc283ebc29.jpg" width="600" /> </a></p>
<p>
<a href=" https://hosting.photobucket.com/95288841-8654-4bf7-8fc9-a4aa78dce87f/4333e95e-bbbd-4f47-aaea-38a9c99e54d8.jpg
" target="_blank"> <img alt="Click for enlarged picture" src="
https://hosting.photobucket.com/95288841-8654-4bf7-8fc9-a4aa78dce87f/4333e95e-bbbd-4f47-aaea-38a9c99e54d8.jpg" width="600" /> </a></p>
<p>
<a href=" https://hosting.photobucket.com/95288841-8654-4bf7-8fc9-a4aa78dce87f/1372f8a2-b222-48ee-ae45-a90b5a354ef7.jpg
" target="_blank"> <img alt="Click for enlarged picture" src="
https://hosting.photobucket.com/95288841-8654-4bf7-8fc9-a4aa78dce87f/1372f8a2-b222-48ee-ae45-a90b5a354ef7.jpg" width="600" /> </a></p>
<p>
<a href=" https://hosting.photobucket.com/95288841-8654-4bf7-8fc9-a4aa78dce87f/6a1b4fd1-d982-4b06-9c5f-3cd40d6bf10a.jpg
" target="_blank"> <img alt="Click for enlarged picture" src="
https://hosting.photobucket.com/95288841-8654-4bf7-8fc9-a4aa78dce87f/6a1b4fd1-d982-4b06-9c5f-3cd40d6bf10a.jpg" width="600" /> </a></p>
<p>
<a href=" https://hosting.photobucket.com/95288841-8654-4bf7-8fc9-a4aa78dce87f/c2ec45e1-e0f3-463a-b254-cb2a38b53e14.jpg
" target="_blank"> <img alt="Click for enlarged picture" src="
https://hosting.photobucket.com/95288841-8654-4bf7-8fc9-a4aa78dce87f/c2ec45e1-e0f3-463a-b254-cb2a38b53e14.jpg" width="600" /> </a></p>
<p>
<a href=" https://hosting.photobucket.com/95288841-8654-4bf7-8fc9-a4aa78dce87f/17553b9a-0592-4f6a-a097-3f1a97e161f3.jpg
" target="_blank"> <img alt="Click for enlarged picture" src="
https://hosting.photobucket.com/95288841-8654-4bf7-8fc9-a4aa78dce87f/17553b9a-0592-4f6a-a097-3f1a97e161f3.jpg" width="600" /> </a></p>
<p>
<a href=" https://hosting.photobucket.com/95288841-8654-4bf7-8fc9-a4aa78dce87f/8658bd6b-dff2-4d24-8473-928d44d44480.jpg
" target="_blank"> <img alt="Click for enlarged picture" src="
https://hosting.photobucket.com/95288841-8654-4bf7-8fc9-a4aa78dce87f/8658bd6b-dff2-4d24-8473-928d44d44480.jpg" width="600" /> </a></p>
<p>
<a href=" https://hosting.photobucket.com/95288841-8654-4bf7-8fc9-a4aa78dce87f/ecab0ea7-f75b-4e31-a520-d088ad39fa17.jpg
" target="_blank"> <img alt="Click for enlarged picture" src="
https://hosting.photobucket.com/95288841-8654-4bf7-8fc9-a4aa78dce87f/ecab0ea7-f75b-4e31-a520-d088ad39fa17.jpg" width="600" /> </a></p>
<p>
<a href=" https://hosting.photobucket.com/95288841-8654-4bf7-8fc9-a4aa78dce87f/9495a2f5-8a82-41f2-abf4-9ade3db41d87.jpg
" target="_blank"> <img alt="Click for enlarged picture" src="
https://hosting.photobucket.com/95288841-8654-4bf7-8fc9-a4aa78dce87f/9495a2f5-8a82-41f2-abf4-9ade3db41d87.jpg" width="600" /> </a></p>
<p>
<a href=" https://hosting.photobucket.com/95288841-8654-4bf7-8fc9-a4aa78dce87f/362cc6fd-a5dd-474b-9b9f-aeab27d6dcfa.jpg
" target="_blank"> <img alt="Click for enlarged picture" src="
https://hosting.photobucket.com/95288841-8654-4bf7-8fc9-a4aa78dce87f/362cc6fd-a5dd-474b-9b9f-aeab27d6dcfa.jpg" width="600" /> </a></p>
<p>
Posebna čast nam je bila ugostiti našeg gosta izlagača, Ninoslava Luka minijaturista iz Poreča koji nam se predstavio svojom kolekcijom povijesnih diorama.</p>
<p>
<a href=" https://hosting.photobucket.com/95288841-8654-4bf7-8fc9-a4aa78dce87f/ba1353de-e2bd-4340-9121-9056e287ed4a.jpg
" target="_blank"> <img alt="Click for enlarged picture" src="
https://hosting.photobucket.com/95288841-8654-4bf7-8fc9-a4aa78dce87f/ba1353de-e2bd-4340-9121-9056e287ed4a.jpg" width="600" /> </a></p>
<p>
<a href=" https://hosting.photobucket.com/95288841-8654-4bf7-8fc9-a4aa78dce87f/cea18506-1b50-4e5b-955c-0b9ca02d7826.jpg
" target="_blank"> <img alt="Click for enlarged picture" src="
https://hosting.photobucket.com/95288841-8654-4bf7-8fc9-a4aa78dce87f/cea18506-1b50-4e5b-955c-0b9ca02d7826.jpg" width="600" /> </a></p>
<p>
<a href=" https://hosting.photobucket.com/95288841-8654-4bf7-8fc9-a4aa78dce87f/1be85b41-e3b6-4536-b141-cd0da6eb38c1.jpg
" target="_blank"> <img alt="Click for enlarged picture" src="
https://hosting.photobucket.com/95288841-8654-4bf7-8fc9-a4aa78dce87f/1be85b41-e3b6-4536-b141-cd0da6eb38c1.jpg" width="600" /> </a></p>
<p>
<a href=" https://hosting.photobucket.com/95288841-8654-4bf7-8fc9-a4aa78dce87f/9e93b87d-ff3c-4b7b-8f06-5f9d3464a134.jpg
" target="_blank"> <img alt="Click for enlarged picture" src="
https://hosting.photobucket.com/95288841-8654-4bf7-8fc9-a4aa78dce87f/9e93b87d-ff3c-4b7b-8f06-5f9d3464a134.jpg" width="600" /> </a></p>
<p>
Tijekom prvog vikenda Izložbe, 21.-22.02.,održali smo 20. godišnje međunarodno natjecanje u bojanju minijatura <strong>Black Queen Hobby and Miniature Painting Competition</strong>!</p>
<p>
<a href=" https://hosting.photobucket.com/95288841-8654-4bf7-8fc9-a4aa78dce87f/3056fb09-f66c-4dea-80a8-a4e72407429a.jpg
" target="_blank"> <img alt="Click for enlarged picture" src="
https://hosting.photobucket.com/95288841-8654-4bf7-8fc9-a4aa78dce87f/3056fb09-f66c-4dea-80a8-a4e72407429a.jpg" width="600" /> </a></p>
<p>
Kako su natjecatelji pristizali i prijavljivali se na natjecanje, naše vrijedno osoblje je fotografiralo sve izloške prije nego li su ih rasporedili po kategorijama i pažljivo ih postavili u staklene vitrine. Niti jutarnja okrijepa nije usfalila zahvaljujući našim revnim volonterima.</p>
<p>
<a href=" https://hosting.photobucket.com/95288841-8654-4bf7-8fc9-a4aa78dce87f/1118089c-2b46-4a2c-b17d-dc92b66d1ffc.jpg
" target="_blank"> <img alt="Click for enlarged picture" src="
https://hosting.photobucket.com/95288841-8654-4bf7-8fc9-a4aa78dce87f/1118089c-2b46-4a2c-b17d-dc92b66d1ffc.jpg" width="600" /> </a></p>
<p>
<a href=" https://hosting.photobucket.com/95288841-8654-4bf7-8fc9-a4aa78dce87f/9fd3c272-9a69-4532-a09d-36497a20a820.jpg
" target="_blank"> <img alt="Click for enlarged picture" src="
https://hosting.photobucket.com/95288841-8654-4bf7-8fc9-a4aa78dce87f/9fd3c272-9a69-4532-a09d-36497a20a820.jpg" width="600" /> </a></p>
<p>
<a href=" https://hosting.photobucket.com/95288841-8654-4bf7-8fc9-a4aa78dce87f/86995e80-c502-45fb-80f5-c8fda27da3f9.jpg
" target="_blank"> <img alt="Click for enlarged picture" src="
https://hosting.photobucket.com/95288841-8654-4bf7-8fc9-a4aa78dce87f/86995e80-c502-45fb-80f5-c8fda27da3f9.jpg" width="600" /> </a></p>
<p>
U podne, sve vitrine su bile pune i natjecanje je moglo službeno početi.</p>
<p>
<a href=" https://hosting.photobucket.com/95288841-8654-4bf7-8fc9-a4aa78dce87f/bce59a4f-c3e3-4708-a3d6-25e81a894c24.jpg
" target="_blank"> <img alt="Click for enlarged picture" src="
https://hosting.photobucket.com/95288841-8654-4bf7-8fc9-a4aa78dce87f/bce59a4f-c3e3-4708-a3d6-25e81a894c24.jpg" width="600" /> </a></p>
<p>
<a href=" https://hosting.photobucket.com/95288841-8654-4bf7-8fc9-a4aa78dce87f/16a0a094-01aa-4e52-82cf-fdab00d74711.jpg
" target="_blank"> <img alt="Click for enlarged picture" src="
https://hosting.photobucket.com/95288841-8654-4bf7-8fc9-a4aa78dce87f/16a0a094-01aa-4e52-82cf-fdab00d74711.jpg" width="600" /> </a></p>
<p>
<a href=" https://hosting.photobucket.com/95288841-8654-4bf7-8fc9-a4aa78dce87f/0d3f4042-ff77-48d0-b332-add0fd08f7c3.jpg
" target="_blank"> <img alt="Click for enlarged picture" src="
https://hosting.photobucket.com/95288841-8654-4bf7-8fc9-a4aa78dce87f/0d3f4042-ff77-48d0-b332-add0fd08f7c3.jpg" width="600" /> </a></p>
<p>
<a href=" https://hosting.photobucket.com/95288841-8654-4bf7-8fc9-a4aa78dce87f/3711baf8-93f2-434a-aea9-a95288ca04dd.jpg
" target="_blank"> <img alt="Click for enlarged picture" src="
https://hosting.photobucket.com/95288841-8654-4bf7-8fc9-a4aa78dce87f/3711baf8-93f2-434a-aea9-a95288ca04dd.jpg" width="600" /> </a></p>
<p>
<a href=" https://hosting.photobucket.com/95288841-8654-4bf7-8fc9-a4aa78dce87f/53113b97-ec06-4409-95ba-95a5ad3f9720.jpg
" target="_blank"> <img alt="Click for enlarged picture" src="
https://hosting.photobucket.com/95288841-8654-4bf7-8fc9-a4aa78dce87f/53113b97-ec06-4409-95ba-95a5ad3f9720.jpg" width="600" /> </a></p>
<p>
<a href=" https://hosting.photobucket.com/95288841-8654-4bf7-8fc9-a4aa78dce87f/ab127858-193d-4976-bdb2-e27302722fca.jpg
" target="_blank"> <img alt="Click for enlarged picture" src="
https://hosting.photobucket.com/95288841-8654-4bf7-8fc9-a4aa78dce87f/ab127858-193d-4976-bdb2-e27302722fca.jpg" width="600" /> </a></p>
<p>
<a href=" https://hosting.photobucket.com/95288841-8654-4bf7-8fc9-a4aa78dce87f/3735af11-3fb6-4772-a8ff-5e0ff6ddf03a.jpg
" target="_blank"> <img alt="Click for enlarged picture" src="
https://hosting.photobucket.com/95288841-8654-4bf7-8fc9-a4aa78dce87f/3735af11-3fb6-4772-a8ff-5e0ff6ddf03a.jpg" width="600" /> </a></p>
<p>
<strong>Back To Basics radionice za najmlađe na Black Queen</strong></p>
<p>
Ove godine smo tijekom cijelog vikenda organizirali radionice bojanja minijatura za najmlađe koji su mogli po prvi puta obojati neku od naših vlastitih minijatura osmišljenih upravo za ovaj program!</p>
<p>
<a href=" https://hosting.photobucket.com/95288841-8654-4bf7-8fc9-a4aa78dce87f/6999be0c-8cc6-4947-a423-9427a2299724.jpg
" target="_blank"> <img alt="Click for enlarged picture" src="
https://hosting.photobucket.com/95288841-8654-4bf7-8fc9-a4aa78dce87f/6999be0c-8cc6-4947-a423-9427a2299724.jpg" width="600" /> </a></p>
<p>
<a href="https://hosting.photobucket.com/95288841-8654-4bf7-8fc9-a4aa78dce87f/835b05a5-f171-49df-afa6-da0692b89074.jpg" target="_blank"><img alt="Click for enlarged picture" src="https://hosting.photobucket.com/95288841-8654-4bf7-8fc9-a4aa78dce87f/835b05a5-f171-49df-afa6-da0692b89074.jpg" width="600" /></a></p>
<p>
<a href=" https://hosting.photobucket.com/95288841-8654-4bf7-8fc9-a4aa78dce87f/ef5dde13-84ee-4ea0-b9f3-28aaf703ef6d.jpg
" target="_blank"> <img alt="Click for enlarged picture" src="
https://hosting.photobucket.com/95288841-8654-4bf7-8fc9-a4aa78dce87f/ef5dde13-84ee-4ea0-b9f3-28aaf703ef6d.jpg" width="600" /> </a></p>
<p>
<strong>PRODAJNI KUTAK</strong></p>
<p>
Tijekom vikenda ugostili smo naše sponzore sa njihovim prodajnim štandovima: Swood.si i Carta Magica.</p>
<p>
<a href=" https://hosting.photobucket.com/95288841-8654-4bf7-8fc9-a4aa78dce87f/5ee9a49f-a387-435a-9110-572402b7191d.jpg
" target="_blank"> <img alt="Click for enlarged picture" src="
https://hosting.photobucket.com/95288841-8654-4bf7-8fc9-a4aa78dce87f/5ee9a49f-a387-435a-9110-572402b7191d.jpg" width="600" /> </a></p>
<p>
<a href=" https://hosting.photobucket.com/95288841-8654-4bf7-8fc9-a4aa78dce87f/47cf600f-b1eb-4655-bf06-305f6f21d5d2.jpg
" target="_blank"> <img alt="Click for enlarged picture" src="
https://hosting.photobucket.com/95288841-8654-4bf7-8fc9-a4aa78dce87f/47cf600f-b1eb-4655-bf06-305f6f21d5d2.jpg" width="600" /> </a></p>
<p>
<strong>OGLEDNE RADIONICE BOJANJA MINIJATURA</strong></p>
<p>
Prostor ZZTK omogućuje održavanje radionica tijekom vikenda u kino dvorani u podrumu, stoga smo tijekom vikenda organizirali i ogledne radionice. Rad predavača snimao se kamerom i projicirao na projekcijsko platno u dvorani. Veliko hvala našim domaćim i inozemnim predavačima: Anžetu Zorku (SLO), doc.dr.sc. Wintonu Afriću (HR), Ivanu Knezoviću (UMS Agram) i Petru Knezoviću (HR).</p>
<p>
<a href=" https://hosting.photobucket.com/95288841-8654-4bf7-8fc9-a4aa78dce87f/e8d835be-ec99-49d7-bc9b-086e38573d1a.jpg
" target="_blank"> <img alt="Click for enlarged picture" src="
https://hosting.photobucket.com/95288841-8654-4bf7-8fc9-a4aa78dce87f/e8d835be-ec99-49d7-bc9b-086e38573d1a.jpg" width="600" /> </a></p>
<p>
<a href=" https://hosting.photobucket.com/95288841-8654-4bf7-8fc9-a4aa78dce87f/f3eba4c1-4637-4da9-8360-75f430355af4.jpg" target="_blank"> <img alt="Click for enlarged picture" src="
https://hosting.photobucket.com/95288841-8654-4bf7-8fc9-a4aa78dce87f/f3eba4c1-4637-4da9-8360-75f430355af4.jpg" width="600" /> </a></p>
<p>
<a href=" https://hosting.photobucket.com/95288841-8654-4bf7-8fc9-a4aa78dce87f/ef523854-4030-4579-aa38-403afda86c91.jpg
" target="_blank"> <img alt="Click for enlarged picture" src="
https://hosting.photobucket.com/95288841-8654-4bf7-8fc9-a4aa78dce87f/ef523854-4030-4579-aa38-403afda86c91.jpg" width="600" /> </a></p>
<p>
<a href=" https://hosting.photobucket.com/95288841-8654-4bf7-8fc9-a4aa78dce87f/dd0943c2-f4a8-40c3-b641-f6dcdd200380.jpg
" target="_blank"> <img alt="Click for enlarged picture" src="
https://hosting.photobucket.com/95288841-8654-4bf7-8fc9-a4aa78dce87f/dd0943c2-f4a8-40c3-b641-f6dcdd200380.jpg" width="600" /> </a></p>
<p>
<a href=" https://hosting.photobucket.com/95288841-8654-4bf7-8fc9-a4aa78dce87f/08b1626a-f6c7-43c9-b718-3e9a41b55ca6.jpg
" target="_blank"> <img alt="Click for enlarged picture" src="
https://hosting.photobucket.com/95288841-8654-4bf7-8fc9-a4aa78dce87f/08b1626a-f6c7-43c9-b718-3e9a41b55ca6.jpg" width="600" /> </a></p>
<p>
<a href=" https://hosting.photobucket.com/95288841-8654-4bf7-8fc9-a4aa78dce87f/91aca7f3-1af6-486d-b174-65079a63a1ea.jpg
" target="_blank"> <img alt="Click for enlarged picture" src="
https://hosting.photobucket.com/95288841-8654-4bf7-8fc9-a4aa78dce87f/91aca7f3-1af6-486d-b174-65079a63a1ea.jpg" width="600" /> </a></p>
<p>
<a href=" https://hosting.photobucket.com/95288841-8654-4bf7-8fc9-a4aa78dce87f/3821f2fb-fbe7-4096-adbc-7d8c981a3b56.jpg
" target="_blank"> <img alt="Click for enlarged picture" src="
https://hosting.photobucket.com/95288841-8654-4bf7-8fc9-a4aa78dce87f/3821f2fb-fbe7-4096-adbc-7d8c981a3b56.jpg" width="600" /> </a></p>
<p>
<a href=" https://hosting.photobucket.com/95288841-8654-4bf7-8fc9-a4aa78dce87f/2c7bb3c5-c0ec-4a96-b6bd-6a90ce5ce154.jpg
" target="_blank"> <img alt="Click for enlarged picture" src="
https://hosting.photobucket.com/95288841-8654-4bf7-8fc9-a4aa78dce87f/2c7bb3c5-c0ec-4a96-b6bd-6a90ce5ce154.jpg" width="600" /> </a></p>
<p>
<a href=" https://hosting.photobucket.com/95288841-8654-4bf7-8fc9-a4aa78dce87f/b646f4ee-21aa-4d12-8db3-6d33351d5aeb.jpg
" target="_blank"> <img alt="Click for enlarged picture" src="
https://hosting.photobucket.com/95288841-8654-4bf7-8fc9-a4aa78dce87f/b646f4ee-21aa-4d12-8db3-6d33351d5aeb.jpg" width="600" /> </a></p>
<p>
<a href=" https://hosting.photobucket.com/95288841-8654-4bf7-8fc9-a4aa78dce87f/fb5efc01-32cc-4119-90e3-188f51b30237.jpg
" target="_blank"> <img alt="Click for enlarged picture" src="
https://hosting.photobucket.com/95288841-8654-4bf7-8fc9-a4aa78dce87f/fb5efc01-32cc-4119-90e3-188f51b30237.jpg" width="600" /> </a></p>
<p>
<strong>NATJECANJE U BRZOM BOJANJU MINIJATURA</strong></p>
<p>
U nedjelju, 22.2. smo organizirali natjecanje u brzom bojanju minijatura. Po prvi puta smo koristili minijature koje su naš dizajn. Sudionici su imali 60 minuta vremena da obojaju og čarobnjaka.</p>
<p>
<a href=" https://hosting.photobucket.com/95288841-8654-4bf7-8fc9-a4aa78dce87f/106417a6-a047-4e0d-9f81-87858806052f.jpg
" target="_blank"> <img alt="Click for enlarged picture" src="
https://hosting.photobucket.com/95288841-8654-4bf7-8fc9-a4aa78dce87f/106417a6-a047-4e0d-9f81-87858806052f.jpg" width="600" /> </a></p>
<p>
<a href=" https://hosting.photobucket.com/95288841-8654-4bf7-8fc9-a4aa78dce87f/ac6853c7-6e34-4e07-a996-8d7d12744b67.jpg
" target="_blank"> <img alt="Click for enlarged picture" src="
https://hosting.photobucket.com/95288841-8654-4bf7-8fc9-a4aa78dce87f/ac6853c7-6e34-4e07-a996-8d7d12744b67.jpg" width="600" /> </a></p>
<p>
<a href=" https://hosting.photobucket.com/95288841-8654-4bf7-8fc9-a4aa78dce87f/ccb155fa-52c5-4a99-9515-f69a6836dce7.jpg
" target="_blank"> <img alt="Click for enlarged picture" src="
https://hosting.photobucket.com/95288841-8654-4bf7-8fc9-a4aa78dce87f/ccb155fa-52c5-4a99-9515-f69a6836dce7.jpg" width="600" /> </a></p>
<p>
<a href=" https://hosting.photobucket.com/95288841-8654-4bf7-8fc9-a4aa78dce87f/a29fedd0-97ea-45b1-85f9-7ea62188b2b2.jpg
" target="_blank"><img alt="Click for enlarged picture" src="
https://hosting.photobucket.com/95288841-8654-4bf7-8fc9-a4aa78dce87f/a29fedd0-97ea-45b1-85f9-7ea62188b2b2.jpg" width="600" /></a></p>
<p>
S time smo došli do samoga kraja ovog predivnog vikenda i sve što je preostalo je bila podjela nagrada i priznanja pobjednicima.</p>
<p>
<a href=" https://hosting.photobucket.com/95288841-8654-4bf7-8fc9-a4aa78dce87f/046ca4c8-0ae7-415e-abd3-e131d580c3ad.jpg
" target="_blank"> <img alt="Click for enlarged picture" src="
https://hosting.photobucket.com/95288841-8654-4bf7-8fc9-a4aa78dce87f/046ca4c8-0ae7-415e-abd3-e131d580c3ad.jpg" width="600" /> </a></p>
<p>
<a href=" https://hosting.photobucket.com/95288841-8654-4bf7-8fc9-a4aa78dce87f/cec0dcef-7acb-4a77-89de-271ed5410672.jpg
" target="_blank"> <img alt="Click for enlarged picture" src="
https://hosting.photobucket.com/95288841-8654-4bf7-8fc9-a4aa78dce87f/cec0dcef-7acb-4a77-89de-271ed5410672.jpg" width="600" /> </a></p>
<p>
<a href=" https://hosting.photobucket.com/95288841-8654-4bf7-8fc9-a4aa78dce87f/a495a5fc-31a2-4979-a970-0fa22c334354.jpg
" target="_blank"> <img alt="Click for enlarged picture" src="
https://hosting.photobucket.com/95288841-8654-4bf7-8fc9-a4aa78dce87f/a495a5fc-31a2-4979-a970-0fa22c334354.jpg" width="600" /> </a></p>
<p>
<strong>AGRAM ARENA – Leaving Asphodel Necropolis28 kampanja</strong></p>
<p>
Tijekom vikenda 21.-22.2. održali smo i novo međunarodno natjecanje Agram Arena! Ovoga puta na redu je bila stolna strateška igra Necropolis 28 za koju su naši članovi osmislili dvodnevnu kampanju. Svaki sudionik je izradio svoju bandu vojnika, a velika većina i svoje vlastite table.</p>
<p>
<a href=" https://hosting.photobucket.com/95288841-8654-4bf7-8fc9-a4aa78dce87f/ac69b182-4bfc-4575-a6d3-fb3c8baba342.jpg
" target="_blank"> <img alt="Click for enlarged picture" src="
https://hosting.photobucket.com/95288841-8654-4bf7-8fc9-a4aa78dce87f/ac69b182-4bfc-4575-a6d3-fb3c8baba342.jpg" width="600" /> </a></p>
<p>
<a href=" https://hosting.photobucket.com/95288841-8654-4bf7-8fc9-a4aa78dce87f/289fed7b-e058-42d8-ba2d-cbd0463e98da.jpg
" target="_blank"> <img alt="Click for enlarged picture" src="
https://hosting.photobucket.com/95288841-8654-4bf7-8fc9-a4aa78dce87f/289fed7b-e058-42d8-ba2d-cbd0463e98da.jpg" width="600" /> </a></p>
<p>
<a href=" https://hosting.photobucket.com/95288841-8654-4bf7-8fc9-a4aa78dce87f/d92ebbee-859d-4441-8386-3d760b20b7a7.jpg
" target="_blank"> <img alt="Click for enlarged picture" src="
https://hosting.photobucket.com/95288841-8654-4bf7-8fc9-a4aa78dce87f/d92ebbee-859d-4441-8386-3d760b20b7a7.jpg" width="600" /> </a></p>
<p>
<a href=" https://hosting.photobucket.com/95288841-8654-4bf7-8fc9-a4aa78dce87f/09c59798-7871-425e-a075-3ca1cd91768a.jpg
" target="_blank"> <img alt="Click for enlarged picture" src="
https://hosting.photobucket.com/95288841-8654-4bf7-8fc9-a4aa78dce87f/09c59798-7871-425e-a075-3ca1cd91768a.jpg" width="600" /> </a></p>
<p>
<a href=" https://hosting.photobucket.com/95288841-8654-4bf7-8fc9-a4aa78dce87f/b2f3edc8-5a23-4552-9a2a-4027b286f327.jpg
" target="_blank"> <img alt="Click for enlarged picture" src="
https://hosting.photobucket.com/95288841-8654-4bf7-8fc9-a4aa78dce87f/b2f3edc8-5a23-4552-9a2a-4027b286f327.jpg" width="600" /> </a></p>
<p>
<a href=" https://hosting.photobucket.com/95288841-8654-4bf7-8fc9-a4aa78dce87f/2a9f43ac-b531-4746-b7bb-ac5a3356aab0.jpg
" target="_blank"> <img alt="Click for enlarged picture" src="
https://hosting.photobucket.com/95288841-8654-4bf7-8fc9-a4aa78dce87f/2a9f43ac-b531-4746-b7bb-ac5a3356aab0.jpg" width="600" /> </a></p>
<p>
<strong>DOGAĐANJA RADNIM DANIMA ZA VRIJEME IZLOŽBE</strong></p>
<p>
Tijekom naredna dva tjedna, naši volonteri su radnim danima od 16:00 do 20:00, držali otvorene radionice bojanja minijatura. Postavljene su radne stanice za bojanje minijatura na kojoj su naši posjetitelji mogli bojati minijature koje smo priredili (ili svoje ukoliko su ih donijeli) koristeći naše materijale i alate.</p>
<p>
<a href=" https://hosting.photobucket.com/95288841-8654-4bf7-8fc9-a4aa78dce87f/6edf7765-42b5-417a-820f-fa5d907179a7.jpg
" target="_blank"> <img alt="Click for enlarged picture" src="
https://hosting.photobucket.com/95288841-8654-4bf7-8fc9-a4aa78dce87f/6edf7765-42b5-417a-820f-fa5d907179a7.jpg" width="600" /> </a></p>
<p>
<a href=" https://hosting.photobucket.com/95288841-8654-4bf7-8fc9-a4aa78dce87f/c084ebe2-f57b-4519-9b31-29bdc1155887.jpg
" target="_blank"> <img alt="Click for enlarged picture" src="
https://hosting.photobucket.com/95288841-8654-4bf7-8fc9-a4aa78dce87f/c084ebe2-f57b-4519-9b31-29bdc1155887.jpg" width="600" /> </a></p>
<p>
<a href=" https://hosting.photobucket.com/95288841-8654-4bf7-8fc9-a4aa78dce87f/37ff2272-f9b0-4b16-a363-1e6f6688c866.jpg
" target="_blank"> <img alt="Click for enlarged picture" src="
https://hosting.photobucket.com/95288841-8654-4bf7-8fc9-a4aa78dce87f/37ff2272-f9b0-4b16-a363-1e6f6688c866.jpg" width="600" /> </a></p>
<p>
<a href=" https://hosting.photobucket.com/95288841-8654-4bf7-8fc9-a4aa78dce87f/5f4f7968-ff50-4a01-98da-6ce8562930b4.jpg
" target="_blank"> <img alt="Click for enlarged picture" src="
https://hosting.photobucket.com/95288841-8654-4bf7-8fc9-a4aa78dce87f/5f4f7968-ff50-4a01-98da-6ce8562930b4.jpg" width="600" /> </a></p>
<p>
<a href=" https://hosting.photobucket.com/95288841-8654-4bf7-8fc9-a4aa78dce87f/cbb45319-d488-483c-bf9d-9af29852fc74.jpg
" target="_blank"> <img alt="Click for enlarged picture" src="
https://hosting.photobucket.com/95288841-8654-4bf7-8fc9-a4aa78dce87f/cbb45319-d488-483c-bf9d-9af29852fc74.jpg" width="600" /> </a></p>
<p>
<a href=" https://hosting.photobucket.com/95288841-8654-4bf7-8fc9-a4aa78dce87f/3dcca26c-d549-4af3-812a-a4a81b9a2310.jpg
" target="_blank"> <img alt="Click for enlarged picture" src="
https://hosting.photobucket.com/95288841-8654-4bf7-8fc9-a4aa78dce87f/3dcca26c-d549-4af3-812a-a4a81b9a2310.jpg" width="600" /> </a></p>
<p>
<a href=" https://hosting.photobucket.com/95288841-8654-4bf7-8fc9-a4aa78dce87f/4adf0fb6-3eab-4b40-b32d-d03eab4a9892.jpg
" target="_blank"> <img alt="Click for enlarged picture" src="
https://hosting.photobucket.com/95288841-8654-4bf7-8fc9-a4aa78dce87f/4adf0fb6-3eab-4b40-b32d-d03eab4a9892.jpg" width="600" /> </a></p>
<p>
<a href=" https://hosting.photobucket.com/95288841-8654-4bf7-8fc9-a4aa78dce87f/4732b58a-9a65-4d1c-a7d5-25513d34b108.jpg
" target="_blank"> <img alt="Click for enlarged picture" src="
https://hosting.photobucket.com/95288841-8654-4bf7-8fc9-a4aa78dce87f/4732b58a-9a65-4d1c-a7d5-25513d34b108.jpg" width="600" /> </a></p>
<p>
<a href=" https://hosting.photobucket.com/95288841-8654-4bf7-8fc9-a4aa78dce87f/274be330-31d5-4e25-95db-ec2f423a003c.jpg
" target="_blank"> <img alt="Click for enlarged picture" src="
https://hosting.photobucket.com/95288841-8654-4bf7-8fc9-a4aa78dce87f/274be330-31d5-4e25-95db-ec2f423a003c.jpg" width="600" /> </a></p>
<p>
<a href=" https://hosting.photobucket.com/95288841-8654-4bf7-8fc9-a4aa78dce87f/8e7b0a80-0f46-4d70-9789-a46976c713d2.jpg
" target="_blank"> <img alt="Click for enlarged picture" src="
https://hosting.photobucket.com/95288841-8654-4bf7-8fc9-a4aa78dce87f/8e7b0a80-0f46-4d70-9789-a46976c713d2.jpg" width="600" /> </a></p>
<p>
<a href=" https://hosting.photobucket.com/95288841-8654-4bf7-8fc9-a4aa78dce87f/8bbd4e96-b911-4f26-80fe-b1c57f29027b.jpg
" target="_blank"> <img alt="Click for enlarged picture" src="
https://hosting.photobucket.com/95288841-8654-4bf7-8fc9-a4aa78dce87f/8bbd4e96-b911-4f26-80fe-b1c57f29027b.jpg" width="600" /> </a></p>
<p>
<a href=" https://hosting.photobucket.com/95288841-8654-4bf7-8fc9-a4aa78dce87f/203a27be-8f10-459d-89b9-befb6b636b74.jpg
" target="_blank"> <img alt="Click for enlarged picture" src="
https://hosting.photobucket.com/95288841-8654-4bf7-8fc9-a4aa78dce87f/203a27be-8f10-459d-89b9-befb6b636b74.jpg" width="600" /> </a></p>
<p>
<a href=" https://hosting.photobucket.com/95288841-8654-4bf7-8fc9-a4aa78dce87f/5dc4358f-19d8-475f-a4af-9c29e9ed18d7.jpg
" target="_blank"> <img alt="Click for enlarged picture" src="
https://hosting.photobucket.com/95288841-8654-4bf7-8fc9-a4aa78dce87f/5dc4358f-19d8-475f-a4af-9c29e9ed18d7.jpg" width="600" /> </a></p>
<p>
<strong>BACK TO BASICS RADIONICE ZA NAJMLAĐE</strong></p>
<p>
Radnim danima od 17:00 do 18:00 održavali smo naše nove radionice za najmlađe u kojima su naši najmlađi polaznici bojali svoje prve minijature.</p>
<p>
<a href=" https://hosting.photobucket.com/95288841-8654-4bf7-8fc9-a4aa78dce87f/948af139-8fb5-4e28-a27c-404466e70d05.jpg
" target="_blank"> <img alt="Click for enlarged picture" src="
https://hosting.photobucket.com/95288841-8654-4bf7-8fc9-a4aa78dce87f/948af139-8fb5-4e28-a27c-404466e70d05.jpg" width="600" /> </a></p>
<p>
<a href=" https://hosting.photobucket.com/95288841-8654-4bf7-8fc9-a4aa78dce87f/bb3e20c2-bb21-4a3d-863a-74de08261467.jpg
" target="_blank"> <img alt="Click for enlarged picture" src="
https://hosting.photobucket.com/95288841-8654-4bf7-8fc9-a4aa78dce87f/bb3e20c2-bb21-4a3d-863a-74de08261467.jpg" width="600" /> </a></p>
<p>
<a href=" https://hosting.photobucket.com/95288841-8654-4bf7-8fc9-a4aa78dce87f/7316c760-98e3-4e3f-9261-d138aa7a5a6a.jpg
" target="_blank"> <img alt="Click for enlarged picture" src="
https://hosting.photobucket.com/95288841-8654-4bf7-8fc9-a4aa78dce87f/7316c760-98e3-4e3f-9261-d138aa7a5a6a.jpg" width="600" /> </a></p>
<p>
<a href=" https://hosting.photobucket.com/95288841-8654-4bf7-8fc9-a4aa78dce87f/68934b39-3d1f-4f43-b967-14b73c41a39e.jpg
" target="_blank"> <img alt="Click for enlarged picture" src="
https://hosting.photobucket.com/95288841-8654-4bf7-8fc9-a4aa78dce87f/68934b39-3d1f-4f43-b967-14b73c41a39e.jpg" width="600" /> </a></p>
<p>
<a href=" https://hosting.photobucket.com/95288841-8654-4bf7-8fc9-a4aa78dce87f/46125bce-a28d-494f-873a-3aeabdc1d6c2.jpg
" target="_blank"> <img alt="Click for enlarged picture" src="
https://hosting.photobucket.com/95288841-8654-4bf7-8fc9-a4aa78dce87f/46125bce-a28d-494f-873a-3aeabdc1d6c2.jpg" width="600" /> </a></p>
<p>
<a href=" https://hosting.photobucket.com/95288841-8654-4bf7-8fc9-a4aa78dce87f/3c58e0ad-77a9-44c8-b6bf-d9a55c514d43.jpg
" target="_blank"> <img alt="Click for enlarged picture" src="
https://hosting.photobucket.com/95288841-8654-4bf7-8fc9-a4aa78dce87f/3c58e0ad-77a9-44c8-b6bf-d9a55c514d43.jpg" width="600" /> </a></p>
<p>
<a href=" https://hosting.photobucket.com/95288841-8654-4bf7-8fc9-a4aa78dce87f/f891f0f0-051b-40ee-9676-cb03b0a9811b.jpg
" target="_blank"> <img alt="Click for enlarged picture" src="
https://hosting.photobucket.com/95288841-8654-4bf7-8fc9-a4aa78dce87f/f891f0f0-051b-40ee-9676-cb03b0a9811b.jpg" width="600" /> </a></p>
<p>
<strong>AGRAM LEGO SEKCIJA predavanje: FW-14b – Bolid F1 za budućnost</strong></p>
<p>
U srijedu 25.2.2026. u sklopu aktivnosti naše Agram Lego Sekcije, naš dežurni strojar Marko Paunović je održao predavanje na temu bolida Formule 1 iz 1992.. Ulaz na predavanje je bio besplatan, a po završetku su LEGO maketu bolida izradili članovi Lego sekcije</p>
<p>
<a href=" https://hosting.photobucket.com/95288841-8654-4bf7-8fc9-a4aa78dce87f/b2e14b1c-daa4-4314-8685-184377bc7e28.jpg
" target="_blank"> <img alt="Click for enlarged picture" src="
https://hosting.photobucket.com/95288841-8654-4bf7-8fc9-a4aa78dce87f/b2e14b1c-daa4-4314-8685-184377bc7e28.jpg" width="600" /> </a></p>
<p>
<a href=" https://hosting.photobucket.com/95288841-8654-4bf7-8fc9-a4aa78dce87f/31fb439a-77d3-4418-83ff-66c3af279cca.jpg" target="_blank"> <img alt="Click for enlarged picture" src="
https://hosting.photobucket.com/95288841-8654-4bf7-8fc9-a4aa78dce87f/31fb439a-77d3-4418-83ff-66c3af279cca.jpg" width="600" /> </a></p>
<p>
<a href=" https://hosting.photobucket.com/95288841-8654-4bf7-8fc9-a4aa78dce87f/bfcaf282-6be8-4b52-a3ed-c91137457876.jpg
" target="_blank"> <img alt="Click for enlarged picture" src="
https://hosting.photobucket.com/95288841-8654-4bf7-8fc9-a4aa78dce87f/bfcaf282-6be8-4b52-a3ed-c91137457876.jpg" width="600" /> </a></p>
<p>
<a href=" https://hosting.photobucket.com/95288841-8654-4bf7-8fc9-a4aa78dce87f/ce70fc61-9e1a-4169-aaad-8b67417656c0.jpg
" target="_blank"> <img alt="Click for enlarged picture" src="
https://hosting.photobucket.com/95288841-8654-4bf7-8fc9-a4aa78dce87f/ce70fc61-9e1a-4169-aaad-8b67417656c0.jpg" width="600" /> </a></p>
<p>
<a href=" https://hosting.photobucket.com/95288841-8654-4bf7-8fc9-a4aa78dce87f/94ca0e36-8710-458d-8194-9f71299f4d74.jpg
" target="_blank"> <img alt="Click for enlarged picture" src="
https://hosting.photobucket.com/95288841-8654-4bf7-8fc9-a4aa78dce87f/94ca0e36-8710-458d-8194-9f71299f4d74.jpg" width="600" /> </a></p>
<p>
<a href=" https://hosting.photobucket.com/95288841-8654-4bf7-8fc9-a4aa78dce87f/c6771f72-7191-4ca3-a792-3bb1ab3897b1.jpg
" target="_blank"> <img alt="Click for enlarged picture" src="
https://hosting.photobucket.com/95288841-8654-4bf7-8fc9-a4aa78dce87f/c6771f72-7191-4ca3-a792-3bb1ab3897b1.jpg" width="600" /> </a></p>
<p>
<a href=" https://hosting.photobucket.com/95288841-8654-4bf7-8fc9-a4aa78dce87f/c8fcfcb6-09f2-4398-a2fb-fa5065771e01.jpg
" target="_blank"> <img alt="Click for enlarged picture" src="
https://hosting.photobucket.com/95288841-8654-4bf7-8fc9-a4aa78dce87f/c8fcfcb6-09f2-4398-a2fb-fa5065771e01.jpg" width="600" /> </a></p>
<p>
<a href=" https://hosting.photobucket.com/95288841-8654-4bf7-8fc9-a4aa78dce87f/d7e187a8-d5b1-433b-b30d-091e54dcdddf.jpg
" target="_blank"> <img alt="Click for enlarged picture" src="
https://hosting.photobucket.com/95288841-8654-4bf7-8fc9-a4aa78dce87f/d7e187a8-d5b1-433b-b30d-091e54dcdddf.jpg" width="600" /> </a></p>
<p>
Tijekom drugog vikenda Izložbe, 28.02.-01.03., organizirali smo <strong>RADIONICU BOJANJA MINIJATURA – Grimdark stil</strong>.</p>
<p>
Radionica se provodila kroz dva dana (cijeli vikend) i polaznici su bojali tri različite figure za igru Trench Crusade. Fokus ovih predavanja bilo je bojenje popularnim Grimdark stilom. Na radionici su bile predstavljene boje i pribor, priprema figura, nekoliko tehnika bojenja minijatura od osnovnih do naprednijih, te tehnike i trikovi za brzo i efikasno bojenje većih količina figura odjednom. U sklopu radionice korištene su akrilne boje na bazi vode.</p>
<p>
<a href=" https://hosting.photobucket.com/95288841-8654-4bf7-8fc9-a4aa78dce87f/733d94b2-8e8d-4a4e-accd-b9168e32577e.jpg
" target="_blank"> <img alt="Click for enlarged picture" src="
https://hosting.photobucket.com/95288841-8654-4bf7-8fc9-a4aa78dce87f/733d94b2-8e8d-4a4e-accd-b9168e32577e.jpg
" width="600" /> </a></p>
<p>
<a href=" https://hosting.photobucket.com/95288841-8654-4bf7-8fc9-a4aa78dce87f/41020062-45b9-41cd-a357-fa23a389f390.jpg
" target="_blank"> <img alt="Click for enlarged picture" src="
https://hosting.photobucket.com/95288841-8654-4bf7-8fc9-a4aa78dce87f/41020062-45b9-41cd-a357-fa23a389f390.jpg
" width="600" /> </a></p>
<p>
<a href=" https://hosting.photobucket.com/95288841-8654-4bf7-8fc9-a4aa78dce87f/0c07cc55-596d-494d-972b-cd6a0dd6b8b7.jpg
" target="_blank"> <img alt="Click for enlarged picture" src="
https://hosting.photobucket.com/95288841-8654-4bf7-8fc9-a4aa78dce87f/0c07cc55-596d-494d-972b-cd6a0dd6b8b7.jpg" width="600" /> </a></p>
<p>
<a href=" https://hosting.photobucket.com/95288841-8654-4bf7-8fc9-a4aa78dce87f/c17dd356-08b1-48e1-b895-6296aed7f818.jpg
" target="_blank"> <img alt="Click for enlarged picture" src="
https://hosting.photobucket.com/95288841-8654-4bf7-8fc9-a4aa78dce87f/c17dd356-08b1-48e1-b895-6296aed7f818.jpg" width="600" /> </a></p>
<p>
U srijedu 04.03.2026. održana je godišnja <strong>sjednica Skupštine</strong> na kojoj smo odredili smjernice rada u 2026.</p>
<p>
<a href=" https://hosting.photobucket.com/95288841-8654-4bf7-8fc9-a4aa78dce87f/59484bd0-7edc-4aed-a04e-ae42900ba3e6.jpg
" target="_blank"> <img alt="Click for enlarged picture" src="
https://hosting.photobucket.com/95288841-8654-4bf7-8fc9-a4aa78dce87f/59484bd0-7edc-4aed-a04e-ae42900ba3e6.jpg
" width="600" /> </a></p>
<p>
U nedjelju 08.03.2026. Izložba je završena, naši eksponati sigurno spremljeni, a Galerija počišćena.</p>
<p>
<a href=" https://hosting.photobucket.com/95288841-8654-4bf7-8fc9-a4aa78dce87f/98af4280-0956-4cdb-b4a9-da40e3a5a44a.jpg
" target="_blank"> <img alt="Click for enlarged picture" src="
https://hosting.photobucket.com/95288841-8654-4bf7-8fc9-a4aa78dce87f/98af4280-0956-4cdb-b4a9-da40e3a5a44a.jpg" width="600" /> </a></p>
<p>
<a href=" https://hosting.photobucket.com/95288841-8654-4bf7-8fc9-a4aa78dce87f/3259b35e-1fc2-4a99-a3c5-c7984958d72b.jpg
" target="_blank"> <img alt="Click for enlarged picture" src="
https://hosting.photobucket.com/95288841-8654-4bf7-8fc9-a4aa78dce87f/3259b35e-1fc2-4a99-a3c5-c7984958d72b.jpg" width="600" /> </a></p>
<p>
Najbitniji dio svake godine prilikom održavanja ove Izložbe je socijalni aspekt, druženje naših članova kako međusobno tako i sa našim međunarodnim prijateljima koji nas posjećuju! Uz ovih par fotografija sa zajedničkih druženja, pozdravljamo vas do sljedeće godine!</p>
<p>
<a href=" https://hosting.photobucket.com/95288841-8654-4bf7-8fc9-a4aa78dce87f/b9168e23-79b2-4d81-8a7d-7534062881a7.jpg
" target="_blank"> <img alt="Click for enlarged picture" src="
https://hosting.photobucket.com/95288841-8654-4bf7-8fc9-a4aa78dce87f/b9168e23-79b2-4d81-8a7d-7534062881a7.jpg " width="600" /> </a></p>
<p>
<a href=" https://hosting.photobucket.com/95288841-8654-4bf7-8fc9-a4aa78dce87f/edff925e-916c-4d78-953e-210abf3753d4.jpg
" target="_blank"> <img alt="Click for enlarged picture" src="
https://hosting.photobucket.com/95288841-8654-4bf7-8fc9-a4aa78dce87f/edff925e-916c-4d78-953e-210abf3753d4.jpg " width="600" /> </a></p>
<p>
<a href=" https://hosting.photobucket.com/95288841-8654-4bf7-8fc9-a4aa78dce87f/8bcb48fa-466b-43f8-8a4b-f15f6794b21e.jpg
" target="_blank"> <img alt="Click for enlarged picture" src="
https://hosting.photobucket.com/95288841-8654-4bf7-8fc9-a4aa78dce87f/8bcb48fa-466b-43f8-8a4b-f15f6794b21e.jpg" width="600" /> </a></p>
"
["created"]=>
string(19) "2026-03-12 08:54:10"
["modified"]=>
string(19) "2026-03-12 08:58:37"
}
["Member"]=>
array(10) {
["id"]=>
string(2) "35"
["group_id"]=>
string(1) "1"
["first_name"]=>
string(5) "Marko"
["last_name"]=>
string(9) "Paunović"
["first_name_mask"]=>
string(5) "marko"
["last_name_mask"]=>
string(8) "paunovic"
["username"]=>
string(5) "marko"
["password"]=>
string(40) "3bd37b326d19d1880d3b93a4b32e8fb3a90fa122"
["born"]=>
string(19) "2033-03-07 20:35:00"
["created"]=>
string(19) "2009-06-02 20:37:03"
}
}
</pre>
<a href="/dok/members/marko.paunovic">Marko Paunović</a>, 12<span class="superscript">nd</span> March 2026</span>
</li>
<li>
<a href="/dok/articles/2026/03/05" class="readMore"></a>
<span class="details"> <pre style="display: none;">
array(2) {
["Article"]=>
array(10) {
["id"]=>
string(3) "495"
["member_id"]=>
string(2) "35"
["title_eng"]=>
string(53) "Miniature Painting Workshop - Grimdark Trench Crusade"
["title_hrv"]=>
string(59) "Radionica bojanja minijatura - Grimdark stil Trench Crusade"
["mask_eng"]=>
string(53) "miniature_painting_workshop_-_grimdark_trench_crusade"
["mask_hrv"]=>
string(59) "radionica_bojanja_minijatura_-_grimdark_stil_trench_crusade"
["content_eng"]=>
string(2880) "<p>
<a href="https://hosting.photobucket.com/95288841-8654-4bf7-8fc9-a4aa78dce87f/d6bd52bf-5585-41ad-a5f0-39ea8eba78af.jpg" target="_blank"><img alt="Click for enlarged picture" src="https://hosting.photobucket.com/95288841-8654-4bf7-8fc9-a4aa78dce87f/d6bd52bf-5585-41ad-a5f0-39ea8eba78af.jpg" width="600" /></a></p>
<p>
<a href="https://hosting.photobucket.com/95288841-8654-4bf7-8fc9-a4aa78dce87f/d894975c-ea8f-4cc4-9f8c-8e87324723b1.jpg" target="_blank"><img alt="Click for enlarged picture" src="https://hosting.photobucket.com/95288841-8654-4bf7-8fc9-a4aa78dce87f/d894975c-ea8f-4cc4-9f8c-8e87324723b1.jpg" width="600" /></a></p>
<p>
<a href="https://hosting.photobucket.com/95288841-8654-4bf7-8fc9-a4aa78dce87f/f72b74ba-1c23-4bfb-9feb-568dc5df1a6a.jpg" target="_blank"><img alt="Click for enlarged picture" src="https://hosting.photobucket.com/95288841-8654-4bf7-8fc9-a4aa78dce87f/f72b74ba-1c23-4bfb-9feb-568dc5df1a6a.jpg" width="600" /></a></p>
<p>
<a href="https://hosting.photobucket.com/95288841-8654-4bf7-8fc9-a4aa78dce87f/40167cf3-b290-41d4-ac8a-212d19fe7f0a.jpg" target="_blank"><img alt="Click for enlarged picture" src="https://hosting.photobucket.com/95288841-8654-4bf7-8fc9-a4aa78dce87f/40167cf3-b290-41d4-ac8a-212d19fe7f0a.jpg" width="600" /></a></p>
<p>
<a href="https://hosting.photobucket.com/95288841-8654-4bf7-8fc9-a4aa78dce87f/cfbd68f1-bc70-4943-8f7b-69716084f638.jpg" target="_blank"><img alt="Click for enlarged picture" src="https://hosting.photobucket.com/95288841-8654-4bf7-8fc9-a4aa78dce87f/cfbd68f1-bc70-4943-8f7b-69716084f638.jpg" width="600" /></a></p>
<p>
<a href="https://hosting.photobucket.com/95288841-8654-4bf7-8fc9-a4aa78dce87f/cef3712c-57f1-435e-80b7-a35b4620c5f9.jpg" target="_blank"><img alt="Click for enlarged picture" src="https://hosting.photobucket.com/95288841-8654-4bf7-8fc9-a4aa78dce87f/cef3712c-57f1-435e-80b7-a35b4620c5f9.jpg" width="600" /></a></p>
<p>
<a href="https://hosting.photobucket.com/95288841-8654-4bf7-8fc9-a4aa78dce87f/f72b74ba-1c23-4bfb-9feb-568dc5df1a6a.jpg" target="_blank"><img alt="Click for enlarged picture" src="https://hosting.photobucket.com/95288841-8654-4bf7-8fc9-a4aa78dce87f/f72b74ba-1c23-4bfb-9feb-568dc5df1a6a.jpg" width="600" /></a></p>
<p>
<a href="https://hosting.photobucket.com/95288841-8654-4bf7-8fc9-a4aa78dce87f/6b6285a7-e08b-482e-9343-74e8d08bbca4.jpg" target="_blank"><img alt="Click for enlarged picture" src="https://hosting.photobucket.com/95288841-8654-4bf7-8fc9-a4aa78dce87f/6b6285a7-e08b-482e-9343-74e8d08bbca4.jpg" width="600" /></a></p>
<p>
<a href="https://hosting.photobucket.com/95288841-8654-4bf7-8fc9-a4aa78dce87f/1be59454-f3ac-4f70-9550-60c9101d7e44.png" target="_blank"><img alt="Click for enlarged picture" src="https://hosting.photobucket.com/95288841-8654-4bf7-8fc9-a4aa78dce87f/1be59454-f3ac-4f70-9550-60c9101d7e44.png" width="600" /></a></p>
"
["content_hrv"]=>
string(4135) "<p>
<a href="https://hosting.photobucket.com/95288841-8654-4bf7-8fc9-a4aa78dce87f/d6bd52bf-5585-41ad-a5f0-39ea8eba78af.jpg" target="_blank"><img alt="Click for enlarged picture" src="https://hosting.photobucket.com/95288841-8654-4bf7-8fc9-a4aa78dce87f/d6bd52bf-5585-41ad-a5f0-39ea8eba78af.jpg" width="600" /></a></p>
<p>
Radionica se provodila kroz dva dana (cijeli vikend) i polaznici su bojali tri različite figure za igru Trench Crusade (prema izboru). Fokus ovih predavanja bilo je bojenje više minijatura odjednom prepoznatljivim GRIMDARK stilom, no znanja s radionice jednako su primjenjiva i na bojenje vojski za boardgame igre te kolekcija figura za pen&paper rpg-ove. Na radionici su bile predstavljene boje i pribor, priprema figura, nekoliko tehnika bojenja minijatura od osnovnih do naprednijih, te tehnike i trikovi za brzo i efikasno bojenje većih količina figura odjednom. U sklopu radionice bile su korištene akrilne boje na bazi vode te uljni efekti jednostavni za korištenje. Predavanja su prilagođena tako da voditelji posveti jednako vrijeme svim polaznicima i može se prilagoditi svim kategorijama minijaturista (od početnika do malo naprednijih).</p>
<p>
<a href="https://hosting.photobucket.com/95288841-8654-4bf7-8fc9-a4aa78dce87f/d894975c-ea8f-4cc4-9f8c-8e87324723b1.jpg" target="_blank"><img alt="Click for enlarged picture" src="https://hosting.photobucket.com/95288841-8654-4bf7-8fc9-a4aa78dce87f/d894975c-ea8f-4cc4-9f8c-8e87324723b1.jpg" width="600" /></a></p>
<p>
<a href="https://hosting.photobucket.com/95288841-8654-4bf7-8fc9-a4aa78dce87f/f72b74ba-1c23-4bfb-9feb-568dc5df1a6a.jpg" target="_blank"><img alt="Click for enlarged picture" src="https://hosting.photobucket.com/95288841-8654-4bf7-8fc9-a4aa78dce87f/f72b74ba-1c23-4bfb-9feb-568dc5df1a6a.jpg" width="600" /></a></p>
<p>
<a href="https://hosting.photobucket.com/95288841-8654-4bf7-8fc9-a4aa78dce87f/40167cf3-b290-41d4-ac8a-212d19fe7f0a.jpg" target="_blank"><img alt="Click for enlarged picture" src="https://hosting.photobucket.com/95288841-8654-4bf7-8fc9-a4aa78dce87f/40167cf3-b290-41d4-ac8a-212d19fe7f0a.jpg" width="600" /></a></p>
<p>
<a href="https://hosting.photobucket.com/95288841-8654-4bf7-8fc9-a4aa78dce87f/cfbd68f1-bc70-4943-8f7b-69716084f638.jpg" target="_blank"><img alt="Click for enlarged picture" src="https://hosting.photobucket.com/95288841-8654-4bf7-8fc9-a4aa78dce87f/cfbd68f1-bc70-4943-8f7b-69716084f638.jpg" width="600" /></a></p>
<p>
Radionica je uključivalai sljedeće tematske cjeline:<br />
1. Planiranje i priprema te sastavljanje minijatura<br />
2. Obrada minijatura prije bojanja<br />
3. Osnovne grimdark stila i izbor boja<br />
4. Osnovne boje<br />
5. Tehnike shadinga i highlighta<br />
6. Naknadno podizanje gotovog paintjoba na višu razinu, uljni efekti</p>
<p>
<a href="https://hosting.photobucket.com/95288841-8654-4bf7-8fc9-a4aa78dce87f/cef3712c-57f1-435e-80b7-a35b4620c5f9.jpg" target="_blank"><img alt="Click for enlarged picture" src="https://hosting.photobucket.com/95288841-8654-4bf7-8fc9-a4aa78dce87f/cef3712c-57f1-435e-80b7-a35b4620c5f9.jpg" width="600" /></a></p>
<p>
<a href="https://hosting.photobucket.com/95288841-8654-4bf7-8fc9-a4aa78dce87f/f72b74ba-1c23-4bfb-9feb-568dc5df1a6a.jpg" target="_blank"><img alt="Click for enlarged picture" src="https://hosting.photobucket.com/95288841-8654-4bf7-8fc9-a4aa78dce87f/f72b74ba-1c23-4bfb-9feb-568dc5df1a6a.jpg" width="600" /></a></p>
<p>
<a href="https://hosting.photobucket.com/95288841-8654-4bf7-8fc9-a4aa78dce87f/6b6285a7-e08b-482e-9343-74e8d08bbca4.jpg" target="_blank"><img alt="Click for enlarged picture" src="https://hosting.photobucket.com/95288841-8654-4bf7-8fc9-a4aa78dce87f/6b6285a7-e08b-482e-9343-74e8d08bbca4.jpg" width="600" /></a></p>
<p>
<a href="https://hosting.photobucket.com/95288841-8654-4bf7-8fc9-a4aa78dce87f/1be59454-f3ac-4f70-9550-60c9101d7e44.png" target="_blank"><img alt="Click for enlarged picture" src="https://hosting.photobucket.com/95288841-8654-4bf7-8fc9-a4aa78dce87f/1be59454-f3ac-4f70-9550-60c9101d7e44.png" width="600" /></a></p>
"
["created"]=>
string(19) "2026-03-05 20:23:04"
["modified"]=>
string(19) "2026-03-05 20:23:04"
}
["Member"]=>
array(10) {
["id"]=>
string(2) "35"
["group_id"]=>
string(1) "1"
["first_name"]=>
string(5) "Marko"
["last_name"]=>
string(9) "Paunović"
["first_name_mask"]=>
string(5) "marko"
["last_name_mask"]=>
string(8) "paunovic"
["username"]=>
string(5) "marko"
["password"]=>
string(40) "3bd37b326d19d1880d3b93a4b32e8fb3a90fa122"
["born"]=>
string(19) "2033-03-07 20:35:00"
["created"]=>
string(19) "2009-06-02 20:37:03"
}
}
</pre>
<a href="/dok/members/marko.paunovic">Marko Paunović</a>, 5<span class="superscript">th</span> March 2026</span>
</li>
<li>
<a href="/dok/articles/2026/02/26" class="readMore"></a>
<span class="details"> <pre style="display: none;">
array(2) {
["Article"]=>
array(10) {
["id"]=>
string(3) "494"
["member_id"]=>
string(2) "64"
["title_eng"]=>
string(35) "AGRAM LEGO SECTION - F1 car: FW14b "
["title_hrv"]=>
string(51) "AGRAM LEGO SEKCIJA - FW14b - F1 bolid za budućnost"
["mask_eng"]=>
string(33) "agram_lego_section_-_f1_car_fw14b"
["mask_hrv"]=>
string(50) "agram_lego_sekcija_-_fw14b_-_f1_bolid_za_buducnost"
["content_eng"]=>
string(2839) "<p style="margin: 0px 0px 10px; padding: 0px; border: 0px; outline: 0px; vertical-align: baseline; background-image: initial; background-position: initial; background-size: initial; background-repeat: initial; background-attachment: initial; background-origin: initial; background-clip: initial; position: relative; float: none; clear: both; color: rgb(0, 0, 0); font-family: Verdana, sans-serif;">
<a href="https://hosting.photobucket.com/95288841-8654-4bf7-8fc9-a4aa78dce87f/1ef40d9f-2e5d-499f-80f7-6b4d72af83f9.jpg" style="font-family: Arial, Verdana, sans-serif;" target="_blank"><img alt="Click for enlarged picture" src="https://hosting.photobucket.com/95288841-8654-4bf7-8fc9-a4aa78dce87f/1ef40d9f-2e5d-499f-80f7-6b4d72af83f9.jpg" width="600" /></a></p>
<p>
<iframe allowfullscreen="" frameborder="0" height="360" src="https://www.youtube.com/embed/LzYP6Hx5nsI?si=jmjVIidV2ZvsAz6F" width="600"></iframe></p>
<p>
<a href="https://hosting.photobucket.com/95288841-8654-4bf7-8fc9-a4aa78dce87f/3141a84f-b80f-429d-9635-98cf9c5fd3ba.jpg" target="_blank"><img alt="Click for enlarged picture" src="https://hosting.photobucket.com/95288841-8654-4bf7-8fc9-a4aa78dce87f/3141a84f-b80f-429d-9635-98cf9c5fd3ba.jpg" width="600" /></a></p>
<p>
<a href="https://hosting.photobucket.com/95288841-8654-4bf7-8fc9-a4aa78dce87f/b0ae7518-4d6c-4af7-85a4-e2c1e5fd52cc.jpg" target="_blank"><img alt="Click for enlarged picture" src="https://hosting.photobucket.com/95288841-8654-4bf7-8fc9-a4aa78dce87f/b0ae7518-4d6c-4af7-85a4-e2c1e5fd52cc.jpg" width="600" /></a></p>
<p>
<a href="https://hosting.photobucket.com/95288841-8654-4bf7-8fc9-a4aa78dce87f/bc98e558-a4db-4676-840b-c67e052f2049.jpg" target="_blank"><img alt="Click for enlarged picture" src="https://hosting.photobucket.com/95288841-8654-4bf7-8fc9-a4aa78dce87f/bc98e558-a4db-4676-840b-c67e052f2049.jpg" width="600" /></a></p>
<p>
<a href="https://hosting.photobucket.com/95288841-8654-4bf7-8fc9-a4aa78dce87f/c992673a-0b69-4b12-b7d4-cf3dcfe87462.jpg" target="_blank"><img alt="Click for enlarged picture" src="https://hosting.photobucket.com/95288841-8654-4bf7-8fc9-a4aa78dce87f/c992673a-0b69-4b12-b7d4-cf3dcfe87462.jpg" width="600" /></a></p>
<p>
<a href="https://hosting.photobucket.com/95288841-8654-4bf7-8fc9-a4aa78dce87f/a5b3c4dd-9d89-423e-b1d9-3324eb88815c.jpg" target="_blank"><img alt="Click for enlarged picture" src="https://hosting.photobucket.com/95288841-8654-4bf7-8fc9-a4aa78dce87f/a5b3c4dd-9d89-423e-b1d9-3324eb88815c.jpg" width="600" /></a></p>
<p>
<a href="https://hosting.photobucket.com/95288841-8654-4bf7-8fc9-a4aa78dce87f/6c83d1bd-a307-4cdf-9e09-f2615d2688c4.jpg" target="_blank"><img alt="Click for enlarged picture" src="https://hosting.photobucket.com/95288841-8654-4bf7-8fc9-a4aa78dce87f/6c83d1bd-a307-4cdf-9e09-f2615d2688c4.jpg" width="600" /></a></p>"
["content_hrv"]=>
string(4213) "<p style="margin: 0px 0px 10px; padding: 0px; border: 0px; outline: 0px; vertical-align: baseline; background-image: initial; background-position: initial; background-size: initial; background-repeat: initial; background-attachment: initial; background-origin: initial; background-clip: initial; position: relative; float: none; clear: both; color: rgb(0, 0, 0); font-family: Verdana, sans-serif;">
U srijedu 25.2. u sklopu naše Izložbe minijatura i maketa Agram 2026, naša Agram Lego Sekcija je odradila svoj četvrti projekt. Nakon Hogwartsa u 2024. te Leonarda i Orient Expressa u 2025., prvi projekt u 2026. bio je bolid Formule 1 sa početka 1990-ih. </p>
<p>
<a href="https://hosting.photobucket.com/95288841-8654-4bf7-8fc9-a4aa78dce87f/1ef40d9f-2e5d-499f-80f7-6b4d72af83f9.jpg" target="_blank"><img alt="Click for enlarged picture" src="https://hosting.photobucket.com/95288841-8654-4bf7-8fc9-a4aa78dce87f/1ef40d9f-2e5d-499f-80f7-6b4d72af83f9.jpg" width="600" /></a></p>
<p>
Kao što je već tradicija kod naše Lego Sekcije, prije izgradnje modela, valjalo se malo educirati o temi. Ovoga puta naš dežurni strojar Marko Paunović održao je predavanje o bolidu FW14b, pobjedničkom bolidu iz 1992. tima Williams s kojim su postali svjetski konstruktorski prvaci, a kojeg je Nigel Mansel vozio do svjetske titule. U svojem predavanju, Marko je obradio teme aerodinamike, aktivnog ovjesa, mjenjača na volanu te ostalih inovacija koje je ovaj bolid uspješno instalirao. </p>
<p>
<iframe allowfullscreen="" frameborder="0" height="360" src="https://www.youtube.com/embed/LzYP6Hx5nsI?si=jmjVIidV2ZvsAz6F" width="600"></iframe></p>
<p>
Ulaz na predavanje bio je besplatan, a prijave nisu bile potrebne!</p>
<p>
<a href="https://hosting.photobucket.com/95288841-8654-4bf7-8fc9-a4aa78dce87f/3141a84f-b80f-429d-9635-98cf9c5fd3ba.jpg" target="_blank"><img alt="Click for enlarged picture" src="https://hosting.photobucket.com/95288841-8654-4bf7-8fc9-a4aa78dce87f/3141a84f-b80f-429d-9635-98cf9c5fd3ba.jpg" width="600" /></a></p>
<p>
<a href="https://hosting.photobucket.com/95288841-8654-4bf7-8fc9-a4aa78dce87f/b0ae7518-4d6c-4af7-85a4-e2c1e5fd52cc.jpg" target="_blank"><img alt="Click for enlarged picture" src="https://hosting.photobucket.com/95288841-8654-4bf7-8fc9-a4aa78dce87f/b0ae7518-4d6c-4af7-85a4-e2c1e5fd52cc.jpg" width="600" /></a></p>
<p>
<span style="color: rgb(0, 0, 0); font-family: Verdana, sans-serif;">Izrada makete je rezervirana za članove Agram Lego Sekcije. </span></p>
<p>
<a href="https://hosting.photobucket.com/95288841-8654-4bf7-8fc9-a4aa78dce87f/bc98e558-a4db-4676-840b-c67e052f2049.jpg" target="_blank"><img alt="Click for enlarged picture" src="https://hosting.photobucket.com/95288841-8654-4bf7-8fc9-a4aa78dce87f/bc98e558-a4db-4676-840b-c67e052f2049.jpg" width="600" /></a></p>
<p>
<a href="https://hosting.photobucket.com/95288841-8654-4bf7-8fc9-a4aa78dce87f/c992673a-0b69-4b12-b7d4-cf3dcfe87462.jpg" target="_blank"><img alt="Click for enlarged picture" src="https://hosting.photobucket.com/95288841-8654-4bf7-8fc9-a4aa78dce87f/c992673a-0b69-4b12-b7d4-cf3dcfe87462.jpg" width="600" /></a></p>
<p>
<a href="https://hosting.photobucket.com/95288841-8654-4bf7-8fc9-a4aa78dce87f/a5b3c4dd-9d89-423e-b1d9-3324eb88815c.jpg" target="_blank"><img alt="Click for enlarged picture" src="https://hosting.photobucket.com/95288841-8654-4bf7-8fc9-a4aa78dce87f/a5b3c4dd-9d89-423e-b1d9-3324eb88815c.jpg" width="600" /></a></p>
<p>
<span style="color: rgb(0, 0, 0); font-family: Verdana, sans-serif;">Ukoliko se želite uključiti u sljedeće projekte, javite se za više informacija na ums.agram@gmail.com .</span></p>
<p>
<a href="https://hosting.photobucket.com/95288841-8654-4bf7-8fc9-a4aa78dce87f/6c83d1bd-a307-4cdf-9e09-f2615d2688c4.jpg" target="_blank"><img alt="Click for enlarged picture" src="https://hosting.photobucket.com/95288841-8654-4bf7-8fc9-a4aa78dce87f/6c83d1bd-a307-4cdf-9e09-f2615d2688c4.jpg" width="600" /></a></p>
<p>
Sljedeći projekt bit će u travnju, a tema će biti Gospodar Prstenova. Očekuju vas pregršt zabavnih predavanja.<br />
<br />
Vidimo se!</p>
"
["created"]=>
string(19) "2026-02-26 13:32:17"
["modified"]=>
string(19) "2026-02-26 13:32:17"
}
["Member"]=>
array(10) {
["id"]=>
string(2) "64"
["group_id"]=>
string(1) "1"
["first_name"]=>
string(9) "Krunoslav"
["last_name"]=>
string(8) "Belinić"
["first_name_mask"]=>
string(9) "krunoslav"
["last_name_mask"]=>
string(7) "belinic"
["username"]=>
string(5) "Kruno"
["password"]=>
string(40) "eb3fda45fbec0258e90d809803b10491c548b22f"
["born"]=>
string(19) "2015-01-18 09:19:00"
["created"]=>
string(19) "2015-01-18 09:20:39"
}
}
</pre>
<a href="/dok/members/krunoslav.belinic">Krunoslav Belinić</a>, 26<span class="superscript">th</span> February 2026</span>
</li>
<li>
<a href="/dok/articles/2026/02/25" class="readMore"></a>
<span class="details"> <pre style="display: none;">
array(2) {
["Article"]=>
array(10) {
["id"]=>
string(3) "493"
["member_id"]=>
string(2) "64"
["title_eng"]=>
string(51) "Gallery of winning entries of Black Queen H&MPC2026"
["title_hrv"]=>
string(54) "Galerija pobjedničkih radova na Black Queen H&MPC2026"
["mask_eng"]=>
string(50) "gallery_of_winning_entries_of_black_queen_hmpc2026"
["mask_hrv"]=>
string(52) "galerija_pobjednickih_radova_na_black_queen_hmpc2026"
["content_eng"]=>
string(12503) "<p>
<strong>BEST OF SHOW</strong> & 1. place <strong>MASTERCLASS - IVAN KNEZOVIĆ</strong></p>
<p>
<a href="https://hosting.photobucket.com/95288841-8654-4bf7-8fc9-a4aa78dce87f/8949b562-8f41-4a80-aab2-f22784b3ba6c.jpg" target="_blank"><img alt="Click for enlarged picture" src="https://hosting.photobucket.com/95288841-8654-4bf7-8fc9-a4aa78dce87f/8949b562-8f41-4a80-aab2-f22784b3ba6c.jpg" width="600" /></a></p>
<p>
2. place <strong>MASTERCLASS </strong><strong>- ANŽE ZORKO</strong></p>
<p>
<a href="https://hosting.photobucket.com/95288841-8654-4bf7-8fc9-a4aa78dce87f/ae622692-061b-49cd-984e-0b93c47c12a9.jpg" target="_blank"><img alt="Click for enlarged picture" src="https://hosting.photobucket.com/95288841-8654-4bf7-8fc9-a4aa78dce87f/ae622692-061b-49cd-984e-0b93c47c12a9.jpg" width="600" /></a></p>
<p>
3. place <strong>MASTERCLASS </strong><strong>- ANA POLANŠĆAK</strong></p>
<p>
<a href="https://hosting.photobucket.com/95288841-8654-4bf7-8fc9-a4aa78dce87f/f33188f9-7799-4375-8e74-e1d946f874cd.jpg" target="_blank"><img alt="Click for enlarged picture" src="https://hosting.photobucket.com/95288841-8654-4bf7-8fc9-a4aa78dce87f/f33188f9-7799-4375-8e74-e1d946f874cd.jpg" width="600" /></a></p>
<p>
<strong>BEST DISPLAY </strong><strong>- MARKO PAUNOVIĆ</strong></p>
<p>
<a href="https://hosting.photobucket.com/95288841-8654-4bf7-8fc9-a4aa78dce87f/3f5d890e-529a-4fcb-9c86-221bd6fc2e57.jpg" target="_blank"><img alt="Click for enlarged picture" src="https://hosting.photobucket.com/95288841-8654-4bf7-8fc9-a4aa78dce87f/3f5d890e-529a-4fcb-9c86-221bd6fc2e57.jpg" width="600" /></a></p>
<p>
<strong>BEST OF FANTASY</strong> & <strong>PEOPLE'S CHOICE </strong><strong>- IVAN KNEZOVIĆ</strong></p>
<p>
<a href="https://hosting.photobucket.com/95288841-8654-4bf7-8fc9-a4aa78dce87f/c89aa7cf-f050-4aa4-bf5d-c31abe70165e.jpg" target="_blank"><img alt="Click for enlarged picture" src="https://hosting.photobucket.com/95288841-8654-4bf7-8fc9-a4aa78dce87f/c89aa7cf-f050-4aa4-bf5d-c31abe70165e.jpg" width="600" /></a></p>
<p>
<strong>BEST OF HISTORICAL </strong><strong>- NINOSLAV LUK</strong></p>
<p>
<a href="https://hosting.photobucket.com/95288841-8654-4bf7-8fc9-a4aa78dce87f/b2751730-af2e-42c6-a33c-30890f8d3a26.jpg" target="_blank"><img alt="Click for enlarged picture" src="https://hosting.photobucket.com/95288841-8654-4bf7-8fc9-a4aa78dce87f/b2751730-af2e-42c6-a33c-30890f8d3a26.jpg" width="600" /></a></p>
<p>
<strong>BEST SCULPT </strong><strong>- MONIKA BEŠENIĆ</strong></p>
<p>
<a href="https://hosting.photobucket.com/95288841-8654-4bf7-8fc9-a4aa78dce87f/7e5a7d8d-cea4-4e51-8bfc-6b67a4c12f05.jpg" target="_blank"><img alt="Click for enlarged picture" src="https://hosting.photobucket.com/95288841-8654-4bf7-8fc9-a4aa78dce87f/7e5a7d8d-cea4-4e51-8bfc-6b67a4c12f05.jpg" width="600" /></a></p>
<p>
1.place<strong>SINGLE MINIATURE </strong><strong>- VLADIMIR MATIĆ-KURILJEV</strong></p>
<p>
<a href="https://hosting.photobucket.com/95288841-8654-4bf7-8fc9-a4aa78dce87f/f4828224-9bde-4e65-8a6d-1af3f312503a.jpg" target="_blank"><img alt="Click for enlarged picture" src="https://hosting.photobucket.com/95288841-8654-4bf7-8fc9-a4aa78dce87f/f4828224-9bde-4e65-8a6d-1af3f312503a.jpg" width="600" /></a></p>
<p>
2.place<strong>SINGLE MINIATURE </strong><strong>- ANA POLANŠĆAK</strong></p>
<p>
<a href="https://hosting.photobucket.com/95288841-8654-4bf7-8fc9-a4aa78dce87f/cb9380c7-f7ee-406a-bccf-9a86477bed82.jpg" target="_blank"><img alt="Click for enlarged picture" src="https://hosting.photobucket.com/95288841-8654-4bf7-8fc9-a4aa78dce87f/cb9380c7-f7ee-406a-bccf-9a86477bed82.jpg" width="600" /></a></p>
<p>
3.place<strong>SINGLE MINIATURE - ADAM SKENDŽIĆ</strong></p>
<p>
<a href="https://hosting.photobucket.com/95288841-8654-4bf7-8fc9-a4aa78dce87f/a5f80a51-27d4-4040-952e-b04eb5bf4c99.jpg" target="_blank"><img alt="Click for enlarged picture" src="https://hosting.photobucket.com/95288841-8654-4bf7-8fc9-a4aa78dce87f/a5f80a51-27d4-4040-952e-b04eb5bf4c99.jpg" width="600" /></a></p>
<p>
1.place<strong>LARGE/MOUNTED MINIATURE - SEBASTIAN SOGARD</strong></p>
<p>
<a href="https://hosting.photobucket.com/95288841-8654-4bf7-8fc9-a4aa78dce87f/1f8e3547-5113-488b-9983-c3c592add875.jpg" target="_blank"><img alt="Click for enlarged picture" src="https://hosting.photobucket.com/95288841-8654-4bf7-8fc9-a4aa78dce87f/1f8e3547-5113-488b-9983-c3c592add875.jpg" width="600" /></a></p>
<p>
2.place<strong>LARGE/MOUNTED MINIATURE - JURE CUKAR</strong></p>
<p>
<a href="https://hosting.photobucket.com/95288841-8654-4bf7-8fc9-a4aa78dce87f/de5778ba-d672-4d24-8e6e-f9f1ac993c26.jpg" target="_blank"><img alt="Click for enlarged picture" src="https://hosting.photobucket.com/95288841-8654-4bf7-8fc9-a4aa78dce87f/de5778ba-d672-4d24-8e6e-f9f1ac993c26.jpg" width="600" /></a></p>
<p>
3.place<strong>LARGE/MOUNTED MINIATURE - ANA POLANŠĆAK</strong></p>
<p>
<a href="https://hosting.photobucket.com/95288841-8654-4bf7-8fc9-a4aa78dce87f/58d2d738-55f2-495d-bd44-cf8d023e0142.jpg" target="_blank"><img alt="Click for enlarged picture" src="https://hosting.photobucket.com/95288841-8654-4bf7-8fc9-a4aa78dce87f/58d2d738-55f2-495d-bd44-cf8d023e0142.jpg" width="600" /></a></p>
<p>
1.place<strong>UNIT / SQUAD </strong><strong>- IVAN KNEZOVIĆ</strong></p>
<p>
<a href="https://hosting.photobucket.com/95288841-8654-4bf7-8fc9-a4aa78dce87f/b77d9055-d0c4-4803-8e3f-0bf295c3d5d0.jpg" target="_blank"><img alt="Click for enlarged picture" src="https://hosting.photobucket.com/95288841-8654-4bf7-8fc9-a4aa78dce87f/b77d9055-d0c4-4803-8e3f-0bf295c3d5d0.jpg" width="600" /></a></p>
<p>
2.place<strong>UNIT / SQUAD - MILAN RADACSI</strong></p>
<p>
<a href="https://hosting.photobucket.com/95288841-8654-4bf7-8fc9-a4aa78dce87f/1a6d64f2-a293-4a81-b974-1696d8bb5972.jpg" target="_blank"><img alt="Click for enlarged picture" src="https://hosting.photobucket.com/95288841-8654-4bf7-8fc9-a4aa78dce87f/1a6d64f2-a293-4a81-b974-1696d8bb5972.jpg" width="600" /></a></p>
<p>
3.place<strong>UNIT / SQUAD - MAKSIMILIJAN ŠPRUNG</strong></p>
<p>
<a href="https://hosting.photobucket.com/95288841-8654-4bf7-8fc9-a4aa78dce87f/0b0ae61f-c140-4c35-b58c-a0813c15d83a.jpg" target="_blank"><img alt="Click for enlarged picture" src="https://hosting.photobucket.com/95288841-8654-4bf7-8fc9-a4aa78dce87f/0b0ae61f-c140-4c35-b58c-a0813c15d83a.jpg" width="600" /></a></p>
<p>
1.place<strong>VEHICLE / MONSTER - MAKSIMILIJAN ŠPRUNG</strong></p>
<p>
<a href="https://hosting.photobucket.com/95288841-8654-4bf7-8fc9-a4aa78dce87f/34dbfff5-b8db-478d-a13d-3698c0490a95.jpg" target="_blank"><img alt="Click for enlarged picture" src="https://hosting.photobucket.com/95288841-8654-4bf7-8fc9-a4aa78dce87f/34dbfff5-b8db-478d-a13d-3698c0490a95.jpg" width="600" /></a></p>
<p>
2.place<strong>VEHICLE / MONSTER - MARIO GRGUREV</strong></p>
<p>
<a href="https://hosting.photobucket.com/95288841-8654-4bf7-8fc9-a4aa78dce87f/387e5e88-4f80-4bb9-9b30-f7241369de41.jpg" target="_blank"><img alt="Click for enlarged picture" src="https://hosting.photobucket.com/95288841-8654-4bf7-8fc9-a4aa78dce87f/387e5e88-4f80-4bb9-9b30-f7241369de41.jpg" width="600" /></a></p>
<p>
3.place<strong>VEHICLE / MONSTER - MARKO PAUNOVIĆ</strong></p>
<p>
<a href="https://hosting.photobucket.com/95288841-8654-4bf7-8fc9-a4aa78dce87f/8c2034d2-cae0-4bc2-bdd9-eab85b71db7b.jpg" target="_blank"><img alt="Click for enlarged picture" src="https://hosting.photobucket.com/95288841-8654-4bf7-8fc9-a4aa78dce87f/8c2034d2-cae0-4bc2-bdd9-eab85b71db7b.jpg" width="600" /></a></p>
<p>
1.place<strong>OPEN - PETAR KNEZOVIĆ</strong></p>
<p>
<a href="https://hosting.photobucket.com/95288841-8654-4bf7-8fc9-a4aa78dce87f/7e2723b8-421d-4d59-b2ab-5b5abf4a067a.jpg" target="_blank"><img alt="Click for enlarged picture" src="https://hosting.photobucket.com/95288841-8654-4bf7-8fc9-a4aa78dce87f/7e2723b8-421d-4d59-b2ab-5b5abf4a067a.jpg" width="600" /></a></p>
<p>
2.place<strong>OPEN - FILIP KNEZOVIĆ</strong></p>
<p>
<a href="https://hosting.photobucket.com/95288841-8654-4bf7-8fc9-a4aa78dce87f/2bcd6dc0-6d54-44fd-b660-4f6862e2551f.jpg" target="_blank"><img alt="Click for enlarged picture" src="https://hosting.photobucket.com/95288841-8654-4bf7-8fc9-a4aa78dce87f/2bcd6dc0-6d54-44fd-b660-4f6862e2551f.jpg" width="600" /></a></p>
<p>
3.place<strong>OPEN - DINO TEREK</strong></p>
<p>
<a href="https://hosting.photobucket.com/95288841-8654-4bf7-8fc9-a4aa78dce87f/fe807e70-9250-49f9-8458-56b2ee4b0fad.jpg" target="_blank"><img alt="Click for enlarged picture" src="https://hosting.photobucket.com/95288841-8654-4bf7-8fc9-a4aa78dce87f/fe807e70-9250-49f9-8458-56b2ee4b0fad.jpg" width="600" /></a></p>
<p>
1.place<strong>DIORAMA / DUEL - MARKO PAUNOVIĆ</strong></p>
<p>
<a href="https://hosting.photobucket.com/95288841-8654-4bf7-8fc9-a4aa78dce87f/a7f3bd4c-74cd-48ff-ac00-2d884c6c4770.jpg" target="_blank"><img alt="Click for enlarged picture" src="https://hosting.photobucket.com/95288841-8654-4bf7-8fc9-a4aa78dce87f/a7f3bd4c-74cd-48ff-ac00-2d884c6c4770.jpg" width="600" /></a></p>
<p>
2.place<strong>DIORAMA / DUEL - VLADIMIR MATIĆ-KURILJEV</strong></p>
<p>
<a href="https://hosting.photobucket.com/95288841-8654-4bf7-8fc9-a4aa78dce87f/1218bbec-f68d-40e4-a8ae-66e57c949846.jpg" target="_blank"><img alt="Click for enlarged picture" src="https://hosting.photobucket.com/95288841-8654-4bf7-8fc9-a4aa78dce87f/1218bbec-f68d-40e4-a8ae-66e57c949846.jpg" width="600" /></a></p>
<p>
3.place<strong>DIORAMA / DUEL - JURE CUKAR</strong></p>
<p>
<a href="https://hosting.photobucket.com/95288841-8654-4bf7-8fc9-a4aa78dce87f/4ad5c251-dd03-471f-8ff2-3526507e4aa7.jpg" target="_blank"><img alt="Click for enlarged picture" src="https://hosting.photobucket.com/95288841-8654-4bf7-8fc9-a4aa78dce87f/4ad5c251-dd03-471f-8ff2-3526507e4aa7.jpg" width="600" /></a></p>
<p>
1.place<strong>BUST - MARKO PAUNOVIĆ</strong></p>
<p>
<a href="https://hosting.photobucket.com/95288841-8654-4bf7-8fc9-a4aa78dce87f/daaa9dff-9d7c-4696-b8d9-7ce0c311012a.jpg" target="_blank"><img alt="Click for enlarged picture" src="https://hosting.photobucket.com/95288841-8654-4bf7-8fc9-a4aa78dce87f/daaa9dff-9d7c-4696-b8d9-7ce0c311012a.jpg" width="600" /></a></p>
<p>
2.place<strong>BUST - ANŽE ZORKO</strong></p>
<p>
<a href="https://hosting.photobucket.com/95288841-8654-4bf7-8fc9-a4aa78dce87f/e11e4893-05f4-49df-a758-720b188c5917.jpg" target="_blank"><img alt="Click for enlarged picture" src="https://hosting.photobucket.com/95288841-8654-4bf7-8fc9-a4aa78dce87f/e11e4893-05f4-49df-a758-720b188c5917.jpg" width="600" /></a></p>
<p>
3.place<strong>BUST </strong><strong>- IVAN KNEZOVIĆ</strong></p>
<p>
<a href="https://hosting.photobucket.com/95288841-8654-4bf7-8fc9-a4aa78dce87f/d2435198-c290-43bf-a2fe-e8e592dabd7f.jpg" target="_blank"><img alt="Click for enlarged picture" src="https://hosting.photobucket.com/95288841-8654-4bf7-8fc9-a4aa78dce87f/d2435198-c290-43bf-a2fe-e8e592dabd7f.jpg" width="600" /></a></p>
<p>
1.place<strong>JUNIOR - ELANOR GRAŠIĆ</strong></p>
<p>
<a href="https://hosting.photobucket.com/95288841-8654-4bf7-8fc9-a4aa78dce87f/f0bbb346-9821-43dc-a463-e507fb1b87ee.jpg" target="_blank"><img alt="Click for enlarged picture" src="https://hosting.photobucket.com/95288841-8654-4bf7-8fc9-a4aa78dce87f/f0bbb346-9821-43dc-a463-e507fb1b87ee.jpg" width="600" /></a></p>
<p>
2.place<strong>JUNIOR - LUKA ŠEGINA</strong></p>
<p>
<a href="https://hosting.photobucket.com/95288841-8654-4bf7-8fc9-a4aa78dce87f/1829eee3-80f3-48de-a013-bada8c612e76.jpg" target="_blank"><img alt="Click for enlarged picture" src="https://hosting.photobucket.com/95288841-8654-4bf7-8fc9-a4aa78dce87f/1829eee3-80f3-48de-a013-bada8c612e76.jpg" width="600" /></a></p>
<p>
3.place<strong>JUNIOR - SOFIJA MARASOVIĆ</strong></p>
<p>
<a href="https://hosting.photobucket.com/95288841-8654-4bf7-8fc9-a4aa78dce87f/bdf02300-4634-46b3-a659-6a8a9183177e.jpg" target="_blank"><img alt="Click for enlarged picture" src="https://hosting.photobucket.com/95288841-8654-4bf7-8fc9-a4aa78dce87f/bdf02300-4634-46b3-a659-6a8a9183177e.jpg" width="600" /></a></p>
<p>
You can see all the entries in the gallery on our <a href="https://www.facebook.com/BlackQueenHMPC/posts/pfbid02gCGwwc8vTLFJDs1MFmbxc8NKZv1oni7uykTLKmomFSM1APfKrGRNtCkr2a6HTGQrl">social networks</a>.</p>
"
["content_hrv"]=>
string(12719) "<p>
<strong>BEST OF SHOW</strong> & 1. mjesto <strong>MASTERCLASS - IVAN KNEZOVIĆ</strong></p>
<p>
<a href="https://hosting.photobucket.com/95288841-8654-4bf7-8fc9-a4aa78dce87f/8949b562-8f41-4a80-aab2-f22784b3ba6c.jpg" target="_blank"><img alt="Click for enlarged picture" src="https://hosting.photobucket.com/95288841-8654-4bf7-8fc9-a4aa78dce87f/8949b562-8f41-4a80-aab2-f22784b3ba6c.jpg" width="600" /></a></p>
<p>
2. mjesto <strong>MASTERCLASS </strong><strong>- ANŽE ZORKO</strong></p>
<p>
<a href="https://hosting.photobucket.com/95288841-8654-4bf7-8fc9-a4aa78dce87f/ae622692-061b-49cd-984e-0b93c47c12a9.jpg" target="_blank"><img alt="Click for enlarged picture" src="https://hosting.photobucket.com/95288841-8654-4bf7-8fc9-a4aa78dce87f/ae622692-061b-49cd-984e-0b93c47c12a9.jpg" width="600" /></a></p>
<p>
3. mjesto <strong>MASTERCLASS </strong><strong>- ANA POLANŠĆAK</strong></p>
<p>
<a href="https://hosting.photobucket.com/95288841-8654-4bf7-8fc9-a4aa78dce87f/f33188f9-7799-4375-8e74-e1d946f874cd.jpg" target="_blank"><img alt="Click for enlarged picture" src="https://hosting.photobucket.com/95288841-8654-4bf7-8fc9-a4aa78dce87f/f33188f9-7799-4375-8e74-e1d946f874cd.jpg" width="600" /></a></p>
<p>
<strong>BEST DISPLAY </strong><strong>- MARKO PAUNOVIĆ</strong></p>
<p>
<a href="https://hosting.photobucket.com/95288841-8654-4bf7-8fc9-a4aa78dce87f/3f5d890e-529a-4fcb-9c86-221bd6fc2e57.jpg" target="_blank"><img alt="Click for enlarged picture" src="https://hosting.photobucket.com/95288841-8654-4bf7-8fc9-a4aa78dce87f/3f5d890e-529a-4fcb-9c86-221bd6fc2e57.jpg" width="600" /></a></p>
<p>
<strong>BEST OF FANTASY</strong> & <strong>PEOPLE'S CHOICE </strong><strong>- IVAN KNEZOVIĆ</strong></p>
<p>
<a href="https://hosting.photobucket.com/95288841-8654-4bf7-8fc9-a4aa78dce87f/c89aa7cf-f050-4aa4-bf5d-c31abe70165e.jpg" target="_blank"><img alt="Click for enlarged picture" src="https://hosting.photobucket.com/95288841-8654-4bf7-8fc9-a4aa78dce87f/c89aa7cf-f050-4aa4-bf5d-c31abe70165e.jpg" width="600" /></a></p>
<p>
<strong>BEST OF HISTORICAL </strong><strong>- NINOSLAV LUK</strong></p>
<p>
<a href="https://hosting.photobucket.com/95288841-8654-4bf7-8fc9-a4aa78dce87f/b2751730-af2e-42c6-a33c-30890f8d3a26.jpg" target="_blank"><img alt="Click for enlarged picture" src="https://hosting.photobucket.com/95288841-8654-4bf7-8fc9-a4aa78dce87f/b2751730-af2e-42c6-a33c-30890f8d3a26.jpg" width="600" /></a></p>
<p>
<strong>BEST SCULPT </strong><strong>- MONIKA BEŠENIĆ</strong></p>
<p>
<a href="https://hosting.photobucket.com/95288841-8654-4bf7-8fc9-a4aa78dce87f/7e5a7d8d-cea4-4e51-8bfc-6b67a4c12f05.jpg" target="_blank"><img alt="Click for enlarged picture" src="https://hosting.photobucket.com/95288841-8654-4bf7-8fc9-a4aa78dce87f/7e5a7d8d-cea4-4e51-8bfc-6b67a4c12f05.jpg" width="600" /></a></p>
<p>
1.mjesto <strong>SINGLE MINIATURE </strong><strong>- VLADIMIR MATIĆ-KURILJEV</strong></p>
<p>
<a href="https://hosting.photobucket.com/95288841-8654-4bf7-8fc9-a4aa78dce87f/f4828224-9bde-4e65-8a6d-1af3f312503a.jpg" target="_blank"><img alt="Click for enlarged picture" src="https://hosting.photobucket.com/95288841-8654-4bf7-8fc9-a4aa78dce87f/f4828224-9bde-4e65-8a6d-1af3f312503a.jpg" width="600" /></a></p>
<p>
2.mjesto <strong>SINGLE MINIATURE </strong><strong>- ANA POLANŠĆAK</strong></p>
<p>
<a href="https://hosting.photobucket.com/95288841-8654-4bf7-8fc9-a4aa78dce87f/cb9380c7-f7ee-406a-bccf-9a86477bed82.jpg" target="_blank"><img alt="Click for enlarged picture" src="https://hosting.photobucket.com/95288841-8654-4bf7-8fc9-a4aa78dce87f/cb9380c7-f7ee-406a-bccf-9a86477bed82.jpg" width="600" /></a></p>
<p>
3.mjesto <strong>SINGLE MINIATURE - ADAM SKENDŽIĆ</strong></p>
<p>
<a href="https://hosting.photobucket.com/95288841-8654-4bf7-8fc9-a4aa78dce87f/a5f80a51-27d4-4040-952e-b04eb5bf4c99.jpg" target="_blank"><img alt="Click for enlarged picture" src="https://hosting.photobucket.com/95288841-8654-4bf7-8fc9-a4aa78dce87f/a5f80a51-27d4-4040-952e-b04eb5bf4c99.jpg" width="600" /></a></p>
<p>
1.mjesto <strong>LARGE/MOUNTED MINIATURE - SEBASTIAN SOGARD</strong></p>
<p>
<a href="https://hosting.photobucket.com/95288841-8654-4bf7-8fc9-a4aa78dce87f/1f8e3547-5113-488b-9983-c3c592add875.jpg" target="_blank"><img alt="Click for enlarged picture" src="https://hosting.photobucket.com/95288841-8654-4bf7-8fc9-a4aa78dce87f/1f8e3547-5113-488b-9983-c3c592add875.jpg" width="600" /></a></p>
<p>
2.mjesto <strong>LARGE/MOUNTED MINIATURE - JURE CUKAR</strong></p>
<p>
<a href="https://hosting.photobucket.com/95288841-8654-4bf7-8fc9-a4aa78dce87f/de5778ba-d672-4d24-8e6e-f9f1ac993c26.jpg" target="_blank"><img alt="Click for enlarged picture" src="https://hosting.photobucket.com/95288841-8654-4bf7-8fc9-a4aa78dce87f/de5778ba-d672-4d24-8e6e-f9f1ac993c26.jpg" width="600" /></a></p>
<p>
3.mjesto <strong>LARGE/MOUNTED MINIATURE - ANA POLANŠĆAK</strong></p>
<p>
<a href="https://hosting.photobucket.com/95288841-8654-4bf7-8fc9-a4aa78dce87f/58d2d738-55f2-495d-bd44-cf8d023e0142.jpg" target="_blank"><img alt="Click for enlarged picture" src="https://hosting.photobucket.com/95288841-8654-4bf7-8fc9-a4aa78dce87f/58d2d738-55f2-495d-bd44-cf8d023e0142.jpg" width="600" /></a></p>
<p>
1.mjesto <strong>UNIT / SQUAD </strong><strong>- IVAN KNEZOVIĆ</strong></p>
<p>
<a href="https://hosting.photobucket.com/95288841-8654-4bf7-8fc9-a4aa78dce87f/b77d9055-d0c4-4803-8e3f-0bf295c3d5d0.jpg" target="_blank"><img alt="Click for enlarged picture" src="https://hosting.photobucket.com/95288841-8654-4bf7-8fc9-a4aa78dce87f/b77d9055-d0c4-4803-8e3f-0bf295c3d5d0.jpg" width="600" /></a></p>
<p>
2.mjesto <strong>UNIT / SQUAD - MILAN RADACSI</strong></p>
<p>
<a href="https://hosting.photobucket.com/95288841-8654-4bf7-8fc9-a4aa78dce87f/1a6d64f2-a293-4a81-b974-1696d8bb5972.jpg" target="_blank"><img alt="Click for enlarged picture" src="https://hosting.photobucket.com/95288841-8654-4bf7-8fc9-a4aa78dce87f/1a6d64f2-a293-4a81-b974-1696d8bb5972.jpg" width="600" /></a></p>
<p>
3.mjesto <strong>UNIT / SQUAD - MAKSIMILIJAN ŠPRUNG</strong></p>
<p>
<a href="https://hosting.photobucket.com/95288841-8654-4bf7-8fc9-a4aa78dce87f/0b0ae61f-c140-4c35-b58c-a0813c15d83a.jpg" target="_blank"><img alt="Click for enlarged picture" src="https://hosting.photobucket.com/95288841-8654-4bf7-8fc9-a4aa78dce87f/0b0ae61f-c140-4c35-b58c-a0813c15d83a.jpg" width="600" /></a></p>
<p>
1.mjesto <strong>VEHICLE / MONSTER - MAKSIMILIJAN ŠPRUNG</strong></p>
<p>
<a href="https://hosting.photobucket.com/95288841-8654-4bf7-8fc9-a4aa78dce87f/34dbfff5-b8db-478d-a13d-3698c0490a95.jpg" target="_blank"><img alt="Click for enlarged picture" src="https://hosting.photobucket.com/95288841-8654-4bf7-8fc9-a4aa78dce87f/34dbfff5-b8db-478d-a13d-3698c0490a95.jpg" width="600" /></a></p>
<p>
2.mjesto <strong>VEHICLE / MONSTER - MARIO GRGUREV</strong></p>
<p>
<a href="https://hosting.photobucket.com/95288841-8654-4bf7-8fc9-a4aa78dce87f/387e5e88-4f80-4bb9-9b30-f7241369de41.jpg" target="_blank"><img alt="Click for enlarged picture" src="https://hosting.photobucket.com/95288841-8654-4bf7-8fc9-a4aa78dce87f/387e5e88-4f80-4bb9-9b30-f7241369de41.jpg" width="600" /></a></p>
<p>
3.mjesto <strong>VEHICLE / MONSTER - MARKO PAUNOVIĆ</strong></p>
<p>
<a href="https://hosting.photobucket.com/95288841-8654-4bf7-8fc9-a4aa78dce87f/8c2034d2-cae0-4bc2-bdd9-eab85b71db7b.jpg" target="_blank"><img alt="Click for enlarged picture" src="https://hosting.photobucket.com/95288841-8654-4bf7-8fc9-a4aa78dce87f/8c2034d2-cae0-4bc2-bdd9-eab85b71db7b.jpg" width="600" /></a></p>
<p>
1.mjesto <strong>OPEN - PETAR KNEZOVIĆ</strong></p>
<p>
<a href="https://hosting.photobucket.com/95288841-8654-4bf7-8fc9-a4aa78dce87f/7e2723b8-421d-4d59-b2ab-5b5abf4a067a.jpg" target="_blank"><img alt="Click for enlarged picture" src="https://hosting.photobucket.com/95288841-8654-4bf7-8fc9-a4aa78dce87f/7e2723b8-421d-4d59-b2ab-5b5abf4a067a.jpg" width="600" /></a></p>
<p>
2.mjesto <strong>OPEN - FILIP KNEZOVIĆ</strong></p>
<p>
<a href="https://hosting.photobucket.com/95288841-8654-4bf7-8fc9-a4aa78dce87f/2bcd6dc0-6d54-44fd-b660-4f6862e2551f.jpg" target="_blank"><img alt="Click for enlarged picture" src="https://hosting.photobucket.com/95288841-8654-4bf7-8fc9-a4aa78dce87f/2bcd6dc0-6d54-44fd-b660-4f6862e2551f.jpg" width="600" /></a></p>
<p>
3.mjesto <strong>OPEN - DINO TEREK</strong></p>
<p>
<a href="https://hosting.photobucket.com/95288841-8654-4bf7-8fc9-a4aa78dce87f/fe807e70-9250-49f9-8458-56b2ee4b0fad.jpg" target="_blank"><img alt="Click for enlarged picture" src="https://hosting.photobucket.com/95288841-8654-4bf7-8fc9-a4aa78dce87f/fe807e70-9250-49f9-8458-56b2ee4b0fad.jpg" width="600" /></a></p>
<p>
1.mjesto <strong>DIORAMA / DUEL - MARKO PAUNOVIĆ</strong></p>
<p>
<a href="https://hosting.photobucket.com/95288841-8654-4bf7-8fc9-a4aa78dce87f/a7f3bd4c-74cd-48ff-ac00-2d884c6c4770.jpg" target="_blank"><img alt="Click for enlarged picture" src="https://hosting.photobucket.com/95288841-8654-4bf7-8fc9-a4aa78dce87f/a7f3bd4c-74cd-48ff-ac00-2d884c6c4770.jpg" width="600" /></a></p>
<p>
2.mjesto <strong>DIORAMA / DUEL - VLADIMIR MATIĆ-KURILJEV</strong></p>
<p>
<a href="https://hosting.photobucket.com/95288841-8654-4bf7-8fc9-a4aa78dce87f/1218bbec-f68d-40e4-a8ae-66e57c949846.jpg" target="_blank"><img alt="Click for enlarged picture" src="https://hosting.photobucket.com/95288841-8654-4bf7-8fc9-a4aa78dce87f/1218bbec-f68d-40e4-a8ae-66e57c949846.jpg" width="600" /></a></p>
<p>
3.mjesto <strong>DIORAMA / DUEL - JURE CUKAR</strong></p>
<p>
<a href="https://hosting.photobucket.com/95288841-8654-4bf7-8fc9-a4aa78dce87f/4ad5c251-dd03-471f-8ff2-3526507e4aa7.jpg" target="_blank"><img alt="Click for enlarged picture" src="https://hosting.photobucket.com/95288841-8654-4bf7-8fc9-a4aa78dce87f/4ad5c251-dd03-471f-8ff2-3526507e4aa7.jpg" width="600" /></a></p>
<p>
1.mjesto <strong>BUST - MARKO PAUNOVIĆ</strong></p>
<p>
<a href="https://hosting.photobucket.com/95288841-8654-4bf7-8fc9-a4aa78dce87f/daaa9dff-9d7c-4696-b8d9-7ce0c311012a.jpg" target="_blank"><img alt="Click for enlarged picture" src="https://hosting.photobucket.com/95288841-8654-4bf7-8fc9-a4aa78dce87f/daaa9dff-9d7c-4696-b8d9-7ce0c311012a.jpg" width="600" /></a></p>
<p>
2.mjesto <strong>BUST - ANŽE ZORKO</strong></p>
<p>
<a href="https://hosting.photobucket.com/95288841-8654-4bf7-8fc9-a4aa78dce87f/e11e4893-05f4-49df-a758-720b188c5917.jpg" target="_blank"><img alt="Click for enlarged picture" src="https://hosting.photobucket.com/95288841-8654-4bf7-8fc9-a4aa78dce87f/e11e4893-05f4-49df-a758-720b188c5917.jpg" width="600" /></a></p>
<p>
3.mjesto <strong>BUST </strong><strong>- IVAN KNEZOVIĆ</strong></p>
<p>
<a href="https://hosting.photobucket.com/95288841-8654-4bf7-8fc9-a4aa78dce87f/d2435198-c290-43bf-a2fe-e8e592dabd7f.jpg" target="_blank"><img alt="Click for enlarged picture" src="https://hosting.photobucket.com/95288841-8654-4bf7-8fc9-a4aa78dce87f/d2435198-c290-43bf-a2fe-e8e592dabd7f.jpg" width="600" /></a></p>
<p>
1.mjesto <strong>JUNIOR - ELANOR GRAŠIĆ</strong></p>
<p>
<a href="https://hosting.photobucket.com/95288841-8654-4bf7-8fc9-a4aa78dce87f/f0bbb346-9821-43dc-a463-e507fb1b87ee.jpg" target="_blank"><img alt="Click for enlarged picture" src="https://hosting.photobucket.com/95288841-8654-4bf7-8fc9-a4aa78dce87f/f0bbb346-9821-43dc-a463-e507fb1b87ee.jpg" width="600" /></a></p>
<p>
2.mjesto <strong>JUNIOR - LUKA ŠEGINA</strong></p>
<p>
<a href="https://hosting.photobucket.com/95288841-8654-4bf7-8fc9-a4aa78dce87f/1829eee3-80f3-48de-a013-bada8c612e76.jpg" target="_blank"><img alt="Click for enlarged picture" src="https://hosting.photobucket.com/95288841-8654-4bf7-8fc9-a4aa78dce87f/1829eee3-80f3-48de-a013-bada8c612e76.jpg" width="600" /></a></p>
<p>
3.mjesto <strong>JUNIOR - SOFIJA MARASOVIĆ</strong></p>
<p>
<a href="https://hosting.photobucket.com/95288841-8654-4bf7-8fc9-a4aa78dce87f/bdf02300-4634-46b3-a659-6a8a9183177e.jpg" target="_blank"><img alt="Click for enlarged picture" src="https://hosting.photobucket.com/95288841-8654-4bf7-8fc9-a4aa78dce87f/bdf02300-4634-46b3-a659-6a8a9183177e.jpg" width="600" /></a></p>
<p>
Sve radove možete pogledati u galeriji na našim <a href="https://www.facebook.com/BlackQueenHMPC/posts/pfbid02gCGwwc8vTLFJDs1MFmbxc8NKZv1oni7uykTLKmomFSM1APfKrGRNtCkr2a6HTGQrl">socijalnim mrežama</a>.</p>
"
["created"]=>
string(19) "2026-02-25 09:03:55"
["modified"]=>
string(19) "2026-02-28 05:54:18"
}
["Member"]=>
array(10) {
["id"]=>
string(2) "64"
["group_id"]=>
string(1) "1"
["first_name"]=>
string(9) "Krunoslav"
["last_name"]=>
string(8) "Belinić"
["first_name_mask"]=>
string(9) "krunoslav"
["last_name_mask"]=>
string(7) "belinic"
["username"]=>
string(5) "Kruno"
["password"]=>
string(40) "eb3fda45fbec0258e90d809803b10491c548b22f"
["born"]=>
string(19) "2015-01-18 09:19:00"
["created"]=>
string(19) "2015-01-18 09:20:39"
}
}
</pre>
<a href="/dok/members/krunoslav.belinic">Krunoslav Belinić</a>, 25<span class="superscript">th</span> February 2026</span>
</li>
<li>
<a href="/dok/articles/2026/01/19" class="readMore"></a>
<span class="details"> <pre style="display: none;">
array(2) {
["Article"]=>
array(10) {
["id"]=>
string(3) "492"
["member_id"]=>
string(2) "35"
["title_eng"]=>
string(27) "SFRJ 1986 v2 Diorama part 5"
["title_hrv"]=>
string(29) "Diorama SFRJ 1986 v2– dio 5"
["mask_eng"]=>
string(27) "sfrj_1986_v2_diorama_part_5"
["mask_hrv"]=>
string(26) "diorama_sfrj_1986_v2_dio_5"
["content_eng"]=>
string(3653) "<p>
<em>In this series of articles, we will follow my work on a new diorama, another in the 1986 series. This time I have again decided to use a former country. Another version of the SFRY 1986.</em></p>
<p>
<a href=" https://hosting.photobucket.com/95288841-8654-4bf7-8fc9-a4aa78dce87f/ff4272e9-997f-49b7-b214-6f7605ca87c5.jpg
" target="_blank"> <img alt="Click for enlarged picture" src=" https://hosting.photobucket.com/95288841-8654-4bf7-8fc9-a4aa78dce87f/ff4272e9-997f-49b7-b214-6f7605ca87c5.jpg" width="600" /> </a></p>
<p>
So far I have finished making the base, painting the base, painting the interior of the vehicle and painting the figures. Now it's time to add the vegetation</p>
<p>
<a href=" https://hosting.photobucket.com/95288841-8654-4bf7-8fc9-a4aa78dce87f/70a25828-f5b9-46fd-9b11-c4be1cfaba63.jpg" target="_blank"> <img alt="Click for enlarged picture" src=" https://hosting.photobucket.com/95288841-8654-4bf7-8fc9-a4aa78dce87f/70a25828-f5b9-46fd-9b11-c4be1cfaba63.jpg" width="600" /> </a></p>
<p>
The pines/trees were already fixed to the base before painting, so the first vegetation I added was tall shrubs that filled the volume of the base.</p>
<p>
<a href=" https://hosting.photobucket.com/95288841-8654-4bf7-8fc9-a4aa78dce87f/9f7cb598-1f48-4d88-98e1-396d0a172363.jpg" target="_blank"> <img alt="Click for enlarged picture" src=" https://hosting.photobucket.com/95288841-8654-4bf7-8fc9-a4aa78dce87f/9f7cb598-1f48-4d88-98e1-396d0a172363.jpg" width="600" /> </a></p>
<p>
Then I added lower vegetation like tall grass and lower bushes.</p>
<p>
<a href=" https://hosting.photobucket.com/95288841-8654-4bf7-8fc9-a4aa78dce87f/3fe54784-a94c-4c0f-bf23-701033a73325.jpg" target="_blank"> <img alt="Click for enlarged picture" src=" https://hosting.photobucket.com/95288841-8654-4bf7-8fc9-a4aa78dce87f/3fe54784-a94c-4c0f-bf23-701033a73325.jpg" width="600" /> </a></p>
<p>
Finally, I added some short grass, making sure when I was making the parking lot and path that there was no vegetation in the places where the wheels pass.</p>
<p>
<a href=" https://hosting.photobucket.com/95288841-8654-4bf7-8fc9-a4aa78dce87f/596ce54a-a0cb-4a9b-9406-835a7b348f9a.jpg" target="_blank"> <img alt="Click for enlarged picture" src=" https://hosting.photobucket.com/95288841-8654-4bf7-8fc9-a4aa78dce87f/596ce54a-a0cb-4a9b-9406-835a7b348f9a.jpg" width="600" /> </a></p>
<p>
The paint on the base has just dried up, so next time I'll add the vegetation.</p>
<p>
<a href=" https://hosting.photobucket.com/95288841-8654-4bf7-8fc9-a4aa78dce87f/1d2acabb-7ec7-4f67-bec8-b3b73d5ddf46.jpg" target="_blank"> <img alt="Click for enlarged picture" src=" https://hosting.photobucket.com/95288841-8654-4bf7-8fc9-a4aa78dce87f/1d2acabb-7ec7-4f67-bec8-b3b73d5ddf46.jpg" width="600" /> </a></p>
<p>
When the diorama is turned to the back, the volume of the forest is visible.</p>
<p>
<a href=" https://hosting.photobucket.com/95288841-8654-4bf7-8fc9-a4aa78dce87f/1d2acabb-7ec7-4f67-bec8-b3b73d5ddf46.jpg" target="_blank"> <img alt="Click for enlarged picture" src=" https://hosting.photobucket.com/95288841-8654-4bf7-8fc9-a4aa78dce87f/1d2acabb-7ec7-4f67-bec8-b3b73d5ddf46.jpg" width="600" /> </a></p>
<p>
Before placing the vehicles and miniatures on the base, the diorama looks like this.</p>
<p>
<a href=" https://hosting.photobucket.com/95288841-8654-4bf7-8fc9-a4aa78dce87f/a7ffc2b0-a9bf-4e41-ab2f-0c3021b0447f.jpg" target="_blank"> <img alt="Click for enlarged picture" src=" https://hosting.photobucket.com/95288841-8654-4bf7-8fc9-a4aa78dce87f/a7ffc2b0-a9bf-4e41-ab2f-0c3021b0447f.jpg" width="600" /> </a></p>
"
["content_hrv"]=>
string(3186) "<p>
<em>U ovoj seriji članaka pratit ćemo moj rad na novoj diorami, još jednoj u nizu serijala 1986. Ovaj put sam se opet odlučio za bivšu državu. Druga verzija SFRJ 1986..</em></p>
<p>
<a href=" https://hosting.photobucket.com/95288841-8654-4bf7-8fc9-a4aa78dce87f/ff4272e9-997f-49b7-b214-6f7605ca87c5.jpg
" target="_blank"> <img alt="Click for enlarged picture" src=" https://hosting.photobucket.com/95288841-8654-4bf7-8fc9-a4aa78dce87f/ff4272e9-997f-49b7-b214-6f7605ca87c5.jpg" width="600" /> </a></p>
<p>
Do sada sam završio s izradom baze, bojanjem baze, bojanjem interijera vozila i bojanjem figura. Sada je došlo vrijeme za dodavanje vegetacije</p>
<p>
<a href=" https://hosting.photobucket.com/95288841-8654-4bf7-8fc9-a4aa78dce87f/70a25828-f5b9-46fd-9b11-c4be1cfaba63.jpg" target="_blank"> <img alt="Click for enlarged picture" src=" https://hosting.photobucket.com/95288841-8654-4bf7-8fc9-a4aa78dce87f/70a25828-f5b9-46fd-9b11-c4be1cfaba63.jpg" width="600" /> </a></p>
<p>
Borovi/drveće je već bilo fiksirano na bazu prije bojanja pa je prva sljedeća vegetacija bila visoko žbunje kojim sam popunio volumen baze.</p>
<p>
<a href=" https://hosting.photobucket.com/95288841-8654-4bf7-8fc9-a4aa78dce87f/9f7cb598-1f48-4d88-98e1-396d0a172363.jpg" target="_blank"> <img alt="Click for enlarged picture" src=" https://hosting.photobucket.com/95288841-8654-4bf7-8fc9-a4aa78dce87f/9f7cb598-1f48-4d88-98e1-396d0a172363.jpg" width="600" /> </a></p>
<p>
Potom sam dodao niže raslinje poput visoke trave i nižeg grmlja.</p>
<p>
<a href=" https://hosting.photobucket.com/95288841-8654-4bf7-8fc9-a4aa78dce87f/3fe54784-a94c-4c0f-bf23-701033a73325.jpg" target="_blank"> <img alt="Click for enlarged picture" src=" https://hosting.photobucket.com/95288841-8654-4bf7-8fc9-a4aa78dce87f/3fe54784-a94c-4c0f-bf23-701033a73325.jpg" width="600" /> </a></p>
<p>
Na kraju sam dodao i nisku travu pri čemu sam pazio kad sam radio ugibalište i puteljak da vegetacije ne bude na mjestima gdje prolaze kotači.</p>
<p>
<a href=" https://hosting.photobucket.com/95288841-8654-4bf7-8fc9-a4aa78dce87f/596ce54a-a0cb-4a9b-9406-835a7b348f9a.jpg" target="_blank"> <img alt="Click for enlarged picture" src=" https://hosting.photobucket.com/95288841-8654-4bf7-8fc9-a4aa78dce87f/596ce54a-a0cb-4a9b-9406-835a7b348f9a.jpg" width="600" /> </a></p>
<p>
Kada se dioramu okrene, vidi se volumen vegetacije u šumi. </p>
<p>
<a href="https://hosting.photobucket.com/95288841-8654-4bf7-8fc9-a4aa78dce87f/1d2acabb-7ec7-4f67-bec8-b3b73d5ddf46.jpg" target="_blank"><img alt="Click for enlarged picture" src="https://hosting.photobucket.com/95288841-8654-4bf7-8fc9-a4aa78dce87f/1d2acabb-7ec7-4f67-bec8-b3b73d5ddf46.jpg" width="600" /></a></p>
<p>
Prije postavljanja vozila i minijatura, diorama izgleda ovako:</p>
<p>
<a href="https://hosting.photobucket.com/95288841-8654-4bf7-8fc9-a4aa78dce87f/a7ffc2b0-a9bf-4e41-ab2f-0c3021b0447f.jpg" target="_blank"><img alt="Click for enlarged picture" src="https://hosting.photobucket.com/95288841-8654-4bf7-8fc9-a4aa78dce87f/a7ffc2b0-a9bf-4e41-ab2f-0c3021b0447f.jpg" width="600" /></a></p>
"
["created"]=>
string(19) "2026-01-19 10:46:08"
["modified"]=>
string(19) "2026-01-19 11:00:21"
}
["Member"]=>
array(10) {
["id"]=>
string(2) "35"
["group_id"]=>
string(1) "1"
["first_name"]=>
string(5) "Marko"
["last_name"]=>
string(9) "Paunović"
["first_name_mask"]=>
string(5) "marko"
["last_name_mask"]=>
string(8) "paunovic"
["username"]=>
string(5) "marko"
["password"]=>
string(40) "3bd37b326d19d1880d3b93a4b32e8fb3a90fa122"
["born"]=>
string(19) "2033-03-07 20:35:00"
["created"]=>
string(19) "2009-06-02 20:37:03"
}
}
</pre>
<a href="/dok/members/marko.paunovic">Marko Paunović</a>, 19<span class="superscript">th</span> January 2026</span>
</li>
</ul>
<p><a href="/dok/articles">more_articles</a></p>
<h2>latest_battle_reports</h2>
<ul class="latest">
<li>
<pre class="cake-debug"><a href="javascript:void(0);" onclick="document.getElementById('cakeErr9-trace').style.display = (document.getElementById('cakeErr9-trace').style.display == 'none' ? '' : 'none');"><b>Notice</b> (8)</a>: Undefined index: title_dok [<b>APP/views/elements/latestBattleReports.ctp</b>, line <b>8</b>]<div id="cakeErr9-trace" class="cake-stack-trace" style="display: none;"><a href="javascript:void(0);" onclick="document.getElementById('cakeErr9-code').style.display = (document.getElementById('cakeErr9-code').style.display == 'none' ? '' : 'none')">Code</a> | <a href="javascript:void(0);" onclick="document.getElementById('cakeErr9-context').style.display = (document.getElementById('cakeErr9-context').style.display == 'none' ? '' : 'none')">Context</a><div id="cakeErr9-code" class="cake-code-dump" style="display: none;"><pre><code><span style="color: #000000"></span></code>
<code><span style="color: #000000"> if (Configure::read() > 0) {</span></code>
<span class="code-highlight"><code><span style="color: #000000"> include ($___viewFn);</span></code></span></pre></div><pre id="cakeErr9-context" class="cake-context" style="display: none;">$___viewFn = "/home/martin/apps/agram/app/views/elements/latestBattleReports.ctp"
$___dataForView = array(
"lang" => "dok",
"otherLangs" => array(
"eng",
"hrv"
),
"globalNav" => array(
array(),
array(),
array(),
array(),
array(),
array(),
array(),
array(),
array(),
array(),
array(),
array(),
array(),
array(),
array(),
array(),
array(),
array(),
array(),
array(),
array(),
array(),
array(),
array(),
array(),
array(),
array()
),
"breadCrumbs" => array(
array()
),
"pageContents" => array(
"home_who_we_are" => null
),
"userData" => null,
"announcements" => array(
array(),
array(),
array()
),
"cache" => array(
"time" => "+1 day",
"key" => "dok"
),
"form" => FormHelper
FormHelper::$helpers = array
FormHelper::$fieldset = array
FormHelper::$__options = array
FormHelper::$fields = array
FormHelper::$requestType = NULL
FormHelper::$defaultModel = NULL
FormHelper::$_inputDefaults = array
FormHelper::$_lastAction = ""
FormHelper::$base = ""
FormHelper::$webroot = "/"
FormHelper::$theme = NULL
FormHelper::$here = "/dok"
FormHelper::$params = array
FormHelper::$action = "index"
FormHelper::$plugin = NULL
FormHelper::$data = NULL
FormHelper::$namedArgs = NULL
FormHelper::$argSeparator = NULL
FormHelper::$validationErrors = NULL
FormHelper::$tags = array
FormHelper::$__tainted = NULL
FormHelper::$__cleaned = NULL
FormHelper::$Html = HtmlHelper object,
"text" => TextHelper
TextHelper::$helpers = NULL
TextHelper::$base = ""
TextHelper::$webroot = "/"
TextHelper::$theme = NULL
TextHelper::$here = "/dok"
TextHelper::$params = array
TextHelper::$action = "index"
TextHelper::$plugin = NULL
TextHelper::$data = NULL
TextHelper::$namedArgs = NULL
TextHelper::$argSeparator = NULL
TextHelper::$validationErrors = NULL
TextHelper::$tags = array
TextHelper::$__tainted = NULL
TextHelper::$__cleaned = NULL,
"stringer" => StringerHelper
StringerHelper::$helpers = array
StringerHelper::$base = ""
StringerHelper::$webroot = "/"
StringerHelper::$theme = NULL
StringerHelper::$here = "/dok"
StringerHelper::$params = array
StringerHelper::$action = "index"
StringerHelper::$plugin = NULL
StringerHelper::$data = NULL
StringerHelper::$namedArgs = NULL
StringerHelper::$argSeparator = NULL
StringerHelper::$validationErrors = NULL
StringerHelper::$tags = array
StringerHelper::$__tainted = NULL
StringerHelper::$__cleaned = NULL
StringerHelper::$Html = HtmlHelper object
StringerHelper::$Link = LinkHelper object
StringerHelper::$Text = TextHelper object,
"menu" => MenuHelper
MenuHelper::$helpers = array
MenuHelper::$base = ""
MenuHelper::$webroot = "/"
MenuHelper::$theme = NULL
MenuHelper::$here = "/dok"
MenuHelper::$params = array
MenuHelper::$action = "index"
MenuHelper::$plugin = NULL
MenuHelper::$data = NULL
MenuHelper::$namedArgs = NULL
MenuHelper::$argSeparator = NULL
MenuHelper::$validationErrors = NULL
MenuHelper::$tags = array
MenuHelper::$__tainted = NULL
MenuHelper::$__cleaned = NULL
MenuHelper::$Link = LinkHelper object,
"session" => SessionHelper
SessionHelper::$helpers = array
SessionHelper::$__active = true
SessionHelper::$valid = false
SessionHelper::$error = false
SessionHelper::$_userAgent = "f9a8355d006790ee743ededbb1f6e3bd"
SessionHelper::$path = "/"
SessionHelper::$lastError = NULL
SessionHelper::$security = "medium"
SessionHelper::$time = 1773314240
SessionHelper::$sessionTime = 1773326240
SessionHelper::$cookieLifeTime = false
SessionHelper::$watchKeys = array
SessionHelper::$id = NULL
SessionHelper::$host = NULL
SessionHelper::$timeout = NULL
SessionHelper::$base = ""
SessionHelper::$webroot = "/"
SessionHelper::$here = "/dok"
SessionHelper::$params = array
SessionHelper::$action = "index"
SessionHelper::$data = NULL
SessionHelper::$theme = NULL
SessionHelper::$plugin = NULL,
"html" => HtmlHelper
HtmlHelper::$tags = array
HtmlHelper::$_crumbs = array
HtmlHelper::$__includedScripts = array
HtmlHelper::$_scriptBlockOptions = array
HtmlHelper::$__docTypes = array
HtmlHelper::$helpers = NULL
HtmlHelper::$base = ""
HtmlHelper::$webroot = "/"
HtmlHelper::$theme = NULL
HtmlHelper::$here = "/dok"
HtmlHelper::$params = array
HtmlHelper::$action = "index"
HtmlHelper::$plugin = NULL
HtmlHelper::$data = NULL
HtmlHelper::$namedArgs = NULL
HtmlHelper::$argSeparator = NULL
HtmlHelper::$validationErrors = NULL
HtmlHelper::$__tainted = NULL
HtmlHelper::$__cleaned = NULL,
"link" => LinkHelper
LinkHelper::$helpers = array
LinkHelper::$lang = "dok"
LinkHelper::$defaultLang = "hrv"
LinkHelper::$base = ""
LinkHelper::$webroot = "/"
LinkHelper::$theme = NULL
LinkHelper::$here = "/dok"
LinkHelper::$params = array
LinkHelper::$action = "index"
LinkHelper::$plugin = NULL
LinkHelper::$data = NULL
LinkHelper::$namedArgs = NULL
LinkHelper::$argSeparator = NULL
LinkHelper::$validationErrors = NULL
LinkHelper::$tags = array
LinkHelper::$__tainted = NULL
LinkHelper::$__cleaned = NULL
LinkHelper::$Html = HtmlHelper object
LinkHelper::$Session = SessionHelper object
)
$loadHelpers = false
$cached = false
$loadedHelpers = array()
$lang = "dok"
$otherLangs = array(
"eng",
"hrv"
)
$globalNav = array(
array(
"Page" => array()
),
array(
"Page" => array()
),
array(
"Page" => array()
),
array(
"Page" => array()
),
array(
"Page" => array()
),
array(
"Page" => array()
),
array(
"Page" => array()
),
array(
"Page" => array()
),
array(
"Page" => array()
),
array(
"Page" => array()
),
array(
"Page" => array()
),
array(
"Page" => array()
),
array(
"Page" => array()
),
array(
"Page" => array()
),
array(
"Page" => array()
),
array(
"Page" => array()
),
array(
"Page" => array()
),
array(
"Page" => array()
),
array(
"Page" => array()
),
array(
"Page" => array()
),
array(
"Page" => array()
),
array(
"Page" => array()
),
array(
"Page" => array()
),
array(
"Page" => array()
),
array(
"Page" => array()
),
array(
"Page" => array()
),
array(
"Page" => array()
)
)
$breadCrumbs = array(
array(
"Page" => array()
)
)
$pageContents = array(
"home_who_we_are" => null
)
$userData = null
$announcements = array(
array(
"Announcement" => array()
),
array(
"Announcement" => array()
),
array(
"Announcement" => array()
)
)
$cache = array(
"time" => "+1 day",
"key" => "dok"
)
$form = FormHelper
FormHelper::$helpers = array
FormHelper::$fieldset = array
FormHelper::$__options = array
FormHelper::$fields = array
FormHelper::$requestType = NULL
FormHelper::$defaultModel = NULL
FormHelper::$_inputDefaults = array
FormHelper::$_lastAction = ""
FormHelper::$base = ""
FormHelper::$webroot = "/"
FormHelper::$theme = NULL
FormHelper::$here = "/dok"
FormHelper::$params = array
FormHelper::$action = "index"
FormHelper::$plugin = NULL
FormHelper::$data = NULL
FormHelper::$namedArgs = NULL
FormHelper::$argSeparator = NULL
FormHelper::$validationErrors = NULL
FormHelper::$tags = array
FormHelper::$__tainted = NULL
FormHelper::$__cleaned = NULL
FormHelper::$Html = HtmlHelper object
$text = TextHelper
TextHelper::$helpers = NULL
TextHelper::$base = ""
TextHelper::$webroot = "/"
TextHelper::$theme = NULL
TextHelper::$here = "/dok"
TextHelper::$params = array
TextHelper::$action = "index"
TextHelper::$plugin = NULL
TextHelper::$data = NULL
TextHelper::$namedArgs = NULL
TextHelper::$argSeparator = NULL
TextHelper::$validationErrors = NULL
TextHelper::$tags = array
TextHelper::$__tainted = NULL
TextHelper::$__cleaned = NULL
$stringer = StringerHelper
StringerHelper::$helpers = array
StringerHelper::$base = ""
StringerHelper::$webroot = "/"
StringerHelper::$theme = NULL
StringerHelper::$here = "/dok"
StringerHelper::$params = array
StringerHelper::$action = "index"
StringerHelper::$plugin = NULL
StringerHelper::$data = NULL
StringerHelper::$namedArgs = NULL
StringerHelper::$argSeparator = NULL
StringerHelper::$validationErrors = NULL
StringerHelper::$tags = array
StringerHelper::$__tainted = NULL
StringerHelper::$__cleaned = NULL
StringerHelper::$Html = HtmlHelper object
StringerHelper::$Link = LinkHelper object
StringerHelper::$Text = TextHelper object
$menu = MenuHelper
MenuHelper::$helpers = array
MenuHelper::$base = ""
MenuHelper::$webroot = "/"
MenuHelper::$theme = NULL
MenuHelper::$here = "/dok"
MenuHelper::$params = array
MenuHelper::$action = "index"
MenuHelper::$plugin = NULL
MenuHelper::$data = NULL
MenuHelper::$namedArgs = NULL
MenuHelper::$argSeparator = NULL
MenuHelper::$validationErrors = NULL
MenuHelper::$tags = array
MenuHelper::$__tainted = NULL
MenuHelper::$__cleaned = NULL
MenuHelper::$Link = LinkHelper object
$session = SessionHelper
SessionHelper::$helpers = array
SessionHelper::$__active = true
SessionHelper::$valid = false
SessionHelper::$error = false
SessionHelper::$_userAgent = "f9a8355d006790ee743ededbb1f6e3bd"
SessionHelper::$path = "/"
SessionHelper::$lastError = NULL
SessionHelper::$security = "medium"
SessionHelper::$time = 1773314240
SessionHelper::$sessionTime = 1773326240
SessionHelper::$cookieLifeTime = false
SessionHelper::$watchKeys = array
SessionHelper::$id = NULL
SessionHelper::$host = NULL
SessionHelper::$timeout = NULL
SessionHelper::$base = ""
SessionHelper::$webroot = "/"
SessionHelper::$here = "/dok"
SessionHelper::$params = array
SessionHelper::$action = "index"
SessionHelper::$data = NULL
SessionHelper::$theme = NULL
SessionHelper::$plugin = NULL
$html = HtmlHelper
HtmlHelper::$tags = array
HtmlHelper::$_crumbs = array
HtmlHelper::$__includedScripts = array
HtmlHelper::$_scriptBlockOptions = array
HtmlHelper::$__docTypes = array
HtmlHelper::$helpers = NULL
HtmlHelper::$base = ""
HtmlHelper::$webroot = "/"
HtmlHelper::$theme = NULL
HtmlHelper::$here = "/dok"
HtmlHelper::$params = array
HtmlHelper::$action = "index"
HtmlHelper::$plugin = NULL
HtmlHelper::$data = NULL
HtmlHelper::$namedArgs = NULL
HtmlHelper::$argSeparator = NULL
HtmlHelper::$validationErrors = NULL
HtmlHelper::$__tainted = NULL
HtmlHelper::$__cleaned = NULL
$link = LinkHelper
LinkHelper::$helpers = array
LinkHelper::$lang = "dok"
LinkHelper::$defaultLang = "hrv"
LinkHelper::$base = ""
LinkHelper::$webroot = "/"
LinkHelper::$theme = NULL
LinkHelper::$here = "/dok"
LinkHelper::$params = array
LinkHelper::$action = "index"
LinkHelper::$plugin = NULL
LinkHelper::$data = NULL
LinkHelper::$namedArgs = NULL
LinkHelper::$argSeparator = NULL
LinkHelper::$validationErrors = NULL
LinkHelper::$tags = array
LinkHelper::$__tainted = NULL
LinkHelper::$__cleaned = NULL
LinkHelper::$Html = HtmlHelper object
LinkHelper::$Session = SessionHelper object
$battleReports = array(
array(
"BattleReport" => array(),
"Game" => array(),
"BattleReportExperience" => array()
),
array(
"BattleReport" => array(),
"Game" => array(),
"BattleReportExperience" => array()
),
array(
"BattleReport" => array(),
"Game" => array(),
"BattleReportExperience" => array()
)
)
$battleReport = array(
"BattleReport" => array(
"id" => "16",
"title_eng" => "Kill Team - Blooded vs. Vespid Stingwings",
"title_hrv" => "Kill Team - Blooded vs. Vespid Stingwings",
"mask_eng" => "kill_team_-_blooded_vs_vespid_stingwings",
"mask_hrv" => "kill_team_-_blooded_vs_vespid_stingwings",
"game_id" => "1",
"fought" => "2025-02-28 16:00:00",
"created" => "2025-03-10 08:53:42",
"modified" => "2025-03-10 08:53:42"
),
"Game" => array(
"id" => "1",
"name_eng" => "GW - Warhammer 40.000",
"name_hrv" => "GW - Warhammer 40.000",
"description_eng" => "<p>
In the grim darkness of the far future, there is only war!</p>
<p>
<a href="http://img.photobucket.com/albums/v467/demonn/Agram-Sajt/40k03_zpsc9a73277.jpg" target="_blank"> <img alt="Click for enlarged picture" src="http://img.photobucket.com/albums/v467/demonn/Agram-Sajt/40k03_zpsc9a73277.jpg" width="600" /> </a> </p>
",
"description_hrv" => "<p>
Warhammer 40000 je strate&scaron;ka igra smje&scaron;tena u daleku budućnost Zemlje, u kojoj preuzimate zapovjedni&scaron;tvo nad vojskama minijatura kako bi prikazali oružane sukobe vojski budućnosti.</p>
<p>
Bitke se vode na stolu uobičajenih dimenzija 120 x 180 cm, na koji se zatim postavlja različit teren kako bi se dočarao izgled pravog boji&scaron;ta. Nakon toga, u uobičajenom scenariju, na suprotne strane stola razmje&scaron;taju se dvije vojske minijatura. Strate&scaron;ki dio igre je vrlo važan jer već samim razmje&scaron;tanjem jedinica na stol možete dobiti veći dio bitke.</p>
<p>
Sada, kada va&scaron;i vojnici preko bojnog polja gledaju u mrskog im neprijatelja, spremni ste poslati naredbu za juri&scaron;, ili se ukopati na poziciji i braniti ono &scaron;to je va&scaron;e (va&scaron;u polovicu drvene ploče prekrivene umjetnim terenom). Kako ne bi nastala zbrka na bojnom polju, igra je podijeljena na poteze, a svaki potez je dodatno podijeljen u faze.<br />
&nbsp;</p>
<p>
<a href="http://img.photobucket.com/albums/v467/demonn/Agram-Sajt/40k03_zpsc9a73277.jpg" target="_blank"> <img alt="Click for enlarged picture" src="http://img.photobucket.com/albums/v467/demonn/Agram-Sajt/40k03_zpsc9a73277.jpg" width="600" /> </a> </p>"
),
"BattleReportExperience" => array(
array()
)
)</pre><pre class="stack-trace">include - APP/views/elements/latestBattleReports.ctp, line 8
View::_render() - CORE/cake/libs/view/view.php, line 736
View::element() - CORE/cake/libs/view/view.php, line 397
include - APP/views/home/index.ctp, line 50
View::_render() - CORE/cake/libs/view/view.php, line 736
View::render() - CORE/cake/libs/view/view.php, line 431
Controller::render() - CORE/cake/libs/controller/controller.php, line 909
Dispatcher::_invoke() - CORE/cake/dispatcher.php, line 207
Dispatcher::dispatch() - CORE/cake/dispatcher.php, line 171
[main] - APP/webroot/index.php, line 86</pre></div></pre><pre class="cake-debug"><a href="javascript:void(0);" onclick="document.getElementById('cakeErr10-trace').style.display = (document.getElementById('cakeErr10-trace').style.display == 'none' ? '' : 'none');"><b>Notice</b> (8)</a>: Undefined index: mask_dok [<b>APP/views/elements/latestBattleReports.ctp</b>, line <b>11</b>]<div id="cakeErr10-trace" class="cake-stack-trace" style="display: none;"><a href="javascript:void(0);" onclick="document.getElementById('cakeErr10-code').style.display = (document.getElementById('cakeErr10-code').style.display == 'none' ? '' : 'none')">Code</a> | <a href="javascript:void(0);" onclick="document.getElementById('cakeErr10-context').style.display = (document.getElementById('cakeErr10-context').style.display == 'none' ? '' : 'none')">Context</a><div id="cakeErr10-code" class="cake-code-dump" style="display: none;"><pre><code><span style="color: #000000"></span></code>
<code><span style="color: #000000"> if (Configure::read() > 0) {</span></code>
<span class="code-highlight"><code><span style="color: #000000"> include ($___viewFn);</span></code></span></pre></div><pre id="cakeErr10-context" class="cake-context" style="display: none;">$___viewFn = "/home/martin/apps/agram/app/views/elements/latestBattleReports.ctp"
$___dataForView = array(
"lang" => "dok",
"otherLangs" => array(
"eng",
"hrv"
),
"globalNav" => array(
array(),
array(),
array(),
array(),
array(),
array(),
array(),
array(),
array(),
array(),
array(),
array(),
array(),
array(),
array(),
array(),
array(),
array(),
array(),
array(),
array(),
array(),
array(),
array(),
array(),
array(),
array()
),
"breadCrumbs" => array(
array()
),
"pageContents" => array(
"home_who_we_are" => null
),
"userData" => null,
"announcements" => array(
array(),
array(),
array()
),
"cache" => array(
"time" => "+1 day",
"key" => "dok"
),
"form" => FormHelper
FormHelper::$helpers = array
FormHelper::$fieldset = array
FormHelper::$__options = array
FormHelper::$fields = array
FormHelper::$requestType = NULL
FormHelper::$defaultModel = NULL
FormHelper::$_inputDefaults = array
FormHelper::$_lastAction = ""
FormHelper::$base = ""
FormHelper::$webroot = "/"
FormHelper::$theme = NULL
FormHelper::$here = "/dok"
FormHelper::$params = array
FormHelper::$action = "index"
FormHelper::$plugin = NULL
FormHelper::$data = NULL
FormHelper::$namedArgs = NULL
FormHelper::$argSeparator = NULL
FormHelper::$validationErrors = NULL
FormHelper::$tags = array
FormHelper::$__tainted = NULL
FormHelper::$__cleaned = NULL
FormHelper::$Html = HtmlHelper object,
"text" => TextHelper
TextHelper::$helpers = NULL
TextHelper::$base = ""
TextHelper::$webroot = "/"
TextHelper::$theme = NULL
TextHelper::$here = "/dok"
TextHelper::$params = array
TextHelper::$action = "index"
TextHelper::$plugin = NULL
TextHelper::$data = NULL
TextHelper::$namedArgs = NULL
TextHelper::$argSeparator = NULL
TextHelper::$validationErrors = NULL
TextHelper::$tags = array
TextHelper::$__tainted = NULL
TextHelper::$__cleaned = NULL,
"stringer" => StringerHelper
StringerHelper::$helpers = array
StringerHelper::$base = ""
StringerHelper::$webroot = "/"
StringerHelper::$theme = NULL
StringerHelper::$here = "/dok"
StringerHelper::$params = array
StringerHelper::$action = "index"
StringerHelper::$plugin = NULL
StringerHelper::$data = NULL
StringerHelper::$namedArgs = NULL
StringerHelper::$argSeparator = NULL
StringerHelper::$validationErrors = NULL
StringerHelper::$tags = array
StringerHelper::$__tainted = NULL
StringerHelper::$__cleaned = NULL
StringerHelper::$Html = HtmlHelper object
StringerHelper::$Link = LinkHelper object
StringerHelper::$Text = TextHelper object,
"menu" => MenuHelper
MenuHelper::$helpers = array
MenuHelper::$base = ""
MenuHelper::$webroot = "/"
MenuHelper::$theme = NULL
MenuHelper::$here = "/dok"
MenuHelper::$params = array
MenuHelper::$action = "index"
MenuHelper::$plugin = NULL
MenuHelper::$data = NULL
MenuHelper::$namedArgs = NULL
MenuHelper::$argSeparator = NULL
MenuHelper::$validationErrors = NULL
MenuHelper::$tags = array
MenuHelper::$__tainted = NULL
MenuHelper::$__cleaned = NULL
MenuHelper::$Link = LinkHelper object,
"session" => SessionHelper
SessionHelper::$helpers = array
SessionHelper::$__active = true
SessionHelper::$valid = false
SessionHelper::$error = false
SessionHelper::$_userAgent = "f9a8355d006790ee743ededbb1f6e3bd"
SessionHelper::$path = "/"
SessionHelper::$lastError = NULL
SessionHelper::$security = "medium"
SessionHelper::$time = 1773314240
SessionHelper::$sessionTime = 1773326240
SessionHelper::$cookieLifeTime = false
SessionHelper::$watchKeys = array
SessionHelper::$id = NULL
SessionHelper::$host = NULL
SessionHelper::$timeout = NULL
SessionHelper::$base = ""
SessionHelper::$webroot = "/"
SessionHelper::$here = "/dok"
SessionHelper::$params = array
SessionHelper::$action = "index"
SessionHelper::$data = NULL
SessionHelper::$theme = NULL
SessionHelper::$plugin = NULL,
"html" => HtmlHelper
HtmlHelper::$tags = array
HtmlHelper::$_crumbs = array
HtmlHelper::$__includedScripts = array
HtmlHelper::$_scriptBlockOptions = array
HtmlHelper::$__docTypes = array
HtmlHelper::$helpers = NULL
HtmlHelper::$base = ""
HtmlHelper::$webroot = "/"
HtmlHelper::$theme = NULL
HtmlHelper::$here = "/dok"
HtmlHelper::$params = array
HtmlHelper::$action = "index"
HtmlHelper::$plugin = NULL
HtmlHelper::$data = NULL
HtmlHelper::$namedArgs = NULL
HtmlHelper::$argSeparator = NULL
HtmlHelper::$validationErrors = NULL
HtmlHelper::$__tainted = NULL
HtmlHelper::$__cleaned = NULL,
"link" => LinkHelper
LinkHelper::$helpers = array
LinkHelper::$lang = "dok"
LinkHelper::$defaultLang = "hrv"
LinkHelper::$base = ""
LinkHelper::$webroot = "/"
LinkHelper::$theme = NULL
LinkHelper::$here = "/dok"
LinkHelper::$params = array
LinkHelper::$action = "index"
LinkHelper::$plugin = NULL
LinkHelper::$data = NULL
LinkHelper::$namedArgs = NULL
LinkHelper::$argSeparator = NULL
LinkHelper::$validationErrors = NULL
LinkHelper::$tags = array
LinkHelper::$__tainted = NULL
LinkHelper::$__cleaned = NULL
LinkHelper::$Html = HtmlHelper object
LinkHelper::$Session = SessionHelper object
)
$loadHelpers = false
$cached = false
$loadedHelpers = array()
$lang = "dok"
$otherLangs = array(
"eng",
"hrv"
)
$globalNav = array(
array(
"Page" => array()
),
array(
"Page" => array()
),
array(
"Page" => array()
),
array(
"Page" => array()
),
array(
"Page" => array()
),
array(
"Page" => array()
),
array(
"Page" => array()
),
array(
"Page" => array()
),
array(
"Page" => array()
),
array(
"Page" => array()
),
array(
"Page" => array()
),
array(
"Page" => array()
),
array(
"Page" => array()
),
array(
"Page" => array()
),
array(
"Page" => array()
),
array(
"Page" => array()
),
array(
"Page" => array()
),
array(
"Page" => array()
),
array(
"Page" => array()
),
array(
"Page" => array()
),
array(
"Page" => array()
),
array(
"Page" => array()
),
array(
"Page" => array()
),
array(
"Page" => array()
),
array(
"Page" => array()
),
array(
"Page" => array()
),
array(
"Page" => array()
)
)
$breadCrumbs = array(
array(
"Page" => array()
)
)
$pageContents = array(
"home_who_we_are" => null
)
$userData = null
$announcements = array(
array(
"Announcement" => array()
),
array(
"Announcement" => array()
),
array(
"Announcement" => array()
)
)
$cache = array(
"time" => "+1 day",
"key" => "dok"
)
$form = FormHelper
FormHelper::$helpers = array
FormHelper::$fieldset = array
FormHelper::$__options = array
FormHelper::$fields = array
FormHelper::$requestType = NULL
FormHelper::$defaultModel = NULL
FormHelper::$_inputDefaults = array
FormHelper::$_lastAction = ""
FormHelper::$base = ""
FormHelper::$webroot = "/"
FormHelper::$theme = NULL
FormHelper::$here = "/dok"
FormHelper::$params = array
FormHelper::$action = "index"
FormHelper::$plugin = NULL
FormHelper::$data = NULL
FormHelper::$namedArgs = NULL
FormHelper::$argSeparator = NULL
FormHelper::$validationErrors = NULL
FormHelper::$tags = array
FormHelper::$__tainted = NULL
FormHelper::$__cleaned = NULL
FormHelper::$Html = HtmlHelper object
$text = TextHelper
TextHelper::$helpers = NULL
TextHelper::$base = ""
TextHelper::$webroot = "/"
TextHelper::$theme = NULL
TextHelper::$here = "/dok"
TextHelper::$params = array
TextHelper::$action = "index"
TextHelper::$plugin = NULL
TextHelper::$data = NULL
TextHelper::$namedArgs = NULL
TextHelper::$argSeparator = NULL
TextHelper::$validationErrors = NULL
TextHelper::$tags = array
TextHelper::$__tainted = NULL
TextHelper::$__cleaned = NULL
$stringer = StringerHelper
StringerHelper::$helpers = array
StringerHelper::$base = ""
StringerHelper::$webroot = "/"
StringerHelper::$theme = NULL
StringerHelper::$here = "/dok"
StringerHelper::$params = array
StringerHelper::$action = "index"
StringerHelper::$plugin = NULL
StringerHelper::$data = NULL
StringerHelper::$namedArgs = NULL
StringerHelper::$argSeparator = NULL
StringerHelper::$validationErrors = NULL
StringerHelper::$tags = array
StringerHelper::$__tainted = NULL
StringerHelper::$__cleaned = NULL
StringerHelper::$Html = HtmlHelper object
StringerHelper::$Link = LinkHelper object
StringerHelper::$Text = TextHelper object
$menu = MenuHelper
MenuHelper::$helpers = array
MenuHelper::$base = ""
MenuHelper::$webroot = "/"
MenuHelper::$theme = NULL
MenuHelper::$here = "/dok"
MenuHelper::$params = array
MenuHelper::$action = "index"
MenuHelper::$plugin = NULL
MenuHelper::$data = NULL
MenuHelper::$namedArgs = NULL
MenuHelper::$argSeparator = NULL
MenuHelper::$validationErrors = NULL
MenuHelper::$tags = array
MenuHelper::$__tainted = NULL
MenuHelper::$__cleaned = NULL
MenuHelper::$Link = LinkHelper object
$session = SessionHelper
SessionHelper::$helpers = array
SessionHelper::$__active = true
SessionHelper::$valid = false
SessionHelper::$error = false
SessionHelper::$_userAgent = "f9a8355d006790ee743ededbb1f6e3bd"
SessionHelper::$path = "/"
SessionHelper::$lastError = NULL
SessionHelper::$security = "medium"
SessionHelper::$time = 1773314240
SessionHelper::$sessionTime = 1773326240
SessionHelper::$cookieLifeTime = false
SessionHelper::$watchKeys = array
SessionHelper::$id = NULL
SessionHelper::$host = NULL
SessionHelper::$timeout = NULL
SessionHelper::$base = ""
SessionHelper::$webroot = "/"
SessionHelper::$here = "/dok"
SessionHelper::$params = array
SessionHelper::$action = "index"
SessionHelper::$data = NULL
SessionHelper::$theme = NULL
SessionHelper::$plugin = NULL
$html = HtmlHelper
HtmlHelper::$tags = array
HtmlHelper::$_crumbs = array
HtmlHelper::$__includedScripts = array
HtmlHelper::$_scriptBlockOptions = array
HtmlHelper::$__docTypes = array
HtmlHelper::$helpers = NULL
HtmlHelper::$base = ""
HtmlHelper::$webroot = "/"
HtmlHelper::$theme = NULL
HtmlHelper::$here = "/dok"
HtmlHelper::$params = array
HtmlHelper::$action = "index"
HtmlHelper::$plugin = NULL
HtmlHelper::$data = NULL
HtmlHelper::$namedArgs = NULL
HtmlHelper::$argSeparator = NULL
HtmlHelper::$validationErrors = NULL
HtmlHelper::$__tainted = NULL
HtmlHelper::$__cleaned = NULL
$link = LinkHelper
LinkHelper::$helpers = array
LinkHelper::$lang = "dok"
LinkHelper::$defaultLang = "hrv"
LinkHelper::$base = ""
LinkHelper::$webroot = "/"
LinkHelper::$theme = NULL
LinkHelper::$here = "/dok"
LinkHelper::$params = array
LinkHelper::$action = "index"
LinkHelper::$plugin = NULL
LinkHelper::$data = NULL
LinkHelper::$namedArgs = NULL
LinkHelper::$argSeparator = NULL
LinkHelper::$validationErrors = NULL
LinkHelper::$tags = array
LinkHelper::$__tainted = NULL
LinkHelper::$__cleaned = NULL
LinkHelper::$Html = HtmlHelper object
LinkHelper::$Session = SessionHelper object
$battleReports = array(
array(
"BattleReport" => array(),
"Game" => array(),
"BattleReportExperience" => array()
),
array(
"BattleReport" => array(),
"Game" => array(),
"BattleReportExperience" => array()
),
array(
"BattleReport" => array(),
"Game" => array(),
"BattleReportExperience" => array()
)
)
$battleReport = array(
"BattleReport" => array(
"id" => "16",
"title_eng" => "Kill Team - Blooded vs. Vespid Stingwings",
"title_hrv" => "Kill Team - Blooded vs. Vespid Stingwings",
"mask_eng" => "kill_team_-_blooded_vs_vespid_stingwings",
"mask_hrv" => "kill_team_-_blooded_vs_vespid_stingwings",
"game_id" => "1",
"fought" => "2025-02-28 16:00:00",
"created" => "2025-03-10 08:53:42",
"modified" => "2025-03-10 08:53:42"
),
"Game" => array(
"id" => "1",
"name_eng" => "GW - Warhammer 40.000",
"name_hrv" => "GW - Warhammer 40.000",
"description_eng" => "<p>
In the grim darkness of the far future, there is only war!</p>
<p>
<a href="http://img.photobucket.com/albums/v467/demonn/Agram-Sajt/40k03_zpsc9a73277.jpg" target="_blank"> <img alt="Click for enlarged picture" src="http://img.photobucket.com/albums/v467/demonn/Agram-Sajt/40k03_zpsc9a73277.jpg" width="600" /> </a> </p>
",
"description_hrv" => "<p>
Warhammer 40000 je strate&scaron;ka igra smje&scaron;tena u daleku budućnost Zemlje, u kojoj preuzimate zapovjedni&scaron;tvo nad vojskama minijatura kako bi prikazali oružane sukobe vojski budućnosti.</p>
<p>
Bitke se vode na stolu uobičajenih dimenzija 120 x 180 cm, na koji se zatim postavlja različit teren kako bi se dočarao izgled pravog boji&scaron;ta. Nakon toga, u uobičajenom scenariju, na suprotne strane stola razmje&scaron;taju se dvije vojske minijatura. Strate&scaron;ki dio igre je vrlo važan jer već samim razmje&scaron;tanjem jedinica na stol možete dobiti veći dio bitke.</p>
<p>
Sada, kada va&scaron;i vojnici preko bojnog polja gledaju u mrskog im neprijatelja, spremni ste poslati naredbu za juri&scaron;, ili se ukopati na poziciji i braniti ono &scaron;to je va&scaron;e (va&scaron;u polovicu drvene ploče prekrivene umjetnim terenom). Kako ne bi nastala zbrka na bojnom polju, igra je podijeljena na poteze, a svaki potez je dodatno podijeljen u faze.<br />
&nbsp;</p>
<p>
<a href="http://img.photobucket.com/albums/v467/demonn/Agram-Sajt/40k03_zpsc9a73277.jpg" target="_blank"> <img alt="Click for enlarged picture" src="http://img.photobucket.com/albums/v467/demonn/Agram-Sajt/40k03_zpsc9a73277.jpg" width="600" /> </a> </p>"
),
"BattleReportExperience" => array(
array()
)
)</pre><pre class="stack-trace">include - APP/views/elements/latestBattleReports.ctp, line 11
View::_render() - CORE/cake/libs/view/view.php, line 736
View::element() - CORE/cake/libs/view/view.php, line 397
include - APP/views/home/index.ctp, line 50
View::_render() - CORE/cake/libs/view/view.php, line 736
View::render() - CORE/cake/libs/view/view.php, line 431
Controller::render() - CORE/cake/libs/controller/controller.php, line 909
Dispatcher::_invoke() - CORE/cake/dispatcher.php, line 207
Dispatcher::dispatch() - CORE/cake/dispatcher.php, line 171
[main] - APP/webroot/index.php, line 86</pre></div></pre><a href="/dok/battle_reports/2025/03/10" class="readMore"></a> <span class="details">
<pre class="cake-debug"><a href="javascript:void(0);" onclick="document.getElementById('cakeErr11-trace').style.display = (document.getElementById('cakeErr11-trace').style.display == 'none' ? '' : 'none');"><b>Notice</b> (8)</a>: Undefined index: name_dok [<b>APP/views/elements/latestBattleReports.ctp</b>, line <b>26</b>]<div id="cakeErr11-trace" class="cake-stack-trace" style="display: none;"><a href="javascript:void(0);" onclick="document.getElementById('cakeErr11-code').style.display = (document.getElementById('cakeErr11-code').style.display == 'none' ? '' : 'none')">Code</a> | <a href="javascript:void(0);" onclick="document.getElementById('cakeErr11-context').style.display = (document.getElementById('cakeErr11-context').style.display == 'none' ? '' : 'none')">Context</a><div id="cakeErr11-code" class="cake-code-dump" style="display: none;"><pre><code><span style="color: #000000"></span></code>
<code><span style="color: #000000"> if (Configure::read() > 0) {</span></code>
<span class="code-highlight"><code><span style="color: #000000"> include ($___viewFn);</span></code></span></pre></div><pre id="cakeErr11-context" class="cake-context" style="display: none;">$___viewFn = "/home/martin/apps/agram/app/views/elements/latestBattleReports.ctp"
$___dataForView = array(
"lang" => "dok",
"otherLangs" => array(
"eng",
"hrv"
),
"globalNav" => array(
array(),
array(),
array(),
array(),
array(),
array(),
array(),
array(),
array(),
array(),
array(),
array(),
array(),
array(),
array(),
array(),
array(),
array(),
array(),
array(),
array(),
array(),
array(),
array(),
array(),
array(),
array()
),
"breadCrumbs" => array(
array()
),
"pageContents" => array(
"home_who_we_are" => null
),
"userData" => null,
"announcements" => array(
array(),
array(),
array()
),
"cache" => array(
"time" => "+1 day",
"key" => "dok"
),
"form" => FormHelper
FormHelper::$helpers = array
FormHelper::$fieldset = array
FormHelper::$__options = array
FormHelper::$fields = array
FormHelper::$requestType = NULL
FormHelper::$defaultModel = NULL
FormHelper::$_inputDefaults = array
FormHelper::$_lastAction = ""
FormHelper::$base = ""
FormHelper::$webroot = "/"
FormHelper::$theme = NULL
FormHelper::$here = "/dok"
FormHelper::$params = array
FormHelper::$action = "index"
FormHelper::$plugin = NULL
FormHelper::$data = NULL
FormHelper::$namedArgs = NULL
FormHelper::$argSeparator = NULL
FormHelper::$validationErrors = NULL
FormHelper::$tags = array
FormHelper::$__tainted = NULL
FormHelper::$__cleaned = NULL
FormHelper::$Html = HtmlHelper object,
"text" => TextHelper
TextHelper::$helpers = NULL
TextHelper::$base = ""
TextHelper::$webroot = "/"
TextHelper::$theme = NULL
TextHelper::$here = "/dok"
TextHelper::$params = array
TextHelper::$action = "index"
TextHelper::$plugin = NULL
TextHelper::$data = NULL
TextHelper::$namedArgs = NULL
TextHelper::$argSeparator = NULL
TextHelper::$validationErrors = NULL
TextHelper::$tags = array
TextHelper::$__tainted = NULL
TextHelper::$__cleaned = NULL,
"stringer" => StringerHelper
StringerHelper::$helpers = array
StringerHelper::$base = ""
StringerHelper::$webroot = "/"
StringerHelper::$theme = NULL
StringerHelper::$here = "/dok"
StringerHelper::$params = array
StringerHelper::$action = "index"
StringerHelper::$plugin = NULL
StringerHelper::$data = NULL
StringerHelper::$namedArgs = NULL
StringerHelper::$argSeparator = NULL
StringerHelper::$validationErrors = NULL
StringerHelper::$tags = array
StringerHelper::$__tainted = NULL
StringerHelper::$__cleaned = NULL
StringerHelper::$Html = HtmlHelper object
StringerHelper::$Link = LinkHelper object
StringerHelper::$Text = TextHelper object,
"menu" => MenuHelper
MenuHelper::$helpers = array
MenuHelper::$base = ""
MenuHelper::$webroot = "/"
MenuHelper::$theme = NULL
MenuHelper::$here = "/dok"
MenuHelper::$params = array
MenuHelper::$action = "index"
MenuHelper::$plugin = NULL
MenuHelper::$data = NULL
MenuHelper::$namedArgs = NULL
MenuHelper::$argSeparator = NULL
MenuHelper::$validationErrors = NULL
MenuHelper::$tags = array
MenuHelper::$__tainted = NULL
MenuHelper::$__cleaned = NULL
MenuHelper::$Link = LinkHelper object,
"session" => SessionHelper
SessionHelper::$helpers = array
SessionHelper::$__active = true
SessionHelper::$valid = false
SessionHelper::$error = false
SessionHelper::$_userAgent = "f9a8355d006790ee743ededbb1f6e3bd"
SessionHelper::$path = "/"
SessionHelper::$lastError = NULL
SessionHelper::$security = "medium"
SessionHelper::$time = 1773314240
SessionHelper::$sessionTime = 1773326240
SessionHelper::$cookieLifeTime = false
SessionHelper::$watchKeys = array
SessionHelper::$id = NULL
SessionHelper::$host = NULL
SessionHelper::$timeout = NULL
SessionHelper::$base = ""
SessionHelper::$webroot = "/"
SessionHelper::$here = "/dok"
SessionHelper::$params = array
SessionHelper::$action = "index"
SessionHelper::$data = NULL
SessionHelper::$theme = NULL
SessionHelper::$plugin = NULL,
"html" => HtmlHelper
HtmlHelper::$tags = array
HtmlHelper::$_crumbs = array
HtmlHelper::$__includedScripts = array
HtmlHelper::$_scriptBlockOptions = array
HtmlHelper::$__docTypes = array
HtmlHelper::$helpers = NULL
HtmlHelper::$base = ""
HtmlHelper::$webroot = "/"
HtmlHelper::$theme = NULL
HtmlHelper::$here = "/dok"
HtmlHelper::$params = array
HtmlHelper::$action = "index"
HtmlHelper::$plugin = NULL
HtmlHelper::$data = NULL
HtmlHelper::$namedArgs = NULL
HtmlHelper::$argSeparator = NULL
HtmlHelper::$validationErrors = NULL
HtmlHelper::$__tainted = NULL
HtmlHelper::$__cleaned = NULL,
"link" => LinkHelper
LinkHelper::$helpers = array
LinkHelper::$lang = "dok"
LinkHelper::$defaultLang = "hrv"
LinkHelper::$base = ""
LinkHelper::$webroot = "/"
LinkHelper::$theme = NULL
LinkHelper::$here = "/dok"
LinkHelper::$params = array
LinkHelper::$action = "index"
LinkHelper::$plugin = NULL
LinkHelper::$data = NULL
LinkHelper::$namedArgs = NULL
LinkHelper::$argSeparator = NULL
LinkHelper::$validationErrors = NULL
LinkHelper::$tags = array
LinkHelper::$__tainted = NULL
LinkHelper::$__cleaned = NULL
LinkHelper::$Html = HtmlHelper object
LinkHelper::$Session = SessionHelper object
)
$loadHelpers = false
$cached = false
$loadedHelpers = array()
$lang = "dok"
$otherLangs = array(
"eng",
"hrv"
)
$globalNav = array(
array(
"Page" => array()
),
array(
"Page" => array()
),
array(
"Page" => array()
),
array(
"Page" => array()
),
array(
"Page" => array()
),
array(
"Page" => array()
),
array(
"Page" => array()
),
array(
"Page" => array()
),
array(
"Page" => array()
),
array(
"Page" => array()
),
array(
"Page" => array()
),
array(
"Page" => array()
),
array(
"Page" => array()
),
array(
"Page" => array()
),
array(
"Page" => array()
),
array(
"Page" => array()
),
array(
"Page" => array()
),
array(
"Page" => array()
),
array(
"Page" => array()
),
array(
"Page" => array()
),
array(
"Page" => array()
),
array(
"Page" => array()
),
array(
"Page" => array()
),
array(
"Page" => array()
),
array(
"Page" => array()
),
array(
"Page" => array()
),
array(
"Page" => array()
)
)
$breadCrumbs = array(
array(
"Page" => array()
)
)
$pageContents = array(
"home_who_we_are" => null
)
$userData = null
$announcements = array(
array(
"Announcement" => array()
),
array(
"Announcement" => array()
),
array(
"Announcement" => array()
)
)
$cache = array(
"time" => "+1 day",
"key" => "dok"
)
$form = FormHelper
FormHelper::$helpers = array
FormHelper::$fieldset = array
FormHelper::$__options = array
FormHelper::$fields = array
FormHelper::$requestType = NULL
FormHelper::$defaultModel = NULL
FormHelper::$_inputDefaults = array
FormHelper::$_lastAction = ""
FormHelper::$base = ""
FormHelper::$webroot = "/"
FormHelper::$theme = NULL
FormHelper::$here = "/dok"
FormHelper::$params = array
FormHelper::$action = "index"
FormHelper::$plugin = NULL
FormHelper::$data = NULL
FormHelper::$namedArgs = NULL
FormHelper::$argSeparator = NULL
FormHelper::$validationErrors = NULL
FormHelper::$tags = array
FormHelper::$__tainted = NULL
FormHelper::$__cleaned = NULL
FormHelper::$Html = HtmlHelper object
$text = TextHelper
TextHelper::$helpers = NULL
TextHelper::$base = ""
TextHelper::$webroot = "/"
TextHelper::$theme = NULL
TextHelper::$here = "/dok"
TextHelper::$params = array
TextHelper::$action = "index"
TextHelper::$plugin = NULL
TextHelper::$data = NULL
TextHelper::$namedArgs = NULL
TextHelper::$argSeparator = NULL
TextHelper::$validationErrors = NULL
TextHelper::$tags = array
TextHelper::$__tainted = NULL
TextHelper::$__cleaned = NULL
$stringer = StringerHelper
StringerHelper::$helpers = array
StringerHelper::$base = ""
StringerHelper::$webroot = "/"
StringerHelper::$theme = NULL
StringerHelper::$here = "/dok"
StringerHelper::$params = array
StringerHelper::$action = "index"
StringerHelper::$plugin = NULL
StringerHelper::$data = NULL
StringerHelper::$namedArgs = NULL
StringerHelper::$argSeparator = NULL
StringerHelper::$validationErrors = NULL
StringerHelper::$tags = array
StringerHelper::$__tainted = NULL
StringerHelper::$__cleaned = NULL
StringerHelper::$Html = HtmlHelper object
StringerHelper::$Link = LinkHelper object
StringerHelper::$Text = TextHelper object
$menu = MenuHelper
MenuHelper::$helpers = array
MenuHelper::$base = ""
MenuHelper::$webroot = "/"
MenuHelper::$theme = NULL
MenuHelper::$here = "/dok"
MenuHelper::$params = array
MenuHelper::$action = "index"
MenuHelper::$plugin = NULL
MenuHelper::$data = NULL
MenuHelper::$namedArgs = NULL
MenuHelper::$argSeparator = NULL
MenuHelper::$validationErrors = NULL
MenuHelper::$tags = array
MenuHelper::$__tainted = NULL
MenuHelper::$__cleaned = NULL
MenuHelper::$Link = LinkHelper object
$session = SessionHelper
SessionHelper::$helpers = array
SessionHelper::$__active = true
SessionHelper::$valid = false
SessionHelper::$error = false
SessionHelper::$_userAgent = "f9a8355d006790ee743ededbb1f6e3bd"
SessionHelper::$path = "/"
SessionHelper::$lastError = NULL
SessionHelper::$security = "medium"
SessionHelper::$time = 1773314240
SessionHelper::$sessionTime = 1773326240
SessionHelper::$cookieLifeTime = false
SessionHelper::$watchKeys = array
SessionHelper::$id = NULL
SessionHelper::$host = NULL
SessionHelper::$timeout = NULL
SessionHelper::$base = ""
SessionHelper::$webroot = "/"
SessionHelper::$here = "/dok"
SessionHelper::$params = array
SessionHelper::$action = "index"
SessionHelper::$data = NULL
SessionHelper::$theme = NULL
SessionHelper::$plugin = NULL
$html = HtmlHelper
HtmlHelper::$tags = array
HtmlHelper::$_crumbs = array
HtmlHelper::$__includedScripts = array
HtmlHelper::$_scriptBlockOptions = array
HtmlHelper::$__docTypes = array
HtmlHelper::$helpers = NULL
HtmlHelper::$base = ""
HtmlHelper::$webroot = "/"
HtmlHelper::$theme = NULL
HtmlHelper::$here = "/dok"
HtmlHelper::$params = array
HtmlHelper::$action = "index"
HtmlHelper::$plugin = NULL
HtmlHelper::$data = NULL
HtmlHelper::$namedArgs = NULL
HtmlHelper::$argSeparator = NULL
HtmlHelper::$validationErrors = NULL
HtmlHelper::$__tainted = NULL
HtmlHelper::$__cleaned = NULL
$link = LinkHelper
LinkHelper::$helpers = array
LinkHelper::$lang = "dok"
LinkHelper::$defaultLang = "hrv"
LinkHelper::$base = ""
LinkHelper::$webroot = "/"
LinkHelper::$theme = NULL
LinkHelper::$here = "/dok"
LinkHelper::$params = array
LinkHelper::$action = "index"
LinkHelper::$plugin = NULL
LinkHelper::$data = NULL
LinkHelper::$namedArgs = NULL
LinkHelper::$argSeparator = NULL
LinkHelper::$validationErrors = NULL
LinkHelper::$tags = array
LinkHelper::$__tainted = NULL
LinkHelper::$__cleaned = NULL
LinkHelper::$Html = HtmlHelper object
LinkHelper::$Session = SessionHelper object
$battleReports = array(
array(
"BattleReport" => array(),
"Game" => array(),
"BattleReportExperience" => array()
),
array(
"BattleReport" => array(),
"Game" => array(),
"BattleReportExperience" => array()
),
array(
"BattleReport" => array(),
"Game" => array(),
"BattleReportExperience" => array()
)
)
$battleReport = array(
"BattleReport" => array(
"id" => "16",
"title_eng" => "Kill Team - Blooded vs. Vespid Stingwings",
"title_hrv" => "Kill Team - Blooded vs. Vespid Stingwings",
"mask_eng" => "kill_team_-_blooded_vs_vespid_stingwings",
"mask_hrv" => "kill_team_-_blooded_vs_vespid_stingwings",
"game_id" => "1",
"fought" => "2025-02-28 16:00:00",
"created" => "2025-03-10 08:53:42",
"modified" => "2025-03-10 08:53:42"
),
"Game" => array(
"id" => "1",
"name_eng" => "GW - Warhammer 40.000",
"name_hrv" => "GW - Warhammer 40.000",
"description_eng" => "<p>
In the grim darkness of the far future, there is only war!</p>
<p>
<a href="http://img.photobucket.com/albums/v467/demonn/Agram-Sajt/40k03_zpsc9a73277.jpg" target="_blank"> <img alt="Click for enlarged picture" src="http://img.photobucket.com/albums/v467/demonn/Agram-Sajt/40k03_zpsc9a73277.jpg" width="600" /> </a> </p>
",
"description_hrv" => "<p>
Warhammer 40000 je strate&scaron;ka igra smje&scaron;tena u daleku budućnost Zemlje, u kojoj preuzimate zapovjedni&scaron;tvo nad vojskama minijatura kako bi prikazali oružane sukobe vojski budućnosti.</p>
<p>
Bitke se vode na stolu uobičajenih dimenzija 120 x 180 cm, na koji se zatim postavlja različit teren kako bi se dočarao izgled pravog boji&scaron;ta. Nakon toga, u uobičajenom scenariju, na suprotne strane stola razmje&scaron;taju se dvije vojske minijatura. Strate&scaron;ki dio igre je vrlo važan jer već samim razmje&scaron;tanjem jedinica na stol možete dobiti veći dio bitke.</p>
<p>
Sada, kada va&scaron;i vojnici preko bojnog polja gledaju u mrskog im neprijatelja, spremni ste poslati naredbu za juri&scaron;, ili se ukopati na poziciji i braniti ono &scaron;to je va&scaron;e (va&scaron;u polovicu drvene ploče prekrivene umjetnim terenom). Kako ne bi nastala zbrka na bojnom polju, igra je podijeljena na poteze, a svaki potez je dodatno podijeljen u faze.<br />
&nbsp;</p>
<p>
<a href="http://img.photobucket.com/albums/v467/demonn/Agram-Sajt/40k03_zpsc9a73277.jpg" target="_blank"> <img alt="Click for enlarged picture" src="http://img.photobucket.com/albums/v467/demonn/Agram-Sajt/40k03_zpsc9a73277.jpg" width="600" /> </a> </p>"
),
"BattleReportExperience" => array(
array()
)
)
$memberString = " and "
$battleReportExperience = array(
"id" => "18",
"battle_report_id" => "16",
"member_id" => "96",
"army_id" => "33",
"intro_eng" => "<p>
This Friday, Luka and I had the opportunity to try out the third edition of the famous Warhammer skirmish game Kill Team, and along the way demonstrate the basics that have remained unchanged. Luka played a team of Vespid Stingwings, a highly mobile T&#39;au unit, and I played the Blooded, a traitor squad that used to belong to the Astra Militarum (in my case they were named Glanton&#39;s Gang). The map, measuring 30x22 inches, was organized so that all terrain was outside of our deployment zones, which were 6 inches from the shorter edges. In the middle of the map, in a slight diagonal, 3 points of interest (objectives) are placed. All this resulted in a very symmetrical setup of operatives &ndash; all Vespids and the entire Blooded gang at the beginning of the game were mirrored hidden behind large pieces of terrain. All buildings with doors were 3 inches high, offering the operatives a Vantage point - the ability to keep one hit die as a success, and the well in the very center, 4 inches high, offers an even better Vantage point, where the operatives keep 2 dice.</p>
<p>
<a href="https://hosting.photobucket.com/95288841-8654-4bf7-8fc9-a4aa78dce87f/e4be55ea-8433-47c7-b28a-459533bba4bc.jpg" target="_blank"><img alt="Click for enlarged picture" src="https://hosting.photobucket.com/95288841-8654-4bf7-8fc9-a4aa78dce87f/e4be55ea-8433-47c7-b28a-459533bba4bc.jpg" width="600" /></a></p>
",
"intro_hrv" => "<p>
Ovaj smo petak Luka i ja imali priliku isprobati treću ediciju poznate Warhammer skirmish igre <em>Kill Team</em> te usput demonstrirati osnove koje su ostale nepromijenjene. Luka je igrao tim Vespid Stingwings, jako mobilne T&#39;au jedinice, a ja sam igrao Blooded, izdajnički odred koji je nekad pripadao Astri Militarum (u mojem su slučaju dobili ime <em>Glantonova banda</em>). Mapa, veličine 30x22 inča, bila je organizirana tako da je sav teren bio van na&scaron;ih deployment zona, koje su iznosile 6 inča od kraćih rubova. Nasred mape, u blagoj dijagonali, postavljene su 3 točke interesa (objectives). Sve je ovo rezultiralo jako simetričnom postavom operativaca &ndash; svi su Vespidi i cijela Blooded banda na početku igre bili zrcaljeno skriveni iza velikih komada terena. Sve građevine s vratima bile su visoke 3 inča, &scaron;to je operativcima nudilo Vantage point &ndash; mogućnost da jednu hit-kockicu zadrže kao uspje&scaron;nu, a bu&scaron;otina u samom centru, visoka 4 inča, nudi jo&scaron; bolji Vantage point, gdje operativci zadržavaju 2 kockice.</p>
<p>
<a href="https://hosting.photobucket.com/95288841-8654-4bf7-8fc9-a4aa78dce87f/e4be55ea-8433-47c7-b28a-459533bba4bc.jpg" target="_blank"><img alt="Click for enlarged picture" src="https://hosting.photobucket.com/95288841-8654-4bf7-8fc9-a4aa78dce87f/e4be55ea-8433-47c7-b28a-459533bba4bc.jpg" width="600" /></a></p>
",
"Member" => array(
"id" => "96",
"group_id" => "2",
"first_name" => "Antoni",
"last_name" => "Pastuović",
"first_name_mask" => "antoni",
"last_name_mask" => "pastuovic",
"username" => "antoni",
"password" => "*****",
"born" => "2005-04-04 18:52:00",
"created" => "2019-04-04 18:53:09"
),
"Army" => array(
"id" => "33",
"game_id" => "1",
"army_alignment_id" => null,
"name_eng" => "Imperial Guard",
"name_hrv" => "Imperial Guard",
"description_eng" => "",
"description_hrv" => ""
)
)</pre><pre class="stack-trace">include - APP/views/elements/latestBattleReports.ctp, line 26
View::_render() - CORE/cake/libs/view/view.php, line 736
View::element() - CORE/cake/libs/view/view.php, line 397
include - APP/views/home/index.ctp, line 50
View::_render() - CORE/cake/libs/view/view.php, line 736
View::render() - CORE/cake/libs/view/view.php, line 431
Controller::render() - CORE/cake/libs/controller/controller.php, line 909
Dispatcher::_invoke() - CORE/cake/dispatcher.php, line 207
Dispatcher::dispatch() - CORE/cake/dispatcher.php, line 171
[main] - APP/webroot/index.php, line 86</pre></div></pre><pre class="cake-debug"><a href="javascript:void(0);" onclick="document.getElementById('cakeErr12-trace').style.display = (document.getElementById('cakeErr12-trace').style.display == 'none' ? '' : 'none');"><b>Notice</b> (8)</a>: Undefined index: name_dok [<b>APP/views/elements/latestBattleReports.ctp</b>, line <b>29</b>]<div id="cakeErr12-trace" class="cake-stack-trace" style="display: none;"><a href="javascript:void(0);" onclick="document.getElementById('cakeErr12-code').style.display = (document.getElementById('cakeErr12-code').style.display == 'none' ? '' : 'none')">Code</a> | <a href="javascript:void(0);" onclick="document.getElementById('cakeErr12-context').style.display = (document.getElementById('cakeErr12-context').style.display == 'none' ? '' : 'none')">Context</a><div id="cakeErr12-code" class="cake-code-dump" style="display: none;"><pre><code><span style="color: #000000"></span></code>
<code><span style="color: #000000"> if (Configure::read() > 0) {</span></code>
<span class="code-highlight"><code><span style="color: #000000"> include ($___viewFn);</span></code></span></pre></div><pre id="cakeErr12-context" class="cake-context" style="display: none;">$___viewFn = "/home/martin/apps/agram/app/views/elements/latestBattleReports.ctp"
$___dataForView = array(
"lang" => "dok",
"otherLangs" => array(
"eng",
"hrv"
),
"globalNav" => array(
array(),
array(),
array(),
array(),
array(),
array(),
array(),
array(),
array(),
array(),
array(),
array(),
array(),
array(),
array(),
array(),
array(),
array(),
array(),
array(),
array(),
array(),
array(),
array(),
array(),
array(),
array()
),
"breadCrumbs" => array(
array()
),
"pageContents" => array(
"home_who_we_are" => null
),
"userData" => null,
"announcements" => array(
array(),
array(),
array()
),
"cache" => array(
"time" => "+1 day",
"key" => "dok"
),
"form" => FormHelper
FormHelper::$helpers = array
FormHelper::$fieldset = array
FormHelper::$__options = array
FormHelper::$fields = array
FormHelper::$requestType = NULL
FormHelper::$defaultModel = NULL
FormHelper::$_inputDefaults = array
FormHelper::$_lastAction = ""
FormHelper::$base = ""
FormHelper::$webroot = "/"
FormHelper::$theme = NULL
FormHelper::$here = "/dok"
FormHelper::$params = array
FormHelper::$action = "index"
FormHelper::$plugin = NULL
FormHelper::$data = NULL
FormHelper::$namedArgs = NULL
FormHelper::$argSeparator = NULL
FormHelper::$validationErrors = NULL
FormHelper::$tags = array
FormHelper::$__tainted = NULL
FormHelper::$__cleaned = NULL
FormHelper::$Html = HtmlHelper object,
"text" => TextHelper
TextHelper::$helpers = NULL
TextHelper::$base = ""
TextHelper::$webroot = "/"
TextHelper::$theme = NULL
TextHelper::$here = "/dok"
TextHelper::$params = array
TextHelper::$action = "index"
TextHelper::$plugin = NULL
TextHelper::$data = NULL
TextHelper::$namedArgs = NULL
TextHelper::$argSeparator = NULL
TextHelper::$validationErrors = NULL
TextHelper::$tags = array
TextHelper::$__tainted = NULL
TextHelper::$__cleaned = NULL,
"stringer" => StringerHelper
StringerHelper::$helpers = array
StringerHelper::$base = ""
StringerHelper::$webroot = "/"
StringerHelper::$theme = NULL
StringerHelper::$here = "/dok"
StringerHelper::$params = array
StringerHelper::$action = "index"
StringerHelper::$plugin = NULL
StringerHelper::$data = NULL
StringerHelper::$namedArgs = NULL
StringerHelper::$argSeparator = NULL
StringerHelper::$validationErrors = NULL
StringerHelper::$tags = array
StringerHelper::$__tainted = NULL
StringerHelper::$__cleaned = NULL
StringerHelper::$Html = HtmlHelper object
StringerHelper::$Link = LinkHelper object
StringerHelper::$Text = TextHelper object,
"menu" => MenuHelper
MenuHelper::$helpers = array
MenuHelper::$base = ""
MenuHelper::$webroot = "/"
MenuHelper::$theme = NULL
MenuHelper::$here = "/dok"
MenuHelper::$params = array
MenuHelper::$action = "index"
MenuHelper::$plugin = NULL
MenuHelper::$data = NULL
MenuHelper::$namedArgs = NULL
MenuHelper::$argSeparator = NULL
MenuHelper::$validationErrors = NULL
MenuHelper::$tags = array
MenuHelper::$__tainted = NULL
MenuHelper::$__cleaned = NULL
MenuHelper::$Link = LinkHelper object,
"session" => SessionHelper
SessionHelper::$helpers = array
SessionHelper::$__active = true
SessionHelper::$valid = false
SessionHelper::$error = false
SessionHelper::$_userAgent = "f9a8355d006790ee743ededbb1f6e3bd"
SessionHelper::$path = "/"
SessionHelper::$lastError = NULL
SessionHelper::$security = "medium"
SessionHelper::$time = 1773314240
SessionHelper::$sessionTime = 1773326240
SessionHelper::$cookieLifeTime = false
SessionHelper::$watchKeys = array
SessionHelper::$id = NULL
SessionHelper::$host = NULL
SessionHelper::$timeout = NULL
SessionHelper::$base = ""
SessionHelper::$webroot = "/"
SessionHelper::$here = "/dok"
SessionHelper::$params = array
SessionHelper::$action = "index"
SessionHelper::$data = NULL
SessionHelper::$theme = NULL
SessionHelper::$plugin = NULL,
"html" => HtmlHelper
HtmlHelper::$tags = array
HtmlHelper::$_crumbs = array
HtmlHelper::$__includedScripts = array
HtmlHelper::$_scriptBlockOptions = array
HtmlHelper::$__docTypes = array
HtmlHelper::$helpers = NULL
HtmlHelper::$base = ""
HtmlHelper::$webroot = "/"
HtmlHelper::$theme = NULL
HtmlHelper::$here = "/dok"
HtmlHelper::$params = array
HtmlHelper::$action = "index"
HtmlHelper::$plugin = NULL
HtmlHelper::$data = NULL
HtmlHelper::$namedArgs = NULL
HtmlHelper::$argSeparator = NULL
HtmlHelper::$validationErrors = NULL
HtmlHelper::$__tainted = NULL
HtmlHelper::$__cleaned = NULL,
"link" => LinkHelper
LinkHelper::$helpers = array
LinkHelper::$lang = "dok"
LinkHelper::$defaultLang = "hrv"
LinkHelper::$base = ""
LinkHelper::$webroot = "/"
LinkHelper::$theme = NULL
LinkHelper::$here = "/dok"
LinkHelper::$params = array
LinkHelper::$action = "index"
LinkHelper::$plugin = NULL
LinkHelper::$data = NULL
LinkHelper::$namedArgs = NULL
LinkHelper::$argSeparator = NULL
LinkHelper::$validationErrors = NULL
LinkHelper::$tags = array
LinkHelper::$__tainted = NULL
LinkHelper::$__cleaned = NULL
LinkHelper::$Html = HtmlHelper object
LinkHelper::$Session = SessionHelper object
)
$loadHelpers = false
$cached = false
$loadedHelpers = array()
$lang = "dok"
$otherLangs = array(
"eng",
"hrv"
)
$globalNav = array(
array(
"Page" => array()
),
array(
"Page" => array()
),
array(
"Page" => array()
),
array(
"Page" => array()
),
array(
"Page" => array()
),
array(
"Page" => array()
),
array(
"Page" => array()
),
array(
"Page" => array()
),
array(
"Page" => array()
),
array(
"Page" => array()
),
array(
"Page" => array()
),
array(
"Page" => array()
),
array(
"Page" => array()
),
array(
"Page" => array()
),
array(
"Page" => array()
),
array(
"Page" => array()
),
array(
"Page" => array()
),
array(
"Page" => array()
),
array(
"Page" => array()
),
array(
"Page" => array()
),
array(
"Page" => array()
),
array(
"Page" => array()
),
array(
"Page" => array()
),
array(
"Page" => array()
),
array(
"Page" => array()
),
array(
"Page" => array()
),
array(
"Page" => array()
)
)
$breadCrumbs = array(
array(
"Page" => array()
)
)
$pageContents = array(
"home_who_we_are" => null
)
$userData = null
$announcements = array(
array(
"Announcement" => array()
),
array(
"Announcement" => array()
),
array(
"Announcement" => array()
)
)
$cache = array(
"time" => "+1 day",
"key" => "dok"
)
$form = FormHelper
FormHelper::$helpers = array
FormHelper::$fieldset = array
FormHelper::$__options = array
FormHelper::$fields = array
FormHelper::$requestType = NULL
FormHelper::$defaultModel = NULL
FormHelper::$_inputDefaults = array
FormHelper::$_lastAction = ""
FormHelper::$base = ""
FormHelper::$webroot = "/"
FormHelper::$theme = NULL
FormHelper::$here = "/dok"
FormHelper::$params = array
FormHelper::$action = "index"
FormHelper::$plugin = NULL
FormHelper::$data = NULL
FormHelper::$namedArgs = NULL
FormHelper::$argSeparator = NULL
FormHelper::$validationErrors = NULL
FormHelper::$tags = array
FormHelper::$__tainted = NULL
FormHelper::$__cleaned = NULL
FormHelper::$Html = HtmlHelper object
$text = TextHelper
TextHelper::$helpers = NULL
TextHelper::$base = ""
TextHelper::$webroot = "/"
TextHelper::$theme = NULL
TextHelper::$here = "/dok"
TextHelper::$params = array
TextHelper::$action = "index"
TextHelper::$plugin = NULL
TextHelper::$data = NULL
TextHelper::$namedArgs = NULL
TextHelper::$argSeparator = NULL
TextHelper::$validationErrors = NULL
TextHelper::$tags = array
TextHelper::$__tainted = NULL
TextHelper::$__cleaned = NULL
$stringer = StringerHelper
StringerHelper::$helpers = array
StringerHelper::$base = ""
StringerHelper::$webroot = "/"
StringerHelper::$theme = NULL
StringerHelper::$here = "/dok"
StringerHelper::$params = array
StringerHelper::$action = "index"
StringerHelper::$plugin = NULL
StringerHelper::$data = NULL
StringerHelper::$namedArgs = NULL
StringerHelper::$argSeparator = NULL
StringerHelper::$validationErrors = NULL
StringerHelper::$tags = array
StringerHelper::$__tainted = NULL
StringerHelper::$__cleaned = NULL
StringerHelper::$Html = HtmlHelper object
StringerHelper::$Link = LinkHelper object
StringerHelper::$Text = TextHelper object
$menu = MenuHelper
MenuHelper::$helpers = array
MenuHelper::$base = ""
MenuHelper::$webroot = "/"
MenuHelper::$theme = NULL
MenuHelper::$here = "/dok"
MenuHelper::$params = array
MenuHelper::$action = "index"
MenuHelper::$plugin = NULL
MenuHelper::$data = NULL
MenuHelper::$namedArgs = NULL
MenuHelper::$argSeparator = NULL
MenuHelper::$validationErrors = NULL
MenuHelper::$tags = array
MenuHelper::$__tainted = NULL
MenuHelper::$__cleaned = NULL
MenuHelper::$Link = LinkHelper object
$session = SessionHelper
SessionHelper::$helpers = array
SessionHelper::$__active = true
SessionHelper::$valid = false
SessionHelper::$error = false
SessionHelper::$_userAgent = "f9a8355d006790ee743ededbb1f6e3bd"
SessionHelper::$path = "/"
SessionHelper::$lastError = NULL
SessionHelper::$security = "medium"
SessionHelper::$time = 1773314240
SessionHelper::$sessionTime = 1773326240
SessionHelper::$cookieLifeTime = false
SessionHelper::$watchKeys = array
SessionHelper::$id = NULL
SessionHelper::$host = NULL
SessionHelper::$timeout = NULL
SessionHelper::$base = ""
SessionHelper::$webroot = "/"
SessionHelper::$here = "/dok"
SessionHelper::$params = array
SessionHelper::$action = "index"
SessionHelper::$data = NULL
SessionHelper::$theme = NULL
SessionHelper::$plugin = NULL
$html = HtmlHelper
HtmlHelper::$tags = array
HtmlHelper::$_crumbs = array
HtmlHelper::$__includedScripts = array
HtmlHelper::$_scriptBlockOptions = array
HtmlHelper::$__docTypes = array
HtmlHelper::$helpers = NULL
HtmlHelper::$base = ""
HtmlHelper::$webroot = "/"
HtmlHelper::$theme = NULL
HtmlHelper::$here = "/dok"
HtmlHelper::$params = array
HtmlHelper::$action = "index"
HtmlHelper::$plugin = NULL
HtmlHelper::$data = NULL
HtmlHelper::$namedArgs = NULL
HtmlHelper::$argSeparator = NULL
HtmlHelper::$validationErrors = NULL
HtmlHelper::$__tainted = NULL
HtmlHelper::$__cleaned = NULL
$link = LinkHelper
LinkHelper::$helpers = array
LinkHelper::$lang = "dok"
LinkHelper::$defaultLang = "hrv"
LinkHelper::$base = ""
LinkHelper::$webroot = "/"
LinkHelper::$theme = NULL
LinkHelper::$here = "/dok"
LinkHelper::$params = array
LinkHelper::$action = "index"
LinkHelper::$plugin = NULL
LinkHelper::$data = NULL
LinkHelper::$namedArgs = NULL
LinkHelper::$argSeparator = NULL
LinkHelper::$validationErrors = NULL
LinkHelper::$tags = array
LinkHelper::$__tainted = NULL
LinkHelper::$__cleaned = NULL
LinkHelper::$Html = HtmlHelper object
LinkHelper::$Session = SessionHelper object
$battleReports = array(
array(
"BattleReport" => array(),
"Game" => array(),
"BattleReportExperience" => array()
),
array(
"BattleReport" => array(),
"Game" => array(),
"BattleReportExperience" => array()
),
array(
"BattleReport" => array(),
"Game" => array(),
"BattleReportExperience" => array()
)
)
$battleReport = array(
"BattleReport" => array(
"id" => "16",
"title_eng" => "Kill Team - Blooded vs. Vespid Stingwings",
"title_hrv" => "Kill Team - Blooded vs. Vespid Stingwings",
"mask_eng" => "kill_team_-_blooded_vs_vespid_stingwings",
"mask_hrv" => "kill_team_-_blooded_vs_vespid_stingwings",
"game_id" => "1",
"fought" => "2025-02-28 16:00:00",
"created" => "2025-03-10 08:53:42",
"modified" => "2025-03-10 08:53:42"
),
"Game" => array(
"id" => "1",
"name_eng" => "GW - Warhammer 40.000",
"name_hrv" => "GW - Warhammer 40.000",
"description_eng" => "<p>
In the grim darkness of the far future, there is only war!</p>
<p>
<a href="http://img.photobucket.com/albums/v467/demonn/Agram-Sajt/40k03_zpsc9a73277.jpg" target="_blank"> <img alt="Click for enlarged picture" src="http://img.photobucket.com/albums/v467/demonn/Agram-Sajt/40k03_zpsc9a73277.jpg" width="600" /> </a> </p>
",
"description_hrv" => "<p>
Warhammer 40000 je strate&scaron;ka igra smje&scaron;tena u daleku budućnost Zemlje, u kojoj preuzimate zapovjedni&scaron;tvo nad vojskama minijatura kako bi prikazali oružane sukobe vojski budućnosti.</p>
<p>
Bitke se vode na stolu uobičajenih dimenzija 120 x 180 cm, na koji se zatim postavlja različit teren kako bi se dočarao izgled pravog boji&scaron;ta. Nakon toga, u uobičajenom scenariju, na suprotne strane stola razmje&scaron;taju se dvije vojske minijatura. Strate&scaron;ki dio igre je vrlo važan jer već samim razmje&scaron;tanjem jedinica na stol možete dobiti veći dio bitke.</p>
<p>
Sada, kada va&scaron;i vojnici preko bojnog polja gledaju u mrskog im neprijatelja, spremni ste poslati naredbu za juri&scaron;, ili se ukopati na poziciji i braniti ono &scaron;to je va&scaron;e (va&scaron;u polovicu drvene ploče prekrivene umjetnim terenom). Kako ne bi nastala zbrka na bojnom polju, igra je podijeljena na poteze, a svaki potez je dodatno podijeljen u faze.<br />
&nbsp;</p>
<p>
<a href="http://img.photobucket.com/albums/v467/demonn/Agram-Sajt/40k03_zpsc9a73277.jpg" target="_blank"> <img alt="Click for enlarged picture" src="http://img.photobucket.com/albums/v467/demonn/Agram-Sajt/40k03_zpsc9a73277.jpg" width="600" /> </a> </p>"
),
"BattleReportExperience" => array(
array()
)
)
$memberString = " and <a href="/dok/members/antoni.pastuovic">Antoni Pastuović</a> ()"
$battleReportExperience = array(
"id" => "18",
"battle_report_id" => "16",
"member_id" => "96",
"army_id" => "33",
"intro_eng" => "<p>
This Friday, Luka and I had the opportunity to try out the third edition of the famous Warhammer skirmish game Kill Team, and along the way demonstrate the basics that have remained unchanged. Luka played a team of Vespid Stingwings, a highly mobile T&#39;au unit, and I played the Blooded, a traitor squad that used to belong to the Astra Militarum (in my case they were named Glanton&#39;s Gang). The map, measuring 30x22 inches, was organized so that all terrain was outside of our deployment zones, which were 6 inches from the shorter edges. In the middle of the map, in a slight diagonal, 3 points of interest (objectives) are placed. All this resulted in a very symmetrical setup of operatives &ndash; all Vespids and the entire Blooded gang at the beginning of the game were mirrored hidden behind large pieces of terrain. All buildings with doors were 3 inches high, offering the operatives a Vantage point - the ability to keep one hit die as a success, and the well in the very center, 4 inches high, offers an even better Vantage point, where the operatives keep 2 dice.</p>
<p>
<a href="https://hosting.photobucket.com/95288841-8654-4bf7-8fc9-a4aa78dce87f/e4be55ea-8433-47c7-b28a-459533bba4bc.jpg" target="_blank"><img alt="Click for enlarged picture" src="https://hosting.photobucket.com/95288841-8654-4bf7-8fc9-a4aa78dce87f/e4be55ea-8433-47c7-b28a-459533bba4bc.jpg" width="600" /></a></p>
",
"intro_hrv" => "<p>
Ovaj smo petak Luka i ja imali priliku isprobati treću ediciju poznate Warhammer skirmish igre <em>Kill Team</em> te usput demonstrirati osnove koje su ostale nepromijenjene. Luka je igrao tim Vespid Stingwings, jako mobilne T&#39;au jedinice, a ja sam igrao Blooded, izdajnički odred koji je nekad pripadao Astri Militarum (u mojem su slučaju dobili ime <em>Glantonova banda</em>). Mapa, veličine 30x22 inča, bila je organizirana tako da je sav teren bio van na&scaron;ih deployment zona, koje su iznosile 6 inča od kraćih rubova. Nasred mape, u blagoj dijagonali, postavljene su 3 točke interesa (objectives). Sve je ovo rezultiralo jako simetričnom postavom operativaca &ndash; svi su Vespidi i cijela Blooded banda na početku igre bili zrcaljeno skriveni iza velikih komada terena. Sve građevine s vratima bile su visoke 3 inča, &scaron;to je operativcima nudilo Vantage point &ndash; mogućnost da jednu hit-kockicu zadrže kao uspje&scaron;nu, a bu&scaron;otina u samom centru, visoka 4 inča, nudi jo&scaron; bolji Vantage point, gdje operativci zadržavaju 2 kockice.</p>
<p>
<a href="https://hosting.photobucket.com/95288841-8654-4bf7-8fc9-a4aa78dce87f/e4be55ea-8433-47c7-b28a-459533bba4bc.jpg" target="_blank"><img alt="Click for enlarged picture" src="https://hosting.photobucket.com/95288841-8654-4bf7-8fc9-a4aa78dce87f/e4be55ea-8433-47c7-b28a-459533bba4bc.jpg" width="600" /></a></p>
",
"Member" => array(
"id" => "96",
"group_id" => "2",
"first_name" => "Antoni",
"last_name" => "Pastuović",
"first_name_mask" => "antoni",
"last_name_mask" => "pastuovic",
"username" => "antoni",
"password" => "*****",
"born" => "2005-04-04 18:52:00",
"created" => "2019-04-04 18:53:09"
),
"Army" => array(
"id" => "33",
"game_id" => "1",
"army_alignment_id" => null,
"name_eng" => "Imperial Guard",
"name_hrv" => "Imperial Guard",
"description_eng" => "",
"description_hrv" => ""
)
)
$dateFought = "28<span class="superscript">th</span> February 2025"</pre><pre class="stack-trace">include - APP/views/elements/latestBattleReports.ctp, line 29
View::_render() - CORE/cake/libs/view/view.php, line 736
View::element() - CORE/cake/libs/view/view.php, line 397
include - APP/views/home/index.ctp, line 50
View::_render() - CORE/cake/libs/view/view.php, line 736
View::render() - CORE/cake/libs/view/view.php, line 431
Controller::render() - CORE/cake/libs/controller/controller.php, line 909
Dispatcher::_invoke() - CORE/cake/dispatcher.php, line 207
Dispatcher::dispatch() - CORE/cake/dispatcher.php, line 171
[main] - APP/webroot/index.php, line 86</pre></div></pre>28<span class="superscript">th</span> February 2025, , and <a href="/dok/members/antoni.pastuovic">Antoni Pastuović</a> () </span>
</li>
<li>
<a href="/dok/battle_reports/2022/05/09" class="readMore"></a> <span class="details">
22<span class="superscript">nd</span> April 2022, , <a href="/dok/members/borna.plese">Borna Pleše</a> () and <a href="/dok/members/kristijan.kliska">Kristijan Kliska</a> () </span>
</li>
<li>
<a href="/dok/battle_reports/2021/11/26" class="readMore"></a> <span class="details">
17<span class="superscript">th</span> November 2021, , and <a href="/dok/members/nino.marasovic">Nino Marasović</a> () </span>
</li>
</ul>
<p><a href="/dok/battle_reports">more_battle_reports</a></p> <div class="fb-like-box" data-href="http://www.facebook.com/UmsAgram" data-width="200" data-show-faces="true" data-stream="true" data-header="true"></div>
</div>
<div id="rightColumn">
<h2>who_are_we</h2>
<h2>friends_and_sponsors</h2>
<div style="padding-bottom: 10px;">
<a href="http://www.zagreb.hr">
<img src="/img/sponsors/zagreb.png" width="300" alt="Grad Zagreb"/>
</a>
</div>
<div style="padding-bottom: 10px;">
<a href="http://zagrebacka.policija.hr/">
<img src="/img/sponsors/mup.png" width="300" alt="MUP"/>
</a>
</div>
<div style="padding-bottom: 10px;">
<a href="http://www.morh.hr/hr/morh-u-zajednici/kultura/">
<img src="/img/sponsors/morh.png" width="300" alt="MORH"/>
</a>
</div>
<div style="padding-bottom: 10px;">
<a href="http://www.cartamagica.hr">
<img src="/img/sponsors/cartamagica300_zps31870fe8.jpg" width="300" alt="Carta Magica"/>
</a>
</div>
<div style="padding-bottom: 10px;">
<a href="https://gardensofhecate.com/">
<img src="https://hosting.photobucket.com/images/v467/demonn/gardens.jpg" width="300" alt="Gardens"/>
</a>
</div>
<div style="padding-bottom: 10px;">
<a href="http://www.artzumbur.hr/">
<img src="/img/sponsors/zumbur.png" width="300" alt="Art Zumbur"/>
</a>
</div>
<div style="padding-bottom: 10px;">
<a href="https://makete.eu/">
<img src="https://hosting.photobucket.com/images/v467/demonn/Hobbychest.png" width="300" alt="HobbyChest"/>
</a>
</div>
<div style="padding-bottom: 10px;">
<a href="https://www.facebook.com/CherryTreeZagreb">
<img src="https://hosting.photobucket.com/images/v467/demonn/CherryTree.png" width="300" alt="CherryTree"/>
</a>
</div>
<div style="padding-bottom: 10px;">
<a href="https://www.instagram.com/swood.si/">
<img src="https://hosting.photobucket.com/95288841-8654-4bf7-8fc9-a4aa78dce87f/2abbad87-444e-4b3a-b532-5b29efe8e4f2.png" width="300" alt="Swood"/>
</a>
</div>
<div style="padding-bottom: 10px;">
<a href="https://www.fireballfigurines.com/">
<img src="https://hosting.photobucket.com/95288841-8654-4bf7-8fc9-a4aa78dce87f/82c70756-04a1-41bb-b537-e2da018e764e.png" width="300" alt="fireball"/>
</a>
</div>
<div style="padding-bottom: 10px;">
<a href="https://nordlysminiatures.com/">
<img src="https://hosting.photobucket.com/images/v467/demonn/nordlyslogo.png" width="300" alt="nordlys"/>
</a>
</div>
<div style="padding-bottom: 10px;">
<a href="https://www.bestiarumgames.com/">
<img src="https://hosting.photobucket.com/images/v467/demonn/bestiarum.png" width="300" alt="bestiarum"/>
</a>
</div>
<div style="padding-bottom: 10px;">
<a href="https://shop.ramshacklegames.co.uk/">
<img src="https://hosting.photobucket.com/images/v467/demonn/ramshackle.png" width="300" alt="ramshackle"/>
</a>
</div>
<div style="padding-bottom: 10px;">
<a href="https://btb-tutorials.com/">
<img src="https://hosting.photobucket.com/images/v467/demonn/logob2b.png" width="300" alt="b2b"/>
</a>
</div>
<div style="padding-bottom: 10px;">
<a href="https://www.miniatures.si/">
<img src="https://hosting.photobucket.com/images/v467/demonn/logominiatures-si.png" width="300" alt="miniatures-si"/>
</a>
</div>
<div style="padding-bottom: 10px;">
<a href="http://thebigbearminiatures.unas.hu/en/">
<img src="https://hosting.photobucket.com/images/v467/demonn/BigBear.jpg" width="300" alt="bigbear"/>
</a>
</div>
<div style="padding-bottom: 10px;">
<a href="https://www.facebook.com/p/Zone-Miniatures-100063970506568/">
<img src="https://hosting.photobucket.com/images/v467/demonn/ZoneMin.jpg" width="300" alt="zone"/>
</a>
</div>
<div style="padding-bottom: 10px;">
<a href="https://www.mrleesminis.com/">
<img src="/img/sponsors/mrleeminis.jpg" width="300" alt="mrlee"/>
</a>
</div>
<div style="padding-bottom: 10px;">
<a href="https://crecymodels.com/">
<img src="https://hosting.photobucket.com/images/v467/demonn/crecymodels.png" width="300" alt="Crecy"/>
</a>
</div>
<div style="padding-bottom: 10px;">
<a href="https://www.scientificmodels.shop/">
<img src="https://hosting.photobucket.com/images/v467/demonn/scientificmini.png" width="300" alt="Scientific"/>
</a>
</div>
<div style="padding-bottom: 10px;">
<a href="https://www.foundminiatures.com/home">
<img src="https://hosting.photobucket.com/images/v467/demonn/found.png" width="300" alt="Found"/>
</a>
</div>
<div style="padding-bottom: 10px;">
<a href="https://www.mkontraros.com/">
<img src="/img/sponsors/kontraros.jpg" width="300" alt="Kontraros"/>
</a>
</div>
<div style="padding-bottom: 10px;">
<a href="http://www.martinwelberg.nl/">
<img src="https://img.photobucket.com/albums/v467/demonn/sponzori/welberg.jpg" width="300" alt="Welberg"/>
</a>
</div>
<div style="padding-bottom: 10px;">
<a href="https://www.dioramapresepe.com/en/shop/">
<img src="https://img.photobucket.com/albums/v467/demonn/sponzori/dioramapresepe.png" width="300" alt="DioramaPresepe"/>
</a>
<div style="padding-bottom: 10px;">
<a href="https://www.greymountainreviews.co.uk/">
<img src="https://hosting.photobucket.com/images/v467/demonn/GMR.png" width="300" alt="GMR"/>
</a>
</div><div style="padding-bottom: 10px;">
<a href="http://triglav-model.simplesite.com/">
<img src="/img/sponsors/Triglav.jpg" width="300" alt="Triglav Model"/>
</a>
</div>
<div style="padding-bottom: 10px;">
<a href="https://magicomens.com/?utm_medium=referral&utm_source=website&utm_campaign=banner&utm_term=ums-agram&utm_content=organic-hr">
<img src="https://hosting.photobucket.com/images/v467/demonn/magicomens.png" width="300" alt="MagicOmens"/>
</a>
</div>
<div style="padding-bottom: 10px;">
<a href="http://www.hostel-bureau.eu/">
<img src="http://img.photobucket.com/albums/v467/demonn/sponzori/bureau1.jpg" width="300" alt="BureauHostelZagreb"/>
</a>
</div>
<div style="padding-bottom: 10px;">
<a href="https://diyconnect.net/">
<img src="https://img.photobucket.com/albums/v467/demonn/sponzori/DIYconnect.png" width="300" alt="DIYConnect"/>
</a>
</div>
<div style="padding-bottom: 10px;">
<a href="http://www.shop.battlefield-berlin.de/">
<img src="/img/sponsors/BBlogo.jpg" width="300" alt="Battlefieldberlin"/>
</a>
</div>
<div style="padding-bottom: 10px;">
<a href="http://www.cartoonminiatures.com/">
<img src="https://img.photobucket.com/albums/v467/demonn/sponzori/scalebro.png" width="300" alt="Cartoon Miniatures"/>
</a>
</div>
<div style="padding-bottom: 10px">
<a href="http://www.shop.microartstudio.com">
<img src="/img/sponsors/MAS_logo_small.png" width="300" alt="MicroArt Studio"/>
</a>
</div>
<div style="padding-bottom: 10px;">
<a href="https://www.secretweaponminiatures.com/">
<img src="http://img.photobucket.com/albums/v467/demonn/sponzori/SecretWeapon.jpg" width="300" alt="Secret Weapon Miniatures"/>
</a>
</div>
<div style="padding-bottom: 10px;">
<a href="http://www.greenstuffworld.com/en/">
<img src="http://img.photobucket.com/albums/v467/demonn/sponzori/GSW.jpg.png" width="300" alt="GSW"/>
</a>
</div>
<div style="padding-bottom: 10px;">
<a href="http://www.gamersgrass.com/">
<img src="https://img.photobucket.com/albums/v467/demonn/sponzori/gamersgrass.png" width="300" alt="Gamers Grass"/>
</a>
</div>
<div style="padding-bottom: 10px;">
<a href="https://www.facebook.com/pg/UO.Artefakt/about/?ref=page_internal">
<img src="http://img.photobucket.com/albums/v467/demonn/sponzori/artefakt.png" width="300" alt="Artefakt"/>
</a>
</div>
<div style="padding-bottom: 10px;">
<a href="http://www.savageforgedminis.de/">
<img src="http://img.photobucket.com/albums/v467/demonn/sponzori/SFM2015.gif" width="300" alt="Savage Forged Minis"/>
</a>
</div>
<div style="padding-bottom: 10px;">
<a href="http://www.brokentoad.co.uk/">
<img src="http://img.photobucket.com/albums/v467/demonn/sponzori/brokentoad.png" width="300" alt="Ebenezers Emporium"/>
</a>
</div>
<div style="padding-bottom: 10px;">
<a href="http://zealotminiatures.com/">
<img src="http://img.photobucket.com/albums/v467/demonn/sponzori/Zealot.jpg" width="300" alt="Zealot"/>
</a>
</div>
<div style="padding-bottom: 10px;">
<a href="http://www.customeeple.com/">
<img src="http://img.photobucket.com/albums/v467/demonn/sponzori/customeeple02.png" width="300" alt="Customeeple"/>
</a>
</div>
<div style="padding-bottom: 10px;">
<a href="http://www.gamemat.eu/">
<img src="https://img.photobucket.com/albums/v467/demonn/sponzori/gamemat.png" width="300" alt="Gamemat"/>
</a>
</div>
<div style="padding-bottom: 10px;">
<a href="http://www.prvidojam.eu/">
<img src="http://img.photobucket.com/albums/v467/demonn/logoWEBretina21.png" width="300" alt="Prvi dojam"/>
</a>
</div>
<div style="padding-bottom: 10px;">
<a href="http://www.infamyminiatures.com/">
<img src="/img/sponsors/infamyLogo.jpg" width="300" alt="Infamy Miniatures"/>
</a>
</div>
<div style="padding-bottom: 10px;">
<a href="http://www.modeldisplayproducts.co.uk">
<img src="http://img.photobucket.com/albums/v467/demonn/sponzori/MDP.gif" width="300" alt="Wamp"/>
</a>
</div>
<div style="padding-bottom: 10px;">
<a href="http://www.wolfdesign.hr/">
<img src="http://img.photobucket.com/albums/v467/demonn/sponzori/WD01.png" width="300" alt="wolfdesign"/>
</a>
</div>
<div style="padding-bottom: 10px;">
<a href="http://www.wampstore.com/store">
<img src="/img/sponsors/wamp.png" width="300" alt="Wamp"/>
</a>
</div>
<div style="padding-bottom: 10px;">
<a href="http://www.tabletop-world.com/">
<img src="http://img.photobucket.com/albums/v467/demonn/sponzori/ttw.png" width="300" alt="TabletopWorld"/>
</a>
</div>
<div style="padding-bottom: 10px;">
<a href="http://www.figurepaintermagazine.co.uk/">
<img src="/img/sponsors/FPM_Logo300_zps2ff0954a.png" width="300" alt="Figure Painter Magazine"/>
</a>
</div>
<div style="padding-bottom: 10px;">
<a href="http://sciborminiatures.com/">
<img src="http://img.photobucket.com/albums/v467/demonn/sponzori/sciborlogo.jpg" width="300" alt="scibor"/>
</a>
</div>
<div style="padding-bottom: 10px;">
<a href="http://www.mrblackpublications.com//">
<img src="http://img.photobucket.com/albums/v467/demonn/sponzori/mrblackpub-1.jpg" width="300" alt="mrblackpublications"/>
</a>
</div>
<div style="padding-bottom: 10px;">
<a href="http://cro-hobby.com/">
<img src="/img/sponsors/ch1.jpg" width="300" alt="crohobby"/>
</a>
</div>
<div style="padding-bottom: 10px;">
<a href="http://www.leo-modeli.hr/">
<img src="/img/sponsors/leomodeli.png" width="300" alt="Leo Modeli"/>
</a>
</div>
<div style="padding-bottom: 10px;">
<a href="http://www.terriblekidsstuff.com">
<img src="/img/sponsors/terribleKS_logo.png" width="300" alt="Terrible Kids Stuff"/>
</a>
</div>
<div style="padding-bottom: 10px;">
<a href="http://www.scale75.com">
<img src="/img/sponsors/scale75.png" width="300" alt="Scale75"/>
</a>
</div>
<div style="padding-bottom: 10px;">
<a href="http://www.lumos.hr/">
<img src="/img/sponsors/lumos.jpg" width="300" alt="Lumos Hobby & Art"/>
</a>
</div>
<div style="padding-bottom: 10px;">
<a href="http://www.initiativemagazine.co.uk/">
<img src="http://img.photobucket.com/albums/v467/demonn/sponzori/Initiative-Magazine-Logo-Big.png" width="300" alt="Initiative Magazine"/>
</a>
</div>
<div style="padding-bottom: 10px;">
<a href="https://www.kset.org/">
<img src="http://img.photobucket.com/albums/v467/demonn/sponzori/kset_logo.png" width="300" alt="KSET"/>
</a>
</div>
<div style="padding-bottom: 10px;">
<a href="http://www.systemagaming.com/">
<img src="/img/sponsors/systema.gif" width="300" alt="Systema Gaming Scenery"/>
</a>
</div>
<div style="padding-bottom: 10px;">
<a href="http://www.figone.fr/en//">
<img src="/img/sponsors/figone.jpg" width="300" alt="figone"/>
</a>
</div>
<div style="padding-bottom: 10px;">
<a href="http://www.crom.hr">
<img src="/img/sponsors/crom.png" width="300" alt="Crom"/>
</a>
</div>
<div style="padding-bottom: 10px;">
<a href="http://www.kerrandking.co.uk/">
<img src="/img/sponsors/kerr&king.png" width="300" alt="Kerrandking"/>
</a>
</div>
<div style="padding-bottom: 10px;">
<a href="http://www.kabukimodels.com/">
<img src="/img/sponsors/kabuki5.gif" width="300" alt="Kabuki Models"/>
</a>
</div>
<div style="padding-bottom: 10px;">
<a href="http://www.phlegyas-art.com">
<img src="/img/sponsors/bannerPhlegyasArt.jpg" width="300" alt="Phlegyas Art"/>
</a>
</div>
<div style="padding-bottom: 10px;">
<a href="http://www.wyrd-games.net/">
<img src="/img/sponsors/wyrd.jpg" width="300" alt="Wyrd Miniatures"/>
</a>
</div>
<div style="padding-bottom: 10px;">
<a href="http://escenorama.com/en/">
<img src="http://img.photobucket.com/albums/v467/demonn/sponzori/escenorama.jpg" width="300" alt="escenorama"/>
</a>
</div>
<div style="padding-bottom: 10px;">
<a href="http://kromlech.eu/">
<img src="http://img.photobucket.com/albums/v467/demonn/sponzori/kromlech.png" width="300" alt="Kromlech"/>
</a>
</div>
<div style="padding-bottom: 10px;">
<a href="http://www.avatars-of-war.com/">
<img src="http://img.photobucket.com/albums/v467/demonn/sponzori/aow.png" width="300" alt="AOW"/>
</a>
</div>
<div style="padding-bottom: 10px;">
<a href="http://www.shieldwolfminiatures.com/">
<img src="http://img.photobucket.com/albums/v467/demonn/sponzori/shieldwolf.png" width="300" alt="Shieldwolf"/>
</a>
</div>
<div style="padding-bottom: 10px;">
<a href="http://www.uschivdr.com/">
<img src="http://img.photobucket.com/albums/v467/demonn/sponzori/uschi02.jpg" width="300" alt="uschi"/>
</a>
</div>
<div style="padding-bottom: 10px;">
<a href="http://www.hangar18miniatures.com">
<img src="http://img.photobucket.com/albums/v467/demonn/sponzori/hangar18.png" width="300" alt="Hangar 18 Miniatures"/>
</a>
</div>
<div style="padding-bottom: 10px;">
<a href="http://www.fallouthobbies.com/">
<img src="http://img.photobucket.com/albums/v467/demonn/sponzori/FOH.jpg" width="300" alt="FOH"/>
</a>
</div>
<div style="padding-bottom: 10px;">
<a href="https://ebenezers-emporium.squarespace.com">
<img src="http://img.photobucket.com/albums/v467/demonn/sponzori/ebenezer.jpg" width="300" alt="Ebenezers Emporium"/>
</a>
</div>
<div>
<a href="/sponsors">friends_and_sponsors</a>
</div>
</div>"
$scripts_for_layout = ""
$title_for_layout = "Home"
$form = FormHelper
FormHelper::$helpers = array
FormHelper::$fieldset = array
FormHelper::$__options = array
FormHelper::$fields = array
FormHelper::$requestType = NULL
FormHelper::$defaultModel = NULL
FormHelper::$_inputDefaults = array
FormHelper::$_lastAction = ""
FormHelper::$base = ""
FormHelper::$webroot = "/"
FormHelper::$theme = NULL
FormHelper::$here = "/dok"
FormHelper::$params = array
FormHelper::$action = "index"
FormHelper::$plugin = NULL
FormHelper::$data = NULL
FormHelper::$namedArgs = NULL
FormHelper::$argSeparator = NULL
FormHelper::$validationErrors = NULL
FormHelper::$tags = array
FormHelper::$__tainted = NULL
FormHelper::$__cleaned = NULL
FormHelper::$Html = HtmlHelper object
$text = TextHelper
TextHelper::$helpers = NULL
TextHelper::$base = ""
TextHelper::$webroot = "/"
TextHelper::$theme = NULL
TextHelper::$here = "/dok"
TextHelper::$params = array
TextHelper::$action = "index"
TextHelper::$plugin = NULL
TextHelper::$data = NULL
TextHelper::$namedArgs = NULL
TextHelper::$argSeparator = NULL
TextHelper::$validationErrors = NULL
TextHelper::$tags = array
TextHelper::$__tainted = NULL
TextHelper::$__cleaned = NULL
$stringer = StringerHelper
StringerHelper::$helpers = array
StringerHelper::$base = ""
StringerHelper::$webroot = "/"
StringerHelper::$theme = NULL
StringerHelper::$here = "/dok"
StringerHelper::$params = array
StringerHelper::$action = "index"
StringerHelper::$plugin = NULL
StringerHelper::$data = NULL
StringerHelper::$namedArgs = NULL
StringerHelper::$argSeparator = NULL
StringerHelper::$validationErrors = NULL
StringerHelper::$tags = array
StringerHelper::$__tainted = NULL
StringerHelper::$__cleaned = NULL
StringerHelper::$Html = HtmlHelper object
StringerHelper::$Link = LinkHelper object
StringerHelper::$Text = TextHelper object
$menu = MenuHelper
MenuHelper::$helpers = array
MenuHelper::$base = ""
MenuHelper::$webroot = "/"
MenuHelper::$theme = NULL
MenuHelper::$here = "/dok"
MenuHelper::$params = array
MenuHelper::$action = "index"
MenuHelper::$plugin = NULL
MenuHelper::$data = NULL
MenuHelper::$namedArgs = NULL
MenuHelper::$argSeparator = NULL
MenuHelper::$validationErrors = NULL
MenuHelper::$tags = array
MenuHelper::$__tainted = NULL
MenuHelper::$__cleaned = NULL
MenuHelper::$Link = LinkHelper object
$session = SessionHelper
SessionHelper::$helpers = array
SessionHelper::$__active = true
SessionHelper::$valid = false
SessionHelper::$error = false
SessionHelper::$_userAgent = "f9a8355d006790ee743ededbb1f6e3bd"
SessionHelper::$path = "/"
SessionHelper::$lastError = NULL
SessionHelper::$security = "medium"
SessionHelper::$time = 1773395484
SessionHelper::$sessionTime = 1773407484
SessionHelper::$cookieLifeTime = false
SessionHelper::$watchKeys = array
SessionHelper::$id = NULL
SessionHelper::$host = NULL
SessionHelper::$timeout = NULL
SessionHelper::$base = ""
SessionHelper::$webroot = "/"
SessionHelper::$here = "/dok"
SessionHelper::$params = array
SessionHelper::$action = "index"
SessionHelper::$data = NULL
SessionHelper::$theme = NULL
SessionHelper::$plugin = NULL
$html = HtmlHelper
HtmlHelper::$tags = array
HtmlHelper::$_crumbs = array
HtmlHelper::$__includedScripts = array
HtmlHelper::$_scriptBlockOptions = array
HtmlHelper::$__docTypes = array
HtmlHelper::$helpers = NULL
HtmlHelper::$base = ""
HtmlHelper::$webroot = "/"
HtmlHelper::$theme = NULL
HtmlHelper::$here = "/dok"
HtmlHelper::$params = array
HtmlHelper::$action = "index"
HtmlHelper::$plugin = NULL
HtmlHelper::$data = NULL
HtmlHelper::$namedArgs = NULL
HtmlHelper::$argSeparator = NULL
HtmlHelper::$validationErrors = NULL
HtmlHelper::$__tainted = NULL
HtmlHelper::$__cleaned = NULL
$link = LinkHelper
LinkHelper::$helpers = array
LinkHelper::$lang = "dok"
LinkHelper::$defaultLang = "hrv"
LinkHelper::$base = ""
LinkHelper::$webroot = "/"
LinkHelper::$theme = NULL
LinkHelper::$here = "/dok"
LinkHelper::$params = array
LinkHelper::$action = "index"
LinkHelper::$plugin = NULL
LinkHelper::$data = NULL
LinkHelper::$namedArgs = NULL
LinkHelper::$argSeparator = NULL
LinkHelper::$validationErrors = NULL
LinkHelper::$tags = array
LinkHelper::$__tainted = NULL
LinkHelper::$__cleaned = NULL
LinkHelper::$Html = HtmlHelper object
LinkHelper::$Session = SessionHelper object
$separator = " > "
$titleSeparator = " < "
$breadcrumbs = "breadcrumbs "
$title = ""
$breadCrumb = array(
"Page" => array(
"id" => "1",
"parent_id" => null,
"controller" => "home",
"title_eng" => "Home",
"title_hrv" => "Naslovnica",
"lft" => "1",
"rght" => "56"
)
)
$controller = array(
"home"
)
include - APP/views/layouts/default.ctp, line 14
View::_render() - CORE/cake/libs/view/view.php, line 736
View::renderLayout() - CORE/cake/libs/view/view.php, line 494
View::render() - CORE/cake/libs/view/view.php, line 440
Controller::render() - CORE/cake/libs/controller/controller.php, line 909
Dispatcher::_invoke() - CORE/cake/dispatcher.php, line 207
Dispatcher::dispatch() - CORE/cake/dispatcher.php, line 171
[main] - APP/webroot/index.php, line 86
Notice (8): Undefined index: title_dok [APP/views/layouts/default.ctp, line 16]
if (Configure::read() > 0) { include ($___viewFn);
$___viewFn = "/home/martin/apps/agram/app/views/layouts/default.ctp"
$___dataForView = array(
"lang" => "dok",
"otherLangs" => array(
"eng",
"hrv"
),
"globalNav" => array(
array(),
array(),
array(),
array(),
array(),
array(),
array(),
array(),
array(),
array(),
array(),
array(),
array(),
array(),
array(),
array(),
array(),
array(),
array(),
array(),
array(),
array(),
array(),
array(),
array(),
array(),
array()
),
"breadCrumbs" => array(
array()
),
"pageContents" => array(
"home_who_we_are" => null
),
"userData" => null,
"announcements" => array(
array(),
array(),
array()
),
"content_for_layout" => "<div id="leftColumn">
<h2>latest_announcements</h2>
<div class="announcement workshop_announcement">
<h3><pre class="cake-debug"><a href="javascript:void(0);" onclick="document.getElementById('cakeErr2-trace').style.display = (document.getElementById('cakeErr2-trace').style.display == 'none' ? '' : 'none');"><b>Notice</b> (8)</a>: Undefined index: title_dok [<b>APP/views/home/index.ctp</b>, line <b>7</b>]<div id="cakeErr2-trace" class="cake-stack-trace" style="display: none;"><a href="javascript:void(0);" onclick="document.getElementById('cakeErr2-code').style.display = (document.getElementById('cakeErr2-code').style.display == 'none' ? '' : 'none')">Code</a> | <a href="javascript:void(0);" onclick="document.getElementById('cakeErr2-context').style.display = (document.getElementById('cakeErr2-context').style.display == 'none' ? '' : 'none')">Context</a><div id="cakeErr2-code" class="cake-code-dump" style="display: none;"><pre><code><span style="color: #000000"></span></code>
<code><span style="color: #000000"> if (Configure::read() > 0) {</span></code>
<span class="code-highlight"><code><span style="color: #000000"> include ($___viewFn);</span></code></span></pre></div><pre id="cakeErr2-context" class="cake-context" style="display: none;">$___viewFn = "/home/martin/apps/agram/app/views/home/index.ctp"
$___dataForView = array(
"lang" => "dok",
"otherLangs" => array(
"eng",
"hrv"
),
"globalNav" => array(
array(),
array(),
array(),
array(),
array(),
array(),
array(),
array(),
array(),
array(),
array(),
array(),
array(),
array(),
array(),
array(),
array(),
array(),
array(),
array(),
array(),
array(),
array(),
array(),
array(),
array(),
array()
),
"breadCrumbs" => array(
array()
),
"pageContents" => array(
"home_who_we_are" => null
),
"userData" => null,
"announcements" => array(
array(),
array(),
array()
)
)
$loadHelpers = true
$cached = false
$form = FormHelper
FormHelper::$helpers = array
FormHelper::$fieldset = array
FormHelper::$__options = array
FormHelper::$fields = array
FormHelper::$requestType = NULL
FormHelper::$defaultModel = NULL
FormHelper::$_inputDefaults = array
FormHelper::$_lastAction = ""
FormHelper::$base = ""
FormHelper::$webroot = "/"
FormHelper::$theme = NULL
FormHelper::$here = "/dok"
FormHelper::$params = array
FormHelper::$action = "index"
FormHelper::$plugin = NULL
FormHelper::$data = NULL
FormHelper::$namedArgs = NULL
FormHelper::$argSeparator = NULL
FormHelper::$validationErrors = NULL
FormHelper::$tags = array
FormHelper::$__tainted = NULL
FormHelper::$__cleaned = NULL
FormHelper::$Html = HtmlHelper object
$text = TextHelper
TextHelper::$helpers = NULL
TextHelper::$base = ""
TextHelper::$webroot = "/"
TextHelper::$theme = NULL
TextHelper::$here = "/dok"
TextHelper::$params = array
TextHelper::$action = "index"
TextHelper::$plugin = NULL
TextHelper::$data = NULL
TextHelper::$namedArgs = NULL
TextHelper::$argSeparator = NULL
TextHelper::$validationErrors = NULL
TextHelper::$tags = array
TextHelper::$__tainted = NULL
TextHelper::$__cleaned = NULL
$stringer = StringerHelper
StringerHelper::$helpers = array
StringerHelper::$base = ""
StringerHelper::$webroot = "/"
StringerHelper::$theme = NULL
StringerHelper::$here = "/dok"
StringerHelper::$params = array
StringerHelper::$action = "index"
StringerHelper::$plugin = NULL
StringerHelper::$data = NULL
StringerHelper::$namedArgs = NULL
StringerHelper::$argSeparator = NULL
StringerHelper::$validationErrors = NULL
StringerHelper::$tags = array
StringerHelper::$__tainted = NULL
StringerHelper::$__cleaned = NULL
StringerHelper::$Html = HtmlHelper object
StringerHelper::$Link = LinkHelper object
StringerHelper::$Text = TextHelper object
$menu = MenuHelper
MenuHelper::$helpers = array
MenuHelper::$base = ""
MenuHelper::$webroot = "/"
MenuHelper::$theme = NULL
MenuHelper::$here = "/dok"
MenuHelper::$params = array
MenuHelper::$action = "index"
MenuHelper::$plugin = NULL
MenuHelper::$data = NULL
MenuHelper::$namedArgs = NULL
MenuHelper::$argSeparator = NULL
MenuHelper::$validationErrors = NULL
MenuHelper::$tags = array
MenuHelper::$__tainted = NULL
MenuHelper::$__cleaned = NULL
MenuHelper::$Link = LinkHelper object
$session = SessionHelper
SessionHelper::$helpers = array
SessionHelper::$__active = true
SessionHelper::$valid = false
SessionHelper::$error = false
SessionHelper::$_userAgent = "f9a8355d006790ee743ededbb1f6e3bd"
SessionHelper::$path = "/"
SessionHelper::$lastError = NULL
SessionHelper::$security = "medium"
SessionHelper::$time = 1773395484
SessionHelper::$sessionTime = 1773407484
SessionHelper::$cookieLifeTime = false
SessionHelper::$watchKeys = array
SessionHelper::$id = NULL
SessionHelper::$host = NULL
SessionHelper::$timeout = NULL
SessionHelper::$base = ""
SessionHelper::$webroot = "/"
SessionHelper::$here = "/dok"
SessionHelper::$params = array
SessionHelper::$action = "index"
SessionHelper::$data = NULL
SessionHelper::$theme = NULL
SessionHelper::$plugin = NULL
$html = HtmlHelper
HtmlHelper::$tags = array
HtmlHelper::$_crumbs = array
HtmlHelper::$__includedScripts = array
HtmlHelper::$_scriptBlockOptions = array
HtmlHelper::$__docTypes = array
HtmlHelper::$helpers = NULL
HtmlHelper::$base = ""
HtmlHelper::$webroot = "/"
HtmlHelper::$theme = NULL
HtmlHelper::$here = "/dok"
HtmlHelper::$params = array
HtmlHelper::$action = "index"
HtmlHelper::$plugin = NULL
HtmlHelper::$data = NULL
HtmlHelper::$namedArgs = NULL
HtmlHelper::$argSeparator = NULL
HtmlHelper::$validationErrors = NULL
HtmlHelper::$__tainted = NULL
HtmlHelper::$__cleaned = NULL
$link = LinkHelper
LinkHelper::$helpers = array
LinkHelper::$lang = NULL
LinkHelper::$defaultLang = NULL
LinkHelper::$base = ""
LinkHelper::$webroot = "/"
LinkHelper::$theme = NULL
LinkHelper::$here = "/dok"
LinkHelper::$params = array
LinkHelper::$action = "index"
LinkHelper::$plugin = NULL
LinkHelper::$data = NULL
LinkHelper::$namedArgs = NULL
LinkHelper::$argSeparator = NULL
LinkHelper::$validationErrors = NULL
LinkHelper::$tags = array
LinkHelper::$__tainted = NULL
LinkHelper::$__cleaned = NULL
LinkHelper::$Html = HtmlHelper object
LinkHelper::$Session = SessionHelper object
$lang = "dok"
$otherLangs = array(
"eng",
"hrv"
)
$globalNav = array(
array(
"Page" => array()
),
array(
"Page" => array()
),
array(
"Page" => array()
),
array(
"Page" => array()
),
array(
"Page" => array()
),
array(
"Page" => array()
),
array(
"Page" => array()
),
array(
"Page" => array()
),
array(
"Page" => array()
),
array(
"Page" => array()
),
array(
"Page" => array()
),
array(
"Page" => array()
),
array(
"Page" => array()
),
array(
"Page" => array()
),
array(
"Page" => array()
),
array(
"Page" => array()
),
array(
"Page" => array()
),
array(
"Page" => array()
),
array(
"Page" => array()
),
array(
"Page" => array()
),
array(
"Page" => array()
),
array(
"Page" => array()
),
array(
"Page" => array()
),
array(
"Page" => array()
),
array(
"Page" => array()
),
array(
"Page" => array()
),
array(
"Page" => array()
)
)
$breadCrumbs = array(
array(
"Page" => array()
)
)
$pageContents = array(
"home_who_we_are" => null
)
$userData = null
$announcements = array(
array(
"Announcement" => array()
),
array(
"Announcement" => array()
),
array(
"Announcement" => array()
)
)
$announcement = array(
"Announcement" => array(
"id" => "4_80",
"class" => "workshop_announcement",
"controller" => "workshop_announcements",
"mask_eng" => "ExhibitionB2B",
"mask_hrv" => "IzložbaB2B",
"title_hrv" => "Back to Basics Radionice za najmlađe na Izložbi minijatura i maketa Agram 2026",
"title_eng" => "Back to Basics Workshops @ Exhibition of Miniatures and Tabletop Scenery Agram 2026",
"content_hrv" => "<p>
Tijekom na&scaron;e Izložbe minijatura i maketa Agram 2026 svakog radnog dana od 17:00 do 18:00 organizirat ćemo i <strong>Back to Basics radionice bojanja minijatura za najmlađe</strong> (8+).&nbsp;</p>
<p>
<a href="https://hosting.photobucket.com/95288841-8654-4bf7-8fc9-a4aa78dce87f/f73b7e94-5adc-4afb-838b-b479ea8886fd.jpg" target="_blank"><img alt="Click for enlarged picture" src="https://hosting.photobucket.com/95288841-8654-4bf7-8fc9-a4aa78dce87f/f73b7e94-5adc-4afb-838b-b479ea8886fd.jpg" width="600" /></a></p>
<p>
<strong>ULAZ BESPLATAN!</strong></p>
<p>
Radionice (trajanja cca 1h ) su prigodne za najmlađe korisnike jer se samo koriste bazične tehnike, alati i materijali a omogućava lak&scaron;i pristup minijaturizmu i maketarstvu fokusiranjem na zabavni proces izrade za razliku od uobičajenog inzistiranja na i&scaron;čekivanje krajnjeg rezultata koji najče&scaron;će donosi stres mlađim polaznicima.</p>
<p>
U svakom od termina po četiri polaznika će moći obojati i sastaviti vlastitu figuru (koju onda nose doma).</p>
",
"content_eng" => "<p>
During our Exhibition of Miniatures and Tabletop Scenery Agram 2026, every weekday from 5:00 PM to 6:00 PM, we will also organize <strong>Back to Basics miniature painting workshops for the youngest (8+)</strong>.</p>
<p>
<a href="https://hosting.photobucket.com/95288841-8654-4bf7-8fc9-a4aa78dce87f/f73b7e94-5adc-4afb-838b-b479ea8886fd.jpg" target="_blank"><img alt="Click for enlarged picture" src="https://hosting.photobucket.com/95288841-8654-4bf7-8fc9-a4aa78dce87f/f73b7e94-5adc-4afb-838b-b479ea8886fd.jpg" width="600" /></a></p>
<p>
<strong>FREE ENTRY! </strong></p>
<p>
The workshops (lasting approx. 1 hour) are suitable for the youngest users because they only use basic techniques, tools and materials and provide an easier approach to miniaturism and model making by focusing on the fun process of making, as opposed to the usual insistence on waiting for the final result, which most often brings stress to younger participants.</p>
<p>
In each session, four participants will be able to color and assemble their own figure (which they then take home).</p>
",
"created" => "2026-02-17 07:57:52",
"first_name" => "Krunoslav",
"last_name" => "Belinić",
"first_name_mask" => "krunoslav",
"last_name_mask" => "belinic",
"start" => null,
"end" => null
)
)</pre><pre class="stack-trace">include - APP/views/home/index.ctp, line 7
View::_render() - CORE/cake/libs/view/view.php, line 736
View::render() - CORE/cake/libs/view/view.php, line 431
Controller::render() - CORE/cake/libs/controller/controller.php, line 909
Dispatcher::_invoke() - CORE/cake/dispatcher.php, line 207
Dispatcher::dispatch() - CORE/cake/dispatcher.php, line 171
[main] - APP/webroot/index.php, line 86</pre></div></pre><pre class="cake-debug"><a href="javascript:void(0);" onclick="document.getElementById('cakeErr3-trace').style.display = (document.getElementById('cakeErr3-trace').style.display == 'none' ? '' : 'none');"><b>Notice</b> (8)</a>: Undefined index: mask_dok [<b>APP/views/home/index.ctp</b>, line <b>10</b>]<div id="cakeErr3-trace" class="cake-stack-trace" style="display: none;"><a href="javascript:void(0);" onclick="document.getElementById('cakeErr3-code').style.display = (document.getElementById('cakeErr3-code').style.display == 'none' ? '' : 'none')">Code</a> | <a href="javascript:void(0);" onclick="document.getElementById('cakeErr3-context').style.display = (document.getElementById('cakeErr3-context').style.display == 'none' ? '' : 'none')">Context</a><div id="cakeErr3-code" class="cake-code-dump" style="display: none;"><pre><code><span style="color: #000000"></span></code>
<code><span style="color: #000000"> if (Configure::read() > 0) {</span></code>
<span class="code-highlight"><code><span style="color: #000000"> include ($___viewFn);</span></code></span></pre></div><pre id="cakeErr3-context" class="cake-context" style="display: none;">$___viewFn = "/home/martin/apps/agram/app/views/home/index.ctp"
$___dataForView = array(
"lang" => "dok",
"otherLangs" => array(
"eng",
"hrv"
),
"globalNav" => array(
array(),
array(),
array(),
array(),
array(),
array(),
array(),
array(),
array(),
array(),
array(),
array(),
array(),
array(),
array(),
array(),
array(),
array(),
array(),
array(),
array(),
array(),
array(),
array(),
array(),
array(),
array()
),
"breadCrumbs" => array(
array()
),
"pageContents" => array(
"home_who_we_are" => null
),
"userData" => null,
"announcements" => array(
array(),
array(),
array()
)
)
$loadHelpers = true
$cached = false
$form = FormHelper
FormHelper::$helpers = array
FormHelper::$fieldset = array
FormHelper::$__options = array
FormHelper::$fields = array
FormHelper::$requestType = NULL
FormHelper::$defaultModel = NULL
FormHelper::$_inputDefaults = array
FormHelper::$_lastAction = ""
FormHelper::$base = ""
FormHelper::$webroot = "/"
FormHelper::$theme = NULL
FormHelper::$here = "/dok"
FormHelper::$params = array
FormHelper::$action = "index"
FormHelper::$plugin = NULL
FormHelper::$data = NULL
FormHelper::$namedArgs = NULL
FormHelper::$argSeparator = NULL
FormHelper::$validationErrors = NULL
FormHelper::$tags = array
FormHelper::$__tainted = NULL
FormHelper::$__cleaned = NULL
FormHelper::$Html = HtmlHelper object
$text = TextHelper
TextHelper::$helpers = NULL
TextHelper::$base = ""
TextHelper::$webroot = "/"
TextHelper::$theme = NULL
TextHelper::$here = "/dok"
TextHelper::$params = array
TextHelper::$action = "index"
TextHelper::$plugin = NULL
TextHelper::$data = NULL
TextHelper::$namedArgs = NULL
TextHelper::$argSeparator = NULL
TextHelper::$validationErrors = NULL
TextHelper::$tags = array
TextHelper::$__tainted = NULL
TextHelper::$__cleaned = NULL
$stringer = StringerHelper
StringerHelper::$helpers = array
StringerHelper::$base = ""
StringerHelper::$webroot = "/"
StringerHelper::$theme = NULL
StringerHelper::$here = "/dok"
StringerHelper::$params = array
StringerHelper::$action = "index"
StringerHelper::$plugin = NULL
StringerHelper::$data = NULL
StringerHelper::$namedArgs = NULL
StringerHelper::$argSeparator = NULL
StringerHelper::$validationErrors = NULL
StringerHelper::$tags = array
StringerHelper::$__tainted = NULL
StringerHelper::$__cleaned = NULL
StringerHelper::$Html = HtmlHelper object
StringerHelper::$Link = LinkHelper object
StringerHelper::$Text = TextHelper object
$menu = MenuHelper
MenuHelper::$helpers = array
MenuHelper::$base = ""
MenuHelper::$webroot = "/"
MenuHelper::$theme = NULL
MenuHelper::$here = "/dok"
MenuHelper::$params = array
MenuHelper::$action = "index"
MenuHelper::$plugin = NULL
MenuHelper::$data = NULL
MenuHelper::$namedArgs = NULL
MenuHelper::$argSeparator = NULL
MenuHelper::$validationErrors = NULL
MenuHelper::$tags = array
MenuHelper::$__tainted = NULL
MenuHelper::$__cleaned = NULL
MenuHelper::$Link = LinkHelper object
$session = SessionHelper
SessionHelper::$helpers = array
SessionHelper::$__active = true
SessionHelper::$valid = false
SessionHelper::$error = false
SessionHelper::$_userAgent = "f9a8355d006790ee743ededbb1f6e3bd"
SessionHelper::$path = "/"
SessionHelper::$lastError = NULL
SessionHelper::$security = "medium"
SessionHelper::$time = 1773395484
SessionHelper::$sessionTime = 1773407484
SessionHelper::$cookieLifeTime = false
SessionHelper::$watchKeys = array
SessionHelper::$id = NULL
SessionHelper::$host = NULL
SessionHelper::$timeout = NULL
SessionHelper::$base = ""
SessionHelper::$webroot = "/"
SessionHelper::$here = "/dok"
SessionHelper::$params = array
SessionHelper::$action = "index"
SessionHelper::$data = NULL
SessionHelper::$theme = NULL
SessionHelper::$plugin = NULL
$html = HtmlHelper
HtmlHelper::$tags = array
HtmlHelper::$_crumbs = array
HtmlHelper::$__includedScripts = array
HtmlHelper::$_scriptBlockOptions = array
HtmlHelper::$__docTypes = array
HtmlHelper::$helpers = NULL
HtmlHelper::$base = ""
HtmlHelper::$webroot = "/"
HtmlHelper::$theme = NULL
HtmlHelper::$here = "/dok"
HtmlHelper::$params = array
HtmlHelper::$action = "index"
HtmlHelper::$plugin = NULL
HtmlHelper::$data = NULL
HtmlHelper::$namedArgs = NULL
HtmlHelper::$argSeparator = NULL
HtmlHelper::$validationErrors = NULL
HtmlHelper::$__tainted = NULL
HtmlHelper::$__cleaned = NULL
$link = LinkHelper
LinkHelper::$helpers = array
LinkHelper::$lang = NULL
LinkHelper::$defaultLang = NULL
LinkHelper::$base = ""
LinkHelper::$webroot = "/"
LinkHelper::$theme = NULL
LinkHelper::$here = "/dok"
LinkHelper::$params = array
LinkHelper::$action = "index"
LinkHelper::$plugin = NULL
LinkHelper::$data = NULL
LinkHelper::$namedArgs = NULL
LinkHelper::$argSeparator = NULL
LinkHelper::$validationErrors = NULL
LinkHelper::$tags = array
LinkHelper::$__tainted = NULL
LinkHelper::$__cleaned = NULL
LinkHelper::$Html = HtmlHelper object
LinkHelper::$Session = SessionHelper object
$lang = "dok"
$otherLangs = array(
"eng",
"hrv"
)
$globalNav = array(
array(
"Page" => array()
),
array(
"Page" => array()
),
array(
"Page" => array()
),
array(
"Page" => array()
),
array(
"Page" => array()
),
array(
"Page" => array()
),
array(
"Page" => array()
),
array(
"Page" => array()
),
array(
"Page" => array()
),
array(
"Page" => array()
),
array(
"Page" => array()
),
array(
"Page" => array()
),
array(
"Page" => array()
),
array(
"Page" => array()
),
array(
"Page" => array()
),
array(
"Page" => array()
),
array(
"Page" => array()
),
array(
"Page" => array()
),
array(
"Page" => array()
),
array(
"Page" => array()
),
array(
"Page" => array()
),
array(
"Page" => array()
),
array(
"Page" => array()
),
array(
"Page" => array()
),
array(
"Page" => array()
),
array(
"Page" => array()
),
array(
"Page" => array()
)
)
$breadCrumbs = array(
array(
"Page" => array()
)
)
$pageContents = array(
"home_who_we_are" => null
)
$userData = null
$announcements = array(
array(
"Announcement" => array()
),
array(
"Announcement" => array()
),
array(
"Announcement" => array()
)
)
$announcement = array(
"Announcement" => array(
"id" => "4_80",
"class" => "workshop_announcement",
"controller" => "workshop_announcements",
"mask_eng" => "ExhibitionB2B",
"mask_hrv" => "IzložbaB2B",
"title_hrv" => "Back to Basics Radionice za najmlađe na Izložbi minijatura i maketa Agram 2026",
"title_eng" => "Back to Basics Workshops @ Exhibition of Miniatures and Tabletop Scenery Agram 2026",
"content_hrv" => "<p>
Tijekom na&scaron;e Izložbe minijatura i maketa Agram 2026 svakog radnog dana od 17:00 do 18:00 organizirat ćemo i <strong>Back to Basics radionice bojanja minijatura za najmlađe</strong> (8+).&nbsp;</p>
<p>
<a href="https://hosting.photobucket.com/95288841-8654-4bf7-8fc9-a4aa78dce87f/f73b7e94-5adc-4afb-838b-b479ea8886fd.jpg" target="_blank"><img alt="Click for enlarged picture" src="https://hosting.photobucket.com/95288841-8654-4bf7-8fc9-a4aa78dce87f/f73b7e94-5adc-4afb-838b-b479ea8886fd.jpg" width="600" /></a></p>
<p>
<strong>ULAZ BESPLATAN!</strong></p>
<p>
Radionice (trajanja cca 1h ) su prigodne za najmlađe korisnike jer se samo koriste bazične tehnike, alati i materijali a omogućava lak&scaron;i pristup minijaturizmu i maketarstvu fokusiranjem na zabavni proces izrade za razliku od uobičajenog inzistiranja na i&scaron;čekivanje krajnjeg rezultata koji najče&scaron;će donosi stres mlađim polaznicima.</p>
<p>
U svakom od termina po četiri polaznika će moći obojati i sastaviti vlastitu figuru (koju onda nose doma).</p>
",
"content_eng" => "<p>
During our Exhibition of Miniatures and Tabletop Scenery Agram 2026, every weekday from 5:00 PM to 6:00 PM, we will also organize <strong>Back to Basics miniature painting workshops for the youngest (8+)</strong>.</p>
<p>
<a href="https://hosting.photobucket.com/95288841-8654-4bf7-8fc9-a4aa78dce87f/f73b7e94-5adc-4afb-838b-b479ea8886fd.jpg" target="_blank"><img alt="Click for enlarged picture" src="https://hosting.photobucket.com/95288841-8654-4bf7-8fc9-a4aa78dce87f/f73b7e94-5adc-4afb-838b-b479ea8886fd.jpg" width="600" /></a></p>
<p>
<strong>FREE ENTRY! </strong></p>
<p>
The workshops (lasting approx. 1 hour) are suitable for the youngest users because they only use basic techniques, tools and materials and provide an easier approach to miniaturism and model making by focusing on the fun process of making, as opposed to the usual insistence on waiting for the final result, which most often brings stress to younger participants.</p>
<p>
In each session, four participants will be able to color and assemble their own figure (which they then take home).</p>
",
"created" => "2026-02-17 07:57:52",
"first_name" => "Krunoslav",
"last_name" => "Belinić",
"first_name_mask" => "krunoslav",
"last_name_mask" => "belinic",
"start" => null,
"end" => null
)
)</pre><pre class="stack-trace">include - APP/views/home/index.ctp, line 10
View::_render() - CORE/cake/libs/view/view.php, line 736
View::render() - CORE/cake/libs/view/view.php, line 431
Controller::render() - CORE/cake/libs/controller/controller.php, line 909
Dispatcher::_invoke() - CORE/cake/dispatcher.php, line 207
Dispatcher::dispatch() - CORE/cake/dispatcher.php, line 171
[main] - APP/webroot/index.php, line 86</pre></div></pre><a href="/dok/workshop_announcements/2026/02/17" class="readMore"></a></h3>
<span class="details">
17<span class="superscript">th</span> February 2026, post_details_1 <a href="/dok/members/krunoslav.belinic">Krunoslav Belinić</a> post_details_2 <a href="/dok/workshop_announcements">category_workshop_announcements</a> </span>
<pre class="cake-debug"><a href="javascript:void(0);" onclick="document.getElementById('cakeErr4-trace').style.display = (document.getElementById('cakeErr4-trace').style.display == 'none' ? '' : 'none');"><b>Notice</b> (8)</a>: Undefined index: content_dok [<b>APP/views/home/index.ctp</b>, line <b>32</b>]<div id="cakeErr4-trace" class="cake-stack-trace" style="display: none;"><a href="javascript:void(0);" onclick="document.getElementById('cakeErr4-code').style.display = (document.getElementById('cakeErr4-code').style.display == 'none' ? '' : 'none')">Code</a> | <a href="javascript:void(0);" onclick="document.getElementById('cakeErr4-context').style.display = (document.getElementById('cakeErr4-context').style.display == 'none' ? '' : 'none')">Context</a><div id="cakeErr4-code" class="cake-code-dump" style="display: none;"><pre><code><span style="color: #000000"></span></code>
<code><span style="color: #000000"> if (Configure::read() > 0) {</span></code>
<span class="code-highlight"><code><span style="color: #000000"> include ($___viewFn);</span></code></span></pre></div><pre id="cakeErr4-context" class="cake-context" style="display: none;">$___viewFn = "/home/martin/apps/agram/app/views/home/index.ctp"
$___dataForView = array(
"lang" => "dok",
"otherLangs" => array(
"eng",
"hrv"
),
"globalNav" => array(
array(),
array(),
array(),
array(),
array(),
array(),
array(),
array(),
array(),
array(),
array(),
array(),
array(),
array(),
array(),
array(),
array(),
array(),
array(),
array(),
array(),
array(),
array(),
array(),
array(),
array(),
array()
),
"breadCrumbs" => array(
array()
),
"pageContents" => array(
"home_who_we_are" => null
),
"userData" => null,
"announcements" => array(
array(),
array(),
array()
)
)
$loadHelpers = true
$cached = false
$form = FormHelper
FormHelper::$helpers = array
FormHelper::$fieldset = array
FormHelper::$__options = array
FormHelper::$fields = array
FormHelper::$requestType = NULL
FormHelper::$defaultModel = NULL
FormHelper::$_inputDefaults = array
FormHelper::$_lastAction = ""
FormHelper::$base = ""
FormHelper::$webroot = "/"
FormHelper::$theme = NULL
FormHelper::$here = "/dok"
FormHelper::$params = array
FormHelper::$action = "index"
FormHelper::$plugin = NULL
FormHelper::$data = NULL
FormHelper::$namedArgs = NULL
FormHelper::$argSeparator = NULL
FormHelper::$validationErrors = NULL
FormHelper::$tags = array
FormHelper::$__tainted = NULL
FormHelper::$__cleaned = NULL
FormHelper::$Html = HtmlHelper object
$text = TextHelper
TextHelper::$helpers = NULL
TextHelper::$base = ""
TextHelper::$webroot = "/"
TextHelper::$theme = NULL
TextHelper::$here = "/dok"
TextHelper::$params = array
TextHelper::$action = "index"
TextHelper::$plugin = NULL
TextHelper::$data = NULL
TextHelper::$namedArgs = NULL
TextHelper::$argSeparator = NULL
TextHelper::$validationErrors = NULL
TextHelper::$tags = array
TextHelper::$__tainted = NULL
TextHelper::$__cleaned = NULL
$stringer = StringerHelper
StringerHelper::$helpers = array
StringerHelper::$base = ""
StringerHelper::$webroot = "/"
StringerHelper::$theme = NULL
StringerHelper::$here = "/dok"
StringerHelper::$params = array
StringerHelper::$action = "index"
StringerHelper::$plugin = NULL
StringerHelper::$data = NULL
StringerHelper::$namedArgs = NULL
StringerHelper::$argSeparator = NULL
StringerHelper::$validationErrors = NULL
StringerHelper::$tags = array
StringerHelper::$__tainted = NULL
StringerHelper::$__cleaned = NULL
StringerHelper::$Html = HtmlHelper object
StringerHelper::$Link = LinkHelper object
StringerHelper::$Text = TextHelper object
$menu = MenuHelper
MenuHelper::$helpers = array
MenuHelper::$base = ""
MenuHelper::$webroot = "/"
MenuHelper::$theme = NULL
MenuHelper::$here = "/dok"
MenuHelper::$params = array
MenuHelper::$action = "index"
MenuHelper::$plugin = NULL
MenuHelper::$data = NULL
MenuHelper::$namedArgs = NULL
MenuHelper::$argSeparator = NULL
MenuHelper::$validationErrors = NULL
MenuHelper::$tags = array
MenuHelper::$__tainted = NULL
MenuHelper::$__cleaned = NULL
MenuHelper::$Link = LinkHelper object
$session = SessionHelper
SessionHelper::$helpers = array
SessionHelper::$__active = true
SessionHelper::$valid = false
SessionHelper::$error = false
SessionHelper::$_userAgent = "f9a8355d006790ee743ededbb1f6e3bd"
SessionHelper::$path = "/"
SessionHelper::$lastError = NULL
SessionHelper::$security = "medium"
SessionHelper::$time = 1773395484
SessionHelper::$sessionTime = 1773407484
SessionHelper::$cookieLifeTime = false
SessionHelper::$watchKeys = array
SessionHelper::$id = NULL
SessionHelper::$host = NULL
SessionHelper::$timeout = NULL
SessionHelper::$base = ""
SessionHelper::$webroot = "/"
SessionHelper::$here = "/dok"
SessionHelper::$params = array
SessionHelper::$action = "index"
SessionHelper::$data = NULL
SessionHelper::$theme = NULL
SessionHelper::$plugin = NULL
$html = HtmlHelper
HtmlHelper::$tags = array
HtmlHelper::$_crumbs = array
HtmlHelper::$__includedScripts = array
HtmlHelper::$_scriptBlockOptions = array
HtmlHelper::$__docTypes = array
HtmlHelper::$helpers = NULL
HtmlHelper::$base = ""
HtmlHelper::$webroot = "/"
HtmlHelper::$theme = NULL
HtmlHelper::$here = "/dok"
HtmlHelper::$params = array
HtmlHelper::$action = "index"
HtmlHelper::$plugin = NULL
HtmlHelper::$data = NULL
HtmlHelper::$namedArgs = NULL
HtmlHelper::$argSeparator = NULL
HtmlHelper::$validationErrors = NULL
HtmlHelper::$__tainted = NULL
HtmlHelper::$__cleaned = NULL
$link = LinkHelper
LinkHelper::$helpers = array
LinkHelper::$lang = "dok"
LinkHelper::$defaultLang = "hrv"
LinkHelper::$base = ""
LinkHelper::$webroot = "/"
LinkHelper::$theme = NULL
LinkHelper::$here = "/dok"
LinkHelper::$params = array
LinkHelper::$action = "index"
LinkHelper::$plugin = NULL
LinkHelper::$data = NULL
LinkHelper::$namedArgs = NULL
LinkHelper::$argSeparator = NULL
LinkHelper::$validationErrors = NULL
LinkHelper::$tags = array
LinkHelper::$__tainted = NULL
LinkHelper::$__cleaned = NULL
LinkHelper::$Html = HtmlHelper object
LinkHelper::$Session = SessionHelper object
$lang = "dok"
$otherLangs = array(
"eng",
"hrv"
)
$globalNav = array(
array(
"Page" => array()
),
array(
"Page" => array()
),
array(
"Page" => array()
),
array(
"Page" => array()
),
array(
"Page" => array()
),
array(
"Page" => array()
),
array(
"Page" => array()
),
array(
"Page" => array()
),
array(
"Page" => array()
),
array(
"Page" => array()
),
array(
"Page" => array()
),
array(
"Page" => array()
),
array(
"Page" => array()
),
array(
"Page" => array()
),
array(
"Page" => array()
),
array(
"Page" => array()
),
array(
"Page" => array()
),
array(
"Page" => array()
),
array(
"Page" => array()
),
array(
"Page" => array()
),
array(
"Page" => array()
),
array(
"Page" => array()
),
array(
"Page" => array()
),
array(
"Page" => array()
),
array(
"Page" => array()
),
array(
"Page" => array()
),
array(
"Page" => array()
)
)
$breadCrumbs = array(
array(
"Page" => array()
)
)
$pageContents = array(
"home_who_we_are" => null
)
$userData = null
$announcements = array(
array(
"Announcement" => array()
),
array(
"Announcement" => array()
),
array(
"Announcement" => array()
)
)
$announcement = array(
"Announcement" => array(
"id" => "4_80",
"class" => "workshop_announcement",
"controller" => "workshop_announcements",
"mask_eng" => "ExhibitionB2B",
"mask_hrv" => "IzložbaB2B",
"title_hrv" => "Back to Basics Radionice za najmlađe na Izložbi minijatura i maketa Agram 2026",
"title_eng" => "Back to Basics Workshops @ Exhibition of Miniatures and Tabletop Scenery Agram 2026",
"content_hrv" => "<p>
Tijekom na&scaron;e Izložbe minijatura i maketa Agram 2026 svakog radnog dana od 17:00 do 18:00 organizirat ćemo i <strong>Back to Basics radionice bojanja minijatura za najmlađe</strong> (8+).&nbsp;</p>
<p>
<a href="https://hosting.photobucket.com/95288841-8654-4bf7-8fc9-a4aa78dce87f/f73b7e94-5adc-4afb-838b-b479ea8886fd.jpg" target="_blank"><img alt="Click for enlarged picture" src="https://hosting.photobucket.com/95288841-8654-4bf7-8fc9-a4aa78dce87f/f73b7e94-5adc-4afb-838b-b479ea8886fd.jpg" width="600" /></a></p>
<p>
<strong>ULAZ BESPLATAN!</strong></p>
<p>
Radionice (trajanja cca 1h ) su prigodne za najmlađe korisnike jer se samo koriste bazične tehnike, alati i materijali a omogućava lak&scaron;i pristup minijaturizmu i maketarstvu fokusiranjem na zabavni proces izrade za razliku od uobičajenog inzistiranja na i&scaron;čekivanje krajnjeg rezultata koji najče&scaron;će donosi stres mlađim polaznicima.</p>
<p>
U svakom od termina po četiri polaznika će moći obojati i sastaviti vlastitu figuru (koju onda nose doma).</p>
",
"content_eng" => "<p>
During our Exhibition of Miniatures and Tabletop Scenery Agram 2026, every weekday from 5:00 PM to 6:00 PM, we will also organize <strong>Back to Basics miniature painting workshops for the youngest (8+)</strong>.</p>
<p>
<a href="https://hosting.photobucket.com/95288841-8654-4bf7-8fc9-a4aa78dce87f/f73b7e94-5adc-4afb-838b-b479ea8886fd.jpg" target="_blank"><img alt="Click for enlarged picture" src="https://hosting.photobucket.com/95288841-8654-4bf7-8fc9-a4aa78dce87f/f73b7e94-5adc-4afb-838b-b479ea8886fd.jpg" width="600" /></a></p>
<p>
<strong>FREE ENTRY! </strong></p>
<p>
The workshops (lasting approx. 1 hour) are suitable for the youngest users because they only use basic techniques, tools and materials and provide an easier approach to miniaturism and model making by focusing on the fun process of making, as opposed to the usual insistence on waiting for the final result, which most often brings stress to younger participants.</p>
<p>
In each session, four participants will be able to color and assemble their own figure (which they then take home).</p>
",
"created" => "2026-02-17 07:57:52",
"first_name" => "Krunoslav",
"last_name" => "Belinić",
"first_name_mask" => "krunoslav",
"last_name_mask" => "belinic",
"start" => null,
"end" => null
)
)
$member = array(
"first_name" => "Krunoslav",
"last_name" => "Belinić",
"first_name_mask" => "krunoslav",
"last_name_mask" => "belinic"
)
$dateCreated = "2026-02-17 07:57:52"</pre><pre class="stack-trace">include - APP/views/home/index.ctp, line 32
View::_render() - CORE/cake/libs/view/view.php, line 736
View::render() - CORE/cake/libs/view/view.php, line 431
Controller::render() - CORE/cake/libs/controller/controller.php, line 909
Dispatcher::_invoke() - CORE/cake/dispatcher.php, line 207
Dispatcher::dispatch() - CORE/cake/dispatcher.php, line 171
[main] - APP/webroot/index.php, line 86</pre></div></pre><pre class="cake-debug"><a href="javascript:void(0);" onclick="document.getElementById('cakeErr5-trace').style.display = (document.getElementById('cakeErr5-trace').style.display == 'none' ? '' : 'none');"><b>Notice</b> (8)</a>: Undefined index: title_dok [<b>APP/views/home/index.ctp</b>, line <b>34</b>]<div id="cakeErr5-trace" class="cake-stack-trace" style="display: none;"><a href="javascript:void(0);" onclick="document.getElementById('cakeErr5-code').style.display = (document.getElementById('cakeErr5-code').style.display == 'none' ? '' : 'none')">Code</a> | <a href="javascript:void(0);" onclick="document.getElementById('cakeErr5-context').style.display = (document.getElementById('cakeErr5-context').style.display == 'none' ? '' : 'none')">Context</a><div id="cakeErr5-code" class="cake-code-dump" style="display: none;"><pre><code><span style="color: #000000"></span></code>
<code><span style="color: #000000"> if (Configure::read() > 0) {</span></code>
<span class="code-highlight"><code><span style="color: #000000"> include ($___viewFn);</span></code></span></pre></div><pre id="cakeErr5-context" class="cake-context" style="display: none;">$___viewFn = "/home/martin/apps/agram/app/views/home/index.ctp"
$___dataForView = array(
"lang" => "dok",
"otherLangs" => array(
"eng",
"hrv"
),
"globalNav" => array(
array(),
array(),
array(),
array(),
array(),
array(),
array(),
array(),
array(),
array(),
array(),
array(),
array(),
array(),
array(),
array(),
array(),
array(),
array(),
array(),
array(),
array(),
array(),
array(),
array(),
array(),
array()
),
"breadCrumbs" => array(
array()
),
"pageContents" => array(
"home_who_we_are" => null
),
"userData" => null,
"announcements" => array(
array(),
array(),
array()
)
)
$loadHelpers = true
$cached = false
$form = FormHelper
FormHelper::$helpers = array
FormHelper::$fieldset = array
FormHelper::$__options = array
FormHelper::$fields = array
FormHelper::$requestType = NULL
FormHelper::$defaultModel = NULL
FormHelper::$_inputDefaults = array
FormHelper::$_lastAction = ""
FormHelper::$base = ""
FormHelper::$webroot = "/"
FormHelper::$theme = NULL
FormHelper::$here = "/dok"
FormHelper::$params = array
FormHelper::$action = "index"
FormHelper::$plugin = NULL
FormHelper::$data = NULL
FormHelper::$namedArgs = NULL
FormHelper::$argSeparator = NULL
FormHelper::$validationErrors = NULL
FormHelper::$tags = array
FormHelper::$__tainted = NULL
FormHelper::$__cleaned = NULL
FormHelper::$Html = HtmlHelper object
$text = TextHelper
TextHelper::$helpers = NULL
TextHelper::$base = ""
TextHelper::$webroot = "/"
TextHelper::$theme = NULL
TextHelper::$here = "/dok"
TextHelper::$params = array
TextHelper::$action = "index"
TextHelper::$plugin = NULL
TextHelper::$data = NULL
TextHelper::$namedArgs = NULL
TextHelper::$argSeparator = NULL
TextHelper::$validationErrors = NULL
TextHelper::$tags = array
TextHelper::$__tainted = NULL
TextHelper::$__cleaned = NULL
$stringer = StringerHelper
StringerHelper::$helpers = array
StringerHelper::$base = ""
StringerHelper::$webroot = "/"
StringerHelper::$theme = NULL
StringerHelper::$here = "/dok"
StringerHelper::$params = array
StringerHelper::$action = "index"
StringerHelper::$plugin = NULL
StringerHelper::$data = NULL
StringerHelper::$namedArgs = NULL
StringerHelper::$argSeparator = NULL
StringerHelper::$validationErrors = NULL
StringerHelper::$tags = array
StringerHelper::$__tainted = NULL
StringerHelper::$__cleaned = NULL
StringerHelper::$Html = HtmlHelper object
StringerHelper::$Link = LinkHelper object
StringerHelper::$Text = TextHelper object
$menu = MenuHelper
MenuHelper::$helpers = array
MenuHelper::$base = ""
MenuHelper::$webroot = "/"
MenuHelper::$theme = NULL
MenuHelper::$here = "/dok"
MenuHelper::$params = array
MenuHelper::$action = "index"
MenuHelper::$plugin = NULL
MenuHelper::$data = NULL
MenuHelper::$namedArgs = NULL
MenuHelper::$argSeparator = NULL
MenuHelper::$validationErrors = NULL
MenuHelper::$tags = array
MenuHelper::$__tainted = NULL
MenuHelper::$__cleaned = NULL
MenuHelper::$Link = LinkHelper object
$session = SessionHelper
SessionHelper::$helpers = array
SessionHelper::$__active = true
SessionHelper::$valid = false
SessionHelper::$error = false
SessionHelper::$_userAgent = "f9a8355d006790ee743ededbb1f6e3bd"
SessionHelper::$path = "/"
SessionHelper::$lastError = NULL
SessionHelper::$security = "medium"
SessionHelper::$time = 1773395484
SessionHelper::$sessionTime = 1773407484
SessionHelper::$cookieLifeTime = false
SessionHelper::$watchKeys = array
SessionHelper::$id = NULL
SessionHelper::$host = NULL
SessionHelper::$timeout = NULL
SessionHelper::$base = ""
SessionHelper::$webroot = "/"
SessionHelper::$here = "/dok"
SessionHelper::$params = array
SessionHelper::$action = "index"
SessionHelper::$data = NULL
SessionHelper::$theme = NULL
SessionHelper::$plugin = NULL
$html = HtmlHelper
HtmlHelper::$tags = array
HtmlHelper::$_crumbs = array
HtmlHelper::$__includedScripts = array
HtmlHelper::$_scriptBlockOptions = array
HtmlHelper::$__docTypes = array
HtmlHelper::$helpers = NULL
HtmlHelper::$base = ""
HtmlHelper::$webroot = "/"
HtmlHelper::$theme = NULL
HtmlHelper::$here = "/dok"
HtmlHelper::$params = array
HtmlHelper::$action = "index"
HtmlHelper::$plugin = NULL
HtmlHelper::$data = NULL
HtmlHelper::$namedArgs = NULL
HtmlHelper::$argSeparator = NULL
HtmlHelper::$validationErrors = NULL
HtmlHelper::$__tainted = NULL
HtmlHelper::$__cleaned = NULL
$link = LinkHelper
LinkHelper::$helpers = array
LinkHelper::$lang = "dok"
LinkHelper::$defaultLang = "hrv"
LinkHelper::$base = ""
LinkHelper::$webroot = "/"
LinkHelper::$theme = NULL
LinkHelper::$here = "/dok"
LinkHelper::$params = array
LinkHelper::$action = "index"
LinkHelper::$plugin = NULL
LinkHelper::$data = NULL
LinkHelper::$namedArgs = NULL
LinkHelper::$argSeparator = NULL
LinkHelper::$validationErrors = NULL
LinkHelper::$tags = array
LinkHelper::$__tainted = NULL
LinkHelper::$__cleaned = NULL
LinkHelper::$Html = HtmlHelper object
LinkHelper::$Session = SessionHelper object
$lang = "dok"
$otherLangs = array(
"eng",
"hrv"
)
$globalNav = array(
array(
"Page" => array()
),
array(
"Page" => array()
),
array(
"Page" => array()
),
array(
"Page" => array()
),
array(
"Page" => array()
),
array(
"Page" => array()
),
array(
"Page" => array()
),
array(
"Page" => array()
),
array(
"Page" => array()
),
array(
"Page" => array()
),
array(
"Page" => array()
),
array(
"Page" => array()
),
array(
"Page" => array()
),
array(
"Page" => array()
),
array(
"Page" => array()
),
array(
"Page" => array()
),
array(
"Page" => array()
),
array(
"Page" => array()
),
array(
"Page" => array()
),
array(
"Page" => array()
),
array(
"Page" => array()
),
array(
"Page" => array()
),
array(
"Page" => array()
),
array(
"Page" => array()
),
array(
"Page" => array()
),
array(
"Page" => array()
),
array(
"Page" => array()
)
)
$breadCrumbs = array(
array(
"Page" => array()
)
)
$pageContents = array(
"home_who_we_are" => null
)
$userData = null
$announcements = array(
array(
"Announcement" => array()
),
array(
"Announcement" => array()
),
array(
"Announcement" => array()
)
)
$announcement = array(
"Announcement" => array(
"id" => "4_80",
"class" => "workshop_announcement",
"controller" => "workshop_announcements",
"mask_eng" => "ExhibitionB2B",
"mask_hrv" => "IzložbaB2B",
"title_hrv" => "Back to Basics Radionice za najmlađe na Izložbi minijatura i maketa Agram 2026",
"title_eng" => "Back to Basics Workshops @ Exhibition of Miniatures and Tabletop Scenery Agram 2026",
"content_hrv" => "<p>
Tijekom na&scaron;e Izložbe minijatura i maketa Agram 2026 svakog radnog dana od 17:00 do 18:00 organizirat ćemo i <strong>Back to Basics radionice bojanja minijatura za najmlađe</strong> (8+).&nbsp;</p>
<p>
<a href="https://hosting.photobucket.com/95288841-8654-4bf7-8fc9-a4aa78dce87f/f73b7e94-5adc-4afb-838b-b479ea8886fd.jpg" target="_blank"><img alt="Click for enlarged picture" src="https://hosting.photobucket.com/95288841-8654-4bf7-8fc9-a4aa78dce87f/f73b7e94-5adc-4afb-838b-b479ea8886fd.jpg" width="600" /></a></p>
<p>
<strong>ULAZ BESPLATAN!</strong></p>
<p>
Radionice (trajanja cca 1h ) su prigodne za najmlađe korisnike jer se samo koriste bazične tehnike, alati i materijali a omogućava lak&scaron;i pristup minijaturizmu i maketarstvu fokusiranjem na zabavni proces izrade za razliku od uobičajenog inzistiranja na i&scaron;čekivanje krajnjeg rezultata koji najče&scaron;će donosi stres mlađim polaznicima.</p>
<p>
U svakom od termina po četiri polaznika će moći obojati i sastaviti vlastitu figuru (koju onda nose doma).</p>
",
"content_eng" => "<p>
During our Exhibition of Miniatures and Tabletop Scenery Agram 2026, every weekday from 5:00 PM to 6:00 PM, we will also organize <strong>Back to Basics miniature painting workshops for the youngest (8+)</strong>.</p>
<p>
<a href="https://hosting.photobucket.com/95288841-8654-4bf7-8fc9-a4aa78dce87f/f73b7e94-5adc-4afb-838b-b479ea8886fd.jpg" target="_blank"><img alt="Click for enlarged picture" src="https://hosting.photobucket.com/95288841-8654-4bf7-8fc9-a4aa78dce87f/f73b7e94-5adc-4afb-838b-b479ea8886fd.jpg" width="600" /></a></p>
<p>
<strong>FREE ENTRY! </strong></p>
<p>
The workshops (lasting approx. 1 hour) are suitable for the youngest users because they only use basic techniques, tools and materials and provide an easier approach to miniaturism and model making by focusing on the fun process of making, as opposed to the usual insistence on waiting for the final result, which most often brings stress to younger participants.</p>
<p>
In each session, four participants will be able to color and assemble their own figure (which they then take home).</p>
",
"created" => "2026-02-17 07:57:52",
"first_name" => "Krunoslav",
"last_name" => "Belinić",
"first_name_mask" => "krunoslav",
"last_name_mask" => "belinic",
"start" => null,
"end" => null
)
)
$member = array(
"first_name" => "Krunoslav",
"last_name" => "Belinić",
"first_name_mask" => "krunoslav",
"last_name_mask" => "belinic"
)
$dateCreated = "2026-02-17 07:57:52"</pre><pre class="stack-trace">include - APP/views/home/index.ctp, line 34
View::_render() - CORE/cake/libs/view/view.php, line 736
View::render() - CORE/cake/libs/view/view.php, line 431
Controller::render() - CORE/cake/libs/controller/controller.php, line 909
Dispatcher::_invoke() - CORE/cake/dispatcher.php, line 207
Dispatcher::dispatch() - CORE/cake/dispatcher.php, line 171
[main] - APP/webroot/index.php, line 86</pre></div></pre><pre class="cake-debug"><a href="javascript:void(0);" onclick="document.getElementById('cakeErr6-trace').style.display = (document.getElementById('cakeErr6-trace').style.display == 'none' ? '' : 'none');"><b>Notice</b> (8)</a>: Undefined index: mask_dok [<b>APP/views/home/index.ctp</b>, line <b>37</b>]<div id="cakeErr6-trace" class="cake-stack-trace" style="display: none;"><a href="javascript:void(0);" onclick="document.getElementById('cakeErr6-code').style.display = (document.getElementById('cakeErr6-code').style.display == 'none' ? '' : 'none')">Code</a> | <a href="javascript:void(0);" onclick="document.getElementById('cakeErr6-context').style.display = (document.getElementById('cakeErr6-context').style.display == 'none' ? '' : 'none')">Context</a><div id="cakeErr6-code" class="cake-code-dump" style="display: none;"><pre><code><span style="color: #000000"></span></code>
<code><span style="color: #000000"> if (Configure::read() > 0) {</span></code>
<span class="code-highlight"><code><span style="color: #000000"> include ($___viewFn);</span></code></span></pre></div><pre id="cakeErr6-context" class="cake-context" style="display: none;">$___viewFn = "/home/martin/apps/agram/app/views/home/index.ctp"
$___dataForView = array(
"lang" => "dok",
"otherLangs" => array(
"eng",
"hrv"
),
"globalNav" => array(
array(),
array(),
array(),
array(),
array(),
array(),
array(),
array(),
array(),
array(),
array(),
array(),
array(),
array(),
array(),
array(),
array(),
array(),
array(),
array(),
array(),
array(),
array(),
array(),
array(),
array(),
array()
),
"breadCrumbs" => array(
array()
),
"pageContents" => array(
"home_who_we_are" => null
),
"userData" => null,
"announcements" => array(
array(),
array(),
array()
)
)
$loadHelpers = true
$cached = false
$form = FormHelper
FormHelper::$helpers = array
FormHelper::$fieldset = array
FormHelper::$__options = array
FormHelper::$fields = array
FormHelper::$requestType = NULL
FormHelper::$defaultModel = NULL
FormHelper::$_inputDefaults = array
FormHelper::$_lastAction = ""
FormHelper::$base = ""
FormHelper::$webroot = "/"
FormHelper::$theme = NULL
FormHelper::$here = "/dok"
FormHelper::$params = array
FormHelper::$action = "index"
FormHelper::$plugin = NULL
FormHelper::$data = NULL
FormHelper::$namedArgs = NULL
FormHelper::$argSeparator = NULL
FormHelper::$validationErrors = NULL
FormHelper::$tags = array
FormHelper::$__tainted = NULL
FormHelper::$__cleaned = NULL
FormHelper::$Html = HtmlHelper object
$text = TextHelper
TextHelper::$helpers = NULL
TextHelper::$base = ""
TextHelper::$webroot = "/"
TextHelper::$theme = NULL
TextHelper::$here = "/dok"
TextHelper::$params = array
TextHelper::$action = "index"
TextHelper::$plugin = NULL
TextHelper::$data = NULL
TextHelper::$namedArgs = NULL
TextHelper::$argSeparator = NULL
TextHelper::$validationErrors = NULL
TextHelper::$tags = array
TextHelper::$__tainted = NULL
TextHelper::$__cleaned = NULL
$stringer = StringerHelper
StringerHelper::$helpers = array
StringerHelper::$base = ""
StringerHelper::$webroot = "/"
StringerHelper::$theme = NULL
StringerHelper::$here = "/dok"
StringerHelper::$params = array
StringerHelper::$action = "index"
StringerHelper::$plugin = NULL
StringerHelper::$data = NULL
StringerHelper::$namedArgs = NULL
StringerHelper::$argSeparator = NULL
StringerHelper::$validationErrors = NULL
StringerHelper::$tags = array
StringerHelper::$__tainted = NULL
StringerHelper::$__cleaned = NULL
StringerHelper::$Html = HtmlHelper object
StringerHelper::$Link = LinkHelper object
StringerHelper::$Text = TextHelper object
$menu = MenuHelper
MenuHelper::$helpers = array
MenuHelper::$base = ""
MenuHelper::$webroot = "/"
MenuHelper::$theme = NULL
MenuHelper::$here = "/dok"
MenuHelper::$params = array
MenuHelper::$action = "index"
MenuHelper::$plugin = NULL
MenuHelper::$data = NULL
MenuHelper::$namedArgs = NULL
MenuHelper::$argSeparator = NULL
MenuHelper::$validationErrors = NULL
MenuHelper::$tags = array
MenuHelper::$__tainted = NULL
MenuHelper::$__cleaned = NULL
MenuHelper::$Link = LinkHelper object
$session = SessionHelper
SessionHelper::$helpers = array
SessionHelper::$__active = true
SessionHelper::$valid = false
SessionHelper::$error = false
SessionHelper::$_userAgent = "f9a8355d006790ee743ededbb1f6e3bd"
SessionHelper::$path = "/"
SessionHelper::$lastError = NULL
SessionHelper::$security = "medium"
SessionHelper::$time = 1773395484
SessionHelper::$sessionTime = 1773407484
SessionHelper::$cookieLifeTime = false
SessionHelper::$watchKeys = array
SessionHelper::$id = NULL
SessionHelper::$host = NULL
SessionHelper::$timeout = NULL
SessionHelper::$base = ""
SessionHelper::$webroot = "/"
SessionHelper::$here = "/dok"
SessionHelper::$params = array
SessionHelper::$action = "index"
SessionHelper::$data = NULL
SessionHelper::$theme = NULL
SessionHelper::$plugin = NULL
$html = HtmlHelper
HtmlHelper::$tags = array
HtmlHelper::$_crumbs = array
HtmlHelper::$__includedScripts = array
HtmlHelper::$_scriptBlockOptions = array
HtmlHelper::$__docTypes = array
HtmlHelper::$helpers = NULL
HtmlHelper::$base = ""
HtmlHelper::$webroot = "/"
HtmlHelper::$theme = NULL
HtmlHelper::$here = "/dok"
HtmlHelper::$params = array
HtmlHelper::$action = "index"
HtmlHelper::$plugin = NULL
HtmlHelper::$data = NULL
HtmlHelper::$namedArgs = NULL
HtmlHelper::$argSeparator = NULL
HtmlHelper::$validationErrors = NULL
HtmlHelper::$__tainted = NULL
HtmlHelper::$__cleaned = NULL
$link = LinkHelper
LinkHelper::$helpers = array
LinkHelper::$lang = "dok"
LinkHelper::$defaultLang = "hrv"
LinkHelper::$base = ""
LinkHelper::$webroot = "/"
LinkHelper::$theme = NULL
LinkHelper::$here = "/dok"
LinkHelper::$params = array
LinkHelper::$action = "index"
LinkHelper::$plugin = NULL
LinkHelper::$data = NULL
LinkHelper::$namedArgs = NULL
LinkHelper::$argSeparator = NULL
LinkHelper::$validationErrors = NULL
LinkHelper::$tags = array
LinkHelper::$__tainted = NULL
LinkHelper::$__cleaned = NULL
LinkHelper::$Html = HtmlHelper object
LinkHelper::$Session = SessionHelper object
$lang = "dok"
$otherLangs = array(
"eng",
"hrv"
)
$globalNav = array(
array(
"Page" => array()
),
array(
"Page" => array()
),
array(
"Page" => array()
),
array(
"Page" => array()
),
array(
"Page" => array()
),
array(
"Page" => array()
),
array(
"Page" => array()
),
array(
"Page" => array()
),
array(
"Page" => array()
),
array(
"Page" => array()
),
array(
"Page" => array()
),
array(
"Page" => array()
),
array(
"Page" => array()
),
array(
"Page" => array()
),
array(
"Page" => array()
),
array(
"Page" => array()
),
array(
"Page" => array()
),
array(
"Page" => array()
),
array(
"Page" => array()
),
array(
"Page" => array()
),
array(
"Page" => array()
),
array(
"Page" => array()
),
array(
"Page" => array()
),
array(
"Page" => array()
),
array(
"Page" => array()
),
array(
"Page" => array()
),
array(
"Page" => array()
)
)
$breadCrumbs = array(
array(
"Page" => array()
)
)
$pageContents = array(
"home_who_we_are" => null
)
$userData = null
$announcements = array(
array(
"Announcement" => array()
),
array(
"Announcement" => array()
),
array(
"Announcement" => array()
)
)
$announcement = array(
"Announcement" => array(
"id" => "4_80",
"class" => "workshop_announcement",
"controller" => "workshop_announcements",
"mask_eng" => "ExhibitionB2B",
"mask_hrv" => "IzložbaB2B",
"title_hrv" => "Back to Basics Radionice za najmlađe na Izložbi minijatura i maketa Agram 2026",
"title_eng" => "Back to Basics Workshops @ Exhibition of Miniatures and Tabletop Scenery Agram 2026",
"content_hrv" => "<p>
Tijekom na&scaron;e Izložbe minijatura i maketa Agram 2026 svakog radnog dana od 17:00 do 18:00 organizirat ćemo i <strong>Back to Basics radionice bojanja minijatura za najmlađe</strong> (8+).&nbsp;</p>
<p>
<a href="https://hosting.photobucket.com/95288841-8654-4bf7-8fc9-a4aa78dce87f/f73b7e94-5adc-4afb-838b-b479ea8886fd.jpg" target="_blank"><img alt="Click for enlarged picture" src="https://hosting.photobucket.com/95288841-8654-4bf7-8fc9-a4aa78dce87f/f73b7e94-5adc-4afb-838b-b479ea8886fd.jpg" width="600" /></a></p>
<p>
<strong>ULAZ BESPLATAN!</strong></p>
<p>
Radionice (trajanja cca 1h ) su prigodne za najmlađe korisnike jer se samo koriste bazične tehnike, alati i materijali a omogućava lak&scaron;i pristup minijaturizmu i maketarstvu fokusiranjem na zabavni proces izrade za razliku od uobičajenog inzistiranja na i&scaron;čekivanje krajnjeg rezultata koji najče&scaron;će donosi stres mlađim polaznicima.</p>
<p>
U svakom od termina po četiri polaznika će moći obojati i sastaviti vlastitu figuru (koju onda nose doma).</p>
",
"content_eng" => "<p>
During our Exhibition of Miniatures and Tabletop Scenery Agram 2026, every weekday from 5:00 PM to 6:00 PM, we will also organize <strong>Back to Basics miniature painting workshops for the youngest (8+)</strong>.</p>
<p>
<a href="https://hosting.photobucket.com/95288841-8654-4bf7-8fc9-a4aa78dce87f/f73b7e94-5adc-4afb-838b-b479ea8886fd.jpg" target="_blank"><img alt="Click for enlarged picture" src="https://hosting.photobucket.com/95288841-8654-4bf7-8fc9-a4aa78dce87f/f73b7e94-5adc-4afb-838b-b479ea8886fd.jpg" width="600" /></a></p>
<p>
<strong>FREE ENTRY! </strong></p>
<p>
The workshops (lasting approx. 1 hour) are suitable for the youngest users because they only use basic techniques, tools and materials and provide an easier approach to miniaturism and model making by focusing on the fun process of making, as opposed to the usual insistence on waiting for the final result, which most often brings stress to younger participants.</p>
<p>
In each session, four participants will be able to color and assemble their own figure (which they then take home).</p>
",
"created" => "2026-02-17 07:57:52",
"first_name" => "Krunoslav",
"last_name" => "Belinić",
"first_name_mask" => "krunoslav",
"last_name_mask" => "belinic",
"start" => null,
"end" => null
)
)
$member = array(
"first_name" => "Krunoslav",
"last_name" => "Belinić",
"first_name_mask" => "krunoslav",
"last_name_mask" => "belinic"
)
$dateCreated = "2026-02-17 07:57:52"</pre><pre class="stack-trace">include - APP/views/home/index.ctp, line 37
View::_render() - CORE/cake/libs/view/view.php, line 736
View::render() - CORE/cake/libs/view/view.php, line 431
Controller::render() - CORE/cake/libs/controller/controller.php, line 909
Dispatcher::_invoke() - CORE/cake/dispatcher.php, line 207
Dispatcher::dispatch() - CORE/cake/dispatcher.php, line 171
[main] - APP/webroot/index.php, line 86</pre></div></pre> </div>
<div class="announcement workshop_announcement">
<h3><a href="/dok/workshop_announcements/2026/02/17" class="readMore"></a></h3>
<span class="details">
17<span class="superscript">th</span> February 2026, post_details_1 <a href="/dok/members/krunoslav.belinic">Krunoslav Belinić</a> post_details_2 <a href="/dok/workshop_announcements">category_workshop_announcements</a> </span>
</div>
<div class="announcement workshop_announcement">
<h3><a href="/dok/workshop_announcements/2026/02/06" class="readMore"></a></h3>
<span class="details">
6<span class="superscript">th</span> February 2026, post_details_1 <a href="/dok/members/marko.paunovic">Marko Paunović</a> post_details_2 <a href="/dok/workshop_announcements">category_workshop_announcements</a> </span>
</div>
<p><a href="/dok/announcements">all_announcements</a></p>
</div>
<div id="middleColumn">
<!--<div id="hotStuff">
hot_tournaments<br/></div>-->
<div id="hotSponsor">
</div><h2>latest_articles</h2>
<ul class="latest">
<li>
<pre class="cake-debug"><a href="javascript:void(0);" onclick="document.getElementById('cakeErr7-trace').style.display = (document.getElementById('cakeErr7-trace').style.display == 'none' ? '' : 'none');"><b>Notice</b> (8)</a>: Undefined index: title_dok [<b>APP/views/elements/latestArticles.ctp</b>, line <b>7</b>]<div id="cakeErr7-trace" class="cake-stack-trace" style="display: none;"><a href="javascript:void(0);" onclick="document.getElementById('cakeErr7-code').style.display = (document.getElementById('cakeErr7-code').style.display == 'none' ? '' : 'none')">Code</a> | <a href="javascript:void(0);" onclick="document.getElementById('cakeErr7-context').style.display = (document.getElementById('cakeErr7-context').style.display == 'none' ? '' : 'none')">Context</a><div id="cakeErr7-code" class="cake-code-dump" style="display: none;"><pre><code><span style="color: #000000"></span></code>
<code><span style="color: #000000"> if (Configure::read() > 0) {</span></code>
<span class="code-highlight"><code><span style="color: #000000"> include ($___viewFn);</span></code></span></pre></div><pre id="cakeErr7-context" class="cake-context" style="display: none;">$___viewFn = "/home/martin/apps/agram/app/views/elements/latestArticles.ctp"
$___dataForView = array(
"lang" => "dok",
"otherLangs" => array(
"eng",
"hrv"
),
"globalNav" => array(
array(),
array(),
array(),
array(),
array(),
array(),
array(),
array(),
array(),
array(),
array(),
array(),
array(),
array(),
array(),
array(),
array(),
array(),
array(),
array(),
array(),
array(),
array(),
array(),
array(),
array(),
array()
),
"breadCrumbs" => array(
array()
),
"pageContents" => array(
"home_who_we_are" => null
),
"userData" => null,
"announcements" => array(
array(),
array(),
array()
),
"cache" => array(
"time" => "+1 day",
"key" => "dok"
),
"form" => FormHelper
FormHelper::$helpers = array
FormHelper::$fieldset = array
FormHelper::$__options = array
FormHelper::$fields = array
FormHelper::$requestType = NULL
FormHelper::$defaultModel = NULL
FormHelper::$_inputDefaults = array
FormHelper::$_lastAction = ""
FormHelper::$base = ""
FormHelper::$webroot = "/"
FormHelper::$theme = NULL
FormHelper::$here = "/dok"
FormHelper::$params = array
FormHelper::$action = "index"
FormHelper::$plugin = NULL
FormHelper::$data = NULL
FormHelper::$namedArgs = NULL
FormHelper::$argSeparator = NULL
FormHelper::$validationErrors = NULL
FormHelper::$tags = array
FormHelper::$__tainted = NULL
FormHelper::$__cleaned = NULL
FormHelper::$Html = HtmlHelper object,
"text" => TextHelper
TextHelper::$helpers = NULL
TextHelper::$base = ""
TextHelper::$webroot = "/"
TextHelper::$theme = NULL
TextHelper::$here = "/dok"
TextHelper::$params = array
TextHelper::$action = "index"
TextHelper::$plugin = NULL
TextHelper::$data = NULL
TextHelper::$namedArgs = NULL
TextHelper::$argSeparator = NULL
TextHelper::$validationErrors = NULL
TextHelper::$tags = array
TextHelper::$__tainted = NULL
TextHelper::$__cleaned = NULL,
"stringer" => StringerHelper
StringerHelper::$helpers = array
StringerHelper::$base = ""
StringerHelper::$webroot = "/"
StringerHelper::$theme = NULL
StringerHelper::$here = "/dok"
StringerHelper::$params = array
StringerHelper::$action = "index"
StringerHelper::$plugin = NULL
StringerHelper::$data = NULL
StringerHelper::$namedArgs = NULL
StringerHelper::$argSeparator = NULL
StringerHelper::$validationErrors = NULL
StringerHelper::$tags = array
StringerHelper::$__tainted = NULL
StringerHelper::$__cleaned = NULL
StringerHelper::$Html = HtmlHelper object
StringerHelper::$Link = LinkHelper object
StringerHelper::$Text = TextHelper object,
"menu" => MenuHelper
MenuHelper::$helpers = array
MenuHelper::$base = ""
MenuHelper::$webroot = "/"
MenuHelper::$theme = NULL
MenuHelper::$here = "/dok"
MenuHelper::$params = array
MenuHelper::$action = "index"
MenuHelper::$plugin = NULL
MenuHelper::$data = NULL
MenuHelper::$namedArgs = NULL
MenuHelper::$argSeparator = NULL
MenuHelper::$validationErrors = NULL
MenuHelper::$tags = array
MenuHelper::$__tainted = NULL
MenuHelper::$__cleaned = NULL
MenuHelper::$Link = LinkHelper object,
"session" => SessionHelper
SessionHelper::$helpers = array
SessionHelper::$__active = true
SessionHelper::$valid = false
SessionHelper::$error = false
SessionHelper::$_userAgent = "f9a8355d006790ee743ededbb1f6e3bd"
SessionHelper::$path = "/"
SessionHelper::$lastError = NULL
SessionHelper::$security = "medium"
SessionHelper::$time = 1773314240
SessionHelper::$sessionTime = 1773326240
SessionHelper::$cookieLifeTime = false
SessionHelper::$watchKeys = array
SessionHelper::$id = NULL
SessionHelper::$host = NULL
SessionHelper::$timeout = NULL
SessionHelper::$base = ""
SessionHelper::$webroot = "/"
SessionHelper::$here = "/dok"
SessionHelper::$params = array
SessionHelper::$action = "index"
SessionHelper::$data = NULL
SessionHelper::$theme = NULL
SessionHelper::$plugin = NULL,
"html" => HtmlHelper
HtmlHelper::$tags = array
HtmlHelper::$_crumbs = array
HtmlHelper::$__includedScripts = array
HtmlHelper::$_scriptBlockOptions = array
HtmlHelper::$__docTypes = array
HtmlHelper::$helpers = NULL
HtmlHelper::$base = ""
HtmlHelper::$webroot = "/"
HtmlHelper::$theme = NULL
HtmlHelper::$here = "/dok"
HtmlHelper::$params = array
HtmlHelper::$action = "index"
HtmlHelper::$plugin = NULL
HtmlHelper::$data = NULL
HtmlHelper::$namedArgs = NULL
HtmlHelper::$argSeparator = NULL
HtmlHelper::$validationErrors = NULL
HtmlHelper::$__tainted = NULL
HtmlHelper::$__cleaned = NULL,
"link" => LinkHelper
LinkHelper::$helpers = array
LinkHelper::$lang = "dok"
LinkHelper::$defaultLang = "hrv"
LinkHelper::$base = ""
LinkHelper::$webroot = "/"
LinkHelper::$theme = NULL
LinkHelper::$here = "/dok"
LinkHelper::$params = array
LinkHelper::$action = "index"
LinkHelper::$plugin = NULL
LinkHelper::$data = NULL
LinkHelper::$namedArgs = NULL
LinkHelper::$argSeparator = NULL
LinkHelper::$validationErrors = NULL
LinkHelper::$tags = array
LinkHelper::$__tainted = NULL
LinkHelper::$__cleaned = NULL
LinkHelper::$Html = HtmlHelper object
LinkHelper::$Session = SessionHelper object
)
$loadHelpers = false
$cached = false
$loadedHelpers = array()
$lang = "dok"
$otherLangs = array(
"eng",
"hrv"
)
$globalNav = array(
array(
"Page" => array()
),
array(
"Page" => array()
),
array(
"Page" => array()
),
array(
"Page" => array()
),
array(
"Page" => array()
),
array(
"Page" => array()
),
array(
"Page" => array()
),
array(
"Page" => array()
),
array(
"Page" => array()
),
array(
"Page" => array()
),
array(
"Page" => array()
),
array(
"Page" => array()
),
array(
"Page" => array()
),
array(
"Page" => array()
),
array(
"Page" => array()
),
array(
"Page" => array()
),
array(
"Page" => array()
),
array(
"Page" => array()
),
array(
"Page" => array()
),
array(
"Page" => array()
),
array(
"Page" => array()
),
array(
"Page" => array()
),
array(
"Page" => array()
),
array(
"Page" => array()
),
array(
"Page" => array()
),
array(
"Page" => array()
),
array(
"Page" => array()
)
)
$breadCrumbs = array(
array(
"Page" => array()
)
)
$pageContents = array(
"home_who_we_are" => null
)
$userData = null
$announcements = array(
array(
"Announcement" => array()
),
array(
"Announcement" => array()
),
array(
"Announcement" => array()
)
)
$cache = array(
"time" => "+1 day",
"key" => "dok"
)
$form = FormHelper
FormHelper::$helpers = array
FormHelper::$fieldset = array
FormHelper::$__options = array
FormHelper::$fields = array
FormHelper::$requestType = NULL
FormHelper::$defaultModel = NULL
FormHelper::$_inputDefaults = array
FormHelper::$_lastAction = ""
FormHelper::$base = ""
FormHelper::$webroot = "/"
FormHelper::$theme = NULL
FormHelper::$here = "/dok"
FormHelper::$params = array
FormHelper::$action = "index"
FormHelper::$plugin = NULL
FormHelper::$data = NULL
FormHelper::$namedArgs = NULL
FormHelper::$argSeparator = NULL
FormHelper::$validationErrors = NULL
FormHelper::$tags = array
FormHelper::$__tainted = NULL
FormHelper::$__cleaned = NULL
FormHelper::$Html = HtmlHelper object
$text = TextHelper
TextHelper::$helpers = NULL
TextHelper::$base = ""
TextHelper::$webroot = "/"
TextHelper::$theme = NULL
TextHelper::$here = "/dok"
TextHelper::$params = array
TextHelper::$action = "index"
TextHelper::$plugin = NULL
TextHelper::$data = NULL
TextHelper::$namedArgs = NULL
TextHelper::$argSeparator = NULL
TextHelper::$validationErrors = NULL
TextHelper::$tags = array
TextHelper::$__tainted = NULL
TextHelper::$__cleaned = NULL
$stringer = StringerHelper
StringerHelper::$helpers = array
StringerHelper::$base = ""
StringerHelper::$webroot = "/"
StringerHelper::$theme = NULL
StringerHelper::$here = "/dok"
StringerHelper::$params = array
StringerHelper::$action = "index"
StringerHelper::$plugin = NULL
StringerHelper::$data = NULL
StringerHelper::$namedArgs = NULL
StringerHelper::$argSeparator = NULL
StringerHelper::$validationErrors = NULL
StringerHelper::$tags = array
StringerHelper::$__tainted = NULL
StringerHelper::$__cleaned = NULL
StringerHelper::$Html = HtmlHelper object
StringerHelper::$Link = LinkHelper object
StringerHelper::$Text = TextHelper object
$menu = MenuHelper
MenuHelper::$helpers = array
MenuHelper::$base = ""
MenuHelper::$webroot = "/"
MenuHelper::$theme = NULL
MenuHelper::$here = "/dok"
MenuHelper::$params = array
MenuHelper::$action = "index"
MenuHelper::$plugin = NULL
MenuHelper::$data = NULL
MenuHelper::$namedArgs = NULL
MenuHelper::$argSeparator = NULL
MenuHelper::$validationErrors = NULL
MenuHelper::$tags = array
MenuHelper::$__tainted = NULL
MenuHelper::$__cleaned = NULL
MenuHelper::$Link = LinkHelper object
$session = SessionHelper
SessionHelper::$helpers = array
SessionHelper::$__active = true
SessionHelper::$valid = false
SessionHelper::$error = false
SessionHelper::$_userAgent = "f9a8355d006790ee743ededbb1f6e3bd"
SessionHelper::$path = "/"
SessionHelper::$lastError = NULL
SessionHelper::$security = "medium"
SessionHelper::$time = 1773314240
SessionHelper::$sessionTime = 1773326240
SessionHelper::$cookieLifeTime = false
SessionHelper::$watchKeys = array
SessionHelper::$id = NULL
SessionHelper::$host = NULL
SessionHelper::$timeout = NULL
SessionHelper::$base = ""
SessionHelper::$webroot = "/"
SessionHelper::$here = "/dok"
SessionHelper::$params = array
SessionHelper::$action = "index"
SessionHelper::$data = NULL
SessionHelper::$theme = NULL
SessionHelper::$plugin = NULL
$html = HtmlHelper
HtmlHelper::$tags = array
HtmlHelper::$_crumbs = array
HtmlHelper::$__includedScripts = array
HtmlHelper::$_scriptBlockOptions = array
HtmlHelper::$__docTypes = array
HtmlHelper::$helpers = NULL
HtmlHelper::$base = ""
HtmlHelper::$webroot = "/"
HtmlHelper::$theme = NULL
HtmlHelper::$here = "/dok"
HtmlHelper::$params = array
HtmlHelper::$action = "index"
HtmlHelper::$plugin = NULL
HtmlHelper::$data = NULL
HtmlHelper::$namedArgs = NULL
HtmlHelper::$argSeparator = NULL
HtmlHelper::$validationErrors = NULL
HtmlHelper::$__tainted = NULL
HtmlHelper::$__cleaned = NULL
$link = LinkHelper
LinkHelper::$helpers = array
LinkHelper::$lang = "dok"
LinkHelper::$defaultLang = "hrv"
LinkHelper::$base = ""
LinkHelper::$webroot = "/"
LinkHelper::$theme = NULL
LinkHelper::$here = "/dok"
LinkHelper::$params = array
LinkHelper::$action = "index"
LinkHelper::$plugin = NULL
LinkHelper::$data = NULL
LinkHelper::$namedArgs = NULL
LinkHelper::$argSeparator = NULL
LinkHelper::$validationErrors = NULL
LinkHelper::$tags = array
LinkHelper::$__tainted = NULL
LinkHelper::$__cleaned = NULL
LinkHelper::$Html = HtmlHelper object
LinkHelper::$Session = SessionHelper object
$articles = array(
array(
"Article" => array(),
"Member" => array()
),
array(
"Article" => array(),
"Member" => array()
),
array(
"Article" => array(),
"Member" => array()
),
array(
"Article" => array(),
"Member" => array()
),
array(
"Article" => array(),
"Member" => array()
)
)
$article = array(
"Article" => array(
"id" => "496",
"member_id" => "35",
"title_eng" => "Exhibition of Miniatures and Tabletop Scenery 2026",
"title_hrv" => "Izložba minijatura i maketa Agram 2026",
"mask_eng" => "exhibition_of_miniatures_and_tabletop_scenery_2026",
"mask_hrv" => "izlozba_minijatura_i_maketa_agram_2026",
"content_eng" => "<p>
<a href=" https://hosting.photobucket.com/95288841-8654-4bf7-8fc9-a4aa78dce87f/dc756f84-867d-4df4-acd8-5d43775cafc2.jpg
" target="_blank"> <img alt="Click for enlarged picture" src="
https://hosting.photobucket.com/95288841-8654-4bf7-8fc9-a4aa78dce87f/dc756f84-867d-4df4-acd8-5d43775cafc2.jpg" width="600" /> </a></p>
<p>
<strong>The exhibition of miniatures and models &quot;Agram 2026&quot;</strong> was held this year from 19.2. to 08.03. 2026. The exhibition was set up on Wednesday 18.2. and was attended by a large number of members and friends of the Association who exhibited their works.</p>
<p>
&nbsp;</p>
<p>
<a href=" https://hosting.photobucket.com/95288841-8654-4bf7-8fc9-a4aa78dce87f/8529d6d4-76ea-4872-a9e6-748e04223a4e.jpg
" target="_blank"> <img alt="Click for enlarged picture" src="
https://hosting.photobucket.com/95288841-8654-4bf7-8fc9-a4aa78dce87f/8529d6d4-76ea-4872-a9e6-748e04223a4e.jpg
" width="600" /> </a></p>
<p>
<a href=" https://hosting.photobucket.com/95288841-8654-4bf7-8fc9-a4aa78dce87f/f3038937-f001-4ceb-b725-a330fcd64cee.jpg
" target="_blank"> <img alt="Click for enlarged picture" src="
https://hosting.photobucket.com/95288841-8654-4bf7-8fc9-a4aa78dce87f/f3038937-f001-4ceb-b725-a330fcd64cee.jpg
" width="600" /> </a></p>
<p>
<a href=" https://hosting.photobucket.com/95288841-8654-4bf7-8fc9-a4aa78dce87f/3575379e-e068-49e2-9d4d-c9a49531fdc2.jpg
" target="_blank"> <img alt="Click for enlarged picture" src="
https://hosting.photobucket.com/95288841-8654-4bf7-8fc9-a4aa78dce87f/3575379e-e068-49e2-9d4d-c9a49531fdc2.jpg" width="600" /> </a></p>
<p>
<a href=" https://hosting.photobucket.com/95288841-8654-4bf7-8fc9-a4aa78dce87f/e51713c7-2add-4f8f-ae37-e6eba25badff.jpg
" target="_blank"> <img alt="Click for enlarged picture" src="
https://hosting.photobucket.com/95288841-8654-4bf7-8fc9-a4aa78dce87f/e51713c7-2add-4f8f-ae37-e6eba25badff.jpg" width="600" /> </a></p>
<p>
<a href=" https://hosting.photobucket.com/95288841-8654-4bf7-8fc9-a4aa78dce87f/9c0bb546-50a8-483d-aeab-ab3b2ce9f094.jpg
" target="_blank"> <img alt="Click for enlarged picture" src="
https://hosting.photobucket.com/95288841-8654-4bf7-8fc9-a4aa78dce87f/9c0bb546-50a8-483d-aeab-ab3b2ce9f094.jpg" width="600" /> </a></p>
<p>
The opening of the Exhibition took place on Thursday, February 19, 2026, starting at 6:00 PM. The exhibition was organized on the occasion of our twenty-third birthday.</p>
<p>
&nbsp;</p>
<p>
<a href=" https://hosting.photobucket.com/95288841-8654-4bf7-8fc9-a4aa78dce87f/71c7bfc2-1ffc-43b9-9d5a-53e009f6b86d.jpg
" target="_blank"> <img alt="Click for enlarged picture" src="
https://hosting.photobucket.com/95288841-8654-4bf7-8fc9-a4aa78dce87f/71c7bfc2-1ffc-43b9-9d5a-53e009f6b86d.jpg" width="600" /> </a></p>
<p>
<a href=" https://hosting.photobucket.com/95288841-8654-4bf7-8fc9-a4aa78dce87f/007b4701-1d7c-4a67-a599-0539a2aa3191.jpg
" target="_blank"> <img alt="Click for enlarged picture" src="
https://hosting.photobucket.com/95288841-8654-4bf7-8fc9-a4aa78dce87f/007b4701-1d7c-4a67-a599-0539a2aa3191.jpg" width="600" /> </a></p>
<p>
<a href=" https://hosting.photobucket.com/95288841-8654-4bf7-8fc9-a4aa78dce87f/2c8090e2-8b95-4368-bb48-98876d680e15.jpg
" target="_blank"> <img alt="Click for enlarged picture" src="
https://hosting.photobucket.com/95288841-8654-4bf7-8fc9-a4aa78dce87f/2c8090e2-8b95-4368-bb48-98876d680e15.jpg" width="600" /> </a></p>
<p>
<a href=" https://hosting.photobucket.com/95288841-8654-4bf7-8fc9-a4aa78dce87f/375768ad-a8bb-49bf-9845-e46c896ba7ec.jpg
" target="_blank"> <img alt="Click for enlarged picture" src="
https://hosting.photobucket.com/95288841-8654-4bf7-8fc9-a4aa78dce87f/375768ad-a8bb-49bf-9845-e46c896ba7ec.jpg" width="600" /> </a></p>
<p>
<a href=" https://hosting.photobucket.com/95288841-8654-4bf7-8fc9-a4aa78dce87f/a93de974-4ccb-4876-85b0-4d066ae402b3.jpg
" target="_blank"> <img alt="Click for enlarged picture" src="
https://hosting.photobucket.com/95288841-8654-4bf7-8fc9-a4aa78dce87f/a93de974-4ccb-4876-85b0-4d066ae402b3.jpg" width="600" /> </a></p>
<p>
<a href=" https://hosting.photobucket.com/95288841-8654-4bf7-8fc9-a4aa78dce87f/d323ccc9-1b9a-4cb2-8adf-7019b0e217f4.jpg
" target="_blank"> <img alt="Click for enlarged picture" src="
https://hosting.photobucket.com/95288841-8654-4bf7-8fc9-a4aa78dce87f/d323ccc9-1b9a-4cb2-8adf-7019b0e217f4.jpg" width="600" /> </a></p>
<p>
<a href=" https://hosting.photobucket.com/95288841-8654-4bf7-8fc9-a4aa78dce87f/a5a66447-2d76-47ae-866d-4d512ef469a5.jpg
" target="_blank"> <img alt="Click for enlarged picture" src="
https://hosting.photobucket.com/95288841-8654-4bf7-8fc9-a4aa78dce87f/a5a66447-2d76-47ae-866d-4d512ef469a5.jpg" width="600" /> </a></p>
<p>
<a href=" https://hosting.photobucket.com/95288841-8654-4bf7-8fc9-a4aa78dce87f/3e7bcfc9-ba02-4f94-a6c3-79dfaea3639e.jpg
" target="_blank"> <img alt="Click for enlarged picture" src="
https://hosting.photobucket.com/95288841-8654-4bf7-8fc9-a4aa78dce87f/3e7bcfc9-ba02-4f94-a6c3-79dfaea3639e.jpg" width="600" /> </a></p>
<p>
<a href=" https://hosting.photobucket.com/95288841-8654-4bf7-8fc9-a4aa78dce87f/24e79466-4a9e-4b10-970c-caad235d260d.jpg
" target="_blank"> <img alt="Click for enlarged picture" src="
https://hosting.photobucket.com/95288841-8654-4bf7-8fc9-a4aa78dce87f/24e79466-4a9e-4b10-970c-caad235d260d.jpg" width="600" /> </a></p>
<p>
As always, the Exhibition presented a cross-section of the work of the Association, its members, participants of its courses and workshops, and members of the Miniature Painters Croatia FB group. In a large number of showcases, there were numerous miniatures for tabletop strategy games, board games, and an entire showcase was dedicated to award-winning exhibits from previous miniature competitions. Several showcases were dedicated to projects that the Association has been implementing for 23 years, such as the UMS &bdquo;Agram&ldquo; Library and Reading Room, the Workshop for Making Spatial Models and the Miniature Painting Workshop, as well as new ones such as the Agram Group Build, the Agram Lego Section and the Back to Basics painting workshop for the youngest.</p>
<p>
<a href=" https://hosting.photobucket.com/95288841-8654-4bf7-8fc9-a4aa78dce87f/fca84936-af71-44d3-9a4c-faeb26163899.jpg
" target="_blank"> <img alt="Click for enlarged picture" src="
https://hosting.photobucket.com/95288841-8654-4bf7-8fc9-a4aa78dce87f/fca84936-af71-44d3-9a4c-faeb26163899.jpg" width="600" /> </a></p>
<p>
<a href=" https://hosting.photobucket.com/95288841-8654-4bf7-8fc9-a4aa78dce87f/459bc5ac-8702-46f9-93b4-547deaabdef4.jpg
" target="_blank"> <img alt="Click for enlarged picture" src="
https://hosting.photobucket.com/95288841-8654-4bf7-8fc9-a4aa78dce87f/459bc5ac-8702-46f9-93b4-547deaabdef4.jpg" width="600" /> </a></p>
<p>
<a href=" https://hosting.photobucket.com/95288841-8654-4bf7-8fc9-a4aa78dce87f/91a04363-b2ef-4635-a046-7edf25ce7808.jpg
" target="_blank"> <img alt="Click for enlarged picture" src="
https://hosting.photobucket.com/95288841-8654-4bf7-8fc9-a4aa78dce87f/91a04363-b2ef-4635-a046-7edf25ce7808.jpg" width="600" /> </a></p>
<p>
<a href=" https://hosting.photobucket.com/95288841-8654-4bf7-8fc9-a4aa78dce87f/73256af5-fd5d-40b5-95e1-120e49c9be87.jpg
" target="_blank"> <img alt="Click for enlarged picture" src="
https://hosting.photobucket.com/95288841-8654-4bf7-8fc9-a4aa78dce87f/73256af5-fd5d-40b5-95e1-120e49c9be87.jpg" width="600" /> </a></p>
<p>
<a href=" https://hosting.photobucket.com/95288841-8654-4bf7-8fc9-a4aa78dce87f/979f9be5-23f3-4df9-91dc-ab71d6a10d64.jpg
" target="_blank"> <img alt="Click for enlarged picture" src="
https://hosting.photobucket.com/95288841-8654-4bf7-8fc9-a4aa78dce87f/979f9be5-23f3-4df9-91dc-ab71d6a10d64.jpg" width="600" /> </a></p>
<p>
<a href=" https://hosting.photobucket.com/95288841-8654-4bf7-8fc9-a4aa78dce87f/d0ff4379-183a-47b9-a740-9ddc283ebc29.jpg
" target="_blank"> <img alt="Click for enlarged picture" src="
https://hosting.photobucket.com/95288841-8654-4bf7-8fc9-a4aa78dce87f/d0ff4379-183a-47b9-a740-9ddc283ebc29.jpg" width="600" /> </a></p>
<p>
<a href=" https://hosting.photobucket.com/95288841-8654-4bf7-8fc9-a4aa78dce87f/4333e95e-bbbd-4f47-aaea-38a9c99e54d8.jpg
" target="_blank"> <img alt="Click for enlarged picture" src="
https://hosting.photobucket.com/95288841-8654-4bf7-8fc9-a4aa78dce87f/4333e95e-bbbd-4f47-aaea-38a9c99e54d8.jpg" width="600" /> </a></p>
<p>
<a href=" https://hosting.photobucket.com/95288841-8654-4bf7-8fc9-a4aa78dce87f/1372f8a2-b222-48ee-ae45-a90b5a354ef7.jpg
" target="_blank"> <img alt="Click for enlarged picture" src="
https://hosting.photobucket.com/95288841-8654-4bf7-8fc9-a4aa78dce87f/1372f8a2-b222-48ee-ae45-a90b5a354ef7.jpg" width="600" /> </a></p>
<p>
<a href=" https://hosting.photobucket.com/95288841-8654-4bf7-8fc9-a4aa78dce87f/6a1b4fd1-d982-4b06-9c5f-3cd40d6bf10a.jpg
" target="_blank"> <img alt="Click for enlarged picture" src="
https://hosting.photobucket.com/95288841-8654-4bf7-8fc9-a4aa78dce87f/6a1b4fd1-d982-4b06-9c5f-3cd40d6bf10a.jpg" width="600" /> </a></p>
<p>
<a href=" https://hosting.photobucket.com/95288841-8654-4bf7-8fc9-a4aa78dce87f/c2ec45e1-e0f3-463a-b254-cb2a38b53e14.jpg
" target="_blank"> <img alt="Click for enlarged picture" src="
https://hosting.photobucket.com/95288841-8654-4bf7-8fc9-a4aa78dce87f/c2ec45e1-e0f3-463a-b254-cb2a38b53e14.jpg" width="600" /> </a></p>
<p>
<a href=" https://hosting.photobucket.com/95288841-8654-4bf7-8fc9-a4aa78dce87f/17553b9a-0592-4f6a-a097-3f1a97e161f3.jpg
" target="_blank"> <img alt="Click for enlarged picture" src="
https://hosting.photobucket.com/95288841-8654-4bf7-8fc9-a4aa78dce87f/17553b9a-0592-4f6a-a097-3f1a97e161f3.jpg" width="600" /> </a></p>
<p>
<a href=" https://hosting.photobucket.com/95288841-8654-4bf7-8fc9-a4aa78dce87f/8658bd6b-dff2-4d24-8473-928d44d44480.jpg
" target="_blank"> <img alt="Click for enlarged picture" src="
https://hosting.photobucket.com/95288841-8654-4bf7-8fc9-a4aa78dce87f/8658bd6b-dff2-4d24-8473-928d44d44480.jpg" width="600" /> </a></p>
<p>
<a href=" https://hosting.photobucket.com/95288841-8654-4bf7-8fc9-a4aa78dce87f/ecab0ea7-f75b-4e31-a520-d088ad39fa17.jpg
" target="_blank"> <img alt="Click for enlarged picture" src="
https://hosting.photobucket.com/95288841-8654-4bf7-8fc9-a4aa78dce87f/ecab0ea7-f75b-4e31-a520-d088ad39fa17.jpg" width="600" /> </a></p>
<p>
<a href=" https://hosting.photobucket.com/95288841-8654-4bf7-8fc9-a4aa78dce87f/9495a2f5-8a82-41f2-abf4-9ade3db41d87.jpg
" target="_blank"> <img alt="Click for enlarged picture" src="
https://hosting.photobucket.com/95288841-8654-4bf7-8fc9-a4aa78dce87f/9495a2f5-8a82-41f2-abf4-9ade3db41d87.jpg" width="600" /> </a></p>
<p>
<a href=" https://hosting.photobucket.com/95288841-8654-4bf7-8fc9-a4aa78dce87f/362cc6fd-a5dd-474b-9b9f-aeab27d6dcfa.jpg
" target="_blank"> <img alt="Click for enlarged picture" src="
https://hosting.photobucket.com/95288841-8654-4bf7-8fc9-a4aa78dce87f/362cc6fd-a5dd-474b-9b9f-aeab27d6dcfa.jpg" width="600" /> </a></p>
<p>
It was a special honor for us to host our guest exhibitor, Ninoslav Luk, a miniaturist from Poreč, who introduced himself to us with his collection of historical dioramas.</p>
<p>
<a href=" https://hosting.photobucket.com/95288841-8654-4bf7-8fc9-a4aa78dce87f/ba1353de-e2bd-4340-9121-9056e287ed4a.jpg
" target="_blank"> <img alt="Click for enlarged picture" src="
https://hosting.photobucket.com/95288841-8654-4bf7-8fc9-a4aa78dce87f/ba1353de-e2bd-4340-9121-9056e287ed4a.jpg" width="600" /> </a></p>
<p>
<a href=" https://hosting.photobucket.com/95288841-8654-4bf7-8fc9-a4aa78dce87f/cea18506-1b50-4e5b-955c-0b9ca02d7826.jpg
" target="_blank"> <img alt="Click for enlarged picture" src="
https://hosting.photobucket.com/95288841-8654-4bf7-8fc9-a4aa78dce87f/cea18506-1b50-4e5b-955c-0b9ca02d7826.jpg" width="600" /> </a></p>
<p>
<a href=" https://hosting.photobucket.com/95288841-8654-4bf7-8fc9-a4aa78dce87f/1be85b41-e3b6-4536-b141-cd0da6eb38c1.jpg
" target="_blank"> <img alt="Click for enlarged picture" src="
https://hosting.photobucket.com/95288841-8654-4bf7-8fc9-a4aa78dce87f/1be85b41-e3b6-4536-b141-cd0da6eb38c1.jpg" width="600" /> </a></p>
<p>
<a href=" https://hosting.photobucket.com/95288841-8654-4bf7-8fc9-a4aa78dce87f/9e93b87d-ff3c-4b7b-8f06-5f9d3464a134.jpg
" target="_blank"> <img alt="Click for enlarged picture" src="
https://hosting.photobucket.com/95288841-8654-4bf7-8fc9-a4aa78dce87f/9e93b87d-ff3c-4b7b-8f06-5f9d3464a134.jpg" width="600" /> </a></p>
<p>
During the first weekend of the Exhibition, 21-22.02., we held the 18th annual international miniature painting competition <strong>Black Queen Hobby and Miniature Painting Competition</strong>!</p>
<p>
<a href=" https://hosting.photobucket.com/95288841-8654-4bf7-8fc9-a4aa78dce87f/3056fb09-f66c-4dea-80a8-a4e72407429a.jpg
" target="_blank"> <img alt="Click for enlarged picture" src="
https://hosting.photobucket.com/95288841-8654-4bf7-8fc9-a4aa78dce87f/3056fb09-f66c-4dea-80a8-a4e72407429a.jpg" width="600" /> </a></p>
<p>
As contestants arrived and registered for the competition, our hardworking staff photographed all the exhibits before sorting them into categories and carefully placing them in glass cases. There was no shortage of morning neccessities like coffe and doughnuts.</p>
<p>
&lt;</p>
<p>
<a href=" https://hosting.photobucket.com/95288841-8654-4bf7-8fc9-a4aa78dce87f/1118089c-2b46-4a2c-b17d-dc92b66d1ffc.jpg
" target="_blank"> <img alt="Click for enlarged picture" src="
https://hosting.photobucket.com/95288841-8654-4bf7-8fc9-a4aa78dce87f/1118089c-2b46-4a2c-b17d-dc92b66d1ffc.jpg" width="600" /> </a></p>
<p>
<a href=" https://hosting.photobucket.com/95288841-8654-4bf7-8fc9-a4aa78dce87f/9fd3c272-9a69-4532-a09d-36497a20a820.jpg
" target="_blank"> <img alt="Click for enlarged picture" src="
https://hosting.photobucket.com/95288841-8654-4bf7-8fc9-a4aa78dce87f/9fd3c272-9a69-4532-a09d-36497a20a820.jpg" width="600" /> </a></p>
<p>
<a href=" https://hosting.photobucket.com/95288841-8654-4bf7-8fc9-a4aa78dce87f/86995e80-c502-45fb-80f5-c8fda27da3f9.jpg
" target="_blank"> <img alt="Click for enlarged picture" src="
https://hosting.photobucket.com/95288841-8654-4bf7-8fc9-a4aa78dce87f/86995e80-c502-45fb-80f5-c8fda27da3f9.jpg" width="600" /> </a></p>
<p>
By noon, all the display cases were full and the competition could officially begin.</p>
<p>
<a href=" https://hosting.photobucket.com/95288841-8654-4bf7-8fc9-a4aa78dce87f/bce59a4f-c3e3-4708-a3d6-25e81a894c24.jpg
" target="_blank"> <img alt="Click for enlarged picture" src="
https://hosting.photobucket.com/95288841-8654-4bf7-8fc9-a4aa78dce87f/bce59a4f-c3e3-4708-a3d6-25e81a894c24.jpg" width="600" /> </a></p>
<p>
<a href=" https://hosting.photobucket.com/95288841-8654-4bf7-8fc9-a4aa78dce87f/16a0a094-01aa-4e52-82cf-fdab00d74711.jpg
" target="_blank"> <img alt="Click for enlarged picture" src="
https://hosting.photobucket.com/95288841-8654-4bf7-8fc9-a4aa78dce87f/16a0a094-01aa-4e52-82cf-fdab00d74711.jpg" width="600" /> </a></p>
<p>
<a href=" https://hosting.photobucket.com/95288841-8654-4bf7-8fc9-a4aa78dce87f/0d3f4042-ff77-48d0-b332-add0fd08f7c3.jpg
" target="_blank"> <img alt="Click for enlarged picture" src="
https://hosting.photobucket.com/95288841-8654-4bf7-8fc9-a4aa78dce87f/0d3f4042-ff77-48d0-b332-add0fd08f7c3.jpg" width="600" /> </a></p>
<p>
<a href=" https://hosting.photobucket.com/95288841-8654-4bf7-8fc9-a4aa78dce87f/3711baf8-93f2-434a-aea9-a95288ca04dd.jpg
" target="_blank"> <img alt="Click for enlarged picture" src="
https://hosting.photobucket.com/95288841-8654-4bf7-8fc9-a4aa78dce87f/3711baf8-93f2-434a-aea9-a95288ca04dd.jpg" width="600" /> </a></p>
<p>
<a href=" https://hosting.photobucket.com/95288841-8654-4bf7-8fc9-a4aa78dce87f/53113b97-ec06-4409-95ba-95a5ad3f9720.jpg
" target="_blank"> <img alt="Click for enlarged picture" src="
https://hosting.photobucket.com/95288841-8654-4bf7-8fc9-a4aa78dce87f/53113b97-ec06-4409-95ba-95a5ad3f9720.jpg" width="600" /> </a></p>
<p>
<a href=" https://hosting.photobucket.com/95288841-8654-4bf7-8fc9-a4aa78dce87f/ab127858-193d-4976-bdb2-e27302722fca.jpg
" target="_blank"> <img alt="Click for enlarged picture" src="
https://hosting.photobucket.com/95288841-8654-4bf7-8fc9-a4aa78dce87f/ab127858-193d-4976-bdb2-e27302722fca.jpg" width="600" /> </a></p>
<p>
<a href=" https://hosting.photobucket.com/95288841-8654-4bf7-8fc9-a4aa78dce87f/3735af11-3fb6-4772-a8ff-5e0ff6ddf03a.jpg
" target="_blank"> <img alt="Click for enlarged picture" src="
https://hosting.photobucket.com/95288841-8654-4bf7-8fc9-a4aa78dce87f/3735af11-3fb6-4772-a8ff-5e0ff6ddf03a.jpg" width="600" /> </a></p>
<p>
<strong>Back To Basics workshops for the young at the Black Queen</strong></p>
<p>
This year, throughout the weekend, we organized miniature painting workshops for the youngest, who were able to paint one of our own miniatures designed specifically for this program for the first time!</p>
<p>
<a href=" https://hosting.photobucket.com/95288841-8654-4bf7-8fc9-a4aa78dce87f/6999be0c-8cc6-4947-a423-9427a2299724.jpg
" target="_blank"> <img alt="Click for enlarged picture" src="
https://hosting.photobucket.com/95288841-8654-4bf7-8fc9-a4aa78dce87f/6999be0c-8cc6-4947-a423-9427a2299724.jpg" width="600" /> </a></p>
<p>
<a href="https://hosting.photobucket.com/95288841-8654-4bf7-8fc9-a4aa78dce87f/835b05a5-f171-49df-afa6-da0692b89074.jpg" target="_blank"><img alt="Click for enlarged picture" src="https://hosting.photobucket.com/95288841-8654-4bf7-8fc9-a4aa78dce87f/835b05a5-f171-49df-afa6-da0692b89074.jpg" width="600" /></a></p>
<p>
<a href=" https://hosting.photobucket.com/95288841-8654-4bf7-8fc9-a4aa78dce87f/ef5dde13-84ee-4ea0-b9f3-28aaf703ef6d.jpg
" target="_blank"> <img alt="Click for enlarged picture" src="
https://hosting.photobucket.com/95288841-8654-4bf7-8fc9-a4aa78dce87f/ef5dde13-84ee-4ea0-b9f3-28aaf703ef6d.jpg" width="600" /> </a></p>
<p>
<strong>SELLERS&#39; COURT</strong></p>
<p>
During the weekend we hosted our sponsors with their sales stands: Swood.si and Carta Magica.</p>
<p>
<a href=" https://hosting.photobucket.com/95288841-8654-4bf7-8fc9-a4aa78dce87f/5ee9a49f-a387-435a-9110-572402b7191d.jpg
" target="_blank"> <img alt="Click for enlarged picture" src="
https://hosting.photobucket.com/95288841-8654-4bf7-8fc9-a4aa78dce87f/5ee9a49f-a387-435a-9110-572402b7191d.jpg" width="600" /> </a></p>
<p>
<a href=" https://hosting.photobucket.com/95288841-8654-4bf7-8fc9-a4aa78dce87f/47cf600f-b1eb-4655-bf06-305f6f21d5d2.jpg
" target="_blank"> <img alt="Click for enlarged picture" src="
https://hosting.photobucket.com/95288841-8654-4bf7-8fc9-a4aa78dce87f/47cf600f-b1eb-4655-bf06-305f6f21d5d2.jpg" width="600" /> </a></p>
<p>
<strong>MINIATURE PAINTING WORKSHOPS</strong></p>
<p>
The ZZTK premises allow workshops to be held during the weekend in the cinema hall in the basement, so we also organized demonstration workshops during the weekend. The lecturers&#39; work was recorded with a camera and projected onto the projection screen in the hall. Many thanks to our domestic and international lecturers: Anže Zorko (SLO), doc.dr.sc. Winton Afrić (CRO), Ivan Knezović (UMS Agram) and Petar Knezoviću (CRO).</p>
<p>
<a href=" https://hosting.photobucket.com/95288841-8654-4bf7-8fc9-a4aa78dce87f/e8d835be-ec99-49d7-bc9b-086e38573d1a.jpg
" target="_blank"> <img alt="Click for enlarged picture" src="
https://hosting.photobucket.com/95288841-8654-4bf7-8fc9-a4aa78dce87f/e8d835be-ec99-49d7-bc9b-086e38573d1a.jpg" width="600" /> </a></p>
<p>
<a href=" https://hosting.photobucket.com/95288841-8654-4bf7-8fc9-a4aa78dce87f/f3eba4c1-4637-4da9-8360-75f430355af4.jpg" target="_blank"> <img alt="Click for enlarged picture" src="
https://hosting.photobucket.com/95288841-8654-4bf7-8fc9-a4aa78dce87f/f3eba4c1-4637-4da9-8360-75f430355af4.jpg" width="600" /> </a></p>
<p>
<a href=" https://hosting.photobucket.com/95288841-8654-4bf7-8fc9-a4aa78dce87f/ef523854-4030-4579-aa38-403afda86c91.jpg
" target="_blank"> <img alt="Click for enlarged picture" src="
https://hosting.photobucket.com/95288841-8654-4bf7-8fc9-a4aa78dce87f/ef523854-4030-4579-aa38-403afda86c91.jpg" width="600" /> </a></p>
<p>
<a href=" https://hosting.photobucket.com/95288841-8654-4bf7-8fc9-a4aa78dce87f/dd0943c2-f4a8-40c3-b641-f6dcdd200380.jpg
" target="_blank"> <img alt="Click for enlarged picture" src="
https://hosting.photobucket.com/95288841-8654-4bf7-8fc9-a4aa78dce87f/dd0943c2-f4a8-40c3-b641-f6dcdd200380.jpg" width="600" /> </a></p>
<p>
<a href=" https://hosting.photobucket.com/95288841-8654-4bf7-8fc9-a4aa78dce87f/08b1626a-f6c7-43c9-b718-3e9a41b55ca6.jpg
" target="_blank"> <img alt="Click for enlarged picture" src="
https://hosting.photobucket.com/95288841-8654-4bf7-8fc9-a4aa78dce87f/08b1626a-f6c7-43c9-b718-3e9a41b55ca6.jpg" width="600" /> </a></p>
<p>
<a href=" https://hosting.photobucket.com/95288841-8654-4bf7-8fc9-a4aa78dce87f/91aca7f3-1af6-486d-b174-65079a63a1ea.jpg
" target="_blank"> <img alt="Click for enlarged picture" src="
https://hosting.photobucket.com/95288841-8654-4bf7-8fc9-a4aa78dce87f/91aca7f3-1af6-486d-b174-65079a63a1ea.jpg" width="600" /> </a></p>
<p>
<a href=" https://hosting.photobucket.com/95288841-8654-4bf7-8fc9-a4aa78dce87f/3821f2fb-fbe7-4096-adbc-7d8c981a3b56.jpg
" target="_blank"> <img alt="Click for enlarged picture" src="
https://hosting.photobucket.com/95288841-8654-4bf7-8fc9-a4aa78dce87f/3821f2fb-fbe7-4096-adbc-7d8c981a3b56.jpg" width="600" /> </a></p>
<p>
<a href=" https://hosting.photobucket.com/95288841-8654-4bf7-8fc9-a4aa78dce87f/2c7bb3c5-c0ec-4a96-b6bd-6a90ce5ce154.jpg
" target="_blank"> <img alt="Click for enlarged picture" src="
https://hosting.photobucket.com/95288841-8654-4bf7-8fc9-a4aa78dce87f/2c7bb3c5-c0ec-4a96-b6bd-6a90ce5ce154.jpg" width="600" /> </a></p>
<p>
<a href=" https://hosting.photobucket.com/95288841-8654-4bf7-8fc9-a4aa78dce87f/b646f4ee-21aa-4d12-8db3-6d33351d5aeb.jpg
" target="_blank"> <img alt="Click for enlarged picture" src="
https://hosting.photobucket.com/95288841-8654-4bf7-8fc9-a4aa78dce87f/b646f4ee-21aa-4d12-8db3-6d33351d5aeb.jpg" width="600" /> </a></p>
<p>
<a href=" https://hosting.photobucket.com/95288841-8654-4bf7-8fc9-a4aa78dce87f/fb5efc01-32cc-4119-90e3-188f51b30237.jpg
" target="_blank"> <img alt="Click for enlarged picture" src="
https://hosting.photobucket.com/95288841-8654-4bf7-8fc9-a4aa78dce87f/fb5efc01-32cc-4119-90e3-188f51b30237.jpg" width="600" /> </a></p>
<p>
<strong>SPEED PAINTING COMPETITION</strong></p>
<p>
We organized a speed painting competition on Sunday afternoon. Participants had 60 minutes to paint one wizrad, a miniature of our own design and production.</p>
<p>
<a href=" https://hosting.photobucket.com/95288841-8654-4bf7-8fc9-a4aa78dce87f/106417a6-a047-4e0d-9f81-87858806052f.jpg
" target="_blank"> <img alt="Click for enlarged picture" src="
https://hosting.photobucket.com/95288841-8654-4bf7-8fc9-a4aa78dce87f/106417a6-a047-4e0d-9f81-87858806052f.jpg" width="600" /> </a></p>
<p>
<a href=" https://hosting.photobucket.com/95288841-8654-4bf7-8fc9-a4aa78dce87f/ac6853c7-6e34-4e07-a996-8d7d12744b67.jpg
" target="_blank"> <img alt="Click for enlarged picture" src="
https://hosting.photobucket.com/95288841-8654-4bf7-8fc9-a4aa78dce87f/ac6853c7-6e34-4e07-a996-8d7d12744b67.jpg" width="600" /> </a></p>
<p>
<a href=" https://hosting.photobucket.com/95288841-8654-4bf7-8fc9-a4aa78dce87f/ccb155fa-52c5-4a99-9515-f69a6836dce7.jpg
" target="_blank"> <img alt="Click for enlarged picture" src="
https://hosting.photobucket.com/95288841-8654-4bf7-8fc9-a4aa78dce87f/ccb155fa-52c5-4a99-9515-f69a6836dce7.jpg" width="600" /> </a></p>
<p>
<a href=" https://hosting.photobucket.com/95288841-8654-4bf7-8fc9-a4aa78dce87f/a29fedd0-97ea-45b1-85f9-7ea62188b2b2.jpg
" target="_blank"><img alt="Click for enlarged picture" src="
https://hosting.photobucket.com/95288841-8654-4bf7-8fc9-a4aa78dce87f/a29fedd0-97ea-45b1-85f9-7ea62188b2b2.jpg" width="600" /></a></p>
<p>
With that, we came to the very end of this wonderful weekend and all that was left was the awarding of prizes and recognition to the winners.</p>
<p>
<a href=" https://hosting.photobucket.com/95288841-8654-4bf7-8fc9-a4aa78dce87f/046ca4c8-0ae7-415e-abd3-e131d580c3ad.jpg
" target="_blank"> <img alt="Click for enlarged picture" src="
https://hosting.photobucket.com/95288841-8654-4bf7-8fc9-a4aa78dce87f/046ca4c8-0ae7-415e-abd3-e131d580c3ad.jpg" width="600" /> </a></p>
<p>
<a href=" https://hosting.photobucket.com/95288841-8654-4bf7-8fc9-a4aa78dce87f/cec0dcef-7acb-4a77-89de-271ed5410672.jpg
" target="_blank"> <img alt="Click for enlarged picture" src="
https://hosting.photobucket.com/95288841-8654-4bf7-8fc9-a4aa78dce87f/cec0dcef-7acb-4a77-89de-271ed5410672.jpg" width="600" /> </a></p>
<p>
<a href=" https://hosting.photobucket.com/95288841-8654-4bf7-8fc9-a4aa78dce87f/a495a5fc-31a2-4979-a970-0fa22c334354.jpg
" target="_blank"> <img alt="Click for enlarged picture" src="
https://hosting.photobucket.com/95288841-8654-4bf7-8fc9-a4aa78dce87f/a495a5fc-31a2-4979-a970-0fa22c334354.jpg" width="600" /> </a></p>
<p>
<strong>AGRAM ARENA &ndash; Leaving Asphodel Necropolis28 Campaign</strong></p>
<p>
During the weekend of February 21-22, we held a new international competition, Agram Arena! This time it was the turn of the tabletop strategy game Necropolis28, for which our members designed a two-day campaign. Each participant created their own gang of soldiers, and the vast majority also created their own boards.</p>
<p>
<a href=" https://hosting.photobucket.com/95288841-8654-4bf7-8fc9-a4aa78dce87f/ac69b182-4bfc-4575-a6d3-fb3c8baba342.jpg
" target="_blank"> <img alt="Click for enlarged picture" src="
https://hosting.photobucket.com/95288841-8654-4bf7-8fc9-a4aa78dce87f/ac69b182-4bfc-4575-a6d3-fb3c8baba342.jpg" width="600" /> </a></p>
<p>
<a href=" https://hosting.photobucket.com/95288841-8654-4bf7-8fc9-a4aa78dce87f/289fed7b-e058-42d8-ba2d-cbd0463e98da.jpg
" target="_blank"> <img alt="Click for enlarged picture" src="
https://hosting.photobucket.com/95288841-8654-4bf7-8fc9-a4aa78dce87f/289fed7b-e058-42d8-ba2d-cbd0463e98da.jpg" width="600" /> </a></p>
<p>
<a href=" https://hosting.photobucket.com/95288841-8654-4bf7-8fc9-a4aa78dce87f/d92ebbee-859d-4441-8386-3d760b20b7a7.jpg
" target="_blank"> <img alt="Click for enlarged picture" src="
https://hosting.photobucket.com/95288841-8654-4bf7-8fc9-a4aa78dce87f/d92ebbee-859d-4441-8386-3d760b20b7a7.jpg" width="600" /> </a></p>
<p>
<a href=" https://hosting.photobucket.com/95288841-8654-4bf7-8fc9-a4aa78dce87f/09c59798-7871-425e-a075-3ca1cd91768a.jpg
" target="_blank"> <img alt="Click for enlarged picture" src="
https://hosting.photobucket.com/95288841-8654-4bf7-8fc9-a4aa78dce87f/09c59798-7871-425e-a075-3ca1cd91768a.jpg" width="600" /> </a></p>
<p>
<a href=" https://hosting.photobucket.com/95288841-8654-4bf7-8fc9-a4aa78dce87f/b2f3edc8-5a23-4552-9a2a-4027b286f327.jpg
" target="_blank"> <img alt="Click for enlarged picture" src="
https://hosting.photobucket.com/95288841-8654-4bf7-8fc9-a4aa78dce87f/b2f3edc8-5a23-4552-9a2a-4027b286f327.jpg" width="600" /> </a></p>
<p>
<a href=" https://hosting.photobucket.com/95288841-8654-4bf7-8fc9-a4aa78dce87f/2a9f43ac-b531-4746-b7bb-ac5a3356aab0.jpg
" target="_blank"> <img alt="Click for enlarged picture" src="
https://hosting.photobucket.com/95288841-8654-4bf7-8fc9-a4aa78dce87f/2a9f43ac-b531-4746-b7bb-ac5a3356aab0.jpg" width="600" /> </a></p>
<p>
<strong>EVENTS ON WEEKDAYS DURING THE EXHIBITION </strong></p>
<p>
Over the next two weeks, our volunteers held open miniature painting workshops on weekdays from 4:00 PM to 8:00 PM. Miniature painting workstations were set up where our visitors could paint miniatures we had prepared (or their own if they had brought them) using our materials and tools.</p>
<p>
<a href=" https://hosting.photobucket.com/95288841-8654-4bf7-8fc9-a4aa78dce87f/6edf7765-42b5-417a-820f-fa5d907179a7.jpg
" target="_blank"> <img alt="Click for enlarged picture" src="
https://hosting.photobucket.com/95288841-8654-4bf7-8fc9-a4aa78dce87f/6edf7765-42b5-417a-820f-fa5d907179a7.jpg" width="600" /> </a></p>
<p>
<a href=" https://hosting.photobucket.com/95288841-8654-4bf7-8fc9-a4aa78dce87f/c084ebe2-f57b-4519-9b31-29bdc1155887.jpg
" target="_blank"> <img alt="Click for enlarged picture" src="
https://hosting.photobucket.com/95288841-8654-4bf7-8fc9-a4aa78dce87f/c084ebe2-f57b-4519-9b31-29bdc1155887.jpg" width="600" /> </a></p>
<p>
<a href=" https://hosting.photobucket.com/95288841-8654-4bf7-8fc9-a4aa78dce87f/37ff2272-f9b0-4b16-a363-1e6f6688c866.jpg
" target="_blank"> <img alt="Click for enlarged picture" src="
https://hosting.photobucket.com/95288841-8654-4bf7-8fc9-a4aa78dce87f/37ff2272-f9b0-4b16-a363-1e6f6688c866.jpg" width="600" /> </a></p>
<p>
<a href=" https://hosting.photobucket.com/95288841-8654-4bf7-8fc9-a4aa78dce87f/5f4f7968-ff50-4a01-98da-6ce8562930b4.jpg
" target="_blank"> <img alt="Click for enlarged picture" src="
https://hosting.photobucket.com/95288841-8654-4bf7-8fc9-a4aa78dce87f/5f4f7968-ff50-4a01-98da-6ce8562930b4.jpg" width="600" /> </a></p>
<p>
<a href=" https://hosting.photobucket.com/95288841-8654-4bf7-8fc9-a4aa78dce87f/cbb45319-d488-483c-bf9d-9af29852fc74.jpg
" target="_blank"> <img alt="Click for enlarged picture" src="
https://hosting.photobucket.com/95288841-8654-4bf7-8fc9-a4aa78dce87f/cbb45319-d488-483c-bf9d-9af29852fc74.jpg" width="600" /> </a></p>
<p>
<a href=" https://hosting.photobucket.com/95288841-8654-4bf7-8fc9-a4aa78dce87f/3dcca26c-d549-4af3-812a-a4a81b9a2310.jpg
" target="_blank"> <img alt="Click for enlarged picture" src="
https://hosting.photobucket.com/95288841-8654-4bf7-8fc9-a4aa78dce87f/3dcca26c-d549-4af3-812a-a4a81b9a2310.jpg" width="600" /> </a></p>
<p>
<a href=" https://hosting.photobucket.com/95288841-8654-4bf7-8fc9-a4aa78dce87f/4adf0fb6-3eab-4b40-b32d-d03eab4a9892.jpg
" target="_blank"> <img alt="Click for enlarged picture" src="
https://hosting.photobucket.com/95288841-8654-4bf7-8fc9-a4aa78dce87f/4adf0fb6-3eab-4b40-b32d-d03eab4a9892.jpg" width="600" /> </a></p>
<p>
<a href=" https://hosting.photobucket.com/95288841-8654-4bf7-8fc9-a4aa78dce87f/4732b58a-9a65-4d1c-a7d5-25513d34b108.jpg
" target="_blank"> <img alt="Click for enlarged picture" src="
https://hosting.photobucket.com/95288841-8654-4bf7-8fc9-a4aa78dce87f/4732b58a-9a65-4d1c-a7d5-25513d34b108.jpg" width="600" /> </a></p>
<p>
<a href=" https://hosting.photobucket.com/95288841-8654-4bf7-8fc9-a4aa78dce87f/274be330-31d5-4e25-95db-ec2f423a003c.jpg
" target="_blank"> <img alt="Click for enlarged picture" src="
https://hosting.photobucket.com/95288841-8654-4bf7-8fc9-a4aa78dce87f/274be330-31d5-4e25-95db-ec2f423a003c.jpg" width="600" /> </a></p>
<p>
<a href=" https://hosting.photobucket.com/95288841-8654-4bf7-8fc9-a4aa78dce87f/8e7b0a80-0f46-4d70-9789-a46976c713d2.jpg
" target="_blank"> <img alt="Click for enlarged picture" src="
https://hosting.photobucket.com/95288841-8654-4bf7-8fc9-a4aa78dce87f/8e7b0a80-0f46-4d70-9789-a46976c713d2.jpg" width="600" /> </a></p>
<p>
<a href=" https://hosting.photobucket.com/95288841-8654-4bf7-8fc9-a4aa78dce87f/8bbd4e96-b911-4f26-80fe-b1c57f29027b.jpg
" target="_blank"> <img alt="Click for enlarged picture" src="
https://hosting.photobucket.com/95288841-8654-4bf7-8fc9-a4aa78dce87f/8bbd4e96-b911-4f26-80fe-b1c57f29027b.jpg" width="600" /> </a></p>
<p>
<a href=" https://hosting.photobucket.com/95288841-8654-4bf7-8fc9-a4aa78dce87f/203a27be-8f10-459d-89b9-befb6b636b74.jpg
" target="_blank"> <img alt="Click for enlarged picture" src="
https://hosting.photobucket.com/95288841-8654-4bf7-8fc9-a4aa78dce87f/203a27be-8f10-459d-89b9-befb6b636b74.jpg" width="600" /> </a></p>
<p>
<a href=" https://hosting.photobucket.com/95288841-8654-4bf7-8fc9-a4aa78dce87f/5dc4358f-19d8-475f-a4af-9c29e9ed18d7.jpg
" target="_blank"> <img alt="Click for enlarged picture" src="
https://hosting.photobucket.com/95288841-8654-4bf7-8fc9-a4aa78dce87f/5dc4358f-19d8-475f-a4af-9c29e9ed18d7.jpg" width="600" /> </a></p>
<p>
<strong>BACK TO BASICS MINIATURE PAINTING WORKSHOPS FOR YOUNG</strong></p>
<p>
On weekdays from 17:00 to 18:00, we held our new workshops for the youngest, in which our youngest participants painted their first miniatures.</p>
<p>
<a href=" https://hosting.photobucket.com/95288841-8654-4bf7-8fc9-a4aa78dce87f/948af139-8fb5-4e28-a27c-404466e70d05.jpg
" target="_blank"> <img alt="Click for enlarged picture" src="
https://hosting.photobucket.com/95288841-8654-4bf7-8fc9-a4aa78dce87f/948af139-8fb5-4e28-a27c-404466e70d05.jpg" width="600" /> </a></p>
<p>
<a href=" https://hosting.photobucket.com/95288841-8654-4bf7-8fc9-a4aa78dce87f/bb3e20c2-bb21-4a3d-863a-74de08261467.jpg
" target="_blank"> <img alt="Click for enlarged picture" src="
https://hosting.photobucket.com/95288841-8654-4bf7-8fc9-a4aa78dce87f/bb3e20c2-bb21-4a3d-863a-74de08261467.jpg" width="600" /> </a></p>
<p>
<a href=" https://hosting.photobucket.com/95288841-8654-4bf7-8fc9-a4aa78dce87f/7316c760-98e3-4e3f-9261-d138aa7a5a6a.jpg
" target="_blank"> <img alt="Click for enlarged picture" src="
https://hosting.photobucket.com/95288841-8654-4bf7-8fc9-a4aa78dce87f/7316c760-98e3-4e3f-9261-d138aa7a5a6a.jpg" width="600" /> </a></p>
<p>
<a href=" https://hosting.photobucket.com/95288841-8654-4bf7-8fc9-a4aa78dce87f/68934b39-3d1f-4f43-b967-14b73c41a39e.jpg
" target="_blank"> <img alt="Click for enlarged picture" src="
https://hosting.photobucket.com/95288841-8654-4bf7-8fc9-a4aa78dce87f/68934b39-3d1f-4f43-b967-14b73c41a39e.jpg" width="600" /> </a></p>
<p>
<a href=" https://hosting.photobucket.com/95288841-8654-4bf7-8fc9-a4aa78dce87f/46125bce-a28d-494f-873a-3aeabdc1d6c2.jpg
" target="_blank"> <img alt="Click for enlarged picture" src="
https://hosting.photobucket.com/95288841-8654-4bf7-8fc9-a4aa78dce87f/46125bce-a28d-494f-873a-3aeabdc1d6c2.jpg" width="600" /> </a></p>
<p>
<a href=" https://hosting.photobucket.com/95288841-8654-4bf7-8fc9-a4aa78dce87f/3c58e0ad-77a9-44c8-b6bf-d9a55c514d43.jpg
" target="_blank"> <img alt="Click for enlarged picture" src="
https://hosting.photobucket.com/95288841-8654-4bf7-8fc9-a4aa78dce87f/3c58e0ad-77a9-44c8-b6bf-d9a55c514d43.jpg" width="600" /> </a></p>
<p>
<a href=" https://hosting.photobucket.com/95288841-8654-4bf7-8fc9-a4aa78dce87f/f891f0f0-051b-40ee-9676-cb03b0a9811b.jpg
" target="_blank"> <img alt="Click for enlarged picture" src="
https://hosting.photobucket.com/95288841-8654-4bf7-8fc9-a4aa78dce87f/f891f0f0-051b-40ee-9676-cb03b0a9811b.jpg" width="600" /> </a></p>
<p>
<strong>AGRAM LEGO SECTION lecture: FW-14b &ndash; An F1 racecar for the future</strong></p>
<p>
On Wednesday, February 25, 2026, as part of the activities of our Agram Lego Section, our resident mechanical engineer Marko Paunović gave a lecture on the topic of the F1 racecar from 1992. Admission to the lecture was free, and upon completion, a LEGO model of the racecar was made by members of the Lego section</p>
<p>
<a href=" https://hosting.photobucket.com/95288841-8654-4bf7-8fc9-a4aa78dce87f/b2e14b1c-daa4-4314-8685-184377bc7e28.jpg
" target="_blank"> <img alt="Click for enlarged picture" src="
https://hosting.photobucket.com/95288841-8654-4bf7-8fc9-a4aa78dce87f/b2e14b1c-daa4-4314-8685-184377bc7e28.jpg" width="600" /> </a></p>
<p>
<a href=" https://hosting.photobucket.com/95288841-8654-4bf7-8fc9-a4aa78dce87f/31fb439a-77d3-4418-83ff-66c3af279cca.jpg" target="_blank"> <img alt="Click for enlarged picture" src="
https://hosting.photobucket.com/95288841-8654-4bf7-8fc9-a4aa78dce87f/31fb439a-77d3-4418-83ff-66c3af279cca.jpg" width="600" /> </a></p>
<p>
<a href=" https://hosting.photobucket.com/95288841-8654-4bf7-8fc9-a4aa78dce87f/bfcaf282-6be8-4b52-a3ed-c91137457876.jpg
" target="_blank"> <img alt="Click for enlarged picture" src="
https://hosting.photobucket.com/95288841-8654-4bf7-8fc9-a4aa78dce87f/bfcaf282-6be8-4b52-a3ed-c91137457876.jpg" width="600" /> </a></p>
<p>
<a href=" https://hosting.photobucket.com/95288841-8654-4bf7-8fc9-a4aa78dce87f/ce70fc61-9e1a-4169-aaad-8b67417656c0.jpg
" target="_blank"> <img alt="Click for enlarged picture" src="
https://hosting.photobucket.com/95288841-8654-4bf7-8fc9-a4aa78dce87f/ce70fc61-9e1a-4169-aaad-8b67417656c0.jpg" width="600" /> </a></p>
<p>
<a href=" https://hosting.photobucket.com/95288841-8654-4bf7-8fc9-a4aa78dce87f/94ca0e36-8710-458d-8194-9f71299f4d74.jpg
" target="_blank"> <img alt="Click for enlarged picture" src="
https://hosting.photobucket.com/95288841-8654-4bf7-8fc9-a4aa78dce87f/94ca0e36-8710-458d-8194-9f71299f4d74.jpg" width="600" /> </a></p>
<p>
<a href=" https://hosting.photobucket.com/95288841-8654-4bf7-8fc9-a4aa78dce87f/c6771f72-7191-4ca3-a792-3bb1ab3897b1.jpg
" target="_blank"> <img alt="Click for enlarged picture" src="
https://hosting.photobucket.com/95288841-8654-4bf7-8fc9-a4aa78dce87f/c6771f72-7191-4ca3-a792-3bb1ab3897b1.jpg" width="600" /> </a></p>
<p>
<a href=" https://hosting.photobucket.com/95288841-8654-4bf7-8fc9-a4aa78dce87f/c8fcfcb6-09f2-4398-a2fb-fa5065771e01.jpg
" target="_blank"> <img alt="Click for enlarged picture" src="
https://hosting.photobucket.com/95288841-8654-4bf7-8fc9-a4aa78dce87f/c8fcfcb6-09f2-4398-a2fb-fa5065771e01.jpg" width="600" /> </a></p>
<p>
<a href=" https://hosting.photobucket.com/95288841-8654-4bf7-8fc9-a4aa78dce87f/d7e187a8-d5b1-433b-b30d-091e54dcdddf.jpg
" target="_blank"> <img alt="Click for enlarged picture" src="
https://hosting.photobucket.com/95288841-8654-4bf7-8fc9-a4aa78dce87f/d7e187a8-d5b1-433b-b30d-091e54dcdddf.jpg" width="600" /> </a></p>
<p>
During the second weekend of the Exhibition, 28.02.-01.03., we organized a <strong>MINIATURE PAINTING WORKSHOP - Grimdark</strong>.</p>
<p>
The workshop was held over two days (the entire weekend) and participants painted up to three different figures for the game Trench Crusade. The focus of these lectures was on painting the popular grimdark style minis. The workshop presented paints and equipment, figure preparation, several miniature painting techniques from basic to advanced, and techniques and tricks for quickly and efficiently painting larger quantities of figures at once. Water-based acrylic paints were used as part of the workshop.</p>
<p>
<a href=" https://hosting.photobucket.com/95288841-8654-4bf7-8fc9-a4aa78dce87f/733d94b2-8e8d-4a4e-accd-b9168e32577e.jpg
" target="_blank"> <img alt="Click for enlarged picture" src="
https://hosting.photobucket.com/95288841-8654-4bf7-8fc9-a4aa78dce87f/733d94b2-8e8d-4a4e-accd-b9168e32577e.jpg
" width="600" /> </a></p>
<p>
<a href=" https://hosting.photobucket.com/95288841-8654-4bf7-8fc9-a4aa78dce87f/41020062-45b9-41cd-a357-fa23a389f390.jpg
" target="_blank"> <img alt="Click for enlarged picture" src="
https://hosting.photobucket.com/95288841-8654-4bf7-8fc9-a4aa78dce87f/41020062-45b9-41cd-a357-fa23a389f390.jpg
" width="600" /> </a></p>
<p>
<a href=" https://hosting.photobucket.com/95288841-8654-4bf7-8fc9-a4aa78dce87f/0c07cc55-596d-494d-972b-cd6a0dd6b8b7.jpg
" target="_blank"> <img alt="Click for enlarged picture" src="
https://hosting.photobucket.com/95288841-8654-4bf7-8fc9-a4aa78dce87f/0c07cc55-596d-494d-972b-cd6a0dd6b8b7.jpg" width="600" /> </a></p>
<p>
<a href=" https://hosting.photobucket.com/95288841-8654-4bf7-8fc9-a4aa78dce87f/c17dd356-08b1-48e1-b895-6296aed7f818.jpg
" target="_blank"> <img alt="Click for enlarged picture" src="
https://hosting.photobucket.com/95288841-8654-4bf7-8fc9-a4aa78dce87f/c17dd356-08b1-48e1-b895-6296aed7f818.jpg" width="600" /> </a></p>
<p>
On Wednesday 04.03.2026. the annual <strong>session of the Assembly</strong> was held, where we determined the guidelines for work in 2026.</p>
<p>
,</p>
<p>
<a href=" https://hosting.photobucket.com/95288841-8654-4bf7-8fc9-a4aa78dce87f/59484bd0-7edc-4aed-a04e-ae42900ba3e6.jpg
" target="_blank"> <img alt="Click for enlarged picture" src="
https://hosting.photobucket.com/95288841-8654-4bf7-8fc9-a4aa78dce87f/59484bd0-7edc-4aed-a04e-ae42900ba3e6.jpg
" width="600" /> </a></p>
<p>
On Sunday 08.03.2026. The exhibition was over, our exhibits safely stored, and the Gallery cleaned.</p>
<p>
<a href=" https://hosting.photobucket.com/95288841-8654-4bf7-8fc9-a4aa78dce87f/98af4280-0956-4cdb-b4a9-da40e3a5a44a.jpg
" target="_blank"> <img alt="Click for enlarged picture" src="
https://hosting.photobucket.com/95288841-8654-4bf7-8fc9-a4aa78dce87f/98af4280-0956-4cdb-b4a9-da40e3a5a44a.jpg" width="600" /> </a></p>
<p>
<a href=" https://hosting.photobucket.com/95288841-8654-4bf7-8fc9-a4aa78dce87f/3259b35e-1fc2-4a99-a3c5-c7984958d72b.jpg
" target="_blank"> <img alt="Click for enlarged picture" src="
https://hosting.photobucket.com/95288841-8654-4bf7-8fc9-a4aa78dce87f/3259b35e-1fc2-4a99-a3c5-c7984958d72b.jpg" width="600" /> </a></p>
<p>
The most important part of every year when holding this Exhibition is the social aspect, the socializing of our members both among themselves and with our international friends who visit us! With these few photos from our joint gatherings, we greet you until next year!</p>
<p>
<a href=" https://hosting.photobucket.com/95288841-8654-4bf7-8fc9-a4aa78dce87f/b9168e23-79b2-4d81-8a7d-7534062881a7.jpg
" target="_blank"> <img alt="Click for enlarged picture" src="
https://hosting.photobucket.com/95288841-8654-4bf7-8fc9-a4aa78dce87f/b9168e23-79b2-4d81-8a7d-7534062881a7.jpg " width="600" /> </a></p>
<p>
<a href=" https://hosting.photobucket.com/95288841-8654-4bf7-8fc9-a4aa78dce87f/edff925e-916c-4d78-953e-210abf3753d4.jpg
" target="_blank"> <img alt="Click for enlarged picture" src="
https://hosting.photobucket.com/95288841-8654-4bf7-8fc9-a4aa78dce87f/edff925e-916c-4d78-953e-210abf3753d4.jpg " width="600" /> </a></p>
<p>
<a href=" https://hosting.photobucket.com/95288841-8654-4bf7-8fc9-a4aa78dce87f/8bcb48fa-466b-43f8-8a4b-f15f6794b21e.jpg
" target="_blank"> <img alt="Click for enlarged picture" src="
https://hosting.photobucket.com/95288841-8654-4bf7-8fc9-a4aa78dce87f/8bcb48fa-466b-43f8-8a4b-f15f6794b21e.jpg" width="600" /> </a></p>
",
"content_hrv" => "<p>
<a href=" https://hosting.photobucket.com/95288841-8654-4bf7-8fc9-a4aa78dce87f/dc756f84-867d-4df4-acd8-5d43775cafc2.jpg
" target="_blank"> <img alt="Click for enlarged picture" src="
https://hosting.photobucket.com/95288841-8654-4bf7-8fc9-a4aa78dce87f/dc756f84-867d-4df4-acd8-5d43775cafc2.jpg" width="600" /> </a></p>
<p>
<strong>Izložba minijatura i maketa &quot;Agram 2026&quot;</strong> održala se ove godine od 19.2. do 08.03. Postavljanje izložbe je održano u srijedu 18.2. i sudjelovao je velik broj članova kao i prijatelja Udruge koji su izlagali svoje radove.</p>
<p>
<a href=" https://hosting.photobucket.com/95288841-8654-4bf7-8fc9-a4aa78dce87f/8529d6d4-76ea-4872-a9e6-748e04223a4e.jpg
" target="_blank"> <img alt="Click for enlarged picture" src="
https://hosting.photobucket.com/95288841-8654-4bf7-8fc9-a4aa78dce87f/8529d6d4-76ea-4872-a9e6-748e04223a4e.jpg
" width="600" /> </a></p>
<p>
<a href=" https://hosting.photobucket.com/95288841-8654-4bf7-8fc9-a4aa78dce87f/f3038937-f001-4ceb-b725-a330fcd64cee.jpg
" target="_blank"> <img alt="Click for enlarged picture" src="
https://hosting.photobucket.com/95288841-8654-4bf7-8fc9-a4aa78dce87f/f3038937-f001-4ceb-b725-a330fcd64cee.jpg
" width="600" /> </a></p>
<p>
<a href=" https://hosting.photobucket.com/95288841-8654-4bf7-8fc9-a4aa78dce87f/3575379e-e068-49e2-9d4d-c9a49531fdc2.jpg
" target="_blank"> <img alt="Click for enlarged picture" src="
https://hosting.photobucket.com/95288841-8654-4bf7-8fc9-a4aa78dce87f/3575379e-e068-49e2-9d4d-c9a49531fdc2.jpg" width="600" /> </a></p>
<p>
<a href=" https://hosting.photobucket.com/95288841-8654-4bf7-8fc9-a4aa78dce87f/e51713c7-2add-4f8f-ae37-e6eba25badff.jpg
" target="_blank"> <img alt="Click for enlarged picture" src="
https://hosting.photobucket.com/95288841-8654-4bf7-8fc9-a4aa78dce87f/e51713c7-2add-4f8f-ae37-e6eba25badff.jpg" width="600" /> </a></p>
<p>
<a href=" https://hosting.photobucket.com/95288841-8654-4bf7-8fc9-a4aa78dce87f/9c0bb546-50a8-483d-aeab-ab3b2ce9f094.jpg
" target="_blank"> <img alt="Click for enlarged picture" src="
https://hosting.photobucket.com/95288841-8654-4bf7-8fc9-a4aa78dce87f/9c0bb546-50a8-483d-aeab-ab3b2ce9f094.jpg" width="600" /> </a></p>
<p>
Otvorenje Izložbe održalo se u četvrtak, 19.2.2026. s početkom u 18:00h. Izložba je organizirana povodom na&scaron;eg dvadeset trećeg rođendana.</p>
<p>
<a href=" https://hosting.photobucket.com/95288841-8654-4bf7-8fc9-a4aa78dce87f/71c7bfc2-1ffc-43b9-9d5a-53e009f6b86d.jpg
" target="_blank"> <img alt="Click for enlarged picture" src="
https://hosting.photobucket.com/95288841-8654-4bf7-8fc9-a4aa78dce87f/71c7bfc2-1ffc-43b9-9d5a-53e009f6b86d.jpg" width="600" /> </a></p>
<p>
<a href=" https://hosting.photobucket.com/95288841-8654-4bf7-8fc9-a4aa78dce87f/007b4701-1d7c-4a67-a599-0539a2aa3191.jpg
" target="_blank"> <img alt="Click for enlarged picture" src="
https://hosting.photobucket.com/95288841-8654-4bf7-8fc9-a4aa78dce87f/007b4701-1d7c-4a67-a599-0539a2aa3191.jpg" width="600" /> </a></p>
<p>
<a href=" https://hosting.photobucket.com/95288841-8654-4bf7-8fc9-a4aa78dce87f/2c8090e2-8b95-4368-bb48-98876d680e15.jpg
" target="_blank"> <img alt="Click for enlarged picture" src="
https://hosting.photobucket.com/95288841-8654-4bf7-8fc9-a4aa78dce87f/2c8090e2-8b95-4368-bb48-98876d680e15.jpg" width="600" /> </a></p>
<p>
<a href=" https://hosting.photobucket.com/95288841-8654-4bf7-8fc9-a4aa78dce87f/375768ad-a8bb-49bf-9845-e46c896ba7ec.jpg
" target="_blank"> <img alt="Click for enlarged picture" src="
https://hosting.photobucket.com/95288841-8654-4bf7-8fc9-a4aa78dce87f/375768ad-a8bb-49bf-9845-e46c896ba7ec.jpg" width="600" /> </a></p>
<p>
<a href=" https://hosting.photobucket.com/95288841-8654-4bf7-8fc9-a4aa78dce87f/a93de974-4ccb-4876-85b0-4d066ae402b3.jpg
" target="_blank"> <img alt="Click for enlarged picture" src="
https://hosting.photobucket.com/95288841-8654-4bf7-8fc9-a4aa78dce87f/a93de974-4ccb-4876-85b0-4d066ae402b3.jpg" width="600" /> </a></p>
<p>
<a href=" https://hosting.photobucket.com/95288841-8654-4bf7-8fc9-a4aa78dce87f/d323ccc9-1b9a-4cb2-8adf-7019b0e217f4.jpg
" target="_blank"> <img alt="Click for enlarged picture" src="
https://hosting.photobucket.com/95288841-8654-4bf7-8fc9-a4aa78dce87f/d323ccc9-1b9a-4cb2-8adf-7019b0e217f4.jpg" width="600" /> </a></p>
<p>
<a href=" https://hosting.photobucket.com/95288841-8654-4bf7-8fc9-a4aa78dce87f/a5a66447-2d76-47ae-866d-4d512ef469a5.jpg
" target="_blank"> <img alt="Click for enlarged picture" src="
https://hosting.photobucket.com/95288841-8654-4bf7-8fc9-a4aa78dce87f/a5a66447-2d76-47ae-866d-4d512ef469a5.jpg" width="600" /> </a></p>
<p>
<a href=" https://hosting.photobucket.com/95288841-8654-4bf7-8fc9-a4aa78dce87f/3e7bcfc9-ba02-4f94-a6c3-79dfaea3639e.jpg
" target="_blank"> <img alt="Click for enlarged picture" src="
https://hosting.photobucket.com/95288841-8654-4bf7-8fc9-a4aa78dce87f/3e7bcfc9-ba02-4f94-a6c3-79dfaea3639e.jpg" width="600" /> </a></p>
<p>
<a href=" https://hosting.photobucket.com/95288841-8654-4bf7-8fc9-a4aa78dce87f/24e79466-4a9e-4b10-970c-caad235d260d.jpg
" target="_blank"> <img alt="Click for enlarged picture" src="
https://hosting.photobucket.com/95288841-8654-4bf7-8fc9-a4aa78dce87f/24e79466-4a9e-4b10-970c-caad235d260d.jpg" width="600" /> </a></p>
<p>
Kao i uvijek, Izložba je prikazivala presjek rada Udruge, njenih članova, polaznika njenih tečajeva i radionica te članova FB grupe Miniature Painters Croatia. U velikom broju vitrina na&scaron;le su se brojne minijature za stolne strate&scaron;ke igre, igre na tabli, a cijela jedna vitrina posvećena je nagrađenim izlo&scaron;cima sa prethodnih minijaturističkih natjecanja. Nekoliko vitrina bilo je posvećeno projektima koje Udruga već 23 godinu provodi poput Knjižnice i čitaonice UMS &bdquo;Agram&ldquo;, Radionice za izradu prostornih maketa i Radionice bojanja minijatura, ali i novih poput Agram Group Build, Agram Lego Sekcije i Back to Basics radionica bojanja za najmlađe.</p>
<p>
<a href=" https://hosting.photobucket.com/95288841-8654-4bf7-8fc9-a4aa78dce87f/fca84936-af71-44d3-9a4c-faeb26163899.jpg
" target="_blank"> <img alt="Click for enlarged picture" src="
https://hosting.photobucket.com/95288841-8654-4bf7-8fc9-a4aa78dce87f/fca84936-af71-44d3-9a4c-faeb26163899.jpg" width="600" /> </a></p>
<p>
<a href=" https://hosting.photobucket.com/95288841-8654-4bf7-8fc9-a4aa78dce87f/459bc5ac-8702-46f9-93b4-547deaabdef4.jpg
" target="_blank"> <img alt="Click for enlarged picture" src="
https://hosting.photobucket.com/95288841-8654-4bf7-8fc9-a4aa78dce87f/459bc5ac-8702-46f9-93b4-547deaabdef4.jpg" width="600" /> </a></p>
<p>
<a href=" https://hosting.photobucket.com/95288841-8654-4bf7-8fc9-a4aa78dce87f/91a04363-b2ef-4635-a046-7edf25ce7808.jpg
" target="_blank"> <img alt="Click for enlarged picture" src="
https://hosting.photobucket.com/95288841-8654-4bf7-8fc9-a4aa78dce87f/91a04363-b2ef-4635-a046-7edf25ce7808.jpg" width="600" /> </a></p>
<p>
<a href=" https://hosting.photobucket.com/95288841-8654-4bf7-8fc9-a4aa78dce87f/73256af5-fd5d-40b5-95e1-120e49c9be87.jpg
" target="_blank"> <img alt="Click for enlarged picture" src="
https://hosting.photobucket.com/95288841-8654-4bf7-8fc9-a4aa78dce87f/73256af5-fd5d-40b5-95e1-120e49c9be87.jpg" width="600" /> </a></p>
<p>
<a href=" https://hosting.photobucket.com/95288841-8654-4bf7-8fc9-a4aa78dce87f/979f9be5-23f3-4df9-91dc-ab71d6a10d64.jpg
" target="_blank"> <img alt="Click for enlarged picture" src="
https://hosting.photobucket.com/95288841-8654-4bf7-8fc9-a4aa78dce87f/979f9be5-23f3-4df9-91dc-ab71d6a10d64.jpg" width="600" /> </a></p>
<p>
<a href=" https://hosting.photobucket.com/95288841-8654-4bf7-8fc9-a4aa78dce87f/d0ff4379-183a-47b9-a740-9ddc283ebc29.jpg
" target="_blank"> <img alt="Click for enlarged picture" src="
https://hosting.photobucket.com/95288841-8654-4bf7-8fc9-a4aa78dce87f/d0ff4379-183a-47b9-a740-9ddc283ebc29.jpg" width="600" /> </a></p>
<p>
<a href=" https://hosting.photobucket.com/95288841-8654-4bf7-8fc9-a4aa78dce87f/4333e95e-bbbd-4f47-aaea-38a9c99e54d8.jpg
" target="_blank"> <img alt="Click for enlarged picture" src="
https://hosting.photobucket.com/95288841-8654-4bf7-8fc9-a4aa78dce87f/4333e95e-bbbd-4f47-aaea-38a9c99e54d8.jpg" width="600" /> </a></p>
<p>
<a href=" https://hosting.photobucket.com/95288841-8654-4bf7-8fc9-a4aa78dce87f/1372f8a2-b222-48ee-ae45-a90b5a354ef7.jpg
" target="_blank"> <img alt="Click for enlarged picture" src="
https://hosting.photobucket.com/95288841-8654-4bf7-8fc9-a4aa78dce87f/1372f8a2-b222-48ee-ae45-a90b5a354ef7.jpg" width="600" /> </a></p>
<p>
<a href=" https://hosting.photobucket.com/95288841-8654-4bf7-8fc9-a4aa78dce87f/6a1b4fd1-d982-4b06-9c5f-3cd40d6bf10a.jpg
" target="_blank"> <img alt="Click for enlarged picture" src="
https://hosting.photobucket.com/95288841-8654-4bf7-8fc9-a4aa78dce87f/6a1b4fd1-d982-4b06-9c5f-3cd40d6bf10a.jpg" width="600" /> </a></p>
<p>
<a href=" https://hosting.photobucket.com/95288841-8654-4bf7-8fc9-a4aa78dce87f/c2ec45e1-e0f3-463a-b254-cb2a38b53e14.jpg
" target="_blank"> <img alt="Click for enlarged picture" src="
https://hosting.photobucket.com/95288841-8654-4bf7-8fc9-a4aa78dce87f/c2ec45e1-e0f3-463a-b254-cb2a38b53e14.jpg" width="600" /> </a></p>
<p>
<a href=" https://hosting.photobucket.com/95288841-8654-4bf7-8fc9-a4aa78dce87f/17553b9a-0592-4f6a-a097-3f1a97e161f3.jpg
" target="_blank"> <img alt="Click for enlarged picture" src="
https://hosting.photobucket.com/95288841-8654-4bf7-8fc9-a4aa78dce87f/17553b9a-0592-4f6a-a097-3f1a97e161f3.jpg" width="600" /> </a></p>
<p>
<a href=" https://hosting.photobucket.com/95288841-8654-4bf7-8fc9-a4aa78dce87f/8658bd6b-dff2-4d24-8473-928d44d44480.jpg
" target="_blank"> <img alt="Click for enlarged picture" src="
https://hosting.photobucket.com/95288841-8654-4bf7-8fc9-a4aa78dce87f/8658bd6b-dff2-4d24-8473-928d44d44480.jpg" width="600" /> </a></p>
<p>
<a href=" https://hosting.photobucket.com/95288841-8654-4bf7-8fc9-a4aa78dce87f/ecab0ea7-f75b-4e31-a520-d088ad39fa17.jpg
" target="_blank"> <img alt="Click for enlarged picture" src="
https://hosting.photobucket.com/95288841-8654-4bf7-8fc9-a4aa78dce87f/ecab0ea7-f75b-4e31-a520-d088ad39fa17.jpg" width="600" /> </a></p>
<p>
<a href=" https://hosting.photobucket.com/95288841-8654-4bf7-8fc9-a4aa78dce87f/9495a2f5-8a82-41f2-abf4-9ade3db41d87.jpg
" target="_blank"> <img alt="Click for enlarged picture" src="
https://hosting.photobucket.com/95288841-8654-4bf7-8fc9-a4aa78dce87f/9495a2f5-8a82-41f2-abf4-9ade3db41d87.jpg" width="600" /> </a></p>
<p>
<a href=" https://hosting.photobucket.com/95288841-8654-4bf7-8fc9-a4aa78dce87f/362cc6fd-a5dd-474b-9b9f-aeab27d6dcfa.jpg
" target="_blank"> <img alt="Click for enlarged picture" src="
https://hosting.photobucket.com/95288841-8654-4bf7-8fc9-a4aa78dce87f/362cc6fd-a5dd-474b-9b9f-aeab27d6dcfa.jpg" width="600" /> </a></p>
<p>
Posebna čast nam je bila ugostiti na&scaron;eg gosta izlagača, Ninoslava Luka minijaturista iz Poreča koji nam se predstavio svojom kolekcijom povijesnih diorama.</p>
<p>
<a href=" https://hosting.photobucket.com/95288841-8654-4bf7-8fc9-a4aa78dce87f/ba1353de-e2bd-4340-9121-9056e287ed4a.jpg
" target="_blank"> <img alt="Click for enlarged picture" src="
https://hosting.photobucket.com/95288841-8654-4bf7-8fc9-a4aa78dce87f/ba1353de-e2bd-4340-9121-9056e287ed4a.jpg" width="600" /> </a></p>
<p>
<a href=" https://hosting.photobucket.com/95288841-8654-4bf7-8fc9-a4aa78dce87f/cea18506-1b50-4e5b-955c-0b9ca02d7826.jpg
" target="_blank"> <img alt="Click for enlarged picture" src="
https://hosting.photobucket.com/95288841-8654-4bf7-8fc9-a4aa78dce87f/cea18506-1b50-4e5b-955c-0b9ca02d7826.jpg" width="600" /> </a></p>
<p>
<a href=" https://hosting.photobucket.com/95288841-8654-4bf7-8fc9-a4aa78dce87f/1be85b41-e3b6-4536-b141-cd0da6eb38c1.jpg
" target="_blank"> <img alt="Click for enlarged picture" src="
https://hosting.photobucket.com/95288841-8654-4bf7-8fc9-a4aa78dce87f/1be85b41-e3b6-4536-b141-cd0da6eb38c1.jpg" width="600" /> </a></p>
<p>
<a href=" https://hosting.photobucket.com/95288841-8654-4bf7-8fc9-a4aa78dce87f/9e93b87d-ff3c-4b7b-8f06-5f9d3464a134.jpg
" target="_blank"> <img alt="Click for enlarged picture" src="
https://hosting.photobucket.com/95288841-8654-4bf7-8fc9-a4aa78dce87f/9e93b87d-ff3c-4b7b-8f06-5f9d3464a134.jpg" width="600" /> </a></p>
<p>
Tijekom prvog vikenda Izložbe, 21.-22.02.,održali smo 20. godi&scaron;nje međunarodno natjecanje u bojanju minijatura <strong>Black Queen Hobby and Miniature Painting Competition</strong>!</p>
<p>
<a href=" https://hosting.photobucket.com/95288841-8654-4bf7-8fc9-a4aa78dce87f/3056fb09-f66c-4dea-80a8-a4e72407429a.jpg
" target="_blank"> <img alt="Click for enlarged picture" src="
https://hosting.photobucket.com/95288841-8654-4bf7-8fc9-a4aa78dce87f/3056fb09-f66c-4dea-80a8-a4e72407429a.jpg" width="600" /> </a></p>
<p>
Kako su natjecatelji pristizali i prijavljivali se na natjecanje, na&scaron;e vrijedno osoblje je fotografiralo sve izlo&scaron;ke prije nego li su ih rasporedili po kategorijama i pažljivo ih postavili u staklene vitrine. Niti jutarnja okrijepa nije usfalila zahvaljujući na&scaron;im revnim volonterima.</p>
<p>
<a href=" https://hosting.photobucket.com/95288841-8654-4bf7-8fc9-a4aa78dce87f/1118089c-2b46-4a2c-b17d-dc92b66d1ffc.jpg
" target="_blank"> <img alt="Click for enlarged picture" src="
https://hosting.photobucket.com/95288841-8654-4bf7-8fc9-a4aa78dce87f/1118089c-2b46-4a2c-b17d-dc92b66d1ffc.jpg" width="600" /> </a></p>
<p>
<a href=" https://hosting.photobucket.com/95288841-8654-4bf7-8fc9-a4aa78dce87f/9fd3c272-9a69-4532-a09d-36497a20a820.jpg
" target="_blank"> <img alt="Click for enlarged picture" src="
https://hosting.photobucket.com/95288841-8654-4bf7-8fc9-a4aa78dce87f/9fd3c272-9a69-4532-a09d-36497a20a820.jpg" width="600" /> </a></p>
<p>
<a href=" https://hosting.photobucket.com/95288841-8654-4bf7-8fc9-a4aa78dce87f/86995e80-c502-45fb-80f5-c8fda27da3f9.jpg
" target="_blank"> <img alt="Click for enlarged picture" src="
https://hosting.photobucket.com/95288841-8654-4bf7-8fc9-a4aa78dce87f/86995e80-c502-45fb-80f5-c8fda27da3f9.jpg" width="600" /> </a></p>
<p>
U podne, sve vitrine su bile pune i natjecanje je moglo službeno početi.</p>
<p>
<a href=" https://hosting.photobucket.com/95288841-8654-4bf7-8fc9-a4aa78dce87f/bce59a4f-c3e3-4708-a3d6-25e81a894c24.jpg
" target="_blank"> <img alt="Click for enlarged picture" src="
https://hosting.photobucket.com/95288841-8654-4bf7-8fc9-a4aa78dce87f/bce59a4f-c3e3-4708-a3d6-25e81a894c24.jpg" width="600" /> </a></p>
<p>
<a href=" https://hosting.photobucket.com/95288841-8654-4bf7-8fc9-a4aa78dce87f/16a0a094-01aa-4e52-82cf-fdab00d74711.jpg
" target="_blank"> <img alt="Click for enlarged picture" src="
https://hosting.photobucket.com/95288841-8654-4bf7-8fc9-a4aa78dce87f/16a0a094-01aa-4e52-82cf-fdab00d74711.jpg" width="600" /> </a></p>
<p>
<a href=" https://hosting.photobucket.com/95288841-8654-4bf7-8fc9-a4aa78dce87f/0d3f4042-ff77-48d0-b332-add0fd08f7c3.jpg
" target="_blank"> <img alt="Click for enlarged picture" src="
https://hosting.photobucket.com/95288841-8654-4bf7-8fc9-a4aa78dce87f/0d3f4042-ff77-48d0-b332-add0fd08f7c3.jpg" width="600" /> </a></p>
<p>
<a href=" https://hosting.photobucket.com/95288841-8654-4bf7-8fc9-a4aa78dce87f/3711baf8-93f2-434a-aea9-a95288ca04dd.jpg
" target="_blank"> <img alt="Click for enlarged picture" src="
https://hosting.photobucket.com/95288841-8654-4bf7-8fc9-a4aa78dce87f/3711baf8-93f2-434a-aea9-a95288ca04dd.jpg" width="600" /> </a></p>
<p>
<a href=" https://hosting.photobucket.com/95288841-8654-4bf7-8fc9-a4aa78dce87f/53113b97-ec06-4409-95ba-95a5ad3f9720.jpg
" target="_blank"> <img alt="Click for enlarged picture" src="
https://hosting.photobucket.com/95288841-8654-4bf7-8fc9-a4aa78dce87f/53113b97-ec06-4409-95ba-95a5ad3f9720.jpg" width="600" /> </a></p>
<p>
<a href=" https://hosting.photobucket.com/95288841-8654-4bf7-8fc9-a4aa78dce87f/ab127858-193d-4976-bdb2-e27302722fca.jpg
" target="_blank"> <img alt="Click for enlarged picture" src="
https://hosting.photobucket.com/95288841-8654-4bf7-8fc9-a4aa78dce87f/ab127858-193d-4976-bdb2-e27302722fca.jpg" width="600" /> </a></p>
<p>
<a href=" https://hosting.photobucket.com/95288841-8654-4bf7-8fc9-a4aa78dce87f/3735af11-3fb6-4772-a8ff-5e0ff6ddf03a.jpg
" target="_blank"> <img alt="Click for enlarged picture" src="
https://hosting.photobucket.com/95288841-8654-4bf7-8fc9-a4aa78dce87f/3735af11-3fb6-4772-a8ff-5e0ff6ddf03a.jpg" width="600" /> </a></p>
<p>
<strong>Back To Basics radionice za najmlađe na Black Queen</strong></p>
<p>
Ove godine smo tijekom cijelog vikenda organizirali radionice bojanja minijatura za najmlađe koji su mogli po prvi puta obojati neku od na&scaron;ih vlastitih minijatura osmi&scaron;ljenih upravo za ovaj program!</p>
<p>
<a href=" https://hosting.photobucket.com/95288841-8654-4bf7-8fc9-a4aa78dce87f/6999be0c-8cc6-4947-a423-9427a2299724.jpg
" target="_blank"> <img alt="Click for enlarged picture" src="
https://hosting.photobucket.com/95288841-8654-4bf7-8fc9-a4aa78dce87f/6999be0c-8cc6-4947-a423-9427a2299724.jpg" width="600" /> </a></p>
<p>
<a href="https://hosting.photobucket.com/95288841-8654-4bf7-8fc9-a4aa78dce87f/835b05a5-f171-49df-afa6-da0692b89074.jpg" target="_blank"><img alt="Click for enlarged picture" src="https://hosting.photobucket.com/95288841-8654-4bf7-8fc9-a4aa78dce87f/835b05a5-f171-49df-afa6-da0692b89074.jpg" width="600" /></a></p>
<p>
<a href=" https://hosting.photobucket.com/95288841-8654-4bf7-8fc9-a4aa78dce87f/ef5dde13-84ee-4ea0-b9f3-28aaf703ef6d.jpg
" target="_blank"> <img alt="Click for enlarged picture" src="
https://hosting.photobucket.com/95288841-8654-4bf7-8fc9-a4aa78dce87f/ef5dde13-84ee-4ea0-b9f3-28aaf703ef6d.jpg" width="600" /> </a></p>
<p>
<strong>PRODAJNI KUTAK</strong></p>
<p>
Tijekom vikenda ugostili smo na&scaron;e sponzore sa njihovim prodajnim &scaron;tandovima: Swood.si i Carta Magica.</p>
<p>
<a href=" https://hosting.photobucket.com/95288841-8654-4bf7-8fc9-a4aa78dce87f/5ee9a49f-a387-435a-9110-572402b7191d.jpg
" target="_blank"> <img alt="Click for enlarged picture" src="
https://hosting.photobucket.com/95288841-8654-4bf7-8fc9-a4aa78dce87f/5ee9a49f-a387-435a-9110-572402b7191d.jpg" width="600" /> </a></p>
<p>
<a href=" https://hosting.photobucket.com/95288841-8654-4bf7-8fc9-a4aa78dce87f/47cf600f-b1eb-4655-bf06-305f6f21d5d2.jpg
" target="_blank"> <img alt="Click for enlarged picture" src="
https://hosting.photobucket.com/95288841-8654-4bf7-8fc9-a4aa78dce87f/47cf600f-b1eb-4655-bf06-305f6f21d5d2.jpg" width="600" /> </a></p>
<p>
<strong>OGLEDNE RADIONICE BOJANJA MINIJATURA</strong></p>
<p>
Prostor ZZTK omogućuje održavanje radionica tijekom vikenda u kino dvorani u podrumu, stoga smo tijekom vikenda organizirali i ogledne radionice. Rad predavača snimao se kamerom i projicirao na projekcijsko platno u dvorani. Veliko hvala na&scaron;im domaćim i inozemnim predavačima: Anžetu Zorku (SLO), doc.dr.sc. Wintonu Afriću (HR), Ivanu Knezoviću (UMS Agram) i Petru Knezoviću (HR).</p>
<p>
<a href=" https://hosting.photobucket.com/95288841-8654-4bf7-8fc9-a4aa78dce87f/e8d835be-ec99-49d7-bc9b-086e38573d1a.jpg
" target="_blank"> <img alt="Click for enlarged picture" src="
https://hosting.photobucket.com/95288841-8654-4bf7-8fc9-a4aa78dce87f/e8d835be-ec99-49d7-bc9b-086e38573d1a.jpg" width="600" /> </a></p>
<p>
<a href=" https://hosting.photobucket.com/95288841-8654-4bf7-8fc9-a4aa78dce87f/f3eba4c1-4637-4da9-8360-75f430355af4.jpg" target="_blank"> <img alt="Click for enlarged picture" src="
https://hosting.photobucket.com/95288841-8654-4bf7-8fc9-a4aa78dce87f/f3eba4c1-4637-4da9-8360-75f430355af4.jpg" width="600" /> </a></p>
<p>
<a href=" https://hosting.photobucket.com/95288841-8654-4bf7-8fc9-a4aa78dce87f/ef523854-4030-4579-aa38-403afda86c91.jpg
" target="_blank"> <img alt="Click for enlarged picture" src="
https://hosting.photobucket.com/95288841-8654-4bf7-8fc9-a4aa78dce87f/ef523854-4030-4579-aa38-403afda86c91.jpg" width="600" /> </a></p>
<p>
<a href=" https://hosting.photobucket.com/95288841-8654-4bf7-8fc9-a4aa78dce87f/dd0943c2-f4a8-40c3-b641-f6dcdd200380.jpg
" target="_blank"> <img alt="Click for enlarged picture" src="
https://hosting.photobucket.com/95288841-8654-4bf7-8fc9-a4aa78dce87f/dd0943c2-f4a8-40c3-b641-f6dcdd200380.jpg" width="600" /> </a></p>
<p>
<a href=" https://hosting.photobucket.com/95288841-8654-4bf7-8fc9-a4aa78dce87f/08b1626a-f6c7-43c9-b718-3e9a41b55ca6.jpg
" target="_blank"> <img alt="Click for enlarged picture" src="
https://hosting.photobucket.com/95288841-8654-4bf7-8fc9-a4aa78dce87f/08b1626a-f6c7-43c9-b718-3e9a41b55ca6.jpg" width="600" /> </a></p>
<p>
<a href=" https://hosting.photobucket.com/95288841-8654-4bf7-8fc9-a4aa78dce87f/91aca7f3-1af6-486d-b174-65079a63a1ea.jpg
" target="_blank"> <img alt="Click for enlarged picture" src="
https://hosting.photobucket.com/95288841-8654-4bf7-8fc9-a4aa78dce87f/91aca7f3-1af6-486d-b174-65079a63a1ea.jpg" width="600" /> </a></p>
<p>
<a href=" https://hosting.photobucket.com/95288841-8654-4bf7-8fc9-a4aa78dce87f/3821f2fb-fbe7-4096-adbc-7d8c981a3b56.jpg
" target="_blank"> <img alt="Click for enlarged picture" src="
https://hosting.photobucket.com/95288841-8654-4bf7-8fc9-a4aa78dce87f/3821f2fb-fbe7-4096-adbc-7d8c981a3b56.jpg" width="600" /> </a></p>
<p>
<a href=" https://hosting.photobucket.com/95288841-8654-4bf7-8fc9-a4aa78dce87f/2c7bb3c5-c0ec-4a96-b6bd-6a90ce5ce154.jpg
" target="_blank"> <img alt="Click for enlarged picture" src="
https://hosting.photobucket.com/95288841-8654-4bf7-8fc9-a4aa78dce87f/2c7bb3c5-c0ec-4a96-b6bd-6a90ce5ce154.jpg" width="600" /> </a></p>
<p>
<a href=" https://hosting.photobucket.com/95288841-8654-4bf7-8fc9-a4aa78dce87f/b646f4ee-21aa-4d12-8db3-6d33351d5aeb.jpg
" target="_blank"> <img alt="Click for enlarged picture" src="
https://hosting.photobucket.com/95288841-8654-4bf7-8fc9-a4aa78dce87f/b646f4ee-21aa-4d12-8db3-6d33351d5aeb.jpg" width="600" /> </a></p>
<p>
<a href=" https://hosting.photobucket.com/95288841-8654-4bf7-8fc9-a4aa78dce87f/fb5efc01-32cc-4119-90e3-188f51b30237.jpg
" target="_blank"> <img alt="Click for enlarged picture" src="
https://hosting.photobucket.com/95288841-8654-4bf7-8fc9-a4aa78dce87f/fb5efc01-32cc-4119-90e3-188f51b30237.jpg" width="600" /> </a></p>
<p>
<strong>NATJECANJE U BRZOM BOJANJU MINIJATURA</strong></p>
<p>
U nedjelju, 22.2. smo organizirali natjecanje u brzom bojanju minijatura. Po prvi puta smo koristili minijature koje su na&scaron; dizajn. Sudionici su imali 60 minuta vremena da obojaju og čarobnjaka.</p>
<p>
<a href=" https://hosting.photobucket.com/95288841-8654-4bf7-8fc9-a4aa78dce87f/106417a6-a047-4e0d-9f81-87858806052f.jpg
" target="_blank"> <img alt="Click for enlarged picture" src="
https://hosting.photobucket.com/95288841-8654-4bf7-8fc9-a4aa78dce87f/106417a6-a047-4e0d-9f81-87858806052f.jpg" width="600" /> </a></p>
<p>
<a href=" https://hosting.photobucket.com/95288841-8654-4bf7-8fc9-a4aa78dce87f/ac6853c7-6e34-4e07-a996-8d7d12744b67.jpg
" target="_blank"> <img alt="Click for enlarged picture" src="
https://hosting.photobucket.com/95288841-8654-4bf7-8fc9-a4aa78dce87f/ac6853c7-6e34-4e07-a996-8d7d12744b67.jpg" width="600" /> </a></p>
<p>
<a href=" https://hosting.photobucket.com/95288841-8654-4bf7-8fc9-a4aa78dce87f/ccb155fa-52c5-4a99-9515-f69a6836dce7.jpg
" target="_blank"> <img alt="Click for enlarged picture" src="
https://hosting.photobucket.com/95288841-8654-4bf7-8fc9-a4aa78dce87f/ccb155fa-52c5-4a99-9515-f69a6836dce7.jpg" width="600" /> </a></p>
<p>
<a href=" https://hosting.photobucket.com/95288841-8654-4bf7-8fc9-a4aa78dce87f/a29fedd0-97ea-45b1-85f9-7ea62188b2b2.jpg
" target="_blank"><img alt="Click for enlarged picture" src="
https://hosting.photobucket.com/95288841-8654-4bf7-8fc9-a4aa78dce87f/a29fedd0-97ea-45b1-85f9-7ea62188b2b2.jpg" width="600" /></a></p>
<p>
S time smo do&scaron;li do samoga kraja ovog predivnog vikenda i sve &scaron;to je preostalo je bila podjela nagrada i priznanja pobjednicima.</p>
<p>
<a href=" https://hosting.photobucket.com/95288841-8654-4bf7-8fc9-a4aa78dce87f/046ca4c8-0ae7-415e-abd3-e131d580c3ad.jpg
" target="_blank"> <img alt="Click for enlarged picture" src="
https://hosting.photobucket.com/95288841-8654-4bf7-8fc9-a4aa78dce87f/046ca4c8-0ae7-415e-abd3-e131d580c3ad.jpg" width="600" /> </a></p>
<p>
<a href=" https://hosting.photobucket.com/95288841-8654-4bf7-8fc9-a4aa78dce87f/cec0dcef-7acb-4a77-89de-271ed5410672.jpg
" target="_blank"> <img alt="Click for enlarged picture" src="
https://hosting.photobucket.com/95288841-8654-4bf7-8fc9-a4aa78dce87f/cec0dcef-7acb-4a77-89de-271ed5410672.jpg" width="600" /> </a></p>
<p>
<a href=" https://hosting.photobucket.com/95288841-8654-4bf7-8fc9-a4aa78dce87f/a495a5fc-31a2-4979-a970-0fa22c334354.jpg
" target="_blank"> <img alt="Click for enlarged picture" src="
https://hosting.photobucket.com/95288841-8654-4bf7-8fc9-a4aa78dce87f/a495a5fc-31a2-4979-a970-0fa22c334354.jpg" width="600" /> </a></p>
<p>
<strong>AGRAM ARENA &ndash; Leaving Asphodel Necropolis28 kampanja</strong></p>
<p>
Tijekom vikenda 21.-22.2. održali smo i novo međunarodno natjecanje Agram Arena! Ovoga puta na redu je bila stolna strate&scaron;ka igra Necropolis 28 za koju su na&scaron;i članovi osmislili dvodnevnu kampanju. Svaki sudionik je izradio svoju bandu vojnika, a velika većina i svoje vlastite table.</p>
<p>
<a href=" https://hosting.photobucket.com/95288841-8654-4bf7-8fc9-a4aa78dce87f/ac69b182-4bfc-4575-a6d3-fb3c8baba342.jpg
" target="_blank"> <img alt="Click for enlarged picture" src="
https://hosting.photobucket.com/95288841-8654-4bf7-8fc9-a4aa78dce87f/ac69b182-4bfc-4575-a6d3-fb3c8baba342.jpg" width="600" /> </a></p>
<p>
<a href=" https://hosting.photobucket.com/95288841-8654-4bf7-8fc9-a4aa78dce87f/289fed7b-e058-42d8-ba2d-cbd0463e98da.jpg
" target="_blank"> <img alt="Click for enlarged picture" src="
https://hosting.photobucket.com/95288841-8654-4bf7-8fc9-a4aa78dce87f/289fed7b-e058-42d8-ba2d-cbd0463e98da.jpg" width="600" /> </a></p>
<p>
<a href=" https://hosting.photobucket.com/95288841-8654-4bf7-8fc9-a4aa78dce87f/d92ebbee-859d-4441-8386-3d760b20b7a7.jpg
" target="_blank"> <img alt="Click for enlarged picture" src="
https://hosting.photobucket.com/95288841-8654-4bf7-8fc9-a4aa78dce87f/d92ebbee-859d-4441-8386-3d760b20b7a7.jpg" width="600" /> </a></p>
<p>
<a href=" https://hosting.photobucket.com/95288841-8654-4bf7-8fc9-a4aa78dce87f/09c59798-7871-425e-a075-3ca1cd91768a.jpg
" target="_blank"> <img alt="Click for enlarged picture" src="
https://hosting.photobucket.com/95288841-8654-4bf7-8fc9-a4aa78dce87f/09c59798-7871-425e-a075-3ca1cd91768a.jpg" width="600" /> </a></p>
<p>
<a href=" https://hosting.photobucket.com/95288841-8654-4bf7-8fc9-a4aa78dce87f/b2f3edc8-5a23-4552-9a2a-4027b286f327.jpg
" target="_blank"> <img alt="Click for enlarged picture" src="
https://hosting.photobucket.com/95288841-8654-4bf7-8fc9-a4aa78dce87f/b2f3edc8-5a23-4552-9a2a-4027b286f327.jpg" width="600" /> </a></p>
<p>
<a href=" https://hosting.photobucket.com/95288841-8654-4bf7-8fc9-a4aa78dce87f/2a9f43ac-b531-4746-b7bb-ac5a3356aab0.jpg
" target="_blank"> <img alt="Click for enlarged picture" src="
https://hosting.photobucket.com/95288841-8654-4bf7-8fc9-a4aa78dce87f/2a9f43ac-b531-4746-b7bb-ac5a3356aab0.jpg" width="600" /> </a></p>
<p>
<strong>DOGAĐANJA RADNIM DANIMA ZA VRIJEME IZLOŽBE</strong></p>
<p>
Tijekom naredna dva tjedna, na&scaron;i volonteri su radnim danima od 16:00 do 20:00, držali otvorene radionice bojanja minijatura. Postavljene su radne stanice za bojanje minijatura na kojoj su na&scaron;i posjetitelji mogli bojati minijature koje smo priredili (ili svoje ukoliko su ih donijeli) koristeći na&scaron;e materijale i alate.</p>
<p>
<a href=" https://hosting.photobucket.com/95288841-8654-4bf7-8fc9-a4aa78dce87f/6edf7765-42b5-417a-820f-fa5d907179a7.jpg
" target="_blank"> <img alt="Click for enlarged picture" src="
https://hosting.photobucket.com/95288841-8654-4bf7-8fc9-a4aa78dce87f/6edf7765-42b5-417a-820f-fa5d907179a7.jpg" width="600" /> </a></p>
<p>
<a href=" https://hosting.photobucket.com/95288841-8654-4bf7-8fc9-a4aa78dce87f/c084ebe2-f57b-4519-9b31-29bdc1155887.jpg
" target="_blank"> <img alt="Click for enlarged picture" src="
https://hosting.photobucket.com/95288841-8654-4bf7-8fc9-a4aa78dce87f/c084ebe2-f57b-4519-9b31-29bdc1155887.jpg" width="600" /> </a></p>
<p>
<a href=" https://hosting.photobucket.com/95288841-8654-4bf7-8fc9-a4aa78dce87f/37ff2272-f9b0-4b16-a363-1e6f6688c866.jpg
" target="_blank"> <img alt="Click for enlarged picture" src="
https://hosting.photobucket.com/95288841-8654-4bf7-8fc9-a4aa78dce87f/37ff2272-f9b0-4b16-a363-1e6f6688c866.jpg" width="600" /> </a></p>
<p>
<a href=" https://hosting.photobucket.com/95288841-8654-4bf7-8fc9-a4aa78dce87f/5f4f7968-ff50-4a01-98da-6ce8562930b4.jpg
" target="_blank"> <img alt="Click for enlarged picture" src="
https://hosting.photobucket.com/95288841-8654-4bf7-8fc9-a4aa78dce87f/5f4f7968-ff50-4a01-98da-6ce8562930b4.jpg" width="600" /> </a></p>
<p>
<a href=" https://hosting.photobucket.com/95288841-8654-4bf7-8fc9-a4aa78dce87f/cbb45319-d488-483c-bf9d-9af29852fc74.jpg
" target="_blank"> <img alt="Click for enlarged picture" src="
https://hosting.photobucket.com/95288841-8654-4bf7-8fc9-a4aa78dce87f/cbb45319-d488-483c-bf9d-9af29852fc74.jpg" width="600" /> </a></p>
<p>
<a href=" https://hosting.photobucket.com/95288841-8654-4bf7-8fc9-a4aa78dce87f/3dcca26c-d549-4af3-812a-a4a81b9a2310.jpg
" target="_blank"> <img alt="Click for enlarged picture" src="
https://hosting.photobucket.com/95288841-8654-4bf7-8fc9-a4aa78dce87f/3dcca26c-d549-4af3-812a-a4a81b9a2310.jpg" width="600" /> </a></p>
<p>
<a href=" https://hosting.photobucket.com/95288841-8654-4bf7-8fc9-a4aa78dce87f/4adf0fb6-3eab-4b40-b32d-d03eab4a9892.jpg
" target="_blank"> <img alt="Click for enlarged picture" src="
https://hosting.photobucket.com/95288841-8654-4bf7-8fc9-a4aa78dce87f/4adf0fb6-3eab-4b40-b32d-d03eab4a9892.jpg" width="600" /> </a></p>
<p>
<a href=" https://hosting.photobucket.com/95288841-8654-4bf7-8fc9-a4aa78dce87f/4732b58a-9a65-4d1c-a7d5-25513d34b108.jpg
" target="_blank"> <img alt="Click for enlarged picture" src="
https://hosting.photobucket.com/95288841-8654-4bf7-8fc9-a4aa78dce87f/4732b58a-9a65-4d1c-a7d5-25513d34b108.jpg" width="600" /> </a></p>
<p>
<a href=" https://hosting.photobucket.com/95288841-8654-4bf7-8fc9-a4aa78dce87f/274be330-31d5-4e25-95db-ec2f423a003c.jpg
" target="_blank"> <img alt="Click for enlarged picture" src="
https://hosting.photobucket.com/95288841-8654-4bf7-8fc9-a4aa78dce87f/274be330-31d5-4e25-95db-ec2f423a003c.jpg" width="600" /> </a></p>
<p>
<a href=" https://hosting.photobucket.com/95288841-8654-4bf7-8fc9-a4aa78dce87f/8e7b0a80-0f46-4d70-9789-a46976c713d2.jpg
" target="_blank"> <img alt="Click for enlarged picture" src="
https://hosting.photobucket.com/95288841-8654-4bf7-8fc9-a4aa78dce87f/8e7b0a80-0f46-4d70-9789-a46976c713d2.jpg" width="600" /> </a></p>
<p>
<a href=" https://hosting.photobucket.com/95288841-8654-4bf7-8fc9-a4aa78dce87f/8bbd4e96-b911-4f26-80fe-b1c57f29027b.jpg
" target="_blank"> <img alt="Click for enlarged picture" src="
https://hosting.photobucket.com/95288841-8654-4bf7-8fc9-a4aa78dce87f/8bbd4e96-b911-4f26-80fe-b1c57f29027b.jpg" width="600" /> </a></p>
<p>
<a href=" https://hosting.photobucket.com/95288841-8654-4bf7-8fc9-a4aa78dce87f/203a27be-8f10-459d-89b9-befb6b636b74.jpg
" target="_blank"> <img alt="Click for enlarged picture" src="
https://hosting.photobucket.com/95288841-8654-4bf7-8fc9-a4aa78dce87f/203a27be-8f10-459d-89b9-befb6b636b74.jpg" width="600" /> </a></p>
<p>
<a href=" https://hosting.photobucket.com/95288841-8654-4bf7-8fc9-a4aa78dce87f/5dc4358f-19d8-475f-a4af-9c29e9ed18d7.jpg
" target="_blank"> <img alt="Click for enlarged picture" src="
https://hosting.photobucket.com/95288841-8654-4bf7-8fc9-a4aa78dce87f/5dc4358f-19d8-475f-a4af-9c29e9ed18d7.jpg" width="600" /> </a></p>
<p>
<strong>BACK TO BASICS RADIONICE ZA NAJMLAĐE</strong></p>
<p>
Radnim danima od 17:00 do 18:00 održavali smo na&scaron;e nove radionice za najmlađe u kojima su na&scaron;i najmlađi polaznici bojali svoje prve minijature.</p>
<p>
<a href=" https://hosting.photobucket.com/95288841-8654-4bf7-8fc9-a4aa78dce87f/948af139-8fb5-4e28-a27c-404466e70d05.jpg
" target="_blank"> <img alt="Click for enlarged picture" src="
https://hosting.photobucket.com/95288841-8654-4bf7-8fc9-a4aa78dce87f/948af139-8fb5-4e28-a27c-404466e70d05.jpg" width="600" /> </a></p>
<p>
<a href=" https://hosting.photobucket.com/95288841-8654-4bf7-8fc9-a4aa78dce87f/bb3e20c2-bb21-4a3d-863a-74de08261467.jpg
" target="_blank"> <img alt="Click for enlarged picture" src="
https://hosting.photobucket.com/95288841-8654-4bf7-8fc9-a4aa78dce87f/bb3e20c2-bb21-4a3d-863a-74de08261467.jpg" width="600" /> </a></p>
<p>
<a href=" https://hosting.photobucket.com/95288841-8654-4bf7-8fc9-a4aa78dce87f/7316c760-98e3-4e3f-9261-d138aa7a5a6a.jpg
" target="_blank"> <img alt="Click for enlarged picture" src="
https://hosting.photobucket.com/95288841-8654-4bf7-8fc9-a4aa78dce87f/7316c760-98e3-4e3f-9261-d138aa7a5a6a.jpg" width="600" /> </a></p>
<p>
<a href=" https://hosting.photobucket.com/95288841-8654-4bf7-8fc9-a4aa78dce87f/68934b39-3d1f-4f43-b967-14b73c41a39e.jpg
" target="_blank"> <img alt="Click for enlarged picture" src="
https://hosting.photobucket.com/95288841-8654-4bf7-8fc9-a4aa78dce87f/68934b39-3d1f-4f43-b967-14b73c41a39e.jpg" width="600" /> </a></p>
<p>
<a href=" https://hosting.photobucket.com/95288841-8654-4bf7-8fc9-a4aa78dce87f/46125bce-a28d-494f-873a-3aeabdc1d6c2.jpg
" target="_blank"> <img alt="Click for enlarged picture" src="
https://hosting.photobucket.com/95288841-8654-4bf7-8fc9-a4aa78dce87f/46125bce-a28d-494f-873a-3aeabdc1d6c2.jpg" width="600" /> </a></p>
<p>
<a href=" https://hosting.photobucket.com/95288841-8654-4bf7-8fc9-a4aa78dce87f/3c58e0ad-77a9-44c8-b6bf-d9a55c514d43.jpg
" target="_blank"> <img alt="Click for enlarged picture" src="
https://hosting.photobucket.com/95288841-8654-4bf7-8fc9-a4aa78dce87f/3c58e0ad-77a9-44c8-b6bf-d9a55c514d43.jpg" width="600" /> </a></p>
<p>
<a href=" https://hosting.photobucket.com/95288841-8654-4bf7-8fc9-a4aa78dce87f/f891f0f0-051b-40ee-9676-cb03b0a9811b.jpg
" target="_blank"> <img alt="Click for enlarged picture" src="
https://hosting.photobucket.com/95288841-8654-4bf7-8fc9-a4aa78dce87f/f891f0f0-051b-40ee-9676-cb03b0a9811b.jpg" width="600" /> </a></p>
<p>
<strong>AGRAM LEGO SEKCIJA predavanje: FW-14b &ndash; Bolid F1 za budućnost</strong></p>
<p>
U srijedu 25.2.2026. u sklopu aktivnosti na&scaron;e Agram Lego Sekcije, na&scaron; dežurni strojar Marko Paunović je održao predavanje na temu bolida Formule 1 iz 1992.. Ulaz na predavanje je bio besplatan, a po zavr&scaron;etku su LEGO maketu bolida izradili članovi Lego sekcije</p>
<p>
<a href=" https://hosting.photobucket.com/95288841-8654-4bf7-8fc9-a4aa78dce87f/b2e14b1c-daa4-4314-8685-184377bc7e28.jpg
" target="_blank"> <img alt="Click for enlarged picture" src="
https://hosting.photobucket.com/95288841-8654-4bf7-8fc9-a4aa78dce87f/b2e14b1c-daa4-4314-8685-184377bc7e28.jpg" width="600" /> </a></p>
<p>
<a href=" https://hosting.photobucket.com/95288841-8654-4bf7-8fc9-a4aa78dce87f/31fb439a-77d3-4418-83ff-66c3af279cca.jpg" target="_blank"> <img alt="Click for enlarged picture" src="
https://hosting.photobucket.com/95288841-8654-4bf7-8fc9-a4aa78dce87f/31fb439a-77d3-4418-83ff-66c3af279cca.jpg" width="600" /> </a></p>
<p>
<a href=" https://hosting.photobucket.com/95288841-8654-4bf7-8fc9-a4aa78dce87f/bfcaf282-6be8-4b52-a3ed-c91137457876.jpg
" target="_blank"> <img alt="Click for enlarged picture" src="
https://hosting.photobucket.com/95288841-8654-4bf7-8fc9-a4aa78dce87f/bfcaf282-6be8-4b52-a3ed-c91137457876.jpg" width="600" /> </a></p>
<p>
<a href=" https://hosting.photobucket.com/95288841-8654-4bf7-8fc9-a4aa78dce87f/ce70fc61-9e1a-4169-aaad-8b67417656c0.jpg
" target="_blank"> <img alt="Click for enlarged picture" src="
https://hosting.photobucket.com/95288841-8654-4bf7-8fc9-a4aa78dce87f/ce70fc61-9e1a-4169-aaad-8b67417656c0.jpg" width="600" /> </a></p>
<p>
<a href=" https://hosting.photobucket.com/95288841-8654-4bf7-8fc9-a4aa78dce87f/94ca0e36-8710-458d-8194-9f71299f4d74.jpg
" target="_blank"> <img alt="Click for enlarged picture" src="
https://hosting.photobucket.com/95288841-8654-4bf7-8fc9-a4aa78dce87f/94ca0e36-8710-458d-8194-9f71299f4d74.jpg" width="600" /> </a></p>
<p>
<a href=" https://hosting.photobucket.com/95288841-8654-4bf7-8fc9-a4aa78dce87f/c6771f72-7191-4ca3-a792-3bb1ab3897b1.jpg
" target="_blank"> <img alt="Click for enlarged picture" src="
https://hosting.photobucket.com/95288841-8654-4bf7-8fc9-a4aa78dce87f/c6771f72-7191-4ca3-a792-3bb1ab3897b1.jpg" width="600" /> </a></p>
<p>
<a href=" https://hosting.photobucket.com/95288841-8654-4bf7-8fc9-a4aa78dce87f/c8fcfcb6-09f2-4398-a2fb-fa5065771e01.jpg
" target="_blank"> <img alt="Click for enlarged picture" src="
https://hosting.photobucket.com/95288841-8654-4bf7-8fc9-a4aa78dce87f/c8fcfcb6-09f2-4398-a2fb-fa5065771e01.jpg" width="600" /> </a></p>
<p>
<a href=" https://hosting.photobucket.com/95288841-8654-4bf7-8fc9-a4aa78dce87f/d7e187a8-d5b1-433b-b30d-091e54dcdddf.jpg
" target="_blank"> <img alt="Click for enlarged picture" src="
https://hosting.photobucket.com/95288841-8654-4bf7-8fc9-a4aa78dce87f/d7e187a8-d5b1-433b-b30d-091e54dcdddf.jpg" width="600" /> </a></p>
<p>
Tijekom drugog vikenda Izložbe, 28.02.-01.03., organizirali smo <strong>RADIONICU BOJANJA MINIJATURA &ndash; Grimdark stil</strong>.</p>
<p>
Radionica se provodila kroz dva dana (cijeli vikend) i polaznici su bojali tri različite figure za igru Trench Crusade. Fokus ovih predavanja bilo je bojenje popularnim Grimdark stilom. Na radionici su bile predstavljene boje i pribor, priprema figura, nekoliko tehnika bojenja minijatura od osnovnih do naprednijih, te tehnike i trikovi za brzo i efikasno bojenje većih količina figura odjednom. U sklopu radionice kori&scaron;tene su akrilne boje na bazi vode.</p>
<p>
<a href=" https://hosting.photobucket.com/95288841-8654-4bf7-8fc9-a4aa78dce87f/733d94b2-8e8d-4a4e-accd-b9168e32577e.jpg
" target="_blank"> <img alt="Click for enlarged picture" src="
https://hosting.photobucket.com/95288841-8654-4bf7-8fc9-a4aa78dce87f/733d94b2-8e8d-4a4e-accd-b9168e32577e.jpg
" width="600" /> </a></p>
<p>
<a href=" https://hosting.photobucket.com/95288841-8654-4bf7-8fc9-a4aa78dce87f/41020062-45b9-41cd-a357-fa23a389f390.jpg
" target="_blank"> <img alt="Click for enlarged picture" src="
https://hosting.photobucket.com/95288841-8654-4bf7-8fc9-a4aa78dce87f/41020062-45b9-41cd-a357-fa23a389f390.jpg
" width="600" /> </a></p>
<p>
<a href=" https://hosting.photobucket.com/95288841-8654-4bf7-8fc9-a4aa78dce87f/0c07cc55-596d-494d-972b-cd6a0dd6b8b7.jpg
" target="_blank"> <img alt="Click for enlarged picture" src="
https://hosting.photobucket.com/95288841-8654-4bf7-8fc9-a4aa78dce87f/0c07cc55-596d-494d-972b-cd6a0dd6b8b7.jpg" width="600" /> </a></p>
<p>
<a href=" https://hosting.photobucket.com/95288841-8654-4bf7-8fc9-a4aa78dce87f/c17dd356-08b1-48e1-b895-6296aed7f818.jpg
" target="_blank"> <img alt="Click for enlarged picture" src="
https://hosting.photobucket.com/95288841-8654-4bf7-8fc9-a4aa78dce87f/c17dd356-08b1-48e1-b895-6296aed7f818.jpg" width="600" /> </a></p>
<p>
U srijedu 04.03.2026. održana je godi&scaron;nja <strong>sjednica Skup&scaron;tine</strong> na kojoj smo odredili smjernice rada u 2026.</p>
<p>
<a href=" https://hosting.photobucket.com/95288841-8654-4bf7-8fc9-a4aa78dce87f/59484bd0-7edc-4aed-a04e-ae42900ba3e6.jpg
" target="_blank"> <img alt="Click for enlarged picture" src="
https://hosting.photobucket.com/95288841-8654-4bf7-8fc9-a4aa78dce87f/59484bd0-7edc-4aed-a04e-ae42900ba3e6.jpg
" width="600" /> </a></p>
<p>
U nedjelju 08.03.2026. Izložba je zavr&scaron;ena, na&scaron;i eksponati sigurno spremljeni, a Galerija poči&scaron;ćena.</p>
<p>
<a href=" https://hosting.photobucket.com/95288841-8654-4bf7-8fc9-a4aa78dce87f/98af4280-0956-4cdb-b4a9-da40e3a5a44a.jpg
" target="_blank"> <img alt="Click for enlarged picture" src="
https://hosting.photobucket.com/95288841-8654-4bf7-8fc9-a4aa78dce87f/98af4280-0956-4cdb-b4a9-da40e3a5a44a.jpg" width="600" /> </a></p>
<p>
<a href=" https://hosting.photobucket.com/95288841-8654-4bf7-8fc9-a4aa78dce87f/3259b35e-1fc2-4a99-a3c5-c7984958d72b.jpg
" target="_blank"> <img alt="Click for enlarged picture" src="
https://hosting.photobucket.com/95288841-8654-4bf7-8fc9-a4aa78dce87f/3259b35e-1fc2-4a99-a3c5-c7984958d72b.jpg" width="600" /> </a></p>
<p>
Najbitniji dio svake godine prilikom održavanja ove Izložbe je socijalni aspekt, druženje na&scaron;ih članova kako međusobno tako i sa na&scaron;im međunarodnim prijateljima koji nas posjećuju! Uz ovih par fotografija sa zajedničkih druženja, pozdravljamo vas do sljedeće godine!</p>
<p>
<a href=" https://hosting.photobucket.com/95288841-8654-4bf7-8fc9-a4aa78dce87f/b9168e23-79b2-4d81-8a7d-7534062881a7.jpg
" target="_blank"> <img alt="Click for enlarged picture" src="
https://hosting.photobucket.com/95288841-8654-4bf7-8fc9-a4aa78dce87f/b9168e23-79b2-4d81-8a7d-7534062881a7.jpg " width="600" /> </a></p>
<p>
<a href=" https://hosting.photobucket.com/95288841-8654-4bf7-8fc9-a4aa78dce87f/edff925e-916c-4d78-953e-210abf3753d4.jpg
" target="_blank"> <img alt="Click for enlarged picture" src="
https://hosting.photobucket.com/95288841-8654-4bf7-8fc9-a4aa78dce87f/edff925e-916c-4d78-953e-210abf3753d4.jpg " width="600" /> </a></p>
<p>
<a href=" https://hosting.photobucket.com/95288841-8654-4bf7-8fc9-a4aa78dce87f/8bcb48fa-466b-43f8-8a4b-f15f6794b21e.jpg
" target="_blank"> <img alt="Click for enlarged picture" src="
https://hosting.photobucket.com/95288841-8654-4bf7-8fc9-a4aa78dce87f/8bcb48fa-466b-43f8-8a4b-f15f6794b21e.jpg" width="600" /> </a></p>
",
"created" => "2026-03-12 08:54:10",
"modified" => "2026-03-12 08:58:37"
),
"Member" => array(
"id" => "35",
"group_id" => "1",
"first_name" => "Marko",
"last_name" => "Paunović",
"first_name_mask" => "marko",
"last_name_mask" => "paunovic",
"username" => "marko",
"password" => "*****",
"born" => "2033-03-07 20:35:00",
"created" => "2009-06-02 20:37:03"
)
)</pre><pre class="stack-trace">include - APP/views/elements/latestArticles.ctp, line 7
View::_render() - CORE/cake/libs/view/view.php, line 736
View::element() - CORE/cake/libs/view/view.php, line 397
include - APP/views/home/index.ctp, line 49
View::_render() - CORE/cake/libs/view/view.php, line 736
View::render() - CORE/cake/libs/view/view.php, line 431
Controller::render() - CORE/cake/libs/controller/controller.php, line 909
Dispatcher::_invoke() - CORE/cake/dispatcher.php, line 207
Dispatcher::dispatch() - CORE/cake/dispatcher.php, line 171
[main] - APP/webroot/index.php, line 86</pre></div></pre><pre class="cake-debug"><a href="javascript:void(0);" onclick="document.getElementById('cakeErr8-trace').style.display = (document.getElementById('cakeErr8-trace').style.display == 'none' ? '' : 'none');"><b>Notice</b> (8)</a>: Undefined index: mask_dok [<b>APP/views/elements/latestArticles.ctp</b>, line <b>10</b>]<div id="cakeErr8-trace" class="cake-stack-trace" style="display: none;"><a href="javascript:void(0);" onclick="document.getElementById('cakeErr8-code').style.display = (document.getElementById('cakeErr8-code').style.display == 'none' ? '' : 'none')">Code</a> | <a href="javascript:void(0);" onclick="document.getElementById('cakeErr8-context').style.display = (document.getElementById('cakeErr8-context').style.display == 'none' ? '' : 'none')">Context</a><div id="cakeErr8-code" class="cake-code-dump" style="display: none;"><pre><code><span style="color: #000000"></span></code>
<code><span style="color: #000000"> if (Configure::read() > 0) {</span></code>
<span class="code-highlight"><code><span style="color: #000000"> include ($___viewFn);</span></code></span></pre></div><pre id="cakeErr8-context" class="cake-context" style="display: none;">$___viewFn = "/home/martin/apps/agram/app/views/elements/latestArticles.ctp"
$___dataForView = array(
"lang" => "dok",
"otherLangs" => array(
"eng",
"hrv"
),
"globalNav" => array(
array(),
array(),
array(),
array(),
array(),
array(),
array(),
array(),
array(),
array(),
array(),
array(),
array(),
array(),
array(),
array(),
array(),
array(),
array(),
array(),
array(),
array(),
array(),
array(),
array(),
array(),
array()
),
"breadCrumbs" => array(
array()
),
"pageContents" => array(
"home_who_we_are" => null
),
"userData" => null,
"announcements" => array(
array(),
array(),
array()
),
"cache" => array(
"time" => "+1 day",
"key" => "dok"
),
"form" => FormHelper
FormHelper::$helpers = array
FormHelper::$fieldset = array
FormHelper::$__options = array
FormHelper::$fields = array
FormHelper::$requestType = NULL
FormHelper::$defaultModel = NULL
FormHelper::$_inputDefaults = array
FormHelper::$_lastAction = ""
FormHelper::$base = ""
FormHelper::$webroot = "/"
FormHelper::$theme = NULL
FormHelper::$here = "/dok"
FormHelper::$params = array
FormHelper::$action = "index"
FormHelper::$plugin = NULL
FormHelper::$data = NULL
FormHelper::$namedArgs = NULL
FormHelper::$argSeparator = NULL
FormHelper::$validationErrors = NULL
FormHelper::$tags = array
FormHelper::$__tainted = NULL
FormHelper::$__cleaned = NULL
FormHelper::$Html = HtmlHelper object,
"text" => TextHelper
TextHelper::$helpers = NULL
TextHelper::$base = ""
TextHelper::$webroot = "/"
TextHelper::$theme = NULL
TextHelper::$here = "/dok"
TextHelper::$params = array
TextHelper::$action = "index"
TextHelper::$plugin = NULL
TextHelper::$data = NULL
TextHelper::$namedArgs = NULL
TextHelper::$argSeparator = NULL
TextHelper::$validationErrors = NULL
TextHelper::$tags = array
TextHelper::$__tainted = NULL
TextHelper::$__cleaned = NULL,
"stringer" => StringerHelper
StringerHelper::$helpers = array
StringerHelper::$base = ""
StringerHelper::$webroot = "/"
StringerHelper::$theme = NULL
StringerHelper::$here = "/dok"
StringerHelper::$params = array
StringerHelper::$action = "index"
StringerHelper::$plugin = NULL
StringerHelper::$data = NULL
StringerHelper::$namedArgs = NULL
StringerHelper::$argSeparator = NULL
StringerHelper::$validationErrors = NULL
StringerHelper::$tags = array
StringerHelper::$__tainted = NULL
StringerHelper::$__cleaned = NULL
StringerHelper::$Html = HtmlHelper object
StringerHelper::$Link = LinkHelper object
StringerHelper::$Text = TextHelper object,
"menu" => MenuHelper
MenuHelper::$helpers = array
MenuHelper::$base = ""
MenuHelper::$webroot = "/"
MenuHelper::$theme = NULL
MenuHelper::$here = "/dok"
MenuHelper::$params = array
MenuHelper::$action = "index"
MenuHelper::$plugin = NULL
MenuHelper::$data = NULL
MenuHelper::$namedArgs = NULL
MenuHelper::$argSeparator = NULL
MenuHelper::$validationErrors = NULL
MenuHelper::$tags = array
MenuHelper::$__tainted = NULL
MenuHelper::$__cleaned = NULL
MenuHelper::$Link = LinkHelper object,
"session" => SessionHelper
SessionHelper::$helpers = array
SessionHelper::$__active = true
SessionHelper::$valid = false
SessionHelper::$error = false
SessionHelper::$_userAgent = "f9a8355d006790ee743ededbb1f6e3bd"
SessionHelper::$path = "/"
SessionHelper::$lastError = NULL
SessionHelper::$security = "medium"
SessionHelper::$time = 1773314240
SessionHelper::$sessionTime = 1773326240
SessionHelper::$cookieLifeTime = false
SessionHelper::$watchKeys = array
SessionHelper::$id = NULL
SessionHelper::$host = NULL
SessionHelper::$timeout = NULL
SessionHelper::$base = ""
SessionHelper::$webroot = "/"
SessionHelper::$here = "/dok"
SessionHelper::$params = array
SessionHelper::$action = "index"
SessionHelper::$data = NULL
SessionHelper::$theme = NULL
SessionHelper::$plugin = NULL,
"html" => HtmlHelper
HtmlHelper::$tags = array
HtmlHelper::$_crumbs = array
HtmlHelper::$__includedScripts = array
HtmlHelper::$_scriptBlockOptions = array
HtmlHelper::$__docTypes = array
HtmlHelper::$helpers = NULL
HtmlHelper::$base = ""
HtmlHelper::$webroot = "/"
HtmlHelper::$theme = NULL
HtmlHelper::$here = "/dok"
HtmlHelper::$params = array
HtmlHelper::$action = "index"
HtmlHelper::$plugin = NULL
HtmlHelper::$data = NULL
HtmlHelper::$namedArgs = NULL
HtmlHelper::$argSeparator = NULL
HtmlHelper::$validationErrors = NULL
HtmlHelper::$__tainted = NULL
HtmlHelper::$__cleaned = NULL,
"link" => LinkHelper
LinkHelper::$helpers = array
LinkHelper::$lang = "dok"
LinkHelper::$defaultLang = "hrv"
LinkHelper::$base = ""
LinkHelper::$webroot = "/"
LinkHelper::$theme = NULL
LinkHelper::$here = "/dok"
LinkHelper::$params = array
LinkHelper::$action = "index"
LinkHelper::$plugin = NULL
LinkHelper::$data = NULL
LinkHelper::$namedArgs = NULL
LinkHelper::$argSeparator = NULL
LinkHelper::$validationErrors = NULL
LinkHelper::$tags = array
LinkHelper::$__tainted = NULL
LinkHelper::$__cleaned = NULL
LinkHelper::$Html = HtmlHelper object
LinkHelper::$Session = SessionHelper object
)
$loadHelpers = false
$cached = false
$loadedHelpers = array()
$lang = "dok"
$otherLangs = array(
"eng",
"hrv"
)
$globalNav = array(
array(
"Page" => array()
),
array(
"Page" => array()
),
array(
"Page" => array()
),
array(
"Page" => array()
),
array(
"Page" => array()
),
array(
"Page" => array()
),
array(
"Page" => array()
),
array(
"Page" => array()
),
array(
"Page" => array()
),
array(
"Page" => array()
),
array(
"Page" => array()
),
array(
"Page" => array()
),
array(
"Page" => array()
),
array(
"Page" => array()
),
array(
"Page" => array()
),
array(
"Page" => array()
),
array(
"Page" => array()
),
array(
"Page" => array()
),
array(
"Page" => array()
),
array(
"Page" => array()
),
array(
"Page" => array()
),
array(
"Page" => array()
),
array(
"Page" => array()
),
array(
"Page" => array()
),
array(
"Page" => array()
),
array(
"Page" => array()
),
array(
"Page" => array()
)
)
$breadCrumbs = array(
array(
"Page" => array()
)
)
$pageContents = array(
"home_who_we_are" => null
)
$userData = null
$announcements = array(
array(
"Announcement" => array()
),
array(
"Announcement" => array()
),
array(
"Announcement" => array()
)
)
$cache = array(
"time" => "+1 day",
"key" => "dok"
)
$form = FormHelper
FormHelper::$helpers = array
FormHelper::$fieldset = array
FormHelper::$__options = array
FormHelper::$fields = array
FormHelper::$requestType = NULL
FormHelper::$defaultModel = NULL
FormHelper::$_inputDefaults = array
FormHelper::$_lastAction = ""
FormHelper::$base = ""
FormHelper::$webroot = "/"
FormHelper::$theme = NULL
FormHelper::$here = "/dok"
FormHelper::$params = array
FormHelper::$action = "index"
FormHelper::$plugin = NULL
FormHelper::$data = NULL
FormHelper::$namedArgs = NULL
FormHelper::$argSeparator = NULL
FormHelper::$validationErrors = NULL
FormHelper::$tags = array
FormHelper::$__tainted = NULL
FormHelper::$__cleaned = NULL
FormHelper::$Html = HtmlHelper object
$text = TextHelper
TextHelper::$helpers = NULL
TextHelper::$base = ""
TextHelper::$webroot = "/"
TextHelper::$theme = NULL
TextHelper::$here = "/dok"
TextHelper::$params = array
TextHelper::$action = "index"
TextHelper::$plugin = NULL
TextHelper::$data = NULL
TextHelper::$namedArgs = NULL
TextHelper::$argSeparator = NULL
TextHelper::$validationErrors = NULL
TextHelper::$tags = array
TextHelper::$__tainted = NULL
TextHelper::$__cleaned = NULL
$stringer = StringerHelper
StringerHelper::$helpers = array
StringerHelper::$base = ""
StringerHelper::$webroot = "/"
StringerHelper::$theme = NULL
StringerHelper::$here = "/dok"
StringerHelper::$params = array
StringerHelper::$action = "index"
StringerHelper::$plugin = NULL
StringerHelper::$data = NULL
StringerHelper::$namedArgs = NULL
StringerHelper::$argSeparator = NULL
StringerHelper::$validationErrors = NULL
StringerHelper::$tags = array
StringerHelper::$__tainted = NULL
StringerHelper::$__cleaned = NULL
StringerHelper::$Html = HtmlHelper object
StringerHelper::$Link = LinkHelper object
StringerHelper::$Text = TextHelper object
$menu = MenuHelper
MenuHelper::$helpers = array
MenuHelper::$base = ""
MenuHelper::$webroot = "/"
MenuHelper::$theme = NULL
MenuHelper::$here = "/dok"
MenuHelper::$params = array
MenuHelper::$action = "index"
MenuHelper::$plugin = NULL
MenuHelper::$data = NULL
MenuHelper::$namedArgs = NULL
MenuHelper::$argSeparator = NULL
MenuHelper::$validationErrors = NULL
MenuHelper::$tags = array
MenuHelper::$__tainted = NULL
MenuHelper::$__cleaned = NULL
MenuHelper::$Link = LinkHelper object
$session = SessionHelper
SessionHelper::$helpers = array
SessionHelper::$__active = true
SessionHelper::$valid = false
SessionHelper::$error = false
SessionHelper::$_userAgent = "f9a8355d006790ee743ededbb1f6e3bd"
SessionHelper::$path = "/"
SessionHelper::$lastError = NULL
SessionHelper::$security = "medium"
SessionHelper::$time = 1773314240
SessionHelper::$sessionTime = 1773326240
SessionHelper::$cookieLifeTime = false
SessionHelper::$watchKeys = array
SessionHelper::$id = NULL
SessionHelper::$host = NULL
SessionHelper::$timeout = NULL
SessionHelper::$base = ""
SessionHelper::$webroot = "/"
SessionHelper::$here = "/dok"
SessionHelper::$params = array
SessionHelper::$action = "index"
SessionHelper::$data = NULL
SessionHelper::$theme = NULL
SessionHelper::$plugin = NULL
$html = HtmlHelper
HtmlHelper::$tags = array
HtmlHelper::$_crumbs = array
HtmlHelper::$__includedScripts = array
HtmlHelper::$_scriptBlockOptions = array
HtmlHelper::$__docTypes = array
HtmlHelper::$helpers = NULL
HtmlHelper::$base = ""
HtmlHelper::$webroot = "/"
HtmlHelper::$theme = NULL
HtmlHelper::$here = "/dok"
HtmlHelper::$params = array
HtmlHelper::$action = "index"
HtmlHelper::$plugin = NULL
HtmlHelper::$data = NULL
HtmlHelper::$namedArgs = NULL
HtmlHelper::$argSeparator = NULL
HtmlHelper::$validationErrors = NULL
HtmlHelper::$__tainted = NULL
HtmlHelper::$__cleaned = NULL
$link = LinkHelper
LinkHelper::$helpers = array
LinkHelper::$lang = "dok"
LinkHelper::$defaultLang = "hrv"
LinkHelper::$base = ""
LinkHelper::$webroot = "/"
LinkHelper::$theme = NULL
LinkHelper::$here = "/dok"
LinkHelper::$params = array
LinkHelper::$action = "index"
LinkHelper::$plugin = NULL
LinkHelper::$data = NULL
LinkHelper::$namedArgs = NULL
LinkHelper::$argSeparator = NULL
LinkHelper::$validationErrors = NULL
LinkHelper::$tags = array
LinkHelper::$__tainted = NULL
LinkHelper::$__cleaned = NULL
LinkHelper::$Html = HtmlHelper object
LinkHelper::$Session = SessionHelper object
$articles = array(
array(
"Article" => array(),
"Member" => array()
),
array(
"Article" => array(),
"Member" => array()
),
array(
"Article" => array(),
"Member" => array()
),
array(
"Article" => array(),
"Member" => array()
),
array(
"Article" => array(),
"Member" => array()
)
)
$article = array(
"Article" => array(
"id" => "496",
"member_id" => "35",
"title_eng" => "Exhibition of Miniatures and Tabletop Scenery 2026",
"title_hrv" => "Izložba minijatura i maketa Agram 2026",
"mask_eng" => "exhibition_of_miniatures_and_tabletop_scenery_2026",
"mask_hrv" => "izlozba_minijatura_i_maketa_agram_2026",
"content_eng" => "<p>
<a href=" https://hosting.photobucket.com/95288841-8654-4bf7-8fc9-a4aa78dce87f/dc756f84-867d-4df4-acd8-5d43775cafc2.jpg
" target="_blank"> <img alt="Click for enlarged picture" src="
https://hosting.photobucket.com/95288841-8654-4bf7-8fc9-a4aa78dce87f/dc756f84-867d-4df4-acd8-5d43775cafc2.jpg" width="600" /> </a></p>
<p>
<strong>The exhibition of miniatures and models &quot;Agram 2026&quot;</strong> was held this year from 19.2. to 08.03. 2026. The exhibition was set up on Wednesday 18.2. and was attended by a large number of members and friends of the Association who exhibited their works.</p>
<p>
&nbsp;</p>
<p>
<a href=" https://hosting.photobucket.com/95288841-8654-4bf7-8fc9-a4aa78dce87f/8529d6d4-76ea-4872-a9e6-748e04223a4e.jpg
" target="_blank"> <img alt="Click for enlarged picture" src="
https://hosting.photobucket.com/95288841-8654-4bf7-8fc9-a4aa78dce87f/8529d6d4-76ea-4872-a9e6-748e04223a4e.jpg
" width="600" /> </a></p>
<p>
<a href=" https://hosting.photobucket.com/95288841-8654-4bf7-8fc9-a4aa78dce87f/f3038937-f001-4ceb-b725-a330fcd64cee.jpg
" target="_blank"> <img alt="Click for enlarged picture" src="
https://hosting.photobucket.com/95288841-8654-4bf7-8fc9-a4aa78dce87f/f3038937-f001-4ceb-b725-a330fcd64cee.jpg
" width="600" /> </a></p>
<p>
<a href=" https://hosting.photobucket.com/95288841-8654-4bf7-8fc9-a4aa78dce87f/3575379e-e068-49e2-9d4d-c9a49531fdc2.jpg
" target="_blank"> <img alt="Click for enlarged picture" src="
https://hosting.photobucket.com/95288841-8654-4bf7-8fc9-a4aa78dce87f/3575379e-e068-49e2-9d4d-c9a49531fdc2.jpg" width="600" /> </a></p>
<p>
<a href=" https://hosting.photobucket.com/95288841-8654-4bf7-8fc9-a4aa78dce87f/e51713c7-2add-4f8f-ae37-e6eba25badff.jpg
" target="_blank"> <img alt="Click for enlarged picture" src="
https://hosting.photobucket.com/95288841-8654-4bf7-8fc9-a4aa78dce87f/e51713c7-2add-4f8f-ae37-e6eba25badff.jpg" width="600" /> </a></p>
<p>
<a href=" https://hosting.photobucket.com/95288841-8654-4bf7-8fc9-a4aa78dce87f/9c0bb546-50a8-483d-aeab-ab3b2ce9f094.jpg
" target="_blank"> <img alt="Click for enlarged picture" src="
https://hosting.photobucket.com/95288841-8654-4bf7-8fc9-a4aa78dce87f/9c0bb546-50a8-483d-aeab-ab3b2ce9f094.jpg" width="600" /> </a></p>
<p>
The opening of the Exhibition took place on Thursday, February 19, 2026, starting at 6:00 PM. The exhibition was organized on the occasion of our twenty-third birthday.</p>
<p>
&nbsp;</p>
<p>
<a href=" https://hosting.photobucket.com/95288841-8654-4bf7-8fc9-a4aa78dce87f/71c7bfc2-1ffc-43b9-9d5a-53e009f6b86d.jpg
" target="_blank"> <img alt="Click for enlarged picture" src="
https://hosting.photobucket.com/95288841-8654-4bf7-8fc9-a4aa78dce87f/71c7bfc2-1ffc-43b9-9d5a-53e009f6b86d.jpg" width="600" /> </a></p>
<p>
<a href=" https://hosting.photobucket.com/95288841-8654-4bf7-8fc9-a4aa78dce87f/007b4701-1d7c-4a67-a599-0539a2aa3191.jpg
" target="_blank"> <img alt="Click for enlarged picture" src="
https://hosting.photobucket.com/95288841-8654-4bf7-8fc9-a4aa78dce87f/007b4701-1d7c-4a67-a599-0539a2aa3191.jpg" width="600" /> </a></p>
<p>
<a href=" https://hosting.photobucket.com/95288841-8654-4bf7-8fc9-a4aa78dce87f/2c8090e2-8b95-4368-bb48-98876d680e15.jpg
" target="_blank"> <img alt="Click for enlarged picture" src="
https://hosting.photobucket.com/95288841-8654-4bf7-8fc9-a4aa78dce87f/2c8090e2-8b95-4368-bb48-98876d680e15.jpg" width="600" /> </a></p>
<p>
<a href=" https://hosting.photobucket.com/95288841-8654-4bf7-8fc9-a4aa78dce87f/375768ad-a8bb-49bf-9845-e46c896ba7ec.jpg
" target="_blank"> <img alt="Click for enlarged picture" src="
https://hosting.photobucket.com/95288841-8654-4bf7-8fc9-a4aa78dce87f/375768ad-a8bb-49bf-9845-e46c896ba7ec.jpg" width="600" /> </a></p>
<p>
<a href=" https://hosting.photobucket.com/95288841-8654-4bf7-8fc9-a4aa78dce87f/a93de974-4ccb-4876-85b0-4d066ae402b3.jpg
" target="_blank"> <img alt="Click for enlarged picture" src="
https://hosting.photobucket.com/95288841-8654-4bf7-8fc9-a4aa78dce87f/a93de974-4ccb-4876-85b0-4d066ae402b3.jpg" width="600" /> </a></p>
<p>
<a href=" https://hosting.photobucket.com/95288841-8654-4bf7-8fc9-a4aa78dce87f/d323ccc9-1b9a-4cb2-8adf-7019b0e217f4.jpg
" target="_blank"> <img alt="Click for enlarged picture" src="
https://hosting.photobucket.com/95288841-8654-4bf7-8fc9-a4aa78dce87f/d323ccc9-1b9a-4cb2-8adf-7019b0e217f4.jpg" width="600" /> </a></p>
<p>
<a href=" https://hosting.photobucket.com/95288841-8654-4bf7-8fc9-a4aa78dce87f/a5a66447-2d76-47ae-866d-4d512ef469a5.jpg
" target="_blank"> <img alt="Click for enlarged picture" src="
https://hosting.photobucket.com/95288841-8654-4bf7-8fc9-a4aa78dce87f/a5a66447-2d76-47ae-866d-4d512ef469a5.jpg" width="600" /> </a></p>
<p>
<a href=" https://hosting.photobucket.com/95288841-8654-4bf7-8fc9-a4aa78dce87f/3e7bcfc9-ba02-4f94-a6c3-79dfaea3639e.jpg
" target="_blank"> <img alt="Click for enlarged picture" src="
https://hosting.photobucket.com/95288841-8654-4bf7-8fc9-a4aa78dce87f/3e7bcfc9-ba02-4f94-a6c3-79dfaea3639e.jpg" width="600" /> </a></p>
<p>
<a href=" https://hosting.photobucket.com/95288841-8654-4bf7-8fc9-a4aa78dce87f/24e79466-4a9e-4b10-970c-caad235d260d.jpg
" target="_blank"> <img alt="Click for enlarged picture" src="
https://hosting.photobucket.com/95288841-8654-4bf7-8fc9-a4aa78dce87f/24e79466-4a9e-4b10-970c-caad235d260d.jpg" width="600" /> </a></p>
<p>
As always, the Exhibition presented a cross-section of the work of the Association, its members, participants of its courses and workshops, and members of the Miniature Painters Croatia FB group. In a large number of showcases, there were numerous miniatures for tabletop strategy games, board games, and an entire showcase was dedicated to award-winning exhibits from previous miniature competitions. Several showcases were dedicated to projects that the Association has been implementing for 23 years, such as the UMS &bdquo;Agram&ldquo; Library and Reading Room, the Workshop for Making Spatial Models and the Miniature Painting Workshop, as well as new ones such as the Agram Group Build, the Agram Lego Section and the Back to Basics painting workshop for the youngest.</p>
<p>
<a href=" https://hosting.photobucket.com/95288841-8654-4bf7-8fc9-a4aa78dce87f/fca84936-af71-44d3-9a4c-faeb26163899.jpg
" target="_blank"> <img alt="Click for enlarged picture" src="
https://hosting.photobucket.com/95288841-8654-4bf7-8fc9-a4aa78dce87f/fca84936-af71-44d3-9a4c-faeb26163899.jpg" width="600" /> </a></p>
<p>
<a href=" https://hosting.photobucket.com/95288841-8654-4bf7-8fc9-a4aa78dce87f/459bc5ac-8702-46f9-93b4-547deaabdef4.jpg
" target="_blank"> <img alt="Click for enlarged picture" src="
https://hosting.photobucket.com/95288841-8654-4bf7-8fc9-a4aa78dce87f/459bc5ac-8702-46f9-93b4-547deaabdef4.jpg" width="600" /> </a></p>
<p>
<a href=" https://hosting.photobucket.com/95288841-8654-4bf7-8fc9-a4aa78dce87f/91a04363-b2ef-4635-a046-7edf25ce7808.jpg
" target="_blank"> <img alt="Click for enlarged picture" src="
https://hosting.photobucket.com/95288841-8654-4bf7-8fc9-a4aa78dce87f/91a04363-b2ef-4635-a046-7edf25ce7808.jpg" width="600" /> </a></p>
<p>
<a href=" https://hosting.photobucket.com/95288841-8654-4bf7-8fc9-a4aa78dce87f/73256af5-fd5d-40b5-95e1-120e49c9be87.jpg
" target="_blank"> <img alt="Click for enlarged picture" src="
https://hosting.photobucket.com/95288841-8654-4bf7-8fc9-a4aa78dce87f/73256af5-fd5d-40b5-95e1-120e49c9be87.jpg" width="600" /> </a></p>
<p>
<a href=" https://hosting.photobucket.com/95288841-8654-4bf7-8fc9-a4aa78dce87f/979f9be5-23f3-4df9-91dc-ab71d6a10d64.jpg
" target="_blank"> <img alt="Click for enlarged picture" src="
https://hosting.photobucket.com/95288841-8654-4bf7-8fc9-a4aa78dce87f/979f9be5-23f3-4df9-91dc-ab71d6a10d64.jpg" width="600" /> </a></p>
<p>
<a href=" https://hosting.photobucket.com/95288841-8654-4bf7-8fc9-a4aa78dce87f/d0ff4379-183a-47b9-a740-9ddc283ebc29.jpg
" target="_blank"> <img alt="Click for enlarged picture" src="
https://hosting.photobucket.com/95288841-8654-4bf7-8fc9-a4aa78dce87f/d0ff4379-183a-47b9-a740-9ddc283ebc29.jpg" width="600" /> </a></p>
<p>
<a href=" https://hosting.photobucket.com/95288841-8654-4bf7-8fc9-a4aa78dce87f/4333e95e-bbbd-4f47-aaea-38a9c99e54d8.jpg
" target="_blank"> <img alt="Click for enlarged picture" src="
https://hosting.photobucket.com/95288841-8654-4bf7-8fc9-a4aa78dce87f/4333e95e-bbbd-4f47-aaea-38a9c99e54d8.jpg" width="600" /> </a></p>
<p>
<a href=" https://hosting.photobucket.com/95288841-8654-4bf7-8fc9-a4aa78dce87f/1372f8a2-b222-48ee-ae45-a90b5a354ef7.jpg
" target="_blank"> <img alt="Click for enlarged picture" src="
https://hosting.photobucket.com/95288841-8654-4bf7-8fc9-a4aa78dce87f/1372f8a2-b222-48ee-ae45-a90b5a354ef7.jpg" width="600" /> </a></p>
<p>
<a href=" https://hosting.photobucket.com/95288841-8654-4bf7-8fc9-a4aa78dce87f/6a1b4fd1-d982-4b06-9c5f-3cd40d6bf10a.jpg
" target="_blank"> <img alt="Click for enlarged picture" src="
https://hosting.photobucket.com/95288841-8654-4bf7-8fc9-a4aa78dce87f/6a1b4fd1-d982-4b06-9c5f-3cd40d6bf10a.jpg" width="600" /> </a></p>
<p>
<a href=" https://hosting.photobucket.com/95288841-8654-4bf7-8fc9-a4aa78dce87f/c2ec45e1-e0f3-463a-b254-cb2a38b53e14.jpg
" target="_blank"> <img alt="Click for enlarged picture" src="
https://hosting.photobucket.com/95288841-8654-4bf7-8fc9-a4aa78dce87f/c2ec45e1-e0f3-463a-b254-cb2a38b53e14.jpg" width="600" /> </a></p>
<p>
<a href=" https://hosting.photobucket.com/95288841-8654-4bf7-8fc9-a4aa78dce87f/17553b9a-0592-4f6a-a097-3f1a97e161f3.jpg
" target="_blank"> <img alt="Click for enlarged picture" src="
https://hosting.photobucket.com/95288841-8654-4bf7-8fc9-a4aa78dce87f/17553b9a-0592-4f6a-a097-3f1a97e161f3.jpg" width="600" /> </a></p>
<p>
<a href=" https://hosting.photobucket.com/95288841-8654-4bf7-8fc9-a4aa78dce87f/8658bd6b-dff2-4d24-8473-928d44d44480.jpg
" target="_blank"> <img alt="Click for enlarged picture" src="
https://hosting.photobucket.com/95288841-8654-4bf7-8fc9-a4aa78dce87f/8658bd6b-dff2-4d24-8473-928d44d44480.jpg" width="600" /> </a></p>
<p>
<a href=" https://hosting.photobucket.com/95288841-8654-4bf7-8fc9-a4aa78dce87f/ecab0ea7-f75b-4e31-a520-d088ad39fa17.jpg
" target="_blank"> <img alt="Click for enlarged picture" src="
https://hosting.photobucket.com/95288841-8654-4bf7-8fc9-a4aa78dce87f/ecab0ea7-f75b-4e31-a520-d088ad39fa17.jpg" width="600" /> </a></p>
<p>
<a href=" https://hosting.photobucket.com/95288841-8654-4bf7-8fc9-a4aa78dce87f/9495a2f5-8a82-41f2-abf4-9ade3db41d87.jpg
" target="_blank"> <img alt="Click for enlarged picture" src="
https://hosting.photobucket.com/95288841-8654-4bf7-8fc9-a4aa78dce87f/9495a2f5-8a82-41f2-abf4-9ade3db41d87.jpg" width="600" /> </a></p>
<p>
<a href=" https://hosting.photobucket.com/95288841-8654-4bf7-8fc9-a4aa78dce87f/362cc6fd-a5dd-474b-9b9f-aeab27d6dcfa.jpg
" target="_blank"> <img alt="Click for enlarged picture" src="
https://hosting.photobucket.com/95288841-8654-4bf7-8fc9-a4aa78dce87f/362cc6fd-a5dd-474b-9b9f-aeab27d6dcfa.jpg" width="600" /> </a></p>
<p>
It was a special honor for us to host our guest exhibitor, Ninoslav Luk, a miniaturist from Poreč, who introduced himself to us with his collection of historical dioramas.</p>
<p>
<a href=" https://hosting.photobucket.com/95288841-8654-4bf7-8fc9-a4aa78dce87f/ba1353de-e2bd-4340-9121-9056e287ed4a.jpg
" target="_blank"> <img alt="Click for enlarged picture" src="
https://hosting.photobucket.com/95288841-8654-4bf7-8fc9-a4aa78dce87f/ba1353de-e2bd-4340-9121-9056e287ed4a.jpg" width="600" /> </a></p>
<p>
<a href=" https://hosting.photobucket.com/95288841-8654-4bf7-8fc9-a4aa78dce87f/cea18506-1b50-4e5b-955c-0b9ca02d7826.jpg
" target="_blank"> <img alt="Click for enlarged picture" src="
https://hosting.photobucket.com/95288841-8654-4bf7-8fc9-a4aa78dce87f/cea18506-1b50-4e5b-955c-0b9ca02d7826.jpg" width="600" /> </a></p>
<p>
<a href=" https://hosting.photobucket.com/95288841-8654-4bf7-8fc9-a4aa78dce87f/1be85b41-e3b6-4536-b141-cd0da6eb38c1.jpg
" target="_blank"> <img alt="Click for enlarged picture" src="
https://hosting.photobucket.com/95288841-8654-4bf7-8fc9-a4aa78dce87f/1be85b41-e3b6-4536-b141-cd0da6eb38c1.jpg" width="600" /> </a></p>
<p>
<a href=" https://hosting.photobucket.com/95288841-8654-4bf7-8fc9-a4aa78dce87f/9e93b87d-ff3c-4b7b-8f06-5f9d3464a134.jpg
" target="_blank"> <img alt="Click for enlarged picture" src="
https://hosting.photobucket.com/95288841-8654-4bf7-8fc9-a4aa78dce87f/9e93b87d-ff3c-4b7b-8f06-5f9d3464a134.jpg" width="600" /> </a></p>
<p>
During the first weekend of the Exhibition, 21-22.02., we held the 18th annual international miniature painting competition <strong>Black Queen Hobby and Miniature Painting Competition</strong>!</p>
<p>
<a href=" https://hosting.photobucket.com/95288841-8654-4bf7-8fc9-a4aa78dce87f/3056fb09-f66c-4dea-80a8-a4e72407429a.jpg
" target="_blank"> <img alt="Click for enlarged picture" src="
https://hosting.photobucket.com/95288841-8654-4bf7-8fc9-a4aa78dce87f/3056fb09-f66c-4dea-80a8-a4e72407429a.jpg" width="600" /> </a></p>
<p>
As contestants arrived and registered for the competition, our hardworking staff photographed all the exhibits before sorting them into categories and carefully placing them in glass cases. There was no shortage of morning neccessities like coffe and doughnuts.</p>
<p>
&lt;</p>
<p>
<a href=" https://hosting.photobucket.com/95288841-8654-4bf7-8fc9-a4aa78dce87f/1118089c-2b46-4a2c-b17d-dc92b66d1ffc.jpg
" target="_blank"> <img alt="Click for enlarged picture" src="
https://hosting.photobucket.com/95288841-8654-4bf7-8fc9-a4aa78dce87f/1118089c-2b46-4a2c-b17d-dc92b66d1ffc.jpg" width="600" /> </a></p>
<p>
<a href=" https://hosting.photobucket.com/95288841-8654-4bf7-8fc9-a4aa78dce87f/9fd3c272-9a69-4532-a09d-36497a20a820.jpg
" target="_blank"> <img alt="Click for enlarged picture" src="
https://hosting.photobucket.com/95288841-8654-4bf7-8fc9-a4aa78dce87f/9fd3c272-9a69-4532-a09d-36497a20a820.jpg" width="600" /> </a></p>
<p>
<a href=" https://hosting.photobucket.com/95288841-8654-4bf7-8fc9-a4aa78dce87f/86995e80-c502-45fb-80f5-c8fda27da3f9.jpg
" target="_blank"> <img alt="Click for enlarged picture" src="
https://hosting.photobucket.com/95288841-8654-4bf7-8fc9-a4aa78dce87f/86995e80-c502-45fb-80f5-c8fda27da3f9.jpg" width="600" /> </a></p>
<p>
By noon, all the display cases were full and the competition could officially begin.</p>
<p>
<a href=" https://hosting.photobucket.com/95288841-8654-4bf7-8fc9-a4aa78dce87f/bce59a4f-c3e3-4708-a3d6-25e81a894c24.jpg
" target="_blank"> <img alt="Click for enlarged picture" src="
https://hosting.photobucket.com/95288841-8654-4bf7-8fc9-a4aa78dce87f/bce59a4f-c3e3-4708-a3d6-25e81a894c24.jpg" width="600" /> </a></p>
<p>
<a href=" https://hosting.photobucket.com/95288841-8654-4bf7-8fc9-a4aa78dce87f/16a0a094-01aa-4e52-82cf-fdab00d74711.jpg
" target="_blank"> <img alt="Click for enlarged picture" src="
https://hosting.photobucket.com/95288841-8654-4bf7-8fc9-a4aa78dce87f/16a0a094-01aa-4e52-82cf-fdab00d74711.jpg" width="600" /> </a></p>
<p>
<a href=" https://hosting.photobucket.com/95288841-8654-4bf7-8fc9-a4aa78dce87f/0d3f4042-ff77-48d0-b332-add0fd08f7c3.jpg
" target="_blank"> <img alt="Click for enlarged picture" src="
https://hosting.photobucket.com/95288841-8654-4bf7-8fc9-a4aa78dce87f/0d3f4042-ff77-48d0-b332-add0fd08f7c3.jpg" width="600" /> </a></p>
<p>
<a href=" https://hosting.photobucket.com/95288841-8654-4bf7-8fc9-a4aa78dce87f/3711baf8-93f2-434a-aea9-a95288ca04dd.jpg
" target="_blank"> <img alt="Click for enlarged picture" src="
https://hosting.photobucket.com/95288841-8654-4bf7-8fc9-a4aa78dce87f/3711baf8-93f2-434a-aea9-a95288ca04dd.jpg" width="600" /> </a></p>
<p>
<a href=" https://hosting.photobucket.com/95288841-8654-4bf7-8fc9-a4aa78dce87f/53113b97-ec06-4409-95ba-95a5ad3f9720.jpg
" target="_blank"> <img alt="Click for enlarged picture" src="
https://hosting.photobucket.com/95288841-8654-4bf7-8fc9-a4aa78dce87f/53113b97-ec06-4409-95ba-95a5ad3f9720.jpg" width="600" /> </a></p>
<p>
<a href=" https://hosting.photobucket.com/95288841-8654-4bf7-8fc9-a4aa78dce87f/ab127858-193d-4976-bdb2-e27302722fca.jpg
" target="_blank"> <img alt="Click for enlarged picture" src="
https://hosting.photobucket.com/95288841-8654-4bf7-8fc9-a4aa78dce87f/ab127858-193d-4976-bdb2-e27302722fca.jpg" width="600" /> </a></p>
<p>
<a href=" https://hosting.photobucket.com/95288841-8654-4bf7-8fc9-a4aa78dce87f/3735af11-3fb6-4772-a8ff-5e0ff6ddf03a.jpg
" target="_blank"> <img alt="Click for enlarged picture" src="
https://hosting.photobucket.com/95288841-8654-4bf7-8fc9-a4aa78dce87f/3735af11-3fb6-4772-a8ff-5e0ff6ddf03a.jpg" width="600" /> </a></p>
<p>
<strong>Back To Basics workshops for the young at the Black Queen</strong></p>
<p>
This year, throughout the weekend, we organized miniature painting workshops for the youngest, who were able to paint one of our own miniatures designed specifically for this program for the first time!</p>
<p>
<a href=" https://hosting.photobucket.com/95288841-8654-4bf7-8fc9-a4aa78dce87f/6999be0c-8cc6-4947-a423-9427a2299724.jpg
" target="_blank"> <img alt="Click for enlarged picture" src="
https://hosting.photobucket.com/95288841-8654-4bf7-8fc9-a4aa78dce87f/6999be0c-8cc6-4947-a423-9427a2299724.jpg" width="600" /> </a></p>
<p>
<a href="https://hosting.photobucket.com/95288841-8654-4bf7-8fc9-a4aa78dce87f/835b05a5-f171-49df-afa6-da0692b89074.jpg" target="_blank"><img alt="Click for enlarged picture" src="https://hosting.photobucket.com/95288841-8654-4bf7-8fc9-a4aa78dce87f/835b05a5-f171-49df-afa6-da0692b89074.jpg" width="600" /></a></p>
<p>
<a href=" https://hosting.photobucket.com/95288841-8654-4bf7-8fc9-a4aa78dce87f/ef5dde13-84ee-4ea0-b9f3-28aaf703ef6d.jpg
" target="_blank"> <img alt="Click for enlarged picture" src="
https://hosting.photobucket.com/95288841-8654-4bf7-8fc9-a4aa78dce87f/ef5dde13-84ee-4ea0-b9f3-28aaf703ef6d.jpg" width="600" /> </a></p>
<p>
<strong>SELLERS&#39; COURT</strong></p>
<p>
During the weekend we hosted our sponsors with their sales stands: Swood.si and Carta Magica.</p>
<p>
<a href=" https://hosting.photobucket.com/95288841-8654-4bf7-8fc9-a4aa78dce87f/5ee9a49f-a387-435a-9110-572402b7191d.jpg
" target="_blank"> <img alt="Click for enlarged picture" src="
https://hosting.photobucket.com/95288841-8654-4bf7-8fc9-a4aa78dce87f/5ee9a49f-a387-435a-9110-572402b7191d.jpg" width="600" /> </a></p>
<p>
<a href=" https://hosting.photobucket.com/95288841-8654-4bf7-8fc9-a4aa78dce87f/47cf600f-b1eb-4655-bf06-305f6f21d5d2.jpg
" target="_blank"> <img alt="Click for enlarged picture" src="
https://hosting.photobucket.com/95288841-8654-4bf7-8fc9-a4aa78dce87f/47cf600f-b1eb-4655-bf06-305f6f21d5d2.jpg" width="600" /> </a></p>
<p>
<strong>MINIATURE PAINTING WORKSHOPS</strong></p>
<p>
The ZZTK premises allow workshops to be held during the weekend in the cinema hall in the basement, so we also organized demonstration workshops during the weekend. The lecturers&#39; work was recorded with a camera and projected onto the projection screen in the hall. Many thanks to our domestic and international lecturers: Anže Zorko (SLO), doc.dr.sc. Winton Afrić (CRO), Ivan Knezović (UMS Agram) and Petar Knezoviću (CRO).</p>
<p>
<a href=" https://hosting.photobucket.com/95288841-8654-4bf7-8fc9-a4aa78dce87f/e8d835be-ec99-49d7-bc9b-086e38573d1a.jpg
" target="_blank"> <img alt="Click for enlarged picture" src="
https://hosting.photobucket.com/95288841-8654-4bf7-8fc9-a4aa78dce87f/e8d835be-ec99-49d7-bc9b-086e38573d1a.jpg" width="600" /> </a></p>
<p>
<a href=" https://hosting.photobucket.com/95288841-8654-4bf7-8fc9-a4aa78dce87f/f3eba4c1-4637-4da9-8360-75f430355af4.jpg" target="_blank"> <img alt="Click for enlarged picture" src="
https://hosting.photobucket.com/95288841-8654-4bf7-8fc9-a4aa78dce87f/f3eba4c1-4637-4da9-8360-75f430355af4.jpg" width="600" /> </a></p>
<p>
<a href=" https://hosting.photobucket.com/95288841-8654-4bf7-8fc9-a4aa78dce87f/ef523854-4030-4579-aa38-403afda86c91.jpg
" target="_blank"> <img alt="Click for enlarged picture" src="
https://hosting.photobucket.com/95288841-8654-4bf7-8fc9-a4aa78dce87f/ef523854-4030-4579-aa38-403afda86c91.jpg" width="600" /> </a></p>
<p>
<a href=" https://hosting.photobucket.com/95288841-8654-4bf7-8fc9-a4aa78dce87f/dd0943c2-f4a8-40c3-b641-f6dcdd200380.jpg
" target="_blank"> <img alt="Click for enlarged picture" src="
https://hosting.photobucket.com/95288841-8654-4bf7-8fc9-a4aa78dce87f/dd0943c2-f4a8-40c3-b641-f6dcdd200380.jpg" width="600" /> </a></p>
<p>
<a href=" https://hosting.photobucket.com/95288841-8654-4bf7-8fc9-a4aa78dce87f/08b1626a-f6c7-43c9-b718-3e9a41b55ca6.jpg
" target="_blank"> <img alt="Click for enlarged picture" src="
https://hosting.photobucket.com/95288841-8654-4bf7-8fc9-a4aa78dce87f/08b1626a-f6c7-43c9-b718-3e9a41b55ca6.jpg" width="600" /> </a></p>
<p>
<a href=" https://hosting.photobucket.com/95288841-8654-4bf7-8fc9-a4aa78dce87f/91aca7f3-1af6-486d-b174-65079a63a1ea.jpg
" target="_blank"> <img alt="Click for enlarged picture" src="
https://hosting.photobucket.com/95288841-8654-4bf7-8fc9-a4aa78dce87f/91aca7f3-1af6-486d-b174-65079a63a1ea.jpg" width="600" /> </a></p>
<p>
<a href=" https://hosting.photobucket.com/95288841-8654-4bf7-8fc9-a4aa78dce87f/3821f2fb-fbe7-4096-adbc-7d8c981a3b56.jpg
" target="_blank"> <img alt="Click for enlarged picture" src="
https://hosting.photobucket.com/95288841-8654-4bf7-8fc9-a4aa78dce87f/3821f2fb-fbe7-4096-adbc-7d8c981a3b56.jpg" width="600" /> </a></p>
<p>
<a href=" https://hosting.photobucket.com/95288841-8654-4bf7-8fc9-a4aa78dce87f/2c7bb3c5-c0ec-4a96-b6bd-6a90ce5ce154.jpg
" target="_blank"> <img alt="Click for enlarged picture" src="
https://hosting.photobucket.com/95288841-8654-4bf7-8fc9-a4aa78dce87f/2c7bb3c5-c0ec-4a96-b6bd-6a90ce5ce154.jpg" width="600" /> </a></p>
<p>
<a href=" https://hosting.photobucket.com/95288841-8654-4bf7-8fc9-a4aa78dce87f/b646f4ee-21aa-4d12-8db3-6d33351d5aeb.jpg
" target="_blank"> <img alt="Click for enlarged picture" src="
https://hosting.photobucket.com/95288841-8654-4bf7-8fc9-a4aa78dce87f/b646f4ee-21aa-4d12-8db3-6d33351d5aeb.jpg" width="600" /> </a></p>
<p>
<a href=" https://hosting.photobucket.com/95288841-8654-4bf7-8fc9-a4aa78dce87f/fb5efc01-32cc-4119-90e3-188f51b30237.jpg
" target="_blank"> <img alt="Click for enlarged picture" src="
https://hosting.photobucket.com/95288841-8654-4bf7-8fc9-a4aa78dce87f/fb5efc01-32cc-4119-90e3-188f51b30237.jpg" width="600" /> </a></p>
<p>
<strong>SPEED PAINTING COMPETITION</strong></p>
<p>
We organized a speed painting competition on Sunday afternoon. Participants had 60 minutes to paint one wizrad, a miniature of our own design and production.</p>
<p>
<a href=" https://hosting.photobucket.com/95288841-8654-4bf7-8fc9-a4aa78dce87f/106417a6-a047-4e0d-9f81-87858806052f.jpg
" target="_blank"> <img alt="Click for enlarged picture" src="
https://hosting.photobucket.com/95288841-8654-4bf7-8fc9-a4aa78dce87f/106417a6-a047-4e0d-9f81-87858806052f.jpg" width="600" /> </a></p>
<p>
<a href=" https://hosting.photobucket.com/95288841-8654-4bf7-8fc9-a4aa78dce87f/ac6853c7-6e34-4e07-a996-8d7d12744b67.jpg
" target="_blank"> <img alt="Click for enlarged picture" src="
https://hosting.photobucket.com/95288841-8654-4bf7-8fc9-a4aa78dce87f/ac6853c7-6e34-4e07-a996-8d7d12744b67.jpg" width="600" /> </a></p>
<p>
<a href=" https://hosting.photobucket.com/95288841-8654-4bf7-8fc9-a4aa78dce87f/ccb155fa-52c5-4a99-9515-f69a6836dce7.jpg
" target="_blank"> <img alt="Click for enlarged picture" src="
https://hosting.photobucket.com/95288841-8654-4bf7-8fc9-a4aa78dce87f/ccb155fa-52c5-4a99-9515-f69a6836dce7.jpg" width="600" /> </a></p>
<p>
<a href=" https://hosting.photobucket.com/95288841-8654-4bf7-8fc9-a4aa78dce87f/a29fedd0-97ea-45b1-85f9-7ea62188b2b2.jpg
" target="_blank"><img alt="Click for enlarged picture" src="
https://hosting.photobucket.com/95288841-8654-4bf7-8fc9-a4aa78dce87f/a29fedd0-97ea-45b1-85f9-7ea62188b2b2.jpg" width="600" /></a></p>
<p>
With that, we came to the very end of this wonderful weekend and all that was left was the awarding of prizes and recognition to the winners.</p>
<p>
<a href=" https://hosting.photobucket.com/95288841-8654-4bf7-8fc9-a4aa78dce87f/046ca4c8-0ae7-415e-abd3-e131d580c3ad.jpg
" target="_blank"> <img alt="Click for enlarged picture" src="
https://hosting.photobucket.com/95288841-8654-4bf7-8fc9-a4aa78dce87f/046ca4c8-0ae7-415e-abd3-e131d580c3ad.jpg" width="600" /> </a></p>
<p>
<a href=" https://hosting.photobucket.com/95288841-8654-4bf7-8fc9-a4aa78dce87f/cec0dcef-7acb-4a77-89de-271ed5410672.jpg
" target="_blank"> <img alt="Click for enlarged picture" src="
https://hosting.photobucket.com/95288841-8654-4bf7-8fc9-a4aa78dce87f/cec0dcef-7acb-4a77-89de-271ed5410672.jpg" width="600" /> </a></p>
<p>
<a href=" https://hosting.photobucket.com/95288841-8654-4bf7-8fc9-a4aa78dce87f/a495a5fc-31a2-4979-a970-0fa22c334354.jpg
" target="_blank"> <img alt="Click for enlarged picture" src="
https://hosting.photobucket.com/95288841-8654-4bf7-8fc9-a4aa78dce87f/a495a5fc-31a2-4979-a970-0fa22c334354.jpg" width="600" /> </a></p>
<p>
<strong>AGRAM ARENA &ndash; Leaving Asphodel Necropolis28 Campaign</strong></p>
<p>
During the weekend of February 21-22, we held a new international competition, Agram Arena! This time it was the turn of the tabletop strategy game Necropolis28, for which our members designed a two-day campaign. Each participant created their own gang of soldiers, and the vast majority also created their own boards.</p>
<p>
<a href=" https://hosting.photobucket.com/95288841-8654-4bf7-8fc9-a4aa78dce87f/ac69b182-4bfc-4575-a6d3-fb3c8baba342.jpg
" target="_blank"> <img alt="Click for enlarged picture" src="
https://hosting.photobucket.com/95288841-8654-4bf7-8fc9-a4aa78dce87f/ac69b182-4bfc-4575-a6d3-fb3c8baba342.jpg" width="600" /> </a></p>
<p>
<a href=" https://hosting.photobucket.com/95288841-8654-4bf7-8fc9-a4aa78dce87f/289fed7b-e058-42d8-ba2d-cbd0463e98da.jpg
" target="_blank"> <img alt="Click for enlarged picture" src="
https://hosting.photobucket.com/95288841-8654-4bf7-8fc9-a4aa78dce87f/289fed7b-e058-42d8-ba2d-cbd0463e98da.jpg" width="600" /> </a></p>
<p>
<a href=" https://hosting.photobucket.com/95288841-8654-4bf7-8fc9-a4aa78dce87f/d92ebbee-859d-4441-8386-3d760b20b7a7.jpg
" target="_blank"> <img alt="Click for enlarged picture" src="
https://hosting.photobucket.com/95288841-8654-4bf7-8fc9-a4aa78dce87f/d92ebbee-859d-4441-8386-3d760b20b7a7.jpg" width="600" /> </a></p>
<p>
<a href=" https://hosting.photobucket.com/95288841-8654-4bf7-8fc9-a4aa78dce87f/09c59798-7871-425e-a075-3ca1cd91768a.jpg
" target="_blank"> <img alt="Click for enlarged picture" src="
https://hosting.photobucket.com/95288841-8654-4bf7-8fc9-a4aa78dce87f/09c59798-7871-425e-a075-3ca1cd91768a.jpg" width="600" /> </a></p>
<p>
<a href=" https://hosting.photobucket.com/95288841-8654-4bf7-8fc9-a4aa78dce87f/b2f3edc8-5a23-4552-9a2a-4027b286f327.jpg
" target="_blank"> <img alt="Click for enlarged picture" src="
https://hosting.photobucket.com/95288841-8654-4bf7-8fc9-a4aa78dce87f/b2f3edc8-5a23-4552-9a2a-4027b286f327.jpg" width="600" /> </a></p>
<p>
<a href=" https://hosting.photobucket.com/95288841-8654-4bf7-8fc9-a4aa78dce87f/2a9f43ac-b531-4746-b7bb-ac5a3356aab0.jpg
" target="_blank"> <img alt="Click for enlarged picture" src="
https://hosting.photobucket.com/95288841-8654-4bf7-8fc9-a4aa78dce87f/2a9f43ac-b531-4746-b7bb-ac5a3356aab0.jpg" width="600" /> </a></p>
<p>
<strong>EVENTS ON WEEKDAYS DURING THE EXHIBITION </strong></p>
<p>
Over the next two weeks, our volunteers held open miniature painting workshops on weekdays from 4:00 PM to 8:00 PM. Miniature painting workstations were set up where our visitors could paint miniatures we had prepared (or their own if they had brought them) using our materials and tools.</p>
<p>
<a href=" https://hosting.photobucket.com/95288841-8654-4bf7-8fc9-a4aa78dce87f/6edf7765-42b5-417a-820f-fa5d907179a7.jpg
" target="_blank"> <img alt="Click for enlarged picture" src="
https://hosting.photobucket.com/95288841-8654-4bf7-8fc9-a4aa78dce87f/6edf7765-42b5-417a-820f-fa5d907179a7.jpg" width="600" /> </a></p>
<p>
<a href=" https://hosting.photobucket.com/95288841-8654-4bf7-8fc9-a4aa78dce87f/c084ebe2-f57b-4519-9b31-29bdc1155887.jpg
" target="_blank"> <img alt="Click for enlarged picture" src="
https://hosting.photobucket.com/95288841-8654-4bf7-8fc9-a4aa78dce87f/c084ebe2-f57b-4519-9b31-29bdc1155887.jpg" width="600" /> </a></p>
<p>
<a href=" https://hosting.photobucket.com/95288841-8654-4bf7-8fc9-a4aa78dce87f/37ff2272-f9b0-4b16-a363-1e6f6688c866.jpg
" target="_blank"> <img alt="Click for enlarged picture" src="
https://hosting.photobucket.com/95288841-8654-4bf7-8fc9-a4aa78dce87f/37ff2272-f9b0-4b16-a363-1e6f6688c866.jpg" width="600" /> </a></p>
<p>
<a href=" https://hosting.photobucket.com/95288841-8654-4bf7-8fc9-a4aa78dce87f/5f4f7968-ff50-4a01-98da-6ce8562930b4.jpg
" target="_blank"> <img alt="Click for enlarged picture" src="
https://hosting.photobucket.com/95288841-8654-4bf7-8fc9-a4aa78dce87f/5f4f7968-ff50-4a01-98da-6ce8562930b4.jpg" width="600" /> </a></p>
<p>
<a href=" https://hosting.photobucket.com/95288841-8654-4bf7-8fc9-a4aa78dce87f/cbb45319-d488-483c-bf9d-9af29852fc74.jpg
" target="_blank"> <img alt="Click for enlarged picture" src="
https://hosting.photobucket.com/95288841-8654-4bf7-8fc9-a4aa78dce87f/cbb45319-d488-483c-bf9d-9af29852fc74.jpg" width="600" /> </a></p>
<p>
<a href=" https://hosting.photobucket.com/95288841-8654-4bf7-8fc9-a4aa78dce87f/3dcca26c-d549-4af3-812a-a4a81b9a2310.jpg
" target="_blank"> <img alt="Click for enlarged picture" src="
https://hosting.photobucket.com/95288841-8654-4bf7-8fc9-a4aa78dce87f/3dcca26c-d549-4af3-812a-a4a81b9a2310.jpg" width="600" /> </a></p>
<p>
<a href=" https://hosting.photobucket.com/95288841-8654-4bf7-8fc9-a4aa78dce87f/4adf0fb6-3eab-4b40-b32d-d03eab4a9892.jpg
" target="_blank"> <img alt="Click for enlarged picture" src="
https://hosting.photobucket.com/95288841-8654-4bf7-8fc9-a4aa78dce87f/4adf0fb6-3eab-4b40-b32d-d03eab4a9892.jpg" width="600" /> </a></p>
<p>
<a href=" https://hosting.photobucket.com/95288841-8654-4bf7-8fc9-a4aa78dce87f/4732b58a-9a65-4d1c-a7d5-25513d34b108.jpg
" target="_blank"> <img alt="Click for enlarged picture" src="
https://hosting.photobucket.com/95288841-8654-4bf7-8fc9-a4aa78dce87f/4732b58a-9a65-4d1c-a7d5-25513d34b108.jpg" width="600" /> </a></p>
<p>
<a href=" https://hosting.photobucket.com/95288841-8654-4bf7-8fc9-a4aa78dce87f/274be330-31d5-4e25-95db-ec2f423a003c.jpg
" target="_blank"> <img alt="Click for enlarged picture" src="
https://hosting.photobucket.com/95288841-8654-4bf7-8fc9-a4aa78dce87f/274be330-31d5-4e25-95db-ec2f423a003c.jpg" width="600" /> </a></p>
<p>
<a href=" https://hosting.photobucket.com/95288841-8654-4bf7-8fc9-a4aa78dce87f/8e7b0a80-0f46-4d70-9789-a46976c713d2.jpg
" target="_blank"> <img alt="Click for enlarged picture" src="
https://hosting.photobucket.com/95288841-8654-4bf7-8fc9-a4aa78dce87f/8e7b0a80-0f46-4d70-9789-a46976c713d2.jpg" width="600" /> </a></p>
<p>
<a href=" https://hosting.photobucket.com/95288841-8654-4bf7-8fc9-a4aa78dce87f/8bbd4e96-b911-4f26-80fe-b1c57f29027b.jpg
" target="_blank"> <img alt="Click for enlarged picture" src="
https://hosting.photobucket.com/95288841-8654-4bf7-8fc9-a4aa78dce87f/8bbd4e96-b911-4f26-80fe-b1c57f29027b.jpg" width="600" /> </a></p>
<p>
<a href=" https://hosting.photobucket.com/95288841-8654-4bf7-8fc9-a4aa78dce87f/203a27be-8f10-459d-89b9-befb6b636b74.jpg
" target="_blank"> <img alt="Click for enlarged picture" src="
https://hosting.photobucket.com/95288841-8654-4bf7-8fc9-a4aa78dce87f/203a27be-8f10-459d-89b9-befb6b636b74.jpg" width="600" /> </a></p>
<p>
<a href=" https://hosting.photobucket.com/95288841-8654-4bf7-8fc9-a4aa78dce87f/5dc4358f-19d8-475f-a4af-9c29e9ed18d7.jpg
" target="_blank"> <img alt="Click for enlarged picture" src="
https://hosting.photobucket.com/95288841-8654-4bf7-8fc9-a4aa78dce87f/5dc4358f-19d8-475f-a4af-9c29e9ed18d7.jpg" width="600" /> </a></p>
<p>
<strong>BACK TO BASICS MINIATURE PAINTING WORKSHOPS FOR YOUNG</strong></p>
<p>
On weekdays from 17:00 to 18:00, we held our new workshops for the youngest, in which our youngest participants painted their first miniatures.</p>
<p>
<a href=" https://hosting.photobucket.com/95288841-8654-4bf7-8fc9-a4aa78dce87f/948af139-8fb5-4e28-a27c-404466e70d05.jpg
" target="_blank"> <img alt="Click for enlarged picture" src="
https://hosting.photobucket.com/95288841-8654-4bf7-8fc9-a4aa78dce87f/948af139-8fb5-4e28-a27c-404466e70d05.jpg" width="600" /> </a></p>
<p>
<a href=" https://hosting.photobucket.com/95288841-8654-4bf7-8fc9-a4aa78dce87f/bb3e20c2-bb21-4a3d-863a-74de08261467.jpg
" target="_blank"> <img alt="Click for enlarged picture" src="
https://hosting.photobucket.com/95288841-8654-4bf7-8fc9-a4aa78dce87f/bb3e20c2-bb21-4a3d-863a-74de08261467.jpg" width="600" /> </a></p>
<p>
<a href=" https://hosting.photobucket.com/95288841-8654-4bf7-8fc9-a4aa78dce87f/7316c760-98e3-4e3f-9261-d138aa7a5a6a.jpg
" target="_blank"> <img alt="Click for enlarged picture" src="
https://hosting.photobucket.com/95288841-8654-4bf7-8fc9-a4aa78dce87f/7316c760-98e3-4e3f-9261-d138aa7a5a6a.jpg" width="600" /> </a></p>
<p>
<a href=" https://hosting.photobucket.com/95288841-8654-4bf7-8fc9-a4aa78dce87f/68934b39-3d1f-4f43-b967-14b73c41a39e.jpg
" target="_blank"> <img alt="Click for enlarged picture" src="
https://hosting.photobucket.com/95288841-8654-4bf7-8fc9-a4aa78dce87f/68934b39-3d1f-4f43-b967-14b73c41a39e.jpg" width="600" /> </a></p>
<p>
<a href=" https://hosting.photobucket.com/95288841-8654-4bf7-8fc9-a4aa78dce87f/46125bce-a28d-494f-873a-3aeabdc1d6c2.jpg
" target="_blank"> <img alt="Click for enlarged picture" src="
https://hosting.photobucket.com/95288841-8654-4bf7-8fc9-a4aa78dce87f/46125bce-a28d-494f-873a-3aeabdc1d6c2.jpg" width="600" /> </a></p>
<p>
<a href=" https://hosting.photobucket.com/95288841-8654-4bf7-8fc9-a4aa78dce87f/3c58e0ad-77a9-44c8-b6bf-d9a55c514d43.jpg
" target="_blank"> <img alt="Click for enlarged picture" src="
https://hosting.photobucket.com/95288841-8654-4bf7-8fc9-a4aa78dce87f/3c58e0ad-77a9-44c8-b6bf-d9a55c514d43.jpg" width="600" /> </a></p>
<p>
<a href=" https://hosting.photobucket.com/95288841-8654-4bf7-8fc9-a4aa78dce87f/f891f0f0-051b-40ee-9676-cb03b0a9811b.jpg
" target="_blank"> <img alt="Click for enlarged picture" src="
https://hosting.photobucket.com/95288841-8654-4bf7-8fc9-a4aa78dce87f/f891f0f0-051b-40ee-9676-cb03b0a9811b.jpg" width="600" /> </a></p>
<p>
<strong>AGRAM LEGO SECTION lecture: FW-14b &ndash; An F1 racecar for the future</strong></p>
<p>
On Wednesday, February 25, 2026, as part of the activities of our Agram Lego Section, our resident mechanical engineer Marko Paunović gave a lecture on the topic of the F1 racecar from 1992. Admission to the lecture was free, and upon completion, a LEGO model of the racecar was made by members of the Lego section</p>
<p>
<a href=" https://hosting.photobucket.com/95288841-8654-4bf7-8fc9-a4aa78dce87f/b2e14b1c-daa4-4314-8685-184377bc7e28.jpg
" target="_blank"> <img alt="Click for enlarged picture" src="
https://hosting.photobucket.com/95288841-8654-4bf7-8fc9-a4aa78dce87f/b2e14b1c-daa4-4314-8685-184377bc7e28.jpg" width="600" /> </a></p>
<p>
<a href=" https://hosting.photobucket.com/95288841-8654-4bf7-8fc9-a4aa78dce87f/31fb439a-77d3-4418-83ff-66c3af279cca.jpg" target="_blank"> <img alt="Click for enlarged picture" src="
https://hosting.photobucket.com/95288841-8654-4bf7-8fc9-a4aa78dce87f/31fb439a-77d3-4418-83ff-66c3af279cca.jpg" width="600" /> </a></p>
<p>
<a href=" https://hosting.photobucket.com/95288841-8654-4bf7-8fc9-a4aa78dce87f/bfcaf282-6be8-4b52-a3ed-c91137457876.jpg
" target="_blank"> <img alt="Click for enlarged picture" src="
https://hosting.photobucket.com/95288841-8654-4bf7-8fc9-a4aa78dce87f/bfcaf282-6be8-4b52-a3ed-c91137457876.jpg" width="600" /> </a></p>
<p>
<a href=" https://hosting.photobucket.com/95288841-8654-4bf7-8fc9-a4aa78dce87f/ce70fc61-9e1a-4169-aaad-8b67417656c0.jpg
" target="_blank"> <img alt="Click for enlarged picture" src="
https://hosting.photobucket.com/95288841-8654-4bf7-8fc9-a4aa78dce87f/ce70fc61-9e1a-4169-aaad-8b67417656c0.jpg" width="600" /> </a></p>
<p>
<a href=" https://hosting.photobucket.com/95288841-8654-4bf7-8fc9-a4aa78dce87f/94ca0e36-8710-458d-8194-9f71299f4d74.jpg
" target="_blank"> <img alt="Click for enlarged picture" src="
https://hosting.photobucket.com/95288841-8654-4bf7-8fc9-a4aa78dce87f/94ca0e36-8710-458d-8194-9f71299f4d74.jpg" width="600" /> </a></p>
<p>
<a href=" https://hosting.photobucket.com/95288841-8654-4bf7-8fc9-a4aa78dce87f/c6771f72-7191-4ca3-a792-3bb1ab3897b1.jpg
" target="_blank"> <img alt="Click for enlarged picture" src="
https://hosting.photobucket.com/95288841-8654-4bf7-8fc9-a4aa78dce87f/c6771f72-7191-4ca3-a792-3bb1ab3897b1.jpg" width="600" /> </a></p>
<p>
<a href=" https://hosting.photobucket.com/95288841-8654-4bf7-8fc9-a4aa78dce87f/c8fcfcb6-09f2-4398-a2fb-fa5065771e01.jpg
" target="_blank"> <img alt="Click for enlarged picture" src="
https://hosting.photobucket.com/95288841-8654-4bf7-8fc9-a4aa78dce87f/c8fcfcb6-09f2-4398-a2fb-fa5065771e01.jpg" width="600" /> </a></p>
<p>
<a href=" https://hosting.photobucket.com/95288841-8654-4bf7-8fc9-a4aa78dce87f/d7e187a8-d5b1-433b-b30d-091e54dcdddf.jpg
" target="_blank"> <img alt="Click for enlarged picture" src="
https://hosting.photobucket.com/95288841-8654-4bf7-8fc9-a4aa78dce87f/d7e187a8-d5b1-433b-b30d-091e54dcdddf.jpg" width="600" /> </a></p>
<p>
During the second weekend of the Exhibition, 28.02.-01.03., we organized a <strong>MINIATURE PAINTING WORKSHOP - Grimdark</strong>.</p>
<p>
The workshop was held over two days (the entire weekend) and participants painted up to three different figures for the game Trench Crusade. The focus of these lectures was on painting the popular grimdark style minis. The workshop presented paints and equipment, figure preparation, several miniature painting techniques from basic to advanced, and techniques and tricks for quickly and efficiently painting larger quantities of figures at once. Water-based acrylic paints were used as part of the workshop.</p>
<p>
<a href=" https://hosting.photobucket.com/95288841-8654-4bf7-8fc9-a4aa78dce87f/733d94b2-8e8d-4a4e-accd-b9168e32577e.jpg
" target="_blank"> <img alt="Click for enlarged picture" src="
https://hosting.photobucket.com/95288841-8654-4bf7-8fc9-a4aa78dce87f/733d94b2-8e8d-4a4e-accd-b9168e32577e.jpg
" width="600" /> </a></p>
<p>
<a href=" https://hosting.photobucket.com/95288841-8654-4bf7-8fc9-a4aa78dce87f/41020062-45b9-41cd-a357-fa23a389f390.jpg
" target="_blank"> <img alt="Click for enlarged picture" src="
https://hosting.photobucket.com/95288841-8654-4bf7-8fc9-a4aa78dce87f/41020062-45b9-41cd-a357-fa23a389f390.jpg
" width="600" /> </a></p>
<p>
<a href=" https://hosting.photobucket.com/95288841-8654-4bf7-8fc9-a4aa78dce87f/0c07cc55-596d-494d-972b-cd6a0dd6b8b7.jpg
" target="_blank"> <img alt="Click for enlarged picture" src="
https://hosting.photobucket.com/95288841-8654-4bf7-8fc9-a4aa78dce87f/0c07cc55-596d-494d-972b-cd6a0dd6b8b7.jpg" width="600" /> </a></p>
<p>
<a href=" https://hosting.photobucket.com/95288841-8654-4bf7-8fc9-a4aa78dce87f/c17dd356-08b1-48e1-b895-6296aed7f818.jpg
" target="_blank"> <img alt="Click for enlarged picture" src="
https://hosting.photobucket.com/95288841-8654-4bf7-8fc9-a4aa78dce87f/c17dd356-08b1-48e1-b895-6296aed7f818.jpg" width="600" /> </a></p>
<p>
On Wednesday 04.03.2026. the annual <strong>session of the Assembly</strong> was held, where we determined the guidelines for work in 2026.</p>
<p>
,</p>
<p>
<a href=" https://hosting.photobucket.com/95288841-8654-4bf7-8fc9-a4aa78dce87f/59484bd0-7edc-4aed-a04e-ae42900ba3e6.jpg
" target="_blank"> <img alt="Click for enlarged picture" src="
https://hosting.photobucket.com/95288841-8654-4bf7-8fc9-a4aa78dce87f/59484bd0-7edc-4aed-a04e-ae42900ba3e6.jpg
" width="600" /> </a></p>
<p>
On Sunday 08.03.2026. The exhibition was over, our exhibits safely stored, and the Gallery cleaned.</p>
<p>
<a href=" https://hosting.photobucket.com/95288841-8654-4bf7-8fc9-a4aa78dce87f/98af4280-0956-4cdb-b4a9-da40e3a5a44a.jpg
" target="_blank"> <img alt="Click for enlarged picture" src="
https://hosting.photobucket.com/95288841-8654-4bf7-8fc9-a4aa78dce87f/98af4280-0956-4cdb-b4a9-da40e3a5a44a.jpg" width="600" /> </a></p>
<p>
<a href=" https://hosting.photobucket.com/95288841-8654-4bf7-8fc9-a4aa78dce87f/3259b35e-1fc2-4a99-a3c5-c7984958d72b.jpg
" target="_blank"> <img alt="Click for enlarged picture" src="
https://hosting.photobucket.com/95288841-8654-4bf7-8fc9-a4aa78dce87f/3259b35e-1fc2-4a99-a3c5-c7984958d72b.jpg" width="600" /> </a></p>
<p>
The most important part of every year when holding this Exhibition is the social aspect, the socializing of our members both among themselves and with our international friends who visit us! With these few photos from our joint gatherings, we greet you until next year!</p>
<p>
<a href=" https://hosting.photobucket.com/95288841-8654-4bf7-8fc9-a4aa78dce87f/b9168e23-79b2-4d81-8a7d-7534062881a7.jpg
" target="_blank"> <img alt="Click for enlarged picture" src="
https://hosting.photobucket.com/95288841-8654-4bf7-8fc9-a4aa78dce87f/b9168e23-79b2-4d81-8a7d-7534062881a7.jpg " width="600" /> </a></p>
<p>
<a href=" https://hosting.photobucket.com/95288841-8654-4bf7-8fc9-a4aa78dce87f/edff925e-916c-4d78-953e-210abf3753d4.jpg
" target="_blank"> <img alt="Click for enlarged picture" src="
https://hosting.photobucket.com/95288841-8654-4bf7-8fc9-a4aa78dce87f/edff925e-916c-4d78-953e-210abf3753d4.jpg " width="600" /> </a></p>
<p>
<a href=" https://hosting.photobucket.com/95288841-8654-4bf7-8fc9-a4aa78dce87f/8bcb48fa-466b-43f8-8a4b-f15f6794b21e.jpg
" target="_blank"> <img alt="Click for enlarged picture" src="
https://hosting.photobucket.com/95288841-8654-4bf7-8fc9-a4aa78dce87f/8bcb48fa-466b-43f8-8a4b-f15f6794b21e.jpg" width="600" /> </a></p>
",
"content_hrv" => "<p>
<a href=" https://hosting.photobucket.com/95288841-8654-4bf7-8fc9-a4aa78dce87f/dc756f84-867d-4df4-acd8-5d43775cafc2.jpg
" target="_blank"> <img alt="Click for enlarged picture" src="
https://hosting.photobucket.com/95288841-8654-4bf7-8fc9-a4aa78dce87f/dc756f84-867d-4df4-acd8-5d43775cafc2.jpg" width="600" /> </a></p>
<p>
<strong>Izložba minijatura i maketa &quot;Agram 2026&quot;</strong> održala se ove godine od 19.2. do 08.03. Postavljanje izložbe je održano u srijedu 18.2. i sudjelovao je velik broj članova kao i prijatelja Udruge koji su izlagali svoje radove.</p>
<p>
<a href=" https://hosting.photobucket.com/95288841-8654-4bf7-8fc9-a4aa78dce87f/8529d6d4-76ea-4872-a9e6-748e04223a4e.jpg
" target="_blank"> <img alt="Click for enlarged picture" src="
https://hosting.photobucket.com/95288841-8654-4bf7-8fc9-a4aa78dce87f/8529d6d4-76ea-4872-a9e6-748e04223a4e.jpg
" width="600" /> </a></p>
<p>
<a href=" https://hosting.photobucket.com/95288841-8654-4bf7-8fc9-a4aa78dce87f/f3038937-f001-4ceb-b725-a330fcd64cee.jpg
" target="_blank"> <img alt="Click for enlarged picture" src="
https://hosting.photobucket.com/95288841-8654-4bf7-8fc9-a4aa78dce87f/f3038937-f001-4ceb-b725-a330fcd64cee.jpg
" width="600" /> </a></p>
<p>
<a href=" https://hosting.photobucket.com/95288841-8654-4bf7-8fc9-a4aa78dce87f/3575379e-e068-49e2-9d4d-c9a49531fdc2.jpg
" target="_blank"> <img alt="Click for enlarged picture" src="
https://hosting.photobucket.com/95288841-8654-4bf7-8fc9-a4aa78dce87f/3575379e-e068-49e2-9d4d-c9a49531fdc2.jpg" width="600" /> </a></p>
<p>
<a href=" https://hosting.photobucket.com/95288841-8654-4bf7-8fc9-a4aa78dce87f/e51713c7-2add-4f8f-ae37-e6eba25badff.jpg
" target="_blank"> <img alt="Click for enlarged picture" src="
https://hosting.photobucket.com/95288841-8654-4bf7-8fc9-a4aa78dce87f/e51713c7-2add-4f8f-ae37-e6eba25badff.jpg" width="600" /> </a></p>
<p>
<a href=" https://hosting.photobucket.com/95288841-8654-4bf7-8fc9-a4aa78dce87f/9c0bb546-50a8-483d-aeab-ab3b2ce9f094.jpg
" target="_blank"> <img alt="Click for enlarged picture" src="
https://hosting.photobucket.com/95288841-8654-4bf7-8fc9-a4aa78dce87f/9c0bb546-50a8-483d-aeab-ab3b2ce9f094.jpg" width="600" /> </a></p>
<p>
Otvorenje Izložbe održalo se u četvrtak, 19.2.2026. s početkom u 18:00h. Izložba je organizirana povodom na&scaron;eg dvadeset trećeg rođendana.</p>
<p>
<a href=" https://hosting.photobucket.com/95288841-8654-4bf7-8fc9-a4aa78dce87f/71c7bfc2-1ffc-43b9-9d5a-53e009f6b86d.jpg
" target="_blank"> <img alt="Click for enlarged picture" src="
https://hosting.photobucket.com/95288841-8654-4bf7-8fc9-a4aa78dce87f/71c7bfc2-1ffc-43b9-9d5a-53e009f6b86d.jpg" width="600" /> </a></p>
<p>
<a href=" https://hosting.photobucket.com/95288841-8654-4bf7-8fc9-a4aa78dce87f/007b4701-1d7c-4a67-a599-0539a2aa3191.jpg
" target="_blank"> <img alt="Click for enlarged picture" src="
https://hosting.photobucket.com/95288841-8654-4bf7-8fc9-a4aa78dce87f/007b4701-1d7c-4a67-a599-0539a2aa3191.jpg" width="600" /> </a></p>
<p>
<a href=" https://hosting.photobucket.com/95288841-8654-4bf7-8fc9-a4aa78dce87f/2c8090e2-8b95-4368-bb48-98876d680e15.jpg
" target="_blank"> <img alt="Click for enlarged picture" src="
https://hosting.photobucket.com/95288841-8654-4bf7-8fc9-a4aa78dce87f/2c8090e2-8b95-4368-bb48-98876d680e15.jpg" width="600" /> </a></p>
<p>
<a href=" https://hosting.photobucket.com/95288841-8654-4bf7-8fc9-a4aa78dce87f/375768ad-a8bb-49bf-9845-e46c896ba7ec.jpg
" target="_blank"> <img alt="Click for enlarged picture" src="
https://hosting.photobucket.com/95288841-8654-4bf7-8fc9-a4aa78dce87f/375768ad-a8bb-49bf-9845-e46c896ba7ec.jpg" width="600" /> </a></p>
<p>
<a href=" https://hosting.photobucket.com/95288841-8654-4bf7-8fc9-a4aa78dce87f/a93de974-4ccb-4876-85b0-4d066ae402b3.jpg
" target="_blank"> <img alt="Click for enlarged picture" src="
https://hosting.photobucket.com/95288841-8654-4bf7-8fc9-a4aa78dce87f/a93de974-4ccb-4876-85b0-4d066ae402b3.jpg" width="600" /> </a></p>
<p>
<a href=" https://hosting.photobucket.com/95288841-8654-4bf7-8fc9-a4aa78dce87f/d323ccc9-1b9a-4cb2-8adf-7019b0e217f4.jpg
" target="_blank"> <img alt="Click for enlarged picture" src="
https://hosting.photobucket.com/95288841-8654-4bf7-8fc9-a4aa78dce87f/d323ccc9-1b9a-4cb2-8adf-7019b0e217f4.jpg" width="600" /> </a></p>
<p>
<a href=" https://hosting.photobucket.com/95288841-8654-4bf7-8fc9-a4aa78dce87f/a5a66447-2d76-47ae-866d-4d512ef469a5.jpg
" target="_blank"> <img alt="Click for enlarged picture" src="
https://hosting.photobucket.com/95288841-8654-4bf7-8fc9-a4aa78dce87f/a5a66447-2d76-47ae-866d-4d512ef469a5.jpg" width="600" /> </a></p>
<p>
<a href=" https://hosting.photobucket.com/95288841-8654-4bf7-8fc9-a4aa78dce87f/3e7bcfc9-ba02-4f94-a6c3-79dfaea3639e.jpg
" target="_blank"> <img alt="Click for enlarged picture" src="
https://hosting.photobucket.com/95288841-8654-4bf7-8fc9-a4aa78dce87f/3e7bcfc9-ba02-4f94-a6c3-79dfaea3639e.jpg" width="600" /> </a></p>
<p>
<a href=" https://hosting.photobucket.com/95288841-8654-4bf7-8fc9-a4aa78dce87f/24e79466-4a9e-4b10-970c-caad235d260d.jpg
" target="_blank"> <img alt="Click for enlarged picture" src="
https://hosting.photobucket.com/95288841-8654-4bf7-8fc9-a4aa78dce87f/24e79466-4a9e-4b10-970c-caad235d260d.jpg" width="600" /> </a></p>
<p>
Kao i uvijek, Izložba je prikazivala presjek rada Udruge, njenih članova, polaznika njenih tečajeva i radionica te članova FB grupe Miniature Painters Croatia. U velikom broju vitrina na&scaron;le su se brojne minijature za stolne strate&scaron;ke igre, igre na tabli, a cijela jedna vitrina posvećena je nagrađenim izlo&scaron;cima sa prethodnih minijaturističkih natjecanja. Nekoliko vitrina bilo je posvećeno projektima koje Udruga već 23 godinu provodi poput Knjižnice i čitaonice UMS &bdquo;Agram&ldquo;, Radionice za izradu prostornih maketa i Radionice bojanja minijatura, ali i novih poput Agram Group Build, Agram Lego Sekcije i Back to Basics radionica bojanja za najmlađe.</p>
<p>
<a href=" https://hosting.photobucket.com/95288841-8654-4bf7-8fc9-a4aa78dce87f/fca84936-af71-44d3-9a4c-faeb26163899.jpg
" target="_blank"> <img alt="Click for enlarged picture" src="
https://hosting.photobucket.com/95288841-8654-4bf7-8fc9-a4aa78dce87f/fca84936-af71-44d3-9a4c-faeb26163899.jpg" width="600" /> </a></p>
<p>
<a href=" https://hosting.photobucket.com/95288841-8654-4bf7-8fc9-a4aa78dce87f/459bc5ac-8702-46f9-93b4-547deaabdef4.jpg
" target="_blank"> <img alt="Click for enlarged picture" src="
https://hosting.photobucket.com/95288841-8654-4bf7-8fc9-a4aa78dce87f/459bc5ac-8702-46f9-93b4-547deaabdef4.jpg" width="600" /> </a></p>
<p>
<a href=" https://hosting.photobucket.com/95288841-8654-4bf7-8fc9-a4aa78dce87f/91a04363-b2ef-4635-a046-7edf25ce7808.jpg
" target="_blank"> <img alt="Click for enlarged picture" src="
https://hosting.photobucket.com/95288841-8654-4bf7-8fc9-a4aa78dce87f/91a04363-b2ef-4635-a046-7edf25ce7808.jpg" width="600" /> </a></p>
<p>
<a href=" https://hosting.photobucket.com/95288841-8654-4bf7-8fc9-a4aa78dce87f/73256af5-fd5d-40b5-95e1-120e49c9be87.jpg
" target="_blank"> <img alt="Click for enlarged picture" src="
https://hosting.photobucket.com/95288841-8654-4bf7-8fc9-a4aa78dce87f/73256af5-fd5d-40b5-95e1-120e49c9be87.jpg" width="600" /> </a></p>
<p>
<a href=" https://hosting.photobucket.com/95288841-8654-4bf7-8fc9-a4aa78dce87f/979f9be5-23f3-4df9-91dc-ab71d6a10d64.jpg
" target="_blank"> <img alt="Click for enlarged picture" src="
https://hosting.photobucket.com/95288841-8654-4bf7-8fc9-a4aa78dce87f/979f9be5-23f3-4df9-91dc-ab71d6a10d64.jpg" width="600" /> </a></p>
<p>
<a href=" https://hosting.photobucket.com/95288841-8654-4bf7-8fc9-a4aa78dce87f/d0ff4379-183a-47b9-a740-9ddc283ebc29.jpg
" target="_blank"> <img alt="Click for enlarged picture" src="
https://hosting.photobucket.com/95288841-8654-4bf7-8fc9-a4aa78dce87f/d0ff4379-183a-47b9-a740-9ddc283ebc29.jpg" width="600" /> </a></p>
<p>
<a href=" https://hosting.photobucket.com/95288841-8654-4bf7-8fc9-a4aa78dce87f/4333e95e-bbbd-4f47-aaea-38a9c99e54d8.jpg
" target="_blank"> <img alt="Click for enlarged picture" src="
https://hosting.photobucket.com/95288841-8654-4bf7-8fc9-a4aa78dce87f/4333e95e-bbbd-4f47-aaea-38a9c99e54d8.jpg" width="600" /> </a></p>
<p>
<a href=" https://hosting.photobucket.com/95288841-8654-4bf7-8fc9-a4aa78dce87f/1372f8a2-b222-48ee-ae45-a90b5a354ef7.jpg
" target="_blank"> <img alt="Click for enlarged picture" src="
https://hosting.photobucket.com/95288841-8654-4bf7-8fc9-a4aa78dce87f/1372f8a2-b222-48ee-ae45-a90b5a354ef7.jpg" width="600" /> </a></p>
<p>
<a href=" https://hosting.photobucket.com/95288841-8654-4bf7-8fc9-a4aa78dce87f/6a1b4fd1-d982-4b06-9c5f-3cd40d6bf10a.jpg
" target="_blank"> <img alt="Click for enlarged picture" src="
https://hosting.photobucket.com/95288841-8654-4bf7-8fc9-a4aa78dce87f/6a1b4fd1-d982-4b06-9c5f-3cd40d6bf10a.jpg" width="600" /> </a></p>
<p>
<a href=" https://hosting.photobucket.com/95288841-8654-4bf7-8fc9-a4aa78dce87f/c2ec45e1-e0f3-463a-b254-cb2a38b53e14.jpg
" target="_blank"> <img alt="Click for enlarged picture" src="
https://hosting.photobucket.com/95288841-8654-4bf7-8fc9-a4aa78dce87f/c2ec45e1-e0f3-463a-b254-cb2a38b53e14.jpg" width="600" /> </a></p>
<p>
<a href=" https://hosting.photobucket.com/95288841-8654-4bf7-8fc9-a4aa78dce87f/17553b9a-0592-4f6a-a097-3f1a97e161f3.jpg
" target="_blank"> <img alt="Click for enlarged picture" src="
https://hosting.photobucket.com/95288841-8654-4bf7-8fc9-a4aa78dce87f/17553b9a-0592-4f6a-a097-3f1a97e161f3.jpg" width="600" /> </a></p>
<p>
<a href=" https://hosting.photobucket.com/95288841-8654-4bf7-8fc9-a4aa78dce87f/8658bd6b-dff2-4d24-8473-928d44d44480.jpg
" target="_blank"> <img alt="Click for enlarged picture" src="
https://hosting.photobucket.com/95288841-8654-4bf7-8fc9-a4aa78dce87f/8658bd6b-dff2-4d24-8473-928d44d44480.jpg" width="600" /> </a></p>
<p>
<a href=" https://hosting.photobucket.com/95288841-8654-4bf7-8fc9-a4aa78dce87f/ecab0ea7-f75b-4e31-a520-d088ad39fa17.jpg
" target="_blank"> <img alt="Click for enlarged picture" src="
https://hosting.photobucket.com/95288841-8654-4bf7-8fc9-a4aa78dce87f/ecab0ea7-f75b-4e31-a520-d088ad39fa17.jpg" width="600" /> </a></p>
<p>
<a href=" https://hosting.photobucket.com/95288841-8654-4bf7-8fc9-a4aa78dce87f/9495a2f5-8a82-41f2-abf4-9ade3db41d87.jpg
" target="_blank"> <img alt="Click for enlarged picture" src="
https://hosting.photobucket.com/95288841-8654-4bf7-8fc9-a4aa78dce87f/9495a2f5-8a82-41f2-abf4-9ade3db41d87.jpg" width="600" /> </a></p>
<p>
<a href=" https://hosting.photobucket.com/95288841-8654-4bf7-8fc9-a4aa78dce87f/362cc6fd-a5dd-474b-9b9f-aeab27d6dcfa.jpg
" target="_blank"> <img alt="Click for enlarged picture" src="
https://hosting.photobucket.com/95288841-8654-4bf7-8fc9-a4aa78dce87f/362cc6fd-a5dd-474b-9b9f-aeab27d6dcfa.jpg" width="600" /> </a></p>
<p>
Posebna čast nam je bila ugostiti na&scaron;eg gosta izlagača, Ninoslava Luka minijaturista iz Poreča koji nam se predstavio svojom kolekcijom povijesnih diorama.</p>
<p>
<a href=" https://hosting.photobucket.com/95288841-8654-4bf7-8fc9-a4aa78dce87f/ba1353de-e2bd-4340-9121-9056e287ed4a.jpg
" target="_blank"> <img alt="Click for enlarged picture" src="
https://hosting.photobucket.com/95288841-8654-4bf7-8fc9-a4aa78dce87f/ba1353de-e2bd-4340-9121-9056e287ed4a.jpg" width="600" /> </a></p>
<p>
<a href=" https://hosting.photobucket.com/95288841-8654-4bf7-8fc9-a4aa78dce87f/cea18506-1b50-4e5b-955c-0b9ca02d7826.jpg
" target="_blank"> <img alt="Click for enlarged picture" src="
https://hosting.photobucket.com/95288841-8654-4bf7-8fc9-a4aa78dce87f/cea18506-1b50-4e5b-955c-0b9ca02d7826.jpg" width="600" /> </a></p>
<p>
<a href=" https://hosting.photobucket.com/95288841-8654-4bf7-8fc9-a4aa78dce87f/1be85b41-e3b6-4536-b141-cd0da6eb38c1.jpg
" target="_blank"> <img alt="Click for enlarged picture" src="
https://hosting.photobucket.com/95288841-8654-4bf7-8fc9-a4aa78dce87f/1be85b41-e3b6-4536-b141-cd0da6eb38c1.jpg" width="600" /> </a></p>
<p>
<a href=" https://hosting.photobucket.com/95288841-8654-4bf7-8fc9-a4aa78dce87f/9e93b87d-ff3c-4b7b-8f06-5f9d3464a134.jpg
" target="_blank"> <img alt="Click for enlarged picture" src="
https://hosting.photobucket.com/95288841-8654-4bf7-8fc9-a4aa78dce87f/9e93b87d-ff3c-4b7b-8f06-5f9d3464a134.jpg" width="600" /> </a></p>
<p>
Tijekom prvog vikenda Izložbe, 21.-22.02.,održali smo 20. godi&scaron;nje međunarodno natjecanje u bojanju minijatura <strong>Black Queen Hobby and Miniature Painting Competition</strong>!</p>
<p>
<a href=" https://hosting.photobucket.com/95288841-8654-4bf7-8fc9-a4aa78dce87f/3056fb09-f66c-4dea-80a8-a4e72407429a.jpg
" target="_blank"> <img alt="Click for enlarged picture" src="
https://hosting.photobucket.com/95288841-8654-4bf7-8fc9-a4aa78dce87f/3056fb09-f66c-4dea-80a8-a4e72407429a.jpg" width="600" /> </a></p>
<p>
Kako su natjecatelji pristizali i prijavljivali se na natjecanje, na&scaron;e vrijedno osoblje je fotografiralo sve izlo&scaron;ke prije nego li su ih rasporedili po kategorijama i pažljivo ih postavili u staklene vitrine. Niti jutarnja okrijepa nije usfalila zahvaljujući na&scaron;im revnim volonterima.</p>
<p>
<a href=" https://hosting.photobucket.com/95288841-8654-4bf7-8fc9-a4aa78dce87f/1118089c-2b46-4a2c-b17d-dc92b66d1ffc.jpg
" target="_blank"> <img alt="Click for enlarged picture" src="
https://hosting.photobucket.com/95288841-8654-4bf7-8fc9-a4aa78dce87f/1118089c-2b46-4a2c-b17d-dc92b66d1ffc.jpg" width="600" /> </a></p>
<p>
<a href=" https://hosting.photobucket.com/95288841-8654-4bf7-8fc9-a4aa78dce87f/9fd3c272-9a69-4532-a09d-36497a20a820.jpg
" target="_blank"> <img alt="Click for enlarged picture" src="
https://hosting.photobucket.com/95288841-8654-4bf7-8fc9-a4aa78dce87f/9fd3c272-9a69-4532-a09d-36497a20a820.jpg" width="600" /> </a></p>
<p>
<a href=" https://hosting.photobucket.com/95288841-8654-4bf7-8fc9-a4aa78dce87f/86995e80-c502-45fb-80f5-c8fda27da3f9.jpg
" target="_blank"> <img alt="Click for enlarged picture" src="
https://hosting.photobucket.com/95288841-8654-4bf7-8fc9-a4aa78dce87f/86995e80-c502-45fb-80f5-c8fda27da3f9.jpg" width="600" /> </a></p>
<p>
U podne, sve vitrine su bile pune i natjecanje je moglo službeno početi.</p>
<p>
<a href=" https://hosting.photobucket.com/95288841-8654-4bf7-8fc9-a4aa78dce87f/bce59a4f-c3e3-4708-a3d6-25e81a894c24.jpg
" target="_blank"> <img alt="Click for enlarged picture" src="
https://hosting.photobucket.com/95288841-8654-4bf7-8fc9-a4aa78dce87f/bce59a4f-c3e3-4708-a3d6-25e81a894c24.jpg" width="600" /> </a></p>
<p>
<a href=" https://hosting.photobucket.com/95288841-8654-4bf7-8fc9-a4aa78dce87f/16a0a094-01aa-4e52-82cf-fdab00d74711.jpg
" target="_blank"> <img alt="Click for enlarged picture" src="
https://hosting.photobucket.com/95288841-8654-4bf7-8fc9-a4aa78dce87f/16a0a094-01aa-4e52-82cf-fdab00d74711.jpg" width="600" /> </a></p>
<p>
<a href=" https://hosting.photobucket.com/95288841-8654-4bf7-8fc9-a4aa78dce87f/0d3f4042-ff77-48d0-b332-add0fd08f7c3.jpg
" target="_blank"> <img alt="Click for enlarged picture" src="
https://hosting.photobucket.com/95288841-8654-4bf7-8fc9-a4aa78dce87f/0d3f4042-ff77-48d0-b332-add0fd08f7c3.jpg" width="600" /> </a></p>
<p>
<a href=" https://hosting.photobucket.com/95288841-8654-4bf7-8fc9-a4aa78dce87f/3711baf8-93f2-434a-aea9-a95288ca04dd.jpg
" target="_blank"> <img alt="Click for enlarged picture" src="
https://hosting.photobucket.com/95288841-8654-4bf7-8fc9-a4aa78dce87f/3711baf8-93f2-434a-aea9-a95288ca04dd.jpg" width="600" /> </a></p>
<p>
<a href=" https://hosting.photobucket.com/95288841-8654-4bf7-8fc9-a4aa78dce87f/53113b97-ec06-4409-95ba-95a5ad3f9720.jpg
" target="_blank"> <img alt="Click for enlarged picture" src="
https://hosting.photobucket.com/95288841-8654-4bf7-8fc9-a4aa78dce87f/53113b97-ec06-4409-95ba-95a5ad3f9720.jpg" width="600" /> </a></p>
<p>
<a href=" https://hosting.photobucket.com/95288841-8654-4bf7-8fc9-a4aa78dce87f/ab127858-193d-4976-bdb2-e27302722fca.jpg
" target="_blank"> <img alt="Click for enlarged picture" src="
https://hosting.photobucket.com/95288841-8654-4bf7-8fc9-a4aa78dce87f/ab127858-193d-4976-bdb2-e27302722fca.jpg" width="600" /> </a></p>
<p>
<a href=" https://hosting.photobucket.com/95288841-8654-4bf7-8fc9-a4aa78dce87f/3735af11-3fb6-4772-a8ff-5e0ff6ddf03a.jpg
" target="_blank"> <img alt="Click for enlarged picture" src="
https://hosting.photobucket.com/95288841-8654-4bf7-8fc9-a4aa78dce87f/3735af11-3fb6-4772-a8ff-5e0ff6ddf03a.jpg" width="600" /> </a></p>
<p>
<strong>Back To Basics radionice za najmlađe na Black Queen</strong></p>
<p>
Ove godine smo tijekom cijelog vikenda organizirali radionice bojanja minijatura za najmlađe koji su mogli po prvi puta obojati neku od na&scaron;ih vlastitih minijatura osmi&scaron;ljenih upravo za ovaj program!</p>
<p>
<a href=" https://hosting.photobucket.com/95288841-8654-4bf7-8fc9-a4aa78dce87f/6999be0c-8cc6-4947-a423-9427a2299724.jpg
" target="_blank"> <img alt="Click for enlarged picture" src="
https://hosting.photobucket.com/95288841-8654-4bf7-8fc9-a4aa78dce87f/6999be0c-8cc6-4947-a423-9427a2299724.jpg" width="600" /> </a></p>
<p>
<a href="https://hosting.photobucket.com/95288841-8654-4bf7-8fc9-a4aa78dce87f/835b05a5-f171-49df-afa6-da0692b89074.jpg" target="_blank"><img alt="Click for enlarged picture" src="https://hosting.photobucket.com/95288841-8654-4bf7-8fc9-a4aa78dce87f/835b05a5-f171-49df-afa6-da0692b89074.jpg" width="600" /></a></p>
<p>
<a href=" https://hosting.photobucket.com/95288841-8654-4bf7-8fc9-a4aa78dce87f/ef5dde13-84ee-4ea0-b9f3-28aaf703ef6d.jpg
" target="_blank"> <img alt="Click for enlarged picture" src="
https://hosting.photobucket.com/95288841-8654-4bf7-8fc9-a4aa78dce87f/ef5dde13-84ee-4ea0-b9f3-28aaf703ef6d.jpg" width="600" /> </a></p>
<p>
<strong>PRODAJNI KUTAK</strong></p>
<p>
Tijekom vikenda ugostili smo na&scaron;e sponzore sa njihovim prodajnim &scaron;tandovima: Swood.si i Carta Magica.</p>
<p>
<a href=" https://hosting.photobucket.com/95288841-8654-4bf7-8fc9-a4aa78dce87f/5ee9a49f-a387-435a-9110-572402b7191d.jpg
" target="_blank"> <img alt="Click for enlarged picture" src="
https://hosting.photobucket.com/95288841-8654-4bf7-8fc9-a4aa78dce87f/5ee9a49f-a387-435a-9110-572402b7191d.jpg" width="600" /> </a></p>
<p>
<a href=" https://hosting.photobucket.com/95288841-8654-4bf7-8fc9-a4aa78dce87f/47cf600f-b1eb-4655-bf06-305f6f21d5d2.jpg
" target="_blank"> <img alt="Click for enlarged picture" src="
https://hosting.photobucket.com/95288841-8654-4bf7-8fc9-a4aa78dce87f/47cf600f-b1eb-4655-bf06-305f6f21d5d2.jpg" width="600" /> </a></p>
<p>
<strong>OGLEDNE RADIONICE BOJANJA MINIJATURA</strong></p>
<p>
Prostor ZZTK omogućuje održavanje radionica tijekom vikenda u kino dvorani u podrumu, stoga smo tijekom vikenda organizirali i ogledne radionice. Rad predavača snimao se kamerom i projicirao na projekcijsko platno u dvorani. Veliko hvala na&scaron;im domaćim i inozemnim predavačima: Anžetu Zorku (SLO), doc.dr.sc. Wintonu Afriću (HR), Ivanu Knezoviću (UMS Agram) i Petru Knezoviću (HR).</p>
<p>
<a href=" https://hosting.photobucket.com/95288841-8654-4bf7-8fc9-a4aa78dce87f/e8d835be-ec99-49d7-bc9b-086e38573d1a.jpg
" target="_blank"> <img alt="Click for enlarged picture" src="
https://hosting.photobucket.com/95288841-8654-4bf7-8fc9-a4aa78dce87f/e8d835be-ec99-49d7-bc9b-086e38573d1a.jpg" width="600" /> </a></p>
<p>
<a href=" https://hosting.photobucket.com/95288841-8654-4bf7-8fc9-a4aa78dce87f/f3eba4c1-4637-4da9-8360-75f430355af4.jpg" target="_blank"> <img alt="Click for enlarged picture" src="
https://hosting.photobucket.com/95288841-8654-4bf7-8fc9-a4aa78dce87f/f3eba4c1-4637-4da9-8360-75f430355af4.jpg" width="600" /> </a></p>
<p>
<a href=" https://hosting.photobucket.com/95288841-8654-4bf7-8fc9-a4aa78dce87f/ef523854-4030-4579-aa38-403afda86c91.jpg
" target="_blank"> <img alt="Click for enlarged picture" src="
https://hosting.photobucket.com/95288841-8654-4bf7-8fc9-a4aa78dce87f/ef523854-4030-4579-aa38-403afda86c91.jpg" width="600" /> </a></p>
<p>
<a href=" https://hosting.photobucket.com/95288841-8654-4bf7-8fc9-a4aa78dce87f/dd0943c2-f4a8-40c3-b641-f6dcdd200380.jpg
" target="_blank"> <img alt="Click for enlarged picture" src="
https://hosting.photobucket.com/95288841-8654-4bf7-8fc9-a4aa78dce87f/dd0943c2-f4a8-40c3-b641-f6dcdd200380.jpg" width="600" /> </a></p>
<p>
<a href=" https://hosting.photobucket.com/95288841-8654-4bf7-8fc9-a4aa78dce87f/08b1626a-f6c7-43c9-b718-3e9a41b55ca6.jpg
" target="_blank"> <img alt="Click for enlarged picture" src="
https://hosting.photobucket.com/95288841-8654-4bf7-8fc9-a4aa78dce87f/08b1626a-f6c7-43c9-b718-3e9a41b55ca6.jpg" width="600" /> </a></p>
<p>
<a href=" https://hosting.photobucket.com/95288841-8654-4bf7-8fc9-a4aa78dce87f/91aca7f3-1af6-486d-b174-65079a63a1ea.jpg
" target="_blank"> <img alt="Click for enlarged picture" src="
https://hosting.photobucket.com/95288841-8654-4bf7-8fc9-a4aa78dce87f/91aca7f3-1af6-486d-b174-65079a63a1ea.jpg" width="600" /> </a></p>
<p>
<a href=" https://hosting.photobucket.com/95288841-8654-4bf7-8fc9-a4aa78dce87f/3821f2fb-fbe7-4096-adbc-7d8c981a3b56.jpg
" target="_blank"> <img alt="Click for enlarged picture" src="
https://hosting.photobucket.com/95288841-8654-4bf7-8fc9-a4aa78dce87f/3821f2fb-fbe7-4096-adbc-7d8c981a3b56.jpg" width="600" /> </a></p>
<p>
<a href=" https://hosting.photobucket.com/95288841-8654-4bf7-8fc9-a4aa78dce87f/2c7bb3c5-c0ec-4a96-b6bd-6a90ce5ce154.jpg
" target="_blank"> <img alt="Click for enlarged picture" src="
https://hosting.photobucket.com/95288841-8654-4bf7-8fc9-a4aa78dce87f/2c7bb3c5-c0ec-4a96-b6bd-6a90ce5ce154.jpg" width="600" /> </a></p>
<p>
<a href=" https://hosting.photobucket.com/95288841-8654-4bf7-8fc9-a4aa78dce87f/b646f4ee-21aa-4d12-8db3-6d33351d5aeb.jpg
" target="_blank"> <img alt="Click for enlarged picture" src="
https://hosting.photobucket.com/95288841-8654-4bf7-8fc9-a4aa78dce87f/b646f4ee-21aa-4d12-8db3-6d33351d5aeb.jpg" width="600" /> </a></p>
<p>
<a href=" https://hosting.photobucket.com/95288841-8654-4bf7-8fc9-a4aa78dce87f/fb5efc01-32cc-4119-90e3-188f51b30237.jpg
" target="_blank"> <img alt="Click for enlarged picture" src="
https://hosting.photobucket.com/95288841-8654-4bf7-8fc9-a4aa78dce87f/fb5efc01-32cc-4119-90e3-188f51b30237.jpg" width="600" /> </a></p>
<p>
<strong>NATJECANJE U BRZOM BOJANJU MINIJATURA</strong></p>
<p>
U nedjelju, 22.2. smo organizirali natjecanje u brzom bojanju minijatura. Po prvi puta smo koristili minijature koje su na&scaron; dizajn. Sudionici su imali 60 minuta vremena da obojaju og čarobnjaka.</p>
<p>
<a href=" https://hosting.photobucket.com/95288841-8654-4bf7-8fc9-a4aa78dce87f/106417a6-a047-4e0d-9f81-87858806052f.jpg
" target="_blank"> <img alt="Click for enlarged picture" src="
https://hosting.photobucket.com/95288841-8654-4bf7-8fc9-a4aa78dce87f/106417a6-a047-4e0d-9f81-87858806052f.jpg" width="600" /> </a></p>
<p>
<a href=" https://hosting.photobucket.com/95288841-8654-4bf7-8fc9-a4aa78dce87f/ac6853c7-6e34-4e07-a996-8d7d12744b67.jpg
" target="_blank"> <img alt="Click for enlarged picture" src="
https://hosting.photobucket.com/95288841-8654-4bf7-8fc9-a4aa78dce87f/ac6853c7-6e34-4e07-a996-8d7d12744b67.jpg" width="600" /> </a></p>
<p>
<a href=" https://hosting.photobucket.com/95288841-8654-4bf7-8fc9-a4aa78dce87f/ccb155fa-52c5-4a99-9515-f69a6836dce7.jpg
" target="_blank"> <img alt="Click for enlarged picture" src="
https://hosting.photobucket.com/95288841-8654-4bf7-8fc9-a4aa78dce87f/ccb155fa-52c5-4a99-9515-f69a6836dce7.jpg" width="600" /> </a></p>
<p>
<a href=" https://hosting.photobucket.com/95288841-8654-4bf7-8fc9-a4aa78dce87f/a29fedd0-97ea-45b1-85f9-7ea62188b2b2.jpg
" target="_blank"><img alt="Click for enlarged picture" src="
https://hosting.photobucket.com/95288841-8654-4bf7-8fc9-a4aa78dce87f/a29fedd0-97ea-45b1-85f9-7ea62188b2b2.jpg" width="600" /></a></p>
<p>
S time smo do&scaron;li do samoga kraja ovog predivnog vikenda i sve &scaron;to je preostalo je bila podjela nagrada i priznanja pobjednicima.</p>
<p>
<a href=" https://hosting.photobucket.com/95288841-8654-4bf7-8fc9-a4aa78dce87f/046ca4c8-0ae7-415e-abd3-e131d580c3ad.jpg
" target="_blank"> <img alt="Click for enlarged picture" src="
https://hosting.photobucket.com/95288841-8654-4bf7-8fc9-a4aa78dce87f/046ca4c8-0ae7-415e-abd3-e131d580c3ad.jpg" width="600" /> </a></p>
<p>
<a href=" https://hosting.photobucket.com/95288841-8654-4bf7-8fc9-a4aa78dce87f/cec0dcef-7acb-4a77-89de-271ed5410672.jpg
" target="_blank"> <img alt="Click for enlarged picture" src="
https://hosting.photobucket.com/95288841-8654-4bf7-8fc9-a4aa78dce87f/cec0dcef-7acb-4a77-89de-271ed5410672.jpg" width="600" /> </a></p>
<p>
<a href=" https://hosting.photobucket.com/95288841-8654-4bf7-8fc9-a4aa78dce87f/a495a5fc-31a2-4979-a970-0fa22c334354.jpg
" target="_blank"> <img alt="Click for enlarged picture" src="
https://hosting.photobucket.com/95288841-8654-4bf7-8fc9-a4aa78dce87f/a495a5fc-31a2-4979-a970-0fa22c334354.jpg" width="600" /> </a></p>
<p>
<strong>AGRAM ARENA &ndash; Leaving Asphodel Necropolis28 kampanja</strong></p>
<p>
Tijekom vikenda 21.-22.2. održali smo i novo međunarodno natjecanje Agram Arena! Ovoga puta na redu je bila stolna strate&scaron;ka igra Necropolis 28 za koju su na&scaron;i članovi osmislili dvodnevnu kampanju. Svaki sudionik je izradio svoju bandu vojnika, a velika većina i svoje vlastite table.</p>
<p>
<a href=" https://hosting.photobucket.com/95288841-8654-4bf7-8fc9-a4aa78dce87f/ac69b182-4bfc-4575-a6d3-fb3c8baba342.jpg
" target="_blank"> <img alt="Click for enlarged picture" src="
https://hosting.photobucket.com/95288841-8654-4bf7-8fc9-a4aa78dce87f/ac69b182-4bfc-4575-a6d3-fb3c8baba342.jpg" width="600" /> </a></p>
<p>
<a href=" https://hosting.photobucket.com/95288841-8654-4bf7-8fc9-a4aa78dce87f/289fed7b-e058-42d8-ba2d-cbd0463e98da.jpg
" target="_blank"> <img alt="Click for enlarged picture" src="
https://hosting.photobucket.com/95288841-8654-4bf7-8fc9-a4aa78dce87f/289fed7b-e058-42d8-ba2d-cbd0463e98da.jpg" width="600" /> </a></p>
<p>
<a href=" https://hosting.photobucket.com/95288841-8654-4bf7-8fc9-a4aa78dce87f/d92ebbee-859d-4441-8386-3d760b20b7a7.jpg
" target="_blank"> <img alt="Click for enlarged picture" src="
https://hosting.photobucket.com/95288841-8654-4bf7-8fc9-a4aa78dce87f/d92ebbee-859d-4441-8386-3d760b20b7a7.jpg" width="600" /> </a></p>
<p>
<a href=" https://hosting.photobucket.com/95288841-8654-4bf7-8fc9-a4aa78dce87f/09c59798-7871-425e-a075-3ca1cd91768a.jpg
" target="_blank"> <img alt="Click for enlarged picture" src="
https://hosting.photobucket.com/95288841-8654-4bf7-8fc9-a4aa78dce87f/09c59798-7871-425e-a075-3ca1cd91768a.jpg" width="600" /> </a></p>
<p>
<a href=" https://hosting.photobucket.com/95288841-8654-4bf7-8fc9-a4aa78dce87f/b2f3edc8-5a23-4552-9a2a-4027b286f327.jpg
" target="_blank"> <img alt="Click for enlarged picture" src="
https://hosting.photobucket.com/95288841-8654-4bf7-8fc9-a4aa78dce87f/b2f3edc8-5a23-4552-9a2a-4027b286f327.jpg" width="600" /> </a></p>
<p>
<a href=" https://hosting.photobucket.com/95288841-8654-4bf7-8fc9-a4aa78dce87f/2a9f43ac-b531-4746-b7bb-ac5a3356aab0.jpg
" target="_blank"> <img alt="Click for enlarged picture" src="
https://hosting.photobucket.com/95288841-8654-4bf7-8fc9-a4aa78dce87f/2a9f43ac-b531-4746-b7bb-ac5a3356aab0.jpg" width="600" /> </a></p>
<p>
<strong>DOGAĐANJA RADNIM DANIMA ZA VRIJEME IZLOŽBE</strong></p>
<p>
Tijekom naredna dva tjedna, na&scaron;i volonteri su radnim danima od 16:00 do 20:00, držali otvorene radionice bojanja minijatura. Postavljene su radne stanice za bojanje minijatura na kojoj su na&scaron;i posjetitelji mogli bojati minijature koje smo priredili (ili svoje ukoliko su ih donijeli) koristeći na&scaron;e materijale i alate.</p>
<p>
<a href=" https://hosting.photobucket.com/95288841-8654-4bf7-8fc9-a4aa78dce87f/6edf7765-42b5-417a-820f-fa5d907179a7.jpg
" target="_blank"> <img alt="Click for enlarged picture" src="
https://hosting.photobucket.com/95288841-8654-4bf7-8fc9-a4aa78dce87f/6edf7765-42b5-417a-820f-fa5d907179a7.jpg" width="600" /> </a></p>
<p>
<a href=" https://hosting.photobucket.com/95288841-8654-4bf7-8fc9-a4aa78dce87f/c084ebe2-f57b-4519-9b31-29bdc1155887.jpg
" target="_blank"> <img alt="Click for enlarged picture" src="
https://hosting.photobucket.com/95288841-8654-4bf7-8fc9-a4aa78dce87f/c084ebe2-f57b-4519-9b31-29bdc1155887.jpg" width="600" /> </a></p>
<p>
<a href=" https://hosting.photobucket.com/95288841-8654-4bf7-8fc9-a4aa78dce87f/37ff2272-f9b0-4b16-a363-1e6f6688c866.jpg
" target="_blank"> <img alt="Click for enlarged picture" src="
https://hosting.photobucket.com/95288841-8654-4bf7-8fc9-a4aa78dce87f/37ff2272-f9b0-4b16-a363-1e6f6688c866.jpg" width="600" /> </a></p>
<p>
<a href=" https://hosting.photobucket.com/95288841-8654-4bf7-8fc9-a4aa78dce87f/5f4f7968-ff50-4a01-98da-6ce8562930b4.jpg
" target="_blank"> <img alt="Click for enlarged picture" src="
https://hosting.photobucket.com/95288841-8654-4bf7-8fc9-a4aa78dce87f/5f4f7968-ff50-4a01-98da-6ce8562930b4.jpg" width="600" /> </a></p>
<p>
<a href=" https://hosting.photobucket.com/95288841-8654-4bf7-8fc9-a4aa78dce87f/cbb45319-d488-483c-bf9d-9af29852fc74.jpg
" target="_blank"> <img alt="Click for enlarged picture" src="
https://hosting.photobucket.com/95288841-8654-4bf7-8fc9-a4aa78dce87f/cbb45319-d488-483c-bf9d-9af29852fc74.jpg" width="600" /> </a></p>
<p>
<a href=" https://hosting.photobucket.com/95288841-8654-4bf7-8fc9-a4aa78dce87f/3dcca26c-d549-4af3-812a-a4a81b9a2310.jpg
" target="_blank"> <img alt="Click for enlarged picture" src="
https://hosting.photobucket.com/95288841-8654-4bf7-8fc9-a4aa78dce87f/3dcca26c-d549-4af3-812a-a4a81b9a2310.jpg" width="600" /> </a></p>
<p>
<a href=" https://hosting.photobucket.com/95288841-8654-4bf7-8fc9-a4aa78dce87f/4adf0fb6-3eab-4b40-b32d-d03eab4a9892.jpg
" target="_blank"> <img alt="Click for enlarged picture" src="
https://hosting.photobucket.com/95288841-8654-4bf7-8fc9-a4aa78dce87f/4adf0fb6-3eab-4b40-b32d-d03eab4a9892.jpg" width="600" /> </a></p>
<p>
<a href=" https://hosting.photobucket.com/95288841-8654-4bf7-8fc9-a4aa78dce87f/4732b58a-9a65-4d1c-a7d5-25513d34b108.jpg
" target="_blank"> <img alt="Click for enlarged picture" src="
https://hosting.photobucket.com/95288841-8654-4bf7-8fc9-a4aa78dce87f/4732b58a-9a65-4d1c-a7d5-25513d34b108.jpg" width="600" /> </a></p>
<p>
<a href=" https://hosting.photobucket.com/95288841-8654-4bf7-8fc9-a4aa78dce87f/274be330-31d5-4e25-95db-ec2f423a003c.jpg
" target="_blank"> <img alt="Click for enlarged picture" src="
https://hosting.photobucket.com/95288841-8654-4bf7-8fc9-a4aa78dce87f/274be330-31d5-4e25-95db-ec2f423a003c.jpg" width="600" /> </a></p>
<p>
<a href=" https://hosting.photobucket.com/95288841-8654-4bf7-8fc9-a4aa78dce87f/8e7b0a80-0f46-4d70-9789-a46976c713d2.jpg
" target="_blank"> <img alt="Click for enlarged picture" src="
https://hosting.photobucket.com/95288841-8654-4bf7-8fc9-a4aa78dce87f/8e7b0a80-0f46-4d70-9789-a46976c713d2.jpg" width="600" /> </a></p>
<p>
<a href=" https://hosting.photobucket.com/95288841-8654-4bf7-8fc9-a4aa78dce87f/8bbd4e96-b911-4f26-80fe-b1c57f29027b.jpg
" target="_blank"> <img alt="Click for enlarged picture" src="
https://hosting.photobucket.com/95288841-8654-4bf7-8fc9-a4aa78dce87f/8bbd4e96-b911-4f26-80fe-b1c57f29027b.jpg" width="600" /> </a></p>
<p>
<a href=" https://hosting.photobucket.com/95288841-8654-4bf7-8fc9-a4aa78dce87f/203a27be-8f10-459d-89b9-befb6b636b74.jpg
" target="_blank"> <img alt="Click for enlarged picture" src="
https://hosting.photobucket.com/95288841-8654-4bf7-8fc9-a4aa78dce87f/203a27be-8f10-459d-89b9-befb6b636b74.jpg" width="600" /> </a></p>
<p>
<a href=" https://hosting.photobucket.com/95288841-8654-4bf7-8fc9-a4aa78dce87f/5dc4358f-19d8-475f-a4af-9c29e9ed18d7.jpg
" target="_blank"> <img alt="Click for enlarged picture" src="
https://hosting.photobucket.com/95288841-8654-4bf7-8fc9-a4aa78dce87f/5dc4358f-19d8-475f-a4af-9c29e9ed18d7.jpg" width="600" /> </a></p>
<p>
<strong>BACK TO BASICS RADIONICE ZA NAJMLAĐE</strong></p>
<p>
Radnim danima od 17:00 do 18:00 održavali smo na&scaron;e nove radionice za najmlađe u kojima su na&scaron;i najmlađi polaznici bojali svoje prve minijature.</p>
<p>
<a href=" https://hosting.photobucket.com/95288841-8654-4bf7-8fc9-a4aa78dce87f/948af139-8fb5-4e28-a27c-404466e70d05.jpg
" target="_blank"> <img alt="Click for enlarged picture" src="
https://hosting.photobucket.com/95288841-8654-4bf7-8fc9-a4aa78dce87f/948af139-8fb5-4e28-a27c-404466e70d05.jpg" width="600" /> </a></p>
<p>
<a href=" https://hosting.photobucket.com/95288841-8654-4bf7-8fc9-a4aa78dce87f/bb3e20c2-bb21-4a3d-863a-74de08261467.jpg
" target="_blank"> <img alt="Click for enlarged picture" src="
https://hosting.photobucket.com/95288841-8654-4bf7-8fc9-a4aa78dce87f/bb3e20c2-bb21-4a3d-863a-74de08261467.jpg" width="600" /> </a></p>
<p>
<a href=" https://hosting.photobucket.com/95288841-8654-4bf7-8fc9-a4aa78dce87f/7316c760-98e3-4e3f-9261-d138aa7a5a6a.jpg
" target="_blank"> <img alt="Click for enlarged picture" src="
https://hosting.photobucket.com/95288841-8654-4bf7-8fc9-a4aa78dce87f/7316c760-98e3-4e3f-9261-d138aa7a5a6a.jpg" width="600" /> </a></p>
<p>
<a href=" https://hosting.photobucket.com/95288841-8654-4bf7-8fc9-a4aa78dce87f/68934b39-3d1f-4f43-b967-14b73c41a39e.jpg
" target="_blank"> <img alt="Click for enlarged picture" src="
https://hosting.photobucket.com/95288841-8654-4bf7-8fc9-a4aa78dce87f/68934b39-3d1f-4f43-b967-14b73c41a39e.jpg" width="600" /> </a></p>
<p>
<a href=" https://hosting.photobucket.com/95288841-8654-4bf7-8fc9-a4aa78dce87f/46125bce-a28d-494f-873a-3aeabdc1d6c2.jpg
" target="_blank"> <img alt="Click for enlarged picture" src="
https://hosting.photobucket.com/95288841-8654-4bf7-8fc9-a4aa78dce87f/46125bce-a28d-494f-873a-3aeabdc1d6c2.jpg" width="600" /> </a></p>
<p>
<a href=" https://hosting.photobucket.com/95288841-8654-4bf7-8fc9-a4aa78dce87f/3c58e0ad-77a9-44c8-b6bf-d9a55c514d43.jpg
" target="_blank"> <img alt="Click for enlarged picture" src="
https://hosting.photobucket.com/95288841-8654-4bf7-8fc9-a4aa78dce87f/3c58e0ad-77a9-44c8-b6bf-d9a55c514d43.jpg" width="600" /> </a></p>
<p>
<a href=" https://hosting.photobucket.com/95288841-8654-4bf7-8fc9-a4aa78dce87f/f891f0f0-051b-40ee-9676-cb03b0a9811b.jpg
" target="_blank"> <img alt="Click for enlarged picture" src="
https://hosting.photobucket.com/95288841-8654-4bf7-8fc9-a4aa78dce87f/f891f0f0-051b-40ee-9676-cb03b0a9811b.jpg" width="600" /> </a></p>
<p>
<strong>AGRAM LEGO SEKCIJA predavanje: FW-14b &ndash; Bolid F1 za budućnost</strong></p>
<p>
U srijedu 25.2.2026. u sklopu aktivnosti na&scaron;e Agram Lego Sekcije, na&scaron; dežurni strojar Marko Paunović je održao predavanje na temu bolida Formule 1 iz 1992.. Ulaz na predavanje je bio besplatan, a po zavr&scaron;etku su LEGO maketu bolida izradili članovi Lego sekcije</p>
<p>
<a href=" https://hosting.photobucket.com/95288841-8654-4bf7-8fc9-a4aa78dce87f/b2e14b1c-daa4-4314-8685-184377bc7e28.jpg
" target="_blank"> <img alt="Click for enlarged picture" src="
https://hosting.photobucket.com/95288841-8654-4bf7-8fc9-a4aa78dce87f/b2e14b1c-daa4-4314-8685-184377bc7e28.jpg" width="600" /> </a></p>
<p>
<a href=" https://hosting.photobucket.com/95288841-8654-4bf7-8fc9-a4aa78dce87f/31fb439a-77d3-4418-83ff-66c3af279cca.jpg" target="_blank"> <img alt="Click for enlarged picture" src="
https://hosting.photobucket.com/95288841-8654-4bf7-8fc9-a4aa78dce87f/31fb439a-77d3-4418-83ff-66c3af279cca.jpg" width="600" /> </a></p>
<p>
<a href=" https://hosting.photobucket.com/95288841-8654-4bf7-8fc9-a4aa78dce87f/bfcaf282-6be8-4b52-a3ed-c91137457876.jpg
" target="_blank"> <img alt="Click for enlarged picture" src="
https://hosting.photobucket.com/95288841-8654-4bf7-8fc9-a4aa78dce87f/bfcaf282-6be8-4b52-a3ed-c91137457876.jpg" width="600" /> </a></p>
<p>
<a href=" https://hosting.photobucket.com/95288841-8654-4bf7-8fc9-a4aa78dce87f/ce70fc61-9e1a-4169-aaad-8b67417656c0.jpg
" target="_blank"> <img alt="Click for enlarged picture" src="
https://hosting.photobucket.com/95288841-8654-4bf7-8fc9-a4aa78dce87f/ce70fc61-9e1a-4169-aaad-8b67417656c0.jpg" width="600" /> </a></p>
<p>
<a href=" https://hosting.photobucket.com/95288841-8654-4bf7-8fc9-a4aa78dce87f/94ca0e36-8710-458d-8194-9f71299f4d74.jpg
" target="_blank"> <img alt="Click for enlarged picture" src="
https://hosting.photobucket.com/95288841-8654-4bf7-8fc9-a4aa78dce87f/94ca0e36-8710-458d-8194-9f71299f4d74.jpg" width="600" /> </a></p>
<p>
<a href=" https://hosting.photobucket.com/95288841-8654-4bf7-8fc9-a4aa78dce87f/c6771f72-7191-4ca3-a792-3bb1ab3897b1.jpg
" target="_blank"> <img alt="Click for enlarged picture" src="
https://hosting.photobucket.com/95288841-8654-4bf7-8fc9-a4aa78dce87f/c6771f72-7191-4ca3-a792-3bb1ab3897b1.jpg" width="600" /> </a></p>
<p>
<a href=" https://hosting.photobucket.com/95288841-8654-4bf7-8fc9-a4aa78dce87f/c8fcfcb6-09f2-4398-a2fb-fa5065771e01.jpg
" target="_blank"> <img alt="Click for enlarged picture" src="
https://hosting.photobucket.com/95288841-8654-4bf7-8fc9-a4aa78dce87f/c8fcfcb6-09f2-4398-a2fb-fa5065771e01.jpg" width="600" /> </a></p>
<p>
<a href=" https://hosting.photobucket.com/95288841-8654-4bf7-8fc9-a4aa78dce87f/d7e187a8-d5b1-433b-b30d-091e54dcdddf.jpg
" target="_blank"> <img alt="Click for enlarged picture" src="
https://hosting.photobucket.com/95288841-8654-4bf7-8fc9-a4aa78dce87f/d7e187a8-d5b1-433b-b30d-091e54dcdddf.jpg" width="600" /> </a></p>
<p>
Tijekom drugog vikenda Izložbe, 28.02.-01.03., organizirali smo <strong>RADIONICU BOJANJA MINIJATURA &ndash; Grimdark stil</strong>.</p>
<p>
Radionica se provodila kroz dva dana (cijeli vikend) i polaznici su bojali tri različite figure za igru Trench Crusade. Fokus ovih predavanja bilo je bojenje popularnim Grimdark stilom. Na radionici su bile predstavljene boje i pribor, priprema figura, nekoliko tehnika bojenja minijatura od osnovnih do naprednijih, te tehnike i trikovi za brzo i efikasno bojenje većih količina figura odjednom. U sklopu radionice kori&scaron;tene su akrilne boje na bazi vode.</p>
<p>
<a href=" https://hosting.photobucket.com/95288841-8654-4bf7-8fc9-a4aa78dce87f/733d94b2-8e8d-4a4e-accd-b9168e32577e.jpg
" target="_blank"> <img alt="Click for enlarged picture" src="
https://hosting.photobucket.com/95288841-8654-4bf7-8fc9-a4aa78dce87f/733d94b2-8e8d-4a4e-accd-b9168e32577e.jpg
" width="600" /> </a></p>
<p>
<a href=" https://hosting.photobucket.com/95288841-8654-4bf7-8fc9-a4aa78dce87f/41020062-45b9-41cd-a357-fa23a389f390.jpg
" target="_blank"> <img alt="Click for enlarged picture" src="
https://hosting.photobucket.com/95288841-8654-4bf7-8fc9-a4aa78dce87f/41020062-45b9-41cd-a357-fa23a389f390.jpg
" width="600" /> </a></p>
<p>
<a href=" https://hosting.photobucket.com/95288841-8654-4bf7-8fc9-a4aa78dce87f/0c07cc55-596d-494d-972b-cd6a0dd6b8b7.jpg
" target="_blank"> <img alt="Click for enlarged picture" src="
https://hosting.photobucket.com/95288841-8654-4bf7-8fc9-a4aa78dce87f/0c07cc55-596d-494d-972b-cd6a0dd6b8b7.jpg" width="600" /> </a></p>
<p>
<a href=" https://hosting.photobucket.com/95288841-8654-4bf7-8fc9-a4aa78dce87f/c17dd356-08b1-48e1-b895-6296aed7f818.jpg
" target="_blank"> <img alt="Click for enlarged picture" src="
https://hosting.photobucket.com/95288841-8654-4bf7-8fc9-a4aa78dce87f/c17dd356-08b1-48e1-b895-6296aed7f818.jpg" width="600" /> </a></p>
<p>
U srijedu 04.03.2026. održana je godi&scaron;nja <strong>sjednica Skup&scaron;tine</strong> na kojoj smo odredili smjernice rada u 2026.</p>
<p>
<a href=" https://hosting.photobucket.com/95288841-8654-4bf7-8fc9-a4aa78dce87f/59484bd0-7edc-4aed-a04e-ae42900ba3e6.jpg
" target="_blank"> <img alt="Click for enlarged picture" src="
https://hosting.photobucket.com/95288841-8654-4bf7-8fc9-a4aa78dce87f/59484bd0-7edc-4aed-a04e-ae42900ba3e6.jpg
" width="600" /> </a></p>
<p>
U nedjelju 08.03.2026. Izložba je zavr&scaron;ena, na&scaron;i eksponati sigurno spremljeni, a Galerija poči&scaron;ćena.</p>
<p>
<a href=" https://hosting.photobucket.com/95288841-8654-4bf7-8fc9-a4aa78dce87f/98af4280-0956-4cdb-b4a9-da40e3a5a44a.jpg
" target="_blank"> <img alt="Click for enlarged picture" src="
https://hosting.photobucket.com/95288841-8654-4bf7-8fc9-a4aa78dce87f/98af4280-0956-4cdb-b4a9-da40e3a5a44a.jpg" width="600" /> </a></p>
<p>
<a href=" https://hosting.photobucket.com/95288841-8654-4bf7-8fc9-a4aa78dce87f/3259b35e-1fc2-4a99-a3c5-c7984958d72b.jpg
" target="_blank"> <img alt="Click for enlarged picture" src="
https://hosting.photobucket.com/95288841-8654-4bf7-8fc9-a4aa78dce87f/3259b35e-1fc2-4a99-a3c5-c7984958d72b.jpg" width="600" /> </a></p>
<p>
Najbitniji dio svake godine prilikom održavanja ove Izložbe je socijalni aspekt, druženje na&scaron;ih članova kako međusobno tako i sa na&scaron;im međunarodnim prijateljima koji nas posjećuju! Uz ovih par fotografija sa zajedničkih druženja, pozdravljamo vas do sljedeće godine!</p>
<p>
<a href=" https://hosting.photobucket.com/95288841-8654-4bf7-8fc9-a4aa78dce87f/b9168e23-79b2-4d81-8a7d-7534062881a7.jpg
" target="_blank"> <img alt="Click for enlarged picture" src="
https://hosting.photobucket.com/95288841-8654-4bf7-8fc9-a4aa78dce87f/b9168e23-79b2-4d81-8a7d-7534062881a7.jpg " width="600" /> </a></p>
<p>
<a href=" https://hosting.photobucket.com/95288841-8654-4bf7-8fc9-a4aa78dce87f/edff925e-916c-4d78-953e-210abf3753d4.jpg
" target="_blank"> <img alt="Click for enlarged picture" src="
https://hosting.photobucket.com/95288841-8654-4bf7-8fc9-a4aa78dce87f/edff925e-916c-4d78-953e-210abf3753d4.jpg " width="600" /> </a></p>
<p>
<a href=" https://hosting.photobucket.com/95288841-8654-4bf7-8fc9-a4aa78dce87f/8bcb48fa-466b-43f8-8a4b-f15f6794b21e.jpg
" target="_blank"> <img alt="Click for enlarged picture" src="
https://hosting.photobucket.com/95288841-8654-4bf7-8fc9-a4aa78dce87f/8bcb48fa-466b-43f8-8a4b-f15f6794b21e.jpg" width="600" /> </a></p>
",
"created" => "2026-03-12 08:54:10",
"modified" => "2026-03-12 08:58:37"
),
"Member" => array(
"id" => "35",
"group_id" => "1",
"first_name" => "Marko",
"last_name" => "Paunović",
"first_name_mask" => "marko",
"last_name_mask" => "paunovic",
"username" => "marko",
"password" => "*****",
"born" => "2033-03-07 20:35:00",
"created" => "2009-06-02 20:37:03"
)
)</pre><pre class="stack-trace">include - APP/views/elements/latestArticles.ctp, line 10
View::_render() - CORE/cake/libs/view/view.php, line 736
View::element() - CORE/cake/libs/view/view.php, line 397
include - APP/views/home/index.ctp, line 49
View::_render() - CORE/cake/libs/view/view.php, line 736
View::render() - CORE/cake/libs/view/view.php, line 431
Controller::render() - CORE/cake/libs/controller/controller.php, line 909
Dispatcher::_invoke() - CORE/cake/dispatcher.php, line 207
Dispatcher::dispatch() - CORE/cake/dispatcher.php, line 171
[main] - APP/webroot/index.php, line 86</pre></div></pre><a href="/dok/articles/2026/03/12" class="readMore"></a>
<span class="details"> <pre style="display: none;">
array(2) {
["Article"]=>
array(10) {
["id"]=>
string(3) "496"
["member_id"]=>
string(2) "35"
["title_eng"]=>
string(50) "Exhibition of Miniatures and Tabletop Scenery 2026"
["title_hrv"]=>
string(39) "Izložba minijatura i maketa Agram 2026"
["mask_eng"]=>
string(50) "exhibition_of_miniatures_and_tabletop_scenery_2026"
["mask_hrv"]=>
string(38) "izlozba_minijatura_i_maketa_agram_2026"
["content_eng"]=>
string(42359) "<p>
<a href=" https://hosting.photobucket.com/95288841-8654-4bf7-8fc9-a4aa78dce87f/dc756f84-867d-4df4-acd8-5d43775cafc2.jpg
" target="_blank"> <img alt="Click for enlarged picture" src="
https://hosting.photobucket.com/95288841-8654-4bf7-8fc9-a4aa78dce87f/dc756f84-867d-4df4-acd8-5d43775cafc2.jpg" width="600" /> </a></p>
<p>
<strong>The exhibition of miniatures and models "Agram 2026"</strong> was held this year from 19.2. to 08.03. 2026. The exhibition was set up on Wednesday 18.2. and was attended by a large number of members and friends of the Association who exhibited their works.</p>
<p>
</p>
<p>
<a href=" https://hosting.photobucket.com/95288841-8654-4bf7-8fc9-a4aa78dce87f/8529d6d4-76ea-4872-a9e6-748e04223a4e.jpg
" target="_blank"> <img alt="Click for enlarged picture" src="
https://hosting.photobucket.com/95288841-8654-4bf7-8fc9-a4aa78dce87f/8529d6d4-76ea-4872-a9e6-748e04223a4e.jpg
" width="600" /> </a></p>
<p>
<a href=" https://hosting.photobucket.com/95288841-8654-4bf7-8fc9-a4aa78dce87f/f3038937-f001-4ceb-b725-a330fcd64cee.jpg
" target="_blank"> <img alt="Click for enlarged picture" src="
https://hosting.photobucket.com/95288841-8654-4bf7-8fc9-a4aa78dce87f/f3038937-f001-4ceb-b725-a330fcd64cee.jpg
" width="600" /> </a></p>
<p>
<a href=" https://hosting.photobucket.com/95288841-8654-4bf7-8fc9-a4aa78dce87f/3575379e-e068-49e2-9d4d-c9a49531fdc2.jpg
" target="_blank"> <img alt="Click for enlarged picture" src="
https://hosting.photobucket.com/95288841-8654-4bf7-8fc9-a4aa78dce87f/3575379e-e068-49e2-9d4d-c9a49531fdc2.jpg" width="600" /> </a></p>
<p>
<a href=" https://hosting.photobucket.com/95288841-8654-4bf7-8fc9-a4aa78dce87f/e51713c7-2add-4f8f-ae37-e6eba25badff.jpg
" target="_blank"> <img alt="Click for enlarged picture" src="
https://hosting.photobucket.com/95288841-8654-4bf7-8fc9-a4aa78dce87f/e51713c7-2add-4f8f-ae37-e6eba25badff.jpg" width="600" /> </a></p>
<p>
<a href=" https://hosting.photobucket.com/95288841-8654-4bf7-8fc9-a4aa78dce87f/9c0bb546-50a8-483d-aeab-ab3b2ce9f094.jpg
" target="_blank"> <img alt="Click for enlarged picture" src="
https://hosting.photobucket.com/95288841-8654-4bf7-8fc9-a4aa78dce87f/9c0bb546-50a8-483d-aeab-ab3b2ce9f094.jpg" width="600" /> </a></p>
<p>
The opening of the Exhibition took place on Thursday, February 19, 2026, starting at 6:00 PM. The exhibition was organized on the occasion of our twenty-third birthday.</p>
<p>
</p>
<p>
<a href=" https://hosting.photobucket.com/95288841-8654-4bf7-8fc9-a4aa78dce87f/71c7bfc2-1ffc-43b9-9d5a-53e009f6b86d.jpg
" target="_blank"> <img alt="Click for enlarged picture" src="
https://hosting.photobucket.com/95288841-8654-4bf7-8fc9-a4aa78dce87f/71c7bfc2-1ffc-43b9-9d5a-53e009f6b86d.jpg" width="600" /> </a></p>
<p>
<a href=" https://hosting.photobucket.com/95288841-8654-4bf7-8fc9-a4aa78dce87f/007b4701-1d7c-4a67-a599-0539a2aa3191.jpg
" target="_blank"> <img alt="Click for enlarged picture" src="
https://hosting.photobucket.com/95288841-8654-4bf7-8fc9-a4aa78dce87f/007b4701-1d7c-4a67-a599-0539a2aa3191.jpg" width="600" /> </a></p>
<p>
<a href=" https://hosting.photobucket.com/95288841-8654-4bf7-8fc9-a4aa78dce87f/2c8090e2-8b95-4368-bb48-98876d680e15.jpg
" target="_blank"> <img alt="Click for enlarged picture" src="
https://hosting.photobucket.com/95288841-8654-4bf7-8fc9-a4aa78dce87f/2c8090e2-8b95-4368-bb48-98876d680e15.jpg" width="600" /> </a></p>
<p>
<a href=" https://hosting.photobucket.com/95288841-8654-4bf7-8fc9-a4aa78dce87f/375768ad-a8bb-49bf-9845-e46c896ba7ec.jpg
" target="_blank"> <img alt="Click for enlarged picture" src="
https://hosting.photobucket.com/95288841-8654-4bf7-8fc9-a4aa78dce87f/375768ad-a8bb-49bf-9845-e46c896ba7ec.jpg" width="600" /> </a></p>
<p>
<a href=" https://hosting.photobucket.com/95288841-8654-4bf7-8fc9-a4aa78dce87f/a93de974-4ccb-4876-85b0-4d066ae402b3.jpg
" target="_blank"> <img alt="Click for enlarged picture" src="
https://hosting.photobucket.com/95288841-8654-4bf7-8fc9-a4aa78dce87f/a93de974-4ccb-4876-85b0-4d066ae402b3.jpg" width="600" /> </a></p>
<p>
<a href=" https://hosting.photobucket.com/95288841-8654-4bf7-8fc9-a4aa78dce87f/d323ccc9-1b9a-4cb2-8adf-7019b0e217f4.jpg
" target="_blank"> <img alt="Click for enlarged picture" src="
https://hosting.photobucket.com/95288841-8654-4bf7-8fc9-a4aa78dce87f/d323ccc9-1b9a-4cb2-8adf-7019b0e217f4.jpg" width="600" /> </a></p>
<p>
<a href=" https://hosting.photobucket.com/95288841-8654-4bf7-8fc9-a4aa78dce87f/a5a66447-2d76-47ae-866d-4d512ef469a5.jpg
" target="_blank"> <img alt="Click for enlarged picture" src="
https://hosting.photobucket.com/95288841-8654-4bf7-8fc9-a4aa78dce87f/a5a66447-2d76-47ae-866d-4d512ef469a5.jpg" width="600" /> </a></p>
<p>
<a href=" https://hosting.photobucket.com/95288841-8654-4bf7-8fc9-a4aa78dce87f/3e7bcfc9-ba02-4f94-a6c3-79dfaea3639e.jpg
" target="_blank"> <img alt="Click for enlarged picture" src="
https://hosting.photobucket.com/95288841-8654-4bf7-8fc9-a4aa78dce87f/3e7bcfc9-ba02-4f94-a6c3-79dfaea3639e.jpg" width="600" /> </a></p>
<p>
<a href=" https://hosting.photobucket.com/95288841-8654-4bf7-8fc9-a4aa78dce87f/24e79466-4a9e-4b10-970c-caad235d260d.jpg
" target="_blank"> <img alt="Click for enlarged picture" src="
https://hosting.photobucket.com/95288841-8654-4bf7-8fc9-a4aa78dce87f/24e79466-4a9e-4b10-970c-caad235d260d.jpg" width="600" /> </a></p>
<p>
As always, the Exhibition presented a cross-section of the work of the Association, its members, participants of its courses and workshops, and members of the Miniature Painters Croatia FB group. In a large number of showcases, there were numerous miniatures for tabletop strategy games, board games, and an entire showcase was dedicated to award-winning exhibits from previous miniature competitions. Several showcases were dedicated to projects that the Association has been implementing for 23 years, such as the UMS „Agram“ Library and Reading Room, the Workshop for Making Spatial Models and the Miniature Painting Workshop, as well as new ones such as the Agram Group Build, the Agram Lego Section and the Back to Basics painting workshop for the youngest.</p>
<p>
<a href=" https://hosting.photobucket.com/95288841-8654-4bf7-8fc9-a4aa78dce87f/fca84936-af71-44d3-9a4c-faeb26163899.jpg
" target="_blank"> <img alt="Click for enlarged picture" src="
https://hosting.photobucket.com/95288841-8654-4bf7-8fc9-a4aa78dce87f/fca84936-af71-44d3-9a4c-faeb26163899.jpg" width="600" /> </a></p>
<p>
<a href=" https://hosting.photobucket.com/95288841-8654-4bf7-8fc9-a4aa78dce87f/459bc5ac-8702-46f9-93b4-547deaabdef4.jpg
" target="_blank"> <img alt="Click for enlarged picture" src="
https://hosting.photobucket.com/95288841-8654-4bf7-8fc9-a4aa78dce87f/459bc5ac-8702-46f9-93b4-547deaabdef4.jpg" width="600" /> </a></p>
<p>
<a href=" https://hosting.photobucket.com/95288841-8654-4bf7-8fc9-a4aa78dce87f/91a04363-b2ef-4635-a046-7edf25ce7808.jpg
" target="_blank"> <img alt="Click for enlarged picture" src="
https://hosting.photobucket.com/95288841-8654-4bf7-8fc9-a4aa78dce87f/91a04363-b2ef-4635-a046-7edf25ce7808.jpg" width="600" /> </a></p>
<p>
<a href=" https://hosting.photobucket.com/95288841-8654-4bf7-8fc9-a4aa78dce87f/73256af5-fd5d-40b5-95e1-120e49c9be87.jpg
" target="_blank"> <img alt="Click for enlarged picture" src="
https://hosting.photobucket.com/95288841-8654-4bf7-8fc9-a4aa78dce87f/73256af5-fd5d-40b5-95e1-120e49c9be87.jpg" width="600" /> </a></p>
<p>
<a href=" https://hosting.photobucket.com/95288841-8654-4bf7-8fc9-a4aa78dce87f/979f9be5-23f3-4df9-91dc-ab71d6a10d64.jpg
" target="_blank"> <img alt="Click for enlarged picture" src="
https://hosting.photobucket.com/95288841-8654-4bf7-8fc9-a4aa78dce87f/979f9be5-23f3-4df9-91dc-ab71d6a10d64.jpg" width="600" /> </a></p>
<p>
<a href=" https://hosting.photobucket.com/95288841-8654-4bf7-8fc9-a4aa78dce87f/d0ff4379-183a-47b9-a740-9ddc283ebc29.jpg
" target="_blank"> <img alt="Click for enlarged picture" src="
https://hosting.photobucket.com/95288841-8654-4bf7-8fc9-a4aa78dce87f/d0ff4379-183a-47b9-a740-9ddc283ebc29.jpg" width="600" /> </a></p>
<p>
<a href=" https://hosting.photobucket.com/95288841-8654-4bf7-8fc9-a4aa78dce87f/4333e95e-bbbd-4f47-aaea-38a9c99e54d8.jpg
" target="_blank"> <img alt="Click for enlarged picture" src="
https://hosting.photobucket.com/95288841-8654-4bf7-8fc9-a4aa78dce87f/4333e95e-bbbd-4f47-aaea-38a9c99e54d8.jpg" width="600" /> </a></p>
<p>
<a href=" https://hosting.photobucket.com/95288841-8654-4bf7-8fc9-a4aa78dce87f/1372f8a2-b222-48ee-ae45-a90b5a354ef7.jpg
" target="_blank"> <img alt="Click for enlarged picture" src="
https://hosting.photobucket.com/95288841-8654-4bf7-8fc9-a4aa78dce87f/1372f8a2-b222-48ee-ae45-a90b5a354ef7.jpg" width="600" /> </a></p>
<p>
<a href=" https://hosting.photobucket.com/95288841-8654-4bf7-8fc9-a4aa78dce87f/6a1b4fd1-d982-4b06-9c5f-3cd40d6bf10a.jpg
" target="_blank"> <img alt="Click for enlarged picture" src="
https://hosting.photobucket.com/95288841-8654-4bf7-8fc9-a4aa78dce87f/6a1b4fd1-d982-4b06-9c5f-3cd40d6bf10a.jpg" width="600" /> </a></p>
<p>
<a href=" https://hosting.photobucket.com/95288841-8654-4bf7-8fc9-a4aa78dce87f/c2ec45e1-e0f3-463a-b254-cb2a38b53e14.jpg
" target="_blank"> <img alt="Click for enlarged picture" src="
https://hosting.photobucket.com/95288841-8654-4bf7-8fc9-a4aa78dce87f/c2ec45e1-e0f3-463a-b254-cb2a38b53e14.jpg" width="600" /> </a></p>
<p>
<a href=" https://hosting.photobucket.com/95288841-8654-4bf7-8fc9-a4aa78dce87f/17553b9a-0592-4f6a-a097-3f1a97e161f3.jpg
" target="_blank"> <img alt="Click for enlarged picture" src="
https://hosting.photobucket.com/95288841-8654-4bf7-8fc9-a4aa78dce87f/17553b9a-0592-4f6a-a097-3f1a97e161f3.jpg" width="600" /> </a></p>
<p>
<a href=" https://hosting.photobucket.com/95288841-8654-4bf7-8fc9-a4aa78dce87f/8658bd6b-dff2-4d24-8473-928d44d44480.jpg
" target="_blank"> <img alt="Click for enlarged picture" src="
https://hosting.photobucket.com/95288841-8654-4bf7-8fc9-a4aa78dce87f/8658bd6b-dff2-4d24-8473-928d44d44480.jpg" width="600" /> </a></p>
<p>
<a href=" https://hosting.photobucket.com/95288841-8654-4bf7-8fc9-a4aa78dce87f/ecab0ea7-f75b-4e31-a520-d088ad39fa17.jpg
" target="_blank"> <img alt="Click for enlarged picture" src="
https://hosting.photobucket.com/95288841-8654-4bf7-8fc9-a4aa78dce87f/ecab0ea7-f75b-4e31-a520-d088ad39fa17.jpg" width="600" /> </a></p>
<p>
<a href=" https://hosting.photobucket.com/95288841-8654-4bf7-8fc9-a4aa78dce87f/9495a2f5-8a82-41f2-abf4-9ade3db41d87.jpg
" target="_blank"> <img alt="Click for enlarged picture" src="
https://hosting.photobucket.com/95288841-8654-4bf7-8fc9-a4aa78dce87f/9495a2f5-8a82-41f2-abf4-9ade3db41d87.jpg" width="600" /> </a></p>
<p>
<a href=" https://hosting.photobucket.com/95288841-8654-4bf7-8fc9-a4aa78dce87f/362cc6fd-a5dd-474b-9b9f-aeab27d6dcfa.jpg
" target="_blank"> <img alt="Click for enlarged picture" src="
https://hosting.photobucket.com/95288841-8654-4bf7-8fc9-a4aa78dce87f/362cc6fd-a5dd-474b-9b9f-aeab27d6dcfa.jpg" width="600" /> </a></p>
<p>
It was a special honor for us to host our guest exhibitor, Ninoslav Luk, a miniaturist from Poreč, who introduced himself to us with his collection of historical dioramas.</p>
<p>
<a href=" https://hosting.photobucket.com/95288841-8654-4bf7-8fc9-a4aa78dce87f/ba1353de-e2bd-4340-9121-9056e287ed4a.jpg
" target="_blank"> <img alt="Click for enlarged picture" src="
https://hosting.photobucket.com/95288841-8654-4bf7-8fc9-a4aa78dce87f/ba1353de-e2bd-4340-9121-9056e287ed4a.jpg" width="600" /> </a></p>
<p>
<a href=" https://hosting.photobucket.com/95288841-8654-4bf7-8fc9-a4aa78dce87f/cea18506-1b50-4e5b-955c-0b9ca02d7826.jpg
" target="_blank"> <img alt="Click for enlarged picture" src="
https://hosting.photobucket.com/95288841-8654-4bf7-8fc9-a4aa78dce87f/cea18506-1b50-4e5b-955c-0b9ca02d7826.jpg" width="600" /> </a></p>
<p>
<a href=" https://hosting.photobucket.com/95288841-8654-4bf7-8fc9-a4aa78dce87f/1be85b41-e3b6-4536-b141-cd0da6eb38c1.jpg
" target="_blank"> <img alt="Click for enlarged picture" src="
https://hosting.photobucket.com/95288841-8654-4bf7-8fc9-a4aa78dce87f/1be85b41-e3b6-4536-b141-cd0da6eb38c1.jpg" width="600" /> </a></p>
<p>
<a href=" https://hosting.photobucket.com/95288841-8654-4bf7-8fc9-a4aa78dce87f/9e93b87d-ff3c-4b7b-8f06-5f9d3464a134.jpg
" target="_blank"> <img alt="Click for enlarged picture" src="
https://hosting.photobucket.com/95288841-8654-4bf7-8fc9-a4aa78dce87f/9e93b87d-ff3c-4b7b-8f06-5f9d3464a134.jpg" width="600" /> </a></p>
<p>
During the first weekend of the Exhibition, 21-22.02., we held the 18th annual international miniature painting competition <strong>Black Queen Hobby and Miniature Painting Competition</strong>!</p>
<p>
<a href=" https://hosting.photobucket.com/95288841-8654-4bf7-8fc9-a4aa78dce87f/3056fb09-f66c-4dea-80a8-a4e72407429a.jpg
" target="_blank"> <img alt="Click for enlarged picture" src="
https://hosting.photobucket.com/95288841-8654-4bf7-8fc9-a4aa78dce87f/3056fb09-f66c-4dea-80a8-a4e72407429a.jpg" width="600" /> </a></p>
<p>
As contestants arrived and registered for the competition, our hardworking staff photographed all the exhibits before sorting them into categories and carefully placing them in glass cases. There was no shortage of morning neccessities like coffe and doughnuts.</p>
<p>
<</p>
<p>
<a href=" https://hosting.photobucket.com/95288841-8654-4bf7-8fc9-a4aa78dce87f/1118089c-2b46-4a2c-b17d-dc92b66d1ffc.jpg
" target="_blank"> <img alt="Click for enlarged picture" src="
https://hosting.photobucket.com/95288841-8654-4bf7-8fc9-a4aa78dce87f/1118089c-2b46-4a2c-b17d-dc92b66d1ffc.jpg" width="600" /> </a></p>
<p>
<a href=" https://hosting.photobucket.com/95288841-8654-4bf7-8fc9-a4aa78dce87f/9fd3c272-9a69-4532-a09d-36497a20a820.jpg
" target="_blank"> <img alt="Click for enlarged picture" src="
https://hosting.photobucket.com/95288841-8654-4bf7-8fc9-a4aa78dce87f/9fd3c272-9a69-4532-a09d-36497a20a820.jpg" width="600" /> </a></p>
<p>
<a href=" https://hosting.photobucket.com/95288841-8654-4bf7-8fc9-a4aa78dce87f/86995e80-c502-45fb-80f5-c8fda27da3f9.jpg
" target="_blank"> <img alt="Click for enlarged picture" src="
https://hosting.photobucket.com/95288841-8654-4bf7-8fc9-a4aa78dce87f/86995e80-c502-45fb-80f5-c8fda27da3f9.jpg" width="600" /> </a></p>
<p>
By noon, all the display cases were full and the competition could officially begin.</p>
<p>
<a href=" https://hosting.photobucket.com/95288841-8654-4bf7-8fc9-a4aa78dce87f/bce59a4f-c3e3-4708-a3d6-25e81a894c24.jpg
" target="_blank"> <img alt="Click for enlarged picture" src="
https://hosting.photobucket.com/95288841-8654-4bf7-8fc9-a4aa78dce87f/bce59a4f-c3e3-4708-a3d6-25e81a894c24.jpg" width="600" /> </a></p>
<p>
<a href=" https://hosting.photobucket.com/95288841-8654-4bf7-8fc9-a4aa78dce87f/16a0a094-01aa-4e52-82cf-fdab00d74711.jpg
" target="_blank"> <img alt="Click for enlarged picture" src="
https://hosting.photobucket.com/95288841-8654-4bf7-8fc9-a4aa78dce87f/16a0a094-01aa-4e52-82cf-fdab00d74711.jpg" width="600" /> </a></p>
<p>
<a href=" https://hosting.photobucket.com/95288841-8654-4bf7-8fc9-a4aa78dce87f/0d3f4042-ff77-48d0-b332-add0fd08f7c3.jpg
" target="_blank"> <img alt="Click for enlarged picture" src="
https://hosting.photobucket.com/95288841-8654-4bf7-8fc9-a4aa78dce87f/0d3f4042-ff77-48d0-b332-add0fd08f7c3.jpg" width="600" /> </a></p>
<p>
<a href=" https://hosting.photobucket.com/95288841-8654-4bf7-8fc9-a4aa78dce87f/3711baf8-93f2-434a-aea9-a95288ca04dd.jpg
" target="_blank"> <img alt="Click for enlarged picture" src="
https://hosting.photobucket.com/95288841-8654-4bf7-8fc9-a4aa78dce87f/3711baf8-93f2-434a-aea9-a95288ca04dd.jpg" width="600" /> </a></p>
<p>
<a href=" https://hosting.photobucket.com/95288841-8654-4bf7-8fc9-a4aa78dce87f/53113b97-ec06-4409-95ba-95a5ad3f9720.jpg
" target="_blank"> <img alt="Click for enlarged picture" src="
https://hosting.photobucket.com/95288841-8654-4bf7-8fc9-a4aa78dce87f/53113b97-ec06-4409-95ba-95a5ad3f9720.jpg" width="600" /> </a></p>
<p>
<a href=" https://hosting.photobucket.com/95288841-8654-4bf7-8fc9-a4aa78dce87f/ab127858-193d-4976-bdb2-e27302722fca.jpg
" target="_blank"> <img alt="Click for enlarged picture" src="
https://hosting.photobucket.com/95288841-8654-4bf7-8fc9-a4aa78dce87f/ab127858-193d-4976-bdb2-e27302722fca.jpg" width="600" /> </a></p>
<p>
<a href=" https://hosting.photobucket.com/95288841-8654-4bf7-8fc9-a4aa78dce87f/3735af11-3fb6-4772-a8ff-5e0ff6ddf03a.jpg
" target="_blank"> <img alt="Click for enlarged picture" src="
https://hosting.photobucket.com/95288841-8654-4bf7-8fc9-a4aa78dce87f/3735af11-3fb6-4772-a8ff-5e0ff6ddf03a.jpg" width="600" /> </a></p>
<p>
<strong>Back To Basics workshops for the young at the Black Queen</strong></p>
<p>
This year, throughout the weekend, we organized miniature painting workshops for the youngest, who were able to paint one of our own miniatures designed specifically for this program for the first time!</p>
<p>
<a href=" https://hosting.photobucket.com/95288841-8654-4bf7-8fc9-a4aa78dce87f/6999be0c-8cc6-4947-a423-9427a2299724.jpg
" target="_blank"> <img alt="Click for enlarged picture" src="
https://hosting.photobucket.com/95288841-8654-4bf7-8fc9-a4aa78dce87f/6999be0c-8cc6-4947-a423-9427a2299724.jpg" width="600" /> </a></p>
<p>
<a href="https://hosting.photobucket.com/95288841-8654-4bf7-8fc9-a4aa78dce87f/835b05a5-f171-49df-afa6-da0692b89074.jpg" target="_blank"><img alt="Click for enlarged picture" src="https://hosting.photobucket.com/95288841-8654-4bf7-8fc9-a4aa78dce87f/835b05a5-f171-49df-afa6-da0692b89074.jpg" width="600" /></a></p>
<p>
<a href=" https://hosting.photobucket.com/95288841-8654-4bf7-8fc9-a4aa78dce87f/ef5dde13-84ee-4ea0-b9f3-28aaf703ef6d.jpg
" target="_blank"> <img alt="Click for enlarged picture" src="
https://hosting.photobucket.com/95288841-8654-4bf7-8fc9-a4aa78dce87f/ef5dde13-84ee-4ea0-b9f3-28aaf703ef6d.jpg" width="600" /> </a></p>
<p>
<strong>SELLERS' COURT</strong></p>
<p>
During the weekend we hosted our sponsors with their sales stands: Swood.si and Carta Magica.</p>
<p>
<a href=" https://hosting.photobucket.com/95288841-8654-4bf7-8fc9-a4aa78dce87f/5ee9a49f-a387-435a-9110-572402b7191d.jpg
" target="_blank"> <img alt="Click for enlarged picture" src="
https://hosting.photobucket.com/95288841-8654-4bf7-8fc9-a4aa78dce87f/5ee9a49f-a387-435a-9110-572402b7191d.jpg" width="600" /> </a></p>
<p>
<a href=" https://hosting.photobucket.com/95288841-8654-4bf7-8fc9-a4aa78dce87f/47cf600f-b1eb-4655-bf06-305f6f21d5d2.jpg
" target="_blank"> <img alt="Click for enlarged picture" src="
https://hosting.photobucket.com/95288841-8654-4bf7-8fc9-a4aa78dce87f/47cf600f-b1eb-4655-bf06-305f6f21d5d2.jpg" width="600" /> </a></p>
<p>
<strong>MINIATURE PAINTING WORKSHOPS</strong></p>
<p>
The ZZTK premises allow workshops to be held during the weekend in the cinema hall in the basement, so we also organized demonstration workshops during the weekend. The lecturers' work was recorded with a camera and projected onto the projection screen in the hall. Many thanks to our domestic and international lecturers: Anže Zorko (SLO), doc.dr.sc. Winton Afrić (CRO), Ivan Knezović (UMS Agram) and Petar Knezoviću (CRO).</p>
<p>
<a href=" https://hosting.photobucket.com/95288841-8654-4bf7-8fc9-a4aa78dce87f/e8d835be-ec99-49d7-bc9b-086e38573d1a.jpg
" target="_blank"> <img alt="Click for enlarged picture" src="
https://hosting.photobucket.com/95288841-8654-4bf7-8fc9-a4aa78dce87f/e8d835be-ec99-49d7-bc9b-086e38573d1a.jpg" width="600" /> </a></p>
<p>
<a href=" https://hosting.photobucket.com/95288841-8654-4bf7-8fc9-a4aa78dce87f/f3eba4c1-4637-4da9-8360-75f430355af4.jpg" target="_blank"> <img alt="Click for enlarged picture" src="
https://hosting.photobucket.com/95288841-8654-4bf7-8fc9-a4aa78dce87f/f3eba4c1-4637-4da9-8360-75f430355af4.jpg" width="600" /> </a></p>
<p>
<a href=" https://hosting.photobucket.com/95288841-8654-4bf7-8fc9-a4aa78dce87f/ef523854-4030-4579-aa38-403afda86c91.jpg
" target="_blank"> <img alt="Click for enlarged picture" src="
https://hosting.photobucket.com/95288841-8654-4bf7-8fc9-a4aa78dce87f/ef523854-4030-4579-aa38-403afda86c91.jpg" width="600" /> </a></p>
<p>
<a href=" https://hosting.photobucket.com/95288841-8654-4bf7-8fc9-a4aa78dce87f/dd0943c2-f4a8-40c3-b641-f6dcdd200380.jpg
" target="_blank"> <img alt="Click for enlarged picture" src="
https://hosting.photobucket.com/95288841-8654-4bf7-8fc9-a4aa78dce87f/dd0943c2-f4a8-40c3-b641-f6dcdd200380.jpg" width="600" /> </a></p>
<p>
<a href=" https://hosting.photobucket.com/95288841-8654-4bf7-8fc9-a4aa78dce87f/08b1626a-f6c7-43c9-b718-3e9a41b55ca6.jpg
" target="_blank"> <img alt="Click for enlarged picture" src="
https://hosting.photobucket.com/95288841-8654-4bf7-8fc9-a4aa78dce87f/08b1626a-f6c7-43c9-b718-3e9a41b55ca6.jpg" width="600" /> </a></p>
<p>
<a href=" https://hosting.photobucket.com/95288841-8654-4bf7-8fc9-a4aa78dce87f/91aca7f3-1af6-486d-b174-65079a63a1ea.jpg
" target="_blank"> <img alt="Click for enlarged picture" src="
https://hosting.photobucket.com/95288841-8654-4bf7-8fc9-a4aa78dce87f/91aca7f3-1af6-486d-b174-65079a63a1ea.jpg" width="600" /> </a></p>
<p>
<a href=" https://hosting.photobucket.com/95288841-8654-4bf7-8fc9-a4aa78dce87f/3821f2fb-fbe7-4096-adbc-7d8c981a3b56.jpg
" target="_blank"> <img alt="Click for enlarged picture" src="
https://hosting.photobucket.com/95288841-8654-4bf7-8fc9-a4aa78dce87f/3821f2fb-fbe7-4096-adbc-7d8c981a3b56.jpg" width="600" /> </a></p>
<p>
<a href=" https://hosting.photobucket.com/95288841-8654-4bf7-8fc9-a4aa78dce87f/2c7bb3c5-c0ec-4a96-b6bd-6a90ce5ce154.jpg
" target="_blank"> <img alt="Click for enlarged picture" src="
https://hosting.photobucket.com/95288841-8654-4bf7-8fc9-a4aa78dce87f/2c7bb3c5-c0ec-4a96-b6bd-6a90ce5ce154.jpg" width="600" /> </a></p>
<p>
<a href=" https://hosting.photobucket.com/95288841-8654-4bf7-8fc9-a4aa78dce87f/b646f4ee-21aa-4d12-8db3-6d33351d5aeb.jpg
" target="_blank"> <img alt="Click for enlarged picture" src="
https://hosting.photobucket.com/95288841-8654-4bf7-8fc9-a4aa78dce87f/b646f4ee-21aa-4d12-8db3-6d33351d5aeb.jpg" width="600" /> </a></p>
<p>
<a href=" https://hosting.photobucket.com/95288841-8654-4bf7-8fc9-a4aa78dce87f/fb5efc01-32cc-4119-90e3-188f51b30237.jpg
" target="_blank"> <img alt="Click for enlarged picture" src="
https://hosting.photobucket.com/95288841-8654-4bf7-8fc9-a4aa78dce87f/fb5efc01-32cc-4119-90e3-188f51b30237.jpg" width="600" /> </a></p>
<p>
<strong>SPEED PAINTING COMPETITION</strong></p>
<p>
We organized a speed painting competition on Sunday afternoon. Participants had 60 minutes to paint one wizrad, a miniature of our own design and production.</p>
<p>
<a href=" https://hosting.photobucket.com/95288841-8654-4bf7-8fc9-a4aa78dce87f/106417a6-a047-4e0d-9f81-87858806052f.jpg
" target="_blank"> <img alt="Click for enlarged picture" src="
https://hosting.photobucket.com/95288841-8654-4bf7-8fc9-a4aa78dce87f/106417a6-a047-4e0d-9f81-87858806052f.jpg" width="600" /> </a></p>
<p>
<a href=" https://hosting.photobucket.com/95288841-8654-4bf7-8fc9-a4aa78dce87f/ac6853c7-6e34-4e07-a996-8d7d12744b67.jpg
" target="_blank"> <img alt="Click for enlarged picture" src="
https://hosting.photobucket.com/95288841-8654-4bf7-8fc9-a4aa78dce87f/ac6853c7-6e34-4e07-a996-8d7d12744b67.jpg" width="600" /> </a></p>
<p>
<a href=" https://hosting.photobucket.com/95288841-8654-4bf7-8fc9-a4aa78dce87f/ccb155fa-52c5-4a99-9515-f69a6836dce7.jpg
" target="_blank"> <img alt="Click for enlarged picture" src="
https://hosting.photobucket.com/95288841-8654-4bf7-8fc9-a4aa78dce87f/ccb155fa-52c5-4a99-9515-f69a6836dce7.jpg" width="600" /> </a></p>
<p>
<a href=" https://hosting.photobucket.com/95288841-8654-4bf7-8fc9-a4aa78dce87f/a29fedd0-97ea-45b1-85f9-7ea62188b2b2.jpg
" target="_blank"><img alt="Click for enlarged picture" src="
https://hosting.photobucket.com/95288841-8654-4bf7-8fc9-a4aa78dce87f/a29fedd0-97ea-45b1-85f9-7ea62188b2b2.jpg" width="600" /></a></p>
<p>
With that, we came to the very end of this wonderful weekend and all that was left was the awarding of prizes and recognition to the winners.</p>
<p>
<a href=" https://hosting.photobucket.com/95288841-8654-4bf7-8fc9-a4aa78dce87f/046ca4c8-0ae7-415e-abd3-e131d580c3ad.jpg
" target="_blank"> <img alt="Click for enlarged picture" src="
https://hosting.photobucket.com/95288841-8654-4bf7-8fc9-a4aa78dce87f/046ca4c8-0ae7-415e-abd3-e131d580c3ad.jpg" width="600" /> </a></p>
<p>
<a href=" https://hosting.photobucket.com/95288841-8654-4bf7-8fc9-a4aa78dce87f/cec0dcef-7acb-4a77-89de-271ed5410672.jpg
" target="_blank"> <img alt="Click for enlarged picture" src="
https://hosting.photobucket.com/95288841-8654-4bf7-8fc9-a4aa78dce87f/cec0dcef-7acb-4a77-89de-271ed5410672.jpg" width="600" /> </a></p>
<p>
<a href=" https://hosting.photobucket.com/95288841-8654-4bf7-8fc9-a4aa78dce87f/a495a5fc-31a2-4979-a970-0fa22c334354.jpg
" target="_blank"> <img alt="Click for enlarged picture" src="
https://hosting.photobucket.com/95288841-8654-4bf7-8fc9-a4aa78dce87f/a495a5fc-31a2-4979-a970-0fa22c334354.jpg" width="600" /> </a></p>
<p>
<strong>AGRAM ARENA – Leaving Asphodel Necropolis28 Campaign</strong></p>
<p>
During the weekend of February 21-22, we held a new international competition, Agram Arena! This time it was the turn of the tabletop strategy game Necropolis28, for which our members designed a two-day campaign. Each participant created their own gang of soldiers, and the vast majority also created their own boards.</p>
<p>
<a href=" https://hosting.photobucket.com/95288841-8654-4bf7-8fc9-a4aa78dce87f/ac69b182-4bfc-4575-a6d3-fb3c8baba342.jpg
" target="_blank"> <img alt="Click for enlarged picture" src="
https://hosting.photobucket.com/95288841-8654-4bf7-8fc9-a4aa78dce87f/ac69b182-4bfc-4575-a6d3-fb3c8baba342.jpg" width="600" /> </a></p>
<p>
<a href=" https://hosting.photobucket.com/95288841-8654-4bf7-8fc9-a4aa78dce87f/289fed7b-e058-42d8-ba2d-cbd0463e98da.jpg
" target="_blank"> <img alt="Click for enlarged picture" src="
https://hosting.photobucket.com/95288841-8654-4bf7-8fc9-a4aa78dce87f/289fed7b-e058-42d8-ba2d-cbd0463e98da.jpg" width="600" /> </a></p>
<p>
<a href=" https://hosting.photobucket.com/95288841-8654-4bf7-8fc9-a4aa78dce87f/d92ebbee-859d-4441-8386-3d760b20b7a7.jpg
" target="_blank"> <img alt="Click for enlarged picture" src="
https://hosting.photobucket.com/95288841-8654-4bf7-8fc9-a4aa78dce87f/d92ebbee-859d-4441-8386-3d760b20b7a7.jpg" width="600" /> </a></p>
<p>
<a href=" https://hosting.photobucket.com/95288841-8654-4bf7-8fc9-a4aa78dce87f/09c59798-7871-425e-a075-3ca1cd91768a.jpg
" target="_blank"> <img alt="Click for enlarged picture" src="
https://hosting.photobucket.com/95288841-8654-4bf7-8fc9-a4aa78dce87f/09c59798-7871-425e-a075-3ca1cd91768a.jpg" width="600" /> </a></p>
<p>
<a href=" https://hosting.photobucket.com/95288841-8654-4bf7-8fc9-a4aa78dce87f/b2f3edc8-5a23-4552-9a2a-4027b286f327.jpg
" target="_blank"> <img alt="Click for enlarged picture" src="
https://hosting.photobucket.com/95288841-8654-4bf7-8fc9-a4aa78dce87f/b2f3edc8-5a23-4552-9a2a-4027b286f327.jpg" width="600" /> </a></p>
<p>
<a href=" https://hosting.photobucket.com/95288841-8654-4bf7-8fc9-a4aa78dce87f/2a9f43ac-b531-4746-b7bb-ac5a3356aab0.jpg
" target="_blank"> <img alt="Click for enlarged picture" src="
https://hosting.photobucket.com/95288841-8654-4bf7-8fc9-a4aa78dce87f/2a9f43ac-b531-4746-b7bb-ac5a3356aab0.jpg" width="600" /> </a></p>
<p>
<strong>EVENTS ON WEEKDAYS DURING THE EXHIBITION </strong></p>
<p>
Over the next two weeks, our volunteers held open miniature painting workshops on weekdays from 4:00 PM to 8:00 PM. Miniature painting workstations were set up where our visitors could paint miniatures we had prepared (or their own if they had brought them) using our materials and tools.</p>
<p>
<a href=" https://hosting.photobucket.com/95288841-8654-4bf7-8fc9-a4aa78dce87f/6edf7765-42b5-417a-820f-fa5d907179a7.jpg
" target="_blank"> <img alt="Click for enlarged picture" src="
https://hosting.photobucket.com/95288841-8654-4bf7-8fc9-a4aa78dce87f/6edf7765-42b5-417a-820f-fa5d907179a7.jpg" width="600" /> </a></p>
<p>
<a href=" https://hosting.photobucket.com/95288841-8654-4bf7-8fc9-a4aa78dce87f/c084ebe2-f57b-4519-9b31-29bdc1155887.jpg
" target="_blank"> <img alt="Click for enlarged picture" src="
https://hosting.photobucket.com/95288841-8654-4bf7-8fc9-a4aa78dce87f/c084ebe2-f57b-4519-9b31-29bdc1155887.jpg" width="600" /> </a></p>
<p>
<a href=" https://hosting.photobucket.com/95288841-8654-4bf7-8fc9-a4aa78dce87f/37ff2272-f9b0-4b16-a363-1e6f6688c866.jpg
" target="_blank"> <img alt="Click for enlarged picture" src="
https://hosting.photobucket.com/95288841-8654-4bf7-8fc9-a4aa78dce87f/37ff2272-f9b0-4b16-a363-1e6f6688c866.jpg" width="600" /> </a></p>
<p>
<a href=" https://hosting.photobucket.com/95288841-8654-4bf7-8fc9-a4aa78dce87f/5f4f7968-ff50-4a01-98da-6ce8562930b4.jpg
" target="_blank"> <img alt="Click for enlarged picture" src="
https://hosting.photobucket.com/95288841-8654-4bf7-8fc9-a4aa78dce87f/5f4f7968-ff50-4a01-98da-6ce8562930b4.jpg" width="600" /> </a></p>
<p>
<a href=" https://hosting.photobucket.com/95288841-8654-4bf7-8fc9-a4aa78dce87f/cbb45319-d488-483c-bf9d-9af29852fc74.jpg
" target="_blank"> <img alt="Click for enlarged picture" src="
https://hosting.photobucket.com/95288841-8654-4bf7-8fc9-a4aa78dce87f/cbb45319-d488-483c-bf9d-9af29852fc74.jpg" width="600" /> </a></p>
<p>
<a href=" https://hosting.photobucket.com/95288841-8654-4bf7-8fc9-a4aa78dce87f/3dcca26c-d549-4af3-812a-a4a81b9a2310.jpg
" target="_blank"> <img alt="Click for enlarged picture" src="
https://hosting.photobucket.com/95288841-8654-4bf7-8fc9-a4aa78dce87f/3dcca26c-d549-4af3-812a-a4a81b9a2310.jpg" width="600" /> </a></p>
<p>
<a href=" https://hosting.photobucket.com/95288841-8654-4bf7-8fc9-a4aa78dce87f/4adf0fb6-3eab-4b40-b32d-d03eab4a9892.jpg
" target="_blank"> <img alt="Click for enlarged picture" src="
https://hosting.photobucket.com/95288841-8654-4bf7-8fc9-a4aa78dce87f/4adf0fb6-3eab-4b40-b32d-d03eab4a9892.jpg" width="600" /> </a></p>
<p>
<a href=" https://hosting.photobucket.com/95288841-8654-4bf7-8fc9-a4aa78dce87f/4732b58a-9a65-4d1c-a7d5-25513d34b108.jpg
" target="_blank"> <img alt="Click for enlarged picture" src="
https://hosting.photobucket.com/95288841-8654-4bf7-8fc9-a4aa78dce87f/4732b58a-9a65-4d1c-a7d5-25513d34b108.jpg" width="600" /> </a></p>
<p>
<a href=" https://hosting.photobucket.com/95288841-8654-4bf7-8fc9-a4aa78dce87f/274be330-31d5-4e25-95db-ec2f423a003c.jpg
" target="_blank"> <img alt="Click for enlarged picture" src="
https://hosting.photobucket.com/95288841-8654-4bf7-8fc9-a4aa78dce87f/274be330-31d5-4e25-95db-ec2f423a003c.jpg" width="600" /> </a></p>
<p>
<a href=" https://hosting.photobucket.com/95288841-8654-4bf7-8fc9-a4aa78dce87f/8e7b0a80-0f46-4d70-9789-a46976c713d2.jpg
" target="_blank"> <img alt="Click for enlarged picture" src="
https://hosting.photobucket.com/95288841-8654-4bf7-8fc9-a4aa78dce87f/8e7b0a80-0f46-4d70-9789-a46976c713d2.jpg" width="600" /> </a></p>
<p>
<a href=" https://hosting.photobucket.com/95288841-8654-4bf7-8fc9-a4aa78dce87f/8bbd4e96-b911-4f26-80fe-b1c57f29027b.jpg
" target="_blank"> <img alt="Click for enlarged picture" src="
https://hosting.photobucket.com/95288841-8654-4bf7-8fc9-a4aa78dce87f/8bbd4e96-b911-4f26-80fe-b1c57f29027b.jpg" width="600" /> </a></p>
<p>
<a href=" https://hosting.photobucket.com/95288841-8654-4bf7-8fc9-a4aa78dce87f/203a27be-8f10-459d-89b9-befb6b636b74.jpg
" target="_blank"> <img alt="Click for enlarged picture" src="
https://hosting.photobucket.com/95288841-8654-4bf7-8fc9-a4aa78dce87f/203a27be-8f10-459d-89b9-befb6b636b74.jpg" width="600" /> </a></p>
<p>
<a href=" https://hosting.photobucket.com/95288841-8654-4bf7-8fc9-a4aa78dce87f/5dc4358f-19d8-475f-a4af-9c29e9ed18d7.jpg
" target="_blank"> <img alt="Click for enlarged picture" src="
https://hosting.photobucket.com/95288841-8654-4bf7-8fc9-a4aa78dce87f/5dc4358f-19d8-475f-a4af-9c29e9ed18d7.jpg" width="600" /> </a></p>
<p>
<strong>BACK TO BASICS MINIATURE PAINTING WORKSHOPS FOR YOUNG</strong></p>
<p>
On weekdays from 17:00 to 18:00, we held our new workshops for the youngest, in which our youngest participants painted their first miniatures.</p>
<p>
<a href=" https://hosting.photobucket.com/95288841-8654-4bf7-8fc9-a4aa78dce87f/948af139-8fb5-4e28-a27c-404466e70d05.jpg
" target="_blank"> <img alt="Click for enlarged picture" src="
https://hosting.photobucket.com/95288841-8654-4bf7-8fc9-a4aa78dce87f/948af139-8fb5-4e28-a27c-404466e70d05.jpg" width="600" /> </a></p>
<p>
<a href=" https://hosting.photobucket.com/95288841-8654-4bf7-8fc9-a4aa78dce87f/bb3e20c2-bb21-4a3d-863a-74de08261467.jpg
" target="_blank"> <img alt="Click for enlarged picture" src="
https://hosting.photobucket.com/95288841-8654-4bf7-8fc9-a4aa78dce87f/bb3e20c2-bb21-4a3d-863a-74de08261467.jpg" width="600" /> </a></p>
<p>
<a href=" https://hosting.photobucket.com/95288841-8654-4bf7-8fc9-a4aa78dce87f/7316c760-98e3-4e3f-9261-d138aa7a5a6a.jpg
" target="_blank"> <img alt="Click for enlarged picture" src="
https://hosting.photobucket.com/95288841-8654-4bf7-8fc9-a4aa78dce87f/7316c760-98e3-4e3f-9261-d138aa7a5a6a.jpg" width="600" /> </a></p>
<p>
<a href=" https://hosting.photobucket.com/95288841-8654-4bf7-8fc9-a4aa78dce87f/68934b39-3d1f-4f43-b967-14b73c41a39e.jpg
" target="_blank"> <img alt="Click for enlarged picture" src="
https://hosting.photobucket.com/95288841-8654-4bf7-8fc9-a4aa78dce87f/68934b39-3d1f-4f43-b967-14b73c41a39e.jpg" width="600" /> </a></p>
<p>
<a href=" https://hosting.photobucket.com/95288841-8654-4bf7-8fc9-a4aa78dce87f/46125bce-a28d-494f-873a-3aeabdc1d6c2.jpg
" target="_blank"> <img alt="Click for enlarged picture" src="
https://hosting.photobucket.com/95288841-8654-4bf7-8fc9-a4aa78dce87f/46125bce-a28d-494f-873a-3aeabdc1d6c2.jpg" width="600" /> </a></p>
<p>
<a href=" https://hosting.photobucket.com/95288841-8654-4bf7-8fc9-a4aa78dce87f/3c58e0ad-77a9-44c8-b6bf-d9a55c514d43.jpg
" target="_blank"> <img alt="Click for enlarged picture" src="
https://hosting.photobucket.com/95288841-8654-4bf7-8fc9-a4aa78dce87f/3c58e0ad-77a9-44c8-b6bf-d9a55c514d43.jpg" width="600" /> </a></p>
<p>
<a href=" https://hosting.photobucket.com/95288841-8654-4bf7-8fc9-a4aa78dce87f/f891f0f0-051b-40ee-9676-cb03b0a9811b.jpg
" target="_blank"> <img alt="Click for enlarged picture" src="
https://hosting.photobucket.com/95288841-8654-4bf7-8fc9-a4aa78dce87f/f891f0f0-051b-40ee-9676-cb03b0a9811b.jpg" width="600" /> </a></p>
<p>
<strong>AGRAM LEGO SECTION lecture: FW-14b – An F1 racecar for the future</strong></p>
<p>
On Wednesday, February 25, 2026, as part of the activities of our Agram Lego Section, our resident mechanical engineer Marko Paunović gave a lecture on the topic of the F1 racecar from 1992. Admission to the lecture was free, and upon completion, a LEGO model of the racecar was made by members of the Lego section</p>
<p>
<a href=" https://hosting.photobucket.com/95288841-8654-4bf7-8fc9-a4aa78dce87f/b2e14b1c-daa4-4314-8685-184377bc7e28.jpg
" target="_blank"> <img alt="Click for enlarged picture" src="
https://hosting.photobucket.com/95288841-8654-4bf7-8fc9-a4aa78dce87f/b2e14b1c-daa4-4314-8685-184377bc7e28.jpg" width="600" /> </a></p>
<p>
<a href=" https://hosting.photobucket.com/95288841-8654-4bf7-8fc9-a4aa78dce87f/31fb439a-77d3-4418-83ff-66c3af279cca.jpg" target="_blank"> <img alt="Click for enlarged picture" src="
https://hosting.photobucket.com/95288841-8654-4bf7-8fc9-a4aa78dce87f/31fb439a-77d3-4418-83ff-66c3af279cca.jpg" width="600" /> </a></p>
<p>
<a href=" https://hosting.photobucket.com/95288841-8654-4bf7-8fc9-a4aa78dce87f/bfcaf282-6be8-4b52-a3ed-c91137457876.jpg
" target="_blank"> <img alt="Click for enlarged picture" src="
https://hosting.photobucket.com/95288841-8654-4bf7-8fc9-a4aa78dce87f/bfcaf282-6be8-4b52-a3ed-c91137457876.jpg" width="600" /> </a></p>
<p>
<a href=" https://hosting.photobucket.com/95288841-8654-4bf7-8fc9-a4aa78dce87f/ce70fc61-9e1a-4169-aaad-8b67417656c0.jpg
" target="_blank"> <img alt="Click for enlarged picture" src="
https://hosting.photobucket.com/95288841-8654-4bf7-8fc9-a4aa78dce87f/ce70fc61-9e1a-4169-aaad-8b67417656c0.jpg" width="600" /> </a></p>
<p>
<a href=" https://hosting.photobucket.com/95288841-8654-4bf7-8fc9-a4aa78dce87f/94ca0e36-8710-458d-8194-9f71299f4d74.jpg
" target="_blank"> <img alt="Click for enlarged picture" src="
https://hosting.photobucket.com/95288841-8654-4bf7-8fc9-a4aa78dce87f/94ca0e36-8710-458d-8194-9f71299f4d74.jpg" width="600" /> </a></p>
<p>
<a href=" https://hosting.photobucket.com/95288841-8654-4bf7-8fc9-a4aa78dce87f/c6771f72-7191-4ca3-a792-3bb1ab3897b1.jpg
" target="_blank"> <img alt="Click for enlarged picture" src="
https://hosting.photobucket.com/95288841-8654-4bf7-8fc9-a4aa78dce87f/c6771f72-7191-4ca3-a792-3bb1ab3897b1.jpg" width="600" /> </a></p>
<p>
<a href=" https://hosting.photobucket.com/95288841-8654-4bf7-8fc9-a4aa78dce87f/c8fcfcb6-09f2-4398-a2fb-fa5065771e01.jpg
" target="_blank"> <img alt="Click for enlarged picture" src="
https://hosting.photobucket.com/95288841-8654-4bf7-8fc9-a4aa78dce87f/c8fcfcb6-09f2-4398-a2fb-fa5065771e01.jpg" width="600" /> </a></p>
<p>
<a href=" https://hosting.photobucket.com/95288841-8654-4bf7-8fc9-a4aa78dce87f/d7e187a8-d5b1-433b-b30d-091e54dcdddf.jpg
" target="_blank"> <img alt="Click for enlarged picture" src="
https://hosting.photobucket.com/95288841-8654-4bf7-8fc9-a4aa78dce87f/d7e187a8-d5b1-433b-b30d-091e54dcdddf.jpg" width="600" /> </a></p>
<p>
During the second weekend of the Exhibition, 28.02.-01.03., we organized a <strong>MINIATURE PAINTING WORKSHOP - Grimdark</strong>.</p>
<p>
The workshop was held over two days (the entire weekend) and participants painted up to three different figures for the game Trench Crusade. The focus of these lectures was on painting the popular grimdark style minis. The workshop presented paints and equipment, figure preparation, several miniature painting techniques from basic to advanced, and techniques and tricks for quickly and efficiently painting larger quantities of figures at once. Water-based acrylic paints were used as part of the workshop.</p>
<p>
<a href=" https://hosting.photobucket.com/95288841-8654-4bf7-8fc9-a4aa78dce87f/733d94b2-8e8d-4a4e-accd-b9168e32577e.jpg
" target="_blank"> <img alt="Click for enlarged picture" src="
https://hosting.photobucket.com/95288841-8654-4bf7-8fc9-a4aa78dce87f/733d94b2-8e8d-4a4e-accd-b9168e32577e.jpg
" width="600" /> </a></p>
<p>
<a href=" https://hosting.photobucket.com/95288841-8654-4bf7-8fc9-a4aa78dce87f/41020062-45b9-41cd-a357-fa23a389f390.jpg
" target="_blank"> <img alt="Click for enlarged picture" src="
https://hosting.photobucket.com/95288841-8654-4bf7-8fc9-a4aa78dce87f/41020062-45b9-41cd-a357-fa23a389f390.jpg
" width="600" /> </a></p>
<p>
<a href=" https://hosting.photobucket.com/95288841-8654-4bf7-8fc9-a4aa78dce87f/0c07cc55-596d-494d-972b-cd6a0dd6b8b7.jpg
" target="_blank"> <img alt="Click for enlarged picture" src="
https://hosting.photobucket.com/95288841-8654-4bf7-8fc9-a4aa78dce87f/0c07cc55-596d-494d-972b-cd6a0dd6b8b7.jpg" width="600" /> </a></p>
<p>
<a href=" https://hosting.photobucket.com/95288841-8654-4bf7-8fc9-a4aa78dce87f/c17dd356-08b1-48e1-b895-6296aed7f818.jpg
" target="_blank"> <img alt="Click for enlarged picture" src="
https://hosting.photobucket.com/95288841-8654-4bf7-8fc9-a4aa78dce87f/c17dd356-08b1-48e1-b895-6296aed7f818.jpg" width="600" /> </a></p>
<p>
On Wednesday 04.03.2026. the annual <strong>session of the Assembly</strong> was held, where we determined the guidelines for work in 2026.</p>
<p>
,</p>
<p>
<a href=" https://hosting.photobucket.com/95288841-8654-4bf7-8fc9-a4aa78dce87f/59484bd0-7edc-4aed-a04e-ae42900ba3e6.jpg
" target="_blank"> <img alt="Click for enlarged picture" src="
https://hosting.photobucket.com/95288841-8654-4bf7-8fc9-a4aa78dce87f/59484bd0-7edc-4aed-a04e-ae42900ba3e6.jpg
" width="600" /> </a></p>
<p>
On Sunday 08.03.2026. The exhibition was over, our exhibits safely stored, and the Gallery cleaned.</p>
<p>
<a href=" https://hosting.photobucket.com/95288841-8654-4bf7-8fc9-a4aa78dce87f/98af4280-0956-4cdb-b4a9-da40e3a5a44a.jpg
" target="_blank"> <img alt="Click for enlarged picture" src="
https://hosting.photobucket.com/95288841-8654-4bf7-8fc9-a4aa78dce87f/98af4280-0956-4cdb-b4a9-da40e3a5a44a.jpg" width="600" /> </a></p>
<p>
<a href=" https://hosting.photobucket.com/95288841-8654-4bf7-8fc9-a4aa78dce87f/3259b35e-1fc2-4a99-a3c5-c7984958d72b.jpg
" target="_blank"> <img alt="Click for enlarged picture" src="
https://hosting.photobucket.com/95288841-8654-4bf7-8fc9-a4aa78dce87f/3259b35e-1fc2-4a99-a3c5-c7984958d72b.jpg" width="600" /> </a></p>
<p>
The most important part of every year when holding this Exhibition is the social aspect, the socializing of our members both among themselves and with our international friends who visit us! With these few photos from our joint gatherings, we greet you until next year!</p>
<p>
<a href=" https://hosting.photobucket.com/95288841-8654-4bf7-8fc9-a4aa78dce87f/b9168e23-79b2-4d81-8a7d-7534062881a7.jpg
" target="_blank"> <img alt="Click for enlarged picture" src="
https://hosting.photobucket.com/95288841-8654-4bf7-8fc9-a4aa78dce87f/b9168e23-79b2-4d81-8a7d-7534062881a7.jpg " width="600" /> </a></p>
<p>
<a href=" https://hosting.photobucket.com/95288841-8654-4bf7-8fc9-a4aa78dce87f/edff925e-916c-4d78-953e-210abf3753d4.jpg
" target="_blank"> <img alt="Click for enlarged picture" src="
https://hosting.photobucket.com/95288841-8654-4bf7-8fc9-a4aa78dce87f/edff925e-916c-4d78-953e-210abf3753d4.jpg " width="600" /> </a></p>
<p>
<a href=" https://hosting.photobucket.com/95288841-8654-4bf7-8fc9-a4aa78dce87f/8bcb48fa-466b-43f8-8a4b-f15f6794b21e.jpg
" target="_blank"> <img alt="Click for enlarged picture" src="
https://hosting.photobucket.com/95288841-8654-4bf7-8fc9-a4aa78dce87f/8bcb48fa-466b-43f8-8a4b-f15f6794b21e.jpg" width="600" /> </a></p>
"
["content_hrv"]=>
string(42265) "<p>
<a href=" https://hosting.photobucket.com/95288841-8654-4bf7-8fc9-a4aa78dce87f/dc756f84-867d-4df4-acd8-5d43775cafc2.jpg
" target="_blank"> <img alt="Click for enlarged picture" src="
https://hosting.photobucket.com/95288841-8654-4bf7-8fc9-a4aa78dce87f/dc756f84-867d-4df4-acd8-5d43775cafc2.jpg" width="600" /> </a></p>
<p>
<strong>Izložba minijatura i maketa "Agram 2026"</strong> održala se ove godine od 19.2. do 08.03. Postavljanje izložbe je održano u srijedu 18.2. i sudjelovao je velik broj članova kao i prijatelja Udruge koji su izlagali svoje radove.</p>
<p>
<a href=" https://hosting.photobucket.com/95288841-8654-4bf7-8fc9-a4aa78dce87f/8529d6d4-76ea-4872-a9e6-748e04223a4e.jpg
" target="_blank"> <img alt="Click for enlarged picture" src="
https://hosting.photobucket.com/95288841-8654-4bf7-8fc9-a4aa78dce87f/8529d6d4-76ea-4872-a9e6-748e04223a4e.jpg
" width="600" /> </a></p>
<p>
<a href=" https://hosting.photobucket.com/95288841-8654-4bf7-8fc9-a4aa78dce87f/f3038937-f001-4ceb-b725-a330fcd64cee.jpg
" target="_blank"> <img alt="Click for enlarged picture" src="
https://hosting.photobucket.com/95288841-8654-4bf7-8fc9-a4aa78dce87f/f3038937-f001-4ceb-b725-a330fcd64cee.jpg
" width="600" /> </a></p>
<p>
<a href=" https://hosting.photobucket.com/95288841-8654-4bf7-8fc9-a4aa78dce87f/3575379e-e068-49e2-9d4d-c9a49531fdc2.jpg
" target="_blank"> <img alt="Click for enlarged picture" src="
https://hosting.photobucket.com/95288841-8654-4bf7-8fc9-a4aa78dce87f/3575379e-e068-49e2-9d4d-c9a49531fdc2.jpg" width="600" /> </a></p>
<p>
<a href=" https://hosting.photobucket.com/95288841-8654-4bf7-8fc9-a4aa78dce87f/e51713c7-2add-4f8f-ae37-e6eba25badff.jpg
" target="_blank"> <img alt="Click for enlarged picture" src="
https://hosting.photobucket.com/95288841-8654-4bf7-8fc9-a4aa78dce87f/e51713c7-2add-4f8f-ae37-e6eba25badff.jpg" width="600" /> </a></p>
<p>
<a href=" https://hosting.photobucket.com/95288841-8654-4bf7-8fc9-a4aa78dce87f/9c0bb546-50a8-483d-aeab-ab3b2ce9f094.jpg
" target="_blank"> <img alt="Click for enlarged picture" src="
https://hosting.photobucket.com/95288841-8654-4bf7-8fc9-a4aa78dce87f/9c0bb546-50a8-483d-aeab-ab3b2ce9f094.jpg" width="600" /> </a></p>
<p>
Otvorenje Izložbe održalo se u četvrtak, 19.2.2026. s početkom u 18:00h. Izložba je organizirana povodom našeg dvadeset trećeg rođendana.</p>
<p>
<a href=" https://hosting.photobucket.com/95288841-8654-4bf7-8fc9-a4aa78dce87f/71c7bfc2-1ffc-43b9-9d5a-53e009f6b86d.jpg
" target="_blank"> <img alt="Click for enlarged picture" src="
https://hosting.photobucket.com/95288841-8654-4bf7-8fc9-a4aa78dce87f/71c7bfc2-1ffc-43b9-9d5a-53e009f6b86d.jpg" width="600" /> </a></p>
<p>
<a href=" https://hosting.photobucket.com/95288841-8654-4bf7-8fc9-a4aa78dce87f/007b4701-1d7c-4a67-a599-0539a2aa3191.jpg
" target="_blank"> <img alt="Click for enlarged picture" src="
https://hosting.photobucket.com/95288841-8654-4bf7-8fc9-a4aa78dce87f/007b4701-1d7c-4a67-a599-0539a2aa3191.jpg" width="600" /> </a></p>
<p>
<a href=" https://hosting.photobucket.com/95288841-8654-4bf7-8fc9-a4aa78dce87f/2c8090e2-8b95-4368-bb48-98876d680e15.jpg
" target="_blank"> <img alt="Click for enlarged picture" src="
https://hosting.photobucket.com/95288841-8654-4bf7-8fc9-a4aa78dce87f/2c8090e2-8b95-4368-bb48-98876d680e15.jpg" width="600" /> </a></p>
<p>
<a href=" https://hosting.photobucket.com/95288841-8654-4bf7-8fc9-a4aa78dce87f/375768ad-a8bb-49bf-9845-e46c896ba7ec.jpg
" target="_blank"> <img alt="Click for enlarged picture" src="
https://hosting.photobucket.com/95288841-8654-4bf7-8fc9-a4aa78dce87f/375768ad-a8bb-49bf-9845-e46c896ba7ec.jpg" width="600" /> </a></p>
<p>
<a href=" https://hosting.photobucket.com/95288841-8654-4bf7-8fc9-a4aa78dce87f/a93de974-4ccb-4876-85b0-4d066ae402b3.jpg
" target="_blank"> <img alt="Click for enlarged picture" src="
https://hosting.photobucket.com/95288841-8654-4bf7-8fc9-a4aa78dce87f/a93de974-4ccb-4876-85b0-4d066ae402b3.jpg" width="600" /> </a></p>
<p>
<a href=" https://hosting.photobucket.com/95288841-8654-4bf7-8fc9-a4aa78dce87f/d323ccc9-1b9a-4cb2-8adf-7019b0e217f4.jpg
" target="_blank"> <img alt="Click for enlarged picture" src="
https://hosting.photobucket.com/95288841-8654-4bf7-8fc9-a4aa78dce87f/d323ccc9-1b9a-4cb2-8adf-7019b0e217f4.jpg" width="600" /> </a></p>
<p>
<a href=" https://hosting.photobucket.com/95288841-8654-4bf7-8fc9-a4aa78dce87f/a5a66447-2d76-47ae-866d-4d512ef469a5.jpg
" target="_blank"> <img alt="Click for enlarged picture" src="
https://hosting.photobucket.com/95288841-8654-4bf7-8fc9-a4aa78dce87f/a5a66447-2d76-47ae-866d-4d512ef469a5.jpg" width="600" /> </a></p>
<p>
<a href=" https://hosting.photobucket.com/95288841-8654-4bf7-8fc9-a4aa78dce87f/3e7bcfc9-ba02-4f94-a6c3-79dfaea3639e.jpg
" target="_blank"> <img alt="Click for enlarged picture" src="
https://hosting.photobucket.com/95288841-8654-4bf7-8fc9-a4aa78dce87f/3e7bcfc9-ba02-4f94-a6c3-79dfaea3639e.jpg" width="600" /> </a></p>
<p>
<a href=" https://hosting.photobucket.com/95288841-8654-4bf7-8fc9-a4aa78dce87f/24e79466-4a9e-4b10-970c-caad235d260d.jpg
" target="_blank"> <img alt="Click for enlarged picture" src="
https://hosting.photobucket.com/95288841-8654-4bf7-8fc9-a4aa78dce87f/24e79466-4a9e-4b10-970c-caad235d260d.jpg" width="600" /> </a></p>
<p>
Kao i uvijek, Izložba je prikazivala presjek rada Udruge, njenih članova, polaznika njenih tečajeva i radionica te članova FB grupe Miniature Painters Croatia. U velikom broju vitrina našle su se brojne minijature za stolne strateške igre, igre na tabli, a cijela jedna vitrina posvećena je nagrađenim izlošcima sa prethodnih minijaturističkih natjecanja. Nekoliko vitrina bilo je posvećeno projektima koje Udruga već 23 godinu provodi poput Knjižnice i čitaonice UMS „Agram“, Radionice za izradu prostornih maketa i Radionice bojanja minijatura, ali i novih poput Agram Group Build, Agram Lego Sekcije i Back to Basics radionica bojanja za najmlađe.</p>
<p>
<a href=" https://hosting.photobucket.com/95288841-8654-4bf7-8fc9-a4aa78dce87f/fca84936-af71-44d3-9a4c-faeb26163899.jpg
" target="_blank"> <img alt="Click for enlarged picture" src="
https://hosting.photobucket.com/95288841-8654-4bf7-8fc9-a4aa78dce87f/fca84936-af71-44d3-9a4c-faeb26163899.jpg" width="600" /> </a></p>
<p>
<a href=" https://hosting.photobucket.com/95288841-8654-4bf7-8fc9-a4aa78dce87f/459bc5ac-8702-46f9-93b4-547deaabdef4.jpg
" target="_blank"> <img alt="Click for enlarged picture" src="
https://hosting.photobucket.com/95288841-8654-4bf7-8fc9-a4aa78dce87f/459bc5ac-8702-46f9-93b4-547deaabdef4.jpg" width="600" /> </a></p>
<p>
<a href=" https://hosting.photobucket.com/95288841-8654-4bf7-8fc9-a4aa78dce87f/91a04363-b2ef-4635-a046-7edf25ce7808.jpg
" target="_blank"> <img alt="Click for enlarged picture" src="
https://hosting.photobucket.com/95288841-8654-4bf7-8fc9-a4aa78dce87f/91a04363-b2ef-4635-a046-7edf25ce7808.jpg" width="600" /> </a></p>
<p>
<a href=" https://hosting.photobucket.com/95288841-8654-4bf7-8fc9-a4aa78dce87f/73256af5-fd5d-40b5-95e1-120e49c9be87.jpg
" target="_blank"> <img alt="Click for enlarged picture" src="
https://hosting.photobucket.com/95288841-8654-4bf7-8fc9-a4aa78dce87f/73256af5-fd5d-40b5-95e1-120e49c9be87.jpg" width="600" /> </a></p>
<p>
<a href=" https://hosting.photobucket.com/95288841-8654-4bf7-8fc9-a4aa78dce87f/979f9be5-23f3-4df9-91dc-ab71d6a10d64.jpg
" target="_blank"> <img alt="Click for enlarged picture" src="
https://hosting.photobucket.com/95288841-8654-4bf7-8fc9-a4aa78dce87f/979f9be5-23f3-4df9-91dc-ab71d6a10d64.jpg" width="600" /> </a></p>
<p>
<a href=" https://hosting.photobucket.com/95288841-8654-4bf7-8fc9-a4aa78dce87f/d0ff4379-183a-47b9-a740-9ddc283ebc29.jpg
" target="_blank"> <img alt="Click for enlarged picture" src="
https://hosting.photobucket.com/95288841-8654-4bf7-8fc9-a4aa78dce87f/d0ff4379-183a-47b9-a740-9ddc283ebc29.jpg" width="600" /> </a></p>
<p>
<a href=" https://hosting.photobucket.com/95288841-8654-4bf7-8fc9-a4aa78dce87f/4333e95e-bbbd-4f47-aaea-38a9c99e54d8.jpg
" target="_blank"> <img alt="Click for enlarged picture" src="
https://hosting.photobucket.com/95288841-8654-4bf7-8fc9-a4aa78dce87f/4333e95e-bbbd-4f47-aaea-38a9c99e54d8.jpg" width="600" /> </a></p>
<p>
<a href=" https://hosting.photobucket.com/95288841-8654-4bf7-8fc9-a4aa78dce87f/1372f8a2-b222-48ee-ae45-a90b5a354ef7.jpg
" target="_blank"> <img alt="Click for enlarged picture" src="
https://hosting.photobucket.com/95288841-8654-4bf7-8fc9-a4aa78dce87f/1372f8a2-b222-48ee-ae45-a90b5a354ef7.jpg" width="600" /> </a></p>
<p>
<a href=" https://hosting.photobucket.com/95288841-8654-4bf7-8fc9-a4aa78dce87f/6a1b4fd1-d982-4b06-9c5f-3cd40d6bf10a.jpg
" target="_blank"> <img alt="Click for enlarged picture" src="
https://hosting.photobucket.com/95288841-8654-4bf7-8fc9-a4aa78dce87f/6a1b4fd1-d982-4b06-9c5f-3cd40d6bf10a.jpg" width="600" /> </a></p>
<p>
<a href=" https://hosting.photobucket.com/95288841-8654-4bf7-8fc9-a4aa78dce87f/c2ec45e1-e0f3-463a-b254-cb2a38b53e14.jpg
" target="_blank"> <img alt="Click for enlarged picture" src="
https://hosting.photobucket.com/95288841-8654-4bf7-8fc9-a4aa78dce87f/c2ec45e1-e0f3-463a-b254-cb2a38b53e14.jpg" width="600" /> </a></p>
<p>
<a href=" https://hosting.photobucket.com/95288841-8654-4bf7-8fc9-a4aa78dce87f/17553b9a-0592-4f6a-a097-3f1a97e161f3.jpg
" target="_blank"> <img alt="Click for enlarged picture" src="
https://hosting.photobucket.com/95288841-8654-4bf7-8fc9-a4aa78dce87f/17553b9a-0592-4f6a-a097-3f1a97e161f3.jpg" width="600" /> </a></p>
<p>
<a href=" https://hosting.photobucket.com/95288841-8654-4bf7-8fc9-a4aa78dce87f/8658bd6b-dff2-4d24-8473-928d44d44480.jpg
" target="_blank"> <img alt="Click for enlarged picture" src="
https://hosting.photobucket.com/95288841-8654-4bf7-8fc9-a4aa78dce87f/8658bd6b-dff2-4d24-8473-928d44d44480.jpg" width="600" /> </a></p>
<p>
<a href=" https://hosting.photobucket.com/95288841-8654-4bf7-8fc9-a4aa78dce87f/ecab0ea7-f75b-4e31-a520-d088ad39fa17.jpg
" target="_blank"> <img alt="Click for enlarged picture" src="
https://hosting.photobucket.com/95288841-8654-4bf7-8fc9-a4aa78dce87f/ecab0ea7-f75b-4e31-a520-d088ad39fa17.jpg" width="600" /> </a></p>
<p>
<a href=" https://hosting.photobucket.com/95288841-8654-4bf7-8fc9-a4aa78dce87f/9495a2f5-8a82-41f2-abf4-9ade3db41d87.jpg
" target="_blank"> <img alt="Click for enlarged picture" src="
https://hosting.photobucket.com/95288841-8654-4bf7-8fc9-a4aa78dce87f/9495a2f5-8a82-41f2-abf4-9ade3db41d87.jpg" width="600" /> </a></p>
<p>
<a href=" https://hosting.photobucket.com/95288841-8654-4bf7-8fc9-a4aa78dce87f/362cc6fd-a5dd-474b-9b9f-aeab27d6dcfa.jpg
" target="_blank"> <img alt="Click for enlarged picture" src="
https://hosting.photobucket.com/95288841-8654-4bf7-8fc9-a4aa78dce87f/362cc6fd-a5dd-474b-9b9f-aeab27d6dcfa.jpg" width="600" /> </a></p>
<p>
Posebna čast nam je bila ugostiti našeg gosta izlagača, Ninoslava Luka minijaturista iz Poreča koji nam se predstavio svojom kolekcijom povijesnih diorama.</p>
<p>
<a href=" https://hosting.photobucket.com/95288841-8654-4bf7-8fc9-a4aa78dce87f/ba1353de-e2bd-4340-9121-9056e287ed4a.jpg
" target="_blank"> <img alt="Click for enlarged picture" src="
https://hosting.photobucket.com/95288841-8654-4bf7-8fc9-a4aa78dce87f/ba1353de-e2bd-4340-9121-9056e287ed4a.jpg" width="600" /> </a></p>
<p>
<a href=" https://hosting.photobucket.com/95288841-8654-4bf7-8fc9-a4aa78dce87f/cea18506-1b50-4e5b-955c-0b9ca02d7826.jpg
" target="_blank"> <img alt="Click for enlarged picture" src="
https://hosting.photobucket.com/95288841-8654-4bf7-8fc9-a4aa78dce87f/cea18506-1b50-4e5b-955c-0b9ca02d7826.jpg" width="600" /> </a></p>
<p>
<a href=" https://hosting.photobucket.com/95288841-8654-4bf7-8fc9-a4aa78dce87f/1be85b41-e3b6-4536-b141-cd0da6eb38c1.jpg
" target="_blank"> <img alt="Click for enlarged picture" src="
https://hosting.photobucket.com/95288841-8654-4bf7-8fc9-a4aa78dce87f/1be85b41-e3b6-4536-b141-cd0da6eb38c1.jpg" width="600" /> </a></p>
<p>
<a href=" https://hosting.photobucket.com/95288841-8654-4bf7-8fc9-a4aa78dce87f/9e93b87d-ff3c-4b7b-8f06-5f9d3464a134.jpg
" target="_blank"> <img alt="Click for enlarged picture" src="
https://hosting.photobucket.com/95288841-8654-4bf7-8fc9-a4aa78dce87f/9e93b87d-ff3c-4b7b-8f06-5f9d3464a134.jpg" width="600" /> </a></p>
<p>
Tijekom prvog vikenda Izložbe, 21.-22.02.,održali smo 20. godišnje međunarodno natjecanje u bojanju minijatura <strong>Black Queen Hobby and Miniature Painting Competition</strong>!</p>
<p>
<a href=" https://hosting.photobucket.com/95288841-8654-4bf7-8fc9-a4aa78dce87f/3056fb09-f66c-4dea-80a8-a4e72407429a.jpg
" target="_blank"> <img alt="Click for enlarged picture" src="
https://hosting.photobucket.com/95288841-8654-4bf7-8fc9-a4aa78dce87f/3056fb09-f66c-4dea-80a8-a4e72407429a.jpg" width="600" /> </a></p>
<p>
Kako su natjecatelji pristizali i prijavljivali se na natjecanje, naše vrijedno osoblje je fotografiralo sve izloške prije nego li su ih rasporedili po kategorijama i pažljivo ih postavili u staklene vitrine. Niti jutarnja okrijepa nije usfalila zahvaljujući našim revnim volonterima.</p>
<p>
<a href=" https://hosting.photobucket.com/95288841-8654-4bf7-8fc9-a4aa78dce87f/1118089c-2b46-4a2c-b17d-dc92b66d1ffc.jpg
" target="_blank"> <img alt="Click for enlarged picture" src="
https://hosting.photobucket.com/95288841-8654-4bf7-8fc9-a4aa78dce87f/1118089c-2b46-4a2c-b17d-dc92b66d1ffc.jpg" width="600" /> </a></p>
<p>
<a href=" https://hosting.photobucket.com/95288841-8654-4bf7-8fc9-a4aa78dce87f/9fd3c272-9a69-4532-a09d-36497a20a820.jpg
" target="_blank"> <img alt="Click for enlarged picture" src="
https://hosting.photobucket.com/95288841-8654-4bf7-8fc9-a4aa78dce87f/9fd3c272-9a69-4532-a09d-36497a20a820.jpg" width="600" /> </a></p>
<p>
<a href=" https://hosting.photobucket.com/95288841-8654-4bf7-8fc9-a4aa78dce87f/86995e80-c502-45fb-80f5-c8fda27da3f9.jpg
" target="_blank"> <img alt="Click for enlarged picture" src="
https://hosting.photobucket.com/95288841-8654-4bf7-8fc9-a4aa78dce87f/86995e80-c502-45fb-80f5-c8fda27da3f9.jpg" width="600" /> </a></p>
<p>
U podne, sve vitrine su bile pune i natjecanje je moglo službeno početi.</p>
<p>
<a href=" https://hosting.photobucket.com/95288841-8654-4bf7-8fc9-a4aa78dce87f/bce59a4f-c3e3-4708-a3d6-25e81a894c24.jpg
" target="_blank"> <img alt="Click for enlarged picture" src="
https://hosting.photobucket.com/95288841-8654-4bf7-8fc9-a4aa78dce87f/bce59a4f-c3e3-4708-a3d6-25e81a894c24.jpg" width="600" /> </a></p>
<p>
<a href=" https://hosting.photobucket.com/95288841-8654-4bf7-8fc9-a4aa78dce87f/16a0a094-01aa-4e52-82cf-fdab00d74711.jpg
" target="_blank"> <img alt="Click for enlarged picture" src="
https://hosting.photobucket.com/95288841-8654-4bf7-8fc9-a4aa78dce87f/16a0a094-01aa-4e52-82cf-fdab00d74711.jpg" width="600" /> </a></p>
<p>
<a href=" https://hosting.photobucket.com/95288841-8654-4bf7-8fc9-a4aa78dce87f/0d3f4042-ff77-48d0-b332-add0fd08f7c3.jpg
" target="_blank"> <img alt="Click for enlarged picture" src="
https://hosting.photobucket.com/95288841-8654-4bf7-8fc9-a4aa78dce87f/0d3f4042-ff77-48d0-b332-add0fd08f7c3.jpg" width="600" /> </a></p>
<p>
<a href=" https://hosting.photobucket.com/95288841-8654-4bf7-8fc9-a4aa78dce87f/3711baf8-93f2-434a-aea9-a95288ca04dd.jpg
" target="_blank"> <img alt="Click for enlarged picture" src="
https://hosting.photobucket.com/95288841-8654-4bf7-8fc9-a4aa78dce87f/3711baf8-93f2-434a-aea9-a95288ca04dd.jpg" width="600" /> </a></p>
<p>
<a href=" https://hosting.photobucket.com/95288841-8654-4bf7-8fc9-a4aa78dce87f/53113b97-ec06-4409-95ba-95a5ad3f9720.jpg
" target="_blank"> <img alt="Click for enlarged picture" src="
https://hosting.photobucket.com/95288841-8654-4bf7-8fc9-a4aa78dce87f/53113b97-ec06-4409-95ba-95a5ad3f9720.jpg" width="600" /> </a></p>
<p>
<a href=" https://hosting.photobucket.com/95288841-8654-4bf7-8fc9-a4aa78dce87f/ab127858-193d-4976-bdb2-e27302722fca.jpg
" target="_blank"> <img alt="Click for enlarged picture" src="
https://hosting.photobucket.com/95288841-8654-4bf7-8fc9-a4aa78dce87f/ab127858-193d-4976-bdb2-e27302722fca.jpg" width="600" /> </a></p>
<p>
<a href=" https://hosting.photobucket.com/95288841-8654-4bf7-8fc9-a4aa78dce87f/3735af11-3fb6-4772-a8ff-5e0ff6ddf03a.jpg
" target="_blank"> <img alt="Click for enlarged picture" src="
https://hosting.photobucket.com/95288841-8654-4bf7-8fc9-a4aa78dce87f/3735af11-3fb6-4772-a8ff-5e0ff6ddf03a.jpg" width="600" /> </a></p>
<p>
<strong>Back To Basics radionice za najmlađe na Black Queen</strong></p>
<p>
Ove godine smo tijekom cijelog vikenda organizirali radionice bojanja minijatura za najmlađe koji su mogli po prvi puta obojati neku od naših vlastitih minijatura osmišljenih upravo za ovaj program!</p>
<p>
<a href=" https://hosting.photobucket.com/95288841-8654-4bf7-8fc9-a4aa78dce87f/6999be0c-8cc6-4947-a423-9427a2299724.jpg
" target="_blank"> <img alt="Click for enlarged picture" src="
https://hosting.photobucket.com/95288841-8654-4bf7-8fc9-a4aa78dce87f/6999be0c-8cc6-4947-a423-9427a2299724.jpg" width="600" /> </a></p>
<p>
<a href="https://hosting.photobucket.com/95288841-8654-4bf7-8fc9-a4aa78dce87f/835b05a5-f171-49df-afa6-da0692b89074.jpg" target="_blank"><img alt="Click for enlarged picture" src="https://hosting.photobucket.com/95288841-8654-4bf7-8fc9-a4aa78dce87f/835b05a5-f171-49df-afa6-da0692b89074.jpg" width="600" /></a></p>
<p>
<a href=" https://hosting.photobucket.com/95288841-8654-4bf7-8fc9-a4aa78dce87f/ef5dde13-84ee-4ea0-b9f3-28aaf703ef6d.jpg
" target="_blank"> <img alt="Click for enlarged picture" src="
https://hosting.photobucket.com/95288841-8654-4bf7-8fc9-a4aa78dce87f/ef5dde13-84ee-4ea0-b9f3-28aaf703ef6d.jpg" width="600" /> </a></p>
<p>
<strong>PRODAJNI KUTAK</strong></p>
<p>
Tijekom vikenda ugostili smo naše sponzore sa njihovim prodajnim štandovima: Swood.si i Carta Magica.</p>
<p>
<a href=" https://hosting.photobucket.com/95288841-8654-4bf7-8fc9-a4aa78dce87f/5ee9a49f-a387-435a-9110-572402b7191d.jpg
" target="_blank"> <img alt="Click for enlarged picture" src="
https://hosting.photobucket.com/95288841-8654-4bf7-8fc9-a4aa78dce87f/5ee9a49f-a387-435a-9110-572402b7191d.jpg" width="600" /> </a></p>
<p>
<a href=" https://hosting.photobucket.com/95288841-8654-4bf7-8fc9-a4aa78dce87f/47cf600f-b1eb-4655-bf06-305f6f21d5d2.jpg
" target="_blank"> <img alt="Click for enlarged picture" src="
https://hosting.photobucket.com/95288841-8654-4bf7-8fc9-a4aa78dce87f/47cf600f-b1eb-4655-bf06-305f6f21d5d2.jpg" width="600" /> </a></p>
<p>
<strong>OGLEDNE RADIONICE BOJANJA MINIJATURA</strong></p>
<p>
Prostor ZZTK omogućuje održavanje radionica tijekom vikenda u kino dvorani u podrumu, stoga smo tijekom vikenda organizirali i ogledne radionice. Rad predavača snimao se kamerom i projicirao na projekcijsko platno u dvorani. Veliko hvala našim domaćim i inozemnim predavačima: Anžetu Zorku (SLO), doc.dr.sc. Wintonu Afriću (HR), Ivanu Knezoviću (UMS Agram) i Petru Knezoviću (HR).</p>
<p>
<a href=" https://hosting.photobucket.com/95288841-8654-4bf7-8fc9-a4aa78dce87f/e8d835be-ec99-49d7-bc9b-086e38573d1a.jpg
" target="_blank"> <img alt="Click for enlarged picture" src="
https://hosting.photobucket.com/95288841-8654-4bf7-8fc9-a4aa78dce87f/e8d835be-ec99-49d7-bc9b-086e38573d1a.jpg" width="600" /> </a></p>
<p>
<a href=" https://hosting.photobucket.com/95288841-8654-4bf7-8fc9-a4aa78dce87f/f3eba4c1-4637-4da9-8360-75f430355af4.jpg" target="_blank"> <img alt="Click for enlarged picture" src="
https://hosting.photobucket.com/95288841-8654-4bf7-8fc9-a4aa78dce87f/f3eba4c1-4637-4da9-8360-75f430355af4.jpg" width="600" /> </a></p>
<p>
<a href=" https://hosting.photobucket.com/95288841-8654-4bf7-8fc9-a4aa78dce87f/ef523854-4030-4579-aa38-403afda86c91.jpg
" target="_blank"> <img alt="Click for enlarged picture" src="
https://hosting.photobucket.com/95288841-8654-4bf7-8fc9-a4aa78dce87f/ef523854-4030-4579-aa38-403afda86c91.jpg" width="600" /> </a></p>
<p>
<a href=" https://hosting.photobucket.com/95288841-8654-4bf7-8fc9-a4aa78dce87f/dd0943c2-f4a8-40c3-b641-f6dcdd200380.jpg
" target="_blank"> <img alt="Click for enlarged picture" src="
https://hosting.photobucket.com/95288841-8654-4bf7-8fc9-a4aa78dce87f/dd0943c2-f4a8-40c3-b641-f6dcdd200380.jpg" width="600" /> </a></p>
<p>
<a href=" https://hosting.photobucket.com/95288841-8654-4bf7-8fc9-a4aa78dce87f/08b1626a-f6c7-43c9-b718-3e9a41b55ca6.jpg
" target="_blank"> <img alt="Click for enlarged picture" src="
https://hosting.photobucket.com/95288841-8654-4bf7-8fc9-a4aa78dce87f/08b1626a-f6c7-43c9-b718-3e9a41b55ca6.jpg" width="600" /> </a></p>
<p>
<a href=" https://hosting.photobucket.com/95288841-8654-4bf7-8fc9-a4aa78dce87f/91aca7f3-1af6-486d-b174-65079a63a1ea.jpg
" target="_blank"> <img alt="Click for enlarged picture" src="
https://hosting.photobucket.com/95288841-8654-4bf7-8fc9-a4aa78dce87f/91aca7f3-1af6-486d-b174-65079a63a1ea.jpg" width="600" /> </a></p>
<p>
<a href=" https://hosting.photobucket.com/95288841-8654-4bf7-8fc9-a4aa78dce87f/3821f2fb-fbe7-4096-adbc-7d8c981a3b56.jpg
" target="_blank"> <img alt="Click for enlarged picture" src="
https://hosting.photobucket.com/95288841-8654-4bf7-8fc9-a4aa78dce87f/3821f2fb-fbe7-4096-adbc-7d8c981a3b56.jpg" width="600" /> </a></p>
<p>
<a href=" https://hosting.photobucket.com/95288841-8654-4bf7-8fc9-a4aa78dce87f/2c7bb3c5-c0ec-4a96-b6bd-6a90ce5ce154.jpg
" target="_blank"> <img alt="Click for enlarged picture" src="
https://hosting.photobucket.com/95288841-8654-4bf7-8fc9-a4aa78dce87f/2c7bb3c5-c0ec-4a96-b6bd-6a90ce5ce154.jpg" width="600" /> </a></p>
<p>
<a href=" https://hosting.photobucket.com/95288841-8654-4bf7-8fc9-a4aa78dce87f/b646f4ee-21aa-4d12-8db3-6d33351d5aeb.jpg
" target="_blank"> <img alt="Click for enlarged picture" src="
https://hosting.photobucket.com/95288841-8654-4bf7-8fc9-a4aa78dce87f/b646f4ee-21aa-4d12-8db3-6d33351d5aeb.jpg" width="600" /> </a></p>
<p>
<a href=" https://hosting.photobucket.com/95288841-8654-4bf7-8fc9-a4aa78dce87f/fb5efc01-32cc-4119-90e3-188f51b30237.jpg
" target="_blank"> <img alt="Click for enlarged picture" src="
https://hosting.photobucket.com/95288841-8654-4bf7-8fc9-a4aa78dce87f/fb5efc01-32cc-4119-90e3-188f51b30237.jpg" width="600" /> </a></p>
<p>
<strong>NATJECANJE U BRZOM BOJANJU MINIJATURA</strong></p>
<p>
U nedjelju, 22.2. smo organizirali natjecanje u brzom bojanju minijatura. Po prvi puta smo koristili minijature koje su naš dizajn. Sudionici su imali 60 minuta vremena da obojaju og čarobnjaka.</p>
<p>
<a href=" https://hosting.photobucket.com/95288841-8654-4bf7-8fc9-a4aa78dce87f/106417a6-a047-4e0d-9f81-87858806052f.jpg
" target="_blank"> <img alt="Click for enlarged picture" src="
https://hosting.photobucket.com/95288841-8654-4bf7-8fc9-a4aa78dce87f/106417a6-a047-4e0d-9f81-87858806052f.jpg" width="600" /> </a></p>
<p>
<a href=" https://hosting.photobucket.com/95288841-8654-4bf7-8fc9-a4aa78dce87f/ac6853c7-6e34-4e07-a996-8d7d12744b67.jpg
" target="_blank"> <img alt="Click for enlarged picture" src="
https://hosting.photobucket.com/95288841-8654-4bf7-8fc9-a4aa78dce87f/ac6853c7-6e34-4e07-a996-8d7d12744b67.jpg" width="600" /> </a></p>
<p>
<a href=" https://hosting.photobucket.com/95288841-8654-4bf7-8fc9-a4aa78dce87f/ccb155fa-52c5-4a99-9515-f69a6836dce7.jpg
" target="_blank"> <img alt="Click for enlarged picture" src="
https://hosting.photobucket.com/95288841-8654-4bf7-8fc9-a4aa78dce87f/ccb155fa-52c5-4a99-9515-f69a6836dce7.jpg" width="600" /> </a></p>
<p>
<a href=" https://hosting.photobucket.com/95288841-8654-4bf7-8fc9-a4aa78dce87f/a29fedd0-97ea-45b1-85f9-7ea62188b2b2.jpg
" target="_blank"><img alt="Click for enlarged picture" src="
https://hosting.photobucket.com/95288841-8654-4bf7-8fc9-a4aa78dce87f/a29fedd0-97ea-45b1-85f9-7ea62188b2b2.jpg" width="600" /></a></p>
<p>
S time smo došli do samoga kraja ovog predivnog vikenda i sve što je preostalo je bila podjela nagrada i priznanja pobjednicima.</p>
<p>
<a href=" https://hosting.photobucket.com/95288841-8654-4bf7-8fc9-a4aa78dce87f/046ca4c8-0ae7-415e-abd3-e131d580c3ad.jpg
" target="_blank"> <img alt="Click for enlarged picture" src="
https://hosting.photobucket.com/95288841-8654-4bf7-8fc9-a4aa78dce87f/046ca4c8-0ae7-415e-abd3-e131d580c3ad.jpg" width="600" /> </a></p>
<p>
<a href=" https://hosting.photobucket.com/95288841-8654-4bf7-8fc9-a4aa78dce87f/cec0dcef-7acb-4a77-89de-271ed5410672.jpg
" target="_blank"> <img alt="Click for enlarged picture" src="
https://hosting.photobucket.com/95288841-8654-4bf7-8fc9-a4aa78dce87f/cec0dcef-7acb-4a77-89de-271ed5410672.jpg" width="600" /> </a></p>
<p>
<a href=" https://hosting.photobucket.com/95288841-8654-4bf7-8fc9-a4aa78dce87f/a495a5fc-31a2-4979-a970-0fa22c334354.jpg
" target="_blank"> <img alt="Click for enlarged picture" src="
https://hosting.photobucket.com/95288841-8654-4bf7-8fc9-a4aa78dce87f/a495a5fc-31a2-4979-a970-0fa22c334354.jpg" width="600" /> </a></p>
<p>
<strong>AGRAM ARENA – Leaving Asphodel Necropolis28 kampanja</strong></p>
<p>
Tijekom vikenda 21.-22.2. održali smo i novo međunarodno natjecanje Agram Arena! Ovoga puta na redu je bila stolna strateška igra Necropolis 28 za koju su naši članovi osmislili dvodnevnu kampanju. Svaki sudionik je izradio svoju bandu vojnika, a velika većina i svoje vlastite table.</p>
<p>
<a href=" https://hosting.photobucket.com/95288841-8654-4bf7-8fc9-a4aa78dce87f/ac69b182-4bfc-4575-a6d3-fb3c8baba342.jpg
" target="_blank"> <img alt="Click for enlarged picture" src="
https://hosting.photobucket.com/95288841-8654-4bf7-8fc9-a4aa78dce87f/ac69b182-4bfc-4575-a6d3-fb3c8baba342.jpg" width="600" /> </a></p>
<p>
<a href=" https://hosting.photobucket.com/95288841-8654-4bf7-8fc9-a4aa78dce87f/289fed7b-e058-42d8-ba2d-cbd0463e98da.jpg
" target="_blank"> <img alt="Click for enlarged picture" src="
https://hosting.photobucket.com/95288841-8654-4bf7-8fc9-a4aa78dce87f/289fed7b-e058-42d8-ba2d-cbd0463e98da.jpg" width="600" /> </a></p>
<p>
<a href=" https://hosting.photobucket.com/95288841-8654-4bf7-8fc9-a4aa78dce87f/d92ebbee-859d-4441-8386-3d760b20b7a7.jpg
" target="_blank"> <img alt="Click for enlarged picture" src="
https://hosting.photobucket.com/95288841-8654-4bf7-8fc9-a4aa78dce87f/d92ebbee-859d-4441-8386-3d760b20b7a7.jpg" width="600" /> </a></p>
<p>
<a href=" https://hosting.photobucket.com/95288841-8654-4bf7-8fc9-a4aa78dce87f/09c59798-7871-425e-a075-3ca1cd91768a.jpg
" target="_blank"> <img alt="Click for enlarged picture" src="
https://hosting.photobucket.com/95288841-8654-4bf7-8fc9-a4aa78dce87f/09c59798-7871-425e-a075-3ca1cd91768a.jpg" width="600" /> </a></p>
<p>
<a href=" https://hosting.photobucket.com/95288841-8654-4bf7-8fc9-a4aa78dce87f/b2f3edc8-5a23-4552-9a2a-4027b286f327.jpg
" target="_blank"> <img alt="Click for enlarged picture" src="
https://hosting.photobucket.com/95288841-8654-4bf7-8fc9-a4aa78dce87f/b2f3edc8-5a23-4552-9a2a-4027b286f327.jpg" width="600" /> </a></p>
<p>
<a href=" https://hosting.photobucket.com/95288841-8654-4bf7-8fc9-a4aa78dce87f/2a9f43ac-b531-4746-b7bb-ac5a3356aab0.jpg
" target="_blank"> <img alt="Click for enlarged picture" src="
https://hosting.photobucket.com/95288841-8654-4bf7-8fc9-a4aa78dce87f/2a9f43ac-b531-4746-b7bb-ac5a3356aab0.jpg" width="600" /> </a></p>
<p>
<strong>DOGAĐANJA RADNIM DANIMA ZA VRIJEME IZLOŽBE</strong></p>
<p>
Tijekom naredna dva tjedna, naši volonteri su radnim danima od 16:00 do 20:00, držali otvorene radionice bojanja minijatura. Postavljene su radne stanice za bojanje minijatura na kojoj su naši posjetitelji mogli bojati minijature koje smo priredili (ili svoje ukoliko su ih donijeli) koristeći naše materijale i alate.</p>
<p>
<a href=" https://hosting.photobucket.com/95288841-8654-4bf7-8fc9-a4aa78dce87f/6edf7765-42b5-417a-820f-fa5d907179a7.jpg
" target="_blank"> <img alt="Click for enlarged picture" src="
https://hosting.photobucket.com/95288841-8654-4bf7-8fc9-a4aa78dce87f/6edf7765-42b5-417a-820f-fa5d907179a7.jpg" width="600" /> </a></p>
<p>
<a href=" https://hosting.photobucket.com/95288841-8654-4bf7-8fc9-a4aa78dce87f/c084ebe2-f57b-4519-9b31-29bdc1155887.jpg
" target="_blank"> <img alt="Click for enlarged picture" src="
https://hosting.photobucket.com/95288841-8654-4bf7-8fc9-a4aa78dce87f/c084ebe2-f57b-4519-9b31-29bdc1155887.jpg" width="600" /> </a></p>
<p>
<a href=" https://hosting.photobucket.com/95288841-8654-4bf7-8fc9-a4aa78dce87f/37ff2272-f9b0-4b16-a363-1e6f6688c866.jpg
" target="_blank"> <img alt="Click for enlarged picture" src="
https://hosting.photobucket.com/95288841-8654-4bf7-8fc9-a4aa78dce87f/37ff2272-f9b0-4b16-a363-1e6f6688c866.jpg" width="600" /> </a></p>
<p>
<a href=" https://hosting.photobucket.com/95288841-8654-4bf7-8fc9-a4aa78dce87f/5f4f7968-ff50-4a01-98da-6ce8562930b4.jpg
" target="_blank"> <img alt="Click for enlarged picture" src="
https://hosting.photobucket.com/95288841-8654-4bf7-8fc9-a4aa78dce87f/5f4f7968-ff50-4a01-98da-6ce8562930b4.jpg" width="600" /> </a></p>
<p>
<a href=" https://hosting.photobucket.com/95288841-8654-4bf7-8fc9-a4aa78dce87f/cbb45319-d488-483c-bf9d-9af29852fc74.jpg
" target="_blank"> <img alt="Click for enlarged picture" src="
https://hosting.photobucket.com/95288841-8654-4bf7-8fc9-a4aa78dce87f/cbb45319-d488-483c-bf9d-9af29852fc74.jpg" width="600" /> </a></p>
<p>
<a href=" https://hosting.photobucket.com/95288841-8654-4bf7-8fc9-a4aa78dce87f/3dcca26c-d549-4af3-812a-a4a81b9a2310.jpg
" target="_blank"> <img alt="Click for enlarged picture" src="
https://hosting.photobucket.com/95288841-8654-4bf7-8fc9-a4aa78dce87f/3dcca26c-d549-4af3-812a-a4a81b9a2310.jpg" width="600" /> </a></p>
<p>
<a href=" https://hosting.photobucket.com/95288841-8654-4bf7-8fc9-a4aa78dce87f/4adf0fb6-3eab-4b40-b32d-d03eab4a9892.jpg
" target="_blank"> <img alt="Click for enlarged picture" src="
https://hosting.photobucket.com/95288841-8654-4bf7-8fc9-a4aa78dce87f/4adf0fb6-3eab-4b40-b32d-d03eab4a9892.jpg" width="600" /> </a></p>
<p>
<a href=" https://hosting.photobucket.com/95288841-8654-4bf7-8fc9-a4aa78dce87f/4732b58a-9a65-4d1c-a7d5-25513d34b108.jpg
" target="_blank"> <img alt="Click for enlarged picture" src="
https://hosting.photobucket.com/95288841-8654-4bf7-8fc9-a4aa78dce87f/4732b58a-9a65-4d1c-a7d5-25513d34b108.jpg" width="600" /> </a></p>
<p>
<a href=" https://hosting.photobucket.com/95288841-8654-4bf7-8fc9-a4aa78dce87f/274be330-31d5-4e25-95db-ec2f423a003c.jpg
" target="_blank"> <img alt="Click for enlarged picture" src="
https://hosting.photobucket.com/95288841-8654-4bf7-8fc9-a4aa78dce87f/274be330-31d5-4e25-95db-ec2f423a003c.jpg" width="600" /> </a></p>
<p>
<a href=" https://hosting.photobucket.com/95288841-8654-4bf7-8fc9-a4aa78dce87f/8e7b0a80-0f46-4d70-9789-a46976c713d2.jpg
" target="_blank"> <img alt="Click for enlarged picture" src="
https://hosting.photobucket.com/95288841-8654-4bf7-8fc9-a4aa78dce87f/8e7b0a80-0f46-4d70-9789-a46976c713d2.jpg" width="600" /> </a></p>
<p>
<a href=" https://hosting.photobucket.com/95288841-8654-4bf7-8fc9-a4aa78dce87f/8bbd4e96-b911-4f26-80fe-b1c57f29027b.jpg
" target="_blank"> <img alt="Click for enlarged picture" src="
https://hosting.photobucket.com/95288841-8654-4bf7-8fc9-a4aa78dce87f/8bbd4e96-b911-4f26-80fe-b1c57f29027b.jpg" width="600" /> </a></p>
<p>
<a href=" https://hosting.photobucket.com/95288841-8654-4bf7-8fc9-a4aa78dce87f/203a27be-8f10-459d-89b9-befb6b636b74.jpg
" target="_blank"> <img alt="Click for enlarged picture" src="
https://hosting.photobucket.com/95288841-8654-4bf7-8fc9-a4aa78dce87f/203a27be-8f10-459d-89b9-befb6b636b74.jpg" width="600" /> </a></p>
<p>
<a href=" https://hosting.photobucket.com/95288841-8654-4bf7-8fc9-a4aa78dce87f/5dc4358f-19d8-475f-a4af-9c29e9ed18d7.jpg
" target="_blank"> <img alt="Click for enlarged picture" src="
https://hosting.photobucket.com/95288841-8654-4bf7-8fc9-a4aa78dce87f/5dc4358f-19d8-475f-a4af-9c29e9ed18d7.jpg" width="600" /> </a></p>
<p>
<strong>BACK TO BASICS RADIONICE ZA NAJMLAĐE</strong></p>
<p>
Radnim danima od 17:00 do 18:00 održavali smo naše nove radionice za najmlađe u kojima su naši najmlađi polaznici bojali svoje prve minijature.</p>
<p>
<a href=" https://hosting.photobucket.com/95288841-8654-4bf7-8fc9-a4aa78dce87f/948af139-8fb5-4e28-a27c-404466e70d05.jpg
" target="_blank"> <img alt="Click for enlarged picture" src="
https://hosting.photobucket.com/95288841-8654-4bf7-8fc9-a4aa78dce87f/948af139-8fb5-4e28-a27c-404466e70d05.jpg" width="600" /> </a></p>
<p>
<a href=" https://hosting.photobucket.com/95288841-8654-4bf7-8fc9-a4aa78dce87f/bb3e20c2-bb21-4a3d-863a-74de08261467.jpg
" target="_blank"> <img alt="Click for enlarged picture" src="
https://hosting.photobucket.com/95288841-8654-4bf7-8fc9-a4aa78dce87f/bb3e20c2-bb21-4a3d-863a-74de08261467.jpg" width="600" /> </a></p>
<p>
<a href=" https://hosting.photobucket.com/95288841-8654-4bf7-8fc9-a4aa78dce87f/7316c760-98e3-4e3f-9261-d138aa7a5a6a.jpg
" target="_blank"> <img alt="Click for enlarged picture" src="
https://hosting.photobucket.com/95288841-8654-4bf7-8fc9-a4aa78dce87f/7316c760-98e3-4e3f-9261-d138aa7a5a6a.jpg" width="600" /> </a></p>
<p>
<a href=" https://hosting.photobucket.com/95288841-8654-4bf7-8fc9-a4aa78dce87f/68934b39-3d1f-4f43-b967-14b73c41a39e.jpg
" target="_blank"> <img alt="Click for enlarged picture" src="
https://hosting.photobucket.com/95288841-8654-4bf7-8fc9-a4aa78dce87f/68934b39-3d1f-4f43-b967-14b73c41a39e.jpg" width="600" /> </a></p>
<p>
<a href=" https://hosting.photobucket.com/95288841-8654-4bf7-8fc9-a4aa78dce87f/46125bce-a28d-494f-873a-3aeabdc1d6c2.jpg
" target="_blank"> <img alt="Click for enlarged picture" src="
https://hosting.photobucket.com/95288841-8654-4bf7-8fc9-a4aa78dce87f/46125bce-a28d-494f-873a-3aeabdc1d6c2.jpg" width="600" /> </a></p>
<p>
<a href=" https://hosting.photobucket.com/95288841-8654-4bf7-8fc9-a4aa78dce87f/3c58e0ad-77a9-44c8-b6bf-d9a55c514d43.jpg
" target="_blank"> <img alt="Click for enlarged picture" src="
https://hosting.photobucket.com/95288841-8654-4bf7-8fc9-a4aa78dce87f/3c58e0ad-77a9-44c8-b6bf-d9a55c514d43.jpg" width="600" /> </a></p>
<p>
<a href=" https://hosting.photobucket.com/95288841-8654-4bf7-8fc9-a4aa78dce87f/f891f0f0-051b-40ee-9676-cb03b0a9811b.jpg
" target="_blank"> <img alt="Click for enlarged picture" src="
https://hosting.photobucket.com/95288841-8654-4bf7-8fc9-a4aa78dce87f/f891f0f0-051b-40ee-9676-cb03b0a9811b.jpg" width="600" /> </a></p>
<p>
<strong>AGRAM LEGO SEKCIJA predavanje: FW-14b – Bolid F1 za budućnost</strong></p>
<p>
U srijedu 25.2.2026. u sklopu aktivnosti naše Agram Lego Sekcije, naš dežurni strojar Marko Paunović je održao predavanje na temu bolida Formule 1 iz 1992.. Ulaz na predavanje je bio besplatan, a po završetku su LEGO maketu bolida izradili članovi Lego sekcije</p>
<p>
<a href=" https://hosting.photobucket.com/95288841-8654-4bf7-8fc9-a4aa78dce87f/b2e14b1c-daa4-4314-8685-184377bc7e28.jpg
" target="_blank"> <img alt="Click for enlarged picture" src="
https://hosting.photobucket.com/95288841-8654-4bf7-8fc9-a4aa78dce87f/b2e14b1c-daa4-4314-8685-184377bc7e28.jpg" width="600" /> </a></p>
<p>
<a href=" https://hosting.photobucket.com/95288841-8654-4bf7-8fc9-a4aa78dce87f/31fb439a-77d3-4418-83ff-66c3af279cca.jpg" target="_blank"> <img alt="Click for enlarged picture" src="
https://hosting.photobucket.com/95288841-8654-4bf7-8fc9-a4aa78dce87f/31fb439a-77d3-4418-83ff-66c3af279cca.jpg" width="600" /> </a></p>
<p>
<a href=" https://hosting.photobucket.com/95288841-8654-4bf7-8fc9-a4aa78dce87f/bfcaf282-6be8-4b52-a3ed-c91137457876.jpg
" target="_blank"> <img alt="Click for enlarged picture" src="
https://hosting.photobucket.com/95288841-8654-4bf7-8fc9-a4aa78dce87f/bfcaf282-6be8-4b52-a3ed-c91137457876.jpg" width="600" /> </a></p>
<p>
<a href=" https://hosting.photobucket.com/95288841-8654-4bf7-8fc9-a4aa78dce87f/ce70fc61-9e1a-4169-aaad-8b67417656c0.jpg
" target="_blank"> <img alt="Click for enlarged picture" src="
https://hosting.photobucket.com/95288841-8654-4bf7-8fc9-a4aa78dce87f/ce70fc61-9e1a-4169-aaad-8b67417656c0.jpg" width="600" /> </a></p>
<p>
<a href=" https://hosting.photobucket.com/95288841-8654-4bf7-8fc9-a4aa78dce87f/94ca0e36-8710-458d-8194-9f71299f4d74.jpg
" target="_blank"> <img alt="Click for enlarged picture" src="
https://hosting.photobucket.com/95288841-8654-4bf7-8fc9-a4aa78dce87f/94ca0e36-8710-458d-8194-9f71299f4d74.jpg" width="600" /> </a></p>
<p>
<a href=" https://hosting.photobucket.com/95288841-8654-4bf7-8fc9-a4aa78dce87f/c6771f72-7191-4ca3-a792-3bb1ab3897b1.jpg
" target="_blank"> <img alt="Click for enlarged picture" src="
https://hosting.photobucket.com/95288841-8654-4bf7-8fc9-a4aa78dce87f/c6771f72-7191-4ca3-a792-3bb1ab3897b1.jpg" width="600" /> </a></p>
<p>
<a href=" https://hosting.photobucket.com/95288841-8654-4bf7-8fc9-a4aa78dce87f/c8fcfcb6-09f2-4398-a2fb-fa5065771e01.jpg
" target="_blank"> <img alt="Click for enlarged picture" src="
https://hosting.photobucket.com/95288841-8654-4bf7-8fc9-a4aa78dce87f/c8fcfcb6-09f2-4398-a2fb-fa5065771e01.jpg" width="600" /> </a></p>
<p>
<a href=" https://hosting.photobucket.com/95288841-8654-4bf7-8fc9-a4aa78dce87f/d7e187a8-d5b1-433b-b30d-091e54dcdddf.jpg
" target="_blank"> <img alt="Click for enlarged picture" src="
https://hosting.photobucket.com/95288841-8654-4bf7-8fc9-a4aa78dce87f/d7e187a8-d5b1-433b-b30d-091e54dcdddf.jpg" width="600" /> </a></p>
<p>
Tijekom drugog vikenda Izložbe, 28.02.-01.03., organizirali smo <strong>RADIONICU BOJANJA MINIJATURA – Grimdark stil</strong>.</p>
<p>
Radionica se provodila kroz dva dana (cijeli vikend) i polaznici su bojali tri različite figure za igru Trench Crusade. Fokus ovih predavanja bilo je bojenje popularnim Grimdark stilom. Na radionici su bile predstavljene boje i pribor, priprema figura, nekoliko tehnika bojenja minijatura od osnovnih do naprednijih, te tehnike i trikovi za brzo i efikasno bojenje većih količina figura odjednom. U sklopu radionice korištene su akrilne boje na bazi vode.</p>
<p>
<a href=" https://hosting.photobucket.com/95288841-8654-4bf7-8fc9-a4aa78dce87f/733d94b2-8e8d-4a4e-accd-b9168e32577e.jpg
" target="_blank"> <img alt="Click for enlarged picture" src="
https://hosting.photobucket.com/95288841-8654-4bf7-8fc9-a4aa78dce87f/733d94b2-8e8d-4a4e-accd-b9168e32577e.jpg
" width="600" /> </a></p>
<p>
<a href=" https://hosting.photobucket.com/95288841-8654-4bf7-8fc9-a4aa78dce87f/41020062-45b9-41cd-a357-fa23a389f390.jpg
" target="_blank"> <img alt="Click for enlarged picture" src="
https://hosting.photobucket.com/95288841-8654-4bf7-8fc9-a4aa78dce87f/41020062-45b9-41cd-a357-fa23a389f390.jpg
" width="600" /> </a></p>
<p>
<a href=" https://hosting.photobucket.com/95288841-8654-4bf7-8fc9-a4aa78dce87f/0c07cc55-596d-494d-972b-cd6a0dd6b8b7.jpg
" target="_blank"> <img alt="Click for enlarged picture" src="
https://hosting.photobucket.com/95288841-8654-4bf7-8fc9-a4aa78dce87f/0c07cc55-596d-494d-972b-cd6a0dd6b8b7.jpg" width="600" /> </a></p>
<p>
<a href=" https://hosting.photobucket.com/95288841-8654-4bf7-8fc9-a4aa78dce87f/c17dd356-08b1-48e1-b895-6296aed7f818.jpg
" target="_blank"> <img alt="Click for enlarged picture" src="
https://hosting.photobucket.com/95288841-8654-4bf7-8fc9-a4aa78dce87f/c17dd356-08b1-48e1-b895-6296aed7f818.jpg" width="600" /> </a></p>
<p>
U srijedu 04.03.2026. održana je godišnja <strong>sjednica Skupštine</strong> na kojoj smo odredili smjernice rada u 2026.</p>
<p>
<a href=" https://hosting.photobucket.com/95288841-8654-4bf7-8fc9-a4aa78dce87f/59484bd0-7edc-4aed-a04e-ae42900ba3e6.jpg
" target="_blank"> <img alt="Click for enlarged picture" src="
https://hosting.photobucket.com/95288841-8654-4bf7-8fc9-a4aa78dce87f/59484bd0-7edc-4aed-a04e-ae42900ba3e6.jpg
" width="600" /> </a></p>
<p>
U nedjelju 08.03.2026. Izložba je završena, naši eksponati sigurno spremljeni, a Galerija počišćena.</p>
<p>
<a href=" https://hosting.photobucket.com/95288841-8654-4bf7-8fc9-a4aa78dce87f/98af4280-0956-4cdb-b4a9-da40e3a5a44a.jpg
" target="_blank"> <img alt="Click for enlarged picture" src="
https://hosting.photobucket.com/95288841-8654-4bf7-8fc9-a4aa78dce87f/98af4280-0956-4cdb-b4a9-da40e3a5a44a.jpg" width="600" /> </a></p>
<p>
<a href=" https://hosting.photobucket.com/95288841-8654-4bf7-8fc9-a4aa78dce87f/3259b35e-1fc2-4a99-a3c5-c7984958d72b.jpg
" target="_blank"> <img alt="Click for enlarged picture" src="
https://hosting.photobucket.com/95288841-8654-4bf7-8fc9-a4aa78dce87f/3259b35e-1fc2-4a99-a3c5-c7984958d72b.jpg" width="600" /> </a></p>
<p>
Najbitniji dio svake godine prilikom održavanja ove Izložbe je socijalni aspekt, druženje naših članova kako međusobno tako i sa našim međunarodnim prijateljima koji nas posjećuju! Uz ovih par fotografija sa zajedničkih druženja, pozdravljamo vas do sljedeće godine!</p>
<p>
<a href=" https://hosting.photobucket.com/95288841-8654-4bf7-8fc9-a4aa78dce87f/b9168e23-79b2-4d81-8a7d-7534062881a7.jpg
" target="_blank"> <img alt="Click for enlarged picture" src="
https://hosting.photobucket.com/95288841-8654-4bf7-8fc9-a4aa78dce87f/b9168e23-79b2-4d81-8a7d-7534062881a7.jpg " width="600" /> </a></p>
<p>
<a href=" https://hosting.photobucket.com/95288841-8654-4bf7-8fc9-a4aa78dce87f/edff925e-916c-4d78-953e-210abf3753d4.jpg
" target="_blank"> <img alt="Click for enlarged picture" src="
https://hosting.photobucket.com/95288841-8654-4bf7-8fc9-a4aa78dce87f/edff925e-916c-4d78-953e-210abf3753d4.jpg " width="600" /> </a></p>
<p>
<a href=" https://hosting.photobucket.com/95288841-8654-4bf7-8fc9-a4aa78dce87f/8bcb48fa-466b-43f8-8a4b-f15f6794b21e.jpg
" target="_blank"> <img alt="Click for enlarged picture" src="
https://hosting.photobucket.com/95288841-8654-4bf7-8fc9-a4aa78dce87f/8bcb48fa-466b-43f8-8a4b-f15f6794b21e.jpg" width="600" /> </a></p>
"
["created"]=>
string(19) "2026-03-12 08:54:10"
["modified"]=>
string(19) "2026-03-12 08:58:37"
}
["Member"]=>
array(10) {
["id"]=>
string(2) "35"
["group_id"]=>
string(1) "1"
["first_name"]=>
string(5) "Marko"
["last_name"]=>
string(9) "Paunović"
["first_name_mask"]=>
string(5) "marko"
["last_name_mask"]=>
string(8) "paunovic"
["username"]=>
string(5) "marko"
["password"]=>
string(40) "3bd37b326d19d1880d3b93a4b32e8fb3a90fa122"
["born"]=>
string(19) "2033-03-07 20:35:00"
["created"]=>
string(19) "2009-06-02 20:37:03"
}
}
</pre>
<a href="/dok/members/marko.paunovic">Marko Paunović</a>, 12<span class="superscript">nd</span> March 2026</span>
</li>
<li>
<a href="/dok/articles/2026/03/05" class="readMore"></a>
<span class="details"> <pre style="display: none;">
array(2) {
["Article"]=>
array(10) {
["id"]=>
string(3) "495"
["member_id"]=>
string(2) "35"
["title_eng"]=>
string(53) "Miniature Painting Workshop - Grimdark Trench Crusade"
["title_hrv"]=>
string(59) "Radionica bojanja minijatura - Grimdark stil Trench Crusade"
["mask_eng"]=>
string(53) "miniature_painting_workshop_-_grimdark_trench_crusade"
["mask_hrv"]=>
string(59) "radionica_bojanja_minijatura_-_grimdark_stil_trench_crusade"
["content_eng"]=>
string(2880) "<p>
<a href="https://hosting.photobucket.com/95288841-8654-4bf7-8fc9-a4aa78dce87f/d6bd52bf-5585-41ad-a5f0-39ea8eba78af.jpg" target="_blank"><img alt="Click for enlarged picture" src="https://hosting.photobucket.com/95288841-8654-4bf7-8fc9-a4aa78dce87f/d6bd52bf-5585-41ad-a5f0-39ea8eba78af.jpg" width="600" /></a></p>
<p>
<a href="https://hosting.photobucket.com/95288841-8654-4bf7-8fc9-a4aa78dce87f/d894975c-ea8f-4cc4-9f8c-8e87324723b1.jpg" target="_blank"><img alt="Click for enlarged picture" src="https://hosting.photobucket.com/95288841-8654-4bf7-8fc9-a4aa78dce87f/d894975c-ea8f-4cc4-9f8c-8e87324723b1.jpg" width="600" /></a></p>
<p>
<a href="https://hosting.photobucket.com/95288841-8654-4bf7-8fc9-a4aa78dce87f/f72b74ba-1c23-4bfb-9feb-568dc5df1a6a.jpg" target="_blank"><img alt="Click for enlarged picture" src="https://hosting.photobucket.com/95288841-8654-4bf7-8fc9-a4aa78dce87f/f72b74ba-1c23-4bfb-9feb-568dc5df1a6a.jpg" width="600" /></a></p>
<p>
<a href="https://hosting.photobucket.com/95288841-8654-4bf7-8fc9-a4aa78dce87f/40167cf3-b290-41d4-ac8a-212d19fe7f0a.jpg" target="_blank"><img alt="Click for enlarged picture" src="https://hosting.photobucket.com/95288841-8654-4bf7-8fc9-a4aa78dce87f/40167cf3-b290-41d4-ac8a-212d19fe7f0a.jpg" width="600" /></a></p>
<p>
<a href="https://hosting.photobucket.com/95288841-8654-4bf7-8fc9-a4aa78dce87f/cfbd68f1-bc70-4943-8f7b-69716084f638.jpg" target="_blank"><img alt="Click for enlarged picture" src="https://hosting.photobucket.com/95288841-8654-4bf7-8fc9-a4aa78dce87f/cfbd68f1-bc70-4943-8f7b-69716084f638.jpg" width="600" /></a></p>
<p>
<a href="https://hosting.photobucket.com/95288841-8654-4bf7-8fc9-a4aa78dce87f/cef3712c-57f1-435e-80b7-a35b4620c5f9.jpg" target="_blank"><img alt="Click for enlarged picture" src="https://hosting.photobucket.com/95288841-8654-4bf7-8fc9-a4aa78dce87f/cef3712c-57f1-435e-80b7-a35b4620c5f9.jpg" width="600" /></a></p>
<p>
<a href="https://hosting.photobucket.com/95288841-8654-4bf7-8fc9-a4aa78dce87f/f72b74ba-1c23-4bfb-9feb-568dc5df1a6a.jpg" target="_blank"><img alt="Click for enlarged picture" src="https://hosting.photobucket.com/95288841-8654-4bf7-8fc9-a4aa78dce87f/f72b74ba-1c23-4bfb-9feb-568dc5df1a6a.jpg" width="600" /></a></p>
<p>
<a href="https://hosting.photobucket.com/95288841-8654-4bf7-8fc9-a4aa78dce87f/6b6285a7-e08b-482e-9343-74e8d08bbca4.jpg" target="_blank"><img alt="Click for enlarged picture" src="https://hosting.photobucket.com/95288841-8654-4bf7-8fc9-a4aa78dce87f/6b6285a7-e08b-482e-9343-74e8d08bbca4.jpg" width="600" /></a></p>
<p>
<a href="https://hosting.photobucket.com/95288841-8654-4bf7-8fc9-a4aa78dce87f/1be59454-f3ac-4f70-9550-60c9101d7e44.png" target="_blank"><img alt="Click for enlarged picture" src="https://hosting.photobucket.com/95288841-8654-4bf7-8fc9-a4aa78dce87f/1be59454-f3ac-4f70-9550-60c9101d7e44.png" width="600" /></a></p>
"
["content_hrv"]=>
string(4135) "<p>
<a href="https://hosting.photobucket.com/95288841-8654-4bf7-8fc9-a4aa78dce87f/d6bd52bf-5585-41ad-a5f0-39ea8eba78af.jpg" target="_blank"><img alt="Click for enlarged picture" src="https://hosting.photobucket.com/95288841-8654-4bf7-8fc9-a4aa78dce87f/d6bd52bf-5585-41ad-a5f0-39ea8eba78af.jpg" width="600" /></a></p>
<p>
Radionica se provodila kroz dva dana (cijeli vikend) i polaznici su bojali tri različite figure za igru Trench Crusade (prema izboru). Fokus ovih predavanja bilo je bojenje više minijatura odjednom prepoznatljivim GRIMDARK stilom, no znanja s radionice jednako su primjenjiva i na bojenje vojski za boardgame igre te kolekcija figura za pen&paper rpg-ove. Na radionici su bile predstavljene boje i pribor, priprema figura, nekoliko tehnika bojenja minijatura od osnovnih do naprednijih, te tehnike i trikovi za brzo i efikasno bojenje većih količina figura odjednom. U sklopu radionice bile su korištene akrilne boje na bazi vode te uljni efekti jednostavni za korištenje. Predavanja su prilagođena tako da voditelji posveti jednako vrijeme svim polaznicima i može se prilagoditi svim kategorijama minijaturista (od početnika do malo naprednijih).</p>
<p>
<a href="https://hosting.photobucket.com/95288841-8654-4bf7-8fc9-a4aa78dce87f/d894975c-ea8f-4cc4-9f8c-8e87324723b1.jpg" target="_blank"><img alt="Click for enlarged picture" src="https://hosting.photobucket.com/95288841-8654-4bf7-8fc9-a4aa78dce87f/d894975c-ea8f-4cc4-9f8c-8e87324723b1.jpg" width="600" /></a></p>
<p>
<a href="https://hosting.photobucket.com/95288841-8654-4bf7-8fc9-a4aa78dce87f/f72b74ba-1c23-4bfb-9feb-568dc5df1a6a.jpg" target="_blank"><img alt="Click for enlarged picture" src="https://hosting.photobucket.com/95288841-8654-4bf7-8fc9-a4aa78dce87f/f72b74ba-1c23-4bfb-9feb-568dc5df1a6a.jpg" width="600" /></a></p>
<p>
<a href="https://hosting.photobucket.com/95288841-8654-4bf7-8fc9-a4aa78dce87f/40167cf3-b290-41d4-ac8a-212d19fe7f0a.jpg" target="_blank"><img alt="Click for enlarged picture" src="https://hosting.photobucket.com/95288841-8654-4bf7-8fc9-a4aa78dce87f/40167cf3-b290-41d4-ac8a-212d19fe7f0a.jpg" width="600" /></a></p>
<p>
<a href="https://hosting.photobucket.com/95288841-8654-4bf7-8fc9-a4aa78dce87f/cfbd68f1-bc70-4943-8f7b-69716084f638.jpg" target="_blank"><img alt="Click for enlarged picture" src="https://hosting.photobucket.com/95288841-8654-4bf7-8fc9-a4aa78dce87f/cfbd68f1-bc70-4943-8f7b-69716084f638.jpg" width="600" /></a></p>
<p>
Radionica je uključivalai sljedeće tematske cjeline:<br />
1. Planiranje i priprema te sastavljanje minijatura<br />
2. Obrada minijatura prije bojanja<br />
3. Osnovne grimdark stila i izbor boja<br />
4. Osnovne boje<br />
5. Tehnike shadinga i highlighta<br />
6. Naknadno podizanje gotovog paintjoba na višu razinu, uljni efekti</p>
<p>
<a href="https://hosting.photobucket.com/95288841-8654-4bf7-8fc9-a4aa78dce87f/cef3712c-57f1-435e-80b7-a35b4620c5f9.jpg" target="_blank"><img alt="Click for enlarged picture" src="https://hosting.photobucket.com/95288841-8654-4bf7-8fc9-a4aa78dce87f/cef3712c-57f1-435e-80b7-a35b4620c5f9.jpg" width="600" /></a></p>
<p>
<a href="https://hosting.photobucket.com/95288841-8654-4bf7-8fc9-a4aa78dce87f/f72b74ba-1c23-4bfb-9feb-568dc5df1a6a.jpg" target="_blank"><img alt="Click for enlarged picture" src="https://hosting.photobucket.com/95288841-8654-4bf7-8fc9-a4aa78dce87f/f72b74ba-1c23-4bfb-9feb-568dc5df1a6a.jpg" width="600" /></a></p>
<p>
<a href="https://hosting.photobucket.com/95288841-8654-4bf7-8fc9-a4aa78dce87f/6b6285a7-e08b-482e-9343-74e8d08bbca4.jpg" target="_blank"><img alt="Click for enlarged picture" src="https://hosting.photobucket.com/95288841-8654-4bf7-8fc9-a4aa78dce87f/6b6285a7-e08b-482e-9343-74e8d08bbca4.jpg" width="600" /></a></p>
<p>
<a href="https://hosting.photobucket.com/95288841-8654-4bf7-8fc9-a4aa78dce87f/1be59454-f3ac-4f70-9550-60c9101d7e44.png" target="_blank"><img alt="Click for enlarged picture" src="https://hosting.photobucket.com/95288841-8654-4bf7-8fc9-a4aa78dce87f/1be59454-f3ac-4f70-9550-60c9101d7e44.png" width="600" /></a></p>
"
["created"]=>
string(19) "2026-03-05 20:23:04"
["modified"]=>
string(19) "2026-03-05 20:23:04"
}
["Member"]=>
array(10) {
["id"]=>
string(2) "35"
["group_id"]=>
string(1) "1"
["first_name"]=>
string(5) "Marko"
["last_name"]=>
string(9) "Paunović"
["first_name_mask"]=>
string(5) "marko"
["last_name_mask"]=>
string(8) "paunovic"
["username"]=>
string(5) "marko"
["password"]=>
string(40) "3bd37b326d19d1880d3b93a4b32e8fb3a90fa122"
["born"]=>
string(19) "2033-03-07 20:35:00"
["created"]=>
string(19) "2009-06-02 20:37:03"
}
}
</pre>
<a href="/dok/members/marko.paunovic">Marko Paunović</a>, 5<span class="superscript">th</span> March 2026</span>
</li>
<li>
<a href="/dok/articles/2026/02/26" class="readMore"></a>
<span class="details"> <pre style="display: none;">
array(2) {
["Article"]=>
array(10) {
["id"]=>
string(3) "494"
["member_id"]=>
string(2) "64"
["title_eng"]=>
string(35) "AGRAM LEGO SECTION - F1 car: FW14b "
["title_hrv"]=>
string(51) "AGRAM LEGO SEKCIJA - FW14b - F1 bolid za budućnost"
["mask_eng"]=>
string(33) "agram_lego_section_-_f1_car_fw14b"
["mask_hrv"]=>
string(50) "agram_lego_sekcija_-_fw14b_-_f1_bolid_za_buducnost"
["content_eng"]=>
string(2839) "<p style="margin: 0px 0px 10px; padding: 0px; border: 0px; outline: 0px; vertical-align: baseline; background-image: initial; background-position: initial; background-size: initial; background-repeat: initial; background-attachment: initial; background-origin: initial; background-clip: initial; position: relative; float: none; clear: both; color: rgb(0, 0, 0); font-family: Verdana, sans-serif;">
<a href="https://hosting.photobucket.com/95288841-8654-4bf7-8fc9-a4aa78dce87f/1ef40d9f-2e5d-499f-80f7-6b4d72af83f9.jpg" style="font-family: Arial, Verdana, sans-serif;" target="_blank"><img alt="Click for enlarged picture" src="https://hosting.photobucket.com/95288841-8654-4bf7-8fc9-a4aa78dce87f/1ef40d9f-2e5d-499f-80f7-6b4d72af83f9.jpg" width="600" /></a></p>
<p>
<iframe allowfullscreen="" frameborder="0" height="360" src="https://www.youtube.com/embed/LzYP6Hx5nsI?si=jmjVIidV2ZvsAz6F" width="600"></iframe></p>
<p>
<a href="https://hosting.photobucket.com/95288841-8654-4bf7-8fc9-a4aa78dce87f/3141a84f-b80f-429d-9635-98cf9c5fd3ba.jpg" target="_blank"><img alt="Click for enlarged picture" src="https://hosting.photobucket.com/95288841-8654-4bf7-8fc9-a4aa78dce87f/3141a84f-b80f-429d-9635-98cf9c5fd3ba.jpg" width="600" /></a></p>
<p>
<a href="https://hosting.photobucket.com/95288841-8654-4bf7-8fc9-a4aa78dce87f/b0ae7518-4d6c-4af7-85a4-e2c1e5fd52cc.jpg" target="_blank"><img alt="Click for enlarged picture" src="https://hosting.photobucket.com/95288841-8654-4bf7-8fc9-a4aa78dce87f/b0ae7518-4d6c-4af7-85a4-e2c1e5fd52cc.jpg" width="600" /></a></p>
<p>
<a href="https://hosting.photobucket.com/95288841-8654-4bf7-8fc9-a4aa78dce87f/bc98e558-a4db-4676-840b-c67e052f2049.jpg" target="_blank"><img alt="Click for enlarged picture" src="https://hosting.photobucket.com/95288841-8654-4bf7-8fc9-a4aa78dce87f/bc98e558-a4db-4676-840b-c67e052f2049.jpg" width="600" /></a></p>
<p>
<a href="https://hosting.photobucket.com/95288841-8654-4bf7-8fc9-a4aa78dce87f/c992673a-0b69-4b12-b7d4-cf3dcfe87462.jpg" target="_blank"><img alt="Click for enlarged picture" src="https://hosting.photobucket.com/95288841-8654-4bf7-8fc9-a4aa78dce87f/c992673a-0b69-4b12-b7d4-cf3dcfe87462.jpg" width="600" /></a></p>
<p>
<a href="https://hosting.photobucket.com/95288841-8654-4bf7-8fc9-a4aa78dce87f/a5b3c4dd-9d89-423e-b1d9-3324eb88815c.jpg" target="_blank"><img alt="Click for enlarged picture" src="https://hosting.photobucket.com/95288841-8654-4bf7-8fc9-a4aa78dce87f/a5b3c4dd-9d89-423e-b1d9-3324eb88815c.jpg" width="600" /></a></p>
<p>
<a href="https://hosting.photobucket.com/95288841-8654-4bf7-8fc9-a4aa78dce87f/6c83d1bd-a307-4cdf-9e09-f2615d2688c4.jpg" target="_blank"><img alt="Click for enlarged picture" src="https://hosting.photobucket.com/95288841-8654-4bf7-8fc9-a4aa78dce87f/6c83d1bd-a307-4cdf-9e09-f2615d2688c4.jpg" width="600" /></a></p>"
["content_hrv"]=>
string(4213) "<p style="margin: 0px 0px 10px; padding: 0px; border: 0px; outline: 0px; vertical-align: baseline; background-image: initial; background-position: initial; background-size: initial; background-repeat: initial; background-attachment: initial; background-origin: initial; background-clip: initial; position: relative; float: none; clear: both; color: rgb(0, 0, 0); font-family: Verdana, sans-serif;">
U srijedu 25.2. u sklopu naše Izložbe minijatura i maketa Agram 2026, naša Agram Lego Sekcija je odradila svoj četvrti projekt. Nakon Hogwartsa u 2024. te Leonarda i Orient Expressa u 2025., prvi projekt u 2026. bio je bolid Formule 1 sa početka 1990-ih. </p>
<p>
<a href="https://hosting.photobucket.com/95288841-8654-4bf7-8fc9-a4aa78dce87f/1ef40d9f-2e5d-499f-80f7-6b4d72af83f9.jpg" target="_blank"><img alt="Click for enlarged picture" src="https://hosting.photobucket.com/95288841-8654-4bf7-8fc9-a4aa78dce87f/1ef40d9f-2e5d-499f-80f7-6b4d72af83f9.jpg" width="600" /></a></p>
<p>
Kao što je već tradicija kod naše Lego Sekcije, prije izgradnje modela, valjalo se malo educirati o temi. Ovoga puta naš dežurni strojar Marko Paunović održao je predavanje o bolidu FW14b, pobjedničkom bolidu iz 1992. tima Williams s kojim su postali svjetski konstruktorski prvaci, a kojeg je Nigel Mansel vozio do svjetske titule. U svojem predavanju, Marko je obradio teme aerodinamike, aktivnog ovjesa, mjenjača na volanu te ostalih inovacija koje je ovaj bolid uspješno instalirao. </p>
<p>
<iframe allowfullscreen="" frameborder="0" height="360" src="https://www.youtube.com/embed/LzYP6Hx5nsI?si=jmjVIidV2ZvsAz6F" width="600"></iframe></p>
<p>
Ulaz na predavanje bio je besplatan, a prijave nisu bile potrebne!</p>
<p>
<a href="https://hosting.photobucket.com/95288841-8654-4bf7-8fc9-a4aa78dce87f/3141a84f-b80f-429d-9635-98cf9c5fd3ba.jpg" target="_blank"><img alt="Click for enlarged picture" src="https://hosting.photobucket.com/95288841-8654-4bf7-8fc9-a4aa78dce87f/3141a84f-b80f-429d-9635-98cf9c5fd3ba.jpg" width="600" /></a></p>
<p>
<a href="https://hosting.photobucket.com/95288841-8654-4bf7-8fc9-a4aa78dce87f/b0ae7518-4d6c-4af7-85a4-e2c1e5fd52cc.jpg" target="_blank"><img alt="Click for enlarged picture" src="https://hosting.photobucket.com/95288841-8654-4bf7-8fc9-a4aa78dce87f/b0ae7518-4d6c-4af7-85a4-e2c1e5fd52cc.jpg" width="600" /></a></p>
<p>
<span style="color: rgb(0, 0, 0); font-family: Verdana, sans-serif;">Izrada makete je rezervirana za članove Agram Lego Sekcije. </span></p>
<p>
<a href="https://hosting.photobucket.com/95288841-8654-4bf7-8fc9-a4aa78dce87f/bc98e558-a4db-4676-840b-c67e052f2049.jpg" target="_blank"><img alt="Click for enlarged picture" src="https://hosting.photobucket.com/95288841-8654-4bf7-8fc9-a4aa78dce87f/bc98e558-a4db-4676-840b-c67e052f2049.jpg" width="600" /></a></p>
<p>
<a href="https://hosting.photobucket.com/95288841-8654-4bf7-8fc9-a4aa78dce87f/c992673a-0b69-4b12-b7d4-cf3dcfe87462.jpg" target="_blank"><img alt="Click for enlarged picture" src="https://hosting.photobucket.com/95288841-8654-4bf7-8fc9-a4aa78dce87f/c992673a-0b69-4b12-b7d4-cf3dcfe87462.jpg" width="600" /></a></p>
<p>
<a href="https://hosting.photobucket.com/95288841-8654-4bf7-8fc9-a4aa78dce87f/a5b3c4dd-9d89-423e-b1d9-3324eb88815c.jpg" target="_blank"><img alt="Click for enlarged picture" src="https://hosting.photobucket.com/95288841-8654-4bf7-8fc9-a4aa78dce87f/a5b3c4dd-9d89-423e-b1d9-3324eb88815c.jpg" width="600" /></a></p>
<p>
<span style="color: rgb(0, 0, 0); font-family: Verdana, sans-serif;">Ukoliko se želite uključiti u sljedeće projekte, javite se za više informacija na ums.agram@gmail.com .</span></p>
<p>
<a href="https://hosting.photobucket.com/95288841-8654-4bf7-8fc9-a4aa78dce87f/6c83d1bd-a307-4cdf-9e09-f2615d2688c4.jpg" target="_blank"><img alt="Click for enlarged picture" src="https://hosting.photobucket.com/95288841-8654-4bf7-8fc9-a4aa78dce87f/6c83d1bd-a307-4cdf-9e09-f2615d2688c4.jpg" width="600" /></a></p>
<p>
Sljedeći projekt bit će u travnju, a tema će biti Gospodar Prstenova. Očekuju vas pregršt zabavnih predavanja.<br />
<br />
Vidimo se!</p>
"
["created"]=>
string(19) "2026-02-26 13:32:17"
["modified"]=>
string(19) "2026-02-26 13:32:17"
}
["Member"]=>
array(10) {
["id"]=>
string(2) "64"
["group_id"]=>
string(1) "1"
["first_name"]=>
string(9) "Krunoslav"
["last_name"]=>
string(8) "Belinić"
["first_name_mask"]=>
string(9) "krunoslav"
["last_name_mask"]=>
string(7) "belinic"
["username"]=>
string(5) "Kruno"
["password"]=>
string(40) "eb3fda45fbec0258e90d809803b10491c548b22f"
["born"]=>
string(19) "2015-01-18 09:19:00"
["created"]=>
string(19) "2015-01-18 09:20:39"
}
}
</pre>
<a href="/dok/members/krunoslav.belinic">Krunoslav Belinić</a>, 26<span class="superscript">th</span> February 2026</span>
</li>
<li>
<a href="/dok/articles/2026/02/25" class="readMore"></a>
<span class="details"> <pre style="display: none;">
array(2) {
["Article"]=>
array(10) {
["id"]=>
string(3) "493"
["member_id"]=>
string(2) "64"
["title_eng"]=>
string(51) "Gallery of winning entries of Black Queen H&MPC2026"
["title_hrv"]=>
string(54) "Galerija pobjedničkih radova na Black Queen H&MPC2026"
["mask_eng"]=>
string(50) "gallery_of_winning_entries_of_black_queen_hmpc2026"
["mask_hrv"]=>
string(52) "galerija_pobjednickih_radova_na_black_queen_hmpc2026"
["content_eng"]=>
string(12503) "<p>
<strong>BEST OF SHOW</strong> & 1. place <strong>MASTERCLASS - IVAN KNEZOVIĆ</strong></p>
<p>
<a href="https://hosting.photobucket.com/95288841-8654-4bf7-8fc9-a4aa78dce87f/8949b562-8f41-4a80-aab2-f22784b3ba6c.jpg" target="_blank"><img alt="Click for enlarged picture" src="https://hosting.photobucket.com/95288841-8654-4bf7-8fc9-a4aa78dce87f/8949b562-8f41-4a80-aab2-f22784b3ba6c.jpg" width="600" /></a></p>
<p>
2. place <strong>MASTERCLASS </strong><strong>- ANŽE ZORKO</strong></p>
<p>
<a href="https://hosting.photobucket.com/95288841-8654-4bf7-8fc9-a4aa78dce87f/ae622692-061b-49cd-984e-0b93c47c12a9.jpg" target="_blank"><img alt="Click for enlarged picture" src="https://hosting.photobucket.com/95288841-8654-4bf7-8fc9-a4aa78dce87f/ae622692-061b-49cd-984e-0b93c47c12a9.jpg" width="600" /></a></p>
<p>
3. place <strong>MASTERCLASS </strong><strong>- ANA POLANŠĆAK</strong></p>
<p>
<a href="https://hosting.photobucket.com/95288841-8654-4bf7-8fc9-a4aa78dce87f/f33188f9-7799-4375-8e74-e1d946f874cd.jpg" target="_blank"><img alt="Click for enlarged picture" src="https://hosting.photobucket.com/95288841-8654-4bf7-8fc9-a4aa78dce87f/f33188f9-7799-4375-8e74-e1d946f874cd.jpg" width="600" /></a></p>
<p>
<strong>BEST DISPLAY </strong><strong>- MARKO PAUNOVIĆ</strong></p>
<p>
<a href="https://hosting.photobucket.com/95288841-8654-4bf7-8fc9-a4aa78dce87f/3f5d890e-529a-4fcb-9c86-221bd6fc2e57.jpg" target="_blank"><img alt="Click for enlarged picture" src="https://hosting.photobucket.com/95288841-8654-4bf7-8fc9-a4aa78dce87f/3f5d890e-529a-4fcb-9c86-221bd6fc2e57.jpg" width="600" /></a></p>
<p>
<strong>BEST OF FANTASY</strong> & <strong>PEOPLE'S CHOICE </strong><strong>- IVAN KNEZOVIĆ</strong></p>
<p>
<a href="https://hosting.photobucket.com/95288841-8654-4bf7-8fc9-a4aa78dce87f/c89aa7cf-f050-4aa4-bf5d-c31abe70165e.jpg" target="_blank"><img alt="Click for enlarged picture" src="https://hosting.photobucket.com/95288841-8654-4bf7-8fc9-a4aa78dce87f/c89aa7cf-f050-4aa4-bf5d-c31abe70165e.jpg" width="600" /></a></p>
<p>
<strong>BEST OF HISTORICAL </strong><strong>- NINOSLAV LUK</strong></p>
<p>
<a href="https://hosting.photobucket.com/95288841-8654-4bf7-8fc9-a4aa78dce87f/b2751730-af2e-42c6-a33c-30890f8d3a26.jpg" target="_blank"><img alt="Click for enlarged picture" src="https://hosting.photobucket.com/95288841-8654-4bf7-8fc9-a4aa78dce87f/b2751730-af2e-42c6-a33c-30890f8d3a26.jpg" width="600" /></a></p>
<p>
<strong>BEST SCULPT </strong><strong>- MONIKA BEŠENIĆ</strong></p>
<p>
<a href="https://hosting.photobucket.com/95288841-8654-4bf7-8fc9-a4aa78dce87f/7e5a7d8d-cea4-4e51-8bfc-6b67a4c12f05.jpg" target="_blank"><img alt="Click for enlarged picture" src="https://hosting.photobucket.com/95288841-8654-4bf7-8fc9-a4aa78dce87f/7e5a7d8d-cea4-4e51-8bfc-6b67a4c12f05.jpg" width="600" /></a></p>
<p>
1.place<strong>SINGLE MINIATURE </strong><strong>- VLADIMIR MATIĆ-KURILJEV</strong></p>
<p>
<a href="https://hosting.photobucket.com/95288841-8654-4bf7-8fc9-a4aa78dce87f/f4828224-9bde-4e65-8a6d-1af3f312503a.jpg" target="_blank"><img alt="Click for enlarged picture" src="https://hosting.photobucket.com/95288841-8654-4bf7-8fc9-a4aa78dce87f/f4828224-9bde-4e65-8a6d-1af3f312503a.jpg" width="600" /></a></p>
<p>
2.place<strong>SINGLE MINIATURE </strong><strong>- ANA POLANŠĆAK</strong></p>
<p>
<a href="https://hosting.photobucket.com/95288841-8654-4bf7-8fc9-a4aa78dce87f/cb9380c7-f7ee-406a-bccf-9a86477bed82.jpg" target="_blank"><img alt="Click for enlarged picture" src="https://hosting.photobucket.com/95288841-8654-4bf7-8fc9-a4aa78dce87f/cb9380c7-f7ee-406a-bccf-9a86477bed82.jpg" width="600" /></a></p>
<p>
3.place<strong>SINGLE MINIATURE - ADAM SKENDŽIĆ</strong></p>
<p>
<a href="https://hosting.photobucket.com/95288841-8654-4bf7-8fc9-a4aa78dce87f/a5f80a51-27d4-4040-952e-b04eb5bf4c99.jpg" target="_blank"><img alt="Click for enlarged picture" src="https://hosting.photobucket.com/95288841-8654-4bf7-8fc9-a4aa78dce87f/a5f80a51-27d4-4040-952e-b04eb5bf4c99.jpg" width="600" /></a></p>
<p>
1.place<strong>LARGE/MOUNTED MINIATURE - SEBASTIAN SOGARD</strong></p>
<p>
<a href="https://hosting.photobucket.com/95288841-8654-4bf7-8fc9-a4aa78dce87f/1f8e3547-5113-488b-9983-c3c592add875.jpg" target="_blank"><img alt="Click for enlarged picture" src="https://hosting.photobucket.com/95288841-8654-4bf7-8fc9-a4aa78dce87f/1f8e3547-5113-488b-9983-c3c592add875.jpg" width="600" /></a></p>
<p>
2.place<strong>LARGE/MOUNTED MINIATURE - JURE CUKAR</strong></p>
<p>
<a href="https://hosting.photobucket.com/95288841-8654-4bf7-8fc9-a4aa78dce87f/de5778ba-d672-4d24-8e6e-f9f1ac993c26.jpg" target="_blank"><img alt="Click for enlarged picture" src="https://hosting.photobucket.com/95288841-8654-4bf7-8fc9-a4aa78dce87f/de5778ba-d672-4d24-8e6e-f9f1ac993c26.jpg" width="600" /></a></p>
<p>
3.place<strong>LARGE/MOUNTED MINIATURE - ANA POLANŠĆAK</strong></p>
<p>
<a href="https://hosting.photobucket.com/95288841-8654-4bf7-8fc9-a4aa78dce87f/58d2d738-55f2-495d-bd44-cf8d023e0142.jpg" target="_blank"><img alt="Click for enlarged picture" src="https://hosting.photobucket.com/95288841-8654-4bf7-8fc9-a4aa78dce87f/58d2d738-55f2-495d-bd44-cf8d023e0142.jpg" width="600" /></a></p>
<p>
1.place<strong>UNIT / SQUAD </strong><strong>- IVAN KNEZOVIĆ</strong></p>
<p>
<a href="https://hosting.photobucket.com/95288841-8654-4bf7-8fc9-a4aa78dce87f/b77d9055-d0c4-4803-8e3f-0bf295c3d5d0.jpg" target="_blank"><img alt="Click for enlarged picture" src="https://hosting.photobucket.com/95288841-8654-4bf7-8fc9-a4aa78dce87f/b77d9055-d0c4-4803-8e3f-0bf295c3d5d0.jpg" width="600" /></a></p>
<p>
2.place<strong>UNIT / SQUAD - MILAN RADACSI</strong></p>
<p>
<a href="https://hosting.photobucket.com/95288841-8654-4bf7-8fc9-a4aa78dce87f/1a6d64f2-a293-4a81-b974-1696d8bb5972.jpg" target="_blank"><img alt="Click for enlarged picture" src="https://hosting.photobucket.com/95288841-8654-4bf7-8fc9-a4aa78dce87f/1a6d64f2-a293-4a81-b974-1696d8bb5972.jpg" width="600" /></a></p>
<p>
3.place<strong>UNIT / SQUAD - MAKSIMILIJAN ŠPRUNG</strong></p>
<p>
<a href="https://hosting.photobucket.com/95288841-8654-4bf7-8fc9-a4aa78dce87f/0b0ae61f-c140-4c35-b58c-a0813c15d83a.jpg" target="_blank"><img alt="Click for enlarged picture" src="https://hosting.photobucket.com/95288841-8654-4bf7-8fc9-a4aa78dce87f/0b0ae61f-c140-4c35-b58c-a0813c15d83a.jpg" width="600" /></a></p>
<p>
1.place<strong>VEHICLE / MONSTER - MAKSIMILIJAN ŠPRUNG</strong></p>
<p>
<a href="https://hosting.photobucket.com/95288841-8654-4bf7-8fc9-a4aa78dce87f/34dbfff5-b8db-478d-a13d-3698c0490a95.jpg" target="_blank"><img alt="Click for enlarged picture" src="https://hosting.photobucket.com/95288841-8654-4bf7-8fc9-a4aa78dce87f/34dbfff5-b8db-478d-a13d-3698c0490a95.jpg" width="600" /></a></p>
<p>
2.place<strong>VEHICLE / MONSTER - MARIO GRGUREV</strong></p>
<p>
<a href="https://hosting.photobucket.com/95288841-8654-4bf7-8fc9-a4aa78dce87f/387e5e88-4f80-4bb9-9b30-f7241369de41.jpg" target="_blank"><img alt="Click for enlarged picture" src="https://hosting.photobucket.com/95288841-8654-4bf7-8fc9-a4aa78dce87f/387e5e88-4f80-4bb9-9b30-f7241369de41.jpg" width="600" /></a></p>
<p>
3.place<strong>VEHICLE / MONSTER - MARKO PAUNOVIĆ</strong></p>
<p>
<a href="https://hosting.photobucket.com/95288841-8654-4bf7-8fc9-a4aa78dce87f/8c2034d2-cae0-4bc2-bdd9-eab85b71db7b.jpg" target="_blank"><img alt="Click for enlarged picture" src="https://hosting.photobucket.com/95288841-8654-4bf7-8fc9-a4aa78dce87f/8c2034d2-cae0-4bc2-bdd9-eab85b71db7b.jpg" width="600" /></a></p>
<p>
1.place<strong>OPEN - PETAR KNEZOVIĆ</strong></p>
<p>
<a href="https://hosting.photobucket.com/95288841-8654-4bf7-8fc9-a4aa78dce87f/7e2723b8-421d-4d59-b2ab-5b5abf4a067a.jpg" target="_blank"><img alt="Click for enlarged picture" src="https://hosting.photobucket.com/95288841-8654-4bf7-8fc9-a4aa78dce87f/7e2723b8-421d-4d59-b2ab-5b5abf4a067a.jpg" width="600" /></a></p>
<p>
2.place<strong>OPEN - FILIP KNEZOVIĆ</strong></p>
<p>
<a href="https://hosting.photobucket.com/95288841-8654-4bf7-8fc9-a4aa78dce87f/2bcd6dc0-6d54-44fd-b660-4f6862e2551f.jpg" target="_blank"><img alt="Click for enlarged picture" src="https://hosting.photobucket.com/95288841-8654-4bf7-8fc9-a4aa78dce87f/2bcd6dc0-6d54-44fd-b660-4f6862e2551f.jpg" width="600" /></a></p>
<p>
3.place<strong>OPEN - DINO TEREK</strong></p>
<p>
<a href="https://hosting.photobucket.com/95288841-8654-4bf7-8fc9-a4aa78dce87f/fe807e70-9250-49f9-8458-56b2ee4b0fad.jpg" target="_blank"><img alt="Click for enlarged picture" src="https://hosting.photobucket.com/95288841-8654-4bf7-8fc9-a4aa78dce87f/fe807e70-9250-49f9-8458-56b2ee4b0fad.jpg" width="600" /></a></p>
<p>
1.place<strong>DIORAMA / DUEL - MARKO PAUNOVIĆ</strong></p>
<p>
<a href="https://hosting.photobucket.com/95288841-8654-4bf7-8fc9-a4aa78dce87f/a7f3bd4c-74cd-48ff-ac00-2d884c6c4770.jpg" target="_blank"><img alt="Click for enlarged picture" src="https://hosting.photobucket.com/95288841-8654-4bf7-8fc9-a4aa78dce87f/a7f3bd4c-74cd-48ff-ac00-2d884c6c4770.jpg" width="600" /></a></p>
<p>
2.place<strong>DIORAMA / DUEL - VLADIMIR MATIĆ-KURILJEV</strong></p>
<p>
<a href="https://hosting.photobucket.com/95288841-8654-4bf7-8fc9-a4aa78dce87f/1218bbec-f68d-40e4-a8ae-66e57c949846.jpg" target="_blank"><img alt="Click for enlarged picture" src="https://hosting.photobucket.com/95288841-8654-4bf7-8fc9-a4aa78dce87f/1218bbec-f68d-40e4-a8ae-66e57c949846.jpg" width="600" /></a></p>
<p>
3.place<strong>DIORAMA / DUEL - JURE CUKAR</strong></p>
<p>
<a href="https://hosting.photobucket.com/95288841-8654-4bf7-8fc9-a4aa78dce87f/4ad5c251-dd03-471f-8ff2-3526507e4aa7.jpg" target="_blank"><img alt="Click for enlarged picture" src="https://hosting.photobucket.com/95288841-8654-4bf7-8fc9-a4aa78dce87f/4ad5c251-dd03-471f-8ff2-3526507e4aa7.jpg" width="600" /></a></p>
<p>
1.place<strong>BUST - MARKO PAUNOVIĆ</strong></p>
<p>
<a href="https://hosting.photobucket.com/95288841-8654-4bf7-8fc9-a4aa78dce87f/daaa9dff-9d7c-4696-b8d9-7ce0c311012a.jpg" target="_blank"><img alt="Click for enlarged picture" src="https://hosting.photobucket.com/95288841-8654-4bf7-8fc9-a4aa78dce87f/daaa9dff-9d7c-4696-b8d9-7ce0c311012a.jpg" width="600" /></a></p>
<p>
2.place<strong>BUST - ANŽE ZORKO</strong></p>
<p>
<a href="https://hosting.photobucket.com/95288841-8654-4bf7-8fc9-a4aa78dce87f/e11e4893-05f4-49df-a758-720b188c5917.jpg" target="_blank"><img alt="Click for enlarged picture" src="https://hosting.photobucket.com/95288841-8654-4bf7-8fc9-a4aa78dce87f/e11e4893-05f4-49df-a758-720b188c5917.jpg" width="600" /></a></p>
<p>
3.place<strong>BUST </strong><strong>- IVAN KNEZOVIĆ</strong></p>
<p>
<a href="https://hosting.photobucket.com/95288841-8654-4bf7-8fc9-a4aa78dce87f/d2435198-c290-43bf-a2fe-e8e592dabd7f.jpg" target="_blank"><img alt="Click for enlarged picture" src="https://hosting.photobucket.com/95288841-8654-4bf7-8fc9-a4aa78dce87f/d2435198-c290-43bf-a2fe-e8e592dabd7f.jpg" width="600" /></a></p>
<p>
1.place<strong>JUNIOR - ELANOR GRAŠIĆ</strong></p>
<p>
<a href="https://hosting.photobucket.com/95288841-8654-4bf7-8fc9-a4aa78dce87f/f0bbb346-9821-43dc-a463-e507fb1b87ee.jpg" target="_blank"><img alt="Click for enlarged picture" src="https://hosting.photobucket.com/95288841-8654-4bf7-8fc9-a4aa78dce87f/f0bbb346-9821-43dc-a463-e507fb1b87ee.jpg" width="600" /></a></p>
<p>
2.place<strong>JUNIOR - LUKA ŠEGINA</strong></p>
<p>
<a href="https://hosting.photobucket.com/95288841-8654-4bf7-8fc9-a4aa78dce87f/1829eee3-80f3-48de-a013-bada8c612e76.jpg" target="_blank"><img alt="Click for enlarged picture" src="https://hosting.photobucket.com/95288841-8654-4bf7-8fc9-a4aa78dce87f/1829eee3-80f3-48de-a013-bada8c612e76.jpg" width="600" /></a></p>
<p>
3.place<strong>JUNIOR - SOFIJA MARASOVIĆ</strong></p>
<p>
<a href="https://hosting.photobucket.com/95288841-8654-4bf7-8fc9-a4aa78dce87f/bdf02300-4634-46b3-a659-6a8a9183177e.jpg" target="_blank"><img alt="Click for enlarged picture" src="https://hosting.photobucket.com/95288841-8654-4bf7-8fc9-a4aa78dce87f/bdf02300-4634-46b3-a659-6a8a9183177e.jpg" width="600" /></a></p>
<p>
You can see all the entries in the gallery on our <a href="https://www.facebook.com/BlackQueenHMPC/posts/pfbid02gCGwwc8vTLFJDs1MFmbxc8NKZv1oni7uykTLKmomFSM1APfKrGRNtCkr2a6HTGQrl">social networks</a>.</p>
"
["content_hrv"]=>
string(12719) "<p>
<strong>BEST OF SHOW</strong> & 1. mjesto <strong>MASTERCLASS - IVAN KNEZOVIĆ</strong></p>
<p>
<a href="https://hosting.photobucket.com/95288841-8654-4bf7-8fc9-a4aa78dce87f/8949b562-8f41-4a80-aab2-f22784b3ba6c.jpg" target="_blank"><img alt="Click for enlarged picture" src="https://hosting.photobucket.com/95288841-8654-4bf7-8fc9-a4aa78dce87f/8949b562-8f41-4a80-aab2-f22784b3ba6c.jpg" width="600" /></a></p>
<p>
2. mjesto <strong>MASTERCLASS </strong><strong>- ANŽE ZORKO</strong></p>
<p>
<a href="https://hosting.photobucket.com/95288841-8654-4bf7-8fc9-a4aa78dce87f/ae622692-061b-49cd-984e-0b93c47c12a9.jpg" target="_blank"><img alt="Click for enlarged picture" src="https://hosting.photobucket.com/95288841-8654-4bf7-8fc9-a4aa78dce87f/ae622692-061b-49cd-984e-0b93c47c12a9.jpg" width="600" /></a></p>
<p>
3. mjesto <strong>MASTERCLASS </strong><strong>- ANA POLANŠĆAK</strong></p>
<p>
<a href="https://hosting.photobucket.com/95288841-8654-4bf7-8fc9-a4aa78dce87f/f33188f9-7799-4375-8e74-e1d946f874cd.jpg" target="_blank"><img alt="Click for enlarged picture" src="https://hosting.photobucket.com/95288841-8654-4bf7-8fc9-a4aa78dce87f/f33188f9-7799-4375-8e74-e1d946f874cd.jpg" width="600" /></a></p>
<p>
<strong>BEST DISPLAY </strong><strong>- MARKO PAUNOVIĆ</strong></p>
<p>
<a href="https://hosting.photobucket.com/95288841-8654-4bf7-8fc9-a4aa78dce87f/3f5d890e-529a-4fcb-9c86-221bd6fc2e57.jpg" target="_blank"><img alt="Click for enlarged picture" src="https://hosting.photobucket.com/95288841-8654-4bf7-8fc9-a4aa78dce87f/3f5d890e-529a-4fcb-9c86-221bd6fc2e57.jpg" width="600" /></a></p>
<p>
<strong>BEST OF FANTASY</strong> & <strong>PEOPLE'S CHOICE </strong><strong>- IVAN KNEZOVIĆ</strong></p>
<p>
<a href="https://hosting.photobucket.com/95288841-8654-4bf7-8fc9-a4aa78dce87f/c89aa7cf-f050-4aa4-bf5d-c31abe70165e.jpg" target="_blank"><img alt="Click for enlarged picture" src="https://hosting.photobucket.com/95288841-8654-4bf7-8fc9-a4aa78dce87f/c89aa7cf-f050-4aa4-bf5d-c31abe70165e.jpg" width="600" /></a></p>
<p>
<strong>BEST OF HISTORICAL </strong><strong>- NINOSLAV LUK</strong></p>
<p>
<a href="https://hosting.photobucket.com/95288841-8654-4bf7-8fc9-a4aa78dce87f/b2751730-af2e-42c6-a33c-30890f8d3a26.jpg" target="_blank"><img alt="Click for enlarged picture" src="https://hosting.photobucket.com/95288841-8654-4bf7-8fc9-a4aa78dce87f/b2751730-af2e-42c6-a33c-30890f8d3a26.jpg" width="600" /></a></p>
<p>
<strong>BEST SCULPT </strong><strong>- MONIKA BEŠENIĆ</strong></p>
<p>
<a href="https://hosting.photobucket.com/95288841-8654-4bf7-8fc9-a4aa78dce87f/7e5a7d8d-cea4-4e51-8bfc-6b67a4c12f05.jpg" target="_blank"><img alt="Click for enlarged picture" src="https://hosting.photobucket.com/95288841-8654-4bf7-8fc9-a4aa78dce87f/7e5a7d8d-cea4-4e51-8bfc-6b67a4c12f05.jpg" width="600" /></a></p>
<p>
1.mjesto <strong>SINGLE MINIATURE </strong><strong>- VLADIMIR MATIĆ-KURILJEV</strong></p>
<p>
<a href="https://hosting.photobucket.com/95288841-8654-4bf7-8fc9-a4aa78dce87f/f4828224-9bde-4e65-8a6d-1af3f312503a.jpg" target="_blank"><img alt="Click for enlarged picture" src="https://hosting.photobucket.com/95288841-8654-4bf7-8fc9-a4aa78dce87f/f4828224-9bde-4e65-8a6d-1af3f312503a.jpg" width="600" /></a></p>
<p>
2.mjesto <strong>SINGLE MINIATURE </strong><strong>- ANA POLANŠĆAK</strong></p>
<p>
<a href="https://hosting.photobucket.com/95288841-8654-4bf7-8fc9-a4aa78dce87f/cb9380c7-f7ee-406a-bccf-9a86477bed82.jpg" target="_blank"><img alt="Click for enlarged picture" src="https://hosting.photobucket.com/95288841-8654-4bf7-8fc9-a4aa78dce87f/cb9380c7-f7ee-406a-bccf-9a86477bed82.jpg" width="600" /></a></p>
<p>
3.mjesto <strong>SINGLE MINIATURE - ADAM SKENDŽIĆ</strong></p>
<p>
<a href="https://hosting.photobucket.com/95288841-8654-4bf7-8fc9-a4aa78dce87f/a5f80a51-27d4-4040-952e-b04eb5bf4c99.jpg" target="_blank"><img alt="Click for enlarged picture" src="https://hosting.photobucket.com/95288841-8654-4bf7-8fc9-a4aa78dce87f/a5f80a51-27d4-4040-952e-b04eb5bf4c99.jpg" width="600" /></a></p>
<p>
1.mjesto <strong>LARGE/MOUNTED MINIATURE - SEBASTIAN SOGARD</strong></p>
<p>
<a href="https://hosting.photobucket.com/95288841-8654-4bf7-8fc9-a4aa78dce87f/1f8e3547-5113-488b-9983-c3c592add875.jpg" target="_blank"><img alt="Click for enlarged picture" src="https://hosting.photobucket.com/95288841-8654-4bf7-8fc9-a4aa78dce87f/1f8e3547-5113-488b-9983-c3c592add875.jpg" width="600" /></a></p>
<p>
2.mjesto <strong>LARGE/MOUNTED MINIATURE - JURE CUKAR</strong></p>
<p>
<a href="https://hosting.photobucket.com/95288841-8654-4bf7-8fc9-a4aa78dce87f/de5778ba-d672-4d24-8e6e-f9f1ac993c26.jpg" target="_blank"><img alt="Click for enlarged picture" src="https://hosting.photobucket.com/95288841-8654-4bf7-8fc9-a4aa78dce87f/de5778ba-d672-4d24-8e6e-f9f1ac993c26.jpg" width="600" /></a></p>
<p>
3.mjesto <strong>LARGE/MOUNTED MINIATURE - ANA POLANŠĆAK</strong></p>
<p>
<a href="https://hosting.photobucket.com/95288841-8654-4bf7-8fc9-a4aa78dce87f/58d2d738-55f2-495d-bd44-cf8d023e0142.jpg" target="_blank"><img alt="Click for enlarged picture" src="https://hosting.photobucket.com/95288841-8654-4bf7-8fc9-a4aa78dce87f/58d2d738-55f2-495d-bd44-cf8d023e0142.jpg" width="600" /></a></p>
<p>
1.mjesto <strong>UNIT / SQUAD </strong><strong>- IVAN KNEZOVIĆ</strong></p>
<p>
<a href="https://hosting.photobucket.com/95288841-8654-4bf7-8fc9-a4aa78dce87f/b77d9055-d0c4-4803-8e3f-0bf295c3d5d0.jpg" target="_blank"><img alt="Click for enlarged picture" src="https://hosting.photobucket.com/95288841-8654-4bf7-8fc9-a4aa78dce87f/b77d9055-d0c4-4803-8e3f-0bf295c3d5d0.jpg" width="600" /></a></p>
<p>
2.mjesto <strong>UNIT / SQUAD - MILAN RADACSI</strong></p>
<p>
<a href="https://hosting.photobucket.com/95288841-8654-4bf7-8fc9-a4aa78dce87f/1a6d64f2-a293-4a81-b974-1696d8bb5972.jpg" target="_blank"><img alt="Click for enlarged picture" src="https://hosting.photobucket.com/95288841-8654-4bf7-8fc9-a4aa78dce87f/1a6d64f2-a293-4a81-b974-1696d8bb5972.jpg" width="600" /></a></p>
<p>
3.mjesto <strong>UNIT / SQUAD - MAKSIMILIJAN ŠPRUNG</strong></p>
<p>
<a href="https://hosting.photobucket.com/95288841-8654-4bf7-8fc9-a4aa78dce87f/0b0ae61f-c140-4c35-b58c-a0813c15d83a.jpg" target="_blank"><img alt="Click for enlarged picture" src="https://hosting.photobucket.com/95288841-8654-4bf7-8fc9-a4aa78dce87f/0b0ae61f-c140-4c35-b58c-a0813c15d83a.jpg" width="600" /></a></p>
<p>
1.mjesto <strong>VEHICLE / MONSTER - MAKSIMILIJAN ŠPRUNG</strong></p>
<p>
<a href="https://hosting.photobucket.com/95288841-8654-4bf7-8fc9-a4aa78dce87f/34dbfff5-b8db-478d-a13d-3698c0490a95.jpg" target="_blank"><img alt="Click for enlarged picture" src="https://hosting.photobucket.com/95288841-8654-4bf7-8fc9-a4aa78dce87f/34dbfff5-b8db-478d-a13d-3698c0490a95.jpg" width="600" /></a></p>
<p>
2.mjesto <strong>VEHICLE / MONSTER - MARIO GRGUREV</strong></p>
<p>
<a href="https://hosting.photobucket.com/95288841-8654-4bf7-8fc9-a4aa78dce87f/387e5e88-4f80-4bb9-9b30-f7241369de41.jpg" target="_blank"><img alt="Click for enlarged picture" src="https://hosting.photobucket.com/95288841-8654-4bf7-8fc9-a4aa78dce87f/387e5e88-4f80-4bb9-9b30-f7241369de41.jpg" width="600" /></a></p>
<p>
3.mjesto <strong>VEHICLE / MONSTER - MARKO PAUNOVIĆ</strong></p>
<p>
<a href="https://hosting.photobucket.com/95288841-8654-4bf7-8fc9-a4aa78dce87f/8c2034d2-cae0-4bc2-bdd9-eab85b71db7b.jpg" target="_blank"><img alt="Click for enlarged picture" src="https://hosting.photobucket.com/95288841-8654-4bf7-8fc9-a4aa78dce87f/8c2034d2-cae0-4bc2-bdd9-eab85b71db7b.jpg" width="600" /></a></p>
<p>
1.mjesto <strong>OPEN - PETAR KNEZOVIĆ</strong></p>
<p>
<a href="https://hosting.photobucket.com/95288841-8654-4bf7-8fc9-a4aa78dce87f/7e2723b8-421d-4d59-b2ab-5b5abf4a067a.jpg" target="_blank"><img alt="Click for enlarged picture" src="https://hosting.photobucket.com/95288841-8654-4bf7-8fc9-a4aa78dce87f/7e2723b8-421d-4d59-b2ab-5b5abf4a067a.jpg" width="600" /></a></p>
<p>
2.mjesto <strong>OPEN - FILIP KNEZOVIĆ</strong></p>
<p>
<a href="https://hosting.photobucket.com/95288841-8654-4bf7-8fc9-a4aa78dce87f/2bcd6dc0-6d54-44fd-b660-4f6862e2551f.jpg" target="_blank"><img alt="Click for enlarged picture" src="https://hosting.photobucket.com/95288841-8654-4bf7-8fc9-a4aa78dce87f/2bcd6dc0-6d54-44fd-b660-4f6862e2551f.jpg" width="600" /></a></p>
<p>
3.mjesto <strong>OPEN - DINO TEREK</strong></p>
<p>
<a href="https://hosting.photobucket.com/95288841-8654-4bf7-8fc9-a4aa78dce87f/fe807e70-9250-49f9-8458-56b2ee4b0fad.jpg" target="_blank"><img alt="Click for enlarged picture" src="https://hosting.photobucket.com/95288841-8654-4bf7-8fc9-a4aa78dce87f/fe807e70-9250-49f9-8458-56b2ee4b0fad.jpg" width="600" /></a></p>
<p>
1.mjesto <strong>DIORAMA / DUEL - MARKO PAUNOVIĆ</strong></p>
<p>
<a href="https://hosting.photobucket.com/95288841-8654-4bf7-8fc9-a4aa78dce87f/a7f3bd4c-74cd-48ff-ac00-2d884c6c4770.jpg" target="_blank"><img alt="Click for enlarged picture" src="https://hosting.photobucket.com/95288841-8654-4bf7-8fc9-a4aa78dce87f/a7f3bd4c-74cd-48ff-ac00-2d884c6c4770.jpg" width="600" /></a></p>
<p>
2.mjesto <strong>DIORAMA / DUEL - VLADIMIR MATIĆ-KURILJEV</strong></p>
<p>
<a href="https://hosting.photobucket.com/95288841-8654-4bf7-8fc9-a4aa78dce87f/1218bbec-f68d-40e4-a8ae-66e57c949846.jpg" target="_blank"><img alt="Click for enlarged picture" src="https://hosting.photobucket.com/95288841-8654-4bf7-8fc9-a4aa78dce87f/1218bbec-f68d-40e4-a8ae-66e57c949846.jpg" width="600" /></a></p>
<p>
3.mjesto <strong>DIORAMA / DUEL - JURE CUKAR</strong></p>
<p>
<a href="https://hosting.photobucket.com/95288841-8654-4bf7-8fc9-a4aa78dce87f/4ad5c251-dd03-471f-8ff2-3526507e4aa7.jpg" target="_blank"><img alt="Click for enlarged picture" src="https://hosting.photobucket.com/95288841-8654-4bf7-8fc9-a4aa78dce87f/4ad5c251-dd03-471f-8ff2-3526507e4aa7.jpg" width="600" /></a></p>
<p>
1.mjesto <strong>BUST - MARKO PAUNOVIĆ</strong></p>
<p>
<a href="https://hosting.photobucket.com/95288841-8654-4bf7-8fc9-a4aa78dce87f/daaa9dff-9d7c-4696-b8d9-7ce0c311012a.jpg" target="_blank"><img alt="Click for enlarged picture" src="https://hosting.photobucket.com/95288841-8654-4bf7-8fc9-a4aa78dce87f/daaa9dff-9d7c-4696-b8d9-7ce0c311012a.jpg" width="600" /></a></p>
<p>
2.mjesto <strong>BUST - ANŽE ZORKO</strong></p>
<p>
<a href="https://hosting.photobucket.com/95288841-8654-4bf7-8fc9-a4aa78dce87f/e11e4893-05f4-49df-a758-720b188c5917.jpg" target="_blank"><img alt="Click for enlarged picture" src="https://hosting.photobucket.com/95288841-8654-4bf7-8fc9-a4aa78dce87f/e11e4893-05f4-49df-a758-720b188c5917.jpg" width="600" /></a></p>
<p>
3.mjesto <strong>BUST </strong><strong>- IVAN KNEZOVIĆ</strong></p>
<p>
<a href="https://hosting.photobucket.com/95288841-8654-4bf7-8fc9-a4aa78dce87f/d2435198-c290-43bf-a2fe-e8e592dabd7f.jpg" target="_blank"><img alt="Click for enlarged picture" src="https://hosting.photobucket.com/95288841-8654-4bf7-8fc9-a4aa78dce87f/d2435198-c290-43bf-a2fe-e8e592dabd7f.jpg" width="600" /></a></p>
<p>
1.mjesto <strong>JUNIOR - ELANOR GRAŠIĆ</strong></p>
<p>
<a href="https://hosting.photobucket.com/95288841-8654-4bf7-8fc9-a4aa78dce87f/f0bbb346-9821-43dc-a463-e507fb1b87ee.jpg" target="_blank"><img alt="Click for enlarged picture" src="https://hosting.photobucket.com/95288841-8654-4bf7-8fc9-a4aa78dce87f/f0bbb346-9821-43dc-a463-e507fb1b87ee.jpg" width="600" /></a></p>
<p>
2.mjesto <strong>JUNIOR - LUKA ŠEGINA</strong></p>
<p>
<a href="https://hosting.photobucket.com/95288841-8654-4bf7-8fc9-a4aa78dce87f/1829eee3-80f3-48de-a013-bada8c612e76.jpg" target="_blank"><img alt="Click for enlarged picture" src="https://hosting.photobucket.com/95288841-8654-4bf7-8fc9-a4aa78dce87f/1829eee3-80f3-48de-a013-bada8c612e76.jpg" width="600" /></a></p>
<p>
3.mjesto <strong>JUNIOR - SOFIJA MARASOVIĆ</strong></p>
<p>
<a href="https://hosting.photobucket.com/95288841-8654-4bf7-8fc9-a4aa78dce87f/bdf02300-4634-46b3-a659-6a8a9183177e.jpg" target="_blank"><img alt="Click for enlarged picture" src="https://hosting.photobucket.com/95288841-8654-4bf7-8fc9-a4aa78dce87f/bdf02300-4634-46b3-a659-6a8a9183177e.jpg" width="600" /></a></p>
<p>
Sve radove možete pogledati u galeriji na našim <a href="https://www.facebook.com/BlackQueenHMPC/posts/pfbid02gCGwwc8vTLFJDs1MFmbxc8NKZv1oni7uykTLKmomFSM1APfKrGRNtCkr2a6HTGQrl">socijalnim mrežama</a>.</p>
"
["created"]=>
string(19) "2026-02-25 09:03:55"
["modified"]=>
string(19) "2026-02-28 05:54:18"
}
["Member"]=>
array(10) {
["id"]=>
string(2) "64"
["group_id"]=>
string(1) "1"
["first_name"]=>
string(9) "Krunoslav"
["last_name"]=>
string(8) "Belinić"
["first_name_mask"]=>
string(9) "krunoslav"
["last_name_mask"]=>
string(7) "belinic"
["username"]=>
string(5) "Kruno"
["password"]=>
string(40) "eb3fda45fbec0258e90d809803b10491c548b22f"
["born"]=>
string(19) "2015-01-18 09:19:00"
["created"]=>
string(19) "2015-01-18 09:20:39"
}
}
</pre>
<a href="/dok/members/krunoslav.belinic">Krunoslav Belinić</a>, 25<span class="superscript">th</span> February 2026</span>
</li>
<li>
<a href="/dok/articles/2026/01/19" class="readMore"></a>
<span class="details"> <pre style="display: none;">
array(2) {
["Article"]=>
array(10) {
["id"]=>
string(3) "492"
["member_id"]=>
string(2) "35"
["title_eng"]=>
string(27) "SFRJ 1986 v2 Diorama part 5"
["title_hrv"]=>
string(29) "Diorama SFRJ 1986 v2– dio 5"
["mask_eng"]=>
string(27) "sfrj_1986_v2_diorama_part_5"
["mask_hrv"]=>
string(26) "diorama_sfrj_1986_v2_dio_5"
["content_eng"]=>
string(3653) "<p>
<em>In this series of articles, we will follow my work on a new diorama, another in the 1986 series. This time I have again decided to use a former country. Another version of the SFRY 1986.</em></p>
<p>
<a href=" https://hosting.photobucket.com/95288841-8654-4bf7-8fc9-a4aa78dce87f/ff4272e9-997f-49b7-b214-6f7605ca87c5.jpg
" target="_blank"> <img alt="Click for enlarged picture" src=" https://hosting.photobucket.com/95288841-8654-4bf7-8fc9-a4aa78dce87f/ff4272e9-997f-49b7-b214-6f7605ca87c5.jpg" width="600" /> </a></p>
<p>
So far I have finished making the base, painting the base, painting the interior of the vehicle and painting the figures. Now it's time to add the vegetation</p>
<p>
<a href=" https://hosting.photobucket.com/95288841-8654-4bf7-8fc9-a4aa78dce87f/70a25828-f5b9-46fd-9b11-c4be1cfaba63.jpg" target="_blank"> <img alt="Click for enlarged picture" src=" https://hosting.photobucket.com/95288841-8654-4bf7-8fc9-a4aa78dce87f/70a25828-f5b9-46fd-9b11-c4be1cfaba63.jpg" width="600" /> </a></p>
<p>
The pines/trees were already fixed to the base before painting, so the first vegetation I added was tall shrubs that filled the volume of the base.</p>
<p>
<a href=" https://hosting.photobucket.com/95288841-8654-4bf7-8fc9-a4aa78dce87f/9f7cb598-1f48-4d88-98e1-396d0a172363.jpg" target="_blank"> <img alt="Click for enlarged picture" src=" https://hosting.photobucket.com/95288841-8654-4bf7-8fc9-a4aa78dce87f/9f7cb598-1f48-4d88-98e1-396d0a172363.jpg" width="600" /> </a></p>
<p>
Then I added lower vegetation like tall grass and lower bushes.</p>
<p>
<a href=" https://hosting.photobucket.com/95288841-8654-4bf7-8fc9-a4aa78dce87f/3fe54784-a94c-4c0f-bf23-701033a73325.jpg" target="_blank"> <img alt="Click for enlarged picture" src=" https://hosting.photobucket.com/95288841-8654-4bf7-8fc9-a4aa78dce87f/3fe54784-a94c-4c0f-bf23-701033a73325.jpg" width="600" /> </a></p>
<p>
Finally, I added some short grass, making sure when I was making the parking lot and path that there was no vegetation in the places where the wheels pass.</p>
<p>
<a href=" https://hosting.photobucket.com/95288841-8654-4bf7-8fc9-a4aa78dce87f/596ce54a-a0cb-4a9b-9406-835a7b348f9a.jpg" target="_blank"> <img alt="Click for enlarged picture" src=" https://hosting.photobucket.com/95288841-8654-4bf7-8fc9-a4aa78dce87f/596ce54a-a0cb-4a9b-9406-835a7b348f9a.jpg" width="600" /> </a></p>
<p>
The paint on the base has just dried up, so next time I'll add the vegetation.</p>
<p>
<a href=" https://hosting.photobucket.com/95288841-8654-4bf7-8fc9-a4aa78dce87f/1d2acabb-7ec7-4f67-bec8-b3b73d5ddf46.jpg" target="_blank"> <img alt="Click for enlarged picture" src=" https://hosting.photobucket.com/95288841-8654-4bf7-8fc9-a4aa78dce87f/1d2acabb-7ec7-4f67-bec8-b3b73d5ddf46.jpg" width="600" /> </a></p>
<p>
When the diorama is turned to the back, the volume of the forest is visible.</p>
<p>
<a href=" https://hosting.photobucket.com/95288841-8654-4bf7-8fc9-a4aa78dce87f/1d2acabb-7ec7-4f67-bec8-b3b73d5ddf46.jpg" target="_blank"> <img alt="Click for enlarged picture" src=" https://hosting.photobucket.com/95288841-8654-4bf7-8fc9-a4aa78dce87f/1d2acabb-7ec7-4f67-bec8-b3b73d5ddf46.jpg" width="600" /> </a></p>
<p>
Before placing the vehicles and miniatures on the base, the diorama looks like this.</p>
<p>
<a href=" https://hosting.photobucket.com/95288841-8654-4bf7-8fc9-a4aa78dce87f/a7ffc2b0-a9bf-4e41-ab2f-0c3021b0447f.jpg" target="_blank"> <img alt="Click for enlarged picture" src=" https://hosting.photobucket.com/95288841-8654-4bf7-8fc9-a4aa78dce87f/a7ffc2b0-a9bf-4e41-ab2f-0c3021b0447f.jpg" width="600" /> </a></p>
"
["content_hrv"]=>
string(3186) "<p>
<em>U ovoj seriji članaka pratit ćemo moj rad na novoj diorami, još jednoj u nizu serijala 1986. Ovaj put sam se opet odlučio za bivšu državu. Druga verzija SFRJ 1986..</em></p>
<p>
<a href=" https://hosting.photobucket.com/95288841-8654-4bf7-8fc9-a4aa78dce87f/ff4272e9-997f-49b7-b214-6f7605ca87c5.jpg
" target="_blank"> <img alt="Click for enlarged picture" src=" https://hosting.photobucket.com/95288841-8654-4bf7-8fc9-a4aa78dce87f/ff4272e9-997f-49b7-b214-6f7605ca87c5.jpg" width="600" /> </a></p>
<p>
Do sada sam završio s izradom baze, bojanjem baze, bojanjem interijera vozila i bojanjem figura. Sada je došlo vrijeme za dodavanje vegetacije</p>
<p>
<a href=" https://hosting.photobucket.com/95288841-8654-4bf7-8fc9-a4aa78dce87f/70a25828-f5b9-46fd-9b11-c4be1cfaba63.jpg" target="_blank"> <img alt="Click for enlarged picture" src=" https://hosting.photobucket.com/95288841-8654-4bf7-8fc9-a4aa78dce87f/70a25828-f5b9-46fd-9b11-c4be1cfaba63.jpg" width="600" /> </a></p>
<p>
Borovi/drveće je već bilo fiksirano na bazu prije bojanja pa je prva sljedeća vegetacija bila visoko žbunje kojim sam popunio volumen baze.</p>
<p>
<a href=" https://hosting.photobucket.com/95288841-8654-4bf7-8fc9-a4aa78dce87f/9f7cb598-1f48-4d88-98e1-396d0a172363.jpg" target="_blank"> <img alt="Click for enlarged picture" src=" https://hosting.photobucket.com/95288841-8654-4bf7-8fc9-a4aa78dce87f/9f7cb598-1f48-4d88-98e1-396d0a172363.jpg" width="600" /> </a></p>
<p>
Potom sam dodao niže raslinje poput visoke trave i nižeg grmlja.</p>
<p>
<a href=" https://hosting.photobucket.com/95288841-8654-4bf7-8fc9-a4aa78dce87f/3fe54784-a94c-4c0f-bf23-701033a73325.jpg" target="_blank"> <img alt="Click for enlarged picture" src=" https://hosting.photobucket.com/95288841-8654-4bf7-8fc9-a4aa78dce87f/3fe54784-a94c-4c0f-bf23-701033a73325.jpg" width="600" /> </a></p>
<p>
Na kraju sam dodao i nisku travu pri čemu sam pazio kad sam radio ugibalište i puteljak da vegetacije ne bude na mjestima gdje prolaze kotači.</p>
<p>
<a href=" https://hosting.photobucket.com/95288841-8654-4bf7-8fc9-a4aa78dce87f/596ce54a-a0cb-4a9b-9406-835a7b348f9a.jpg" target="_blank"> <img alt="Click for enlarged picture" src=" https://hosting.photobucket.com/95288841-8654-4bf7-8fc9-a4aa78dce87f/596ce54a-a0cb-4a9b-9406-835a7b348f9a.jpg" width="600" /> </a></p>
<p>
Kada se dioramu okrene, vidi se volumen vegetacije u šumi. </p>
<p>
<a href="https://hosting.photobucket.com/95288841-8654-4bf7-8fc9-a4aa78dce87f/1d2acabb-7ec7-4f67-bec8-b3b73d5ddf46.jpg" target="_blank"><img alt="Click for enlarged picture" src="https://hosting.photobucket.com/95288841-8654-4bf7-8fc9-a4aa78dce87f/1d2acabb-7ec7-4f67-bec8-b3b73d5ddf46.jpg" width="600" /></a></p>
<p>
Prije postavljanja vozila i minijatura, diorama izgleda ovako:</p>
<p>
<a href="https://hosting.photobucket.com/95288841-8654-4bf7-8fc9-a4aa78dce87f/a7ffc2b0-a9bf-4e41-ab2f-0c3021b0447f.jpg" target="_blank"><img alt="Click for enlarged picture" src="https://hosting.photobucket.com/95288841-8654-4bf7-8fc9-a4aa78dce87f/a7ffc2b0-a9bf-4e41-ab2f-0c3021b0447f.jpg" width="600" /></a></p>
"
["created"]=>
string(19) "2026-01-19 10:46:08"
["modified"]=>
string(19) "2026-01-19 11:00:21"
}
["Member"]=>
array(10) {
["id"]=>
string(2) "35"
["group_id"]=>
string(1) "1"
["first_name"]=>
string(5) "Marko"
["last_name"]=>
string(9) "Paunović"
["first_name_mask"]=>
string(5) "marko"
["last_name_mask"]=>
string(8) "paunovic"
["username"]=>
string(5) "marko"
["password"]=>
string(40) "3bd37b326d19d1880d3b93a4b32e8fb3a90fa122"
["born"]=>
string(19) "2033-03-07 20:35:00"
["created"]=>
string(19) "2009-06-02 20:37:03"
}
}
</pre>
<a href="/dok/members/marko.paunovic">Marko Paunović</a>, 19<span class="superscript">th</span> January 2026</span>
</li>
</ul>
<p><a href="/dok/articles">more_articles</a></p>
<h2>latest_battle_reports</h2>
<ul class="latest">
<li>
<pre class="cake-debug"><a href="javascript:void(0);" onclick="document.getElementById('cakeErr9-trace').style.display = (document.getElementById('cakeErr9-trace').style.display == 'none' ? '' : 'none');"><b>Notice</b> (8)</a>: Undefined index: title_dok [<b>APP/views/elements/latestBattleReports.ctp</b>, line <b>8</b>]<div id="cakeErr9-trace" class="cake-stack-trace" style="display: none;"><a href="javascript:void(0);" onclick="document.getElementById('cakeErr9-code').style.display = (document.getElementById('cakeErr9-code').style.display == 'none' ? '' : 'none')">Code</a> | <a href="javascript:void(0);" onclick="document.getElementById('cakeErr9-context').style.display = (document.getElementById('cakeErr9-context').style.display == 'none' ? '' : 'none')">Context</a><div id="cakeErr9-code" class="cake-code-dump" style="display: none;"><pre><code><span style="color: #000000"></span></code>
<code><span style="color: #000000"> if (Configure::read() > 0) {</span></code>
<span class="code-highlight"><code><span style="color: #000000"> include ($___viewFn);</span></code></span></pre></div><pre id="cakeErr9-context" class="cake-context" style="display: none;">$___viewFn = "/home/martin/apps/agram/app/views/elements/latestBattleReports.ctp"
$___dataForView = array(
"lang" => "dok",
"otherLangs" => array(
"eng",
"hrv"
),
"globalNav" => array(
array(),
array(),
array(),
array(),
array(),
array(),
array(),
array(),
array(),
array(),
array(),
array(),
array(),
array(),
array(),
array(),
array(),
array(),
array(),
array(),
array(),
array(),
array(),
array(),
array(),
array(),
array()
),
"breadCrumbs" => array(
array()
),
"pageContents" => array(
"home_who_we_are" => null
),
"userData" => null,
"announcements" => array(
array(),
array(),
array()
),
"cache" => array(
"time" => "+1 day",
"key" => "dok"
),
"form" => FormHelper
FormHelper::$helpers = array
FormHelper::$fieldset = array
FormHelper::$__options = array
FormHelper::$fields = array
FormHelper::$requestType = NULL
FormHelper::$defaultModel = NULL
FormHelper::$_inputDefaults = array
FormHelper::$_lastAction = ""
FormHelper::$base = ""
FormHelper::$webroot = "/"
FormHelper::$theme = NULL
FormHelper::$here = "/dok"
FormHelper::$params = array
FormHelper::$action = "index"
FormHelper::$plugin = NULL
FormHelper::$data = NULL
FormHelper::$namedArgs = NULL
FormHelper::$argSeparator = NULL
FormHelper::$validationErrors = NULL
FormHelper::$tags = array
FormHelper::$__tainted = NULL
FormHelper::$__cleaned = NULL
FormHelper::$Html = HtmlHelper object,
"text" => TextHelper
TextHelper::$helpers = NULL
TextHelper::$base = ""
TextHelper::$webroot = "/"
TextHelper::$theme = NULL
TextHelper::$here = "/dok"
TextHelper::$params = array
TextHelper::$action = "index"
TextHelper::$plugin = NULL
TextHelper::$data = NULL
TextHelper::$namedArgs = NULL
TextHelper::$argSeparator = NULL
TextHelper::$validationErrors = NULL
TextHelper::$tags = array
TextHelper::$__tainted = NULL
TextHelper::$__cleaned = NULL,
"stringer" => StringerHelper
StringerHelper::$helpers = array
StringerHelper::$base = ""
StringerHelper::$webroot = "/"
StringerHelper::$theme = NULL
StringerHelper::$here = "/dok"
StringerHelper::$params = array
StringerHelper::$action = "index"
StringerHelper::$plugin = NULL
StringerHelper::$data = NULL
StringerHelper::$namedArgs = NULL
StringerHelper::$argSeparator = NULL
StringerHelper::$validationErrors = NULL
StringerHelper::$tags = array
StringerHelper::$__tainted = NULL
StringerHelper::$__cleaned = NULL
StringerHelper::$Html = HtmlHelper object
StringerHelper::$Link = LinkHelper object
StringerHelper::$Text = TextHelper object,
"menu" => MenuHelper
MenuHelper::$helpers = array
MenuHelper::$base = ""
MenuHelper::$webroot = "/"
MenuHelper::$theme = NULL
MenuHelper::$here = "/dok"
MenuHelper::$params = array
MenuHelper::$action = "index"
MenuHelper::$plugin = NULL
MenuHelper::$data = NULL
MenuHelper::$namedArgs = NULL
MenuHelper::$argSeparator = NULL
MenuHelper::$validationErrors = NULL
MenuHelper::$tags = array
MenuHelper::$__tainted = NULL
MenuHelper::$__cleaned = NULL
MenuHelper::$Link = LinkHelper object,
"session" => SessionHelper
SessionHelper::$helpers = array
SessionHelper::$__active = true
SessionHelper::$valid = false
SessionHelper::$error = false
SessionHelper::$_userAgent = "f9a8355d006790ee743ededbb1f6e3bd"
SessionHelper::$path = "/"
SessionHelper::$lastError = NULL
SessionHelper::$security = "medium"
SessionHelper::$time = 1773314240
SessionHelper::$sessionTime = 1773326240
SessionHelper::$cookieLifeTime = false
SessionHelper::$watchKeys = array
SessionHelper::$id = NULL
SessionHelper::$host = NULL
SessionHelper::$timeout = NULL
SessionHelper::$base = ""
SessionHelper::$webroot = "/"
SessionHelper::$here = "/dok"
SessionHelper::$params = array
SessionHelper::$action = "index"
SessionHelper::$data = NULL
SessionHelper::$theme = NULL
SessionHelper::$plugin = NULL,
"html" => HtmlHelper
HtmlHelper::$tags = array
HtmlHelper::$_crumbs = array
HtmlHelper::$__includedScripts = array
HtmlHelper::$_scriptBlockOptions = array
HtmlHelper::$__docTypes = array
HtmlHelper::$helpers = NULL
HtmlHelper::$base = ""
HtmlHelper::$webroot = "/"
HtmlHelper::$theme = NULL
HtmlHelper::$here = "/dok"
HtmlHelper::$params = array
HtmlHelper::$action = "index"
HtmlHelper::$plugin = NULL
HtmlHelper::$data = NULL
HtmlHelper::$namedArgs = NULL
HtmlHelper::$argSeparator = NULL
HtmlHelper::$validationErrors = NULL
HtmlHelper::$__tainted = NULL
HtmlHelper::$__cleaned = NULL,
"link" => LinkHelper
LinkHelper::$helpers = array
LinkHelper::$lang = "dok"
LinkHelper::$defaultLang = "hrv"
LinkHelper::$base = ""
LinkHelper::$webroot = "/"
LinkHelper::$theme = NULL
LinkHelper::$here = "/dok"
LinkHelper::$params = array
LinkHelper::$action = "index"
LinkHelper::$plugin = NULL
LinkHelper::$data = NULL
LinkHelper::$namedArgs = NULL
LinkHelper::$argSeparator = NULL
LinkHelper::$validationErrors = NULL
LinkHelper::$tags = array
LinkHelper::$__tainted = NULL
LinkHelper::$__cleaned = NULL
LinkHelper::$Html = HtmlHelper object
LinkHelper::$Session = SessionHelper object
)
$loadHelpers = false
$cached = false
$loadedHelpers = array()
$lang = "dok"
$otherLangs = array(
"eng",
"hrv"
)
$globalNav = array(
array(
"Page" => array()
),
array(
"Page" => array()
),
array(
"Page" => array()
),
array(
"Page" => array()
),
array(
"Page" => array()
),
array(
"Page" => array()
),
array(
"Page" => array()
),
array(
"Page" => array()
),
array(
"Page" => array()
),
array(
"Page" => array()
),
array(
"Page" => array()
),
array(
"Page" => array()
),
array(
"Page" => array()
),
array(
"Page" => array()
),
array(
"Page" => array()
),
array(
"Page" => array()
),
array(
"Page" => array()
),
array(
"Page" => array()
),
array(
"Page" => array()
),
array(
"Page" => array()
),
array(
"Page" => array()
),
array(
"Page" => array()
),
array(
"Page" => array()
),
array(
"Page" => array()
),
array(
"Page" => array()
),
array(
"Page" => array()
),
array(
"Page" => array()
)
)
$breadCrumbs = array(
array(
"Page" => array()
)
)
$pageContents = array(
"home_who_we_are" => null
)
$userData = null
$announcements = array(
array(
"Announcement" => array()
),
array(
"Announcement" => array()
),
array(
"Announcement" => array()
)
)
$cache = array(
"time" => "+1 day",
"key" => "dok"
)
$form = FormHelper
FormHelper::$helpers = array
FormHelper::$fieldset = array
FormHelper::$__options = array
FormHelper::$fields = array
FormHelper::$requestType = NULL
FormHelper::$defaultModel = NULL
FormHelper::$_inputDefaults = array
FormHelper::$_lastAction = ""
FormHelper::$base = ""
FormHelper::$webroot = "/"
FormHelper::$theme = NULL
FormHelper::$here = "/dok"
FormHelper::$params = array
FormHelper::$action = "index"
FormHelper::$plugin = NULL
FormHelper::$data = NULL
FormHelper::$namedArgs = NULL
FormHelper::$argSeparator = NULL
FormHelper::$validationErrors = NULL
FormHelper::$tags = array
FormHelper::$__tainted = NULL
FormHelper::$__cleaned = NULL
FormHelper::$Html = HtmlHelper object
$text = TextHelper
TextHelper::$helpers = NULL
TextHelper::$base = ""
TextHelper::$webroot = "/"
TextHelper::$theme = NULL
TextHelper::$here = "/dok"
TextHelper::$params = array
TextHelper::$action = "index"
TextHelper::$plugin = NULL
TextHelper::$data = NULL
TextHelper::$namedArgs = NULL
TextHelper::$argSeparator = NULL
TextHelper::$validationErrors = NULL
TextHelper::$tags = array
TextHelper::$__tainted = NULL
TextHelper::$__cleaned = NULL
$stringer = StringerHelper
StringerHelper::$helpers = array
StringerHelper::$base = ""
StringerHelper::$webroot = "/"
StringerHelper::$theme = NULL
StringerHelper::$here = "/dok"
StringerHelper::$params = array
StringerHelper::$action = "index"
StringerHelper::$plugin = NULL
StringerHelper::$data = NULL
StringerHelper::$namedArgs = NULL
StringerHelper::$argSeparator = NULL
StringerHelper::$validationErrors = NULL
StringerHelper::$tags = array
StringerHelper::$__tainted = NULL
StringerHelper::$__cleaned = NULL
StringerHelper::$Html = HtmlHelper object
StringerHelper::$Link = LinkHelper object
StringerHelper::$Text = TextHelper object
$menu = MenuHelper
MenuHelper::$helpers = array
MenuHelper::$base = ""
MenuHelper::$webroot = "/"
MenuHelper::$theme = NULL
MenuHelper::$here = "/dok"
MenuHelper::$params = array
MenuHelper::$action = "index"
MenuHelper::$plugin = NULL
MenuHelper::$data = NULL
MenuHelper::$namedArgs = NULL
MenuHelper::$argSeparator = NULL
MenuHelper::$validationErrors = NULL
MenuHelper::$tags = array
MenuHelper::$__tainted = NULL
MenuHelper::$__cleaned = NULL
MenuHelper::$Link = LinkHelper object
$session = SessionHelper
SessionHelper::$helpers = array
SessionHelper::$__active = true
SessionHelper::$valid = false
SessionHelper::$error = false
SessionHelper::$_userAgent = "f9a8355d006790ee743ededbb1f6e3bd"
SessionHelper::$path = "/"
SessionHelper::$lastError = NULL
SessionHelper::$security = "medium"
SessionHelper::$time = 1773314240
SessionHelper::$sessionTime = 1773326240
SessionHelper::$cookieLifeTime = false
SessionHelper::$watchKeys = array
SessionHelper::$id = NULL
SessionHelper::$host = NULL
SessionHelper::$timeout = NULL
SessionHelper::$base = ""
SessionHelper::$webroot = "/"
SessionHelper::$here = "/dok"
SessionHelper::$params = array
SessionHelper::$action = "index"
SessionHelper::$data = NULL
SessionHelper::$theme = NULL
SessionHelper::$plugin = NULL
$html = HtmlHelper
HtmlHelper::$tags = array
HtmlHelper::$_crumbs = array
HtmlHelper::$__includedScripts = array
HtmlHelper::$_scriptBlockOptions = array
HtmlHelper::$__docTypes = array
HtmlHelper::$helpers = NULL
HtmlHelper::$base = ""
HtmlHelper::$webroot = "/"
HtmlHelper::$theme = NULL
HtmlHelper::$here = "/dok"
HtmlHelper::$params = array
HtmlHelper::$action = "index"
HtmlHelper::$plugin = NULL
HtmlHelper::$data = NULL
HtmlHelper::$namedArgs = NULL
HtmlHelper::$argSeparator = NULL
HtmlHelper::$validationErrors = NULL
HtmlHelper::$__tainted = NULL
HtmlHelper::$__cleaned = NULL
$link = LinkHelper
LinkHelper::$helpers = array
LinkHelper::$lang = "dok"
LinkHelper::$defaultLang = "hrv"
LinkHelper::$base = ""
LinkHelper::$webroot = "/"
LinkHelper::$theme = NULL
LinkHelper::$here = "/dok"
LinkHelper::$params = array
LinkHelper::$action = "index"
LinkHelper::$plugin = NULL
LinkHelper::$data = NULL
LinkHelper::$namedArgs = NULL
LinkHelper::$argSeparator = NULL
LinkHelper::$validationErrors = NULL
LinkHelper::$tags = array
LinkHelper::$__tainted = NULL
LinkHelper::$__cleaned = NULL
LinkHelper::$Html = HtmlHelper object
LinkHelper::$Session = SessionHelper object
$battleReports = array(
array(
"BattleReport" => array(),
"Game" => array(),
"BattleReportExperience" => array()
),
array(
"BattleReport" => array(),
"Game" => array(),
"BattleReportExperience" => array()
),
array(
"BattleReport" => array(),
"Game" => array(),
"BattleReportExperience" => array()
)
)
$battleReport = array(
"BattleReport" => array(
"id" => "16",
"title_eng" => "Kill Team - Blooded vs. Vespid Stingwings",
"title_hrv" => "Kill Team - Blooded vs. Vespid Stingwings",
"mask_eng" => "kill_team_-_blooded_vs_vespid_stingwings",
"mask_hrv" => "kill_team_-_blooded_vs_vespid_stingwings",
"game_id" => "1",
"fought" => "2025-02-28 16:00:00",
"created" => "2025-03-10 08:53:42",
"modified" => "2025-03-10 08:53:42"
),
"Game" => array(
"id" => "1",
"name_eng" => "GW - Warhammer 40.000",
"name_hrv" => "GW - Warhammer 40.000",
"description_eng" => "<p>
In the grim darkness of the far future, there is only war!</p>
<p>
<a href="http://img.photobucket.com/albums/v467/demonn/Agram-Sajt/40k03_zpsc9a73277.jpg" target="_blank"> <img alt="Click for enlarged picture" src="http://img.photobucket.com/albums/v467/demonn/Agram-Sajt/40k03_zpsc9a73277.jpg" width="600" /> </a> </p>
",
"description_hrv" => "<p>
Warhammer 40000 je strate&scaron;ka igra smje&scaron;tena u daleku budućnost Zemlje, u kojoj preuzimate zapovjedni&scaron;tvo nad vojskama minijatura kako bi prikazali oružane sukobe vojski budućnosti.</p>
<p>
Bitke se vode na stolu uobičajenih dimenzija 120 x 180 cm, na koji se zatim postavlja različit teren kako bi se dočarao izgled pravog boji&scaron;ta. Nakon toga, u uobičajenom scenariju, na suprotne strane stola razmje&scaron;taju se dvije vojske minijatura. Strate&scaron;ki dio igre je vrlo važan jer već samim razmje&scaron;tanjem jedinica na stol možete dobiti veći dio bitke.</p>
<p>
Sada, kada va&scaron;i vojnici preko bojnog polja gledaju u mrskog im neprijatelja, spremni ste poslati naredbu za juri&scaron;, ili se ukopati na poziciji i braniti ono &scaron;to je va&scaron;e (va&scaron;u polovicu drvene ploče prekrivene umjetnim terenom). Kako ne bi nastala zbrka na bojnom polju, igra je podijeljena na poteze, a svaki potez je dodatno podijeljen u faze.<br />
&nbsp;</p>
<p>
<a href="http://img.photobucket.com/albums/v467/demonn/Agram-Sajt/40k03_zpsc9a73277.jpg" target="_blank"> <img alt="Click for enlarged picture" src="http://img.photobucket.com/albums/v467/demonn/Agram-Sajt/40k03_zpsc9a73277.jpg" width="600" /> </a> </p>"
),
"BattleReportExperience" => array(
array()
)
)</pre><pre class="stack-trace">include - APP/views/elements/latestBattleReports.ctp, line 8
View::_render() - CORE/cake/libs/view/view.php, line 736
View::element() - CORE/cake/libs/view/view.php, line 397
include - APP/views/home/index.ctp, line 50
View::_render() - CORE/cake/libs/view/view.php, line 736
View::render() - CORE/cake/libs/view/view.php, line 431
Controller::render() - CORE/cake/libs/controller/controller.php, line 909
Dispatcher::_invoke() - CORE/cake/dispatcher.php, line 207
Dispatcher::dispatch() - CORE/cake/dispatcher.php, line 171
[main] - APP/webroot/index.php, line 86</pre></div></pre><pre class="cake-debug"><a href="javascript:void(0);" onclick="document.getElementById('cakeErr10-trace').style.display = (document.getElementById('cakeErr10-trace').style.display == 'none' ? '' : 'none');"><b>Notice</b> (8)</a>: Undefined index: mask_dok [<b>APP/views/elements/latestBattleReports.ctp</b>, line <b>11</b>]<div id="cakeErr10-trace" class="cake-stack-trace" style="display: none;"><a href="javascript:void(0);" onclick="document.getElementById('cakeErr10-code').style.display = (document.getElementById('cakeErr10-code').style.display == 'none' ? '' : 'none')">Code</a> | <a href="javascript:void(0);" onclick="document.getElementById('cakeErr10-context').style.display = (document.getElementById('cakeErr10-context').style.display == 'none' ? '' : 'none')">Context</a><div id="cakeErr10-code" class="cake-code-dump" style="display: none;"><pre><code><span style="color: #000000"></span></code>
<code><span style="color: #000000"> if (Configure::read() > 0) {</span></code>
<span class="code-highlight"><code><span style="color: #000000"> include ($___viewFn);</span></code></span></pre></div><pre id="cakeErr10-context" class="cake-context" style="display: none;">$___viewFn = "/home/martin/apps/agram/app/views/elements/latestBattleReports.ctp"
$___dataForView = array(
"lang" => "dok",
"otherLangs" => array(
"eng",
"hrv"
),
"globalNav" => array(
array(),
array(),
array(),
array(),
array(),
array(),
array(),
array(),
array(),
array(),
array(),
array(),
array(),
array(),
array(),
array(),
array(),
array(),
array(),
array(),
array(),
array(),
array(),
array(),
array(),
array(),
array()
),
"breadCrumbs" => array(
array()
),
"pageContents" => array(
"home_who_we_are" => null
),
"userData" => null,
"announcements" => array(
array(),
array(),
array()
),
"cache" => array(
"time" => "+1 day",
"key" => "dok"
),
"form" => FormHelper
FormHelper::$helpers = array
FormHelper::$fieldset = array
FormHelper::$__options = array
FormHelper::$fields = array
FormHelper::$requestType = NULL
FormHelper::$defaultModel = NULL
FormHelper::$_inputDefaults = array
FormHelper::$_lastAction = ""
FormHelper::$base = ""
FormHelper::$webroot = "/"
FormHelper::$theme = NULL
FormHelper::$here = "/dok"
FormHelper::$params = array
FormHelper::$action = "index"
FormHelper::$plugin = NULL
FormHelper::$data = NULL
FormHelper::$namedArgs = NULL
FormHelper::$argSeparator = NULL
FormHelper::$validationErrors = NULL
FormHelper::$tags = array
FormHelper::$__tainted = NULL
FormHelper::$__cleaned = NULL
FormHelper::$Html = HtmlHelper object,
"text" => TextHelper
TextHelper::$helpers = NULL
TextHelper::$base = ""
TextHelper::$webroot = "/"
TextHelper::$theme = NULL
TextHelper::$here = "/dok"
TextHelper::$params = array
TextHelper::$action = "index"
TextHelper::$plugin = NULL
TextHelper::$data = NULL
TextHelper::$namedArgs = NULL
TextHelper::$argSeparator = NULL
TextHelper::$validationErrors = NULL
TextHelper::$tags = array
TextHelper::$__tainted = NULL
TextHelper::$__cleaned = NULL,
"stringer" => StringerHelper
StringerHelper::$helpers = array
StringerHelper::$base = ""
StringerHelper::$webroot = "/"
StringerHelper::$theme = NULL
StringerHelper::$here = "/dok"
StringerHelper::$params = array
StringerHelper::$action = "index"
StringerHelper::$plugin = NULL
StringerHelper::$data = NULL
StringerHelper::$namedArgs = NULL
StringerHelper::$argSeparator = NULL
StringerHelper::$validationErrors = NULL
StringerHelper::$tags = array
StringerHelper::$__tainted = NULL
StringerHelper::$__cleaned = NULL
StringerHelper::$Html = HtmlHelper object
StringerHelper::$Link = LinkHelper object
StringerHelper::$Text = TextHelper object,
"menu" => MenuHelper
MenuHelper::$helpers = array
MenuHelper::$base = ""
MenuHelper::$webroot = "/"
MenuHelper::$theme = NULL
MenuHelper::$here = "/dok"
MenuHelper::$params = array
MenuHelper::$action = "index"
MenuHelper::$plugin = NULL
MenuHelper::$data = NULL
MenuHelper::$namedArgs = NULL
MenuHelper::$argSeparator = NULL
MenuHelper::$validationErrors = NULL
MenuHelper::$tags = array
MenuHelper::$__tainted = NULL
MenuHelper::$__cleaned = NULL
MenuHelper::$Link = LinkHelper object,
"session" => SessionHelper
SessionHelper::$helpers = array
SessionHelper::$__active = true
SessionHelper::$valid = false
SessionHelper::$error = false
SessionHelper::$_userAgent = "f9a8355d006790ee743ededbb1f6e3bd"
SessionHelper::$path = "/"
SessionHelper::$lastError = NULL
SessionHelper::$security = "medium"
SessionHelper::$time = 1773314240
SessionHelper::$sessionTime = 1773326240
SessionHelper::$cookieLifeTime = false
SessionHelper::$watchKeys = array
SessionHelper::$id = NULL
SessionHelper::$host = NULL
SessionHelper::$timeout = NULL
SessionHelper::$base = ""
SessionHelper::$webroot = "/"
SessionHelper::$here = "/dok"
SessionHelper::$params = array
SessionHelper::$action = "index"
SessionHelper::$data = NULL
SessionHelper::$theme = NULL
SessionHelper::$plugin = NULL,
"html" => HtmlHelper
HtmlHelper::$tags = array
HtmlHelper::$_crumbs = array
HtmlHelper::$__includedScripts = array
HtmlHelper::$_scriptBlockOptions = array
HtmlHelper::$__docTypes = array
HtmlHelper::$helpers = NULL
HtmlHelper::$base = ""
HtmlHelper::$webroot = "/"
HtmlHelper::$theme = NULL
HtmlHelper::$here = "/dok"
HtmlHelper::$params = array
HtmlHelper::$action = "index"
HtmlHelper::$plugin = NULL
HtmlHelper::$data = NULL
HtmlHelper::$namedArgs = NULL
HtmlHelper::$argSeparator = NULL
HtmlHelper::$validationErrors = NULL
HtmlHelper::$__tainted = NULL
HtmlHelper::$__cleaned = NULL,
"link" => LinkHelper
LinkHelper::$helpers = array
LinkHelper::$lang = "dok"
LinkHelper::$defaultLang = "hrv"
LinkHelper::$base = ""
LinkHelper::$webroot = "/"
LinkHelper::$theme = NULL
LinkHelper::$here = "/dok"
LinkHelper::$params = array
LinkHelper::$action = "index"
LinkHelper::$plugin = NULL
LinkHelper::$data = NULL
LinkHelper::$namedArgs = NULL
LinkHelper::$argSeparator = NULL
LinkHelper::$validationErrors = NULL
LinkHelper::$tags = array
LinkHelper::$__tainted = NULL
LinkHelper::$__cleaned = NULL
LinkHelper::$Html = HtmlHelper object
LinkHelper::$Session = SessionHelper object
)
$loadHelpers = false
$cached = false
$loadedHelpers = array()
$lang = "dok"
$otherLangs = array(
"eng",
"hrv"
)
$globalNav = array(
array(
"Page" => array()
),
array(
"Page" => array()
),
array(
"Page" => array()
),
array(
"Page" => array()
),
array(
"Page" => array()
),
array(
"Page" => array()
),
array(
"Page" => array()
),
array(
"Page" => array()
),
array(
"Page" => array()
),
array(
"Page" => array()
),
array(
"Page" => array()
),
array(
"Page" => array()
),
array(
"Page" => array()
),
array(
"Page" => array()
),
array(
"Page" => array()
),
array(
"Page" => array()
),
array(
"Page" => array()
),
array(
"Page" => array()
),
array(
"Page" => array()
),
array(
"Page" => array()
),
array(
"Page" => array()
),
array(
"Page" => array()
),
array(
"Page" => array()
),
array(
"Page" => array()
),
array(
"Page" => array()
),
array(
"Page" => array()
),
array(
"Page" => array()
)
)
$breadCrumbs = array(
array(
"Page" => array()
)
)
$pageContents = array(
"home_who_we_are" => null
)
$userData = null
$announcements = array(
array(
"Announcement" => array()
),
array(
"Announcement" => array()
),
array(
"Announcement" => array()
)
)
$cache = array(
"time" => "+1 day",
"key" => "dok"
)
$form = FormHelper
FormHelper::$helpers = array
FormHelper::$fieldset = array
FormHelper::$__options = array
FormHelper::$fields = array
FormHelper::$requestType = NULL
FormHelper::$defaultModel = NULL
FormHelper::$_inputDefaults = array
FormHelper::$_lastAction = ""
FormHelper::$base = ""
FormHelper::$webroot = "/"
FormHelper::$theme = NULL
FormHelper::$here = "/dok"
FormHelper::$params = array
FormHelper::$action = "index"
FormHelper::$plugin = NULL
FormHelper::$data = NULL
FormHelper::$namedArgs = NULL
FormHelper::$argSeparator = NULL
FormHelper::$validationErrors = NULL
FormHelper::$tags = array
FormHelper::$__tainted = NULL
FormHelper::$__cleaned = NULL
FormHelper::$Html = HtmlHelper object
$text = TextHelper
TextHelper::$helpers = NULL
TextHelper::$base = ""
TextHelper::$webroot = "/"
TextHelper::$theme = NULL
TextHelper::$here = "/dok"
TextHelper::$params = array
TextHelper::$action = "index"
TextHelper::$plugin = NULL
TextHelper::$data = NULL
TextHelper::$namedArgs = NULL
TextHelper::$argSeparator = NULL
TextHelper::$validationErrors = NULL
TextHelper::$tags = array
TextHelper::$__tainted = NULL
TextHelper::$__cleaned = NULL
$stringer = StringerHelper
StringerHelper::$helpers = array
StringerHelper::$base = ""
StringerHelper::$webroot = "/"
StringerHelper::$theme = NULL
StringerHelper::$here = "/dok"
StringerHelper::$params = array
StringerHelper::$action = "index"
StringerHelper::$plugin = NULL
StringerHelper::$data = NULL
StringerHelper::$namedArgs = NULL
StringerHelper::$argSeparator = NULL
StringerHelper::$validationErrors = NULL
StringerHelper::$tags = array
StringerHelper::$__tainted = NULL
StringerHelper::$__cleaned = NULL
StringerHelper::$Html = HtmlHelper object
StringerHelper::$Link = LinkHelper object
StringerHelper::$Text = TextHelper object
$menu = MenuHelper
MenuHelper::$helpers = array
MenuHelper::$base = ""
MenuHelper::$webroot = "/"
MenuHelper::$theme = NULL
MenuHelper::$here = "/dok"
MenuHelper::$params = array
MenuHelper::$action = "index"
MenuHelper::$plugin = NULL
MenuHelper::$data = NULL
MenuHelper::$namedArgs = NULL
MenuHelper::$argSeparator = NULL
MenuHelper::$validationErrors = NULL
MenuHelper::$tags = array
MenuHelper::$__tainted = NULL
MenuHelper::$__cleaned = NULL
MenuHelper::$Link = LinkHelper object
$session = SessionHelper
SessionHelper::$helpers = array
SessionHelper::$__active = true
SessionHelper::$valid = false
SessionHelper::$error = false
SessionHelper::$_userAgent = "f9a8355d006790ee743ededbb1f6e3bd"
SessionHelper::$path = "/"
SessionHelper::$lastError = NULL
SessionHelper::$security = "medium"
SessionHelper::$time = 1773314240
SessionHelper::$sessionTime = 1773326240
SessionHelper::$cookieLifeTime = false
SessionHelper::$watchKeys = array
SessionHelper::$id = NULL
SessionHelper::$host = NULL
SessionHelper::$timeout = NULL
SessionHelper::$base = ""
SessionHelper::$webroot = "/"
SessionHelper::$here = "/dok"
SessionHelper::$params = array
SessionHelper::$action = "index"
SessionHelper::$data = NULL
SessionHelper::$theme = NULL
SessionHelper::$plugin = NULL
$html = HtmlHelper
HtmlHelper::$tags = array
HtmlHelper::$_crumbs = array
HtmlHelper::$__includedScripts = array
HtmlHelper::$_scriptBlockOptions = array
HtmlHelper::$__docTypes = array
HtmlHelper::$helpers = NULL
HtmlHelper::$base = ""
HtmlHelper::$webroot = "/"
HtmlHelper::$theme = NULL
HtmlHelper::$here = "/dok"
HtmlHelper::$params = array
HtmlHelper::$action = "index"
HtmlHelper::$plugin = NULL
HtmlHelper::$data = NULL
HtmlHelper::$namedArgs = NULL
HtmlHelper::$argSeparator = NULL
HtmlHelper::$validationErrors = NULL
HtmlHelper::$__tainted = NULL
HtmlHelper::$__cleaned = NULL
$link = LinkHelper
LinkHelper::$helpers = array
LinkHelper::$lang = "dok"
LinkHelper::$defaultLang = "hrv"
LinkHelper::$base = ""
LinkHelper::$webroot = "/"
LinkHelper::$theme = NULL
LinkHelper::$here = "/dok"
LinkHelper::$params = array
LinkHelper::$action = "index"
LinkHelper::$plugin = NULL
LinkHelper::$data = NULL
LinkHelper::$namedArgs = NULL
LinkHelper::$argSeparator = NULL
LinkHelper::$validationErrors = NULL
LinkHelper::$tags = array
LinkHelper::$__tainted = NULL
LinkHelper::$__cleaned = NULL
LinkHelper::$Html = HtmlHelper object
LinkHelper::$Session = SessionHelper object
$battleReports = array(
array(
"BattleReport" => array(),
"Game" => array(),
"BattleReportExperience" => array()
),
array(
"BattleReport" => array(),
"Game" => array(),
"BattleReportExperience" => array()
),
array(
"BattleReport" => array(),
"Game" => array(),
"BattleReportExperience" => array()
)
)
$battleReport = array(
"BattleReport" => array(
"id" => "16",
"title_eng" => "Kill Team - Blooded vs. Vespid Stingwings",
"title_hrv" => "Kill Team - Blooded vs. Vespid Stingwings",
"mask_eng" => "kill_team_-_blooded_vs_vespid_stingwings",
"mask_hrv" => "kill_team_-_blooded_vs_vespid_stingwings",
"game_id" => "1",
"fought" => "2025-02-28 16:00:00",
"created" => "2025-03-10 08:53:42",
"modified" => "2025-03-10 08:53:42"
),
"Game" => array(
"id" => "1",
"name_eng" => "GW - Warhammer 40.000",
"name_hrv" => "GW - Warhammer 40.000",
"description_eng" => "<p>
In the grim darkness of the far future, there is only war!</p>
<p>
<a href="http://img.photobucket.com/albums/v467/demonn/Agram-Sajt/40k03_zpsc9a73277.jpg" target="_blank"> <img alt="Click for enlarged picture" src="http://img.photobucket.com/albums/v467/demonn/Agram-Sajt/40k03_zpsc9a73277.jpg" width="600" /> </a> </p>
",
"description_hrv" => "<p>
Warhammer 40000 je strate&scaron;ka igra smje&scaron;tena u daleku budućnost Zemlje, u kojoj preuzimate zapovjedni&scaron;tvo nad vojskama minijatura kako bi prikazali oružane sukobe vojski budućnosti.</p>
<p>
Bitke se vode na stolu uobičajenih dimenzija 120 x 180 cm, na koji se zatim postavlja različit teren kako bi se dočarao izgled pravog boji&scaron;ta. Nakon toga, u uobičajenom scenariju, na suprotne strane stola razmje&scaron;taju se dvije vojske minijatura. Strate&scaron;ki dio igre je vrlo važan jer već samim razmje&scaron;tanjem jedinica na stol možete dobiti veći dio bitke.</p>
<p>
Sada, kada va&scaron;i vojnici preko bojnog polja gledaju u mrskog im neprijatelja, spremni ste poslati naredbu za juri&scaron;, ili se ukopati na poziciji i braniti ono &scaron;to je va&scaron;e (va&scaron;u polovicu drvene ploče prekrivene umjetnim terenom). Kako ne bi nastala zbrka na bojnom polju, igra je podijeljena na poteze, a svaki potez je dodatno podijeljen u faze.<br />
&nbsp;</p>
<p>
<a href="http://img.photobucket.com/albums/v467/demonn/Agram-Sajt/40k03_zpsc9a73277.jpg" target="_blank"> <img alt="Click for enlarged picture" src="http://img.photobucket.com/albums/v467/demonn/Agram-Sajt/40k03_zpsc9a73277.jpg" width="600" /> </a> </p>"
),
"BattleReportExperience" => array(
array()
)
)</pre><pre class="stack-trace">include - APP/views/elements/latestBattleReports.ctp, line 11
View::_render() - CORE/cake/libs/view/view.php, line 736
View::element() - CORE/cake/libs/view/view.php, line 397
include - APP/views/home/index.ctp, line 50
View::_render() - CORE/cake/libs/view/view.php, line 736
View::render() - CORE/cake/libs/view/view.php, line 431
Controller::render() - CORE/cake/libs/controller/controller.php, line 909
Dispatcher::_invoke() - CORE/cake/dispatcher.php, line 207
Dispatcher::dispatch() - CORE/cake/dispatcher.php, line 171
[main] - APP/webroot/index.php, line 86</pre></div></pre><a href="/dok/battle_reports/2025/03/10" class="readMore"></a> <span class="details">
<pre class="cake-debug"><a href="javascript:void(0);" onclick="document.getElementById('cakeErr11-trace').style.display = (document.getElementById('cakeErr11-trace').style.display == 'none' ? '' : 'none');"><b>Notice</b> (8)</a>: Undefined index: name_dok [<b>APP/views/elements/latestBattleReports.ctp</b>, line <b>26</b>]<div id="cakeErr11-trace" class="cake-stack-trace" style="display: none;"><a href="javascript:void(0);" onclick="document.getElementById('cakeErr11-code').style.display = (document.getElementById('cakeErr11-code').style.display == 'none' ? '' : 'none')">Code</a> | <a href="javascript:void(0);" onclick="document.getElementById('cakeErr11-context').style.display = (document.getElementById('cakeErr11-context').style.display == 'none' ? '' : 'none')">Context</a><div id="cakeErr11-code" class="cake-code-dump" style="display: none;"><pre><code><span style="color: #000000"></span></code>
<code><span style="color: #000000"> if (Configure::read() > 0) {</span></code>
<span class="code-highlight"><code><span style="color: #000000"> include ($___viewFn);</span></code></span></pre></div><pre id="cakeErr11-context" class="cake-context" style="display: none;">$___viewFn = "/home/martin/apps/agram/app/views/elements/latestBattleReports.ctp"
$___dataForView = array(
"lang" => "dok",
"otherLangs" => array(
"eng",
"hrv"
),
"globalNav" => array(
array(),
array(),
array(),
array(),
array(),
array(),
array(),
array(),
array(),
array(),
array(),
array(),
array(),
array(),
array(),
array(),
array(),
array(),
array(),
array(),
array(),
array(),
array(),
array(),
array(),
array(),
array()
),
"breadCrumbs" => array(
array()
),
"pageContents" => array(
"home_who_we_are" => null
),
"userData" => null,
"announcements" => array(
array(),
array(),
array()
),
"cache" => array(
"time" => "+1 day",
"key" => "dok"
),
"form" => FormHelper
FormHelper::$helpers = array
FormHelper::$fieldset = array
FormHelper::$__options = array
FormHelper::$fields = array
FormHelper::$requestType = NULL
FormHelper::$defaultModel = NULL
FormHelper::$_inputDefaults = array
FormHelper::$_lastAction = ""
FormHelper::$base = ""
FormHelper::$webroot = "/"
FormHelper::$theme = NULL
FormHelper::$here = "/dok"
FormHelper::$params = array
FormHelper::$action = "index"
FormHelper::$plugin = NULL
FormHelper::$data = NULL
FormHelper::$namedArgs = NULL
FormHelper::$argSeparator = NULL
FormHelper::$validationErrors = NULL
FormHelper::$tags = array
FormHelper::$__tainted = NULL
FormHelper::$__cleaned = NULL
FormHelper::$Html = HtmlHelper object,
"text" => TextHelper
TextHelper::$helpers = NULL
TextHelper::$base = ""
TextHelper::$webroot = "/"
TextHelper::$theme = NULL
TextHelper::$here = "/dok"
TextHelper::$params = array
TextHelper::$action = "index"
TextHelper::$plugin = NULL
TextHelper::$data = NULL
TextHelper::$namedArgs = NULL
TextHelper::$argSeparator = NULL
TextHelper::$validationErrors = NULL
TextHelper::$tags = array
TextHelper::$__tainted = NULL
TextHelper::$__cleaned = NULL,
"stringer" => StringerHelper
StringerHelper::$helpers = array
StringerHelper::$base = ""
StringerHelper::$webroot = "/"
StringerHelper::$theme = NULL
StringerHelper::$here = "/dok"
StringerHelper::$params = array
StringerHelper::$action = "index"
StringerHelper::$plugin = NULL
StringerHelper::$data = NULL
StringerHelper::$namedArgs = NULL
StringerHelper::$argSeparator = NULL
StringerHelper::$validationErrors = NULL
StringerHelper::$tags = array
StringerHelper::$__tainted = NULL
StringerHelper::$__cleaned = NULL
StringerHelper::$Html = HtmlHelper object
StringerHelper::$Link = LinkHelper object
StringerHelper::$Text = TextHelper object,
"menu" => MenuHelper
MenuHelper::$helpers = array
MenuHelper::$base = ""
MenuHelper::$webroot = "/"
MenuHelper::$theme = NULL
MenuHelper::$here = "/dok"
MenuHelper::$params = array
MenuHelper::$action = "index"
MenuHelper::$plugin = NULL
MenuHelper::$data = NULL
MenuHelper::$namedArgs = NULL
MenuHelper::$argSeparator = NULL
MenuHelper::$validationErrors = NULL
MenuHelper::$tags = array
MenuHelper::$__tainted = NULL
MenuHelper::$__cleaned = NULL
MenuHelper::$Link = LinkHelper object,
"session" => SessionHelper
SessionHelper::$helpers = array
SessionHelper::$__active = true
SessionHelper::$valid = false
SessionHelper::$error = false
SessionHelper::$_userAgent = "f9a8355d006790ee743ededbb1f6e3bd"
SessionHelper::$path = "/"
SessionHelper::$lastError = NULL
SessionHelper::$security = "medium"
SessionHelper::$time = 1773314240
SessionHelper::$sessionTime = 1773326240
SessionHelper::$cookieLifeTime = false
SessionHelper::$watchKeys = array
SessionHelper::$id = NULL
SessionHelper::$host = NULL
SessionHelper::$timeout = NULL
SessionHelper::$base = ""
SessionHelper::$webroot = "/"
SessionHelper::$here = "/dok"
SessionHelper::$params = array
SessionHelper::$action = "index"
SessionHelper::$data = NULL
SessionHelper::$theme = NULL
SessionHelper::$plugin = NULL,
"html" => HtmlHelper
HtmlHelper::$tags = array
HtmlHelper::$_crumbs = array
HtmlHelper::$__includedScripts = array
HtmlHelper::$_scriptBlockOptions = array
HtmlHelper::$__docTypes = array
HtmlHelper::$helpers = NULL
HtmlHelper::$base = ""
HtmlHelper::$webroot = "/"
HtmlHelper::$theme = NULL
HtmlHelper::$here = "/dok"
HtmlHelper::$params = array
HtmlHelper::$action = "index"
HtmlHelper::$plugin = NULL
HtmlHelper::$data = NULL
HtmlHelper::$namedArgs = NULL
HtmlHelper::$argSeparator = NULL
HtmlHelper::$validationErrors = NULL
HtmlHelper::$__tainted = NULL
HtmlHelper::$__cleaned = NULL,
"link" => LinkHelper
LinkHelper::$helpers = array
LinkHelper::$lang = "dok"
LinkHelper::$defaultLang = "hrv"
LinkHelper::$base = ""
LinkHelper::$webroot = "/"
LinkHelper::$theme = NULL
LinkHelper::$here = "/dok"
LinkHelper::$params = array
LinkHelper::$action = "index"
LinkHelper::$plugin = NULL
LinkHelper::$data = NULL
LinkHelper::$namedArgs = NULL
LinkHelper::$argSeparator = NULL
LinkHelper::$validationErrors = NULL
LinkHelper::$tags = array
LinkHelper::$__tainted = NULL
LinkHelper::$__cleaned = NULL
LinkHelper::$Html = HtmlHelper object
LinkHelper::$Session = SessionHelper object
)
$loadHelpers = false
$cached = false
$loadedHelpers = array()
$lang = "dok"
$otherLangs = array(
"eng",
"hrv"
)
$globalNav = array(
array(
"Page" => array()
),
array(
"Page" => array()
),
array(
"Page" => array()
),
array(
"Page" => array()
),
array(
"Page" => array()
),
array(
"Page" => array()
),
array(
"Page" => array()
),
array(
"Page" => array()
),
array(
"Page" => array()
),
array(
"Page" => array()
),
array(
"Page" => array()
),
array(
"Page" => array()
),
array(
"Page" => array()
),
array(
"Page" => array()
),
array(
"Page" => array()
),
array(
"Page" => array()
),
array(
"Page" => array()
),
array(
"Page" => array()
),
array(
"Page" => array()
),
array(
"Page" => array()
),
array(
"Page" => array()
),
array(
"Page" => array()
),
array(
"Page" => array()
),
array(
"Page" => array()
),
array(
"Page" => array()
),
array(
"Page" => array()
),
array(
"Page" => array()
)
)
$breadCrumbs = array(
array(
"Page" => array()
)
)
$pageContents = array(
"home_who_we_are" => null
)
$userData = null
$announcements = array(
array(
"Announcement" => array()
),
array(
"Announcement" => array()
),
array(
"Announcement" => array()
)
)
$cache = array(
"time" => "+1 day",
"key" => "dok"
)
$form = FormHelper
FormHelper::$helpers = array
FormHelper::$fieldset = array
FormHelper::$__options = array
FormHelper::$fields = array
FormHelper::$requestType = NULL
FormHelper::$defaultModel = NULL
FormHelper::$_inputDefaults = array
FormHelper::$_lastAction = ""
FormHelper::$base = ""
FormHelper::$webroot = "/"
FormHelper::$theme = NULL
FormHelper::$here = "/dok"
FormHelper::$params = array
FormHelper::$action = "index"
FormHelper::$plugin = NULL
FormHelper::$data = NULL
FormHelper::$namedArgs = NULL
FormHelper::$argSeparator = NULL
FormHelper::$validationErrors = NULL
FormHelper::$tags = array
FormHelper::$__tainted = NULL
FormHelper::$__cleaned = NULL
FormHelper::$Html = HtmlHelper object
$text = TextHelper
TextHelper::$helpers = NULL
TextHelper::$base = ""
TextHelper::$webroot = "/"
TextHelper::$theme = NULL
TextHelper::$here = "/dok"
TextHelper::$params = array
TextHelper::$action = "index"
TextHelper::$plugin = NULL
TextHelper::$data = NULL
TextHelper::$namedArgs = NULL
TextHelper::$argSeparator = NULL
TextHelper::$validationErrors = NULL
TextHelper::$tags = array
TextHelper::$__tainted = NULL
TextHelper::$__cleaned = NULL
$stringer = StringerHelper
StringerHelper::$helpers = array
StringerHelper::$base = ""
StringerHelper::$webroot = "/"
StringerHelper::$theme = NULL
StringerHelper::$here = "/dok"
StringerHelper::$params = array
StringerHelper::$action = "index"
StringerHelper::$plugin = NULL
StringerHelper::$data = NULL
StringerHelper::$namedArgs = NULL
StringerHelper::$argSeparator = NULL
StringerHelper::$validationErrors = NULL
StringerHelper::$tags = array
StringerHelper::$__tainted = NULL
StringerHelper::$__cleaned = NULL
StringerHelper::$Html = HtmlHelper object
StringerHelper::$Link = LinkHelper object
StringerHelper::$Text = TextHelper object
$menu = MenuHelper
MenuHelper::$helpers = array
MenuHelper::$base = ""
MenuHelper::$webroot = "/"
MenuHelper::$theme = NULL
MenuHelper::$here = "/dok"
MenuHelper::$params = array
MenuHelper::$action = "index"
MenuHelper::$plugin = NULL
MenuHelper::$data = NULL
MenuHelper::$namedArgs = NULL
MenuHelper::$argSeparator = NULL
MenuHelper::$validationErrors = NULL
MenuHelper::$tags = array
MenuHelper::$__tainted = NULL
MenuHelper::$__cleaned = NULL
MenuHelper::$Link = LinkHelper object
$session = SessionHelper
SessionHelper::$helpers = array
SessionHelper::$__active = true
SessionHelper::$valid = false
SessionHelper::$error = false
SessionHelper::$_userAgent = "f9a8355d006790ee743ededbb1f6e3bd"
SessionHelper::$path = "/"
SessionHelper::$lastError = NULL
SessionHelper::$security = "medium"
SessionHelper::$time = 1773314240
SessionHelper::$sessionTime = 1773326240
SessionHelper::$cookieLifeTime = false
SessionHelper::$watchKeys = array
SessionHelper::$id = NULL
SessionHelper::$host = NULL
SessionHelper::$timeout = NULL
SessionHelper::$base = ""
SessionHelper::$webroot = "/"
SessionHelper::$here = "/dok"
SessionHelper::$params = array
SessionHelper::$action = "index"
SessionHelper::$data = NULL
SessionHelper::$theme = NULL
SessionHelper::$plugin = NULL
$html = HtmlHelper
HtmlHelper::$tags = array
HtmlHelper::$_crumbs = array
HtmlHelper::$__includedScripts = array
HtmlHelper::$_scriptBlockOptions = array
HtmlHelper::$__docTypes = array
HtmlHelper::$helpers = NULL
HtmlHelper::$base = ""
HtmlHelper::$webroot = "/"
HtmlHelper::$theme = NULL
HtmlHelper::$here = "/dok"
HtmlHelper::$params = array
HtmlHelper::$action = "index"
HtmlHelper::$plugin = NULL
HtmlHelper::$data = NULL
HtmlHelper::$namedArgs = NULL
HtmlHelper::$argSeparator = NULL
HtmlHelper::$validationErrors = NULL
HtmlHelper::$__tainted = NULL
HtmlHelper::$__cleaned = NULL
$link = LinkHelper
LinkHelper::$helpers = array
LinkHelper::$lang = "dok"
LinkHelper::$defaultLang = "hrv"
LinkHelper::$base = ""
LinkHelper::$webroot = "/"
LinkHelper::$theme = NULL
LinkHelper::$here = "/dok"
LinkHelper::$params = array
LinkHelper::$action = "index"
LinkHelper::$plugin = NULL
LinkHelper::$data = NULL
LinkHelper::$namedArgs = NULL
LinkHelper::$argSeparator = NULL
LinkHelper::$validationErrors = NULL
LinkHelper::$tags = array
LinkHelper::$__tainted = NULL
LinkHelper::$__cleaned = NULL
LinkHelper::$Html = HtmlHelper object
LinkHelper::$Session = SessionHelper object
$battleReports = array(
array(
"BattleReport" => array(),
"Game" => array(),
"BattleReportExperience" => array()
),
array(
"BattleReport" => array(),
"Game" => array(),
"BattleReportExperience" => array()
),
array(
"BattleReport" => array(),
"Game" => array(),
"BattleReportExperience" => array()
)
)
$battleReport = array(
"BattleReport" => array(
"id" => "16",
"title_eng" => "Kill Team - Blooded vs. Vespid Stingwings",
"title_hrv" => "Kill Team - Blooded vs. Vespid Stingwings",
"mask_eng" => "kill_team_-_blooded_vs_vespid_stingwings",
"mask_hrv" => "kill_team_-_blooded_vs_vespid_stingwings",
"game_id" => "1",
"fought" => "2025-02-28 16:00:00",
"created" => "2025-03-10 08:53:42",
"modified" => "2025-03-10 08:53:42"
),
"Game" => array(
"id" => "1",
"name_eng" => "GW - Warhammer 40.000",
"name_hrv" => "GW - Warhammer 40.000",
"description_eng" => "<p>
In the grim darkness of the far future, there is only war!</p>
<p>
<a href="http://img.photobucket.com/albums/v467/demonn/Agram-Sajt/40k03_zpsc9a73277.jpg" target="_blank"> <img alt="Click for enlarged picture" src="http://img.photobucket.com/albums/v467/demonn/Agram-Sajt/40k03_zpsc9a73277.jpg" width="600" /> </a> </p>
",
"description_hrv" => "<p>
Warhammer 40000 je strate&scaron;ka igra smje&scaron;tena u daleku budućnost Zemlje, u kojoj preuzimate zapovjedni&scaron;tvo nad vojskama minijatura kako bi prikazali oružane sukobe vojski budućnosti.</p>
<p>
Bitke se vode na stolu uobičajenih dimenzija 120 x 180 cm, na koji se zatim postavlja različit teren kako bi se dočarao izgled pravog boji&scaron;ta. Nakon toga, u uobičajenom scenariju, na suprotne strane stola razmje&scaron;taju se dvije vojske minijatura. Strate&scaron;ki dio igre je vrlo važan jer već samim razmje&scaron;tanjem jedinica na stol možete dobiti veći dio bitke.</p>
<p>
Sada, kada va&scaron;i vojnici preko bojnog polja gledaju u mrskog im neprijatelja, spremni ste poslati naredbu za juri&scaron;, ili se ukopati na poziciji i braniti ono &scaron;to je va&scaron;e (va&scaron;u polovicu drvene ploče prekrivene umjetnim terenom). Kako ne bi nastala zbrka na bojnom polju, igra je podijeljena na poteze, a svaki potez je dodatno podijeljen u faze.<br />
&nbsp;</p>
<p>
<a href="http://img.photobucket.com/albums/v467/demonn/Agram-Sajt/40k03_zpsc9a73277.jpg" target="_blank"> <img alt="Click for enlarged picture" src="http://img.photobucket.com/albums/v467/demonn/Agram-Sajt/40k03_zpsc9a73277.jpg" width="600" /> </a> </p>"
),
"BattleReportExperience" => array(
array()
)
)
$memberString = " and "
$battleReportExperience = array(
"id" => "18",
"battle_report_id" => "16",
"member_id" => "96",
"army_id" => "33",
"intro_eng" => "<p>
This Friday, Luka and I had the opportunity to try out the third edition of the famous Warhammer skirmish game Kill Team, and along the way demonstrate the basics that have remained unchanged. Luka played a team of Vespid Stingwings, a highly mobile T&#39;au unit, and I played the Blooded, a traitor squad that used to belong to the Astra Militarum (in my case they were named Glanton&#39;s Gang). The map, measuring 30x22 inches, was organized so that all terrain was outside of our deployment zones, which were 6 inches from the shorter edges. In the middle of the map, in a slight diagonal, 3 points of interest (objectives) are placed. All this resulted in a very symmetrical setup of operatives &ndash; all Vespids and the entire Blooded gang at the beginning of the game were mirrored hidden behind large pieces of terrain. All buildings with doors were 3 inches high, offering the operatives a Vantage point - the ability to keep one hit die as a success, and the well in the very center, 4 inches high, offers an even better Vantage point, where the operatives keep 2 dice.</p>
<p>
<a href="https://hosting.photobucket.com/95288841-8654-4bf7-8fc9-a4aa78dce87f/e4be55ea-8433-47c7-b28a-459533bba4bc.jpg" target="_blank"><img alt="Click for enlarged picture" src="https://hosting.photobucket.com/95288841-8654-4bf7-8fc9-a4aa78dce87f/e4be55ea-8433-47c7-b28a-459533bba4bc.jpg" width="600" /></a></p>
",
"intro_hrv" => "<p>
Ovaj smo petak Luka i ja imali priliku isprobati treću ediciju poznate Warhammer skirmish igre <em>Kill Team</em> te usput demonstrirati osnove koje su ostale nepromijenjene. Luka je igrao tim Vespid Stingwings, jako mobilne T&#39;au jedinice, a ja sam igrao Blooded, izdajnički odred koji je nekad pripadao Astri Militarum (u mojem su slučaju dobili ime <em>Glantonova banda</em>). Mapa, veličine 30x22 inča, bila je organizirana tako da je sav teren bio van na&scaron;ih deployment zona, koje su iznosile 6 inča od kraćih rubova. Nasred mape, u blagoj dijagonali, postavljene su 3 točke interesa (objectives). Sve je ovo rezultiralo jako simetričnom postavom operativaca &ndash; svi su Vespidi i cijela Blooded banda na početku igre bili zrcaljeno skriveni iza velikih komada terena. Sve građevine s vratima bile su visoke 3 inča, &scaron;to je operativcima nudilo Vantage point &ndash; mogućnost da jednu hit-kockicu zadrže kao uspje&scaron;nu, a bu&scaron;otina u samom centru, visoka 4 inča, nudi jo&scaron; bolji Vantage point, gdje operativci zadržavaju 2 kockice.</p>
<p>
<a href="https://hosting.photobucket.com/95288841-8654-4bf7-8fc9-a4aa78dce87f/e4be55ea-8433-47c7-b28a-459533bba4bc.jpg" target="_blank"><img alt="Click for enlarged picture" src="https://hosting.photobucket.com/95288841-8654-4bf7-8fc9-a4aa78dce87f/e4be55ea-8433-47c7-b28a-459533bba4bc.jpg" width="600" /></a></p>
",
"Member" => array(
"id" => "96",
"group_id" => "2",
"first_name" => "Antoni",
"last_name" => "Pastuović",
"first_name_mask" => "antoni",
"last_name_mask" => "pastuovic",
"username" => "antoni",
"password" => "*****",
"born" => "2005-04-04 18:52:00",
"created" => "2019-04-04 18:53:09"
),
"Army" => array(
"id" => "33",
"game_id" => "1",
"army_alignment_id" => null,
"name_eng" => "Imperial Guard",
"name_hrv" => "Imperial Guard",
"description_eng" => "",
"description_hrv" => ""
)
)</pre><pre class="stack-trace">include - APP/views/elements/latestBattleReports.ctp, line 26
View::_render() - CORE/cake/libs/view/view.php, line 736
View::element() - CORE/cake/libs/view/view.php, line 397
include - APP/views/home/index.ctp, line 50
View::_render() - CORE/cake/libs/view/view.php, line 736
View::render() - CORE/cake/libs/view/view.php, line 431
Controller::render() - CORE/cake/libs/controller/controller.php, line 909
Dispatcher::_invoke() - CORE/cake/dispatcher.php, line 207
Dispatcher::dispatch() - CORE/cake/dispatcher.php, line 171
[main] - APP/webroot/index.php, line 86</pre></div></pre><pre class="cake-debug"><a href="javascript:void(0);" onclick="document.getElementById('cakeErr12-trace').style.display = (document.getElementById('cakeErr12-trace').style.display == 'none' ? '' : 'none');"><b>Notice</b> (8)</a>: Undefined index: name_dok [<b>APP/views/elements/latestBattleReports.ctp</b>, line <b>29</b>]<div id="cakeErr12-trace" class="cake-stack-trace" style="display: none;"><a href="javascript:void(0);" onclick="document.getElementById('cakeErr12-code').style.display = (document.getElementById('cakeErr12-code').style.display == 'none' ? '' : 'none')">Code</a> | <a href="javascript:void(0);" onclick="document.getElementById('cakeErr12-context').style.display = (document.getElementById('cakeErr12-context').style.display == 'none' ? '' : 'none')">Context</a><div id="cakeErr12-code" class="cake-code-dump" style="display: none;"><pre><code><span style="color: #000000"></span></code>
<code><span style="color: #000000"> if (Configure::read() > 0) {</span></code>
<span class="code-highlight"><code><span style="color: #000000"> include ($___viewFn);</span></code></span></pre></div><pre id="cakeErr12-context" class="cake-context" style="display: none;">$___viewFn = "/home/martin/apps/agram/app/views/elements/latestBattleReports.ctp"
$___dataForView = array(
"lang" => "dok",
"otherLangs" => array(
"eng",
"hrv"
),
"globalNav" => array(
array(),
array(),
array(),
array(),
array(),
array(),
array(),
array(),
array(),
array(),
array(),
array(),
array(),
array(),
array(),
array(),
array(),
array(),
array(),
array(),
array(),
array(),
array(),
array(),
array(),
array(),
array()
),
"breadCrumbs" => array(
array()
),
"pageContents" => array(
"home_who_we_are" => null
),
"userData" => null,
"announcements" => array(
array(),
array(),
array()
),
"cache" => array(
"time" => "+1 day",
"key" => "dok"
),
"form" => FormHelper
FormHelper::$helpers = array
FormHelper::$fieldset = array
FormHelper::$__options = array
FormHelper::$fields = array
FormHelper::$requestType = NULL
FormHelper::$defaultModel = NULL
FormHelper::$_inputDefaults = array
FormHelper::$_lastAction = ""
FormHelper::$base = ""
FormHelper::$webroot = "/"
FormHelper::$theme = NULL
FormHelper::$here = "/dok"
FormHelper::$params = array
FormHelper::$action = "index"
FormHelper::$plugin = NULL
FormHelper::$data = NULL
FormHelper::$namedArgs = NULL
FormHelper::$argSeparator = NULL
FormHelper::$validationErrors = NULL
FormHelper::$tags = array
FormHelper::$__tainted = NULL
FormHelper::$__cleaned = NULL
FormHelper::$Html = HtmlHelper object,
"text" => TextHelper
TextHelper::$helpers = NULL
TextHelper::$base = ""
TextHelper::$webroot = "/"
TextHelper::$theme = NULL
TextHelper::$here = "/dok"
TextHelper::$params = array
TextHelper::$action = "index"
TextHelper::$plugin = NULL
TextHelper::$data = NULL
TextHelper::$namedArgs = NULL
TextHelper::$argSeparator = NULL
TextHelper::$validationErrors = NULL
TextHelper::$tags = array
TextHelper::$__tainted = NULL
TextHelper::$__cleaned = NULL,
"stringer" => StringerHelper
StringerHelper::$helpers = array
StringerHelper::$base = ""
StringerHelper::$webroot = "/"
StringerHelper::$theme = NULL
StringerHelper::$here = "/dok"
StringerHelper::$params = array
StringerHelper::$action = "index"
StringerHelper::$plugin = NULL
StringerHelper::$data = NULL
StringerHelper::$namedArgs = NULL
StringerHelper::$argSeparator = NULL
StringerHelper::$validationErrors = NULL
StringerHelper::$tags = array
StringerHelper::$__tainted = NULL
StringerHelper::$__cleaned = NULL
StringerHelper::$Html = HtmlHelper object
StringerHelper::$Link = LinkHelper object
StringerHelper::$Text = TextHelper object,
"menu" => MenuHelper
MenuHelper::$helpers = array
MenuHelper::$base = ""
MenuHelper::$webroot = "/"
MenuHelper::$theme = NULL
MenuHelper::$here = "/dok"
MenuHelper::$params = array
MenuHelper::$action = "index"
MenuHelper::$plugin = NULL
MenuHelper::$data = NULL
MenuHelper::$namedArgs = NULL
MenuHelper::$argSeparator = NULL
MenuHelper::$validationErrors = NULL
MenuHelper::$tags = array
MenuHelper::$__tainted = NULL
MenuHelper::$__cleaned = NULL
MenuHelper::$Link = LinkHelper object,
"session" => SessionHelper
SessionHelper::$helpers = array
SessionHelper::$__active = true
SessionHelper::$valid = false
SessionHelper::$error = false
SessionHelper::$_userAgent = "f9a8355d006790ee743ededbb1f6e3bd"
SessionHelper::$path = "/"
SessionHelper::$lastError = NULL
SessionHelper::$security = "medium"
SessionHelper::$time = 1773314240
SessionHelper::$sessionTime = 1773326240
SessionHelper::$cookieLifeTime = false
SessionHelper::$watchKeys = array
SessionHelper::$id = NULL
SessionHelper::$host = NULL
SessionHelper::$timeout = NULL
SessionHelper::$base = ""
SessionHelper::$webroot = "/"
SessionHelper::$here = "/dok"
SessionHelper::$params = array
SessionHelper::$action = "index"
SessionHelper::$data = NULL
SessionHelper::$theme = NULL
SessionHelper::$plugin = NULL,
"html" => HtmlHelper
HtmlHelper::$tags = array
HtmlHelper::$_crumbs = array
HtmlHelper::$__includedScripts = array
HtmlHelper::$_scriptBlockOptions = array
HtmlHelper::$__docTypes = array
HtmlHelper::$helpers = NULL
HtmlHelper::$base = ""
HtmlHelper::$webroot = "/"
HtmlHelper::$theme = NULL
HtmlHelper::$here = "/dok"
HtmlHelper::$params = array
HtmlHelper::$action = "index"
HtmlHelper::$plugin = NULL
HtmlHelper::$data = NULL
HtmlHelper::$namedArgs = NULL
HtmlHelper::$argSeparator = NULL
HtmlHelper::$validationErrors = NULL
HtmlHelper::$__tainted = NULL
HtmlHelper::$__cleaned = NULL,
"link" => LinkHelper
LinkHelper::$helpers = array
LinkHelper::$lang = "dok"
LinkHelper::$defaultLang = "hrv"
LinkHelper::$base = ""
LinkHelper::$webroot = "/"
LinkHelper::$theme = NULL
LinkHelper::$here = "/dok"
LinkHelper::$params = array
LinkHelper::$action = "index"
LinkHelper::$plugin = NULL
LinkHelper::$data = NULL
LinkHelper::$namedArgs = NULL
LinkHelper::$argSeparator = NULL
LinkHelper::$validationErrors = NULL
LinkHelper::$tags = array
LinkHelper::$__tainted = NULL
LinkHelper::$__cleaned = NULL
LinkHelper::$Html = HtmlHelper object
LinkHelper::$Session = SessionHelper object
)
$loadHelpers = false
$cached = false
$loadedHelpers = array()
$lang = "dok"
$otherLangs = array(
"eng",
"hrv"
)
$globalNav = array(
array(
"Page" => array()
),
array(
"Page" => array()
),
array(
"Page" => array()
),
array(
"Page" => array()
),
array(
"Page" => array()
),
array(
"Page" => array()
),
array(
"Page" => array()
),
array(
"Page" => array()
),
array(
"Page" => array()
),
array(
"Page" => array()
),
array(
"Page" => array()
),
array(
"Page" => array()
),
array(
"Page" => array()
),
array(
"Page" => array()
),
array(
"Page" => array()
),
array(
"Page" => array()
),
array(
"Page" => array()
),
array(
"Page" => array()
),
array(
"Page" => array()
),
array(
"Page" => array()
),
array(
"Page" => array()
),
array(
"Page" => array()
),
array(
"Page" => array()
),
array(
"Page" => array()
),
array(
"Page" => array()
),
array(
"Page" => array()
),
array(
"Page" => array()
)
)
$breadCrumbs = array(
array(
"Page" => array()
)
)
$pageContents = array(
"home_who_we_are" => null
)
$userData = null
$announcements = array(
array(
"Announcement" => array()
),
array(
"Announcement" => array()
),
array(
"Announcement" => array()
)
)
$cache = array(
"time" => "+1 day",
"key" => "dok"
)
$form = FormHelper
FormHelper::$helpers = array
FormHelper::$fieldset = array
FormHelper::$__options = array
FormHelper::$fields = array
FormHelper::$requestType = NULL
FormHelper::$defaultModel = NULL
FormHelper::$_inputDefaults = array
FormHelper::$_lastAction = ""
FormHelper::$base = ""
FormHelper::$webroot = "/"
FormHelper::$theme = NULL
FormHelper::$here = "/dok"
FormHelper::$params = array
FormHelper::$action = "index"
FormHelper::$plugin = NULL
FormHelper::$data = NULL
FormHelper::$namedArgs = NULL
FormHelper::$argSeparator = NULL
FormHelper::$validationErrors = NULL
FormHelper::$tags = array
FormHelper::$__tainted = NULL
FormHelper::$__cleaned = NULL
FormHelper::$Html = HtmlHelper object
$text = TextHelper
TextHelper::$helpers = NULL
TextHelper::$base = ""
TextHelper::$webroot = "/"
TextHelper::$theme = NULL
TextHelper::$here = "/dok"
TextHelper::$params = array
TextHelper::$action = "index"
TextHelper::$plugin = NULL
TextHelper::$data = NULL
TextHelper::$namedArgs = NULL
TextHelper::$argSeparator = NULL
TextHelper::$validationErrors = NULL
TextHelper::$tags = array
TextHelper::$__tainted = NULL
TextHelper::$__cleaned = NULL
$stringer = StringerHelper
StringerHelper::$helpers = array
StringerHelper::$base = ""
StringerHelper::$webroot = "/"
StringerHelper::$theme = NULL
StringerHelper::$here = "/dok"
StringerHelper::$params = array
StringerHelper::$action = "index"
StringerHelper::$plugin = NULL
StringerHelper::$data = NULL
StringerHelper::$namedArgs = NULL
StringerHelper::$argSeparator = NULL
StringerHelper::$validationErrors = NULL
StringerHelper::$tags = array
StringerHelper::$__tainted = NULL
StringerHelper::$__cleaned = NULL
StringerHelper::$Html = HtmlHelper object
StringerHelper::$Link = LinkHelper object
StringerHelper::$Text = TextHelper object
$menu = MenuHelper
MenuHelper::$helpers = array
MenuHelper::$base = ""
MenuHelper::$webroot = "/"
MenuHelper::$theme = NULL
MenuHelper::$here = "/dok"
MenuHelper::$params = array
MenuHelper::$action = "index"
MenuHelper::$plugin = NULL
MenuHelper::$data = NULL
MenuHelper::$namedArgs = NULL
MenuHelper::$argSeparator = NULL
MenuHelper::$validationErrors = NULL
MenuHelper::$tags = array
MenuHelper::$__tainted = NULL
MenuHelper::$__cleaned = NULL
MenuHelper::$Link = LinkHelper object
$session = SessionHelper
SessionHelper::$helpers = array
SessionHelper::$__active = true
SessionHelper::$valid = false
SessionHelper::$error = false
SessionHelper::$_userAgent = "f9a8355d006790ee743ededbb1f6e3bd"
SessionHelper::$path = "/"
SessionHelper::$lastError = NULL
SessionHelper::$security = "medium"
SessionHelper::$time = 1773314240
SessionHelper::$sessionTime = 1773326240
SessionHelper::$cookieLifeTime = false
SessionHelper::$watchKeys = array
SessionHelper::$id = NULL
SessionHelper::$host = NULL
SessionHelper::$timeout = NULL
SessionHelper::$base = ""
SessionHelper::$webroot = "/"
SessionHelper::$here = "/dok"
SessionHelper::$params = array
SessionHelper::$action = "index"
SessionHelper::$data = NULL
SessionHelper::$theme = NULL
SessionHelper::$plugin = NULL
$html = HtmlHelper
HtmlHelper::$tags = array
HtmlHelper::$_crumbs = array
HtmlHelper::$__includedScripts = array
HtmlHelper::$_scriptBlockOptions = array
HtmlHelper::$__docTypes = array
HtmlHelper::$helpers = NULL
HtmlHelper::$base = ""
HtmlHelper::$webroot = "/"
HtmlHelper::$theme = NULL
HtmlHelper::$here = "/dok"
HtmlHelper::$params = array
HtmlHelper::$action = "index"
HtmlHelper::$plugin = NULL
HtmlHelper::$data = NULL
HtmlHelper::$namedArgs = NULL
HtmlHelper::$argSeparator = NULL
HtmlHelper::$validationErrors = NULL
HtmlHelper::$__tainted = NULL
HtmlHelper::$__cleaned = NULL
$link = LinkHelper
LinkHelper::$helpers = array
LinkHelper::$lang = "dok"
LinkHelper::$defaultLang = "hrv"
LinkHelper::$base = ""
LinkHelper::$webroot = "/"
LinkHelper::$theme = NULL
LinkHelper::$here = "/dok"
LinkHelper::$params = array
LinkHelper::$action = "index"
LinkHelper::$plugin = NULL
LinkHelper::$data = NULL
LinkHelper::$namedArgs = NULL
LinkHelper::$argSeparator = NULL
LinkHelper::$validationErrors = NULL
LinkHelper::$tags = array
LinkHelper::$__tainted = NULL
LinkHelper::$__cleaned = NULL
LinkHelper::$Html = HtmlHelper object
LinkHelper::$Session = SessionHelper object
$battleReports = array(
array(
"BattleReport" => array(),
"Game" => array(),
"BattleReportExperience" => array()
),
array(
"BattleReport" => array(),
"Game" => array(),
"BattleReportExperience" => array()
),
array(
"BattleReport" => array(),
"Game" => array(),
"BattleReportExperience" => array()
)
)
$battleReport = array(
"BattleReport" => array(
"id" => "16",
"title_eng" => "Kill Team - Blooded vs. Vespid Stingwings",
"title_hrv" => "Kill Team - Blooded vs. Vespid Stingwings",
"mask_eng" => "kill_team_-_blooded_vs_vespid_stingwings",
"mask_hrv" => "kill_team_-_blooded_vs_vespid_stingwings",
"game_id" => "1",
"fought" => "2025-02-28 16:00:00",
"created" => "2025-03-10 08:53:42",
"modified" => "2025-03-10 08:53:42"
),
"Game" => array(
"id" => "1",
"name_eng" => "GW - Warhammer 40.000",
"name_hrv" => "GW - Warhammer 40.000",
"description_eng" => "<p>
In the grim darkness of the far future, there is only war!</p>
<p>
<a href="http://img.photobucket.com/albums/v467/demonn/Agram-Sajt/40k03_zpsc9a73277.jpg" target="_blank"> <img alt="Click for enlarged picture" src="http://img.photobucket.com/albums/v467/demonn/Agram-Sajt/40k03_zpsc9a73277.jpg" width="600" /> </a> </p>
",
"description_hrv" => "<p>
Warhammer 40000 je strate&scaron;ka igra smje&scaron;tena u daleku budućnost Zemlje, u kojoj preuzimate zapovjedni&scaron;tvo nad vojskama minijatura kako bi prikazali oružane sukobe vojski budućnosti.</p>
<p>
Bitke se vode na stolu uobičajenih dimenzija 120 x 180 cm, na koji se zatim postavlja različit teren kako bi se dočarao izgled pravog boji&scaron;ta. Nakon toga, u uobičajenom scenariju, na suprotne strane stola razmje&scaron;taju se dvije vojske minijatura. Strate&scaron;ki dio igre je vrlo važan jer već samim razmje&scaron;tanjem jedinica na stol možete dobiti veći dio bitke.</p>
<p>
Sada, kada va&scaron;i vojnici preko bojnog polja gledaju u mrskog im neprijatelja, spremni ste poslati naredbu za juri&scaron;, ili se ukopati na poziciji i braniti ono &scaron;to je va&scaron;e (va&scaron;u polovicu drvene ploče prekrivene umjetnim terenom). Kako ne bi nastala zbrka na bojnom polju, igra je podijeljena na poteze, a svaki potez je dodatno podijeljen u faze.<br />
&nbsp;</p>
<p>
<a href="http://img.photobucket.com/albums/v467/demonn/Agram-Sajt/40k03_zpsc9a73277.jpg" target="_blank"> <img alt="Click for enlarged picture" src="http://img.photobucket.com/albums/v467/demonn/Agram-Sajt/40k03_zpsc9a73277.jpg" width="600" /> </a> </p>"
),
"BattleReportExperience" => array(
array()
)
)
$memberString = " and <a href="/dok/members/antoni.pastuovic">Antoni Pastuović</a> ()"
$battleReportExperience = array(
"id" => "18",
"battle_report_id" => "16",
"member_id" => "96",
"army_id" => "33",
"intro_eng" => "<p>
This Friday, Luka and I had the opportunity to try out the third edition of the famous Warhammer skirmish game Kill Team, and along the way demonstrate the basics that have remained unchanged. Luka played a team of Vespid Stingwings, a highly mobile T&#39;au unit, and I played the Blooded, a traitor squad that used to belong to the Astra Militarum (in my case they were named Glanton&#39;s Gang). The map, measuring 30x22 inches, was organized so that all terrain was outside of our deployment zones, which were 6 inches from the shorter edges. In the middle of the map, in a slight diagonal, 3 points of interest (objectives) are placed. All this resulted in a very symmetrical setup of operatives &ndash; all Vespids and the entire Blooded gang at the beginning of the game were mirrored hidden behind large pieces of terrain. All buildings with doors were 3 inches high, offering the operatives a Vantage point - the ability to keep one hit die as a success, and the well in the very center, 4 inches high, offers an even better Vantage point, where the operatives keep 2 dice.</p>
<p>
<a href="https://hosting.photobucket.com/95288841-8654-4bf7-8fc9-a4aa78dce87f/e4be55ea-8433-47c7-b28a-459533bba4bc.jpg" target="_blank"><img alt="Click for enlarged picture" src="https://hosting.photobucket.com/95288841-8654-4bf7-8fc9-a4aa78dce87f/e4be55ea-8433-47c7-b28a-459533bba4bc.jpg" width="600" /></a></p>
",
"intro_hrv" => "<p>
Ovaj smo petak Luka i ja imali priliku isprobati treću ediciju poznate Warhammer skirmish igre <em>Kill Team</em> te usput demonstrirati osnove koje su ostale nepromijenjene. Luka je igrao tim Vespid Stingwings, jako mobilne T&#39;au jedinice, a ja sam igrao Blooded, izdajnički odred koji je nekad pripadao Astri Militarum (u mojem su slučaju dobili ime <em>Glantonova banda</em>). Mapa, veličine 30x22 inča, bila je organizirana tako da je sav teren bio van na&scaron;ih deployment zona, koje su iznosile 6 inča od kraćih rubova. Nasred mape, u blagoj dijagonali, postavljene su 3 točke interesa (objectives). Sve je ovo rezultiralo jako simetričnom postavom operativaca &ndash; svi su Vespidi i cijela Blooded banda na početku igre bili zrcaljeno skriveni iza velikih komada terena. Sve građevine s vratima bile su visoke 3 inča, &scaron;to je operativcima nudilo Vantage point &ndash; mogućnost da jednu hit-kockicu zadrže kao uspje&scaron;nu, a bu&scaron;otina u samom centru, visoka 4 inča, nudi jo&scaron; bolji Vantage point, gdje operativci zadržavaju 2 kockice.</p>
<p>
<a href="https://hosting.photobucket.com/95288841-8654-4bf7-8fc9-a4aa78dce87f/e4be55ea-8433-47c7-b28a-459533bba4bc.jpg" target="_blank"><img alt="Click for enlarged picture" src="https://hosting.photobucket.com/95288841-8654-4bf7-8fc9-a4aa78dce87f/e4be55ea-8433-47c7-b28a-459533bba4bc.jpg" width="600" /></a></p>
",
"Member" => array(
"id" => "96",
"group_id" => "2",
"first_name" => "Antoni",
"last_name" => "Pastuović",
"first_name_mask" => "antoni",
"last_name_mask" => "pastuovic",
"username" => "antoni",
"password" => "*****",
"born" => "2005-04-04 18:52:00",
"created" => "2019-04-04 18:53:09"
),
"Army" => array(
"id" => "33",
"game_id" => "1",
"army_alignment_id" => null,
"name_eng" => "Imperial Guard",
"name_hrv" => "Imperial Guard",
"description_eng" => "",
"description_hrv" => ""
)
)
$dateFought = "28<span class="superscript">th</span> February 2025"</pre><pre class="stack-trace">include - APP/views/elements/latestBattleReports.ctp, line 29
View::_render() - CORE/cake/libs/view/view.php, line 736
View::element() - CORE/cake/libs/view/view.php, line 397
include - APP/views/home/index.ctp, line 50
View::_render() - CORE/cake/libs/view/view.php, line 736
View::render() - CORE/cake/libs/view/view.php, line 431
Controller::render() - CORE/cake/libs/controller/controller.php, line 909
Dispatcher::_invoke() - CORE/cake/dispatcher.php, line 207
Dispatcher::dispatch() - CORE/cake/dispatcher.php, line 171
[main] - APP/webroot/index.php, line 86</pre></div></pre>28<span class="superscript">th</span> February 2025, , and <a href="/dok/members/antoni.pastuovic">Antoni Pastuović</a> () </span>
</li>
<li>
<a href="/dok/battle_reports/2022/05/09" class="readMore"></a> <span class="details">
22<span class="superscript">nd</span> April 2022, , <a href="/dok/members/borna.plese">Borna Pleše</a> () and <a href="/dok/members/kristijan.kliska">Kristijan Kliska</a> () </span>
</li>
<li>
<a href="/dok/battle_reports/2021/11/26" class="readMore"></a> <span class="details">
17<span class="superscript">th</span> November 2021, , and <a href="/dok/members/nino.marasovic">Nino Marasović</a> () </span>
</li>
</ul>
<p><a href="/dok/battle_reports">more_battle_reports</a></p> <div class="fb-like-box" data-href="http://www.facebook.com/UmsAgram" data-width="200" data-show-faces="true" data-stream="true" data-header="true"></div>
</div>
<div id="rightColumn">
<h2>who_are_we</h2>
<h2>friends_and_sponsors</h2>
<div style="padding-bottom: 10px;">
<a href="http://www.zagreb.hr">
<img src="/img/sponsors/zagreb.png" width="300" alt="Grad Zagreb"/>
</a>
</div>
<div style="padding-bottom: 10px;">
<a href="http://zagrebacka.policija.hr/">
<img src="/img/sponsors/mup.png" width="300" alt="MUP"/>
</a>
</div>
<div style="padding-bottom: 10px;">
<a href="http://www.morh.hr/hr/morh-u-zajednici/kultura/">
<img src="/img/sponsors/morh.png" width="300" alt="MORH"/>
</a>
</div>
<div style="padding-bottom: 10px;">
<a href="http://www.cartamagica.hr">
<img src="/img/sponsors/cartamagica300_zps31870fe8.jpg" width="300" alt="Carta Magica"/>
</a>
</div>
<div style="padding-bottom: 10px;">
<a href="https://gardensofhecate.com/">
<img src="https://hosting.photobucket.com/images/v467/demonn/gardens.jpg" width="300" alt="Gardens"/>
</a>
</div>
<div style="padding-bottom: 10px;">
<a href="http://www.artzumbur.hr/">
<img src="/img/sponsors/zumbur.png" width="300" alt="Art Zumbur"/>
</a>
</div>
<div style="padding-bottom: 10px;">
<a href="https://makete.eu/">
<img src="https://hosting.photobucket.com/images/v467/demonn/Hobbychest.png" width="300" alt="HobbyChest"/>
</a>
</div>
<div style="padding-bottom: 10px;">
<a href="https://www.facebook.com/CherryTreeZagreb">
<img src="https://hosting.photobucket.com/images/v467/demonn/CherryTree.png" width="300" alt="CherryTree"/>
</a>
</div>
<div style="padding-bottom: 10px;">
<a href="https://www.instagram.com/swood.si/">
<img src="https://hosting.photobucket.com/95288841-8654-4bf7-8fc9-a4aa78dce87f/2abbad87-444e-4b3a-b532-5b29efe8e4f2.png" width="300" alt="Swood"/>
</a>
</div>
<div style="padding-bottom: 10px;">
<a href="https://www.fireballfigurines.com/">
<img src="https://hosting.photobucket.com/95288841-8654-4bf7-8fc9-a4aa78dce87f/82c70756-04a1-41bb-b537-e2da018e764e.png" width="300" alt="fireball"/>
</a>
</div>
<div style="padding-bottom: 10px;">
<a href="https://nordlysminiatures.com/">
<img src="https://hosting.photobucket.com/images/v467/demonn/nordlyslogo.png" width="300" alt="nordlys"/>
</a>
</div>
<div style="padding-bottom: 10px;">
<a href="https://www.bestiarumgames.com/">
<img src="https://hosting.photobucket.com/images/v467/demonn/bestiarum.png" width="300" alt="bestiarum"/>
</a>
</div>
<div style="padding-bottom: 10px;">
<a href="https://shop.ramshacklegames.co.uk/">
<img src="https://hosting.photobucket.com/images/v467/demonn/ramshackle.png" width="300" alt="ramshackle"/>
</a>
</div>
<div style="padding-bottom: 10px;">
<a href="https://btb-tutorials.com/">
<img src="https://hosting.photobucket.com/images/v467/demonn/logob2b.png" width="300" alt="b2b"/>
</a>
</div>
<div style="padding-bottom: 10px;">
<a href="https://www.miniatures.si/">
<img src="https://hosting.photobucket.com/images/v467/demonn/logominiatures-si.png" width="300" alt="miniatures-si"/>
</a>
</div>
<div style="padding-bottom: 10px;">
<a href="http://thebigbearminiatures.unas.hu/en/">
<img src="https://hosting.photobucket.com/images/v467/demonn/BigBear.jpg" width="300" alt="bigbear"/>
</a>
</div>
<div style="padding-bottom: 10px;">
<a href="https://www.facebook.com/p/Zone-Miniatures-100063970506568/">
<img src="https://hosting.photobucket.com/images/v467/demonn/ZoneMin.jpg" width="300" alt="zone"/>
</a>
</div>
<div style="padding-bottom: 10px;">
<a href="https://www.mrleesminis.com/">
<img src="/img/sponsors/mrleeminis.jpg" width="300" alt="mrlee"/>
</a>
</div>
<div style="padding-bottom: 10px;">
<a href="https://crecymodels.com/">
<img src="https://hosting.photobucket.com/images/v467/demonn/crecymodels.png" width="300" alt="Crecy"/>
</a>
</div>
<div style="padding-bottom: 10px;">
<a href="https://www.scientificmodels.shop/">
<img src="https://hosting.photobucket.com/images/v467/demonn/scientificmini.png" width="300" alt="Scientific"/>
</a>
</div>
<div style="padding-bottom: 10px;">
<a href="https://www.foundminiatures.com/home">
<img src="https://hosting.photobucket.com/images/v467/demonn/found.png" width="300" alt="Found"/>
</a>
</div>
<div style="padding-bottom: 10px;">
<a href="https://www.mkontraros.com/">
<img src="/img/sponsors/kontraros.jpg" width="300" alt="Kontraros"/>
</a>
</div>
<div style="padding-bottom: 10px;">
<a href="http://www.martinwelberg.nl/">
<img src="https://img.photobucket.com/albums/v467/demonn/sponzori/welberg.jpg" width="300" alt="Welberg"/>
</a>
</div>
<div style="padding-bottom: 10px;">
<a href="https://www.dioramapresepe.com/en/shop/">
<img src="https://img.photobucket.com/albums/v467/demonn/sponzori/dioramapresepe.png" width="300" alt="DioramaPresepe"/>
</a>
<div style="padding-bottom: 10px;">
<a href="https://www.greymountainreviews.co.uk/">
<img src="https://hosting.photobucket.com/images/v467/demonn/GMR.png" width="300" alt="GMR"/>
</a>
</div><div style="padding-bottom: 10px;">
<a href="http://triglav-model.simplesite.com/">
<img src="/img/sponsors/Triglav.jpg" width="300" alt="Triglav Model"/>
</a>
</div>
<div style="padding-bottom: 10px;">
<a href="https://magicomens.com/?utm_medium=referral&utm_source=website&utm_campaign=banner&utm_term=ums-agram&utm_content=organic-hr">
<img src="https://hosting.photobucket.com/images/v467/demonn/magicomens.png" width="300" alt="MagicOmens"/>
</a>
</div>
<div style="padding-bottom: 10px;">
<a href="http://www.hostel-bureau.eu/">
<img src="http://img.photobucket.com/albums/v467/demonn/sponzori/bureau1.jpg" width="300" alt="BureauHostelZagreb"/>
</a>
</div>
<div style="padding-bottom: 10px;">
<a href="https://diyconnect.net/">
<img src="https://img.photobucket.com/albums/v467/demonn/sponzori/DIYconnect.png" width="300" alt="DIYConnect"/>
</a>
</div>
<div style="padding-bottom: 10px;">
<a href="http://www.shop.battlefield-berlin.de/">
<img src="/img/sponsors/BBlogo.jpg" width="300" alt="Battlefieldberlin"/>
</a>
</div>
<div style="padding-bottom: 10px;">
<a href="http://www.cartoonminiatures.com/">
<img src="https://img.photobucket.com/albums/v467/demonn/sponzori/scalebro.png" width="300" alt="Cartoon Miniatures"/>
</a>
</div>
<div style="padding-bottom: 10px">
<a href="http://www.shop.microartstudio.com">
<img src="/img/sponsors/MAS_logo_small.png" width="300" alt="MicroArt Studio"/>
</a>
</div>
<div style="padding-bottom: 10px;">
<a href="https://www.secretweaponminiatures.com/">
<img src="http://img.photobucket.com/albums/v467/demonn/sponzori/SecretWeapon.jpg" width="300" alt="Secret Weapon Miniatures"/>
</a>
</div>
<div style="padding-bottom: 10px;">
<a href="http://www.greenstuffworld.com/en/">
<img src="http://img.photobucket.com/albums/v467/demonn/sponzori/GSW.jpg.png" width="300" alt="GSW"/>
</a>
</div>
<div style="padding-bottom: 10px;">
<a href="http://www.gamersgrass.com/">
<img src="https://img.photobucket.com/albums/v467/demonn/sponzori/gamersgrass.png" width="300" alt="Gamers Grass"/>
</a>
</div>
<div style="padding-bottom: 10px;">
<a href="https://www.facebook.com/pg/UO.Artefakt/about/?ref=page_internal">
<img src="http://img.photobucket.com/albums/v467/demonn/sponzori/artefakt.png" width="300" alt="Artefakt"/>
</a>
</div>
<div style="padding-bottom: 10px;">
<a href="http://www.savageforgedminis.de/">
<img src="http://img.photobucket.com/albums/v467/demonn/sponzori/SFM2015.gif" width="300" alt="Savage Forged Minis"/>
</a>
</div>
<div style="padding-bottom: 10px;">
<a href="http://www.brokentoad.co.uk/">
<img src="http://img.photobucket.com/albums/v467/demonn/sponzori/brokentoad.png" width="300" alt="Ebenezers Emporium"/>
</a>
</div>
<div style="padding-bottom: 10px;">
<a href="http://zealotminiatures.com/">
<img src="http://img.photobucket.com/albums/v467/demonn/sponzori/Zealot.jpg" width="300" alt="Zealot"/>
</a>
</div>
<div style="padding-bottom: 10px;">
<a href="http://www.customeeple.com/">
<img src="http://img.photobucket.com/albums/v467/demonn/sponzori/customeeple02.png" width="300" alt="Customeeple"/>
</a>
</div>
<div style="padding-bottom: 10px;">
<a href="http://www.gamemat.eu/">
<img src="https://img.photobucket.com/albums/v467/demonn/sponzori/gamemat.png" width="300" alt="Gamemat"/>
</a>
</div>
<div style="padding-bottom: 10px;">
<a href="http://www.prvidojam.eu/">
<img src="http://img.photobucket.com/albums/v467/demonn/logoWEBretina21.png" width="300" alt="Prvi dojam"/>
</a>
</div>
<div style="padding-bottom: 10px;">
<a href="http://www.infamyminiatures.com/">
<img src="/img/sponsors/infamyLogo.jpg" width="300" alt="Infamy Miniatures"/>
</a>
</div>
<div style="padding-bottom: 10px;">
<a href="http://www.modeldisplayproducts.co.uk">
<img src="http://img.photobucket.com/albums/v467/demonn/sponzori/MDP.gif" width="300" alt="Wamp"/>
</a>
</div>
<div style="padding-bottom: 10px;">
<a href="http://www.wolfdesign.hr/">
<img src="http://img.photobucket.com/albums/v467/demonn/sponzori/WD01.png" width="300" alt="wolfdesign"/>
</a>
</div>
<div style="padding-bottom: 10px;">
<a href="http://www.wampstore.com/store">
<img src="/img/sponsors/wamp.png" width="300" alt="Wamp"/>
</a>
</div>
<div style="padding-bottom: 10px;">
<a href="http://www.tabletop-world.com/">
<img src="http://img.photobucket.com/albums/v467/demonn/sponzori/ttw.png" width="300" alt="TabletopWorld"/>
</a>
</div>
<div style="padding-bottom: 10px;">
<a href="http://www.figurepaintermagazine.co.uk/">
<img src="/img/sponsors/FPM_Logo300_zps2ff0954a.png" width="300" alt="Figure Painter Magazine"/>
</a>
</div>
<div style="padding-bottom: 10px;">
<a href="http://sciborminiatures.com/">
<img src="http://img.photobucket.com/albums/v467/demonn/sponzori/sciborlogo.jpg" width="300" alt="scibor"/>
</a>
</div>
<div style="padding-bottom: 10px;">
<a href="http://www.mrblackpublications.com//">
<img src="http://img.photobucket.com/albums/v467/demonn/sponzori/mrblackpub-1.jpg" width="300" alt="mrblackpublications"/>
</a>
</div>
<div style="padding-bottom: 10px;">
<a href="http://cro-hobby.com/">
<img src="/img/sponsors/ch1.jpg" width="300" alt="crohobby"/>
</a>
</div>
<div style="padding-bottom: 10px;">
<a href="http://www.leo-modeli.hr/">
<img src="/img/sponsors/leomodeli.png" width="300" alt="Leo Modeli"/>
</a>
</div>
<div style="padding-bottom: 10px;">
<a href="http://www.terriblekidsstuff.com">
<img src="/img/sponsors/terribleKS_logo.png" width="300" alt="Terrible Kids Stuff"/>
</a>
</div>
<div style="padding-bottom: 10px;">
<a href="http://www.scale75.com">
<img src="/img/sponsors/scale75.png" width="300" alt="Scale75"/>
</a>
</div>
<div style="padding-bottom: 10px;">
<a href="http://www.lumos.hr/">
<img src="/img/sponsors/lumos.jpg" width="300" alt="Lumos Hobby & Art"/>
</a>
</div>
<div style="padding-bottom: 10px;">
<a href="http://www.initiativemagazine.co.uk/">
<img src="http://img.photobucket.com/albums/v467/demonn/sponzori/Initiative-Magazine-Logo-Big.png" width="300" alt="Initiative Magazine"/>
</a>
</div>
<div style="padding-bottom: 10px;">
<a href="https://www.kset.org/">
<img src="http://img.photobucket.com/albums/v467/demonn/sponzori/kset_logo.png" width="300" alt="KSET"/>
</a>
</div>
<div style="padding-bottom: 10px;">
<a href="http://www.systemagaming.com/">
<img src="/img/sponsors/systema.gif" width="300" alt="Systema Gaming Scenery"/>
</a>
</div>
<div style="padding-bottom: 10px;">
<a href="http://www.figone.fr/en//">
<img src="/img/sponsors/figone.jpg" width="300" alt="figone"/>
</a>
</div>
<div style="padding-bottom: 10px;">
<a href="http://www.crom.hr">
<img src="/img/sponsors/crom.png" width="300" alt="Crom"/>
</a>
</div>
<div style="padding-bottom: 10px;">
<a href="http://www.kerrandking.co.uk/">
<img src="/img/sponsors/kerr&king.png" width="300" alt="Kerrandking"/>
</a>
</div>
<div style="padding-bottom: 10px;">
<a href="http://www.kabukimodels.com/">
<img src="/img/sponsors/kabuki5.gif" width="300" alt="Kabuki Models"/>
</a>
</div>
<div style="padding-bottom: 10px;">
<a href="http://www.phlegyas-art.com">
<img src="/img/sponsors/bannerPhlegyasArt.jpg" width="300" alt="Phlegyas Art"/>
</a>
</div>
<div style="padding-bottom: 10px;">
<a href="http://www.wyrd-games.net/">
<img src="/img/sponsors/wyrd.jpg" width="300" alt="Wyrd Miniatures"/>
</a>
</div>
<div style="padding-bottom: 10px;">
<a href="http://escenorama.com/en/">
<img src="http://img.photobucket.com/albums/v467/demonn/sponzori/escenorama.jpg" width="300" alt="escenorama"/>
</a>
</div>
<div style="padding-bottom: 10px;">
<a href="http://kromlech.eu/">
<img src="http://img.photobucket.com/albums/v467/demonn/sponzori/kromlech.png" width="300" alt="Kromlech"/>
</a>
</div>
<div style="padding-bottom: 10px;">
<a href="http://www.avatars-of-war.com/">
<img src="http://img.photobucket.com/albums/v467/demonn/sponzori/aow.png" width="300" alt="AOW"/>
</a>
</div>
<div style="padding-bottom: 10px;">
<a href="http://www.shieldwolfminiatures.com/">
<img src="http://img.photobucket.com/albums/v467/demonn/sponzori/shieldwolf.png" width="300" alt="Shieldwolf"/>
</a>
</div>
<div style="padding-bottom: 10px;">
<a href="http://www.uschivdr.com/">
<img src="http://img.photobucket.com/albums/v467/demonn/sponzori/uschi02.jpg" width="300" alt="uschi"/>
</a>
</div>
<div style="padding-bottom: 10px;">
<a href="http://www.hangar18miniatures.com">
<img src="http://img.photobucket.com/albums/v467/demonn/sponzori/hangar18.png" width="300" alt="Hangar 18 Miniatures"/>
</a>
</div>
<div style="padding-bottom: 10px;">
<a href="http://www.fallouthobbies.com/">
<img src="http://img.photobucket.com/albums/v467/demonn/sponzori/FOH.jpg" width="300" alt="FOH"/>
</a>
</div>
<div style="padding-bottom: 10px;">
<a href="https://ebenezers-emporium.squarespace.com">
<img src="http://img.photobucket.com/albums/v467/demonn/sponzori/ebenezer.jpg" width="300" alt="Ebenezers Emporium"/>
</a>
</div>
<div>
<a href="/sponsors">friends_and_sponsors</a>
</div>
</div>",
"scripts_for_layout" => "",
"title_for_layout" => "Home",
"form" => FormHelper
FormHelper::$helpers = array
FormHelper::$fieldset = array
FormHelper::$__options = array
FormHelper::$fields = array
FormHelper::$requestType = NULL
FormHelper::$defaultModel = NULL
FormHelper::$_inputDefaults = array
FormHelper::$_lastAction = ""
FormHelper::$base = ""
FormHelper::$webroot = "/"
FormHelper::$theme = NULL
FormHelper::$here = "/dok"
FormHelper::$params = array
FormHelper::$action = "index"
FormHelper::$plugin = NULL
FormHelper::$data = NULL
FormHelper::$namedArgs = NULL
FormHelper::$argSeparator = NULL
FormHelper::$validationErrors = NULL
FormHelper::$tags = array
FormHelper::$__tainted = NULL
FormHelper::$__cleaned = NULL
FormHelper::$Html = HtmlHelper object,
"text" => TextHelper
TextHelper::$helpers = NULL
TextHelper::$base = ""
TextHelper::$webroot = "/"
TextHelper::$theme = NULL
TextHelper::$here = "/dok"
TextHelper::$params = array
TextHelper::$action = "index"
TextHelper::$plugin = NULL
TextHelper::$data = NULL
TextHelper::$namedArgs = NULL
TextHelper::$argSeparator = NULL
TextHelper::$validationErrors = NULL
TextHelper::$tags = array
TextHelper::$__tainted = NULL
TextHelper::$__cleaned = NULL,
"stringer" => StringerHelper
StringerHelper::$helpers = array
StringerHelper::$base = ""
StringerHelper::$webroot = "/"
StringerHelper::$theme = NULL
StringerHelper::$here = "/dok"
StringerHelper::$params = array
StringerHelper::$action = "index"
StringerHelper::$plugin = NULL
StringerHelper::$data = NULL
StringerHelper::$namedArgs = NULL
StringerHelper::$argSeparator = NULL
StringerHelper::$validationErrors = NULL
StringerHelper::$tags = array
StringerHelper::$__tainted = NULL
StringerHelper::$__cleaned = NULL
StringerHelper::$Html = HtmlHelper object
StringerHelper::$Link = LinkHelper object
StringerHelper::$Text = TextHelper object,
"menu" => MenuHelper
MenuHelper::$helpers = array
MenuHelper::$base = ""
MenuHelper::$webroot = "/"
MenuHelper::$theme = NULL
MenuHelper::$here = "/dok"
MenuHelper::$params = array
MenuHelper::$action = "index"
MenuHelper::$plugin = NULL
MenuHelper::$data = NULL
MenuHelper::$namedArgs = NULL
MenuHelper::$argSeparator = NULL
MenuHelper::$validationErrors = NULL
MenuHelper::$tags = array
MenuHelper::$__tainted = NULL
MenuHelper::$__cleaned = NULL
MenuHelper::$Link = LinkHelper object,
"session" => SessionHelper
SessionHelper::$helpers = array
SessionHelper::$__active = true
SessionHelper::$valid = false
SessionHelper::$error = false
SessionHelper::$_userAgent = "f9a8355d006790ee743ededbb1f6e3bd"
SessionHelper::$path = "/"
SessionHelper::$lastError = NULL
SessionHelper::$security = "medium"
SessionHelper::$time = 1773395484
SessionHelper::$sessionTime = 1773407484
SessionHelper::$cookieLifeTime = false
SessionHelper::$watchKeys = array
SessionHelper::$id = NULL
SessionHelper::$host = NULL
SessionHelper::$timeout = NULL
SessionHelper::$base = ""
SessionHelper::$webroot = "/"
SessionHelper::$here = "/dok"
SessionHelper::$params = array
SessionHelper::$action = "index"
SessionHelper::$data = NULL
SessionHelper::$theme = NULL
SessionHelper::$plugin = NULL,
"html" => HtmlHelper
HtmlHelper::$tags = array
HtmlHelper::$_crumbs = array
HtmlHelper::$__includedScripts = array
HtmlHelper::$_scriptBlockOptions = array
HtmlHelper::$__docTypes = array
HtmlHelper::$helpers = NULL
HtmlHelper::$base = ""
HtmlHelper::$webroot = "/"
HtmlHelper::$theme = NULL
HtmlHelper::$here = "/dok"
HtmlHelper::$params = array
HtmlHelper::$action = "index"
HtmlHelper::$plugin = NULL
HtmlHelper::$data = NULL
HtmlHelper::$namedArgs = NULL
HtmlHelper::$argSeparator = NULL
HtmlHelper::$validationErrors = NULL
HtmlHelper::$__tainted = NULL
HtmlHelper::$__cleaned = NULL,
"link" => LinkHelper
LinkHelper::$helpers = array
LinkHelper::$lang = "dok"
LinkHelper::$defaultLang = "hrv"
LinkHelper::$base = ""
LinkHelper::$webroot = "/"
LinkHelper::$theme = NULL
LinkHelper::$here = "/dok"
LinkHelper::$params = array
LinkHelper::$action = "index"
LinkHelper::$plugin = NULL
LinkHelper::$data = NULL
LinkHelper::$namedArgs = NULL
LinkHelper::$argSeparator = NULL
LinkHelper::$validationErrors = NULL
LinkHelper::$tags = array
LinkHelper::$__tainted = NULL
LinkHelper::$__cleaned = NULL
LinkHelper::$Html = HtmlHelper object
LinkHelper::$Session = SessionHelper object
)
$loadHelpers = false
$cached = true
$loadedHelpers = array()
$lang = "dok"
$otherLangs = array(
"eng",
"hrv"
)
$globalNav = array(
array(
"Page" => array()
),
array(
"Page" => array()
),
array(
"Page" => array()
),
array(
"Page" => array()
),
array(
"Page" => array()
),
array(
"Page" => array()
),
array(
"Page" => array()
),
array(
"Page" => array()
),
array(
"Page" => array()
),
array(
"Page" => array()
),
array(
"Page" => array()
),
array(
"Page" => array()
),
array(
"Page" => array()
),
array(
"Page" => array()
),
array(
"Page" => array()
),
array(
"Page" => array()
),
array(
"Page" => array()
),
array(
"Page" => array()
),
array(
"Page" => array()
),
array(
"Page" => array()
),
array(
"Page" => array()
),
array(
"Page" => array()
),
array(
"Page" => array()
),
array(
"Page" => array()
),
array(
"Page" => array()
),
array(
"Page" => array()
),
array(
"Page" => array()
)
)
$breadCrumbs = array(
array(
"Page" => array()
)
)
$pageContents = array(
"home_who_we_are" => null
)
$userData = null
$announcements = array(
array(
"Announcement" => array()
),
array(
"Announcement" => array()
),
array(
"Announcement" => array()
)
)
$content_for_layout = "<div id="leftColumn">
<h2>latest_announcements</h2>
<div class="announcement workshop_announcement">
<h3><pre class="cake-debug"><a href="javascript:void(0);" onclick="document.getElementById('cakeErr2-trace').style.display = (document.getElementById('cakeErr2-trace').style.display == 'none' ? '' : 'none');"><b>Notice</b> (8)</a>: Undefined index: title_dok [<b>APP/views/home/index.ctp</b>, line <b>7</b>]<div id="cakeErr2-trace" class="cake-stack-trace" style="display: none;"><a href="javascript:void(0);" onclick="document.getElementById('cakeErr2-code').style.display = (document.getElementById('cakeErr2-code').style.display == 'none' ? '' : 'none')">Code</a> | <a href="javascript:void(0);" onclick="document.getElementById('cakeErr2-context').style.display = (document.getElementById('cakeErr2-context').style.display == 'none' ? '' : 'none')">Context</a><div id="cakeErr2-code" class="cake-code-dump" style="display: none;"><pre><code><span style="color: #000000"></span></code>
<code><span style="color: #000000"> if (Configure::read() > 0) {</span></code>
<span class="code-highlight"><code><span style="color: #000000"> include ($___viewFn);</span></code></span></pre></div><pre id="cakeErr2-context" class="cake-context" style="display: none;">$___viewFn = "/home/martin/apps/agram/app/views/home/index.ctp"
$___dataForView = array(
"lang" => "dok",
"otherLangs" => array(
"eng",
"hrv"
),
"globalNav" => array(
array(),
array(),
array(),
array(),
array(),
array(),
array(),
array(),
array(),
array(),
array(),
array(),
array(),
array(),
array(),
array(),
array(),
array(),
array(),
array(),
array(),
array(),
array(),
array(),
array(),
array(),
array()
),
"breadCrumbs" => array(
array()
),
"pageContents" => array(
"home_who_we_are" => null
),
"userData" => null,
"announcements" => array(
array(),
array(),
array()
)
)
$loadHelpers = true
$cached = false
$form = FormHelper
FormHelper::$helpers = array
FormHelper::$fieldset = array
FormHelper::$__options = array
FormHelper::$fields = array
FormHelper::$requestType = NULL
FormHelper::$defaultModel = NULL
FormHelper::$_inputDefaults = array
FormHelper::$_lastAction = ""
FormHelper::$base = ""
FormHelper::$webroot = "/"
FormHelper::$theme = NULL
FormHelper::$here = "/dok"
FormHelper::$params = array
FormHelper::$action = "index"
FormHelper::$plugin = NULL
FormHelper::$data = NULL
FormHelper::$namedArgs = NULL
FormHelper::$argSeparator = NULL
FormHelper::$validationErrors = NULL
FormHelper::$tags = array
FormHelper::$__tainted = NULL
FormHelper::$__cleaned = NULL
FormHelper::$Html = HtmlHelper object
$text = TextHelper
TextHelper::$helpers = NULL
TextHelper::$base = ""
TextHelper::$webroot = "/"
TextHelper::$theme = NULL
TextHelper::$here = "/dok"
TextHelper::$params = array
TextHelper::$action = "index"
TextHelper::$plugin = NULL
TextHelper::$data = NULL
TextHelper::$namedArgs = NULL
TextHelper::$argSeparator = NULL
TextHelper::$validationErrors = NULL
TextHelper::$tags = array
TextHelper::$__tainted = NULL
TextHelper::$__cleaned = NULL
$stringer = StringerHelper
StringerHelper::$helpers = array
StringerHelper::$base = ""
StringerHelper::$webroot = "/"
StringerHelper::$theme = NULL
StringerHelper::$here = "/dok"
StringerHelper::$params = array
StringerHelper::$action = "index"
StringerHelper::$plugin = NULL
StringerHelper::$data = NULL
StringerHelper::$namedArgs = NULL
StringerHelper::$argSeparator = NULL
StringerHelper::$validationErrors = NULL
StringerHelper::$tags = array
StringerHelper::$__tainted = NULL
StringerHelper::$__cleaned = NULL
StringerHelper::$Html = HtmlHelper object
StringerHelper::$Link = LinkHelper object
StringerHelper::$Text = TextHelper object
$menu = MenuHelper
MenuHelper::$helpers = array
MenuHelper::$base = ""
MenuHelper::$webroot = "/"
MenuHelper::$theme = NULL
MenuHelper::$here = "/dok"
MenuHelper::$params = array
MenuHelper::$action = "index"
MenuHelper::$plugin = NULL
MenuHelper::$data = NULL
MenuHelper::$namedArgs = NULL
MenuHelper::$argSeparator = NULL
MenuHelper::$validationErrors = NULL
MenuHelper::$tags = array
MenuHelper::$__tainted = NULL
MenuHelper::$__cleaned = NULL
MenuHelper::$Link = LinkHelper object
$session = SessionHelper
SessionHelper::$helpers = array
SessionHelper::$__active = true
SessionHelper::$valid = false
SessionHelper::$error = false
SessionHelper::$_userAgent = "f9a8355d006790ee743ededbb1f6e3bd"
SessionHelper::$path = "/"
SessionHelper::$lastError = NULL
SessionHelper::$security = "medium"
SessionHelper::$time = 1773395484
SessionHelper::$sessionTime = 1773407484
SessionHelper::$cookieLifeTime = false
SessionHelper::$watchKeys = array
SessionHelper::$id = NULL
SessionHelper::$host = NULL
SessionHelper::$timeout = NULL
SessionHelper::$base = ""
SessionHelper::$webroot = "/"
SessionHelper::$here = "/dok"
SessionHelper::$params = array
SessionHelper::$action = "index"
SessionHelper::$data = NULL
SessionHelper::$theme = NULL
SessionHelper::$plugin = NULL
$html = HtmlHelper
HtmlHelper::$tags = array
HtmlHelper::$_crumbs = array
HtmlHelper::$__includedScripts = array
HtmlHelper::$_scriptBlockOptions = array
HtmlHelper::$__docTypes = array
HtmlHelper::$helpers = NULL
HtmlHelper::$base = ""
HtmlHelper::$webroot = "/"
HtmlHelper::$theme = NULL
HtmlHelper::$here = "/dok"
HtmlHelper::$params = array
HtmlHelper::$action = "index"
HtmlHelper::$plugin = NULL
HtmlHelper::$data = NULL
HtmlHelper::$namedArgs = NULL
HtmlHelper::$argSeparator = NULL
HtmlHelper::$validationErrors = NULL
HtmlHelper::$__tainted = NULL
HtmlHelper::$__cleaned = NULL
$link = LinkHelper
LinkHelper::$helpers = array
LinkHelper::$lang = NULL
LinkHelper::$defaultLang = NULL
LinkHelper::$base = ""
LinkHelper::$webroot = "/"
LinkHelper::$theme = NULL
LinkHelper::$here = "/dok"
LinkHelper::$params = array
LinkHelper::$action = "index"
LinkHelper::$plugin = NULL
LinkHelper::$data = NULL
LinkHelper::$namedArgs = NULL
LinkHelper::$argSeparator = NULL
LinkHelper::$validationErrors = NULL
LinkHelper::$tags = array
LinkHelper::$__tainted = NULL
LinkHelper::$__cleaned = NULL
LinkHelper::$Html = HtmlHelper object
LinkHelper::$Session = SessionHelper object
$lang = "dok"
$otherLangs = array(
"eng",
"hrv"
)
$globalNav = array(
array(
"Page" => array()
),
array(
"Page" => array()
),
array(
"Page" => array()
),
array(
"Page" => array()
),
array(
"Page" => array()
),
array(
"Page" => array()
),
array(
"Page" => array()
),
array(
"Page" => array()
),
array(
"Page" => array()
),
array(
"Page" => array()
),
array(
"Page" => array()
),
array(
"Page" => array()
),
array(
"Page" => array()
),
array(
"Page" => array()
),
array(
"Page" => array()
),
array(
"Page" => array()
),
array(
"Page" => array()
),
array(
"Page" => array()
),
array(
"Page" => array()
),
array(
"Page" => array()
),
array(
"Page" => array()
),
array(
"Page" => array()
),
array(
"Page" => array()
),
array(
"Page" => array()
),
array(
"Page" => array()
),
array(
"Page" => array()
),
array(
"Page" => array()
)
)
$breadCrumbs = array(
array(
"Page" => array()
)
)
$pageContents = array(
"home_who_we_are" => null
)
$userData = null
$announcements = array(
array(
"Announcement" => array()
),
array(
"Announcement" => array()
),
array(
"Announcement" => array()
)
)
$announcement = array(
"Announcement" => array(
"id" => "4_80",
"class" => "workshop_announcement",
"controller" => "workshop_announcements",
"mask_eng" => "ExhibitionB2B",
"mask_hrv" => "IzložbaB2B",
"title_hrv" => "Back to Basics Radionice za najmlađe na Izložbi minijatura i maketa Agram 2026",
"title_eng" => "Back to Basics Workshops @ Exhibition of Miniatures and Tabletop Scenery Agram 2026",
"content_hrv" => "<p>
Tijekom na&scaron;e Izložbe minijatura i maketa Agram 2026 svakog radnog dana od 17:00 do 18:00 organizirat ćemo i <strong>Back to Basics radionice bojanja minijatura za najmlađe</strong> (8+).&nbsp;</p>
<p>
<a href="https://hosting.photobucket.com/95288841-8654-4bf7-8fc9-a4aa78dce87f/f73b7e94-5adc-4afb-838b-b479ea8886fd.jpg" target="_blank"><img alt="Click for enlarged picture" src="https://hosting.photobucket.com/95288841-8654-4bf7-8fc9-a4aa78dce87f/f73b7e94-5adc-4afb-838b-b479ea8886fd.jpg" width="600" /></a></p>
<p>
<strong>ULAZ BESPLATAN!</strong></p>
<p>
Radionice (trajanja cca 1h ) su prigodne za najmlađe korisnike jer se samo koriste bazične tehnike, alati i materijali a omogućava lak&scaron;i pristup minijaturizmu i maketarstvu fokusiranjem na zabavni proces izrade za razliku od uobičajenog inzistiranja na i&scaron;čekivanje krajnjeg rezultata koji najče&scaron;će donosi stres mlađim polaznicima.</p>
<p>
U svakom od termina po četiri polaznika će moći obojati i sastaviti vlastitu figuru (koju onda nose doma).</p>
",
"content_eng" => "<p>
During our Exhibition of Miniatures and Tabletop Scenery Agram 2026, every weekday from 5:00 PM to 6:00 PM, we will also organize <strong>Back to Basics miniature painting workshops for the youngest (8+)</strong>.</p>
<p>
<a href="https://hosting.photobucket.com/95288841-8654-4bf7-8fc9-a4aa78dce87f/f73b7e94-5adc-4afb-838b-b479ea8886fd.jpg" target="_blank"><img alt="Click for enlarged picture" src="https://hosting.photobucket.com/95288841-8654-4bf7-8fc9-a4aa78dce87f/f73b7e94-5adc-4afb-838b-b479ea8886fd.jpg" width="600" /></a></p>
<p>
<strong>FREE ENTRY! </strong></p>
<p>
The workshops (lasting approx. 1 hour) are suitable for the youngest users because they only use basic techniques, tools and materials and provide an easier approach to miniaturism and model making by focusing on the fun process of making, as opposed to the usual insistence on waiting for the final result, which most often brings stress to younger participants.</p>
<p>
In each session, four participants will be able to color and assemble their own figure (which they then take home).</p>
",
"created" => "2026-02-17 07:57:52",
"first_name" => "Krunoslav",
"last_name" => "Belinić",
"first_name_mask" => "krunoslav",
"last_name_mask" => "belinic",
"start" => null,
"end" => null
)
)</pre><pre class="stack-trace">include - APP/views/home/index.ctp, line 7
View::_render() - CORE/cake/libs/view/view.php, line 736
View::render() - CORE/cake/libs/view/view.php, line 431
Controller::render() - CORE/cake/libs/controller/controller.php, line 909
Dispatcher::_invoke() - CORE/cake/dispatcher.php, line 207
Dispatcher::dispatch() - CORE/cake/dispatcher.php, line 171
[main] - APP/webroot/index.php, line 86</pre></div></pre><pre class="cake-debug"><a href="javascript:void(0);" onclick="document.getElementById('cakeErr3-trace').style.display = (document.getElementById('cakeErr3-trace').style.display == 'none' ? '' : 'none');"><b>Notice</b> (8)</a>: Undefined index: mask_dok [<b>APP/views/home/index.ctp</b>, line <b>10</b>]<div id="cakeErr3-trace" class="cake-stack-trace" style="display: none;"><a href="javascript:void(0);" onclick="document.getElementById('cakeErr3-code').style.display = (document.getElementById('cakeErr3-code').style.display == 'none' ? '' : 'none')">Code</a> | <a href="javascript:void(0);" onclick="document.getElementById('cakeErr3-context').style.display = (document.getElementById('cakeErr3-context').style.display == 'none' ? '' : 'none')">Context</a><div id="cakeErr3-code" class="cake-code-dump" style="display: none;"><pre><code><span style="color: #000000"></span></code>
<code><span style="color: #000000"> if (Configure::read() > 0) {</span></code>
<span class="code-highlight"><code><span style="color: #000000"> include ($___viewFn);</span></code></span></pre></div><pre id="cakeErr3-context" class="cake-context" style="display: none;">$___viewFn = "/home/martin/apps/agram/app/views/home/index.ctp"
$___dataForView = array(
"lang" => "dok",
"otherLangs" => array(
"eng",
"hrv"
),
"globalNav" => array(
array(),
array(),
array(),
array(),
array(),
array(),
array(),
array(),
array(),
array(),
array(),
array(),
array(),
array(),
array(),
array(),
array(),
array(),
array(),
array(),
array(),
array(),
array(),
array(),
array(),
array(),
array()
),
"breadCrumbs" => array(
array()
),
"pageContents" => array(
"home_who_we_are" => null
),
"userData" => null,
"announcements" => array(
array(),
array(),
array()
)
)
$loadHelpers = true
$cached = false
$form = FormHelper
FormHelper::$helpers = array
FormHelper::$fieldset = array
FormHelper::$__options = array
FormHelper::$fields = array
FormHelper::$requestType = NULL
FormHelper::$defaultModel = NULL
FormHelper::$_inputDefaults = array
FormHelper::$_lastAction = ""
FormHelper::$base = ""
FormHelper::$webroot = "/"
FormHelper::$theme = NULL
FormHelper::$here = "/dok"
FormHelper::$params = array
FormHelper::$action = "index"
FormHelper::$plugin = NULL
FormHelper::$data = NULL
FormHelper::$namedArgs = NULL
FormHelper::$argSeparator = NULL
FormHelper::$validationErrors = NULL
FormHelper::$tags = array
FormHelper::$__tainted = NULL
FormHelper::$__cleaned = NULL
FormHelper::$Html = HtmlHelper object
$text = TextHelper
TextHelper::$helpers = NULL
TextHelper::$base = ""
TextHelper::$webroot = "/"
TextHelper::$theme = NULL
TextHelper::$here = "/dok"
TextHelper::$params = array
TextHelper::$action = "index"
TextHelper::$plugin = NULL
TextHelper::$data = NULL
TextHelper::$namedArgs = NULL
TextHelper::$argSeparator = NULL
TextHelper::$validationErrors = NULL
TextHelper::$tags = array
TextHelper::$__tainted = NULL
TextHelper::$__cleaned = NULL
$stringer = StringerHelper
StringerHelper::$helpers = array
StringerHelper::$base = ""
StringerHelper::$webroot = "/"
StringerHelper::$theme = NULL
StringerHelper::$here = "/dok"
StringerHelper::$params = array
StringerHelper::$action = "index"
StringerHelper::$plugin = NULL
StringerHelper::$data = NULL
StringerHelper::$namedArgs = NULL
StringerHelper::$argSeparator = NULL
StringerHelper::$validationErrors = NULL
StringerHelper::$tags = array
StringerHelper::$__tainted = NULL
StringerHelper::$__cleaned = NULL
StringerHelper::$Html = HtmlHelper object
StringerHelper::$Link = LinkHelper object
StringerHelper::$Text = TextHelper object
$menu = MenuHelper
MenuHelper::$helpers = array
MenuHelper::$base = ""
MenuHelper::$webroot = "/"
MenuHelper::$theme = NULL
MenuHelper::$here = "/dok"
MenuHelper::$params = array
MenuHelper::$action = "index"
MenuHelper::$plugin = NULL
MenuHelper::$data = NULL
MenuHelper::$namedArgs = NULL
MenuHelper::$argSeparator = NULL
MenuHelper::$validationErrors = NULL
MenuHelper::$tags = array
MenuHelper::$__tainted = NULL
MenuHelper::$__cleaned = NULL
MenuHelper::$Link = LinkHelper object
$session = SessionHelper
SessionHelper::$helpers = array
SessionHelper::$__active = true
SessionHelper::$valid = false
SessionHelper::$error = false
SessionHelper::$_userAgent = "f9a8355d006790ee743ededbb1f6e3bd"
SessionHelper::$path = "/"
SessionHelper::$lastError = NULL
SessionHelper::$security = "medium"
SessionHelper::$time = 1773395484
SessionHelper::$sessionTime = 1773407484
SessionHelper::$cookieLifeTime = false
SessionHelper::$watchKeys = array
SessionHelper::$id = NULL
SessionHelper::$host = NULL
SessionHelper::$timeout = NULL
SessionHelper::$base = ""
SessionHelper::$webroot = "/"
SessionHelper::$here = "/dok"
SessionHelper::$params = array
SessionHelper::$action = "index"
SessionHelper::$data = NULL
SessionHelper::$theme = NULL
SessionHelper::$plugin = NULL
$html = HtmlHelper
HtmlHelper::$tags = array
HtmlHelper::$_crumbs = array
HtmlHelper::$__includedScripts = array
HtmlHelper::$_scriptBlockOptions = array
HtmlHelper::$__docTypes = array
HtmlHelper::$helpers = NULL
HtmlHelper::$base = ""
HtmlHelper::$webroot = "/"
HtmlHelper::$theme = NULL
HtmlHelper::$here = "/dok"
HtmlHelper::$params = array
HtmlHelper::$action = "index"
HtmlHelper::$plugin = NULL
HtmlHelper::$data = NULL
HtmlHelper::$namedArgs = NULL
HtmlHelper::$argSeparator = NULL
HtmlHelper::$validationErrors = NULL
HtmlHelper::$__tainted = NULL
HtmlHelper::$__cleaned = NULL
$link = LinkHelper
LinkHelper::$helpers = array
LinkHelper::$lang = NULL
LinkHelper::$defaultLang = NULL
LinkHelper::$base = ""
LinkHelper::$webroot = "/"
LinkHelper::$theme = NULL
LinkHelper::$here = "/dok"
LinkHelper::$params = array
LinkHelper::$action = "index"
LinkHelper::$plugin = NULL
LinkHelper::$data = NULL
LinkHelper::$namedArgs = NULL
LinkHelper::$argSeparator = NULL
LinkHelper::$validationErrors = NULL
LinkHelper::$tags = array
LinkHelper::$__tainted = NULL
LinkHelper::$__cleaned = NULL
LinkHelper::$Html = HtmlHelper object
LinkHelper::$Session = SessionHelper object
$lang = "dok"
$otherLangs = array(
"eng",
"hrv"
)
$globalNav = array(
array(
"Page" => array()
),
array(
"Page" => array()
),
array(
"Page" => array()
),
array(
"Page" => array()
),
array(
"Page" => array()
),
array(
"Page" => array()
),
array(
"Page" => array()
),
array(
"Page" => array()
),
array(
"Page" => array()
),
array(
"Page" => array()
),
array(
"Page" => array()
),
array(
"Page" => array()
),
array(
"Page" => array()
),
array(
"Page" => array()
),
array(
"Page" => array()
),
array(
"Page" => array()
),
array(
"Page" => array()
),
array(
"Page" => array()
),
array(
"Page" => array()
),
array(
"Page" => array()
),
array(
"Page" => array()
),
array(
"Page" => array()
),
array(
"Page" => array()
),
array(
"Page" => array()
),
array(
"Page" => array()
),
array(
"Page" => array()
),
array(
"Page" => array()
)
)
$breadCrumbs = array(
array(
"Page" => array()
)
)
$pageContents = array(
"home_who_we_are" => null
)
$userData = null
$announcements = array(
array(
"Announcement" => array()
),
array(
"Announcement" => array()
),
array(
"Announcement" => array()
)
)
$announcement = array(
"Announcement" => array(
"id" => "4_80",
"class" => "workshop_announcement",
"controller" => "workshop_announcements",
"mask_eng" => "ExhibitionB2B",
"mask_hrv" => "IzložbaB2B",
"title_hrv" => "Back to Basics Radionice za najmlađe na Izložbi minijatura i maketa Agram 2026",
"title_eng" => "Back to Basics Workshops @ Exhibition of Miniatures and Tabletop Scenery Agram 2026",
"content_hrv" => "<p>
Tijekom na&scaron;e Izložbe minijatura i maketa Agram 2026 svakog radnog dana od 17:00 do 18:00 organizirat ćemo i <strong>Back to Basics radionice bojanja minijatura za najmlađe</strong> (8+).&nbsp;</p>
<p>
<a href="https://hosting.photobucket.com/95288841-8654-4bf7-8fc9-a4aa78dce87f/f73b7e94-5adc-4afb-838b-b479ea8886fd.jpg" target="_blank"><img alt="Click for enlarged picture" src="https://hosting.photobucket.com/95288841-8654-4bf7-8fc9-a4aa78dce87f/f73b7e94-5adc-4afb-838b-b479ea8886fd.jpg" width="600" /></a></p>
<p>
<strong>ULAZ BESPLATAN!</strong></p>
<p>
Radionice (trajanja cca 1h ) su prigodne za najmlađe korisnike jer se samo koriste bazične tehnike, alati i materijali a omogućava lak&scaron;i pristup minijaturizmu i maketarstvu fokusiranjem na zabavni proces izrade za razliku od uobičajenog inzistiranja na i&scaron;čekivanje krajnjeg rezultata koji najče&scaron;će donosi stres mlađim polaznicima.</p>
<p>
U svakom od termina po četiri polaznika će moći obojati i sastaviti vlastitu figuru (koju onda nose doma).</p>
",
"content_eng" => "<p>
During our Exhibition of Miniatures and Tabletop Scenery Agram 2026, every weekday from 5:00 PM to 6:00 PM, we will also organize <strong>Back to Basics miniature painting workshops for the youngest (8+)</strong>.</p>
<p>
<a href="https://hosting.photobucket.com/95288841-8654-4bf7-8fc9-a4aa78dce87f/f73b7e94-5adc-4afb-838b-b479ea8886fd.jpg" target="_blank"><img alt="Click for enlarged picture" src="https://hosting.photobucket.com/95288841-8654-4bf7-8fc9-a4aa78dce87f/f73b7e94-5adc-4afb-838b-b479ea8886fd.jpg" width="600" /></a></p>
<p>
<strong>FREE ENTRY! </strong></p>
<p>
The workshops (lasting approx. 1 hour) are suitable for the youngest users because they only use basic techniques, tools and materials and provide an easier approach to miniaturism and model making by focusing on the fun process of making, as opposed to the usual insistence on waiting for the final result, which most often brings stress to younger participants.</p>
<p>
In each session, four participants will be able to color and assemble their own figure (which they then take home).</p>
",
"created" => "2026-02-17 07:57:52",
"first_name" => "Krunoslav",
"last_name" => "Belinić",
"first_name_mask" => "krunoslav",
"last_name_mask" => "belinic",
"start" => null,
"end" => null
)
)</pre><pre class="stack-trace">include - APP/views/home/index.ctp, line 10
View::_render() - CORE/cake/libs/view/view.php, line 736
View::render() - CORE/cake/libs/view/view.php, line 431
Controller::render() - CORE/cake/libs/controller/controller.php, line 909
Dispatcher::_invoke() - CORE/cake/dispatcher.php, line 207
Dispatcher::dispatch() - CORE/cake/dispatcher.php, line 171
[main] - APP/webroot/index.php, line 86</pre></div></pre><a href="/dok/workshop_announcements/2026/02/17" class="readMore"></a></h3>
<span class="details">
17<span class="superscript">th</span> February 2026, post_details_1 <a href="/dok/members/krunoslav.belinic">Krunoslav Belinić</a> post_details_2 <a href="/dok/workshop_announcements">category_workshop_announcements</a> </span>
<pre class="cake-debug"><a href="javascript:void(0);" onclick="document.getElementById('cakeErr4-trace').style.display = (document.getElementById('cakeErr4-trace').style.display == 'none' ? '' : 'none');"><b>Notice</b> (8)</a>: Undefined index: content_dok [<b>APP/views/home/index.ctp</b>, line <b>32</b>]<div id="cakeErr4-trace" class="cake-stack-trace" style="display: none;"><a href="javascript:void(0);" onclick="document.getElementById('cakeErr4-code').style.display = (document.getElementById('cakeErr4-code').style.display == 'none' ? '' : 'none')">Code</a> | <a href="javascript:void(0);" onclick="document.getElementById('cakeErr4-context').style.display = (document.getElementById('cakeErr4-context').style.display == 'none' ? '' : 'none')">Context</a><div id="cakeErr4-code" class="cake-code-dump" style="display: none;"><pre><code><span style="color: #000000"></span></code>
<code><span style="color: #000000"> if (Configure::read() > 0) {</span></code>
<span class="code-highlight"><code><span style="color: #000000"> include ($___viewFn);</span></code></span></pre></div><pre id="cakeErr4-context" class="cake-context" style="display: none;">$___viewFn = "/home/martin/apps/agram/app/views/home/index.ctp"
$___dataForView = array(
"lang" => "dok",
"otherLangs" => array(
"eng",
"hrv"
),
"globalNav" => array(
array(),
array(),
array(),
array(),
array(),
array(),
array(),
array(),
array(),
array(),
array(),
array(),
array(),
array(),
array(),
array(),
array(),
array(),
array(),
array(),
array(),
array(),
array(),
array(),
array(),
array(),
array()
),
"breadCrumbs" => array(
array()
),
"pageContents" => array(
"home_who_we_are" => null
),
"userData" => null,
"announcements" => array(
array(),
array(),
array()
)
)
$loadHelpers = true
$cached = false
$form = FormHelper
FormHelper::$helpers = array
FormHelper::$fieldset = array
FormHelper::$__options = array
FormHelper::$fields = array
FormHelper::$requestType = NULL
FormHelper::$defaultModel = NULL
FormHelper::$_inputDefaults = array
FormHelper::$_lastAction = ""
FormHelper::$base = ""
FormHelper::$webroot = "/"
FormHelper::$theme = NULL
FormHelper::$here = "/dok"
FormHelper::$params = array
FormHelper::$action = "index"
FormHelper::$plugin = NULL
FormHelper::$data = NULL
FormHelper::$namedArgs = NULL
FormHelper::$argSeparator = NULL
FormHelper::$validationErrors = NULL
FormHelper::$tags = array
FormHelper::$__tainted = NULL
FormHelper::$__cleaned = NULL
FormHelper::$Html = HtmlHelper object
$text = TextHelper
TextHelper::$helpers = NULL
TextHelper::$base = ""
TextHelper::$webroot = "/"
TextHelper::$theme = NULL
TextHelper::$here = "/dok"
TextHelper::$params = array
TextHelper::$action = "index"
TextHelper::$plugin = NULL
TextHelper::$data = NULL
TextHelper::$namedArgs = NULL
TextHelper::$argSeparator = NULL
TextHelper::$validationErrors = NULL
TextHelper::$tags = array
TextHelper::$__tainted = NULL
TextHelper::$__cleaned = NULL
$stringer = StringerHelper
StringerHelper::$helpers = array
StringerHelper::$base = ""
StringerHelper::$webroot = "/"
StringerHelper::$theme = NULL
StringerHelper::$here = "/dok"
StringerHelper::$params = array
StringerHelper::$action = "index"
StringerHelper::$plugin = NULL
StringerHelper::$data = NULL
StringerHelper::$namedArgs = NULL
StringerHelper::$argSeparator = NULL
StringerHelper::$validationErrors = NULL
StringerHelper::$tags = array
StringerHelper::$__tainted = NULL
StringerHelper::$__cleaned = NULL
StringerHelper::$Html = HtmlHelper object
StringerHelper::$Link = LinkHelper object
StringerHelper::$Text = TextHelper object
$menu = MenuHelper
MenuHelper::$helpers = array
MenuHelper::$base = ""
MenuHelper::$webroot = "/"
MenuHelper::$theme = NULL
MenuHelper::$here = "/dok"
MenuHelper::$params = array
MenuHelper::$action = "index"
MenuHelper::$plugin = NULL
MenuHelper::$data = NULL
MenuHelper::$namedArgs = NULL
MenuHelper::$argSeparator = NULL
MenuHelper::$validationErrors = NULL
MenuHelper::$tags = array
MenuHelper::$__tainted = NULL
MenuHelper::$__cleaned = NULL
MenuHelper::$Link = LinkHelper object
$session = SessionHelper
SessionHelper::$helpers = array
SessionHelper::$__active = true
SessionHelper::$valid = false
SessionHelper::$error = false
SessionHelper::$_userAgent = "f9a8355d006790ee743ededbb1f6e3bd"
SessionHelper::$path = "/"
SessionHelper::$lastError = NULL
SessionHelper::$security = "medium"
SessionHelper::$time = 1773395484
SessionHelper::$sessionTime = 1773407484
SessionHelper::$cookieLifeTime = false
SessionHelper::$watchKeys = array
SessionHelper::$id = NULL
SessionHelper::$host = NULL
SessionHelper::$timeout = NULL
SessionHelper::$base = ""
SessionHelper::$webroot = "/"
SessionHelper::$here = "/dok"
SessionHelper::$params = array
SessionHelper::$action = "index"
SessionHelper::$data = NULL
SessionHelper::$theme = NULL
SessionHelper::$plugin = NULL
$html = HtmlHelper
HtmlHelper::$tags = array
HtmlHelper::$_crumbs = array
HtmlHelper::$__includedScripts = array
HtmlHelper::$_scriptBlockOptions = array
HtmlHelper::$__docTypes = array
HtmlHelper::$helpers = NULL
HtmlHelper::$base = ""
HtmlHelper::$webroot = "/"
HtmlHelper::$theme = NULL
HtmlHelper::$here = "/dok"
HtmlHelper::$params = array
HtmlHelper::$action = "index"
HtmlHelper::$plugin = NULL
HtmlHelper::$data = NULL
HtmlHelper::$namedArgs = NULL
HtmlHelper::$argSeparator = NULL
HtmlHelper::$validationErrors = NULL
HtmlHelper::$__tainted = NULL
HtmlHelper::$__cleaned = NULL
$link = LinkHelper
LinkHelper::$helpers = array
LinkHelper::$lang = "dok"
LinkHelper::$defaultLang = "hrv"
LinkHelper::$base = ""
LinkHelper::$webroot = "/"
LinkHelper::$theme = NULL
LinkHelper::$here = "/dok"
LinkHelper::$params = array
LinkHelper::$action = "index"
LinkHelper::$plugin = NULL
LinkHelper::$data = NULL
LinkHelper::$namedArgs = NULL
LinkHelper::$argSeparator = NULL
LinkHelper::$validationErrors = NULL
LinkHelper::$tags = array
LinkHelper::$__tainted = NULL
LinkHelper::$__cleaned = NULL
LinkHelper::$Html = HtmlHelper object
LinkHelper::$Session = SessionHelper object
$lang = "dok"
$otherLangs = array(
"eng",
"hrv"
)
$globalNav = array(
array(
"Page" => array()
),
array(
"Page" => array()
),
array(
"Page" => array()
),
array(
"Page" => array()
),
array(
"Page" => array()
),
array(
"Page" => array()
),
array(
"Page" => array()
),
array(
"Page" => array()
),
array(
"Page" => array()
),
array(
"Page" => array()
),
array(
"Page" => array()
),
array(
"Page" => array()
),
array(
"Page" => array()
),
array(
"Page" => array()
),
array(
"Page" => array()
),
array(
"Page" => array()
),
array(
"Page" => array()
),
array(
"Page" => array()
),
array(
"Page" => array()
),
array(
"Page" => array()
),
array(
"Page" => array()
),
array(
"Page" => array()
),
array(
"Page" => array()
),
array(
"Page" => array()
),
array(
"Page" => array()
),
array(
"Page" => array()
),
array(
"Page" => array()
)
)
$breadCrumbs = array(
array(
"Page" => array()
)
)
$pageContents = array(
"home_who_we_are" => null
)
$userData = null
$announcements = array(
array(
"Announcement" => array()
),
array(
"Announcement" => array()
),
array(
"Announcement" => array()
)
)
$announcement = array(
"Announcement" => array(
"id" => "4_80",
"class" => "workshop_announcement",
"controller" => "workshop_announcements",
"mask_eng" => "ExhibitionB2B",
"mask_hrv" => "IzložbaB2B",
"title_hrv" => "Back to Basics Radionice za najmlađe na Izložbi minijatura i maketa Agram 2026",
"title_eng" => "Back to Basics Workshops @ Exhibition of Miniatures and Tabletop Scenery Agram 2026",
"content_hrv" => "<p>
Tijekom na&scaron;e Izložbe minijatura i maketa Agram 2026 svakog radnog dana od 17:00 do 18:00 organizirat ćemo i <strong>Back to Basics radionice bojanja minijatura za najmlađe</strong> (8+).&nbsp;</p>
<p>
<a href="https://hosting.photobucket.com/95288841-8654-4bf7-8fc9-a4aa78dce87f/f73b7e94-5adc-4afb-838b-b479ea8886fd.jpg" target="_blank"><img alt="Click for enlarged picture" src="https://hosting.photobucket.com/95288841-8654-4bf7-8fc9-a4aa78dce87f/f73b7e94-5adc-4afb-838b-b479ea8886fd.jpg" width="600" /></a></p>
<p>
<strong>ULAZ BESPLATAN!</strong></p>
<p>
Radionice (trajanja cca 1h ) su prigodne za najmlađe korisnike jer se samo koriste bazične tehnike, alati i materijali a omogućava lak&scaron;i pristup minijaturizmu i maketarstvu fokusiranjem na zabavni proces izrade za razliku od uobičajenog inzistiranja na i&scaron;čekivanje krajnjeg rezultata koji najče&scaron;će donosi stres mlađim polaznicima.</p>
<p>
U svakom od termina po četiri polaznika će moći obojati i sastaviti vlastitu figuru (koju onda nose doma).</p>
",
"content_eng" => "<p>
During our Exhibition of Miniatures and Tabletop Scenery Agram 2026, every weekday from 5:00 PM to 6:00 PM, we will also organize <strong>Back to Basics miniature painting workshops for the youngest (8+)</strong>.</p>
<p>
<a href="https://hosting.photobucket.com/95288841-8654-4bf7-8fc9-a4aa78dce87f/f73b7e94-5adc-4afb-838b-b479ea8886fd.jpg" target="_blank"><img alt="Click for enlarged picture" src="https://hosting.photobucket.com/95288841-8654-4bf7-8fc9-a4aa78dce87f/f73b7e94-5adc-4afb-838b-b479ea8886fd.jpg" width="600" /></a></p>
<p>
<strong>FREE ENTRY! </strong></p>
<p>
The workshops (lasting approx. 1 hour) are suitable for the youngest users because they only use basic techniques, tools and materials and provide an easier approach to miniaturism and model making by focusing on the fun process of making, as opposed to the usual insistence on waiting for the final result, which most often brings stress to younger participants.</p>
<p>
In each session, four participants will be able to color and assemble their own figure (which they then take home).</p>
",
"created" => "2026-02-17 07:57:52",
"first_name" => "Krunoslav",
"last_name" => "Belinić",
"first_name_mask" => "krunoslav",
"last_name_mask" => "belinic",
"start" => null,
"end" => null
)
)
$member = array(
"first_name" => "Krunoslav",
"last_name" => "Belinić",
"first_name_mask" => "krunoslav",
"last_name_mask" => "belinic"
)
$dateCreated = "2026-02-17 07:57:52"</pre><pre class="stack-trace">include - APP/views/home/index.ctp, line 32
View::_render() - CORE/cake/libs/view/view.php, line 736
View::render() - CORE/cake/libs/view/view.php, line 431
Controller::render() - CORE/cake/libs/controller/controller.php, line 909
Dispatcher::_invoke() - CORE/cake/dispatcher.php, line 207
Dispatcher::dispatch() - CORE/cake/dispatcher.php, line 171
[main] - APP/webroot/index.php, line 86</pre></div></pre><pre class="cake-debug"><a href="javascript:void(0);" onclick="document.getElementById('cakeErr5-trace').style.display = (document.getElementById('cakeErr5-trace').style.display == 'none' ? '' : 'none');"><b>Notice</b> (8)</a>: Undefined index: title_dok [<b>APP/views/home/index.ctp</b>, line <b>34</b>]<div id="cakeErr5-trace" class="cake-stack-trace" style="display: none;"><a href="javascript:void(0);" onclick="document.getElementById('cakeErr5-code').style.display = (document.getElementById('cakeErr5-code').style.display == 'none' ? '' : 'none')">Code</a> | <a href="javascript:void(0);" onclick="document.getElementById('cakeErr5-context').style.display = (document.getElementById('cakeErr5-context').style.display == 'none' ? '' : 'none')">Context</a><div id="cakeErr5-code" class="cake-code-dump" style="display: none;"><pre><code><span style="color: #000000"></span></code>
<code><span style="color: #000000"> if (Configure::read() > 0) {</span></code>
<span class="code-highlight"><code><span style="color: #000000"> include ($___viewFn);</span></code></span></pre></div><pre id="cakeErr5-context" class="cake-context" style="display: none;">$___viewFn = "/home/martin/apps/agram/app/views/home/index.ctp"
$___dataForView = array(
"lang" => "dok",
"otherLangs" => array(
"eng",
"hrv"
),
"globalNav" => array(
array(),
array(),
array(),
array(),
array(),
array(),
array(),
array(),
array(),
array(),
array(),
array(),
array(),
array(),
array(),
array(),
array(),
array(),
array(),
array(),
array(),
array(),
array(),
array(),
array(),
array(),
array()
),
"breadCrumbs" => array(
array()
),
"pageContents" => array(
"home_who_we_are" => null
),
"userData" => null,
"announcements" => array(
array(),
array(),
array()
)
)
$loadHelpers = true
$cached = false
$form = FormHelper
FormHelper::$helpers = array
FormHelper::$fieldset = array
FormHelper::$__options = array
FormHelper::$fields = array
FormHelper::$requestType = NULL
FormHelper::$defaultModel = NULL
FormHelper::$_inputDefaults = array
FormHelper::$_lastAction = ""
FormHelper::$base = ""
FormHelper::$webroot = "/"
FormHelper::$theme = NULL
FormHelper::$here = "/dok"
FormHelper::$params = array
FormHelper::$action = "index"
FormHelper::$plugin = NULL
FormHelper::$data = NULL
FormHelper::$namedArgs = NULL
FormHelper::$argSeparator = NULL
FormHelper::$validationErrors = NULL
FormHelper::$tags = array
FormHelper::$__tainted = NULL
FormHelper::$__cleaned = NULL
FormHelper::$Html = HtmlHelper object
$text = TextHelper
TextHelper::$helpers = NULL
TextHelper::$base = ""
TextHelper::$webroot = "/"
TextHelper::$theme = NULL
TextHelper::$here = "/dok"
TextHelper::$params = array
TextHelper::$action = "index"
TextHelper::$plugin = NULL
TextHelper::$data = NULL
TextHelper::$namedArgs = NULL
TextHelper::$argSeparator = NULL
TextHelper::$validationErrors = NULL
TextHelper::$tags = array
TextHelper::$__tainted = NULL
TextHelper::$__cleaned = NULL
$stringer = StringerHelper
StringerHelper::$helpers = array
StringerHelper::$base = ""
StringerHelper::$webroot = "/"
StringerHelper::$theme = NULL
StringerHelper::$here = "/dok"
StringerHelper::$params = array
StringerHelper::$action = "index"
StringerHelper::$plugin = NULL
StringerHelper::$data = NULL
StringerHelper::$namedArgs = NULL
StringerHelper::$argSeparator = NULL
StringerHelper::$validationErrors = NULL
StringerHelper::$tags = array
StringerHelper::$__tainted = NULL
StringerHelper::$__cleaned = NULL
StringerHelper::$Html = HtmlHelper object
StringerHelper::$Link = LinkHelper object
StringerHelper::$Text = TextHelper object
$menu = MenuHelper
MenuHelper::$helpers = array
MenuHelper::$base = ""
MenuHelper::$webroot = "/"
MenuHelper::$theme = NULL
MenuHelper::$here = "/dok"
MenuHelper::$params = array
MenuHelper::$action = "index"
MenuHelper::$plugin = NULL
MenuHelper::$data = NULL
MenuHelper::$namedArgs = NULL
MenuHelper::$argSeparator = NULL
MenuHelper::$validationErrors = NULL
MenuHelper::$tags = array
MenuHelper::$__tainted = NULL
MenuHelper::$__cleaned = NULL
MenuHelper::$Link = LinkHelper object
$session = SessionHelper
SessionHelper::$helpers = array
SessionHelper::$__active = true
SessionHelper::$valid = false
SessionHelper::$error = false
SessionHelper::$_userAgent = "f9a8355d006790ee743ededbb1f6e3bd"
SessionHelper::$path = "/"
SessionHelper::$lastError = NULL
SessionHelper::$security = "medium"
SessionHelper::$time = 1773395484
SessionHelper::$sessionTime = 1773407484
SessionHelper::$cookieLifeTime = false
SessionHelper::$watchKeys = array
SessionHelper::$id = NULL
SessionHelper::$host = NULL
SessionHelper::$timeout = NULL
SessionHelper::$base = ""
SessionHelper::$webroot = "/"
SessionHelper::$here = "/dok"
SessionHelper::$params = array
SessionHelper::$action = "index"
SessionHelper::$data = NULL
SessionHelper::$theme = NULL
SessionHelper::$plugin = NULL
$html = HtmlHelper
HtmlHelper::$tags = array
HtmlHelper::$_crumbs = array
HtmlHelper::$__includedScripts = array
HtmlHelper::$_scriptBlockOptions = array
HtmlHelper::$__docTypes = array
HtmlHelper::$helpers = NULL
HtmlHelper::$base = ""
HtmlHelper::$webroot = "/"
HtmlHelper::$theme = NULL
HtmlHelper::$here = "/dok"
HtmlHelper::$params = array
HtmlHelper::$action = "index"
HtmlHelper::$plugin = NULL
HtmlHelper::$data = NULL
HtmlHelper::$namedArgs = NULL
HtmlHelper::$argSeparator = NULL
HtmlHelper::$validationErrors = NULL
HtmlHelper::$__tainted = NULL
HtmlHelper::$__cleaned = NULL
$link = LinkHelper
LinkHelper::$helpers = array
LinkHelper::$lang = "dok"
LinkHelper::$defaultLang = "hrv"
LinkHelper::$base = ""
LinkHelper::$webroot = "/"
LinkHelper::$theme = NULL
LinkHelper::$here = "/dok"
LinkHelper::$params = array
LinkHelper::$action = "index"
LinkHelper::$plugin = NULL
LinkHelper::$data = NULL
LinkHelper::$namedArgs = NULL
LinkHelper::$argSeparator = NULL
LinkHelper::$validationErrors = NULL
LinkHelper::$tags = array
LinkHelper::$__tainted = NULL
LinkHelper::$__cleaned = NULL
LinkHelper::$Html = HtmlHelper object
LinkHelper::$Session = SessionHelper object
$lang = "dok"
$otherLangs = array(
"eng",
"hrv"
)
$globalNav = array(
array(
"Page" => array()
),
array(
"Page" => array()
),
array(
"Page" => array()
),
array(
"Page" => array()
),
array(
"Page" => array()
),
array(
"Page" => array()
),
array(
"Page" => array()
),
array(
"Page" => array()
),
array(
"Page" => array()
),
array(
"Page" => array()
),
array(
"Page" => array()
),
array(
"Page" => array()
),
array(
"Page" => array()
),
array(
"Page" => array()
),
array(
"Page" => array()
),
array(
"Page" => array()
),
array(
"Page" => array()
),
array(
"Page" => array()
),
array(
"Page" => array()
),
array(
"Page" => array()
),
array(
"Page" => array()
),
array(
"Page" => array()
),
array(
"Page" => array()
),
array(
"Page" => array()
),
array(
"Page" => array()
),
array(
"Page" => array()
),
array(
"Page" => array()
)
)
$breadCrumbs = array(
array(
"Page" => array()
)
)
$pageContents = array(
"home_who_we_are" => null
)
$userData = null
$announcements = array(
array(
"Announcement" => array()
),
array(
"Announcement" => array()
),
array(
"Announcement" => array()
)
)
$announcement = array(
"Announcement" => array(
"id" => "4_80",
"class" => "workshop_announcement",
"controller" => "workshop_announcements",
"mask_eng" => "ExhibitionB2B",
"mask_hrv" => "IzložbaB2B",
"title_hrv" => "Back to Basics Radionice za najmlađe na Izložbi minijatura i maketa Agram 2026",
"title_eng" => "Back to Basics Workshops @ Exhibition of Miniatures and Tabletop Scenery Agram 2026",
"content_hrv" => "<p>
Tijekom na&scaron;e Izložbe minijatura i maketa Agram 2026 svakog radnog dana od 17:00 do 18:00 organizirat ćemo i <strong>Back to Basics radionice bojanja minijatura za najmlađe</strong> (8+).&nbsp;</p>
<p>
<a href="https://hosting.photobucket.com/95288841-8654-4bf7-8fc9-a4aa78dce87f/f73b7e94-5adc-4afb-838b-b479ea8886fd.jpg" target="_blank"><img alt="Click for enlarged picture" src="https://hosting.photobucket.com/95288841-8654-4bf7-8fc9-a4aa78dce87f/f73b7e94-5adc-4afb-838b-b479ea8886fd.jpg" width="600" /></a></p>
<p>
<strong>ULAZ BESPLATAN!</strong></p>
<p>
Radionice (trajanja cca 1h ) su prigodne za najmlađe korisnike jer se samo koriste bazične tehnike, alati i materijali a omogućava lak&scaron;i pristup minijaturizmu i maketarstvu fokusiranjem na zabavni proces izrade za razliku od uobičajenog inzistiranja na i&scaron;čekivanje krajnjeg rezultata koji najče&scaron;će donosi stres mlađim polaznicima.</p>
<p>
U svakom od termina po četiri polaznika će moći obojati i sastaviti vlastitu figuru (koju onda nose doma).</p>
",
"content_eng" => "<p>
During our Exhibition of Miniatures and Tabletop Scenery Agram 2026, every weekday from 5:00 PM to 6:00 PM, we will also organize <strong>Back to Basics miniature painting workshops for the youngest (8+)</strong>.</p>
<p>
<a href="https://hosting.photobucket.com/95288841-8654-4bf7-8fc9-a4aa78dce87f/f73b7e94-5adc-4afb-838b-b479ea8886fd.jpg" target="_blank"><img alt="Click for enlarged picture" src="https://hosting.photobucket.com/95288841-8654-4bf7-8fc9-a4aa78dce87f/f73b7e94-5adc-4afb-838b-b479ea8886fd.jpg" width="600" /></a></p>
<p>
<strong>FREE ENTRY! </strong></p>
<p>
The workshops (lasting approx. 1 hour) are suitable for the youngest users because they only use basic techniques, tools and materials and provide an easier approach to miniaturism and model making by focusing on the fun process of making, as opposed to the usual insistence on waiting for the final result, which most often brings stress to younger participants.</p>
<p>
In each session, four participants will be able to color and assemble their own figure (which they then take home).</p>
",
"created" => "2026-02-17 07:57:52",
"first_name" => "Krunoslav",
"last_name" => "Belinić",
"first_name_mask" => "krunoslav",
"last_name_mask" => "belinic",
"start" => null,
"end" => null
)
)
$member = array(
"first_name" => "Krunoslav",
"last_name" => "Belinić",
"first_name_mask" => "krunoslav",
"last_name_mask" => "belinic"
)
$dateCreated = "2026-02-17 07:57:52"</pre><pre class="stack-trace">include - APP/views/home/index.ctp, line 34
View::_render() - CORE/cake/libs/view/view.php, line 736
View::render() - CORE/cake/libs/view/view.php, line 431
Controller::render() - CORE/cake/libs/controller/controller.php, line 909
Dispatcher::_invoke() - CORE/cake/dispatcher.php, line 207
Dispatcher::dispatch() - CORE/cake/dispatcher.php, line 171
[main] - APP/webroot/index.php, line 86</pre></div></pre><pre class="cake-debug"><a href="javascript:void(0);" onclick="document.getElementById('cakeErr6-trace').style.display = (document.getElementById('cakeErr6-trace').style.display == 'none' ? '' : 'none');"><b>Notice</b> (8)</a>: Undefined index: mask_dok [<b>APP/views/home/index.ctp</b>, line <b>37</b>]<div id="cakeErr6-trace" class="cake-stack-trace" style="display: none;"><a href="javascript:void(0);" onclick="document.getElementById('cakeErr6-code').style.display = (document.getElementById('cakeErr6-code').style.display == 'none' ? '' : 'none')">Code</a> | <a href="javascript:void(0);" onclick="document.getElementById('cakeErr6-context').style.display = (document.getElementById('cakeErr6-context').style.display == 'none' ? '' : 'none')">Context</a><div id="cakeErr6-code" class="cake-code-dump" style="display: none;"><pre><code><span style="color: #000000"></span></code>
<code><span style="color: #000000"> if (Configure::read() > 0) {</span></code>
<span class="code-highlight"><code><span style="color: #000000"> include ($___viewFn);</span></code></span></pre></div><pre id="cakeErr6-context" class="cake-context" style="display: none;">$___viewFn = "/home/martin/apps/agram/app/views/home/index.ctp"
$___dataForView = array(
"lang" => "dok",
"otherLangs" => array(
"eng",
"hrv"
),
"globalNav" => array(
array(),
array(),
array(),
array(),
array(),
array(),
array(),
array(),
array(),
array(),
array(),
array(),
array(),
array(),
array(),
array(),
array(),
array(),
array(),
array(),
array(),
array(),
array(),
array(),
array(),
array(),
array()
),
"breadCrumbs" => array(
array()
),
"pageContents" => array(
"home_who_we_are" => null
),
"userData" => null,
"announcements" => array(
array(),
array(),
array()
)
)
$loadHelpers = true
$cached = false
$form = FormHelper
FormHelper::$helpers = array
FormHelper::$fieldset = array
FormHelper::$__options = array
FormHelper::$fields = array
FormHelper::$requestType = NULL
FormHelper::$defaultModel = NULL
FormHelper::$_inputDefaults = array
FormHelper::$_lastAction = ""
FormHelper::$base = ""
FormHelper::$webroot = "/"
FormHelper::$theme = NULL
FormHelper::$here = "/dok"
FormHelper::$params = array
FormHelper::$action = "index"
FormHelper::$plugin = NULL
FormHelper::$data = NULL
FormHelper::$namedArgs = NULL
FormHelper::$argSeparator = NULL
FormHelper::$validationErrors = NULL
FormHelper::$tags = array
FormHelper::$__tainted = NULL
FormHelper::$__cleaned = NULL
FormHelper::$Html = HtmlHelper object
$text = TextHelper
TextHelper::$helpers = NULL
TextHelper::$base = ""
TextHelper::$webroot = "/"
TextHelper::$theme = NULL
TextHelper::$here = "/dok"
TextHelper::$params = array
TextHelper::$action = "index"
TextHelper::$plugin = NULL
TextHelper::$data = NULL
TextHelper::$namedArgs = NULL
TextHelper::$argSeparator = NULL
TextHelper::$validationErrors = NULL
TextHelper::$tags = array
TextHelper::$__tainted = NULL
TextHelper::$__cleaned = NULL
$stringer = StringerHelper
StringerHelper::$helpers = array
StringerHelper::$base = ""
StringerHelper::$webroot = "/"
StringerHelper::$theme = NULL
StringerHelper::$here = "/dok"
StringerHelper::$params = array
StringerHelper::$action = "index"
StringerHelper::$plugin = NULL
StringerHelper::$data = NULL
StringerHelper::$namedArgs = NULL
StringerHelper::$argSeparator = NULL
StringerHelper::$validationErrors = NULL
StringerHelper::$tags = array
StringerHelper::$__tainted = NULL
StringerHelper::$__cleaned = NULL
StringerHelper::$Html = HtmlHelper object
StringerHelper::$Link = LinkHelper object
StringerHelper::$Text = TextHelper object
$menu = MenuHelper
MenuHelper::$helpers = array
MenuHelper::$base = ""
MenuHelper::$webroot = "/"
MenuHelper::$theme = NULL
MenuHelper::$here = "/dok"
MenuHelper::$params = array
MenuHelper::$action = "index"
MenuHelper::$plugin = NULL
MenuHelper::$data = NULL
MenuHelper::$namedArgs = NULL
MenuHelper::$argSeparator = NULL
MenuHelper::$validationErrors = NULL
MenuHelper::$tags = array
MenuHelper::$__tainted = NULL
MenuHelper::$__cleaned = NULL
MenuHelper::$Link = LinkHelper object
$session = SessionHelper
SessionHelper::$helpers = array
SessionHelper::$__active = true
SessionHelper::$valid = false
SessionHelper::$error = false
SessionHelper::$_userAgent = "f9a8355d006790ee743ededbb1f6e3bd"
SessionHelper::$path = "/"
SessionHelper::$lastError = NULL
SessionHelper::$security = "medium"
SessionHelper::$time = 1773395484
SessionHelper::$sessionTime = 1773407484
SessionHelper::$cookieLifeTime = false
SessionHelper::$watchKeys = array
SessionHelper::$id = NULL
SessionHelper::$host = NULL
SessionHelper::$timeout = NULL
SessionHelper::$base = ""
SessionHelper::$webroot = "/"
SessionHelper::$here = "/dok"
SessionHelper::$params = array
SessionHelper::$action = "index"
SessionHelper::$data = NULL
SessionHelper::$theme = NULL
SessionHelper::$plugin = NULL
$html = HtmlHelper
HtmlHelper::$tags = array
HtmlHelper::$_crumbs = array
HtmlHelper::$__includedScripts = array
HtmlHelper::$_scriptBlockOptions = array
HtmlHelper::$__docTypes = array
HtmlHelper::$helpers = NULL
HtmlHelper::$base = ""
HtmlHelper::$webroot = "/"
HtmlHelper::$theme = NULL
HtmlHelper::$here = "/dok"
HtmlHelper::$params = array
HtmlHelper::$action = "index"
HtmlHelper::$plugin = NULL
HtmlHelper::$data = NULL
HtmlHelper::$namedArgs = NULL
HtmlHelper::$argSeparator = NULL
HtmlHelper::$validationErrors = NULL
HtmlHelper::$__tainted = NULL
HtmlHelper::$__cleaned = NULL
$link = LinkHelper
LinkHelper::$helpers = array
LinkHelper::$lang = "dok"
LinkHelper::$defaultLang = "hrv"
LinkHelper::$base = ""
LinkHelper::$webroot = "/"
LinkHelper::$theme = NULL
LinkHelper::$here = "/dok"
LinkHelper::$params = array
LinkHelper::$action = "index"
LinkHelper::$plugin = NULL
LinkHelper::$data = NULL
LinkHelper::$namedArgs = NULL
LinkHelper::$argSeparator = NULL
LinkHelper::$validationErrors = NULL
LinkHelper::$tags = array
LinkHelper::$__tainted = NULL
LinkHelper::$__cleaned = NULL
LinkHelper::$Html = HtmlHelper object
LinkHelper::$Session = SessionHelper object
$lang = "dok"
$otherLangs = array(
"eng",
"hrv"
)
$globalNav = array(
array(
"Page" => array()
),
array(
"Page" => array()
),
array(
"Page" => array()
),
array(
"Page" => array()
),
array(
"Page" => array()
),
array(
"Page" => array()
),
array(
"Page" => array()
),
array(
"Page" => array()
),
array(
"Page" => array()
),
array(
"Page" => array()
),
array(
"Page" => array()
),
array(
"Page" => array()
),
array(
"Page" => array()
),
array(
"Page" => array()
),
array(
"Page" => array()
),
array(
"Page" => array()
),
array(
"Page" => array()
),
array(
"Page" => array()
),
array(
"Page" => array()
),
array(
"Page" => array()
),
array(
"Page" => array()
),
array(
"Page" => array()
),
array(
"Page" => array()
),
array(
"Page" => array()
),
array(
"Page" => array()
),
array(
"Page" => array()
),
array(
"Page" => array()
)
)
$breadCrumbs = array(
array(
"Page" => array()
)
)
$pageContents = array(
"home_who_we_are" => null
)
$userData = null
$announcements = array(
array(
"Announcement" => array()
),
array(
"Announcement" => array()
),
array(
"Announcement" => array()
)
)
$announcement = array(
"Announcement" => array(
"id" => "4_80",
"class" => "workshop_announcement",
"controller" => "workshop_announcements",
"mask_eng" => "ExhibitionB2B",
"mask_hrv" => "IzložbaB2B",
"title_hrv" => "Back to Basics Radionice za najmlađe na Izložbi minijatura i maketa Agram 2026",
"title_eng" => "Back to Basics Workshops @ Exhibition of Miniatures and Tabletop Scenery Agram 2026",
"content_hrv" => "<p>
Tijekom na&scaron;e Izložbe minijatura i maketa Agram 2026 svakog radnog dana od 17:00 do 18:00 organizirat ćemo i <strong>Back to Basics radionice bojanja minijatura za najmlađe</strong> (8+).&nbsp;</p>
<p>
<a href="https://hosting.photobucket.com/95288841-8654-4bf7-8fc9-a4aa78dce87f/f73b7e94-5adc-4afb-838b-b479ea8886fd.jpg" target="_blank"><img alt="Click for enlarged picture" src="https://hosting.photobucket.com/95288841-8654-4bf7-8fc9-a4aa78dce87f/f73b7e94-5adc-4afb-838b-b479ea8886fd.jpg" width="600" /></a></p>
<p>
<strong>ULAZ BESPLATAN!</strong></p>
<p>
Radionice (trajanja cca 1h ) su prigodne za najmlađe korisnike jer se samo koriste bazične tehnike, alati i materijali a omogućava lak&scaron;i pristup minijaturizmu i maketarstvu fokusiranjem na zabavni proces izrade za razliku od uobičajenog inzistiranja na i&scaron;čekivanje krajnjeg rezultata koji najče&scaron;će donosi stres mlađim polaznicima.</p>
<p>
U svakom od termina po četiri polaznika će moći obojati i sastaviti vlastitu figuru (koju onda nose doma).</p>
",
"content_eng" => "<p>
During our Exhibition of Miniatures and Tabletop Scenery Agram 2026, every weekday from 5:00 PM to 6:00 PM, we will also organize <strong>Back to Basics miniature painting workshops for the youngest (8+)</strong>.</p>
<p>
<a href="https://hosting.photobucket.com/95288841-8654-4bf7-8fc9-a4aa78dce87f/f73b7e94-5adc-4afb-838b-b479ea8886fd.jpg" target="_blank"><img alt="Click for enlarged picture" src="https://hosting.photobucket.com/95288841-8654-4bf7-8fc9-a4aa78dce87f/f73b7e94-5adc-4afb-838b-b479ea8886fd.jpg" width="600" /></a></p>
<p>
<strong>FREE ENTRY! </strong></p>
<p>
The workshops (lasting approx. 1 hour) are suitable for the youngest users because they only use basic techniques, tools and materials and provide an easier approach to miniaturism and model making by focusing on the fun process of making, as opposed to the usual insistence on waiting for the final result, which most often brings stress to younger participants.</p>
<p>
In each session, four participants will be able to color and assemble their own figure (which they then take home).</p>
",
"created" => "2026-02-17 07:57:52",
"first_name" => "Krunoslav",
"last_name" => "Belinić",
"first_name_mask" => "krunoslav",
"last_name_mask" => "belinic",
"start" => null,
"end" => null
)
)
$member = array(
"first_name" => "Krunoslav",
"last_name" => "Belinić",
"first_name_mask" => "krunoslav",
"last_name_mask" => "belinic"
)
$dateCreated = "2026-02-17 07:57:52"</pre><pre class="stack-trace">include - APP/views/home/index.ctp, line 37
View::_render() - CORE/cake/libs/view/view.php, line 736
View::render() - CORE/cake/libs/view/view.php, line 431
Controller::render() - CORE/cake/libs/controller/controller.php, line 909
Dispatcher::_invoke() - CORE/cake/dispatcher.php, line 207
Dispatcher::dispatch() - CORE/cake/dispatcher.php, line 171
[main] - APP/webroot/index.php, line 86</pre></div></pre> </div>
<div class="announcement workshop_announcement">
<h3><a href="/dok/workshop_announcements/2026/02/17" class="readMore"></a></h3>
<span class="details">
17<span class="superscript">th</span> February 2026, post_details_1 <a href="/dok/members/krunoslav.belinic">Krunoslav Belinić</a> post_details_2 <a href="/dok/workshop_announcements">category_workshop_announcements</a> </span>
</div>
<div class="announcement workshop_announcement">
<h3><a href="/dok/workshop_announcements/2026/02/06" class="readMore"></a></h3>
<span class="details">
6<span class="superscript">th</span> February 2026, post_details_1 <a href="/dok/members/marko.paunovic">Marko Paunović</a> post_details_2 <a href="/dok/workshop_announcements">category_workshop_announcements</a> </span>
</div>
<p><a href="/dok/announcements">all_announcements</a></p>
</div>
<div id="middleColumn">
<!--<div id="hotStuff">
hot_tournaments<br/></div>-->
<div id="hotSponsor">
</div><h2>latest_articles</h2>
<ul class="latest">
<li>
<pre class="cake-debug"><a href="javascript:void(0);" onclick="document.getElementById('cakeErr7-trace').style.display = (document.getElementById('cakeErr7-trace').style.display == 'none' ? '' : 'none');"><b>Notice</b> (8)</a>: Undefined index: title_dok [<b>APP/views/elements/latestArticles.ctp</b>, line <b>7</b>]<div id="cakeErr7-trace" class="cake-stack-trace" style="display: none;"><a href="javascript:void(0);" onclick="document.getElementById('cakeErr7-code').style.display = (document.getElementById('cakeErr7-code').style.display == 'none' ? '' : 'none')">Code</a> | <a href="javascript:void(0);" onclick="document.getElementById('cakeErr7-context').style.display = (document.getElementById('cakeErr7-context').style.display == 'none' ? '' : 'none')">Context</a><div id="cakeErr7-code" class="cake-code-dump" style="display: none;"><pre><code><span style="color: #000000"></span></code>
<code><span style="color: #000000"> if (Configure::read() > 0) {</span></code>
<span class="code-highlight"><code><span style="color: #000000"> include ($___viewFn);</span></code></span></pre></div><pre id="cakeErr7-context" class="cake-context" style="display: none;">$___viewFn = "/home/martin/apps/agram/app/views/elements/latestArticles.ctp"
$___dataForView = array(
"lang" => "dok",
"otherLangs" => array(
"eng",
"hrv"
),
"globalNav" => array(
array(),
array(),
array(),
array(),
array(),
array(),
array(),
array(),
array(),
array(),
array(),
array(),
array(),
array(),
array(),
array(),
array(),
array(),
array(),
array(),
array(),
array(),
array(),
array(),
array(),
array(),
array()
),
"breadCrumbs" => array(
array()
),
"pageContents" => array(
"home_who_we_are" => null
),
"userData" => null,
"announcements" => array(
array(),
array(),
array()
),
"cache" => array(
"time" => "+1 day",
"key" => "dok"
),
"form" => FormHelper
FormHelper::$helpers = array
FormHelper::$fieldset = array
FormHelper::$__options = array
FormHelper::$fields = array
FormHelper::$requestType = NULL
FormHelper::$defaultModel = NULL
FormHelper::$_inputDefaults = array
FormHelper::$_lastAction = ""
FormHelper::$base = ""
FormHelper::$webroot = "/"
FormHelper::$theme = NULL
FormHelper::$here = "/dok"
FormHelper::$params = array
FormHelper::$action = "index"
FormHelper::$plugin = NULL
FormHelper::$data = NULL
FormHelper::$namedArgs = NULL
FormHelper::$argSeparator = NULL
FormHelper::$validationErrors = NULL
FormHelper::$tags = array
FormHelper::$__tainted = NULL
FormHelper::$__cleaned = NULL
FormHelper::$Html = HtmlHelper object,
"text" => TextHelper
TextHelper::$helpers = NULL
TextHelper::$base = ""
TextHelper::$webroot = "/"
TextHelper::$theme = NULL
TextHelper::$here = "/dok"
TextHelper::$params = array
TextHelper::$action = "index"
TextHelper::$plugin = NULL
TextHelper::$data = NULL
TextHelper::$namedArgs = NULL
TextHelper::$argSeparator = NULL
TextHelper::$validationErrors = NULL
TextHelper::$tags = array
TextHelper::$__tainted = NULL
TextHelper::$__cleaned = NULL,
"stringer" => StringerHelper
StringerHelper::$helpers = array
StringerHelper::$base = ""
StringerHelper::$webroot = "/"
StringerHelper::$theme = NULL
StringerHelper::$here = "/dok"
StringerHelper::$params = array
StringerHelper::$action = "index"
StringerHelper::$plugin = NULL
StringerHelper::$data = NULL
StringerHelper::$namedArgs = NULL
StringerHelper::$argSeparator = NULL
StringerHelper::$validationErrors = NULL
StringerHelper::$tags = array
StringerHelper::$__tainted = NULL
StringerHelper::$__cleaned = NULL
StringerHelper::$Html = HtmlHelper object
StringerHelper::$Link = LinkHelper object
StringerHelper::$Text = TextHelper object,
"menu" => MenuHelper
MenuHelper::$helpers = array
MenuHelper::$base = ""
MenuHelper::$webroot = "/"
MenuHelper::$theme = NULL
MenuHelper::$here = "/dok"
MenuHelper::$params = array
MenuHelper::$action = "index"
MenuHelper::$plugin = NULL
MenuHelper::$data = NULL
MenuHelper::$namedArgs = NULL
MenuHelper::$argSeparator = NULL
MenuHelper::$validationErrors = NULL
MenuHelper::$tags = array
MenuHelper::$__tainted = NULL
MenuHelper::$__cleaned = NULL
MenuHelper::$Link = LinkHelper object,
"session" => SessionHelper
SessionHelper::$helpers = array
SessionHelper::$__active = true
SessionHelper::$valid = false
SessionHelper::$error = false
SessionHelper::$_userAgent = "f9a8355d006790ee743ededbb1f6e3bd"
SessionHelper::$path = "/"
SessionHelper::$lastError = NULL
SessionHelper::$security = "medium"
SessionHelper::$time = 1773314240
SessionHelper::$sessionTime = 1773326240
SessionHelper::$cookieLifeTime = false
SessionHelper::$watchKeys = array
SessionHelper::$id = NULL
SessionHelper::$host = NULL
SessionHelper::$timeout = NULL
SessionHelper::$base = ""
SessionHelper::$webroot = "/"
SessionHelper::$here = "/dok"
SessionHelper::$params = array
SessionHelper::$action = "index"
SessionHelper::$data = NULL
SessionHelper::$theme = NULL
SessionHelper::$plugin = NULL,
"html" => HtmlHelper
HtmlHelper::$tags = array
HtmlHelper::$_crumbs = array
HtmlHelper::$__includedScripts = array
HtmlHelper::$_scriptBlockOptions = array
HtmlHelper::$__docTypes = array
HtmlHelper::$helpers = NULL
HtmlHelper::$base = ""
HtmlHelper::$webroot = "/"
HtmlHelper::$theme = NULL
HtmlHelper::$here = "/dok"
HtmlHelper::$params = array
HtmlHelper::$action = "index"
HtmlHelper::$plugin = NULL
HtmlHelper::$data = NULL
HtmlHelper::$namedArgs = NULL
HtmlHelper::$argSeparator = NULL
HtmlHelper::$validationErrors = NULL
HtmlHelper::$__tainted = NULL
HtmlHelper::$__cleaned = NULL,
"link" => LinkHelper
LinkHelper::$helpers = array
LinkHelper::$lang = "dok"
LinkHelper::$defaultLang = "hrv"
LinkHelper::$base = ""
LinkHelper::$webroot = "/"
LinkHelper::$theme = NULL
LinkHelper::$here = "/dok"
LinkHelper::$params = array
LinkHelper::$action = "index"
LinkHelper::$plugin = NULL
LinkHelper::$data = NULL
LinkHelper::$namedArgs = NULL
LinkHelper::$argSeparator = NULL
LinkHelper::$validationErrors = NULL
LinkHelper::$tags = array
LinkHelper::$__tainted = NULL
LinkHelper::$__cleaned = NULL
LinkHelper::$Html = HtmlHelper object
LinkHelper::$Session = SessionHelper object
)
$loadHelpers = false
$cached = false
$loadedHelpers = array()
$lang = "dok"
$otherLangs = array(
"eng",
"hrv"
)
$globalNav = array(
array(
"Page" => array()
),
array(
"Page" => array()
),
array(
"Page" => array()
),
array(
"Page" => array()
),
array(
"Page" => array()
),
array(
"Page" => array()
),
array(
"Page" => array()
),
array(
"Page" => array()
),
array(
"Page" => array()
),
array(
"Page" => array()
),
array(
"Page" => array()
),
array(
"Page" => array()
),
array(
"Page" => array()
),
array(
"Page" => array()
),
array(
"Page" => array()
),
array(
"Page" => array()
),
array(
"Page" => array()
),
array(
"Page" => array()
),
array(
"Page" => array()
),
array(
"Page" => array()
),
array(
"Page" => array()
),
array(
"Page" => array()
),
array(
"Page" => array()
),
array(
"Page" => array()
),
array(
"Page" => array()
),
array(
"Page" => array()
),
array(
"Page" => array()
)
)
$breadCrumbs = array(
array(
"Page" => array()
)
)
$pageContents = array(
"home_who_we_are" => null
)
$userData = null
$announcements = array(
array(
"Announcement" => array()
),
array(
"Announcement" => array()
),
array(
"Announcement" => array()
)
)
$cache = array(
"time" => "+1 day",
"key" => "dok"
)
$form = FormHelper
FormHelper::$helpers = array
FormHelper::$fieldset = array
FormHelper::$__options = array
FormHelper::$fields = array
FormHelper::$requestType = NULL
FormHelper::$defaultModel = NULL
FormHelper::$_inputDefaults = array
FormHelper::$_lastAction = ""
FormHelper::$base = ""
FormHelper::$webroot = "/"
FormHelper::$theme = NULL
FormHelper::$here = "/dok"
FormHelper::$params = array
FormHelper::$action = "index"
FormHelper::$plugin = NULL
FormHelper::$data = NULL
FormHelper::$namedArgs = NULL
FormHelper::$argSeparator = NULL
FormHelper::$validationErrors = NULL
FormHelper::$tags = array
FormHelper::$__tainted = NULL
FormHelper::$__cleaned = NULL
FormHelper::$Html = HtmlHelper object
$text = TextHelper
TextHelper::$helpers = NULL
TextHelper::$base = ""
TextHelper::$webroot = "/"
TextHelper::$theme = NULL
TextHelper::$here = "/dok"
TextHelper::$params = array
TextHelper::$action = "index"
TextHelper::$plugin = NULL
TextHelper::$data = NULL
TextHelper::$namedArgs = NULL
TextHelper::$argSeparator = NULL
TextHelper::$validationErrors = NULL
TextHelper::$tags = array
TextHelper::$__tainted = NULL
TextHelper::$__cleaned = NULL
$stringer = StringerHelper
StringerHelper::$helpers = array
StringerHelper::$base = ""
StringerHelper::$webroot = "/"
StringerHelper::$theme = NULL
StringerHelper::$here = "/dok"
StringerHelper::$params = array
StringerHelper::$action = "index"
StringerHelper::$plugin = NULL
StringerHelper::$data = NULL
StringerHelper::$namedArgs = NULL
StringerHelper::$argSeparator = NULL
StringerHelper::$validationErrors = NULL
StringerHelper::$tags = array
StringerHelper::$__tainted = NULL
StringerHelper::$__cleaned = NULL
StringerHelper::$Html = HtmlHelper object
StringerHelper::$Link = LinkHelper object
StringerHelper::$Text = TextHelper object
$menu = MenuHelper
MenuHelper::$helpers = array
MenuHelper::$base = ""
MenuHelper::$webroot = "/"
MenuHelper::$theme = NULL
MenuHelper::$here = "/dok"
MenuHelper::$params = array
MenuHelper::$action = "index"
MenuHelper::$plugin = NULL
MenuHelper::$data = NULL
MenuHelper::$namedArgs = NULL
MenuHelper::$argSeparator = NULL
MenuHelper::$validationErrors = NULL
MenuHelper::$tags = array
MenuHelper::$__tainted = NULL
MenuHelper::$__cleaned = NULL
MenuHelper::$Link = LinkHelper object
$session = SessionHelper
SessionHelper::$helpers = array
SessionHelper::$__active = true
SessionHelper::$valid = false
SessionHelper::$error = false
SessionHelper::$_userAgent = "f9a8355d006790ee743ededbb1f6e3bd"
SessionHelper::$path = "/"
SessionHelper::$lastError = NULL
SessionHelper::$security = "medium"
SessionHelper::$time = 1773314240
SessionHelper::$sessionTime = 1773326240
SessionHelper::$cookieLifeTime = false
SessionHelper::$watchKeys = array
SessionHelper::$id = NULL
SessionHelper::$host = NULL
SessionHelper::$timeout = NULL
SessionHelper::$base = ""
SessionHelper::$webroot = "/"
SessionHelper::$here = "/dok"
SessionHelper::$params = array
SessionHelper::$action = "index"
SessionHelper::$data = NULL
SessionHelper::$theme = NULL
SessionHelper::$plugin = NULL
$html = HtmlHelper
HtmlHelper::$tags = array
HtmlHelper::$_crumbs = array
HtmlHelper::$__includedScripts = array
HtmlHelper::$_scriptBlockOptions = array
HtmlHelper::$__docTypes = array
HtmlHelper::$helpers = NULL
HtmlHelper::$base = ""
HtmlHelper::$webroot = "/"
HtmlHelper::$theme = NULL
HtmlHelper::$here = "/dok"
HtmlHelper::$params = array
HtmlHelper::$action = "index"
HtmlHelper::$plugin = NULL
HtmlHelper::$data = NULL
HtmlHelper::$namedArgs = NULL
HtmlHelper::$argSeparator = NULL
HtmlHelper::$validationErrors = NULL
HtmlHelper::$__tainted = NULL
HtmlHelper::$__cleaned = NULL
$link = LinkHelper
LinkHelper::$helpers = array
LinkHelper::$lang = "dok"
LinkHelper::$defaultLang = "hrv"
LinkHelper::$base = ""
LinkHelper::$webroot = "/"
LinkHelper::$theme = NULL
LinkHelper::$here = "/dok"
LinkHelper::$params = array
LinkHelper::$action = "index"
LinkHelper::$plugin = NULL
LinkHelper::$data = NULL
LinkHelper::$namedArgs = NULL
LinkHelper::$argSeparator = NULL
LinkHelper::$validationErrors = NULL
LinkHelper::$tags = array
LinkHelper::$__tainted = NULL
LinkHelper::$__cleaned = NULL
LinkHelper::$Html = HtmlHelper object
LinkHelper::$Session = SessionHelper object
$articles = array(
array(
"Article" => array(),
"Member" => array()
),
array(
"Article" => array(),
"Member" => array()
),
array(
"Article" => array(),
"Member" => array()
),
array(
"Article" => array(),
"Member" => array()
),
array(
"Article" => array(),
"Member" => array()
)
)
$article = array(
"Article" => array(
"id" => "496",
"member_id" => "35",
"title_eng" => "Exhibition of Miniatures and Tabletop Scenery 2026",
"title_hrv" => "Izložba minijatura i maketa Agram 2026",
"mask_eng" => "exhibition_of_miniatures_and_tabletop_scenery_2026",
"mask_hrv" => "izlozba_minijatura_i_maketa_agram_2026",
"content_eng" => "<p>
<a href=" https://hosting.photobucket.com/95288841-8654-4bf7-8fc9-a4aa78dce87f/dc756f84-867d-4df4-acd8-5d43775cafc2.jpg
" target="_blank"> <img alt="Click for enlarged picture" src="
https://hosting.photobucket.com/95288841-8654-4bf7-8fc9-a4aa78dce87f/dc756f84-867d-4df4-acd8-5d43775cafc2.jpg" width="600" /> </a></p>
<p>
<strong>The exhibition of miniatures and models &quot;Agram 2026&quot;</strong> was held this year from 19.2. to 08.03. 2026. The exhibition was set up on Wednesday 18.2. and was attended by a large number of members and friends of the Association who exhibited their works.</p>
<p>
&nbsp;</p>
<p>
<a href=" https://hosting.photobucket.com/95288841-8654-4bf7-8fc9-a4aa78dce87f/8529d6d4-76ea-4872-a9e6-748e04223a4e.jpg
" target="_blank"> <img alt="Click for enlarged picture" src="
https://hosting.photobucket.com/95288841-8654-4bf7-8fc9-a4aa78dce87f/8529d6d4-76ea-4872-a9e6-748e04223a4e.jpg
" width="600" /> </a></p>
<p>
<a href=" https://hosting.photobucket.com/95288841-8654-4bf7-8fc9-a4aa78dce87f/f3038937-f001-4ceb-b725-a330fcd64cee.jpg
" target="_blank"> <img alt="Click for enlarged picture" src="
https://hosting.photobucket.com/95288841-8654-4bf7-8fc9-a4aa78dce87f/f3038937-f001-4ceb-b725-a330fcd64cee.jpg
" width="600" /> </a></p>
<p>
<a href=" https://hosting.photobucket.com/95288841-8654-4bf7-8fc9-a4aa78dce87f/3575379e-e068-49e2-9d4d-c9a49531fdc2.jpg
" target="_blank"> <img alt="Click for enlarged picture" src="
https://hosting.photobucket.com/95288841-8654-4bf7-8fc9-a4aa78dce87f/3575379e-e068-49e2-9d4d-c9a49531fdc2.jpg" width="600" /> </a></p>
<p>
<a href=" https://hosting.photobucket.com/95288841-8654-4bf7-8fc9-a4aa78dce87f/e51713c7-2add-4f8f-ae37-e6eba25badff.jpg
" target="_blank"> <img alt="Click for enlarged picture" src="
https://hosting.photobucket.com/95288841-8654-4bf7-8fc9-a4aa78dce87f/e51713c7-2add-4f8f-ae37-e6eba25badff.jpg" width="600" /> </a></p>
<p>
<a href=" https://hosting.photobucket.com/95288841-8654-4bf7-8fc9-a4aa78dce87f/9c0bb546-50a8-483d-aeab-ab3b2ce9f094.jpg
" target="_blank"> <img alt="Click for enlarged picture" src="
https://hosting.photobucket.com/95288841-8654-4bf7-8fc9-a4aa78dce87f/9c0bb546-50a8-483d-aeab-ab3b2ce9f094.jpg" width="600" /> </a></p>
<p>
The opening of the Exhibition took place on Thursday, February 19, 2026, starting at 6:00 PM. The exhibition was organized on the occasion of our twenty-third birthday.</p>
<p>
&nbsp;</p>
<p>
<a href=" https://hosting.photobucket.com/95288841-8654-4bf7-8fc9-a4aa78dce87f/71c7bfc2-1ffc-43b9-9d5a-53e009f6b86d.jpg
" target="_blank"> <img alt="Click for enlarged picture" src="
https://hosting.photobucket.com/95288841-8654-4bf7-8fc9-a4aa78dce87f/71c7bfc2-1ffc-43b9-9d5a-53e009f6b86d.jpg" width="600" /> </a></p>
<p>
<a href=" https://hosting.photobucket.com/95288841-8654-4bf7-8fc9-a4aa78dce87f/007b4701-1d7c-4a67-a599-0539a2aa3191.jpg
" target="_blank"> <img alt="Click for enlarged picture" src="
https://hosting.photobucket.com/95288841-8654-4bf7-8fc9-a4aa78dce87f/007b4701-1d7c-4a67-a599-0539a2aa3191.jpg" width="600" /> </a></p>
<p>
<a href=" https://hosting.photobucket.com/95288841-8654-4bf7-8fc9-a4aa78dce87f/2c8090e2-8b95-4368-bb48-98876d680e15.jpg
" target="_blank"> <img alt="Click for enlarged picture" src="
https://hosting.photobucket.com/95288841-8654-4bf7-8fc9-a4aa78dce87f/2c8090e2-8b95-4368-bb48-98876d680e15.jpg" width="600" /> </a></p>
<p>
<a href=" https://hosting.photobucket.com/95288841-8654-4bf7-8fc9-a4aa78dce87f/375768ad-a8bb-49bf-9845-e46c896ba7ec.jpg
" target="_blank"> <img alt="Click for enlarged picture" src="
https://hosting.photobucket.com/95288841-8654-4bf7-8fc9-a4aa78dce87f/375768ad-a8bb-49bf-9845-e46c896ba7ec.jpg" width="600" /> </a></p>
<p>
<a href=" https://hosting.photobucket.com/95288841-8654-4bf7-8fc9-a4aa78dce87f/a93de974-4ccb-4876-85b0-4d066ae402b3.jpg
" target="_blank"> <img alt="Click for enlarged picture" src="
https://hosting.photobucket.com/95288841-8654-4bf7-8fc9-a4aa78dce87f/a93de974-4ccb-4876-85b0-4d066ae402b3.jpg" width="600" /> </a></p>
<p>
<a href=" https://hosting.photobucket.com/95288841-8654-4bf7-8fc9-a4aa78dce87f/d323ccc9-1b9a-4cb2-8adf-7019b0e217f4.jpg
" target="_blank"> <img alt="Click for enlarged picture" src="
https://hosting.photobucket.com/95288841-8654-4bf7-8fc9-a4aa78dce87f/d323ccc9-1b9a-4cb2-8adf-7019b0e217f4.jpg" width="600" /> </a></p>
<p>
<a href=" https://hosting.photobucket.com/95288841-8654-4bf7-8fc9-a4aa78dce87f/a5a66447-2d76-47ae-866d-4d512ef469a5.jpg
" target="_blank"> <img alt="Click for enlarged picture" src="
https://hosting.photobucket.com/95288841-8654-4bf7-8fc9-a4aa78dce87f/a5a66447-2d76-47ae-866d-4d512ef469a5.jpg" width="600" /> </a></p>
<p>
<a href=" https://hosting.photobucket.com/95288841-8654-4bf7-8fc9-a4aa78dce87f/3e7bcfc9-ba02-4f94-a6c3-79dfaea3639e.jpg
" target="_blank"> <img alt="Click for enlarged picture" src="
https://hosting.photobucket.com/95288841-8654-4bf7-8fc9-a4aa78dce87f/3e7bcfc9-ba02-4f94-a6c3-79dfaea3639e.jpg" width="600" /> </a></p>
<p>
<a href=" https://hosting.photobucket.com/95288841-8654-4bf7-8fc9-a4aa78dce87f/24e79466-4a9e-4b10-970c-caad235d260d.jpg
" target="_blank"> <img alt="Click for enlarged picture" src="
https://hosting.photobucket.com/95288841-8654-4bf7-8fc9-a4aa78dce87f/24e79466-4a9e-4b10-970c-caad235d260d.jpg" width="600" /> </a></p>
<p>
As always, the Exhibition presented a cross-section of the work of the Association, its members, participants of its courses and workshops, and members of the Miniature Painters Croatia FB group. In a large number of showcases, there were numerous miniatures for tabletop strategy games, board games, and an entire showcase was dedicated to award-winning exhibits from previous miniature competitions. Several showcases were dedicated to projects that the Association has been implementing for 23 years, such as the UMS &bdquo;Agram&ldquo; Library and Reading Room, the Workshop for Making Spatial Models and the Miniature Painting Workshop, as well as new ones such as the Agram Group Build, the Agram Lego Section and the Back to Basics painting workshop for the youngest.</p>
<p>
<a href=" https://hosting.photobucket.com/95288841-8654-4bf7-8fc9-a4aa78dce87f/fca84936-af71-44d3-9a4c-faeb26163899.jpg
" target="_blank"> <img alt="Click for enlarged picture" src="
https://hosting.photobucket.com/95288841-8654-4bf7-8fc9-a4aa78dce87f/fca84936-af71-44d3-9a4c-faeb26163899.jpg" width="600" /> </a></p>
<p>
<a href=" https://hosting.photobucket.com/95288841-8654-4bf7-8fc9-a4aa78dce87f/459bc5ac-8702-46f9-93b4-547deaabdef4.jpg
" target="_blank"> <img alt="Click for enlarged picture" src="
https://hosting.photobucket.com/95288841-8654-4bf7-8fc9-a4aa78dce87f/459bc5ac-8702-46f9-93b4-547deaabdef4.jpg" width="600" /> </a></p>
<p>
<a href=" https://hosting.photobucket.com/95288841-8654-4bf7-8fc9-a4aa78dce87f/91a04363-b2ef-4635-a046-7edf25ce7808.jpg
" target="_blank"> <img alt="Click for enlarged picture" src="
https://hosting.photobucket.com/95288841-8654-4bf7-8fc9-a4aa78dce87f/91a04363-b2ef-4635-a046-7edf25ce7808.jpg" width="600" /> </a></p>
<p>
<a href=" https://hosting.photobucket.com/95288841-8654-4bf7-8fc9-a4aa78dce87f/73256af5-fd5d-40b5-95e1-120e49c9be87.jpg
" target="_blank"> <img alt="Click for enlarged picture" src="
https://hosting.photobucket.com/95288841-8654-4bf7-8fc9-a4aa78dce87f/73256af5-fd5d-40b5-95e1-120e49c9be87.jpg" width="600" /> </a></p>
<p>
<a href=" https://hosting.photobucket.com/95288841-8654-4bf7-8fc9-a4aa78dce87f/979f9be5-23f3-4df9-91dc-ab71d6a10d64.jpg
" target="_blank"> <img alt="Click for enlarged picture" src="
https://hosting.photobucket.com/95288841-8654-4bf7-8fc9-a4aa78dce87f/979f9be5-23f3-4df9-91dc-ab71d6a10d64.jpg" width="600" /> </a></p>
<p>
<a href=" https://hosting.photobucket.com/95288841-8654-4bf7-8fc9-a4aa78dce87f/d0ff4379-183a-47b9-a740-9ddc283ebc29.jpg
" target="_blank"> <img alt="Click for enlarged picture" src="
https://hosting.photobucket.com/95288841-8654-4bf7-8fc9-a4aa78dce87f/d0ff4379-183a-47b9-a740-9ddc283ebc29.jpg" width="600" /> </a></p>
<p>
<a href=" https://hosting.photobucket.com/95288841-8654-4bf7-8fc9-a4aa78dce87f/4333e95e-bbbd-4f47-aaea-38a9c99e54d8.jpg
" target="_blank"> <img alt="Click for enlarged picture" src="
https://hosting.photobucket.com/95288841-8654-4bf7-8fc9-a4aa78dce87f/4333e95e-bbbd-4f47-aaea-38a9c99e54d8.jpg" width="600" /> </a></p>
<p>
<a href=" https://hosting.photobucket.com/95288841-8654-4bf7-8fc9-a4aa78dce87f/1372f8a2-b222-48ee-ae45-a90b5a354ef7.jpg
" target="_blank"> <img alt="Click for enlarged picture" src="
https://hosting.photobucket.com/95288841-8654-4bf7-8fc9-a4aa78dce87f/1372f8a2-b222-48ee-ae45-a90b5a354ef7.jpg" width="600" /> </a></p>
<p>
<a href=" https://hosting.photobucket.com/95288841-8654-4bf7-8fc9-a4aa78dce87f/6a1b4fd1-d982-4b06-9c5f-3cd40d6bf10a.jpg
" target="_blank"> <img alt="Click for enlarged picture" src="
https://hosting.photobucket.com/95288841-8654-4bf7-8fc9-a4aa78dce87f/6a1b4fd1-d982-4b06-9c5f-3cd40d6bf10a.jpg" width="600" /> </a></p>
<p>
<a href=" https://hosting.photobucket.com/95288841-8654-4bf7-8fc9-a4aa78dce87f/c2ec45e1-e0f3-463a-b254-cb2a38b53e14.jpg
" target="_blank"> <img alt="Click for enlarged picture" src="
https://hosting.photobucket.com/95288841-8654-4bf7-8fc9-a4aa78dce87f/c2ec45e1-e0f3-463a-b254-cb2a38b53e14.jpg" width="600" /> </a></p>
<p>
<a href=" https://hosting.photobucket.com/95288841-8654-4bf7-8fc9-a4aa78dce87f/17553b9a-0592-4f6a-a097-3f1a97e161f3.jpg
" target="_blank"> <img alt="Click for enlarged picture" src="
https://hosting.photobucket.com/95288841-8654-4bf7-8fc9-a4aa78dce87f/17553b9a-0592-4f6a-a097-3f1a97e161f3.jpg" width="600" /> </a></p>
<p>
<a href=" https://hosting.photobucket.com/95288841-8654-4bf7-8fc9-a4aa78dce87f/8658bd6b-dff2-4d24-8473-928d44d44480.jpg
" target="_blank"> <img alt="Click for enlarged picture" src="
https://hosting.photobucket.com/95288841-8654-4bf7-8fc9-a4aa78dce87f/8658bd6b-dff2-4d24-8473-928d44d44480.jpg" width="600" /> </a></p>
<p>
<a href=" https://hosting.photobucket.com/95288841-8654-4bf7-8fc9-a4aa78dce87f/ecab0ea7-f75b-4e31-a520-d088ad39fa17.jpg
" target="_blank"> <img alt="Click for enlarged picture" src="
https://hosting.photobucket.com/95288841-8654-4bf7-8fc9-a4aa78dce87f/ecab0ea7-f75b-4e31-a520-d088ad39fa17.jpg" width="600" /> </a></p>
<p>
<a href=" https://hosting.photobucket.com/95288841-8654-4bf7-8fc9-a4aa78dce87f/9495a2f5-8a82-41f2-abf4-9ade3db41d87.jpg
" target="_blank"> <img alt="Click for enlarged picture" src="
https://hosting.photobucket.com/95288841-8654-4bf7-8fc9-a4aa78dce87f/9495a2f5-8a82-41f2-abf4-9ade3db41d87.jpg" width="600" /> </a></p>
<p>
<a href=" https://hosting.photobucket.com/95288841-8654-4bf7-8fc9-a4aa78dce87f/362cc6fd-a5dd-474b-9b9f-aeab27d6dcfa.jpg
" target="_blank"> <img alt="Click for enlarged picture" src="
https://hosting.photobucket.com/95288841-8654-4bf7-8fc9-a4aa78dce87f/362cc6fd-a5dd-474b-9b9f-aeab27d6dcfa.jpg" width="600" /> </a></p>
<p>
It was a special honor for us to host our guest exhibitor, Ninoslav Luk, a miniaturist from Poreč, who introduced himself to us with his collection of historical dioramas.</p>
<p>
<a href=" https://hosting.photobucket.com/95288841-8654-4bf7-8fc9-a4aa78dce87f/ba1353de-e2bd-4340-9121-9056e287ed4a.jpg
" target="_blank"> <img alt="Click for enlarged picture" src="
https://hosting.photobucket.com/95288841-8654-4bf7-8fc9-a4aa78dce87f/ba1353de-e2bd-4340-9121-9056e287ed4a.jpg" width="600" /> </a></p>
<p>
<a href=" https://hosting.photobucket.com/95288841-8654-4bf7-8fc9-a4aa78dce87f/cea18506-1b50-4e5b-955c-0b9ca02d7826.jpg
" target="_blank"> <img alt="Click for enlarged picture" src="
https://hosting.photobucket.com/95288841-8654-4bf7-8fc9-a4aa78dce87f/cea18506-1b50-4e5b-955c-0b9ca02d7826.jpg" width="600" /> </a></p>
<p>
<a href=" https://hosting.photobucket.com/95288841-8654-4bf7-8fc9-a4aa78dce87f/1be85b41-e3b6-4536-b141-cd0da6eb38c1.jpg
" target="_blank"> <img alt="Click for enlarged picture" src="
https://hosting.photobucket.com/95288841-8654-4bf7-8fc9-a4aa78dce87f/1be85b41-e3b6-4536-b141-cd0da6eb38c1.jpg" width="600" /> </a></p>
<p>
<a href=" https://hosting.photobucket.com/95288841-8654-4bf7-8fc9-a4aa78dce87f/9e93b87d-ff3c-4b7b-8f06-5f9d3464a134.jpg
" target="_blank"> <img alt="Click for enlarged picture" src="
https://hosting.photobucket.com/95288841-8654-4bf7-8fc9-a4aa78dce87f/9e93b87d-ff3c-4b7b-8f06-5f9d3464a134.jpg" width="600" /> </a></p>
<p>
During the first weekend of the Exhibition, 21-22.02., we held the 18th annual international miniature painting competition <strong>Black Queen Hobby and Miniature Painting Competition</strong>!</p>
<p>
<a href=" https://hosting.photobucket.com/95288841-8654-4bf7-8fc9-a4aa78dce87f/3056fb09-f66c-4dea-80a8-a4e72407429a.jpg
" target="_blank"> <img alt="Click for enlarged picture" src="
https://hosting.photobucket.com/95288841-8654-4bf7-8fc9-a4aa78dce87f/3056fb09-f66c-4dea-80a8-a4e72407429a.jpg" width="600" /> </a></p>
<p>
As contestants arrived and registered for the competition, our hardworking staff photographed all the exhibits before sorting them into categories and carefully placing them in glass cases. There was no shortage of morning neccessities like coffe and doughnuts.</p>
<p>
&lt;</p>
<p>
<a href=" https://hosting.photobucket.com/95288841-8654-4bf7-8fc9-a4aa78dce87f/1118089c-2b46-4a2c-b17d-dc92b66d1ffc.jpg
" target="_blank"> <img alt="Click for enlarged picture" src="
https://hosting.photobucket.com/95288841-8654-4bf7-8fc9-a4aa78dce87f/1118089c-2b46-4a2c-b17d-dc92b66d1ffc.jpg" width="600" /> </a></p>
<p>
<a href=" https://hosting.photobucket.com/95288841-8654-4bf7-8fc9-a4aa78dce87f/9fd3c272-9a69-4532-a09d-36497a20a820.jpg
" target="_blank"> <img alt="Click for enlarged picture" src="
https://hosting.photobucket.com/95288841-8654-4bf7-8fc9-a4aa78dce87f/9fd3c272-9a69-4532-a09d-36497a20a820.jpg" width="600" /> </a></p>
<p>
<a href=" https://hosting.photobucket.com/95288841-8654-4bf7-8fc9-a4aa78dce87f/86995e80-c502-45fb-80f5-c8fda27da3f9.jpg
" target="_blank"> <img alt="Click for enlarged picture" src="
https://hosting.photobucket.com/95288841-8654-4bf7-8fc9-a4aa78dce87f/86995e80-c502-45fb-80f5-c8fda27da3f9.jpg" width="600" /> </a></p>
<p>
By noon, all the display cases were full and the competition could officially begin.</p>
<p>
<a href=" https://hosting.photobucket.com/95288841-8654-4bf7-8fc9-a4aa78dce87f/bce59a4f-c3e3-4708-a3d6-25e81a894c24.jpg
" target="_blank"> <img alt="Click for enlarged picture" src="
https://hosting.photobucket.com/95288841-8654-4bf7-8fc9-a4aa78dce87f/bce59a4f-c3e3-4708-a3d6-25e81a894c24.jpg" width="600" /> </a></p>
<p>
<a href=" https://hosting.photobucket.com/95288841-8654-4bf7-8fc9-a4aa78dce87f/16a0a094-01aa-4e52-82cf-fdab00d74711.jpg
" target="_blank"> <img alt="Click for enlarged picture" src="
https://hosting.photobucket.com/95288841-8654-4bf7-8fc9-a4aa78dce87f/16a0a094-01aa-4e52-82cf-fdab00d74711.jpg" width="600" /> </a></p>
<p>
<a href=" https://hosting.photobucket.com/95288841-8654-4bf7-8fc9-a4aa78dce87f/0d3f4042-ff77-48d0-b332-add0fd08f7c3.jpg
" target="_blank"> <img alt="Click for enlarged picture" src="
https://hosting.photobucket.com/95288841-8654-4bf7-8fc9-a4aa78dce87f/0d3f4042-ff77-48d0-b332-add0fd08f7c3.jpg" width="600" /> </a></p>
<p>
<a href=" https://hosting.photobucket.com/95288841-8654-4bf7-8fc9-a4aa78dce87f/3711baf8-93f2-434a-aea9-a95288ca04dd.jpg
" target="_blank"> <img alt="Click for enlarged picture" src="
https://hosting.photobucket.com/95288841-8654-4bf7-8fc9-a4aa78dce87f/3711baf8-93f2-434a-aea9-a95288ca04dd.jpg" width="600" /> </a></p>
<p>
<a href=" https://hosting.photobucket.com/95288841-8654-4bf7-8fc9-a4aa78dce87f/53113b97-ec06-4409-95ba-95a5ad3f9720.jpg
" target="_blank"> <img alt="Click for enlarged picture" src="
https://hosting.photobucket.com/95288841-8654-4bf7-8fc9-a4aa78dce87f/53113b97-ec06-4409-95ba-95a5ad3f9720.jpg" width="600" /> </a></p>
<p>
<a href=" https://hosting.photobucket.com/95288841-8654-4bf7-8fc9-a4aa78dce87f/ab127858-193d-4976-bdb2-e27302722fca.jpg
" target="_blank"> <img alt="Click for enlarged picture" src="
https://hosting.photobucket.com/95288841-8654-4bf7-8fc9-a4aa78dce87f/ab127858-193d-4976-bdb2-e27302722fca.jpg" width="600" /> </a></p>
<p>
<a href=" https://hosting.photobucket.com/95288841-8654-4bf7-8fc9-a4aa78dce87f/3735af11-3fb6-4772-a8ff-5e0ff6ddf03a.jpg
" target="_blank"> <img alt="Click for enlarged picture" src="
https://hosting.photobucket.com/95288841-8654-4bf7-8fc9-a4aa78dce87f/3735af11-3fb6-4772-a8ff-5e0ff6ddf03a.jpg" width="600" /> </a></p>
<p>
<strong>Back To Basics workshops for the young at the Black Queen</strong></p>
<p>
This year, throughout the weekend, we organized miniature painting workshops for the youngest, who were able to paint one of our own miniatures designed specifically for this program for the first time!</p>
<p>
<a href=" https://hosting.photobucket.com/95288841-8654-4bf7-8fc9-a4aa78dce87f/6999be0c-8cc6-4947-a423-9427a2299724.jpg
" target="_blank"> <img alt="Click for enlarged picture" src="
https://hosting.photobucket.com/95288841-8654-4bf7-8fc9-a4aa78dce87f/6999be0c-8cc6-4947-a423-9427a2299724.jpg" width="600" /> </a></p>
<p>
<a href="https://hosting.photobucket.com/95288841-8654-4bf7-8fc9-a4aa78dce87f/835b05a5-f171-49df-afa6-da0692b89074.jpg" target="_blank"><img alt="Click for enlarged picture" src="https://hosting.photobucket.com/95288841-8654-4bf7-8fc9-a4aa78dce87f/835b05a5-f171-49df-afa6-da0692b89074.jpg" width="600" /></a></p>
<p>
<a href=" https://hosting.photobucket.com/95288841-8654-4bf7-8fc9-a4aa78dce87f/ef5dde13-84ee-4ea0-b9f3-28aaf703ef6d.jpg
" target="_blank"> <img alt="Click for enlarged picture" src="
https://hosting.photobucket.com/95288841-8654-4bf7-8fc9-a4aa78dce87f/ef5dde13-84ee-4ea0-b9f3-28aaf703ef6d.jpg" width="600" /> </a></p>
<p>
<strong>SELLERS&#39; COURT</strong></p>
<p>
During the weekend we hosted our sponsors with their sales stands: Swood.si and Carta Magica.</p>
<p>
<a href=" https://hosting.photobucket.com/95288841-8654-4bf7-8fc9-a4aa78dce87f/5ee9a49f-a387-435a-9110-572402b7191d.jpg
" target="_blank"> <img alt="Click for enlarged picture" src="
https://hosting.photobucket.com/95288841-8654-4bf7-8fc9-a4aa78dce87f/5ee9a49f-a387-435a-9110-572402b7191d.jpg" width="600" /> </a></p>
<p>
<a href=" https://hosting.photobucket.com/95288841-8654-4bf7-8fc9-a4aa78dce87f/47cf600f-b1eb-4655-bf06-305f6f21d5d2.jpg
" target="_blank"> <img alt="Click for enlarged picture" src="
https://hosting.photobucket.com/95288841-8654-4bf7-8fc9-a4aa78dce87f/47cf600f-b1eb-4655-bf06-305f6f21d5d2.jpg" width="600" /> </a></p>
<p>
<strong>MINIATURE PAINTING WORKSHOPS</strong></p>
<p>
The ZZTK premises allow workshops to be held during the weekend in the cinema hall in the basement, so we also organized demonstration workshops during the weekend. The lecturers&#39; work was recorded with a camera and projected onto the projection screen in the hall. Many thanks to our domestic and international lecturers: Anže Zorko (SLO), doc.dr.sc. Winton Afrić (CRO), Ivan Knezović (UMS Agram) and Petar Knezoviću (CRO).</p>
<p>
<a href=" https://hosting.photobucket.com/95288841-8654-4bf7-8fc9-a4aa78dce87f/e8d835be-ec99-49d7-bc9b-086e38573d1a.jpg
" target="_blank"> <img alt="Click for enlarged picture" src="
https://hosting.photobucket.com/95288841-8654-4bf7-8fc9-a4aa78dce87f/e8d835be-ec99-49d7-bc9b-086e38573d1a.jpg" width="600" /> </a></p>
<p>
<a href=" https://hosting.photobucket.com/95288841-8654-4bf7-8fc9-a4aa78dce87f/f3eba4c1-4637-4da9-8360-75f430355af4.jpg" target="_blank"> <img alt="Click for enlarged picture" src="
https://hosting.photobucket.com/95288841-8654-4bf7-8fc9-a4aa78dce87f/f3eba4c1-4637-4da9-8360-75f430355af4.jpg" width="600" /> </a></p>
<p>
<a href=" https://hosting.photobucket.com/95288841-8654-4bf7-8fc9-a4aa78dce87f/ef523854-4030-4579-aa38-403afda86c91.jpg
" target="_blank"> <img alt="Click for enlarged picture" src="
https://hosting.photobucket.com/95288841-8654-4bf7-8fc9-a4aa78dce87f/ef523854-4030-4579-aa38-403afda86c91.jpg" width="600" /> </a></p>
<p>
<a href=" https://hosting.photobucket.com/95288841-8654-4bf7-8fc9-a4aa78dce87f/dd0943c2-f4a8-40c3-b641-f6dcdd200380.jpg
" target="_blank"> <img alt="Click for enlarged picture" src="
https://hosting.photobucket.com/95288841-8654-4bf7-8fc9-a4aa78dce87f/dd0943c2-f4a8-40c3-b641-f6dcdd200380.jpg" width="600" /> </a></p>
<p>
<a href=" https://hosting.photobucket.com/95288841-8654-4bf7-8fc9-a4aa78dce87f/08b1626a-f6c7-43c9-b718-3e9a41b55ca6.jpg
" target="_blank"> <img alt="Click for enlarged picture" src="
https://hosting.photobucket.com/95288841-8654-4bf7-8fc9-a4aa78dce87f/08b1626a-f6c7-43c9-b718-3e9a41b55ca6.jpg" width="600" /> </a></p>
<p>
<a href=" https://hosting.photobucket.com/95288841-8654-4bf7-8fc9-a4aa78dce87f/91aca7f3-1af6-486d-b174-65079a63a1ea.jpg
" target="_blank"> <img alt="Click for enlarged picture" src="
https://hosting.photobucket.com/95288841-8654-4bf7-8fc9-a4aa78dce87f/91aca7f3-1af6-486d-b174-65079a63a1ea.jpg" width="600" /> </a></p>
<p>
<a href=" https://hosting.photobucket.com/95288841-8654-4bf7-8fc9-a4aa78dce87f/3821f2fb-fbe7-4096-adbc-7d8c981a3b56.jpg
" target="_blank"> <img alt="Click for enlarged picture" src="
https://hosting.photobucket.com/95288841-8654-4bf7-8fc9-a4aa78dce87f/3821f2fb-fbe7-4096-adbc-7d8c981a3b56.jpg" width="600" /> </a></p>
<p>
<a href=" https://hosting.photobucket.com/95288841-8654-4bf7-8fc9-a4aa78dce87f/2c7bb3c5-c0ec-4a96-b6bd-6a90ce5ce154.jpg
" target="_blank"> <img alt="Click for enlarged picture" src="
https://hosting.photobucket.com/95288841-8654-4bf7-8fc9-a4aa78dce87f/2c7bb3c5-c0ec-4a96-b6bd-6a90ce5ce154.jpg" width="600" /> </a></p>
<p>
<a href=" https://hosting.photobucket.com/95288841-8654-4bf7-8fc9-a4aa78dce87f/b646f4ee-21aa-4d12-8db3-6d33351d5aeb.jpg
" target="_blank"> <img alt="Click for enlarged picture" src="
https://hosting.photobucket.com/95288841-8654-4bf7-8fc9-a4aa78dce87f/b646f4ee-21aa-4d12-8db3-6d33351d5aeb.jpg" width="600" /> </a></p>
<p>
<a href=" https://hosting.photobucket.com/95288841-8654-4bf7-8fc9-a4aa78dce87f/fb5efc01-32cc-4119-90e3-188f51b30237.jpg
" target="_blank"> <img alt="Click for enlarged picture" src="
https://hosting.photobucket.com/95288841-8654-4bf7-8fc9-a4aa78dce87f/fb5efc01-32cc-4119-90e3-188f51b30237.jpg" width="600" /> </a></p>
<p>
<strong>SPEED PAINTING COMPETITION</strong></p>
<p>
We organized a speed painting competition on Sunday afternoon. Participants had 60 minutes to paint one wizrad, a miniature of our own design and production.</p>
<p>
<a href=" https://hosting.photobucket.com/95288841-8654-4bf7-8fc9-a4aa78dce87f/106417a6-a047-4e0d-9f81-87858806052f.jpg
" target="_blank"> <img alt="Click for enlarged picture" src="
https://hosting.photobucket.com/95288841-8654-4bf7-8fc9-a4aa78dce87f/106417a6-a047-4e0d-9f81-87858806052f.jpg" width="600" /> </a></p>
<p>
<a href=" https://hosting.photobucket.com/95288841-8654-4bf7-8fc9-a4aa78dce87f/ac6853c7-6e34-4e07-a996-8d7d12744b67.jpg
" target="_blank"> <img alt="Click for enlarged picture" src="
https://hosting.photobucket.com/95288841-8654-4bf7-8fc9-a4aa78dce87f/ac6853c7-6e34-4e07-a996-8d7d12744b67.jpg" width="600" /> </a></p>
<p>
<a href=" https://hosting.photobucket.com/95288841-8654-4bf7-8fc9-a4aa78dce87f/ccb155fa-52c5-4a99-9515-f69a6836dce7.jpg
" target="_blank"> <img alt="Click for enlarged picture" src="
https://hosting.photobucket.com/95288841-8654-4bf7-8fc9-a4aa78dce87f/ccb155fa-52c5-4a99-9515-f69a6836dce7.jpg" width="600" /> </a></p>
<p>
<a href=" https://hosting.photobucket.com/95288841-8654-4bf7-8fc9-a4aa78dce87f/a29fedd0-97ea-45b1-85f9-7ea62188b2b2.jpg
" target="_blank"><img alt="Click for enlarged picture" src="
https://hosting.photobucket.com/95288841-8654-4bf7-8fc9-a4aa78dce87f/a29fedd0-97ea-45b1-85f9-7ea62188b2b2.jpg" width="600" /></a></p>
<p>
With that, we came to the very end of this wonderful weekend and all that was left was the awarding of prizes and recognition to the winners.</p>
<p>
<a href=" https://hosting.photobucket.com/95288841-8654-4bf7-8fc9-a4aa78dce87f/046ca4c8-0ae7-415e-abd3-e131d580c3ad.jpg
" target="_blank"> <img alt="Click for enlarged picture" src="
https://hosting.photobucket.com/95288841-8654-4bf7-8fc9-a4aa78dce87f/046ca4c8-0ae7-415e-abd3-e131d580c3ad.jpg" width="600" /> </a></p>
<p>
<a href=" https://hosting.photobucket.com/95288841-8654-4bf7-8fc9-a4aa78dce87f/cec0dcef-7acb-4a77-89de-271ed5410672.jpg
" target="_blank"> <img alt="Click for enlarged picture" src="
https://hosting.photobucket.com/95288841-8654-4bf7-8fc9-a4aa78dce87f/cec0dcef-7acb-4a77-89de-271ed5410672.jpg" width="600" /> </a></p>
<p>
<a href=" https://hosting.photobucket.com/95288841-8654-4bf7-8fc9-a4aa78dce87f/a495a5fc-31a2-4979-a970-0fa22c334354.jpg
" target="_blank"> <img alt="Click for enlarged picture" src="
https://hosting.photobucket.com/95288841-8654-4bf7-8fc9-a4aa78dce87f/a495a5fc-31a2-4979-a970-0fa22c334354.jpg" width="600" /> </a></p>
<p>
<strong>AGRAM ARENA &ndash; Leaving Asphodel Necropolis28 Campaign</strong></p>
<p>
During the weekend of February 21-22, we held a new international competition, Agram Arena! This time it was the turn of the tabletop strategy game Necropolis28, for which our members designed a two-day campaign. Each participant created their own gang of soldiers, and the vast majority also created their own boards.</p>
<p>
<a href=" https://hosting.photobucket.com/95288841-8654-4bf7-8fc9-a4aa78dce87f/ac69b182-4bfc-4575-a6d3-fb3c8baba342.jpg
" target="_blank"> <img alt="Click for enlarged picture" src="
https://hosting.photobucket.com/95288841-8654-4bf7-8fc9-a4aa78dce87f/ac69b182-4bfc-4575-a6d3-fb3c8baba342.jpg" width="600" /> </a></p>
<p>
<a href=" https://hosting.photobucket.com/95288841-8654-4bf7-8fc9-a4aa78dce87f/289fed7b-e058-42d8-ba2d-cbd0463e98da.jpg
" target="_blank"> <img alt="Click for enlarged picture" src="
https://hosting.photobucket.com/95288841-8654-4bf7-8fc9-a4aa78dce87f/289fed7b-e058-42d8-ba2d-cbd0463e98da.jpg" width="600" /> </a></p>
<p>
<a href=" https://hosting.photobucket.com/95288841-8654-4bf7-8fc9-a4aa78dce87f/d92ebbee-859d-4441-8386-3d760b20b7a7.jpg
" target="_blank"> <img alt="Click for enlarged picture" src="
https://hosting.photobucket.com/95288841-8654-4bf7-8fc9-a4aa78dce87f/d92ebbee-859d-4441-8386-3d760b20b7a7.jpg" width="600" /> </a></p>
<p>
<a href=" https://hosting.photobucket.com/95288841-8654-4bf7-8fc9-a4aa78dce87f/09c59798-7871-425e-a075-3ca1cd91768a.jpg
" target="_blank"> <img alt="Click for enlarged picture" src="
https://hosting.photobucket.com/95288841-8654-4bf7-8fc9-a4aa78dce87f/09c59798-7871-425e-a075-3ca1cd91768a.jpg" width="600" /> </a></p>
<p>
<a href=" https://hosting.photobucket.com/95288841-8654-4bf7-8fc9-a4aa78dce87f/b2f3edc8-5a23-4552-9a2a-4027b286f327.jpg
" target="_blank"> <img alt="Click for enlarged picture" src="
https://hosting.photobucket.com/95288841-8654-4bf7-8fc9-a4aa78dce87f/b2f3edc8-5a23-4552-9a2a-4027b286f327.jpg" width="600" /> </a></p>
<p>
<a href=" https://hosting.photobucket.com/95288841-8654-4bf7-8fc9-a4aa78dce87f/2a9f43ac-b531-4746-b7bb-ac5a3356aab0.jpg
" target="_blank"> <img alt="Click for enlarged picture" src="
https://hosting.photobucket.com/95288841-8654-4bf7-8fc9-a4aa78dce87f/2a9f43ac-b531-4746-b7bb-ac5a3356aab0.jpg" width="600" /> </a></p>
<p>
<strong>EVENTS ON WEEKDAYS DURING THE EXHIBITION </strong></p>
<p>
Over the next two weeks, our volunteers held open miniature painting workshops on weekdays from 4:00 PM to 8:00 PM. Miniature painting workstations were set up where our visitors could paint miniatures we had prepared (or their own if they had brought them) using our materials and tools.</p>
<p>
<a href=" https://hosting.photobucket.com/95288841-8654-4bf7-8fc9-a4aa78dce87f/6edf7765-42b5-417a-820f-fa5d907179a7.jpg
" target="_blank"> <img alt="Click for enlarged picture" src="
https://hosting.photobucket.com/95288841-8654-4bf7-8fc9-a4aa78dce87f/6edf7765-42b5-417a-820f-fa5d907179a7.jpg" width="600" /> </a></p>
<p>
<a href=" https://hosting.photobucket.com/95288841-8654-4bf7-8fc9-a4aa78dce87f/c084ebe2-f57b-4519-9b31-29bdc1155887.jpg
" target="_blank"> <img alt="Click for enlarged picture" src="
https://hosting.photobucket.com/95288841-8654-4bf7-8fc9-a4aa78dce87f/c084ebe2-f57b-4519-9b31-29bdc1155887.jpg" width="600" /> </a></p>
<p>
<a href=" https://hosting.photobucket.com/95288841-8654-4bf7-8fc9-a4aa78dce87f/37ff2272-f9b0-4b16-a363-1e6f6688c866.jpg
" target="_blank"> <img alt="Click for enlarged picture" src="
https://hosting.photobucket.com/95288841-8654-4bf7-8fc9-a4aa78dce87f/37ff2272-f9b0-4b16-a363-1e6f6688c866.jpg" width="600" /> </a></p>
<p>
<a href=" https://hosting.photobucket.com/95288841-8654-4bf7-8fc9-a4aa78dce87f/5f4f7968-ff50-4a01-98da-6ce8562930b4.jpg
" target="_blank"> <img alt="Click for enlarged picture" src="
https://hosting.photobucket.com/95288841-8654-4bf7-8fc9-a4aa78dce87f/5f4f7968-ff50-4a01-98da-6ce8562930b4.jpg" width="600" /> </a></p>
<p>
<a href=" https://hosting.photobucket.com/95288841-8654-4bf7-8fc9-a4aa78dce87f/cbb45319-d488-483c-bf9d-9af29852fc74.jpg
" target="_blank"> <img alt="Click for enlarged picture" src="
https://hosting.photobucket.com/95288841-8654-4bf7-8fc9-a4aa78dce87f/cbb45319-d488-483c-bf9d-9af29852fc74.jpg" width="600" /> </a></p>
<p>
<a href=" https://hosting.photobucket.com/95288841-8654-4bf7-8fc9-a4aa78dce87f/3dcca26c-d549-4af3-812a-a4a81b9a2310.jpg
" target="_blank"> <img alt="Click for enlarged picture" src="
https://hosting.photobucket.com/95288841-8654-4bf7-8fc9-a4aa78dce87f/3dcca26c-d549-4af3-812a-a4a81b9a2310.jpg" width="600" /> </a></p>
<p>
<a href=" https://hosting.photobucket.com/95288841-8654-4bf7-8fc9-a4aa78dce87f/4adf0fb6-3eab-4b40-b32d-d03eab4a9892.jpg
" target="_blank"> <img alt="Click for enlarged picture" src="
https://hosting.photobucket.com/95288841-8654-4bf7-8fc9-a4aa78dce87f/4adf0fb6-3eab-4b40-b32d-d03eab4a9892.jpg" width="600" /> </a></p>
<p>
<a href=" https://hosting.photobucket.com/95288841-8654-4bf7-8fc9-a4aa78dce87f/4732b58a-9a65-4d1c-a7d5-25513d34b108.jpg
" target="_blank"> <img alt="Click for enlarged picture" src="
https://hosting.photobucket.com/95288841-8654-4bf7-8fc9-a4aa78dce87f/4732b58a-9a65-4d1c-a7d5-25513d34b108.jpg" width="600" /> </a></p>
<p>
<a href=" https://hosting.photobucket.com/95288841-8654-4bf7-8fc9-a4aa78dce87f/274be330-31d5-4e25-95db-ec2f423a003c.jpg
" target="_blank"> <img alt="Click for enlarged picture" src="
https://hosting.photobucket.com/95288841-8654-4bf7-8fc9-a4aa78dce87f/274be330-31d5-4e25-95db-ec2f423a003c.jpg" width="600" /> </a></p>
<p>
<a href=" https://hosting.photobucket.com/95288841-8654-4bf7-8fc9-a4aa78dce87f/8e7b0a80-0f46-4d70-9789-a46976c713d2.jpg
" target="_blank"> <img alt="Click for enlarged picture" src="
https://hosting.photobucket.com/95288841-8654-4bf7-8fc9-a4aa78dce87f/8e7b0a80-0f46-4d70-9789-a46976c713d2.jpg" width="600" /> </a></p>
<p>
<a href=" https://hosting.photobucket.com/95288841-8654-4bf7-8fc9-a4aa78dce87f/8bbd4e96-b911-4f26-80fe-b1c57f29027b.jpg
" target="_blank"> <img alt="Click for enlarged picture" src="
https://hosting.photobucket.com/95288841-8654-4bf7-8fc9-a4aa78dce87f/8bbd4e96-b911-4f26-80fe-b1c57f29027b.jpg" width="600" /> </a></p>
<p>
<a href=" https://hosting.photobucket.com/95288841-8654-4bf7-8fc9-a4aa78dce87f/203a27be-8f10-459d-89b9-befb6b636b74.jpg
" target="_blank"> <img alt="Click for enlarged picture" src="
https://hosting.photobucket.com/95288841-8654-4bf7-8fc9-a4aa78dce87f/203a27be-8f10-459d-89b9-befb6b636b74.jpg" width="600" /> </a></p>
<p>
<a href=" https://hosting.photobucket.com/95288841-8654-4bf7-8fc9-a4aa78dce87f/5dc4358f-19d8-475f-a4af-9c29e9ed18d7.jpg
" target="_blank"> <img alt="Click for enlarged picture" src="
https://hosting.photobucket.com/95288841-8654-4bf7-8fc9-a4aa78dce87f/5dc4358f-19d8-475f-a4af-9c29e9ed18d7.jpg" width="600" /> </a></p>
<p>
<strong>BACK TO BASICS MINIATURE PAINTING WORKSHOPS FOR YOUNG</strong></p>
<p>
On weekdays from 17:00 to 18:00, we held our new workshops for the youngest, in which our youngest participants painted their first miniatures.</p>
<p>
<a href=" https://hosting.photobucket.com/95288841-8654-4bf7-8fc9-a4aa78dce87f/948af139-8fb5-4e28-a27c-404466e70d05.jpg
" target="_blank"> <img alt="Click for enlarged picture" src="
https://hosting.photobucket.com/95288841-8654-4bf7-8fc9-a4aa78dce87f/948af139-8fb5-4e28-a27c-404466e70d05.jpg" width="600" /> </a></p>
<p>
<a href=" https://hosting.photobucket.com/95288841-8654-4bf7-8fc9-a4aa78dce87f/bb3e20c2-bb21-4a3d-863a-74de08261467.jpg
" target="_blank"> <img alt="Click for enlarged picture" src="
https://hosting.photobucket.com/95288841-8654-4bf7-8fc9-a4aa78dce87f/bb3e20c2-bb21-4a3d-863a-74de08261467.jpg" width="600" /> </a></p>
<p>
<a href=" https://hosting.photobucket.com/95288841-8654-4bf7-8fc9-a4aa78dce87f/7316c760-98e3-4e3f-9261-d138aa7a5a6a.jpg
" target="_blank"> <img alt="Click for enlarged picture" src="
https://hosting.photobucket.com/95288841-8654-4bf7-8fc9-a4aa78dce87f/7316c760-98e3-4e3f-9261-d138aa7a5a6a.jpg" width="600" /> </a></p>
<p>
<a href=" https://hosting.photobucket.com/95288841-8654-4bf7-8fc9-a4aa78dce87f/68934b39-3d1f-4f43-b967-14b73c41a39e.jpg
" target="_blank"> <img alt="Click for enlarged picture" src="
https://hosting.photobucket.com/95288841-8654-4bf7-8fc9-a4aa78dce87f/68934b39-3d1f-4f43-b967-14b73c41a39e.jpg" width="600" /> </a></p>
<p>
<a href=" https://hosting.photobucket.com/95288841-8654-4bf7-8fc9-a4aa78dce87f/46125bce-a28d-494f-873a-3aeabdc1d6c2.jpg
" target="_blank"> <img alt="Click for enlarged picture" src="
https://hosting.photobucket.com/95288841-8654-4bf7-8fc9-a4aa78dce87f/46125bce-a28d-494f-873a-3aeabdc1d6c2.jpg" width="600" /> </a></p>
<p>
<a href=" https://hosting.photobucket.com/95288841-8654-4bf7-8fc9-a4aa78dce87f/3c58e0ad-77a9-44c8-b6bf-d9a55c514d43.jpg
" target="_blank"> <img alt="Click for enlarged picture" src="
https://hosting.photobucket.com/95288841-8654-4bf7-8fc9-a4aa78dce87f/3c58e0ad-77a9-44c8-b6bf-d9a55c514d43.jpg" width="600" /> </a></p>
<p>
<a href=" https://hosting.photobucket.com/95288841-8654-4bf7-8fc9-a4aa78dce87f/f891f0f0-051b-40ee-9676-cb03b0a9811b.jpg
" target="_blank"> <img alt="Click for enlarged picture" src="
https://hosting.photobucket.com/95288841-8654-4bf7-8fc9-a4aa78dce87f/f891f0f0-051b-40ee-9676-cb03b0a9811b.jpg" width="600" /> </a></p>
<p>
<strong>AGRAM LEGO SECTION lecture: FW-14b &ndash; An F1 racecar for the future</strong></p>
<p>
On Wednesday, February 25, 2026, as part of the activities of our Agram Lego Section, our resident mechanical engineer Marko Paunović gave a lecture on the topic of the F1 racecar from 1992. Admission to the lecture was free, and upon completion, a LEGO model of the racecar was made by members of the Lego section</p>
<p>
<a href=" https://hosting.photobucket.com/95288841-8654-4bf7-8fc9-a4aa78dce87f/b2e14b1c-daa4-4314-8685-184377bc7e28.jpg
" target="_blank"> <img alt="Click for enlarged picture" src="
https://hosting.photobucket.com/95288841-8654-4bf7-8fc9-a4aa78dce87f/b2e14b1c-daa4-4314-8685-184377bc7e28.jpg" width="600" /> </a></p>
<p>
<a href=" https://hosting.photobucket.com/95288841-8654-4bf7-8fc9-a4aa78dce87f/31fb439a-77d3-4418-83ff-66c3af279cca.jpg" target="_blank"> <img alt="Click for enlarged picture" src="
https://hosting.photobucket.com/95288841-8654-4bf7-8fc9-a4aa78dce87f/31fb439a-77d3-4418-83ff-66c3af279cca.jpg" width="600" /> </a></p>
<p>
<a href=" https://hosting.photobucket.com/95288841-8654-4bf7-8fc9-a4aa78dce87f/bfcaf282-6be8-4b52-a3ed-c91137457876.jpg
" target="_blank"> <img alt="Click for enlarged picture" src="
https://hosting.photobucket.com/95288841-8654-4bf7-8fc9-a4aa78dce87f/bfcaf282-6be8-4b52-a3ed-c91137457876.jpg" width="600" /> </a></p>
<p>
<a href=" https://hosting.photobucket.com/95288841-8654-4bf7-8fc9-a4aa78dce87f/ce70fc61-9e1a-4169-aaad-8b67417656c0.jpg
" target="_blank"> <img alt="Click for enlarged picture" src="
https://hosting.photobucket.com/95288841-8654-4bf7-8fc9-a4aa78dce87f/ce70fc61-9e1a-4169-aaad-8b67417656c0.jpg" width="600" /> </a></p>
<p>
<a href=" https://hosting.photobucket.com/95288841-8654-4bf7-8fc9-a4aa78dce87f/94ca0e36-8710-458d-8194-9f71299f4d74.jpg
" target="_blank"> <img alt="Click for enlarged picture" src="
https://hosting.photobucket.com/95288841-8654-4bf7-8fc9-a4aa78dce87f/94ca0e36-8710-458d-8194-9f71299f4d74.jpg" width="600" /> </a></p>
<p>
<a href=" https://hosting.photobucket.com/95288841-8654-4bf7-8fc9-a4aa78dce87f/c6771f72-7191-4ca3-a792-3bb1ab3897b1.jpg
" target="_blank"> <img alt="Click for enlarged picture" src="
https://hosting.photobucket.com/95288841-8654-4bf7-8fc9-a4aa78dce87f/c6771f72-7191-4ca3-a792-3bb1ab3897b1.jpg" width="600" /> </a></p>
<p>
<a href=" https://hosting.photobucket.com/95288841-8654-4bf7-8fc9-a4aa78dce87f/c8fcfcb6-09f2-4398-a2fb-fa5065771e01.jpg
" target="_blank"> <img alt="Click for enlarged picture" src="
https://hosting.photobucket.com/95288841-8654-4bf7-8fc9-a4aa78dce87f/c8fcfcb6-09f2-4398-a2fb-fa5065771e01.jpg" width="600" /> </a></p>
<p>
<a href=" https://hosting.photobucket.com/95288841-8654-4bf7-8fc9-a4aa78dce87f/d7e187a8-d5b1-433b-b30d-091e54dcdddf.jpg
" target="_blank"> <img alt="Click for enlarged picture" src="
https://hosting.photobucket.com/95288841-8654-4bf7-8fc9-a4aa78dce87f/d7e187a8-d5b1-433b-b30d-091e54dcdddf.jpg" width="600" /> </a></p>
<p>
During the second weekend of the Exhibition, 28.02.-01.03., we organized a <strong>MINIATURE PAINTING WORKSHOP - Grimdark</strong>.</p>
<p>
The workshop was held over two days (the entire weekend) and participants painted up to three different figures for the game Trench Crusade. The focus of these lectures was on painting the popular grimdark style minis. The workshop presented paints and equipment, figure preparation, several miniature painting techniques from basic to advanced, and techniques and tricks for quickly and efficiently painting larger quantities of figures at once. Water-based acrylic paints were used as part of the workshop.</p>
<p>
<a href=" https://hosting.photobucket.com/95288841-8654-4bf7-8fc9-a4aa78dce87f/733d94b2-8e8d-4a4e-accd-b9168e32577e.jpg
" target="_blank"> <img alt="Click for enlarged picture" src="
https://hosting.photobucket.com/95288841-8654-4bf7-8fc9-a4aa78dce87f/733d94b2-8e8d-4a4e-accd-b9168e32577e.jpg
" width="600" /> </a></p>
<p>
<a href=" https://hosting.photobucket.com/95288841-8654-4bf7-8fc9-a4aa78dce87f/41020062-45b9-41cd-a357-fa23a389f390.jpg
" target="_blank"> <img alt="Click for enlarged picture" src="
https://hosting.photobucket.com/95288841-8654-4bf7-8fc9-a4aa78dce87f/41020062-45b9-41cd-a357-fa23a389f390.jpg
" width="600" /> </a></p>
<p>
<a href=" https://hosting.photobucket.com/95288841-8654-4bf7-8fc9-a4aa78dce87f/0c07cc55-596d-494d-972b-cd6a0dd6b8b7.jpg
" target="_blank"> <img alt="Click for enlarged picture" src="
https://hosting.photobucket.com/95288841-8654-4bf7-8fc9-a4aa78dce87f/0c07cc55-596d-494d-972b-cd6a0dd6b8b7.jpg" width="600" /> </a></p>
<p>
<a href=" https://hosting.photobucket.com/95288841-8654-4bf7-8fc9-a4aa78dce87f/c17dd356-08b1-48e1-b895-6296aed7f818.jpg
" target="_blank"> <img alt="Click for enlarged picture" src="
https://hosting.photobucket.com/95288841-8654-4bf7-8fc9-a4aa78dce87f/c17dd356-08b1-48e1-b895-6296aed7f818.jpg" width="600" /> </a></p>
<p>
On Wednesday 04.03.2026. the annual <strong>session of the Assembly</strong> was held, where we determined the guidelines for work in 2026.</p>
<p>
,</p>
<p>
<a href=" https://hosting.photobucket.com/95288841-8654-4bf7-8fc9-a4aa78dce87f/59484bd0-7edc-4aed-a04e-ae42900ba3e6.jpg
" target="_blank"> <img alt="Click for enlarged picture" src="
https://hosting.photobucket.com/95288841-8654-4bf7-8fc9-a4aa78dce87f/59484bd0-7edc-4aed-a04e-ae42900ba3e6.jpg
" width="600" /> </a></p>
<p>
On Sunday 08.03.2026. The exhibition was over, our exhibits safely stored, and the Gallery cleaned.</p>
<p>
<a href=" https://hosting.photobucket.com/95288841-8654-4bf7-8fc9-a4aa78dce87f/98af4280-0956-4cdb-b4a9-da40e3a5a44a.jpg
" target="_blank"> <img alt="Click for enlarged picture" src="
https://hosting.photobucket.com/95288841-8654-4bf7-8fc9-a4aa78dce87f/98af4280-0956-4cdb-b4a9-da40e3a5a44a.jpg" width="600" /> </a></p>
<p>
<a href=" https://hosting.photobucket.com/95288841-8654-4bf7-8fc9-a4aa78dce87f/3259b35e-1fc2-4a99-a3c5-c7984958d72b.jpg
" target="_blank"> <img alt="Click for enlarged picture" src="
https://hosting.photobucket.com/95288841-8654-4bf7-8fc9-a4aa78dce87f/3259b35e-1fc2-4a99-a3c5-c7984958d72b.jpg" width="600" /> </a></p>
<p>
The most important part of every year when holding this Exhibition is the social aspect, the socializing of our members both among themselves and with our international friends who visit us! With these few photos from our joint gatherings, we greet you until next year!</p>
<p>
<a href=" https://hosting.photobucket.com/95288841-8654-4bf7-8fc9-a4aa78dce87f/b9168e23-79b2-4d81-8a7d-7534062881a7.jpg
" target="_blank"> <img alt="Click for enlarged picture" src="
https://hosting.photobucket.com/95288841-8654-4bf7-8fc9-a4aa78dce87f/b9168e23-79b2-4d81-8a7d-7534062881a7.jpg " width="600" /> </a></p>
<p>
<a href=" https://hosting.photobucket.com/95288841-8654-4bf7-8fc9-a4aa78dce87f/edff925e-916c-4d78-953e-210abf3753d4.jpg
" target="_blank"> <img alt="Click for enlarged picture" src="
https://hosting.photobucket.com/95288841-8654-4bf7-8fc9-a4aa78dce87f/edff925e-916c-4d78-953e-210abf3753d4.jpg " width="600" /> </a></p>
<p>
<a href=" https://hosting.photobucket.com/95288841-8654-4bf7-8fc9-a4aa78dce87f/8bcb48fa-466b-43f8-8a4b-f15f6794b21e.jpg
" target="_blank"> <img alt="Click for enlarged picture" src="
https://hosting.photobucket.com/95288841-8654-4bf7-8fc9-a4aa78dce87f/8bcb48fa-466b-43f8-8a4b-f15f6794b21e.jpg" width="600" /> </a></p>
",
"content_hrv" => "<p>
<a href=" https://hosting.photobucket.com/95288841-8654-4bf7-8fc9-a4aa78dce87f/dc756f84-867d-4df4-acd8-5d43775cafc2.jpg
" target="_blank"> <img alt="Click for enlarged picture" src="
https://hosting.photobucket.com/95288841-8654-4bf7-8fc9-a4aa78dce87f/dc756f84-867d-4df4-acd8-5d43775cafc2.jpg" width="600" /> </a></p>
<p>
<strong>Izložba minijatura i maketa &quot;Agram 2026&quot;</strong> održala se ove godine od 19.2. do 08.03. Postavljanje izložbe je održano u srijedu 18.2. i sudjelovao je velik broj članova kao i prijatelja Udruge koji su izlagali svoje radove.</p>
<p>
<a href=" https://hosting.photobucket.com/95288841-8654-4bf7-8fc9-a4aa78dce87f/8529d6d4-76ea-4872-a9e6-748e04223a4e.jpg
" target="_blank"> <img alt="Click for enlarged picture" src="
https://hosting.photobucket.com/95288841-8654-4bf7-8fc9-a4aa78dce87f/8529d6d4-76ea-4872-a9e6-748e04223a4e.jpg
" width="600" /> </a></p>
<p>
<a href=" https://hosting.photobucket.com/95288841-8654-4bf7-8fc9-a4aa78dce87f/f3038937-f001-4ceb-b725-a330fcd64cee.jpg
" target="_blank"> <img alt="Click for enlarged picture" src="
https://hosting.photobucket.com/95288841-8654-4bf7-8fc9-a4aa78dce87f/f3038937-f001-4ceb-b725-a330fcd64cee.jpg
" width="600" /> </a></p>
<p>
<a href=" https://hosting.photobucket.com/95288841-8654-4bf7-8fc9-a4aa78dce87f/3575379e-e068-49e2-9d4d-c9a49531fdc2.jpg
" target="_blank"> <img alt="Click for enlarged picture" src="
https://hosting.photobucket.com/95288841-8654-4bf7-8fc9-a4aa78dce87f/3575379e-e068-49e2-9d4d-c9a49531fdc2.jpg" width="600" /> </a></p>
<p>
<a href=" https://hosting.photobucket.com/95288841-8654-4bf7-8fc9-a4aa78dce87f/e51713c7-2add-4f8f-ae37-e6eba25badff.jpg
" target="_blank"> <img alt="Click for enlarged picture" src="
https://hosting.photobucket.com/95288841-8654-4bf7-8fc9-a4aa78dce87f/e51713c7-2add-4f8f-ae37-e6eba25badff.jpg" width="600" /> </a></p>
<p>
<a href=" https://hosting.photobucket.com/95288841-8654-4bf7-8fc9-a4aa78dce87f/9c0bb546-50a8-483d-aeab-ab3b2ce9f094.jpg
" target="_blank"> <img alt="Click for enlarged picture" src="
https://hosting.photobucket.com/95288841-8654-4bf7-8fc9-a4aa78dce87f/9c0bb546-50a8-483d-aeab-ab3b2ce9f094.jpg" width="600" /> </a></p>
<p>
Otvorenje Izložbe održalo se u četvrtak, 19.2.2026. s početkom u 18:00h. Izložba je organizirana povodom na&scaron;eg dvadeset trećeg rođendana.</p>
<p>
<a href=" https://hosting.photobucket.com/95288841-8654-4bf7-8fc9-a4aa78dce87f/71c7bfc2-1ffc-43b9-9d5a-53e009f6b86d.jpg
" target="_blank"> <img alt="Click for enlarged picture" src="
https://hosting.photobucket.com/95288841-8654-4bf7-8fc9-a4aa78dce87f/71c7bfc2-1ffc-43b9-9d5a-53e009f6b86d.jpg" width="600" /> </a></p>
<p>
<a href=" https://hosting.photobucket.com/95288841-8654-4bf7-8fc9-a4aa78dce87f/007b4701-1d7c-4a67-a599-0539a2aa3191.jpg
" target="_blank"> <img alt="Click for enlarged picture" src="
https://hosting.photobucket.com/95288841-8654-4bf7-8fc9-a4aa78dce87f/007b4701-1d7c-4a67-a599-0539a2aa3191.jpg" width="600" /> </a></p>
<p>
<a href=" https://hosting.photobucket.com/95288841-8654-4bf7-8fc9-a4aa78dce87f/2c8090e2-8b95-4368-bb48-98876d680e15.jpg
" target="_blank"> <img alt="Click for enlarged picture" src="
https://hosting.photobucket.com/95288841-8654-4bf7-8fc9-a4aa78dce87f/2c8090e2-8b95-4368-bb48-98876d680e15.jpg" width="600" /> </a></p>
<p>
<a href=" https://hosting.photobucket.com/95288841-8654-4bf7-8fc9-a4aa78dce87f/375768ad-a8bb-49bf-9845-e46c896ba7ec.jpg
" target="_blank"> <img alt="Click for enlarged picture" src="
https://hosting.photobucket.com/95288841-8654-4bf7-8fc9-a4aa78dce87f/375768ad-a8bb-49bf-9845-e46c896ba7ec.jpg" width="600" /> </a></p>
<p>
<a href=" https://hosting.photobucket.com/95288841-8654-4bf7-8fc9-a4aa78dce87f/a93de974-4ccb-4876-85b0-4d066ae402b3.jpg
" target="_blank"> <img alt="Click for enlarged picture" src="
https://hosting.photobucket.com/95288841-8654-4bf7-8fc9-a4aa78dce87f/a93de974-4ccb-4876-85b0-4d066ae402b3.jpg" width="600" /> </a></p>
<p>
<a href=" https://hosting.photobucket.com/95288841-8654-4bf7-8fc9-a4aa78dce87f/d323ccc9-1b9a-4cb2-8adf-7019b0e217f4.jpg
" target="_blank"> <img alt="Click for enlarged picture" src="
https://hosting.photobucket.com/95288841-8654-4bf7-8fc9-a4aa78dce87f/d323ccc9-1b9a-4cb2-8adf-7019b0e217f4.jpg" width="600" /> </a></p>
<p>
<a href=" https://hosting.photobucket.com/95288841-8654-4bf7-8fc9-a4aa78dce87f/a5a66447-2d76-47ae-866d-4d512ef469a5.jpg
" target="_blank"> <img alt="Click for enlarged picture" src="
https://hosting.photobucket.com/95288841-8654-4bf7-8fc9-a4aa78dce87f/a5a66447-2d76-47ae-866d-4d512ef469a5.jpg" width="600" /> </a></p>
<p>
<a href=" https://hosting.photobucket.com/95288841-8654-4bf7-8fc9-a4aa78dce87f/3e7bcfc9-ba02-4f94-a6c3-79dfaea3639e.jpg
" target="_blank"> <img alt="Click for enlarged picture" src="
https://hosting.photobucket.com/95288841-8654-4bf7-8fc9-a4aa78dce87f/3e7bcfc9-ba02-4f94-a6c3-79dfaea3639e.jpg" width="600" /> </a></p>
<p>
<a href=" https://hosting.photobucket.com/95288841-8654-4bf7-8fc9-a4aa78dce87f/24e79466-4a9e-4b10-970c-caad235d260d.jpg
" target="_blank"> <img alt="Click for enlarged picture" src="
https://hosting.photobucket.com/95288841-8654-4bf7-8fc9-a4aa78dce87f/24e79466-4a9e-4b10-970c-caad235d260d.jpg" width="600" /> </a></p>
<p>
Kao i uvijek, Izložba je prikazivala presjek rada Udruge, njenih članova, polaznika njenih tečajeva i radionica te članova FB grupe Miniature Painters Croatia. U velikom broju vitrina na&scaron;le su se brojne minijature za stolne strate&scaron;ke igre, igre na tabli, a cijela jedna vitrina posvećena je nagrađenim izlo&scaron;cima sa prethodnih minijaturističkih natjecanja. Nekoliko vitrina bilo je posvećeno projektima koje Udruga već 23 godinu provodi poput Knjižnice i čitaonice UMS &bdquo;Agram&ldquo;, Radionice za izradu prostornih maketa i Radionice bojanja minijatura, ali i novih poput Agram Group Build, Agram Lego Sekcije i Back to Basics radionica bojanja za najmlađe.</p>
<p>
<a href=" https://hosting.photobucket.com/95288841-8654-4bf7-8fc9-a4aa78dce87f/fca84936-af71-44d3-9a4c-faeb26163899.jpg
" target="_blank"> <img alt="Click for enlarged picture" src="
https://hosting.photobucket.com/95288841-8654-4bf7-8fc9-a4aa78dce87f/fca84936-af71-44d3-9a4c-faeb26163899.jpg" width="600" /> </a></p>
<p>
<a href=" https://hosting.photobucket.com/95288841-8654-4bf7-8fc9-a4aa78dce87f/459bc5ac-8702-46f9-93b4-547deaabdef4.jpg
" target="_blank"> <img alt="Click for enlarged picture" src="
https://hosting.photobucket.com/95288841-8654-4bf7-8fc9-a4aa78dce87f/459bc5ac-8702-46f9-93b4-547deaabdef4.jpg" width="600" /> </a></p>
<p>
<a href=" https://hosting.photobucket.com/95288841-8654-4bf7-8fc9-a4aa78dce87f/91a04363-b2ef-4635-a046-7edf25ce7808.jpg
" target="_blank"> <img alt="Click for enlarged picture" src="
https://hosting.photobucket.com/95288841-8654-4bf7-8fc9-a4aa78dce87f/91a04363-b2ef-4635-a046-7edf25ce7808.jpg" width="600" /> </a></p>
<p>
<a href=" https://hosting.photobucket.com/95288841-8654-4bf7-8fc9-a4aa78dce87f/73256af5-fd5d-40b5-95e1-120e49c9be87.jpg
" target="_blank"> <img alt="Click for enlarged picture" src="
https://hosting.photobucket.com/95288841-8654-4bf7-8fc9-a4aa78dce87f/73256af5-fd5d-40b5-95e1-120e49c9be87.jpg" width="600" /> </a></p>
<p>
<a href=" https://hosting.photobucket.com/95288841-8654-4bf7-8fc9-a4aa78dce87f/979f9be5-23f3-4df9-91dc-ab71d6a10d64.jpg
" target="_blank"> <img alt="Click for enlarged picture" src="
https://hosting.photobucket.com/95288841-8654-4bf7-8fc9-a4aa78dce87f/979f9be5-23f3-4df9-91dc-ab71d6a10d64.jpg" width="600" /> </a></p>
<p>
<a href=" https://hosting.photobucket.com/95288841-8654-4bf7-8fc9-a4aa78dce87f/d0ff4379-183a-47b9-a740-9ddc283ebc29.jpg
" target="_blank"> <img alt="Click for enlarged picture" src="
https://hosting.photobucket.com/95288841-8654-4bf7-8fc9-a4aa78dce87f/d0ff4379-183a-47b9-a740-9ddc283ebc29.jpg" width="600" /> </a></p>
<p>
<a href=" https://hosting.photobucket.com/95288841-8654-4bf7-8fc9-a4aa78dce87f/4333e95e-bbbd-4f47-aaea-38a9c99e54d8.jpg
" target="_blank"> <img alt="Click for enlarged picture" src="
https://hosting.photobucket.com/95288841-8654-4bf7-8fc9-a4aa78dce87f/4333e95e-bbbd-4f47-aaea-38a9c99e54d8.jpg" width="600" /> </a></p>
<p>
<a href=" https://hosting.photobucket.com/95288841-8654-4bf7-8fc9-a4aa78dce87f/1372f8a2-b222-48ee-ae45-a90b5a354ef7.jpg
" target="_blank"> <img alt="Click for enlarged picture" src="
https://hosting.photobucket.com/95288841-8654-4bf7-8fc9-a4aa78dce87f/1372f8a2-b222-48ee-ae45-a90b5a354ef7.jpg" width="600" /> </a></p>
<p>
<a href=" https://hosting.photobucket.com/95288841-8654-4bf7-8fc9-a4aa78dce87f/6a1b4fd1-d982-4b06-9c5f-3cd40d6bf10a.jpg
" target="_blank"> <img alt="Click for enlarged picture" src="
https://hosting.photobucket.com/95288841-8654-4bf7-8fc9-a4aa78dce87f/6a1b4fd1-d982-4b06-9c5f-3cd40d6bf10a.jpg" width="600" /> </a></p>
<p>
<a href=" https://hosting.photobucket.com/95288841-8654-4bf7-8fc9-a4aa78dce87f/c2ec45e1-e0f3-463a-b254-cb2a38b53e14.jpg
" target="_blank"> <img alt="Click for enlarged picture" src="
https://hosting.photobucket.com/95288841-8654-4bf7-8fc9-a4aa78dce87f/c2ec45e1-e0f3-463a-b254-cb2a38b53e14.jpg" width="600" /> </a></p>
<p>
<a href=" https://hosting.photobucket.com/95288841-8654-4bf7-8fc9-a4aa78dce87f/17553b9a-0592-4f6a-a097-3f1a97e161f3.jpg
" target="_blank"> <img alt="Click for enlarged picture" src="
https://hosting.photobucket.com/95288841-8654-4bf7-8fc9-a4aa78dce87f/17553b9a-0592-4f6a-a097-3f1a97e161f3.jpg" width="600" /> </a></p>
<p>
<a href=" https://hosting.photobucket.com/95288841-8654-4bf7-8fc9-a4aa78dce87f/8658bd6b-dff2-4d24-8473-928d44d44480.jpg
" target="_blank"> <img alt="Click for enlarged picture" src="
https://hosting.photobucket.com/95288841-8654-4bf7-8fc9-a4aa78dce87f/8658bd6b-dff2-4d24-8473-928d44d44480.jpg" width="600" /> </a></p>
<p>
<a href=" https://hosting.photobucket.com/95288841-8654-4bf7-8fc9-a4aa78dce87f/ecab0ea7-f75b-4e31-a520-d088ad39fa17.jpg
" target="_blank"> <img alt="Click for enlarged picture" src="
https://hosting.photobucket.com/95288841-8654-4bf7-8fc9-a4aa78dce87f/ecab0ea7-f75b-4e31-a520-d088ad39fa17.jpg" width="600" /> </a></p>
<p>
<a href=" https://hosting.photobucket.com/95288841-8654-4bf7-8fc9-a4aa78dce87f/9495a2f5-8a82-41f2-abf4-9ade3db41d87.jpg
" target="_blank"> <img alt="Click for enlarged picture" src="
https://hosting.photobucket.com/95288841-8654-4bf7-8fc9-a4aa78dce87f/9495a2f5-8a82-41f2-abf4-9ade3db41d87.jpg" width="600" /> </a></p>
<p>
<a href=" https://hosting.photobucket.com/95288841-8654-4bf7-8fc9-a4aa78dce87f/362cc6fd-a5dd-474b-9b9f-aeab27d6dcfa.jpg
" target="_blank"> <img alt="Click for enlarged picture" src="
https://hosting.photobucket.com/95288841-8654-4bf7-8fc9-a4aa78dce87f/362cc6fd-a5dd-474b-9b9f-aeab27d6dcfa.jpg" width="600" /> </a></p>
<p>
Posebna čast nam je bila ugostiti na&scaron;eg gosta izlagača, Ninoslava Luka minijaturista iz Poreča koji nam se predstavio svojom kolekcijom povijesnih diorama.</p>
<p>
<a href=" https://hosting.photobucket.com/95288841-8654-4bf7-8fc9-a4aa78dce87f/ba1353de-e2bd-4340-9121-9056e287ed4a.jpg
" target="_blank"> <img alt="Click for enlarged picture" src="
https://hosting.photobucket.com/95288841-8654-4bf7-8fc9-a4aa78dce87f/ba1353de-e2bd-4340-9121-9056e287ed4a.jpg" width="600" /> </a></p>
<p>
<a href=" https://hosting.photobucket.com/95288841-8654-4bf7-8fc9-a4aa78dce87f/cea18506-1b50-4e5b-955c-0b9ca02d7826.jpg
" target="_blank"> <img alt="Click for enlarged picture" src="
https://hosting.photobucket.com/95288841-8654-4bf7-8fc9-a4aa78dce87f/cea18506-1b50-4e5b-955c-0b9ca02d7826.jpg" width="600" /> </a></p>
<p>
<a href=" https://hosting.photobucket.com/95288841-8654-4bf7-8fc9-a4aa78dce87f/1be85b41-e3b6-4536-b141-cd0da6eb38c1.jpg
" target="_blank"> <img alt="Click for enlarged picture" src="
https://hosting.photobucket.com/95288841-8654-4bf7-8fc9-a4aa78dce87f/1be85b41-e3b6-4536-b141-cd0da6eb38c1.jpg" width="600" /> </a></p>
<p>
<a href=" https://hosting.photobucket.com/95288841-8654-4bf7-8fc9-a4aa78dce87f/9e93b87d-ff3c-4b7b-8f06-5f9d3464a134.jpg
" target="_blank"> <img alt="Click for enlarged picture" src="
https://hosting.photobucket.com/95288841-8654-4bf7-8fc9-a4aa78dce87f/9e93b87d-ff3c-4b7b-8f06-5f9d3464a134.jpg" width="600" /> </a></p>
<p>
Tijekom prvog vikenda Izložbe, 21.-22.02.,održali smo 20. godi&scaron;nje međunarodno natjecanje u bojanju minijatura <strong>Black Queen Hobby and Miniature Painting Competition</strong>!</p>
<p>
<a href=" https://hosting.photobucket.com/95288841-8654-4bf7-8fc9-a4aa78dce87f/3056fb09-f66c-4dea-80a8-a4e72407429a.jpg
" target="_blank"> <img alt="Click for enlarged picture" src="
https://hosting.photobucket.com/95288841-8654-4bf7-8fc9-a4aa78dce87f/3056fb09-f66c-4dea-80a8-a4e72407429a.jpg" width="600" /> </a></p>
<p>
Kako su natjecatelji pristizali i prijavljivali se na natjecanje, na&scaron;e vrijedno osoblje je fotografiralo sve izlo&scaron;ke prije nego li su ih rasporedili po kategorijama i pažljivo ih postavili u staklene vitrine. Niti jutarnja okrijepa nije usfalila zahvaljujući na&scaron;im revnim volonterima.</p>
<p>
<a href=" https://hosting.photobucket.com/95288841-8654-4bf7-8fc9-a4aa78dce87f/1118089c-2b46-4a2c-b17d-dc92b66d1ffc.jpg
" target="_blank"> <img alt="Click for enlarged picture" src="
https://hosting.photobucket.com/95288841-8654-4bf7-8fc9-a4aa78dce87f/1118089c-2b46-4a2c-b17d-dc92b66d1ffc.jpg" width="600" /> </a></p>
<p>
<a href=" https://hosting.photobucket.com/95288841-8654-4bf7-8fc9-a4aa78dce87f/9fd3c272-9a69-4532-a09d-36497a20a820.jpg
" target="_blank"> <img alt="Click for enlarged picture" src="
https://hosting.photobucket.com/95288841-8654-4bf7-8fc9-a4aa78dce87f/9fd3c272-9a69-4532-a09d-36497a20a820.jpg" width="600" /> </a></p>
<p>
<a href=" https://hosting.photobucket.com/95288841-8654-4bf7-8fc9-a4aa78dce87f/86995e80-c502-45fb-80f5-c8fda27da3f9.jpg
" target="_blank"> <img alt="Click for enlarged picture" src="
https://hosting.photobucket.com/95288841-8654-4bf7-8fc9-a4aa78dce87f/86995e80-c502-45fb-80f5-c8fda27da3f9.jpg" width="600" /> </a></p>
<p>
U podne, sve vitrine su bile pune i natjecanje je moglo službeno početi.</p>
<p>
<a href=" https://hosting.photobucket.com/95288841-8654-4bf7-8fc9-a4aa78dce87f/bce59a4f-c3e3-4708-a3d6-25e81a894c24.jpg
" target="_blank"> <img alt="Click for enlarged picture" src="
https://hosting.photobucket.com/95288841-8654-4bf7-8fc9-a4aa78dce87f/bce59a4f-c3e3-4708-a3d6-25e81a894c24.jpg" width="600" /> </a></p>
<p>
<a href=" https://hosting.photobucket.com/95288841-8654-4bf7-8fc9-a4aa78dce87f/16a0a094-01aa-4e52-82cf-fdab00d74711.jpg
" target="_blank"> <img alt="Click for enlarged picture" src="
https://hosting.photobucket.com/95288841-8654-4bf7-8fc9-a4aa78dce87f/16a0a094-01aa-4e52-82cf-fdab00d74711.jpg" width="600" /> </a></p>
<p>
<a href=" https://hosting.photobucket.com/95288841-8654-4bf7-8fc9-a4aa78dce87f/0d3f4042-ff77-48d0-b332-add0fd08f7c3.jpg
" target="_blank"> <img alt="Click for enlarged picture" src="
https://hosting.photobucket.com/95288841-8654-4bf7-8fc9-a4aa78dce87f/0d3f4042-ff77-48d0-b332-add0fd08f7c3.jpg" width="600" /> </a></p>
<p>
<a href=" https://hosting.photobucket.com/95288841-8654-4bf7-8fc9-a4aa78dce87f/3711baf8-93f2-434a-aea9-a95288ca04dd.jpg
" target="_blank"> <img alt="Click for enlarged picture" src="
https://hosting.photobucket.com/95288841-8654-4bf7-8fc9-a4aa78dce87f/3711baf8-93f2-434a-aea9-a95288ca04dd.jpg" width="600" /> </a></p>
<p>
<a href=" https://hosting.photobucket.com/95288841-8654-4bf7-8fc9-a4aa78dce87f/53113b97-ec06-4409-95ba-95a5ad3f9720.jpg
" target="_blank"> <img alt="Click for enlarged picture" src="
https://hosting.photobucket.com/95288841-8654-4bf7-8fc9-a4aa78dce87f/53113b97-ec06-4409-95ba-95a5ad3f9720.jpg" width="600" /> </a></p>
<p>
<a href=" https://hosting.photobucket.com/95288841-8654-4bf7-8fc9-a4aa78dce87f/ab127858-193d-4976-bdb2-e27302722fca.jpg
" target="_blank"> <img alt="Click for enlarged picture" src="
https://hosting.photobucket.com/95288841-8654-4bf7-8fc9-a4aa78dce87f/ab127858-193d-4976-bdb2-e27302722fca.jpg" width="600" /> </a></p>
<p>
<a href=" https://hosting.photobucket.com/95288841-8654-4bf7-8fc9-a4aa78dce87f/3735af11-3fb6-4772-a8ff-5e0ff6ddf03a.jpg
" target="_blank"> <img alt="Click for enlarged picture" src="
https://hosting.photobucket.com/95288841-8654-4bf7-8fc9-a4aa78dce87f/3735af11-3fb6-4772-a8ff-5e0ff6ddf03a.jpg" width="600" /> </a></p>
<p>
<strong>Back To Basics radionice za najmlađe na Black Queen</strong></p>
<p>
Ove godine smo tijekom cijelog vikenda organizirali radionice bojanja minijatura za najmlađe koji su mogli po prvi puta obojati neku od na&scaron;ih vlastitih minijatura osmi&scaron;ljenih upravo za ovaj program!</p>
<p>
<a href=" https://hosting.photobucket.com/95288841-8654-4bf7-8fc9-a4aa78dce87f/6999be0c-8cc6-4947-a423-9427a2299724.jpg
" target="_blank"> <img alt="Click for enlarged picture" src="
https://hosting.photobucket.com/95288841-8654-4bf7-8fc9-a4aa78dce87f/6999be0c-8cc6-4947-a423-9427a2299724.jpg" width="600" /> </a></p>
<p>
<a href="https://hosting.photobucket.com/95288841-8654-4bf7-8fc9-a4aa78dce87f/835b05a5-f171-49df-afa6-da0692b89074.jpg" target="_blank"><img alt="Click for enlarged picture" src="https://hosting.photobucket.com/95288841-8654-4bf7-8fc9-a4aa78dce87f/835b05a5-f171-49df-afa6-da0692b89074.jpg" width="600" /></a></p>
<p>
<a href=" https://hosting.photobucket.com/95288841-8654-4bf7-8fc9-a4aa78dce87f/ef5dde13-84ee-4ea0-b9f3-28aaf703ef6d.jpg
" target="_blank"> <img alt="Click for enlarged picture" src="
https://hosting.photobucket.com/95288841-8654-4bf7-8fc9-a4aa78dce87f/ef5dde13-84ee-4ea0-b9f3-28aaf703ef6d.jpg" width="600" /> </a></p>
<p>
<strong>PRODAJNI KUTAK</strong></p>
<p>
Tijekom vikenda ugostili smo na&scaron;e sponzore sa njihovim prodajnim &scaron;tandovima: Swood.si i Carta Magica.</p>
<p>
<a href=" https://hosting.photobucket.com/95288841-8654-4bf7-8fc9-a4aa78dce87f/5ee9a49f-a387-435a-9110-572402b7191d.jpg
" target="_blank"> <img alt="Click for enlarged picture" src="
https://hosting.photobucket.com/95288841-8654-4bf7-8fc9-a4aa78dce87f/5ee9a49f-a387-435a-9110-572402b7191d.jpg" width="600" /> </a></p>
<p>
<a href=" https://hosting.photobucket.com/95288841-8654-4bf7-8fc9-a4aa78dce87f/47cf600f-b1eb-4655-bf06-305f6f21d5d2.jpg
" target="_blank"> <img alt="Click for enlarged picture" src="
https://hosting.photobucket.com/95288841-8654-4bf7-8fc9-a4aa78dce87f/47cf600f-b1eb-4655-bf06-305f6f21d5d2.jpg" width="600" /> </a></p>
<p>
<strong>OGLEDNE RADIONICE BOJANJA MINIJATURA</strong></p>
<p>
Prostor ZZTK omogućuje održavanje radionica tijekom vikenda u kino dvorani u podrumu, stoga smo tijekom vikenda organizirali i ogledne radionice. Rad predavača snimao se kamerom i projicirao na projekcijsko platno u dvorani. Veliko hvala na&scaron;im domaćim i inozemnim predavačima: Anžetu Zorku (SLO), doc.dr.sc. Wintonu Afriću (HR), Ivanu Knezoviću (UMS Agram) i Petru Knezoviću (HR).</p>
<p>
<a href=" https://hosting.photobucket.com/95288841-8654-4bf7-8fc9-a4aa78dce87f/e8d835be-ec99-49d7-bc9b-086e38573d1a.jpg
" target="_blank"> <img alt="Click for enlarged picture" src="
https://hosting.photobucket.com/95288841-8654-4bf7-8fc9-a4aa78dce87f/e8d835be-ec99-49d7-bc9b-086e38573d1a.jpg" width="600" /> </a></p>
<p>
<a href=" https://hosting.photobucket.com/95288841-8654-4bf7-8fc9-a4aa78dce87f/f3eba4c1-4637-4da9-8360-75f430355af4.jpg" target="_blank"> <img alt="Click for enlarged picture" src="
https://hosting.photobucket.com/95288841-8654-4bf7-8fc9-a4aa78dce87f/f3eba4c1-4637-4da9-8360-75f430355af4.jpg" width="600" /> </a></p>
<p>
<a href=" https://hosting.photobucket.com/95288841-8654-4bf7-8fc9-a4aa78dce87f/ef523854-4030-4579-aa38-403afda86c91.jpg
" target="_blank"> <img alt="Click for enlarged picture" src="
https://hosting.photobucket.com/95288841-8654-4bf7-8fc9-a4aa78dce87f/ef523854-4030-4579-aa38-403afda86c91.jpg" width="600" /> </a></p>
<p>
<a href=" https://hosting.photobucket.com/95288841-8654-4bf7-8fc9-a4aa78dce87f/dd0943c2-f4a8-40c3-b641-f6dcdd200380.jpg
" target="_blank"> <img alt="Click for enlarged picture" src="
https://hosting.photobucket.com/95288841-8654-4bf7-8fc9-a4aa78dce87f/dd0943c2-f4a8-40c3-b641-f6dcdd200380.jpg" width="600" /> </a></p>
<p>
<a href=" https://hosting.photobucket.com/95288841-8654-4bf7-8fc9-a4aa78dce87f/08b1626a-f6c7-43c9-b718-3e9a41b55ca6.jpg
" target="_blank"> <img alt="Click for enlarged picture" src="
https://hosting.photobucket.com/95288841-8654-4bf7-8fc9-a4aa78dce87f/08b1626a-f6c7-43c9-b718-3e9a41b55ca6.jpg" width="600" /> </a></p>
<p>
<a href=" https://hosting.photobucket.com/95288841-8654-4bf7-8fc9-a4aa78dce87f/91aca7f3-1af6-486d-b174-65079a63a1ea.jpg
" target="_blank"> <img alt="Click for enlarged picture" src="
https://hosting.photobucket.com/95288841-8654-4bf7-8fc9-a4aa78dce87f/91aca7f3-1af6-486d-b174-65079a63a1ea.jpg" width="600" /> </a></p>
<p>
<a href=" https://hosting.photobucket.com/95288841-8654-4bf7-8fc9-a4aa78dce87f/3821f2fb-fbe7-4096-adbc-7d8c981a3b56.jpg
" target="_blank"> <img alt="Click for enlarged picture" src="
https://hosting.photobucket.com/95288841-8654-4bf7-8fc9-a4aa78dce87f/3821f2fb-fbe7-4096-adbc-7d8c981a3b56.jpg" width="600" /> </a></p>
<p>
<a href=" https://hosting.photobucket.com/95288841-8654-4bf7-8fc9-a4aa78dce87f/2c7bb3c5-c0ec-4a96-b6bd-6a90ce5ce154.jpg
" target="_blank"> <img alt="Click for enlarged picture" src="
https://hosting.photobucket.com/95288841-8654-4bf7-8fc9-a4aa78dce87f/2c7bb3c5-c0ec-4a96-b6bd-6a90ce5ce154.jpg" width="600" /> </a></p>
<p>
<a href=" https://hosting.photobucket.com/95288841-8654-4bf7-8fc9-a4aa78dce87f/b646f4ee-21aa-4d12-8db3-6d33351d5aeb.jpg
" target="_blank"> <img alt="Click for enlarged picture" src="
https://hosting.photobucket.com/95288841-8654-4bf7-8fc9-a4aa78dce87f/b646f4ee-21aa-4d12-8db3-6d33351d5aeb.jpg" width="600" /> </a></p>
<p>
<a href=" https://hosting.photobucket.com/95288841-8654-4bf7-8fc9-a4aa78dce87f/fb5efc01-32cc-4119-90e3-188f51b30237.jpg
" target="_blank"> <img alt="Click for enlarged picture" src="
https://hosting.photobucket.com/95288841-8654-4bf7-8fc9-a4aa78dce87f/fb5efc01-32cc-4119-90e3-188f51b30237.jpg" width="600" /> </a></p>
<p>
<strong>NATJECANJE U BRZOM BOJANJU MINIJATURA</strong></p>
<p>
U nedjelju, 22.2. smo organizirali natjecanje u brzom bojanju minijatura. Po prvi puta smo koristili minijature koje su na&scaron; dizajn. Sudionici su imali 60 minuta vremena da obojaju og čarobnjaka.</p>
<p>
<a href=" https://hosting.photobucket.com/95288841-8654-4bf7-8fc9-a4aa78dce87f/106417a6-a047-4e0d-9f81-87858806052f.jpg
" target="_blank"> <img alt="Click for enlarged picture" src="
https://hosting.photobucket.com/95288841-8654-4bf7-8fc9-a4aa78dce87f/106417a6-a047-4e0d-9f81-87858806052f.jpg" width="600" /> </a></p>
<p>
<a href=" https://hosting.photobucket.com/95288841-8654-4bf7-8fc9-a4aa78dce87f/ac6853c7-6e34-4e07-a996-8d7d12744b67.jpg
" target="_blank"> <img alt="Click for enlarged picture" src="
https://hosting.photobucket.com/95288841-8654-4bf7-8fc9-a4aa78dce87f/ac6853c7-6e34-4e07-a996-8d7d12744b67.jpg" width="600" /> </a></p>
<p>
<a href=" https://hosting.photobucket.com/95288841-8654-4bf7-8fc9-a4aa78dce87f/ccb155fa-52c5-4a99-9515-f69a6836dce7.jpg
" target="_blank"> <img alt="Click for enlarged picture" src="
https://hosting.photobucket.com/95288841-8654-4bf7-8fc9-a4aa78dce87f/ccb155fa-52c5-4a99-9515-f69a6836dce7.jpg" width="600" /> </a></p>
<p>
<a href=" https://hosting.photobucket.com/95288841-8654-4bf7-8fc9-a4aa78dce87f/a29fedd0-97ea-45b1-85f9-7ea62188b2b2.jpg
" target="_blank"><img alt="Click for enlarged picture" src="
https://hosting.photobucket.com/95288841-8654-4bf7-8fc9-a4aa78dce87f/a29fedd0-97ea-45b1-85f9-7ea62188b2b2.jpg" width="600" /></a></p>
<p>
S time smo do&scaron;li do samoga kraja ovog predivnog vikenda i sve &scaron;to je preostalo je bila podjela nagrada i priznanja pobjednicima.</p>
<p>
<a href=" https://hosting.photobucket.com/95288841-8654-4bf7-8fc9-a4aa78dce87f/046ca4c8-0ae7-415e-abd3-e131d580c3ad.jpg
" target="_blank"> <img alt="Click for enlarged picture" src="
https://hosting.photobucket.com/95288841-8654-4bf7-8fc9-a4aa78dce87f/046ca4c8-0ae7-415e-abd3-e131d580c3ad.jpg" width="600" /> </a></p>
<p>
<a href=" https://hosting.photobucket.com/95288841-8654-4bf7-8fc9-a4aa78dce87f/cec0dcef-7acb-4a77-89de-271ed5410672.jpg
" target="_blank"> <img alt="Click for enlarged picture" src="
https://hosting.photobucket.com/95288841-8654-4bf7-8fc9-a4aa78dce87f/cec0dcef-7acb-4a77-89de-271ed5410672.jpg" width="600" /> </a></p>
<p>
<a href=" https://hosting.photobucket.com/95288841-8654-4bf7-8fc9-a4aa78dce87f/a495a5fc-31a2-4979-a970-0fa22c334354.jpg
" target="_blank"> <img alt="Click for enlarged picture" src="
https://hosting.photobucket.com/95288841-8654-4bf7-8fc9-a4aa78dce87f/a495a5fc-31a2-4979-a970-0fa22c334354.jpg" width="600" /> </a></p>
<p>
<strong>AGRAM ARENA &ndash; Leaving Asphodel Necropolis28 kampanja</strong></p>
<p>
Tijekom vikenda 21.-22.2. održali smo i novo međunarodno natjecanje Agram Arena! Ovoga puta na redu je bila stolna strate&scaron;ka igra Necropolis 28 za koju su na&scaron;i članovi osmislili dvodnevnu kampanju. Svaki sudionik je izradio svoju bandu vojnika, a velika većina i svoje vlastite table.</p>
<p>
<a href=" https://hosting.photobucket.com/95288841-8654-4bf7-8fc9-a4aa78dce87f/ac69b182-4bfc-4575-a6d3-fb3c8baba342.jpg
" target="_blank"> <img alt="Click for enlarged picture" src="
https://hosting.photobucket.com/95288841-8654-4bf7-8fc9-a4aa78dce87f/ac69b182-4bfc-4575-a6d3-fb3c8baba342.jpg" width="600" /> </a></p>
<p>
<a href=" https://hosting.photobucket.com/95288841-8654-4bf7-8fc9-a4aa78dce87f/289fed7b-e058-42d8-ba2d-cbd0463e98da.jpg
" target="_blank"> <img alt="Click for enlarged picture" src="
https://hosting.photobucket.com/95288841-8654-4bf7-8fc9-a4aa78dce87f/289fed7b-e058-42d8-ba2d-cbd0463e98da.jpg" width="600" /> </a></p>
<p>
<a href=" https://hosting.photobucket.com/95288841-8654-4bf7-8fc9-a4aa78dce87f/d92ebbee-859d-4441-8386-3d760b20b7a7.jpg
" target="_blank"> <img alt="Click for enlarged picture" src="
https://hosting.photobucket.com/95288841-8654-4bf7-8fc9-a4aa78dce87f/d92ebbee-859d-4441-8386-3d760b20b7a7.jpg" width="600" /> </a></p>
<p>
<a href=" https://hosting.photobucket.com/95288841-8654-4bf7-8fc9-a4aa78dce87f/09c59798-7871-425e-a075-3ca1cd91768a.jpg
" target="_blank"> <img alt="Click for enlarged picture" src="
https://hosting.photobucket.com/95288841-8654-4bf7-8fc9-a4aa78dce87f/09c59798-7871-425e-a075-3ca1cd91768a.jpg" width="600" /> </a></p>
<p>
<a href=" https://hosting.photobucket.com/95288841-8654-4bf7-8fc9-a4aa78dce87f/b2f3edc8-5a23-4552-9a2a-4027b286f327.jpg
" target="_blank"> <img alt="Click for enlarged picture" src="
https://hosting.photobucket.com/95288841-8654-4bf7-8fc9-a4aa78dce87f/b2f3edc8-5a23-4552-9a2a-4027b286f327.jpg" width="600" /> </a></p>
<p>
<a href=" https://hosting.photobucket.com/95288841-8654-4bf7-8fc9-a4aa78dce87f/2a9f43ac-b531-4746-b7bb-ac5a3356aab0.jpg
" target="_blank"> <img alt="Click for enlarged picture" src="
https://hosting.photobucket.com/95288841-8654-4bf7-8fc9-a4aa78dce87f/2a9f43ac-b531-4746-b7bb-ac5a3356aab0.jpg" width="600" /> </a></p>
<p>
<strong>DOGAĐANJA RADNIM DANIMA ZA VRIJEME IZLOŽBE</strong></p>
<p>
Tijekom naredna dva tjedna, na&scaron;i volonteri su radnim danima od 16:00 do 20:00, držali otvorene radionice bojanja minijatura. Postavljene su radne stanice za bojanje minijatura na kojoj su na&scaron;i posjetitelji mogli bojati minijature koje smo priredili (ili svoje ukoliko su ih donijeli) koristeći na&scaron;e materijale i alate.</p>
<p>
<a href=" https://hosting.photobucket.com/95288841-8654-4bf7-8fc9-a4aa78dce87f/6edf7765-42b5-417a-820f-fa5d907179a7.jpg
" target="_blank"> <img alt="Click for enlarged picture" src="
https://hosting.photobucket.com/95288841-8654-4bf7-8fc9-a4aa78dce87f/6edf7765-42b5-417a-820f-fa5d907179a7.jpg" width="600" /> </a></p>
<p>
<a href=" https://hosting.photobucket.com/95288841-8654-4bf7-8fc9-a4aa78dce87f/c084ebe2-f57b-4519-9b31-29bdc1155887.jpg
" target="_blank"> <img alt="Click for enlarged picture" src="
https://hosting.photobucket.com/95288841-8654-4bf7-8fc9-a4aa78dce87f/c084ebe2-f57b-4519-9b31-29bdc1155887.jpg" width="600" /> </a></p>
<p>
<a href=" https://hosting.photobucket.com/95288841-8654-4bf7-8fc9-a4aa78dce87f/37ff2272-f9b0-4b16-a363-1e6f6688c866.jpg
" target="_blank"> <img alt="Click for enlarged picture" src="
https://hosting.photobucket.com/95288841-8654-4bf7-8fc9-a4aa78dce87f/37ff2272-f9b0-4b16-a363-1e6f6688c866.jpg" width="600" /> </a></p>
<p>
<a href=" https://hosting.photobucket.com/95288841-8654-4bf7-8fc9-a4aa78dce87f/5f4f7968-ff50-4a01-98da-6ce8562930b4.jpg
" target="_blank"> <img alt="Click for enlarged picture" src="
https://hosting.photobucket.com/95288841-8654-4bf7-8fc9-a4aa78dce87f/5f4f7968-ff50-4a01-98da-6ce8562930b4.jpg" width="600" /> </a></p>
<p>
<a href=" https://hosting.photobucket.com/95288841-8654-4bf7-8fc9-a4aa78dce87f/cbb45319-d488-483c-bf9d-9af29852fc74.jpg
" target="_blank"> <img alt="Click for enlarged picture" src="
https://hosting.photobucket.com/95288841-8654-4bf7-8fc9-a4aa78dce87f/cbb45319-d488-483c-bf9d-9af29852fc74.jpg" width="600" /> </a></p>
<p>
<a href=" https://hosting.photobucket.com/95288841-8654-4bf7-8fc9-a4aa78dce87f/3dcca26c-d549-4af3-812a-a4a81b9a2310.jpg
" target="_blank"> <img alt="Click for enlarged picture" src="
https://hosting.photobucket.com/95288841-8654-4bf7-8fc9-a4aa78dce87f/3dcca26c-d549-4af3-812a-a4a81b9a2310.jpg" width="600" /> </a></p>
<p>
<a href=" https://hosting.photobucket.com/95288841-8654-4bf7-8fc9-a4aa78dce87f/4adf0fb6-3eab-4b40-b32d-d03eab4a9892.jpg
" target="_blank"> <img alt="Click for enlarged picture" src="
https://hosting.photobucket.com/95288841-8654-4bf7-8fc9-a4aa78dce87f/4adf0fb6-3eab-4b40-b32d-d03eab4a9892.jpg" width="600" /> </a></p>
<p>
<a href=" https://hosting.photobucket.com/95288841-8654-4bf7-8fc9-a4aa78dce87f/4732b58a-9a65-4d1c-a7d5-25513d34b108.jpg
" target="_blank"> <img alt="Click for enlarged picture" src="
https://hosting.photobucket.com/95288841-8654-4bf7-8fc9-a4aa78dce87f/4732b58a-9a65-4d1c-a7d5-25513d34b108.jpg" width="600" /> </a></p>
<p>
<a href=" https://hosting.photobucket.com/95288841-8654-4bf7-8fc9-a4aa78dce87f/274be330-31d5-4e25-95db-ec2f423a003c.jpg
" target="_blank"> <img alt="Click for enlarged picture" src="
https://hosting.photobucket.com/95288841-8654-4bf7-8fc9-a4aa78dce87f/274be330-31d5-4e25-95db-ec2f423a003c.jpg" width="600" /> </a></p>
<p>
<a href=" https://hosting.photobucket.com/95288841-8654-4bf7-8fc9-a4aa78dce87f/8e7b0a80-0f46-4d70-9789-a46976c713d2.jpg
" target="_blank"> <img alt="Click for enlarged picture" src="
https://hosting.photobucket.com/95288841-8654-4bf7-8fc9-a4aa78dce87f/8e7b0a80-0f46-4d70-9789-a46976c713d2.jpg" width="600" /> </a></p>
<p>
<a href=" https://hosting.photobucket.com/95288841-8654-4bf7-8fc9-a4aa78dce87f/8bbd4e96-b911-4f26-80fe-b1c57f29027b.jpg
" target="_blank"> <img alt="Click for enlarged picture" src="
https://hosting.photobucket.com/95288841-8654-4bf7-8fc9-a4aa78dce87f/8bbd4e96-b911-4f26-80fe-b1c57f29027b.jpg" width="600" /> </a></p>
<p>
<a href=" https://hosting.photobucket.com/95288841-8654-4bf7-8fc9-a4aa78dce87f/203a27be-8f10-459d-89b9-befb6b636b74.jpg
" target="_blank"> <img alt="Click for enlarged picture" src="
https://hosting.photobucket.com/95288841-8654-4bf7-8fc9-a4aa78dce87f/203a27be-8f10-459d-89b9-befb6b636b74.jpg" width="600" /> </a></p>
<p>
<a href=" https://hosting.photobucket.com/95288841-8654-4bf7-8fc9-a4aa78dce87f/5dc4358f-19d8-475f-a4af-9c29e9ed18d7.jpg
" target="_blank"> <img alt="Click for enlarged picture" src="
https://hosting.photobucket.com/95288841-8654-4bf7-8fc9-a4aa78dce87f/5dc4358f-19d8-475f-a4af-9c29e9ed18d7.jpg" width="600" /> </a></p>
<p>
<strong>BACK TO BASICS RADIONICE ZA NAJMLAĐE</strong></p>
<p>
Radnim danima od 17:00 do 18:00 održavali smo na&scaron;e nove radionice za najmlađe u kojima su na&scaron;i najmlađi polaznici bojali svoje prve minijature.</p>
<p>
<a href=" https://hosting.photobucket.com/95288841-8654-4bf7-8fc9-a4aa78dce87f/948af139-8fb5-4e28-a27c-404466e70d05.jpg
" target="_blank"> <img alt="Click for enlarged picture" src="
https://hosting.photobucket.com/95288841-8654-4bf7-8fc9-a4aa78dce87f/948af139-8fb5-4e28-a27c-404466e70d05.jpg" width="600" /> </a></p>
<p>
<a href=" https://hosting.photobucket.com/95288841-8654-4bf7-8fc9-a4aa78dce87f/bb3e20c2-bb21-4a3d-863a-74de08261467.jpg
" target="_blank"> <img alt="Click for enlarged picture" src="
https://hosting.photobucket.com/95288841-8654-4bf7-8fc9-a4aa78dce87f/bb3e20c2-bb21-4a3d-863a-74de08261467.jpg" width="600" /> </a></p>
<p>
<a href=" https://hosting.photobucket.com/95288841-8654-4bf7-8fc9-a4aa78dce87f/7316c760-98e3-4e3f-9261-d138aa7a5a6a.jpg
" target="_blank"> <img alt="Click for enlarged picture" src="
https://hosting.photobucket.com/95288841-8654-4bf7-8fc9-a4aa78dce87f/7316c760-98e3-4e3f-9261-d138aa7a5a6a.jpg" width="600" /> </a></p>
<p>
<a href=" https://hosting.photobucket.com/95288841-8654-4bf7-8fc9-a4aa78dce87f/68934b39-3d1f-4f43-b967-14b73c41a39e.jpg
" target="_blank"> <img alt="Click for enlarged picture" src="
https://hosting.photobucket.com/95288841-8654-4bf7-8fc9-a4aa78dce87f/68934b39-3d1f-4f43-b967-14b73c41a39e.jpg" width="600" /> </a></p>
<p>
<a href=" https://hosting.photobucket.com/95288841-8654-4bf7-8fc9-a4aa78dce87f/46125bce-a28d-494f-873a-3aeabdc1d6c2.jpg
" target="_blank"> <img alt="Click for enlarged picture" src="
https://hosting.photobucket.com/95288841-8654-4bf7-8fc9-a4aa78dce87f/46125bce-a28d-494f-873a-3aeabdc1d6c2.jpg" width="600" /> </a></p>
<p>
<a href=" https://hosting.photobucket.com/95288841-8654-4bf7-8fc9-a4aa78dce87f/3c58e0ad-77a9-44c8-b6bf-d9a55c514d43.jpg
" target="_blank"> <img alt="Click for enlarged picture" src="
https://hosting.photobucket.com/95288841-8654-4bf7-8fc9-a4aa78dce87f/3c58e0ad-77a9-44c8-b6bf-d9a55c514d43.jpg" width="600" /> </a></p>
<p>
<a href=" https://hosting.photobucket.com/95288841-8654-4bf7-8fc9-a4aa78dce87f/f891f0f0-051b-40ee-9676-cb03b0a9811b.jpg
" target="_blank"> <img alt="Click for enlarged picture" src="
https://hosting.photobucket.com/95288841-8654-4bf7-8fc9-a4aa78dce87f/f891f0f0-051b-40ee-9676-cb03b0a9811b.jpg" width="600" /> </a></p>
<p>
<strong>AGRAM LEGO SEKCIJA predavanje: FW-14b &ndash; Bolid F1 za budućnost</strong></p>
<p>
U srijedu 25.2.2026. u sklopu aktivnosti na&scaron;e Agram Lego Sekcije, na&scaron; dežurni strojar Marko Paunović je održao predavanje na temu bolida Formule 1 iz 1992.. Ulaz na predavanje je bio besplatan, a po zavr&scaron;etku su LEGO maketu bolida izradili članovi Lego sekcije</p>
<p>
<a href=" https://hosting.photobucket.com/95288841-8654-4bf7-8fc9-a4aa78dce87f/b2e14b1c-daa4-4314-8685-184377bc7e28.jpg
" target="_blank"> <img alt="Click for enlarged picture" src="
https://hosting.photobucket.com/95288841-8654-4bf7-8fc9-a4aa78dce87f/b2e14b1c-daa4-4314-8685-184377bc7e28.jpg" width="600" /> </a></p>
<p>
<a href=" https://hosting.photobucket.com/95288841-8654-4bf7-8fc9-a4aa78dce87f/31fb439a-77d3-4418-83ff-66c3af279cca.jpg" target="_blank"> <img alt="Click for enlarged picture" src="
https://hosting.photobucket.com/95288841-8654-4bf7-8fc9-a4aa78dce87f/31fb439a-77d3-4418-83ff-66c3af279cca.jpg" width="600" /> </a></p>
<p>
<a href=" https://hosting.photobucket.com/95288841-8654-4bf7-8fc9-a4aa78dce87f/bfcaf282-6be8-4b52-a3ed-c91137457876.jpg
" target="_blank"> <img alt="Click for enlarged picture" src="
https://hosting.photobucket.com/95288841-8654-4bf7-8fc9-a4aa78dce87f/bfcaf282-6be8-4b52-a3ed-c91137457876.jpg" width="600" /> </a></p>
<p>
<a href=" https://hosting.photobucket.com/95288841-8654-4bf7-8fc9-a4aa78dce87f/ce70fc61-9e1a-4169-aaad-8b67417656c0.jpg
" target="_blank"> <img alt="Click for enlarged picture" src="
https://hosting.photobucket.com/95288841-8654-4bf7-8fc9-a4aa78dce87f/ce70fc61-9e1a-4169-aaad-8b67417656c0.jpg" width="600" /> </a></p>
<p>
<a href=" https://hosting.photobucket.com/95288841-8654-4bf7-8fc9-a4aa78dce87f/94ca0e36-8710-458d-8194-9f71299f4d74.jpg
" target="_blank"> <img alt="Click for enlarged picture" src="
https://hosting.photobucket.com/95288841-8654-4bf7-8fc9-a4aa78dce87f/94ca0e36-8710-458d-8194-9f71299f4d74.jpg" width="600" /> </a></p>
<p>
<a href=" https://hosting.photobucket.com/95288841-8654-4bf7-8fc9-a4aa78dce87f/c6771f72-7191-4ca3-a792-3bb1ab3897b1.jpg
" target="_blank"> <img alt="Click for enlarged picture" src="
https://hosting.photobucket.com/95288841-8654-4bf7-8fc9-a4aa78dce87f/c6771f72-7191-4ca3-a792-3bb1ab3897b1.jpg" width="600" /> </a></p>
<p>
<a href=" https://hosting.photobucket.com/95288841-8654-4bf7-8fc9-a4aa78dce87f/c8fcfcb6-09f2-4398-a2fb-fa5065771e01.jpg
" target="_blank"> <img alt="Click for enlarged picture" src="
https://hosting.photobucket.com/95288841-8654-4bf7-8fc9-a4aa78dce87f/c8fcfcb6-09f2-4398-a2fb-fa5065771e01.jpg" width="600" /> </a></p>
<p>
<a href=" https://hosting.photobucket.com/95288841-8654-4bf7-8fc9-a4aa78dce87f/d7e187a8-d5b1-433b-b30d-091e54dcdddf.jpg
" target="_blank"> <img alt="Click for enlarged picture" src="
https://hosting.photobucket.com/95288841-8654-4bf7-8fc9-a4aa78dce87f/d7e187a8-d5b1-433b-b30d-091e54dcdddf.jpg" width="600" /> </a></p>
<p>
Tijekom drugog vikenda Izložbe, 28.02.-01.03., organizirali smo <strong>RADIONICU BOJANJA MINIJATURA &ndash; Grimdark stil</strong>.</p>
<p>
Radionica se provodila kroz dva dana (cijeli vikend) i polaznici su bojali tri različite figure za igru Trench Crusade. Fokus ovih predavanja bilo je bojenje popularnim Grimdark stilom. Na radionici su bile predstavljene boje i pribor, priprema figura, nekoliko tehnika bojenja minijatura od osnovnih do naprednijih, te tehnike i trikovi za brzo i efikasno bojenje većih količina figura odjednom. U sklopu radionice kori&scaron;tene su akrilne boje na bazi vode.</p>
<p>
<a href=" https://hosting.photobucket.com/95288841-8654-4bf7-8fc9-a4aa78dce87f/733d94b2-8e8d-4a4e-accd-b9168e32577e.jpg
" target="_blank"> <img alt="Click for enlarged picture" src="
https://hosting.photobucket.com/95288841-8654-4bf7-8fc9-a4aa78dce87f/733d94b2-8e8d-4a4e-accd-b9168e32577e.jpg
" width="600" /> </a></p>
<p>
<a href=" https://hosting.photobucket.com/95288841-8654-4bf7-8fc9-a4aa78dce87f/41020062-45b9-41cd-a357-fa23a389f390.jpg
" target="_blank"> <img alt="Click for enlarged picture" src="
https://hosting.photobucket.com/95288841-8654-4bf7-8fc9-a4aa78dce87f/41020062-45b9-41cd-a357-fa23a389f390.jpg
" width="600" /> </a></p>
<p>
<a href=" https://hosting.photobucket.com/95288841-8654-4bf7-8fc9-a4aa78dce87f/0c07cc55-596d-494d-972b-cd6a0dd6b8b7.jpg
" target="_blank"> <img alt="Click for enlarged picture" src="
https://hosting.photobucket.com/95288841-8654-4bf7-8fc9-a4aa78dce87f/0c07cc55-596d-494d-972b-cd6a0dd6b8b7.jpg" width="600" /> </a></p>
<p>
<a href=" https://hosting.photobucket.com/95288841-8654-4bf7-8fc9-a4aa78dce87f/c17dd356-08b1-48e1-b895-6296aed7f818.jpg
" target="_blank"> <img alt="Click for enlarged picture" src="
https://hosting.photobucket.com/95288841-8654-4bf7-8fc9-a4aa78dce87f/c17dd356-08b1-48e1-b895-6296aed7f818.jpg" width="600" /> </a></p>
<p>
U srijedu 04.03.2026. održana je godi&scaron;nja <strong>sjednica Skup&scaron;tine</strong> na kojoj smo odredili smjernice rada u 2026.</p>
<p>
<a href=" https://hosting.photobucket.com/95288841-8654-4bf7-8fc9-a4aa78dce87f/59484bd0-7edc-4aed-a04e-ae42900ba3e6.jpg
" target="_blank"> <img alt="Click for enlarged picture" src="
https://hosting.photobucket.com/95288841-8654-4bf7-8fc9-a4aa78dce87f/59484bd0-7edc-4aed-a04e-ae42900ba3e6.jpg
" width="600" /> </a></p>
<p>
U nedjelju 08.03.2026. Izložba je zavr&scaron;ena, na&scaron;i eksponati sigurno spremljeni, a Galerija poči&scaron;ćena.</p>
<p>
<a href=" https://hosting.photobucket.com/95288841-8654-4bf7-8fc9-a4aa78dce87f/98af4280-0956-4cdb-b4a9-da40e3a5a44a.jpg
" target="_blank"> <img alt="Click for enlarged picture" src="
https://hosting.photobucket.com/95288841-8654-4bf7-8fc9-a4aa78dce87f/98af4280-0956-4cdb-b4a9-da40e3a5a44a.jpg" width="600" /> </a></p>
<p>
<a href=" https://hosting.photobucket.com/95288841-8654-4bf7-8fc9-a4aa78dce87f/3259b35e-1fc2-4a99-a3c5-c7984958d72b.jpg
" target="_blank"> <img alt="Click for enlarged picture" src="
https://hosting.photobucket.com/95288841-8654-4bf7-8fc9-a4aa78dce87f/3259b35e-1fc2-4a99-a3c5-c7984958d72b.jpg" width="600" /> </a></p>
<p>
Najbitniji dio svake godine prilikom održavanja ove Izložbe je socijalni aspekt, druženje na&scaron;ih članova kako međusobno tako i sa na&scaron;im međunarodnim prijateljima koji nas posjećuju! Uz ovih par fotografija sa zajedničkih druženja, pozdravljamo vas do sljedeće godine!</p>
<p>
<a href=" https://hosting.photobucket.com/95288841-8654-4bf7-8fc9-a4aa78dce87f/b9168e23-79b2-4d81-8a7d-7534062881a7.jpg
" target="_blank"> <img alt="Click for enlarged picture" src="
https://hosting.photobucket.com/95288841-8654-4bf7-8fc9-a4aa78dce87f/b9168e23-79b2-4d81-8a7d-7534062881a7.jpg " width="600" /> </a></p>
<p>
<a href=" https://hosting.photobucket.com/95288841-8654-4bf7-8fc9-a4aa78dce87f/edff925e-916c-4d78-953e-210abf3753d4.jpg
" target="_blank"> <img alt="Click for enlarged picture" src="
https://hosting.photobucket.com/95288841-8654-4bf7-8fc9-a4aa78dce87f/edff925e-916c-4d78-953e-210abf3753d4.jpg " width="600" /> </a></p>
<p>
<a href=" https://hosting.photobucket.com/95288841-8654-4bf7-8fc9-a4aa78dce87f/8bcb48fa-466b-43f8-8a4b-f15f6794b21e.jpg
" target="_blank"> <img alt="Click for enlarged picture" src="
https://hosting.photobucket.com/95288841-8654-4bf7-8fc9-a4aa78dce87f/8bcb48fa-466b-43f8-8a4b-f15f6794b21e.jpg" width="600" /> </a></p>
",
"created" => "2026-03-12 08:54:10",
"modified" => "2026-03-12 08:58:37"
),
"Member" => array(
"id" => "35",
"group_id" => "1",
"first_name" => "Marko",
"last_name" => "Paunović",
"first_name_mask" => "marko",
"last_name_mask" => "paunovic",
"username" => "marko",
"password" => "*****",
"born" => "2033-03-07 20:35:00",
"created" => "2009-06-02 20:37:03"
)
)</pre><pre class="stack-trace">include - APP/views/elements/latestArticles.ctp, line 7
View::_render() - CORE/cake/libs/view/view.php, line 736
View::element() - CORE/cake/libs/view/view.php, line 397
include - APP/views/home/index.ctp, line 49
View::_render() - CORE/cake/libs/view/view.php, line 736
View::render() - CORE/cake/libs/view/view.php, line 431
Controller::render() - CORE/cake/libs/controller/controller.php, line 909
Dispatcher::_invoke() - CORE/cake/dispatcher.php, line 207
Dispatcher::dispatch() - CORE/cake/dispatcher.php, line 171
[main] - APP/webroot/index.php, line 86</pre></div></pre><pre class="cake-debug"><a href="javascript:void(0);" onclick="document.getElementById('cakeErr8-trace').style.display = (document.getElementById('cakeErr8-trace').style.display == 'none' ? '' : 'none');"><b>Notice</b> (8)</a>: Undefined index: mask_dok [<b>APP/views/elements/latestArticles.ctp</b>, line <b>10</b>]<div id="cakeErr8-trace" class="cake-stack-trace" style="display: none;"><a href="javascript:void(0);" onclick="document.getElementById('cakeErr8-code').style.display = (document.getElementById('cakeErr8-code').style.display == 'none' ? '' : 'none')">Code</a> | <a href="javascript:void(0);" onclick="document.getElementById('cakeErr8-context').style.display = (document.getElementById('cakeErr8-context').style.display == 'none' ? '' : 'none')">Context</a><div id="cakeErr8-code" class="cake-code-dump" style="display: none;"><pre><code><span style="color: #000000"></span></code>
<code><span style="color: #000000"> if (Configure::read() > 0) {</span></code>
<span class="code-highlight"><code><span style="color: #000000"> include ($___viewFn);</span></code></span></pre></div><pre id="cakeErr8-context" class="cake-context" style="display: none;">$___viewFn = "/home/martin/apps/agram/app/views/elements/latestArticles.ctp"
$___dataForView = array(
"lang" => "dok",
"otherLangs" => array(
"eng",
"hrv"
),
"globalNav" => array(
array(),
array(),
array(),
array(),
array(),
array(),
array(),
array(),
array(),
array(),
array(),
array(),
array(),
array(),
array(),
array(),
array(),
array(),
array(),
array(),
array(),
array(),
array(),
array(),
array(),
array(),
array()
),
"breadCrumbs" => array(
array()
),
"pageContents" => array(
"home_who_we_are" => null
),
"userData" => null,
"announcements" => array(
array(),
array(),
array()
),
"cache" => array(
"time" => "+1 day",
"key" => "dok"
),
"form" => FormHelper
FormHelper::$helpers = array
FormHelper::$fieldset = array
FormHelper::$__options = array
FormHelper::$fields = array
FormHelper::$requestType = NULL
FormHelper::$defaultModel = NULL
FormHelper::$_inputDefaults = array
FormHelper::$_lastAction = ""
FormHelper::$base = ""
FormHelper::$webroot = "/"
FormHelper::$theme = NULL
FormHelper::$here = "/dok"
FormHelper::$params = array
FormHelper::$action = "index"
FormHelper::$plugin = NULL
FormHelper::$data = NULL
FormHelper::$namedArgs = NULL
FormHelper::$argSeparator = NULL
FormHelper::$validationErrors = NULL
FormHelper::$tags = array
FormHelper::$__tainted = NULL
FormHelper::$__cleaned = NULL
FormHelper::$Html = HtmlHelper object,
"text" => TextHelper
TextHelper::$helpers = NULL
TextHelper::$base = ""
TextHelper::$webroot = "/"
TextHelper::$theme = NULL
TextHelper::$here = "/dok"
TextHelper::$params = array
TextHelper::$action = "index"
TextHelper::$plugin = NULL
TextHelper::$data = NULL
TextHelper::$namedArgs = NULL
TextHelper::$argSeparator = NULL
TextHelper::$validationErrors = NULL
TextHelper::$tags = array
TextHelper::$__tainted = NULL
TextHelper::$__cleaned = NULL,
"stringer" => StringerHelper
StringerHelper::$helpers = array
StringerHelper::$base = ""
StringerHelper::$webroot = "/"
StringerHelper::$theme = NULL
StringerHelper::$here = "/dok"
StringerHelper::$params = array
StringerHelper::$action = "index"
StringerHelper::$plugin = NULL
StringerHelper::$data = NULL
StringerHelper::$namedArgs = NULL
StringerHelper::$argSeparator = NULL
StringerHelper::$validationErrors = NULL
StringerHelper::$tags = array
StringerHelper::$__tainted = NULL
StringerHelper::$__cleaned = NULL
StringerHelper::$Html = HtmlHelper object
StringerHelper::$Link = LinkHelper object
StringerHelper::$Text = TextHelper object,
"menu" => MenuHelper
MenuHelper::$helpers = array
MenuHelper::$base = ""
MenuHelper::$webroot = "/"
MenuHelper::$theme = NULL
MenuHelper::$here = "/dok"
MenuHelper::$params = array
MenuHelper::$action = "index"
MenuHelper::$plugin = NULL
MenuHelper::$data = NULL
MenuHelper::$namedArgs = NULL
MenuHelper::$argSeparator = NULL
MenuHelper::$validationErrors = NULL
MenuHelper::$tags = array
MenuHelper::$__tainted = NULL
MenuHelper::$__cleaned = NULL
MenuHelper::$Link = LinkHelper object,
"session" => SessionHelper
SessionHelper::$helpers = array
SessionHelper::$__active = true
SessionHelper::$valid = false
SessionHelper::$error = false
SessionHelper::$_userAgent = "f9a8355d006790ee743ededbb1f6e3bd"
SessionHelper::$path = "/"
SessionHelper::$lastError = NULL
SessionHelper::$security = "medium"
SessionHelper::$time = 1773314240
SessionHelper::$sessionTime = 1773326240
SessionHelper::$cookieLifeTime = false
SessionHelper::$watchKeys = array
SessionHelper::$id = NULL
SessionHelper::$host = NULL
SessionHelper::$timeout = NULL
SessionHelper::$base = ""
SessionHelper::$webroot = "/"
SessionHelper::$here = "/dok"
SessionHelper::$params = array
SessionHelper::$action = "index"
SessionHelper::$data = NULL
SessionHelper::$theme = NULL
SessionHelper::$plugin = NULL,
"html" => HtmlHelper
HtmlHelper::$tags = array
HtmlHelper::$_crumbs = array
HtmlHelper::$__includedScripts = array
HtmlHelper::$_scriptBlockOptions = array
HtmlHelper::$__docTypes = array
HtmlHelper::$helpers = NULL
HtmlHelper::$base = ""
HtmlHelper::$webroot = "/"
HtmlHelper::$theme = NULL
HtmlHelper::$here = "/dok"
HtmlHelper::$params = array
HtmlHelper::$action = "index"
HtmlHelper::$plugin = NULL
HtmlHelper::$data = NULL
HtmlHelper::$namedArgs = NULL
HtmlHelper::$argSeparator = NULL
HtmlHelper::$validationErrors = NULL
HtmlHelper::$__tainted = NULL
HtmlHelper::$__cleaned = NULL,
"link" => LinkHelper
LinkHelper::$helpers = array
LinkHelper::$lang = "dok"
LinkHelper::$defaultLang = "hrv"
LinkHelper::$base = ""
LinkHelper::$webroot = "/"
LinkHelper::$theme = NULL
LinkHelper::$here = "/dok"
LinkHelper::$params = array
LinkHelper::$action = "index"
LinkHelper::$plugin = NULL
LinkHelper::$data = NULL
LinkHelper::$namedArgs = NULL
LinkHelper::$argSeparator = NULL
LinkHelper::$validationErrors = NULL
LinkHelper::$tags = array
LinkHelper::$__tainted = NULL
LinkHelper::$__cleaned = NULL
LinkHelper::$Html = HtmlHelper object
LinkHelper::$Session = SessionHelper object
)
$loadHelpers = false
$cached = false
$loadedHelpers = array()
$lang = "dok"
$otherLangs = array(
"eng",
"hrv"
)
$globalNav = array(
array(
"Page" => array()
),
array(
"Page" => array()
),
array(
"Page" => array()
),
array(
"Page" => array()
),
array(
"Page" => array()
),
array(
"Page" => array()
),
array(
"Page" => array()
),
array(
"Page" => array()
),
array(
"Page" => array()
),
array(
"Page" => array()
),
array(
"Page" => array()
),
array(
"Page" => array()
),
array(
"Page" => array()
),
array(
"Page" => array()
),
array(
"Page" => array()
),
array(
"Page" => array()
),
array(
"Page" => array()
),
array(
"Page" => array()
),
array(
"Page" => array()
),
array(
"Page" => array()
),
array(
"Page" => array()
),
array(
"Page" => array()
),
array(
"Page" => array()
),
array(
"Page" => array()
),
array(
"Page" => array()
),
array(
"Page" => array()
),
array(
"Page" => array()
)
)
$breadCrumbs = array(
array(
"Page" => array()
)
)
$pageContents = array(
"home_who_we_are" => null
)
$userData = null
$announcements = array(
array(
"Announcement" => array()
),
array(
"Announcement" => array()
),
array(
"Announcement" => array()
)
)
$cache = array(
"time" => "+1 day",
"key" => "dok"
)
$form = FormHelper
FormHelper::$helpers = array
FormHelper::$fieldset = array
FormHelper::$__options = array
FormHelper::$fields = array
FormHelper::$requestType = NULL
FormHelper::$defaultModel = NULL
FormHelper::$_inputDefaults = array
FormHelper::$_lastAction = ""
FormHelper::$base = ""
FormHelper::$webroot = "/"
FormHelper::$theme = NULL
FormHelper::$here = "/dok"
FormHelper::$params = array
FormHelper::$action = "index"
FormHelper::$plugin = NULL
FormHelper::$data = NULL
FormHelper::$namedArgs = NULL
FormHelper::$argSeparator = NULL
FormHelper::$validationErrors = NULL
FormHelper::$tags = array
FormHelper::$__tainted = NULL
FormHelper::$__cleaned = NULL
FormHelper::$Html = HtmlHelper object
$text = TextHelper
TextHelper::$helpers = NULL
TextHelper::$base = ""
TextHelper::$webroot = "/"
TextHelper::$theme = NULL
TextHelper::$here = "/dok"
TextHelper::$params = array
TextHelper::$action = "index"
TextHelper::$plugin = NULL
TextHelper::$data = NULL
TextHelper::$namedArgs = NULL
TextHelper::$argSeparator = NULL
TextHelper::$validationErrors = NULL
TextHelper::$tags = array
TextHelper::$__tainted = NULL
TextHelper::$__cleaned = NULL
$stringer = StringerHelper
StringerHelper::$helpers = array
StringerHelper::$base = ""
StringerHelper::$webroot = "/"
StringerHelper::$theme = NULL
StringerHelper::$here = "/dok"
StringerHelper::$params = array
StringerHelper::$action = "index"
StringerHelper::$plugin = NULL
StringerHelper::$data = NULL
StringerHelper::$namedArgs = NULL
StringerHelper::$argSeparator = NULL
StringerHelper::$validationErrors = NULL
StringerHelper::$tags = array
StringerHelper::$__tainted = NULL
StringerHelper::$__cleaned = NULL
StringerHelper::$Html = HtmlHelper object
StringerHelper::$Link = LinkHelper object
StringerHelper::$Text = TextHelper object
$menu = MenuHelper
MenuHelper::$helpers = array
MenuHelper::$base = ""
MenuHelper::$webroot = "/"
MenuHelper::$theme = NULL
MenuHelper::$here = "/dok"
MenuHelper::$params = array
MenuHelper::$action = "index"
MenuHelper::$plugin = NULL
MenuHelper::$data = NULL
MenuHelper::$namedArgs = NULL
MenuHelper::$argSeparator = NULL
MenuHelper::$validationErrors = NULL
MenuHelper::$tags = array
MenuHelper::$__tainted = NULL
MenuHelper::$__cleaned = NULL
MenuHelper::$Link = LinkHelper object
$session = SessionHelper
SessionHelper::$helpers = array
SessionHelper::$__active = true
SessionHelper::$valid = false
SessionHelper::$error = false
SessionHelper::$_userAgent = "f9a8355d006790ee743ededbb1f6e3bd"
SessionHelper::$path = "/"
SessionHelper::$lastError = NULL
SessionHelper::$security = "medium"
SessionHelper::$time = 1773314240
SessionHelper::$sessionTime = 1773326240
SessionHelper::$cookieLifeTime = false
SessionHelper::$watchKeys = array
SessionHelper::$id = NULL
SessionHelper::$host = NULL
SessionHelper::$timeout = NULL
SessionHelper::$base = ""
SessionHelper::$webroot = "/"
SessionHelper::$here = "/dok"
SessionHelper::$params = array
SessionHelper::$action = "index"
SessionHelper::$data = NULL
SessionHelper::$theme = NULL
SessionHelper::$plugin = NULL
$html = HtmlHelper
HtmlHelper::$tags = array
HtmlHelper::$_crumbs = array
HtmlHelper::$__includedScripts = array
HtmlHelper::$_scriptBlockOptions = array
HtmlHelper::$__docTypes = array
HtmlHelper::$helpers = NULL
HtmlHelper::$base = ""
HtmlHelper::$webroot = "/"
HtmlHelper::$theme = NULL
HtmlHelper::$here = "/dok"
HtmlHelper::$params = array
HtmlHelper::$action = "index"
HtmlHelper::$plugin = NULL
HtmlHelper::$data = NULL
HtmlHelper::$namedArgs = NULL
HtmlHelper::$argSeparator = NULL
HtmlHelper::$validationErrors = NULL
HtmlHelper::$__tainted = NULL
HtmlHelper::$__cleaned = NULL
$link = LinkHelper
LinkHelper::$helpers = array
LinkHelper::$lang = "dok"
LinkHelper::$defaultLang = "hrv"
LinkHelper::$base = ""
LinkHelper::$webroot = "/"
LinkHelper::$theme = NULL
LinkHelper::$here = "/dok"
LinkHelper::$params = array
LinkHelper::$action = "index"
LinkHelper::$plugin = NULL
LinkHelper::$data = NULL
LinkHelper::$namedArgs = NULL
LinkHelper::$argSeparator = NULL
LinkHelper::$validationErrors = NULL
LinkHelper::$tags = array
LinkHelper::$__tainted = NULL
LinkHelper::$__cleaned = NULL
LinkHelper::$Html = HtmlHelper object
LinkHelper::$Session = SessionHelper object
$articles = array(
array(
"Article" => array(),
"Member" => array()
),
array(
"Article" => array(),
"Member" => array()
),
array(
"Article" => array(),
"Member" => array()
),
array(
"Article" => array(),
"Member" => array()
),
array(
"Article" => array(),
"Member" => array()
)
)
$article = array(
"Article" => array(
"id" => "496",
"member_id" => "35",
"title_eng" => "Exhibition of Miniatures and Tabletop Scenery 2026",
"title_hrv" => "Izložba minijatura i maketa Agram 2026",
"mask_eng" => "exhibition_of_miniatures_and_tabletop_scenery_2026",
"mask_hrv" => "izlozba_minijatura_i_maketa_agram_2026",
"content_eng" => "<p>
<a href=" https://hosting.photobucket.com/95288841-8654-4bf7-8fc9-a4aa78dce87f/dc756f84-867d-4df4-acd8-5d43775cafc2.jpg
" target="_blank"> <img alt="Click for enlarged picture" src="
https://hosting.photobucket.com/95288841-8654-4bf7-8fc9-a4aa78dce87f/dc756f84-867d-4df4-acd8-5d43775cafc2.jpg" width="600" /> </a></p>
<p>
<strong>The exhibition of miniatures and models &quot;Agram 2026&quot;</strong> was held this year from 19.2. to 08.03. 2026. The exhibition was set up on Wednesday 18.2. and was attended by a large number of members and friends of the Association who exhibited their works.</p>
<p>
&nbsp;</p>
<p>
<a href=" https://hosting.photobucket.com/95288841-8654-4bf7-8fc9-a4aa78dce87f/8529d6d4-76ea-4872-a9e6-748e04223a4e.jpg
" target="_blank"> <img alt="Click for enlarged picture" src="
https://hosting.photobucket.com/95288841-8654-4bf7-8fc9-a4aa78dce87f/8529d6d4-76ea-4872-a9e6-748e04223a4e.jpg
" width="600" /> </a></p>
<p>
<a href=" https://hosting.photobucket.com/95288841-8654-4bf7-8fc9-a4aa78dce87f/f3038937-f001-4ceb-b725-a330fcd64cee.jpg
" target="_blank"> <img alt="Click for enlarged picture" src="
https://hosting.photobucket.com/95288841-8654-4bf7-8fc9-a4aa78dce87f/f3038937-f001-4ceb-b725-a330fcd64cee.jpg
" width="600" /> </a></p>
<p>
<a href=" https://hosting.photobucket.com/95288841-8654-4bf7-8fc9-a4aa78dce87f/3575379e-e068-49e2-9d4d-c9a49531fdc2.jpg
" target="_blank"> <img alt="Click for enlarged picture" src="
https://hosting.photobucket.com/95288841-8654-4bf7-8fc9-a4aa78dce87f/3575379e-e068-49e2-9d4d-c9a49531fdc2.jpg" width="600" /> </a></p>
<p>
<a href=" https://hosting.photobucket.com/95288841-8654-4bf7-8fc9-a4aa78dce87f/e51713c7-2add-4f8f-ae37-e6eba25badff.jpg
" target="_blank"> <img alt="Click for enlarged picture" src="
https://hosting.photobucket.com/95288841-8654-4bf7-8fc9-a4aa78dce87f/e51713c7-2add-4f8f-ae37-e6eba25badff.jpg" width="600" /> </a></p>
<p>
<a href=" https://hosting.photobucket.com/95288841-8654-4bf7-8fc9-a4aa78dce87f/9c0bb546-50a8-483d-aeab-ab3b2ce9f094.jpg
" target="_blank"> <img alt="Click for enlarged picture" src="
https://hosting.photobucket.com/95288841-8654-4bf7-8fc9-a4aa78dce87f/9c0bb546-50a8-483d-aeab-ab3b2ce9f094.jpg" width="600" /> </a></p>
<p>
The opening of the Exhibition took place on Thursday, February 19, 2026, starting at 6:00 PM. The exhibition was organized on the occasion of our twenty-third birthday.</p>
<p>
&nbsp;</p>
<p>
<a href=" https://hosting.photobucket.com/95288841-8654-4bf7-8fc9-a4aa78dce87f/71c7bfc2-1ffc-43b9-9d5a-53e009f6b86d.jpg
" target="_blank"> <img alt="Click for enlarged picture" src="
https://hosting.photobucket.com/95288841-8654-4bf7-8fc9-a4aa78dce87f/71c7bfc2-1ffc-43b9-9d5a-53e009f6b86d.jpg" width="600" /> </a></p>
<p>
<a href=" https://hosting.photobucket.com/95288841-8654-4bf7-8fc9-a4aa78dce87f/007b4701-1d7c-4a67-a599-0539a2aa3191.jpg
" target="_blank"> <img alt="Click for enlarged picture" src="
https://hosting.photobucket.com/95288841-8654-4bf7-8fc9-a4aa78dce87f/007b4701-1d7c-4a67-a599-0539a2aa3191.jpg" width="600" /> </a></p>
<p>
<a href=" https://hosting.photobucket.com/95288841-8654-4bf7-8fc9-a4aa78dce87f/2c8090e2-8b95-4368-bb48-98876d680e15.jpg
" target="_blank"> <img alt="Click for enlarged picture" src="
https://hosting.photobucket.com/95288841-8654-4bf7-8fc9-a4aa78dce87f/2c8090e2-8b95-4368-bb48-98876d680e15.jpg" width="600" /> </a></p>
<p>
<a href=" https://hosting.photobucket.com/95288841-8654-4bf7-8fc9-a4aa78dce87f/375768ad-a8bb-49bf-9845-e46c896ba7ec.jpg
" target="_blank"> <img alt="Click for enlarged picture" src="
https://hosting.photobucket.com/95288841-8654-4bf7-8fc9-a4aa78dce87f/375768ad-a8bb-49bf-9845-e46c896ba7ec.jpg" width="600" /> </a></p>
<p>
<a href=" https://hosting.photobucket.com/95288841-8654-4bf7-8fc9-a4aa78dce87f/a93de974-4ccb-4876-85b0-4d066ae402b3.jpg
" target="_blank"> <img alt="Click for enlarged picture" src="
https://hosting.photobucket.com/95288841-8654-4bf7-8fc9-a4aa78dce87f/a93de974-4ccb-4876-85b0-4d066ae402b3.jpg" width="600" /> </a></p>
<p>
<a href=" https://hosting.photobucket.com/95288841-8654-4bf7-8fc9-a4aa78dce87f/d323ccc9-1b9a-4cb2-8adf-7019b0e217f4.jpg
" target="_blank"> <img alt="Click for enlarged picture" src="
https://hosting.photobucket.com/95288841-8654-4bf7-8fc9-a4aa78dce87f/d323ccc9-1b9a-4cb2-8adf-7019b0e217f4.jpg" width="600" /> </a></p>
<p>
<a href=" https://hosting.photobucket.com/95288841-8654-4bf7-8fc9-a4aa78dce87f/a5a66447-2d76-47ae-866d-4d512ef469a5.jpg
" target="_blank"> <img alt="Click for enlarged picture" src="
https://hosting.photobucket.com/95288841-8654-4bf7-8fc9-a4aa78dce87f/a5a66447-2d76-47ae-866d-4d512ef469a5.jpg" width="600" /> </a></p>
<p>
<a href=" https://hosting.photobucket.com/95288841-8654-4bf7-8fc9-a4aa78dce87f/3e7bcfc9-ba02-4f94-a6c3-79dfaea3639e.jpg
" target="_blank"> <img alt="Click for enlarged picture" src="
https://hosting.photobucket.com/95288841-8654-4bf7-8fc9-a4aa78dce87f/3e7bcfc9-ba02-4f94-a6c3-79dfaea3639e.jpg" width="600" /> </a></p>
<p>
<a href=" https://hosting.photobucket.com/95288841-8654-4bf7-8fc9-a4aa78dce87f/24e79466-4a9e-4b10-970c-caad235d260d.jpg
" target="_blank"> <img alt="Click for enlarged picture" src="
https://hosting.photobucket.com/95288841-8654-4bf7-8fc9-a4aa78dce87f/24e79466-4a9e-4b10-970c-caad235d260d.jpg" width="600" /> </a></p>
<p>
As always, the Exhibition presented a cross-section of the work of the Association, its members, participants of its courses and workshops, and members of the Miniature Painters Croatia FB group. In a large number of showcases, there were numerous miniatures for tabletop strategy games, board games, and an entire showcase was dedicated to award-winning exhibits from previous miniature competitions. Several showcases were dedicated to projects that the Association has been implementing for 23 years, such as the UMS &bdquo;Agram&ldquo; Library and Reading Room, the Workshop for Making Spatial Models and the Miniature Painting Workshop, as well as new ones such as the Agram Group Build, the Agram Lego Section and the Back to Basics painting workshop for the youngest.</p>
<p>
<a href=" https://hosting.photobucket.com/95288841-8654-4bf7-8fc9-a4aa78dce87f/fca84936-af71-44d3-9a4c-faeb26163899.jpg
" target="_blank"> <img alt="Click for enlarged picture" src="
https://hosting.photobucket.com/95288841-8654-4bf7-8fc9-a4aa78dce87f/fca84936-af71-44d3-9a4c-faeb26163899.jpg" width="600" /> </a></p>
<p>
<a href=" https://hosting.photobucket.com/95288841-8654-4bf7-8fc9-a4aa78dce87f/459bc5ac-8702-46f9-93b4-547deaabdef4.jpg
" target="_blank"> <img alt="Click for enlarged picture" src="
https://hosting.photobucket.com/95288841-8654-4bf7-8fc9-a4aa78dce87f/459bc5ac-8702-46f9-93b4-547deaabdef4.jpg" width="600" /> </a></p>
<p>
<a href=" https://hosting.photobucket.com/95288841-8654-4bf7-8fc9-a4aa78dce87f/91a04363-b2ef-4635-a046-7edf25ce7808.jpg
" target="_blank"> <img alt="Click for enlarged picture" src="
https://hosting.photobucket.com/95288841-8654-4bf7-8fc9-a4aa78dce87f/91a04363-b2ef-4635-a046-7edf25ce7808.jpg" width="600" /> </a></p>
<p>
<a href=" https://hosting.photobucket.com/95288841-8654-4bf7-8fc9-a4aa78dce87f/73256af5-fd5d-40b5-95e1-120e49c9be87.jpg
" target="_blank"> <img alt="Click for enlarged picture" src="
https://hosting.photobucket.com/95288841-8654-4bf7-8fc9-a4aa78dce87f/73256af5-fd5d-40b5-95e1-120e49c9be87.jpg" width="600" /> </a></p>
<p>
<a href=" https://hosting.photobucket.com/95288841-8654-4bf7-8fc9-a4aa78dce87f/979f9be5-23f3-4df9-91dc-ab71d6a10d64.jpg
" target="_blank"> <img alt="Click for enlarged picture" src="
https://hosting.photobucket.com/95288841-8654-4bf7-8fc9-a4aa78dce87f/979f9be5-23f3-4df9-91dc-ab71d6a10d64.jpg" width="600" /> </a></p>
<p>
<a href=" https://hosting.photobucket.com/95288841-8654-4bf7-8fc9-a4aa78dce87f/d0ff4379-183a-47b9-a740-9ddc283ebc29.jpg
" target="_blank"> <img alt="Click for enlarged picture" src="
https://hosting.photobucket.com/95288841-8654-4bf7-8fc9-a4aa78dce87f/d0ff4379-183a-47b9-a740-9ddc283ebc29.jpg" width="600" /> </a></p>
<p>
<a href=" https://hosting.photobucket.com/95288841-8654-4bf7-8fc9-a4aa78dce87f/4333e95e-bbbd-4f47-aaea-38a9c99e54d8.jpg
" target="_blank"> <img alt="Click for enlarged picture" src="
https://hosting.photobucket.com/95288841-8654-4bf7-8fc9-a4aa78dce87f/4333e95e-bbbd-4f47-aaea-38a9c99e54d8.jpg" width="600" /> </a></p>
<p>
<a href=" https://hosting.photobucket.com/95288841-8654-4bf7-8fc9-a4aa78dce87f/1372f8a2-b222-48ee-ae45-a90b5a354ef7.jpg
" target="_blank"> <img alt="Click for enlarged picture" src="
https://hosting.photobucket.com/95288841-8654-4bf7-8fc9-a4aa78dce87f/1372f8a2-b222-48ee-ae45-a90b5a354ef7.jpg" width="600" /> </a></p>
<p>
<a href=" https://hosting.photobucket.com/95288841-8654-4bf7-8fc9-a4aa78dce87f/6a1b4fd1-d982-4b06-9c5f-3cd40d6bf10a.jpg
" target="_blank"> <img alt="Click for enlarged picture" src="
https://hosting.photobucket.com/95288841-8654-4bf7-8fc9-a4aa78dce87f/6a1b4fd1-d982-4b06-9c5f-3cd40d6bf10a.jpg" width="600" /> </a></p>
<p>
<a href=" https://hosting.photobucket.com/95288841-8654-4bf7-8fc9-a4aa78dce87f/c2ec45e1-e0f3-463a-b254-cb2a38b53e14.jpg
" target="_blank"> <img alt="Click for enlarged picture" src="
https://hosting.photobucket.com/95288841-8654-4bf7-8fc9-a4aa78dce87f/c2ec45e1-e0f3-463a-b254-cb2a38b53e14.jpg" width="600" /> </a></p>
<p>
<a href=" https://hosting.photobucket.com/95288841-8654-4bf7-8fc9-a4aa78dce87f/17553b9a-0592-4f6a-a097-3f1a97e161f3.jpg
" target="_blank"> <img alt="Click for enlarged picture" src="
https://hosting.photobucket.com/95288841-8654-4bf7-8fc9-a4aa78dce87f/17553b9a-0592-4f6a-a097-3f1a97e161f3.jpg" width="600" /> </a></p>
<p>
<a href=" https://hosting.photobucket.com/95288841-8654-4bf7-8fc9-a4aa78dce87f/8658bd6b-dff2-4d24-8473-928d44d44480.jpg
" target="_blank"> <img alt="Click for enlarged picture" src="
https://hosting.photobucket.com/95288841-8654-4bf7-8fc9-a4aa78dce87f/8658bd6b-dff2-4d24-8473-928d44d44480.jpg" width="600" /> </a></p>
<p>
<a href=" https://hosting.photobucket.com/95288841-8654-4bf7-8fc9-a4aa78dce87f/ecab0ea7-f75b-4e31-a520-d088ad39fa17.jpg
" target="_blank"> <img alt="Click for enlarged picture" src="
https://hosting.photobucket.com/95288841-8654-4bf7-8fc9-a4aa78dce87f/ecab0ea7-f75b-4e31-a520-d088ad39fa17.jpg" width="600" /> </a></p>
<p>
<a href=" https://hosting.photobucket.com/95288841-8654-4bf7-8fc9-a4aa78dce87f/9495a2f5-8a82-41f2-abf4-9ade3db41d87.jpg
" target="_blank"> <img alt="Click for enlarged picture" src="
https://hosting.photobucket.com/95288841-8654-4bf7-8fc9-a4aa78dce87f/9495a2f5-8a82-41f2-abf4-9ade3db41d87.jpg" width="600" /> </a></p>
<p>
<a href=" https://hosting.photobucket.com/95288841-8654-4bf7-8fc9-a4aa78dce87f/362cc6fd-a5dd-474b-9b9f-aeab27d6dcfa.jpg
" target="_blank"> <img alt="Click for enlarged picture" src="
https://hosting.photobucket.com/95288841-8654-4bf7-8fc9-a4aa78dce87f/362cc6fd-a5dd-474b-9b9f-aeab27d6dcfa.jpg" width="600" /> </a></p>
<p>
It was a special honor for us to host our guest exhibitor, Ninoslav Luk, a miniaturist from Poreč, who introduced himself to us with his collection of historical dioramas.</p>
<p>
<a href=" https://hosting.photobucket.com/95288841-8654-4bf7-8fc9-a4aa78dce87f/ba1353de-e2bd-4340-9121-9056e287ed4a.jpg
" target="_blank"> <img alt="Click for enlarged picture" src="
https://hosting.photobucket.com/95288841-8654-4bf7-8fc9-a4aa78dce87f/ba1353de-e2bd-4340-9121-9056e287ed4a.jpg" width="600" /> </a></p>
<p>
<a href=" https://hosting.photobucket.com/95288841-8654-4bf7-8fc9-a4aa78dce87f/cea18506-1b50-4e5b-955c-0b9ca02d7826.jpg
" target="_blank"> <img alt="Click for enlarged picture" src="
https://hosting.photobucket.com/95288841-8654-4bf7-8fc9-a4aa78dce87f/cea18506-1b50-4e5b-955c-0b9ca02d7826.jpg" width="600" /> </a></p>
<p>
<a href=" https://hosting.photobucket.com/95288841-8654-4bf7-8fc9-a4aa78dce87f/1be85b41-e3b6-4536-b141-cd0da6eb38c1.jpg
" target="_blank"> <img alt="Click for enlarged picture" src="
https://hosting.photobucket.com/95288841-8654-4bf7-8fc9-a4aa78dce87f/1be85b41-e3b6-4536-b141-cd0da6eb38c1.jpg" width="600" /> </a></p>
<p>
<a href=" https://hosting.photobucket.com/95288841-8654-4bf7-8fc9-a4aa78dce87f/9e93b87d-ff3c-4b7b-8f06-5f9d3464a134.jpg
" target="_blank"> <img alt="Click for enlarged picture" src="
https://hosting.photobucket.com/95288841-8654-4bf7-8fc9-a4aa78dce87f/9e93b87d-ff3c-4b7b-8f06-5f9d3464a134.jpg" width="600" /> </a></p>
<p>
During the first weekend of the Exhibition, 21-22.02., we held the 18th annual international miniature painting competition <strong>Black Queen Hobby and Miniature Painting Competition</strong>!</p>
<p>
<a href=" https://hosting.photobucket.com/95288841-8654-4bf7-8fc9-a4aa78dce87f/3056fb09-f66c-4dea-80a8-a4e72407429a.jpg
" target="_blank"> <img alt="Click for enlarged picture" src="
https://hosting.photobucket.com/95288841-8654-4bf7-8fc9-a4aa78dce87f/3056fb09-f66c-4dea-80a8-a4e72407429a.jpg" width="600" /> </a></p>
<p>
As contestants arrived and registered for the competition, our hardworking staff photographed all the exhibits before sorting them into categories and carefully placing them in glass cases. There was no shortage of morning neccessities like coffe and doughnuts.</p>
<p>
&lt;</p>
<p>
<a href=" https://hosting.photobucket.com/95288841-8654-4bf7-8fc9-a4aa78dce87f/1118089c-2b46-4a2c-b17d-dc92b66d1ffc.jpg
" target="_blank"> <img alt="Click for enlarged picture" src="
https://hosting.photobucket.com/95288841-8654-4bf7-8fc9-a4aa78dce87f/1118089c-2b46-4a2c-b17d-dc92b66d1ffc.jpg" width="600" /> </a></p>
<p>
<a href=" https://hosting.photobucket.com/95288841-8654-4bf7-8fc9-a4aa78dce87f/9fd3c272-9a69-4532-a09d-36497a20a820.jpg
" target="_blank"> <img alt="Click for enlarged picture" src="
https://hosting.photobucket.com/95288841-8654-4bf7-8fc9-a4aa78dce87f/9fd3c272-9a69-4532-a09d-36497a20a820.jpg" width="600" /> </a></p>
<p>
<a href=" https://hosting.photobucket.com/95288841-8654-4bf7-8fc9-a4aa78dce87f/86995e80-c502-45fb-80f5-c8fda27da3f9.jpg
" target="_blank"> <img alt="Click for enlarged picture" src="
https://hosting.photobucket.com/95288841-8654-4bf7-8fc9-a4aa78dce87f/86995e80-c502-45fb-80f5-c8fda27da3f9.jpg" width="600" /> </a></p>
<p>
By noon, all the display cases were full and the competition could officially begin.</p>
<p>
<a href=" https://hosting.photobucket.com/95288841-8654-4bf7-8fc9-a4aa78dce87f/bce59a4f-c3e3-4708-a3d6-25e81a894c24.jpg
" target="_blank"> <img alt="Click for enlarged picture" src="
https://hosting.photobucket.com/95288841-8654-4bf7-8fc9-a4aa78dce87f/bce59a4f-c3e3-4708-a3d6-25e81a894c24.jpg" width="600" /> </a></p>
<p>
<a href=" https://hosting.photobucket.com/95288841-8654-4bf7-8fc9-a4aa78dce87f/16a0a094-01aa-4e52-82cf-fdab00d74711.jpg
" target="_blank"> <img alt="Click for enlarged picture" src="
https://hosting.photobucket.com/95288841-8654-4bf7-8fc9-a4aa78dce87f/16a0a094-01aa-4e52-82cf-fdab00d74711.jpg" width="600" /> </a></p>
<p>
<a href=" https://hosting.photobucket.com/95288841-8654-4bf7-8fc9-a4aa78dce87f/0d3f4042-ff77-48d0-b332-add0fd08f7c3.jpg
" target="_blank"> <img alt="Click for enlarged picture" src="
https://hosting.photobucket.com/95288841-8654-4bf7-8fc9-a4aa78dce87f/0d3f4042-ff77-48d0-b332-add0fd08f7c3.jpg" width="600" /> </a></p>
<p>
<a href=" https://hosting.photobucket.com/95288841-8654-4bf7-8fc9-a4aa78dce87f/3711baf8-93f2-434a-aea9-a95288ca04dd.jpg
" target="_blank"> <img alt="Click for enlarged picture" src="
https://hosting.photobucket.com/95288841-8654-4bf7-8fc9-a4aa78dce87f/3711baf8-93f2-434a-aea9-a95288ca04dd.jpg" width="600" /> </a></p>
<p>
<a href=" https://hosting.photobucket.com/95288841-8654-4bf7-8fc9-a4aa78dce87f/53113b97-ec06-4409-95ba-95a5ad3f9720.jpg
" target="_blank"> <img alt="Click for enlarged picture" src="
https://hosting.photobucket.com/95288841-8654-4bf7-8fc9-a4aa78dce87f/53113b97-ec06-4409-95ba-95a5ad3f9720.jpg" width="600" /> </a></p>
<p>
<a href=" https://hosting.photobucket.com/95288841-8654-4bf7-8fc9-a4aa78dce87f/ab127858-193d-4976-bdb2-e27302722fca.jpg
" target="_blank"> <img alt="Click for enlarged picture" src="
https://hosting.photobucket.com/95288841-8654-4bf7-8fc9-a4aa78dce87f/ab127858-193d-4976-bdb2-e27302722fca.jpg" width="600" /> </a></p>
<p>
<a href=" https://hosting.photobucket.com/95288841-8654-4bf7-8fc9-a4aa78dce87f/3735af11-3fb6-4772-a8ff-5e0ff6ddf03a.jpg
" target="_blank"> <img alt="Click for enlarged picture" src="
https://hosting.photobucket.com/95288841-8654-4bf7-8fc9-a4aa78dce87f/3735af11-3fb6-4772-a8ff-5e0ff6ddf03a.jpg" width="600" /> </a></p>
<p>
<strong>Back To Basics workshops for the young at the Black Queen</strong></p>
<p>
This year, throughout the weekend, we organized miniature painting workshops for the youngest, who were able to paint one of our own miniatures designed specifically for this program for the first time!</p>
<p>
<a href=" https://hosting.photobucket.com/95288841-8654-4bf7-8fc9-a4aa78dce87f/6999be0c-8cc6-4947-a423-9427a2299724.jpg
" target="_blank"> <img alt="Click for enlarged picture" src="
https://hosting.photobucket.com/95288841-8654-4bf7-8fc9-a4aa78dce87f/6999be0c-8cc6-4947-a423-9427a2299724.jpg" width="600" /> </a></p>
<p>
<a href="https://hosting.photobucket.com/95288841-8654-4bf7-8fc9-a4aa78dce87f/835b05a5-f171-49df-afa6-da0692b89074.jpg" target="_blank"><img alt="Click for enlarged picture" src="https://hosting.photobucket.com/95288841-8654-4bf7-8fc9-a4aa78dce87f/835b05a5-f171-49df-afa6-da0692b89074.jpg" width="600" /></a></p>
<p>
<a href=" https://hosting.photobucket.com/95288841-8654-4bf7-8fc9-a4aa78dce87f/ef5dde13-84ee-4ea0-b9f3-28aaf703ef6d.jpg
" target="_blank"> <img alt="Click for enlarged picture" src="
https://hosting.photobucket.com/95288841-8654-4bf7-8fc9-a4aa78dce87f/ef5dde13-84ee-4ea0-b9f3-28aaf703ef6d.jpg" width="600" /> </a></p>
<p>
<strong>SELLERS&#39; COURT</strong></p>
<p>
During the weekend we hosted our sponsors with their sales stands: Swood.si and Carta Magica.</p>
<p>
<a href=" https://hosting.photobucket.com/95288841-8654-4bf7-8fc9-a4aa78dce87f/5ee9a49f-a387-435a-9110-572402b7191d.jpg
" target="_blank"> <img alt="Click for enlarged picture" src="
https://hosting.photobucket.com/95288841-8654-4bf7-8fc9-a4aa78dce87f/5ee9a49f-a387-435a-9110-572402b7191d.jpg" width="600" /> </a></p>
<p>
<a href=" https://hosting.photobucket.com/95288841-8654-4bf7-8fc9-a4aa78dce87f/47cf600f-b1eb-4655-bf06-305f6f21d5d2.jpg
" target="_blank"> <img alt="Click for enlarged picture" src="
https://hosting.photobucket.com/95288841-8654-4bf7-8fc9-a4aa78dce87f/47cf600f-b1eb-4655-bf06-305f6f21d5d2.jpg" width="600" /> </a></p>
<p>
<strong>MINIATURE PAINTING WORKSHOPS</strong></p>
<p>
The ZZTK premises allow workshops to be held during the weekend in the cinema hall in the basement, so we also organized demonstration workshops during the weekend. The lecturers&#39; work was recorded with a camera and projected onto the projection screen in the hall. Many thanks to our domestic and international lecturers: Anže Zorko (SLO), doc.dr.sc. Winton Afrić (CRO), Ivan Knezović (UMS Agram) and Petar Knezoviću (CRO).</p>
<p>
<a href=" https://hosting.photobucket.com/95288841-8654-4bf7-8fc9-a4aa78dce87f/e8d835be-ec99-49d7-bc9b-086e38573d1a.jpg
" target="_blank"> <img alt="Click for enlarged picture" src="
https://hosting.photobucket.com/95288841-8654-4bf7-8fc9-a4aa78dce87f/e8d835be-ec99-49d7-bc9b-086e38573d1a.jpg" width="600" /> </a></p>
<p>
<a href=" https://hosting.photobucket.com/95288841-8654-4bf7-8fc9-a4aa78dce87f/f3eba4c1-4637-4da9-8360-75f430355af4.jpg" target="_blank"> <img alt="Click for enlarged picture" src="
https://hosting.photobucket.com/95288841-8654-4bf7-8fc9-a4aa78dce87f/f3eba4c1-4637-4da9-8360-75f430355af4.jpg" width="600" /> </a></p>
<p>
<a href=" https://hosting.photobucket.com/95288841-8654-4bf7-8fc9-a4aa78dce87f/ef523854-4030-4579-aa38-403afda86c91.jpg
" target="_blank"> <img alt="Click for enlarged picture" src="
https://hosting.photobucket.com/95288841-8654-4bf7-8fc9-a4aa78dce87f/ef523854-4030-4579-aa38-403afda86c91.jpg" width="600" /> </a></p>
<p>
<a href=" https://hosting.photobucket.com/95288841-8654-4bf7-8fc9-a4aa78dce87f/dd0943c2-f4a8-40c3-b641-f6dcdd200380.jpg
" target="_blank"> <img alt="Click for enlarged picture" src="
https://hosting.photobucket.com/95288841-8654-4bf7-8fc9-a4aa78dce87f/dd0943c2-f4a8-40c3-b641-f6dcdd200380.jpg" width="600" /> </a></p>
<p>
<a href=" https://hosting.photobucket.com/95288841-8654-4bf7-8fc9-a4aa78dce87f/08b1626a-f6c7-43c9-b718-3e9a41b55ca6.jpg
" target="_blank"> <img alt="Click for enlarged picture" src="
https://hosting.photobucket.com/95288841-8654-4bf7-8fc9-a4aa78dce87f/08b1626a-f6c7-43c9-b718-3e9a41b55ca6.jpg" width="600" /> </a></p>
<p>
<a href=" https://hosting.photobucket.com/95288841-8654-4bf7-8fc9-a4aa78dce87f/91aca7f3-1af6-486d-b174-65079a63a1ea.jpg
" target="_blank"> <img alt="Click for enlarged picture" src="
https://hosting.photobucket.com/95288841-8654-4bf7-8fc9-a4aa78dce87f/91aca7f3-1af6-486d-b174-65079a63a1ea.jpg" width="600" /> </a></p>
<p>
<a href=" https://hosting.photobucket.com/95288841-8654-4bf7-8fc9-a4aa78dce87f/3821f2fb-fbe7-4096-adbc-7d8c981a3b56.jpg
" target="_blank"> <img alt="Click for enlarged picture" src="
https://hosting.photobucket.com/95288841-8654-4bf7-8fc9-a4aa78dce87f/3821f2fb-fbe7-4096-adbc-7d8c981a3b56.jpg" width="600" /> </a></p>
<p>
<a href=" https://hosting.photobucket.com/95288841-8654-4bf7-8fc9-a4aa78dce87f/2c7bb3c5-c0ec-4a96-b6bd-6a90ce5ce154.jpg
" target="_blank"> <img alt="Click for enlarged picture" src="
https://hosting.photobucket.com/95288841-8654-4bf7-8fc9-a4aa78dce87f/2c7bb3c5-c0ec-4a96-b6bd-6a90ce5ce154.jpg" width="600" /> </a></p>
<p>
<a href=" https://hosting.photobucket.com/95288841-8654-4bf7-8fc9-a4aa78dce87f/b646f4ee-21aa-4d12-8db3-6d33351d5aeb.jpg
" target="_blank"> <img alt="Click for enlarged picture" src="
https://hosting.photobucket.com/95288841-8654-4bf7-8fc9-a4aa78dce87f/b646f4ee-21aa-4d12-8db3-6d33351d5aeb.jpg" width="600" /> </a></p>
<p>
<a href=" https://hosting.photobucket.com/95288841-8654-4bf7-8fc9-a4aa78dce87f/fb5efc01-32cc-4119-90e3-188f51b30237.jpg
" target="_blank"> <img alt="Click for enlarged picture" src="
https://hosting.photobucket.com/95288841-8654-4bf7-8fc9-a4aa78dce87f/fb5efc01-32cc-4119-90e3-188f51b30237.jpg" width="600" /> </a></p>
<p>
<strong>SPEED PAINTING COMPETITION</strong></p>
<p>
We organized a speed painting competition on Sunday afternoon. Participants had 60 minutes to paint one wizrad, a miniature of our own design and production.</p>
<p>
<a href=" https://hosting.photobucket.com/95288841-8654-4bf7-8fc9-a4aa78dce87f/106417a6-a047-4e0d-9f81-87858806052f.jpg
" target="_blank"> <img alt="Click for enlarged picture" src="
https://hosting.photobucket.com/95288841-8654-4bf7-8fc9-a4aa78dce87f/106417a6-a047-4e0d-9f81-87858806052f.jpg" width="600" /> </a></p>
<p>
<a href=" https://hosting.photobucket.com/95288841-8654-4bf7-8fc9-a4aa78dce87f/ac6853c7-6e34-4e07-a996-8d7d12744b67.jpg
" target="_blank"> <img alt="Click for enlarged picture" src="
https://hosting.photobucket.com/95288841-8654-4bf7-8fc9-a4aa78dce87f/ac6853c7-6e34-4e07-a996-8d7d12744b67.jpg" width="600" /> </a></p>
<p>
<a href=" https://hosting.photobucket.com/95288841-8654-4bf7-8fc9-a4aa78dce87f/ccb155fa-52c5-4a99-9515-f69a6836dce7.jpg
" target="_blank"> <img alt="Click for enlarged picture" src="
https://hosting.photobucket.com/95288841-8654-4bf7-8fc9-a4aa78dce87f/ccb155fa-52c5-4a99-9515-f69a6836dce7.jpg" width="600" /> </a></p>
<p>
<a href=" https://hosting.photobucket.com/95288841-8654-4bf7-8fc9-a4aa78dce87f/a29fedd0-97ea-45b1-85f9-7ea62188b2b2.jpg
" target="_blank"><img alt="Click for enlarged picture" src="
https://hosting.photobucket.com/95288841-8654-4bf7-8fc9-a4aa78dce87f/a29fedd0-97ea-45b1-85f9-7ea62188b2b2.jpg" width="600" /></a></p>
<p>
With that, we came to the very end of this wonderful weekend and all that was left was the awarding of prizes and recognition to the winners.</p>
<p>
<a href=" https://hosting.photobucket.com/95288841-8654-4bf7-8fc9-a4aa78dce87f/046ca4c8-0ae7-415e-abd3-e131d580c3ad.jpg
" target="_blank"> <img alt="Click for enlarged picture" src="
https://hosting.photobucket.com/95288841-8654-4bf7-8fc9-a4aa78dce87f/046ca4c8-0ae7-415e-abd3-e131d580c3ad.jpg" width="600" /> </a></p>
<p>
<a href=" https://hosting.photobucket.com/95288841-8654-4bf7-8fc9-a4aa78dce87f/cec0dcef-7acb-4a77-89de-271ed5410672.jpg
" target="_blank"> <img alt="Click for enlarged picture" src="
https://hosting.photobucket.com/95288841-8654-4bf7-8fc9-a4aa78dce87f/cec0dcef-7acb-4a77-89de-271ed5410672.jpg" width="600" /> </a></p>
<p>
<a href=" https://hosting.photobucket.com/95288841-8654-4bf7-8fc9-a4aa78dce87f/a495a5fc-31a2-4979-a970-0fa22c334354.jpg
" target="_blank"> <img alt="Click for enlarged picture" src="
https://hosting.photobucket.com/95288841-8654-4bf7-8fc9-a4aa78dce87f/a495a5fc-31a2-4979-a970-0fa22c334354.jpg" width="600" /> </a></p>
<p>
<strong>AGRAM ARENA &ndash; Leaving Asphodel Necropolis28 Campaign</strong></p>
<p>
During the weekend of February 21-22, we held a new international competition, Agram Arena! This time it was the turn of the tabletop strategy game Necropolis28, for which our members designed a two-day campaign. Each participant created their own gang of soldiers, and the vast majority also created their own boards.</p>
<p>
<a href=" https://hosting.photobucket.com/95288841-8654-4bf7-8fc9-a4aa78dce87f/ac69b182-4bfc-4575-a6d3-fb3c8baba342.jpg
" target="_blank"> <img alt="Click for enlarged picture" src="
https://hosting.photobucket.com/95288841-8654-4bf7-8fc9-a4aa78dce87f/ac69b182-4bfc-4575-a6d3-fb3c8baba342.jpg" width="600" /> </a></p>
<p>
<a href=" https://hosting.photobucket.com/95288841-8654-4bf7-8fc9-a4aa78dce87f/289fed7b-e058-42d8-ba2d-cbd0463e98da.jpg
" target="_blank"> <img alt="Click for enlarged picture" src="
https://hosting.photobucket.com/95288841-8654-4bf7-8fc9-a4aa78dce87f/289fed7b-e058-42d8-ba2d-cbd0463e98da.jpg" width="600" /> </a></p>
<p>
<a href=" https://hosting.photobucket.com/95288841-8654-4bf7-8fc9-a4aa78dce87f/d92ebbee-859d-4441-8386-3d760b20b7a7.jpg
" target="_blank"> <img alt="Click for enlarged picture" src="
https://hosting.photobucket.com/95288841-8654-4bf7-8fc9-a4aa78dce87f/d92ebbee-859d-4441-8386-3d760b20b7a7.jpg" width="600" /> </a></p>
<p>
<a href=" https://hosting.photobucket.com/95288841-8654-4bf7-8fc9-a4aa78dce87f/09c59798-7871-425e-a075-3ca1cd91768a.jpg
" target="_blank"> <img alt="Click for enlarged picture" src="
https://hosting.photobucket.com/95288841-8654-4bf7-8fc9-a4aa78dce87f/09c59798-7871-425e-a075-3ca1cd91768a.jpg" width="600" /> </a></p>
<p>
<a href=" https://hosting.photobucket.com/95288841-8654-4bf7-8fc9-a4aa78dce87f/b2f3edc8-5a23-4552-9a2a-4027b286f327.jpg
" target="_blank"> <img alt="Click for enlarged picture" src="
https://hosting.photobucket.com/95288841-8654-4bf7-8fc9-a4aa78dce87f/b2f3edc8-5a23-4552-9a2a-4027b286f327.jpg" width="600" /> </a></p>
<p>
<a href=" https://hosting.photobucket.com/95288841-8654-4bf7-8fc9-a4aa78dce87f/2a9f43ac-b531-4746-b7bb-ac5a3356aab0.jpg
" target="_blank"> <img alt="Click for enlarged picture" src="
https://hosting.photobucket.com/95288841-8654-4bf7-8fc9-a4aa78dce87f/2a9f43ac-b531-4746-b7bb-ac5a3356aab0.jpg" width="600" /> </a></p>
<p>
<strong>EVENTS ON WEEKDAYS DURING THE EXHIBITION </strong></p>
<p>
Over the next two weeks, our volunteers held open miniature painting workshops on weekdays from 4:00 PM to 8:00 PM. Miniature painting workstations were set up where our visitors could paint miniatures we had prepared (or their own if they had brought them) using our materials and tools.</p>
<p>
<a href=" https://hosting.photobucket.com/95288841-8654-4bf7-8fc9-a4aa78dce87f/6edf7765-42b5-417a-820f-fa5d907179a7.jpg
" target="_blank"> <img alt="Click for enlarged picture" src="
https://hosting.photobucket.com/95288841-8654-4bf7-8fc9-a4aa78dce87f/6edf7765-42b5-417a-820f-fa5d907179a7.jpg" width="600" /> </a></p>
<p>
<a href=" https://hosting.photobucket.com/95288841-8654-4bf7-8fc9-a4aa78dce87f/c084ebe2-f57b-4519-9b31-29bdc1155887.jpg
" target="_blank"> <img alt="Click for enlarged picture" src="
https://hosting.photobucket.com/95288841-8654-4bf7-8fc9-a4aa78dce87f/c084ebe2-f57b-4519-9b31-29bdc1155887.jpg" width="600" /> </a></p>
<p>
<a href=" https://hosting.photobucket.com/95288841-8654-4bf7-8fc9-a4aa78dce87f/37ff2272-f9b0-4b16-a363-1e6f6688c866.jpg
" target="_blank"> <img alt="Click for enlarged picture" src="
https://hosting.photobucket.com/95288841-8654-4bf7-8fc9-a4aa78dce87f/37ff2272-f9b0-4b16-a363-1e6f6688c866.jpg" width="600" /> </a></p>
<p>
<a href=" https://hosting.photobucket.com/95288841-8654-4bf7-8fc9-a4aa78dce87f/5f4f7968-ff50-4a01-98da-6ce8562930b4.jpg
" target="_blank"> <img alt="Click for enlarged picture" src="
https://hosting.photobucket.com/95288841-8654-4bf7-8fc9-a4aa78dce87f/5f4f7968-ff50-4a01-98da-6ce8562930b4.jpg" width="600" /> </a></p>
<p>
<a href=" https://hosting.photobucket.com/95288841-8654-4bf7-8fc9-a4aa78dce87f/cbb45319-d488-483c-bf9d-9af29852fc74.jpg
" target="_blank"> <img alt="Click for enlarged picture" src="
https://hosting.photobucket.com/95288841-8654-4bf7-8fc9-a4aa78dce87f/cbb45319-d488-483c-bf9d-9af29852fc74.jpg" width="600" /> </a></p>
<p>
<a href=" https://hosting.photobucket.com/95288841-8654-4bf7-8fc9-a4aa78dce87f/3dcca26c-d549-4af3-812a-a4a81b9a2310.jpg
" target="_blank"> <img alt="Click for enlarged picture" src="
https://hosting.photobucket.com/95288841-8654-4bf7-8fc9-a4aa78dce87f/3dcca26c-d549-4af3-812a-a4a81b9a2310.jpg" width="600" /> </a></p>
<p>
<a href=" https://hosting.photobucket.com/95288841-8654-4bf7-8fc9-a4aa78dce87f/4adf0fb6-3eab-4b40-b32d-d03eab4a9892.jpg
" target="_blank"> <img alt="Click for enlarged picture" src="
https://hosting.photobucket.com/95288841-8654-4bf7-8fc9-a4aa78dce87f/4adf0fb6-3eab-4b40-b32d-d03eab4a9892.jpg" width="600" /> </a></p>
<p>
<a href=" https://hosting.photobucket.com/95288841-8654-4bf7-8fc9-a4aa78dce87f/4732b58a-9a65-4d1c-a7d5-25513d34b108.jpg
" target="_blank"> <img alt="Click for enlarged picture" src="
https://hosting.photobucket.com/95288841-8654-4bf7-8fc9-a4aa78dce87f/4732b58a-9a65-4d1c-a7d5-25513d34b108.jpg" width="600" /> </a></p>
<p>
<a href=" https://hosting.photobucket.com/95288841-8654-4bf7-8fc9-a4aa78dce87f/274be330-31d5-4e25-95db-ec2f423a003c.jpg
" target="_blank"> <img alt="Click for enlarged picture" src="
https://hosting.photobucket.com/95288841-8654-4bf7-8fc9-a4aa78dce87f/274be330-31d5-4e25-95db-ec2f423a003c.jpg" width="600" /> </a></p>
<p>
<a href=" https://hosting.photobucket.com/95288841-8654-4bf7-8fc9-a4aa78dce87f/8e7b0a80-0f46-4d70-9789-a46976c713d2.jpg
" target="_blank"> <img alt="Click for enlarged picture" src="
https://hosting.photobucket.com/95288841-8654-4bf7-8fc9-a4aa78dce87f/8e7b0a80-0f46-4d70-9789-a46976c713d2.jpg" width="600" /> </a></p>
<p>
<a href=" https://hosting.photobucket.com/95288841-8654-4bf7-8fc9-a4aa78dce87f/8bbd4e96-b911-4f26-80fe-b1c57f29027b.jpg
" target="_blank"> <img alt="Click for enlarged picture" src="
https://hosting.photobucket.com/95288841-8654-4bf7-8fc9-a4aa78dce87f/8bbd4e96-b911-4f26-80fe-b1c57f29027b.jpg" width="600" /> </a></p>
<p>
<a href=" https://hosting.photobucket.com/95288841-8654-4bf7-8fc9-a4aa78dce87f/203a27be-8f10-459d-89b9-befb6b636b74.jpg
" target="_blank"> <img alt="Click for enlarged picture" src="
https://hosting.photobucket.com/95288841-8654-4bf7-8fc9-a4aa78dce87f/203a27be-8f10-459d-89b9-befb6b636b74.jpg" width="600" /> </a></p>
<p>
<a href=" https://hosting.photobucket.com/95288841-8654-4bf7-8fc9-a4aa78dce87f/5dc4358f-19d8-475f-a4af-9c29e9ed18d7.jpg
" target="_blank"> <img alt="Click for enlarged picture" src="
https://hosting.photobucket.com/95288841-8654-4bf7-8fc9-a4aa78dce87f/5dc4358f-19d8-475f-a4af-9c29e9ed18d7.jpg" width="600" /> </a></p>
<p>
<strong>BACK TO BASICS MINIATURE PAINTING WORKSHOPS FOR YOUNG</strong></p>
<p>
On weekdays from 17:00 to 18:00, we held our new workshops for the youngest, in which our youngest participants painted their first miniatures.</p>
<p>
<a href=" https://hosting.photobucket.com/95288841-8654-4bf7-8fc9-a4aa78dce87f/948af139-8fb5-4e28-a27c-404466e70d05.jpg
" target="_blank"> <img alt="Click for enlarged picture" src="
https://hosting.photobucket.com/95288841-8654-4bf7-8fc9-a4aa78dce87f/948af139-8fb5-4e28-a27c-404466e70d05.jpg" width="600" /> </a></p>
<p>
<a href=" https://hosting.photobucket.com/95288841-8654-4bf7-8fc9-a4aa78dce87f/bb3e20c2-bb21-4a3d-863a-74de08261467.jpg
" target="_blank"> <img alt="Click for enlarged picture" src="
https://hosting.photobucket.com/95288841-8654-4bf7-8fc9-a4aa78dce87f/bb3e20c2-bb21-4a3d-863a-74de08261467.jpg" width="600" /> </a></p>
<p>
<a href=" https://hosting.photobucket.com/95288841-8654-4bf7-8fc9-a4aa78dce87f/7316c760-98e3-4e3f-9261-d138aa7a5a6a.jpg
" target="_blank"> <img alt="Click for enlarged picture" src="
https://hosting.photobucket.com/95288841-8654-4bf7-8fc9-a4aa78dce87f/7316c760-98e3-4e3f-9261-d138aa7a5a6a.jpg" width="600" /> </a></p>
<p>
<a href=" https://hosting.photobucket.com/95288841-8654-4bf7-8fc9-a4aa78dce87f/68934b39-3d1f-4f43-b967-14b73c41a39e.jpg
" target="_blank"> <img alt="Click for enlarged picture" src="
https://hosting.photobucket.com/95288841-8654-4bf7-8fc9-a4aa78dce87f/68934b39-3d1f-4f43-b967-14b73c41a39e.jpg" width="600" /> </a></p>
<p>
<a href=" https://hosting.photobucket.com/95288841-8654-4bf7-8fc9-a4aa78dce87f/46125bce-a28d-494f-873a-3aeabdc1d6c2.jpg
" target="_blank"> <img alt="Click for enlarged picture" src="
https://hosting.photobucket.com/95288841-8654-4bf7-8fc9-a4aa78dce87f/46125bce-a28d-494f-873a-3aeabdc1d6c2.jpg" width="600" /> </a></p>
<p>
<a href=" https://hosting.photobucket.com/95288841-8654-4bf7-8fc9-a4aa78dce87f/3c58e0ad-77a9-44c8-b6bf-d9a55c514d43.jpg
" target="_blank"> <img alt="Click for enlarged picture" src="
https://hosting.photobucket.com/95288841-8654-4bf7-8fc9-a4aa78dce87f/3c58e0ad-77a9-44c8-b6bf-d9a55c514d43.jpg" width="600" /> </a></p>
<p>
<a href=" https://hosting.photobucket.com/95288841-8654-4bf7-8fc9-a4aa78dce87f/f891f0f0-051b-40ee-9676-cb03b0a9811b.jpg
" target="_blank"> <img alt="Click for enlarged picture" src="
https://hosting.photobucket.com/95288841-8654-4bf7-8fc9-a4aa78dce87f/f891f0f0-051b-40ee-9676-cb03b0a9811b.jpg" width="600" /> </a></p>
<p>
<strong>AGRAM LEGO SECTION lecture: FW-14b &ndash; An F1 racecar for the future</strong></p>
<p>
On Wednesday, February 25, 2026, as part of the activities of our Agram Lego Section, our resident mechanical engineer Marko Paunović gave a lecture on the topic of the F1 racecar from 1992. Admission to the lecture was free, and upon completion, a LEGO model of the racecar was made by members of the Lego section</p>
<p>
<a href=" https://hosting.photobucket.com/95288841-8654-4bf7-8fc9-a4aa78dce87f/b2e14b1c-daa4-4314-8685-184377bc7e28.jpg
" target="_blank"> <img alt="Click for enlarged picture" src="
https://hosting.photobucket.com/95288841-8654-4bf7-8fc9-a4aa78dce87f/b2e14b1c-daa4-4314-8685-184377bc7e28.jpg" width="600" /> </a></p>
<p>
<a href=" https://hosting.photobucket.com/95288841-8654-4bf7-8fc9-a4aa78dce87f/31fb439a-77d3-4418-83ff-66c3af279cca.jpg" target="_blank"> <img alt="Click for enlarged picture" src="
https://hosting.photobucket.com/95288841-8654-4bf7-8fc9-a4aa78dce87f/31fb439a-77d3-4418-83ff-66c3af279cca.jpg" width="600" /> </a></p>
<p>
<a href=" https://hosting.photobucket.com/95288841-8654-4bf7-8fc9-a4aa78dce87f/bfcaf282-6be8-4b52-a3ed-c91137457876.jpg
" target="_blank"> <img alt="Click for enlarged picture" src="
https://hosting.photobucket.com/95288841-8654-4bf7-8fc9-a4aa78dce87f/bfcaf282-6be8-4b52-a3ed-c91137457876.jpg" width="600" /> </a></p>
<p>
<a href=" https://hosting.photobucket.com/95288841-8654-4bf7-8fc9-a4aa78dce87f/ce70fc61-9e1a-4169-aaad-8b67417656c0.jpg
" target="_blank"> <img alt="Click for enlarged picture" src="
https://hosting.photobucket.com/95288841-8654-4bf7-8fc9-a4aa78dce87f/ce70fc61-9e1a-4169-aaad-8b67417656c0.jpg" width="600" /> </a></p>
<p>
<a href=" https://hosting.photobucket.com/95288841-8654-4bf7-8fc9-a4aa78dce87f/94ca0e36-8710-458d-8194-9f71299f4d74.jpg
" target="_blank"> <img alt="Click for enlarged picture" src="
https://hosting.photobucket.com/95288841-8654-4bf7-8fc9-a4aa78dce87f/94ca0e36-8710-458d-8194-9f71299f4d74.jpg" width="600" /> </a></p>
<p>
<a href=" https://hosting.photobucket.com/95288841-8654-4bf7-8fc9-a4aa78dce87f/c6771f72-7191-4ca3-a792-3bb1ab3897b1.jpg
" target="_blank"> <img alt="Click for enlarged picture" src="
https://hosting.photobucket.com/95288841-8654-4bf7-8fc9-a4aa78dce87f/c6771f72-7191-4ca3-a792-3bb1ab3897b1.jpg" width="600" /> </a></p>
<p>
<a href=" https://hosting.photobucket.com/95288841-8654-4bf7-8fc9-a4aa78dce87f/c8fcfcb6-09f2-4398-a2fb-fa5065771e01.jpg
" target="_blank"> <img alt="Click for enlarged picture" src="
https://hosting.photobucket.com/95288841-8654-4bf7-8fc9-a4aa78dce87f/c8fcfcb6-09f2-4398-a2fb-fa5065771e01.jpg" width="600" /> </a></p>
<p>
<a href=" https://hosting.photobucket.com/95288841-8654-4bf7-8fc9-a4aa78dce87f/d7e187a8-d5b1-433b-b30d-091e54dcdddf.jpg
" target="_blank"> <img alt="Click for enlarged picture" src="
https://hosting.photobucket.com/95288841-8654-4bf7-8fc9-a4aa78dce87f/d7e187a8-d5b1-433b-b30d-091e54dcdddf.jpg" width="600" /> </a></p>
<p>
During the second weekend of the Exhibition, 28.02.-01.03., we organized a <strong>MINIATURE PAINTING WORKSHOP - Grimdark</strong>.</p>
<p>
The workshop was held over two days (the entire weekend) and participants painted up to three different figures for the game Trench Crusade. The focus of these lectures was on painting the popular grimdark style minis. The workshop presented paints and equipment, figure preparation, several miniature painting techniques from basic to advanced, and techniques and tricks for quickly and efficiently painting larger quantities of figures at once. Water-based acrylic paints were used as part of the workshop.</p>
<p>
<a href=" https://hosting.photobucket.com/95288841-8654-4bf7-8fc9-a4aa78dce87f/733d94b2-8e8d-4a4e-accd-b9168e32577e.jpg
" target="_blank"> <img alt="Click for enlarged picture" src="
https://hosting.photobucket.com/95288841-8654-4bf7-8fc9-a4aa78dce87f/733d94b2-8e8d-4a4e-accd-b9168e32577e.jpg
" width="600" /> </a></p>
<p>
<a href=" https://hosting.photobucket.com/95288841-8654-4bf7-8fc9-a4aa78dce87f/41020062-45b9-41cd-a357-fa23a389f390.jpg
" target="_blank"> <img alt="Click for enlarged picture" src="
https://hosting.photobucket.com/95288841-8654-4bf7-8fc9-a4aa78dce87f/41020062-45b9-41cd-a357-fa23a389f390.jpg
" width="600" /> </a></p>
<p>
<a href=" https://hosting.photobucket.com/95288841-8654-4bf7-8fc9-a4aa78dce87f/0c07cc55-596d-494d-972b-cd6a0dd6b8b7.jpg
" target="_blank"> <img alt="Click for enlarged picture" src="
https://hosting.photobucket.com/95288841-8654-4bf7-8fc9-a4aa78dce87f/0c07cc55-596d-494d-972b-cd6a0dd6b8b7.jpg" width="600" /> </a></p>
<p>
<a href=" https://hosting.photobucket.com/95288841-8654-4bf7-8fc9-a4aa78dce87f/c17dd356-08b1-48e1-b895-6296aed7f818.jpg
" target="_blank"> <img alt="Click for enlarged picture" src="
https://hosting.photobucket.com/95288841-8654-4bf7-8fc9-a4aa78dce87f/c17dd356-08b1-48e1-b895-6296aed7f818.jpg" width="600" /> </a></p>
<p>
On Wednesday 04.03.2026. the annual <strong>session of the Assembly</strong> was held, where we determined the guidelines for work in 2026.</p>
<p>
,</p>
<p>
<a href=" https://hosting.photobucket.com/95288841-8654-4bf7-8fc9-a4aa78dce87f/59484bd0-7edc-4aed-a04e-ae42900ba3e6.jpg
" target="_blank"> <img alt="Click for enlarged picture" src="
https://hosting.photobucket.com/95288841-8654-4bf7-8fc9-a4aa78dce87f/59484bd0-7edc-4aed-a04e-ae42900ba3e6.jpg
" width="600" /> </a></p>
<p>
On Sunday 08.03.2026. The exhibition was over, our exhibits safely stored, and the Gallery cleaned.</p>
<p>
<a href=" https://hosting.photobucket.com/95288841-8654-4bf7-8fc9-a4aa78dce87f/98af4280-0956-4cdb-b4a9-da40e3a5a44a.jpg
" target="_blank"> <img alt="Click for enlarged picture" src="
https://hosting.photobucket.com/95288841-8654-4bf7-8fc9-a4aa78dce87f/98af4280-0956-4cdb-b4a9-da40e3a5a44a.jpg" width="600" /> </a></p>
<p>
<a href=" https://hosting.photobucket.com/95288841-8654-4bf7-8fc9-a4aa78dce87f/3259b35e-1fc2-4a99-a3c5-c7984958d72b.jpg
" target="_blank"> <img alt="Click for enlarged picture" src="
https://hosting.photobucket.com/95288841-8654-4bf7-8fc9-a4aa78dce87f/3259b35e-1fc2-4a99-a3c5-c7984958d72b.jpg" width="600" /> </a></p>
<p>
The most important part of every year when holding this Exhibition is the social aspect, the socializing of our members both among themselves and with our international friends who visit us! With these few photos from our joint gatherings, we greet you until next year!</p>
<p>
<a href=" https://hosting.photobucket.com/95288841-8654-4bf7-8fc9-a4aa78dce87f/b9168e23-79b2-4d81-8a7d-7534062881a7.jpg
" target="_blank"> <img alt="Click for enlarged picture" src="
https://hosting.photobucket.com/95288841-8654-4bf7-8fc9-a4aa78dce87f/b9168e23-79b2-4d81-8a7d-7534062881a7.jpg " width="600" /> </a></p>
<p>
<a href=" https://hosting.photobucket.com/95288841-8654-4bf7-8fc9-a4aa78dce87f/edff925e-916c-4d78-953e-210abf3753d4.jpg
" target="_blank"> <img alt="Click for enlarged picture" src="
https://hosting.photobucket.com/95288841-8654-4bf7-8fc9-a4aa78dce87f/edff925e-916c-4d78-953e-210abf3753d4.jpg " width="600" /> </a></p>
<p>
<a href=" https://hosting.photobucket.com/95288841-8654-4bf7-8fc9-a4aa78dce87f/8bcb48fa-466b-43f8-8a4b-f15f6794b21e.jpg
" target="_blank"> <img alt="Click for enlarged picture" src="
https://hosting.photobucket.com/95288841-8654-4bf7-8fc9-a4aa78dce87f/8bcb48fa-466b-43f8-8a4b-f15f6794b21e.jpg" width="600" /> </a></p>
",
"content_hrv" => "<p>
<a href=" https://hosting.photobucket.com/95288841-8654-4bf7-8fc9-a4aa78dce87f/dc756f84-867d-4df4-acd8-5d43775cafc2.jpg
" target="_blank"> <img alt="Click for enlarged picture" src="
https://hosting.photobucket.com/95288841-8654-4bf7-8fc9-a4aa78dce87f/dc756f84-867d-4df4-acd8-5d43775cafc2.jpg" width="600" /> </a></p>
<p>
<strong>Izložba minijatura i maketa &quot;Agram 2026&quot;</strong> održala se ove godine od 19.2. do 08.03. Postavljanje izložbe je održano u srijedu 18.2. i sudjelovao je velik broj članova kao i prijatelja Udruge koji su izlagali svoje radove.</p>
<p>
<a href=" https://hosting.photobucket.com/95288841-8654-4bf7-8fc9-a4aa78dce87f/8529d6d4-76ea-4872-a9e6-748e04223a4e.jpg
" target="_blank"> <img alt="Click for enlarged picture" src="
https://hosting.photobucket.com/95288841-8654-4bf7-8fc9-a4aa78dce87f/8529d6d4-76ea-4872-a9e6-748e04223a4e.jpg
" width="600" /> </a></p>
<p>
<a href=" https://hosting.photobucket.com/95288841-8654-4bf7-8fc9-a4aa78dce87f/f3038937-f001-4ceb-b725-a330fcd64cee.jpg
" target="_blank"> <img alt="Click for enlarged picture" src="
https://hosting.photobucket.com/95288841-8654-4bf7-8fc9-a4aa78dce87f/f3038937-f001-4ceb-b725-a330fcd64cee.jpg
" width="600" /> </a></p>
<p>
<a href=" https://hosting.photobucket.com/95288841-8654-4bf7-8fc9-a4aa78dce87f/3575379e-e068-49e2-9d4d-c9a49531fdc2.jpg
" target="_blank"> <img alt="Click for enlarged picture" src="
https://hosting.photobucket.com/95288841-8654-4bf7-8fc9-a4aa78dce87f/3575379e-e068-49e2-9d4d-c9a49531fdc2.jpg" width="600" /> </a></p>
<p>
<a href=" https://hosting.photobucket.com/95288841-8654-4bf7-8fc9-a4aa78dce87f/e51713c7-2add-4f8f-ae37-e6eba25badff.jpg
" target="_blank"> <img alt="Click for enlarged picture" src="
https://hosting.photobucket.com/95288841-8654-4bf7-8fc9-a4aa78dce87f/e51713c7-2add-4f8f-ae37-e6eba25badff.jpg" width="600" /> </a></p>
<p>
<a href=" https://hosting.photobucket.com/95288841-8654-4bf7-8fc9-a4aa78dce87f/9c0bb546-50a8-483d-aeab-ab3b2ce9f094.jpg
" target="_blank"> <img alt="Click for enlarged picture" src="
https://hosting.photobucket.com/95288841-8654-4bf7-8fc9-a4aa78dce87f/9c0bb546-50a8-483d-aeab-ab3b2ce9f094.jpg" width="600" /> </a></p>
<p>
Otvorenje Izložbe održalo se u četvrtak, 19.2.2026. s početkom u 18:00h. Izložba je organizirana povodom na&scaron;eg dvadeset trećeg rođendana.</p>
<p>
<a href=" https://hosting.photobucket.com/95288841-8654-4bf7-8fc9-a4aa78dce87f/71c7bfc2-1ffc-43b9-9d5a-53e009f6b86d.jpg
" target="_blank"> <img alt="Click for enlarged picture" src="
https://hosting.photobucket.com/95288841-8654-4bf7-8fc9-a4aa78dce87f/71c7bfc2-1ffc-43b9-9d5a-53e009f6b86d.jpg" width="600" /> </a></p>
<p>
<a href=" https://hosting.photobucket.com/95288841-8654-4bf7-8fc9-a4aa78dce87f/007b4701-1d7c-4a67-a599-0539a2aa3191.jpg
" target="_blank"> <img alt="Click for enlarged picture" src="
https://hosting.photobucket.com/95288841-8654-4bf7-8fc9-a4aa78dce87f/007b4701-1d7c-4a67-a599-0539a2aa3191.jpg" width="600" /> </a></p>
<p>
<a href=" https://hosting.photobucket.com/95288841-8654-4bf7-8fc9-a4aa78dce87f/2c8090e2-8b95-4368-bb48-98876d680e15.jpg
" target="_blank"> <img alt="Click for enlarged picture" src="
https://hosting.photobucket.com/95288841-8654-4bf7-8fc9-a4aa78dce87f/2c8090e2-8b95-4368-bb48-98876d680e15.jpg" width="600" /> </a></p>
<p>
<a href=" https://hosting.photobucket.com/95288841-8654-4bf7-8fc9-a4aa78dce87f/375768ad-a8bb-49bf-9845-e46c896ba7ec.jpg
" target="_blank"> <img alt="Click for enlarged picture" src="
https://hosting.photobucket.com/95288841-8654-4bf7-8fc9-a4aa78dce87f/375768ad-a8bb-49bf-9845-e46c896ba7ec.jpg" width="600" /> </a></p>
<p>
<a href=" https://hosting.photobucket.com/95288841-8654-4bf7-8fc9-a4aa78dce87f/a93de974-4ccb-4876-85b0-4d066ae402b3.jpg
" target="_blank"> <img alt="Click for enlarged picture" src="
https://hosting.photobucket.com/95288841-8654-4bf7-8fc9-a4aa78dce87f/a93de974-4ccb-4876-85b0-4d066ae402b3.jpg" width="600" /> </a></p>
<p>
<a href=" https://hosting.photobucket.com/95288841-8654-4bf7-8fc9-a4aa78dce87f/d323ccc9-1b9a-4cb2-8adf-7019b0e217f4.jpg
" target="_blank"> <img alt="Click for enlarged picture" src="
https://hosting.photobucket.com/95288841-8654-4bf7-8fc9-a4aa78dce87f/d323ccc9-1b9a-4cb2-8adf-7019b0e217f4.jpg" width="600" /> </a></p>
<p>
<a href=" https://hosting.photobucket.com/95288841-8654-4bf7-8fc9-a4aa78dce87f/a5a66447-2d76-47ae-866d-4d512ef469a5.jpg
" target="_blank"> <img alt="Click for enlarged picture" src="
https://hosting.photobucket.com/95288841-8654-4bf7-8fc9-a4aa78dce87f/a5a66447-2d76-47ae-866d-4d512ef469a5.jpg" width="600" /> </a></p>
<p>
<a href=" https://hosting.photobucket.com/95288841-8654-4bf7-8fc9-a4aa78dce87f/3e7bcfc9-ba02-4f94-a6c3-79dfaea3639e.jpg
" target="_blank"> <img alt="Click for enlarged picture" src="
https://hosting.photobucket.com/95288841-8654-4bf7-8fc9-a4aa78dce87f/3e7bcfc9-ba02-4f94-a6c3-79dfaea3639e.jpg" width="600" /> </a></p>
<p>
<a href=" https://hosting.photobucket.com/95288841-8654-4bf7-8fc9-a4aa78dce87f/24e79466-4a9e-4b10-970c-caad235d260d.jpg
" target="_blank"> <img alt="Click for enlarged picture" src="
https://hosting.photobucket.com/95288841-8654-4bf7-8fc9-a4aa78dce87f/24e79466-4a9e-4b10-970c-caad235d260d.jpg" width="600" /> </a></p>
<p>
Kao i uvijek, Izložba je prikazivala presjek rada Udruge, njenih članova, polaznika njenih tečajeva i radionica te članova FB grupe Miniature Painters Croatia. U velikom broju vitrina na&scaron;le su se brojne minijature za stolne strate&scaron;ke igre, igre na tabli, a cijela jedna vitrina posvećena je nagrađenim izlo&scaron;cima sa prethodnih minijaturističkih natjecanja. Nekoliko vitrina bilo je posvećeno projektima koje Udruga već 23 godinu provodi poput Knjižnice i čitaonice UMS &bdquo;Agram&ldquo;, Radionice za izradu prostornih maketa i Radionice bojanja minijatura, ali i novih poput Agram Group Build, Agram Lego Sekcije i Back to Basics radionica bojanja za najmlađe.</p>
<p>
<a href=" https://hosting.photobucket.com/95288841-8654-4bf7-8fc9-a4aa78dce87f/fca84936-af71-44d3-9a4c-faeb26163899.jpg
" target="_blank"> <img alt="Click for enlarged picture" src="
https://hosting.photobucket.com/95288841-8654-4bf7-8fc9-a4aa78dce87f/fca84936-af71-44d3-9a4c-faeb26163899.jpg" width="600" /> </a></p>
<p>
<a href=" https://hosting.photobucket.com/95288841-8654-4bf7-8fc9-a4aa78dce87f/459bc5ac-8702-46f9-93b4-547deaabdef4.jpg
" target="_blank"> <img alt="Click for enlarged picture" src="
https://hosting.photobucket.com/95288841-8654-4bf7-8fc9-a4aa78dce87f/459bc5ac-8702-46f9-93b4-547deaabdef4.jpg" width="600" /> </a></p>
<p>
<a href=" https://hosting.photobucket.com/95288841-8654-4bf7-8fc9-a4aa78dce87f/91a04363-b2ef-4635-a046-7edf25ce7808.jpg
" target="_blank"> <img alt="Click for enlarged picture" src="
https://hosting.photobucket.com/95288841-8654-4bf7-8fc9-a4aa78dce87f/91a04363-b2ef-4635-a046-7edf25ce7808.jpg" width="600" /> </a></p>
<p>
<a href=" https://hosting.photobucket.com/95288841-8654-4bf7-8fc9-a4aa78dce87f/73256af5-fd5d-40b5-95e1-120e49c9be87.jpg
" target="_blank"> <img alt="Click for enlarged picture" src="
https://hosting.photobucket.com/95288841-8654-4bf7-8fc9-a4aa78dce87f/73256af5-fd5d-40b5-95e1-120e49c9be87.jpg" width="600" /> </a></p>
<p>
<a href=" https://hosting.photobucket.com/95288841-8654-4bf7-8fc9-a4aa78dce87f/979f9be5-23f3-4df9-91dc-ab71d6a10d64.jpg
" target="_blank"> <img alt="Click for enlarged picture" src="
https://hosting.photobucket.com/95288841-8654-4bf7-8fc9-a4aa78dce87f/979f9be5-23f3-4df9-91dc-ab71d6a10d64.jpg" width="600" /> </a></p>
<p>
<a href=" https://hosting.photobucket.com/95288841-8654-4bf7-8fc9-a4aa78dce87f/d0ff4379-183a-47b9-a740-9ddc283ebc29.jpg
" target="_blank"> <img alt="Click for enlarged picture" src="
https://hosting.photobucket.com/95288841-8654-4bf7-8fc9-a4aa78dce87f/d0ff4379-183a-47b9-a740-9ddc283ebc29.jpg" width="600" /> </a></p>
<p>
<a href=" https://hosting.photobucket.com/95288841-8654-4bf7-8fc9-a4aa78dce87f/4333e95e-bbbd-4f47-aaea-38a9c99e54d8.jpg
" target="_blank"> <img alt="Click for enlarged picture" src="
https://hosting.photobucket.com/95288841-8654-4bf7-8fc9-a4aa78dce87f/4333e95e-bbbd-4f47-aaea-38a9c99e54d8.jpg" width="600" /> </a></p>
<p>
<a href=" https://hosting.photobucket.com/95288841-8654-4bf7-8fc9-a4aa78dce87f/1372f8a2-b222-48ee-ae45-a90b5a354ef7.jpg
" target="_blank"> <img alt="Click for enlarged picture" src="
https://hosting.photobucket.com/95288841-8654-4bf7-8fc9-a4aa78dce87f/1372f8a2-b222-48ee-ae45-a90b5a354ef7.jpg" width="600" /> </a></p>
<p>
<a href=" https://hosting.photobucket.com/95288841-8654-4bf7-8fc9-a4aa78dce87f/6a1b4fd1-d982-4b06-9c5f-3cd40d6bf10a.jpg
" target="_blank"> <img alt="Click for enlarged picture" src="
https://hosting.photobucket.com/95288841-8654-4bf7-8fc9-a4aa78dce87f/6a1b4fd1-d982-4b06-9c5f-3cd40d6bf10a.jpg" width="600" /> </a></p>
<p>
<a href=" https://hosting.photobucket.com/95288841-8654-4bf7-8fc9-a4aa78dce87f/c2ec45e1-e0f3-463a-b254-cb2a38b53e14.jpg
" target="_blank"> <img alt="Click for enlarged picture" src="
https://hosting.photobucket.com/95288841-8654-4bf7-8fc9-a4aa78dce87f/c2ec45e1-e0f3-463a-b254-cb2a38b53e14.jpg" width="600" /> </a></p>
<p>
<a href=" https://hosting.photobucket.com/95288841-8654-4bf7-8fc9-a4aa78dce87f/17553b9a-0592-4f6a-a097-3f1a97e161f3.jpg
" target="_blank"> <img alt="Click for enlarged picture" src="
https://hosting.photobucket.com/95288841-8654-4bf7-8fc9-a4aa78dce87f/17553b9a-0592-4f6a-a097-3f1a97e161f3.jpg" width="600" /> </a></p>
<p>
<a href=" https://hosting.photobucket.com/95288841-8654-4bf7-8fc9-a4aa78dce87f/8658bd6b-dff2-4d24-8473-928d44d44480.jpg
" target="_blank"> <img alt="Click for enlarged picture" src="
https://hosting.photobucket.com/95288841-8654-4bf7-8fc9-a4aa78dce87f/8658bd6b-dff2-4d24-8473-928d44d44480.jpg" width="600" /> </a></p>
<p>
<a href=" https://hosting.photobucket.com/95288841-8654-4bf7-8fc9-a4aa78dce87f/ecab0ea7-f75b-4e31-a520-d088ad39fa17.jpg
" target="_blank"> <img alt="Click for enlarged picture" src="
https://hosting.photobucket.com/95288841-8654-4bf7-8fc9-a4aa78dce87f/ecab0ea7-f75b-4e31-a520-d088ad39fa17.jpg" width="600" /> </a></p>
<p>
<a href=" https://hosting.photobucket.com/95288841-8654-4bf7-8fc9-a4aa78dce87f/9495a2f5-8a82-41f2-abf4-9ade3db41d87.jpg
" target="_blank"> <img alt="Click for enlarged picture" src="
https://hosting.photobucket.com/95288841-8654-4bf7-8fc9-a4aa78dce87f/9495a2f5-8a82-41f2-abf4-9ade3db41d87.jpg" width="600" /> </a></p>
<p>
<a href=" https://hosting.photobucket.com/95288841-8654-4bf7-8fc9-a4aa78dce87f/362cc6fd-a5dd-474b-9b9f-aeab27d6dcfa.jpg
" target="_blank"> <img alt="Click for enlarged picture" src="
https://hosting.photobucket.com/95288841-8654-4bf7-8fc9-a4aa78dce87f/362cc6fd-a5dd-474b-9b9f-aeab27d6dcfa.jpg" width="600" /> </a></p>
<p>
Posebna čast nam je bila ugostiti na&scaron;eg gosta izlagača, Ninoslava Luka minijaturista iz Poreča koji nam se predstavio svojom kolekcijom povijesnih diorama.</p>
<p>
<a href=" https://hosting.photobucket.com/95288841-8654-4bf7-8fc9-a4aa78dce87f/ba1353de-e2bd-4340-9121-9056e287ed4a.jpg
" target="_blank"> <img alt="Click for enlarged picture" src="
https://hosting.photobucket.com/95288841-8654-4bf7-8fc9-a4aa78dce87f/ba1353de-e2bd-4340-9121-9056e287ed4a.jpg" width="600" /> </a></p>
<p>
<a href=" https://hosting.photobucket.com/95288841-8654-4bf7-8fc9-a4aa78dce87f/cea18506-1b50-4e5b-955c-0b9ca02d7826.jpg
" target="_blank"> <img alt="Click for enlarged picture" src="
https://hosting.photobucket.com/95288841-8654-4bf7-8fc9-a4aa78dce87f/cea18506-1b50-4e5b-955c-0b9ca02d7826.jpg" width="600" /> </a></p>
<p>
<a href=" https://hosting.photobucket.com/95288841-8654-4bf7-8fc9-a4aa78dce87f/1be85b41-e3b6-4536-b141-cd0da6eb38c1.jpg
" target="_blank"> <img alt="Click for enlarged picture" src="
https://hosting.photobucket.com/95288841-8654-4bf7-8fc9-a4aa78dce87f/1be85b41-e3b6-4536-b141-cd0da6eb38c1.jpg" width="600" /> </a></p>
<p>
<a href=" https://hosting.photobucket.com/95288841-8654-4bf7-8fc9-a4aa78dce87f/9e93b87d-ff3c-4b7b-8f06-5f9d3464a134.jpg
" target="_blank"> <img alt="Click for enlarged picture" src="
https://hosting.photobucket.com/95288841-8654-4bf7-8fc9-a4aa78dce87f/9e93b87d-ff3c-4b7b-8f06-5f9d3464a134.jpg" width="600" /> </a></p>
<p>
Tijekom prvog vikenda Izložbe, 21.-22.02.,održali smo 20. godi&scaron;nje međunarodno natjecanje u bojanju minijatura <strong>Black Queen Hobby and Miniature Painting Competition</strong>!</p>
<p>
<a href=" https://hosting.photobucket.com/95288841-8654-4bf7-8fc9-a4aa78dce87f/3056fb09-f66c-4dea-80a8-a4e72407429a.jpg
" target="_blank"> <img alt="Click for enlarged picture" src="
https://hosting.photobucket.com/95288841-8654-4bf7-8fc9-a4aa78dce87f/3056fb09-f66c-4dea-80a8-a4e72407429a.jpg" width="600" /> </a></p>
<p>
Kako su natjecatelji pristizali i prijavljivali se na natjecanje, na&scaron;e vrijedno osoblje je fotografiralo sve izlo&scaron;ke prije nego li su ih rasporedili po kategorijama i pažljivo ih postavili u staklene vitrine. Niti jutarnja okrijepa nije usfalila zahvaljujući na&scaron;im revnim volonterima.</p>
<p>
<a href=" https://hosting.photobucket.com/95288841-8654-4bf7-8fc9-a4aa78dce87f/1118089c-2b46-4a2c-b17d-dc92b66d1ffc.jpg
" target="_blank"> <img alt="Click for enlarged picture" src="
https://hosting.photobucket.com/95288841-8654-4bf7-8fc9-a4aa78dce87f/1118089c-2b46-4a2c-b17d-dc92b66d1ffc.jpg" width="600" /> </a></p>
<p>
<a href=" https://hosting.photobucket.com/95288841-8654-4bf7-8fc9-a4aa78dce87f/9fd3c272-9a69-4532-a09d-36497a20a820.jpg
" target="_blank"> <img alt="Click for enlarged picture" src="
https://hosting.photobucket.com/95288841-8654-4bf7-8fc9-a4aa78dce87f/9fd3c272-9a69-4532-a09d-36497a20a820.jpg" width="600" /> </a></p>
<p>
<a href=" https://hosting.photobucket.com/95288841-8654-4bf7-8fc9-a4aa78dce87f/86995e80-c502-45fb-80f5-c8fda27da3f9.jpg
" target="_blank"> <img alt="Click for enlarged picture" src="
https://hosting.photobucket.com/95288841-8654-4bf7-8fc9-a4aa78dce87f/86995e80-c502-45fb-80f5-c8fda27da3f9.jpg" width="600" /> </a></p>
<p>
U podne, sve vitrine su bile pune i natjecanje je moglo službeno početi.</p>
<p>
<a href=" https://hosting.photobucket.com/95288841-8654-4bf7-8fc9-a4aa78dce87f/bce59a4f-c3e3-4708-a3d6-25e81a894c24.jpg
" target="_blank"> <img alt="Click for enlarged picture" src="
https://hosting.photobucket.com/95288841-8654-4bf7-8fc9-a4aa78dce87f/bce59a4f-c3e3-4708-a3d6-25e81a894c24.jpg" width="600" /> </a></p>
<p>
<a href=" https://hosting.photobucket.com/95288841-8654-4bf7-8fc9-a4aa78dce87f/16a0a094-01aa-4e52-82cf-fdab00d74711.jpg
" target="_blank"> <img alt="Click for enlarged picture" src="
https://hosting.photobucket.com/95288841-8654-4bf7-8fc9-a4aa78dce87f/16a0a094-01aa-4e52-82cf-fdab00d74711.jpg" width="600" /> </a></p>
<p>
<a href=" https://hosting.photobucket.com/95288841-8654-4bf7-8fc9-a4aa78dce87f/0d3f4042-ff77-48d0-b332-add0fd08f7c3.jpg
" target="_blank"> <img alt="Click for enlarged picture" src="
https://hosting.photobucket.com/95288841-8654-4bf7-8fc9-a4aa78dce87f/0d3f4042-ff77-48d0-b332-add0fd08f7c3.jpg" width="600" /> </a></p>
<p>
<a href=" https://hosting.photobucket.com/95288841-8654-4bf7-8fc9-a4aa78dce87f/3711baf8-93f2-434a-aea9-a95288ca04dd.jpg
" target="_blank"> <img alt="Click for enlarged picture" src="
https://hosting.photobucket.com/95288841-8654-4bf7-8fc9-a4aa78dce87f/3711baf8-93f2-434a-aea9-a95288ca04dd.jpg" width="600" /> </a></p>
<p>
<a href=" https://hosting.photobucket.com/95288841-8654-4bf7-8fc9-a4aa78dce87f/53113b97-ec06-4409-95ba-95a5ad3f9720.jpg
" target="_blank"> <img alt="Click for enlarged picture" src="
https://hosting.photobucket.com/95288841-8654-4bf7-8fc9-a4aa78dce87f/53113b97-ec06-4409-95ba-95a5ad3f9720.jpg" width="600" /> </a></p>
<p>
<a href=" https://hosting.photobucket.com/95288841-8654-4bf7-8fc9-a4aa78dce87f/ab127858-193d-4976-bdb2-e27302722fca.jpg
" target="_blank"> <img alt="Click for enlarged picture" src="
https://hosting.photobucket.com/95288841-8654-4bf7-8fc9-a4aa78dce87f/ab127858-193d-4976-bdb2-e27302722fca.jpg" width="600" /> </a></p>
<p>
<a href=" https://hosting.photobucket.com/95288841-8654-4bf7-8fc9-a4aa78dce87f/3735af11-3fb6-4772-a8ff-5e0ff6ddf03a.jpg
" target="_blank"> <img alt="Click for enlarged picture" src="
https://hosting.photobucket.com/95288841-8654-4bf7-8fc9-a4aa78dce87f/3735af11-3fb6-4772-a8ff-5e0ff6ddf03a.jpg" width="600" /> </a></p>
<p>
<strong>Back To Basics radionice za najmlađe na Black Queen</strong></p>
<p>
Ove godine smo tijekom cijelog vikenda organizirali radionice bojanja minijatura za najmlađe koji su mogli po prvi puta obojati neku od na&scaron;ih vlastitih minijatura osmi&scaron;ljenih upravo za ovaj program!</p>
<p>
<a href=" https://hosting.photobucket.com/95288841-8654-4bf7-8fc9-a4aa78dce87f/6999be0c-8cc6-4947-a423-9427a2299724.jpg
" target="_blank"> <img alt="Click for enlarged picture" src="
https://hosting.photobucket.com/95288841-8654-4bf7-8fc9-a4aa78dce87f/6999be0c-8cc6-4947-a423-9427a2299724.jpg" width="600" /> </a></p>
<p>
<a href="https://hosting.photobucket.com/95288841-8654-4bf7-8fc9-a4aa78dce87f/835b05a5-f171-49df-afa6-da0692b89074.jpg" target="_blank"><img alt="Click for enlarged picture" src="https://hosting.photobucket.com/95288841-8654-4bf7-8fc9-a4aa78dce87f/835b05a5-f171-49df-afa6-da0692b89074.jpg" width="600" /></a></p>
<p>
<a href=" https://hosting.photobucket.com/95288841-8654-4bf7-8fc9-a4aa78dce87f/ef5dde13-84ee-4ea0-b9f3-28aaf703ef6d.jpg
" target="_blank"> <img alt="Click for enlarged picture" src="
https://hosting.photobucket.com/95288841-8654-4bf7-8fc9-a4aa78dce87f/ef5dde13-84ee-4ea0-b9f3-28aaf703ef6d.jpg" width="600" /> </a></p>
<p>
<strong>PRODAJNI KUTAK</strong></p>
<p>
Tijekom vikenda ugostili smo na&scaron;e sponzore sa njihovim prodajnim &scaron;tandovima: Swood.si i Carta Magica.</p>
<p>
<a href=" https://hosting.photobucket.com/95288841-8654-4bf7-8fc9-a4aa78dce87f/5ee9a49f-a387-435a-9110-572402b7191d.jpg
" target="_blank"> <img alt="Click for enlarged picture" src="
https://hosting.photobucket.com/95288841-8654-4bf7-8fc9-a4aa78dce87f/5ee9a49f-a387-435a-9110-572402b7191d.jpg" width="600" /> </a></p>
<p>
<a href=" https://hosting.photobucket.com/95288841-8654-4bf7-8fc9-a4aa78dce87f/47cf600f-b1eb-4655-bf06-305f6f21d5d2.jpg
" target="_blank"> <img alt="Click for enlarged picture" src="
https://hosting.photobucket.com/95288841-8654-4bf7-8fc9-a4aa78dce87f/47cf600f-b1eb-4655-bf06-305f6f21d5d2.jpg" width="600" /> </a></p>
<p>
<strong>OGLEDNE RADIONICE BOJANJA MINIJATURA</strong></p>
<p>
Prostor ZZTK omogućuje održavanje radionica tijekom vikenda u kino dvorani u podrumu, stoga smo tijekom vikenda organizirali i ogledne radionice. Rad predavača snimao se kamerom i projicirao na projekcijsko platno u dvorani. Veliko hvala na&scaron;im domaćim i inozemnim predavačima: Anžetu Zorku (SLO), doc.dr.sc. Wintonu Afriću (HR), Ivanu Knezoviću (UMS Agram) i Petru Knezoviću (HR).</p>
<p>
<a href=" https://hosting.photobucket.com/95288841-8654-4bf7-8fc9-a4aa78dce87f/e8d835be-ec99-49d7-bc9b-086e38573d1a.jpg
" target="_blank"> <img alt="Click for enlarged picture" src="
https://hosting.photobucket.com/95288841-8654-4bf7-8fc9-a4aa78dce87f/e8d835be-ec99-49d7-bc9b-086e38573d1a.jpg" width="600" /> </a></p>
<p>
<a href=" https://hosting.photobucket.com/95288841-8654-4bf7-8fc9-a4aa78dce87f/f3eba4c1-4637-4da9-8360-75f430355af4.jpg" target="_blank"> <img alt="Click for enlarged picture" src="
https://hosting.photobucket.com/95288841-8654-4bf7-8fc9-a4aa78dce87f/f3eba4c1-4637-4da9-8360-75f430355af4.jpg" width="600" /> </a></p>
<p>
<a href=" https://hosting.photobucket.com/95288841-8654-4bf7-8fc9-a4aa78dce87f/ef523854-4030-4579-aa38-403afda86c91.jpg
" target="_blank"> <img alt="Click for enlarged picture" src="
https://hosting.photobucket.com/95288841-8654-4bf7-8fc9-a4aa78dce87f/ef523854-4030-4579-aa38-403afda86c91.jpg" width="600" /> </a></p>
<p>
<a href=" https://hosting.photobucket.com/95288841-8654-4bf7-8fc9-a4aa78dce87f/dd0943c2-f4a8-40c3-b641-f6dcdd200380.jpg
" target="_blank"> <img alt="Click for enlarged picture" src="
https://hosting.photobucket.com/95288841-8654-4bf7-8fc9-a4aa78dce87f/dd0943c2-f4a8-40c3-b641-f6dcdd200380.jpg" width="600" /> </a></p>
<p>
<a href=" https://hosting.photobucket.com/95288841-8654-4bf7-8fc9-a4aa78dce87f/08b1626a-f6c7-43c9-b718-3e9a41b55ca6.jpg
" target="_blank"> <img alt="Click for enlarged picture" src="
https://hosting.photobucket.com/95288841-8654-4bf7-8fc9-a4aa78dce87f/08b1626a-f6c7-43c9-b718-3e9a41b55ca6.jpg" width="600" /> </a></p>
<p>
<a href=" https://hosting.photobucket.com/95288841-8654-4bf7-8fc9-a4aa78dce87f/91aca7f3-1af6-486d-b174-65079a63a1ea.jpg
" target="_blank"> <img alt="Click for enlarged picture" src="
https://hosting.photobucket.com/95288841-8654-4bf7-8fc9-a4aa78dce87f/91aca7f3-1af6-486d-b174-65079a63a1ea.jpg" width="600" /> </a></p>
<p>
<a href=" https://hosting.photobucket.com/95288841-8654-4bf7-8fc9-a4aa78dce87f/3821f2fb-fbe7-4096-adbc-7d8c981a3b56.jpg
" target="_blank"> <img alt="Click for enlarged picture" src="
https://hosting.photobucket.com/95288841-8654-4bf7-8fc9-a4aa78dce87f/3821f2fb-fbe7-4096-adbc-7d8c981a3b56.jpg" width="600" /> </a></p>
<p>
<a href=" https://hosting.photobucket.com/95288841-8654-4bf7-8fc9-a4aa78dce87f/2c7bb3c5-c0ec-4a96-b6bd-6a90ce5ce154.jpg
" target="_blank"> <img alt="Click for enlarged picture" src="
https://hosting.photobucket.com/95288841-8654-4bf7-8fc9-a4aa78dce87f/2c7bb3c5-c0ec-4a96-b6bd-6a90ce5ce154.jpg" width="600" /> </a></p>
<p>
<a href=" https://hosting.photobucket.com/95288841-8654-4bf7-8fc9-a4aa78dce87f/b646f4ee-21aa-4d12-8db3-6d33351d5aeb.jpg
" target="_blank"> <img alt="Click for enlarged picture" src="
https://hosting.photobucket.com/95288841-8654-4bf7-8fc9-a4aa78dce87f/b646f4ee-21aa-4d12-8db3-6d33351d5aeb.jpg" width="600" /> </a></p>
<p>
<a href=" https://hosting.photobucket.com/95288841-8654-4bf7-8fc9-a4aa78dce87f/fb5efc01-32cc-4119-90e3-188f51b30237.jpg
" target="_blank"> <img alt="Click for enlarged picture" src="
https://hosting.photobucket.com/95288841-8654-4bf7-8fc9-a4aa78dce87f/fb5efc01-32cc-4119-90e3-188f51b30237.jpg" width="600" /> </a></p>
<p>
<strong>NATJECANJE U BRZOM BOJANJU MINIJATURA</strong></p>
<p>
U nedjelju, 22.2. smo organizirali natjecanje u brzom bojanju minijatura. Po prvi puta smo koristili minijature koje su na&scaron; dizajn. Sudionici su imali 60 minuta vremena da obojaju og čarobnjaka.</p>
<p>
<a href=" https://hosting.photobucket.com/95288841-8654-4bf7-8fc9-a4aa78dce87f/106417a6-a047-4e0d-9f81-87858806052f.jpg
" target="_blank"> <img alt="Click for enlarged picture" src="
https://hosting.photobucket.com/95288841-8654-4bf7-8fc9-a4aa78dce87f/106417a6-a047-4e0d-9f81-87858806052f.jpg" width="600" /> </a></p>
<p>
<a href=" https://hosting.photobucket.com/95288841-8654-4bf7-8fc9-a4aa78dce87f/ac6853c7-6e34-4e07-a996-8d7d12744b67.jpg
" target="_blank"> <img alt="Click for enlarged picture" src="
https://hosting.photobucket.com/95288841-8654-4bf7-8fc9-a4aa78dce87f/ac6853c7-6e34-4e07-a996-8d7d12744b67.jpg" width="600" /> </a></p>
<p>
<a href=" https://hosting.photobucket.com/95288841-8654-4bf7-8fc9-a4aa78dce87f/ccb155fa-52c5-4a99-9515-f69a6836dce7.jpg
" target="_blank"> <img alt="Click for enlarged picture" src="
https://hosting.photobucket.com/95288841-8654-4bf7-8fc9-a4aa78dce87f/ccb155fa-52c5-4a99-9515-f69a6836dce7.jpg" width="600" /> </a></p>
<p>
<a href=" https://hosting.photobucket.com/95288841-8654-4bf7-8fc9-a4aa78dce87f/a29fedd0-97ea-45b1-85f9-7ea62188b2b2.jpg
" target="_blank"><img alt="Click for enlarged picture" src="
https://hosting.photobucket.com/95288841-8654-4bf7-8fc9-a4aa78dce87f/a29fedd0-97ea-45b1-85f9-7ea62188b2b2.jpg" width="600" /></a></p>
<p>
S time smo do&scaron;li do samoga kraja ovog predivnog vikenda i sve &scaron;to je preostalo je bila podjela nagrada i priznanja pobjednicima.</p>
<p>
<a href=" https://hosting.photobucket.com/95288841-8654-4bf7-8fc9-a4aa78dce87f/046ca4c8-0ae7-415e-abd3-e131d580c3ad.jpg
" target="_blank"> <img alt="Click for enlarged picture" src="
https://hosting.photobucket.com/95288841-8654-4bf7-8fc9-a4aa78dce87f/046ca4c8-0ae7-415e-abd3-e131d580c3ad.jpg" width="600" /> </a></p>
<p>
<a href=" https://hosting.photobucket.com/95288841-8654-4bf7-8fc9-a4aa78dce87f/cec0dcef-7acb-4a77-89de-271ed5410672.jpg
" target="_blank"> <img alt="Click for enlarged picture" src="
https://hosting.photobucket.com/95288841-8654-4bf7-8fc9-a4aa78dce87f/cec0dcef-7acb-4a77-89de-271ed5410672.jpg" width="600" /> </a></p>
<p>
<a href=" https://hosting.photobucket.com/95288841-8654-4bf7-8fc9-a4aa78dce87f/a495a5fc-31a2-4979-a970-0fa22c334354.jpg
" target="_blank"> <img alt="Click for enlarged picture" src="
https://hosting.photobucket.com/95288841-8654-4bf7-8fc9-a4aa78dce87f/a495a5fc-31a2-4979-a970-0fa22c334354.jpg" width="600" /> </a></p>
<p>
<strong>AGRAM ARENA &ndash; Leaving Asphodel Necropolis28 kampanja</strong></p>
<p>
Tijekom vikenda 21.-22.2. održali smo i novo međunarodno natjecanje Agram Arena! Ovoga puta na redu je bila stolna strate&scaron;ka igra Necropolis 28 za koju su na&scaron;i članovi osmislili dvodnevnu kampanju. Svaki sudionik je izradio svoju bandu vojnika, a velika većina i svoje vlastite table.</p>
<p>
<a href=" https://hosting.photobucket.com/95288841-8654-4bf7-8fc9-a4aa78dce87f/ac69b182-4bfc-4575-a6d3-fb3c8baba342.jpg
" target="_blank"> <img alt="Click for enlarged picture" src="
https://hosting.photobucket.com/95288841-8654-4bf7-8fc9-a4aa78dce87f/ac69b182-4bfc-4575-a6d3-fb3c8baba342.jpg" width="600" /> </a></p>
<p>
<a href=" https://hosting.photobucket.com/95288841-8654-4bf7-8fc9-a4aa78dce87f/289fed7b-e058-42d8-ba2d-cbd0463e98da.jpg
" target="_blank"> <img alt="Click for enlarged picture" src="
https://hosting.photobucket.com/95288841-8654-4bf7-8fc9-a4aa78dce87f/289fed7b-e058-42d8-ba2d-cbd0463e98da.jpg" width="600" /> </a></p>
<p>
<a href=" https://hosting.photobucket.com/95288841-8654-4bf7-8fc9-a4aa78dce87f/d92ebbee-859d-4441-8386-3d760b20b7a7.jpg
" target="_blank"> <img alt="Click for enlarged picture" src="
https://hosting.photobucket.com/95288841-8654-4bf7-8fc9-a4aa78dce87f/d92ebbee-859d-4441-8386-3d760b20b7a7.jpg" width="600" /> </a></p>
<p>
<a href=" https://hosting.photobucket.com/95288841-8654-4bf7-8fc9-a4aa78dce87f/09c59798-7871-425e-a075-3ca1cd91768a.jpg
" target="_blank"> <img alt="Click for enlarged picture" src="
https://hosting.photobucket.com/95288841-8654-4bf7-8fc9-a4aa78dce87f/09c59798-7871-425e-a075-3ca1cd91768a.jpg" width="600" /> </a></p>
<p>
<a href=" https://hosting.photobucket.com/95288841-8654-4bf7-8fc9-a4aa78dce87f/b2f3edc8-5a23-4552-9a2a-4027b286f327.jpg
" target="_blank"> <img alt="Click for enlarged picture" src="
https://hosting.photobucket.com/95288841-8654-4bf7-8fc9-a4aa78dce87f/b2f3edc8-5a23-4552-9a2a-4027b286f327.jpg" width="600" /> </a></p>
<p>
<a href=" https://hosting.photobucket.com/95288841-8654-4bf7-8fc9-a4aa78dce87f/2a9f43ac-b531-4746-b7bb-ac5a3356aab0.jpg
" target="_blank"> <img alt="Click for enlarged picture" src="
https://hosting.photobucket.com/95288841-8654-4bf7-8fc9-a4aa78dce87f/2a9f43ac-b531-4746-b7bb-ac5a3356aab0.jpg" width="600" /> </a></p>
<p>
<strong>DOGAĐANJA RADNIM DANIMA ZA VRIJEME IZLOŽBE</strong></p>
<p>
Tijekom naredna dva tjedna, na&scaron;i volonteri su radnim danima od 16:00 do 20:00, držali otvorene radionice bojanja minijatura. Postavljene su radne stanice za bojanje minijatura na kojoj su na&scaron;i posjetitelji mogli bojati minijature koje smo priredili (ili svoje ukoliko su ih donijeli) koristeći na&scaron;e materijale i alate.</p>
<p>
<a href=" https://hosting.photobucket.com/95288841-8654-4bf7-8fc9-a4aa78dce87f/6edf7765-42b5-417a-820f-fa5d907179a7.jpg
" target="_blank"> <img alt="Click for enlarged picture" src="
https://hosting.photobucket.com/95288841-8654-4bf7-8fc9-a4aa78dce87f/6edf7765-42b5-417a-820f-fa5d907179a7.jpg" width="600" /> </a></p>
<p>
<a href=" https://hosting.photobucket.com/95288841-8654-4bf7-8fc9-a4aa78dce87f/c084ebe2-f57b-4519-9b31-29bdc1155887.jpg
" target="_blank"> <img alt="Click for enlarged picture" src="
https://hosting.photobucket.com/95288841-8654-4bf7-8fc9-a4aa78dce87f/c084ebe2-f57b-4519-9b31-29bdc1155887.jpg" width="600" /> </a></p>
<p>
<a href=" https://hosting.photobucket.com/95288841-8654-4bf7-8fc9-a4aa78dce87f/37ff2272-f9b0-4b16-a363-1e6f6688c866.jpg
" target="_blank"> <img alt="Click for enlarged picture" src="
https://hosting.photobucket.com/95288841-8654-4bf7-8fc9-a4aa78dce87f/37ff2272-f9b0-4b16-a363-1e6f6688c866.jpg" width="600" /> </a></p>
<p>
<a href=" https://hosting.photobucket.com/95288841-8654-4bf7-8fc9-a4aa78dce87f/5f4f7968-ff50-4a01-98da-6ce8562930b4.jpg
" target="_blank"> <img alt="Click for enlarged picture" src="
https://hosting.photobucket.com/95288841-8654-4bf7-8fc9-a4aa78dce87f/5f4f7968-ff50-4a01-98da-6ce8562930b4.jpg" width="600" /> </a></p>
<p>
<a href=" https://hosting.photobucket.com/95288841-8654-4bf7-8fc9-a4aa78dce87f/cbb45319-d488-483c-bf9d-9af29852fc74.jpg
" target="_blank"> <img alt="Click for enlarged picture" src="
https://hosting.photobucket.com/95288841-8654-4bf7-8fc9-a4aa78dce87f/cbb45319-d488-483c-bf9d-9af29852fc74.jpg" width="600" /> </a></p>
<p>
<a href=" https://hosting.photobucket.com/95288841-8654-4bf7-8fc9-a4aa78dce87f/3dcca26c-d549-4af3-812a-a4a81b9a2310.jpg
" target="_blank"> <img alt="Click for enlarged picture" src="
https://hosting.photobucket.com/95288841-8654-4bf7-8fc9-a4aa78dce87f/3dcca26c-d549-4af3-812a-a4a81b9a2310.jpg" width="600" /> </a></p>
<p>
<a href=" https://hosting.photobucket.com/95288841-8654-4bf7-8fc9-a4aa78dce87f/4adf0fb6-3eab-4b40-b32d-d03eab4a9892.jpg
" target="_blank"> <img alt="Click for enlarged picture" src="
https://hosting.photobucket.com/95288841-8654-4bf7-8fc9-a4aa78dce87f/4adf0fb6-3eab-4b40-b32d-d03eab4a9892.jpg" width="600" /> </a></p>
<p>
<a href=" https://hosting.photobucket.com/95288841-8654-4bf7-8fc9-a4aa78dce87f/4732b58a-9a65-4d1c-a7d5-25513d34b108.jpg
" target="_blank"> <img alt="Click for enlarged picture" src="
https://hosting.photobucket.com/95288841-8654-4bf7-8fc9-a4aa78dce87f/4732b58a-9a65-4d1c-a7d5-25513d34b108.jpg" width="600" /> </a></p>
<p>
<a href=" https://hosting.photobucket.com/95288841-8654-4bf7-8fc9-a4aa78dce87f/274be330-31d5-4e25-95db-ec2f423a003c.jpg
" target="_blank"> <img alt="Click for enlarged picture" src="
https://hosting.photobucket.com/95288841-8654-4bf7-8fc9-a4aa78dce87f/274be330-31d5-4e25-95db-ec2f423a003c.jpg" width="600" /> </a></p>
<p>
<a href=" https://hosting.photobucket.com/95288841-8654-4bf7-8fc9-a4aa78dce87f/8e7b0a80-0f46-4d70-9789-a46976c713d2.jpg
" target="_blank"> <img alt="Click for enlarged picture" src="
https://hosting.photobucket.com/95288841-8654-4bf7-8fc9-a4aa78dce87f/8e7b0a80-0f46-4d70-9789-a46976c713d2.jpg" width="600" /> </a></p>
<p>
<a href=" https://hosting.photobucket.com/95288841-8654-4bf7-8fc9-a4aa78dce87f/8bbd4e96-b911-4f26-80fe-b1c57f29027b.jpg
" target="_blank"> <img alt="Click for enlarged picture" src="
https://hosting.photobucket.com/95288841-8654-4bf7-8fc9-a4aa78dce87f/8bbd4e96-b911-4f26-80fe-b1c57f29027b.jpg" width="600" /> </a></p>
<p>
<a href=" https://hosting.photobucket.com/95288841-8654-4bf7-8fc9-a4aa78dce87f/203a27be-8f10-459d-89b9-befb6b636b74.jpg
" target="_blank"> <img alt="Click for enlarged picture" src="
https://hosting.photobucket.com/95288841-8654-4bf7-8fc9-a4aa78dce87f/203a27be-8f10-459d-89b9-befb6b636b74.jpg" width="600" /> </a></p>
<p>
<a href=" https://hosting.photobucket.com/95288841-8654-4bf7-8fc9-a4aa78dce87f/5dc4358f-19d8-475f-a4af-9c29e9ed18d7.jpg
" target="_blank"> <img alt="Click for enlarged picture" src="
https://hosting.photobucket.com/95288841-8654-4bf7-8fc9-a4aa78dce87f/5dc4358f-19d8-475f-a4af-9c29e9ed18d7.jpg" width="600" /> </a></p>
<p>
<strong>BACK TO BASICS RADIONICE ZA NAJMLAĐE</strong></p>
<p>
Radnim danima od 17:00 do 18:00 održavali smo na&scaron;e nove radionice za najmlađe u kojima su na&scaron;i najmlađi polaznici bojali svoje prve minijature.</p>
<p>
<a href=" https://hosting.photobucket.com/95288841-8654-4bf7-8fc9-a4aa78dce87f/948af139-8fb5-4e28-a27c-404466e70d05.jpg
" target="_blank"> <img alt="Click for enlarged picture" src="
https://hosting.photobucket.com/95288841-8654-4bf7-8fc9-a4aa78dce87f/948af139-8fb5-4e28-a27c-404466e70d05.jpg" width="600" /> </a></p>
<p>
<a href=" https://hosting.photobucket.com/95288841-8654-4bf7-8fc9-a4aa78dce87f/bb3e20c2-bb21-4a3d-863a-74de08261467.jpg
" target="_blank"> <img alt="Click for enlarged picture" src="
https://hosting.photobucket.com/95288841-8654-4bf7-8fc9-a4aa78dce87f/bb3e20c2-bb21-4a3d-863a-74de08261467.jpg" width="600" /> </a></p>
<p>
<a href=" https://hosting.photobucket.com/95288841-8654-4bf7-8fc9-a4aa78dce87f/7316c760-98e3-4e3f-9261-d138aa7a5a6a.jpg
" target="_blank"> <img alt="Click for enlarged picture" src="
https://hosting.photobucket.com/95288841-8654-4bf7-8fc9-a4aa78dce87f/7316c760-98e3-4e3f-9261-d138aa7a5a6a.jpg" width="600" /> </a></p>
<p>
<a href=" https://hosting.photobucket.com/95288841-8654-4bf7-8fc9-a4aa78dce87f/68934b39-3d1f-4f43-b967-14b73c41a39e.jpg
" target="_blank"> <img alt="Click for enlarged picture" src="
https://hosting.photobucket.com/95288841-8654-4bf7-8fc9-a4aa78dce87f/68934b39-3d1f-4f43-b967-14b73c41a39e.jpg" width="600" /> </a></p>
<p>
<a href=" https://hosting.photobucket.com/95288841-8654-4bf7-8fc9-a4aa78dce87f/46125bce-a28d-494f-873a-3aeabdc1d6c2.jpg
" target="_blank"> <img alt="Click for enlarged picture" src="
https://hosting.photobucket.com/95288841-8654-4bf7-8fc9-a4aa78dce87f/46125bce-a28d-494f-873a-3aeabdc1d6c2.jpg" width="600" /> </a></p>
<p>
<a href=" https://hosting.photobucket.com/95288841-8654-4bf7-8fc9-a4aa78dce87f/3c58e0ad-77a9-44c8-b6bf-d9a55c514d43.jpg
" target="_blank"> <img alt="Click for enlarged picture" src="
https://hosting.photobucket.com/95288841-8654-4bf7-8fc9-a4aa78dce87f/3c58e0ad-77a9-44c8-b6bf-d9a55c514d43.jpg" width="600" /> </a></p>
<p>
<a href=" https://hosting.photobucket.com/95288841-8654-4bf7-8fc9-a4aa78dce87f/f891f0f0-051b-40ee-9676-cb03b0a9811b.jpg
" target="_blank"> <img alt="Click for enlarged picture" src="
https://hosting.photobucket.com/95288841-8654-4bf7-8fc9-a4aa78dce87f/f891f0f0-051b-40ee-9676-cb03b0a9811b.jpg" width="600" /> </a></p>
<p>
<strong>AGRAM LEGO SEKCIJA predavanje: FW-14b &ndash; Bolid F1 za budućnost</strong></p>
<p>
U srijedu 25.2.2026. u sklopu aktivnosti na&scaron;e Agram Lego Sekcije, na&scaron; dežurni strojar Marko Paunović je održao predavanje na temu bolida Formule 1 iz 1992.. Ulaz na predavanje je bio besplatan, a po zavr&scaron;etku su LEGO maketu bolida izradili članovi Lego sekcije</p>
<p>
<a href=" https://hosting.photobucket.com/95288841-8654-4bf7-8fc9-a4aa78dce87f/b2e14b1c-daa4-4314-8685-184377bc7e28.jpg
" target="_blank"> <img alt="Click for enlarged picture" src="
https://hosting.photobucket.com/95288841-8654-4bf7-8fc9-a4aa78dce87f/b2e14b1c-daa4-4314-8685-184377bc7e28.jpg" width="600" /> </a></p>
<p>
<a href=" https://hosting.photobucket.com/95288841-8654-4bf7-8fc9-a4aa78dce87f/31fb439a-77d3-4418-83ff-66c3af279cca.jpg" target="_blank"> <img alt="Click for enlarged picture" src="
https://hosting.photobucket.com/95288841-8654-4bf7-8fc9-a4aa78dce87f/31fb439a-77d3-4418-83ff-66c3af279cca.jpg" width="600" /> </a></p>
<p>
<a href=" https://hosting.photobucket.com/95288841-8654-4bf7-8fc9-a4aa78dce87f/bfcaf282-6be8-4b52-a3ed-c91137457876.jpg
" target="_blank"> <img alt="Click for enlarged picture" src="
https://hosting.photobucket.com/95288841-8654-4bf7-8fc9-a4aa78dce87f/bfcaf282-6be8-4b52-a3ed-c91137457876.jpg" width="600" /> </a></p>
<p>
<a href=" https://hosting.photobucket.com/95288841-8654-4bf7-8fc9-a4aa78dce87f/ce70fc61-9e1a-4169-aaad-8b67417656c0.jpg
" target="_blank"> <img alt="Click for enlarged picture" src="
https://hosting.photobucket.com/95288841-8654-4bf7-8fc9-a4aa78dce87f/ce70fc61-9e1a-4169-aaad-8b67417656c0.jpg" width="600" /> </a></p>
<p>
<a href=" https://hosting.photobucket.com/95288841-8654-4bf7-8fc9-a4aa78dce87f/94ca0e36-8710-458d-8194-9f71299f4d74.jpg
" target="_blank"> <img alt="Click for enlarged picture" src="
https://hosting.photobucket.com/95288841-8654-4bf7-8fc9-a4aa78dce87f/94ca0e36-8710-458d-8194-9f71299f4d74.jpg" width="600" /> </a></p>
<p>
<a href=" https://hosting.photobucket.com/95288841-8654-4bf7-8fc9-a4aa78dce87f/c6771f72-7191-4ca3-a792-3bb1ab3897b1.jpg
" target="_blank"> <img alt="Click for enlarged picture" src="
https://hosting.photobucket.com/95288841-8654-4bf7-8fc9-a4aa78dce87f/c6771f72-7191-4ca3-a792-3bb1ab3897b1.jpg" width="600" /> </a></p>
<p>
<a href=" https://hosting.photobucket.com/95288841-8654-4bf7-8fc9-a4aa78dce87f/c8fcfcb6-09f2-4398-a2fb-fa5065771e01.jpg
" target="_blank"> <img alt="Click for enlarged picture" src="
https://hosting.photobucket.com/95288841-8654-4bf7-8fc9-a4aa78dce87f/c8fcfcb6-09f2-4398-a2fb-fa5065771e01.jpg" width="600" /> </a></p>
<p>
<a href=" https://hosting.photobucket.com/95288841-8654-4bf7-8fc9-a4aa78dce87f/d7e187a8-d5b1-433b-b30d-091e54dcdddf.jpg
" target="_blank"> <img alt="Click for enlarged picture" src="
https://hosting.photobucket.com/95288841-8654-4bf7-8fc9-a4aa78dce87f/d7e187a8-d5b1-433b-b30d-091e54dcdddf.jpg" width="600" /> </a></p>
<p>
Tijekom drugog vikenda Izložbe, 28.02.-01.03., organizirali smo <strong>RADIONICU BOJANJA MINIJATURA &ndash; Grimdark stil</strong>.</p>
<p>
Radionica se provodila kroz dva dana (cijeli vikend) i polaznici su bojali tri različite figure za igru Trench Crusade. Fokus ovih predavanja bilo je bojenje popularnim Grimdark stilom. Na radionici su bile predstavljene boje i pribor, priprema figura, nekoliko tehnika bojenja minijatura od osnovnih do naprednijih, te tehnike i trikovi za brzo i efikasno bojenje većih količina figura odjednom. U sklopu radionice kori&scaron;tene su akrilne boje na bazi vode.</p>
<p>
<a href=" https://hosting.photobucket.com/95288841-8654-4bf7-8fc9-a4aa78dce87f/733d94b2-8e8d-4a4e-accd-b9168e32577e.jpg
" target="_blank"> <img alt="Click for enlarged picture" src="
https://hosting.photobucket.com/95288841-8654-4bf7-8fc9-a4aa78dce87f/733d94b2-8e8d-4a4e-accd-b9168e32577e.jpg
" width="600" /> </a></p>
<p>
<a href=" https://hosting.photobucket.com/95288841-8654-4bf7-8fc9-a4aa78dce87f/41020062-45b9-41cd-a357-fa23a389f390.jpg
" target="_blank"> <img alt="Click for enlarged picture" src="
https://hosting.photobucket.com/95288841-8654-4bf7-8fc9-a4aa78dce87f/41020062-45b9-41cd-a357-fa23a389f390.jpg
" width="600" /> </a></p>
<p>
<a href=" https://hosting.photobucket.com/95288841-8654-4bf7-8fc9-a4aa78dce87f/0c07cc55-596d-494d-972b-cd6a0dd6b8b7.jpg
" target="_blank"> <img alt="Click for enlarged picture" src="
https://hosting.photobucket.com/95288841-8654-4bf7-8fc9-a4aa78dce87f/0c07cc55-596d-494d-972b-cd6a0dd6b8b7.jpg" width="600" /> </a></p>
<p>
<a href=" https://hosting.photobucket.com/95288841-8654-4bf7-8fc9-a4aa78dce87f/c17dd356-08b1-48e1-b895-6296aed7f818.jpg
" target="_blank"> <img alt="Click for enlarged picture" src="
https://hosting.photobucket.com/95288841-8654-4bf7-8fc9-a4aa78dce87f/c17dd356-08b1-48e1-b895-6296aed7f818.jpg" width="600" /> </a></p>
<p>
U srijedu 04.03.2026. održana je godi&scaron;nja <strong>sjednica Skup&scaron;tine</strong> na kojoj smo odredili smjernice rada u 2026.</p>
<p>
<a href=" https://hosting.photobucket.com/95288841-8654-4bf7-8fc9-a4aa78dce87f/59484bd0-7edc-4aed-a04e-ae42900ba3e6.jpg
" target="_blank"> <img alt="Click for enlarged picture" src="
https://hosting.photobucket.com/95288841-8654-4bf7-8fc9-a4aa78dce87f/59484bd0-7edc-4aed-a04e-ae42900ba3e6.jpg
" width="600" /> </a></p>
<p>
U nedjelju 08.03.2026. Izložba je zavr&scaron;ena, na&scaron;i eksponati sigurno spremljeni, a Galerija poči&scaron;ćena.</p>
<p>
<a href=" https://hosting.photobucket.com/95288841-8654-4bf7-8fc9-a4aa78dce87f/98af4280-0956-4cdb-b4a9-da40e3a5a44a.jpg
" target="_blank"> <img alt="Click for enlarged picture" src="
https://hosting.photobucket.com/95288841-8654-4bf7-8fc9-a4aa78dce87f/98af4280-0956-4cdb-b4a9-da40e3a5a44a.jpg" width="600" /> </a></p>
<p>
<a href=" https://hosting.photobucket.com/95288841-8654-4bf7-8fc9-a4aa78dce87f/3259b35e-1fc2-4a99-a3c5-c7984958d72b.jpg
" target="_blank"> <img alt="Click for enlarged picture" src="
https://hosting.photobucket.com/95288841-8654-4bf7-8fc9-a4aa78dce87f/3259b35e-1fc2-4a99-a3c5-c7984958d72b.jpg" width="600" /> </a></p>
<p>
Najbitniji dio svake godine prilikom održavanja ove Izložbe je socijalni aspekt, druženje na&scaron;ih članova kako međusobno tako i sa na&scaron;im međunarodnim prijateljima koji nas posjećuju! Uz ovih par fotografija sa zajedničkih druženja, pozdravljamo vas do sljedeće godine!</p>
<p>
<a href=" https://hosting.photobucket.com/95288841-8654-4bf7-8fc9-a4aa78dce87f/b9168e23-79b2-4d81-8a7d-7534062881a7.jpg
" target="_blank"> <img alt="Click for enlarged picture" src="
https://hosting.photobucket.com/95288841-8654-4bf7-8fc9-a4aa78dce87f/b9168e23-79b2-4d81-8a7d-7534062881a7.jpg " width="600" /> </a></p>
<p>
<a href=" https://hosting.photobucket.com/95288841-8654-4bf7-8fc9-a4aa78dce87f/edff925e-916c-4d78-953e-210abf3753d4.jpg
" target="_blank"> <img alt="Click for enlarged picture" src="
https://hosting.photobucket.com/95288841-8654-4bf7-8fc9-a4aa78dce87f/edff925e-916c-4d78-953e-210abf3753d4.jpg " width="600" /> </a></p>
<p>
<a href=" https://hosting.photobucket.com/95288841-8654-4bf7-8fc9-a4aa78dce87f/8bcb48fa-466b-43f8-8a4b-f15f6794b21e.jpg
" target="_blank"> <img alt="Click for enlarged picture" src="
https://hosting.photobucket.com/95288841-8654-4bf7-8fc9-a4aa78dce87f/8bcb48fa-466b-43f8-8a4b-f15f6794b21e.jpg" width="600" /> </a></p>
",
"created" => "2026-03-12 08:54:10",
"modified" => "2026-03-12 08:58:37"
),
"Member" => array(
"id" => "35",
"group_id" => "1",
"first_name" => "Marko",
"last_name" => "Paunović",
"first_name_mask" => "marko",
"last_name_mask" => "paunovic",
"username" => "marko",
"password" => "*****",
"born" => "2033-03-07 20:35:00",
"created" => "2009-06-02 20:37:03"
)
)</pre><pre class="stack-trace">include - APP/views/elements/latestArticles.ctp, line 10
View::_render() - CORE/cake/libs/view/view.php, line 736
View::element() - CORE/cake/libs/view/view.php, line 397
include - APP/views/home/index.ctp, line 49
View::_render() - CORE/cake/libs/view/view.php, line 736
View::render() - CORE/cake/libs/view/view.php, line 431
Controller::render() - CORE/cake/libs/controller/controller.php, line 909
Dispatcher::_invoke() - CORE/cake/dispatcher.php, line 207
Dispatcher::dispatch() - CORE/cake/dispatcher.php, line 171
[main] - APP/webroot/index.php, line 86</pre></div></pre><a href="/dok/articles/2026/03/12" class="readMore"></a>
<span class="details"> <pre style="display: none;">
array(2) {
["Article"]=>
array(10) {
["id"]=>
string(3) "496"
["member_id"]=>
string(2) "35"
["title_eng"]=>
string(50) "Exhibition of Miniatures and Tabletop Scenery 2026"
["title_hrv"]=>
string(39) "Izložba minijatura i maketa Agram 2026"
["mask_eng"]=>
string(50) "exhibition_of_miniatures_and_tabletop_scenery_2026"
["mask_hrv"]=>
string(38) "izlozba_minijatura_i_maketa_agram_2026"
["content_eng"]=>
string(42359) "<p>
<a href=" https://hosting.photobucket.com/95288841-8654-4bf7-8fc9-a4aa78dce87f/dc756f84-867d-4df4-acd8-5d43775cafc2.jpg
" target="_blank"> <img alt="Click for enlarged picture" src="
https://hosting.photobucket.com/95288841-8654-4bf7-8fc9-a4aa78dce87f/dc756f84-867d-4df4-acd8-5d43775cafc2.jpg" width="600" /> </a></p>
<p>
<strong>The exhibition of miniatures and models "Agram 2026"</strong> was held this year from 19.2. to 08.03. 2026. The exhibition was set up on Wednesday 18.2. and was attended by a large number of members and friends of the Association who exhibited their works.</p>
<p>
</p>
<p>
<a href=" https://hosting.photobucket.com/95288841-8654-4bf7-8fc9-a4aa78dce87f/8529d6d4-76ea-4872-a9e6-748e04223a4e.jpg
" target="_blank"> <img alt="Click for enlarged picture" src="
https://hosting.photobucket.com/95288841-8654-4bf7-8fc9-a4aa78dce87f/8529d6d4-76ea-4872-a9e6-748e04223a4e.jpg
" width="600" /> </a></p>
<p>
<a href=" https://hosting.photobucket.com/95288841-8654-4bf7-8fc9-a4aa78dce87f/f3038937-f001-4ceb-b725-a330fcd64cee.jpg
" target="_blank"> <img alt="Click for enlarged picture" src="
https://hosting.photobucket.com/95288841-8654-4bf7-8fc9-a4aa78dce87f/f3038937-f001-4ceb-b725-a330fcd64cee.jpg
" width="600" /> </a></p>
<p>
<a href=" https://hosting.photobucket.com/95288841-8654-4bf7-8fc9-a4aa78dce87f/3575379e-e068-49e2-9d4d-c9a49531fdc2.jpg
" target="_blank"> <img alt="Click for enlarged picture" src="
https://hosting.photobucket.com/95288841-8654-4bf7-8fc9-a4aa78dce87f/3575379e-e068-49e2-9d4d-c9a49531fdc2.jpg" width="600" /> </a></p>
<p>
<a href=" https://hosting.photobucket.com/95288841-8654-4bf7-8fc9-a4aa78dce87f/e51713c7-2add-4f8f-ae37-e6eba25badff.jpg
" target="_blank"> <img alt="Click for enlarged picture" src="
https://hosting.photobucket.com/95288841-8654-4bf7-8fc9-a4aa78dce87f/e51713c7-2add-4f8f-ae37-e6eba25badff.jpg" width="600" /> </a></p>
<p>
<a href=" https://hosting.photobucket.com/95288841-8654-4bf7-8fc9-a4aa78dce87f/9c0bb546-50a8-483d-aeab-ab3b2ce9f094.jpg
" target="_blank"> <img alt="Click for enlarged picture" src="
https://hosting.photobucket.com/95288841-8654-4bf7-8fc9-a4aa78dce87f/9c0bb546-50a8-483d-aeab-ab3b2ce9f094.jpg" width="600" /> </a></p>
<p>
The opening of the Exhibition took place on Thursday, February 19, 2026, starting at 6:00 PM. The exhibition was organized on the occasion of our twenty-third birthday.</p>
<p>
</p>
<p>
<a href=" https://hosting.photobucket.com/95288841-8654-4bf7-8fc9-a4aa78dce87f/71c7bfc2-1ffc-43b9-9d5a-53e009f6b86d.jpg
" target="_blank"> <img alt="Click for enlarged picture" src="
https://hosting.photobucket.com/95288841-8654-4bf7-8fc9-a4aa78dce87f/71c7bfc2-1ffc-43b9-9d5a-53e009f6b86d.jpg" width="600" /> </a></p>
<p>
<a href=" https://hosting.photobucket.com/95288841-8654-4bf7-8fc9-a4aa78dce87f/007b4701-1d7c-4a67-a599-0539a2aa3191.jpg
" target="_blank"> <img alt="Click for enlarged picture" src="
https://hosting.photobucket.com/95288841-8654-4bf7-8fc9-a4aa78dce87f/007b4701-1d7c-4a67-a599-0539a2aa3191.jpg" width="600" /> </a></p>
<p>
<a href=" https://hosting.photobucket.com/95288841-8654-4bf7-8fc9-a4aa78dce87f/2c8090e2-8b95-4368-bb48-98876d680e15.jpg
" target="_blank"> <img alt="Click for enlarged picture" src="
https://hosting.photobucket.com/95288841-8654-4bf7-8fc9-a4aa78dce87f/2c8090e2-8b95-4368-bb48-98876d680e15.jpg" width="600" /> </a></p>
<p>
<a href=" https://hosting.photobucket.com/95288841-8654-4bf7-8fc9-a4aa78dce87f/375768ad-a8bb-49bf-9845-e46c896ba7ec.jpg
" target="_blank"> <img alt="Click for enlarged picture" src="
https://hosting.photobucket.com/95288841-8654-4bf7-8fc9-a4aa78dce87f/375768ad-a8bb-49bf-9845-e46c896ba7ec.jpg" width="600" /> </a></p>
<p>
<a href=" https://hosting.photobucket.com/95288841-8654-4bf7-8fc9-a4aa78dce87f/a93de974-4ccb-4876-85b0-4d066ae402b3.jpg
" target="_blank"> <img alt="Click for enlarged picture" src="
https://hosting.photobucket.com/95288841-8654-4bf7-8fc9-a4aa78dce87f/a93de974-4ccb-4876-85b0-4d066ae402b3.jpg" width="600" /> </a></p>
<p>
<a href=" https://hosting.photobucket.com/95288841-8654-4bf7-8fc9-a4aa78dce87f/d323ccc9-1b9a-4cb2-8adf-7019b0e217f4.jpg
" target="_blank"> <img alt="Click for enlarged picture" src="
https://hosting.photobucket.com/95288841-8654-4bf7-8fc9-a4aa78dce87f/d323ccc9-1b9a-4cb2-8adf-7019b0e217f4.jpg" width="600" /> </a></p>
<p>
<a href=" https://hosting.photobucket.com/95288841-8654-4bf7-8fc9-a4aa78dce87f/a5a66447-2d76-47ae-866d-4d512ef469a5.jpg
" target="_blank"> <img alt="Click for enlarged picture" src="
https://hosting.photobucket.com/95288841-8654-4bf7-8fc9-a4aa78dce87f/a5a66447-2d76-47ae-866d-4d512ef469a5.jpg" width="600" /> </a></p>
<p>
<a href=" https://hosting.photobucket.com/95288841-8654-4bf7-8fc9-a4aa78dce87f/3e7bcfc9-ba02-4f94-a6c3-79dfaea3639e.jpg
" target="_blank"> <img alt="Click for enlarged picture" src="
https://hosting.photobucket.com/95288841-8654-4bf7-8fc9-a4aa78dce87f/3e7bcfc9-ba02-4f94-a6c3-79dfaea3639e.jpg" width="600" /> </a></p>
<p>
<a href=" https://hosting.photobucket.com/95288841-8654-4bf7-8fc9-a4aa78dce87f/24e79466-4a9e-4b10-970c-caad235d260d.jpg
" target="_blank"> <img alt="Click for enlarged picture" src="
https://hosting.photobucket.com/95288841-8654-4bf7-8fc9-a4aa78dce87f/24e79466-4a9e-4b10-970c-caad235d260d.jpg" width="600" /> </a></p>
<p>
As always, the Exhibition presented a cross-section of the work of the Association, its members, participants of its courses and workshops, and members of the Miniature Painters Croatia FB group. In a large number of showcases, there were numerous miniatures for tabletop strategy games, board games, and an entire showcase was dedicated to award-winning exhibits from previous miniature competitions. Several showcases were dedicated to projects that the Association has been implementing for 23 years, such as the UMS „Agram“ Library and Reading Room, the Workshop for Making Spatial Models and the Miniature Painting Workshop, as well as new ones such as the Agram Group Build, the Agram Lego Section and the Back to Basics painting workshop for the youngest.</p>
<p>
<a href=" https://hosting.photobucket.com/95288841-8654-4bf7-8fc9-a4aa78dce87f/fca84936-af71-44d3-9a4c-faeb26163899.jpg
" target="_blank"> <img alt="Click for enlarged picture" src="
https://hosting.photobucket.com/95288841-8654-4bf7-8fc9-a4aa78dce87f/fca84936-af71-44d3-9a4c-faeb26163899.jpg" width="600" /> </a></p>
<p>
<a href=" https://hosting.photobucket.com/95288841-8654-4bf7-8fc9-a4aa78dce87f/459bc5ac-8702-46f9-93b4-547deaabdef4.jpg
" target="_blank"> <img alt="Click for enlarged picture" src="
https://hosting.photobucket.com/95288841-8654-4bf7-8fc9-a4aa78dce87f/459bc5ac-8702-46f9-93b4-547deaabdef4.jpg" width="600" /> </a></p>
<p>
<a href=" https://hosting.photobucket.com/95288841-8654-4bf7-8fc9-a4aa78dce87f/91a04363-b2ef-4635-a046-7edf25ce7808.jpg
" target="_blank"> <img alt="Click for enlarged picture" src="
https://hosting.photobucket.com/95288841-8654-4bf7-8fc9-a4aa78dce87f/91a04363-b2ef-4635-a046-7edf25ce7808.jpg" width="600" /> </a></p>
<p>
<a href=" https://hosting.photobucket.com/95288841-8654-4bf7-8fc9-a4aa78dce87f/73256af5-fd5d-40b5-95e1-120e49c9be87.jpg
" target="_blank"> <img alt="Click for enlarged picture" src="
https://hosting.photobucket.com/95288841-8654-4bf7-8fc9-a4aa78dce87f/73256af5-fd5d-40b5-95e1-120e49c9be87.jpg" width="600" /> </a></p>
<p>
<a href=" https://hosting.photobucket.com/95288841-8654-4bf7-8fc9-a4aa78dce87f/979f9be5-23f3-4df9-91dc-ab71d6a10d64.jpg
" target="_blank"> <img alt="Click for enlarged picture" src="
https://hosting.photobucket.com/95288841-8654-4bf7-8fc9-a4aa78dce87f/979f9be5-23f3-4df9-91dc-ab71d6a10d64.jpg" width="600" /> </a></p>
<p>
<a href=" https://hosting.photobucket.com/95288841-8654-4bf7-8fc9-a4aa78dce87f/d0ff4379-183a-47b9-a740-9ddc283ebc29.jpg
" target="_blank"> <img alt="Click for enlarged picture" src="
https://hosting.photobucket.com/95288841-8654-4bf7-8fc9-a4aa78dce87f/d0ff4379-183a-47b9-a740-9ddc283ebc29.jpg" width="600" /> </a></p>
<p>
<a href=" https://hosting.photobucket.com/95288841-8654-4bf7-8fc9-a4aa78dce87f/4333e95e-bbbd-4f47-aaea-38a9c99e54d8.jpg
" target="_blank"> <img alt="Click for enlarged picture" src="
https://hosting.photobucket.com/95288841-8654-4bf7-8fc9-a4aa78dce87f/4333e95e-bbbd-4f47-aaea-38a9c99e54d8.jpg" width="600" /> </a></p>
<p>
<a href=" https://hosting.photobucket.com/95288841-8654-4bf7-8fc9-a4aa78dce87f/1372f8a2-b222-48ee-ae45-a90b5a354ef7.jpg
" target="_blank"> <img alt="Click for enlarged picture" src="
https://hosting.photobucket.com/95288841-8654-4bf7-8fc9-a4aa78dce87f/1372f8a2-b222-48ee-ae45-a90b5a354ef7.jpg" width="600" /> </a></p>
<p>
<a href=" https://hosting.photobucket.com/95288841-8654-4bf7-8fc9-a4aa78dce87f/6a1b4fd1-d982-4b06-9c5f-3cd40d6bf10a.jpg
" target="_blank"> <img alt="Click for enlarged picture" src="
https://hosting.photobucket.com/95288841-8654-4bf7-8fc9-a4aa78dce87f/6a1b4fd1-d982-4b06-9c5f-3cd40d6bf10a.jpg" width="600" /> </a></p>
<p>
<a href=" https://hosting.photobucket.com/95288841-8654-4bf7-8fc9-a4aa78dce87f/c2ec45e1-e0f3-463a-b254-cb2a38b53e14.jpg
" target="_blank"> <img alt="Click for enlarged picture" src="
https://hosting.photobucket.com/95288841-8654-4bf7-8fc9-a4aa78dce87f/c2ec45e1-e0f3-463a-b254-cb2a38b53e14.jpg" width="600" /> </a></p>
<p>
<a href=" https://hosting.photobucket.com/95288841-8654-4bf7-8fc9-a4aa78dce87f/17553b9a-0592-4f6a-a097-3f1a97e161f3.jpg
" target="_blank"> <img alt="Click for enlarged picture" src="
https://hosting.photobucket.com/95288841-8654-4bf7-8fc9-a4aa78dce87f/17553b9a-0592-4f6a-a097-3f1a97e161f3.jpg" width="600" /> </a></p>
<p>
<a href=" https://hosting.photobucket.com/95288841-8654-4bf7-8fc9-a4aa78dce87f/8658bd6b-dff2-4d24-8473-928d44d44480.jpg
" target="_blank"> <img alt="Click for enlarged picture" src="
https://hosting.photobucket.com/95288841-8654-4bf7-8fc9-a4aa78dce87f/8658bd6b-dff2-4d24-8473-928d44d44480.jpg" width="600" /> </a></p>
<p>
<a href=" https://hosting.photobucket.com/95288841-8654-4bf7-8fc9-a4aa78dce87f/ecab0ea7-f75b-4e31-a520-d088ad39fa17.jpg
" target="_blank"> <img alt="Click for enlarged picture" src="
https://hosting.photobucket.com/95288841-8654-4bf7-8fc9-a4aa78dce87f/ecab0ea7-f75b-4e31-a520-d088ad39fa17.jpg" width="600" /> </a></p>
<p>
<a href=" https://hosting.photobucket.com/95288841-8654-4bf7-8fc9-a4aa78dce87f/9495a2f5-8a82-41f2-abf4-9ade3db41d87.jpg
" target="_blank"> <img alt="Click for enlarged picture" src="
https://hosting.photobucket.com/95288841-8654-4bf7-8fc9-a4aa78dce87f/9495a2f5-8a82-41f2-abf4-9ade3db41d87.jpg" width="600" /> </a></p>
<p>
<a href=" https://hosting.photobucket.com/95288841-8654-4bf7-8fc9-a4aa78dce87f/362cc6fd-a5dd-474b-9b9f-aeab27d6dcfa.jpg
" target="_blank"> <img alt="Click for enlarged picture" src="
https://hosting.photobucket.com/95288841-8654-4bf7-8fc9-a4aa78dce87f/362cc6fd-a5dd-474b-9b9f-aeab27d6dcfa.jpg" width="600" /> </a></p>
<p>
It was a special honor for us to host our guest exhibitor, Ninoslav Luk, a miniaturist from Poreč, who introduced himself to us with his collection of historical dioramas.</p>
<p>
<a href=" https://hosting.photobucket.com/95288841-8654-4bf7-8fc9-a4aa78dce87f/ba1353de-e2bd-4340-9121-9056e287ed4a.jpg
" target="_blank"> <img alt="Click for enlarged picture" src="
https://hosting.photobucket.com/95288841-8654-4bf7-8fc9-a4aa78dce87f/ba1353de-e2bd-4340-9121-9056e287ed4a.jpg" width="600" /> </a></p>
<p>
<a href=" https://hosting.photobucket.com/95288841-8654-4bf7-8fc9-a4aa78dce87f/cea18506-1b50-4e5b-955c-0b9ca02d7826.jpg
" target="_blank"> <img alt="Click for enlarged picture" src="
https://hosting.photobucket.com/95288841-8654-4bf7-8fc9-a4aa78dce87f/cea18506-1b50-4e5b-955c-0b9ca02d7826.jpg" width="600" /> </a></p>
<p>
<a href=" https://hosting.photobucket.com/95288841-8654-4bf7-8fc9-a4aa78dce87f/1be85b41-e3b6-4536-b141-cd0da6eb38c1.jpg
" target="_blank"> <img alt="Click for enlarged picture" src="
https://hosting.photobucket.com/95288841-8654-4bf7-8fc9-a4aa78dce87f/1be85b41-e3b6-4536-b141-cd0da6eb38c1.jpg" width="600" /> </a></p>
<p>
<a href=" https://hosting.photobucket.com/95288841-8654-4bf7-8fc9-a4aa78dce87f/9e93b87d-ff3c-4b7b-8f06-5f9d3464a134.jpg
" target="_blank"> <img alt="Click for enlarged picture" src="
https://hosting.photobucket.com/95288841-8654-4bf7-8fc9-a4aa78dce87f/9e93b87d-ff3c-4b7b-8f06-5f9d3464a134.jpg" width="600" /> </a></p>
<p>
During the first weekend of the Exhibition, 21-22.02., we held the 18th annual international miniature painting competition <strong>Black Queen Hobby and Miniature Painting Competition</strong>!</p>
<p>
<a href=" https://hosting.photobucket.com/95288841-8654-4bf7-8fc9-a4aa78dce87f/3056fb09-f66c-4dea-80a8-a4e72407429a.jpg
" target="_blank"> <img alt="Click for enlarged picture" src="
https://hosting.photobucket.com/95288841-8654-4bf7-8fc9-a4aa78dce87f/3056fb09-f66c-4dea-80a8-a4e72407429a.jpg" width="600" /> </a></p>
<p>
As contestants arrived and registered for the competition, our hardworking staff photographed all the exhibits before sorting them into categories and carefully placing them in glass cases. There was no shortage of morning neccessities like coffe and doughnuts.</p>
<p>
<</p>
<p>
<a href=" https://hosting.photobucket.com/95288841-8654-4bf7-8fc9-a4aa78dce87f/1118089c-2b46-4a2c-b17d-dc92b66d1ffc.jpg
" target="_blank"> <img alt="Click for enlarged picture" src="
https://hosting.photobucket.com/95288841-8654-4bf7-8fc9-a4aa78dce87f/1118089c-2b46-4a2c-b17d-dc92b66d1ffc.jpg" width="600" /> </a></p>
<p>
<a href=" https://hosting.photobucket.com/95288841-8654-4bf7-8fc9-a4aa78dce87f/9fd3c272-9a69-4532-a09d-36497a20a820.jpg
" target="_blank"> <img alt="Click for enlarged picture" src="
https://hosting.photobucket.com/95288841-8654-4bf7-8fc9-a4aa78dce87f/9fd3c272-9a69-4532-a09d-36497a20a820.jpg" width="600" /> </a></p>
<p>
<a href=" https://hosting.photobucket.com/95288841-8654-4bf7-8fc9-a4aa78dce87f/86995e80-c502-45fb-80f5-c8fda27da3f9.jpg
" target="_blank"> <img alt="Click for enlarged picture" src="
https://hosting.photobucket.com/95288841-8654-4bf7-8fc9-a4aa78dce87f/86995e80-c502-45fb-80f5-c8fda27da3f9.jpg" width="600" /> </a></p>
<p>
By noon, all the display cases were full and the competition could officially begin.</p>
<p>
<a href=" https://hosting.photobucket.com/95288841-8654-4bf7-8fc9-a4aa78dce87f/bce59a4f-c3e3-4708-a3d6-25e81a894c24.jpg
" target="_blank"> <img alt="Click for enlarged picture" src="
https://hosting.photobucket.com/95288841-8654-4bf7-8fc9-a4aa78dce87f/bce59a4f-c3e3-4708-a3d6-25e81a894c24.jpg" width="600" /> </a></p>
<p>
<a href=" https://hosting.photobucket.com/95288841-8654-4bf7-8fc9-a4aa78dce87f/16a0a094-01aa-4e52-82cf-fdab00d74711.jpg
" target="_blank"> <img alt="Click for enlarged picture" src="
https://hosting.photobucket.com/95288841-8654-4bf7-8fc9-a4aa78dce87f/16a0a094-01aa-4e52-82cf-fdab00d74711.jpg" width="600" /> </a></p>
<p>
<a href=" https://hosting.photobucket.com/95288841-8654-4bf7-8fc9-a4aa78dce87f/0d3f4042-ff77-48d0-b332-add0fd08f7c3.jpg
" target="_blank"> <img alt="Click for enlarged picture" src="
https://hosting.photobucket.com/95288841-8654-4bf7-8fc9-a4aa78dce87f/0d3f4042-ff77-48d0-b332-add0fd08f7c3.jpg" width="600" /> </a></p>
<p>
<a href=" https://hosting.photobucket.com/95288841-8654-4bf7-8fc9-a4aa78dce87f/3711baf8-93f2-434a-aea9-a95288ca04dd.jpg
" target="_blank"> <img alt="Click for enlarged picture" src="
https://hosting.photobucket.com/95288841-8654-4bf7-8fc9-a4aa78dce87f/3711baf8-93f2-434a-aea9-a95288ca04dd.jpg" width="600" /> </a></p>
<p>
<a href=" https://hosting.photobucket.com/95288841-8654-4bf7-8fc9-a4aa78dce87f/53113b97-ec06-4409-95ba-95a5ad3f9720.jpg
" target="_blank"> <img alt="Click for enlarged picture" src="
https://hosting.photobucket.com/95288841-8654-4bf7-8fc9-a4aa78dce87f/53113b97-ec06-4409-95ba-95a5ad3f9720.jpg" width="600" /> </a></p>
<p>
<a href=" https://hosting.photobucket.com/95288841-8654-4bf7-8fc9-a4aa78dce87f/ab127858-193d-4976-bdb2-e27302722fca.jpg
" target="_blank"> <img alt="Click for enlarged picture" src="
https://hosting.photobucket.com/95288841-8654-4bf7-8fc9-a4aa78dce87f/ab127858-193d-4976-bdb2-e27302722fca.jpg" width="600" /> </a></p>
<p>
<a href=" https://hosting.photobucket.com/95288841-8654-4bf7-8fc9-a4aa78dce87f/3735af11-3fb6-4772-a8ff-5e0ff6ddf03a.jpg
" target="_blank"> <img alt="Click for enlarged picture" src="
https://hosting.photobucket.com/95288841-8654-4bf7-8fc9-a4aa78dce87f/3735af11-3fb6-4772-a8ff-5e0ff6ddf03a.jpg" width="600" /> </a></p>
<p>
<strong>Back To Basics workshops for the young at the Black Queen</strong></p>
<p>
This year, throughout the weekend, we organized miniature painting workshops for the youngest, who were able to paint one of our own miniatures designed specifically for this program for the first time!</p>
<p>
<a href=" https://hosting.photobucket.com/95288841-8654-4bf7-8fc9-a4aa78dce87f/6999be0c-8cc6-4947-a423-9427a2299724.jpg
" target="_blank"> <img alt="Click for enlarged picture" src="
https://hosting.photobucket.com/95288841-8654-4bf7-8fc9-a4aa78dce87f/6999be0c-8cc6-4947-a423-9427a2299724.jpg" width="600" /> </a></p>
<p>
<a href="https://hosting.photobucket.com/95288841-8654-4bf7-8fc9-a4aa78dce87f/835b05a5-f171-49df-afa6-da0692b89074.jpg" target="_blank"><img alt="Click for enlarged picture" src="https://hosting.photobucket.com/95288841-8654-4bf7-8fc9-a4aa78dce87f/835b05a5-f171-49df-afa6-da0692b89074.jpg" width="600" /></a></p>
<p>
<a href=" https://hosting.photobucket.com/95288841-8654-4bf7-8fc9-a4aa78dce87f/ef5dde13-84ee-4ea0-b9f3-28aaf703ef6d.jpg
" target="_blank"> <img alt="Click for enlarged picture" src="
https://hosting.photobucket.com/95288841-8654-4bf7-8fc9-a4aa78dce87f/ef5dde13-84ee-4ea0-b9f3-28aaf703ef6d.jpg" width="600" /> </a></p>
<p>
<strong>SELLERS' COURT</strong></p>
<p>
During the weekend we hosted our sponsors with their sales stands: Swood.si and Carta Magica.</p>
<p>
<a href=" https://hosting.photobucket.com/95288841-8654-4bf7-8fc9-a4aa78dce87f/5ee9a49f-a387-435a-9110-572402b7191d.jpg
" target="_blank"> <img alt="Click for enlarged picture" src="
https://hosting.photobucket.com/95288841-8654-4bf7-8fc9-a4aa78dce87f/5ee9a49f-a387-435a-9110-572402b7191d.jpg" width="600" /> </a></p>
<p>
<a href=" https://hosting.photobucket.com/95288841-8654-4bf7-8fc9-a4aa78dce87f/47cf600f-b1eb-4655-bf06-305f6f21d5d2.jpg
" target="_blank"> <img alt="Click for enlarged picture" src="
https://hosting.photobucket.com/95288841-8654-4bf7-8fc9-a4aa78dce87f/47cf600f-b1eb-4655-bf06-305f6f21d5d2.jpg" width="600" /> </a></p>
<p>
<strong>MINIATURE PAINTING WORKSHOPS</strong></p>
<p>
The ZZTK premises allow workshops to be held during the weekend in the cinema hall in the basement, so we also organized demonstration workshops during the weekend. The lecturers' work was recorded with a camera and projected onto the projection screen in the hall. Many thanks to our domestic and international lecturers: Anže Zorko (SLO), doc.dr.sc. Winton Afrić (CRO), Ivan Knezović (UMS Agram) and Petar Knezoviću (CRO).</p>
<p>
<a href=" https://hosting.photobucket.com/95288841-8654-4bf7-8fc9-a4aa78dce87f/e8d835be-ec99-49d7-bc9b-086e38573d1a.jpg
" target="_blank"> <img alt="Click for enlarged picture" src="
https://hosting.photobucket.com/95288841-8654-4bf7-8fc9-a4aa78dce87f/e8d835be-ec99-49d7-bc9b-086e38573d1a.jpg" width="600" /> </a></p>
<p>
<a href=" https://hosting.photobucket.com/95288841-8654-4bf7-8fc9-a4aa78dce87f/f3eba4c1-4637-4da9-8360-75f430355af4.jpg" target="_blank"> <img alt="Click for enlarged picture" src="
https://hosting.photobucket.com/95288841-8654-4bf7-8fc9-a4aa78dce87f/f3eba4c1-4637-4da9-8360-75f430355af4.jpg" width="600" /> </a></p>
<p>
<a href=" https://hosting.photobucket.com/95288841-8654-4bf7-8fc9-a4aa78dce87f/ef523854-4030-4579-aa38-403afda86c91.jpg
" target="_blank"> <img alt="Click for enlarged picture" src="
https://hosting.photobucket.com/95288841-8654-4bf7-8fc9-a4aa78dce87f/ef523854-4030-4579-aa38-403afda86c91.jpg" width="600" /> </a></p>
<p>
<a href=" https://hosting.photobucket.com/95288841-8654-4bf7-8fc9-a4aa78dce87f/dd0943c2-f4a8-40c3-b641-f6dcdd200380.jpg
" target="_blank"> <img alt="Click for enlarged picture" src="
https://hosting.photobucket.com/95288841-8654-4bf7-8fc9-a4aa78dce87f/dd0943c2-f4a8-40c3-b641-f6dcdd200380.jpg" width="600" /> </a></p>
<p>
<a href=" https://hosting.photobucket.com/95288841-8654-4bf7-8fc9-a4aa78dce87f/08b1626a-f6c7-43c9-b718-3e9a41b55ca6.jpg
" target="_blank"> <img alt="Click for enlarged picture" src="
https://hosting.photobucket.com/95288841-8654-4bf7-8fc9-a4aa78dce87f/08b1626a-f6c7-43c9-b718-3e9a41b55ca6.jpg" width="600" /> </a></p>
<p>
<a href=" https://hosting.photobucket.com/95288841-8654-4bf7-8fc9-a4aa78dce87f/91aca7f3-1af6-486d-b174-65079a63a1ea.jpg
" target="_blank"> <img alt="Click for enlarged picture" src="
https://hosting.photobucket.com/95288841-8654-4bf7-8fc9-a4aa78dce87f/91aca7f3-1af6-486d-b174-65079a63a1ea.jpg" width="600" /> </a></p>
<p>
<a href=" https://hosting.photobucket.com/95288841-8654-4bf7-8fc9-a4aa78dce87f/3821f2fb-fbe7-4096-adbc-7d8c981a3b56.jpg
" target="_blank"> <img alt="Click for enlarged picture" src="
https://hosting.photobucket.com/95288841-8654-4bf7-8fc9-a4aa78dce87f/3821f2fb-fbe7-4096-adbc-7d8c981a3b56.jpg" width="600" /> </a></p>
<p>
<a href=" https://hosting.photobucket.com/95288841-8654-4bf7-8fc9-a4aa78dce87f/2c7bb3c5-c0ec-4a96-b6bd-6a90ce5ce154.jpg
" target="_blank"> <img alt="Click for enlarged picture" src="
https://hosting.photobucket.com/95288841-8654-4bf7-8fc9-a4aa78dce87f/2c7bb3c5-c0ec-4a96-b6bd-6a90ce5ce154.jpg" width="600" /> </a></p>
<p>
<a href=" https://hosting.photobucket.com/95288841-8654-4bf7-8fc9-a4aa78dce87f/b646f4ee-21aa-4d12-8db3-6d33351d5aeb.jpg
" target="_blank"> <img alt="Click for enlarged picture" src="
https://hosting.photobucket.com/95288841-8654-4bf7-8fc9-a4aa78dce87f/b646f4ee-21aa-4d12-8db3-6d33351d5aeb.jpg" width="600" /> </a></p>
<p>
<a href=" https://hosting.photobucket.com/95288841-8654-4bf7-8fc9-a4aa78dce87f/fb5efc01-32cc-4119-90e3-188f51b30237.jpg
" target="_blank"> <img alt="Click for enlarged picture" src="
https://hosting.photobucket.com/95288841-8654-4bf7-8fc9-a4aa78dce87f/fb5efc01-32cc-4119-90e3-188f51b30237.jpg" width="600" /> </a></p>
<p>
<strong>SPEED PAINTING COMPETITION</strong></p>
<p>
We organized a speed painting competition on Sunday afternoon. Participants had 60 minutes to paint one wizrad, a miniature of our own design and production.</p>
<p>
<a href=" https://hosting.photobucket.com/95288841-8654-4bf7-8fc9-a4aa78dce87f/106417a6-a047-4e0d-9f81-87858806052f.jpg
" target="_blank"> <img alt="Click for enlarged picture" src="
https://hosting.photobucket.com/95288841-8654-4bf7-8fc9-a4aa78dce87f/106417a6-a047-4e0d-9f81-87858806052f.jpg" width="600" /> </a></p>
<p>
<a href=" https://hosting.photobucket.com/95288841-8654-4bf7-8fc9-a4aa78dce87f/ac6853c7-6e34-4e07-a996-8d7d12744b67.jpg
" target="_blank"> <img alt="Click for enlarged picture" src="
https://hosting.photobucket.com/95288841-8654-4bf7-8fc9-a4aa78dce87f/ac6853c7-6e34-4e07-a996-8d7d12744b67.jpg" width="600" /> </a></p>
<p>
<a href=" https://hosting.photobucket.com/95288841-8654-4bf7-8fc9-a4aa78dce87f/ccb155fa-52c5-4a99-9515-f69a6836dce7.jpg
" target="_blank"> <img alt="Click for enlarged picture" src="
https://hosting.photobucket.com/95288841-8654-4bf7-8fc9-a4aa78dce87f/ccb155fa-52c5-4a99-9515-f69a6836dce7.jpg" width="600" /> </a></p>
<p>
<a href=" https://hosting.photobucket.com/95288841-8654-4bf7-8fc9-a4aa78dce87f/a29fedd0-97ea-45b1-85f9-7ea62188b2b2.jpg
" target="_blank"><img alt="Click for enlarged picture" src="
https://hosting.photobucket.com/95288841-8654-4bf7-8fc9-a4aa78dce87f/a29fedd0-97ea-45b1-85f9-7ea62188b2b2.jpg" width="600" /></a></p>
<p>
With that, we came to the very end of this wonderful weekend and all that was left was the awarding of prizes and recognition to the winners.</p>
<p>
<a href=" https://hosting.photobucket.com/95288841-8654-4bf7-8fc9-a4aa78dce87f/046ca4c8-0ae7-415e-abd3-e131d580c3ad.jpg
" target="_blank"> <img alt="Click for enlarged picture" src="
https://hosting.photobucket.com/95288841-8654-4bf7-8fc9-a4aa78dce87f/046ca4c8-0ae7-415e-abd3-e131d580c3ad.jpg" width="600" /> </a></p>
<p>
<a href=" https://hosting.photobucket.com/95288841-8654-4bf7-8fc9-a4aa78dce87f/cec0dcef-7acb-4a77-89de-271ed5410672.jpg
" target="_blank"> <img alt="Click for enlarged picture" src="
https://hosting.photobucket.com/95288841-8654-4bf7-8fc9-a4aa78dce87f/cec0dcef-7acb-4a77-89de-271ed5410672.jpg" width="600" /> </a></p>
<p>
<a href=" https://hosting.photobucket.com/95288841-8654-4bf7-8fc9-a4aa78dce87f/a495a5fc-31a2-4979-a970-0fa22c334354.jpg
" target="_blank"> <img alt="Click for enlarged picture" src="
https://hosting.photobucket.com/95288841-8654-4bf7-8fc9-a4aa78dce87f/a495a5fc-31a2-4979-a970-0fa22c334354.jpg" width="600" /> </a></p>
<p>
<strong>AGRAM ARENA – Leaving Asphodel Necropolis28 Campaign</strong></p>
<p>
During the weekend of February 21-22, we held a new international competition, Agram Arena! This time it was the turn of the tabletop strategy game Necropolis28, for which our members designed a two-day campaign. Each participant created their own gang of soldiers, and the vast majority also created their own boards.</p>
<p>
<a href=" https://hosting.photobucket.com/95288841-8654-4bf7-8fc9-a4aa78dce87f/ac69b182-4bfc-4575-a6d3-fb3c8baba342.jpg
" target="_blank"> <img alt="Click for enlarged picture" src="
https://hosting.photobucket.com/95288841-8654-4bf7-8fc9-a4aa78dce87f/ac69b182-4bfc-4575-a6d3-fb3c8baba342.jpg" width="600" /> </a></p>
<p>
<a href=" https://hosting.photobucket.com/95288841-8654-4bf7-8fc9-a4aa78dce87f/289fed7b-e058-42d8-ba2d-cbd0463e98da.jpg
" target="_blank"> <img alt="Click for enlarged picture" src="
https://hosting.photobucket.com/95288841-8654-4bf7-8fc9-a4aa78dce87f/289fed7b-e058-42d8-ba2d-cbd0463e98da.jpg" width="600" /> </a></p>
<p>
<a href=" https://hosting.photobucket.com/95288841-8654-4bf7-8fc9-a4aa78dce87f/d92ebbee-859d-4441-8386-3d760b20b7a7.jpg
" target="_blank"> <img alt="Click for enlarged picture" src="
https://hosting.photobucket.com/95288841-8654-4bf7-8fc9-a4aa78dce87f/d92ebbee-859d-4441-8386-3d760b20b7a7.jpg" width="600" /> </a></p>
<p>
<a href=" https://hosting.photobucket.com/95288841-8654-4bf7-8fc9-a4aa78dce87f/09c59798-7871-425e-a075-3ca1cd91768a.jpg
" target="_blank"> <img alt="Click for enlarged picture" src="
https://hosting.photobucket.com/95288841-8654-4bf7-8fc9-a4aa78dce87f/09c59798-7871-425e-a075-3ca1cd91768a.jpg" width="600" /> </a></p>
<p>
<a href=" https://hosting.photobucket.com/95288841-8654-4bf7-8fc9-a4aa78dce87f/b2f3edc8-5a23-4552-9a2a-4027b286f327.jpg
" target="_blank"> <img alt="Click for enlarged picture" src="
https://hosting.photobucket.com/95288841-8654-4bf7-8fc9-a4aa78dce87f/b2f3edc8-5a23-4552-9a2a-4027b286f327.jpg" width="600" /> </a></p>
<p>
<a href=" https://hosting.photobucket.com/95288841-8654-4bf7-8fc9-a4aa78dce87f/2a9f43ac-b531-4746-b7bb-ac5a3356aab0.jpg
" target="_blank"> <img alt="Click for enlarged picture" src="
https://hosting.photobucket.com/95288841-8654-4bf7-8fc9-a4aa78dce87f/2a9f43ac-b531-4746-b7bb-ac5a3356aab0.jpg" width="600" /> </a></p>
<p>
<strong>EVENTS ON WEEKDAYS DURING THE EXHIBITION </strong></p>
<p>
Over the next two weeks, our volunteers held open miniature painting workshops on weekdays from 4:00 PM to 8:00 PM. Miniature painting workstations were set up where our visitors could paint miniatures we had prepared (or their own if they had brought them) using our materials and tools.</p>
<p>
<a href=" https://hosting.photobucket.com/95288841-8654-4bf7-8fc9-a4aa78dce87f/6edf7765-42b5-417a-820f-fa5d907179a7.jpg
" target="_blank"> <img alt="Click for enlarged picture" src="
https://hosting.photobucket.com/95288841-8654-4bf7-8fc9-a4aa78dce87f/6edf7765-42b5-417a-820f-fa5d907179a7.jpg" width="600" /> </a></p>
<p>
<a href=" https://hosting.photobucket.com/95288841-8654-4bf7-8fc9-a4aa78dce87f/c084ebe2-f57b-4519-9b31-29bdc1155887.jpg
" target="_blank"> <img alt="Click for enlarged picture" src="
https://hosting.photobucket.com/95288841-8654-4bf7-8fc9-a4aa78dce87f/c084ebe2-f57b-4519-9b31-29bdc1155887.jpg" width="600" /> </a></p>
<p>
<a href=" https://hosting.photobucket.com/95288841-8654-4bf7-8fc9-a4aa78dce87f/37ff2272-f9b0-4b16-a363-1e6f6688c866.jpg
" target="_blank"> <img alt="Click for enlarged picture" src="
https://hosting.photobucket.com/95288841-8654-4bf7-8fc9-a4aa78dce87f/37ff2272-f9b0-4b16-a363-1e6f6688c866.jpg" width="600" /> </a></p>
<p>
<a href=" https://hosting.photobucket.com/95288841-8654-4bf7-8fc9-a4aa78dce87f/5f4f7968-ff50-4a01-98da-6ce8562930b4.jpg
" target="_blank"> <img alt="Click for enlarged picture" src="
https://hosting.photobucket.com/95288841-8654-4bf7-8fc9-a4aa78dce87f/5f4f7968-ff50-4a01-98da-6ce8562930b4.jpg" width="600" /> </a></p>
<p>
<a href=" https://hosting.photobucket.com/95288841-8654-4bf7-8fc9-a4aa78dce87f/cbb45319-d488-483c-bf9d-9af29852fc74.jpg
" target="_blank"> <img alt="Click for enlarged picture" src="
https://hosting.photobucket.com/95288841-8654-4bf7-8fc9-a4aa78dce87f/cbb45319-d488-483c-bf9d-9af29852fc74.jpg" width="600" /> </a></p>
<p>
<a href=" https://hosting.photobucket.com/95288841-8654-4bf7-8fc9-a4aa78dce87f/3dcca26c-d549-4af3-812a-a4a81b9a2310.jpg
" target="_blank"> <img alt="Click for enlarged picture" src="
https://hosting.photobucket.com/95288841-8654-4bf7-8fc9-a4aa78dce87f/3dcca26c-d549-4af3-812a-a4a81b9a2310.jpg" width="600" /> </a></p>
<p>
<a href=" https://hosting.photobucket.com/95288841-8654-4bf7-8fc9-a4aa78dce87f/4adf0fb6-3eab-4b40-b32d-d03eab4a9892.jpg
" target="_blank"> <img alt="Click for enlarged picture" src="
https://hosting.photobucket.com/95288841-8654-4bf7-8fc9-a4aa78dce87f/4adf0fb6-3eab-4b40-b32d-d03eab4a9892.jpg" width="600" /> </a></p>
<p>
<a href=" https://hosting.photobucket.com/95288841-8654-4bf7-8fc9-a4aa78dce87f/4732b58a-9a65-4d1c-a7d5-25513d34b108.jpg
" target="_blank"> <img alt="Click for enlarged picture" src="
https://hosting.photobucket.com/95288841-8654-4bf7-8fc9-a4aa78dce87f/4732b58a-9a65-4d1c-a7d5-25513d34b108.jpg" width="600" /> </a></p>
<p>
<a href=" https://hosting.photobucket.com/95288841-8654-4bf7-8fc9-a4aa78dce87f/274be330-31d5-4e25-95db-ec2f423a003c.jpg
" target="_blank"> <img alt="Click for enlarged picture" src="
https://hosting.photobucket.com/95288841-8654-4bf7-8fc9-a4aa78dce87f/274be330-31d5-4e25-95db-ec2f423a003c.jpg" width="600" /> </a></p>
<p>
<a href=" https://hosting.photobucket.com/95288841-8654-4bf7-8fc9-a4aa78dce87f/8e7b0a80-0f46-4d70-9789-a46976c713d2.jpg
" target="_blank"> <img alt="Click for enlarged picture" src="
https://hosting.photobucket.com/95288841-8654-4bf7-8fc9-a4aa78dce87f/8e7b0a80-0f46-4d70-9789-a46976c713d2.jpg" width="600" /> </a></p>
<p>
<a href=" https://hosting.photobucket.com/95288841-8654-4bf7-8fc9-a4aa78dce87f/8bbd4e96-b911-4f26-80fe-b1c57f29027b.jpg
" target="_blank"> <img alt="Click for enlarged picture" src="
https://hosting.photobucket.com/95288841-8654-4bf7-8fc9-a4aa78dce87f/8bbd4e96-b911-4f26-80fe-b1c57f29027b.jpg" width="600" /> </a></p>
<p>
<a href=" https://hosting.photobucket.com/95288841-8654-4bf7-8fc9-a4aa78dce87f/203a27be-8f10-459d-89b9-befb6b636b74.jpg
" target="_blank"> <img alt="Click for enlarged picture" src="
https://hosting.photobucket.com/95288841-8654-4bf7-8fc9-a4aa78dce87f/203a27be-8f10-459d-89b9-befb6b636b74.jpg" width="600" /> </a></p>
<p>
<a href=" https://hosting.photobucket.com/95288841-8654-4bf7-8fc9-a4aa78dce87f/5dc4358f-19d8-475f-a4af-9c29e9ed18d7.jpg
" target="_blank"> <img alt="Click for enlarged picture" src="
https://hosting.photobucket.com/95288841-8654-4bf7-8fc9-a4aa78dce87f/5dc4358f-19d8-475f-a4af-9c29e9ed18d7.jpg" width="600" /> </a></p>
<p>
<strong>BACK TO BASICS MINIATURE PAINTING WORKSHOPS FOR YOUNG</strong></p>
<p>
On weekdays from 17:00 to 18:00, we held our new workshops for the youngest, in which our youngest participants painted their first miniatures.</p>
<p>
<a href=" https://hosting.photobucket.com/95288841-8654-4bf7-8fc9-a4aa78dce87f/948af139-8fb5-4e28-a27c-404466e70d05.jpg
" target="_blank"> <img alt="Click for enlarged picture" src="
https://hosting.photobucket.com/95288841-8654-4bf7-8fc9-a4aa78dce87f/948af139-8fb5-4e28-a27c-404466e70d05.jpg" width="600" /> </a></p>
<p>
<a href=" https://hosting.photobucket.com/95288841-8654-4bf7-8fc9-a4aa78dce87f/bb3e20c2-bb21-4a3d-863a-74de08261467.jpg
" target="_blank"> <img alt="Click for enlarged picture" src="
https://hosting.photobucket.com/95288841-8654-4bf7-8fc9-a4aa78dce87f/bb3e20c2-bb21-4a3d-863a-74de08261467.jpg" width="600" /> </a></p>
<p>
<a href=" https://hosting.photobucket.com/95288841-8654-4bf7-8fc9-a4aa78dce87f/7316c760-98e3-4e3f-9261-d138aa7a5a6a.jpg
" target="_blank"> <img alt="Click for enlarged picture" src="
https://hosting.photobucket.com/95288841-8654-4bf7-8fc9-a4aa78dce87f/7316c760-98e3-4e3f-9261-d138aa7a5a6a.jpg" width="600" /> </a></p>
<p>
<a href=" https://hosting.photobucket.com/95288841-8654-4bf7-8fc9-a4aa78dce87f/68934b39-3d1f-4f43-b967-14b73c41a39e.jpg
" target="_blank"> <img alt="Click for enlarged picture" src="
https://hosting.photobucket.com/95288841-8654-4bf7-8fc9-a4aa78dce87f/68934b39-3d1f-4f43-b967-14b73c41a39e.jpg" width="600" /> </a></p>
<p>
<a href=" https://hosting.photobucket.com/95288841-8654-4bf7-8fc9-a4aa78dce87f/46125bce-a28d-494f-873a-3aeabdc1d6c2.jpg
" target="_blank"> <img alt="Click for enlarged picture" src="
https://hosting.photobucket.com/95288841-8654-4bf7-8fc9-a4aa78dce87f/46125bce-a28d-494f-873a-3aeabdc1d6c2.jpg" width="600" /> </a></p>
<p>
<a href=" https://hosting.photobucket.com/95288841-8654-4bf7-8fc9-a4aa78dce87f/3c58e0ad-77a9-44c8-b6bf-d9a55c514d43.jpg
" target="_blank"> <img alt="Click for enlarged picture" src="
https://hosting.photobucket.com/95288841-8654-4bf7-8fc9-a4aa78dce87f/3c58e0ad-77a9-44c8-b6bf-d9a55c514d43.jpg" width="600" /> </a></p>
<p>
<a href=" https://hosting.photobucket.com/95288841-8654-4bf7-8fc9-a4aa78dce87f/f891f0f0-051b-40ee-9676-cb03b0a9811b.jpg
" target="_blank"> <img alt="Click for enlarged picture" src="
https://hosting.photobucket.com/95288841-8654-4bf7-8fc9-a4aa78dce87f/f891f0f0-051b-40ee-9676-cb03b0a9811b.jpg" width="600" /> </a></p>
<p>
<strong>AGRAM LEGO SECTION lecture: FW-14b – An F1 racecar for the future</strong></p>
<p>
On Wednesday, February 25, 2026, as part of the activities of our Agram Lego Section, our resident mechanical engineer Marko Paunović gave a lecture on the topic of the F1 racecar from 1992. Admission to the lecture was free, and upon completion, a LEGO model of the racecar was made by members of the Lego section</p>
<p>
<a href=" https://hosting.photobucket.com/95288841-8654-4bf7-8fc9-a4aa78dce87f/b2e14b1c-daa4-4314-8685-184377bc7e28.jpg
" target="_blank"> <img alt="Click for enlarged picture" src="
https://hosting.photobucket.com/95288841-8654-4bf7-8fc9-a4aa78dce87f/b2e14b1c-daa4-4314-8685-184377bc7e28.jpg" width="600" /> </a></p>
<p>
<a href=" https://hosting.photobucket.com/95288841-8654-4bf7-8fc9-a4aa78dce87f/31fb439a-77d3-4418-83ff-66c3af279cca.jpg" target="_blank"> <img alt="Click for enlarged picture" src="
https://hosting.photobucket.com/95288841-8654-4bf7-8fc9-a4aa78dce87f/31fb439a-77d3-4418-83ff-66c3af279cca.jpg" width="600" /> </a></p>
<p>
<a href=" https://hosting.photobucket.com/95288841-8654-4bf7-8fc9-a4aa78dce87f/bfcaf282-6be8-4b52-a3ed-c91137457876.jpg
" target="_blank"> <img alt="Click for enlarged picture" src="
https://hosting.photobucket.com/95288841-8654-4bf7-8fc9-a4aa78dce87f/bfcaf282-6be8-4b52-a3ed-c91137457876.jpg" width="600" /> </a></p>
<p>
<a href=" https://hosting.photobucket.com/95288841-8654-4bf7-8fc9-a4aa78dce87f/ce70fc61-9e1a-4169-aaad-8b67417656c0.jpg
" target="_blank"> <img alt="Click for enlarged picture" src="
https://hosting.photobucket.com/95288841-8654-4bf7-8fc9-a4aa78dce87f/ce70fc61-9e1a-4169-aaad-8b67417656c0.jpg" width="600" /> </a></p>
<p>
<a href=" https://hosting.photobucket.com/95288841-8654-4bf7-8fc9-a4aa78dce87f/94ca0e36-8710-458d-8194-9f71299f4d74.jpg
" target="_blank"> <img alt="Click for enlarged picture" src="
https://hosting.photobucket.com/95288841-8654-4bf7-8fc9-a4aa78dce87f/94ca0e36-8710-458d-8194-9f71299f4d74.jpg" width="600" /> </a></p>
<p>
<a href=" https://hosting.photobucket.com/95288841-8654-4bf7-8fc9-a4aa78dce87f/c6771f72-7191-4ca3-a792-3bb1ab3897b1.jpg
" target="_blank"> <img alt="Click for enlarged picture" src="
https://hosting.photobucket.com/95288841-8654-4bf7-8fc9-a4aa78dce87f/c6771f72-7191-4ca3-a792-3bb1ab3897b1.jpg" width="600" /> </a></p>
<p>
<a href=" https://hosting.photobucket.com/95288841-8654-4bf7-8fc9-a4aa78dce87f/c8fcfcb6-09f2-4398-a2fb-fa5065771e01.jpg
" target="_blank"> <img alt="Click for enlarged picture" src="
https://hosting.photobucket.com/95288841-8654-4bf7-8fc9-a4aa78dce87f/c8fcfcb6-09f2-4398-a2fb-fa5065771e01.jpg" width="600" /> </a></p>
<p>
<a href=" https://hosting.photobucket.com/95288841-8654-4bf7-8fc9-a4aa78dce87f/d7e187a8-d5b1-433b-b30d-091e54dcdddf.jpg
" target="_blank"> <img alt="Click for enlarged picture" src="
https://hosting.photobucket.com/95288841-8654-4bf7-8fc9-a4aa78dce87f/d7e187a8-d5b1-433b-b30d-091e54dcdddf.jpg" width="600" /> </a></p>
<p>
During the second weekend of the Exhibition, 28.02.-01.03., we organized a <strong>MINIATURE PAINTING WORKSHOP - Grimdark</strong>.</p>
<p>
The workshop was held over two days (the entire weekend) and participants painted up to three different figures for the game Trench Crusade. The focus of these lectures was on painting the popular grimdark style minis. The workshop presented paints and equipment, figure preparation, several miniature painting techniques from basic to advanced, and techniques and tricks for quickly and efficiently painting larger quantities of figures at once. Water-based acrylic paints were used as part of the workshop.</p>
<p>
<a href=" https://hosting.photobucket.com/95288841-8654-4bf7-8fc9-a4aa78dce87f/733d94b2-8e8d-4a4e-accd-b9168e32577e.jpg
" target="_blank"> <img alt="Click for enlarged picture" src="
https://hosting.photobucket.com/95288841-8654-4bf7-8fc9-a4aa78dce87f/733d94b2-8e8d-4a4e-accd-b9168e32577e.jpg
" width="600" /> </a></p>
<p>
<a href=" https://hosting.photobucket.com/95288841-8654-4bf7-8fc9-a4aa78dce87f/41020062-45b9-41cd-a357-fa23a389f390.jpg
" target="_blank"> <img alt="Click for enlarged picture" src="
https://hosting.photobucket.com/95288841-8654-4bf7-8fc9-a4aa78dce87f/41020062-45b9-41cd-a357-fa23a389f390.jpg
" width="600" /> </a></p>
<p>
<a href=" https://hosting.photobucket.com/95288841-8654-4bf7-8fc9-a4aa78dce87f/0c07cc55-596d-494d-972b-cd6a0dd6b8b7.jpg
" target="_blank"> <img alt="Click for enlarged picture" src="
https://hosting.photobucket.com/95288841-8654-4bf7-8fc9-a4aa78dce87f/0c07cc55-596d-494d-972b-cd6a0dd6b8b7.jpg" width="600" /> </a></p>
<p>
<a href=" https://hosting.photobucket.com/95288841-8654-4bf7-8fc9-a4aa78dce87f/c17dd356-08b1-48e1-b895-6296aed7f818.jpg
" target="_blank"> <img alt="Click for enlarged picture" src="
https://hosting.photobucket.com/95288841-8654-4bf7-8fc9-a4aa78dce87f/c17dd356-08b1-48e1-b895-6296aed7f818.jpg" width="600" /> </a></p>
<p>
On Wednesday 04.03.2026. the annual <strong>session of the Assembly</strong> was held, where we determined the guidelines for work in 2026.</p>
<p>
,</p>
<p>
<a href=" https://hosting.photobucket.com/95288841-8654-4bf7-8fc9-a4aa78dce87f/59484bd0-7edc-4aed-a04e-ae42900ba3e6.jpg
" target="_blank"> <img alt="Click for enlarged picture" src="
https://hosting.photobucket.com/95288841-8654-4bf7-8fc9-a4aa78dce87f/59484bd0-7edc-4aed-a04e-ae42900ba3e6.jpg
" width="600" /> </a></p>
<p>
On Sunday 08.03.2026. The exhibition was over, our exhibits safely stored, and the Gallery cleaned.</p>
<p>
<a href=" https://hosting.photobucket.com/95288841-8654-4bf7-8fc9-a4aa78dce87f/98af4280-0956-4cdb-b4a9-da40e3a5a44a.jpg
" target="_blank"> <img alt="Click for enlarged picture" src="
https://hosting.photobucket.com/95288841-8654-4bf7-8fc9-a4aa78dce87f/98af4280-0956-4cdb-b4a9-da40e3a5a44a.jpg" width="600" /> </a></p>
<p>
<a href=" https://hosting.photobucket.com/95288841-8654-4bf7-8fc9-a4aa78dce87f/3259b35e-1fc2-4a99-a3c5-c7984958d72b.jpg
" target="_blank"> <img alt="Click for enlarged picture" src="
https://hosting.photobucket.com/95288841-8654-4bf7-8fc9-a4aa78dce87f/3259b35e-1fc2-4a99-a3c5-c7984958d72b.jpg" width="600" /> </a></p>
<p>
The most important part of every year when holding this Exhibition is the social aspect, the socializing of our members both among themselves and with our international friends who visit us! With these few photos from our joint gatherings, we greet you until next year!</p>
<p>
<a href=" https://hosting.photobucket.com/95288841-8654-4bf7-8fc9-a4aa78dce87f/b9168e23-79b2-4d81-8a7d-7534062881a7.jpg
" target="_blank"> <img alt="Click for enlarged picture" src="
https://hosting.photobucket.com/95288841-8654-4bf7-8fc9-a4aa78dce87f/b9168e23-79b2-4d81-8a7d-7534062881a7.jpg " width="600" /> </a></p>
<p>
<a href=" https://hosting.photobucket.com/95288841-8654-4bf7-8fc9-a4aa78dce87f/edff925e-916c-4d78-953e-210abf3753d4.jpg
" target="_blank"> <img alt="Click for enlarged picture" src="
https://hosting.photobucket.com/95288841-8654-4bf7-8fc9-a4aa78dce87f/edff925e-916c-4d78-953e-210abf3753d4.jpg " width="600" /> </a></p>
<p>
<a href=" https://hosting.photobucket.com/95288841-8654-4bf7-8fc9-a4aa78dce87f/8bcb48fa-466b-43f8-8a4b-f15f6794b21e.jpg
" target="_blank"> <img alt="Click for enlarged picture" src="
https://hosting.photobucket.com/95288841-8654-4bf7-8fc9-a4aa78dce87f/8bcb48fa-466b-43f8-8a4b-f15f6794b21e.jpg" width="600" /> </a></p>
"
["content_hrv"]=>
string(42265) "<p>
<a href=" https://hosting.photobucket.com/95288841-8654-4bf7-8fc9-a4aa78dce87f/dc756f84-867d-4df4-acd8-5d43775cafc2.jpg
" target="_blank"> <img alt="Click for enlarged picture" src="
https://hosting.photobucket.com/95288841-8654-4bf7-8fc9-a4aa78dce87f/dc756f84-867d-4df4-acd8-5d43775cafc2.jpg" width="600" /> </a></p>
<p>
<strong>Izložba minijatura i maketa "Agram 2026"</strong> održala se ove godine od 19.2. do 08.03. Postavljanje izložbe je održano u srijedu 18.2. i sudjelovao je velik broj članova kao i prijatelja Udruge koji su izlagali svoje radove.</p>
<p>
<a href=" https://hosting.photobucket.com/95288841-8654-4bf7-8fc9-a4aa78dce87f/8529d6d4-76ea-4872-a9e6-748e04223a4e.jpg
" target="_blank"> <img alt="Click for enlarged picture" src="
https://hosting.photobucket.com/95288841-8654-4bf7-8fc9-a4aa78dce87f/8529d6d4-76ea-4872-a9e6-748e04223a4e.jpg
" width="600" /> </a></p>
<p>
<a href=" https://hosting.photobucket.com/95288841-8654-4bf7-8fc9-a4aa78dce87f/f3038937-f001-4ceb-b725-a330fcd64cee.jpg
" target="_blank"> <img alt="Click for enlarged picture" src="
https://hosting.photobucket.com/95288841-8654-4bf7-8fc9-a4aa78dce87f/f3038937-f001-4ceb-b725-a330fcd64cee.jpg
" width="600" /> </a></p>
<p>
<a href=" https://hosting.photobucket.com/95288841-8654-4bf7-8fc9-a4aa78dce87f/3575379e-e068-49e2-9d4d-c9a49531fdc2.jpg
" target="_blank"> <img alt="Click for enlarged picture" src="
https://hosting.photobucket.com/95288841-8654-4bf7-8fc9-a4aa78dce87f/3575379e-e068-49e2-9d4d-c9a49531fdc2.jpg" width="600" /> </a></p>
<p>
<a href=" https://hosting.photobucket.com/95288841-8654-4bf7-8fc9-a4aa78dce87f/e51713c7-2add-4f8f-ae37-e6eba25badff.jpg
" target="_blank"> <img alt="Click for enlarged picture" src="
https://hosting.photobucket.com/95288841-8654-4bf7-8fc9-a4aa78dce87f/e51713c7-2add-4f8f-ae37-e6eba25badff.jpg" width="600" /> </a></p>
<p>
<a href=" https://hosting.photobucket.com/95288841-8654-4bf7-8fc9-a4aa78dce87f/9c0bb546-50a8-483d-aeab-ab3b2ce9f094.jpg
" target="_blank"> <img alt="Click for enlarged picture" src="
https://hosting.photobucket.com/95288841-8654-4bf7-8fc9-a4aa78dce87f/9c0bb546-50a8-483d-aeab-ab3b2ce9f094.jpg" width="600" /> </a></p>
<p>
Otvorenje Izložbe održalo se u četvrtak, 19.2.2026. s početkom u 18:00h. Izložba je organizirana povodom našeg dvadeset trećeg rođendana.</p>
<p>
<a href=" https://hosting.photobucket.com/95288841-8654-4bf7-8fc9-a4aa78dce87f/71c7bfc2-1ffc-43b9-9d5a-53e009f6b86d.jpg
" target="_blank"> <img alt="Click for enlarged picture" src="
https://hosting.photobucket.com/95288841-8654-4bf7-8fc9-a4aa78dce87f/71c7bfc2-1ffc-43b9-9d5a-53e009f6b86d.jpg" width="600" /> </a></p>
<p>
<a href=" https://hosting.photobucket.com/95288841-8654-4bf7-8fc9-a4aa78dce87f/007b4701-1d7c-4a67-a599-0539a2aa3191.jpg
" target="_blank"> <img alt="Click for enlarged picture" src="
https://hosting.photobucket.com/95288841-8654-4bf7-8fc9-a4aa78dce87f/007b4701-1d7c-4a67-a599-0539a2aa3191.jpg" width="600" /> </a></p>
<p>
<a href=" https://hosting.photobucket.com/95288841-8654-4bf7-8fc9-a4aa78dce87f/2c8090e2-8b95-4368-bb48-98876d680e15.jpg
" target="_blank"> <img alt="Click for enlarged picture" src="
https://hosting.photobucket.com/95288841-8654-4bf7-8fc9-a4aa78dce87f/2c8090e2-8b95-4368-bb48-98876d680e15.jpg" width="600" /> </a></p>
<p>
<a href=" https://hosting.photobucket.com/95288841-8654-4bf7-8fc9-a4aa78dce87f/375768ad-a8bb-49bf-9845-e46c896ba7ec.jpg
" target="_blank"> <img alt="Click for enlarged picture" src="
https://hosting.photobucket.com/95288841-8654-4bf7-8fc9-a4aa78dce87f/375768ad-a8bb-49bf-9845-e46c896ba7ec.jpg" width="600" /> </a></p>
<p>
<a href=" https://hosting.photobucket.com/95288841-8654-4bf7-8fc9-a4aa78dce87f/a93de974-4ccb-4876-85b0-4d066ae402b3.jpg
" target="_blank"> <img alt="Click for enlarged picture" src="
https://hosting.photobucket.com/95288841-8654-4bf7-8fc9-a4aa78dce87f/a93de974-4ccb-4876-85b0-4d066ae402b3.jpg" width="600" /> </a></p>
<p>
<a href=" https://hosting.photobucket.com/95288841-8654-4bf7-8fc9-a4aa78dce87f/d323ccc9-1b9a-4cb2-8adf-7019b0e217f4.jpg
" target="_blank"> <img alt="Click for enlarged picture" src="
https://hosting.photobucket.com/95288841-8654-4bf7-8fc9-a4aa78dce87f/d323ccc9-1b9a-4cb2-8adf-7019b0e217f4.jpg" width="600" /> </a></p>
<p>
<a href=" https://hosting.photobucket.com/95288841-8654-4bf7-8fc9-a4aa78dce87f/a5a66447-2d76-47ae-866d-4d512ef469a5.jpg
" target="_blank"> <img alt="Click for enlarged picture" src="
https://hosting.photobucket.com/95288841-8654-4bf7-8fc9-a4aa78dce87f/a5a66447-2d76-47ae-866d-4d512ef469a5.jpg" width="600" /> </a></p>
<p>
<a href=" https://hosting.photobucket.com/95288841-8654-4bf7-8fc9-a4aa78dce87f/3e7bcfc9-ba02-4f94-a6c3-79dfaea3639e.jpg
" target="_blank"> <img alt="Click for enlarged picture" src="
https://hosting.photobucket.com/95288841-8654-4bf7-8fc9-a4aa78dce87f/3e7bcfc9-ba02-4f94-a6c3-79dfaea3639e.jpg" width="600" /> </a></p>
<p>
<a href=" https://hosting.photobucket.com/95288841-8654-4bf7-8fc9-a4aa78dce87f/24e79466-4a9e-4b10-970c-caad235d260d.jpg
" target="_blank"> <img alt="Click for enlarged picture" src="
https://hosting.photobucket.com/95288841-8654-4bf7-8fc9-a4aa78dce87f/24e79466-4a9e-4b10-970c-caad235d260d.jpg" width="600" /> </a></p>
<p>
Kao i uvijek, Izložba je prikazivala presjek rada Udruge, njenih članova, polaznika njenih tečajeva i radionica te članova FB grupe Miniature Painters Croatia. U velikom broju vitrina našle su se brojne minijature za stolne strateške igre, igre na tabli, a cijela jedna vitrina posvećena je nagrađenim izlošcima sa prethodnih minijaturističkih natjecanja. Nekoliko vitrina bilo je posvećeno projektima koje Udruga već 23 godinu provodi poput Knjižnice i čitaonice UMS „Agram“, Radionice za izradu prostornih maketa i Radionice bojanja minijatura, ali i novih poput Agram Group Build, Agram Lego Sekcije i Back to Basics radionica bojanja za najmlađe.</p>
<p>
<a href=" https://hosting.photobucket.com/95288841-8654-4bf7-8fc9-a4aa78dce87f/fca84936-af71-44d3-9a4c-faeb26163899.jpg
" target="_blank"> <img alt="Click for enlarged picture" src="
https://hosting.photobucket.com/95288841-8654-4bf7-8fc9-a4aa78dce87f/fca84936-af71-44d3-9a4c-faeb26163899.jpg" width="600" /> </a></p>
<p>
<a href=" https://hosting.photobucket.com/95288841-8654-4bf7-8fc9-a4aa78dce87f/459bc5ac-8702-46f9-93b4-547deaabdef4.jpg
" target="_blank"> <img alt="Click for enlarged picture" src="
https://hosting.photobucket.com/95288841-8654-4bf7-8fc9-a4aa78dce87f/459bc5ac-8702-46f9-93b4-547deaabdef4.jpg" width="600" /> </a></p>
<p>
<a href=" https://hosting.photobucket.com/95288841-8654-4bf7-8fc9-a4aa78dce87f/91a04363-b2ef-4635-a046-7edf25ce7808.jpg
" target="_blank"> <img alt="Click for enlarged picture" src="
https://hosting.photobucket.com/95288841-8654-4bf7-8fc9-a4aa78dce87f/91a04363-b2ef-4635-a046-7edf25ce7808.jpg" width="600" /> </a></p>
<p>
<a href=" https://hosting.photobucket.com/95288841-8654-4bf7-8fc9-a4aa78dce87f/73256af5-fd5d-40b5-95e1-120e49c9be87.jpg
" target="_blank"> <img alt="Click for enlarged picture" src="
https://hosting.photobucket.com/95288841-8654-4bf7-8fc9-a4aa78dce87f/73256af5-fd5d-40b5-95e1-120e49c9be87.jpg" width="600" /> </a></p>
<p>
<a href=" https://hosting.photobucket.com/95288841-8654-4bf7-8fc9-a4aa78dce87f/979f9be5-23f3-4df9-91dc-ab71d6a10d64.jpg
" target="_blank"> <img alt="Click for enlarged picture" src="
https://hosting.photobucket.com/95288841-8654-4bf7-8fc9-a4aa78dce87f/979f9be5-23f3-4df9-91dc-ab71d6a10d64.jpg" width="600" /> </a></p>
<p>
<a href=" https://hosting.photobucket.com/95288841-8654-4bf7-8fc9-a4aa78dce87f/d0ff4379-183a-47b9-a740-9ddc283ebc29.jpg
" target="_blank"> <img alt="Click for enlarged picture" src="
https://hosting.photobucket.com/95288841-8654-4bf7-8fc9-a4aa78dce87f/d0ff4379-183a-47b9-a740-9ddc283ebc29.jpg" width="600" /> </a></p>
<p>
<a href=" https://hosting.photobucket.com/95288841-8654-4bf7-8fc9-a4aa78dce87f/4333e95e-bbbd-4f47-aaea-38a9c99e54d8.jpg
" target="_blank"> <img alt="Click for enlarged picture" src="
https://hosting.photobucket.com/95288841-8654-4bf7-8fc9-a4aa78dce87f/4333e95e-bbbd-4f47-aaea-38a9c99e54d8.jpg" width="600" /> </a></p>
<p>
<a href=" https://hosting.photobucket.com/95288841-8654-4bf7-8fc9-a4aa78dce87f/1372f8a2-b222-48ee-ae45-a90b5a354ef7.jpg
" target="_blank"> <img alt="Click for enlarged picture" src="
https://hosting.photobucket.com/95288841-8654-4bf7-8fc9-a4aa78dce87f/1372f8a2-b222-48ee-ae45-a90b5a354ef7.jpg" width="600" /> </a></p>
<p>
<a href=" https://hosting.photobucket.com/95288841-8654-4bf7-8fc9-a4aa78dce87f/6a1b4fd1-d982-4b06-9c5f-3cd40d6bf10a.jpg
" target="_blank"> <img alt="Click for enlarged picture" src="
https://hosting.photobucket.com/95288841-8654-4bf7-8fc9-a4aa78dce87f/6a1b4fd1-d982-4b06-9c5f-3cd40d6bf10a.jpg" width="600" /> </a></p>
<p>
<a href=" https://hosting.photobucket.com/95288841-8654-4bf7-8fc9-a4aa78dce87f/c2ec45e1-e0f3-463a-b254-cb2a38b53e14.jpg
" target="_blank"> <img alt="Click for enlarged picture" src="
https://hosting.photobucket.com/95288841-8654-4bf7-8fc9-a4aa78dce87f/c2ec45e1-e0f3-463a-b254-cb2a38b53e14.jpg" width="600" /> </a></p>
<p>
<a href=" https://hosting.photobucket.com/95288841-8654-4bf7-8fc9-a4aa78dce87f/17553b9a-0592-4f6a-a097-3f1a97e161f3.jpg
" target="_blank"> <img alt="Click for enlarged picture" src="
https://hosting.photobucket.com/95288841-8654-4bf7-8fc9-a4aa78dce87f/17553b9a-0592-4f6a-a097-3f1a97e161f3.jpg" width="600" /> </a></p>
<p>
<a href=" https://hosting.photobucket.com/95288841-8654-4bf7-8fc9-a4aa78dce87f/8658bd6b-dff2-4d24-8473-928d44d44480.jpg
" target="_blank"> <img alt="Click for enlarged picture" src="
https://hosting.photobucket.com/95288841-8654-4bf7-8fc9-a4aa78dce87f/8658bd6b-dff2-4d24-8473-928d44d44480.jpg" width="600" /> </a></p>
<p>
<a href=" https://hosting.photobucket.com/95288841-8654-4bf7-8fc9-a4aa78dce87f/ecab0ea7-f75b-4e31-a520-d088ad39fa17.jpg
" target="_blank"> <img alt="Click for enlarged picture" src="
https://hosting.photobucket.com/95288841-8654-4bf7-8fc9-a4aa78dce87f/ecab0ea7-f75b-4e31-a520-d088ad39fa17.jpg" width="600" /> </a></p>
<p>
<a href=" https://hosting.photobucket.com/95288841-8654-4bf7-8fc9-a4aa78dce87f/9495a2f5-8a82-41f2-abf4-9ade3db41d87.jpg
" target="_blank"> <img alt="Click for enlarged picture" src="
https://hosting.photobucket.com/95288841-8654-4bf7-8fc9-a4aa78dce87f/9495a2f5-8a82-41f2-abf4-9ade3db41d87.jpg" width="600" /> </a></p>
<p>
<a href=" https://hosting.photobucket.com/95288841-8654-4bf7-8fc9-a4aa78dce87f/362cc6fd-a5dd-474b-9b9f-aeab27d6dcfa.jpg
" target="_blank"> <img alt="Click for enlarged picture" src="
https://hosting.photobucket.com/95288841-8654-4bf7-8fc9-a4aa78dce87f/362cc6fd-a5dd-474b-9b9f-aeab27d6dcfa.jpg" width="600" /> </a></p>
<p>
Posebna čast nam je bila ugostiti našeg gosta izlagača, Ninoslava Luka minijaturista iz Poreča koji nam se predstavio svojom kolekcijom povijesnih diorama.</p>
<p>
<a href=" https://hosting.photobucket.com/95288841-8654-4bf7-8fc9-a4aa78dce87f/ba1353de-e2bd-4340-9121-9056e287ed4a.jpg
" target="_blank"> <img alt="Click for enlarged picture" src="
https://hosting.photobucket.com/95288841-8654-4bf7-8fc9-a4aa78dce87f/ba1353de-e2bd-4340-9121-9056e287ed4a.jpg" width="600" /> </a></p>
<p>
<a href=" https://hosting.photobucket.com/95288841-8654-4bf7-8fc9-a4aa78dce87f/cea18506-1b50-4e5b-955c-0b9ca02d7826.jpg
" target="_blank"> <img alt="Click for enlarged picture" src="
https://hosting.photobucket.com/95288841-8654-4bf7-8fc9-a4aa78dce87f/cea18506-1b50-4e5b-955c-0b9ca02d7826.jpg" width="600" /> </a></p>
<p>
<a href=" https://hosting.photobucket.com/95288841-8654-4bf7-8fc9-a4aa78dce87f/1be85b41-e3b6-4536-b141-cd0da6eb38c1.jpg
" target="_blank"> <img alt="Click for enlarged picture" src="
https://hosting.photobucket.com/95288841-8654-4bf7-8fc9-a4aa78dce87f/1be85b41-e3b6-4536-b141-cd0da6eb38c1.jpg" width="600" /> </a></p>
<p>
<a href=" https://hosting.photobucket.com/95288841-8654-4bf7-8fc9-a4aa78dce87f/9e93b87d-ff3c-4b7b-8f06-5f9d3464a134.jpg
" target="_blank"> <img alt="Click for enlarged picture" src="
https://hosting.photobucket.com/95288841-8654-4bf7-8fc9-a4aa78dce87f/9e93b87d-ff3c-4b7b-8f06-5f9d3464a134.jpg" width="600" /> </a></p>
<p>
Tijekom prvog vikenda Izložbe, 21.-22.02.,održali smo 20. godišnje međunarodno natjecanje u bojanju minijatura <strong>Black Queen Hobby and Miniature Painting Competition</strong>!</p>
<p>
<a href=" https://hosting.photobucket.com/95288841-8654-4bf7-8fc9-a4aa78dce87f/3056fb09-f66c-4dea-80a8-a4e72407429a.jpg
" target="_blank"> <img alt="Click for enlarged picture" src="
https://hosting.photobucket.com/95288841-8654-4bf7-8fc9-a4aa78dce87f/3056fb09-f66c-4dea-80a8-a4e72407429a.jpg" width="600" /> </a></p>
<p>
Kako su natjecatelji pristizali i prijavljivali se na natjecanje, naše vrijedno osoblje je fotografiralo sve izloške prije nego li su ih rasporedili po kategorijama i pažljivo ih postavili u staklene vitrine. Niti jutarnja okrijepa nije usfalila zahvaljujući našim revnim volonterima.</p>
<p>
<a href=" https://hosting.photobucket.com/95288841-8654-4bf7-8fc9-a4aa78dce87f/1118089c-2b46-4a2c-b17d-dc92b66d1ffc.jpg
" target="_blank"> <img alt="Click for enlarged picture" src="
https://hosting.photobucket.com/95288841-8654-4bf7-8fc9-a4aa78dce87f/1118089c-2b46-4a2c-b17d-dc92b66d1ffc.jpg" width="600" /> </a></p>
<p>
<a href=" https://hosting.photobucket.com/95288841-8654-4bf7-8fc9-a4aa78dce87f/9fd3c272-9a69-4532-a09d-36497a20a820.jpg
" target="_blank"> <img alt="Click for enlarged picture" src="
https://hosting.photobucket.com/95288841-8654-4bf7-8fc9-a4aa78dce87f/9fd3c272-9a69-4532-a09d-36497a20a820.jpg" width="600" /> </a></p>
<p>
<a href=" https://hosting.photobucket.com/95288841-8654-4bf7-8fc9-a4aa78dce87f/86995e80-c502-45fb-80f5-c8fda27da3f9.jpg
" target="_blank"> <img alt="Click for enlarged picture" src="
https://hosting.photobucket.com/95288841-8654-4bf7-8fc9-a4aa78dce87f/86995e80-c502-45fb-80f5-c8fda27da3f9.jpg" width="600" /> </a></p>
<p>
U podne, sve vitrine su bile pune i natjecanje je moglo službeno početi.</p>
<p>
<a href=" https://hosting.photobucket.com/95288841-8654-4bf7-8fc9-a4aa78dce87f/bce59a4f-c3e3-4708-a3d6-25e81a894c24.jpg
" target="_blank"> <img alt="Click for enlarged picture" src="
https://hosting.photobucket.com/95288841-8654-4bf7-8fc9-a4aa78dce87f/bce59a4f-c3e3-4708-a3d6-25e81a894c24.jpg" width="600" /> </a></p>
<p>
<a href=" https://hosting.photobucket.com/95288841-8654-4bf7-8fc9-a4aa78dce87f/16a0a094-01aa-4e52-82cf-fdab00d74711.jpg
" target="_blank"> <img alt="Click for enlarged picture" src="
https://hosting.photobucket.com/95288841-8654-4bf7-8fc9-a4aa78dce87f/16a0a094-01aa-4e52-82cf-fdab00d74711.jpg" width="600" /> </a></p>
<p>
<a href=" https://hosting.photobucket.com/95288841-8654-4bf7-8fc9-a4aa78dce87f/0d3f4042-ff77-48d0-b332-add0fd08f7c3.jpg
" target="_blank"> <img alt="Click for enlarged picture" src="
https://hosting.photobucket.com/95288841-8654-4bf7-8fc9-a4aa78dce87f/0d3f4042-ff77-48d0-b332-add0fd08f7c3.jpg" width="600" /> </a></p>
<p>
<a href=" https://hosting.photobucket.com/95288841-8654-4bf7-8fc9-a4aa78dce87f/3711baf8-93f2-434a-aea9-a95288ca04dd.jpg
" target="_blank"> <img alt="Click for enlarged picture" src="
https://hosting.photobucket.com/95288841-8654-4bf7-8fc9-a4aa78dce87f/3711baf8-93f2-434a-aea9-a95288ca04dd.jpg" width="600" /> </a></p>
<p>
<a href=" https://hosting.photobucket.com/95288841-8654-4bf7-8fc9-a4aa78dce87f/53113b97-ec06-4409-95ba-95a5ad3f9720.jpg
" target="_blank"> <img alt="Click for enlarged picture" src="
https://hosting.photobucket.com/95288841-8654-4bf7-8fc9-a4aa78dce87f/53113b97-ec06-4409-95ba-95a5ad3f9720.jpg" width="600" /> </a></p>
<p>
<a href=" https://hosting.photobucket.com/95288841-8654-4bf7-8fc9-a4aa78dce87f/ab127858-193d-4976-bdb2-e27302722fca.jpg
" target="_blank"> <img alt="Click for enlarged picture" src="
https://hosting.photobucket.com/95288841-8654-4bf7-8fc9-a4aa78dce87f/ab127858-193d-4976-bdb2-e27302722fca.jpg" width="600" /> </a></p>
<p>
<a href=" https://hosting.photobucket.com/95288841-8654-4bf7-8fc9-a4aa78dce87f/3735af11-3fb6-4772-a8ff-5e0ff6ddf03a.jpg
" target="_blank"> <img alt="Click for enlarged picture" src="
https://hosting.photobucket.com/95288841-8654-4bf7-8fc9-a4aa78dce87f/3735af11-3fb6-4772-a8ff-5e0ff6ddf03a.jpg" width="600" /> </a></p>
<p>
<strong>Back To Basics radionice za najmlađe na Black Queen</strong></p>
<p>
Ove godine smo tijekom cijelog vikenda organizirali radionice bojanja minijatura za najmlađe koji su mogli po prvi puta obojati neku od naših vlastitih minijatura osmišljenih upravo za ovaj program!</p>
<p>
<a href=" https://hosting.photobucket.com/95288841-8654-4bf7-8fc9-a4aa78dce87f/6999be0c-8cc6-4947-a423-9427a2299724.jpg
" target="_blank"> <img alt="Click for enlarged picture" src="
https://hosting.photobucket.com/95288841-8654-4bf7-8fc9-a4aa78dce87f/6999be0c-8cc6-4947-a423-9427a2299724.jpg" width="600" /> </a></p>
<p>
<a href="https://hosting.photobucket.com/95288841-8654-4bf7-8fc9-a4aa78dce87f/835b05a5-f171-49df-afa6-da0692b89074.jpg" target="_blank"><img alt="Click for enlarged picture" src="https://hosting.photobucket.com/95288841-8654-4bf7-8fc9-a4aa78dce87f/835b05a5-f171-49df-afa6-da0692b89074.jpg" width="600" /></a></p>
<p>
<a href=" https://hosting.photobucket.com/95288841-8654-4bf7-8fc9-a4aa78dce87f/ef5dde13-84ee-4ea0-b9f3-28aaf703ef6d.jpg
" target="_blank"> <img alt="Click for enlarged picture" src="
https://hosting.photobucket.com/95288841-8654-4bf7-8fc9-a4aa78dce87f/ef5dde13-84ee-4ea0-b9f3-28aaf703ef6d.jpg" width="600" /> </a></p>
<p>
<strong>PRODAJNI KUTAK</strong></p>
<p>
Tijekom vikenda ugostili smo naše sponzore sa njihovim prodajnim štandovima: Swood.si i Carta Magica.</p>
<p>
<a href=" https://hosting.photobucket.com/95288841-8654-4bf7-8fc9-a4aa78dce87f/5ee9a49f-a387-435a-9110-572402b7191d.jpg
" target="_blank"> <img alt="Click for enlarged picture" src="
https://hosting.photobucket.com/95288841-8654-4bf7-8fc9-a4aa78dce87f/5ee9a49f-a387-435a-9110-572402b7191d.jpg" width="600" /> </a></p>
<p>
<a href=" https://hosting.photobucket.com/95288841-8654-4bf7-8fc9-a4aa78dce87f/47cf600f-b1eb-4655-bf06-305f6f21d5d2.jpg
" target="_blank"> <img alt="Click for enlarged picture" src="
https://hosting.photobucket.com/95288841-8654-4bf7-8fc9-a4aa78dce87f/47cf600f-b1eb-4655-bf06-305f6f21d5d2.jpg" width="600" /> </a></p>
<p>
<strong>OGLEDNE RADIONICE BOJANJA MINIJATURA</strong></p>
<p>
Prostor ZZTK omogućuje održavanje radionica tijekom vikenda u kino dvorani u podrumu, stoga smo tijekom vikenda organizirali i ogledne radionice. Rad predavača snimao se kamerom i projicirao na projekcijsko platno u dvorani. Veliko hvala našim domaćim i inozemnim predavačima: Anžetu Zorku (SLO), doc.dr.sc. Wintonu Afriću (HR), Ivanu Knezoviću (UMS Agram) i Petru Knezoviću (HR).</p>
<p>
<a href=" https://hosting.photobucket.com/95288841-8654-4bf7-8fc9-a4aa78dce87f/e8d835be-ec99-49d7-bc9b-086e38573d1a.jpg
" target="_blank"> <img alt="Click for enlarged picture" src="
https://hosting.photobucket.com/95288841-8654-4bf7-8fc9-a4aa78dce87f/e8d835be-ec99-49d7-bc9b-086e38573d1a.jpg" width="600" /> </a></p>
<p>
<a href=" https://hosting.photobucket.com/95288841-8654-4bf7-8fc9-a4aa78dce87f/f3eba4c1-4637-4da9-8360-75f430355af4.jpg" target="_blank"> <img alt="Click for enlarged picture" src="
https://hosting.photobucket.com/95288841-8654-4bf7-8fc9-a4aa78dce87f/f3eba4c1-4637-4da9-8360-75f430355af4.jpg" width="600" /> </a></p>
<p>
<a href=" https://hosting.photobucket.com/95288841-8654-4bf7-8fc9-a4aa78dce87f/ef523854-4030-4579-aa38-403afda86c91.jpg
" target="_blank"> <img alt="Click for enlarged picture" src="
https://hosting.photobucket.com/95288841-8654-4bf7-8fc9-a4aa78dce87f/ef523854-4030-4579-aa38-403afda86c91.jpg" width="600" /> </a></p>
<p>
<a href=" https://hosting.photobucket.com/95288841-8654-4bf7-8fc9-a4aa78dce87f/dd0943c2-f4a8-40c3-b641-f6dcdd200380.jpg
" target="_blank"> <img alt="Click for enlarged picture" src="
https://hosting.photobucket.com/95288841-8654-4bf7-8fc9-a4aa78dce87f/dd0943c2-f4a8-40c3-b641-f6dcdd200380.jpg" width="600" /> </a></p>
<p>
<a href=" https://hosting.photobucket.com/95288841-8654-4bf7-8fc9-a4aa78dce87f/08b1626a-f6c7-43c9-b718-3e9a41b55ca6.jpg
" target="_blank"> <img alt="Click for enlarged picture" src="
https://hosting.photobucket.com/95288841-8654-4bf7-8fc9-a4aa78dce87f/08b1626a-f6c7-43c9-b718-3e9a41b55ca6.jpg" width="600" /> </a></p>
<p>
<a href=" https://hosting.photobucket.com/95288841-8654-4bf7-8fc9-a4aa78dce87f/91aca7f3-1af6-486d-b174-65079a63a1ea.jpg
" target="_blank"> <img alt="Click for enlarged picture" src="
https://hosting.photobucket.com/95288841-8654-4bf7-8fc9-a4aa78dce87f/91aca7f3-1af6-486d-b174-65079a63a1ea.jpg" width="600" /> </a></p>
<p>
<a href=" https://hosting.photobucket.com/95288841-8654-4bf7-8fc9-a4aa78dce87f/3821f2fb-fbe7-4096-adbc-7d8c981a3b56.jpg
" target="_blank"> <img alt="Click for enlarged picture" src="
https://hosting.photobucket.com/95288841-8654-4bf7-8fc9-a4aa78dce87f/3821f2fb-fbe7-4096-adbc-7d8c981a3b56.jpg" width="600" /> </a></p>
<p>
<a href=" https://hosting.photobucket.com/95288841-8654-4bf7-8fc9-a4aa78dce87f/2c7bb3c5-c0ec-4a96-b6bd-6a90ce5ce154.jpg
" target="_blank"> <img alt="Click for enlarged picture" src="
https://hosting.photobucket.com/95288841-8654-4bf7-8fc9-a4aa78dce87f/2c7bb3c5-c0ec-4a96-b6bd-6a90ce5ce154.jpg" width="600" /> </a></p>
<p>
<a href=" https://hosting.photobucket.com/95288841-8654-4bf7-8fc9-a4aa78dce87f/b646f4ee-21aa-4d12-8db3-6d33351d5aeb.jpg
" target="_blank"> <img alt="Click for enlarged picture" src="
https://hosting.photobucket.com/95288841-8654-4bf7-8fc9-a4aa78dce87f/b646f4ee-21aa-4d12-8db3-6d33351d5aeb.jpg" width="600" /> </a></p>
<p>
<a href=" https://hosting.photobucket.com/95288841-8654-4bf7-8fc9-a4aa78dce87f/fb5efc01-32cc-4119-90e3-188f51b30237.jpg
" target="_blank"> <img alt="Click for enlarged picture" src="
https://hosting.photobucket.com/95288841-8654-4bf7-8fc9-a4aa78dce87f/fb5efc01-32cc-4119-90e3-188f51b30237.jpg" width="600" /> </a></p>
<p>
<strong>NATJECANJE U BRZOM BOJANJU MINIJATURA</strong></p>
<p>
U nedjelju, 22.2. smo organizirali natjecanje u brzom bojanju minijatura. Po prvi puta smo koristili minijature koje su naš dizajn. Sudionici su imali 60 minuta vremena da obojaju og čarobnjaka.</p>
<p>
<a href=" https://hosting.photobucket.com/95288841-8654-4bf7-8fc9-a4aa78dce87f/106417a6-a047-4e0d-9f81-87858806052f.jpg
" target="_blank"> <img alt="Click for enlarged picture" src="
https://hosting.photobucket.com/95288841-8654-4bf7-8fc9-a4aa78dce87f/106417a6-a047-4e0d-9f81-87858806052f.jpg" width="600" /> </a></p>
<p>
<a href=" https://hosting.photobucket.com/95288841-8654-4bf7-8fc9-a4aa78dce87f/ac6853c7-6e34-4e07-a996-8d7d12744b67.jpg
" target="_blank"> <img alt="Click for enlarged picture" src="
https://hosting.photobucket.com/95288841-8654-4bf7-8fc9-a4aa78dce87f/ac6853c7-6e34-4e07-a996-8d7d12744b67.jpg" width="600" /> </a></p>
<p>
<a href=" https://hosting.photobucket.com/95288841-8654-4bf7-8fc9-a4aa78dce87f/ccb155fa-52c5-4a99-9515-f69a6836dce7.jpg
" target="_blank"> <img alt="Click for enlarged picture" src="
https://hosting.photobucket.com/95288841-8654-4bf7-8fc9-a4aa78dce87f/ccb155fa-52c5-4a99-9515-f69a6836dce7.jpg" width="600" /> </a></p>
<p>
<a href=" https://hosting.photobucket.com/95288841-8654-4bf7-8fc9-a4aa78dce87f/a29fedd0-97ea-45b1-85f9-7ea62188b2b2.jpg
" target="_blank"><img alt="Click for enlarged picture" src="
https://hosting.photobucket.com/95288841-8654-4bf7-8fc9-a4aa78dce87f/a29fedd0-97ea-45b1-85f9-7ea62188b2b2.jpg" width="600" /></a></p>
<p>
S time smo došli do samoga kraja ovog predivnog vikenda i sve što je preostalo je bila podjela nagrada i priznanja pobjednicima.</p>
<p>
<a href=" https://hosting.photobucket.com/95288841-8654-4bf7-8fc9-a4aa78dce87f/046ca4c8-0ae7-415e-abd3-e131d580c3ad.jpg
" target="_blank"> <img alt="Click for enlarged picture" src="
https://hosting.photobucket.com/95288841-8654-4bf7-8fc9-a4aa78dce87f/046ca4c8-0ae7-415e-abd3-e131d580c3ad.jpg" width="600" /> </a></p>
<p>
<a href=" https://hosting.photobucket.com/95288841-8654-4bf7-8fc9-a4aa78dce87f/cec0dcef-7acb-4a77-89de-271ed5410672.jpg
" target="_blank"> <img alt="Click for enlarged picture" src="
https://hosting.photobucket.com/95288841-8654-4bf7-8fc9-a4aa78dce87f/cec0dcef-7acb-4a77-89de-271ed5410672.jpg" width="600" /> </a></p>
<p>
<a href=" https://hosting.photobucket.com/95288841-8654-4bf7-8fc9-a4aa78dce87f/a495a5fc-31a2-4979-a970-0fa22c334354.jpg
" target="_blank"> <img alt="Click for enlarged picture" src="
https://hosting.photobucket.com/95288841-8654-4bf7-8fc9-a4aa78dce87f/a495a5fc-31a2-4979-a970-0fa22c334354.jpg" width="600" /> </a></p>
<p>
<strong>AGRAM ARENA – Leaving Asphodel Necropolis28 kampanja</strong></p>
<p>
Tijekom vikenda 21.-22.2. održali smo i novo međunarodno natjecanje Agram Arena! Ovoga puta na redu je bila stolna strateška igra Necropolis 28 za koju su naši članovi osmislili dvodnevnu kampanju. Svaki sudionik je izradio svoju bandu vojnika, a velika većina i svoje vlastite table.</p>
<p>
<a href=" https://hosting.photobucket.com/95288841-8654-4bf7-8fc9-a4aa78dce87f/ac69b182-4bfc-4575-a6d3-fb3c8baba342.jpg
" target="_blank"> <img alt="Click for enlarged picture" src="
https://hosting.photobucket.com/95288841-8654-4bf7-8fc9-a4aa78dce87f/ac69b182-4bfc-4575-a6d3-fb3c8baba342.jpg" width="600" /> </a></p>
<p>
<a href=" https://hosting.photobucket.com/95288841-8654-4bf7-8fc9-a4aa78dce87f/289fed7b-e058-42d8-ba2d-cbd0463e98da.jpg
" target="_blank"> <img alt="Click for enlarged picture" src="
https://hosting.photobucket.com/95288841-8654-4bf7-8fc9-a4aa78dce87f/289fed7b-e058-42d8-ba2d-cbd0463e98da.jpg" width="600" /> </a></p>
<p>
<a href=" https://hosting.photobucket.com/95288841-8654-4bf7-8fc9-a4aa78dce87f/d92ebbee-859d-4441-8386-3d760b20b7a7.jpg
" target="_blank"> <img alt="Click for enlarged picture" src="
https://hosting.photobucket.com/95288841-8654-4bf7-8fc9-a4aa78dce87f/d92ebbee-859d-4441-8386-3d760b20b7a7.jpg" width="600" /> </a></p>
<p>
<a href=" https://hosting.photobucket.com/95288841-8654-4bf7-8fc9-a4aa78dce87f/09c59798-7871-425e-a075-3ca1cd91768a.jpg
" target="_blank"> <img alt="Click for enlarged picture" src="
https://hosting.photobucket.com/95288841-8654-4bf7-8fc9-a4aa78dce87f/09c59798-7871-425e-a075-3ca1cd91768a.jpg" width="600" /> </a></p>
<p>
<a href=" https://hosting.photobucket.com/95288841-8654-4bf7-8fc9-a4aa78dce87f/b2f3edc8-5a23-4552-9a2a-4027b286f327.jpg
" target="_blank"> <img alt="Click for enlarged picture" src="
https://hosting.photobucket.com/95288841-8654-4bf7-8fc9-a4aa78dce87f/b2f3edc8-5a23-4552-9a2a-4027b286f327.jpg" width="600" /> </a></p>
<p>
<a href=" https://hosting.photobucket.com/95288841-8654-4bf7-8fc9-a4aa78dce87f/2a9f43ac-b531-4746-b7bb-ac5a3356aab0.jpg
" target="_blank"> <img alt="Click for enlarged picture" src="
https://hosting.photobucket.com/95288841-8654-4bf7-8fc9-a4aa78dce87f/2a9f43ac-b531-4746-b7bb-ac5a3356aab0.jpg" width="600" /> </a></p>
<p>
<strong>DOGAĐANJA RADNIM DANIMA ZA VRIJEME IZLOŽBE</strong></p>
<p>
Tijekom naredna dva tjedna, naši volonteri su radnim danima od 16:00 do 20:00, držali otvorene radionice bojanja minijatura. Postavljene su radne stanice za bojanje minijatura na kojoj su naši posjetitelji mogli bojati minijature koje smo priredili (ili svoje ukoliko su ih donijeli) koristeći naše materijale i alate.</p>
<p>
<a href=" https://hosting.photobucket.com/95288841-8654-4bf7-8fc9-a4aa78dce87f/6edf7765-42b5-417a-820f-fa5d907179a7.jpg
" target="_blank"> <img alt="Click for enlarged picture" src="
https://hosting.photobucket.com/95288841-8654-4bf7-8fc9-a4aa78dce87f/6edf7765-42b5-417a-820f-fa5d907179a7.jpg" width="600" /> </a></p>
<p>
<a href=" https://hosting.photobucket.com/95288841-8654-4bf7-8fc9-a4aa78dce87f/c084ebe2-f57b-4519-9b31-29bdc1155887.jpg
" target="_blank"> <img alt="Click for enlarged picture" src="
https://hosting.photobucket.com/95288841-8654-4bf7-8fc9-a4aa78dce87f/c084ebe2-f57b-4519-9b31-29bdc1155887.jpg" width="600" /> </a></p>
<p>
<a href=" https://hosting.photobucket.com/95288841-8654-4bf7-8fc9-a4aa78dce87f/37ff2272-f9b0-4b16-a363-1e6f6688c866.jpg
" target="_blank"> <img alt="Click for enlarged picture" src="
https://hosting.photobucket.com/95288841-8654-4bf7-8fc9-a4aa78dce87f/37ff2272-f9b0-4b16-a363-1e6f6688c866.jpg" width="600" /> </a></p>
<p>
<a href=" https://hosting.photobucket.com/95288841-8654-4bf7-8fc9-a4aa78dce87f/5f4f7968-ff50-4a01-98da-6ce8562930b4.jpg
" target="_blank"> <img alt="Click for enlarged picture" src="
https://hosting.photobucket.com/95288841-8654-4bf7-8fc9-a4aa78dce87f/5f4f7968-ff50-4a01-98da-6ce8562930b4.jpg" width="600" /> </a></p>
<p>
<a href=" https://hosting.photobucket.com/95288841-8654-4bf7-8fc9-a4aa78dce87f/cbb45319-d488-483c-bf9d-9af29852fc74.jpg
" target="_blank"> <img alt="Click for enlarged picture" src="
https://hosting.photobucket.com/95288841-8654-4bf7-8fc9-a4aa78dce87f/cbb45319-d488-483c-bf9d-9af29852fc74.jpg" width="600" /> </a></p>
<p>
<a href=" https://hosting.photobucket.com/95288841-8654-4bf7-8fc9-a4aa78dce87f/3dcca26c-d549-4af3-812a-a4a81b9a2310.jpg
" target="_blank"> <img alt="Click for enlarged picture" src="
https://hosting.photobucket.com/95288841-8654-4bf7-8fc9-a4aa78dce87f/3dcca26c-d549-4af3-812a-a4a81b9a2310.jpg" width="600" /> </a></p>
<p>
<a href=" https://hosting.photobucket.com/95288841-8654-4bf7-8fc9-a4aa78dce87f/4adf0fb6-3eab-4b40-b32d-d03eab4a9892.jpg
" target="_blank"> <img alt="Click for enlarged picture" src="
https://hosting.photobucket.com/95288841-8654-4bf7-8fc9-a4aa78dce87f/4adf0fb6-3eab-4b40-b32d-d03eab4a9892.jpg" width="600" /> </a></p>
<p>
<a href=" https://hosting.photobucket.com/95288841-8654-4bf7-8fc9-a4aa78dce87f/4732b58a-9a65-4d1c-a7d5-25513d34b108.jpg
" target="_blank"> <img alt="Click for enlarged picture" src="
https://hosting.photobucket.com/95288841-8654-4bf7-8fc9-a4aa78dce87f/4732b58a-9a65-4d1c-a7d5-25513d34b108.jpg" width="600" /> </a></p>
<p>
<a href=" https://hosting.photobucket.com/95288841-8654-4bf7-8fc9-a4aa78dce87f/274be330-31d5-4e25-95db-ec2f423a003c.jpg
" target="_blank"> <img alt="Click for enlarged picture" src="
https://hosting.photobucket.com/95288841-8654-4bf7-8fc9-a4aa78dce87f/274be330-31d5-4e25-95db-ec2f423a003c.jpg" width="600" /> </a></p>
<p>
<a href=" https://hosting.photobucket.com/95288841-8654-4bf7-8fc9-a4aa78dce87f/8e7b0a80-0f46-4d70-9789-a46976c713d2.jpg
" target="_blank"> <img alt="Click for enlarged picture" src="
https://hosting.photobucket.com/95288841-8654-4bf7-8fc9-a4aa78dce87f/8e7b0a80-0f46-4d70-9789-a46976c713d2.jpg" width="600" /> </a></p>
<p>
<a href=" https://hosting.photobucket.com/95288841-8654-4bf7-8fc9-a4aa78dce87f/8bbd4e96-b911-4f26-80fe-b1c57f29027b.jpg
" target="_blank"> <img alt="Click for enlarged picture" src="
https://hosting.photobucket.com/95288841-8654-4bf7-8fc9-a4aa78dce87f/8bbd4e96-b911-4f26-80fe-b1c57f29027b.jpg" width="600" /> </a></p>
<p>
<a href=" https://hosting.photobucket.com/95288841-8654-4bf7-8fc9-a4aa78dce87f/203a27be-8f10-459d-89b9-befb6b636b74.jpg
" target="_blank"> <img alt="Click for enlarged picture" src="
https://hosting.photobucket.com/95288841-8654-4bf7-8fc9-a4aa78dce87f/203a27be-8f10-459d-89b9-befb6b636b74.jpg" width="600" /> </a></p>
<p>
<a href=" https://hosting.photobucket.com/95288841-8654-4bf7-8fc9-a4aa78dce87f/5dc4358f-19d8-475f-a4af-9c29e9ed18d7.jpg
" target="_blank"> <img alt="Click for enlarged picture" src="
https://hosting.photobucket.com/95288841-8654-4bf7-8fc9-a4aa78dce87f/5dc4358f-19d8-475f-a4af-9c29e9ed18d7.jpg" width="600" /> </a></p>
<p>
<strong>BACK TO BASICS RADIONICE ZA NAJMLAĐE</strong></p>
<p>
Radnim danima od 17:00 do 18:00 održavali smo naše nove radionice za najmlađe u kojima su naši najmlađi polaznici bojali svoje prve minijature.</p>
<p>
<a href=" https://hosting.photobucket.com/95288841-8654-4bf7-8fc9-a4aa78dce87f/948af139-8fb5-4e28-a27c-404466e70d05.jpg
" target="_blank"> <img alt="Click for enlarged picture" src="
https://hosting.photobucket.com/95288841-8654-4bf7-8fc9-a4aa78dce87f/948af139-8fb5-4e28-a27c-404466e70d05.jpg" width="600" /> </a></p>
<p>
<a href=" https://hosting.photobucket.com/95288841-8654-4bf7-8fc9-a4aa78dce87f/bb3e20c2-bb21-4a3d-863a-74de08261467.jpg
" target="_blank"> <img alt="Click for enlarged picture" src="
https://hosting.photobucket.com/95288841-8654-4bf7-8fc9-a4aa78dce87f/bb3e20c2-bb21-4a3d-863a-74de08261467.jpg" width="600" /> </a></p>
<p>
<a href=" https://hosting.photobucket.com/95288841-8654-4bf7-8fc9-a4aa78dce87f/7316c760-98e3-4e3f-9261-d138aa7a5a6a.jpg
" target="_blank"> <img alt="Click for enlarged picture" src="
https://hosting.photobucket.com/95288841-8654-4bf7-8fc9-a4aa78dce87f/7316c760-98e3-4e3f-9261-d138aa7a5a6a.jpg" width="600" /> </a></p>
<p>
<a href=" https://hosting.photobucket.com/95288841-8654-4bf7-8fc9-a4aa78dce87f/68934b39-3d1f-4f43-b967-14b73c41a39e.jpg
" target="_blank"> <img alt="Click for enlarged picture" src="
https://hosting.photobucket.com/95288841-8654-4bf7-8fc9-a4aa78dce87f/68934b39-3d1f-4f43-b967-14b73c41a39e.jpg" width="600" /> </a></p>
<p>
<a href=" https://hosting.photobucket.com/95288841-8654-4bf7-8fc9-a4aa78dce87f/46125bce-a28d-494f-873a-3aeabdc1d6c2.jpg
" target="_blank"> <img alt="Click for enlarged picture" src="
https://hosting.photobucket.com/95288841-8654-4bf7-8fc9-a4aa78dce87f/46125bce-a28d-494f-873a-3aeabdc1d6c2.jpg" width="600" /> </a></p>
<p>
<a href=" https://hosting.photobucket.com/95288841-8654-4bf7-8fc9-a4aa78dce87f/3c58e0ad-77a9-44c8-b6bf-d9a55c514d43.jpg
" target="_blank"> <img alt="Click for enlarged picture" src="
https://hosting.photobucket.com/95288841-8654-4bf7-8fc9-a4aa78dce87f/3c58e0ad-77a9-44c8-b6bf-d9a55c514d43.jpg" width="600" /> </a></p>
<p>
<a href=" https://hosting.photobucket.com/95288841-8654-4bf7-8fc9-a4aa78dce87f/f891f0f0-051b-40ee-9676-cb03b0a9811b.jpg
" target="_blank"> <img alt="Click for enlarged picture" src="
https://hosting.photobucket.com/95288841-8654-4bf7-8fc9-a4aa78dce87f/f891f0f0-051b-40ee-9676-cb03b0a9811b.jpg" width="600" /> </a></p>
<p>
<strong>AGRAM LEGO SEKCIJA predavanje: FW-14b – Bolid F1 za budućnost</strong></p>
<p>
U srijedu 25.2.2026. u sklopu aktivnosti naše Agram Lego Sekcije, naš dežurni strojar Marko Paunović je održao predavanje na temu bolida Formule 1 iz 1992.. Ulaz na predavanje je bio besplatan, a po završetku su LEGO maketu bolida izradili članovi Lego sekcije</p>
<p>
<a href=" https://hosting.photobucket.com/95288841-8654-4bf7-8fc9-a4aa78dce87f/b2e14b1c-daa4-4314-8685-184377bc7e28.jpg
" target="_blank"> <img alt="Click for enlarged picture" src="
https://hosting.photobucket.com/95288841-8654-4bf7-8fc9-a4aa78dce87f/b2e14b1c-daa4-4314-8685-184377bc7e28.jpg" width="600" /> </a></p>
<p>
<a href=" https://hosting.photobucket.com/95288841-8654-4bf7-8fc9-a4aa78dce87f/31fb439a-77d3-4418-83ff-66c3af279cca.jpg" target="_blank"> <img alt="Click for enlarged picture" src="
https://hosting.photobucket.com/95288841-8654-4bf7-8fc9-a4aa78dce87f/31fb439a-77d3-4418-83ff-66c3af279cca.jpg" width="600" /> </a></p>
<p>
<a href=" https://hosting.photobucket.com/95288841-8654-4bf7-8fc9-a4aa78dce87f/bfcaf282-6be8-4b52-a3ed-c91137457876.jpg
" target="_blank"> <img alt="Click for enlarged picture" src="
https://hosting.photobucket.com/95288841-8654-4bf7-8fc9-a4aa78dce87f/bfcaf282-6be8-4b52-a3ed-c91137457876.jpg" width="600" /> </a></p>
<p>
<a href=" https://hosting.photobucket.com/95288841-8654-4bf7-8fc9-a4aa78dce87f/ce70fc61-9e1a-4169-aaad-8b67417656c0.jpg
" target="_blank"> <img alt="Click for enlarged picture" src="
https://hosting.photobucket.com/95288841-8654-4bf7-8fc9-a4aa78dce87f/ce70fc61-9e1a-4169-aaad-8b67417656c0.jpg" width="600" /> </a></p>
<p>
<a href=" https://hosting.photobucket.com/95288841-8654-4bf7-8fc9-a4aa78dce87f/94ca0e36-8710-458d-8194-9f71299f4d74.jpg
" target="_blank"> <img alt="Click for enlarged picture" src="
https://hosting.photobucket.com/95288841-8654-4bf7-8fc9-a4aa78dce87f/94ca0e36-8710-458d-8194-9f71299f4d74.jpg" width="600" /> </a></p>
<p>
<a href=" https://hosting.photobucket.com/95288841-8654-4bf7-8fc9-a4aa78dce87f/c6771f72-7191-4ca3-a792-3bb1ab3897b1.jpg
" target="_blank"> <img alt="Click for enlarged picture" src="
https://hosting.photobucket.com/95288841-8654-4bf7-8fc9-a4aa78dce87f/c6771f72-7191-4ca3-a792-3bb1ab3897b1.jpg" width="600" /> </a></p>
<p>
<a href=" https://hosting.photobucket.com/95288841-8654-4bf7-8fc9-a4aa78dce87f/c8fcfcb6-09f2-4398-a2fb-fa5065771e01.jpg
" target="_blank"> <img alt="Click for enlarged picture" src="
https://hosting.photobucket.com/95288841-8654-4bf7-8fc9-a4aa78dce87f/c8fcfcb6-09f2-4398-a2fb-fa5065771e01.jpg" width="600" /> </a></p>
<p>
<a href=" https://hosting.photobucket.com/95288841-8654-4bf7-8fc9-a4aa78dce87f/d7e187a8-d5b1-433b-b30d-091e54dcdddf.jpg
" target="_blank"> <img alt="Click for enlarged picture" src="
https://hosting.photobucket.com/95288841-8654-4bf7-8fc9-a4aa78dce87f/d7e187a8-d5b1-433b-b30d-091e54dcdddf.jpg" width="600" /> </a></p>
<p>
Tijekom drugog vikenda Izložbe, 28.02.-01.03., organizirali smo <strong>RADIONICU BOJANJA MINIJATURA – Grimdark stil</strong>.</p>
<p>
Radionica se provodila kroz dva dana (cijeli vikend) i polaznici su bojali tri različite figure za igru Trench Crusade. Fokus ovih predavanja bilo je bojenje popularnim Grimdark stilom. Na radionici su bile predstavljene boje i pribor, priprema figura, nekoliko tehnika bojenja minijatura od osnovnih do naprednijih, te tehnike i trikovi za brzo i efikasno bojenje većih količina figura odjednom. U sklopu radionice korištene su akrilne boje na bazi vode.</p>
<p>
<a href=" https://hosting.photobucket.com/95288841-8654-4bf7-8fc9-a4aa78dce87f/733d94b2-8e8d-4a4e-accd-b9168e32577e.jpg
" target="_blank"> <img alt="Click for enlarged picture" src="
https://hosting.photobucket.com/95288841-8654-4bf7-8fc9-a4aa78dce87f/733d94b2-8e8d-4a4e-accd-b9168e32577e.jpg
" width="600" /> </a></p>
<p>
<a href=" https://hosting.photobucket.com/95288841-8654-4bf7-8fc9-a4aa78dce87f/41020062-45b9-41cd-a357-fa23a389f390.jpg
" target="_blank"> <img alt="Click for enlarged picture" src="
https://hosting.photobucket.com/95288841-8654-4bf7-8fc9-a4aa78dce87f/41020062-45b9-41cd-a357-fa23a389f390.jpg
" width="600" /> </a></p>
<p>
<a href=" https://hosting.photobucket.com/95288841-8654-4bf7-8fc9-a4aa78dce87f/0c07cc55-596d-494d-972b-cd6a0dd6b8b7.jpg
" target="_blank"> <img alt="Click for enlarged picture" src="
https://hosting.photobucket.com/95288841-8654-4bf7-8fc9-a4aa78dce87f/0c07cc55-596d-494d-972b-cd6a0dd6b8b7.jpg" width="600" /> </a></p>
<p>
<a href=" https://hosting.photobucket.com/95288841-8654-4bf7-8fc9-a4aa78dce87f/c17dd356-08b1-48e1-b895-6296aed7f818.jpg
" target="_blank"> <img alt="Click for enlarged picture" src="
https://hosting.photobucket.com/95288841-8654-4bf7-8fc9-a4aa78dce87f/c17dd356-08b1-48e1-b895-6296aed7f818.jpg" width="600" /> </a></p>
<p>
U srijedu 04.03.2026. održana je godišnja <strong>sjednica Skupštine</strong> na kojoj smo odredili smjernice rada u 2026.</p>
<p>
<a href=" https://hosting.photobucket.com/95288841-8654-4bf7-8fc9-a4aa78dce87f/59484bd0-7edc-4aed-a04e-ae42900ba3e6.jpg
" target="_blank"> <img alt="Click for enlarged picture" src="
https://hosting.photobucket.com/95288841-8654-4bf7-8fc9-a4aa78dce87f/59484bd0-7edc-4aed-a04e-ae42900ba3e6.jpg
" width="600" /> </a></p>
<p>
U nedjelju 08.03.2026. Izložba je završena, naši eksponati sigurno spremljeni, a Galerija počišćena.</p>
<p>
<a href=" https://hosting.photobucket.com/95288841-8654-4bf7-8fc9-a4aa78dce87f/98af4280-0956-4cdb-b4a9-da40e3a5a44a.jpg
" target="_blank"> <img alt="Click for enlarged picture" src="
https://hosting.photobucket.com/95288841-8654-4bf7-8fc9-a4aa78dce87f/98af4280-0956-4cdb-b4a9-da40e3a5a44a.jpg" width="600" /> </a></p>
<p>
<a href=" https://hosting.photobucket.com/95288841-8654-4bf7-8fc9-a4aa78dce87f/3259b35e-1fc2-4a99-a3c5-c7984958d72b.jpg
" target="_blank"> <img alt="Click for enlarged picture" src="
https://hosting.photobucket.com/95288841-8654-4bf7-8fc9-a4aa78dce87f/3259b35e-1fc2-4a99-a3c5-c7984958d72b.jpg" width="600" /> </a></p>
<p>
Najbitniji dio svake godine prilikom održavanja ove Izložbe je socijalni aspekt, druženje naših članova kako međusobno tako i sa našim međunarodnim prijateljima koji nas posjećuju! Uz ovih par fotografija sa zajedničkih druženja, pozdravljamo vas do sljedeće godine!</p>
<p>
<a href=" https://hosting.photobucket.com/95288841-8654-4bf7-8fc9-a4aa78dce87f/b9168e23-79b2-4d81-8a7d-7534062881a7.jpg
" target="_blank"> <img alt="Click for enlarged picture" src="
https://hosting.photobucket.com/95288841-8654-4bf7-8fc9-a4aa78dce87f/b9168e23-79b2-4d81-8a7d-7534062881a7.jpg " width="600" /> </a></p>
<p>
<a href=" https://hosting.photobucket.com/95288841-8654-4bf7-8fc9-a4aa78dce87f/edff925e-916c-4d78-953e-210abf3753d4.jpg
" target="_blank"> <img alt="Click for enlarged picture" src="
https://hosting.photobucket.com/95288841-8654-4bf7-8fc9-a4aa78dce87f/edff925e-916c-4d78-953e-210abf3753d4.jpg " width="600" /> </a></p>
<p>
<a href=" https://hosting.photobucket.com/95288841-8654-4bf7-8fc9-a4aa78dce87f/8bcb48fa-466b-43f8-8a4b-f15f6794b21e.jpg
" target="_blank"> <img alt="Click for enlarged picture" src="
https://hosting.photobucket.com/95288841-8654-4bf7-8fc9-a4aa78dce87f/8bcb48fa-466b-43f8-8a4b-f15f6794b21e.jpg" width="600" /> </a></p>
"
["created"]=>
string(19) "2026-03-12 08:54:10"
["modified"]=>
string(19) "2026-03-12 08:58:37"
}
["Member"]=>
array(10) {
["id"]=>
string(2) "35"
["group_id"]=>
string(1) "1"
["first_name"]=>
string(5) "Marko"
["last_name"]=>
string(9) "Paunović"
["first_name_mask"]=>
string(5) "marko"
["last_name_mask"]=>
string(8) "paunovic"
["username"]=>
string(5) "marko"
["password"]=>
string(40) "3bd37b326d19d1880d3b93a4b32e8fb3a90fa122"
["born"]=>
string(19) "2033-03-07 20:35:00"
["created"]=>
string(19) "2009-06-02 20:37:03"
}
}
</pre>
<a href="/dok/members/marko.paunovic">Marko Paunović</a>, 12<span class="superscript">nd</span> March 2026</span>
</li>
<li>
<a href="/dok/articles/2026/03/05" class="readMore"></a>
<span class="details"> <pre style="display: none;">
array(2) {
["Article"]=>
array(10) {
["id"]=>
string(3) "495"
["member_id"]=>
string(2) "35"
["title_eng"]=>
string(53) "Miniature Painting Workshop - Grimdark Trench Crusade"
["title_hrv"]=>
string(59) "Radionica bojanja minijatura - Grimdark stil Trench Crusade"
["mask_eng"]=>
string(53) "miniature_painting_workshop_-_grimdark_trench_crusade"
["mask_hrv"]=>
string(59) "radionica_bojanja_minijatura_-_grimdark_stil_trench_crusade"
["content_eng"]=>
string(2880) "<p>
<a href="https://hosting.photobucket.com/95288841-8654-4bf7-8fc9-a4aa78dce87f/d6bd52bf-5585-41ad-a5f0-39ea8eba78af.jpg" target="_blank"><img alt="Click for enlarged picture" src="https://hosting.photobucket.com/95288841-8654-4bf7-8fc9-a4aa78dce87f/d6bd52bf-5585-41ad-a5f0-39ea8eba78af.jpg" width="600" /></a></p>
<p>
<a href="https://hosting.photobucket.com/95288841-8654-4bf7-8fc9-a4aa78dce87f/d894975c-ea8f-4cc4-9f8c-8e87324723b1.jpg" target="_blank"><img alt="Click for enlarged picture" src="https://hosting.photobucket.com/95288841-8654-4bf7-8fc9-a4aa78dce87f/d894975c-ea8f-4cc4-9f8c-8e87324723b1.jpg" width="600" /></a></p>
<p>
<a href="https://hosting.photobucket.com/95288841-8654-4bf7-8fc9-a4aa78dce87f/f72b74ba-1c23-4bfb-9feb-568dc5df1a6a.jpg" target="_blank"><img alt="Click for enlarged picture" src="https://hosting.photobucket.com/95288841-8654-4bf7-8fc9-a4aa78dce87f/f72b74ba-1c23-4bfb-9feb-568dc5df1a6a.jpg" width="600" /></a></p>
<p>
<a href="https://hosting.photobucket.com/95288841-8654-4bf7-8fc9-a4aa78dce87f/40167cf3-b290-41d4-ac8a-212d19fe7f0a.jpg" target="_blank"><img alt="Click for enlarged picture" src="https://hosting.photobucket.com/95288841-8654-4bf7-8fc9-a4aa78dce87f/40167cf3-b290-41d4-ac8a-212d19fe7f0a.jpg" width="600" /></a></p>
<p>
<a href="https://hosting.photobucket.com/95288841-8654-4bf7-8fc9-a4aa78dce87f/cfbd68f1-bc70-4943-8f7b-69716084f638.jpg" target="_blank"><img alt="Click for enlarged picture" src="https://hosting.photobucket.com/95288841-8654-4bf7-8fc9-a4aa78dce87f/cfbd68f1-bc70-4943-8f7b-69716084f638.jpg" width="600" /></a></p>
<p>
<a href="https://hosting.photobucket.com/95288841-8654-4bf7-8fc9-a4aa78dce87f/cef3712c-57f1-435e-80b7-a35b4620c5f9.jpg" target="_blank"><img alt="Click for enlarged picture" src="https://hosting.photobucket.com/95288841-8654-4bf7-8fc9-a4aa78dce87f/cef3712c-57f1-435e-80b7-a35b4620c5f9.jpg" width="600" /></a></p>
<p>
<a href="https://hosting.photobucket.com/95288841-8654-4bf7-8fc9-a4aa78dce87f/f72b74ba-1c23-4bfb-9feb-568dc5df1a6a.jpg" target="_blank"><img alt="Click for enlarged picture" src="https://hosting.photobucket.com/95288841-8654-4bf7-8fc9-a4aa78dce87f/f72b74ba-1c23-4bfb-9feb-568dc5df1a6a.jpg" width="600" /></a></p>
<p>
<a href="https://hosting.photobucket.com/95288841-8654-4bf7-8fc9-a4aa78dce87f/6b6285a7-e08b-482e-9343-74e8d08bbca4.jpg" target="_blank"><img alt="Click for enlarged picture" src="https://hosting.photobucket.com/95288841-8654-4bf7-8fc9-a4aa78dce87f/6b6285a7-e08b-482e-9343-74e8d08bbca4.jpg" width="600" /></a></p>
<p>
<a href="https://hosting.photobucket.com/95288841-8654-4bf7-8fc9-a4aa78dce87f/1be59454-f3ac-4f70-9550-60c9101d7e44.png" target="_blank"><img alt="Click for enlarged picture" src="https://hosting.photobucket.com/95288841-8654-4bf7-8fc9-a4aa78dce87f/1be59454-f3ac-4f70-9550-60c9101d7e44.png" width="600" /></a></p>
"
["content_hrv"]=>
string(4135) "<p>
<a href="https://hosting.photobucket.com/95288841-8654-4bf7-8fc9-a4aa78dce87f/d6bd52bf-5585-41ad-a5f0-39ea8eba78af.jpg" target="_blank"><img alt="Click for enlarged picture" src="https://hosting.photobucket.com/95288841-8654-4bf7-8fc9-a4aa78dce87f/d6bd52bf-5585-41ad-a5f0-39ea8eba78af.jpg" width="600" /></a></p>
<p>
Radionica se provodila kroz dva dana (cijeli vikend) i polaznici su bojali tri različite figure za igru Trench Crusade (prema izboru). Fokus ovih predavanja bilo je bojenje više minijatura odjednom prepoznatljivim GRIMDARK stilom, no znanja s radionice jednako su primjenjiva i na bojenje vojski za boardgame igre te kolekcija figura za pen&paper rpg-ove. Na radionici su bile predstavljene boje i pribor, priprema figura, nekoliko tehnika bojenja minijatura od osnovnih do naprednijih, te tehnike i trikovi za brzo i efikasno bojenje većih količina figura odjednom. U sklopu radionice bile su korištene akrilne boje na bazi vode te uljni efekti jednostavni za korištenje. Predavanja su prilagođena tako da voditelji posveti jednako vrijeme svim polaznicima i može se prilagoditi svim kategorijama minijaturista (od početnika do malo naprednijih).</p>
<p>
<a href="https://hosting.photobucket.com/95288841-8654-4bf7-8fc9-a4aa78dce87f/d894975c-ea8f-4cc4-9f8c-8e87324723b1.jpg" target="_blank"><img alt="Click for enlarged picture" src="https://hosting.photobucket.com/95288841-8654-4bf7-8fc9-a4aa78dce87f/d894975c-ea8f-4cc4-9f8c-8e87324723b1.jpg" width="600" /></a></p>
<p>
<a href="https://hosting.photobucket.com/95288841-8654-4bf7-8fc9-a4aa78dce87f/f72b74ba-1c23-4bfb-9feb-568dc5df1a6a.jpg" target="_blank"><img alt="Click for enlarged picture" src="https://hosting.photobucket.com/95288841-8654-4bf7-8fc9-a4aa78dce87f/f72b74ba-1c23-4bfb-9feb-568dc5df1a6a.jpg" width="600" /></a></p>
<p>
<a href="https://hosting.photobucket.com/95288841-8654-4bf7-8fc9-a4aa78dce87f/40167cf3-b290-41d4-ac8a-212d19fe7f0a.jpg" target="_blank"><img alt="Click for enlarged picture" src="https://hosting.photobucket.com/95288841-8654-4bf7-8fc9-a4aa78dce87f/40167cf3-b290-41d4-ac8a-212d19fe7f0a.jpg" width="600" /></a></p>
<p>
<a href="https://hosting.photobucket.com/95288841-8654-4bf7-8fc9-a4aa78dce87f/cfbd68f1-bc70-4943-8f7b-69716084f638.jpg" target="_blank"><img alt="Click for enlarged picture" src="https://hosting.photobucket.com/95288841-8654-4bf7-8fc9-a4aa78dce87f/cfbd68f1-bc70-4943-8f7b-69716084f638.jpg" width="600" /></a></p>
<p>
Radionica je uključivalai sljedeće tematske cjeline:<br />
1. Planiranje i priprema te sastavljanje minijatura<br />
2. Obrada minijatura prije bojanja<br />
3. Osnovne grimdark stila i izbor boja<br />
4. Osnovne boje<br />
5. Tehnike shadinga i highlighta<br />
6. Naknadno podizanje gotovog paintjoba na višu razinu, uljni efekti</p>
<p>
<a href="https://hosting.photobucket.com/95288841-8654-4bf7-8fc9-a4aa78dce87f/cef3712c-57f1-435e-80b7-a35b4620c5f9.jpg" target="_blank"><img alt="Click for enlarged picture" src="https://hosting.photobucket.com/95288841-8654-4bf7-8fc9-a4aa78dce87f/cef3712c-57f1-435e-80b7-a35b4620c5f9.jpg" width="600" /></a></p>
<p>
<a href="https://hosting.photobucket.com/95288841-8654-4bf7-8fc9-a4aa78dce87f/f72b74ba-1c23-4bfb-9feb-568dc5df1a6a.jpg" target="_blank"><img alt="Click for enlarged picture" src="https://hosting.photobucket.com/95288841-8654-4bf7-8fc9-a4aa78dce87f/f72b74ba-1c23-4bfb-9feb-568dc5df1a6a.jpg" width="600" /></a></p>
<p>
<a href="https://hosting.photobucket.com/95288841-8654-4bf7-8fc9-a4aa78dce87f/6b6285a7-e08b-482e-9343-74e8d08bbca4.jpg" target="_blank"><img alt="Click for enlarged picture" src="https://hosting.photobucket.com/95288841-8654-4bf7-8fc9-a4aa78dce87f/6b6285a7-e08b-482e-9343-74e8d08bbca4.jpg" width="600" /></a></p>
<p>
<a href="https://hosting.photobucket.com/95288841-8654-4bf7-8fc9-a4aa78dce87f/1be59454-f3ac-4f70-9550-60c9101d7e44.png" target="_blank"><img alt="Click for enlarged picture" src="https://hosting.photobucket.com/95288841-8654-4bf7-8fc9-a4aa78dce87f/1be59454-f3ac-4f70-9550-60c9101d7e44.png" width="600" /></a></p>
"
["created"]=>
string(19) "2026-03-05 20:23:04"
["modified"]=>
string(19) "2026-03-05 20:23:04"
}
["Member"]=>
array(10) {
["id"]=>
string(2) "35"
["group_id"]=>
string(1) "1"
["first_name"]=>
string(5) "Marko"
["last_name"]=>
string(9) "Paunović"
["first_name_mask"]=>
string(5) "marko"
["last_name_mask"]=>
string(8) "paunovic"
["username"]=>
string(5) "marko"
["password"]=>
string(40) "3bd37b326d19d1880d3b93a4b32e8fb3a90fa122"
["born"]=>
string(19) "2033-03-07 20:35:00"
["created"]=>
string(19) "2009-06-02 20:37:03"
}
}
</pre>
<a href="/dok/members/marko.paunovic">Marko Paunović</a>, 5<span class="superscript">th</span> March 2026</span>
</li>
<li>
<a href="/dok/articles/2026/02/26" class="readMore"></a>
<span class="details"> <pre style="display: none;">
array(2) {
["Article"]=>
array(10) {
["id"]=>
string(3) "494"
["member_id"]=>
string(2) "64"
["title_eng"]=>
string(35) "AGRAM LEGO SECTION - F1 car: FW14b "
["title_hrv"]=>
string(51) "AGRAM LEGO SEKCIJA - FW14b - F1 bolid za budućnost"
["mask_eng"]=>
string(33) "agram_lego_section_-_f1_car_fw14b"
["mask_hrv"]=>
string(50) "agram_lego_sekcija_-_fw14b_-_f1_bolid_za_buducnost"
["content_eng"]=>
string(2839) "<p style="margin: 0px 0px 10px; padding: 0px; border: 0px; outline: 0px; vertical-align: baseline; background-image: initial; background-position: initial; background-size: initial; background-repeat: initial; background-attachment: initial; background-origin: initial; background-clip: initial; position: relative; float: none; clear: both; color: rgb(0, 0, 0); font-family: Verdana, sans-serif;">
<a href="https://hosting.photobucket.com/95288841-8654-4bf7-8fc9-a4aa78dce87f/1ef40d9f-2e5d-499f-80f7-6b4d72af83f9.jpg" style="font-family: Arial, Verdana, sans-serif;" target="_blank"><img alt="Click for enlarged picture" src="https://hosting.photobucket.com/95288841-8654-4bf7-8fc9-a4aa78dce87f/1ef40d9f-2e5d-499f-80f7-6b4d72af83f9.jpg" width="600" /></a></p>
<p>
<iframe allowfullscreen="" frameborder="0" height="360" src="https://www.youtube.com/embed/LzYP6Hx5nsI?si=jmjVIidV2ZvsAz6F" width="600"></iframe></p>
<p>
<a href="https://hosting.photobucket.com/95288841-8654-4bf7-8fc9-a4aa78dce87f/3141a84f-b80f-429d-9635-98cf9c5fd3ba.jpg" target="_blank"><img alt="Click for enlarged picture" src="https://hosting.photobucket.com/95288841-8654-4bf7-8fc9-a4aa78dce87f/3141a84f-b80f-429d-9635-98cf9c5fd3ba.jpg" width="600" /></a></p>
<p>
<a href="https://hosting.photobucket.com/95288841-8654-4bf7-8fc9-a4aa78dce87f/b0ae7518-4d6c-4af7-85a4-e2c1e5fd52cc.jpg" target="_blank"><img alt="Click for enlarged picture" src="https://hosting.photobucket.com/95288841-8654-4bf7-8fc9-a4aa78dce87f/b0ae7518-4d6c-4af7-85a4-e2c1e5fd52cc.jpg" width="600" /></a></p>
<p>
<a href="https://hosting.photobucket.com/95288841-8654-4bf7-8fc9-a4aa78dce87f/bc98e558-a4db-4676-840b-c67e052f2049.jpg" target="_blank"><img alt="Click for enlarged picture" src="https://hosting.photobucket.com/95288841-8654-4bf7-8fc9-a4aa78dce87f/bc98e558-a4db-4676-840b-c67e052f2049.jpg" width="600" /></a></p>
<p>
<a href="https://hosting.photobucket.com/95288841-8654-4bf7-8fc9-a4aa78dce87f/c992673a-0b69-4b12-b7d4-cf3dcfe87462.jpg" target="_blank"><img alt="Click for enlarged picture" src="https://hosting.photobucket.com/95288841-8654-4bf7-8fc9-a4aa78dce87f/c992673a-0b69-4b12-b7d4-cf3dcfe87462.jpg" width="600" /></a></p>
<p>
<a href="https://hosting.photobucket.com/95288841-8654-4bf7-8fc9-a4aa78dce87f/a5b3c4dd-9d89-423e-b1d9-3324eb88815c.jpg" target="_blank"><img alt="Click for enlarged picture" src="https://hosting.photobucket.com/95288841-8654-4bf7-8fc9-a4aa78dce87f/a5b3c4dd-9d89-423e-b1d9-3324eb88815c.jpg" width="600" /></a></p>
<p>
<a href="https://hosting.photobucket.com/95288841-8654-4bf7-8fc9-a4aa78dce87f/6c83d1bd-a307-4cdf-9e09-f2615d2688c4.jpg" target="_blank"><img alt="Click for enlarged picture" src="https://hosting.photobucket.com/95288841-8654-4bf7-8fc9-a4aa78dce87f/6c83d1bd-a307-4cdf-9e09-f2615d2688c4.jpg" width="600" /></a></p>"
["content_hrv"]=>
string(4213) "<p style="margin: 0px 0px 10px; padding: 0px; border: 0px; outline: 0px; vertical-align: baseline; background-image: initial; background-position: initial; background-size: initial; background-repeat: initial; background-attachment: initial; background-origin: initial; background-clip: initial; position: relative; float: none; clear: both; color: rgb(0, 0, 0); font-family: Verdana, sans-serif;">
U srijedu 25.2. u sklopu naše Izložbe minijatura i maketa Agram 2026, naša Agram Lego Sekcija je odradila svoj četvrti projekt. Nakon Hogwartsa u 2024. te Leonarda i Orient Expressa u 2025., prvi projekt u 2026. bio je bolid Formule 1 sa početka 1990-ih. </p>
<p>
<a href="https://hosting.photobucket.com/95288841-8654-4bf7-8fc9-a4aa78dce87f/1ef40d9f-2e5d-499f-80f7-6b4d72af83f9.jpg" target="_blank"><img alt="Click for enlarged picture" src="https://hosting.photobucket.com/95288841-8654-4bf7-8fc9-a4aa78dce87f/1ef40d9f-2e5d-499f-80f7-6b4d72af83f9.jpg" width="600" /></a></p>
<p>
Kao što je već tradicija kod naše Lego Sekcije, prije izgradnje modela, valjalo se malo educirati o temi. Ovoga puta naš dežurni strojar Marko Paunović održao je predavanje o bolidu FW14b, pobjedničkom bolidu iz 1992. tima Williams s kojim su postali svjetski konstruktorski prvaci, a kojeg je Nigel Mansel vozio do svjetske titule. U svojem predavanju, Marko je obradio teme aerodinamike, aktivnog ovjesa, mjenjača na volanu te ostalih inovacija koje je ovaj bolid uspješno instalirao. </p>
<p>
<iframe allowfullscreen="" frameborder="0" height="360" src="https://www.youtube.com/embed/LzYP6Hx5nsI?si=jmjVIidV2ZvsAz6F" width="600"></iframe></p>
<p>
Ulaz na predavanje bio je besplatan, a prijave nisu bile potrebne!</p>
<p>
<a href="https://hosting.photobucket.com/95288841-8654-4bf7-8fc9-a4aa78dce87f/3141a84f-b80f-429d-9635-98cf9c5fd3ba.jpg" target="_blank"><img alt="Click for enlarged picture" src="https://hosting.photobucket.com/95288841-8654-4bf7-8fc9-a4aa78dce87f/3141a84f-b80f-429d-9635-98cf9c5fd3ba.jpg" width="600" /></a></p>
<p>
<a href="https://hosting.photobucket.com/95288841-8654-4bf7-8fc9-a4aa78dce87f/b0ae7518-4d6c-4af7-85a4-e2c1e5fd52cc.jpg" target="_blank"><img alt="Click for enlarged picture" src="https://hosting.photobucket.com/95288841-8654-4bf7-8fc9-a4aa78dce87f/b0ae7518-4d6c-4af7-85a4-e2c1e5fd52cc.jpg" width="600" /></a></p>
<p>
<span style="color: rgb(0, 0, 0); font-family: Verdana, sans-serif;">Izrada makete je rezervirana za članove Agram Lego Sekcije. </span></p>
<p>
<a href="https://hosting.photobucket.com/95288841-8654-4bf7-8fc9-a4aa78dce87f/bc98e558-a4db-4676-840b-c67e052f2049.jpg" target="_blank"><img alt="Click for enlarged picture" src="https://hosting.photobucket.com/95288841-8654-4bf7-8fc9-a4aa78dce87f/bc98e558-a4db-4676-840b-c67e052f2049.jpg" width="600" /></a></p>
<p>
<a href="https://hosting.photobucket.com/95288841-8654-4bf7-8fc9-a4aa78dce87f/c992673a-0b69-4b12-b7d4-cf3dcfe87462.jpg" target="_blank"><img alt="Click for enlarged picture" src="https://hosting.photobucket.com/95288841-8654-4bf7-8fc9-a4aa78dce87f/c992673a-0b69-4b12-b7d4-cf3dcfe87462.jpg" width="600" /></a></p>
<p>
<a href="https://hosting.photobucket.com/95288841-8654-4bf7-8fc9-a4aa78dce87f/a5b3c4dd-9d89-423e-b1d9-3324eb88815c.jpg" target="_blank"><img alt="Click for enlarged picture" src="https://hosting.photobucket.com/95288841-8654-4bf7-8fc9-a4aa78dce87f/a5b3c4dd-9d89-423e-b1d9-3324eb88815c.jpg" width="600" /></a></p>
<p>
<span style="color: rgb(0, 0, 0); font-family: Verdana, sans-serif;">Ukoliko se želite uključiti u sljedeće projekte, javite se za više informacija na ums.agram@gmail.com .</span></p>
<p>
<a href="https://hosting.photobucket.com/95288841-8654-4bf7-8fc9-a4aa78dce87f/6c83d1bd-a307-4cdf-9e09-f2615d2688c4.jpg" target="_blank"><img alt="Click for enlarged picture" src="https://hosting.photobucket.com/95288841-8654-4bf7-8fc9-a4aa78dce87f/6c83d1bd-a307-4cdf-9e09-f2615d2688c4.jpg" width="600" /></a></p>
<p>
Sljedeći projekt bit će u travnju, a tema će biti Gospodar Prstenova. Očekuju vas pregršt zabavnih predavanja.<br />
<br />
Vidimo se!</p>
"
["created"]=>
string(19) "2026-02-26 13:32:17"
["modified"]=>
string(19) "2026-02-26 13:32:17"
}
["Member"]=>
array(10) {
["id"]=>
string(2) "64"
["group_id"]=>
string(1) "1"
["first_name"]=>
string(9) "Krunoslav"
["last_name"]=>
string(8) "Belinić"
["first_name_mask"]=>
string(9) "krunoslav"
["last_name_mask"]=>
string(7) "belinic"
["username"]=>
string(5) "Kruno"
["password"]=>
string(40) "eb3fda45fbec0258e90d809803b10491c548b22f"
["born"]=>
string(19) "2015-01-18 09:19:00"
["created"]=>
string(19) "2015-01-18 09:20:39"
}
}
</pre>
<a href="/dok/members/krunoslav.belinic">Krunoslav Belinić</a>, 26<span class="superscript">th</span> February 2026</span>
</li>
<li>
<a href="/dok/articles/2026/02/25" class="readMore"></a>
<span class="details"> <pre style="display: none;">
array(2) {
["Article"]=>
array(10) {
["id"]=>
string(3) "493"
["member_id"]=>
string(2) "64"
["title_eng"]=>
string(51) "Gallery of winning entries of Black Queen H&MPC2026"
["title_hrv"]=>
string(54) "Galerija pobjedničkih radova na Black Queen H&MPC2026"
["mask_eng"]=>
string(50) "gallery_of_winning_entries_of_black_queen_hmpc2026"
["mask_hrv"]=>
string(52) "galerija_pobjednickih_radova_na_black_queen_hmpc2026"
["content_eng"]=>
string(12503) "<p>
<strong>BEST OF SHOW</strong> & 1. place <strong>MASTERCLASS - IVAN KNEZOVIĆ</strong></p>
<p>
<a href="https://hosting.photobucket.com/95288841-8654-4bf7-8fc9-a4aa78dce87f/8949b562-8f41-4a80-aab2-f22784b3ba6c.jpg" target="_blank"><img alt="Click for enlarged picture" src="https://hosting.photobucket.com/95288841-8654-4bf7-8fc9-a4aa78dce87f/8949b562-8f41-4a80-aab2-f22784b3ba6c.jpg" width="600" /></a></p>
<p>
2. place <strong>MASTERCLASS </strong><strong>- ANŽE ZORKO</strong></p>
<p>
<a href="https://hosting.photobucket.com/95288841-8654-4bf7-8fc9-a4aa78dce87f/ae622692-061b-49cd-984e-0b93c47c12a9.jpg" target="_blank"><img alt="Click for enlarged picture" src="https://hosting.photobucket.com/95288841-8654-4bf7-8fc9-a4aa78dce87f/ae622692-061b-49cd-984e-0b93c47c12a9.jpg" width="600" /></a></p>
<p>
3. place <strong>MASTERCLASS </strong><strong>- ANA POLANŠĆAK</strong></p>
<p>
<a href="https://hosting.photobucket.com/95288841-8654-4bf7-8fc9-a4aa78dce87f/f33188f9-7799-4375-8e74-e1d946f874cd.jpg" target="_blank"><img alt="Click for enlarged picture" src="https://hosting.photobucket.com/95288841-8654-4bf7-8fc9-a4aa78dce87f/f33188f9-7799-4375-8e74-e1d946f874cd.jpg" width="600" /></a></p>
<p>
<strong>BEST DISPLAY </strong><strong>- MARKO PAUNOVIĆ</strong></p>
<p>
<a href="https://hosting.photobucket.com/95288841-8654-4bf7-8fc9-a4aa78dce87f/3f5d890e-529a-4fcb-9c86-221bd6fc2e57.jpg" target="_blank"><img alt="Click for enlarged picture" src="https://hosting.photobucket.com/95288841-8654-4bf7-8fc9-a4aa78dce87f/3f5d890e-529a-4fcb-9c86-221bd6fc2e57.jpg" width="600" /></a></p>
<p>
<strong>BEST OF FANTASY</strong> & <strong>PEOPLE'S CHOICE </strong><strong>- IVAN KNEZOVIĆ</strong></p>
<p>
<a href="https://hosting.photobucket.com/95288841-8654-4bf7-8fc9-a4aa78dce87f/c89aa7cf-f050-4aa4-bf5d-c31abe70165e.jpg" target="_blank"><img alt="Click for enlarged picture" src="https://hosting.photobucket.com/95288841-8654-4bf7-8fc9-a4aa78dce87f/c89aa7cf-f050-4aa4-bf5d-c31abe70165e.jpg" width="600" /></a></p>
<p>
<strong>BEST OF HISTORICAL </strong><strong>- NINOSLAV LUK</strong></p>
<p>
<a href="https://hosting.photobucket.com/95288841-8654-4bf7-8fc9-a4aa78dce87f/b2751730-af2e-42c6-a33c-30890f8d3a26.jpg" target="_blank"><img alt="Click for enlarged picture" src="https://hosting.photobucket.com/95288841-8654-4bf7-8fc9-a4aa78dce87f/b2751730-af2e-42c6-a33c-30890f8d3a26.jpg" width="600" /></a></p>
<p>
<strong>BEST SCULPT </strong><strong>- MONIKA BEŠENIĆ</strong></p>
<p>
<a href="https://hosting.photobucket.com/95288841-8654-4bf7-8fc9-a4aa78dce87f/7e5a7d8d-cea4-4e51-8bfc-6b67a4c12f05.jpg" target="_blank"><img alt="Click for enlarged picture" src="https://hosting.photobucket.com/95288841-8654-4bf7-8fc9-a4aa78dce87f/7e5a7d8d-cea4-4e51-8bfc-6b67a4c12f05.jpg" width="600" /></a></p>
<p>
1.place<strong>SINGLE MINIATURE </strong><strong>- VLADIMIR MATIĆ-KURILJEV</strong></p>
<p>
<a href="https://hosting.photobucket.com/95288841-8654-4bf7-8fc9-a4aa78dce87f/f4828224-9bde-4e65-8a6d-1af3f312503a.jpg" target="_blank"><img alt="Click for enlarged picture" src="https://hosting.photobucket.com/95288841-8654-4bf7-8fc9-a4aa78dce87f/f4828224-9bde-4e65-8a6d-1af3f312503a.jpg" width="600" /></a></p>
<p>
2.place<strong>SINGLE MINIATURE </strong><strong>- ANA POLANŠĆAK</strong></p>
<p>
<a href="https://hosting.photobucket.com/95288841-8654-4bf7-8fc9-a4aa78dce87f/cb9380c7-f7ee-406a-bccf-9a86477bed82.jpg" target="_blank"><img alt="Click for enlarged picture" src="https://hosting.photobucket.com/95288841-8654-4bf7-8fc9-a4aa78dce87f/cb9380c7-f7ee-406a-bccf-9a86477bed82.jpg" width="600" /></a></p>
<p>
3.place<strong>SINGLE MINIATURE - ADAM SKENDŽIĆ</strong></p>
<p>
<a href="https://hosting.photobucket.com/95288841-8654-4bf7-8fc9-a4aa78dce87f/a5f80a51-27d4-4040-952e-b04eb5bf4c99.jpg" target="_blank"><img alt="Click for enlarged picture" src="https://hosting.photobucket.com/95288841-8654-4bf7-8fc9-a4aa78dce87f/a5f80a51-27d4-4040-952e-b04eb5bf4c99.jpg" width="600" /></a></p>
<p>
1.place<strong>LARGE/MOUNTED MINIATURE - SEBASTIAN SOGARD</strong></p>
<p>
<a href="https://hosting.photobucket.com/95288841-8654-4bf7-8fc9-a4aa78dce87f/1f8e3547-5113-488b-9983-c3c592add875.jpg" target="_blank"><img alt="Click for enlarged picture" src="https://hosting.photobucket.com/95288841-8654-4bf7-8fc9-a4aa78dce87f/1f8e3547-5113-488b-9983-c3c592add875.jpg" width="600" /></a></p>
<p>
2.place<strong>LARGE/MOUNTED MINIATURE - JURE CUKAR</strong></p>
<p>
<a href="https://hosting.photobucket.com/95288841-8654-4bf7-8fc9-a4aa78dce87f/de5778ba-d672-4d24-8e6e-f9f1ac993c26.jpg" target="_blank"><img alt="Click for enlarged picture" src="https://hosting.photobucket.com/95288841-8654-4bf7-8fc9-a4aa78dce87f/de5778ba-d672-4d24-8e6e-f9f1ac993c26.jpg" width="600" /></a></p>
<p>
3.place<strong>LARGE/MOUNTED MINIATURE - ANA POLANŠĆAK</strong></p>
<p>
<a href="https://hosting.photobucket.com/95288841-8654-4bf7-8fc9-a4aa78dce87f/58d2d738-55f2-495d-bd44-cf8d023e0142.jpg" target="_blank"><img alt="Click for enlarged picture" src="https://hosting.photobucket.com/95288841-8654-4bf7-8fc9-a4aa78dce87f/58d2d738-55f2-495d-bd44-cf8d023e0142.jpg" width="600" /></a></p>
<p>
1.place<strong>UNIT / SQUAD </strong><strong>- IVAN KNEZOVIĆ</strong></p>
<p>
<a href="https://hosting.photobucket.com/95288841-8654-4bf7-8fc9-a4aa78dce87f/b77d9055-d0c4-4803-8e3f-0bf295c3d5d0.jpg" target="_blank"><img alt="Click for enlarged picture" src="https://hosting.photobucket.com/95288841-8654-4bf7-8fc9-a4aa78dce87f/b77d9055-d0c4-4803-8e3f-0bf295c3d5d0.jpg" width="600" /></a></p>
<p>
2.place<strong>UNIT / SQUAD - MILAN RADACSI</strong></p>
<p>
<a href="https://hosting.photobucket.com/95288841-8654-4bf7-8fc9-a4aa78dce87f/1a6d64f2-a293-4a81-b974-1696d8bb5972.jpg" target="_blank"><img alt="Click for enlarged picture" src="https://hosting.photobucket.com/95288841-8654-4bf7-8fc9-a4aa78dce87f/1a6d64f2-a293-4a81-b974-1696d8bb5972.jpg" width="600" /></a></p>
<p>
3.place<strong>UNIT / SQUAD - MAKSIMILIJAN ŠPRUNG</strong></p>
<p>
<a href="https://hosting.photobucket.com/95288841-8654-4bf7-8fc9-a4aa78dce87f/0b0ae61f-c140-4c35-b58c-a0813c15d83a.jpg" target="_blank"><img alt="Click for enlarged picture" src="https://hosting.photobucket.com/95288841-8654-4bf7-8fc9-a4aa78dce87f/0b0ae61f-c140-4c35-b58c-a0813c15d83a.jpg" width="600" /></a></p>
<p>
1.place<strong>VEHICLE / MONSTER - MAKSIMILIJAN ŠPRUNG</strong></p>
<p>
<a href="https://hosting.photobucket.com/95288841-8654-4bf7-8fc9-a4aa78dce87f/34dbfff5-b8db-478d-a13d-3698c0490a95.jpg" target="_blank"><img alt="Click for enlarged picture" src="https://hosting.photobucket.com/95288841-8654-4bf7-8fc9-a4aa78dce87f/34dbfff5-b8db-478d-a13d-3698c0490a95.jpg" width="600" /></a></p>
<p>
2.place<strong>VEHICLE / MONSTER - MARIO GRGUREV</strong></p>
<p>
<a href="https://hosting.photobucket.com/95288841-8654-4bf7-8fc9-a4aa78dce87f/387e5e88-4f80-4bb9-9b30-f7241369de41.jpg" target="_blank"><img alt="Click for enlarged picture" src="https://hosting.photobucket.com/95288841-8654-4bf7-8fc9-a4aa78dce87f/387e5e88-4f80-4bb9-9b30-f7241369de41.jpg" width="600" /></a></p>
<p>
3.place<strong>VEHICLE / MONSTER - MARKO PAUNOVIĆ</strong></p>
<p>
<a href="https://hosting.photobucket.com/95288841-8654-4bf7-8fc9-a4aa78dce87f/8c2034d2-cae0-4bc2-bdd9-eab85b71db7b.jpg" target="_blank"><img alt="Click for enlarged picture" src="https://hosting.photobucket.com/95288841-8654-4bf7-8fc9-a4aa78dce87f/8c2034d2-cae0-4bc2-bdd9-eab85b71db7b.jpg" width="600" /></a></p>
<p>
1.place<strong>OPEN - PETAR KNEZOVIĆ</strong></p>
<p>
<a href="https://hosting.photobucket.com/95288841-8654-4bf7-8fc9-a4aa78dce87f/7e2723b8-421d-4d59-b2ab-5b5abf4a067a.jpg" target="_blank"><img alt="Click for enlarged picture" src="https://hosting.photobucket.com/95288841-8654-4bf7-8fc9-a4aa78dce87f/7e2723b8-421d-4d59-b2ab-5b5abf4a067a.jpg" width="600" /></a></p>
<p>
2.place<strong>OPEN - FILIP KNEZOVIĆ</strong></p>
<p>
<a href="https://hosting.photobucket.com/95288841-8654-4bf7-8fc9-a4aa78dce87f/2bcd6dc0-6d54-44fd-b660-4f6862e2551f.jpg" target="_blank"><img alt="Click for enlarged picture" src="https://hosting.photobucket.com/95288841-8654-4bf7-8fc9-a4aa78dce87f/2bcd6dc0-6d54-44fd-b660-4f6862e2551f.jpg" width="600" /></a></p>
<p>
3.place<strong>OPEN - DINO TEREK</strong></p>
<p>
<a href="https://hosting.photobucket.com/95288841-8654-4bf7-8fc9-a4aa78dce87f/fe807e70-9250-49f9-8458-56b2ee4b0fad.jpg" target="_blank"><img alt="Click for enlarged picture" src="https://hosting.photobucket.com/95288841-8654-4bf7-8fc9-a4aa78dce87f/fe807e70-9250-49f9-8458-56b2ee4b0fad.jpg" width="600" /></a></p>
<p>
1.place<strong>DIORAMA / DUEL - MARKO PAUNOVIĆ</strong></p>
<p>
<a href="https://hosting.photobucket.com/95288841-8654-4bf7-8fc9-a4aa78dce87f/a7f3bd4c-74cd-48ff-ac00-2d884c6c4770.jpg" target="_blank"><img alt="Click for enlarged picture" src="https://hosting.photobucket.com/95288841-8654-4bf7-8fc9-a4aa78dce87f/a7f3bd4c-74cd-48ff-ac00-2d884c6c4770.jpg" width="600" /></a></p>
<p>
2.place<strong>DIORAMA / DUEL - VLADIMIR MATIĆ-KURILJEV</strong></p>
<p>
<a href="https://hosting.photobucket.com/95288841-8654-4bf7-8fc9-a4aa78dce87f/1218bbec-f68d-40e4-a8ae-66e57c949846.jpg" target="_blank"><img alt="Click for enlarged picture" src="https://hosting.photobucket.com/95288841-8654-4bf7-8fc9-a4aa78dce87f/1218bbec-f68d-40e4-a8ae-66e57c949846.jpg" width="600" /></a></p>
<p>
3.place<strong>DIORAMA / DUEL - JURE CUKAR</strong></p>
<p>
<a href="https://hosting.photobucket.com/95288841-8654-4bf7-8fc9-a4aa78dce87f/4ad5c251-dd03-471f-8ff2-3526507e4aa7.jpg" target="_blank"><img alt="Click for enlarged picture" src="https://hosting.photobucket.com/95288841-8654-4bf7-8fc9-a4aa78dce87f/4ad5c251-dd03-471f-8ff2-3526507e4aa7.jpg" width="600" /></a></p>
<p>
1.place<strong>BUST - MARKO PAUNOVIĆ</strong></p>
<p>
<a href="https://hosting.photobucket.com/95288841-8654-4bf7-8fc9-a4aa78dce87f/daaa9dff-9d7c-4696-b8d9-7ce0c311012a.jpg" target="_blank"><img alt="Click for enlarged picture" src="https://hosting.photobucket.com/95288841-8654-4bf7-8fc9-a4aa78dce87f/daaa9dff-9d7c-4696-b8d9-7ce0c311012a.jpg" width="600" /></a></p>
<p>
2.place<strong>BUST - ANŽE ZORKO</strong></p>
<p>
<a href="https://hosting.photobucket.com/95288841-8654-4bf7-8fc9-a4aa78dce87f/e11e4893-05f4-49df-a758-720b188c5917.jpg" target="_blank"><img alt="Click for enlarged picture" src="https://hosting.photobucket.com/95288841-8654-4bf7-8fc9-a4aa78dce87f/e11e4893-05f4-49df-a758-720b188c5917.jpg" width="600" /></a></p>
<p>
3.place<strong>BUST </strong><strong>- IVAN KNEZOVIĆ</strong></p>
<p>
<a href="https://hosting.photobucket.com/95288841-8654-4bf7-8fc9-a4aa78dce87f/d2435198-c290-43bf-a2fe-e8e592dabd7f.jpg" target="_blank"><img alt="Click for enlarged picture" src="https://hosting.photobucket.com/95288841-8654-4bf7-8fc9-a4aa78dce87f/d2435198-c290-43bf-a2fe-e8e592dabd7f.jpg" width="600" /></a></p>
<p>
1.place<strong>JUNIOR - ELANOR GRAŠIĆ</strong></p>
<p>
<a href="https://hosting.photobucket.com/95288841-8654-4bf7-8fc9-a4aa78dce87f/f0bbb346-9821-43dc-a463-e507fb1b87ee.jpg" target="_blank"><img alt="Click for enlarged picture" src="https://hosting.photobucket.com/95288841-8654-4bf7-8fc9-a4aa78dce87f/f0bbb346-9821-43dc-a463-e507fb1b87ee.jpg" width="600" /></a></p>
<p>
2.place<strong>JUNIOR - LUKA ŠEGINA</strong></p>
<p>
<a href="https://hosting.photobucket.com/95288841-8654-4bf7-8fc9-a4aa78dce87f/1829eee3-80f3-48de-a013-bada8c612e76.jpg" target="_blank"><img alt="Click for enlarged picture" src="https://hosting.photobucket.com/95288841-8654-4bf7-8fc9-a4aa78dce87f/1829eee3-80f3-48de-a013-bada8c612e76.jpg" width="600" /></a></p>
<p>
3.place<strong>JUNIOR - SOFIJA MARASOVIĆ</strong></p>
<p>
<a href="https://hosting.photobucket.com/95288841-8654-4bf7-8fc9-a4aa78dce87f/bdf02300-4634-46b3-a659-6a8a9183177e.jpg" target="_blank"><img alt="Click for enlarged picture" src="https://hosting.photobucket.com/95288841-8654-4bf7-8fc9-a4aa78dce87f/bdf02300-4634-46b3-a659-6a8a9183177e.jpg" width="600" /></a></p>
<p>
You can see all the entries in the gallery on our <a href="https://www.facebook.com/BlackQueenHMPC/posts/pfbid02gCGwwc8vTLFJDs1MFmbxc8NKZv1oni7uykTLKmomFSM1APfKrGRNtCkr2a6HTGQrl">social networks</a>.</p>
"
["content_hrv"]=>
string(12719) "<p>
<strong>BEST OF SHOW</strong> & 1. mjesto <strong>MASTERCLASS - IVAN KNEZOVIĆ</strong></p>
<p>
<a href="https://hosting.photobucket.com/95288841-8654-4bf7-8fc9-a4aa78dce87f/8949b562-8f41-4a80-aab2-f22784b3ba6c.jpg" target="_blank"><img alt="Click for enlarged picture" src="https://hosting.photobucket.com/95288841-8654-4bf7-8fc9-a4aa78dce87f/8949b562-8f41-4a80-aab2-f22784b3ba6c.jpg" width="600" /></a></p>
<p>
2. mjesto <strong>MASTERCLASS </strong><strong>- ANŽE ZORKO</strong></p>
<p>
<a href="https://hosting.photobucket.com/95288841-8654-4bf7-8fc9-a4aa78dce87f/ae622692-061b-49cd-984e-0b93c47c12a9.jpg" target="_blank"><img alt="Click for enlarged picture" src="https://hosting.photobucket.com/95288841-8654-4bf7-8fc9-a4aa78dce87f/ae622692-061b-49cd-984e-0b93c47c12a9.jpg" width="600" /></a></p>
<p>
3. mjesto <strong>MASTERCLASS </strong><strong>- ANA POLANŠĆAK</strong></p>
<p>
<a href="https://hosting.photobucket.com/95288841-8654-4bf7-8fc9-a4aa78dce87f/f33188f9-7799-4375-8e74-e1d946f874cd.jpg" target="_blank"><img alt="Click for enlarged picture" src="https://hosting.photobucket.com/95288841-8654-4bf7-8fc9-a4aa78dce87f/f33188f9-7799-4375-8e74-e1d946f874cd.jpg" width="600" /></a></p>
<p>
<strong>BEST DISPLAY </strong><strong>- MARKO PAUNOVIĆ</strong></p>
<p>
<a href="https://hosting.photobucket.com/95288841-8654-4bf7-8fc9-a4aa78dce87f/3f5d890e-529a-4fcb-9c86-221bd6fc2e57.jpg" target="_blank"><img alt="Click for enlarged picture" src="https://hosting.photobucket.com/95288841-8654-4bf7-8fc9-a4aa78dce87f/3f5d890e-529a-4fcb-9c86-221bd6fc2e57.jpg" width="600" /></a></p>
<p>
<strong>BEST OF FANTASY</strong> & <strong>PEOPLE'S CHOICE </strong><strong>- IVAN KNEZOVIĆ</strong></p>
<p>
<a href="https://hosting.photobucket.com/95288841-8654-4bf7-8fc9-a4aa78dce87f/c89aa7cf-f050-4aa4-bf5d-c31abe70165e.jpg" target="_blank"><img alt="Click for enlarged picture" src="https://hosting.photobucket.com/95288841-8654-4bf7-8fc9-a4aa78dce87f/c89aa7cf-f050-4aa4-bf5d-c31abe70165e.jpg" width="600" /></a></p>
<p>
<strong>BEST OF HISTORICAL </strong><strong>- NINOSLAV LUK</strong></p>
<p>
<a href="https://hosting.photobucket.com/95288841-8654-4bf7-8fc9-a4aa78dce87f/b2751730-af2e-42c6-a33c-30890f8d3a26.jpg" target="_blank"><img alt="Click for enlarged picture" src="https://hosting.photobucket.com/95288841-8654-4bf7-8fc9-a4aa78dce87f/b2751730-af2e-42c6-a33c-30890f8d3a26.jpg" width="600" /></a></p>
<p>
<strong>BEST SCULPT </strong><strong>- MONIKA BEŠENIĆ</strong></p>
<p>
<a href="https://hosting.photobucket.com/95288841-8654-4bf7-8fc9-a4aa78dce87f/7e5a7d8d-cea4-4e51-8bfc-6b67a4c12f05.jpg" target="_blank"><img alt="Click for enlarged picture" src="https://hosting.photobucket.com/95288841-8654-4bf7-8fc9-a4aa78dce87f/7e5a7d8d-cea4-4e51-8bfc-6b67a4c12f05.jpg" width="600" /></a></p>
<p>
1.mjesto <strong>SINGLE MINIATURE </strong><strong>- VLADIMIR MATIĆ-KURILJEV</strong></p>
<p>
<a href="https://hosting.photobucket.com/95288841-8654-4bf7-8fc9-a4aa78dce87f/f4828224-9bde-4e65-8a6d-1af3f312503a.jpg" target="_blank"><img alt="Click for enlarged picture" src="https://hosting.photobucket.com/95288841-8654-4bf7-8fc9-a4aa78dce87f/f4828224-9bde-4e65-8a6d-1af3f312503a.jpg" width="600" /></a></p>
<p>
2.mjesto <strong>SINGLE MINIATURE </strong><strong>- ANA POLANŠĆAK</strong></p>
<p>
<a href="https://hosting.photobucket.com/95288841-8654-4bf7-8fc9-a4aa78dce87f/cb9380c7-f7ee-406a-bccf-9a86477bed82.jpg" target="_blank"><img alt="Click for enlarged picture" src="https://hosting.photobucket.com/95288841-8654-4bf7-8fc9-a4aa78dce87f/cb9380c7-f7ee-406a-bccf-9a86477bed82.jpg" width="600" /></a></p>
<p>
3.mjesto <strong>SINGLE MINIATURE - ADAM SKENDŽIĆ</strong></p>
<p>
<a href="https://hosting.photobucket.com/95288841-8654-4bf7-8fc9-a4aa78dce87f/a5f80a51-27d4-4040-952e-b04eb5bf4c99.jpg" target="_blank"><img alt="Click for enlarged picture" src="https://hosting.photobucket.com/95288841-8654-4bf7-8fc9-a4aa78dce87f/a5f80a51-27d4-4040-952e-b04eb5bf4c99.jpg" width="600" /></a></p>
<p>
1.mjesto <strong>LARGE/MOUNTED MINIATURE - SEBASTIAN SOGARD</strong></p>
<p>
<a href="https://hosting.photobucket.com/95288841-8654-4bf7-8fc9-a4aa78dce87f/1f8e3547-5113-488b-9983-c3c592add875.jpg" target="_blank"><img alt="Click for enlarged picture" src="https://hosting.photobucket.com/95288841-8654-4bf7-8fc9-a4aa78dce87f/1f8e3547-5113-488b-9983-c3c592add875.jpg" width="600" /></a></p>
<p>
2.mjesto <strong>LARGE/MOUNTED MINIATURE - JURE CUKAR</strong></p>
<p>
<a href="https://hosting.photobucket.com/95288841-8654-4bf7-8fc9-a4aa78dce87f/de5778ba-d672-4d24-8e6e-f9f1ac993c26.jpg" target="_blank"><img alt="Click for enlarged picture" src="https://hosting.photobucket.com/95288841-8654-4bf7-8fc9-a4aa78dce87f/de5778ba-d672-4d24-8e6e-f9f1ac993c26.jpg" width="600" /></a></p>
<p>
3.mjesto <strong>LARGE/MOUNTED MINIATURE - ANA POLANŠĆAK</strong></p>
<p>
<a href="https://hosting.photobucket.com/95288841-8654-4bf7-8fc9-a4aa78dce87f/58d2d738-55f2-495d-bd44-cf8d023e0142.jpg" target="_blank"><img alt="Click for enlarged picture" src="https://hosting.photobucket.com/95288841-8654-4bf7-8fc9-a4aa78dce87f/58d2d738-55f2-495d-bd44-cf8d023e0142.jpg" width="600" /></a></p>
<p>
1.mjesto <strong>UNIT / SQUAD </strong><strong>- IVAN KNEZOVIĆ</strong></p>
<p>
<a href="https://hosting.photobucket.com/95288841-8654-4bf7-8fc9-a4aa78dce87f/b77d9055-d0c4-4803-8e3f-0bf295c3d5d0.jpg" target="_blank"><img alt="Click for enlarged picture" src="https://hosting.photobucket.com/95288841-8654-4bf7-8fc9-a4aa78dce87f/b77d9055-d0c4-4803-8e3f-0bf295c3d5d0.jpg" width="600" /></a></p>
<p>
2.mjesto <strong>UNIT / SQUAD - MILAN RADACSI</strong></p>
<p>
<a href="https://hosting.photobucket.com/95288841-8654-4bf7-8fc9-a4aa78dce87f/1a6d64f2-a293-4a81-b974-1696d8bb5972.jpg" target="_blank"><img alt="Click for enlarged picture" src="https://hosting.photobucket.com/95288841-8654-4bf7-8fc9-a4aa78dce87f/1a6d64f2-a293-4a81-b974-1696d8bb5972.jpg" width="600" /></a></p>
<p>
3.mjesto <strong>UNIT / SQUAD - MAKSIMILIJAN ŠPRUNG</strong></p>
<p>
<a href="https://hosting.photobucket.com/95288841-8654-4bf7-8fc9-a4aa78dce87f/0b0ae61f-c140-4c35-b58c-a0813c15d83a.jpg" target="_blank"><img alt="Click for enlarged picture" src="https://hosting.photobucket.com/95288841-8654-4bf7-8fc9-a4aa78dce87f/0b0ae61f-c140-4c35-b58c-a0813c15d83a.jpg" width="600" /></a></p>
<p>
1.mjesto <strong>VEHICLE / MONSTER - MAKSIMILIJAN ŠPRUNG</strong></p>
<p>
<a href="https://hosting.photobucket.com/95288841-8654-4bf7-8fc9-a4aa78dce87f/34dbfff5-b8db-478d-a13d-3698c0490a95.jpg" target="_blank"><img alt="Click for enlarged picture" src="https://hosting.photobucket.com/95288841-8654-4bf7-8fc9-a4aa78dce87f/34dbfff5-b8db-478d-a13d-3698c0490a95.jpg" width="600" /></a></p>
<p>
2.mjesto <strong>VEHICLE / MONSTER - MARIO GRGUREV</strong></p>
<p>
<a href="https://hosting.photobucket.com/95288841-8654-4bf7-8fc9-a4aa78dce87f/387e5e88-4f80-4bb9-9b30-f7241369de41.jpg" target="_blank"><img alt="Click for enlarged picture" src="https://hosting.photobucket.com/95288841-8654-4bf7-8fc9-a4aa78dce87f/387e5e88-4f80-4bb9-9b30-f7241369de41.jpg" width="600" /></a></p>
<p>
3.mjesto <strong>VEHICLE / MONSTER - MARKO PAUNOVIĆ</strong></p>
<p>
<a href="https://hosting.photobucket.com/95288841-8654-4bf7-8fc9-a4aa78dce87f/8c2034d2-cae0-4bc2-bdd9-eab85b71db7b.jpg" target="_blank"><img alt="Click for enlarged picture" src="https://hosting.photobucket.com/95288841-8654-4bf7-8fc9-a4aa78dce87f/8c2034d2-cae0-4bc2-bdd9-eab85b71db7b.jpg" width="600" /></a></p>
<p>
1.mjesto <strong>OPEN - PETAR KNEZOVIĆ</strong></p>
<p>
<a href="https://hosting.photobucket.com/95288841-8654-4bf7-8fc9-a4aa78dce87f/7e2723b8-421d-4d59-b2ab-5b5abf4a067a.jpg" target="_blank"><img alt="Click for enlarged picture" src="https://hosting.photobucket.com/95288841-8654-4bf7-8fc9-a4aa78dce87f/7e2723b8-421d-4d59-b2ab-5b5abf4a067a.jpg" width="600" /></a></p>
<p>
2.mjesto <strong>OPEN - FILIP KNEZOVIĆ</strong></p>
<p>
<a href="https://hosting.photobucket.com/95288841-8654-4bf7-8fc9-a4aa78dce87f/2bcd6dc0-6d54-44fd-b660-4f6862e2551f.jpg" target="_blank"><img alt="Click for enlarged picture" src="https://hosting.photobucket.com/95288841-8654-4bf7-8fc9-a4aa78dce87f/2bcd6dc0-6d54-44fd-b660-4f6862e2551f.jpg" width="600" /></a></p>
<p>
3.mjesto <strong>OPEN - DINO TEREK</strong></p>
<p>
<a href="https://hosting.photobucket.com/95288841-8654-4bf7-8fc9-a4aa78dce87f/fe807e70-9250-49f9-8458-56b2ee4b0fad.jpg" target="_blank"><img alt="Click for enlarged picture" src="https://hosting.photobucket.com/95288841-8654-4bf7-8fc9-a4aa78dce87f/fe807e70-9250-49f9-8458-56b2ee4b0fad.jpg" width="600" /></a></p>
<p>
1.mjesto <strong>DIORAMA / DUEL - MARKO PAUNOVIĆ</strong></p>
<p>
<a href="https://hosting.photobucket.com/95288841-8654-4bf7-8fc9-a4aa78dce87f/a7f3bd4c-74cd-48ff-ac00-2d884c6c4770.jpg" target="_blank"><img alt="Click for enlarged picture" src="https://hosting.photobucket.com/95288841-8654-4bf7-8fc9-a4aa78dce87f/a7f3bd4c-74cd-48ff-ac00-2d884c6c4770.jpg" width="600" /></a></p>
<p>
2.mjesto <strong>DIORAMA / DUEL - VLADIMIR MATIĆ-KURILJEV</strong></p>
<p>
<a href="https://hosting.photobucket.com/95288841-8654-4bf7-8fc9-a4aa78dce87f/1218bbec-f68d-40e4-a8ae-66e57c949846.jpg" target="_blank"><img alt="Click for enlarged picture" src="https://hosting.photobucket.com/95288841-8654-4bf7-8fc9-a4aa78dce87f/1218bbec-f68d-40e4-a8ae-66e57c949846.jpg" width="600" /></a></p>
<p>
3.mjesto <strong>DIORAMA / DUEL - JURE CUKAR</strong></p>
<p>
<a href="https://hosting.photobucket.com/95288841-8654-4bf7-8fc9-a4aa78dce87f/4ad5c251-dd03-471f-8ff2-3526507e4aa7.jpg" target="_blank"><img alt="Click for enlarged picture" src="https://hosting.photobucket.com/95288841-8654-4bf7-8fc9-a4aa78dce87f/4ad5c251-dd03-471f-8ff2-3526507e4aa7.jpg" width="600" /></a></p>
<p>
1.mjesto <strong>BUST - MARKO PAUNOVIĆ</strong></p>
<p>
<a href="https://hosting.photobucket.com/95288841-8654-4bf7-8fc9-a4aa78dce87f/daaa9dff-9d7c-4696-b8d9-7ce0c311012a.jpg" target="_blank"><img alt="Click for enlarged picture" src="https://hosting.photobucket.com/95288841-8654-4bf7-8fc9-a4aa78dce87f/daaa9dff-9d7c-4696-b8d9-7ce0c311012a.jpg" width="600" /></a></p>
<p>
2.mjesto <strong>BUST - ANŽE ZORKO</strong></p>
<p>
<a href="https://hosting.photobucket.com/95288841-8654-4bf7-8fc9-a4aa78dce87f/e11e4893-05f4-49df-a758-720b188c5917.jpg" target="_blank"><img alt="Click for enlarged picture" src="https://hosting.photobucket.com/95288841-8654-4bf7-8fc9-a4aa78dce87f/e11e4893-05f4-49df-a758-720b188c5917.jpg" width="600" /></a></p>
<p>
3.mjesto <strong>BUST </strong><strong>- IVAN KNEZOVIĆ</strong></p>
<p>
<a href="https://hosting.photobucket.com/95288841-8654-4bf7-8fc9-a4aa78dce87f/d2435198-c290-43bf-a2fe-e8e592dabd7f.jpg" target="_blank"><img alt="Click for enlarged picture" src="https://hosting.photobucket.com/95288841-8654-4bf7-8fc9-a4aa78dce87f/d2435198-c290-43bf-a2fe-e8e592dabd7f.jpg" width="600" /></a></p>
<p>
1.mjesto <strong>JUNIOR - ELANOR GRAŠIĆ</strong></p>
<p>
<a href="https://hosting.photobucket.com/95288841-8654-4bf7-8fc9-a4aa78dce87f/f0bbb346-9821-43dc-a463-e507fb1b87ee.jpg" target="_blank"><img alt="Click for enlarged picture" src="https://hosting.photobucket.com/95288841-8654-4bf7-8fc9-a4aa78dce87f/f0bbb346-9821-43dc-a463-e507fb1b87ee.jpg" width="600" /></a></p>
<p>
2.mjesto <strong>JUNIOR - LUKA ŠEGINA</strong></p>
<p>
<a href="https://hosting.photobucket.com/95288841-8654-4bf7-8fc9-a4aa78dce87f/1829eee3-80f3-48de-a013-bada8c612e76.jpg" target="_blank"><img alt="Click for enlarged picture" src="https://hosting.photobucket.com/95288841-8654-4bf7-8fc9-a4aa78dce87f/1829eee3-80f3-48de-a013-bada8c612e76.jpg" width="600" /></a></p>
<p>
3.mjesto <strong>JUNIOR - SOFIJA MARASOVIĆ</strong></p>
<p>
<a href="https://hosting.photobucket.com/95288841-8654-4bf7-8fc9-a4aa78dce87f/bdf02300-4634-46b3-a659-6a8a9183177e.jpg" target="_blank"><img alt="Click for enlarged picture" src="https://hosting.photobucket.com/95288841-8654-4bf7-8fc9-a4aa78dce87f/bdf02300-4634-46b3-a659-6a8a9183177e.jpg" width="600" /></a></p>
<p>
Sve radove možete pogledati u galeriji na našim <a href="https://www.facebook.com/BlackQueenHMPC/posts/pfbid02gCGwwc8vTLFJDs1MFmbxc8NKZv1oni7uykTLKmomFSM1APfKrGRNtCkr2a6HTGQrl">socijalnim mrežama</a>.</p>
"
["created"]=>
string(19) "2026-02-25 09:03:55"
["modified"]=>
string(19) "2026-02-28 05:54:18"
}
["Member"]=>
array(10) {
["id"]=>
string(2) "64"
["group_id"]=>
string(1) "1"
["first_name"]=>
string(9) "Krunoslav"
["last_name"]=>
string(8) "Belinić"
["first_name_mask"]=>
string(9) "krunoslav"
["last_name_mask"]=>
string(7) "belinic"
["username"]=>
string(5) "Kruno"
["password"]=>
string(40) "eb3fda45fbec0258e90d809803b10491c548b22f"
["born"]=>
string(19) "2015-01-18 09:19:00"
["created"]=>
string(19) "2015-01-18 09:20:39"
}
}
</pre>
<a href="/dok/members/krunoslav.belinic">Krunoslav Belinić</a>, 25<span class="superscript">th</span> February 2026</span>
</li>
<li>
<a href="/dok/articles/2026/01/19" class="readMore"></a>
<span class="details"> <pre style="display: none;">
array(2) {
["Article"]=>
array(10) {
["id"]=>
string(3) "492"
["member_id"]=>
string(2) "35"
["title_eng"]=>
string(27) "SFRJ 1986 v2 Diorama part 5"
["title_hrv"]=>
string(29) "Diorama SFRJ 1986 v2– dio 5"
["mask_eng"]=>
string(27) "sfrj_1986_v2_diorama_part_5"
["mask_hrv"]=>
string(26) "diorama_sfrj_1986_v2_dio_5"
["content_eng"]=>
string(3653) "<p>
<em>In this series of articles, we will follow my work on a new diorama, another in the 1986 series. This time I have again decided to use a former country. Another version of the SFRY 1986.</em></p>
<p>
<a href=" https://hosting.photobucket.com/95288841-8654-4bf7-8fc9-a4aa78dce87f/ff4272e9-997f-49b7-b214-6f7605ca87c5.jpg
" target="_blank"> <img alt="Click for enlarged picture" src=" https://hosting.photobucket.com/95288841-8654-4bf7-8fc9-a4aa78dce87f/ff4272e9-997f-49b7-b214-6f7605ca87c5.jpg" width="600" /> </a></p>
<p>
So far I have finished making the base, painting the base, painting the interior of the vehicle and painting the figures. Now it's time to add the vegetation</p>
<p>
<a href=" https://hosting.photobucket.com/95288841-8654-4bf7-8fc9-a4aa78dce87f/70a25828-f5b9-46fd-9b11-c4be1cfaba63.jpg" target="_blank"> <img alt="Click for enlarged picture" src=" https://hosting.photobucket.com/95288841-8654-4bf7-8fc9-a4aa78dce87f/70a25828-f5b9-46fd-9b11-c4be1cfaba63.jpg" width="600" /> </a></p>
<p>
The pines/trees were already fixed to the base before painting, so the first vegetation I added was tall shrubs that filled the volume of the base.</p>
<p>
<a href=" https://hosting.photobucket.com/95288841-8654-4bf7-8fc9-a4aa78dce87f/9f7cb598-1f48-4d88-98e1-396d0a172363.jpg" target="_blank"> <img alt="Click for enlarged picture" src=" https://hosting.photobucket.com/95288841-8654-4bf7-8fc9-a4aa78dce87f/9f7cb598-1f48-4d88-98e1-396d0a172363.jpg" width="600" /> </a></p>
<p>
Then I added lower vegetation like tall grass and lower bushes.</p>
<p>
<a href=" https://hosting.photobucket.com/95288841-8654-4bf7-8fc9-a4aa78dce87f/3fe54784-a94c-4c0f-bf23-701033a73325.jpg" target="_blank"> <img alt="Click for enlarged picture" src=" https://hosting.photobucket.com/95288841-8654-4bf7-8fc9-a4aa78dce87f/3fe54784-a94c-4c0f-bf23-701033a73325.jpg" width="600" /> </a></p>
<p>
Finally, I added some short grass, making sure when I was making the parking lot and path that there was no vegetation in the places where the wheels pass.</p>
<p>
<a href=" https://hosting.photobucket.com/95288841-8654-4bf7-8fc9-a4aa78dce87f/596ce54a-a0cb-4a9b-9406-835a7b348f9a.jpg" target="_blank"> <img alt="Click for enlarged picture" src=" https://hosting.photobucket.com/95288841-8654-4bf7-8fc9-a4aa78dce87f/596ce54a-a0cb-4a9b-9406-835a7b348f9a.jpg" width="600" /> </a></p>
<p>
The paint on the base has just dried up, so next time I'll add the vegetation.</p>
<p>
<a href=" https://hosting.photobucket.com/95288841-8654-4bf7-8fc9-a4aa78dce87f/1d2acabb-7ec7-4f67-bec8-b3b73d5ddf46.jpg" target="_blank"> <img alt="Click for enlarged picture" src=" https://hosting.photobucket.com/95288841-8654-4bf7-8fc9-a4aa78dce87f/1d2acabb-7ec7-4f67-bec8-b3b73d5ddf46.jpg" width="600" /> </a></p>
<p>
When the diorama is turned to the back, the volume of the forest is visible.</p>
<p>
<a href=" https://hosting.photobucket.com/95288841-8654-4bf7-8fc9-a4aa78dce87f/1d2acabb-7ec7-4f67-bec8-b3b73d5ddf46.jpg" target="_blank"> <img alt="Click for enlarged picture" src=" https://hosting.photobucket.com/95288841-8654-4bf7-8fc9-a4aa78dce87f/1d2acabb-7ec7-4f67-bec8-b3b73d5ddf46.jpg" width="600" /> </a></p>
<p>
Before placing the vehicles and miniatures on the base, the diorama looks like this.</p>
<p>
<a href=" https://hosting.photobucket.com/95288841-8654-4bf7-8fc9-a4aa78dce87f/a7ffc2b0-a9bf-4e41-ab2f-0c3021b0447f.jpg" target="_blank"> <img alt="Click for enlarged picture" src=" https://hosting.photobucket.com/95288841-8654-4bf7-8fc9-a4aa78dce87f/a7ffc2b0-a9bf-4e41-ab2f-0c3021b0447f.jpg" width="600" /> </a></p>
"
["content_hrv"]=>
string(3186) "<p>
<em>U ovoj seriji članaka pratit ćemo moj rad na novoj diorami, još jednoj u nizu serijala 1986. Ovaj put sam se opet odlučio za bivšu državu. Druga verzija SFRJ 1986..</em></p>
<p>
<a href=" https://hosting.photobucket.com/95288841-8654-4bf7-8fc9-a4aa78dce87f/ff4272e9-997f-49b7-b214-6f7605ca87c5.jpg
" target="_blank"> <img alt="Click for enlarged picture" src=" https://hosting.photobucket.com/95288841-8654-4bf7-8fc9-a4aa78dce87f/ff4272e9-997f-49b7-b214-6f7605ca87c5.jpg" width="600" /> </a></p>
<p>
Do sada sam završio s izradom baze, bojanjem baze, bojanjem interijera vozila i bojanjem figura. Sada je došlo vrijeme za dodavanje vegetacije</p>
<p>
<a href=" https://hosting.photobucket.com/95288841-8654-4bf7-8fc9-a4aa78dce87f/70a25828-f5b9-46fd-9b11-c4be1cfaba63.jpg" target="_blank"> <img alt="Click for enlarged picture" src=" https://hosting.photobucket.com/95288841-8654-4bf7-8fc9-a4aa78dce87f/70a25828-f5b9-46fd-9b11-c4be1cfaba63.jpg" width="600" /> </a></p>
<p>
Borovi/drveće je već bilo fiksirano na bazu prije bojanja pa je prva sljedeća vegetacija bila visoko žbunje kojim sam popunio volumen baze.</p>
<p>
<a href=" https://hosting.photobucket.com/95288841-8654-4bf7-8fc9-a4aa78dce87f/9f7cb598-1f48-4d88-98e1-396d0a172363.jpg" target="_blank"> <img alt="Click for enlarged picture" src=" https://hosting.photobucket.com/95288841-8654-4bf7-8fc9-a4aa78dce87f/9f7cb598-1f48-4d88-98e1-396d0a172363.jpg" width="600" /> </a></p>
<p>
Potom sam dodao niže raslinje poput visoke trave i nižeg grmlja.</p>
<p>
<a href=" https://hosting.photobucket.com/95288841-8654-4bf7-8fc9-a4aa78dce87f/3fe54784-a94c-4c0f-bf23-701033a73325.jpg" target="_blank"> <img alt="Click for enlarged picture" src=" https://hosting.photobucket.com/95288841-8654-4bf7-8fc9-a4aa78dce87f/3fe54784-a94c-4c0f-bf23-701033a73325.jpg" width="600" /> </a></p>
<p>
Na kraju sam dodao i nisku travu pri čemu sam pazio kad sam radio ugibalište i puteljak da vegetacije ne bude na mjestima gdje prolaze kotači.</p>
<p>
<a href=" https://hosting.photobucket.com/95288841-8654-4bf7-8fc9-a4aa78dce87f/596ce54a-a0cb-4a9b-9406-835a7b348f9a.jpg" target="_blank"> <img alt="Click for enlarged picture" src=" https://hosting.photobucket.com/95288841-8654-4bf7-8fc9-a4aa78dce87f/596ce54a-a0cb-4a9b-9406-835a7b348f9a.jpg" width="600" /> </a></p>
<p>
Kada se dioramu okrene, vidi se volumen vegetacije u šumi. </p>
<p>
<a href="https://hosting.photobucket.com/95288841-8654-4bf7-8fc9-a4aa78dce87f/1d2acabb-7ec7-4f67-bec8-b3b73d5ddf46.jpg" target="_blank"><img alt="Click for enlarged picture" src="https://hosting.photobucket.com/95288841-8654-4bf7-8fc9-a4aa78dce87f/1d2acabb-7ec7-4f67-bec8-b3b73d5ddf46.jpg" width="600" /></a></p>
<p>
Prije postavljanja vozila i minijatura, diorama izgleda ovako:</p>
<p>
<a href="https://hosting.photobucket.com/95288841-8654-4bf7-8fc9-a4aa78dce87f/a7ffc2b0-a9bf-4e41-ab2f-0c3021b0447f.jpg" target="_blank"><img alt="Click for enlarged picture" src="https://hosting.photobucket.com/95288841-8654-4bf7-8fc9-a4aa78dce87f/a7ffc2b0-a9bf-4e41-ab2f-0c3021b0447f.jpg" width="600" /></a></p>
"
["created"]=>
string(19) "2026-01-19 10:46:08"
["modified"]=>
string(19) "2026-01-19 11:00:21"
}
["Member"]=>
array(10) {
["id"]=>
string(2) "35"
["group_id"]=>
string(1) "1"
["first_name"]=>
string(5) "Marko"
["last_name"]=>
string(9) "Paunović"
["first_name_mask"]=>
string(5) "marko"
["last_name_mask"]=>
string(8) "paunovic"
["username"]=>
string(5) "marko"
["password"]=>
string(40) "3bd37b326d19d1880d3b93a4b32e8fb3a90fa122"
["born"]=>
string(19) "2033-03-07 20:35:00"
["created"]=>
string(19) "2009-06-02 20:37:03"
}
}
</pre>
<a href="/dok/members/marko.paunovic">Marko Paunović</a>, 19<span class="superscript">th</span> January 2026</span>
</li>
</ul>
<p><a href="/dok/articles">more_articles</a></p>
<h2>latest_battle_reports</h2>
<ul class="latest">
<li>
<pre class="cake-debug"><a href="javascript:void(0);" onclick="document.getElementById('cakeErr9-trace').style.display = (document.getElementById('cakeErr9-trace').style.display == 'none' ? '' : 'none');"><b>Notice</b> (8)</a>: Undefined index: title_dok [<b>APP/views/elements/latestBattleReports.ctp</b>, line <b>8</b>]<div id="cakeErr9-trace" class="cake-stack-trace" style="display: none;"><a href="javascript:void(0);" onclick="document.getElementById('cakeErr9-code').style.display = (document.getElementById('cakeErr9-code').style.display == 'none' ? '' : 'none')">Code</a> | <a href="javascript:void(0);" onclick="document.getElementById('cakeErr9-context').style.display = (document.getElementById('cakeErr9-context').style.display == 'none' ? '' : 'none')">Context</a><div id="cakeErr9-code" class="cake-code-dump" style="display: none;"><pre><code><span style="color: #000000"></span></code>
<code><span style="color: #000000"> if (Configure::read() > 0) {</span></code>
<span class="code-highlight"><code><span style="color: #000000"> include ($___viewFn);</span></code></span></pre></div><pre id="cakeErr9-context" class="cake-context" style="display: none;">$___viewFn = "/home/martin/apps/agram/app/views/elements/latestBattleReports.ctp"
$___dataForView = array(
"lang" => "dok",
"otherLangs" => array(
"eng",
"hrv"
),
"globalNav" => array(
array(),
array(),
array(),
array(),
array(),
array(),
array(),
array(),
array(),
array(),
array(),
array(),
array(),
array(),
array(),
array(),
array(),
array(),
array(),
array(),
array(),
array(),
array(),
array(),
array(),
array(),
array()
),
"breadCrumbs" => array(
array()
),
"pageContents" => array(
"home_who_we_are" => null
),
"userData" => null,
"announcements" => array(
array(),
array(),
array()
),
"cache" => array(
"time" => "+1 day",
"key" => "dok"
),
"form" => FormHelper
FormHelper::$helpers = array
FormHelper::$fieldset = array
FormHelper::$__options = array
FormHelper::$fields = array
FormHelper::$requestType = NULL
FormHelper::$defaultModel = NULL
FormHelper::$_inputDefaults = array
FormHelper::$_lastAction = ""
FormHelper::$base = ""
FormHelper::$webroot = "/"
FormHelper::$theme = NULL
FormHelper::$here = "/dok"
FormHelper::$params = array
FormHelper::$action = "index"
FormHelper::$plugin = NULL
FormHelper::$data = NULL
FormHelper::$namedArgs = NULL
FormHelper::$argSeparator = NULL
FormHelper::$validationErrors = NULL
FormHelper::$tags = array
FormHelper::$__tainted = NULL
FormHelper::$__cleaned = NULL
FormHelper::$Html = HtmlHelper object,
"text" => TextHelper
TextHelper::$helpers = NULL
TextHelper::$base = ""
TextHelper::$webroot = "/"
TextHelper::$theme = NULL
TextHelper::$here = "/dok"
TextHelper::$params = array
TextHelper::$action = "index"
TextHelper::$plugin = NULL
TextHelper::$data = NULL
TextHelper::$namedArgs = NULL
TextHelper::$argSeparator = NULL
TextHelper::$validationErrors = NULL
TextHelper::$tags = array
TextHelper::$__tainted = NULL
TextHelper::$__cleaned = NULL,
"stringer" => StringerHelper
StringerHelper::$helpers = array
StringerHelper::$base = ""
StringerHelper::$webroot = "/"
StringerHelper::$theme = NULL
StringerHelper::$here = "/dok"
StringerHelper::$params = array
StringerHelper::$action = "index"
StringerHelper::$plugin = NULL
StringerHelper::$data = NULL
StringerHelper::$namedArgs = NULL
StringerHelper::$argSeparator = NULL
StringerHelper::$validationErrors = NULL
StringerHelper::$tags = array
StringerHelper::$__tainted = NULL
StringerHelper::$__cleaned = NULL
StringerHelper::$Html = HtmlHelper object
StringerHelper::$Link = LinkHelper object
StringerHelper::$Text = TextHelper object,
"menu" => MenuHelper
MenuHelper::$helpers = array
MenuHelper::$base = ""
MenuHelper::$webroot = "/"
MenuHelper::$theme = NULL
MenuHelper::$here = "/dok"
MenuHelper::$params = array
MenuHelper::$action = "index"
MenuHelper::$plugin = NULL
MenuHelper::$data = NULL
MenuHelper::$namedArgs = NULL
MenuHelper::$argSeparator = NULL
MenuHelper::$validationErrors = NULL
MenuHelper::$tags = array
MenuHelper::$__tainted = NULL
MenuHelper::$__cleaned = NULL
MenuHelper::$Link = LinkHelper object,
"session" => SessionHelper
SessionHelper::$helpers = array
SessionHelper::$__active = true
SessionHelper::$valid = false
SessionHelper::$error = false
SessionHelper::$_userAgent = "f9a8355d006790ee743ededbb1f6e3bd"
SessionHelper::$path = "/"
SessionHelper::$lastError = NULL
SessionHelper::$security = "medium"
SessionHelper::$time = 1773314240
SessionHelper::$sessionTime = 1773326240
SessionHelper::$cookieLifeTime = false
SessionHelper::$watchKeys = array
SessionHelper::$id = NULL
SessionHelper::$host = NULL
SessionHelper::$timeout = NULL
SessionHelper::$base = ""
SessionHelper::$webroot = "/"
SessionHelper::$here = "/dok"
SessionHelper::$params = array
SessionHelper::$action = "index"
SessionHelper::$data = NULL
SessionHelper::$theme = NULL
SessionHelper::$plugin = NULL,
"html" => HtmlHelper
HtmlHelper::$tags = array
HtmlHelper::$_crumbs = array
HtmlHelper::$__includedScripts = array
HtmlHelper::$_scriptBlockOptions = array
HtmlHelper::$__docTypes = array
HtmlHelper::$helpers = NULL
HtmlHelper::$base = ""
HtmlHelper::$webroot = "/"
HtmlHelper::$theme = NULL
HtmlHelper::$here = "/dok"
HtmlHelper::$params = array
HtmlHelper::$action = "index"
HtmlHelper::$plugin = NULL
HtmlHelper::$data = NULL
HtmlHelper::$namedArgs = NULL
HtmlHelper::$argSeparator = NULL
HtmlHelper::$validationErrors = NULL
HtmlHelper::$__tainted = NULL
HtmlHelper::$__cleaned = NULL,
"link" => LinkHelper
LinkHelper::$helpers = array
LinkHelper::$lang = "dok"
LinkHelper::$defaultLang = "hrv"
LinkHelper::$base = ""
LinkHelper::$webroot = "/"
LinkHelper::$theme = NULL
LinkHelper::$here = "/dok"
LinkHelper::$params = array
LinkHelper::$action = "index"
LinkHelper::$plugin = NULL
LinkHelper::$data = NULL
LinkHelper::$namedArgs = NULL
LinkHelper::$argSeparator = NULL
LinkHelper::$validationErrors = NULL
LinkHelper::$tags = array
LinkHelper::$__tainted = NULL
LinkHelper::$__cleaned = NULL
LinkHelper::$Html = HtmlHelper object
LinkHelper::$Session = SessionHelper object
)
$loadHelpers = false
$cached = false
$loadedHelpers = array()
$lang = "dok"
$otherLangs = array(
"eng",
"hrv"
)
$globalNav = array(
array(
"Page" => array()
),
array(
"Page" => array()
),
array(
"Page" => array()
),
array(
"Page" => array()
),
array(
"Page" => array()
),
array(
"Page" => array()
),
array(
"Page" => array()
),
array(
"Page" => array()
),
array(
"Page" => array()
),
array(
"Page" => array()
),
array(
"Page" => array()
),
array(
"Page" => array()
),
array(
"Page" => array()
),
array(
"Page" => array()
),
array(
"Page" => array()
),
array(
"Page" => array()
),
array(
"Page" => array()
),
array(
"Page" => array()
),
array(
"Page" => array()
),
array(
"Page" => array()
),
array(
"Page" => array()
),
array(
"Page" => array()
),
array(
"Page" => array()
),
array(
"Page" => array()
),
array(
"Page" => array()
),
array(
"Page" => array()
),
array(
"Page" => array()
)
)
$breadCrumbs = array(
array(
"Page" => array()
)
)
$pageContents = array(
"home_who_we_are" => null
)
$userData = null
$announcements = array(
array(
"Announcement" => array()
),
array(
"Announcement" => array()
),
array(
"Announcement" => array()
)
)
$cache = array(
"time" => "+1 day",
"key" => "dok"
)
$form = FormHelper
FormHelper::$helpers = array
FormHelper::$fieldset = array
FormHelper::$__options = array
FormHelper::$fields = array
FormHelper::$requestType = NULL
FormHelper::$defaultModel = NULL
FormHelper::$_inputDefaults = array
FormHelper::$_lastAction = ""
FormHelper::$base = ""
FormHelper::$webroot = "/"
FormHelper::$theme = NULL
FormHelper::$here = "/dok"
FormHelper::$params = array
FormHelper::$action = "index"
FormHelper::$plugin = NULL
FormHelper::$data = NULL
FormHelper::$namedArgs = NULL
FormHelper::$argSeparator = NULL
FormHelper::$validationErrors = NULL
FormHelper::$tags = array
FormHelper::$__tainted = NULL
FormHelper::$__cleaned = NULL
FormHelper::$Html = HtmlHelper object
$text = TextHelper
TextHelper::$helpers = NULL
TextHelper::$base = ""
TextHelper::$webroot = "/"
TextHelper::$theme = NULL
TextHelper::$here = "/dok"
TextHelper::$params = array
TextHelper::$action = "index"
TextHelper::$plugin = NULL
TextHelper::$data = NULL
TextHelper::$namedArgs = NULL
TextHelper::$argSeparator = NULL
TextHelper::$validationErrors = NULL
TextHelper::$tags = array
TextHelper::$__tainted = NULL
TextHelper::$__cleaned = NULL
$stringer = StringerHelper
StringerHelper::$helpers = array
StringerHelper::$base = ""
StringerHelper::$webroot = "/"
StringerHelper::$theme = NULL
StringerHelper::$here = "/dok"
StringerHelper::$params = array
StringerHelper::$action = "index"
StringerHelper::$plugin = NULL
StringerHelper::$data = NULL
StringerHelper::$namedArgs = NULL
StringerHelper::$argSeparator = NULL
StringerHelper::$validationErrors = NULL
StringerHelper::$tags = array
StringerHelper::$__tainted = NULL
StringerHelper::$__cleaned = NULL
StringerHelper::$Html = HtmlHelper object
StringerHelper::$Link = LinkHelper object
StringerHelper::$Text = TextHelper object
$menu = MenuHelper
MenuHelper::$helpers = array
MenuHelper::$base = ""
MenuHelper::$webroot = "/"
MenuHelper::$theme = NULL
MenuHelper::$here = "/dok"
MenuHelper::$params = array
MenuHelper::$action = "index"
MenuHelper::$plugin = NULL
MenuHelper::$data = NULL
MenuHelper::$namedArgs = NULL
MenuHelper::$argSeparator = NULL
MenuHelper::$validationErrors = NULL
MenuHelper::$tags = array
MenuHelper::$__tainted = NULL
MenuHelper::$__cleaned = NULL
MenuHelper::$Link = LinkHelper object
$session = SessionHelper
SessionHelper::$helpers = array
SessionHelper::$__active = true
SessionHelper::$valid = false
SessionHelper::$error = false
SessionHelper::$_userAgent = "f9a8355d006790ee743ededbb1f6e3bd"
SessionHelper::$path = "/"
SessionHelper::$lastError = NULL
SessionHelper::$security = "medium"
SessionHelper::$time = 1773314240
SessionHelper::$sessionTime = 1773326240
SessionHelper::$cookieLifeTime = false
SessionHelper::$watchKeys = array
SessionHelper::$id = NULL
SessionHelper::$host = NULL
SessionHelper::$timeout = NULL
SessionHelper::$base = ""
SessionHelper::$webroot = "/"
SessionHelper::$here = "/dok"
SessionHelper::$params = array
SessionHelper::$action = "index"
SessionHelper::$data = NULL
SessionHelper::$theme = NULL
SessionHelper::$plugin = NULL
$html = HtmlHelper
HtmlHelper::$tags = array
HtmlHelper::$_crumbs = array
HtmlHelper::$__includedScripts = array
HtmlHelper::$_scriptBlockOptions = array
HtmlHelper::$__docTypes = array
HtmlHelper::$helpers = NULL
HtmlHelper::$base = ""
HtmlHelper::$webroot = "/"
HtmlHelper::$theme = NULL
HtmlHelper::$here = "/dok"
HtmlHelper::$params = array
HtmlHelper::$action = "index"
HtmlHelper::$plugin = NULL
HtmlHelper::$data = NULL
HtmlHelper::$namedArgs = NULL
HtmlHelper::$argSeparator = NULL
HtmlHelper::$validationErrors = NULL
HtmlHelper::$__tainted = NULL
HtmlHelper::$__cleaned = NULL
$link = LinkHelper
LinkHelper::$helpers = array
LinkHelper::$lang = "dok"
LinkHelper::$defaultLang = "hrv"
LinkHelper::$base = ""
LinkHelper::$webroot = "/"
LinkHelper::$theme = NULL
LinkHelper::$here = "/dok"
LinkHelper::$params = array
LinkHelper::$action = "index"
LinkHelper::$plugin = NULL
LinkHelper::$data = NULL
LinkHelper::$namedArgs = NULL
LinkHelper::$argSeparator = NULL
LinkHelper::$validationErrors = NULL
LinkHelper::$tags = array
LinkHelper::$__tainted = NULL
LinkHelper::$__cleaned = NULL
LinkHelper::$Html = HtmlHelper object
LinkHelper::$Session = SessionHelper object
$battleReports = array(
array(
"BattleReport" => array(),
"Game" => array(),
"BattleReportExperience" => array()
),
array(
"BattleReport" => array(),
"Game" => array(),
"BattleReportExperience" => array()
),
array(
"BattleReport" => array(),
"Game" => array(),
"BattleReportExperience" => array()
)
)
$battleReport = array(
"BattleReport" => array(
"id" => "16",
"title_eng" => "Kill Team - Blooded vs. Vespid Stingwings",
"title_hrv" => "Kill Team - Blooded vs. Vespid Stingwings",
"mask_eng" => "kill_team_-_blooded_vs_vespid_stingwings",
"mask_hrv" => "kill_team_-_blooded_vs_vespid_stingwings",
"game_id" => "1",
"fought" => "2025-02-28 16:00:00",
"created" => "2025-03-10 08:53:42",
"modified" => "2025-03-10 08:53:42"
),
"Game" => array(
"id" => "1",
"name_eng" => "GW - Warhammer 40.000",
"name_hrv" => "GW - Warhammer 40.000",
"description_eng" => "<p>
In the grim darkness of the far future, there is only war!</p>
<p>
<a href="http://img.photobucket.com/albums/v467/demonn/Agram-Sajt/40k03_zpsc9a73277.jpg" target="_blank"> <img alt="Click for enlarged picture" src="http://img.photobucket.com/albums/v467/demonn/Agram-Sajt/40k03_zpsc9a73277.jpg" width="600" /> </a> </p>
",
"description_hrv" => "<p>
Warhammer 40000 je strate&scaron;ka igra smje&scaron;tena u daleku budućnost Zemlje, u kojoj preuzimate zapovjedni&scaron;tvo nad vojskama minijatura kako bi prikazali oružane sukobe vojski budućnosti.</p>
<p>
Bitke se vode na stolu uobičajenih dimenzija 120 x 180 cm, na koji se zatim postavlja različit teren kako bi se dočarao izgled pravog boji&scaron;ta. Nakon toga, u uobičajenom scenariju, na suprotne strane stola razmje&scaron;taju se dvije vojske minijatura. Strate&scaron;ki dio igre je vrlo važan jer već samim razmje&scaron;tanjem jedinica na stol možete dobiti veći dio bitke.</p>
<p>
Sada, kada va&scaron;i vojnici preko bojnog polja gledaju u mrskog im neprijatelja, spremni ste poslati naredbu za juri&scaron;, ili se ukopati na poziciji i braniti ono &scaron;to je va&scaron;e (va&scaron;u polovicu drvene ploče prekrivene umjetnim terenom). Kako ne bi nastala zbrka na bojnom polju, igra je podijeljena na poteze, a svaki potez je dodatno podijeljen u faze.<br />
&nbsp;</p>
<p>
<a href="http://img.photobucket.com/albums/v467/demonn/Agram-Sajt/40k03_zpsc9a73277.jpg" target="_blank"> <img alt="Click for enlarged picture" src="http://img.photobucket.com/albums/v467/demonn/Agram-Sajt/40k03_zpsc9a73277.jpg" width="600" /> </a> </p>"
),
"BattleReportExperience" => array(
array()
)
)</pre><pre class="stack-trace">include - APP/views/elements/latestBattleReports.ctp, line 8
View::_render() - CORE/cake/libs/view/view.php, line 736
View::element() - CORE/cake/libs/view/view.php, line 397
include - APP/views/home/index.ctp, line 50
View::_render() - CORE/cake/libs/view/view.php, line 736
View::render() - CORE/cake/libs/view/view.php, line 431
Controller::render() - CORE/cake/libs/controller/controller.php, line 909
Dispatcher::_invoke() - CORE/cake/dispatcher.php, line 207
Dispatcher::dispatch() - CORE/cake/dispatcher.php, line 171
[main] - APP/webroot/index.php, line 86</pre></div></pre><pre class="cake-debug"><a href="javascript:void(0);" onclick="document.getElementById('cakeErr10-trace').style.display = (document.getElementById('cakeErr10-trace').style.display == 'none' ? '' : 'none');"><b>Notice</b> (8)</a>: Undefined index: mask_dok [<b>APP/views/elements/latestBattleReports.ctp</b>, line <b>11</b>]<div id="cakeErr10-trace" class="cake-stack-trace" style="display: none;"><a href="javascript:void(0);" onclick="document.getElementById('cakeErr10-code').style.display = (document.getElementById('cakeErr10-code').style.display == 'none' ? '' : 'none')">Code</a> | <a href="javascript:void(0);" onclick="document.getElementById('cakeErr10-context').style.display = (document.getElementById('cakeErr10-context').style.display == 'none' ? '' : 'none')">Context</a><div id="cakeErr10-code" class="cake-code-dump" style="display: none;"><pre><code><span style="color: #000000"></span></code>
<code><span style="color: #000000"> if (Configure::read() > 0) {</span></code>
<span class="code-highlight"><code><span style="color: #000000"> include ($___viewFn);</span></code></span></pre></div><pre id="cakeErr10-context" class="cake-context" style="display: none;">$___viewFn = "/home/martin/apps/agram/app/views/elements/latestBattleReports.ctp"
$___dataForView = array(
"lang" => "dok",
"otherLangs" => array(
"eng",
"hrv"
),
"globalNav" => array(
array(),
array(),
array(),
array(),
array(),
array(),
array(),
array(),
array(),
array(),
array(),
array(),
array(),
array(),
array(),
array(),
array(),
array(),
array(),
array(),
array(),
array(),
array(),
array(),
array(),
array(),
array()
),
"breadCrumbs" => array(
array()
),
"pageContents" => array(
"home_who_we_are" => null
),
"userData" => null,
"announcements" => array(
array(),
array(),
array()
),
"cache" => array(
"time" => "+1 day",
"key" => "dok"
),
"form" => FormHelper
FormHelper::$helpers = array
FormHelper::$fieldset = array
FormHelper::$__options = array
FormHelper::$fields = array
FormHelper::$requestType = NULL
FormHelper::$defaultModel = NULL
FormHelper::$_inputDefaults = array
FormHelper::$_lastAction = ""
FormHelper::$base = ""
FormHelper::$webroot = "/"
FormHelper::$theme = NULL
FormHelper::$here = "/dok"
FormHelper::$params = array
FormHelper::$action = "index"
FormHelper::$plugin = NULL
FormHelper::$data = NULL
FormHelper::$namedArgs = NULL
FormHelper::$argSeparator = NULL
FormHelper::$validationErrors = NULL
FormHelper::$tags = array
FormHelper::$__tainted = NULL
FormHelper::$__cleaned = NULL
FormHelper::$Html = HtmlHelper object,
"text" => TextHelper
TextHelper::$helpers = NULL
TextHelper::$base = ""
TextHelper::$webroot = "/"
TextHelper::$theme = NULL
TextHelper::$here = "/dok"
TextHelper::$params = array
TextHelper::$action = "index"
TextHelper::$plugin = NULL
TextHelper::$data = NULL
TextHelper::$namedArgs = NULL
TextHelper::$argSeparator = NULL
TextHelper::$validationErrors = NULL
TextHelper::$tags = array
TextHelper::$__tainted = NULL
TextHelper::$__cleaned = NULL,
"stringer" => StringerHelper
StringerHelper::$helpers = array
StringerHelper::$base = ""
StringerHelper::$webroot = "/"
StringerHelper::$theme = NULL
StringerHelper::$here = "/dok"
StringerHelper::$params = array
StringerHelper::$action = "index"
StringerHelper::$plugin = NULL
StringerHelper::$data = NULL
StringerHelper::$namedArgs = NULL
StringerHelper::$argSeparator = NULL
StringerHelper::$validationErrors = NULL
StringerHelper::$tags = array
StringerHelper::$__tainted = NULL
StringerHelper::$__cleaned = NULL
StringerHelper::$Html = HtmlHelper object
StringerHelper::$Link = LinkHelper object
StringerHelper::$Text = TextHelper object,
"menu" => MenuHelper
MenuHelper::$helpers = array
MenuHelper::$base = ""
MenuHelper::$webroot = "/"
MenuHelper::$theme = NULL
MenuHelper::$here = "/dok"
MenuHelper::$params = array
MenuHelper::$action = "index"
MenuHelper::$plugin = NULL
MenuHelper::$data = NULL
MenuHelper::$namedArgs = NULL
MenuHelper::$argSeparator = NULL
MenuHelper::$validationErrors = NULL
MenuHelper::$tags = array
MenuHelper::$__tainted = NULL
MenuHelper::$__cleaned = NULL
MenuHelper::$Link = LinkHelper object,
"session" => SessionHelper
SessionHelper::$helpers = array
SessionHelper::$__active = true
SessionHelper::$valid = false
SessionHelper::$error = false
SessionHelper::$_userAgent = "f9a8355d006790ee743ededbb1f6e3bd"
SessionHelper::$path = "/"
SessionHelper::$lastError = NULL
SessionHelper::$security = "medium"
SessionHelper::$time = 1773314240
SessionHelper::$sessionTime = 1773326240
SessionHelper::$cookieLifeTime = false
SessionHelper::$watchKeys = array
SessionHelper::$id = NULL
SessionHelper::$host = NULL
SessionHelper::$timeout = NULL
SessionHelper::$base = ""
SessionHelper::$webroot = "/"
SessionHelper::$here = "/dok"
SessionHelper::$params = array
SessionHelper::$action = "index"
SessionHelper::$data = NULL
SessionHelper::$theme = NULL
SessionHelper::$plugin = NULL,
"html" => HtmlHelper
HtmlHelper::$tags = array
HtmlHelper::$_crumbs = array
HtmlHelper::$__includedScripts = array
HtmlHelper::$_scriptBlockOptions = array
HtmlHelper::$__docTypes = array
HtmlHelper::$helpers = NULL
HtmlHelper::$base = ""
HtmlHelper::$webroot = "/"
HtmlHelper::$theme = NULL
HtmlHelper::$here = "/dok"
HtmlHelper::$params = array
HtmlHelper::$action = "index"
HtmlHelper::$plugin = NULL
HtmlHelper::$data = NULL
HtmlHelper::$namedArgs = NULL
HtmlHelper::$argSeparator = NULL
HtmlHelper::$validationErrors = NULL
HtmlHelper::$__tainted = NULL
HtmlHelper::$__cleaned = NULL,
"link" => LinkHelper
LinkHelper::$helpers = array
LinkHelper::$lang = "dok"
LinkHelper::$defaultLang = "hrv"
LinkHelper::$base = ""
LinkHelper::$webroot = "/"
LinkHelper::$theme = NULL
LinkHelper::$here = "/dok"
LinkHelper::$params = array
LinkHelper::$action = "index"
LinkHelper::$plugin = NULL
LinkHelper::$data = NULL
LinkHelper::$namedArgs = NULL
LinkHelper::$argSeparator = NULL
LinkHelper::$validationErrors = NULL
LinkHelper::$tags = array
LinkHelper::$__tainted = NULL
LinkHelper::$__cleaned = NULL
LinkHelper::$Html = HtmlHelper object
LinkHelper::$Session = SessionHelper object
)
$loadHelpers = false
$cached = false
$loadedHelpers = array()
$lang = "dok"
$otherLangs = array(
"eng",
"hrv"
)
$globalNav = array(
array(
"Page" => array()
),
array(
"Page" => array()
),
array(
"Page" => array()
),
array(
"Page" => array()
),
array(
"Page" => array()
),
array(
"Page" => array()
),
array(
"Page" => array()
),
array(
"Page" => array()
),
array(
"Page" => array()
),
array(
"Page" => array()
),
array(
"Page" => array()
),
array(
"Page" => array()
),
array(
"Page" => array()
),
array(
"Page" => array()
),
array(
"Page" => array()
),
array(
"Page" => array()
),
array(
"Page" => array()
),
array(
"Page" => array()
),
array(
"Page" => array()
),
array(
"Page" => array()
),
array(
"Page" => array()
),
array(
"Page" => array()
),
array(
"Page" => array()
),
array(
"Page" => array()
),
array(
"Page" => array()
),
array(
"Page" => array()
),
array(
"Page" => array()
)
)
$breadCrumbs = array(
array(
"Page" => array()
)
)
$pageContents = array(
"home_who_we_are" => null
)
$userData = null
$announcements = array(
array(
"Announcement" => array()
),
array(
"Announcement" => array()
),
array(
"Announcement" => array()
)
)
$cache = array(
"time" => "+1 day",
"key" => "dok"
)
$form = FormHelper
FormHelper::$helpers = array
FormHelper::$fieldset = array
FormHelper::$__options = array
FormHelper::$fields = array
FormHelper::$requestType = NULL
FormHelper::$defaultModel = NULL
FormHelper::$_inputDefaults = array
FormHelper::$_lastAction = ""
FormHelper::$base = ""
FormHelper::$webroot = "/"
FormHelper::$theme = NULL
FormHelper::$here = "/dok"
FormHelper::$params = array
FormHelper::$action = "index"
FormHelper::$plugin = NULL
FormHelper::$data = NULL
FormHelper::$namedArgs = NULL
FormHelper::$argSeparator = NULL
FormHelper::$validationErrors = NULL
FormHelper::$tags = array
FormHelper::$__tainted = NULL
FormHelper::$__cleaned = NULL
FormHelper::$Html = HtmlHelper object
$text = TextHelper
TextHelper::$helpers = NULL
TextHelper::$base = ""
TextHelper::$webroot = "/"
TextHelper::$theme = NULL
TextHelper::$here = "/dok"
TextHelper::$params = array
TextHelper::$action = "index"
TextHelper::$plugin = NULL
TextHelper::$data = NULL
TextHelper::$namedArgs = NULL
TextHelper::$argSeparator = NULL
TextHelper::$validationErrors = NULL
TextHelper::$tags = array
TextHelper::$__tainted = NULL
TextHelper::$__cleaned = NULL
$stringer = StringerHelper
StringerHelper::$helpers = array
StringerHelper::$base = ""
StringerHelper::$webroot = "/"
StringerHelper::$theme = NULL
StringerHelper::$here = "/dok"
StringerHelper::$params = array
StringerHelper::$action = "index"
StringerHelper::$plugin = NULL
StringerHelper::$data = NULL
StringerHelper::$namedArgs = NULL
StringerHelper::$argSeparator = NULL
StringerHelper::$validationErrors = NULL
StringerHelper::$tags = array
StringerHelper::$__tainted = NULL
StringerHelper::$__cleaned = NULL
StringerHelper::$Html = HtmlHelper object
StringerHelper::$Link = LinkHelper object
StringerHelper::$Text = TextHelper object
$menu = MenuHelper
MenuHelper::$helpers = array
MenuHelper::$base = ""
MenuHelper::$webroot = "/"
MenuHelper::$theme = NULL
MenuHelper::$here = "/dok"
MenuHelper::$params = array
MenuHelper::$action = "index"
MenuHelper::$plugin = NULL
MenuHelper::$data = NULL
MenuHelper::$namedArgs = NULL
MenuHelper::$argSeparator = NULL
MenuHelper::$validationErrors = NULL
MenuHelper::$tags = array
MenuHelper::$__tainted = NULL
MenuHelper::$__cleaned = NULL
MenuHelper::$Link = LinkHelper object
$session = SessionHelper
SessionHelper::$helpers = array
SessionHelper::$__active = true
SessionHelper::$valid = false
SessionHelper::$error = false
SessionHelper::$_userAgent = "f9a8355d006790ee743ededbb1f6e3bd"
SessionHelper::$path = "/"
SessionHelper::$lastError = NULL
SessionHelper::$security = "medium"
SessionHelper::$time = 1773314240
SessionHelper::$sessionTime = 1773326240
SessionHelper::$cookieLifeTime = false
SessionHelper::$watchKeys = array
SessionHelper::$id = NULL
SessionHelper::$host = NULL
SessionHelper::$timeout = NULL
SessionHelper::$base = ""
SessionHelper::$webroot = "/"
SessionHelper::$here = "/dok"
SessionHelper::$params = array
SessionHelper::$action = "index"
SessionHelper::$data = NULL
SessionHelper::$theme = NULL
SessionHelper::$plugin = NULL
$html = HtmlHelper
HtmlHelper::$tags = array
HtmlHelper::$_crumbs = array
HtmlHelper::$__includedScripts = array
HtmlHelper::$_scriptBlockOptions = array
HtmlHelper::$__docTypes = array
HtmlHelper::$helpers = NULL
HtmlHelper::$base = ""
HtmlHelper::$webroot = "/"
HtmlHelper::$theme = NULL
HtmlHelper::$here = "/dok"
HtmlHelper::$params = array
HtmlHelper::$action = "index"
HtmlHelper::$plugin = NULL
HtmlHelper::$data = NULL
HtmlHelper::$namedArgs = NULL
HtmlHelper::$argSeparator = NULL
HtmlHelper::$validationErrors = NULL
HtmlHelper::$__tainted = NULL
HtmlHelper::$__cleaned = NULL
$link = LinkHelper
LinkHelper::$helpers = array
LinkHelper::$lang = "dok"
LinkHelper::$defaultLang = "hrv"
LinkHelper::$base = ""
LinkHelper::$webroot = "/"
LinkHelper::$theme = NULL
LinkHelper::$here = "/dok"
LinkHelper::$params = array
LinkHelper::$action = "index"
LinkHelper::$plugin = NULL
LinkHelper::$data = NULL
LinkHelper::$namedArgs = NULL
LinkHelper::$argSeparator = NULL
LinkHelper::$validationErrors = NULL
LinkHelper::$tags = array
LinkHelper::$__tainted = NULL
LinkHelper::$__cleaned = NULL
LinkHelper::$Html = HtmlHelper object
LinkHelper::$Session = SessionHelper object
$battleReports = array(
array(
"BattleReport" => array(),
"Game" => array(),
"BattleReportExperience" => array()
),
array(
"BattleReport" => array(),
"Game" => array(),
"BattleReportExperience" => array()
),
array(
"BattleReport" => array(),
"Game" => array(),
"BattleReportExperience" => array()
)
)
$battleReport = array(
"BattleReport" => array(
"id" => "16",
"title_eng" => "Kill Team - Blooded vs. Vespid Stingwings",
"title_hrv" => "Kill Team - Blooded vs. Vespid Stingwings",
"mask_eng" => "kill_team_-_blooded_vs_vespid_stingwings",
"mask_hrv" => "kill_team_-_blooded_vs_vespid_stingwings",
"game_id" => "1",
"fought" => "2025-02-28 16:00:00",
"created" => "2025-03-10 08:53:42",
"modified" => "2025-03-10 08:53:42"
),
"Game" => array(
"id" => "1",
"name_eng" => "GW - Warhammer 40.000",
"name_hrv" => "GW - Warhammer 40.000",
"description_eng" => "<p>
In the grim darkness of the far future, there is only war!</p>
<p>
<a href="http://img.photobucket.com/albums/v467/demonn/Agram-Sajt/40k03_zpsc9a73277.jpg" target="_blank"> <img alt="Click for enlarged picture" src="http://img.photobucket.com/albums/v467/demonn/Agram-Sajt/40k03_zpsc9a73277.jpg" width="600" /> </a> </p>
",
"description_hrv" => "<p>
Warhammer 40000 je strate&scaron;ka igra smje&scaron;tena u daleku budućnost Zemlje, u kojoj preuzimate zapovjedni&scaron;tvo nad vojskama minijatura kako bi prikazali oružane sukobe vojski budućnosti.</p>
<p>
Bitke se vode na stolu uobičajenih dimenzija 120 x 180 cm, na koji se zatim postavlja različit teren kako bi se dočarao izgled pravog boji&scaron;ta. Nakon toga, u uobičajenom scenariju, na suprotne strane stola razmje&scaron;taju se dvije vojske minijatura. Strate&scaron;ki dio igre je vrlo važan jer već samim razmje&scaron;tanjem jedinica na stol možete dobiti veći dio bitke.</p>
<p>
Sada, kada va&scaron;i vojnici preko bojnog polja gledaju u mrskog im neprijatelja, spremni ste poslati naredbu za juri&scaron;, ili se ukopati na poziciji i braniti ono &scaron;to je va&scaron;e (va&scaron;u polovicu drvene ploče prekrivene umjetnim terenom). Kako ne bi nastala zbrka na bojnom polju, igra je podijeljena na poteze, a svaki potez je dodatno podijeljen u faze.<br />
&nbsp;</p>
<p>
<a href="http://img.photobucket.com/albums/v467/demonn/Agram-Sajt/40k03_zpsc9a73277.jpg" target="_blank"> <img alt="Click for enlarged picture" src="http://img.photobucket.com/albums/v467/demonn/Agram-Sajt/40k03_zpsc9a73277.jpg" width="600" /> </a> </p>"
),
"BattleReportExperience" => array(
array()
)
)</pre><pre class="stack-trace">include - APP/views/elements/latestBattleReports.ctp, line 11
View::_render() - CORE/cake/libs/view/view.php, line 736
View::element() - CORE/cake/libs/view/view.php, line 397
include - APP/views/home/index.ctp, line 50
View::_render() - CORE/cake/libs/view/view.php, line 736
View::render() - CORE/cake/libs/view/view.php, line 431
Controller::render() - CORE/cake/libs/controller/controller.php, line 909
Dispatcher::_invoke() - CORE/cake/dispatcher.php, line 207
Dispatcher::dispatch() - CORE/cake/dispatcher.php, line 171
[main] - APP/webroot/index.php, line 86</pre></div></pre><a href="/dok/battle_reports/2025/03/10" class="readMore"></a> <span class="details">
<pre class="cake-debug"><a href="javascript:void(0);" onclick="document.getElementById('cakeErr11-trace').style.display = (document.getElementById('cakeErr11-trace').style.display == 'none' ? '' : 'none');"><b>Notice</b> (8)</a>: Undefined index: name_dok [<b>APP/views/elements/latestBattleReports.ctp</b>, line <b>26</b>]<div id="cakeErr11-trace" class="cake-stack-trace" style="display: none;"><a href="javascript:void(0);" onclick="document.getElementById('cakeErr11-code').style.display = (document.getElementById('cakeErr11-code').style.display == 'none' ? '' : 'none')">Code</a> | <a href="javascript:void(0);" onclick="document.getElementById('cakeErr11-context').style.display = (document.getElementById('cakeErr11-context').style.display == 'none' ? '' : 'none')">Context</a><div id="cakeErr11-code" class="cake-code-dump" style="display: none;"><pre><code><span style="color: #000000"></span></code>
<code><span style="color: #000000"> if (Configure::read() > 0) {</span></code>
<span class="code-highlight"><code><span style="color: #000000"> include ($___viewFn);</span></code></span></pre></div><pre id="cakeErr11-context" class="cake-context" style="display: none;">$___viewFn = "/home/martin/apps/agram/app/views/elements/latestBattleReports.ctp"
$___dataForView = array(
"lang" => "dok",
"otherLangs" => array(
"eng",
"hrv"
),
"globalNav" => array(
array(),
array(),
array(),
array(),
array(),
array(),
array(),
array(),
array(),
array(),
array(),
array(),
array(),
array(),
array(),
array(),
array(),
array(),
array(),
array(),
array(),
array(),
array(),
array(),
array(),
array(),
array()
),
"breadCrumbs" => array(
array()
),
"pageContents" => array(
"home_who_we_are" => null
),
"userData" => null,
"announcements" => array(
array(),
array(),
array()
),
"cache" => array(
"time" => "+1 day",
"key" => "dok"
),
"form" => FormHelper
FormHelper::$helpers = array
FormHelper::$fieldset = array
FormHelper::$__options = array
FormHelper::$fields = array
FormHelper::$requestType = NULL
FormHelper::$defaultModel = NULL
FormHelper::$_inputDefaults = array
FormHelper::$_lastAction = ""
FormHelper::$base = ""
FormHelper::$webroot = "/"
FormHelper::$theme = NULL
FormHelper::$here = "/dok"
FormHelper::$params = array
FormHelper::$action = "index"
FormHelper::$plugin = NULL
FormHelper::$data = NULL
FormHelper::$namedArgs = NULL
FormHelper::$argSeparator = NULL
FormHelper::$validationErrors = NULL
FormHelper::$tags = array
FormHelper::$__tainted = NULL
FormHelper::$__cleaned = NULL
FormHelper::$Html = HtmlHelper object,
"text" => TextHelper
TextHelper::$helpers = NULL
TextHelper::$base = ""
TextHelper::$webroot = "/"
TextHelper::$theme = NULL
TextHelper::$here = "/dok"
TextHelper::$params = array
TextHelper::$action = "index"
TextHelper::$plugin = NULL
TextHelper::$data = NULL
TextHelper::$namedArgs = NULL
TextHelper::$argSeparator = NULL
TextHelper::$validationErrors = NULL
TextHelper::$tags = array
TextHelper::$__tainted = NULL
TextHelper::$__cleaned = NULL,
"stringer" => StringerHelper
StringerHelper::$helpers = array
StringerHelper::$base = ""
StringerHelper::$webroot = "/"
StringerHelper::$theme = NULL
StringerHelper::$here = "/dok"
StringerHelper::$params = array
StringerHelper::$action = "index"
StringerHelper::$plugin = NULL
StringerHelper::$data = NULL
StringerHelper::$namedArgs = NULL
StringerHelper::$argSeparator = NULL
StringerHelper::$validationErrors = NULL
StringerHelper::$tags = array
StringerHelper::$__tainted = NULL
StringerHelper::$__cleaned = NULL
StringerHelper::$Html = HtmlHelper object
StringerHelper::$Link = LinkHelper object
StringerHelper::$Text = TextHelper object,
"menu" => MenuHelper
MenuHelper::$helpers = array
MenuHelper::$base = ""
MenuHelper::$webroot = "/"
MenuHelper::$theme = NULL
MenuHelper::$here = "/dok"
MenuHelper::$params = array
MenuHelper::$action = "index"
MenuHelper::$plugin = NULL
MenuHelper::$data = NULL
MenuHelper::$namedArgs = NULL
MenuHelper::$argSeparator = NULL
MenuHelper::$validationErrors = NULL
MenuHelper::$tags = array
MenuHelper::$__tainted = NULL
MenuHelper::$__cleaned = NULL
MenuHelper::$Link = LinkHelper object,
"session" => SessionHelper
SessionHelper::$helpers = array
SessionHelper::$__active = true
SessionHelper::$valid = false
SessionHelper::$error = false
SessionHelper::$_userAgent = "f9a8355d006790ee743ededbb1f6e3bd"
SessionHelper::$path = "/"
SessionHelper::$lastError = NULL
SessionHelper::$security = "medium"
SessionHelper::$time = 1773314240
SessionHelper::$sessionTime = 1773326240
SessionHelper::$cookieLifeTime = false
SessionHelper::$watchKeys = array
SessionHelper::$id = NULL
SessionHelper::$host = NULL
SessionHelper::$timeout = NULL
SessionHelper::$base = ""
SessionHelper::$webroot = "/"
SessionHelper::$here = "/dok"
SessionHelper::$params = array
SessionHelper::$action = "index"
SessionHelper::$data = NULL
SessionHelper::$theme = NULL
SessionHelper::$plugin = NULL,
"html" => HtmlHelper
HtmlHelper::$tags = array
HtmlHelper::$_crumbs = array
HtmlHelper::$__includedScripts = array
HtmlHelper::$_scriptBlockOptions = array
HtmlHelper::$__docTypes = array
HtmlHelper::$helpers = NULL
HtmlHelper::$base = ""
HtmlHelper::$webroot = "/"
HtmlHelper::$theme = NULL
HtmlHelper::$here = "/dok"
HtmlHelper::$params = array
HtmlHelper::$action = "index"
HtmlHelper::$plugin = NULL
HtmlHelper::$data = NULL
HtmlHelper::$namedArgs = NULL
HtmlHelper::$argSeparator = NULL
HtmlHelper::$validationErrors = NULL
HtmlHelper::$__tainted = NULL
HtmlHelper::$__cleaned = NULL,
"link" => LinkHelper
LinkHelper::$helpers = array
LinkHelper::$lang = "dok"
LinkHelper::$defaultLang = "hrv"
LinkHelper::$base = ""
LinkHelper::$webroot = "/"
LinkHelper::$theme = NULL
LinkHelper::$here = "/dok"
LinkHelper::$params = array
LinkHelper::$action = "index"
LinkHelper::$plugin = NULL
LinkHelper::$data = NULL
LinkHelper::$namedArgs = NULL
LinkHelper::$argSeparator = NULL
LinkHelper::$validationErrors = NULL
LinkHelper::$tags = array
LinkHelper::$__tainted = NULL
LinkHelper::$__cleaned = NULL
LinkHelper::$Html = HtmlHelper object
LinkHelper::$Session = SessionHelper object
)
$loadHelpers = false
$cached = false
$loadedHelpers = array()
$lang = "dok"
$otherLangs = array(
"eng",
"hrv"
)
$globalNav = array(
array(
"Page" => array()
),
array(
"Page" => array()
),
array(
"Page" => array()
),
array(
"Page" => array()
),
array(
"Page" => array()
),
array(
"Page" => array()
),
array(
"Page" => array()
),
array(
"Page" => array()
),
array(
"Page" => array()
),
array(
"Page" => array()
),
array(
"Page" => array()
),
array(
"Page" => array()
),
array(
"Page" => array()
),
array(
"Page" => array()
),
array(
"Page" => array()
),
array(
"Page" => array()
),
array(
"Page" => array()
),
array(
"Page" => array()
),
array(
"Page" => array()
),
array(
"Page" => array()
),
array(
"Page" => array()
),
array(
"Page" => array()
),
array(
"Page" => array()
),
array(
"Page" => array()
),
array(
"Page" => array()
),
array(
"Page" => array()
),
array(
"Page" => array()
)
)
$breadCrumbs = array(
array(
"Page" => array()
)
)
$pageContents = array(
"home_who_we_are" => null
)
$userData = null
$announcements = array(
array(
"Announcement" => array()
),
array(
"Announcement" => array()
),
array(
"Announcement" => array()
)
)
$cache = array(
"time" => "+1 day",
"key" => "dok"
)
$form = FormHelper
FormHelper::$helpers = array
FormHelper::$fieldset = array
FormHelper::$__options = array
FormHelper::$fields = array
FormHelper::$requestType = NULL
FormHelper::$defaultModel = NULL
FormHelper::$_inputDefaults = array
FormHelper::$_lastAction = ""
FormHelper::$base = ""
FormHelper::$webroot = "/"
FormHelper::$theme = NULL
FormHelper::$here = "/dok"
FormHelper::$params = array
FormHelper::$action = "index"
FormHelper::$plugin = NULL
FormHelper::$data = NULL
FormHelper::$namedArgs = NULL
FormHelper::$argSeparator = NULL
FormHelper::$validationErrors = NULL
FormHelper::$tags = array
FormHelper::$__tainted = NULL
FormHelper::$__cleaned = NULL
FormHelper::$Html = HtmlHelper object
$text = TextHelper
TextHelper::$helpers = NULL
TextHelper::$base = ""
TextHelper::$webroot = "/"
TextHelper::$theme = NULL
TextHelper::$here = "/dok"
TextHelper::$params = array
TextHelper::$action = "index"
TextHelper::$plugin = NULL
TextHelper::$data = NULL
TextHelper::$namedArgs = NULL
TextHelper::$argSeparator = NULL
TextHelper::$validationErrors = NULL
TextHelper::$tags = array
TextHelper::$__tainted = NULL
TextHelper::$__cleaned = NULL
$stringer = StringerHelper
StringerHelper::$helpers = array
StringerHelper::$base = ""
StringerHelper::$webroot = "/"
StringerHelper::$theme = NULL
StringerHelper::$here = "/dok"
StringerHelper::$params = array
StringerHelper::$action = "index"
StringerHelper::$plugin = NULL
StringerHelper::$data = NULL
StringerHelper::$namedArgs = NULL
StringerHelper::$argSeparator = NULL
StringerHelper::$validationErrors = NULL
StringerHelper::$tags = array
StringerHelper::$__tainted = NULL
StringerHelper::$__cleaned = NULL
StringerHelper::$Html = HtmlHelper object
StringerHelper::$Link = LinkHelper object
StringerHelper::$Text = TextHelper object
$menu = MenuHelper
MenuHelper::$helpers = array
MenuHelper::$base = ""
MenuHelper::$webroot = "/"
MenuHelper::$theme = NULL
MenuHelper::$here = "/dok"
MenuHelper::$params = array
MenuHelper::$action = "index"
MenuHelper::$plugin = NULL
MenuHelper::$data = NULL
MenuHelper::$namedArgs = NULL
MenuHelper::$argSeparator = NULL
MenuHelper::$validationErrors = NULL
MenuHelper::$tags = array
MenuHelper::$__tainted = NULL
MenuHelper::$__cleaned = NULL
MenuHelper::$Link = LinkHelper object
$session = SessionHelper
SessionHelper::$helpers = array
SessionHelper::$__active = true
SessionHelper::$valid = false
SessionHelper::$error = false
SessionHelper::$_userAgent = "f9a8355d006790ee743ededbb1f6e3bd"
SessionHelper::$path = "/"
SessionHelper::$lastError = NULL
SessionHelper::$security = "medium"
SessionHelper::$time = 1773314240
SessionHelper::$sessionTime = 1773326240
SessionHelper::$cookieLifeTime = false
SessionHelper::$watchKeys = array
SessionHelper::$id = NULL
SessionHelper::$host = NULL
SessionHelper::$timeout = NULL
SessionHelper::$base = ""
SessionHelper::$webroot = "/"
SessionHelper::$here = "/dok"
SessionHelper::$params = array
SessionHelper::$action = "index"
SessionHelper::$data = NULL
SessionHelper::$theme = NULL
SessionHelper::$plugin = NULL
$html = HtmlHelper
HtmlHelper::$tags = array
HtmlHelper::$_crumbs = array
HtmlHelper::$__includedScripts = array
HtmlHelper::$_scriptBlockOptions = array
HtmlHelper::$__docTypes = array
HtmlHelper::$helpers = NULL
HtmlHelper::$base = ""
HtmlHelper::$webroot = "/"
HtmlHelper::$theme = NULL
HtmlHelper::$here = "/dok"
HtmlHelper::$params = array
HtmlHelper::$action = "index"
HtmlHelper::$plugin = NULL
HtmlHelper::$data = NULL
HtmlHelper::$namedArgs = NULL
HtmlHelper::$argSeparator = NULL
HtmlHelper::$validationErrors = NULL
HtmlHelper::$__tainted = NULL
HtmlHelper::$__cleaned = NULL
$link = LinkHelper
LinkHelper::$helpers = array
LinkHelper::$lang = "dok"
LinkHelper::$defaultLang = "hrv"
LinkHelper::$base = ""
LinkHelper::$webroot = "/"
LinkHelper::$theme = NULL
LinkHelper::$here = "/dok"
LinkHelper::$params = array
LinkHelper::$action = "index"
LinkHelper::$plugin = NULL
LinkHelper::$data = NULL
LinkHelper::$namedArgs = NULL
LinkHelper::$argSeparator = NULL
LinkHelper::$validationErrors = NULL
LinkHelper::$tags = array
LinkHelper::$__tainted = NULL
LinkHelper::$__cleaned = NULL
LinkHelper::$Html = HtmlHelper object
LinkHelper::$Session = SessionHelper object
$battleReports = array(
array(
"BattleReport" => array(),
"Game" => array(),
"BattleReportExperience" => array()
),
array(
"BattleReport" => array(),
"Game" => array(),
"BattleReportExperience" => array()
),
array(
"BattleReport" => array(),
"Game" => array(),
"BattleReportExperience" => array()
)
)
$battleReport = array(
"BattleReport" => array(
"id" => "16",
"title_eng" => "Kill Team - Blooded vs. Vespid Stingwings",
"title_hrv" => "Kill Team - Blooded vs. Vespid Stingwings",
"mask_eng" => "kill_team_-_blooded_vs_vespid_stingwings",
"mask_hrv" => "kill_team_-_blooded_vs_vespid_stingwings",
"game_id" => "1",
"fought" => "2025-02-28 16:00:00",
"created" => "2025-03-10 08:53:42",
"modified" => "2025-03-10 08:53:42"
),
"Game" => array(
"id" => "1",
"name_eng" => "GW - Warhammer 40.000",
"name_hrv" => "GW - Warhammer 40.000",
"description_eng" => "<p>
In the grim darkness of the far future, there is only war!</p>
<p>
<a href="http://img.photobucket.com/albums/v467/demonn/Agram-Sajt/40k03_zpsc9a73277.jpg" target="_blank"> <img alt="Click for enlarged picture" src="http://img.photobucket.com/albums/v467/demonn/Agram-Sajt/40k03_zpsc9a73277.jpg" width="600" /> </a> </p>
",
"description_hrv" => "<p>
Warhammer 40000 je strate&scaron;ka igra smje&scaron;tena u daleku budućnost Zemlje, u kojoj preuzimate zapovjedni&scaron;tvo nad vojskama minijatura kako bi prikazali oružane sukobe vojski budućnosti.</p>
<p>
Bitke se vode na stolu uobičajenih dimenzija 120 x 180 cm, na koji se zatim postavlja različit teren kako bi se dočarao izgled pravog boji&scaron;ta. Nakon toga, u uobičajenom scenariju, na suprotne strane stola razmje&scaron;taju se dvije vojske minijatura. Strate&scaron;ki dio igre je vrlo važan jer već samim razmje&scaron;tanjem jedinica na stol možete dobiti veći dio bitke.</p>
<p>
Sada, kada va&scaron;i vojnici preko bojnog polja gledaju u mrskog im neprijatelja, spremni ste poslati naredbu za juri&scaron;, ili se ukopati na poziciji i braniti ono &scaron;to je va&scaron;e (va&scaron;u polovicu drvene ploče prekrivene umjetnim terenom). Kako ne bi nastala zbrka na bojnom polju, igra je podijeljena na poteze, a svaki potez je dodatno podijeljen u faze.<br />
&nbsp;</p>
<p>
<a href="http://img.photobucket.com/albums/v467/demonn/Agram-Sajt/40k03_zpsc9a73277.jpg" target="_blank"> <img alt="Click for enlarged picture" src="http://img.photobucket.com/albums/v467/demonn/Agram-Sajt/40k03_zpsc9a73277.jpg" width="600" /> </a> </p>"
),
"BattleReportExperience" => array(
array()
)
)
$memberString = " and "
$battleReportExperience = array(
"id" => "18",
"battle_report_id" => "16",
"member_id" => "96",
"army_id" => "33",
"intro_eng" => "<p>
This Friday, Luka and I had the opportunity to try out the third edition of the famous Warhammer skirmish game Kill Team, and along the way demonstrate the basics that have remained unchanged. Luka played a team of Vespid Stingwings, a highly mobile T&#39;au unit, and I played the Blooded, a traitor squad that used to belong to the Astra Militarum (in my case they were named Glanton&#39;s Gang). The map, measuring 30x22 inches, was organized so that all terrain was outside of our deployment zones, which were 6 inches from the shorter edges. In the middle of the map, in a slight diagonal, 3 points of interest (objectives) are placed. All this resulted in a very symmetrical setup of operatives &ndash; all Vespids and the entire Blooded gang at the beginning of the game were mirrored hidden behind large pieces of terrain. All buildings with doors were 3 inches high, offering the operatives a Vantage point - the ability to keep one hit die as a success, and the well in the very center, 4 inches high, offers an even better Vantage point, where the operatives keep 2 dice.</p>
<p>
<a href="https://hosting.photobucket.com/95288841-8654-4bf7-8fc9-a4aa78dce87f/e4be55ea-8433-47c7-b28a-459533bba4bc.jpg" target="_blank"><img alt="Click for enlarged picture" src="https://hosting.photobucket.com/95288841-8654-4bf7-8fc9-a4aa78dce87f/e4be55ea-8433-47c7-b28a-459533bba4bc.jpg" width="600" /></a></p>
",
"intro_hrv" => "<p>
Ovaj smo petak Luka i ja imali priliku isprobati treću ediciju poznate Warhammer skirmish igre <em>Kill Team</em> te usput demonstrirati osnove koje su ostale nepromijenjene. Luka je igrao tim Vespid Stingwings, jako mobilne T&#39;au jedinice, a ja sam igrao Blooded, izdajnički odred koji je nekad pripadao Astri Militarum (u mojem su slučaju dobili ime <em>Glantonova banda</em>). Mapa, veličine 30x22 inča, bila je organizirana tako da je sav teren bio van na&scaron;ih deployment zona, koje su iznosile 6 inča od kraćih rubova. Nasred mape, u blagoj dijagonali, postavljene su 3 točke interesa (objectives). Sve je ovo rezultiralo jako simetričnom postavom operativaca &ndash; svi su Vespidi i cijela Blooded banda na početku igre bili zrcaljeno skriveni iza velikih komada terena. Sve građevine s vratima bile su visoke 3 inča, &scaron;to je operativcima nudilo Vantage point &ndash; mogućnost da jednu hit-kockicu zadrže kao uspje&scaron;nu, a bu&scaron;otina u samom centru, visoka 4 inča, nudi jo&scaron; bolji Vantage point, gdje operativci zadržavaju 2 kockice.</p>
<p>
<a href="https://hosting.photobucket.com/95288841-8654-4bf7-8fc9-a4aa78dce87f/e4be55ea-8433-47c7-b28a-459533bba4bc.jpg" target="_blank"><img alt="Click for enlarged picture" src="https://hosting.photobucket.com/95288841-8654-4bf7-8fc9-a4aa78dce87f/e4be55ea-8433-47c7-b28a-459533bba4bc.jpg" width="600" /></a></p>
",
"Member" => array(
"id" => "96",
"group_id" => "2",
"first_name" => "Antoni",
"last_name" => "Pastuović",
"first_name_mask" => "antoni",
"last_name_mask" => "pastuovic",
"username" => "antoni",
"password" => "*****",
"born" => "2005-04-04 18:52:00",
"created" => "2019-04-04 18:53:09"
),
"Army" => array(
"id" => "33",
"game_id" => "1",
"army_alignment_id" => null,
"name_eng" => "Imperial Guard",
"name_hrv" => "Imperial Guard",
"description_eng" => "",
"description_hrv" => ""
)
)</pre><pre class="stack-trace">include - APP/views/elements/latestBattleReports.ctp, line 26
View::_render() - CORE/cake/libs/view/view.php, line 736
View::element() - CORE/cake/libs/view/view.php, line 397
include - APP/views/home/index.ctp, line 50
View::_render() - CORE/cake/libs/view/view.php, line 736
View::render() - CORE/cake/libs/view/view.php, line 431
Controller::render() - CORE/cake/libs/controller/controller.php, line 909
Dispatcher::_invoke() - CORE/cake/dispatcher.php, line 207
Dispatcher::dispatch() - CORE/cake/dispatcher.php, line 171
[main] - APP/webroot/index.php, line 86</pre></div></pre><pre class="cake-debug"><a href="javascript:void(0);" onclick="document.getElementById('cakeErr12-trace').style.display = (document.getElementById('cakeErr12-trace').style.display == 'none' ? '' : 'none');"><b>Notice</b> (8)</a>: Undefined index: name_dok [<b>APP/views/elements/latestBattleReports.ctp</b>, line <b>29</b>]<div id="cakeErr12-trace" class="cake-stack-trace" style="display: none;"><a href="javascript:void(0);" onclick="document.getElementById('cakeErr12-code').style.display = (document.getElementById('cakeErr12-code').style.display == 'none' ? '' : 'none')">Code</a> | <a href="javascript:void(0);" onclick="document.getElementById('cakeErr12-context').style.display = (document.getElementById('cakeErr12-context').style.display == 'none' ? '' : 'none')">Context</a><div id="cakeErr12-code" class="cake-code-dump" style="display: none;"><pre><code><span style="color: #000000"></span></code>
<code><span style="color: #000000"> if (Configure::read() > 0) {</span></code>
<span class="code-highlight"><code><span style="color: #000000"> include ($___viewFn);</span></code></span></pre></div><pre id="cakeErr12-context" class="cake-context" style="display: none;">$___viewFn = "/home/martin/apps/agram/app/views/elements/latestBattleReports.ctp"
$___dataForView = array(
"lang" => "dok",
"otherLangs" => array(
"eng",
"hrv"
),
"globalNav" => array(
array(),
array(),
array(),
array(),
array(),
array(),
array(),
array(),
array(),
array(),
array(),
array(),
array(),
array(),
array(),
array(),
array(),
array(),
array(),
array(),
array(),
array(),
array(),
array(),
array(),
array(),
array()
),
"breadCrumbs" => array(
array()
),
"pageContents" => array(
"home_who_we_are" => null
),
"userData" => null,
"announcements" => array(
array(),
array(),
array()
),
"cache" => array(
"time" => "+1 day",
"key" => "dok"
),
"form" => FormHelper
FormHelper::$helpers = array
FormHelper::$fieldset = array
FormHelper::$__options = array
FormHelper::$fields = array
FormHelper::$requestType = NULL
FormHelper::$defaultModel = NULL
FormHelper::$_inputDefaults = array
FormHelper::$_lastAction = ""
FormHelper::$base = ""
FormHelper::$webroot = "/"
FormHelper::$theme = NULL
FormHelper::$here = "/dok"
FormHelper::$params = array
FormHelper::$action = "index"
FormHelper::$plugin = NULL
FormHelper::$data = NULL
FormHelper::$namedArgs = NULL
FormHelper::$argSeparator = NULL
FormHelper::$validationErrors = NULL
FormHelper::$tags = array
FormHelper::$__tainted = NULL
FormHelper::$__cleaned = NULL
FormHelper::$Html = HtmlHelper object,
"text" => TextHelper
TextHelper::$helpers = NULL
TextHelper::$base = ""
TextHelper::$webroot = "/"
TextHelper::$theme = NULL
TextHelper::$here = "/dok"
TextHelper::$params = array
TextHelper::$action = "index"
TextHelper::$plugin = NULL
TextHelper::$data = NULL
TextHelper::$namedArgs = NULL
TextHelper::$argSeparator = NULL
TextHelper::$validationErrors = NULL
TextHelper::$tags = array
TextHelper::$__tainted = NULL
TextHelper::$__cleaned = NULL,
"stringer" => StringerHelper
StringerHelper::$helpers = array
StringerHelper::$base = ""
StringerHelper::$webroot = "/"
StringerHelper::$theme = NULL
StringerHelper::$here = "/dok"
StringerHelper::$params = array
StringerHelper::$action = "index"
StringerHelper::$plugin = NULL
StringerHelper::$data = NULL
StringerHelper::$namedArgs = NULL
StringerHelper::$argSeparator = NULL
StringerHelper::$validationErrors = NULL
StringerHelper::$tags = array
StringerHelper::$__tainted = NULL
StringerHelper::$__cleaned = NULL
StringerHelper::$Html = HtmlHelper object
StringerHelper::$Link = LinkHelper object
StringerHelper::$Text = TextHelper object,
"menu" => MenuHelper
MenuHelper::$helpers = array
MenuHelper::$base = ""
MenuHelper::$webroot = "/"
MenuHelper::$theme = NULL
MenuHelper::$here = "/dok"
MenuHelper::$params = array
MenuHelper::$action = "index"
MenuHelper::$plugin = NULL
MenuHelper::$data = NULL
MenuHelper::$namedArgs = NULL
MenuHelper::$argSeparator = NULL
MenuHelper::$validationErrors = NULL
MenuHelper::$tags = array
MenuHelper::$__tainted = NULL
MenuHelper::$__cleaned = NULL
MenuHelper::$Link = LinkHelper object,
"session" => SessionHelper
SessionHelper::$helpers = array
SessionHelper::$__active = true
SessionHelper::$valid = false
SessionHelper::$error = false
SessionHelper::$_userAgent = "f9a8355d006790ee743ededbb1f6e3bd"
SessionHelper::$path = "/"
SessionHelper::$lastError = NULL
SessionHelper::$security = "medium"
SessionHelper::$time = 1773314240
SessionHelper::$sessionTime = 1773326240
SessionHelper::$cookieLifeTime = false
SessionHelper::$watchKeys = array
SessionHelper::$id = NULL
SessionHelper::$host = NULL
SessionHelper::$timeout = NULL
SessionHelper::$base = ""
SessionHelper::$webroot = "/"
SessionHelper::$here = "/dok"
SessionHelper::$params = array
SessionHelper::$action = "index"
SessionHelper::$data = NULL
SessionHelper::$theme = NULL
SessionHelper::$plugin = NULL,
"html" => HtmlHelper
HtmlHelper::$tags = array
HtmlHelper::$_crumbs = array
HtmlHelper::$__includedScripts = array
HtmlHelper::$_scriptBlockOptions = array
HtmlHelper::$__docTypes = array
HtmlHelper::$helpers = NULL
HtmlHelper::$base = ""
HtmlHelper::$webroot = "/"
HtmlHelper::$theme = NULL
HtmlHelper::$here = "/dok"
HtmlHelper::$params = array
HtmlHelper::$action = "index"
HtmlHelper::$plugin = NULL
HtmlHelper::$data = NULL
HtmlHelper::$namedArgs = NULL
HtmlHelper::$argSeparator = NULL
HtmlHelper::$validationErrors = NULL
HtmlHelper::$__tainted = NULL
HtmlHelper::$__cleaned = NULL,
"link" => LinkHelper
LinkHelper::$helpers = array
LinkHelper::$lang = "dok"
LinkHelper::$defaultLang = "hrv"
LinkHelper::$base = ""
LinkHelper::$webroot = "/"
LinkHelper::$theme = NULL
LinkHelper::$here = "/dok"
LinkHelper::$params = array
LinkHelper::$action = "index"
LinkHelper::$plugin = NULL
LinkHelper::$data = NULL
LinkHelper::$namedArgs = NULL
LinkHelper::$argSeparator = NULL
LinkHelper::$validationErrors = NULL
LinkHelper::$tags = array
LinkHelper::$__tainted = NULL
LinkHelper::$__cleaned = NULL
LinkHelper::$Html = HtmlHelper object
LinkHelper::$Session = SessionHelper object
)
$loadHelpers = false
$cached = false
$loadedHelpers = array()
$lang = "dok"
$otherLangs = array(
"eng",
"hrv"
)
$globalNav = array(
array(
"Page" => array()
),
array(
"Page" => array()
),
array(
"Page" => array()
),
array(
"Page" => array()
),
array(
"Page" => array()
),
array(
"Page" => array()
),
array(
"Page" => array()
),
array(
"Page" => array()
),
array(
"Page" => array()
),
array(
"Page" => array()
),
array(
"Page" => array()
),
array(
"Page" => array()
),
array(
"Page" => array()
),
array(
"Page" => array()
),
array(
"Page" => array()
),
array(
"Page" => array()
),
array(
"Page" => array()
),
array(
"Page" => array()
),
array(
"Page" => array()
),
array(
"Page" => array()
),
array(
"Page" => array()
),
array(
"Page" => array()
),
array(
"Page" => array()
),
array(
"Page" => array()
),
array(
"Page" => array()
),
array(
"Page" => array()
),
array(
"Page" => array()
)
)
$breadCrumbs = array(
array(
"Page" => array()
)
)
$pageContents = array(
"home_who_we_are" => null
)
$userData = null
$announcements = array(
array(
"Announcement" => array()
),
array(
"Announcement" => array()
),
array(
"Announcement" => array()
)
)
$cache = array(
"time" => "+1 day",
"key" => "dok"
)
$form = FormHelper
FormHelper::$helpers = array
FormHelper::$fieldset = array
FormHelper::$__options = array
FormHelper::$fields = array
FormHelper::$requestType = NULL
FormHelper::$defaultModel = NULL
FormHelper::$_inputDefaults = array
FormHelper::$_lastAction = ""
FormHelper::$base = ""
FormHelper::$webroot = "/"
FormHelper::$theme = NULL
FormHelper::$here = "/dok"
FormHelper::$params = array
FormHelper::$action = "index"
FormHelper::$plugin = NULL
FormHelper::$data = NULL
FormHelper::$namedArgs = NULL
FormHelper::$argSeparator = NULL
FormHelper::$validationErrors = NULL
FormHelper::$tags = array
FormHelper::$__tainted = NULL
FormHelper::$__cleaned = NULL
FormHelper::$Html = HtmlHelper object
$text = TextHelper
TextHelper::$helpers = NULL
TextHelper::$base = ""
TextHelper::$webroot = "/"
TextHelper::$theme = NULL
TextHelper::$here = "/dok"
TextHelper::$params = array
TextHelper::$action = "index"
TextHelper::$plugin = NULL
TextHelper::$data = NULL
TextHelper::$namedArgs = NULL
TextHelper::$argSeparator = NULL
TextHelper::$validationErrors = NULL
TextHelper::$tags = array
TextHelper::$__tainted = NULL
TextHelper::$__cleaned = NULL
$stringer = StringerHelper
StringerHelper::$helpers = array
StringerHelper::$base = ""
StringerHelper::$webroot = "/"
StringerHelper::$theme = NULL
StringerHelper::$here = "/dok"
StringerHelper::$params = array
StringerHelper::$action = "index"
StringerHelper::$plugin = NULL
StringerHelper::$data = NULL
StringerHelper::$namedArgs = NULL
StringerHelper::$argSeparator = NULL
StringerHelper::$validationErrors = NULL
StringerHelper::$tags = array
StringerHelper::$__tainted = NULL
StringerHelper::$__cleaned = NULL
StringerHelper::$Html = HtmlHelper object
StringerHelper::$Link = LinkHelper object
StringerHelper::$Text = TextHelper object
$menu = MenuHelper
MenuHelper::$helpers = array
MenuHelper::$base = ""
MenuHelper::$webroot = "/"
MenuHelper::$theme = NULL
MenuHelper::$here = "/dok"
MenuHelper::$params = array
MenuHelper::$action = "index"
MenuHelper::$plugin = NULL
MenuHelper::$data = NULL
MenuHelper::$namedArgs = NULL
MenuHelper::$argSeparator = NULL
MenuHelper::$validationErrors = NULL
MenuHelper::$tags = array
MenuHelper::$__tainted = NULL
MenuHelper::$__cleaned = NULL
MenuHelper::$Link = LinkHelper object
$session = SessionHelper
SessionHelper::$helpers = array
SessionHelper::$__active = true
SessionHelper::$valid = false
SessionHelper::$error = false
SessionHelper::$_userAgent = "f9a8355d006790ee743ededbb1f6e3bd"
SessionHelper::$path = "/"
SessionHelper::$lastError = NULL
SessionHelper::$security = "medium"
SessionHelper::$time = 1773314240
SessionHelper::$sessionTime = 1773326240
SessionHelper::$cookieLifeTime = false
SessionHelper::$watchKeys = array
SessionHelper::$id = NULL
SessionHelper::$host = NULL
SessionHelper::$timeout = NULL
SessionHelper::$base = ""
SessionHelper::$webroot = "/"
SessionHelper::$here = "/dok"
SessionHelper::$params = array
SessionHelper::$action = "index"
SessionHelper::$data = NULL
SessionHelper::$theme = NULL
SessionHelper::$plugin = NULL
$html = HtmlHelper
HtmlHelper::$tags = array
HtmlHelper::$_crumbs = array
HtmlHelper::$__includedScripts = array
HtmlHelper::$_scriptBlockOptions = array
HtmlHelper::$__docTypes = array
HtmlHelper::$helpers = NULL
HtmlHelper::$base = ""
HtmlHelper::$webroot = "/"
HtmlHelper::$theme = NULL
HtmlHelper::$here = "/dok"
HtmlHelper::$params = array
HtmlHelper::$action = "index"
HtmlHelper::$plugin = NULL
HtmlHelper::$data = NULL
HtmlHelper::$namedArgs = NULL
HtmlHelper::$argSeparator = NULL
HtmlHelper::$validationErrors = NULL
HtmlHelper::$__tainted = NULL
HtmlHelper::$__cleaned = NULL
$link = LinkHelper
LinkHelper::$helpers = array
LinkHelper::$lang = "dok"
LinkHelper::$defaultLang = "hrv"
LinkHelper::$base = ""
LinkHelper::$webroot = "/"
LinkHelper::$theme = NULL
LinkHelper::$here = "/dok"
LinkHelper::$params = array
LinkHelper::$action = "index"
LinkHelper::$plugin = NULL
LinkHelper::$data = NULL
LinkHelper::$namedArgs = NULL
LinkHelper::$argSeparator = NULL
LinkHelper::$validationErrors = NULL
LinkHelper::$tags = array
LinkHelper::$__tainted = NULL
LinkHelper::$__cleaned = NULL
LinkHelper::$Html = HtmlHelper object
LinkHelper::$Session = SessionHelper object
$battleReports = array(
array(
"BattleReport" => array(),
"Game" => array(),
"BattleReportExperience" => array()
),
array(
"BattleReport" => array(),
"Game" => array(),
"BattleReportExperience" => array()
),
array(
"BattleReport" => array(),
"Game" => array(),
"BattleReportExperience" => array()
)
)
$battleReport = array(
"BattleReport" => array(
"id" => "16",
"title_eng" => "Kill Team - Blooded vs. Vespid Stingwings",
"title_hrv" => "Kill Team - Blooded vs. Vespid Stingwings",
"mask_eng" => "kill_team_-_blooded_vs_vespid_stingwings",
"mask_hrv" => "kill_team_-_blooded_vs_vespid_stingwings",
"game_id" => "1",
"fought" => "2025-02-28 16:00:00",
"created" => "2025-03-10 08:53:42",
"modified" => "2025-03-10 08:53:42"
),
"Game" => array(
"id" => "1",
"name_eng" => "GW - Warhammer 40.000",
"name_hrv" => "GW - Warhammer 40.000",
"description_eng" => "<p>
In the grim darkness of the far future, there is only war!</p>
<p>
<a href="http://img.photobucket.com/albums/v467/demonn/Agram-Sajt/40k03_zpsc9a73277.jpg" target="_blank"> <img alt="Click for enlarged picture" src="http://img.photobucket.com/albums/v467/demonn/Agram-Sajt/40k03_zpsc9a73277.jpg" width="600" /> </a> </p>
",
"description_hrv" => "<p>
Warhammer 40000 je strate&scaron;ka igra smje&scaron;tena u daleku budućnost Zemlje, u kojoj preuzimate zapovjedni&scaron;tvo nad vojskama minijatura kako bi prikazali oružane sukobe vojski budućnosti.</p>
<p>
Bitke se vode na stolu uobičajenih dimenzija 120 x 180 cm, na koji se zatim postavlja različit teren kako bi se dočarao izgled pravog boji&scaron;ta. Nakon toga, u uobičajenom scenariju, na suprotne strane stola razmje&scaron;taju se dvije vojske minijatura. Strate&scaron;ki dio igre je vrlo važan jer već samim razmje&scaron;tanjem jedinica na stol možete dobiti veći dio bitke.</p>
<p>
Sada, kada va&scaron;i vojnici preko bojnog polja gledaju u mrskog im neprijatelja, spremni ste poslati naredbu za juri&scaron;, ili se ukopati na poziciji i braniti ono &scaron;to je va&scaron;e (va&scaron;u polovicu drvene ploče prekrivene umjetnim terenom). Kako ne bi nastala zbrka na bojnom polju, igra je podijeljena na poteze, a svaki potez je dodatno podijeljen u faze.<br />
&nbsp;</p>
<p>
<a href="http://img.photobucket.com/albums/v467/demonn/Agram-Sajt/40k03_zpsc9a73277.jpg" target="_blank"> <img alt="Click for enlarged picture" src="http://img.photobucket.com/albums/v467/demonn/Agram-Sajt/40k03_zpsc9a73277.jpg" width="600" /> </a> </p>"
),
"BattleReportExperience" => array(
array()
)
)
$memberString = " and <a href="/dok/members/antoni.pastuovic">Antoni Pastuović</a> ()"
$battleReportExperience = array(
"id" => "18",
"battle_report_id" => "16",
"member_id" => "96",
"army_id" => "33",
"intro_eng" => "<p>
This Friday, Luka and I had the opportunity to try out the third edition of the famous Warhammer skirmish game Kill Team, and along the way demonstrate the basics that have remained unchanged. Luka played a team of Vespid Stingwings, a highly mobile T&#39;au unit, and I played the Blooded, a traitor squad that used to belong to the Astra Militarum (in my case they were named Glanton&#39;s Gang). The map, measuring 30x22 inches, was organized so that all terrain was outside of our deployment zones, which were 6 inches from the shorter edges. In the middle of the map, in a slight diagonal, 3 points of interest (objectives) are placed. All this resulted in a very symmetrical setup of operatives &ndash; all Vespids and the entire Blooded gang at the beginning of the game were mirrored hidden behind large pieces of terrain. All buildings with doors were 3 inches high, offering the operatives a Vantage point - the ability to keep one hit die as a success, and the well in the very center, 4 inches high, offers an even better Vantage point, where the operatives keep 2 dice.</p>
<p>
<a href="https://hosting.photobucket.com/95288841-8654-4bf7-8fc9-a4aa78dce87f/e4be55ea-8433-47c7-b28a-459533bba4bc.jpg" target="_blank"><img alt="Click for enlarged picture" src="https://hosting.photobucket.com/95288841-8654-4bf7-8fc9-a4aa78dce87f/e4be55ea-8433-47c7-b28a-459533bba4bc.jpg" width="600" /></a></p>
",
"intro_hrv" => "<p>
Ovaj smo petak Luka i ja imali priliku isprobati treću ediciju poznate Warhammer skirmish igre <em>Kill Team</em> te usput demonstrirati osnove koje su ostale nepromijenjene. Luka je igrao tim Vespid Stingwings, jako mobilne T&#39;au jedinice, a ja sam igrao Blooded, izdajnički odred koji je nekad pripadao Astri Militarum (u mojem su slučaju dobili ime <em>Glantonova banda</em>). Mapa, veličine 30x22 inča, bila je organizirana tako da je sav teren bio van na&scaron;ih deployment zona, koje su iznosile 6 inča od kraćih rubova. Nasred mape, u blagoj dijagonali, postavljene su 3 točke interesa (objectives). Sve je ovo rezultiralo jako simetričnom postavom operativaca &ndash; svi su Vespidi i cijela Blooded banda na početku igre bili zrcaljeno skriveni iza velikih komada terena. Sve građevine s vratima bile su visoke 3 inča, &scaron;to je operativcima nudilo Vantage point &ndash; mogućnost da jednu hit-kockicu zadrže kao uspje&scaron;nu, a bu&scaron;otina u samom centru, visoka 4 inča, nudi jo&scaron; bolji Vantage point, gdje operativci zadržavaju 2 kockice.</p>
<p>
<a href="https://hosting.photobucket.com/95288841-8654-4bf7-8fc9-a4aa78dce87f/e4be55ea-8433-47c7-b28a-459533bba4bc.jpg" target="_blank"><img alt="Click for enlarged picture" src="https://hosting.photobucket.com/95288841-8654-4bf7-8fc9-a4aa78dce87f/e4be55ea-8433-47c7-b28a-459533bba4bc.jpg" width="600" /></a></p>
",
"Member" => array(
"id" => "96",
"group_id" => "2",
"first_name" => "Antoni",
"last_name" => "Pastuović",
"first_name_mask" => "antoni",
"last_name_mask" => "pastuovic",
"username" => "antoni",
"password" => "*****",
"born" => "2005-04-04 18:52:00",
"created" => "2019-04-04 18:53:09"
),
"Army" => array(
"id" => "33",
"game_id" => "1",
"army_alignment_id" => null,
"name_eng" => "Imperial Guard",
"name_hrv" => "Imperial Guard",
"description_eng" => "",
"description_hrv" => ""
)
)
$dateFought = "28<span class="superscript">th</span> February 2025"</pre><pre class="stack-trace">include - APP/views/elements/latestBattleReports.ctp, line 29
View::_render() - CORE/cake/libs/view/view.php, line 736
View::element() - CORE/cake/libs/view/view.php, line 397
include - APP/views/home/index.ctp, line 50
View::_render() - CORE/cake/libs/view/view.php, line 736
View::render() - CORE/cake/libs/view/view.php, line 431
Controller::render() - CORE/cake/libs/controller/controller.php, line 909
Dispatcher::_invoke() - CORE/cake/dispatcher.php, line 207
Dispatcher::dispatch() - CORE/cake/dispatcher.php, line 171
[main] - APP/webroot/index.php, line 86</pre></div></pre>28<span class="superscript">th</span> February 2025, , and <a href="/dok/members/antoni.pastuovic">Antoni Pastuović</a> () </span>
</li>
<li>
<a href="/dok/battle_reports/2022/05/09" class="readMore"></a> <span class="details">
22<span class="superscript">nd</span> April 2022, , <a href="/dok/members/borna.plese">Borna Pleše</a> () and <a href="/dok/members/kristijan.kliska">Kristijan Kliska</a> () </span>
</li>
<li>
<a href="/dok/battle_reports/2021/11/26" class="readMore"></a> <span class="details">
17<span class="superscript">th</span> November 2021, , and <a href="/dok/members/nino.marasovic">Nino Marasović</a> () </span>
</li>
</ul>
<p><a href="/dok/battle_reports">more_battle_reports</a></p> <div class="fb-like-box" data-href="http://www.facebook.com/UmsAgram" data-width="200" data-show-faces="true" data-stream="true" data-header="true"></div>
</div>
<div id="rightColumn">
<h2>who_are_we</h2>
<h2>friends_and_sponsors</h2>
<div style="padding-bottom: 10px;">
<a href="http://www.zagreb.hr">
<img src="/img/sponsors/zagreb.png" width="300" alt="Grad Zagreb"/>
</a>
</div>
<div style="padding-bottom: 10px;">
<a href="http://zagrebacka.policija.hr/">
<img src="/img/sponsors/mup.png" width="300" alt="MUP"/>
</a>
</div>
<div style="padding-bottom: 10px;">
<a href="http://www.morh.hr/hr/morh-u-zajednici/kultura/">
<img src="/img/sponsors/morh.png" width="300" alt="MORH"/>
</a>
</div>
<div style="padding-bottom: 10px;">
<a href="http://www.cartamagica.hr">
<img src="/img/sponsors/cartamagica300_zps31870fe8.jpg" width="300" alt="Carta Magica"/>
</a>
</div>
<div style="padding-bottom: 10px;">
<a href="https://gardensofhecate.com/">
<img src="https://hosting.photobucket.com/images/v467/demonn/gardens.jpg" width="300" alt="Gardens"/>
</a>
</div>
<div style="padding-bottom: 10px;">
<a href="http://www.artzumbur.hr/">
<img src="/img/sponsors/zumbur.png" width="300" alt="Art Zumbur"/>
</a>
</div>
<div style="padding-bottom: 10px;">
<a href="https://makete.eu/">
<img src="https://hosting.photobucket.com/images/v467/demonn/Hobbychest.png" width="300" alt="HobbyChest"/>
</a>
</div>
<div style="padding-bottom: 10px;">
<a href="https://www.facebook.com/CherryTreeZagreb">
<img src="https://hosting.photobucket.com/images/v467/demonn/CherryTree.png" width="300" alt="CherryTree"/>
</a>
</div>
<div style="padding-bottom: 10px;">
<a href="https://www.instagram.com/swood.si/">
<img src="https://hosting.photobucket.com/95288841-8654-4bf7-8fc9-a4aa78dce87f/2abbad87-444e-4b3a-b532-5b29efe8e4f2.png" width="300" alt="Swood"/>
</a>
</div>
<div style="padding-bottom: 10px;">
<a href="https://www.fireballfigurines.com/">
<img src="https://hosting.photobucket.com/95288841-8654-4bf7-8fc9-a4aa78dce87f/82c70756-04a1-41bb-b537-e2da018e764e.png" width="300" alt="fireball"/>
</a>
</div>
<div style="padding-bottom: 10px;">
<a href="https://nordlysminiatures.com/">
<img src="https://hosting.photobucket.com/images/v467/demonn/nordlyslogo.png" width="300" alt="nordlys"/>
</a>
</div>
<div style="padding-bottom: 10px;">
<a href="https://www.bestiarumgames.com/">
<img src="https://hosting.photobucket.com/images/v467/demonn/bestiarum.png" width="300" alt="bestiarum"/>
</a>
</div>
<div style="padding-bottom: 10px;">
<a href="https://shop.ramshacklegames.co.uk/">
<img src="https://hosting.photobucket.com/images/v467/demonn/ramshackle.png" width="300" alt="ramshackle"/>
</a>
</div>
<div style="padding-bottom: 10px;">
<a href="https://btb-tutorials.com/">
<img src="https://hosting.photobucket.com/images/v467/demonn/logob2b.png" width="300" alt="b2b"/>
</a>
</div>
<div style="padding-bottom: 10px;">
<a href="https://www.miniatures.si/">
<img src="https://hosting.photobucket.com/images/v467/demonn/logominiatures-si.png" width="300" alt="miniatures-si"/>
</a>
</div>
<div style="padding-bottom: 10px;">
<a href="http://thebigbearminiatures.unas.hu/en/">
<img src="https://hosting.photobucket.com/images/v467/demonn/BigBear.jpg" width="300" alt="bigbear"/>
</a>
</div>
<div style="padding-bottom: 10px;">
<a href="https://www.facebook.com/p/Zone-Miniatures-100063970506568/">
<img src="https://hosting.photobucket.com/images/v467/demonn/ZoneMin.jpg" width="300" alt="zone"/>
</a>
</div>
<div style="padding-bottom: 10px;">
<a href="https://www.mrleesminis.com/">
<img src="/img/sponsors/mrleeminis.jpg" width="300" alt="mrlee"/>
</a>
</div>
<div style="padding-bottom: 10px;">
<a href="https://crecymodels.com/">
<img src="https://hosting.photobucket.com/images/v467/demonn/crecymodels.png" width="300" alt="Crecy"/>
</a>
</div>
<div style="padding-bottom: 10px;">
<a href="https://www.scientificmodels.shop/">
<img src="https://hosting.photobucket.com/images/v467/demonn/scientificmini.png" width="300" alt="Scientific"/>
</a>
</div>
<div style="padding-bottom: 10px;">
<a href="https://www.foundminiatures.com/home">
<img src="https://hosting.photobucket.com/images/v467/demonn/found.png" width="300" alt="Found"/>
</a>
</div>
<div style="padding-bottom: 10px;">
<a href="https://www.mkontraros.com/">
<img src="/img/sponsors/kontraros.jpg" width="300" alt="Kontraros"/>
</a>
</div>
<div style="padding-bottom: 10px;">
<a href="http://www.martinwelberg.nl/">
<img src="https://img.photobucket.com/albums/v467/demonn/sponzori/welberg.jpg" width="300" alt="Welberg"/>
</a>
</div>
<div style="padding-bottom: 10px;">
<a href="https://www.dioramapresepe.com/en/shop/">
<img src="https://img.photobucket.com/albums/v467/demonn/sponzori/dioramapresepe.png" width="300" alt="DioramaPresepe"/>
</a>
<div style="padding-bottom: 10px;">
<a href="https://www.greymountainreviews.co.uk/">
<img src="https://hosting.photobucket.com/images/v467/demonn/GMR.png" width="300" alt="GMR"/>
</a>
</div><div style="padding-bottom: 10px;">
<a href="http://triglav-model.simplesite.com/">
<img src="/img/sponsors/Triglav.jpg" width="300" alt="Triglav Model"/>
</a>
</div>
<div style="padding-bottom: 10px;">
<a href="https://magicomens.com/?utm_medium=referral&utm_source=website&utm_campaign=banner&utm_term=ums-agram&utm_content=organic-hr">
<img src="https://hosting.photobucket.com/images/v467/demonn/magicomens.png" width="300" alt="MagicOmens"/>
</a>
</div>
<div style="padding-bottom: 10px;">
<a href="http://www.hostel-bureau.eu/">
<img src="http://img.photobucket.com/albums/v467/demonn/sponzori/bureau1.jpg" width="300" alt="BureauHostelZagreb"/>
</a>
</div>
<div style="padding-bottom: 10px;">
<a href="https://diyconnect.net/">
<img src="https://img.photobucket.com/albums/v467/demonn/sponzori/DIYconnect.png" width="300" alt="DIYConnect"/>
</a>
</div>
<div style="padding-bottom: 10px;">
<a href="http://www.shop.battlefield-berlin.de/">
<img src="/img/sponsors/BBlogo.jpg" width="300" alt="Battlefieldberlin"/>
</a>
</div>
<div style="padding-bottom: 10px;">
<a href="http://www.cartoonminiatures.com/">
<img src="https://img.photobucket.com/albums/v467/demonn/sponzori/scalebro.png" width="300" alt="Cartoon Miniatures"/>
</a>
</div>
<div style="padding-bottom: 10px">
<a href="http://www.shop.microartstudio.com">
<img src="/img/sponsors/MAS_logo_small.png" width="300" alt="MicroArt Studio"/>
</a>
</div>
<div style="padding-bottom: 10px;">
<a href="https://www.secretweaponminiatures.com/">
<img src="http://img.photobucket.com/albums/v467/demonn/sponzori/SecretWeapon.jpg" width="300" alt="Secret Weapon Miniatures"/>
</a>
</div>
<div style="padding-bottom: 10px;">
<a href="http://www.greenstuffworld.com/en/">
<img src="http://img.photobucket.com/albums/v467/demonn/sponzori/GSW.jpg.png" width="300" alt="GSW"/>
</a>
</div>
<div style="padding-bottom: 10px;">
<a href="http://www.gamersgrass.com/">
<img src="https://img.photobucket.com/albums/v467/demonn/sponzori/gamersgrass.png" width="300" alt="Gamers Grass"/>
</a>
</div>
<div style="padding-bottom: 10px;">
<a href="https://www.facebook.com/pg/UO.Artefakt/about/?ref=page_internal">
<img src="http://img.photobucket.com/albums/v467/demonn/sponzori/artefakt.png" width="300" alt="Artefakt"/>
</a>
</div>
<div style="padding-bottom: 10px;">
<a href="http://www.savageforgedminis.de/">
<img src="http://img.photobucket.com/albums/v467/demonn/sponzori/SFM2015.gif" width="300" alt="Savage Forged Minis"/>
</a>
</div>
<div style="padding-bottom: 10px;">
<a href="http://www.brokentoad.co.uk/">
<img src="http://img.photobucket.com/albums/v467/demonn/sponzori/brokentoad.png" width="300" alt="Ebenezers Emporium"/>
</a>
</div>
<div style="padding-bottom: 10px;">
<a href="http://zealotminiatures.com/">
<img src="http://img.photobucket.com/albums/v467/demonn/sponzori/Zealot.jpg" width="300" alt="Zealot"/>
</a>
</div>
<div style="padding-bottom: 10px;">
<a href="http://www.customeeple.com/">
<img src="http://img.photobucket.com/albums/v467/demonn/sponzori/customeeple02.png" width="300" alt="Customeeple"/>
</a>
</div>
<div style="padding-bottom: 10px;">
<a href="http://www.gamemat.eu/">
<img src="https://img.photobucket.com/albums/v467/demonn/sponzori/gamemat.png" width="300" alt="Gamemat"/>
</a>
</div>
<div style="padding-bottom: 10px;">
<a href="http://www.prvidojam.eu/">
<img src="http://img.photobucket.com/albums/v467/demonn/logoWEBretina21.png" width="300" alt="Prvi dojam"/>
</a>
</div>
<div style="padding-bottom: 10px;">
<a href="http://www.infamyminiatures.com/">
<img src="/img/sponsors/infamyLogo.jpg" width="300" alt="Infamy Miniatures"/>
</a>
</div>
<div style="padding-bottom: 10px;">
<a href="http://www.modeldisplayproducts.co.uk">
<img src="http://img.photobucket.com/albums/v467/demonn/sponzori/MDP.gif" width="300" alt="Wamp"/>
</a>
</div>
<div style="padding-bottom: 10px;">
<a href="http://www.wolfdesign.hr/">
<img src="http://img.photobucket.com/albums/v467/demonn/sponzori/WD01.png" width="300" alt="wolfdesign"/>
</a>
</div>
<div style="padding-bottom: 10px;">
<a href="http://www.wampstore.com/store">
<img src="/img/sponsors/wamp.png" width="300" alt="Wamp"/>
</a>
</div>
<div style="padding-bottom: 10px;">
<a href="http://www.tabletop-world.com/">
<img src="http://img.photobucket.com/albums/v467/demonn/sponzori/ttw.png" width="300" alt="TabletopWorld"/>
</a>
</div>
<div style="padding-bottom: 10px;">
<a href="http://www.figurepaintermagazine.co.uk/">
<img src="/img/sponsors/FPM_Logo300_zps2ff0954a.png" width="300" alt="Figure Painter Magazine"/>
</a>
</div>
<div style="padding-bottom: 10px;">
<a href="http://sciborminiatures.com/">
<img src="http://img.photobucket.com/albums/v467/demonn/sponzori/sciborlogo.jpg" width="300" alt="scibor"/>
</a>
</div>
<div style="padding-bottom: 10px;">
<a href="http://www.mrblackpublications.com//">
<img src="http://img.photobucket.com/albums/v467/demonn/sponzori/mrblackpub-1.jpg" width="300" alt="mrblackpublications"/>
</a>
</div>
<div style="padding-bottom: 10px;">
<a href="http://cro-hobby.com/">
<img src="/img/sponsors/ch1.jpg" width="300" alt="crohobby"/>
</a>
</div>
<div style="padding-bottom: 10px;">
<a href="http://www.leo-modeli.hr/">
<img src="/img/sponsors/leomodeli.png" width="300" alt="Leo Modeli"/>
</a>
</div>
<div style="padding-bottom: 10px;">
<a href="http://www.terriblekidsstuff.com">
<img src="/img/sponsors/terribleKS_logo.png" width="300" alt="Terrible Kids Stuff"/>
</a>
</div>
<div style="padding-bottom: 10px;">
<a href="http://www.scale75.com">
<img src="/img/sponsors/scale75.png" width="300" alt="Scale75"/>
</a>
</div>
<div style="padding-bottom: 10px;">
<a href="http://www.lumos.hr/">
<img src="/img/sponsors/lumos.jpg" width="300" alt="Lumos Hobby & Art"/>
</a>
</div>
<div style="padding-bottom: 10px;">
<a href="http://www.initiativemagazine.co.uk/">
<img src="http://img.photobucket.com/albums/v467/demonn/sponzori/Initiative-Magazine-Logo-Big.png" width="300" alt="Initiative Magazine"/>
</a>
</div>
<div style="padding-bottom: 10px;">
<a href="https://www.kset.org/">
<img src="http://img.photobucket.com/albums/v467/demonn/sponzori/kset_logo.png" width="300" alt="KSET"/>
</a>
</div>
<div style="padding-bottom: 10px;">
<a href="http://www.systemagaming.com/">
<img src="/img/sponsors/systema.gif" width="300" alt="Systema Gaming Scenery"/>
</a>
</div>
<div style="padding-bottom: 10px;">
<a href="http://www.figone.fr/en//">
<img src="/img/sponsors/figone.jpg" width="300" alt="figone"/>
</a>
</div>
<div style="padding-bottom: 10px;">
<a href="http://www.crom.hr">
<img src="/img/sponsors/crom.png" width="300" alt="Crom"/>
</a>
</div>
<div style="padding-bottom: 10px;">
<a href="http://www.kerrandking.co.uk/">
<img src="/img/sponsors/kerr&king.png" width="300" alt="Kerrandking"/>
</a>
</div>
<div style="padding-bottom: 10px;">
<a href="http://www.kabukimodels.com/">
<img src="/img/sponsors/kabuki5.gif" width="300" alt="Kabuki Models"/>
</a>
</div>
<div style="padding-bottom: 10px;">
<a href="http://www.phlegyas-art.com">
<img src="/img/sponsors/bannerPhlegyasArt.jpg" width="300" alt="Phlegyas Art"/>
</a>
</div>
<div style="padding-bottom: 10px;">
<a href="http://www.wyrd-games.net/">
<img src="/img/sponsors/wyrd.jpg" width="300" alt="Wyrd Miniatures"/>
</a>
</div>
<div style="padding-bottom: 10px;">
<a href="http://escenorama.com/en/">
<img src="http://img.photobucket.com/albums/v467/demonn/sponzori/escenorama.jpg" width="300" alt="escenorama"/>
</a>
</div>
<div style="padding-bottom: 10px;">
<a href="http://kromlech.eu/">
<img src="http://img.photobucket.com/albums/v467/demonn/sponzori/kromlech.png" width="300" alt="Kromlech"/>
</a>
</div>
<div style="padding-bottom: 10px;">
<a href="http://www.avatars-of-war.com/">
<img src="http://img.photobucket.com/albums/v467/demonn/sponzori/aow.png" width="300" alt="AOW"/>
</a>
</div>
<div style="padding-bottom: 10px;">
<a href="http://www.shieldwolfminiatures.com/">
<img src="http://img.photobucket.com/albums/v467/demonn/sponzori/shieldwolf.png" width="300" alt="Shieldwolf"/>
</a>
</div>
<div style="padding-bottom: 10px;">
<a href="http://www.uschivdr.com/">
<img src="http://img.photobucket.com/albums/v467/demonn/sponzori/uschi02.jpg" width="300" alt="uschi"/>
</a>
</div>
<div style="padding-bottom: 10px;">
<a href="http://www.hangar18miniatures.com">
<img src="http://img.photobucket.com/albums/v467/demonn/sponzori/hangar18.png" width="300" alt="Hangar 18 Miniatures"/>
</a>
</div>
<div style="padding-bottom: 10px;">
<a href="http://www.fallouthobbies.com/">
<img src="http://img.photobucket.com/albums/v467/demonn/sponzori/FOH.jpg" width="300" alt="FOH"/>
</a>
</div>
<div style="padding-bottom: 10px;">
<a href="https://ebenezers-emporium.squarespace.com">
<img src="http://img.photobucket.com/albums/v467/demonn/sponzori/ebenezer.jpg" width="300" alt="Ebenezers Emporium"/>
</a>
</div>
<div>
<a href="/sponsors">friends_and_sponsors</a>
</div>
</div>"
$scripts_for_layout = ""
$title_for_layout = "Home"
$form = FormHelper
FormHelper::$helpers = array
FormHelper::$fieldset = array
FormHelper::$__options = array
FormHelper::$fields = array
FormHelper::$requestType = NULL
FormHelper::$defaultModel = NULL
FormHelper::$_inputDefaults = array
FormHelper::$_lastAction = ""
FormHelper::$base = ""
FormHelper::$webroot = "/"
FormHelper::$theme = NULL
FormHelper::$here = "/dok"
FormHelper::$params = array
FormHelper::$action = "index"
FormHelper::$plugin = NULL
FormHelper::$data = NULL
FormHelper::$namedArgs = NULL
FormHelper::$argSeparator = NULL
FormHelper::$validationErrors = NULL
FormHelper::$tags = array
FormHelper::$__tainted = NULL
FormHelper::$__cleaned = NULL
FormHelper::$Html = HtmlHelper object
$text = TextHelper
TextHelper::$helpers = NULL
TextHelper::$base = ""
TextHelper::$webroot = "/"
TextHelper::$theme = NULL
TextHelper::$here = "/dok"
TextHelper::$params = array
TextHelper::$action = "index"
TextHelper::$plugin = NULL
TextHelper::$data = NULL
TextHelper::$namedArgs = NULL
TextHelper::$argSeparator = NULL
TextHelper::$validationErrors = NULL
TextHelper::$tags = array
TextHelper::$__tainted = NULL
TextHelper::$__cleaned = NULL
$stringer = StringerHelper
StringerHelper::$helpers = array
StringerHelper::$base = ""
StringerHelper::$webroot = "/"
StringerHelper::$theme = NULL
StringerHelper::$here = "/dok"
StringerHelper::$params = array
StringerHelper::$action = "index"
StringerHelper::$plugin = NULL
StringerHelper::$data = NULL
StringerHelper::$namedArgs = NULL
StringerHelper::$argSeparator = NULL
StringerHelper::$validationErrors = NULL
StringerHelper::$tags = array
StringerHelper::$__tainted = NULL
StringerHelper::$__cleaned = NULL
StringerHelper::$Html = HtmlHelper object
StringerHelper::$Link = LinkHelper object
StringerHelper::$Text = TextHelper object
$menu = MenuHelper
MenuHelper::$helpers = array
MenuHelper::$base = ""
MenuHelper::$webroot = "/"
MenuHelper::$theme = NULL
MenuHelper::$here = "/dok"
MenuHelper::$params = array
MenuHelper::$action = "index"
MenuHelper::$plugin = NULL
MenuHelper::$data = NULL
MenuHelper::$namedArgs = NULL
MenuHelper::$argSeparator = NULL
MenuHelper::$validationErrors = NULL
MenuHelper::$tags = array
MenuHelper::$__tainted = NULL
MenuHelper::$__cleaned = NULL
MenuHelper::$Link = LinkHelper object
$session = SessionHelper
SessionHelper::$helpers = array
SessionHelper::$__active = true
SessionHelper::$valid = false
SessionHelper::$error = false
SessionHelper::$_userAgent = "f9a8355d006790ee743ededbb1f6e3bd"
SessionHelper::$path = "/"
SessionHelper::$lastError = NULL
SessionHelper::$security = "medium"
SessionHelper::$time = 1773395484
SessionHelper::$sessionTime = 1773407484
SessionHelper::$cookieLifeTime = false
SessionHelper::$watchKeys = array
SessionHelper::$id = NULL
SessionHelper::$host = NULL
SessionHelper::$timeout = NULL
SessionHelper::$base = ""
SessionHelper::$webroot = "/"
SessionHelper::$here = "/dok"
SessionHelper::$params = array
SessionHelper::$action = "index"
SessionHelper::$data = NULL
SessionHelper::$theme = NULL
SessionHelper::$plugin = NULL
$html = HtmlHelper
HtmlHelper::$tags = array
HtmlHelper::$_crumbs = array
HtmlHelper::$__includedScripts = array
HtmlHelper::$_scriptBlockOptions = array
HtmlHelper::$__docTypes = array
HtmlHelper::$helpers = NULL
HtmlHelper::$base = ""
HtmlHelper::$webroot = "/"
HtmlHelper::$theme = NULL
HtmlHelper::$here = "/dok"
HtmlHelper::$params = array
HtmlHelper::$action = "index"
HtmlHelper::$plugin = NULL
HtmlHelper::$data = NULL
HtmlHelper::$namedArgs = NULL
HtmlHelper::$argSeparator = NULL
HtmlHelper::$validationErrors = NULL
HtmlHelper::$__tainted = NULL
HtmlHelper::$__cleaned = NULL
$link = LinkHelper
LinkHelper::$helpers = array
LinkHelper::$lang = "dok"
LinkHelper::$defaultLang = "hrv"
LinkHelper::$base = ""
LinkHelper::$webroot = "/"
LinkHelper::$theme = NULL
LinkHelper::$here = "/dok"
LinkHelper::$params = array
LinkHelper::$action = "index"
LinkHelper::$plugin = NULL
LinkHelper::$data = NULL
LinkHelper::$namedArgs = NULL
LinkHelper::$argSeparator = NULL
LinkHelper::$validationErrors = NULL
LinkHelper::$tags = array
LinkHelper::$__tainted = NULL
LinkHelper::$__cleaned = NULL
LinkHelper::$Html = HtmlHelper object
LinkHelper::$Session = SessionHelper object
$separator = " > "
$titleSeparator = " < "
$breadcrumbs = "breadcrumbs "
$title = ""
$breadCrumb = array(
"Page" => array(
"id" => "1",
"parent_id" => null,
"controller" => "home",
"title_eng" => "Home",
"title_hrv" => "Naslovnica",
"lft" => "1",
"rght" => "56"
)
)
$controller = array(
"home"
)
include - APP/views/layouts/default.ctp, line 16
View::_render() - CORE/cake/libs/view/view.php, line 736
View::renderLayout() - CORE/cake/libs/view/view.php, line 494
View::render() - CORE/cake/libs/view/view.php, line 440
Controller::render() - CORE/cake/libs/controller/controller.php, line 909
Dispatcher::_invoke() - CORE/cake/dispatcher.php, line 207
Dispatcher::dispatch() - CORE/cake/dispatcher.php, line 171
[main] - APP/webroot/index.php, line 86
UMS "Agram" :
Notice (8): Undefined index: title_dok [APP/views/helpers/menu.php, line 36]
MenuHelper::display() - APP/views/helpers/menu.php, line 36
include - APP/views/layouts/default.ctp, line 68
View::_render() - CORE/cake/libs/view/view.php, line 736
View::renderLayout() - CORE/cake/libs/view/view.php, line 494
View::render() - CORE/cake/libs/view/view.php, line 440
Controller::render() - CORE/cake/libs/controller/controller.php, line 909
Dispatcher::_invoke() - CORE/cake/dispatcher.php, line 207
Dispatcher::dispatch() - CORE/cake/dispatcher.php, line 171
[main] - APP/webroot/index.php, line 86
if (Configure::read() > 0) { include ($___viewFn);
$___viewFn = "/home/martin/apps/agram/app/views/home/index.ctp"
$___dataForView = array(
"lang" => "dok",
"otherLangs" => array(
"eng",
"hrv"
),
"globalNav" => array(
array(),
array(),
array(),
array(),
array(),
array(),
array(),
array(),
array(),
array(),
array(),
array(),
array(),
array(),
array(),
array(),
array(),
array(),
array(),
array(),
array(),
array(),
array(),
array(),
array(),
array(),
array()
),
"breadCrumbs" => array(
array()
),
"pageContents" => array(
"home_who_we_are" => null
),
"userData" => null,
"announcements" => array(
array(),
array(),
array()
)
)
$loadHelpers = true
$cached = false
$form = FormHelper
FormHelper::$helpers = array
FormHelper::$fieldset = array
FormHelper::$__options = array
FormHelper::$fields = array
FormHelper::$requestType = NULL
FormHelper::$defaultModel = NULL
FormHelper::$_inputDefaults = array
FormHelper::$_lastAction = ""
FormHelper::$base = ""
FormHelper::$webroot = "/"
FormHelper::$theme = NULL
FormHelper::$here = "/dok"
FormHelper::$params = array
FormHelper::$action = "index"
FormHelper::$plugin = NULL
FormHelper::$data = NULL
FormHelper::$namedArgs = NULL
FormHelper::$argSeparator = NULL
FormHelper::$validationErrors = NULL
FormHelper::$tags = array
FormHelper::$__tainted = NULL
FormHelper::$__cleaned = NULL
FormHelper::$Html = HtmlHelper object
$text = TextHelper
TextHelper::$helpers = NULL
TextHelper::$base = ""
TextHelper::$webroot = "/"
TextHelper::$theme = NULL
TextHelper::$here = "/dok"
TextHelper::$params = array
TextHelper::$action = "index"
TextHelper::$plugin = NULL
TextHelper::$data = NULL
TextHelper::$namedArgs = NULL
TextHelper::$argSeparator = NULL
TextHelper::$validationErrors = NULL
TextHelper::$tags = array
TextHelper::$__tainted = NULL
TextHelper::$__cleaned = NULL
$stringer = StringerHelper
StringerHelper::$helpers = array
StringerHelper::$base = ""
StringerHelper::$webroot = "/"
StringerHelper::$theme = NULL
StringerHelper::$here = "/dok"
StringerHelper::$params = array
StringerHelper::$action = "index"
StringerHelper::$plugin = NULL
StringerHelper::$data = NULL
StringerHelper::$namedArgs = NULL
StringerHelper::$argSeparator = NULL
StringerHelper::$validationErrors = NULL
StringerHelper::$tags = array
StringerHelper::$__tainted = NULL
StringerHelper::$__cleaned = NULL
StringerHelper::$Html = HtmlHelper object
StringerHelper::$Link = LinkHelper object
StringerHelper::$Text = TextHelper object
$menu = MenuHelper
MenuHelper::$helpers = array
MenuHelper::$base = ""
MenuHelper::$webroot = "/"
MenuHelper::$theme = NULL
MenuHelper::$here = "/dok"
MenuHelper::$params = array
MenuHelper::$action = "index"
MenuHelper::$plugin = NULL
MenuHelper::$data = NULL
MenuHelper::$namedArgs = NULL
MenuHelper::$argSeparator = NULL
MenuHelper::$validationErrors = NULL
MenuHelper::$tags = array
MenuHelper::$__tainted = NULL
MenuHelper::$__cleaned = NULL
MenuHelper::$Link = LinkHelper object
$session = SessionHelper
SessionHelper::$helpers = array
SessionHelper::$__active = true
SessionHelper::$valid = false
SessionHelper::$error = false
SessionHelper::$_userAgent = "f9a8355d006790ee743ededbb1f6e3bd"
SessionHelper::$path = "/"
SessionHelper::$lastError = NULL
SessionHelper::$security = "medium"
SessionHelper::$time = 1773395484
SessionHelper::$sessionTime = 1773407484
SessionHelper::$cookieLifeTime = false
SessionHelper::$watchKeys = array
SessionHelper::$id = NULL
SessionHelper::$host = NULL
SessionHelper::$timeout = NULL
SessionHelper::$base = ""
SessionHelper::$webroot = "/"
SessionHelper::$here = "/dok"
SessionHelper::$params = array
SessionHelper::$action = "index"
SessionHelper::$data = NULL
SessionHelper::$theme = NULL
SessionHelper::$plugin = NULL
$html = HtmlHelper
HtmlHelper::$tags = array
HtmlHelper::$_crumbs = array
HtmlHelper::$__includedScripts = array
HtmlHelper::$_scriptBlockOptions = array
HtmlHelper::$__docTypes = array
HtmlHelper::$helpers = NULL
HtmlHelper::$base = ""
HtmlHelper::$webroot = "/"
HtmlHelper::$theme = NULL
HtmlHelper::$here = "/dok"
HtmlHelper::$params = array
HtmlHelper::$action = "index"
HtmlHelper::$plugin = NULL
HtmlHelper::$data = NULL
HtmlHelper::$namedArgs = NULL
HtmlHelper::$argSeparator = NULL
HtmlHelper::$validationErrors = NULL
HtmlHelper::$__tainted = NULL
HtmlHelper::$__cleaned = NULL
$link = LinkHelper
LinkHelper::$helpers = array
LinkHelper::$lang = NULL
LinkHelper::$defaultLang = NULL
LinkHelper::$base = ""
LinkHelper::$webroot = "/"
LinkHelper::$theme = NULL
LinkHelper::$here = "/dok"
LinkHelper::$params = array
LinkHelper::$action = "index"
LinkHelper::$plugin = NULL
LinkHelper::$data = NULL
LinkHelper::$namedArgs = NULL
LinkHelper::$argSeparator = NULL
LinkHelper::$validationErrors = NULL
LinkHelper::$tags = array
LinkHelper::$__tainted = NULL
LinkHelper::$__cleaned = NULL
LinkHelper::$Html = HtmlHelper object
LinkHelper::$Session = SessionHelper object
$lang = "dok"
$otherLangs = array(
"eng",
"hrv"
)
$globalNav = array(
array(
"Page" => array()
),
array(
"Page" => array()
),
array(
"Page" => array()
),
array(
"Page" => array()
),
array(
"Page" => array()
),
array(
"Page" => array()
),
array(
"Page" => array()
),
array(
"Page" => array()
),
array(
"Page" => array()
),
array(
"Page" => array()
),
array(
"Page" => array()
),
array(
"Page" => array()
),
array(
"Page" => array()
),
array(
"Page" => array()
),
array(
"Page" => array()
),
array(
"Page" => array()
),
array(
"Page" => array()
),
array(
"Page" => array()
),
array(
"Page" => array()
),
array(
"Page" => array()
),
array(
"Page" => array()
),
array(
"Page" => array()
),
array(
"Page" => array()
),
array(
"Page" => array()
),
array(
"Page" => array()
),
array(
"Page" => array()
),
array(
"Page" => array()
)
)
$breadCrumbs = array(
array(
"Page" => array()
)
)
$pageContents = array(
"home_who_we_are" => null
)
$userData = null
$announcements = array(
array(
"Announcement" => array()
),
array(
"Announcement" => array()
),
array(
"Announcement" => array()
)
)
$announcement = array(
"Announcement" => array(
"id" => "4_80",
"class" => "workshop_announcement",
"controller" => "workshop_announcements",
"mask_eng" => "ExhibitionB2B",
"mask_hrv" => "IzložbaB2B",
"title_hrv" => "Back to Basics Radionice za najmlađe na Izložbi minijatura i maketa Agram 2026",
"title_eng" => "Back to Basics Workshops @ Exhibition of Miniatures and Tabletop Scenery Agram 2026",
"content_hrv" => "<p>
Tijekom naše Izložbe minijatura i maketa Agram 2026 svakog radnog dana od 17:00 do 18:00 organizirat ćemo i <strong>Back to Basics radionice bojanja minijatura za najmlađe</strong> (8+). </p>
<p>
<a href="https://hosting.photobucket.com/95288841-8654-4bf7-8fc9-a4aa78dce87f/f73b7e94-5adc-4afb-838b-b479ea8886fd.jpg" target="_blank"><img alt="Click for enlarged picture" src="https://hosting.photobucket.com/95288841-8654-4bf7-8fc9-a4aa78dce87f/f73b7e94-5adc-4afb-838b-b479ea8886fd.jpg" width="600" /></a></p>
<p>
<strong>ULAZ BESPLATAN!</strong></p>
<p>
Radionice (trajanja cca 1h ) su prigodne za najmlađe korisnike jer se samo koriste bazične tehnike, alati i materijali a omogućava lakši pristup minijaturizmu i maketarstvu fokusiranjem na zabavni proces izrade za razliku od uobičajenog inzistiranja na iščekivanje krajnjeg rezultata koji najčešće donosi stres mlađim polaznicima.</p>
<p>
U svakom od termina po četiri polaznika će moći obojati i sastaviti vlastitu figuru (koju onda nose doma).</p>
",
"content_eng" => "<p>
During our Exhibition of Miniatures and Tabletop Scenery Agram 2026, every weekday from 5:00 PM to 6:00 PM, we will also organize <strong>Back to Basics miniature painting workshops for the youngest (8+)</strong>.</p>
<p>
<a href="https://hosting.photobucket.com/95288841-8654-4bf7-8fc9-a4aa78dce87f/f73b7e94-5adc-4afb-838b-b479ea8886fd.jpg" target="_blank"><img alt="Click for enlarged picture" src="https://hosting.photobucket.com/95288841-8654-4bf7-8fc9-a4aa78dce87f/f73b7e94-5adc-4afb-838b-b479ea8886fd.jpg" width="600" /></a></p>
<p>
<strong>FREE ENTRY! </strong></p>
<p>
The workshops (lasting approx. 1 hour) are suitable for the youngest users because they only use basic techniques, tools and materials and provide an easier approach to miniaturism and model making by focusing on the fun process of making, as opposed to the usual insistence on waiting for the final result, which most often brings stress to younger participants.</p>
<p>
In each session, four participants will be able to color and assemble their own figure (which they then take home).</p>
",
"created" => "2026-02-17 07:57:52",
"first_name" => "Krunoslav",
"last_name" => "Belinić",
"first_name_mask" => "krunoslav",
"last_name_mask" => "belinic",
"start" => null,
"end" => null
)
)
include - APP/views/home/index.ctp, line 7
View::_render() - CORE/cake/libs/view/view.php, line 736
View::render() - CORE/cake/libs/view/view.php, line 431
Controller::render() - CORE/cake/libs/controller/controller.php, line 909
Dispatcher::_invoke() - CORE/cake/dispatcher.php, line 207
Dispatcher::dispatch() - CORE/cake/dispatcher.php, line 171
[main] - APP/webroot/index.php, line 86
Notice (8): Undefined index: mask_dok [APP/views/home/index.ctp, line 10]
if (Configure::read() > 0) { include ($___viewFn);
$___viewFn = "/home/martin/apps/agram/app/views/home/index.ctp"
$___dataForView = array(
"lang" => "dok",
"otherLangs" => array(
"eng",
"hrv"
),
"globalNav" => array(
array(),
array(),
array(),
array(),
array(),
array(),
array(),
array(),
array(),
array(),
array(),
array(),
array(),
array(),
array(),
array(),
array(),
array(),
array(),
array(),
array(),
array(),
array(),
array(),
array(),
array(),
array()
),
"breadCrumbs" => array(
array()
),
"pageContents" => array(
"home_who_we_are" => null
),
"userData" => null,
"announcements" => array(
array(),
array(),
array()
)
)
$loadHelpers = true
$cached = false
$form = FormHelper
FormHelper::$helpers = array
FormHelper::$fieldset = array
FormHelper::$__options = array
FormHelper::$fields = array
FormHelper::$requestType = NULL
FormHelper::$defaultModel = NULL
FormHelper::$_inputDefaults = array
FormHelper::$_lastAction = ""
FormHelper::$base = ""
FormHelper::$webroot = "/"
FormHelper::$theme = NULL
FormHelper::$here = "/dok"
FormHelper::$params = array
FormHelper::$action = "index"
FormHelper::$plugin = NULL
FormHelper::$data = NULL
FormHelper::$namedArgs = NULL
FormHelper::$argSeparator = NULL
FormHelper::$validationErrors = NULL
FormHelper::$tags = array
FormHelper::$__tainted = NULL
FormHelper::$__cleaned = NULL
FormHelper::$Html = HtmlHelper object
$text = TextHelper
TextHelper::$helpers = NULL
TextHelper::$base = ""
TextHelper::$webroot = "/"
TextHelper::$theme = NULL
TextHelper::$here = "/dok"
TextHelper::$params = array
TextHelper::$action = "index"
TextHelper::$plugin = NULL
TextHelper::$data = NULL
TextHelper::$namedArgs = NULL
TextHelper::$argSeparator = NULL
TextHelper::$validationErrors = NULL
TextHelper::$tags = array
TextHelper::$__tainted = NULL
TextHelper::$__cleaned = NULL
$stringer = StringerHelper
StringerHelper::$helpers = array
StringerHelper::$base = ""
StringerHelper::$webroot = "/"
StringerHelper::$theme = NULL
StringerHelper::$here = "/dok"
StringerHelper::$params = array
StringerHelper::$action = "index"
StringerHelper::$plugin = NULL
StringerHelper::$data = NULL
StringerHelper::$namedArgs = NULL
StringerHelper::$argSeparator = NULL
StringerHelper::$validationErrors = NULL
StringerHelper::$tags = array
StringerHelper::$__tainted = NULL
StringerHelper::$__cleaned = NULL
StringerHelper::$Html = HtmlHelper object
StringerHelper::$Link = LinkHelper object
StringerHelper::$Text = TextHelper object
$menu = MenuHelper
MenuHelper::$helpers = array
MenuHelper::$base = ""
MenuHelper::$webroot = "/"
MenuHelper::$theme = NULL
MenuHelper::$here = "/dok"
MenuHelper::$params = array
MenuHelper::$action = "index"
MenuHelper::$plugin = NULL
MenuHelper::$data = NULL
MenuHelper::$namedArgs = NULL
MenuHelper::$argSeparator = NULL
MenuHelper::$validationErrors = NULL
MenuHelper::$tags = array
MenuHelper::$__tainted = NULL
MenuHelper::$__cleaned = NULL
MenuHelper::$Link = LinkHelper object
$session = SessionHelper
SessionHelper::$helpers = array
SessionHelper::$__active = true
SessionHelper::$valid = false
SessionHelper::$error = false
SessionHelper::$_userAgent = "f9a8355d006790ee743ededbb1f6e3bd"
SessionHelper::$path = "/"
SessionHelper::$lastError = NULL
SessionHelper::$security = "medium"
SessionHelper::$time = 1773395484
SessionHelper::$sessionTime = 1773407484
SessionHelper::$cookieLifeTime = false
SessionHelper::$watchKeys = array
SessionHelper::$id = NULL
SessionHelper::$host = NULL
SessionHelper::$timeout = NULL
SessionHelper::$base = ""
SessionHelper::$webroot = "/"
SessionHelper::$here = "/dok"
SessionHelper::$params = array
SessionHelper::$action = "index"
SessionHelper::$data = NULL
SessionHelper::$theme = NULL
SessionHelper::$plugin = NULL
$html = HtmlHelper
HtmlHelper::$tags = array
HtmlHelper::$_crumbs = array
HtmlHelper::$__includedScripts = array
HtmlHelper::$_scriptBlockOptions = array
HtmlHelper::$__docTypes = array
HtmlHelper::$helpers = NULL
HtmlHelper::$base = ""
HtmlHelper::$webroot = "/"
HtmlHelper::$theme = NULL
HtmlHelper::$here = "/dok"
HtmlHelper::$params = array
HtmlHelper::$action = "index"
HtmlHelper::$plugin = NULL
HtmlHelper::$data = NULL
HtmlHelper::$namedArgs = NULL
HtmlHelper::$argSeparator = NULL
HtmlHelper::$validationErrors = NULL
HtmlHelper::$__tainted = NULL
HtmlHelper::$__cleaned = NULL
$link = LinkHelper
LinkHelper::$helpers = array
LinkHelper::$lang = NULL
LinkHelper::$defaultLang = NULL
LinkHelper::$base = ""
LinkHelper::$webroot = "/"
LinkHelper::$theme = NULL
LinkHelper::$here = "/dok"
LinkHelper::$params = array
LinkHelper::$action = "index"
LinkHelper::$plugin = NULL
LinkHelper::$data = NULL
LinkHelper::$namedArgs = NULL
LinkHelper::$argSeparator = NULL
LinkHelper::$validationErrors = NULL
LinkHelper::$tags = array
LinkHelper::$__tainted = NULL
LinkHelper::$__cleaned = NULL
LinkHelper::$Html = HtmlHelper object
LinkHelper::$Session = SessionHelper object
$lang = "dok"
$otherLangs = array(
"eng",
"hrv"
)
$globalNav = array(
array(
"Page" => array()
),
array(
"Page" => array()
),
array(
"Page" => array()
),
array(
"Page" => array()
),
array(
"Page" => array()
),
array(
"Page" => array()
),
array(
"Page" => array()
),
array(
"Page" => array()
),
array(
"Page" => array()
),
array(
"Page" => array()
),
array(
"Page" => array()
),
array(
"Page" => array()
),
array(
"Page" => array()
),
array(
"Page" => array()
),
array(
"Page" => array()
),
array(
"Page" => array()
),
array(
"Page" => array()
),
array(
"Page" => array()
),
array(
"Page" => array()
),
array(
"Page" => array()
),
array(
"Page" => array()
),
array(
"Page" => array()
),
array(
"Page" => array()
),
array(
"Page" => array()
),
array(
"Page" => array()
),
array(
"Page" => array()
),
array(
"Page" => array()
)
)
$breadCrumbs = array(
array(
"Page" => array()
)
)
$pageContents = array(
"home_who_we_are" => null
)
$userData = null
$announcements = array(
array(
"Announcement" => array()
),
array(
"Announcement" => array()
),
array(
"Announcement" => array()
)
)
$announcement = array(
"Announcement" => array(
"id" => "4_80",
"class" => "workshop_announcement",
"controller" => "workshop_announcements",
"mask_eng" => "ExhibitionB2B",
"mask_hrv" => "IzložbaB2B",
"title_hrv" => "Back to Basics Radionice za najmlađe na Izložbi minijatura i maketa Agram 2026",
"title_eng" => "Back to Basics Workshops @ Exhibition of Miniatures and Tabletop Scenery Agram 2026",
"content_hrv" => "<p>
Tijekom naše Izložbe minijatura i maketa Agram 2026 svakog radnog dana od 17:00 do 18:00 organizirat ćemo i <strong>Back to Basics radionice bojanja minijatura za najmlađe</strong> (8+). </p>
<p>
<a href="https://hosting.photobucket.com/95288841-8654-4bf7-8fc9-a4aa78dce87f/f73b7e94-5adc-4afb-838b-b479ea8886fd.jpg" target="_blank"><img alt="Click for enlarged picture" src="https://hosting.photobucket.com/95288841-8654-4bf7-8fc9-a4aa78dce87f/f73b7e94-5adc-4afb-838b-b479ea8886fd.jpg" width="600" /></a></p>
<p>
<strong>ULAZ BESPLATAN!</strong></p>
<p>
Radionice (trajanja cca 1h ) su prigodne za najmlađe korisnike jer se samo koriste bazične tehnike, alati i materijali a omogućava lakši pristup minijaturizmu i maketarstvu fokusiranjem na zabavni proces izrade za razliku od uobičajenog inzistiranja na iščekivanje krajnjeg rezultata koji najčešće donosi stres mlađim polaznicima.</p>
<p>
U svakom od termina po četiri polaznika će moći obojati i sastaviti vlastitu figuru (koju onda nose doma).</p>
",
"content_eng" => "<p>
During our Exhibition of Miniatures and Tabletop Scenery Agram 2026, every weekday from 5:00 PM to 6:00 PM, we will also organize <strong>Back to Basics miniature painting workshops for the youngest (8+)</strong>.</p>
<p>
<a href="https://hosting.photobucket.com/95288841-8654-4bf7-8fc9-a4aa78dce87f/f73b7e94-5adc-4afb-838b-b479ea8886fd.jpg" target="_blank"><img alt="Click for enlarged picture" src="https://hosting.photobucket.com/95288841-8654-4bf7-8fc9-a4aa78dce87f/f73b7e94-5adc-4afb-838b-b479ea8886fd.jpg" width="600" /></a></p>
<p>
<strong>FREE ENTRY! </strong></p>
<p>
The workshops (lasting approx. 1 hour) are suitable for the youngest users because they only use basic techniques, tools and materials and provide an easier approach to miniaturism and model making by focusing on the fun process of making, as opposed to the usual insistence on waiting for the final result, which most often brings stress to younger participants.</p>
<p>
In each session, four participants will be able to color and assemble their own figure (which they then take home).</p>
",
"created" => "2026-02-17 07:57:52",
"first_name" => "Krunoslav",
"last_name" => "Belinić",
"first_name_mask" => "krunoslav",
"last_name_mask" => "belinic",
"start" => null,
"end" => null
)
)
include - APP/views/home/index.ctp, line 10
View::_render() - CORE/cake/libs/view/view.php, line 736
View::render() - CORE/cake/libs/view/view.php, line 431
Controller::render() - CORE/cake/libs/controller/controller.php, line 909
Dispatcher::_invoke() - CORE/cake/dispatcher.php, line 207
Dispatcher::dispatch() - CORE/cake/dispatcher.php, line 171
[main] - APP/webroot/index.php, line 86
if (Configure::read() > 0) { include ($___viewFn);
$___viewFn = "/home/martin/apps/agram/app/views/home/index.ctp"
$___dataForView = array(
"lang" => "dok",
"otherLangs" => array(
"eng",
"hrv"
),
"globalNav" => array(
array(),
array(),
array(),
array(),
array(),
array(),
array(),
array(),
array(),
array(),
array(),
array(),
array(),
array(),
array(),
array(),
array(),
array(),
array(),
array(),
array(),
array(),
array(),
array(),
array(),
array(),
array()
),
"breadCrumbs" => array(
array()
),
"pageContents" => array(
"home_who_we_are" => null
),
"userData" => null,
"announcements" => array(
array(),
array(),
array()
)
)
$loadHelpers = true
$cached = false
$form = FormHelper
FormHelper::$helpers = array
FormHelper::$fieldset = array
FormHelper::$__options = array
FormHelper::$fields = array
FormHelper::$requestType = NULL
FormHelper::$defaultModel = NULL
FormHelper::$_inputDefaults = array
FormHelper::$_lastAction = ""
FormHelper::$base = ""
FormHelper::$webroot = "/"
FormHelper::$theme = NULL
FormHelper::$here = "/dok"
FormHelper::$params = array
FormHelper::$action = "index"
FormHelper::$plugin = NULL
FormHelper::$data = NULL
FormHelper::$namedArgs = NULL
FormHelper::$argSeparator = NULL
FormHelper::$validationErrors = NULL
FormHelper::$tags = array
FormHelper::$__tainted = NULL
FormHelper::$__cleaned = NULL
FormHelper::$Html = HtmlHelper object
$text = TextHelper
TextHelper::$helpers = NULL
TextHelper::$base = ""
TextHelper::$webroot = "/"
TextHelper::$theme = NULL
TextHelper::$here = "/dok"
TextHelper::$params = array
TextHelper::$action = "index"
TextHelper::$plugin = NULL
TextHelper::$data = NULL
TextHelper::$namedArgs = NULL
TextHelper::$argSeparator = NULL
TextHelper::$validationErrors = NULL
TextHelper::$tags = array
TextHelper::$__tainted = NULL
TextHelper::$__cleaned = NULL
$stringer = StringerHelper
StringerHelper::$helpers = array
StringerHelper::$base = ""
StringerHelper::$webroot = "/"
StringerHelper::$theme = NULL
StringerHelper::$here = "/dok"
StringerHelper::$params = array
StringerHelper::$action = "index"
StringerHelper::$plugin = NULL
StringerHelper::$data = NULL
StringerHelper::$namedArgs = NULL
StringerHelper::$argSeparator = NULL
StringerHelper::$validationErrors = NULL
StringerHelper::$tags = array
StringerHelper::$__tainted = NULL
StringerHelper::$__cleaned = NULL
StringerHelper::$Html = HtmlHelper object
StringerHelper::$Link = LinkHelper object
StringerHelper::$Text = TextHelper object
$menu = MenuHelper
MenuHelper::$helpers = array
MenuHelper::$base = ""
MenuHelper::$webroot = "/"
MenuHelper::$theme = NULL
MenuHelper::$here = "/dok"
MenuHelper::$params = array
MenuHelper::$action = "index"
MenuHelper::$plugin = NULL
MenuHelper::$data = NULL
MenuHelper::$namedArgs = NULL
MenuHelper::$argSeparator = NULL
MenuHelper::$validationErrors = NULL
MenuHelper::$tags = array
MenuHelper::$__tainted = NULL
MenuHelper::$__cleaned = NULL
MenuHelper::$Link = LinkHelper object
$session = SessionHelper
SessionHelper::$helpers = array
SessionHelper::$__active = true
SessionHelper::$valid = false
SessionHelper::$error = false
SessionHelper::$_userAgent = "f9a8355d006790ee743ededbb1f6e3bd"
SessionHelper::$path = "/"
SessionHelper::$lastError = NULL
SessionHelper::$security = "medium"
SessionHelper::$time = 1773395484
SessionHelper::$sessionTime = 1773407484
SessionHelper::$cookieLifeTime = false
SessionHelper::$watchKeys = array
SessionHelper::$id = NULL
SessionHelper::$host = NULL
SessionHelper::$timeout = NULL
SessionHelper::$base = ""
SessionHelper::$webroot = "/"
SessionHelper::$here = "/dok"
SessionHelper::$params = array
SessionHelper::$action = "index"
SessionHelper::$data = NULL
SessionHelper::$theme = NULL
SessionHelper::$plugin = NULL
$html = HtmlHelper
HtmlHelper::$tags = array
HtmlHelper::$_crumbs = array
HtmlHelper::$__includedScripts = array
HtmlHelper::$_scriptBlockOptions = array
HtmlHelper::$__docTypes = array
HtmlHelper::$helpers = NULL
HtmlHelper::$base = ""
HtmlHelper::$webroot = "/"
HtmlHelper::$theme = NULL
HtmlHelper::$here = "/dok"
HtmlHelper::$params = array
HtmlHelper::$action = "index"
HtmlHelper::$plugin = NULL
HtmlHelper::$data = NULL
HtmlHelper::$namedArgs = NULL
HtmlHelper::$argSeparator = NULL
HtmlHelper::$validationErrors = NULL
HtmlHelper::$__tainted = NULL
HtmlHelper::$__cleaned = NULL
$link = LinkHelper
LinkHelper::$helpers = array
LinkHelper::$lang = "dok"
LinkHelper::$defaultLang = "hrv"
LinkHelper::$base = ""
LinkHelper::$webroot = "/"
LinkHelper::$theme = NULL
LinkHelper::$here = "/dok"
LinkHelper::$params = array
LinkHelper::$action = "index"
LinkHelper::$plugin = NULL
LinkHelper::$data = NULL
LinkHelper::$namedArgs = NULL
LinkHelper::$argSeparator = NULL
LinkHelper::$validationErrors = NULL
LinkHelper::$tags = array
LinkHelper::$__tainted = NULL
LinkHelper::$__cleaned = NULL
LinkHelper::$Html = HtmlHelper object
LinkHelper::$Session = SessionHelper object
$lang = "dok"
$otherLangs = array(
"eng",
"hrv"
)
$globalNav = array(
array(
"Page" => array()
),
array(
"Page" => array()
),
array(
"Page" => array()
),
array(
"Page" => array()
),
array(
"Page" => array()
),
array(
"Page" => array()
),
array(
"Page" => array()
),
array(
"Page" => array()
),
array(
"Page" => array()
),
array(
"Page" => array()
),
array(
"Page" => array()
),
array(
"Page" => array()
),
array(
"Page" => array()
),
array(
"Page" => array()
),
array(
"Page" => array()
),
array(
"Page" => array()
),
array(
"Page" => array()
),
array(
"Page" => array()
),
array(
"Page" => array()
),
array(
"Page" => array()
),
array(
"Page" => array()
),
array(
"Page" => array()
),
array(
"Page" => array()
),
array(
"Page" => array()
),
array(
"Page" => array()
),
array(
"Page" => array()
),
array(
"Page" => array()
)
)
$breadCrumbs = array(
array(
"Page" => array()
)
)
$pageContents = array(
"home_who_we_are" => null
)
$userData = null
$announcements = array(
array(
"Announcement" => array()
),
array(
"Announcement" => array()
),
array(
"Announcement" => array()
)
)
$announcement = array(
"Announcement" => array(
"id" => "4_80",
"class" => "workshop_announcement",
"controller" => "workshop_announcements",
"mask_eng" => "ExhibitionB2B",
"mask_hrv" => "IzložbaB2B",
"title_hrv" => "Back to Basics Radionice za najmlađe na Izložbi minijatura i maketa Agram 2026",
"title_eng" => "Back to Basics Workshops @ Exhibition of Miniatures and Tabletop Scenery Agram 2026",
"content_hrv" => "<p>
Tijekom naše Izložbe minijatura i maketa Agram 2026 svakog radnog dana od 17:00 do 18:00 organizirat ćemo i <strong>Back to Basics radionice bojanja minijatura za najmlađe</strong> (8+). </p>
<p>
<a href="https://hosting.photobucket.com/95288841-8654-4bf7-8fc9-a4aa78dce87f/f73b7e94-5adc-4afb-838b-b479ea8886fd.jpg" target="_blank"><img alt="Click for enlarged picture" src="https://hosting.photobucket.com/95288841-8654-4bf7-8fc9-a4aa78dce87f/f73b7e94-5adc-4afb-838b-b479ea8886fd.jpg" width="600" /></a></p>
<p>
<strong>ULAZ BESPLATAN!</strong></p>
<p>
Radionice (trajanja cca 1h ) su prigodne za najmlađe korisnike jer se samo koriste bazične tehnike, alati i materijali a omogućava lakši pristup minijaturizmu i maketarstvu fokusiranjem na zabavni proces izrade za razliku od uobičajenog inzistiranja na iščekivanje krajnjeg rezultata koji najčešće donosi stres mlađim polaznicima.</p>
<p>
U svakom od termina po četiri polaznika će moći obojati i sastaviti vlastitu figuru (koju onda nose doma).</p>
",
"content_eng" => "<p>
During our Exhibition of Miniatures and Tabletop Scenery Agram 2026, every weekday from 5:00 PM to 6:00 PM, we will also organize <strong>Back to Basics miniature painting workshops for the youngest (8+)</strong>.</p>
<p>
<a href="https://hosting.photobucket.com/95288841-8654-4bf7-8fc9-a4aa78dce87f/f73b7e94-5adc-4afb-838b-b479ea8886fd.jpg" target="_blank"><img alt="Click for enlarged picture" src="https://hosting.photobucket.com/95288841-8654-4bf7-8fc9-a4aa78dce87f/f73b7e94-5adc-4afb-838b-b479ea8886fd.jpg" width="600" /></a></p>
<p>
<strong>FREE ENTRY! </strong></p>
<p>
The workshops (lasting approx. 1 hour) are suitable for the youngest users because they only use basic techniques, tools and materials and provide an easier approach to miniaturism and model making by focusing on the fun process of making, as opposed to the usual insistence on waiting for the final result, which most often brings stress to younger participants.</p>
<p>
In each session, four participants will be able to color and assemble their own figure (which they then take home).</p>
",
"created" => "2026-02-17 07:57:52",
"first_name" => "Krunoslav",
"last_name" => "Belinić",
"first_name_mask" => "krunoslav",
"last_name_mask" => "belinic",
"start" => null,
"end" => null
)
)
$member = array(
"first_name" => "Krunoslav",
"last_name" => "Belinić",
"first_name_mask" => "krunoslav",
"last_name_mask" => "belinic"
)
$dateCreated = "2026-02-17 07:57:52"
include - APP/views/home/index.ctp, line 32
View::_render() - CORE/cake/libs/view/view.php, line 736
View::render() - CORE/cake/libs/view/view.php, line 431
Controller::render() - CORE/cake/libs/controller/controller.php, line 909
Dispatcher::_invoke() - CORE/cake/dispatcher.php, line 207
Dispatcher::dispatch() - CORE/cake/dispatcher.php, line 171
[main] - APP/webroot/index.php, line 86
Notice (8): Undefined index: title_dok [APP/views/home/index.ctp, line 34]
if (Configure::read() > 0) { include ($___viewFn);
$___viewFn = "/home/martin/apps/agram/app/views/home/index.ctp"
$___dataForView = array(
"lang" => "dok",
"otherLangs" => array(
"eng",
"hrv"
),
"globalNav" => array(
array(),
array(),
array(),
array(),
array(),
array(),
array(),
array(),
array(),
array(),
array(),
array(),
array(),
array(),
array(),
array(),
array(),
array(),
array(),
array(),
array(),
array(),
array(),
array(),
array(),
array(),
array()
),
"breadCrumbs" => array(
array()
),
"pageContents" => array(
"home_who_we_are" => null
),
"userData" => null,
"announcements" => array(
array(),
array(),
array()
)
)
$loadHelpers = true
$cached = false
$form = FormHelper
FormHelper::$helpers = array
FormHelper::$fieldset = array
FormHelper::$__options = array
FormHelper::$fields = array
FormHelper::$requestType = NULL
FormHelper::$defaultModel = NULL
FormHelper::$_inputDefaults = array
FormHelper::$_lastAction = ""
FormHelper::$base = ""
FormHelper::$webroot = "/"
FormHelper::$theme = NULL
FormHelper::$here = "/dok"
FormHelper::$params = array
FormHelper::$action = "index"
FormHelper::$plugin = NULL
FormHelper::$data = NULL
FormHelper::$namedArgs = NULL
FormHelper::$argSeparator = NULL
FormHelper::$validationErrors = NULL
FormHelper::$tags = array
FormHelper::$__tainted = NULL
FormHelper::$__cleaned = NULL
FormHelper::$Html = HtmlHelper object
$text = TextHelper
TextHelper::$helpers = NULL
TextHelper::$base = ""
TextHelper::$webroot = "/"
TextHelper::$theme = NULL
TextHelper::$here = "/dok"
TextHelper::$params = array
TextHelper::$action = "index"
TextHelper::$plugin = NULL
TextHelper::$data = NULL
TextHelper::$namedArgs = NULL
TextHelper::$argSeparator = NULL
TextHelper::$validationErrors = NULL
TextHelper::$tags = array
TextHelper::$__tainted = NULL
TextHelper::$__cleaned = NULL
$stringer = StringerHelper
StringerHelper::$helpers = array
StringerHelper::$base = ""
StringerHelper::$webroot = "/"
StringerHelper::$theme = NULL
StringerHelper::$here = "/dok"
StringerHelper::$params = array
StringerHelper::$action = "index"
StringerHelper::$plugin = NULL
StringerHelper::$data = NULL
StringerHelper::$namedArgs = NULL
StringerHelper::$argSeparator = NULL
StringerHelper::$validationErrors = NULL
StringerHelper::$tags = array
StringerHelper::$__tainted = NULL
StringerHelper::$__cleaned = NULL
StringerHelper::$Html = HtmlHelper object
StringerHelper::$Link = LinkHelper object
StringerHelper::$Text = TextHelper object
$menu = MenuHelper
MenuHelper::$helpers = array
MenuHelper::$base = ""
MenuHelper::$webroot = "/"
MenuHelper::$theme = NULL
MenuHelper::$here = "/dok"
MenuHelper::$params = array
MenuHelper::$action = "index"
MenuHelper::$plugin = NULL
MenuHelper::$data = NULL
MenuHelper::$namedArgs = NULL
MenuHelper::$argSeparator = NULL
MenuHelper::$validationErrors = NULL
MenuHelper::$tags = array
MenuHelper::$__tainted = NULL
MenuHelper::$__cleaned = NULL
MenuHelper::$Link = LinkHelper object
$session = SessionHelper
SessionHelper::$helpers = array
SessionHelper::$__active = true
SessionHelper::$valid = false
SessionHelper::$error = false
SessionHelper::$_userAgent = "f9a8355d006790ee743ededbb1f6e3bd"
SessionHelper::$path = "/"
SessionHelper::$lastError = NULL
SessionHelper::$security = "medium"
SessionHelper::$time = 1773395484
SessionHelper::$sessionTime = 1773407484
SessionHelper::$cookieLifeTime = false
SessionHelper::$watchKeys = array
SessionHelper::$id = NULL
SessionHelper::$host = NULL
SessionHelper::$timeout = NULL
SessionHelper::$base = ""
SessionHelper::$webroot = "/"
SessionHelper::$here = "/dok"
SessionHelper::$params = array
SessionHelper::$action = "index"
SessionHelper::$data = NULL
SessionHelper::$theme = NULL
SessionHelper::$plugin = NULL
$html = HtmlHelper
HtmlHelper::$tags = array
HtmlHelper::$_crumbs = array
HtmlHelper::$__includedScripts = array
HtmlHelper::$_scriptBlockOptions = array
HtmlHelper::$__docTypes = array
HtmlHelper::$helpers = NULL
HtmlHelper::$base = ""
HtmlHelper::$webroot = "/"
HtmlHelper::$theme = NULL
HtmlHelper::$here = "/dok"
HtmlHelper::$params = array
HtmlHelper::$action = "index"
HtmlHelper::$plugin = NULL
HtmlHelper::$data = NULL
HtmlHelper::$namedArgs = NULL
HtmlHelper::$argSeparator = NULL
HtmlHelper::$validationErrors = NULL
HtmlHelper::$__tainted = NULL
HtmlHelper::$__cleaned = NULL
$link = LinkHelper
LinkHelper::$helpers = array
LinkHelper::$lang = "dok"
LinkHelper::$defaultLang = "hrv"
LinkHelper::$base = ""
LinkHelper::$webroot = "/"
LinkHelper::$theme = NULL
LinkHelper::$here = "/dok"
LinkHelper::$params = array
LinkHelper::$action = "index"
LinkHelper::$plugin = NULL
LinkHelper::$data = NULL
LinkHelper::$namedArgs = NULL
LinkHelper::$argSeparator = NULL
LinkHelper::$validationErrors = NULL
LinkHelper::$tags = array
LinkHelper::$__tainted = NULL
LinkHelper::$__cleaned = NULL
LinkHelper::$Html = HtmlHelper object
LinkHelper::$Session = SessionHelper object
$lang = "dok"
$otherLangs = array(
"eng",
"hrv"
)
$globalNav = array(
array(
"Page" => array()
),
array(
"Page" => array()
),
array(
"Page" => array()
),
array(
"Page" => array()
),
array(
"Page" => array()
),
array(
"Page" => array()
),
array(
"Page" => array()
),
array(
"Page" => array()
),
array(
"Page" => array()
),
array(
"Page" => array()
),
array(
"Page" => array()
),
array(
"Page" => array()
),
array(
"Page" => array()
),
array(
"Page" => array()
),
array(
"Page" => array()
),
array(
"Page" => array()
),
array(
"Page" => array()
),
array(
"Page" => array()
),
array(
"Page" => array()
),
array(
"Page" => array()
),
array(
"Page" => array()
),
array(
"Page" => array()
),
array(
"Page" => array()
),
array(
"Page" => array()
),
array(
"Page" => array()
),
array(
"Page" => array()
),
array(
"Page" => array()
)
)
$breadCrumbs = array(
array(
"Page" => array()
)
)
$pageContents = array(
"home_who_we_are" => null
)
$userData = null
$announcements = array(
array(
"Announcement" => array()
),
array(
"Announcement" => array()
),
array(
"Announcement" => array()
)
)
$announcement = array(
"Announcement" => array(
"id" => "4_80",
"class" => "workshop_announcement",
"controller" => "workshop_announcements",
"mask_eng" => "ExhibitionB2B",
"mask_hrv" => "IzložbaB2B",
"title_hrv" => "Back to Basics Radionice za najmlađe na Izložbi minijatura i maketa Agram 2026",
"title_eng" => "Back to Basics Workshops @ Exhibition of Miniatures and Tabletop Scenery Agram 2026",
"content_hrv" => "<p>
Tijekom naše Izložbe minijatura i maketa Agram 2026 svakog radnog dana od 17:00 do 18:00 organizirat ćemo i <strong>Back to Basics radionice bojanja minijatura za najmlađe</strong> (8+). </p>
<p>
<a href="https://hosting.photobucket.com/95288841-8654-4bf7-8fc9-a4aa78dce87f/f73b7e94-5adc-4afb-838b-b479ea8886fd.jpg" target="_blank"><img alt="Click for enlarged picture" src="https://hosting.photobucket.com/95288841-8654-4bf7-8fc9-a4aa78dce87f/f73b7e94-5adc-4afb-838b-b479ea8886fd.jpg" width="600" /></a></p>
<p>
<strong>ULAZ BESPLATAN!</strong></p>
<p>
Radionice (trajanja cca 1h ) su prigodne za najmlađe korisnike jer se samo koriste bazične tehnike, alati i materijali a omogućava lakši pristup minijaturizmu i maketarstvu fokusiranjem na zabavni proces izrade za razliku od uobičajenog inzistiranja na iščekivanje krajnjeg rezultata koji najčešće donosi stres mlađim polaznicima.</p>
<p>
U svakom od termina po četiri polaznika će moći obojati i sastaviti vlastitu figuru (koju onda nose doma).</p>
",
"content_eng" => "<p>
During our Exhibition of Miniatures and Tabletop Scenery Agram 2026, every weekday from 5:00 PM to 6:00 PM, we will also organize <strong>Back to Basics miniature painting workshops for the youngest (8+)</strong>.</p>
<p>
<a href="https://hosting.photobucket.com/95288841-8654-4bf7-8fc9-a4aa78dce87f/f73b7e94-5adc-4afb-838b-b479ea8886fd.jpg" target="_blank"><img alt="Click for enlarged picture" src="https://hosting.photobucket.com/95288841-8654-4bf7-8fc9-a4aa78dce87f/f73b7e94-5adc-4afb-838b-b479ea8886fd.jpg" width="600" /></a></p>
<p>
<strong>FREE ENTRY! </strong></p>
<p>
The workshops (lasting approx. 1 hour) are suitable for the youngest users because they only use basic techniques, tools and materials and provide an easier approach to miniaturism and model making by focusing on the fun process of making, as opposed to the usual insistence on waiting for the final result, which most often brings stress to younger participants.</p>
<p>
In each session, four participants will be able to color and assemble their own figure (which they then take home).</p>
",
"created" => "2026-02-17 07:57:52",
"first_name" => "Krunoslav",
"last_name" => "Belinić",
"first_name_mask" => "krunoslav",
"last_name_mask" => "belinic",
"start" => null,
"end" => null
)
)
$member = array(
"first_name" => "Krunoslav",
"last_name" => "Belinić",
"first_name_mask" => "krunoslav",
"last_name_mask" => "belinic"
)
$dateCreated = "2026-02-17 07:57:52"
include - APP/views/home/index.ctp, line 34
View::_render() - CORE/cake/libs/view/view.php, line 736
View::render() - CORE/cake/libs/view/view.php, line 431
Controller::render() - CORE/cake/libs/controller/controller.php, line 909
Dispatcher::_invoke() - CORE/cake/dispatcher.php, line 207
Dispatcher::dispatch() - CORE/cake/dispatcher.php, line 171
[main] - APP/webroot/index.php, line 86
Notice (8): Undefined index: mask_dok [APP/views/home/index.ctp, line 37]
if (Configure::read() > 0) { include ($___viewFn);
$___viewFn = "/home/martin/apps/agram/app/views/home/index.ctp"
$___dataForView = array(
"lang" => "dok",
"otherLangs" => array(
"eng",
"hrv"
),
"globalNav" => array(
array(),
array(),
array(),
array(),
array(),
array(),
array(),
array(),
array(),
array(),
array(),
array(),
array(),
array(),
array(),
array(),
array(),
array(),
array(),
array(),
array(),
array(),
array(),
array(),
array(),
array(),
array()
),
"breadCrumbs" => array(
array()
),
"pageContents" => array(
"home_who_we_are" => null
),
"userData" => null,
"announcements" => array(
array(),
array(),
array()
)
)
$loadHelpers = true
$cached = false
$form = FormHelper
FormHelper::$helpers = array
FormHelper::$fieldset = array
FormHelper::$__options = array
FormHelper::$fields = array
FormHelper::$requestType = NULL
FormHelper::$defaultModel = NULL
FormHelper::$_inputDefaults = array
FormHelper::$_lastAction = ""
FormHelper::$base = ""
FormHelper::$webroot = "/"
FormHelper::$theme = NULL
FormHelper::$here = "/dok"
FormHelper::$params = array
FormHelper::$action = "index"
FormHelper::$plugin = NULL
FormHelper::$data = NULL
FormHelper::$namedArgs = NULL
FormHelper::$argSeparator = NULL
FormHelper::$validationErrors = NULL
FormHelper::$tags = array
FormHelper::$__tainted = NULL
FormHelper::$__cleaned = NULL
FormHelper::$Html = HtmlHelper object
$text = TextHelper
TextHelper::$helpers = NULL
TextHelper::$base = ""
TextHelper::$webroot = "/"
TextHelper::$theme = NULL
TextHelper::$here = "/dok"
TextHelper::$params = array
TextHelper::$action = "index"
TextHelper::$plugin = NULL
TextHelper::$data = NULL
TextHelper::$namedArgs = NULL
TextHelper::$argSeparator = NULL
TextHelper::$validationErrors = NULL
TextHelper::$tags = array
TextHelper::$__tainted = NULL
TextHelper::$__cleaned = NULL
$stringer = StringerHelper
StringerHelper::$helpers = array
StringerHelper::$base = ""
StringerHelper::$webroot = "/"
StringerHelper::$theme = NULL
StringerHelper::$here = "/dok"
StringerHelper::$params = array
StringerHelper::$action = "index"
StringerHelper::$plugin = NULL
StringerHelper::$data = NULL
StringerHelper::$namedArgs = NULL
StringerHelper::$argSeparator = NULL
StringerHelper::$validationErrors = NULL
StringerHelper::$tags = array
StringerHelper::$__tainted = NULL
StringerHelper::$__cleaned = NULL
StringerHelper::$Html = HtmlHelper object
StringerHelper::$Link = LinkHelper object
StringerHelper::$Text = TextHelper object
$menu = MenuHelper
MenuHelper::$helpers = array
MenuHelper::$base = ""
MenuHelper::$webroot = "/"
MenuHelper::$theme = NULL
MenuHelper::$here = "/dok"
MenuHelper::$params = array
MenuHelper::$action = "index"
MenuHelper::$plugin = NULL
MenuHelper::$data = NULL
MenuHelper::$namedArgs = NULL
MenuHelper::$argSeparator = NULL
MenuHelper::$validationErrors = NULL
MenuHelper::$tags = array
MenuHelper::$__tainted = NULL
MenuHelper::$__cleaned = NULL
MenuHelper::$Link = LinkHelper object
$session = SessionHelper
SessionHelper::$helpers = array
SessionHelper::$__active = true
SessionHelper::$valid = false
SessionHelper::$error = false
SessionHelper::$_userAgent = "f9a8355d006790ee743ededbb1f6e3bd"
SessionHelper::$path = "/"
SessionHelper::$lastError = NULL
SessionHelper::$security = "medium"
SessionHelper::$time = 1773395484
SessionHelper::$sessionTime = 1773407484
SessionHelper::$cookieLifeTime = false
SessionHelper::$watchKeys = array
SessionHelper::$id = NULL
SessionHelper::$host = NULL
SessionHelper::$timeout = NULL
SessionHelper::$base = ""
SessionHelper::$webroot = "/"
SessionHelper::$here = "/dok"
SessionHelper::$params = array
SessionHelper::$action = "index"
SessionHelper::$data = NULL
SessionHelper::$theme = NULL
SessionHelper::$plugin = NULL
$html = HtmlHelper
HtmlHelper::$tags = array
HtmlHelper::$_crumbs = array
HtmlHelper::$__includedScripts = array
HtmlHelper::$_scriptBlockOptions = array
HtmlHelper::$__docTypes = array
HtmlHelper::$helpers = NULL
HtmlHelper::$base = ""
HtmlHelper::$webroot = "/"
HtmlHelper::$theme = NULL
HtmlHelper::$here = "/dok"
HtmlHelper::$params = array
HtmlHelper::$action = "index"
HtmlHelper::$plugin = NULL
HtmlHelper::$data = NULL
HtmlHelper::$namedArgs = NULL
HtmlHelper::$argSeparator = NULL
HtmlHelper::$validationErrors = NULL
HtmlHelper::$__tainted = NULL
HtmlHelper::$__cleaned = NULL
$link = LinkHelper
LinkHelper::$helpers = array
LinkHelper::$lang = "dok"
LinkHelper::$defaultLang = "hrv"
LinkHelper::$base = ""
LinkHelper::$webroot = "/"
LinkHelper::$theme = NULL
LinkHelper::$here = "/dok"
LinkHelper::$params = array
LinkHelper::$action = "index"
LinkHelper::$plugin = NULL
LinkHelper::$data = NULL
LinkHelper::$namedArgs = NULL
LinkHelper::$argSeparator = NULL
LinkHelper::$validationErrors = NULL
LinkHelper::$tags = array
LinkHelper::$__tainted = NULL
LinkHelper::$__cleaned = NULL
LinkHelper::$Html = HtmlHelper object
LinkHelper::$Session = SessionHelper object
$lang = "dok"
$otherLangs = array(
"eng",
"hrv"
)
$globalNav = array(
array(
"Page" => array()
),
array(
"Page" => array()
),
array(
"Page" => array()
),
array(
"Page" => array()
),
array(
"Page" => array()
),
array(
"Page" => array()
),
array(
"Page" => array()
),
array(
"Page" => array()
),
array(
"Page" => array()
),
array(
"Page" => array()
),
array(
"Page" => array()
),
array(
"Page" => array()
),
array(
"Page" => array()
),
array(
"Page" => array()
),
array(
"Page" => array()
),
array(
"Page" => array()
),
array(
"Page" => array()
),
array(
"Page" => array()
),
array(
"Page" => array()
),
array(
"Page" => array()
),
array(
"Page" => array()
),
array(
"Page" => array()
),
array(
"Page" => array()
),
array(
"Page" => array()
),
array(
"Page" => array()
),
array(
"Page" => array()
),
array(
"Page" => array()
)
)
$breadCrumbs = array(
array(
"Page" => array()
)
)
$pageContents = array(
"home_who_we_are" => null
)
$userData = null
$announcements = array(
array(
"Announcement" => array()
),
array(
"Announcement" => array()
),
array(
"Announcement" => array()
)
)
$announcement = array(
"Announcement" => array(
"id" => "4_80",
"class" => "workshop_announcement",
"controller" => "workshop_announcements",
"mask_eng" => "ExhibitionB2B",
"mask_hrv" => "IzložbaB2B",
"title_hrv" => "Back to Basics Radionice za najmlađe na Izložbi minijatura i maketa Agram 2026",
"title_eng" => "Back to Basics Workshops @ Exhibition of Miniatures and Tabletop Scenery Agram 2026",
"content_hrv" => "<p>
Tijekom naše Izložbe minijatura i maketa Agram 2026 svakog radnog dana od 17:00 do 18:00 organizirat ćemo i <strong>Back to Basics radionice bojanja minijatura za najmlađe</strong> (8+). </p>
<p>
<a href="https://hosting.photobucket.com/95288841-8654-4bf7-8fc9-a4aa78dce87f/f73b7e94-5adc-4afb-838b-b479ea8886fd.jpg" target="_blank"><img alt="Click for enlarged picture" src="https://hosting.photobucket.com/95288841-8654-4bf7-8fc9-a4aa78dce87f/f73b7e94-5adc-4afb-838b-b479ea8886fd.jpg" width="600" /></a></p>
<p>
<strong>ULAZ BESPLATAN!</strong></p>
<p>
Radionice (trajanja cca 1h ) su prigodne za najmlađe korisnike jer se samo koriste bazične tehnike, alati i materijali a omogućava lakši pristup minijaturizmu i maketarstvu fokusiranjem na zabavni proces izrade za razliku od uobičajenog inzistiranja na iščekivanje krajnjeg rezultata koji najčešće donosi stres mlađim polaznicima.</p>
<p>
U svakom od termina po četiri polaznika će moći obojati i sastaviti vlastitu figuru (koju onda nose doma).</p>
",
"content_eng" => "<p>
During our Exhibition of Miniatures and Tabletop Scenery Agram 2026, every weekday from 5:00 PM to 6:00 PM, we will also organize <strong>Back to Basics miniature painting workshops for the youngest (8+)</strong>.</p>
<p>
<a href="https://hosting.photobucket.com/95288841-8654-4bf7-8fc9-a4aa78dce87f/f73b7e94-5adc-4afb-838b-b479ea8886fd.jpg" target="_blank"><img alt="Click for enlarged picture" src="https://hosting.photobucket.com/95288841-8654-4bf7-8fc9-a4aa78dce87f/f73b7e94-5adc-4afb-838b-b479ea8886fd.jpg" width="600" /></a></p>
<p>
<strong>FREE ENTRY! </strong></p>
<p>
The workshops (lasting approx. 1 hour) are suitable for the youngest users because they only use basic techniques, tools and materials and provide an easier approach to miniaturism and model making by focusing on the fun process of making, as opposed to the usual insistence on waiting for the final result, which most often brings stress to younger participants.</p>
<p>
In each session, four participants will be able to color and assemble their own figure (which they then take home).</p>
",
"created" => "2026-02-17 07:57:52",
"first_name" => "Krunoslav",
"last_name" => "Belinić",
"first_name_mask" => "krunoslav",
"last_name_mask" => "belinic",
"start" => null,
"end" => null
)
)
$member = array(
"first_name" => "Krunoslav",
"last_name" => "Belinić",
"first_name_mask" => "krunoslav",
"last_name_mask" => "belinic"
)
$dateCreated = "2026-02-17 07:57:52"
include - APP/views/home/index.ctp, line 37
View::_render() - CORE/cake/libs/view/view.php, line 736
View::render() - CORE/cake/libs/view/view.php, line 431
Controller::render() - CORE/cake/libs/controller/controller.php, line 909
Dispatcher::_invoke() - CORE/cake/dispatcher.php, line 207
Dispatcher::dispatch() - CORE/cake/dispatcher.php, line 171
[main] - APP/webroot/index.php, line 86
if (Configure::read() > 0) { include ($___viewFn);
$___viewFn = "/home/martin/apps/agram/app/views/elements/latestArticles.ctp"
$___dataForView = array(
"lang" => "dok",
"otherLangs" => array(
"eng",
"hrv"
),
"globalNav" => array(
array(),
array(),
array(),
array(),
array(),
array(),
array(),
array(),
array(),
array(),
array(),
array(),
array(),
array(),
array(),
array(),
array(),
array(),
array(),
array(),
array(),
array(),
array(),
array(),
array(),
array(),
array()
),
"breadCrumbs" => array(
array()
),
"pageContents" => array(
"home_who_we_are" => null
),
"userData" => null,
"announcements" => array(
array(),
array(),
array()
),
"cache" => array(
"time" => "+1 day",
"key" => "dok"
),
"form" => FormHelper
FormHelper::$helpers = array
FormHelper::$fieldset = array
FormHelper::$__options = array
FormHelper::$fields = array
FormHelper::$requestType = NULL
FormHelper::$defaultModel = NULL
FormHelper::$_inputDefaults = array
FormHelper::$_lastAction = ""
FormHelper::$base = ""
FormHelper::$webroot = "/"
FormHelper::$theme = NULL
FormHelper::$here = "/dok"
FormHelper::$params = array
FormHelper::$action = "index"
FormHelper::$plugin = NULL
FormHelper::$data = NULL
FormHelper::$namedArgs = NULL
FormHelper::$argSeparator = NULL
FormHelper::$validationErrors = NULL
FormHelper::$tags = array
FormHelper::$__tainted = NULL
FormHelper::$__cleaned = NULL
FormHelper::$Html = HtmlHelper object,
"text" => TextHelper
TextHelper::$helpers = NULL
TextHelper::$base = ""
TextHelper::$webroot = "/"
TextHelper::$theme = NULL
TextHelper::$here = "/dok"
TextHelper::$params = array
TextHelper::$action = "index"
TextHelper::$plugin = NULL
TextHelper::$data = NULL
TextHelper::$namedArgs = NULL
TextHelper::$argSeparator = NULL
TextHelper::$validationErrors = NULL
TextHelper::$tags = array
TextHelper::$__tainted = NULL
TextHelper::$__cleaned = NULL,
"stringer" => StringerHelper
StringerHelper::$helpers = array
StringerHelper::$base = ""
StringerHelper::$webroot = "/"
StringerHelper::$theme = NULL
StringerHelper::$here = "/dok"
StringerHelper::$params = array
StringerHelper::$action = "index"
StringerHelper::$plugin = NULL
StringerHelper::$data = NULL
StringerHelper::$namedArgs = NULL
StringerHelper::$argSeparator = NULL
StringerHelper::$validationErrors = NULL
StringerHelper::$tags = array
StringerHelper::$__tainted = NULL
StringerHelper::$__cleaned = NULL
StringerHelper::$Html = HtmlHelper object
StringerHelper::$Link = LinkHelper object
StringerHelper::$Text = TextHelper object,
"menu" => MenuHelper
MenuHelper::$helpers = array
MenuHelper::$base = ""
MenuHelper::$webroot = "/"
MenuHelper::$theme = NULL
MenuHelper::$here = "/dok"
MenuHelper::$params = array
MenuHelper::$action = "index"
MenuHelper::$plugin = NULL
MenuHelper::$data = NULL
MenuHelper::$namedArgs = NULL
MenuHelper::$argSeparator = NULL
MenuHelper::$validationErrors = NULL
MenuHelper::$tags = array
MenuHelper::$__tainted = NULL
MenuHelper::$__cleaned = NULL
MenuHelper::$Link = LinkHelper object,
"session" => SessionHelper
SessionHelper::$helpers = array
SessionHelper::$__active = true
SessionHelper::$valid = false
SessionHelper::$error = false
SessionHelper::$_userAgent = "f9a8355d006790ee743ededbb1f6e3bd"
SessionHelper::$path = "/"
SessionHelper::$lastError = NULL
SessionHelper::$security = "medium"
SessionHelper::$time = 1773314240
SessionHelper::$sessionTime = 1773326240
SessionHelper::$cookieLifeTime = false
SessionHelper::$watchKeys = array
SessionHelper::$id = NULL
SessionHelper::$host = NULL
SessionHelper::$timeout = NULL
SessionHelper::$base = ""
SessionHelper::$webroot = "/"
SessionHelper::$here = "/dok"
SessionHelper::$params = array
SessionHelper::$action = "index"
SessionHelper::$data = NULL
SessionHelper::$theme = NULL
SessionHelper::$plugin = NULL,
"html" => HtmlHelper
HtmlHelper::$tags = array
HtmlHelper::$_crumbs = array
HtmlHelper::$__includedScripts = array
HtmlHelper::$_scriptBlockOptions = array
HtmlHelper::$__docTypes = array
HtmlHelper::$helpers = NULL
HtmlHelper::$base = ""
HtmlHelper::$webroot = "/"
HtmlHelper::$theme = NULL
HtmlHelper::$here = "/dok"
HtmlHelper::$params = array
HtmlHelper::$action = "index"
HtmlHelper::$plugin = NULL
HtmlHelper::$data = NULL
HtmlHelper::$namedArgs = NULL
HtmlHelper::$argSeparator = NULL
HtmlHelper::$validationErrors = NULL
HtmlHelper::$__tainted = NULL
HtmlHelper::$__cleaned = NULL,
"link" => LinkHelper
LinkHelper::$helpers = array
LinkHelper::$lang = "dok"
LinkHelper::$defaultLang = "hrv"
LinkHelper::$base = ""
LinkHelper::$webroot = "/"
LinkHelper::$theme = NULL
LinkHelper::$here = "/dok"
LinkHelper::$params = array
LinkHelper::$action = "index"
LinkHelper::$plugin = NULL
LinkHelper::$data = NULL
LinkHelper::$namedArgs = NULL
LinkHelper::$argSeparator = NULL
LinkHelper::$validationErrors = NULL
LinkHelper::$tags = array
LinkHelper::$__tainted = NULL
LinkHelper::$__cleaned = NULL
LinkHelper::$Html = HtmlHelper object
LinkHelper::$Session = SessionHelper object
)
$loadHelpers = false
$cached = false
$loadedHelpers = array()
$lang = "dok"
$otherLangs = array(
"eng",
"hrv"
)
$globalNav = array(
array(
"Page" => array()
),
array(
"Page" => array()
),
array(
"Page" => array()
),
array(
"Page" => array()
),
array(
"Page" => array()
),
array(
"Page" => array()
),
array(
"Page" => array()
),
array(
"Page" => array()
),
array(
"Page" => array()
),
array(
"Page" => array()
),
array(
"Page" => array()
),
array(
"Page" => array()
),
array(
"Page" => array()
),
array(
"Page" => array()
),
array(
"Page" => array()
),
array(
"Page" => array()
),
array(
"Page" => array()
),
array(
"Page" => array()
),
array(
"Page" => array()
),
array(
"Page" => array()
),
array(
"Page" => array()
),
array(
"Page" => array()
),
array(
"Page" => array()
),
array(
"Page" => array()
),
array(
"Page" => array()
),
array(
"Page" => array()
),
array(
"Page" => array()
)
)
$breadCrumbs = array(
array(
"Page" => array()
)
)
$pageContents = array(
"home_who_we_are" => null
)
$userData = null
$announcements = array(
array(
"Announcement" => array()
),
array(
"Announcement" => array()
),
array(
"Announcement" => array()
)
)
$cache = array(
"time" => "+1 day",
"key" => "dok"
)
$form = FormHelper
FormHelper::$helpers = array
FormHelper::$fieldset = array
FormHelper::$__options = array
FormHelper::$fields = array
FormHelper::$requestType = NULL
FormHelper::$defaultModel = NULL
FormHelper::$_inputDefaults = array
FormHelper::$_lastAction = ""
FormHelper::$base = ""
FormHelper::$webroot = "/"
FormHelper::$theme = NULL
FormHelper::$here = "/dok"
FormHelper::$params = array
FormHelper::$action = "index"
FormHelper::$plugin = NULL
FormHelper::$data = NULL
FormHelper::$namedArgs = NULL
FormHelper::$argSeparator = NULL
FormHelper::$validationErrors = NULL
FormHelper::$tags = array
FormHelper::$__tainted = NULL
FormHelper::$__cleaned = NULL
FormHelper::$Html = HtmlHelper object
$text = TextHelper
TextHelper::$helpers = NULL
TextHelper::$base = ""
TextHelper::$webroot = "/"
TextHelper::$theme = NULL
TextHelper::$here = "/dok"
TextHelper::$params = array
TextHelper::$action = "index"
TextHelper::$plugin = NULL
TextHelper::$data = NULL
TextHelper::$namedArgs = NULL
TextHelper::$argSeparator = NULL
TextHelper::$validationErrors = NULL
TextHelper::$tags = array
TextHelper::$__tainted = NULL
TextHelper::$__cleaned = NULL
$stringer = StringerHelper
StringerHelper::$helpers = array
StringerHelper::$base = ""
StringerHelper::$webroot = "/"
StringerHelper::$theme = NULL
StringerHelper::$here = "/dok"
StringerHelper::$params = array
StringerHelper::$action = "index"
StringerHelper::$plugin = NULL
StringerHelper::$data = NULL
StringerHelper::$namedArgs = NULL
StringerHelper::$argSeparator = NULL
StringerHelper::$validationErrors = NULL
StringerHelper::$tags = array
StringerHelper::$__tainted = NULL
StringerHelper::$__cleaned = NULL
StringerHelper::$Html = HtmlHelper object
StringerHelper::$Link = LinkHelper object
StringerHelper::$Text = TextHelper object
$menu = MenuHelper
MenuHelper::$helpers = array
MenuHelper::$base = ""
MenuHelper::$webroot = "/"
MenuHelper::$theme = NULL
MenuHelper::$here = "/dok"
MenuHelper::$params = array
MenuHelper::$action = "index"
MenuHelper::$plugin = NULL
MenuHelper::$data = NULL
MenuHelper::$namedArgs = NULL
MenuHelper::$argSeparator = NULL
MenuHelper::$validationErrors = NULL
MenuHelper::$tags = array
MenuHelper::$__tainted = NULL
MenuHelper::$__cleaned = NULL
MenuHelper::$Link = LinkHelper object
$session = SessionHelper
SessionHelper::$helpers = array
SessionHelper::$__active = true
SessionHelper::$valid = false
SessionHelper::$error = false
SessionHelper::$_userAgent = "f9a8355d006790ee743ededbb1f6e3bd"
SessionHelper::$path = "/"
SessionHelper::$lastError = NULL
SessionHelper::$security = "medium"
SessionHelper::$time = 1773314240
SessionHelper::$sessionTime = 1773326240
SessionHelper::$cookieLifeTime = false
SessionHelper::$watchKeys = array
SessionHelper::$id = NULL
SessionHelper::$host = NULL
SessionHelper::$timeout = NULL
SessionHelper::$base = ""
SessionHelper::$webroot = "/"
SessionHelper::$here = "/dok"
SessionHelper::$params = array
SessionHelper::$action = "index"
SessionHelper::$data = NULL
SessionHelper::$theme = NULL
SessionHelper::$plugin = NULL
$html = HtmlHelper
HtmlHelper::$tags = array
HtmlHelper::$_crumbs = array
HtmlHelper::$__includedScripts = array
HtmlHelper::$_scriptBlockOptions = array
HtmlHelper::$__docTypes = array
HtmlHelper::$helpers = NULL
HtmlHelper::$base = ""
HtmlHelper::$webroot = "/"
HtmlHelper::$theme = NULL
HtmlHelper::$here = "/dok"
HtmlHelper::$params = array
HtmlHelper::$action = "index"
HtmlHelper::$plugin = NULL
HtmlHelper::$data = NULL
HtmlHelper::$namedArgs = NULL
HtmlHelper::$argSeparator = NULL
HtmlHelper::$validationErrors = NULL
HtmlHelper::$__tainted = NULL
HtmlHelper::$__cleaned = NULL
$link = LinkHelper
LinkHelper::$helpers = array
LinkHelper::$lang = "dok"
LinkHelper::$defaultLang = "hrv"
LinkHelper::$base = ""
LinkHelper::$webroot = "/"
LinkHelper::$theme = NULL
LinkHelper::$here = "/dok"
LinkHelper::$params = array
LinkHelper::$action = "index"
LinkHelper::$plugin = NULL
LinkHelper::$data = NULL
LinkHelper::$namedArgs = NULL
LinkHelper::$argSeparator = NULL
LinkHelper::$validationErrors = NULL
LinkHelper::$tags = array
LinkHelper::$__tainted = NULL
LinkHelper::$__cleaned = NULL
LinkHelper::$Html = HtmlHelper object
LinkHelper::$Session = SessionHelper object
$articles = array(
array(
"Article" => array(),
"Member" => array()
),
array(
"Article" => array(),
"Member" => array()
),
array(
"Article" => array(),
"Member" => array()
),
array(
"Article" => array(),
"Member" => array()
),
array(
"Article" => array(),
"Member" => array()
)
)
$article = array(
"Article" => array(
"id" => "496",
"member_id" => "35",
"title_eng" => "Exhibition of Miniatures and Tabletop Scenery 2026",
"title_hrv" => "Izložba minijatura i maketa Agram 2026",
"mask_eng" => "exhibition_of_miniatures_and_tabletop_scenery_2026",
"mask_hrv" => "izlozba_minijatura_i_maketa_agram_2026",
"content_eng" => "<p>
<a href=" https://hosting.photobucket.com/95288841-8654-4bf7-8fc9-a4aa78dce87f/dc756f84-867d-4df4-acd8-5d43775cafc2.jpg
" target="_blank"> <img alt="Click for enlarged picture" src="
https://hosting.photobucket.com/95288841-8654-4bf7-8fc9-a4aa78dce87f/dc756f84-867d-4df4-acd8-5d43775cafc2.jpg" width="600" /> </a></p>
<p>
<strong>The exhibition of miniatures and models "Agram 2026"</strong> was held this year from 19.2. to 08.03. 2026. The exhibition was set up on Wednesday 18.2. and was attended by a large number of members and friends of the Association who exhibited their works.</p>
<p>
</p>
<p>
<a href=" https://hosting.photobucket.com/95288841-8654-4bf7-8fc9-a4aa78dce87f/8529d6d4-76ea-4872-a9e6-748e04223a4e.jpg
" target="_blank"> <img alt="Click for enlarged picture" src="
https://hosting.photobucket.com/95288841-8654-4bf7-8fc9-a4aa78dce87f/8529d6d4-76ea-4872-a9e6-748e04223a4e.jpg
" width="600" /> </a></p>
<p>
<a href=" https://hosting.photobucket.com/95288841-8654-4bf7-8fc9-a4aa78dce87f/f3038937-f001-4ceb-b725-a330fcd64cee.jpg
" target="_blank"> <img alt="Click for enlarged picture" src="
https://hosting.photobucket.com/95288841-8654-4bf7-8fc9-a4aa78dce87f/f3038937-f001-4ceb-b725-a330fcd64cee.jpg
" width="600" /> </a></p>
<p>
<a href=" https://hosting.photobucket.com/95288841-8654-4bf7-8fc9-a4aa78dce87f/3575379e-e068-49e2-9d4d-c9a49531fdc2.jpg
" target="_blank"> <img alt="Click for enlarged picture" src="
https://hosting.photobucket.com/95288841-8654-4bf7-8fc9-a4aa78dce87f/3575379e-e068-49e2-9d4d-c9a49531fdc2.jpg" width="600" /> </a></p>
<p>
<a href=" https://hosting.photobucket.com/95288841-8654-4bf7-8fc9-a4aa78dce87f/e51713c7-2add-4f8f-ae37-e6eba25badff.jpg
" target="_blank"> <img alt="Click for enlarged picture" src="
https://hosting.photobucket.com/95288841-8654-4bf7-8fc9-a4aa78dce87f/e51713c7-2add-4f8f-ae37-e6eba25badff.jpg" width="600" /> </a></p>
<p>
<a href=" https://hosting.photobucket.com/95288841-8654-4bf7-8fc9-a4aa78dce87f/9c0bb546-50a8-483d-aeab-ab3b2ce9f094.jpg
" target="_blank"> <img alt="Click for enlarged picture" src="
https://hosting.photobucket.com/95288841-8654-4bf7-8fc9-a4aa78dce87f/9c0bb546-50a8-483d-aeab-ab3b2ce9f094.jpg" width="600" /> </a></p>
<p>
The opening of the Exhibition took place on Thursday, February 19, 2026, starting at 6:00 PM. The exhibition was organized on the occasion of our twenty-third birthday.</p>
<p>
</p>
<p>
<a href=" https://hosting.photobucket.com/95288841-8654-4bf7-8fc9-a4aa78dce87f/71c7bfc2-1ffc-43b9-9d5a-53e009f6b86d.jpg
" target="_blank"> <img alt="Click for enlarged picture" src="
https://hosting.photobucket.com/95288841-8654-4bf7-8fc9-a4aa78dce87f/71c7bfc2-1ffc-43b9-9d5a-53e009f6b86d.jpg" width="600" /> </a></p>
<p>
<a href=" https://hosting.photobucket.com/95288841-8654-4bf7-8fc9-a4aa78dce87f/007b4701-1d7c-4a67-a599-0539a2aa3191.jpg
" target="_blank"> <img alt="Click for enlarged picture" src="
https://hosting.photobucket.com/95288841-8654-4bf7-8fc9-a4aa78dce87f/007b4701-1d7c-4a67-a599-0539a2aa3191.jpg" width="600" /> </a></p>
<p>
<a href=" https://hosting.photobucket.com/95288841-8654-4bf7-8fc9-a4aa78dce87f/2c8090e2-8b95-4368-bb48-98876d680e15.jpg
" target="_blank"> <img alt="Click for enlarged picture" src="
https://hosting.photobucket.com/95288841-8654-4bf7-8fc9-a4aa78dce87f/2c8090e2-8b95-4368-bb48-98876d680e15.jpg" width="600" /> </a></p>
<p>
<a href=" https://hosting.photobucket.com/95288841-8654-4bf7-8fc9-a4aa78dce87f/375768ad-a8bb-49bf-9845-e46c896ba7ec.jpg
" target="_blank"> <img alt="Click for enlarged picture" src="
https://hosting.photobucket.com/95288841-8654-4bf7-8fc9-a4aa78dce87f/375768ad-a8bb-49bf-9845-e46c896ba7ec.jpg" width="600" /> </a></p>
<p>
<a href=" https://hosting.photobucket.com/95288841-8654-4bf7-8fc9-a4aa78dce87f/a93de974-4ccb-4876-85b0-4d066ae402b3.jpg
" target="_blank"> <img alt="Click for enlarged picture" src="
https://hosting.photobucket.com/95288841-8654-4bf7-8fc9-a4aa78dce87f/a93de974-4ccb-4876-85b0-4d066ae402b3.jpg" width="600" /> </a></p>
<p>
<a href=" https://hosting.photobucket.com/95288841-8654-4bf7-8fc9-a4aa78dce87f/d323ccc9-1b9a-4cb2-8adf-7019b0e217f4.jpg
" target="_blank"> <img alt="Click for enlarged picture" src="
https://hosting.photobucket.com/95288841-8654-4bf7-8fc9-a4aa78dce87f/d323ccc9-1b9a-4cb2-8adf-7019b0e217f4.jpg" width="600" /> </a></p>
<p>
<a href=" https://hosting.photobucket.com/95288841-8654-4bf7-8fc9-a4aa78dce87f/a5a66447-2d76-47ae-866d-4d512ef469a5.jpg
" target="_blank"> <img alt="Click for enlarged picture" src="
https://hosting.photobucket.com/95288841-8654-4bf7-8fc9-a4aa78dce87f/a5a66447-2d76-47ae-866d-4d512ef469a5.jpg" width="600" /> </a></p>
<p>
<a href=" https://hosting.photobucket.com/95288841-8654-4bf7-8fc9-a4aa78dce87f/3e7bcfc9-ba02-4f94-a6c3-79dfaea3639e.jpg
" target="_blank"> <img alt="Click for enlarged picture" src="
https://hosting.photobucket.com/95288841-8654-4bf7-8fc9-a4aa78dce87f/3e7bcfc9-ba02-4f94-a6c3-79dfaea3639e.jpg" width="600" /> </a></p>
<p>
<a href=" https://hosting.photobucket.com/95288841-8654-4bf7-8fc9-a4aa78dce87f/24e79466-4a9e-4b10-970c-caad235d260d.jpg
" target="_blank"> <img alt="Click for enlarged picture" src="
https://hosting.photobucket.com/95288841-8654-4bf7-8fc9-a4aa78dce87f/24e79466-4a9e-4b10-970c-caad235d260d.jpg" width="600" /> </a></p>
<p>
As always, the Exhibition presented a cross-section of the work of the Association, its members, participants of its courses and workshops, and members of the Miniature Painters Croatia FB group. In a large number of showcases, there were numerous miniatures for tabletop strategy games, board games, and an entire showcase was dedicated to award-winning exhibits from previous miniature competitions. Several showcases were dedicated to projects that the Association has been implementing for 23 years, such as the UMS „Agram“ Library and Reading Room, the Workshop for Making Spatial Models and the Miniature Painting Workshop, as well as new ones such as the Agram Group Build, the Agram Lego Section and the Back to Basics painting workshop for the youngest.</p>
<p>
<a href=" https://hosting.photobucket.com/95288841-8654-4bf7-8fc9-a4aa78dce87f/fca84936-af71-44d3-9a4c-faeb26163899.jpg
" target="_blank"> <img alt="Click for enlarged picture" src="
https://hosting.photobucket.com/95288841-8654-4bf7-8fc9-a4aa78dce87f/fca84936-af71-44d3-9a4c-faeb26163899.jpg" width="600" /> </a></p>
<p>
<a href=" https://hosting.photobucket.com/95288841-8654-4bf7-8fc9-a4aa78dce87f/459bc5ac-8702-46f9-93b4-547deaabdef4.jpg
" target="_blank"> <img alt="Click for enlarged picture" src="
https://hosting.photobucket.com/95288841-8654-4bf7-8fc9-a4aa78dce87f/459bc5ac-8702-46f9-93b4-547deaabdef4.jpg" width="600" /> </a></p>
<p>
<a href=" https://hosting.photobucket.com/95288841-8654-4bf7-8fc9-a4aa78dce87f/91a04363-b2ef-4635-a046-7edf25ce7808.jpg
" target="_blank"> <img alt="Click for enlarged picture" src="
https://hosting.photobucket.com/95288841-8654-4bf7-8fc9-a4aa78dce87f/91a04363-b2ef-4635-a046-7edf25ce7808.jpg" width="600" /> </a></p>
<p>
<a href=" https://hosting.photobucket.com/95288841-8654-4bf7-8fc9-a4aa78dce87f/73256af5-fd5d-40b5-95e1-120e49c9be87.jpg
" target="_blank"> <img alt="Click for enlarged picture" src="
https://hosting.photobucket.com/95288841-8654-4bf7-8fc9-a4aa78dce87f/73256af5-fd5d-40b5-95e1-120e49c9be87.jpg" width="600" /> </a></p>
<p>
<a href=" https://hosting.photobucket.com/95288841-8654-4bf7-8fc9-a4aa78dce87f/979f9be5-23f3-4df9-91dc-ab71d6a10d64.jpg
" target="_blank"> <img alt="Click for enlarged picture" src="
https://hosting.photobucket.com/95288841-8654-4bf7-8fc9-a4aa78dce87f/979f9be5-23f3-4df9-91dc-ab71d6a10d64.jpg" width="600" /> </a></p>
<p>
<a href=" https://hosting.photobucket.com/95288841-8654-4bf7-8fc9-a4aa78dce87f/d0ff4379-183a-47b9-a740-9ddc283ebc29.jpg
" target="_blank"> <img alt="Click for enlarged picture" src="
https://hosting.photobucket.com/95288841-8654-4bf7-8fc9-a4aa78dce87f/d0ff4379-183a-47b9-a740-9ddc283ebc29.jpg" width="600" /> </a></p>
<p>
<a href=" https://hosting.photobucket.com/95288841-8654-4bf7-8fc9-a4aa78dce87f/4333e95e-bbbd-4f47-aaea-38a9c99e54d8.jpg
" target="_blank"> <img alt="Click for enlarged picture" src="
https://hosting.photobucket.com/95288841-8654-4bf7-8fc9-a4aa78dce87f/4333e95e-bbbd-4f47-aaea-38a9c99e54d8.jpg" width="600" /> </a></p>
<p>
<a href=" https://hosting.photobucket.com/95288841-8654-4bf7-8fc9-a4aa78dce87f/1372f8a2-b222-48ee-ae45-a90b5a354ef7.jpg
" target="_blank"> <img alt="Click for enlarged picture" src="
https://hosting.photobucket.com/95288841-8654-4bf7-8fc9-a4aa78dce87f/1372f8a2-b222-48ee-ae45-a90b5a354ef7.jpg" width="600" /> </a></p>
<p>
<a href=" https://hosting.photobucket.com/95288841-8654-4bf7-8fc9-a4aa78dce87f/6a1b4fd1-d982-4b06-9c5f-3cd40d6bf10a.jpg
" target="_blank"> <img alt="Click for enlarged picture" src="
https://hosting.photobucket.com/95288841-8654-4bf7-8fc9-a4aa78dce87f/6a1b4fd1-d982-4b06-9c5f-3cd40d6bf10a.jpg" width="600" /> </a></p>
<p>
<a href=" https://hosting.photobucket.com/95288841-8654-4bf7-8fc9-a4aa78dce87f/c2ec45e1-e0f3-463a-b254-cb2a38b53e14.jpg
" target="_blank"> <img alt="Click for enlarged picture" src="
https://hosting.photobucket.com/95288841-8654-4bf7-8fc9-a4aa78dce87f/c2ec45e1-e0f3-463a-b254-cb2a38b53e14.jpg" width="600" /> </a></p>
<p>
<a href=" https://hosting.photobucket.com/95288841-8654-4bf7-8fc9-a4aa78dce87f/17553b9a-0592-4f6a-a097-3f1a97e161f3.jpg
" target="_blank"> <img alt="Click for enlarged picture" src="
https://hosting.photobucket.com/95288841-8654-4bf7-8fc9-a4aa78dce87f/17553b9a-0592-4f6a-a097-3f1a97e161f3.jpg" width="600" /> </a></p>
<p>
<a href=" https://hosting.photobucket.com/95288841-8654-4bf7-8fc9-a4aa78dce87f/8658bd6b-dff2-4d24-8473-928d44d44480.jpg
" target="_blank"> <img alt="Click for enlarged picture" src="
https://hosting.photobucket.com/95288841-8654-4bf7-8fc9-a4aa78dce87f/8658bd6b-dff2-4d24-8473-928d44d44480.jpg" width="600" /> </a></p>
<p>
<a href=" https://hosting.photobucket.com/95288841-8654-4bf7-8fc9-a4aa78dce87f/ecab0ea7-f75b-4e31-a520-d088ad39fa17.jpg
" target="_blank"> <img alt="Click for enlarged picture" src="
https://hosting.photobucket.com/95288841-8654-4bf7-8fc9-a4aa78dce87f/ecab0ea7-f75b-4e31-a520-d088ad39fa17.jpg" width="600" /> </a></p>
<p>
<a href=" https://hosting.photobucket.com/95288841-8654-4bf7-8fc9-a4aa78dce87f/9495a2f5-8a82-41f2-abf4-9ade3db41d87.jpg
" target="_blank"> <img alt="Click for enlarged picture" src="
https://hosting.photobucket.com/95288841-8654-4bf7-8fc9-a4aa78dce87f/9495a2f5-8a82-41f2-abf4-9ade3db41d87.jpg" width="600" /> </a></p>
<p>
<a href=" https://hosting.photobucket.com/95288841-8654-4bf7-8fc9-a4aa78dce87f/362cc6fd-a5dd-474b-9b9f-aeab27d6dcfa.jpg
" target="_blank"> <img alt="Click for enlarged picture" src="
https://hosting.photobucket.com/95288841-8654-4bf7-8fc9-a4aa78dce87f/362cc6fd-a5dd-474b-9b9f-aeab27d6dcfa.jpg" width="600" /> </a></p>
<p>
It was a special honor for us to host our guest exhibitor, Ninoslav Luk, a miniaturist from Poreč, who introduced himself to us with his collection of historical dioramas.</p>
<p>
<a href=" https://hosting.photobucket.com/95288841-8654-4bf7-8fc9-a4aa78dce87f/ba1353de-e2bd-4340-9121-9056e287ed4a.jpg
" target="_blank"> <img alt="Click for enlarged picture" src="
https://hosting.photobucket.com/95288841-8654-4bf7-8fc9-a4aa78dce87f/ba1353de-e2bd-4340-9121-9056e287ed4a.jpg" width="600" /> </a></p>
<p>
<a href=" https://hosting.photobucket.com/95288841-8654-4bf7-8fc9-a4aa78dce87f/cea18506-1b50-4e5b-955c-0b9ca02d7826.jpg
" target="_blank"> <img alt="Click for enlarged picture" src="
https://hosting.photobucket.com/95288841-8654-4bf7-8fc9-a4aa78dce87f/cea18506-1b50-4e5b-955c-0b9ca02d7826.jpg" width="600" /> </a></p>
<p>
<a href=" https://hosting.photobucket.com/95288841-8654-4bf7-8fc9-a4aa78dce87f/1be85b41-e3b6-4536-b141-cd0da6eb38c1.jpg
" target="_blank"> <img alt="Click for enlarged picture" src="
https://hosting.photobucket.com/95288841-8654-4bf7-8fc9-a4aa78dce87f/1be85b41-e3b6-4536-b141-cd0da6eb38c1.jpg" width="600" /> </a></p>
<p>
<a href=" https://hosting.photobucket.com/95288841-8654-4bf7-8fc9-a4aa78dce87f/9e93b87d-ff3c-4b7b-8f06-5f9d3464a134.jpg
" target="_blank"> <img alt="Click for enlarged picture" src="
https://hosting.photobucket.com/95288841-8654-4bf7-8fc9-a4aa78dce87f/9e93b87d-ff3c-4b7b-8f06-5f9d3464a134.jpg" width="600" /> </a></p>
<p>
During the first weekend of the Exhibition, 21-22.02., we held the 18th annual international miniature painting competition <strong>Black Queen Hobby and Miniature Painting Competition</strong>!</p>
<p>
<a href=" https://hosting.photobucket.com/95288841-8654-4bf7-8fc9-a4aa78dce87f/3056fb09-f66c-4dea-80a8-a4e72407429a.jpg
" target="_blank"> <img alt="Click for enlarged picture" src="
https://hosting.photobucket.com/95288841-8654-4bf7-8fc9-a4aa78dce87f/3056fb09-f66c-4dea-80a8-a4e72407429a.jpg" width="600" /> </a></p>
<p>
As contestants arrived and registered for the competition, our hardworking staff photographed all the exhibits before sorting them into categories and carefully placing them in glass cases. There was no shortage of morning neccessities like coffe and doughnuts.</p>
<p>
<</p>
<p>
<a href=" https://hosting.photobucket.com/95288841-8654-4bf7-8fc9-a4aa78dce87f/1118089c-2b46-4a2c-b17d-dc92b66d1ffc.jpg
" target="_blank"> <img alt="Click for enlarged picture" src="
https://hosting.photobucket.com/95288841-8654-4bf7-8fc9-a4aa78dce87f/1118089c-2b46-4a2c-b17d-dc92b66d1ffc.jpg" width="600" /> </a></p>
<p>
<a href=" https://hosting.photobucket.com/95288841-8654-4bf7-8fc9-a4aa78dce87f/9fd3c272-9a69-4532-a09d-36497a20a820.jpg
" target="_blank"> <img alt="Click for enlarged picture" src="
https://hosting.photobucket.com/95288841-8654-4bf7-8fc9-a4aa78dce87f/9fd3c272-9a69-4532-a09d-36497a20a820.jpg" width="600" /> </a></p>
<p>
<a href=" https://hosting.photobucket.com/95288841-8654-4bf7-8fc9-a4aa78dce87f/86995e80-c502-45fb-80f5-c8fda27da3f9.jpg
" target="_blank"> <img alt="Click for enlarged picture" src="
https://hosting.photobucket.com/95288841-8654-4bf7-8fc9-a4aa78dce87f/86995e80-c502-45fb-80f5-c8fda27da3f9.jpg" width="600" /> </a></p>
<p>
By noon, all the display cases were full and the competition could officially begin.</p>
<p>
<a href=" https://hosting.photobucket.com/95288841-8654-4bf7-8fc9-a4aa78dce87f/bce59a4f-c3e3-4708-a3d6-25e81a894c24.jpg
" target="_blank"> <img alt="Click for enlarged picture" src="
https://hosting.photobucket.com/95288841-8654-4bf7-8fc9-a4aa78dce87f/bce59a4f-c3e3-4708-a3d6-25e81a894c24.jpg" width="600" /> </a></p>
<p>
<a href=" https://hosting.photobucket.com/95288841-8654-4bf7-8fc9-a4aa78dce87f/16a0a094-01aa-4e52-82cf-fdab00d74711.jpg
" target="_blank"> <img alt="Click for enlarged picture" src="
https://hosting.photobucket.com/95288841-8654-4bf7-8fc9-a4aa78dce87f/16a0a094-01aa-4e52-82cf-fdab00d74711.jpg" width="600" /> </a></p>
<p>
<a href=" https://hosting.photobucket.com/95288841-8654-4bf7-8fc9-a4aa78dce87f/0d3f4042-ff77-48d0-b332-add0fd08f7c3.jpg
" target="_blank"> <img alt="Click for enlarged picture" src="
https://hosting.photobucket.com/95288841-8654-4bf7-8fc9-a4aa78dce87f/0d3f4042-ff77-48d0-b332-add0fd08f7c3.jpg" width="600" /> </a></p>
<p>
<a href=" https://hosting.photobucket.com/95288841-8654-4bf7-8fc9-a4aa78dce87f/3711baf8-93f2-434a-aea9-a95288ca04dd.jpg
" target="_blank"> <img alt="Click for enlarged picture" src="
https://hosting.photobucket.com/95288841-8654-4bf7-8fc9-a4aa78dce87f/3711baf8-93f2-434a-aea9-a95288ca04dd.jpg" width="600" /> </a></p>
<p>
<a href=" https://hosting.photobucket.com/95288841-8654-4bf7-8fc9-a4aa78dce87f/53113b97-ec06-4409-95ba-95a5ad3f9720.jpg
" target="_blank"> <img alt="Click for enlarged picture" src="
https://hosting.photobucket.com/95288841-8654-4bf7-8fc9-a4aa78dce87f/53113b97-ec06-4409-95ba-95a5ad3f9720.jpg" width="600" /> </a></p>
<p>
<a href=" https://hosting.photobucket.com/95288841-8654-4bf7-8fc9-a4aa78dce87f/ab127858-193d-4976-bdb2-e27302722fca.jpg
" target="_blank"> <img alt="Click for enlarged picture" src="
https://hosting.photobucket.com/95288841-8654-4bf7-8fc9-a4aa78dce87f/ab127858-193d-4976-bdb2-e27302722fca.jpg" width="600" /> </a></p>
<p>
<a href=" https://hosting.photobucket.com/95288841-8654-4bf7-8fc9-a4aa78dce87f/3735af11-3fb6-4772-a8ff-5e0ff6ddf03a.jpg
" target="_blank"> <img alt="Click for enlarged picture" src="
https://hosting.photobucket.com/95288841-8654-4bf7-8fc9-a4aa78dce87f/3735af11-3fb6-4772-a8ff-5e0ff6ddf03a.jpg" width="600" /> </a></p>
<p>
<strong>Back To Basics workshops for the young at the Black Queen</strong></p>
<p>
This year, throughout the weekend, we organized miniature painting workshops for the youngest, who were able to paint one of our own miniatures designed specifically for this program for the first time!</p>
<p>
<a href=" https://hosting.photobucket.com/95288841-8654-4bf7-8fc9-a4aa78dce87f/6999be0c-8cc6-4947-a423-9427a2299724.jpg
" target="_blank"> <img alt="Click for enlarged picture" src="
https://hosting.photobucket.com/95288841-8654-4bf7-8fc9-a4aa78dce87f/6999be0c-8cc6-4947-a423-9427a2299724.jpg" width="600" /> </a></p>
<p>
<a href="https://hosting.photobucket.com/95288841-8654-4bf7-8fc9-a4aa78dce87f/835b05a5-f171-49df-afa6-da0692b89074.jpg" target="_blank"><img alt="Click for enlarged picture" src="https://hosting.photobucket.com/95288841-8654-4bf7-8fc9-a4aa78dce87f/835b05a5-f171-49df-afa6-da0692b89074.jpg" width="600" /></a></p>
<p>
<a href=" https://hosting.photobucket.com/95288841-8654-4bf7-8fc9-a4aa78dce87f/ef5dde13-84ee-4ea0-b9f3-28aaf703ef6d.jpg
" target="_blank"> <img alt="Click for enlarged picture" src="
https://hosting.photobucket.com/95288841-8654-4bf7-8fc9-a4aa78dce87f/ef5dde13-84ee-4ea0-b9f3-28aaf703ef6d.jpg" width="600" /> </a></p>
<p>
<strong>SELLERS' COURT</strong></p>
<p>
During the weekend we hosted our sponsors with their sales stands: Swood.si and Carta Magica.</p>
<p>
<a href=" https://hosting.photobucket.com/95288841-8654-4bf7-8fc9-a4aa78dce87f/5ee9a49f-a387-435a-9110-572402b7191d.jpg
" target="_blank"> <img alt="Click for enlarged picture" src="
https://hosting.photobucket.com/95288841-8654-4bf7-8fc9-a4aa78dce87f/5ee9a49f-a387-435a-9110-572402b7191d.jpg" width="600" /> </a></p>
<p>
<a href=" https://hosting.photobucket.com/95288841-8654-4bf7-8fc9-a4aa78dce87f/47cf600f-b1eb-4655-bf06-305f6f21d5d2.jpg
" target="_blank"> <img alt="Click for enlarged picture" src="
https://hosting.photobucket.com/95288841-8654-4bf7-8fc9-a4aa78dce87f/47cf600f-b1eb-4655-bf06-305f6f21d5d2.jpg" width="600" /> </a></p>
<p>
<strong>MINIATURE PAINTING WORKSHOPS</strong></p>
<p>
The ZZTK premises allow workshops to be held during the weekend in the cinema hall in the basement, so we also organized demonstration workshops during the weekend. The lecturers' work was recorded with a camera and projected onto the projection screen in the hall. Many thanks to our domestic and international lecturers: Anže Zorko (SLO), doc.dr.sc. Winton Afrić (CRO), Ivan Knezović (UMS Agram) and Petar Knezoviću (CRO).</p>
<p>
<a href=" https://hosting.photobucket.com/95288841-8654-4bf7-8fc9-a4aa78dce87f/e8d835be-ec99-49d7-bc9b-086e38573d1a.jpg
" target="_blank"> <img alt="Click for enlarged picture" src="
https://hosting.photobucket.com/95288841-8654-4bf7-8fc9-a4aa78dce87f/e8d835be-ec99-49d7-bc9b-086e38573d1a.jpg" width="600" /> </a></p>
<p>
<a href=" https://hosting.photobucket.com/95288841-8654-4bf7-8fc9-a4aa78dce87f/f3eba4c1-4637-4da9-8360-75f430355af4.jpg" target="_blank"> <img alt="Click for enlarged picture" src="
https://hosting.photobucket.com/95288841-8654-4bf7-8fc9-a4aa78dce87f/f3eba4c1-4637-4da9-8360-75f430355af4.jpg" width="600" /> </a></p>
<p>
<a href=" https://hosting.photobucket.com/95288841-8654-4bf7-8fc9-a4aa78dce87f/ef523854-4030-4579-aa38-403afda86c91.jpg
" target="_blank"> <img alt="Click for enlarged picture" src="
https://hosting.photobucket.com/95288841-8654-4bf7-8fc9-a4aa78dce87f/ef523854-4030-4579-aa38-403afda86c91.jpg" width="600" /> </a></p>
<p>
<a href=" https://hosting.photobucket.com/95288841-8654-4bf7-8fc9-a4aa78dce87f/dd0943c2-f4a8-40c3-b641-f6dcdd200380.jpg
" target="_blank"> <img alt="Click for enlarged picture" src="
https://hosting.photobucket.com/95288841-8654-4bf7-8fc9-a4aa78dce87f/dd0943c2-f4a8-40c3-b641-f6dcdd200380.jpg" width="600" /> </a></p>
<p>
<a href=" https://hosting.photobucket.com/95288841-8654-4bf7-8fc9-a4aa78dce87f/08b1626a-f6c7-43c9-b718-3e9a41b55ca6.jpg
" target="_blank"> <img alt="Click for enlarged picture" src="
https://hosting.photobucket.com/95288841-8654-4bf7-8fc9-a4aa78dce87f/08b1626a-f6c7-43c9-b718-3e9a41b55ca6.jpg" width="600" /> </a></p>
<p>
<a href=" https://hosting.photobucket.com/95288841-8654-4bf7-8fc9-a4aa78dce87f/91aca7f3-1af6-486d-b174-65079a63a1ea.jpg
" target="_blank"> <img alt="Click for enlarged picture" src="
https://hosting.photobucket.com/95288841-8654-4bf7-8fc9-a4aa78dce87f/91aca7f3-1af6-486d-b174-65079a63a1ea.jpg" width="600" /> </a></p>
<p>
<a href=" https://hosting.photobucket.com/95288841-8654-4bf7-8fc9-a4aa78dce87f/3821f2fb-fbe7-4096-adbc-7d8c981a3b56.jpg
" target="_blank"> <img alt="Click for enlarged picture" src="
https://hosting.photobucket.com/95288841-8654-4bf7-8fc9-a4aa78dce87f/3821f2fb-fbe7-4096-adbc-7d8c981a3b56.jpg" width="600" /> </a></p>
<p>
<a href=" https://hosting.photobucket.com/95288841-8654-4bf7-8fc9-a4aa78dce87f/2c7bb3c5-c0ec-4a96-b6bd-6a90ce5ce154.jpg
" target="_blank"> <img alt="Click for enlarged picture" src="
https://hosting.photobucket.com/95288841-8654-4bf7-8fc9-a4aa78dce87f/2c7bb3c5-c0ec-4a96-b6bd-6a90ce5ce154.jpg" width="600" /> </a></p>
<p>
<a href=" https://hosting.photobucket.com/95288841-8654-4bf7-8fc9-a4aa78dce87f/b646f4ee-21aa-4d12-8db3-6d33351d5aeb.jpg
" target="_blank"> <img alt="Click for enlarged picture" src="
https://hosting.photobucket.com/95288841-8654-4bf7-8fc9-a4aa78dce87f/b646f4ee-21aa-4d12-8db3-6d33351d5aeb.jpg" width="600" /> </a></p>
<p>
<a href=" https://hosting.photobucket.com/95288841-8654-4bf7-8fc9-a4aa78dce87f/fb5efc01-32cc-4119-90e3-188f51b30237.jpg
" target="_blank"> <img alt="Click for enlarged picture" src="
https://hosting.photobucket.com/95288841-8654-4bf7-8fc9-a4aa78dce87f/fb5efc01-32cc-4119-90e3-188f51b30237.jpg" width="600" /> </a></p>
<p>
<strong>SPEED PAINTING COMPETITION</strong></p>
<p>
We organized a speed painting competition on Sunday afternoon. Participants had 60 minutes to paint one wizrad, a miniature of our own design and production.</p>
<p>
<a href=" https://hosting.photobucket.com/95288841-8654-4bf7-8fc9-a4aa78dce87f/106417a6-a047-4e0d-9f81-87858806052f.jpg
" target="_blank"> <img alt="Click for enlarged picture" src="
https://hosting.photobucket.com/95288841-8654-4bf7-8fc9-a4aa78dce87f/106417a6-a047-4e0d-9f81-87858806052f.jpg" width="600" /> </a></p>
<p>
<a href=" https://hosting.photobucket.com/95288841-8654-4bf7-8fc9-a4aa78dce87f/ac6853c7-6e34-4e07-a996-8d7d12744b67.jpg
" target="_blank"> <img alt="Click for enlarged picture" src="
https://hosting.photobucket.com/95288841-8654-4bf7-8fc9-a4aa78dce87f/ac6853c7-6e34-4e07-a996-8d7d12744b67.jpg" width="600" /> </a></p>
<p>
<a href=" https://hosting.photobucket.com/95288841-8654-4bf7-8fc9-a4aa78dce87f/ccb155fa-52c5-4a99-9515-f69a6836dce7.jpg
" target="_blank"> <img alt="Click for enlarged picture" src="
https://hosting.photobucket.com/95288841-8654-4bf7-8fc9-a4aa78dce87f/ccb155fa-52c5-4a99-9515-f69a6836dce7.jpg" width="600" /> </a></p>
<p>
<a href=" https://hosting.photobucket.com/95288841-8654-4bf7-8fc9-a4aa78dce87f/a29fedd0-97ea-45b1-85f9-7ea62188b2b2.jpg
" target="_blank"><img alt="Click for enlarged picture" src="
https://hosting.photobucket.com/95288841-8654-4bf7-8fc9-a4aa78dce87f/a29fedd0-97ea-45b1-85f9-7ea62188b2b2.jpg" width="600" /></a></p>
<p>
With that, we came to the very end of this wonderful weekend and all that was left was the awarding of prizes and recognition to the winners.</p>
<p>
<a href=" https://hosting.photobucket.com/95288841-8654-4bf7-8fc9-a4aa78dce87f/046ca4c8-0ae7-415e-abd3-e131d580c3ad.jpg
" target="_blank"> <img alt="Click for enlarged picture" src="
https://hosting.photobucket.com/95288841-8654-4bf7-8fc9-a4aa78dce87f/046ca4c8-0ae7-415e-abd3-e131d580c3ad.jpg" width="600" /> </a></p>
<p>
<a href=" https://hosting.photobucket.com/95288841-8654-4bf7-8fc9-a4aa78dce87f/cec0dcef-7acb-4a77-89de-271ed5410672.jpg
" target="_blank"> <img alt="Click for enlarged picture" src="
https://hosting.photobucket.com/95288841-8654-4bf7-8fc9-a4aa78dce87f/cec0dcef-7acb-4a77-89de-271ed5410672.jpg" width="600" /> </a></p>
<p>
<a href=" https://hosting.photobucket.com/95288841-8654-4bf7-8fc9-a4aa78dce87f/a495a5fc-31a2-4979-a970-0fa22c334354.jpg
" target="_blank"> <img alt="Click for enlarged picture" src="
https://hosting.photobucket.com/95288841-8654-4bf7-8fc9-a4aa78dce87f/a495a5fc-31a2-4979-a970-0fa22c334354.jpg" width="600" /> </a></p>
<p>
<strong>AGRAM ARENA – Leaving Asphodel Necropolis28 Campaign</strong></p>
<p>
During the weekend of February 21-22, we held a new international competition, Agram Arena! This time it was the turn of the tabletop strategy game Necropolis28, for which our members designed a two-day campaign. Each participant created their own gang of soldiers, and the vast majority also created their own boards.</p>
<p>
<a href=" https://hosting.photobucket.com/95288841-8654-4bf7-8fc9-a4aa78dce87f/ac69b182-4bfc-4575-a6d3-fb3c8baba342.jpg
" target="_blank"> <img alt="Click for enlarged picture" src="
https://hosting.photobucket.com/95288841-8654-4bf7-8fc9-a4aa78dce87f/ac69b182-4bfc-4575-a6d3-fb3c8baba342.jpg" width="600" /> </a></p>
<p>
<a href=" https://hosting.photobucket.com/95288841-8654-4bf7-8fc9-a4aa78dce87f/289fed7b-e058-42d8-ba2d-cbd0463e98da.jpg
" target="_blank"> <img alt="Click for enlarged picture" src="
https://hosting.photobucket.com/95288841-8654-4bf7-8fc9-a4aa78dce87f/289fed7b-e058-42d8-ba2d-cbd0463e98da.jpg" width="600" /> </a></p>
<p>
<a href=" https://hosting.photobucket.com/95288841-8654-4bf7-8fc9-a4aa78dce87f/d92ebbee-859d-4441-8386-3d760b20b7a7.jpg
" target="_blank"> <img alt="Click for enlarged picture" src="
https://hosting.photobucket.com/95288841-8654-4bf7-8fc9-a4aa78dce87f/d92ebbee-859d-4441-8386-3d760b20b7a7.jpg" width="600" /> </a></p>
<p>
<a href=" https://hosting.photobucket.com/95288841-8654-4bf7-8fc9-a4aa78dce87f/09c59798-7871-425e-a075-3ca1cd91768a.jpg
" target="_blank"> <img alt="Click for enlarged picture" src="
https://hosting.photobucket.com/95288841-8654-4bf7-8fc9-a4aa78dce87f/09c59798-7871-425e-a075-3ca1cd91768a.jpg" width="600" /> </a></p>
<p>
<a href=" https://hosting.photobucket.com/95288841-8654-4bf7-8fc9-a4aa78dce87f/b2f3edc8-5a23-4552-9a2a-4027b286f327.jpg
" target="_blank"> <img alt="Click for enlarged picture" src="
https://hosting.photobucket.com/95288841-8654-4bf7-8fc9-a4aa78dce87f/b2f3edc8-5a23-4552-9a2a-4027b286f327.jpg" width="600" /> </a></p>
<p>
<a href=" https://hosting.photobucket.com/95288841-8654-4bf7-8fc9-a4aa78dce87f/2a9f43ac-b531-4746-b7bb-ac5a3356aab0.jpg
" target="_blank"> <img alt="Click for enlarged picture" src="
https://hosting.photobucket.com/95288841-8654-4bf7-8fc9-a4aa78dce87f/2a9f43ac-b531-4746-b7bb-ac5a3356aab0.jpg" width="600" /> </a></p>
<p>
<strong>EVENTS ON WEEKDAYS DURING THE EXHIBITION </strong></p>
<p>
Over the next two weeks, our volunteers held open miniature painting workshops on weekdays from 4:00 PM to 8:00 PM. Miniature painting workstations were set up where our visitors could paint miniatures we had prepared (or their own if they had brought them) using our materials and tools.</p>
<p>
<a href=" https://hosting.photobucket.com/95288841-8654-4bf7-8fc9-a4aa78dce87f/6edf7765-42b5-417a-820f-fa5d907179a7.jpg
" target="_blank"> <img alt="Click for enlarged picture" src="
https://hosting.photobucket.com/95288841-8654-4bf7-8fc9-a4aa78dce87f/6edf7765-42b5-417a-820f-fa5d907179a7.jpg" width="600" /> </a></p>
<p>
<a href=" https://hosting.photobucket.com/95288841-8654-4bf7-8fc9-a4aa78dce87f/c084ebe2-f57b-4519-9b31-29bdc1155887.jpg
" target="_blank"> <img alt="Click for enlarged picture" src="
https://hosting.photobucket.com/95288841-8654-4bf7-8fc9-a4aa78dce87f/c084ebe2-f57b-4519-9b31-29bdc1155887.jpg" width="600" /> </a></p>
<p>
<a href=" https://hosting.photobucket.com/95288841-8654-4bf7-8fc9-a4aa78dce87f/37ff2272-f9b0-4b16-a363-1e6f6688c866.jpg
" target="_blank"> <img alt="Click for enlarged picture" src="
https://hosting.photobucket.com/95288841-8654-4bf7-8fc9-a4aa78dce87f/37ff2272-f9b0-4b16-a363-1e6f6688c866.jpg" width="600" /> </a></p>
<p>
<a href=" https://hosting.photobucket.com/95288841-8654-4bf7-8fc9-a4aa78dce87f/5f4f7968-ff50-4a01-98da-6ce8562930b4.jpg
" target="_blank"> <img alt="Click for enlarged picture" src="
https://hosting.photobucket.com/95288841-8654-4bf7-8fc9-a4aa78dce87f/5f4f7968-ff50-4a01-98da-6ce8562930b4.jpg" width="600" /> </a></p>
<p>
<a href=" https://hosting.photobucket.com/95288841-8654-4bf7-8fc9-a4aa78dce87f/cbb45319-d488-483c-bf9d-9af29852fc74.jpg
" target="_blank"> <img alt="Click for enlarged picture" src="
https://hosting.photobucket.com/95288841-8654-4bf7-8fc9-a4aa78dce87f/cbb45319-d488-483c-bf9d-9af29852fc74.jpg" width="600" /> </a></p>
<p>
<a href=" https://hosting.photobucket.com/95288841-8654-4bf7-8fc9-a4aa78dce87f/3dcca26c-d549-4af3-812a-a4a81b9a2310.jpg
" target="_blank"> <img alt="Click for enlarged picture" src="
https://hosting.photobucket.com/95288841-8654-4bf7-8fc9-a4aa78dce87f/3dcca26c-d549-4af3-812a-a4a81b9a2310.jpg" width="600" /> </a></p>
<p>
<a href=" https://hosting.photobucket.com/95288841-8654-4bf7-8fc9-a4aa78dce87f/4adf0fb6-3eab-4b40-b32d-d03eab4a9892.jpg
" target="_blank"> <img alt="Click for enlarged picture" src="
https://hosting.photobucket.com/95288841-8654-4bf7-8fc9-a4aa78dce87f/4adf0fb6-3eab-4b40-b32d-d03eab4a9892.jpg" width="600" /> </a></p>
<p>
<a href=" https://hosting.photobucket.com/95288841-8654-4bf7-8fc9-a4aa78dce87f/4732b58a-9a65-4d1c-a7d5-25513d34b108.jpg
" target="_blank"> <img alt="Click for enlarged picture" src="
https://hosting.photobucket.com/95288841-8654-4bf7-8fc9-a4aa78dce87f/4732b58a-9a65-4d1c-a7d5-25513d34b108.jpg" width="600" /> </a></p>
<p>
<a href=" https://hosting.photobucket.com/95288841-8654-4bf7-8fc9-a4aa78dce87f/274be330-31d5-4e25-95db-ec2f423a003c.jpg
" target="_blank"> <img alt="Click for enlarged picture" src="
https://hosting.photobucket.com/95288841-8654-4bf7-8fc9-a4aa78dce87f/274be330-31d5-4e25-95db-ec2f423a003c.jpg" width="600" /> </a></p>
<p>
<a href=" https://hosting.photobucket.com/95288841-8654-4bf7-8fc9-a4aa78dce87f/8e7b0a80-0f46-4d70-9789-a46976c713d2.jpg
" target="_blank"> <img alt="Click for enlarged picture" src="
https://hosting.photobucket.com/95288841-8654-4bf7-8fc9-a4aa78dce87f/8e7b0a80-0f46-4d70-9789-a46976c713d2.jpg" width="600" /> </a></p>
<p>
<a href=" https://hosting.photobucket.com/95288841-8654-4bf7-8fc9-a4aa78dce87f/8bbd4e96-b911-4f26-80fe-b1c57f29027b.jpg
" target="_blank"> <img alt="Click for enlarged picture" src="
https://hosting.photobucket.com/95288841-8654-4bf7-8fc9-a4aa78dce87f/8bbd4e96-b911-4f26-80fe-b1c57f29027b.jpg" width="600" /> </a></p>
<p>
<a href=" https://hosting.photobucket.com/95288841-8654-4bf7-8fc9-a4aa78dce87f/203a27be-8f10-459d-89b9-befb6b636b74.jpg
" target="_blank"> <img alt="Click for enlarged picture" src="
https://hosting.photobucket.com/95288841-8654-4bf7-8fc9-a4aa78dce87f/203a27be-8f10-459d-89b9-befb6b636b74.jpg" width="600" /> </a></p>
<p>
<a href=" https://hosting.photobucket.com/95288841-8654-4bf7-8fc9-a4aa78dce87f/5dc4358f-19d8-475f-a4af-9c29e9ed18d7.jpg
" target="_blank"> <img alt="Click for enlarged picture" src="
https://hosting.photobucket.com/95288841-8654-4bf7-8fc9-a4aa78dce87f/5dc4358f-19d8-475f-a4af-9c29e9ed18d7.jpg" width="600" /> </a></p>
<p>
<strong>BACK TO BASICS MINIATURE PAINTING WORKSHOPS FOR YOUNG</strong></p>
<p>
On weekdays from 17:00 to 18:00, we held our new workshops for the youngest, in which our youngest participants painted their first miniatures.</p>
<p>
<a href=" https://hosting.photobucket.com/95288841-8654-4bf7-8fc9-a4aa78dce87f/948af139-8fb5-4e28-a27c-404466e70d05.jpg
" target="_blank"> <img alt="Click for enlarged picture" src="
https://hosting.photobucket.com/95288841-8654-4bf7-8fc9-a4aa78dce87f/948af139-8fb5-4e28-a27c-404466e70d05.jpg" width="600" /> </a></p>
<p>
<a href=" https://hosting.photobucket.com/95288841-8654-4bf7-8fc9-a4aa78dce87f/bb3e20c2-bb21-4a3d-863a-74de08261467.jpg
" target="_blank"> <img alt="Click for enlarged picture" src="
https://hosting.photobucket.com/95288841-8654-4bf7-8fc9-a4aa78dce87f/bb3e20c2-bb21-4a3d-863a-74de08261467.jpg" width="600" /> </a></p>
<p>
<a href=" https://hosting.photobucket.com/95288841-8654-4bf7-8fc9-a4aa78dce87f/7316c760-98e3-4e3f-9261-d138aa7a5a6a.jpg
" target="_blank"> <img alt="Click for enlarged picture" src="
https://hosting.photobucket.com/95288841-8654-4bf7-8fc9-a4aa78dce87f/7316c760-98e3-4e3f-9261-d138aa7a5a6a.jpg" width="600" /> </a></p>
<p>
<a href=" https://hosting.photobucket.com/95288841-8654-4bf7-8fc9-a4aa78dce87f/68934b39-3d1f-4f43-b967-14b73c41a39e.jpg
" target="_blank"> <img alt="Click for enlarged picture" src="
https://hosting.photobucket.com/95288841-8654-4bf7-8fc9-a4aa78dce87f/68934b39-3d1f-4f43-b967-14b73c41a39e.jpg" width="600" /> </a></p>
<p>
<a href=" https://hosting.photobucket.com/95288841-8654-4bf7-8fc9-a4aa78dce87f/46125bce-a28d-494f-873a-3aeabdc1d6c2.jpg
" target="_blank"> <img alt="Click for enlarged picture" src="
https://hosting.photobucket.com/95288841-8654-4bf7-8fc9-a4aa78dce87f/46125bce-a28d-494f-873a-3aeabdc1d6c2.jpg" width="600" /> </a></p>
<p>
<a href=" https://hosting.photobucket.com/95288841-8654-4bf7-8fc9-a4aa78dce87f/3c58e0ad-77a9-44c8-b6bf-d9a55c514d43.jpg
" target="_blank"> <img alt="Click for enlarged picture" src="
https://hosting.photobucket.com/95288841-8654-4bf7-8fc9-a4aa78dce87f/3c58e0ad-77a9-44c8-b6bf-d9a55c514d43.jpg" width="600" /> </a></p>
<p>
<a href=" https://hosting.photobucket.com/95288841-8654-4bf7-8fc9-a4aa78dce87f/f891f0f0-051b-40ee-9676-cb03b0a9811b.jpg
" target="_blank"> <img alt="Click for enlarged picture" src="
https://hosting.photobucket.com/95288841-8654-4bf7-8fc9-a4aa78dce87f/f891f0f0-051b-40ee-9676-cb03b0a9811b.jpg" width="600" /> </a></p>
<p>
<strong>AGRAM LEGO SECTION lecture: FW-14b – An F1 racecar for the future</strong></p>
<p>
On Wednesday, February 25, 2026, as part of the activities of our Agram Lego Section, our resident mechanical engineer Marko Paunović gave a lecture on the topic of the F1 racecar from 1992. Admission to the lecture was free, and upon completion, a LEGO model of the racecar was made by members of the Lego section</p>
<p>
<a href=" https://hosting.photobucket.com/95288841-8654-4bf7-8fc9-a4aa78dce87f/b2e14b1c-daa4-4314-8685-184377bc7e28.jpg
" target="_blank"> <img alt="Click for enlarged picture" src="
https://hosting.photobucket.com/95288841-8654-4bf7-8fc9-a4aa78dce87f/b2e14b1c-daa4-4314-8685-184377bc7e28.jpg" width="600" /> </a></p>
<p>
<a href=" https://hosting.photobucket.com/95288841-8654-4bf7-8fc9-a4aa78dce87f/31fb439a-77d3-4418-83ff-66c3af279cca.jpg" target="_blank"> <img alt="Click for enlarged picture" src="
https://hosting.photobucket.com/95288841-8654-4bf7-8fc9-a4aa78dce87f/31fb439a-77d3-4418-83ff-66c3af279cca.jpg" width="600" /> </a></p>
<p>
<a href=" https://hosting.photobucket.com/95288841-8654-4bf7-8fc9-a4aa78dce87f/bfcaf282-6be8-4b52-a3ed-c91137457876.jpg
" target="_blank"> <img alt="Click for enlarged picture" src="
https://hosting.photobucket.com/95288841-8654-4bf7-8fc9-a4aa78dce87f/bfcaf282-6be8-4b52-a3ed-c91137457876.jpg" width="600" /> </a></p>
<p>
<a href=" https://hosting.photobucket.com/95288841-8654-4bf7-8fc9-a4aa78dce87f/ce70fc61-9e1a-4169-aaad-8b67417656c0.jpg
" target="_blank"> <img alt="Click for enlarged picture" src="
https://hosting.photobucket.com/95288841-8654-4bf7-8fc9-a4aa78dce87f/ce70fc61-9e1a-4169-aaad-8b67417656c0.jpg" width="600" /> </a></p>
<p>
<a href=" https://hosting.photobucket.com/95288841-8654-4bf7-8fc9-a4aa78dce87f/94ca0e36-8710-458d-8194-9f71299f4d74.jpg
" target="_blank"> <img alt="Click for enlarged picture" src="
https://hosting.photobucket.com/95288841-8654-4bf7-8fc9-a4aa78dce87f/94ca0e36-8710-458d-8194-9f71299f4d74.jpg" width="600" /> </a></p>
<p>
<a href=" https://hosting.photobucket.com/95288841-8654-4bf7-8fc9-a4aa78dce87f/c6771f72-7191-4ca3-a792-3bb1ab3897b1.jpg
" target="_blank"> <img alt="Click for enlarged picture" src="
https://hosting.photobucket.com/95288841-8654-4bf7-8fc9-a4aa78dce87f/c6771f72-7191-4ca3-a792-3bb1ab3897b1.jpg" width="600" /> </a></p>
<p>
<a href=" https://hosting.photobucket.com/95288841-8654-4bf7-8fc9-a4aa78dce87f/c8fcfcb6-09f2-4398-a2fb-fa5065771e01.jpg
" target="_blank"> <img alt="Click for enlarged picture" src="
https://hosting.photobucket.com/95288841-8654-4bf7-8fc9-a4aa78dce87f/c8fcfcb6-09f2-4398-a2fb-fa5065771e01.jpg" width="600" /> </a></p>
<p>
<a href=" https://hosting.photobucket.com/95288841-8654-4bf7-8fc9-a4aa78dce87f/d7e187a8-d5b1-433b-b30d-091e54dcdddf.jpg
" target="_blank"> <img alt="Click for enlarged picture" src="
https://hosting.photobucket.com/95288841-8654-4bf7-8fc9-a4aa78dce87f/d7e187a8-d5b1-433b-b30d-091e54dcdddf.jpg" width="600" /> </a></p>
<p>
During the second weekend of the Exhibition, 28.02.-01.03., we organized a <strong>MINIATURE PAINTING WORKSHOP - Grimdark</strong>.</p>
<p>
The workshop was held over two days (the entire weekend) and participants painted up to three different figures for the game Trench Crusade. The focus of these lectures was on painting the popular grimdark style minis. The workshop presented paints and equipment, figure preparation, several miniature painting techniques from basic to advanced, and techniques and tricks for quickly and efficiently painting larger quantities of figures at once. Water-based acrylic paints were used as part of the workshop.</p>
<p>
<a href=" https://hosting.photobucket.com/95288841-8654-4bf7-8fc9-a4aa78dce87f/733d94b2-8e8d-4a4e-accd-b9168e32577e.jpg
" target="_blank"> <img alt="Click for enlarged picture" src="
https://hosting.photobucket.com/95288841-8654-4bf7-8fc9-a4aa78dce87f/733d94b2-8e8d-4a4e-accd-b9168e32577e.jpg
" width="600" /> </a></p>
<p>
<a href=" https://hosting.photobucket.com/95288841-8654-4bf7-8fc9-a4aa78dce87f/41020062-45b9-41cd-a357-fa23a389f390.jpg
" target="_blank"> <img alt="Click for enlarged picture" src="
https://hosting.photobucket.com/95288841-8654-4bf7-8fc9-a4aa78dce87f/41020062-45b9-41cd-a357-fa23a389f390.jpg
" width="600" /> </a></p>
<p>
<a href=" https://hosting.photobucket.com/95288841-8654-4bf7-8fc9-a4aa78dce87f/0c07cc55-596d-494d-972b-cd6a0dd6b8b7.jpg
" target="_blank"> <img alt="Click for enlarged picture" src="
https://hosting.photobucket.com/95288841-8654-4bf7-8fc9-a4aa78dce87f/0c07cc55-596d-494d-972b-cd6a0dd6b8b7.jpg" width="600" /> </a></p>
<p>
<a href=" https://hosting.photobucket.com/95288841-8654-4bf7-8fc9-a4aa78dce87f/c17dd356-08b1-48e1-b895-6296aed7f818.jpg
" target="_blank"> <img alt="Click for enlarged picture" src="
https://hosting.photobucket.com/95288841-8654-4bf7-8fc9-a4aa78dce87f/c17dd356-08b1-48e1-b895-6296aed7f818.jpg" width="600" /> </a></p>
<p>
On Wednesday 04.03.2026. the annual <strong>session of the Assembly</strong> was held, where we determined the guidelines for work in 2026.</p>
<p>
,</p>
<p>
<a href=" https://hosting.photobucket.com/95288841-8654-4bf7-8fc9-a4aa78dce87f/59484bd0-7edc-4aed-a04e-ae42900ba3e6.jpg
" target="_blank"> <img alt="Click for enlarged picture" src="
https://hosting.photobucket.com/95288841-8654-4bf7-8fc9-a4aa78dce87f/59484bd0-7edc-4aed-a04e-ae42900ba3e6.jpg
" width="600" /> </a></p>
<p>
On Sunday 08.03.2026. The exhibition was over, our exhibits safely stored, and the Gallery cleaned.</p>
<p>
<a href=" https://hosting.photobucket.com/95288841-8654-4bf7-8fc9-a4aa78dce87f/98af4280-0956-4cdb-b4a9-da40e3a5a44a.jpg
" target="_blank"> <img alt="Click for enlarged picture" src="
https://hosting.photobucket.com/95288841-8654-4bf7-8fc9-a4aa78dce87f/98af4280-0956-4cdb-b4a9-da40e3a5a44a.jpg" width="600" /> </a></p>
<p>
<a href=" https://hosting.photobucket.com/95288841-8654-4bf7-8fc9-a4aa78dce87f/3259b35e-1fc2-4a99-a3c5-c7984958d72b.jpg
" target="_blank"> <img alt="Click for enlarged picture" src="
https://hosting.photobucket.com/95288841-8654-4bf7-8fc9-a4aa78dce87f/3259b35e-1fc2-4a99-a3c5-c7984958d72b.jpg" width="600" /> </a></p>
<p>
The most important part of every year when holding this Exhibition is the social aspect, the socializing of our members both among themselves and with our international friends who visit us! With these few photos from our joint gatherings, we greet you until next year!</p>
<p>
<a href=" https://hosting.photobucket.com/95288841-8654-4bf7-8fc9-a4aa78dce87f/b9168e23-79b2-4d81-8a7d-7534062881a7.jpg
" target="_blank"> <img alt="Click for enlarged picture" src="
https://hosting.photobucket.com/95288841-8654-4bf7-8fc9-a4aa78dce87f/b9168e23-79b2-4d81-8a7d-7534062881a7.jpg " width="600" /> </a></p>
<p>
<a href=" https://hosting.photobucket.com/95288841-8654-4bf7-8fc9-a4aa78dce87f/edff925e-916c-4d78-953e-210abf3753d4.jpg
" target="_blank"> <img alt="Click for enlarged picture" src="
https://hosting.photobucket.com/95288841-8654-4bf7-8fc9-a4aa78dce87f/edff925e-916c-4d78-953e-210abf3753d4.jpg " width="600" /> </a></p>
<p>
<a href=" https://hosting.photobucket.com/95288841-8654-4bf7-8fc9-a4aa78dce87f/8bcb48fa-466b-43f8-8a4b-f15f6794b21e.jpg
" target="_blank"> <img alt="Click for enlarged picture" src="
https://hosting.photobucket.com/95288841-8654-4bf7-8fc9-a4aa78dce87f/8bcb48fa-466b-43f8-8a4b-f15f6794b21e.jpg" width="600" /> </a></p>
",
"content_hrv" => "<p>
<a href=" https://hosting.photobucket.com/95288841-8654-4bf7-8fc9-a4aa78dce87f/dc756f84-867d-4df4-acd8-5d43775cafc2.jpg
" target="_blank"> <img alt="Click for enlarged picture" src="
https://hosting.photobucket.com/95288841-8654-4bf7-8fc9-a4aa78dce87f/dc756f84-867d-4df4-acd8-5d43775cafc2.jpg" width="600" /> </a></p>
<p>
<strong>Izložba minijatura i maketa "Agram 2026"</strong> održala se ove godine od 19.2. do 08.03. Postavljanje izložbe je održano u srijedu 18.2. i sudjelovao je velik broj članova kao i prijatelja Udruge koji su izlagali svoje radove.</p>
<p>
<a href=" https://hosting.photobucket.com/95288841-8654-4bf7-8fc9-a4aa78dce87f/8529d6d4-76ea-4872-a9e6-748e04223a4e.jpg
" target="_blank"> <img alt="Click for enlarged picture" src="
https://hosting.photobucket.com/95288841-8654-4bf7-8fc9-a4aa78dce87f/8529d6d4-76ea-4872-a9e6-748e04223a4e.jpg
" width="600" /> </a></p>
<p>
<a href=" https://hosting.photobucket.com/95288841-8654-4bf7-8fc9-a4aa78dce87f/f3038937-f001-4ceb-b725-a330fcd64cee.jpg
" target="_blank"> <img alt="Click for enlarged picture" src="
https://hosting.photobucket.com/95288841-8654-4bf7-8fc9-a4aa78dce87f/f3038937-f001-4ceb-b725-a330fcd64cee.jpg
" width="600" /> </a></p>
<p>
<a href=" https://hosting.photobucket.com/95288841-8654-4bf7-8fc9-a4aa78dce87f/3575379e-e068-49e2-9d4d-c9a49531fdc2.jpg
" target="_blank"> <img alt="Click for enlarged picture" src="
https://hosting.photobucket.com/95288841-8654-4bf7-8fc9-a4aa78dce87f/3575379e-e068-49e2-9d4d-c9a49531fdc2.jpg" width="600" /> </a></p>
<p>
<a href=" https://hosting.photobucket.com/95288841-8654-4bf7-8fc9-a4aa78dce87f/e51713c7-2add-4f8f-ae37-e6eba25badff.jpg
" target="_blank"> <img alt="Click for enlarged picture" src="
https://hosting.photobucket.com/95288841-8654-4bf7-8fc9-a4aa78dce87f/e51713c7-2add-4f8f-ae37-e6eba25badff.jpg" width="600" /> </a></p>
<p>
<a href=" https://hosting.photobucket.com/95288841-8654-4bf7-8fc9-a4aa78dce87f/9c0bb546-50a8-483d-aeab-ab3b2ce9f094.jpg
" target="_blank"> <img alt="Click for enlarged picture" src="
https://hosting.photobucket.com/95288841-8654-4bf7-8fc9-a4aa78dce87f/9c0bb546-50a8-483d-aeab-ab3b2ce9f094.jpg" width="600" /> </a></p>
<p>
Otvorenje Izložbe održalo se u četvrtak, 19.2.2026. s početkom u 18:00h. Izložba je organizirana povodom našeg dvadeset trećeg rođendana.</p>
<p>
<a href=" https://hosting.photobucket.com/95288841-8654-4bf7-8fc9-a4aa78dce87f/71c7bfc2-1ffc-43b9-9d5a-53e009f6b86d.jpg
" target="_blank"> <img alt="Click for enlarged picture" src="
https://hosting.photobucket.com/95288841-8654-4bf7-8fc9-a4aa78dce87f/71c7bfc2-1ffc-43b9-9d5a-53e009f6b86d.jpg" width="600" /> </a></p>
<p>
<a href=" https://hosting.photobucket.com/95288841-8654-4bf7-8fc9-a4aa78dce87f/007b4701-1d7c-4a67-a599-0539a2aa3191.jpg
" target="_blank"> <img alt="Click for enlarged picture" src="
https://hosting.photobucket.com/95288841-8654-4bf7-8fc9-a4aa78dce87f/007b4701-1d7c-4a67-a599-0539a2aa3191.jpg" width="600" /> </a></p>
<p>
<a href=" https://hosting.photobucket.com/95288841-8654-4bf7-8fc9-a4aa78dce87f/2c8090e2-8b95-4368-bb48-98876d680e15.jpg
" target="_blank"> <img alt="Click for enlarged picture" src="
https://hosting.photobucket.com/95288841-8654-4bf7-8fc9-a4aa78dce87f/2c8090e2-8b95-4368-bb48-98876d680e15.jpg" width="600" /> </a></p>
<p>
<a href=" https://hosting.photobucket.com/95288841-8654-4bf7-8fc9-a4aa78dce87f/375768ad-a8bb-49bf-9845-e46c896ba7ec.jpg
" target="_blank"> <img alt="Click for enlarged picture" src="
https://hosting.photobucket.com/95288841-8654-4bf7-8fc9-a4aa78dce87f/375768ad-a8bb-49bf-9845-e46c896ba7ec.jpg" width="600" /> </a></p>
<p>
<a href=" https://hosting.photobucket.com/95288841-8654-4bf7-8fc9-a4aa78dce87f/a93de974-4ccb-4876-85b0-4d066ae402b3.jpg
" target="_blank"> <img alt="Click for enlarged picture" src="
https://hosting.photobucket.com/95288841-8654-4bf7-8fc9-a4aa78dce87f/a93de974-4ccb-4876-85b0-4d066ae402b3.jpg" width="600" /> </a></p>
<p>
<a href=" https://hosting.photobucket.com/95288841-8654-4bf7-8fc9-a4aa78dce87f/d323ccc9-1b9a-4cb2-8adf-7019b0e217f4.jpg
" target="_blank"> <img alt="Click for enlarged picture" src="
https://hosting.photobucket.com/95288841-8654-4bf7-8fc9-a4aa78dce87f/d323ccc9-1b9a-4cb2-8adf-7019b0e217f4.jpg" width="600" /> </a></p>
<p>
<a href=" https://hosting.photobucket.com/95288841-8654-4bf7-8fc9-a4aa78dce87f/a5a66447-2d76-47ae-866d-4d512ef469a5.jpg
" target="_blank"> <img alt="Click for enlarged picture" src="
https://hosting.photobucket.com/95288841-8654-4bf7-8fc9-a4aa78dce87f/a5a66447-2d76-47ae-866d-4d512ef469a5.jpg" width="600" /> </a></p>
<p>
<a href=" https://hosting.photobucket.com/95288841-8654-4bf7-8fc9-a4aa78dce87f/3e7bcfc9-ba02-4f94-a6c3-79dfaea3639e.jpg
" target="_blank"> <img alt="Click for enlarged picture" src="
https://hosting.photobucket.com/95288841-8654-4bf7-8fc9-a4aa78dce87f/3e7bcfc9-ba02-4f94-a6c3-79dfaea3639e.jpg" width="600" /> </a></p>
<p>
<a href=" https://hosting.photobucket.com/95288841-8654-4bf7-8fc9-a4aa78dce87f/24e79466-4a9e-4b10-970c-caad235d260d.jpg
" target="_blank"> <img alt="Click for enlarged picture" src="
https://hosting.photobucket.com/95288841-8654-4bf7-8fc9-a4aa78dce87f/24e79466-4a9e-4b10-970c-caad235d260d.jpg" width="600" /> </a></p>
<p>
Kao i uvijek, Izložba je prikazivala presjek rada Udruge, njenih članova, polaznika njenih tečajeva i radionica te članova FB grupe Miniature Painters Croatia. U velikom broju vitrina našle su se brojne minijature za stolne strateške igre, igre na tabli, a cijela jedna vitrina posvećena je nagrađenim izlošcima sa prethodnih minijaturističkih natjecanja. Nekoliko vitrina bilo je posvećeno projektima koje Udruga već 23 godinu provodi poput Knjižnice i čitaonice UMS „Agram“, Radionice za izradu prostornih maketa i Radionice bojanja minijatura, ali i novih poput Agram Group Build, Agram Lego Sekcije i Back to Basics radionica bojanja za najmlađe.</p>
<p>
<a href=" https://hosting.photobucket.com/95288841-8654-4bf7-8fc9-a4aa78dce87f/fca84936-af71-44d3-9a4c-faeb26163899.jpg
" target="_blank"> <img alt="Click for enlarged picture" src="
https://hosting.photobucket.com/95288841-8654-4bf7-8fc9-a4aa78dce87f/fca84936-af71-44d3-9a4c-faeb26163899.jpg" width="600" /> </a></p>
<p>
<a href=" https://hosting.photobucket.com/95288841-8654-4bf7-8fc9-a4aa78dce87f/459bc5ac-8702-46f9-93b4-547deaabdef4.jpg
" target="_blank"> <img alt="Click for enlarged picture" src="
https://hosting.photobucket.com/95288841-8654-4bf7-8fc9-a4aa78dce87f/459bc5ac-8702-46f9-93b4-547deaabdef4.jpg" width="600" /> </a></p>
<p>
<a href=" https://hosting.photobucket.com/95288841-8654-4bf7-8fc9-a4aa78dce87f/91a04363-b2ef-4635-a046-7edf25ce7808.jpg
" target="_blank"> <img alt="Click for enlarged picture" src="
https://hosting.photobucket.com/95288841-8654-4bf7-8fc9-a4aa78dce87f/91a04363-b2ef-4635-a046-7edf25ce7808.jpg" width="600" /> </a></p>
<p>
<a href=" https://hosting.photobucket.com/95288841-8654-4bf7-8fc9-a4aa78dce87f/73256af5-fd5d-40b5-95e1-120e49c9be87.jpg
" target="_blank"> <img alt="Click for enlarged picture" src="
https://hosting.photobucket.com/95288841-8654-4bf7-8fc9-a4aa78dce87f/73256af5-fd5d-40b5-95e1-120e49c9be87.jpg" width="600" /> </a></p>
<p>
<a href=" https://hosting.photobucket.com/95288841-8654-4bf7-8fc9-a4aa78dce87f/979f9be5-23f3-4df9-91dc-ab71d6a10d64.jpg
" target="_blank"> <img alt="Click for enlarged picture" src="
https://hosting.photobucket.com/95288841-8654-4bf7-8fc9-a4aa78dce87f/979f9be5-23f3-4df9-91dc-ab71d6a10d64.jpg" width="600" /> </a></p>
<p>
<a href=" https://hosting.photobucket.com/95288841-8654-4bf7-8fc9-a4aa78dce87f/d0ff4379-183a-47b9-a740-9ddc283ebc29.jpg
" target="_blank"> <img alt="Click for enlarged picture" src="
https://hosting.photobucket.com/95288841-8654-4bf7-8fc9-a4aa78dce87f/d0ff4379-183a-47b9-a740-9ddc283ebc29.jpg" width="600" /> </a></p>
<p>
<a href=" https://hosting.photobucket.com/95288841-8654-4bf7-8fc9-a4aa78dce87f/4333e95e-bbbd-4f47-aaea-38a9c99e54d8.jpg
" target="_blank"> <img alt="Click for enlarged picture" src="
https://hosting.photobucket.com/95288841-8654-4bf7-8fc9-a4aa78dce87f/4333e95e-bbbd-4f47-aaea-38a9c99e54d8.jpg" width="600" /> </a></p>
<p>
<a href=" https://hosting.photobucket.com/95288841-8654-4bf7-8fc9-a4aa78dce87f/1372f8a2-b222-48ee-ae45-a90b5a354ef7.jpg
" target="_blank"> <img alt="Click for enlarged picture" src="
https://hosting.photobucket.com/95288841-8654-4bf7-8fc9-a4aa78dce87f/1372f8a2-b222-48ee-ae45-a90b5a354ef7.jpg" width="600" /> </a></p>
<p>
<a href=" https://hosting.photobucket.com/95288841-8654-4bf7-8fc9-a4aa78dce87f/6a1b4fd1-d982-4b06-9c5f-3cd40d6bf10a.jpg
" target="_blank"> <img alt="Click for enlarged picture" src="
https://hosting.photobucket.com/95288841-8654-4bf7-8fc9-a4aa78dce87f/6a1b4fd1-d982-4b06-9c5f-3cd40d6bf10a.jpg" width="600" /> </a></p>
<p>
<a href=" https://hosting.photobucket.com/95288841-8654-4bf7-8fc9-a4aa78dce87f/c2ec45e1-e0f3-463a-b254-cb2a38b53e14.jpg
" target="_blank"> <img alt="Click for enlarged picture" src="
https://hosting.photobucket.com/95288841-8654-4bf7-8fc9-a4aa78dce87f/c2ec45e1-e0f3-463a-b254-cb2a38b53e14.jpg" width="600" /> </a></p>
<p>
<a href=" https://hosting.photobucket.com/95288841-8654-4bf7-8fc9-a4aa78dce87f/17553b9a-0592-4f6a-a097-3f1a97e161f3.jpg
" target="_blank"> <img alt="Click for enlarged picture" src="
https://hosting.photobucket.com/95288841-8654-4bf7-8fc9-a4aa78dce87f/17553b9a-0592-4f6a-a097-3f1a97e161f3.jpg" width="600" /> </a></p>
<p>
<a href=" https://hosting.photobucket.com/95288841-8654-4bf7-8fc9-a4aa78dce87f/8658bd6b-dff2-4d24-8473-928d44d44480.jpg
" target="_blank"> <img alt="Click for enlarged picture" src="
https://hosting.photobucket.com/95288841-8654-4bf7-8fc9-a4aa78dce87f/8658bd6b-dff2-4d24-8473-928d44d44480.jpg" width="600" /> </a></p>
<p>
<a href=" https://hosting.photobucket.com/95288841-8654-4bf7-8fc9-a4aa78dce87f/ecab0ea7-f75b-4e31-a520-d088ad39fa17.jpg
" target="_blank"> <img alt="Click for enlarged picture" src="
https://hosting.photobucket.com/95288841-8654-4bf7-8fc9-a4aa78dce87f/ecab0ea7-f75b-4e31-a520-d088ad39fa17.jpg" width="600" /> </a></p>
<p>
<a href=" https://hosting.photobucket.com/95288841-8654-4bf7-8fc9-a4aa78dce87f/9495a2f5-8a82-41f2-abf4-9ade3db41d87.jpg
" target="_blank"> <img alt="Click for enlarged picture" src="
https://hosting.photobucket.com/95288841-8654-4bf7-8fc9-a4aa78dce87f/9495a2f5-8a82-41f2-abf4-9ade3db41d87.jpg" width="600" /> </a></p>
<p>
<a href=" https://hosting.photobucket.com/95288841-8654-4bf7-8fc9-a4aa78dce87f/362cc6fd-a5dd-474b-9b9f-aeab27d6dcfa.jpg
" target="_blank"> <img alt="Click for enlarged picture" src="
https://hosting.photobucket.com/95288841-8654-4bf7-8fc9-a4aa78dce87f/362cc6fd-a5dd-474b-9b9f-aeab27d6dcfa.jpg" width="600" /> </a></p>
<p>
Posebna čast nam je bila ugostiti našeg gosta izlagača, Ninoslava Luka minijaturista iz Poreča koji nam se predstavio svojom kolekcijom povijesnih diorama.</p>
<p>
<a href=" https://hosting.photobucket.com/95288841-8654-4bf7-8fc9-a4aa78dce87f/ba1353de-e2bd-4340-9121-9056e287ed4a.jpg
" target="_blank"> <img alt="Click for enlarged picture" src="
https://hosting.photobucket.com/95288841-8654-4bf7-8fc9-a4aa78dce87f/ba1353de-e2bd-4340-9121-9056e287ed4a.jpg" width="600" /> </a></p>
<p>
<a href=" https://hosting.photobucket.com/95288841-8654-4bf7-8fc9-a4aa78dce87f/cea18506-1b50-4e5b-955c-0b9ca02d7826.jpg
" target="_blank"> <img alt="Click for enlarged picture" src="
https://hosting.photobucket.com/95288841-8654-4bf7-8fc9-a4aa78dce87f/cea18506-1b50-4e5b-955c-0b9ca02d7826.jpg" width="600" /> </a></p>
<p>
<a href=" https://hosting.photobucket.com/95288841-8654-4bf7-8fc9-a4aa78dce87f/1be85b41-e3b6-4536-b141-cd0da6eb38c1.jpg
" target="_blank"> <img alt="Click for enlarged picture" src="
https://hosting.photobucket.com/95288841-8654-4bf7-8fc9-a4aa78dce87f/1be85b41-e3b6-4536-b141-cd0da6eb38c1.jpg" width="600" /> </a></p>
<p>
<a href=" https://hosting.photobucket.com/95288841-8654-4bf7-8fc9-a4aa78dce87f/9e93b87d-ff3c-4b7b-8f06-5f9d3464a134.jpg
" target="_blank"> <img alt="Click for enlarged picture" src="
https://hosting.photobucket.com/95288841-8654-4bf7-8fc9-a4aa78dce87f/9e93b87d-ff3c-4b7b-8f06-5f9d3464a134.jpg" width="600" /> </a></p>
<p>
Tijekom prvog vikenda Izložbe, 21.-22.02.,održali smo 20. godišnje međunarodno natjecanje u bojanju minijatura <strong>Black Queen Hobby and Miniature Painting Competition</strong>!</p>
<p>
<a href=" https://hosting.photobucket.com/95288841-8654-4bf7-8fc9-a4aa78dce87f/3056fb09-f66c-4dea-80a8-a4e72407429a.jpg
" target="_blank"> <img alt="Click for enlarged picture" src="
https://hosting.photobucket.com/95288841-8654-4bf7-8fc9-a4aa78dce87f/3056fb09-f66c-4dea-80a8-a4e72407429a.jpg" width="600" /> </a></p>
<p>
Kako su natjecatelji pristizali i prijavljivali se na natjecanje, naše vrijedno osoblje je fotografiralo sve izloške prije nego li su ih rasporedili po kategorijama i pažljivo ih postavili u staklene vitrine. Niti jutarnja okrijepa nije usfalila zahvaljujući našim revnim volonterima.</p>
<p>
<a href=" https://hosting.photobucket.com/95288841-8654-4bf7-8fc9-a4aa78dce87f/1118089c-2b46-4a2c-b17d-dc92b66d1ffc.jpg
" target="_blank"> <img alt="Click for enlarged picture" src="
https://hosting.photobucket.com/95288841-8654-4bf7-8fc9-a4aa78dce87f/1118089c-2b46-4a2c-b17d-dc92b66d1ffc.jpg" width="600" /> </a></p>
<p>
<a href=" https://hosting.photobucket.com/95288841-8654-4bf7-8fc9-a4aa78dce87f/9fd3c272-9a69-4532-a09d-36497a20a820.jpg
" target="_blank"> <img alt="Click for enlarged picture" src="
https://hosting.photobucket.com/95288841-8654-4bf7-8fc9-a4aa78dce87f/9fd3c272-9a69-4532-a09d-36497a20a820.jpg" width="600" /> </a></p>
<p>
<a href=" https://hosting.photobucket.com/95288841-8654-4bf7-8fc9-a4aa78dce87f/86995e80-c502-45fb-80f5-c8fda27da3f9.jpg
" target="_blank"> <img alt="Click for enlarged picture" src="
https://hosting.photobucket.com/95288841-8654-4bf7-8fc9-a4aa78dce87f/86995e80-c502-45fb-80f5-c8fda27da3f9.jpg" width="600" /> </a></p>
<p>
U podne, sve vitrine su bile pune i natjecanje je moglo službeno početi.</p>
<p>
<a href=" https://hosting.photobucket.com/95288841-8654-4bf7-8fc9-a4aa78dce87f/bce59a4f-c3e3-4708-a3d6-25e81a894c24.jpg
" target="_blank"> <img alt="Click for enlarged picture" src="
https://hosting.photobucket.com/95288841-8654-4bf7-8fc9-a4aa78dce87f/bce59a4f-c3e3-4708-a3d6-25e81a894c24.jpg" width="600" /> </a></p>
<p>
<a href=" https://hosting.photobucket.com/95288841-8654-4bf7-8fc9-a4aa78dce87f/16a0a094-01aa-4e52-82cf-fdab00d74711.jpg
" target="_blank"> <img alt="Click for enlarged picture" src="
https://hosting.photobucket.com/95288841-8654-4bf7-8fc9-a4aa78dce87f/16a0a094-01aa-4e52-82cf-fdab00d74711.jpg" width="600" /> </a></p>
<p>
<a href=" https://hosting.photobucket.com/95288841-8654-4bf7-8fc9-a4aa78dce87f/0d3f4042-ff77-48d0-b332-add0fd08f7c3.jpg
" target="_blank"> <img alt="Click for enlarged picture" src="
https://hosting.photobucket.com/95288841-8654-4bf7-8fc9-a4aa78dce87f/0d3f4042-ff77-48d0-b332-add0fd08f7c3.jpg" width="600" /> </a></p>
<p>
<a href=" https://hosting.photobucket.com/95288841-8654-4bf7-8fc9-a4aa78dce87f/3711baf8-93f2-434a-aea9-a95288ca04dd.jpg
" target="_blank"> <img alt="Click for enlarged picture" src="
https://hosting.photobucket.com/95288841-8654-4bf7-8fc9-a4aa78dce87f/3711baf8-93f2-434a-aea9-a95288ca04dd.jpg" width="600" /> </a></p>
<p>
<a href=" https://hosting.photobucket.com/95288841-8654-4bf7-8fc9-a4aa78dce87f/53113b97-ec06-4409-95ba-95a5ad3f9720.jpg
" target="_blank"> <img alt="Click for enlarged picture" src="
https://hosting.photobucket.com/95288841-8654-4bf7-8fc9-a4aa78dce87f/53113b97-ec06-4409-95ba-95a5ad3f9720.jpg" width="600" /> </a></p>
<p>
<a href=" https://hosting.photobucket.com/95288841-8654-4bf7-8fc9-a4aa78dce87f/ab127858-193d-4976-bdb2-e27302722fca.jpg
" target="_blank"> <img alt="Click for enlarged picture" src="
https://hosting.photobucket.com/95288841-8654-4bf7-8fc9-a4aa78dce87f/ab127858-193d-4976-bdb2-e27302722fca.jpg" width="600" /> </a></p>
<p>
<a href=" https://hosting.photobucket.com/95288841-8654-4bf7-8fc9-a4aa78dce87f/3735af11-3fb6-4772-a8ff-5e0ff6ddf03a.jpg
" target="_blank"> <img alt="Click for enlarged picture" src="
https://hosting.photobucket.com/95288841-8654-4bf7-8fc9-a4aa78dce87f/3735af11-3fb6-4772-a8ff-5e0ff6ddf03a.jpg" width="600" /> </a></p>
<p>
<strong>Back To Basics radionice za najmlađe na Black Queen</strong></p>
<p>
Ove godine smo tijekom cijelog vikenda organizirali radionice bojanja minijatura za najmlađe koji su mogli po prvi puta obojati neku od naših vlastitih minijatura osmišljenih upravo za ovaj program!</p>
<p>
<a href=" https://hosting.photobucket.com/95288841-8654-4bf7-8fc9-a4aa78dce87f/6999be0c-8cc6-4947-a423-9427a2299724.jpg
" target="_blank"> <img alt="Click for enlarged picture" src="
https://hosting.photobucket.com/95288841-8654-4bf7-8fc9-a4aa78dce87f/6999be0c-8cc6-4947-a423-9427a2299724.jpg" width="600" /> </a></p>
<p>
<a href="https://hosting.photobucket.com/95288841-8654-4bf7-8fc9-a4aa78dce87f/835b05a5-f171-49df-afa6-da0692b89074.jpg" target="_blank"><img alt="Click for enlarged picture" src="https://hosting.photobucket.com/95288841-8654-4bf7-8fc9-a4aa78dce87f/835b05a5-f171-49df-afa6-da0692b89074.jpg" width="600" /></a></p>
<p>
<a href=" https://hosting.photobucket.com/95288841-8654-4bf7-8fc9-a4aa78dce87f/ef5dde13-84ee-4ea0-b9f3-28aaf703ef6d.jpg
" target="_blank"> <img alt="Click for enlarged picture" src="
https://hosting.photobucket.com/95288841-8654-4bf7-8fc9-a4aa78dce87f/ef5dde13-84ee-4ea0-b9f3-28aaf703ef6d.jpg" width="600" /> </a></p>
<p>
<strong>PRODAJNI KUTAK</strong></p>
<p>
Tijekom vikenda ugostili smo naše sponzore sa njihovim prodajnim štandovima: Swood.si i Carta Magica.</p>
<p>
<a href=" https://hosting.photobucket.com/95288841-8654-4bf7-8fc9-a4aa78dce87f/5ee9a49f-a387-435a-9110-572402b7191d.jpg
" target="_blank"> <img alt="Click for enlarged picture" src="
https://hosting.photobucket.com/95288841-8654-4bf7-8fc9-a4aa78dce87f/5ee9a49f-a387-435a-9110-572402b7191d.jpg" width="600" /> </a></p>
<p>
<a href=" https://hosting.photobucket.com/95288841-8654-4bf7-8fc9-a4aa78dce87f/47cf600f-b1eb-4655-bf06-305f6f21d5d2.jpg
" target="_blank"> <img alt="Click for enlarged picture" src="
https://hosting.photobucket.com/95288841-8654-4bf7-8fc9-a4aa78dce87f/47cf600f-b1eb-4655-bf06-305f6f21d5d2.jpg" width="600" /> </a></p>
<p>
<strong>OGLEDNE RADIONICE BOJANJA MINIJATURA</strong></p>
<p>
Prostor ZZTK omogućuje održavanje radionica tijekom vikenda u kino dvorani u podrumu, stoga smo tijekom vikenda organizirali i ogledne radionice. Rad predavača snimao se kamerom i projicirao na projekcijsko platno u dvorani. Veliko hvala našim domaćim i inozemnim predavačima: Anžetu Zorku (SLO), doc.dr.sc. Wintonu Afriću (HR), Ivanu Knezoviću (UMS Agram) i Petru Knezoviću (HR).</p>
<p>
<a href=" https://hosting.photobucket.com/95288841-8654-4bf7-8fc9-a4aa78dce87f/e8d835be-ec99-49d7-bc9b-086e38573d1a.jpg
" target="_blank"> <img alt="Click for enlarged picture" src="
https://hosting.photobucket.com/95288841-8654-4bf7-8fc9-a4aa78dce87f/e8d835be-ec99-49d7-bc9b-086e38573d1a.jpg" width="600" /> </a></p>
<p>
<a href=" https://hosting.photobucket.com/95288841-8654-4bf7-8fc9-a4aa78dce87f/f3eba4c1-4637-4da9-8360-75f430355af4.jpg" target="_blank"> <img alt="Click for enlarged picture" src="
https://hosting.photobucket.com/95288841-8654-4bf7-8fc9-a4aa78dce87f/f3eba4c1-4637-4da9-8360-75f430355af4.jpg" width="600" /> </a></p>
<p>
<a href=" https://hosting.photobucket.com/95288841-8654-4bf7-8fc9-a4aa78dce87f/ef523854-4030-4579-aa38-403afda86c91.jpg
" target="_blank"> <img alt="Click for enlarged picture" src="
https://hosting.photobucket.com/95288841-8654-4bf7-8fc9-a4aa78dce87f/ef523854-4030-4579-aa38-403afda86c91.jpg" width="600" /> </a></p>
<p>
<a href=" https://hosting.photobucket.com/95288841-8654-4bf7-8fc9-a4aa78dce87f/dd0943c2-f4a8-40c3-b641-f6dcdd200380.jpg
" target="_blank"> <img alt="Click for enlarged picture" src="
https://hosting.photobucket.com/95288841-8654-4bf7-8fc9-a4aa78dce87f/dd0943c2-f4a8-40c3-b641-f6dcdd200380.jpg" width="600" /> </a></p>
<p>
<a href=" https://hosting.photobucket.com/95288841-8654-4bf7-8fc9-a4aa78dce87f/08b1626a-f6c7-43c9-b718-3e9a41b55ca6.jpg
" target="_blank"> <img alt="Click for enlarged picture" src="
https://hosting.photobucket.com/95288841-8654-4bf7-8fc9-a4aa78dce87f/08b1626a-f6c7-43c9-b718-3e9a41b55ca6.jpg" width="600" /> </a></p>
<p>
<a href=" https://hosting.photobucket.com/95288841-8654-4bf7-8fc9-a4aa78dce87f/91aca7f3-1af6-486d-b174-65079a63a1ea.jpg
" target="_blank"> <img alt="Click for enlarged picture" src="
https://hosting.photobucket.com/95288841-8654-4bf7-8fc9-a4aa78dce87f/91aca7f3-1af6-486d-b174-65079a63a1ea.jpg" width="600" /> </a></p>
<p>
<a href=" https://hosting.photobucket.com/95288841-8654-4bf7-8fc9-a4aa78dce87f/3821f2fb-fbe7-4096-adbc-7d8c981a3b56.jpg
" target="_blank"> <img alt="Click for enlarged picture" src="
https://hosting.photobucket.com/95288841-8654-4bf7-8fc9-a4aa78dce87f/3821f2fb-fbe7-4096-adbc-7d8c981a3b56.jpg" width="600" /> </a></p>
<p>
<a href=" https://hosting.photobucket.com/95288841-8654-4bf7-8fc9-a4aa78dce87f/2c7bb3c5-c0ec-4a96-b6bd-6a90ce5ce154.jpg
" target="_blank"> <img alt="Click for enlarged picture" src="
https://hosting.photobucket.com/95288841-8654-4bf7-8fc9-a4aa78dce87f/2c7bb3c5-c0ec-4a96-b6bd-6a90ce5ce154.jpg" width="600" /> </a></p>
<p>
<a href=" https://hosting.photobucket.com/95288841-8654-4bf7-8fc9-a4aa78dce87f/b646f4ee-21aa-4d12-8db3-6d33351d5aeb.jpg
" target="_blank"> <img alt="Click for enlarged picture" src="
https://hosting.photobucket.com/95288841-8654-4bf7-8fc9-a4aa78dce87f/b646f4ee-21aa-4d12-8db3-6d33351d5aeb.jpg" width="600" /> </a></p>
<p>
<a href=" https://hosting.photobucket.com/95288841-8654-4bf7-8fc9-a4aa78dce87f/fb5efc01-32cc-4119-90e3-188f51b30237.jpg
" target="_blank"> <img alt="Click for enlarged picture" src="
https://hosting.photobucket.com/95288841-8654-4bf7-8fc9-a4aa78dce87f/fb5efc01-32cc-4119-90e3-188f51b30237.jpg" width="600" /> </a></p>
<p>
<strong>NATJECANJE U BRZOM BOJANJU MINIJATURA</strong></p>
<p>
U nedjelju, 22.2. smo organizirali natjecanje u brzom bojanju minijatura. Po prvi puta smo koristili minijature koje su naš dizajn. Sudionici su imali 60 minuta vremena da obojaju og čarobnjaka.</p>
<p>
<a href=" https://hosting.photobucket.com/95288841-8654-4bf7-8fc9-a4aa78dce87f/106417a6-a047-4e0d-9f81-87858806052f.jpg
" target="_blank"> <img alt="Click for enlarged picture" src="
https://hosting.photobucket.com/95288841-8654-4bf7-8fc9-a4aa78dce87f/106417a6-a047-4e0d-9f81-87858806052f.jpg" width="600" /> </a></p>
<p>
<a href=" https://hosting.photobucket.com/95288841-8654-4bf7-8fc9-a4aa78dce87f/ac6853c7-6e34-4e07-a996-8d7d12744b67.jpg
" target="_blank"> <img alt="Click for enlarged picture" src="
https://hosting.photobucket.com/95288841-8654-4bf7-8fc9-a4aa78dce87f/ac6853c7-6e34-4e07-a996-8d7d12744b67.jpg" width="600" /> </a></p>
<p>
<a href=" https://hosting.photobucket.com/95288841-8654-4bf7-8fc9-a4aa78dce87f/ccb155fa-52c5-4a99-9515-f69a6836dce7.jpg
" target="_blank"> <img alt="Click for enlarged picture" src="
https://hosting.photobucket.com/95288841-8654-4bf7-8fc9-a4aa78dce87f/ccb155fa-52c5-4a99-9515-f69a6836dce7.jpg" width="600" /> </a></p>
<p>
<a href=" https://hosting.photobucket.com/95288841-8654-4bf7-8fc9-a4aa78dce87f/a29fedd0-97ea-45b1-85f9-7ea62188b2b2.jpg
" target="_blank"><img alt="Click for enlarged picture" src="
https://hosting.photobucket.com/95288841-8654-4bf7-8fc9-a4aa78dce87f/a29fedd0-97ea-45b1-85f9-7ea62188b2b2.jpg" width="600" /></a></p>
<p>
S time smo došli do samoga kraja ovog predivnog vikenda i sve što je preostalo je bila podjela nagrada i priznanja pobjednicima.</p>
<p>
<a href=" https://hosting.photobucket.com/95288841-8654-4bf7-8fc9-a4aa78dce87f/046ca4c8-0ae7-415e-abd3-e131d580c3ad.jpg
" target="_blank"> <img alt="Click for enlarged picture" src="
https://hosting.photobucket.com/95288841-8654-4bf7-8fc9-a4aa78dce87f/046ca4c8-0ae7-415e-abd3-e131d580c3ad.jpg" width="600" /> </a></p>
<p>
<a href=" https://hosting.photobucket.com/95288841-8654-4bf7-8fc9-a4aa78dce87f/cec0dcef-7acb-4a77-89de-271ed5410672.jpg
" target="_blank"> <img alt="Click for enlarged picture" src="
https://hosting.photobucket.com/95288841-8654-4bf7-8fc9-a4aa78dce87f/cec0dcef-7acb-4a77-89de-271ed5410672.jpg" width="600" /> </a></p>
<p>
<a href=" https://hosting.photobucket.com/95288841-8654-4bf7-8fc9-a4aa78dce87f/a495a5fc-31a2-4979-a970-0fa22c334354.jpg
" target="_blank"> <img alt="Click for enlarged picture" src="
https://hosting.photobucket.com/95288841-8654-4bf7-8fc9-a4aa78dce87f/a495a5fc-31a2-4979-a970-0fa22c334354.jpg" width="600" /> </a></p>
<p>
<strong>AGRAM ARENA – Leaving Asphodel Necropolis28 kampanja</strong></p>
<p>
Tijekom vikenda 21.-22.2. održali smo i novo međunarodno natjecanje Agram Arena! Ovoga puta na redu je bila stolna strateška igra Necropolis 28 za koju su naši članovi osmislili dvodnevnu kampanju. Svaki sudionik je izradio svoju bandu vojnika, a velika većina i svoje vlastite table.</p>
<p>
<a href=" https://hosting.photobucket.com/95288841-8654-4bf7-8fc9-a4aa78dce87f/ac69b182-4bfc-4575-a6d3-fb3c8baba342.jpg
" target="_blank"> <img alt="Click for enlarged picture" src="
https://hosting.photobucket.com/95288841-8654-4bf7-8fc9-a4aa78dce87f/ac69b182-4bfc-4575-a6d3-fb3c8baba342.jpg" width="600" /> </a></p>
<p>
<a href=" https://hosting.photobucket.com/95288841-8654-4bf7-8fc9-a4aa78dce87f/289fed7b-e058-42d8-ba2d-cbd0463e98da.jpg
" target="_blank"> <img alt="Click for enlarged picture" src="
https://hosting.photobucket.com/95288841-8654-4bf7-8fc9-a4aa78dce87f/289fed7b-e058-42d8-ba2d-cbd0463e98da.jpg" width="600" /> </a></p>
<p>
<a href=" https://hosting.photobucket.com/95288841-8654-4bf7-8fc9-a4aa78dce87f/d92ebbee-859d-4441-8386-3d760b20b7a7.jpg
" target="_blank"> <img alt="Click for enlarged picture" src="
https://hosting.photobucket.com/95288841-8654-4bf7-8fc9-a4aa78dce87f/d92ebbee-859d-4441-8386-3d760b20b7a7.jpg" width="600" /> </a></p>
<p>
<a href=" https://hosting.photobucket.com/95288841-8654-4bf7-8fc9-a4aa78dce87f/09c59798-7871-425e-a075-3ca1cd91768a.jpg
" target="_blank"> <img alt="Click for enlarged picture" src="
https://hosting.photobucket.com/95288841-8654-4bf7-8fc9-a4aa78dce87f/09c59798-7871-425e-a075-3ca1cd91768a.jpg" width="600" /> </a></p>
<p>
<a href=" https://hosting.photobucket.com/95288841-8654-4bf7-8fc9-a4aa78dce87f/b2f3edc8-5a23-4552-9a2a-4027b286f327.jpg
" target="_blank"> <img alt="Click for enlarged picture" src="
https://hosting.photobucket.com/95288841-8654-4bf7-8fc9-a4aa78dce87f/b2f3edc8-5a23-4552-9a2a-4027b286f327.jpg" width="600" /> </a></p>
<p>
<a href=" https://hosting.photobucket.com/95288841-8654-4bf7-8fc9-a4aa78dce87f/2a9f43ac-b531-4746-b7bb-ac5a3356aab0.jpg
" target="_blank"> <img alt="Click for enlarged picture" src="
https://hosting.photobucket.com/95288841-8654-4bf7-8fc9-a4aa78dce87f/2a9f43ac-b531-4746-b7bb-ac5a3356aab0.jpg" width="600" /> </a></p>
<p>
<strong>DOGAĐANJA RADNIM DANIMA ZA VRIJEME IZLOŽBE</strong></p>
<p>
Tijekom naredna dva tjedna, naši volonteri su radnim danima od 16:00 do 20:00, držali otvorene radionice bojanja minijatura. Postavljene su radne stanice za bojanje minijatura na kojoj su naši posjetitelji mogli bojati minijature koje smo priredili (ili svoje ukoliko su ih donijeli) koristeći naše materijale i alate.</p>
<p>
<a href=" https://hosting.photobucket.com/95288841-8654-4bf7-8fc9-a4aa78dce87f/6edf7765-42b5-417a-820f-fa5d907179a7.jpg
" target="_blank"> <img alt="Click for enlarged picture" src="
https://hosting.photobucket.com/95288841-8654-4bf7-8fc9-a4aa78dce87f/6edf7765-42b5-417a-820f-fa5d907179a7.jpg" width="600" /> </a></p>
<p>
<a href=" https://hosting.photobucket.com/95288841-8654-4bf7-8fc9-a4aa78dce87f/c084ebe2-f57b-4519-9b31-29bdc1155887.jpg
" target="_blank"> <img alt="Click for enlarged picture" src="
https://hosting.photobucket.com/95288841-8654-4bf7-8fc9-a4aa78dce87f/c084ebe2-f57b-4519-9b31-29bdc1155887.jpg" width="600" /> </a></p>
<p>
<a href=" https://hosting.photobucket.com/95288841-8654-4bf7-8fc9-a4aa78dce87f/37ff2272-f9b0-4b16-a363-1e6f6688c866.jpg
" target="_blank"> <img alt="Click for enlarged picture" src="
https://hosting.photobucket.com/95288841-8654-4bf7-8fc9-a4aa78dce87f/37ff2272-f9b0-4b16-a363-1e6f6688c866.jpg" width="600" /> </a></p>
<p>
<a href=" https://hosting.photobucket.com/95288841-8654-4bf7-8fc9-a4aa78dce87f/5f4f7968-ff50-4a01-98da-6ce8562930b4.jpg
" target="_blank"> <img alt="Click for enlarged picture" src="
https://hosting.photobucket.com/95288841-8654-4bf7-8fc9-a4aa78dce87f/5f4f7968-ff50-4a01-98da-6ce8562930b4.jpg" width="600" /> </a></p>
<p>
<a href=" https://hosting.photobucket.com/95288841-8654-4bf7-8fc9-a4aa78dce87f/cbb45319-d488-483c-bf9d-9af29852fc74.jpg
" target="_blank"> <img alt="Click for enlarged picture" src="
https://hosting.photobucket.com/95288841-8654-4bf7-8fc9-a4aa78dce87f/cbb45319-d488-483c-bf9d-9af29852fc74.jpg" width="600" /> </a></p>
<p>
<a href=" https://hosting.photobucket.com/95288841-8654-4bf7-8fc9-a4aa78dce87f/3dcca26c-d549-4af3-812a-a4a81b9a2310.jpg
" target="_blank"> <img alt="Click for enlarged picture" src="
https://hosting.photobucket.com/95288841-8654-4bf7-8fc9-a4aa78dce87f/3dcca26c-d549-4af3-812a-a4a81b9a2310.jpg" width="600" /> </a></p>
<p>
<a href=" https://hosting.photobucket.com/95288841-8654-4bf7-8fc9-a4aa78dce87f/4adf0fb6-3eab-4b40-b32d-d03eab4a9892.jpg
" target="_blank"> <img alt="Click for enlarged picture" src="
https://hosting.photobucket.com/95288841-8654-4bf7-8fc9-a4aa78dce87f/4adf0fb6-3eab-4b40-b32d-d03eab4a9892.jpg" width="600" /> </a></p>
<p>
<a href=" https://hosting.photobucket.com/95288841-8654-4bf7-8fc9-a4aa78dce87f/4732b58a-9a65-4d1c-a7d5-25513d34b108.jpg
" target="_blank"> <img alt="Click for enlarged picture" src="
https://hosting.photobucket.com/95288841-8654-4bf7-8fc9-a4aa78dce87f/4732b58a-9a65-4d1c-a7d5-25513d34b108.jpg" width="600" /> </a></p>
<p>
<a href=" https://hosting.photobucket.com/95288841-8654-4bf7-8fc9-a4aa78dce87f/274be330-31d5-4e25-95db-ec2f423a003c.jpg
" target="_blank"> <img alt="Click for enlarged picture" src="
https://hosting.photobucket.com/95288841-8654-4bf7-8fc9-a4aa78dce87f/274be330-31d5-4e25-95db-ec2f423a003c.jpg" width="600" /> </a></p>
<p>
<a href=" https://hosting.photobucket.com/95288841-8654-4bf7-8fc9-a4aa78dce87f/8e7b0a80-0f46-4d70-9789-a46976c713d2.jpg
" target="_blank"> <img alt="Click for enlarged picture" src="
https://hosting.photobucket.com/95288841-8654-4bf7-8fc9-a4aa78dce87f/8e7b0a80-0f46-4d70-9789-a46976c713d2.jpg" width="600" /> </a></p>
<p>
<a href=" https://hosting.photobucket.com/95288841-8654-4bf7-8fc9-a4aa78dce87f/8bbd4e96-b911-4f26-80fe-b1c57f29027b.jpg
" target="_blank"> <img alt="Click for enlarged picture" src="
https://hosting.photobucket.com/95288841-8654-4bf7-8fc9-a4aa78dce87f/8bbd4e96-b911-4f26-80fe-b1c57f29027b.jpg" width="600" /> </a></p>
<p>
<a href=" https://hosting.photobucket.com/95288841-8654-4bf7-8fc9-a4aa78dce87f/203a27be-8f10-459d-89b9-befb6b636b74.jpg
" target="_blank"> <img alt="Click for enlarged picture" src="
https://hosting.photobucket.com/95288841-8654-4bf7-8fc9-a4aa78dce87f/203a27be-8f10-459d-89b9-befb6b636b74.jpg" width="600" /> </a></p>
<p>
<a href=" https://hosting.photobucket.com/95288841-8654-4bf7-8fc9-a4aa78dce87f/5dc4358f-19d8-475f-a4af-9c29e9ed18d7.jpg
" target="_blank"> <img alt="Click for enlarged picture" src="
https://hosting.photobucket.com/95288841-8654-4bf7-8fc9-a4aa78dce87f/5dc4358f-19d8-475f-a4af-9c29e9ed18d7.jpg" width="600" /> </a></p>
<p>
<strong>BACK TO BASICS RADIONICE ZA NAJMLAĐE</strong></p>
<p>
Radnim danima od 17:00 do 18:00 održavali smo naše nove radionice za najmlađe u kojima su naši najmlađi polaznici bojali svoje prve minijature.</p>
<p>
<a href=" https://hosting.photobucket.com/95288841-8654-4bf7-8fc9-a4aa78dce87f/948af139-8fb5-4e28-a27c-404466e70d05.jpg
" target="_blank"> <img alt="Click for enlarged picture" src="
https://hosting.photobucket.com/95288841-8654-4bf7-8fc9-a4aa78dce87f/948af139-8fb5-4e28-a27c-404466e70d05.jpg" width="600" /> </a></p>
<p>
<a href=" https://hosting.photobucket.com/95288841-8654-4bf7-8fc9-a4aa78dce87f/bb3e20c2-bb21-4a3d-863a-74de08261467.jpg
" target="_blank"> <img alt="Click for enlarged picture" src="
https://hosting.photobucket.com/95288841-8654-4bf7-8fc9-a4aa78dce87f/bb3e20c2-bb21-4a3d-863a-74de08261467.jpg" width="600" /> </a></p>
<p>
<a href=" https://hosting.photobucket.com/95288841-8654-4bf7-8fc9-a4aa78dce87f/7316c760-98e3-4e3f-9261-d138aa7a5a6a.jpg
" target="_blank"> <img alt="Click for enlarged picture" src="
https://hosting.photobucket.com/95288841-8654-4bf7-8fc9-a4aa78dce87f/7316c760-98e3-4e3f-9261-d138aa7a5a6a.jpg" width="600" /> </a></p>
<p>
<a href=" https://hosting.photobucket.com/95288841-8654-4bf7-8fc9-a4aa78dce87f/68934b39-3d1f-4f43-b967-14b73c41a39e.jpg
" target="_blank"> <img alt="Click for enlarged picture" src="
https://hosting.photobucket.com/95288841-8654-4bf7-8fc9-a4aa78dce87f/68934b39-3d1f-4f43-b967-14b73c41a39e.jpg" width="600" /> </a></p>
<p>
<a href=" https://hosting.photobucket.com/95288841-8654-4bf7-8fc9-a4aa78dce87f/46125bce-a28d-494f-873a-3aeabdc1d6c2.jpg
" target="_blank"> <img alt="Click for enlarged picture" src="
https://hosting.photobucket.com/95288841-8654-4bf7-8fc9-a4aa78dce87f/46125bce-a28d-494f-873a-3aeabdc1d6c2.jpg" width="600" /> </a></p>
<p>
<a href=" https://hosting.photobucket.com/95288841-8654-4bf7-8fc9-a4aa78dce87f/3c58e0ad-77a9-44c8-b6bf-d9a55c514d43.jpg
" target="_blank"> <img alt="Click for enlarged picture" src="
https://hosting.photobucket.com/95288841-8654-4bf7-8fc9-a4aa78dce87f/3c58e0ad-77a9-44c8-b6bf-d9a55c514d43.jpg" width="600" /> </a></p>
<p>
<a href=" https://hosting.photobucket.com/95288841-8654-4bf7-8fc9-a4aa78dce87f/f891f0f0-051b-40ee-9676-cb03b0a9811b.jpg
" target="_blank"> <img alt="Click for enlarged picture" src="
https://hosting.photobucket.com/95288841-8654-4bf7-8fc9-a4aa78dce87f/f891f0f0-051b-40ee-9676-cb03b0a9811b.jpg" width="600" /> </a></p>
<p>
<strong>AGRAM LEGO SEKCIJA predavanje: FW-14b – Bolid F1 za budućnost</strong></p>
<p>
U srijedu 25.2.2026. u sklopu aktivnosti naše Agram Lego Sekcije, naš dežurni strojar Marko Paunović je održao predavanje na temu bolida Formule 1 iz 1992.. Ulaz na predavanje je bio besplatan, a po završetku su LEGO maketu bolida izradili članovi Lego sekcije</p>
<p>
<a href=" https://hosting.photobucket.com/95288841-8654-4bf7-8fc9-a4aa78dce87f/b2e14b1c-daa4-4314-8685-184377bc7e28.jpg
" target="_blank"> <img alt="Click for enlarged picture" src="
https://hosting.photobucket.com/95288841-8654-4bf7-8fc9-a4aa78dce87f/b2e14b1c-daa4-4314-8685-184377bc7e28.jpg" width="600" /> </a></p>
<p>
<a href=" https://hosting.photobucket.com/95288841-8654-4bf7-8fc9-a4aa78dce87f/31fb439a-77d3-4418-83ff-66c3af279cca.jpg" target="_blank"> <img alt="Click for enlarged picture" src="
https://hosting.photobucket.com/95288841-8654-4bf7-8fc9-a4aa78dce87f/31fb439a-77d3-4418-83ff-66c3af279cca.jpg" width="600" /> </a></p>
<p>
<a href=" https://hosting.photobucket.com/95288841-8654-4bf7-8fc9-a4aa78dce87f/bfcaf282-6be8-4b52-a3ed-c91137457876.jpg
" target="_blank"> <img alt="Click for enlarged picture" src="
https://hosting.photobucket.com/95288841-8654-4bf7-8fc9-a4aa78dce87f/bfcaf282-6be8-4b52-a3ed-c91137457876.jpg" width="600" /> </a></p>
<p>
<a href=" https://hosting.photobucket.com/95288841-8654-4bf7-8fc9-a4aa78dce87f/ce70fc61-9e1a-4169-aaad-8b67417656c0.jpg
" target="_blank"> <img alt="Click for enlarged picture" src="
https://hosting.photobucket.com/95288841-8654-4bf7-8fc9-a4aa78dce87f/ce70fc61-9e1a-4169-aaad-8b67417656c0.jpg" width="600" /> </a></p>
<p>
<a href=" https://hosting.photobucket.com/95288841-8654-4bf7-8fc9-a4aa78dce87f/94ca0e36-8710-458d-8194-9f71299f4d74.jpg
" target="_blank"> <img alt="Click for enlarged picture" src="
https://hosting.photobucket.com/95288841-8654-4bf7-8fc9-a4aa78dce87f/94ca0e36-8710-458d-8194-9f71299f4d74.jpg" width="600" /> </a></p>
<p>
<a href=" https://hosting.photobucket.com/95288841-8654-4bf7-8fc9-a4aa78dce87f/c6771f72-7191-4ca3-a792-3bb1ab3897b1.jpg
" target="_blank"> <img alt="Click for enlarged picture" src="
https://hosting.photobucket.com/95288841-8654-4bf7-8fc9-a4aa78dce87f/c6771f72-7191-4ca3-a792-3bb1ab3897b1.jpg" width="600" /> </a></p>
<p>
<a href=" https://hosting.photobucket.com/95288841-8654-4bf7-8fc9-a4aa78dce87f/c8fcfcb6-09f2-4398-a2fb-fa5065771e01.jpg
" target="_blank"> <img alt="Click for enlarged picture" src="
https://hosting.photobucket.com/95288841-8654-4bf7-8fc9-a4aa78dce87f/c8fcfcb6-09f2-4398-a2fb-fa5065771e01.jpg" width="600" /> </a></p>
<p>
<a href=" https://hosting.photobucket.com/95288841-8654-4bf7-8fc9-a4aa78dce87f/d7e187a8-d5b1-433b-b30d-091e54dcdddf.jpg
" target="_blank"> <img alt="Click for enlarged picture" src="
https://hosting.photobucket.com/95288841-8654-4bf7-8fc9-a4aa78dce87f/d7e187a8-d5b1-433b-b30d-091e54dcdddf.jpg" width="600" /> </a></p>
<p>
Tijekom drugog vikenda Izložbe, 28.02.-01.03., organizirali smo <strong>RADIONICU BOJANJA MINIJATURA – Grimdark stil</strong>.</p>
<p>
Radionica se provodila kroz dva dana (cijeli vikend) i polaznici su bojali tri različite figure za igru Trench Crusade. Fokus ovih predavanja bilo je bojenje popularnim Grimdark stilom. Na radionici su bile predstavljene boje i pribor, priprema figura, nekoliko tehnika bojenja minijatura od osnovnih do naprednijih, te tehnike i trikovi za brzo i efikasno bojenje većih količina figura odjednom. U sklopu radionice korištene su akrilne boje na bazi vode.</p>
<p>
<a href=" https://hosting.photobucket.com/95288841-8654-4bf7-8fc9-a4aa78dce87f/733d94b2-8e8d-4a4e-accd-b9168e32577e.jpg
" target="_blank"> <img alt="Click for enlarged picture" src="
https://hosting.photobucket.com/95288841-8654-4bf7-8fc9-a4aa78dce87f/733d94b2-8e8d-4a4e-accd-b9168e32577e.jpg
" width="600" /> </a></p>
<p>
<a href=" https://hosting.photobucket.com/95288841-8654-4bf7-8fc9-a4aa78dce87f/41020062-45b9-41cd-a357-fa23a389f390.jpg
" target="_blank"> <img alt="Click for enlarged picture" src="
https://hosting.photobucket.com/95288841-8654-4bf7-8fc9-a4aa78dce87f/41020062-45b9-41cd-a357-fa23a389f390.jpg
" width="600" /> </a></p>
<p>
<a href=" https://hosting.photobucket.com/95288841-8654-4bf7-8fc9-a4aa78dce87f/0c07cc55-596d-494d-972b-cd6a0dd6b8b7.jpg
" target="_blank"> <img alt="Click for enlarged picture" src="
https://hosting.photobucket.com/95288841-8654-4bf7-8fc9-a4aa78dce87f/0c07cc55-596d-494d-972b-cd6a0dd6b8b7.jpg" width="600" /> </a></p>
<p>
<a href=" https://hosting.photobucket.com/95288841-8654-4bf7-8fc9-a4aa78dce87f/c17dd356-08b1-48e1-b895-6296aed7f818.jpg
" target="_blank"> <img alt="Click for enlarged picture" src="
https://hosting.photobucket.com/95288841-8654-4bf7-8fc9-a4aa78dce87f/c17dd356-08b1-48e1-b895-6296aed7f818.jpg" width="600" /> </a></p>
<p>
U srijedu 04.03.2026. održana je godišnja <strong>sjednica Skupštine</strong> na kojoj smo odredili smjernice rada u 2026.</p>
<p>
<a href=" https://hosting.photobucket.com/95288841-8654-4bf7-8fc9-a4aa78dce87f/59484bd0-7edc-4aed-a04e-ae42900ba3e6.jpg
" target="_blank"> <img alt="Click for enlarged picture" src="
https://hosting.photobucket.com/95288841-8654-4bf7-8fc9-a4aa78dce87f/59484bd0-7edc-4aed-a04e-ae42900ba3e6.jpg
" width="600" /> </a></p>
<p>
U nedjelju 08.03.2026. Izložba je završena, naši eksponati sigurno spremljeni, a Galerija počišćena.</p>
<p>
<a href=" https://hosting.photobucket.com/95288841-8654-4bf7-8fc9-a4aa78dce87f/98af4280-0956-4cdb-b4a9-da40e3a5a44a.jpg
" target="_blank"> <img alt="Click for enlarged picture" src="
https://hosting.photobucket.com/95288841-8654-4bf7-8fc9-a4aa78dce87f/98af4280-0956-4cdb-b4a9-da40e3a5a44a.jpg" width="600" /> </a></p>
<p>
<a href=" https://hosting.photobucket.com/95288841-8654-4bf7-8fc9-a4aa78dce87f/3259b35e-1fc2-4a99-a3c5-c7984958d72b.jpg
" target="_blank"> <img alt="Click for enlarged picture" src="
https://hosting.photobucket.com/95288841-8654-4bf7-8fc9-a4aa78dce87f/3259b35e-1fc2-4a99-a3c5-c7984958d72b.jpg" width="600" /> </a></p>
<p>
Najbitniji dio svake godine prilikom održavanja ove Izložbe je socijalni aspekt, druženje naših članova kako međusobno tako i sa našim međunarodnim prijateljima koji nas posjećuju! Uz ovih par fotografija sa zajedničkih druženja, pozdravljamo vas do sljedeće godine!</p>
<p>
<a href=" https://hosting.photobucket.com/95288841-8654-4bf7-8fc9-a4aa78dce87f/b9168e23-79b2-4d81-8a7d-7534062881a7.jpg
" target="_blank"> <img alt="Click for enlarged picture" src="
https://hosting.photobucket.com/95288841-8654-4bf7-8fc9-a4aa78dce87f/b9168e23-79b2-4d81-8a7d-7534062881a7.jpg " width="600" /> </a></p>
<p>
<a href=" https://hosting.photobucket.com/95288841-8654-4bf7-8fc9-a4aa78dce87f/edff925e-916c-4d78-953e-210abf3753d4.jpg
" target="_blank"> <img alt="Click for enlarged picture" src="
https://hosting.photobucket.com/95288841-8654-4bf7-8fc9-a4aa78dce87f/edff925e-916c-4d78-953e-210abf3753d4.jpg " width="600" /> </a></p>
<p>
<a href=" https://hosting.photobucket.com/95288841-8654-4bf7-8fc9-a4aa78dce87f/8bcb48fa-466b-43f8-8a4b-f15f6794b21e.jpg
" target="_blank"> <img alt="Click for enlarged picture" src="
https://hosting.photobucket.com/95288841-8654-4bf7-8fc9-a4aa78dce87f/8bcb48fa-466b-43f8-8a4b-f15f6794b21e.jpg" width="600" /> </a></p>
",
"created" => "2026-03-12 08:54:10",
"modified" => "2026-03-12 08:58:37"
),
"Member" => array(
"id" => "35",
"group_id" => "1",
"first_name" => "Marko",
"last_name" => "Paunović",
"first_name_mask" => "marko",
"last_name_mask" => "paunovic",
"username" => "marko",
"password" => "*****",
"born" => "2033-03-07 20:35:00",
"created" => "2009-06-02 20:37:03"
)
)
include - APP/views/elements/latestArticles.ctp, line 7
View::_render() - CORE/cake/libs/view/view.php, line 736
View::element() - CORE/cake/libs/view/view.php, line 397
include - APP/views/home/index.ctp, line 49
View::_render() - CORE/cake/libs/view/view.php, line 736
View::render() - CORE/cake/libs/view/view.php, line 431
Controller::render() - CORE/cake/libs/controller/controller.php, line 909
Dispatcher::_invoke() - CORE/cake/dispatcher.php, line 207
Dispatcher::dispatch() - CORE/cake/dispatcher.php, line 171
[main] - APP/webroot/index.php, line 86
Notice (8): Undefined index: mask_dok [APP/views/elements/latestArticles.ctp, line 10]
if (Configure::read() > 0) { include ($___viewFn);
$___viewFn = "/home/martin/apps/agram/app/views/elements/latestArticles.ctp"
$___dataForView = array(
"lang" => "dok",
"otherLangs" => array(
"eng",
"hrv"
),
"globalNav" => array(
array(),
array(),
array(),
array(),
array(),
array(),
array(),
array(),
array(),
array(),
array(),
array(),
array(),
array(),
array(),
array(),
array(),
array(),
array(),
array(),
array(),
array(),
array(),
array(),
array(),
array(),
array()
),
"breadCrumbs" => array(
array()
),
"pageContents" => array(
"home_who_we_are" => null
),
"userData" => null,
"announcements" => array(
array(),
array(),
array()
),
"cache" => array(
"time" => "+1 day",
"key" => "dok"
),
"form" => FormHelper
FormHelper::$helpers = array
FormHelper::$fieldset = array
FormHelper::$__options = array
FormHelper::$fields = array
FormHelper::$requestType = NULL
FormHelper::$defaultModel = NULL
FormHelper::$_inputDefaults = array
FormHelper::$_lastAction = ""
FormHelper::$base = ""
FormHelper::$webroot = "/"
FormHelper::$theme = NULL
FormHelper::$here = "/dok"
FormHelper::$params = array
FormHelper::$action = "index"
FormHelper::$plugin = NULL
FormHelper::$data = NULL
FormHelper::$namedArgs = NULL
FormHelper::$argSeparator = NULL
FormHelper::$validationErrors = NULL
FormHelper::$tags = array
FormHelper::$__tainted = NULL
FormHelper::$__cleaned = NULL
FormHelper::$Html = HtmlHelper object,
"text" => TextHelper
TextHelper::$helpers = NULL
TextHelper::$base = ""
TextHelper::$webroot = "/"
TextHelper::$theme = NULL
TextHelper::$here = "/dok"
TextHelper::$params = array
TextHelper::$action = "index"
TextHelper::$plugin = NULL
TextHelper::$data = NULL
TextHelper::$namedArgs = NULL
TextHelper::$argSeparator = NULL
TextHelper::$validationErrors = NULL
TextHelper::$tags = array
TextHelper::$__tainted = NULL
TextHelper::$__cleaned = NULL,
"stringer" => StringerHelper
StringerHelper::$helpers = array
StringerHelper::$base = ""
StringerHelper::$webroot = "/"
StringerHelper::$theme = NULL
StringerHelper::$here = "/dok"
StringerHelper::$params = array
StringerHelper::$action = "index"
StringerHelper::$plugin = NULL
StringerHelper::$data = NULL
StringerHelper::$namedArgs = NULL
StringerHelper::$argSeparator = NULL
StringerHelper::$validationErrors = NULL
StringerHelper::$tags = array
StringerHelper::$__tainted = NULL
StringerHelper::$__cleaned = NULL
StringerHelper::$Html = HtmlHelper object
StringerHelper::$Link = LinkHelper object
StringerHelper::$Text = TextHelper object,
"menu" => MenuHelper
MenuHelper::$helpers = array
MenuHelper::$base = ""
MenuHelper::$webroot = "/"
MenuHelper::$theme = NULL
MenuHelper::$here = "/dok"
MenuHelper::$params = array
MenuHelper::$action = "index"
MenuHelper::$plugin = NULL
MenuHelper::$data = NULL
MenuHelper::$namedArgs = NULL
MenuHelper::$argSeparator = NULL
MenuHelper::$validationErrors = NULL
MenuHelper::$tags = array
MenuHelper::$__tainted = NULL
MenuHelper::$__cleaned = NULL
MenuHelper::$Link = LinkHelper object,
"session" => SessionHelper
SessionHelper::$helpers = array
SessionHelper::$__active = true
SessionHelper::$valid = false
SessionHelper::$error = false
SessionHelper::$_userAgent = "f9a8355d006790ee743ededbb1f6e3bd"
SessionHelper::$path = "/"
SessionHelper::$lastError = NULL
SessionHelper::$security = "medium"
SessionHelper::$time = 1773314240
SessionHelper::$sessionTime = 1773326240
SessionHelper::$cookieLifeTime = false
SessionHelper::$watchKeys = array
SessionHelper::$id = NULL
SessionHelper::$host = NULL
SessionHelper::$timeout = NULL
SessionHelper::$base = ""
SessionHelper::$webroot = "/"
SessionHelper::$here = "/dok"
SessionHelper::$params = array
SessionHelper::$action = "index"
SessionHelper::$data = NULL
SessionHelper::$theme = NULL
SessionHelper::$plugin = NULL,
"html" => HtmlHelper
HtmlHelper::$tags = array
HtmlHelper::$_crumbs = array
HtmlHelper::$__includedScripts = array
HtmlHelper::$_scriptBlockOptions = array
HtmlHelper::$__docTypes = array
HtmlHelper::$helpers = NULL
HtmlHelper::$base = ""
HtmlHelper::$webroot = "/"
HtmlHelper::$theme = NULL
HtmlHelper::$here = "/dok"
HtmlHelper::$params = array
HtmlHelper::$action = "index"
HtmlHelper::$plugin = NULL
HtmlHelper::$data = NULL
HtmlHelper::$namedArgs = NULL
HtmlHelper::$argSeparator = NULL
HtmlHelper::$validationErrors = NULL
HtmlHelper::$__tainted = NULL
HtmlHelper::$__cleaned = NULL,
"link" => LinkHelper
LinkHelper::$helpers = array
LinkHelper::$lang = "dok"
LinkHelper::$defaultLang = "hrv"
LinkHelper::$base = ""
LinkHelper::$webroot = "/"
LinkHelper::$theme = NULL
LinkHelper::$here = "/dok"
LinkHelper::$params = array
LinkHelper::$action = "index"
LinkHelper::$plugin = NULL
LinkHelper::$data = NULL
LinkHelper::$namedArgs = NULL
LinkHelper::$argSeparator = NULL
LinkHelper::$validationErrors = NULL
LinkHelper::$tags = array
LinkHelper::$__tainted = NULL
LinkHelper::$__cleaned = NULL
LinkHelper::$Html = HtmlHelper object
LinkHelper::$Session = SessionHelper object
)
$loadHelpers = false
$cached = false
$loadedHelpers = array()
$lang = "dok"
$otherLangs = array(
"eng",
"hrv"
)
$globalNav = array(
array(
"Page" => array()
),
array(
"Page" => array()
),
array(
"Page" => array()
),
array(
"Page" => array()
),
array(
"Page" => array()
),
array(
"Page" => array()
),
array(
"Page" => array()
),
array(
"Page" => array()
),
array(
"Page" => array()
),
array(
"Page" => array()
),
array(
"Page" => array()
),
array(
"Page" => array()
),
array(
"Page" => array()
),
array(
"Page" => array()
),
array(
"Page" => array()
),
array(
"Page" => array()
),
array(
"Page" => array()
),
array(
"Page" => array()
),
array(
"Page" => array()
),
array(
"Page" => array()
),
array(
"Page" => array()
),
array(
"Page" => array()
),
array(
"Page" => array()
),
array(
"Page" => array()
),
array(
"Page" => array()
),
array(
"Page" => array()
),
array(
"Page" => array()
)
)
$breadCrumbs = array(
array(
"Page" => array()
)
)
$pageContents = array(
"home_who_we_are" => null
)
$userData = null
$announcements = array(
array(
"Announcement" => array()
),
array(
"Announcement" => array()
),
array(
"Announcement" => array()
)
)
$cache = array(
"time" => "+1 day",
"key" => "dok"
)
$form = FormHelper
FormHelper::$helpers = array
FormHelper::$fieldset = array
FormHelper::$__options = array
FormHelper::$fields = array
FormHelper::$requestType = NULL
FormHelper::$defaultModel = NULL
FormHelper::$_inputDefaults = array
FormHelper::$_lastAction = ""
FormHelper::$base = ""
FormHelper::$webroot = "/"
FormHelper::$theme = NULL
FormHelper::$here = "/dok"
FormHelper::$params = array
FormHelper::$action = "index"
FormHelper::$plugin = NULL
FormHelper::$data = NULL
FormHelper::$namedArgs = NULL
FormHelper::$argSeparator = NULL
FormHelper::$validationErrors = NULL
FormHelper::$tags = array
FormHelper::$__tainted = NULL
FormHelper::$__cleaned = NULL
FormHelper::$Html = HtmlHelper object
$text = TextHelper
TextHelper::$helpers = NULL
TextHelper::$base = ""
TextHelper::$webroot = "/"
TextHelper::$theme = NULL
TextHelper::$here = "/dok"
TextHelper::$params = array
TextHelper::$action = "index"
TextHelper::$plugin = NULL
TextHelper::$data = NULL
TextHelper::$namedArgs = NULL
TextHelper::$argSeparator = NULL
TextHelper::$validationErrors = NULL
TextHelper::$tags = array
TextHelper::$__tainted = NULL
TextHelper::$__cleaned = NULL
$stringer = StringerHelper
StringerHelper::$helpers = array
StringerHelper::$base = ""
StringerHelper::$webroot = "/"
StringerHelper::$theme = NULL
StringerHelper::$here = "/dok"
StringerHelper::$params = array
StringerHelper::$action = "index"
StringerHelper::$plugin = NULL
StringerHelper::$data = NULL
StringerHelper::$namedArgs = NULL
StringerHelper::$argSeparator = NULL
StringerHelper::$validationErrors = NULL
StringerHelper::$tags = array
StringerHelper::$__tainted = NULL
StringerHelper::$__cleaned = NULL
StringerHelper::$Html = HtmlHelper object
StringerHelper::$Link = LinkHelper object
StringerHelper::$Text = TextHelper object
$menu = MenuHelper
MenuHelper::$helpers = array
MenuHelper::$base = ""
MenuHelper::$webroot = "/"
MenuHelper::$theme = NULL
MenuHelper::$here = "/dok"
MenuHelper::$params = array
MenuHelper::$action = "index"
MenuHelper::$plugin = NULL
MenuHelper::$data = NULL
MenuHelper::$namedArgs = NULL
MenuHelper::$argSeparator = NULL
MenuHelper::$validationErrors = NULL
MenuHelper::$tags = array
MenuHelper::$__tainted = NULL
MenuHelper::$__cleaned = NULL
MenuHelper::$Link = LinkHelper object
$session = SessionHelper
SessionHelper::$helpers = array
SessionHelper::$__active = true
SessionHelper::$valid = false
SessionHelper::$error = false
SessionHelper::$_userAgent = "f9a8355d006790ee743ededbb1f6e3bd"
SessionHelper::$path = "/"
SessionHelper::$lastError = NULL
SessionHelper::$security = "medium"
SessionHelper::$time = 1773314240
SessionHelper::$sessionTime = 1773326240
SessionHelper::$cookieLifeTime = false
SessionHelper::$watchKeys = array
SessionHelper::$id = NULL
SessionHelper::$host = NULL
SessionHelper::$timeout = NULL
SessionHelper::$base = ""
SessionHelper::$webroot = "/"
SessionHelper::$here = "/dok"
SessionHelper::$params = array
SessionHelper::$action = "index"
SessionHelper::$data = NULL
SessionHelper::$theme = NULL
SessionHelper::$plugin = NULL
$html = HtmlHelper
HtmlHelper::$tags = array
HtmlHelper::$_crumbs = array
HtmlHelper::$__includedScripts = array
HtmlHelper::$_scriptBlockOptions = array
HtmlHelper::$__docTypes = array
HtmlHelper::$helpers = NULL
HtmlHelper::$base = ""
HtmlHelper::$webroot = "/"
HtmlHelper::$theme = NULL
HtmlHelper::$here = "/dok"
HtmlHelper::$params = array
HtmlHelper::$action = "index"
HtmlHelper::$plugin = NULL
HtmlHelper::$data = NULL
HtmlHelper::$namedArgs = NULL
HtmlHelper::$argSeparator = NULL
HtmlHelper::$validationErrors = NULL
HtmlHelper::$__tainted = NULL
HtmlHelper::$__cleaned = NULL
$link = LinkHelper
LinkHelper::$helpers = array
LinkHelper::$lang = "dok"
LinkHelper::$defaultLang = "hrv"
LinkHelper::$base = ""
LinkHelper::$webroot = "/"
LinkHelper::$theme = NULL
LinkHelper::$here = "/dok"
LinkHelper::$params = array
LinkHelper::$action = "index"
LinkHelper::$plugin = NULL
LinkHelper::$data = NULL
LinkHelper::$namedArgs = NULL
LinkHelper::$argSeparator = NULL
LinkHelper::$validationErrors = NULL
LinkHelper::$tags = array
LinkHelper::$__tainted = NULL
LinkHelper::$__cleaned = NULL
LinkHelper::$Html = HtmlHelper object
LinkHelper::$Session = SessionHelper object
$articles = array(
array(
"Article" => array(),
"Member" => array()
),
array(
"Article" => array(),
"Member" => array()
),
array(
"Article" => array(),
"Member" => array()
),
array(
"Article" => array(),
"Member" => array()
),
array(
"Article" => array(),
"Member" => array()
)
)
$article = array(
"Article" => array(
"id" => "496",
"member_id" => "35",
"title_eng" => "Exhibition of Miniatures and Tabletop Scenery 2026",
"title_hrv" => "Izložba minijatura i maketa Agram 2026",
"mask_eng" => "exhibition_of_miniatures_and_tabletop_scenery_2026",
"mask_hrv" => "izlozba_minijatura_i_maketa_agram_2026",
"content_eng" => "<p>
<a href=" https://hosting.photobucket.com/95288841-8654-4bf7-8fc9-a4aa78dce87f/dc756f84-867d-4df4-acd8-5d43775cafc2.jpg
" target="_blank"> <img alt="Click for enlarged picture" src="
https://hosting.photobucket.com/95288841-8654-4bf7-8fc9-a4aa78dce87f/dc756f84-867d-4df4-acd8-5d43775cafc2.jpg" width="600" /> </a></p>
<p>
<strong>The exhibition of miniatures and models "Agram 2026"</strong> was held this year from 19.2. to 08.03. 2026. The exhibition was set up on Wednesday 18.2. and was attended by a large number of members and friends of the Association who exhibited their works.</p>
<p>
</p>
<p>
<a href=" https://hosting.photobucket.com/95288841-8654-4bf7-8fc9-a4aa78dce87f/8529d6d4-76ea-4872-a9e6-748e04223a4e.jpg
" target="_blank"> <img alt="Click for enlarged picture" src="
https://hosting.photobucket.com/95288841-8654-4bf7-8fc9-a4aa78dce87f/8529d6d4-76ea-4872-a9e6-748e04223a4e.jpg
" width="600" /> </a></p>
<p>
<a href=" https://hosting.photobucket.com/95288841-8654-4bf7-8fc9-a4aa78dce87f/f3038937-f001-4ceb-b725-a330fcd64cee.jpg
" target="_blank"> <img alt="Click for enlarged picture" src="
https://hosting.photobucket.com/95288841-8654-4bf7-8fc9-a4aa78dce87f/f3038937-f001-4ceb-b725-a330fcd64cee.jpg
" width="600" /> </a></p>
<p>
<a href=" https://hosting.photobucket.com/95288841-8654-4bf7-8fc9-a4aa78dce87f/3575379e-e068-49e2-9d4d-c9a49531fdc2.jpg
" target="_blank"> <img alt="Click for enlarged picture" src="
https://hosting.photobucket.com/95288841-8654-4bf7-8fc9-a4aa78dce87f/3575379e-e068-49e2-9d4d-c9a49531fdc2.jpg" width="600" /> </a></p>
<p>
<a href=" https://hosting.photobucket.com/95288841-8654-4bf7-8fc9-a4aa78dce87f/e51713c7-2add-4f8f-ae37-e6eba25badff.jpg
" target="_blank"> <img alt="Click for enlarged picture" src="
https://hosting.photobucket.com/95288841-8654-4bf7-8fc9-a4aa78dce87f/e51713c7-2add-4f8f-ae37-e6eba25badff.jpg" width="600" /> </a></p>
<p>
<a href=" https://hosting.photobucket.com/95288841-8654-4bf7-8fc9-a4aa78dce87f/9c0bb546-50a8-483d-aeab-ab3b2ce9f094.jpg
" target="_blank"> <img alt="Click for enlarged picture" src="
https://hosting.photobucket.com/95288841-8654-4bf7-8fc9-a4aa78dce87f/9c0bb546-50a8-483d-aeab-ab3b2ce9f094.jpg" width="600" /> </a></p>
<p>
The opening of the Exhibition took place on Thursday, February 19, 2026, starting at 6:00 PM. The exhibition was organized on the occasion of our twenty-third birthday.</p>
<p>
</p>
<p>
<a href=" https://hosting.photobucket.com/95288841-8654-4bf7-8fc9-a4aa78dce87f/71c7bfc2-1ffc-43b9-9d5a-53e009f6b86d.jpg
" target="_blank"> <img alt="Click for enlarged picture" src="
https://hosting.photobucket.com/95288841-8654-4bf7-8fc9-a4aa78dce87f/71c7bfc2-1ffc-43b9-9d5a-53e009f6b86d.jpg" width="600" /> </a></p>
<p>
<a href=" https://hosting.photobucket.com/95288841-8654-4bf7-8fc9-a4aa78dce87f/007b4701-1d7c-4a67-a599-0539a2aa3191.jpg
" target="_blank"> <img alt="Click for enlarged picture" src="
https://hosting.photobucket.com/95288841-8654-4bf7-8fc9-a4aa78dce87f/007b4701-1d7c-4a67-a599-0539a2aa3191.jpg" width="600" /> </a></p>
<p>
<a href=" https://hosting.photobucket.com/95288841-8654-4bf7-8fc9-a4aa78dce87f/2c8090e2-8b95-4368-bb48-98876d680e15.jpg
" target="_blank"> <img alt="Click for enlarged picture" src="
https://hosting.photobucket.com/95288841-8654-4bf7-8fc9-a4aa78dce87f/2c8090e2-8b95-4368-bb48-98876d680e15.jpg" width="600" /> </a></p>
<p>
<a href=" https://hosting.photobucket.com/95288841-8654-4bf7-8fc9-a4aa78dce87f/375768ad-a8bb-49bf-9845-e46c896ba7ec.jpg
" target="_blank"> <img alt="Click for enlarged picture" src="
https://hosting.photobucket.com/95288841-8654-4bf7-8fc9-a4aa78dce87f/375768ad-a8bb-49bf-9845-e46c896ba7ec.jpg" width="600" /> </a></p>
<p>
<a href=" https://hosting.photobucket.com/95288841-8654-4bf7-8fc9-a4aa78dce87f/a93de974-4ccb-4876-85b0-4d066ae402b3.jpg
" target="_blank"> <img alt="Click for enlarged picture" src="
https://hosting.photobucket.com/95288841-8654-4bf7-8fc9-a4aa78dce87f/a93de974-4ccb-4876-85b0-4d066ae402b3.jpg" width="600" /> </a></p>
<p>
<a href=" https://hosting.photobucket.com/95288841-8654-4bf7-8fc9-a4aa78dce87f/d323ccc9-1b9a-4cb2-8adf-7019b0e217f4.jpg
" target="_blank"> <img alt="Click for enlarged picture" src="
https://hosting.photobucket.com/95288841-8654-4bf7-8fc9-a4aa78dce87f/d323ccc9-1b9a-4cb2-8adf-7019b0e217f4.jpg" width="600" /> </a></p>
<p>
<a href=" https://hosting.photobucket.com/95288841-8654-4bf7-8fc9-a4aa78dce87f/a5a66447-2d76-47ae-866d-4d512ef469a5.jpg
" target="_blank"> <img alt="Click for enlarged picture" src="
https://hosting.photobucket.com/95288841-8654-4bf7-8fc9-a4aa78dce87f/a5a66447-2d76-47ae-866d-4d512ef469a5.jpg" width="600" /> </a></p>
<p>
<a href=" https://hosting.photobucket.com/95288841-8654-4bf7-8fc9-a4aa78dce87f/3e7bcfc9-ba02-4f94-a6c3-79dfaea3639e.jpg
" target="_blank"> <img alt="Click for enlarged picture" src="
https://hosting.photobucket.com/95288841-8654-4bf7-8fc9-a4aa78dce87f/3e7bcfc9-ba02-4f94-a6c3-79dfaea3639e.jpg" width="600" /> </a></p>
<p>
<a href=" https://hosting.photobucket.com/95288841-8654-4bf7-8fc9-a4aa78dce87f/24e79466-4a9e-4b10-970c-caad235d260d.jpg
" target="_blank"> <img alt="Click for enlarged picture" src="
https://hosting.photobucket.com/95288841-8654-4bf7-8fc9-a4aa78dce87f/24e79466-4a9e-4b10-970c-caad235d260d.jpg" width="600" /> </a></p>
<p>
As always, the Exhibition presented a cross-section of the work of the Association, its members, participants of its courses and workshops, and members of the Miniature Painters Croatia FB group. In a large number of showcases, there were numerous miniatures for tabletop strategy games, board games, and an entire showcase was dedicated to award-winning exhibits from previous miniature competitions. Several showcases were dedicated to projects that the Association has been implementing for 23 years, such as the UMS „Agram“ Library and Reading Room, the Workshop for Making Spatial Models and the Miniature Painting Workshop, as well as new ones such as the Agram Group Build, the Agram Lego Section and the Back to Basics painting workshop for the youngest.</p>
<p>
<a href=" https://hosting.photobucket.com/95288841-8654-4bf7-8fc9-a4aa78dce87f/fca84936-af71-44d3-9a4c-faeb26163899.jpg
" target="_blank"> <img alt="Click for enlarged picture" src="
https://hosting.photobucket.com/95288841-8654-4bf7-8fc9-a4aa78dce87f/fca84936-af71-44d3-9a4c-faeb26163899.jpg" width="600" /> </a></p>
<p>
<a href=" https://hosting.photobucket.com/95288841-8654-4bf7-8fc9-a4aa78dce87f/459bc5ac-8702-46f9-93b4-547deaabdef4.jpg
" target="_blank"> <img alt="Click for enlarged picture" src="
https://hosting.photobucket.com/95288841-8654-4bf7-8fc9-a4aa78dce87f/459bc5ac-8702-46f9-93b4-547deaabdef4.jpg" width="600" /> </a></p>
<p>
<a href=" https://hosting.photobucket.com/95288841-8654-4bf7-8fc9-a4aa78dce87f/91a04363-b2ef-4635-a046-7edf25ce7808.jpg
" target="_blank"> <img alt="Click for enlarged picture" src="
https://hosting.photobucket.com/95288841-8654-4bf7-8fc9-a4aa78dce87f/91a04363-b2ef-4635-a046-7edf25ce7808.jpg" width="600" /> </a></p>
<p>
<a href=" https://hosting.photobucket.com/95288841-8654-4bf7-8fc9-a4aa78dce87f/73256af5-fd5d-40b5-95e1-120e49c9be87.jpg
" target="_blank"> <img alt="Click for enlarged picture" src="
https://hosting.photobucket.com/95288841-8654-4bf7-8fc9-a4aa78dce87f/73256af5-fd5d-40b5-95e1-120e49c9be87.jpg" width="600" /> </a></p>
<p>
<a href=" https://hosting.photobucket.com/95288841-8654-4bf7-8fc9-a4aa78dce87f/979f9be5-23f3-4df9-91dc-ab71d6a10d64.jpg
" target="_blank"> <img alt="Click for enlarged picture" src="
https://hosting.photobucket.com/95288841-8654-4bf7-8fc9-a4aa78dce87f/979f9be5-23f3-4df9-91dc-ab71d6a10d64.jpg" width="600" /> </a></p>
<p>
<a href=" https://hosting.photobucket.com/95288841-8654-4bf7-8fc9-a4aa78dce87f/d0ff4379-183a-47b9-a740-9ddc283ebc29.jpg
" target="_blank"> <img alt="Click for enlarged picture" src="
https://hosting.photobucket.com/95288841-8654-4bf7-8fc9-a4aa78dce87f/d0ff4379-183a-47b9-a740-9ddc283ebc29.jpg" width="600" /> </a></p>
<p>
<a href=" https://hosting.photobucket.com/95288841-8654-4bf7-8fc9-a4aa78dce87f/4333e95e-bbbd-4f47-aaea-38a9c99e54d8.jpg
" target="_blank"> <img alt="Click for enlarged picture" src="
https://hosting.photobucket.com/95288841-8654-4bf7-8fc9-a4aa78dce87f/4333e95e-bbbd-4f47-aaea-38a9c99e54d8.jpg" width="600" /> </a></p>
<p>
<a href=" https://hosting.photobucket.com/95288841-8654-4bf7-8fc9-a4aa78dce87f/1372f8a2-b222-48ee-ae45-a90b5a354ef7.jpg
" target="_blank"> <img alt="Click for enlarged picture" src="
https://hosting.photobucket.com/95288841-8654-4bf7-8fc9-a4aa78dce87f/1372f8a2-b222-48ee-ae45-a90b5a354ef7.jpg" width="600" /> </a></p>
<p>
<a href=" https://hosting.photobucket.com/95288841-8654-4bf7-8fc9-a4aa78dce87f/6a1b4fd1-d982-4b06-9c5f-3cd40d6bf10a.jpg
" target="_blank"> <img alt="Click for enlarged picture" src="
https://hosting.photobucket.com/95288841-8654-4bf7-8fc9-a4aa78dce87f/6a1b4fd1-d982-4b06-9c5f-3cd40d6bf10a.jpg" width="600" /> </a></p>
<p>
<a href=" https://hosting.photobucket.com/95288841-8654-4bf7-8fc9-a4aa78dce87f/c2ec45e1-e0f3-463a-b254-cb2a38b53e14.jpg
" target="_blank"> <img alt="Click for enlarged picture" src="
https://hosting.photobucket.com/95288841-8654-4bf7-8fc9-a4aa78dce87f/c2ec45e1-e0f3-463a-b254-cb2a38b53e14.jpg" width="600" /> </a></p>
<p>
<a href=" https://hosting.photobucket.com/95288841-8654-4bf7-8fc9-a4aa78dce87f/17553b9a-0592-4f6a-a097-3f1a97e161f3.jpg
" target="_blank"> <img alt="Click for enlarged picture" src="
https://hosting.photobucket.com/95288841-8654-4bf7-8fc9-a4aa78dce87f/17553b9a-0592-4f6a-a097-3f1a97e161f3.jpg" width="600" /> </a></p>
<p>
<a href=" https://hosting.photobucket.com/95288841-8654-4bf7-8fc9-a4aa78dce87f/8658bd6b-dff2-4d24-8473-928d44d44480.jpg
" target="_blank"> <img alt="Click for enlarged picture" src="
https://hosting.photobucket.com/95288841-8654-4bf7-8fc9-a4aa78dce87f/8658bd6b-dff2-4d24-8473-928d44d44480.jpg" width="600" /> </a></p>
<p>
<a href=" https://hosting.photobucket.com/95288841-8654-4bf7-8fc9-a4aa78dce87f/ecab0ea7-f75b-4e31-a520-d088ad39fa17.jpg
" target="_blank"> <img alt="Click for enlarged picture" src="
https://hosting.photobucket.com/95288841-8654-4bf7-8fc9-a4aa78dce87f/ecab0ea7-f75b-4e31-a520-d088ad39fa17.jpg" width="600" /> </a></p>
<p>
<a href=" https://hosting.photobucket.com/95288841-8654-4bf7-8fc9-a4aa78dce87f/9495a2f5-8a82-41f2-abf4-9ade3db41d87.jpg
" target="_blank"> <img alt="Click for enlarged picture" src="
https://hosting.photobucket.com/95288841-8654-4bf7-8fc9-a4aa78dce87f/9495a2f5-8a82-41f2-abf4-9ade3db41d87.jpg" width="600" /> </a></p>
<p>
<a href=" https://hosting.photobucket.com/95288841-8654-4bf7-8fc9-a4aa78dce87f/362cc6fd-a5dd-474b-9b9f-aeab27d6dcfa.jpg
" target="_blank"> <img alt="Click for enlarged picture" src="
https://hosting.photobucket.com/95288841-8654-4bf7-8fc9-a4aa78dce87f/362cc6fd-a5dd-474b-9b9f-aeab27d6dcfa.jpg" width="600" /> </a></p>
<p>
It was a special honor for us to host our guest exhibitor, Ninoslav Luk, a miniaturist from Poreč, who introduced himself to us with his collection of historical dioramas.</p>
<p>
<a href=" https://hosting.photobucket.com/95288841-8654-4bf7-8fc9-a4aa78dce87f/ba1353de-e2bd-4340-9121-9056e287ed4a.jpg
" target="_blank"> <img alt="Click for enlarged picture" src="
https://hosting.photobucket.com/95288841-8654-4bf7-8fc9-a4aa78dce87f/ba1353de-e2bd-4340-9121-9056e287ed4a.jpg" width="600" /> </a></p>
<p>
<a href=" https://hosting.photobucket.com/95288841-8654-4bf7-8fc9-a4aa78dce87f/cea18506-1b50-4e5b-955c-0b9ca02d7826.jpg
" target="_blank"> <img alt="Click for enlarged picture" src="
https://hosting.photobucket.com/95288841-8654-4bf7-8fc9-a4aa78dce87f/cea18506-1b50-4e5b-955c-0b9ca02d7826.jpg" width="600" /> </a></p>
<p>
<a href=" https://hosting.photobucket.com/95288841-8654-4bf7-8fc9-a4aa78dce87f/1be85b41-e3b6-4536-b141-cd0da6eb38c1.jpg
" target="_blank"> <img alt="Click for enlarged picture" src="
https://hosting.photobucket.com/95288841-8654-4bf7-8fc9-a4aa78dce87f/1be85b41-e3b6-4536-b141-cd0da6eb38c1.jpg" width="600" /> </a></p>
<p>
<a href=" https://hosting.photobucket.com/95288841-8654-4bf7-8fc9-a4aa78dce87f/9e93b87d-ff3c-4b7b-8f06-5f9d3464a134.jpg
" target="_blank"> <img alt="Click for enlarged picture" src="
https://hosting.photobucket.com/95288841-8654-4bf7-8fc9-a4aa78dce87f/9e93b87d-ff3c-4b7b-8f06-5f9d3464a134.jpg" width="600" /> </a></p>
<p>
During the first weekend of the Exhibition, 21-22.02., we held the 18th annual international miniature painting competition <strong>Black Queen Hobby and Miniature Painting Competition</strong>!</p>
<p>
<a href=" https://hosting.photobucket.com/95288841-8654-4bf7-8fc9-a4aa78dce87f/3056fb09-f66c-4dea-80a8-a4e72407429a.jpg
" target="_blank"> <img alt="Click for enlarged picture" src="
https://hosting.photobucket.com/95288841-8654-4bf7-8fc9-a4aa78dce87f/3056fb09-f66c-4dea-80a8-a4e72407429a.jpg" width="600" /> </a></p>
<p>
As contestants arrived and registered for the competition, our hardworking staff photographed all the exhibits before sorting them into categories and carefully placing them in glass cases. There was no shortage of morning neccessities like coffe and doughnuts.</p>
<p>
<</p>
<p>
<a href=" https://hosting.photobucket.com/95288841-8654-4bf7-8fc9-a4aa78dce87f/1118089c-2b46-4a2c-b17d-dc92b66d1ffc.jpg
" target="_blank"> <img alt="Click for enlarged picture" src="
https://hosting.photobucket.com/95288841-8654-4bf7-8fc9-a4aa78dce87f/1118089c-2b46-4a2c-b17d-dc92b66d1ffc.jpg" width="600" /> </a></p>
<p>
<a href=" https://hosting.photobucket.com/95288841-8654-4bf7-8fc9-a4aa78dce87f/9fd3c272-9a69-4532-a09d-36497a20a820.jpg
" target="_blank"> <img alt="Click for enlarged picture" src="
https://hosting.photobucket.com/95288841-8654-4bf7-8fc9-a4aa78dce87f/9fd3c272-9a69-4532-a09d-36497a20a820.jpg" width="600" /> </a></p>
<p>
<a href=" https://hosting.photobucket.com/95288841-8654-4bf7-8fc9-a4aa78dce87f/86995e80-c502-45fb-80f5-c8fda27da3f9.jpg
" target="_blank"> <img alt="Click for enlarged picture" src="
https://hosting.photobucket.com/95288841-8654-4bf7-8fc9-a4aa78dce87f/86995e80-c502-45fb-80f5-c8fda27da3f9.jpg" width="600" /> </a></p>
<p>
By noon, all the display cases were full and the competition could officially begin.</p>
<p>
<a href=" https://hosting.photobucket.com/95288841-8654-4bf7-8fc9-a4aa78dce87f/bce59a4f-c3e3-4708-a3d6-25e81a894c24.jpg
" target="_blank"> <img alt="Click for enlarged picture" src="
https://hosting.photobucket.com/95288841-8654-4bf7-8fc9-a4aa78dce87f/bce59a4f-c3e3-4708-a3d6-25e81a894c24.jpg" width="600" /> </a></p>
<p>
<a href=" https://hosting.photobucket.com/95288841-8654-4bf7-8fc9-a4aa78dce87f/16a0a094-01aa-4e52-82cf-fdab00d74711.jpg
" target="_blank"> <img alt="Click for enlarged picture" src="
https://hosting.photobucket.com/95288841-8654-4bf7-8fc9-a4aa78dce87f/16a0a094-01aa-4e52-82cf-fdab00d74711.jpg" width="600" /> </a></p>
<p>
<a href=" https://hosting.photobucket.com/95288841-8654-4bf7-8fc9-a4aa78dce87f/0d3f4042-ff77-48d0-b332-add0fd08f7c3.jpg
" target="_blank"> <img alt="Click for enlarged picture" src="
https://hosting.photobucket.com/95288841-8654-4bf7-8fc9-a4aa78dce87f/0d3f4042-ff77-48d0-b332-add0fd08f7c3.jpg" width="600" /> </a></p>
<p>
<a href=" https://hosting.photobucket.com/95288841-8654-4bf7-8fc9-a4aa78dce87f/3711baf8-93f2-434a-aea9-a95288ca04dd.jpg
" target="_blank"> <img alt="Click for enlarged picture" src="
https://hosting.photobucket.com/95288841-8654-4bf7-8fc9-a4aa78dce87f/3711baf8-93f2-434a-aea9-a95288ca04dd.jpg" width="600" /> </a></p>
<p>
<a href=" https://hosting.photobucket.com/95288841-8654-4bf7-8fc9-a4aa78dce87f/53113b97-ec06-4409-95ba-95a5ad3f9720.jpg
" target="_blank"> <img alt="Click for enlarged picture" src="
https://hosting.photobucket.com/95288841-8654-4bf7-8fc9-a4aa78dce87f/53113b97-ec06-4409-95ba-95a5ad3f9720.jpg" width="600" /> </a></p>
<p>
<a href=" https://hosting.photobucket.com/95288841-8654-4bf7-8fc9-a4aa78dce87f/ab127858-193d-4976-bdb2-e27302722fca.jpg
" target="_blank"> <img alt="Click for enlarged picture" src="
https://hosting.photobucket.com/95288841-8654-4bf7-8fc9-a4aa78dce87f/ab127858-193d-4976-bdb2-e27302722fca.jpg" width="600" /> </a></p>
<p>
<a href=" https://hosting.photobucket.com/95288841-8654-4bf7-8fc9-a4aa78dce87f/3735af11-3fb6-4772-a8ff-5e0ff6ddf03a.jpg
" target="_blank"> <img alt="Click for enlarged picture" src="
https://hosting.photobucket.com/95288841-8654-4bf7-8fc9-a4aa78dce87f/3735af11-3fb6-4772-a8ff-5e0ff6ddf03a.jpg" width="600" /> </a></p>
<p>
<strong>Back To Basics workshops for the young at the Black Queen</strong></p>
<p>
This year, throughout the weekend, we organized miniature painting workshops for the youngest, who were able to paint one of our own miniatures designed specifically for this program for the first time!</p>
<p>
<a href=" https://hosting.photobucket.com/95288841-8654-4bf7-8fc9-a4aa78dce87f/6999be0c-8cc6-4947-a423-9427a2299724.jpg
" target="_blank"> <img alt="Click for enlarged picture" src="
https://hosting.photobucket.com/95288841-8654-4bf7-8fc9-a4aa78dce87f/6999be0c-8cc6-4947-a423-9427a2299724.jpg" width="600" /> </a></p>
<p>
<a href="https://hosting.photobucket.com/95288841-8654-4bf7-8fc9-a4aa78dce87f/835b05a5-f171-49df-afa6-da0692b89074.jpg" target="_blank"><img alt="Click for enlarged picture" src="https://hosting.photobucket.com/95288841-8654-4bf7-8fc9-a4aa78dce87f/835b05a5-f171-49df-afa6-da0692b89074.jpg" width="600" /></a></p>
<p>
<a href=" https://hosting.photobucket.com/95288841-8654-4bf7-8fc9-a4aa78dce87f/ef5dde13-84ee-4ea0-b9f3-28aaf703ef6d.jpg
" target="_blank"> <img alt="Click for enlarged picture" src="
https://hosting.photobucket.com/95288841-8654-4bf7-8fc9-a4aa78dce87f/ef5dde13-84ee-4ea0-b9f3-28aaf703ef6d.jpg" width="600" /> </a></p>
<p>
<strong>SELLERS' COURT</strong></p>
<p>
During the weekend we hosted our sponsors with their sales stands: Swood.si and Carta Magica.</p>
<p>
<a href=" https://hosting.photobucket.com/95288841-8654-4bf7-8fc9-a4aa78dce87f/5ee9a49f-a387-435a-9110-572402b7191d.jpg
" target="_blank"> <img alt="Click for enlarged picture" src="
https://hosting.photobucket.com/95288841-8654-4bf7-8fc9-a4aa78dce87f/5ee9a49f-a387-435a-9110-572402b7191d.jpg" width="600" /> </a></p>
<p>
<a href=" https://hosting.photobucket.com/95288841-8654-4bf7-8fc9-a4aa78dce87f/47cf600f-b1eb-4655-bf06-305f6f21d5d2.jpg
" target="_blank"> <img alt="Click for enlarged picture" src="
https://hosting.photobucket.com/95288841-8654-4bf7-8fc9-a4aa78dce87f/47cf600f-b1eb-4655-bf06-305f6f21d5d2.jpg" width="600" /> </a></p>
<p>
<strong>MINIATURE PAINTING WORKSHOPS</strong></p>
<p>
The ZZTK premises allow workshops to be held during the weekend in the cinema hall in the basement, so we also organized demonstration workshops during the weekend. The lecturers' work was recorded with a camera and projected onto the projection screen in the hall. Many thanks to our domestic and international lecturers: Anže Zorko (SLO), doc.dr.sc. Winton Afrić (CRO), Ivan Knezović (UMS Agram) and Petar Knezoviću (CRO).</p>
<p>
<a href=" https://hosting.photobucket.com/95288841-8654-4bf7-8fc9-a4aa78dce87f/e8d835be-ec99-49d7-bc9b-086e38573d1a.jpg
" target="_blank"> <img alt="Click for enlarged picture" src="
https://hosting.photobucket.com/95288841-8654-4bf7-8fc9-a4aa78dce87f/e8d835be-ec99-49d7-bc9b-086e38573d1a.jpg" width="600" /> </a></p>
<p>
<a href=" https://hosting.photobucket.com/95288841-8654-4bf7-8fc9-a4aa78dce87f/f3eba4c1-4637-4da9-8360-75f430355af4.jpg" target="_blank"> <img alt="Click for enlarged picture" src="
https://hosting.photobucket.com/95288841-8654-4bf7-8fc9-a4aa78dce87f/f3eba4c1-4637-4da9-8360-75f430355af4.jpg" width="600" /> </a></p>
<p>
<a href=" https://hosting.photobucket.com/95288841-8654-4bf7-8fc9-a4aa78dce87f/ef523854-4030-4579-aa38-403afda86c91.jpg
" target="_blank"> <img alt="Click for enlarged picture" src="
https://hosting.photobucket.com/95288841-8654-4bf7-8fc9-a4aa78dce87f/ef523854-4030-4579-aa38-403afda86c91.jpg" width="600" /> </a></p>
<p>
<a href=" https://hosting.photobucket.com/95288841-8654-4bf7-8fc9-a4aa78dce87f/dd0943c2-f4a8-40c3-b641-f6dcdd200380.jpg
" target="_blank"> <img alt="Click for enlarged picture" src="
https://hosting.photobucket.com/95288841-8654-4bf7-8fc9-a4aa78dce87f/dd0943c2-f4a8-40c3-b641-f6dcdd200380.jpg" width="600" /> </a></p>
<p>
<a href=" https://hosting.photobucket.com/95288841-8654-4bf7-8fc9-a4aa78dce87f/08b1626a-f6c7-43c9-b718-3e9a41b55ca6.jpg
" target="_blank"> <img alt="Click for enlarged picture" src="
https://hosting.photobucket.com/95288841-8654-4bf7-8fc9-a4aa78dce87f/08b1626a-f6c7-43c9-b718-3e9a41b55ca6.jpg" width="600" /> </a></p>
<p>
<a href=" https://hosting.photobucket.com/95288841-8654-4bf7-8fc9-a4aa78dce87f/91aca7f3-1af6-486d-b174-65079a63a1ea.jpg
" target="_blank"> <img alt="Click for enlarged picture" src="
https://hosting.photobucket.com/95288841-8654-4bf7-8fc9-a4aa78dce87f/91aca7f3-1af6-486d-b174-65079a63a1ea.jpg" width="600" /> </a></p>
<p>
<a href=" https://hosting.photobucket.com/95288841-8654-4bf7-8fc9-a4aa78dce87f/3821f2fb-fbe7-4096-adbc-7d8c981a3b56.jpg
" target="_blank"> <img alt="Click for enlarged picture" src="
https://hosting.photobucket.com/95288841-8654-4bf7-8fc9-a4aa78dce87f/3821f2fb-fbe7-4096-adbc-7d8c981a3b56.jpg" width="600" /> </a></p>
<p>
<a href=" https://hosting.photobucket.com/95288841-8654-4bf7-8fc9-a4aa78dce87f/2c7bb3c5-c0ec-4a96-b6bd-6a90ce5ce154.jpg
" target="_blank"> <img alt="Click for enlarged picture" src="
https://hosting.photobucket.com/95288841-8654-4bf7-8fc9-a4aa78dce87f/2c7bb3c5-c0ec-4a96-b6bd-6a90ce5ce154.jpg" width="600" /> </a></p>
<p>
<a href=" https://hosting.photobucket.com/95288841-8654-4bf7-8fc9-a4aa78dce87f/b646f4ee-21aa-4d12-8db3-6d33351d5aeb.jpg
" target="_blank"> <img alt="Click for enlarged picture" src="
https://hosting.photobucket.com/95288841-8654-4bf7-8fc9-a4aa78dce87f/b646f4ee-21aa-4d12-8db3-6d33351d5aeb.jpg" width="600" /> </a></p>
<p>
<a href=" https://hosting.photobucket.com/95288841-8654-4bf7-8fc9-a4aa78dce87f/fb5efc01-32cc-4119-90e3-188f51b30237.jpg
" target="_blank"> <img alt="Click for enlarged picture" src="
https://hosting.photobucket.com/95288841-8654-4bf7-8fc9-a4aa78dce87f/fb5efc01-32cc-4119-90e3-188f51b30237.jpg" width="600" /> </a></p>
<p>
<strong>SPEED PAINTING COMPETITION</strong></p>
<p>
We organized a speed painting competition on Sunday afternoon. Participants had 60 minutes to paint one wizrad, a miniature of our own design and production.</p>
<p>
<a href=" https://hosting.photobucket.com/95288841-8654-4bf7-8fc9-a4aa78dce87f/106417a6-a047-4e0d-9f81-87858806052f.jpg
" target="_blank"> <img alt="Click for enlarged picture" src="
https://hosting.photobucket.com/95288841-8654-4bf7-8fc9-a4aa78dce87f/106417a6-a047-4e0d-9f81-87858806052f.jpg" width="600" /> </a></p>
<p>
<a href=" https://hosting.photobucket.com/95288841-8654-4bf7-8fc9-a4aa78dce87f/ac6853c7-6e34-4e07-a996-8d7d12744b67.jpg
" target="_blank"> <img alt="Click for enlarged picture" src="
https://hosting.photobucket.com/95288841-8654-4bf7-8fc9-a4aa78dce87f/ac6853c7-6e34-4e07-a996-8d7d12744b67.jpg" width="600" /> </a></p>
<p>
<a href=" https://hosting.photobucket.com/95288841-8654-4bf7-8fc9-a4aa78dce87f/ccb155fa-52c5-4a99-9515-f69a6836dce7.jpg
" target="_blank"> <img alt="Click for enlarged picture" src="
https://hosting.photobucket.com/95288841-8654-4bf7-8fc9-a4aa78dce87f/ccb155fa-52c5-4a99-9515-f69a6836dce7.jpg" width="600" /> </a></p>
<p>
<a href=" https://hosting.photobucket.com/95288841-8654-4bf7-8fc9-a4aa78dce87f/a29fedd0-97ea-45b1-85f9-7ea62188b2b2.jpg
" target="_blank"><img alt="Click for enlarged picture" src="
https://hosting.photobucket.com/95288841-8654-4bf7-8fc9-a4aa78dce87f/a29fedd0-97ea-45b1-85f9-7ea62188b2b2.jpg" width="600" /></a></p>
<p>
With that, we came to the very end of this wonderful weekend and all that was left was the awarding of prizes and recognition to the winners.</p>
<p>
<a href=" https://hosting.photobucket.com/95288841-8654-4bf7-8fc9-a4aa78dce87f/046ca4c8-0ae7-415e-abd3-e131d580c3ad.jpg
" target="_blank"> <img alt="Click for enlarged picture" src="
https://hosting.photobucket.com/95288841-8654-4bf7-8fc9-a4aa78dce87f/046ca4c8-0ae7-415e-abd3-e131d580c3ad.jpg" width="600" /> </a></p>
<p>
<a href=" https://hosting.photobucket.com/95288841-8654-4bf7-8fc9-a4aa78dce87f/cec0dcef-7acb-4a77-89de-271ed5410672.jpg
" target="_blank"> <img alt="Click for enlarged picture" src="
https://hosting.photobucket.com/95288841-8654-4bf7-8fc9-a4aa78dce87f/cec0dcef-7acb-4a77-89de-271ed5410672.jpg" width="600" /> </a></p>
<p>
<a href=" https://hosting.photobucket.com/95288841-8654-4bf7-8fc9-a4aa78dce87f/a495a5fc-31a2-4979-a970-0fa22c334354.jpg
" target="_blank"> <img alt="Click for enlarged picture" src="
https://hosting.photobucket.com/95288841-8654-4bf7-8fc9-a4aa78dce87f/a495a5fc-31a2-4979-a970-0fa22c334354.jpg" width="600" /> </a></p>
<p>
<strong>AGRAM ARENA – Leaving Asphodel Necropolis28 Campaign</strong></p>
<p>
During the weekend of February 21-22, we held a new international competition, Agram Arena! This time it was the turn of the tabletop strategy game Necropolis28, for which our members designed a two-day campaign. Each participant created their own gang of soldiers, and the vast majority also created their own boards.</p>
<p>
<a href=" https://hosting.photobucket.com/95288841-8654-4bf7-8fc9-a4aa78dce87f/ac69b182-4bfc-4575-a6d3-fb3c8baba342.jpg
" target="_blank"> <img alt="Click for enlarged picture" src="
https://hosting.photobucket.com/95288841-8654-4bf7-8fc9-a4aa78dce87f/ac69b182-4bfc-4575-a6d3-fb3c8baba342.jpg" width="600" /> </a></p>
<p>
<a href=" https://hosting.photobucket.com/95288841-8654-4bf7-8fc9-a4aa78dce87f/289fed7b-e058-42d8-ba2d-cbd0463e98da.jpg
" target="_blank"> <img alt="Click for enlarged picture" src="
https://hosting.photobucket.com/95288841-8654-4bf7-8fc9-a4aa78dce87f/289fed7b-e058-42d8-ba2d-cbd0463e98da.jpg" width="600" /> </a></p>
<p>
<a href=" https://hosting.photobucket.com/95288841-8654-4bf7-8fc9-a4aa78dce87f/d92ebbee-859d-4441-8386-3d760b20b7a7.jpg
" target="_blank"> <img alt="Click for enlarged picture" src="
https://hosting.photobucket.com/95288841-8654-4bf7-8fc9-a4aa78dce87f/d92ebbee-859d-4441-8386-3d760b20b7a7.jpg" width="600" /> </a></p>
<p>
<a href=" https://hosting.photobucket.com/95288841-8654-4bf7-8fc9-a4aa78dce87f/09c59798-7871-425e-a075-3ca1cd91768a.jpg
" target="_blank"> <img alt="Click for enlarged picture" src="
https://hosting.photobucket.com/95288841-8654-4bf7-8fc9-a4aa78dce87f/09c59798-7871-425e-a075-3ca1cd91768a.jpg" width="600" /> </a></p>
<p>
<a href=" https://hosting.photobucket.com/95288841-8654-4bf7-8fc9-a4aa78dce87f/b2f3edc8-5a23-4552-9a2a-4027b286f327.jpg
" target="_blank"> <img alt="Click for enlarged picture" src="
https://hosting.photobucket.com/95288841-8654-4bf7-8fc9-a4aa78dce87f/b2f3edc8-5a23-4552-9a2a-4027b286f327.jpg" width="600" /> </a></p>
<p>
<a href=" https://hosting.photobucket.com/95288841-8654-4bf7-8fc9-a4aa78dce87f/2a9f43ac-b531-4746-b7bb-ac5a3356aab0.jpg
" target="_blank"> <img alt="Click for enlarged picture" src="
https://hosting.photobucket.com/95288841-8654-4bf7-8fc9-a4aa78dce87f/2a9f43ac-b531-4746-b7bb-ac5a3356aab0.jpg" width="600" /> </a></p>
<p>
<strong>EVENTS ON WEEKDAYS DURING THE EXHIBITION </strong></p>
<p>
Over the next two weeks, our volunteers held open miniature painting workshops on weekdays from 4:00 PM to 8:00 PM. Miniature painting workstations were set up where our visitors could paint miniatures we had prepared (or their own if they had brought them) using our materials and tools.</p>
<p>
<a href=" https://hosting.photobucket.com/95288841-8654-4bf7-8fc9-a4aa78dce87f/6edf7765-42b5-417a-820f-fa5d907179a7.jpg
" target="_blank"> <img alt="Click for enlarged picture" src="
https://hosting.photobucket.com/95288841-8654-4bf7-8fc9-a4aa78dce87f/6edf7765-42b5-417a-820f-fa5d907179a7.jpg" width="600" /> </a></p>
<p>
<a href=" https://hosting.photobucket.com/95288841-8654-4bf7-8fc9-a4aa78dce87f/c084ebe2-f57b-4519-9b31-29bdc1155887.jpg
" target="_blank"> <img alt="Click for enlarged picture" src="
https://hosting.photobucket.com/95288841-8654-4bf7-8fc9-a4aa78dce87f/c084ebe2-f57b-4519-9b31-29bdc1155887.jpg" width="600" /> </a></p>
<p>
<a href=" https://hosting.photobucket.com/95288841-8654-4bf7-8fc9-a4aa78dce87f/37ff2272-f9b0-4b16-a363-1e6f6688c866.jpg
" target="_blank"> <img alt="Click for enlarged picture" src="
https://hosting.photobucket.com/95288841-8654-4bf7-8fc9-a4aa78dce87f/37ff2272-f9b0-4b16-a363-1e6f6688c866.jpg" width="600" /> </a></p>
<p>
<a href=" https://hosting.photobucket.com/95288841-8654-4bf7-8fc9-a4aa78dce87f/5f4f7968-ff50-4a01-98da-6ce8562930b4.jpg
" target="_blank"> <img alt="Click for enlarged picture" src="
https://hosting.photobucket.com/95288841-8654-4bf7-8fc9-a4aa78dce87f/5f4f7968-ff50-4a01-98da-6ce8562930b4.jpg" width="600" /> </a></p>
<p>
<a href=" https://hosting.photobucket.com/95288841-8654-4bf7-8fc9-a4aa78dce87f/cbb45319-d488-483c-bf9d-9af29852fc74.jpg
" target="_blank"> <img alt="Click for enlarged picture" src="
https://hosting.photobucket.com/95288841-8654-4bf7-8fc9-a4aa78dce87f/cbb45319-d488-483c-bf9d-9af29852fc74.jpg" width="600" /> </a></p>
<p>
<a href=" https://hosting.photobucket.com/95288841-8654-4bf7-8fc9-a4aa78dce87f/3dcca26c-d549-4af3-812a-a4a81b9a2310.jpg
" target="_blank"> <img alt="Click for enlarged picture" src="
https://hosting.photobucket.com/95288841-8654-4bf7-8fc9-a4aa78dce87f/3dcca26c-d549-4af3-812a-a4a81b9a2310.jpg" width="600" /> </a></p>
<p>
<a href=" https://hosting.photobucket.com/95288841-8654-4bf7-8fc9-a4aa78dce87f/4adf0fb6-3eab-4b40-b32d-d03eab4a9892.jpg
" target="_blank"> <img alt="Click for enlarged picture" src="
https://hosting.photobucket.com/95288841-8654-4bf7-8fc9-a4aa78dce87f/4adf0fb6-3eab-4b40-b32d-d03eab4a9892.jpg" width="600" /> </a></p>
<p>
<a href=" https://hosting.photobucket.com/95288841-8654-4bf7-8fc9-a4aa78dce87f/4732b58a-9a65-4d1c-a7d5-25513d34b108.jpg
" target="_blank"> <img alt="Click for enlarged picture" src="
https://hosting.photobucket.com/95288841-8654-4bf7-8fc9-a4aa78dce87f/4732b58a-9a65-4d1c-a7d5-25513d34b108.jpg" width="600" /> </a></p>
<p>
<a href=" https://hosting.photobucket.com/95288841-8654-4bf7-8fc9-a4aa78dce87f/274be330-31d5-4e25-95db-ec2f423a003c.jpg
" target="_blank"> <img alt="Click for enlarged picture" src="
https://hosting.photobucket.com/95288841-8654-4bf7-8fc9-a4aa78dce87f/274be330-31d5-4e25-95db-ec2f423a003c.jpg" width="600" /> </a></p>
<p>
<a href=" https://hosting.photobucket.com/95288841-8654-4bf7-8fc9-a4aa78dce87f/8e7b0a80-0f46-4d70-9789-a46976c713d2.jpg
" target="_blank"> <img alt="Click for enlarged picture" src="
https://hosting.photobucket.com/95288841-8654-4bf7-8fc9-a4aa78dce87f/8e7b0a80-0f46-4d70-9789-a46976c713d2.jpg" width="600" /> </a></p>
<p>
<a href=" https://hosting.photobucket.com/95288841-8654-4bf7-8fc9-a4aa78dce87f/8bbd4e96-b911-4f26-80fe-b1c57f29027b.jpg
" target="_blank"> <img alt="Click for enlarged picture" src="
https://hosting.photobucket.com/95288841-8654-4bf7-8fc9-a4aa78dce87f/8bbd4e96-b911-4f26-80fe-b1c57f29027b.jpg" width="600" /> </a></p>
<p>
<a href=" https://hosting.photobucket.com/95288841-8654-4bf7-8fc9-a4aa78dce87f/203a27be-8f10-459d-89b9-befb6b636b74.jpg
" target="_blank"> <img alt="Click for enlarged picture" src="
https://hosting.photobucket.com/95288841-8654-4bf7-8fc9-a4aa78dce87f/203a27be-8f10-459d-89b9-befb6b636b74.jpg" width="600" /> </a></p>
<p>
<a href=" https://hosting.photobucket.com/95288841-8654-4bf7-8fc9-a4aa78dce87f/5dc4358f-19d8-475f-a4af-9c29e9ed18d7.jpg
" target="_blank"> <img alt="Click for enlarged picture" src="
https://hosting.photobucket.com/95288841-8654-4bf7-8fc9-a4aa78dce87f/5dc4358f-19d8-475f-a4af-9c29e9ed18d7.jpg" width="600" /> </a></p>
<p>
<strong>BACK TO BASICS MINIATURE PAINTING WORKSHOPS FOR YOUNG</strong></p>
<p>
On weekdays from 17:00 to 18:00, we held our new workshops for the youngest, in which our youngest participants painted their first miniatures.</p>
<p>
<a href=" https://hosting.photobucket.com/95288841-8654-4bf7-8fc9-a4aa78dce87f/948af139-8fb5-4e28-a27c-404466e70d05.jpg
" target="_blank"> <img alt="Click for enlarged picture" src="
https://hosting.photobucket.com/95288841-8654-4bf7-8fc9-a4aa78dce87f/948af139-8fb5-4e28-a27c-404466e70d05.jpg" width="600" /> </a></p>
<p>
<a href=" https://hosting.photobucket.com/95288841-8654-4bf7-8fc9-a4aa78dce87f/bb3e20c2-bb21-4a3d-863a-74de08261467.jpg
" target="_blank"> <img alt="Click for enlarged picture" src="
https://hosting.photobucket.com/95288841-8654-4bf7-8fc9-a4aa78dce87f/bb3e20c2-bb21-4a3d-863a-74de08261467.jpg" width="600" /> </a></p>
<p>
<a href=" https://hosting.photobucket.com/95288841-8654-4bf7-8fc9-a4aa78dce87f/7316c760-98e3-4e3f-9261-d138aa7a5a6a.jpg
" target="_blank"> <img alt="Click for enlarged picture" src="
https://hosting.photobucket.com/95288841-8654-4bf7-8fc9-a4aa78dce87f/7316c760-98e3-4e3f-9261-d138aa7a5a6a.jpg" width="600" /> </a></p>
<p>
<a href=" https://hosting.photobucket.com/95288841-8654-4bf7-8fc9-a4aa78dce87f/68934b39-3d1f-4f43-b967-14b73c41a39e.jpg
" target="_blank"> <img alt="Click for enlarged picture" src="
https://hosting.photobucket.com/95288841-8654-4bf7-8fc9-a4aa78dce87f/68934b39-3d1f-4f43-b967-14b73c41a39e.jpg" width="600" /> </a></p>
<p>
<a href=" https://hosting.photobucket.com/95288841-8654-4bf7-8fc9-a4aa78dce87f/46125bce-a28d-494f-873a-3aeabdc1d6c2.jpg
" target="_blank"> <img alt="Click for enlarged picture" src="
https://hosting.photobucket.com/95288841-8654-4bf7-8fc9-a4aa78dce87f/46125bce-a28d-494f-873a-3aeabdc1d6c2.jpg" width="600" /> </a></p>
<p>
<a href=" https://hosting.photobucket.com/95288841-8654-4bf7-8fc9-a4aa78dce87f/3c58e0ad-77a9-44c8-b6bf-d9a55c514d43.jpg
" target="_blank"> <img alt="Click for enlarged picture" src="
https://hosting.photobucket.com/95288841-8654-4bf7-8fc9-a4aa78dce87f/3c58e0ad-77a9-44c8-b6bf-d9a55c514d43.jpg" width="600" /> </a></p>
<p>
<a href=" https://hosting.photobucket.com/95288841-8654-4bf7-8fc9-a4aa78dce87f/f891f0f0-051b-40ee-9676-cb03b0a9811b.jpg
" target="_blank"> <img alt="Click for enlarged picture" src="
https://hosting.photobucket.com/95288841-8654-4bf7-8fc9-a4aa78dce87f/f891f0f0-051b-40ee-9676-cb03b0a9811b.jpg" width="600" /> </a></p>
<p>
<strong>AGRAM LEGO SECTION lecture: FW-14b – An F1 racecar for the future</strong></p>
<p>
On Wednesday, February 25, 2026, as part of the activities of our Agram Lego Section, our resident mechanical engineer Marko Paunović gave a lecture on the topic of the F1 racecar from 1992. Admission to the lecture was free, and upon completion, a LEGO model of the racecar was made by members of the Lego section</p>
<p>
<a href=" https://hosting.photobucket.com/95288841-8654-4bf7-8fc9-a4aa78dce87f/b2e14b1c-daa4-4314-8685-184377bc7e28.jpg
" target="_blank"> <img alt="Click for enlarged picture" src="
https://hosting.photobucket.com/95288841-8654-4bf7-8fc9-a4aa78dce87f/b2e14b1c-daa4-4314-8685-184377bc7e28.jpg" width="600" /> </a></p>
<p>
<a href=" https://hosting.photobucket.com/95288841-8654-4bf7-8fc9-a4aa78dce87f/31fb439a-77d3-4418-83ff-66c3af279cca.jpg" target="_blank"> <img alt="Click for enlarged picture" src="
https://hosting.photobucket.com/95288841-8654-4bf7-8fc9-a4aa78dce87f/31fb439a-77d3-4418-83ff-66c3af279cca.jpg" width="600" /> </a></p>
<p>
<a href=" https://hosting.photobucket.com/95288841-8654-4bf7-8fc9-a4aa78dce87f/bfcaf282-6be8-4b52-a3ed-c91137457876.jpg
" target="_blank"> <img alt="Click for enlarged picture" src="
https://hosting.photobucket.com/95288841-8654-4bf7-8fc9-a4aa78dce87f/bfcaf282-6be8-4b52-a3ed-c91137457876.jpg" width="600" /> </a></p>
<p>
<a href=" https://hosting.photobucket.com/95288841-8654-4bf7-8fc9-a4aa78dce87f/ce70fc61-9e1a-4169-aaad-8b67417656c0.jpg
" target="_blank"> <img alt="Click for enlarged picture" src="
https://hosting.photobucket.com/95288841-8654-4bf7-8fc9-a4aa78dce87f/ce70fc61-9e1a-4169-aaad-8b67417656c0.jpg" width="600" /> </a></p>
<p>
<a href=" https://hosting.photobucket.com/95288841-8654-4bf7-8fc9-a4aa78dce87f/94ca0e36-8710-458d-8194-9f71299f4d74.jpg
" target="_blank"> <img alt="Click for enlarged picture" src="
https://hosting.photobucket.com/95288841-8654-4bf7-8fc9-a4aa78dce87f/94ca0e36-8710-458d-8194-9f71299f4d74.jpg" width="600" /> </a></p>
<p>
<a href=" https://hosting.photobucket.com/95288841-8654-4bf7-8fc9-a4aa78dce87f/c6771f72-7191-4ca3-a792-3bb1ab3897b1.jpg
" target="_blank"> <img alt="Click for enlarged picture" src="
https://hosting.photobucket.com/95288841-8654-4bf7-8fc9-a4aa78dce87f/c6771f72-7191-4ca3-a792-3bb1ab3897b1.jpg" width="600" /> </a></p>
<p>
<a href=" https://hosting.photobucket.com/95288841-8654-4bf7-8fc9-a4aa78dce87f/c8fcfcb6-09f2-4398-a2fb-fa5065771e01.jpg
" target="_blank"> <img alt="Click for enlarged picture" src="
https://hosting.photobucket.com/95288841-8654-4bf7-8fc9-a4aa78dce87f/c8fcfcb6-09f2-4398-a2fb-fa5065771e01.jpg" width="600" /> </a></p>
<p>
<a href=" https://hosting.photobucket.com/95288841-8654-4bf7-8fc9-a4aa78dce87f/d7e187a8-d5b1-433b-b30d-091e54dcdddf.jpg
" target="_blank"> <img alt="Click for enlarged picture" src="
https://hosting.photobucket.com/95288841-8654-4bf7-8fc9-a4aa78dce87f/d7e187a8-d5b1-433b-b30d-091e54dcdddf.jpg" width="600" /> </a></p>
<p>
During the second weekend of the Exhibition, 28.02.-01.03., we organized a <strong>MINIATURE PAINTING WORKSHOP - Grimdark</strong>.</p>
<p>
The workshop was held over two days (the entire weekend) and participants painted up to three different figures for the game Trench Crusade. The focus of these lectures was on painting the popular grimdark style minis. The workshop presented paints and equipment, figure preparation, several miniature painting techniques from basic to advanced, and techniques and tricks for quickly and efficiently painting larger quantities of figures at once. Water-based acrylic paints were used as part of the workshop.</p>
<p>
<a href=" https://hosting.photobucket.com/95288841-8654-4bf7-8fc9-a4aa78dce87f/733d94b2-8e8d-4a4e-accd-b9168e32577e.jpg
" target="_blank"> <img alt="Click for enlarged picture" src="
https://hosting.photobucket.com/95288841-8654-4bf7-8fc9-a4aa78dce87f/733d94b2-8e8d-4a4e-accd-b9168e32577e.jpg
" width="600" /> </a></p>
<p>
<a href=" https://hosting.photobucket.com/95288841-8654-4bf7-8fc9-a4aa78dce87f/41020062-45b9-41cd-a357-fa23a389f390.jpg
" target="_blank"> <img alt="Click for enlarged picture" src="
https://hosting.photobucket.com/95288841-8654-4bf7-8fc9-a4aa78dce87f/41020062-45b9-41cd-a357-fa23a389f390.jpg
" width="600" /> </a></p>
<p>
<a href=" https://hosting.photobucket.com/95288841-8654-4bf7-8fc9-a4aa78dce87f/0c07cc55-596d-494d-972b-cd6a0dd6b8b7.jpg
" target="_blank"> <img alt="Click for enlarged picture" src="
https://hosting.photobucket.com/95288841-8654-4bf7-8fc9-a4aa78dce87f/0c07cc55-596d-494d-972b-cd6a0dd6b8b7.jpg" width="600" /> </a></p>
<p>
<a href=" https://hosting.photobucket.com/95288841-8654-4bf7-8fc9-a4aa78dce87f/c17dd356-08b1-48e1-b895-6296aed7f818.jpg
" target="_blank"> <img alt="Click for enlarged picture" src="
https://hosting.photobucket.com/95288841-8654-4bf7-8fc9-a4aa78dce87f/c17dd356-08b1-48e1-b895-6296aed7f818.jpg" width="600" /> </a></p>
<p>
On Wednesday 04.03.2026. the annual <strong>session of the Assembly</strong> was held, where we determined the guidelines for work in 2026.</p>
<p>
,</p>
<p>
<a href=" https://hosting.photobucket.com/95288841-8654-4bf7-8fc9-a4aa78dce87f/59484bd0-7edc-4aed-a04e-ae42900ba3e6.jpg
" target="_blank"> <img alt="Click for enlarged picture" src="
https://hosting.photobucket.com/95288841-8654-4bf7-8fc9-a4aa78dce87f/59484bd0-7edc-4aed-a04e-ae42900ba3e6.jpg
" width="600" /> </a></p>
<p>
On Sunday 08.03.2026. The exhibition was over, our exhibits safely stored, and the Gallery cleaned.</p>
<p>
<a href=" https://hosting.photobucket.com/95288841-8654-4bf7-8fc9-a4aa78dce87f/98af4280-0956-4cdb-b4a9-da40e3a5a44a.jpg
" target="_blank"> <img alt="Click for enlarged picture" src="
https://hosting.photobucket.com/95288841-8654-4bf7-8fc9-a4aa78dce87f/98af4280-0956-4cdb-b4a9-da40e3a5a44a.jpg" width="600" /> </a></p>
<p>
<a href=" https://hosting.photobucket.com/95288841-8654-4bf7-8fc9-a4aa78dce87f/3259b35e-1fc2-4a99-a3c5-c7984958d72b.jpg
" target="_blank"> <img alt="Click for enlarged picture" src="
https://hosting.photobucket.com/95288841-8654-4bf7-8fc9-a4aa78dce87f/3259b35e-1fc2-4a99-a3c5-c7984958d72b.jpg" width="600" /> </a></p>
<p>
The most important part of every year when holding this Exhibition is the social aspect, the socializing of our members both among themselves and with our international friends who visit us! With these few photos from our joint gatherings, we greet you until next year!</p>
<p>
<a href=" https://hosting.photobucket.com/95288841-8654-4bf7-8fc9-a4aa78dce87f/b9168e23-79b2-4d81-8a7d-7534062881a7.jpg
" target="_blank"> <img alt="Click for enlarged picture" src="
https://hosting.photobucket.com/95288841-8654-4bf7-8fc9-a4aa78dce87f/b9168e23-79b2-4d81-8a7d-7534062881a7.jpg " width="600" /> </a></p>
<p>
<a href=" https://hosting.photobucket.com/95288841-8654-4bf7-8fc9-a4aa78dce87f/edff925e-916c-4d78-953e-210abf3753d4.jpg
" target="_blank"> <img alt="Click for enlarged picture" src="
https://hosting.photobucket.com/95288841-8654-4bf7-8fc9-a4aa78dce87f/edff925e-916c-4d78-953e-210abf3753d4.jpg " width="600" /> </a></p>
<p>
<a href=" https://hosting.photobucket.com/95288841-8654-4bf7-8fc9-a4aa78dce87f/8bcb48fa-466b-43f8-8a4b-f15f6794b21e.jpg
" target="_blank"> <img alt="Click for enlarged picture" src="
https://hosting.photobucket.com/95288841-8654-4bf7-8fc9-a4aa78dce87f/8bcb48fa-466b-43f8-8a4b-f15f6794b21e.jpg" width="600" /> </a></p>
",
"content_hrv" => "<p>
<a href=" https://hosting.photobucket.com/95288841-8654-4bf7-8fc9-a4aa78dce87f/dc756f84-867d-4df4-acd8-5d43775cafc2.jpg
" target="_blank"> <img alt="Click for enlarged picture" src="
https://hosting.photobucket.com/95288841-8654-4bf7-8fc9-a4aa78dce87f/dc756f84-867d-4df4-acd8-5d43775cafc2.jpg" width="600" /> </a></p>
<p>
<strong>Izložba minijatura i maketa "Agram 2026"</strong> održala se ove godine od 19.2. do 08.03. Postavljanje izložbe je održano u srijedu 18.2. i sudjelovao je velik broj članova kao i prijatelja Udruge koji su izlagali svoje radove.</p>
<p>
<a href=" https://hosting.photobucket.com/95288841-8654-4bf7-8fc9-a4aa78dce87f/8529d6d4-76ea-4872-a9e6-748e04223a4e.jpg
" target="_blank"> <img alt="Click for enlarged picture" src="
https://hosting.photobucket.com/95288841-8654-4bf7-8fc9-a4aa78dce87f/8529d6d4-76ea-4872-a9e6-748e04223a4e.jpg
" width="600" /> </a></p>
<p>
<a href=" https://hosting.photobucket.com/95288841-8654-4bf7-8fc9-a4aa78dce87f/f3038937-f001-4ceb-b725-a330fcd64cee.jpg
" target="_blank"> <img alt="Click for enlarged picture" src="
https://hosting.photobucket.com/95288841-8654-4bf7-8fc9-a4aa78dce87f/f3038937-f001-4ceb-b725-a330fcd64cee.jpg
" width="600" /> </a></p>
<p>
<a href=" https://hosting.photobucket.com/95288841-8654-4bf7-8fc9-a4aa78dce87f/3575379e-e068-49e2-9d4d-c9a49531fdc2.jpg
" target="_blank"> <img alt="Click for enlarged picture" src="
https://hosting.photobucket.com/95288841-8654-4bf7-8fc9-a4aa78dce87f/3575379e-e068-49e2-9d4d-c9a49531fdc2.jpg" width="600" /> </a></p>
<p>
<a href=" https://hosting.photobucket.com/95288841-8654-4bf7-8fc9-a4aa78dce87f/e51713c7-2add-4f8f-ae37-e6eba25badff.jpg
" target="_blank"> <img alt="Click for enlarged picture" src="
https://hosting.photobucket.com/95288841-8654-4bf7-8fc9-a4aa78dce87f/e51713c7-2add-4f8f-ae37-e6eba25badff.jpg" width="600" /> </a></p>
<p>
<a href=" https://hosting.photobucket.com/95288841-8654-4bf7-8fc9-a4aa78dce87f/9c0bb546-50a8-483d-aeab-ab3b2ce9f094.jpg
" target="_blank"> <img alt="Click for enlarged picture" src="
https://hosting.photobucket.com/95288841-8654-4bf7-8fc9-a4aa78dce87f/9c0bb546-50a8-483d-aeab-ab3b2ce9f094.jpg" width="600" /> </a></p>
<p>
Otvorenje Izložbe održalo se u četvrtak, 19.2.2026. s početkom u 18:00h. Izložba je organizirana povodom našeg dvadeset trećeg rođendana.</p>
<p>
<a href=" https://hosting.photobucket.com/95288841-8654-4bf7-8fc9-a4aa78dce87f/71c7bfc2-1ffc-43b9-9d5a-53e009f6b86d.jpg
" target="_blank"> <img alt="Click for enlarged picture" src="
https://hosting.photobucket.com/95288841-8654-4bf7-8fc9-a4aa78dce87f/71c7bfc2-1ffc-43b9-9d5a-53e009f6b86d.jpg" width="600" /> </a></p>
<p>
<a href=" https://hosting.photobucket.com/95288841-8654-4bf7-8fc9-a4aa78dce87f/007b4701-1d7c-4a67-a599-0539a2aa3191.jpg
" target="_blank"> <img alt="Click for enlarged picture" src="
https://hosting.photobucket.com/95288841-8654-4bf7-8fc9-a4aa78dce87f/007b4701-1d7c-4a67-a599-0539a2aa3191.jpg" width="600" /> </a></p>
<p>
<a href=" https://hosting.photobucket.com/95288841-8654-4bf7-8fc9-a4aa78dce87f/2c8090e2-8b95-4368-bb48-98876d680e15.jpg
" target="_blank"> <img alt="Click for enlarged picture" src="
https://hosting.photobucket.com/95288841-8654-4bf7-8fc9-a4aa78dce87f/2c8090e2-8b95-4368-bb48-98876d680e15.jpg" width="600" /> </a></p>
<p>
<a href=" https://hosting.photobucket.com/95288841-8654-4bf7-8fc9-a4aa78dce87f/375768ad-a8bb-49bf-9845-e46c896ba7ec.jpg
" target="_blank"> <img alt="Click for enlarged picture" src="
https://hosting.photobucket.com/95288841-8654-4bf7-8fc9-a4aa78dce87f/375768ad-a8bb-49bf-9845-e46c896ba7ec.jpg" width="600" /> </a></p>
<p>
<a href=" https://hosting.photobucket.com/95288841-8654-4bf7-8fc9-a4aa78dce87f/a93de974-4ccb-4876-85b0-4d066ae402b3.jpg
" target="_blank"> <img alt="Click for enlarged picture" src="
https://hosting.photobucket.com/95288841-8654-4bf7-8fc9-a4aa78dce87f/a93de974-4ccb-4876-85b0-4d066ae402b3.jpg" width="600" /> </a></p>
<p>
<a href=" https://hosting.photobucket.com/95288841-8654-4bf7-8fc9-a4aa78dce87f/d323ccc9-1b9a-4cb2-8adf-7019b0e217f4.jpg
" target="_blank"> <img alt="Click for enlarged picture" src="
https://hosting.photobucket.com/95288841-8654-4bf7-8fc9-a4aa78dce87f/d323ccc9-1b9a-4cb2-8adf-7019b0e217f4.jpg" width="600" /> </a></p>
<p>
<a href=" https://hosting.photobucket.com/95288841-8654-4bf7-8fc9-a4aa78dce87f/a5a66447-2d76-47ae-866d-4d512ef469a5.jpg
" target="_blank"> <img alt="Click for enlarged picture" src="
https://hosting.photobucket.com/95288841-8654-4bf7-8fc9-a4aa78dce87f/a5a66447-2d76-47ae-866d-4d512ef469a5.jpg" width="600" /> </a></p>
<p>
<a href=" https://hosting.photobucket.com/95288841-8654-4bf7-8fc9-a4aa78dce87f/3e7bcfc9-ba02-4f94-a6c3-79dfaea3639e.jpg
" target="_blank"> <img alt="Click for enlarged picture" src="
https://hosting.photobucket.com/95288841-8654-4bf7-8fc9-a4aa78dce87f/3e7bcfc9-ba02-4f94-a6c3-79dfaea3639e.jpg" width="600" /> </a></p>
<p>
<a href=" https://hosting.photobucket.com/95288841-8654-4bf7-8fc9-a4aa78dce87f/24e79466-4a9e-4b10-970c-caad235d260d.jpg
" target="_blank"> <img alt="Click for enlarged picture" src="
https://hosting.photobucket.com/95288841-8654-4bf7-8fc9-a4aa78dce87f/24e79466-4a9e-4b10-970c-caad235d260d.jpg" width="600" /> </a></p>
<p>
Kao i uvijek, Izložba je prikazivala presjek rada Udruge, njenih članova, polaznika njenih tečajeva i radionica te članova FB grupe Miniature Painters Croatia. U velikom broju vitrina našle su se brojne minijature za stolne strateške igre, igre na tabli, a cijela jedna vitrina posvećena je nagrađenim izlošcima sa prethodnih minijaturističkih natjecanja. Nekoliko vitrina bilo je posvećeno projektima koje Udruga već 23 godinu provodi poput Knjižnice i čitaonice UMS „Agram“, Radionice za izradu prostornih maketa i Radionice bojanja minijatura, ali i novih poput Agram Group Build, Agram Lego Sekcije i Back to Basics radionica bojanja za najmlađe.</p>
<p>
<a href=" https://hosting.photobucket.com/95288841-8654-4bf7-8fc9-a4aa78dce87f/fca84936-af71-44d3-9a4c-faeb26163899.jpg
" target="_blank"> <img alt="Click for enlarged picture" src="
https://hosting.photobucket.com/95288841-8654-4bf7-8fc9-a4aa78dce87f/fca84936-af71-44d3-9a4c-faeb26163899.jpg" width="600" /> </a></p>
<p>
<a href=" https://hosting.photobucket.com/95288841-8654-4bf7-8fc9-a4aa78dce87f/459bc5ac-8702-46f9-93b4-547deaabdef4.jpg
" target="_blank"> <img alt="Click for enlarged picture" src="
https://hosting.photobucket.com/95288841-8654-4bf7-8fc9-a4aa78dce87f/459bc5ac-8702-46f9-93b4-547deaabdef4.jpg" width="600" /> </a></p>
<p>
<a href=" https://hosting.photobucket.com/95288841-8654-4bf7-8fc9-a4aa78dce87f/91a04363-b2ef-4635-a046-7edf25ce7808.jpg
" target="_blank"> <img alt="Click for enlarged picture" src="
https://hosting.photobucket.com/95288841-8654-4bf7-8fc9-a4aa78dce87f/91a04363-b2ef-4635-a046-7edf25ce7808.jpg" width="600" /> </a></p>
<p>
<a href=" https://hosting.photobucket.com/95288841-8654-4bf7-8fc9-a4aa78dce87f/73256af5-fd5d-40b5-95e1-120e49c9be87.jpg
" target="_blank"> <img alt="Click for enlarged picture" src="
https://hosting.photobucket.com/95288841-8654-4bf7-8fc9-a4aa78dce87f/73256af5-fd5d-40b5-95e1-120e49c9be87.jpg" width="600" /> </a></p>
<p>
<a href=" https://hosting.photobucket.com/95288841-8654-4bf7-8fc9-a4aa78dce87f/979f9be5-23f3-4df9-91dc-ab71d6a10d64.jpg
" target="_blank"> <img alt="Click for enlarged picture" src="
https://hosting.photobucket.com/95288841-8654-4bf7-8fc9-a4aa78dce87f/979f9be5-23f3-4df9-91dc-ab71d6a10d64.jpg" width="600" /> </a></p>
<p>
<a href=" https://hosting.photobucket.com/95288841-8654-4bf7-8fc9-a4aa78dce87f/d0ff4379-183a-47b9-a740-9ddc283ebc29.jpg
" target="_blank"> <img alt="Click for enlarged picture" src="
https://hosting.photobucket.com/95288841-8654-4bf7-8fc9-a4aa78dce87f/d0ff4379-183a-47b9-a740-9ddc283ebc29.jpg" width="600" /> </a></p>
<p>
<a href=" https://hosting.photobucket.com/95288841-8654-4bf7-8fc9-a4aa78dce87f/4333e95e-bbbd-4f47-aaea-38a9c99e54d8.jpg
" target="_blank"> <img alt="Click for enlarged picture" src="
https://hosting.photobucket.com/95288841-8654-4bf7-8fc9-a4aa78dce87f/4333e95e-bbbd-4f47-aaea-38a9c99e54d8.jpg" width="600" /> </a></p>
<p>
<a href=" https://hosting.photobucket.com/95288841-8654-4bf7-8fc9-a4aa78dce87f/1372f8a2-b222-48ee-ae45-a90b5a354ef7.jpg
" target="_blank"> <img alt="Click for enlarged picture" src="
https://hosting.photobucket.com/95288841-8654-4bf7-8fc9-a4aa78dce87f/1372f8a2-b222-48ee-ae45-a90b5a354ef7.jpg" width="600" /> </a></p>
<p>
<a href=" https://hosting.photobucket.com/95288841-8654-4bf7-8fc9-a4aa78dce87f/6a1b4fd1-d982-4b06-9c5f-3cd40d6bf10a.jpg
" target="_blank"> <img alt="Click for enlarged picture" src="
https://hosting.photobucket.com/95288841-8654-4bf7-8fc9-a4aa78dce87f/6a1b4fd1-d982-4b06-9c5f-3cd40d6bf10a.jpg" width="600" /> </a></p>
<p>
<a href=" https://hosting.photobucket.com/95288841-8654-4bf7-8fc9-a4aa78dce87f/c2ec45e1-e0f3-463a-b254-cb2a38b53e14.jpg
" target="_blank"> <img alt="Click for enlarged picture" src="
https://hosting.photobucket.com/95288841-8654-4bf7-8fc9-a4aa78dce87f/c2ec45e1-e0f3-463a-b254-cb2a38b53e14.jpg" width="600" /> </a></p>
<p>
<a href=" https://hosting.photobucket.com/95288841-8654-4bf7-8fc9-a4aa78dce87f/17553b9a-0592-4f6a-a097-3f1a97e161f3.jpg
" target="_blank"> <img alt="Click for enlarged picture" src="
https://hosting.photobucket.com/95288841-8654-4bf7-8fc9-a4aa78dce87f/17553b9a-0592-4f6a-a097-3f1a97e161f3.jpg" width="600" /> </a></p>
<p>
<a href=" https://hosting.photobucket.com/95288841-8654-4bf7-8fc9-a4aa78dce87f/8658bd6b-dff2-4d24-8473-928d44d44480.jpg
" target="_blank"> <img alt="Click for enlarged picture" src="
https://hosting.photobucket.com/95288841-8654-4bf7-8fc9-a4aa78dce87f/8658bd6b-dff2-4d24-8473-928d44d44480.jpg" width="600" /> </a></p>
<p>
<a href=" https://hosting.photobucket.com/95288841-8654-4bf7-8fc9-a4aa78dce87f/ecab0ea7-f75b-4e31-a520-d088ad39fa17.jpg
" target="_blank"> <img alt="Click for enlarged picture" src="
https://hosting.photobucket.com/95288841-8654-4bf7-8fc9-a4aa78dce87f/ecab0ea7-f75b-4e31-a520-d088ad39fa17.jpg" width="600" /> </a></p>
<p>
<a href=" https://hosting.photobucket.com/95288841-8654-4bf7-8fc9-a4aa78dce87f/9495a2f5-8a82-41f2-abf4-9ade3db41d87.jpg
" target="_blank"> <img alt="Click for enlarged picture" src="
https://hosting.photobucket.com/95288841-8654-4bf7-8fc9-a4aa78dce87f/9495a2f5-8a82-41f2-abf4-9ade3db41d87.jpg" width="600" /> </a></p>
<p>
<a href=" https://hosting.photobucket.com/95288841-8654-4bf7-8fc9-a4aa78dce87f/362cc6fd-a5dd-474b-9b9f-aeab27d6dcfa.jpg
" target="_blank"> <img alt="Click for enlarged picture" src="
https://hosting.photobucket.com/95288841-8654-4bf7-8fc9-a4aa78dce87f/362cc6fd-a5dd-474b-9b9f-aeab27d6dcfa.jpg" width="600" /> </a></p>
<p>
Posebna čast nam je bila ugostiti našeg gosta izlagača, Ninoslava Luka minijaturista iz Poreča koji nam se predstavio svojom kolekcijom povijesnih diorama.</p>
<p>
<a href=" https://hosting.photobucket.com/95288841-8654-4bf7-8fc9-a4aa78dce87f/ba1353de-e2bd-4340-9121-9056e287ed4a.jpg
" target="_blank"> <img alt="Click for enlarged picture" src="
https://hosting.photobucket.com/95288841-8654-4bf7-8fc9-a4aa78dce87f/ba1353de-e2bd-4340-9121-9056e287ed4a.jpg" width="600" /> </a></p>
<p>
<a href=" https://hosting.photobucket.com/95288841-8654-4bf7-8fc9-a4aa78dce87f/cea18506-1b50-4e5b-955c-0b9ca02d7826.jpg
" target="_blank"> <img alt="Click for enlarged picture" src="
https://hosting.photobucket.com/95288841-8654-4bf7-8fc9-a4aa78dce87f/cea18506-1b50-4e5b-955c-0b9ca02d7826.jpg" width="600" /> </a></p>
<p>
<a href=" https://hosting.photobucket.com/95288841-8654-4bf7-8fc9-a4aa78dce87f/1be85b41-e3b6-4536-b141-cd0da6eb38c1.jpg
" target="_blank"> <img alt="Click for enlarged picture" src="
https://hosting.photobucket.com/95288841-8654-4bf7-8fc9-a4aa78dce87f/1be85b41-e3b6-4536-b141-cd0da6eb38c1.jpg" width="600" /> </a></p>
<p>
<a href=" https://hosting.photobucket.com/95288841-8654-4bf7-8fc9-a4aa78dce87f/9e93b87d-ff3c-4b7b-8f06-5f9d3464a134.jpg
" target="_blank"> <img alt="Click for enlarged picture" src="
https://hosting.photobucket.com/95288841-8654-4bf7-8fc9-a4aa78dce87f/9e93b87d-ff3c-4b7b-8f06-5f9d3464a134.jpg" width="600" /> </a></p>
<p>
Tijekom prvog vikenda Izložbe, 21.-22.02.,održali smo 20. godišnje međunarodno natjecanje u bojanju minijatura <strong>Black Queen Hobby and Miniature Painting Competition</strong>!</p>
<p>
<a href=" https://hosting.photobucket.com/95288841-8654-4bf7-8fc9-a4aa78dce87f/3056fb09-f66c-4dea-80a8-a4e72407429a.jpg
" target="_blank"> <img alt="Click for enlarged picture" src="
https://hosting.photobucket.com/95288841-8654-4bf7-8fc9-a4aa78dce87f/3056fb09-f66c-4dea-80a8-a4e72407429a.jpg" width="600" /> </a></p>
<p>
Kako su natjecatelji pristizali i prijavljivali se na natjecanje, naše vrijedno osoblje je fotografiralo sve izloške prije nego li su ih rasporedili po kategorijama i pažljivo ih postavili u staklene vitrine. Niti jutarnja okrijepa nije usfalila zahvaljujući našim revnim volonterima.</p>
<p>
<a href=" https://hosting.photobucket.com/95288841-8654-4bf7-8fc9-a4aa78dce87f/1118089c-2b46-4a2c-b17d-dc92b66d1ffc.jpg
" target="_blank"> <img alt="Click for enlarged picture" src="
https://hosting.photobucket.com/95288841-8654-4bf7-8fc9-a4aa78dce87f/1118089c-2b46-4a2c-b17d-dc92b66d1ffc.jpg" width="600" /> </a></p>
<p>
<a href=" https://hosting.photobucket.com/95288841-8654-4bf7-8fc9-a4aa78dce87f/9fd3c272-9a69-4532-a09d-36497a20a820.jpg
" target="_blank"> <img alt="Click for enlarged picture" src="
https://hosting.photobucket.com/95288841-8654-4bf7-8fc9-a4aa78dce87f/9fd3c272-9a69-4532-a09d-36497a20a820.jpg" width="600" /> </a></p>
<p>
<a href=" https://hosting.photobucket.com/95288841-8654-4bf7-8fc9-a4aa78dce87f/86995e80-c502-45fb-80f5-c8fda27da3f9.jpg
" target="_blank"> <img alt="Click for enlarged picture" src="
https://hosting.photobucket.com/95288841-8654-4bf7-8fc9-a4aa78dce87f/86995e80-c502-45fb-80f5-c8fda27da3f9.jpg" width="600" /> </a></p>
<p>
U podne, sve vitrine su bile pune i natjecanje je moglo službeno početi.</p>
<p>
<a href=" https://hosting.photobucket.com/95288841-8654-4bf7-8fc9-a4aa78dce87f/bce59a4f-c3e3-4708-a3d6-25e81a894c24.jpg
" target="_blank"> <img alt="Click for enlarged picture" src="
https://hosting.photobucket.com/95288841-8654-4bf7-8fc9-a4aa78dce87f/bce59a4f-c3e3-4708-a3d6-25e81a894c24.jpg" width="600" /> </a></p>
<p>
<a href=" https://hosting.photobucket.com/95288841-8654-4bf7-8fc9-a4aa78dce87f/16a0a094-01aa-4e52-82cf-fdab00d74711.jpg
" target="_blank"> <img alt="Click for enlarged picture" src="
https://hosting.photobucket.com/95288841-8654-4bf7-8fc9-a4aa78dce87f/16a0a094-01aa-4e52-82cf-fdab00d74711.jpg" width="600" /> </a></p>
<p>
<a href=" https://hosting.photobucket.com/95288841-8654-4bf7-8fc9-a4aa78dce87f/0d3f4042-ff77-48d0-b332-add0fd08f7c3.jpg
" target="_blank"> <img alt="Click for enlarged picture" src="
https://hosting.photobucket.com/95288841-8654-4bf7-8fc9-a4aa78dce87f/0d3f4042-ff77-48d0-b332-add0fd08f7c3.jpg" width="600" /> </a></p>
<p>
<a href=" https://hosting.photobucket.com/95288841-8654-4bf7-8fc9-a4aa78dce87f/3711baf8-93f2-434a-aea9-a95288ca04dd.jpg
" target="_blank"> <img alt="Click for enlarged picture" src="
https://hosting.photobucket.com/95288841-8654-4bf7-8fc9-a4aa78dce87f/3711baf8-93f2-434a-aea9-a95288ca04dd.jpg" width="600" /> </a></p>
<p>
<a href=" https://hosting.photobucket.com/95288841-8654-4bf7-8fc9-a4aa78dce87f/53113b97-ec06-4409-95ba-95a5ad3f9720.jpg
" target="_blank"> <img alt="Click for enlarged picture" src="
https://hosting.photobucket.com/95288841-8654-4bf7-8fc9-a4aa78dce87f/53113b97-ec06-4409-95ba-95a5ad3f9720.jpg" width="600" /> </a></p>
<p>
<a href=" https://hosting.photobucket.com/95288841-8654-4bf7-8fc9-a4aa78dce87f/ab127858-193d-4976-bdb2-e27302722fca.jpg
" target="_blank"> <img alt="Click for enlarged picture" src="
https://hosting.photobucket.com/95288841-8654-4bf7-8fc9-a4aa78dce87f/ab127858-193d-4976-bdb2-e27302722fca.jpg" width="600" /> </a></p>
<p>
<a href=" https://hosting.photobucket.com/95288841-8654-4bf7-8fc9-a4aa78dce87f/3735af11-3fb6-4772-a8ff-5e0ff6ddf03a.jpg
" target="_blank"> <img alt="Click for enlarged picture" src="
https://hosting.photobucket.com/95288841-8654-4bf7-8fc9-a4aa78dce87f/3735af11-3fb6-4772-a8ff-5e0ff6ddf03a.jpg" width="600" /> </a></p>
<p>
<strong>Back To Basics radionice za najmlađe na Black Queen</strong></p>
<p>
Ove godine smo tijekom cijelog vikenda organizirali radionice bojanja minijatura za najmlađe koji su mogli po prvi puta obojati neku od naših vlastitih minijatura osmišljenih upravo za ovaj program!</p>
<p>
<a href=" https://hosting.photobucket.com/95288841-8654-4bf7-8fc9-a4aa78dce87f/6999be0c-8cc6-4947-a423-9427a2299724.jpg
" target="_blank"> <img alt="Click for enlarged picture" src="
https://hosting.photobucket.com/95288841-8654-4bf7-8fc9-a4aa78dce87f/6999be0c-8cc6-4947-a423-9427a2299724.jpg" width="600" /> </a></p>
<p>
<a href="https://hosting.photobucket.com/95288841-8654-4bf7-8fc9-a4aa78dce87f/835b05a5-f171-49df-afa6-da0692b89074.jpg" target="_blank"><img alt="Click for enlarged picture" src="https://hosting.photobucket.com/95288841-8654-4bf7-8fc9-a4aa78dce87f/835b05a5-f171-49df-afa6-da0692b89074.jpg" width="600" /></a></p>
<p>
<a href=" https://hosting.photobucket.com/95288841-8654-4bf7-8fc9-a4aa78dce87f/ef5dde13-84ee-4ea0-b9f3-28aaf703ef6d.jpg
" target="_blank"> <img alt="Click for enlarged picture" src="
https://hosting.photobucket.com/95288841-8654-4bf7-8fc9-a4aa78dce87f/ef5dde13-84ee-4ea0-b9f3-28aaf703ef6d.jpg" width="600" /> </a></p>
<p>
<strong>PRODAJNI KUTAK</strong></p>
<p>
Tijekom vikenda ugostili smo naše sponzore sa njihovim prodajnim štandovima: Swood.si i Carta Magica.</p>
<p>
<a href=" https://hosting.photobucket.com/95288841-8654-4bf7-8fc9-a4aa78dce87f/5ee9a49f-a387-435a-9110-572402b7191d.jpg
" target="_blank"> <img alt="Click for enlarged picture" src="
https://hosting.photobucket.com/95288841-8654-4bf7-8fc9-a4aa78dce87f/5ee9a49f-a387-435a-9110-572402b7191d.jpg" width="600" /> </a></p>
<p>
<a href=" https://hosting.photobucket.com/95288841-8654-4bf7-8fc9-a4aa78dce87f/47cf600f-b1eb-4655-bf06-305f6f21d5d2.jpg
" target="_blank"> <img alt="Click for enlarged picture" src="
https://hosting.photobucket.com/95288841-8654-4bf7-8fc9-a4aa78dce87f/47cf600f-b1eb-4655-bf06-305f6f21d5d2.jpg" width="600" /> </a></p>
<p>
<strong>OGLEDNE RADIONICE BOJANJA MINIJATURA</strong></p>
<p>
Prostor ZZTK omogućuje održavanje radionica tijekom vikenda u kino dvorani u podrumu, stoga smo tijekom vikenda organizirali i ogledne radionice. Rad predavača snimao se kamerom i projicirao na projekcijsko platno u dvorani. Veliko hvala našim domaćim i inozemnim predavačima: Anžetu Zorku (SLO), doc.dr.sc. Wintonu Afriću (HR), Ivanu Knezoviću (UMS Agram) i Petru Knezoviću (HR).</p>
<p>
<a href=" https://hosting.photobucket.com/95288841-8654-4bf7-8fc9-a4aa78dce87f/e8d835be-ec99-49d7-bc9b-086e38573d1a.jpg
" target="_blank"> <img alt="Click for enlarged picture" src="
https://hosting.photobucket.com/95288841-8654-4bf7-8fc9-a4aa78dce87f/e8d835be-ec99-49d7-bc9b-086e38573d1a.jpg" width="600" /> </a></p>
<p>
<a href=" https://hosting.photobucket.com/95288841-8654-4bf7-8fc9-a4aa78dce87f/f3eba4c1-4637-4da9-8360-75f430355af4.jpg" target="_blank"> <img alt="Click for enlarged picture" src="
https://hosting.photobucket.com/95288841-8654-4bf7-8fc9-a4aa78dce87f/f3eba4c1-4637-4da9-8360-75f430355af4.jpg" width="600" /> </a></p>
<p>
<a href=" https://hosting.photobucket.com/95288841-8654-4bf7-8fc9-a4aa78dce87f/ef523854-4030-4579-aa38-403afda86c91.jpg
" target="_blank"> <img alt="Click for enlarged picture" src="
https://hosting.photobucket.com/95288841-8654-4bf7-8fc9-a4aa78dce87f/ef523854-4030-4579-aa38-403afda86c91.jpg" width="600" /> </a></p>
<p>
<a href=" https://hosting.photobucket.com/95288841-8654-4bf7-8fc9-a4aa78dce87f/dd0943c2-f4a8-40c3-b641-f6dcdd200380.jpg
" target="_blank"> <img alt="Click for enlarged picture" src="
https://hosting.photobucket.com/95288841-8654-4bf7-8fc9-a4aa78dce87f/dd0943c2-f4a8-40c3-b641-f6dcdd200380.jpg" width="600" /> </a></p>
<p>
<a href=" https://hosting.photobucket.com/95288841-8654-4bf7-8fc9-a4aa78dce87f/08b1626a-f6c7-43c9-b718-3e9a41b55ca6.jpg
" target="_blank"> <img alt="Click for enlarged picture" src="
https://hosting.photobucket.com/95288841-8654-4bf7-8fc9-a4aa78dce87f/08b1626a-f6c7-43c9-b718-3e9a41b55ca6.jpg" width="600" /> </a></p>
<p>
<a href=" https://hosting.photobucket.com/95288841-8654-4bf7-8fc9-a4aa78dce87f/91aca7f3-1af6-486d-b174-65079a63a1ea.jpg
" target="_blank"> <img alt="Click for enlarged picture" src="
https://hosting.photobucket.com/95288841-8654-4bf7-8fc9-a4aa78dce87f/91aca7f3-1af6-486d-b174-65079a63a1ea.jpg" width="600" /> </a></p>
<p>
<a href=" https://hosting.photobucket.com/95288841-8654-4bf7-8fc9-a4aa78dce87f/3821f2fb-fbe7-4096-adbc-7d8c981a3b56.jpg
" target="_blank"> <img alt="Click for enlarged picture" src="
https://hosting.photobucket.com/95288841-8654-4bf7-8fc9-a4aa78dce87f/3821f2fb-fbe7-4096-adbc-7d8c981a3b56.jpg" width="600" /> </a></p>
<p>
<a href=" https://hosting.photobucket.com/95288841-8654-4bf7-8fc9-a4aa78dce87f/2c7bb3c5-c0ec-4a96-b6bd-6a90ce5ce154.jpg
" target="_blank"> <img alt="Click for enlarged picture" src="
https://hosting.photobucket.com/95288841-8654-4bf7-8fc9-a4aa78dce87f/2c7bb3c5-c0ec-4a96-b6bd-6a90ce5ce154.jpg" width="600" /> </a></p>
<p>
<a href=" https://hosting.photobucket.com/95288841-8654-4bf7-8fc9-a4aa78dce87f/b646f4ee-21aa-4d12-8db3-6d33351d5aeb.jpg
" target="_blank"> <img alt="Click for enlarged picture" src="
https://hosting.photobucket.com/95288841-8654-4bf7-8fc9-a4aa78dce87f/b646f4ee-21aa-4d12-8db3-6d33351d5aeb.jpg" width="600" /> </a></p>
<p>
<a href=" https://hosting.photobucket.com/95288841-8654-4bf7-8fc9-a4aa78dce87f/fb5efc01-32cc-4119-90e3-188f51b30237.jpg
" target="_blank"> <img alt="Click for enlarged picture" src="
https://hosting.photobucket.com/95288841-8654-4bf7-8fc9-a4aa78dce87f/fb5efc01-32cc-4119-90e3-188f51b30237.jpg" width="600" /> </a></p>
<p>
<strong>NATJECANJE U BRZOM BOJANJU MINIJATURA</strong></p>
<p>
U nedjelju, 22.2. smo organizirali natjecanje u brzom bojanju minijatura. Po prvi puta smo koristili minijature koje su naš dizajn. Sudionici su imali 60 minuta vremena da obojaju og čarobnjaka.</p>
<p>
<a href=" https://hosting.photobucket.com/95288841-8654-4bf7-8fc9-a4aa78dce87f/106417a6-a047-4e0d-9f81-87858806052f.jpg
" target="_blank"> <img alt="Click for enlarged picture" src="
https://hosting.photobucket.com/95288841-8654-4bf7-8fc9-a4aa78dce87f/106417a6-a047-4e0d-9f81-87858806052f.jpg" width="600" /> </a></p>
<p>
<a href=" https://hosting.photobucket.com/95288841-8654-4bf7-8fc9-a4aa78dce87f/ac6853c7-6e34-4e07-a996-8d7d12744b67.jpg
" target="_blank"> <img alt="Click for enlarged picture" src="
https://hosting.photobucket.com/95288841-8654-4bf7-8fc9-a4aa78dce87f/ac6853c7-6e34-4e07-a996-8d7d12744b67.jpg" width="600" /> </a></p>
<p>
<a href=" https://hosting.photobucket.com/95288841-8654-4bf7-8fc9-a4aa78dce87f/ccb155fa-52c5-4a99-9515-f69a6836dce7.jpg
" target="_blank"> <img alt="Click for enlarged picture" src="
https://hosting.photobucket.com/95288841-8654-4bf7-8fc9-a4aa78dce87f/ccb155fa-52c5-4a99-9515-f69a6836dce7.jpg" width="600" /> </a></p>
<p>
<a href=" https://hosting.photobucket.com/95288841-8654-4bf7-8fc9-a4aa78dce87f/a29fedd0-97ea-45b1-85f9-7ea62188b2b2.jpg
" target="_blank"><img alt="Click for enlarged picture" src="
https://hosting.photobucket.com/95288841-8654-4bf7-8fc9-a4aa78dce87f/a29fedd0-97ea-45b1-85f9-7ea62188b2b2.jpg" width="600" /></a></p>
<p>
S time smo došli do samoga kraja ovog predivnog vikenda i sve što je preostalo je bila podjela nagrada i priznanja pobjednicima.</p>
<p>
<a href=" https://hosting.photobucket.com/95288841-8654-4bf7-8fc9-a4aa78dce87f/046ca4c8-0ae7-415e-abd3-e131d580c3ad.jpg
" target="_blank"> <img alt="Click for enlarged picture" src="
https://hosting.photobucket.com/95288841-8654-4bf7-8fc9-a4aa78dce87f/046ca4c8-0ae7-415e-abd3-e131d580c3ad.jpg" width="600" /> </a></p>
<p>
<a href=" https://hosting.photobucket.com/95288841-8654-4bf7-8fc9-a4aa78dce87f/cec0dcef-7acb-4a77-89de-271ed5410672.jpg
" target="_blank"> <img alt="Click for enlarged picture" src="
https://hosting.photobucket.com/95288841-8654-4bf7-8fc9-a4aa78dce87f/cec0dcef-7acb-4a77-89de-271ed5410672.jpg" width="600" /> </a></p>
<p>
<a href=" https://hosting.photobucket.com/95288841-8654-4bf7-8fc9-a4aa78dce87f/a495a5fc-31a2-4979-a970-0fa22c334354.jpg
" target="_blank"> <img alt="Click for enlarged picture" src="
https://hosting.photobucket.com/95288841-8654-4bf7-8fc9-a4aa78dce87f/a495a5fc-31a2-4979-a970-0fa22c334354.jpg" width="600" /> </a></p>
<p>
<strong>AGRAM ARENA – Leaving Asphodel Necropolis28 kampanja</strong></p>
<p>
Tijekom vikenda 21.-22.2. održali smo i novo međunarodno natjecanje Agram Arena! Ovoga puta na redu je bila stolna strateška igra Necropolis 28 za koju su naši članovi osmislili dvodnevnu kampanju. Svaki sudionik je izradio svoju bandu vojnika, a velika većina i svoje vlastite table.</p>
<p>
<a href=" https://hosting.photobucket.com/95288841-8654-4bf7-8fc9-a4aa78dce87f/ac69b182-4bfc-4575-a6d3-fb3c8baba342.jpg
" target="_blank"> <img alt="Click for enlarged picture" src="
https://hosting.photobucket.com/95288841-8654-4bf7-8fc9-a4aa78dce87f/ac69b182-4bfc-4575-a6d3-fb3c8baba342.jpg" width="600" /> </a></p>
<p>
<a href=" https://hosting.photobucket.com/95288841-8654-4bf7-8fc9-a4aa78dce87f/289fed7b-e058-42d8-ba2d-cbd0463e98da.jpg
" target="_blank"> <img alt="Click for enlarged picture" src="
https://hosting.photobucket.com/95288841-8654-4bf7-8fc9-a4aa78dce87f/289fed7b-e058-42d8-ba2d-cbd0463e98da.jpg" width="600" /> </a></p>
<p>
<a href=" https://hosting.photobucket.com/95288841-8654-4bf7-8fc9-a4aa78dce87f/d92ebbee-859d-4441-8386-3d760b20b7a7.jpg
" target="_blank"> <img alt="Click for enlarged picture" src="
https://hosting.photobucket.com/95288841-8654-4bf7-8fc9-a4aa78dce87f/d92ebbee-859d-4441-8386-3d760b20b7a7.jpg" width="600" /> </a></p>
<p>
<a href=" https://hosting.photobucket.com/95288841-8654-4bf7-8fc9-a4aa78dce87f/09c59798-7871-425e-a075-3ca1cd91768a.jpg
" target="_blank"> <img alt="Click for enlarged picture" src="
https://hosting.photobucket.com/95288841-8654-4bf7-8fc9-a4aa78dce87f/09c59798-7871-425e-a075-3ca1cd91768a.jpg" width="600" /> </a></p>
<p>
<a href=" https://hosting.photobucket.com/95288841-8654-4bf7-8fc9-a4aa78dce87f/b2f3edc8-5a23-4552-9a2a-4027b286f327.jpg
" target="_blank"> <img alt="Click for enlarged picture" src="
https://hosting.photobucket.com/95288841-8654-4bf7-8fc9-a4aa78dce87f/b2f3edc8-5a23-4552-9a2a-4027b286f327.jpg" width="600" /> </a></p>
<p>
<a href=" https://hosting.photobucket.com/95288841-8654-4bf7-8fc9-a4aa78dce87f/2a9f43ac-b531-4746-b7bb-ac5a3356aab0.jpg
" target="_blank"> <img alt="Click for enlarged picture" src="
https://hosting.photobucket.com/95288841-8654-4bf7-8fc9-a4aa78dce87f/2a9f43ac-b531-4746-b7bb-ac5a3356aab0.jpg" width="600" /> </a></p>
<p>
<strong>DOGAĐANJA RADNIM DANIMA ZA VRIJEME IZLOŽBE</strong></p>
<p>
Tijekom naredna dva tjedna, naši volonteri su radnim danima od 16:00 do 20:00, držali otvorene radionice bojanja minijatura. Postavljene su radne stanice za bojanje minijatura na kojoj su naši posjetitelji mogli bojati minijature koje smo priredili (ili svoje ukoliko su ih donijeli) koristeći naše materijale i alate.</p>
<p>
<a href=" https://hosting.photobucket.com/95288841-8654-4bf7-8fc9-a4aa78dce87f/6edf7765-42b5-417a-820f-fa5d907179a7.jpg
" target="_blank"> <img alt="Click for enlarged picture" src="
https://hosting.photobucket.com/95288841-8654-4bf7-8fc9-a4aa78dce87f/6edf7765-42b5-417a-820f-fa5d907179a7.jpg" width="600" /> </a></p>
<p>
<a href=" https://hosting.photobucket.com/95288841-8654-4bf7-8fc9-a4aa78dce87f/c084ebe2-f57b-4519-9b31-29bdc1155887.jpg
" target="_blank"> <img alt="Click for enlarged picture" src="
https://hosting.photobucket.com/95288841-8654-4bf7-8fc9-a4aa78dce87f/c084ebe2-f57b-4519-9b31-29bdc1155887.jpg" width="600" /> </a></p>
<p>
<a href=" https://hosting.photobucket.com/95288841-8654-4bf7-8fc9-a4aa78dce87f/37ff2272-f9b0-4b16-a363-1e6f6688c866.jpg
" target="_blank"> <img alt="Click for enlarged picture" src="
https://hosting.photobucket.com/95288841-8654-4bf7-8fc9-a4aa78dce87f/37ff2272-f9b0-4b16-a363-1e6f6688c866.jpg" width="600" /> </a></p>
<p>
<a href=" https://hosting.photobucket.com/95288841-8654-4bf7-8fc9-a4aa78dce87f/5f4f7968-ff50-4a01-98da-6ce8562930b4.jpg
" target="_blank"> <img alt="Click for enlarged picture" src="
https://hosting.photobucket.com/95288841-8654-4bf7-8fc9-a4aa78dce87f/5f4f7968-ff50-4a01-98da-6ce8562930b4.jpg" width="600" /> </a></p>
<p>
<a href=" https://hosting.photobucket.com/95288841-8654-4bf7-8fc9-a4aa78dce87f/cbb45319-d488-483c-bf9d-9af29852fc74.jpg
" target="_blank"> <img alt="Click for enlarged picture" src="
https://hosting.photobucket.com/95288841-8654-4bf7-8fc9-a4aa78dce87f/cbb45319-d488-483c-bf9d-9af29852fc74.jpg" width="600" /> </a></p>
<p>
<a href=" https://hosting.photobucket.com/95288841-8654-4bf7-8fc9-a4aa78dce87f/3dcca26c-d549-4af3-812a-a4a81b9a2310.jpg
" target="_blank"> <img alt="Click for enlarged picture" src="
https://hosting.photobucket.com/95288841-8654-4bf7-8fc9-a4aa78dce87f/3dcca26c-d549-4af3-812a-a4a81b9a2310.jpg" width="600" /> </a></p>
<p>
<a href=" https://hosting.photobucket.com/95288841-8654-4bf7-8fc9-a4aa78dce87f/4adf0fb6-3eab-4b40-b32d-d03eab4a9892.jpg
" target="_blank"> <img alt="Click for enlarged picture" src="
https://hosting.photobucket.com/95288841-8654-4bf7-8fc9-a4aa78dce87f/4adf0fb6-3eab-4b40-b32d-d03eab4a9892.jpg" width="600" /> </a></p>
<p>
<a href=" https://hosting.photobucket.com/95288841-8654-4bf7-8fc9-a4aa78dce87f/4732b58a-9a65-4d1c-a7d5-25513d34b108.jpg
" target="_blank"> <img alt="Click for enlarged picture" src="
https://hosting.photobucket.com/95288841-8654-4bf7-8fc9-a4aa78dce87f/4732b58a-9a65-4d1c-a7d5-25513d34b108.jpg" width="600" /> </a></p>
<p>
<a href=" https://hosting.photobucket.com/95288841-8654-4bf7-8fc9-a4aa78dce87f/274be330-31d5-4e25-95db-ec2f423a003c.jpg
" target="_blank"> <img alt="Click for enlarged picture" src="
https://hosting.photobucket.com/95288841-8654-4bf7-8fc9-a4aa78dce87f/274be330-31d5-4e25-95db-ec2f423a003c.jpg" width="600" /> </a></p>
<p>
<a href=" https://hosting.photobucket.com/95288841-8654-4bf7-8fc9-a4aa78dce87f/8e7b0a80-0f46-4d70-9789-a46976c713d2.jpg
" target="_blank"> <img alt="Click for enlarged picture" src="
https://hosting.photobucket.com/95288841-8654-4bf7-8fc9-a4aa78dce87f/8e7b0a80-0f46-4d70-9789-a46976c713d2.jpg" width="600" /> </a></p>
<p>
<a href=" https://hosting.photobucket.com/95288841-8654-4bf7-8fc9-a4aa78dce87f/8bbd4e96-b911-4f26-80fe-b1c57f29027b.jpg
" target="_blank"> <img alt="Click for enlarged picture" src="
https://hosting.photobucket.com/95288841-8654-4bf7-8fc9-a4aa78dce87f/8bbd4e96-b911-4f26-80fe-b1c57f29027b.jpg" width="600" /> </a></p>
<p>
<a href=" https://hosting.photobucket.com/95288841-8654-4bf7-8fc9-a4aa78dce87f/203a27be-8f10-459d-89b9-befb6b636b74.jpg
" target="_blank"> <img alt="Click for enlarged picture" src="
https://hosting.photobucket.com/95288841-8654-4bf7-8fc9-a4aa78dce87f/203a27be-8f10-459d-89b9-befb6b636b74.jpg" width="600" /> </a></p>
<p>
<a href=" https://hosting.photobucket.com/95288841-8654-4bf7-8fc9-a4aa78dce87f/5dc4358f-19d8-475f-a4af-9c29e9ed18d7.jpg
" target="_blank"> <img alt="Click for enlarged picture" src="
https://hosting.photobucket.com/95288841-8654-4bf7-8fc9-a4aa78dce87f/5dc4358f-19d8-475f-a4af-9c29e9ed18d7.jpg" width="600" /> </a></p>
<p>
<strong>BACK TO BASICS RADIONICE ZA NAJMLAĐE</strong></p>
<p>
Radnim danima od 17:00 do 18:00 održavali smo naše nove radionice za najmlađe u kojima su naši najmlađi polaznici bojali svoje prve minijature.</p>
<p>
<a href=" https://hosting.photobucket.com/95288841-8654-4bf7-8fc9-a4aa78dce87f/948af139-8fb5-4e28-a27c-404466e70d05.jpg
" target="_blank"> <img alt="Click for enlarged picture" src="
https://hosting.photobucket.com/95288841-8654-4bf7-8fc9-a4aa78dce87f/948af139-8fb5-4e28-a27c-404466e70d05.jpg" width="600" /> </a></p>
<p>
<a href=" https://hosting.photobucket.com/95288841-8654-4bf7-8fc9-a4aa78dce87f/bb3e20c2-bb21-4a3d-863a-74de08261467.jpg
" target="_blank"> <img alt="Click for enlarged picture" src="
https://hosting.photobucket.com/95288841-8654-4bf7-8fc9-a4aa78dce87f/bb3e20c2-bb21-4a3d-863a-74de08261467.jpg" width="600" /> </a></p>
<p>
<a href=" https://hosting.photobucket.com/95288841-8654-4bf7-8fc9-a4aa78dce87f/7316c760-98e3-4e3f-9261-d138aa7a5a6a.jpg
" target="_blank"> <img alt="Click for enlarged picture" src="
https://hosting.photobucket.com/95288841-8654-4bf7-8fc9-a4aa78dce87f/7316c760-98e3-4e3f-9261-d138aa7a5a6a.jpg" width="600" /> </a></p>
<p>
<a href=" https://hosting.photobucket.com/95288841-8654-4bf7-8fc9-a4aa78dce87f/68934b39-3d1f-4f43-b967-14b73c41a39e.jpg
" target="_blank"> <img alt="Click for enlarged picture" src="
https://hosting.photobucket.com/95288841-8654-4bf7-8fc9-a4aa78dce87f/68934b39-3d1f-4f43-b967-14b73c41a39e.jpg" width="600" /> </a></p>
<p>
<a href=" https://hosting.photobucket.com/95288841-8654-4bf7-8fc9-a4aa78dce87f/46125bce-a28d-494f-873a-3aeabdc1d6c2.jpg
" target="_blank"> <img alt="Click for enlarged picture" src="
https://hosting.photobucket.com/95288841-8654-4bf7-8fc9-a4aa78dce87f/46125bce-a28d-494f-873a-3aeabdc1d6c2.jpg" width="600" /> </a></p>
<p>
<a href=" https://hosting.photobucket.com/95288841-8654-4bf7-8fc9-a4aa78dce87f/3c58e0ad-77a9-44c8-b6bf-d9a55c514d43.jpg
" target="_blank"> <img alt="Click for enlarged picture" src="
https://hosting.photobucket.com/95288841-8654-4bf7-8fc9-a4aa78dce87f/3c58e0ad-77a9-44c8-b6bf-d9a55c514d43.jpg" width="600" /> </a></p>
<p>
<a href=" https://hosting.photobucket.com/95288841-8654-4bf7-8fc9-a4aa78dce87f/f891f0f0-051b-40ee-9676-cb03b0a9811b.jpg
" target="_blank"> <img alt="Click for enlarged picture" src="
https://hosting.photobucket.com/95288841-8654-4bf7-8fc9-a4aa78dce87f/f891f0f0-051b-40ee-9676-cb03b0a9811b.jpg" width="600" /> </a></p>
<p>
<strong>AGRAM LEGO SEKCIJA predavanje: FW-14b – Bolid F1 za budućnost</strong></p>
<p>
U srijedu 25.2.2026. u sklopu aktivnosti naše Agram Lego Sekcije, naš dežurni strojar Marko Paunović je održao predavanje na temu bolida Formule 1 iz 1992.. Ulaz na predavanje je bio besplatan, a po završetku su LEGO maketu bolida izradili članovi Lego sekcije</p>
<p>
<a href=" https://hosting.photobucket.com/95288841-8654-4bf7-8fc9-a4aa78dce87f/b2e14b1c-daa4-4314-8685-184377bc7e28.jpg
" target="_blank"> <img alt="Click for enlarged picture" src="
https://hosting.photobucket.com/95288841-8654-4bf7-8fc9-a4aa78dce87f/b2e14b1c-daa4-4314-8685-184377bc7e28.jpg" width="600" /> </a></p>
<p>
<a href=" https://hosting.photobucket.com/95288841-8654-4bf7-8fc9-a4aa78dce87f/31fb439a-77d3-4418-83ff-66c3af279cca.jpg" target="_blank"> <img alt="Click for enlarged picture" src="
https://hosting.photobucket.com/95288841-8654-4bf7-8fc9-a4aa78dce87f/31fb439a-77d3-4418-83ff-66c3af279cca.jpg" width="600" /> </a></p>
<p>
<a href=" https://hosting.photobucket.com/95288841-8654-4bf7-8fc9-a4aa78dce87f/bfcaf282-6be8-4b52-a3ed-c91137457876.jpg
" target="_blank"> <img alt="Click for enlarged picture" src="
https://hosting.photobucket.com/95288841-8654-4bf7-8fc9-a4aa78dce87f/bfcaf282-6be8-4b52-a3ed-c91137457876.jpg" width="600" /> </a></p>
<p>
<a href=" https://hosting.photobucket.com/95288841-8654-4bf7-8fc9-a4aa78dce87f/ce70fc61-9e1a-4169-aaad-8b67417656c0.jpg
" target="_blank"> <img alt="Click for enlarged picture" src="
https://hosting.photobucket.com/95288841-8654-4bf7-8fc9-a4aa78dce87f/ce70fc61-9e1a-4169-aaad-8b67417656c0.jpg" width="600" /> </a></p>
<p>
<a href=" https://hosting.photobucket.com/95288841-8654-4bf7-8fc9-a4aa78dce87f/94ca0e36-8710-458d-8194-9f71299f4d74.jpg
" target="_blank"> <img alt="Click for enlarged picture" src="
https://hosting.photobucket.com/95288841-8654-4bf7-8fc9-a4aa78dce87f/94ca0e36-8710-458d-8194-9f71299f4d74.jpg" width="600" /> </a></p>
<p>
<a href=" https://hosting.photobucket.com/95288841-8654-4bf7-8fc9-a4aa78dce87f/c6771f72-7191-4ca3-a792-3bb1ab3897b1.jpg
" target="_blank"> <img alt="Click for enlarged picture" src="
https://hosting.photobucket.com/95288841-8654-4bf7-8fc9-a4aa78dce87f/c6771f72-7191-4ca3-a792-3bb1ab3897b1.jpg" width="600" /> </a></p>
<p>
<a href=" https://hosting.photobucket.com/95288841-8654-4bf7-8fc9-a4aa78dce87f/c8fcfcb6-09f2-4398-a2fb-fa5065771e01.jpg
" target="_blank"> <img alt="Click for enlarged picture" src="
https://hosting.photobucket.com/95288841-8654-4bf7-8fc9-a4aa78dce87f/c8fcfcb6-09f2-4398-a2fb-fa5065771e01.jpg" width="600" /> </a></p>
<p>
<a href=" https://hosting.photobucket.com/95288841-8654-4bf7-8fc9-a4aa78dce87f/d7e187a8-d5b1-433b-b30d-091e54dcdddf.jpg
" target="_blank"> <img alt="Click for enlarged picture" src="
https://hosting.photobucket.com/95288841-8654-4bf7-8fc9-a4aa78dce87f/d7e187a8-d5b1-433b-b30d-091e54dcdddf.jpg" width="600" /> </a></p>
<p>
Tijekom drugog vikenda Izložbe, 28.02.-01.03., organizirali smo <strong>RADIONICU BOJANJA MINIJATURA – Grimdark stil</strong>.</p>
<p>
Radionica se provodila kroz dva dana (cijeli vikend) i polaznici su bojali tri različite figure za igru Trench Crusade. Fokus ovih predavanja bilo je bojenje popularnim Grimdark stilom. Na radionici su bile predstavljene boje i pribor, priprema figura, nekoliko tehnika bojenja minijatura od osnovnih do naprednijih, te tehnike i trikovi za brzo i efikasno bojenje većih količina figura odjednom. U sklopu radionice korištene su akrilne boje na bazi vode.</p>
<p>
<a href=" https://hosting.photobucket.com/95288841-8654-4bf7-8fc9-a4aa78dce87f/733d94b2-8e8d-4a4e-accd-b9168e32577e.jpg
" target="_blank"> <img alt="Click for enlarged picture" src="
https://hosting.photobucket.com/95288841-8654-4bf7-8fc9-a4aa78dce87f/733d94b2-8e8d-4a4e-accd-b9168e32577e.jpg
" width="600" /> </a></p>
<p>
<a href=" https://hosting.photobucket.com/95288841-8654-4bf7-8fc9-a4aa78dce87f/41020062-45b9-41cd-a357-fa23a389f390.jpg
" target="_blank"> <img alt="Click for enlarged picture" src="
https://hosting.photobucket.com/95288841-8654-4bf7-8fc9-a4aa78dce87f/41020062-45b9-41cd-a357-fa23a389f390.jpg
" width="600" /> </a></p>
<p>
<a href=" https://hosting.photobucket.com/95288841-8654-4bf7-8fc9-a4aa78dce87f/0c07cc55-596d-494d-972b-cd6a0dd6b8b7.jpg
" target="_blank"> <img alt="Click for enlarged picture" src="
https://hosting.photobucket.com/95288841-8654-4bf7-8fc9-a4aa78dce87f/0c07cc55-596d-494d-972b-cd6a0dd6b8b7.jpg" width="600" /> </a></p>
<p>
<a href=" https://hosting.photobucket.com/95288841-8654-4bf7-8fc9-a4aa78dce87f/c17dd356-08b1-48e1-b895-6296aed7f818.jpg
" target="_blank"> <img alt="Click for enlarged picture" src="
https://hosting.photobucket.com/95288841-8654-4bf7-8fc9-a4aa78dce87f/c17dd356-08b1-48e1-b895-6296aed7f818.jpg" width="600" /> </a></p>
<p>
U srijedu 04.03.2026. održana je godišnja <strong>sjednica Skupštine</strong> na kojoj smo odredili smjernice rada u 2026.</p>
<p>
<a href=" https://hosting.photobucket.com/95288841-8654-4bf7-8fc9-a4aa78dce87f/59484bd0-7edc-4aed-a04e-ae42900ba3e6.jpg
" target="_blank"> <img alt="Click for enlarged picture" src="
https://hosting.photobucket.com/95288841-8654-4bf7-8fc9-a4aa78dce87f/59484bd0-7edc-4aed-a04e-ae42900ba3e6.jpg
" width="600" /> </a></p>
<p>
U nedjelju 08.03.2026. Izložba je završena, naši eksponati sigurno spremljeni, a Galerija počišćena.</p>
<p>
<a href=" https://hosting.photobucket.com/95288841-8654-4bf7-8fc9-a4aa78dce87f/98af4280-0956-4cdb-b4a9-da40e3a5a44a.jpg
" target="_blank"> <img alt="Click for enlarged picture" src="
https://hosting.photobucket.com/95288841-8654-4bf7-8fc9-a4aa78dce87f/98af4280-0956-4cdb-b4a9-da40e3a5a44a.jpg" width="600" /> </a></p>
<p>
<a href=" https://hosting.photobucket.com/95288841-8654-4bf7-8fc9-a4aa78dce87f/3259b35e-1fc2-4a99-a3c5-c7984958d72b.jpg
" target="_blank"> <img alt="Click for enlarged picture" src="
https://hosting.photobucket.com/95288841-8654-4bf7-8fc9-a4aa78dce87f/3259b35e-1fc2-4a99-a3c5-c7984958d72b.jpg" width="600" /> </a></p>
<p>
Najbitniji dio svake godine prilikom održavanja ove Izložbe je socijalni aspekt, druženje naših članova kako međusobno tako i sa našim međunarodnim prijateljima koji nas posjećuju! Uz ovih par fotografija sa zajedničkih druženja, pozdravljamo vas do sljedeće godine!</p>
<p>
<a href=" https://hosting.photobucket.com/95288841-8654-4bf7-8fc9-a4aa78dce87f/b9168e23-79b2-4d81-8a7d-7534062881a7.jpg
" target="_blank"> <img alt="Click for enlarged picture" src="
https://hosting.photobucket.com/95288841-8654-4bf7-8fc9-a4aa78dce87f/b9168e23-79b2-4d81-8a7d-7534062881a7.jpg " width="600" /> </a></p>
<p>
<a href=" https://hosting.photobucket.com/95288841-8654-4bf7-8fc9-a4aa78dce87f/edff925e-916c-4d78-953e-210abf3753d4.jpg
" target="_blank"> <img alt="Click for enlarged picture" src="
https://hosting.photobucket.com/95288841-8654-4bf7-8fc9-a4aa78dce87f/edff925e-916c-4d78-953e-210abf3753d4.jpg " width="600" /> </a></p>
<p>
<a href=" https://hosting.photobucket.com/95288841-8654-4bf7-8fc9-a4aa78dce87f/8bcb48fa-466b-43f8-8a4b-f15f6794b21e.jpg
" target="_blank"> <img alt="Click for enlarged picture" src="
https://hosting.photobucket.com/95288841-8654-4bf7-8fc9-a4aa78dce87f/8bcb48fa-466b-43f8-8a4b-f15f6794b21e.jpg" width="600" /> </a></p>
",
"created" => "2026-03-12 08:54:10",
"modified" => "2026-03-12 08:58:37"
),
"Member" => array(
"id" => "35",
"group_id" => "1",
"first_name" => "Marko",
"last_name" => "Paunović",
"first_name_mask" => "marko",
"last_name_mask" => "paunovic",
"username" => "marko",
"password" => "*****",
"born" => "2033-03-07 20:35:00",
"created" => "2009-06-02 20:37:03"
)
)
include - APP/views/elements/latestArticles.ctp, line 10
View::_render() - CORE/cake/libs/view/view.php, line 736
View::element() - CORE/cake/libs/view/view.php, line 397
include - APP/views/home/index.ctp, line 49
View::_render() - CORE/cake/libs/view/view.php, line 736
View::render() - CORE/cake/libs/view/view.php, line 431
Controller::render() - CORE/cake/libs/controller/controller.php, line 909
Dispatcher::_invoke() - CORE/cake/dispatcher.php, line 207
Dispatcher::dispatch() - CORE/cake/dispatcher.php, line 171
[main] - APP/webroot/index.php, line 86
The exhibition of miniatures and models "Agram 2026" was held this year from 19.2. to 08.03. 2026. The exhibition was set up on Wednesday 18.2. and was attended by a large number of members and friends of the Association who exhibited their works.
The opening of the Exhibition took place on Thursday, February 19, 2026, starting at 6:00 PM. The exhibition was organized on the occasion of our twenty-third birthday.
As always, the Exhibition presented a cross-section of the work of the Association, its members, participants of its courses and workshops, and members of the Miniature Painters Croatia FB group. In a large number of showcases, there were numerous miniatures for tabletop strategy games, board games, and an entire showcase was dedicated to award-winning exhibits from previous miniature competitions. Several showcases were dedicated to projects that the Association has been implementing for 23 years, such as the UMS „Agram“ Library and Reading Room, the Workshop for Making Spatial Models and the Miniature Painting Workshop, as well as new ones such as the Agram Group Build, the Agram Lego Section and the Back to Basics painting workshop for the youngest.
It was a special honor for us to host our guest exhibitor, Ninoslav Luk, a miniaturist from Poreč, who introduced himself to us with his collection of historical dioramas.
During the first weekend of the Exhibition, 21-22.02., we held the 18th annual international miniature painting competition Black Queen Hobby and Miniature Painting Competition!
As contestants arrived and registered for the competition, our hardworking staff photographed all the exhibits before sorting them into categories and carefully placing them in glass cases. There was no shortage of morning neccessities like coffe and doughnuts.
<
By noon, all the display cases were full and the competition could officially begin.
Back To Basics workshops for the young at the Black Queen
This year, throughout the weekend, we organized miniature painting workshops for the youngest, who were able to paint one of our own miniatures designed specifically for this program for the first time!
SELLERS' COURT
During the weekend we hosted our sponsors with their sales stands: Swood.si and Carta Magica.
MINIATURE PAINTING WORKSHOPS
The ZZTK premises allow workshops to be held during the weekend in the cinema hall in the basement, so we also organized demonstration workshops during the weekend. The lecturers' work was recorded with a camera and projected onto the projection screen in the hall. Many thanks to our domestic and international lecturers: Anže Zorko (SLO), doc.dr.sc. Winton Afrić (CRO), Ivan Knezović (UMS Agram) and Petar Knezoviću (CRO).
SPEED PAINTING COMPETITION
We organized a speed painting competition on Sunday afternoon. Participants had 60 minutes to paint one wizrad, a miniature of our own design and production.
With that, we came to the very end of this wonderful weekend and all that was left was the awarding of prizes and recognition to the winners.
During the weekend of February 21-22, we held a new international competition, Agram Arena! This time it was the turn of the tabletop strategy game Necropolis28, for which our members designed a two-day campaign. Each participant created their own gang of soldiers, and the vast majority also created their own boards.
EVENTS ON WEEKDAYS DURING THE EXHIBITION
Over the next two weeks, our volunteers held open miniature painting workshops on weekdays from 4:00 PM to 8:00 PM. Miniature painting workstations were set up where our visitors could paint miniatures we had prepared (or their own if they had brought them) using our materials and tools.
BACK TO BASICS MINIATURE PAINTING WORKSHOPS FOR YOUNG
On weekdays from 17:00 to 18:00, we held our new workshops for the youngest, in which our youngest participants painted their first miniatures.
AGRAM LEGO SECTION lecture: FW-14b – An F1 racecar for the future
On Wednesday, February 25, 2026, as part of the activities of our Agram Lego Section, our resident mechanical engineer Marko Paunović gave a lecture on the topic of the F1 racecar from 1992. Admission to the lecture was free, and upon completion, a LEGO model of the racecar was made by members of the Lego section
During the second weekend of the Exhibition, 28.02.-01.03., we organized a MINIATURE PAINTING WORKSHOP - Grimdark.
The workshop was held over two days (the entire weekend) and participants painted up to three different figures for the game Trench Crusade. The focus of these lectures was on painting the popular grimdark style minis. The workshop presented paints and equipment, figure preparation, several miniature painting techniques from basic to advanced, and techniques and tricks for quickly and efficiently painting larger quantities of figures at once. Water-based acrylic paints were used as part of the workshop.
On Wednesday 04.03.2026. the annual session of the Assembly was held, where we determined the guidelines for work in 2026.
,
On Sunday 08.03.2026. The exhibition was over, our exhibits safely stored, and the Gallery cleaned.
The most important part of every year when holding this Exhibition is the social aspect, the socializing of our members both among themselves and with our international friends who visit us! With these few photos from our joint gatherings, we greet you until next year!
"
["content_hrv"]=>
string(42265) "
Izložba minijatura i maketa "Agram 2026" održala se ove godine od 19.2. do 08.03. Postavljanje izložbe je održano u srijedu 18.2. i sudjelovao je velik broj članova kao i prijatelja Udruge koji su izlagali svoje radove.
Otvorenje Izložbe održalo se u četvrtak, 19.2.2026. s početkom u 18:00h. Izložba je organizirana povodom našeg dvadeset trećeg rođendana.
Kao i uvijek, Izložba je prikazivala presjek rada Udruge, njenih članova, polaznika njenih tečajeva i radionica te članova FB grupe Miniature Painters Croatia. U velikom broju vitrina našle su se brojne minijature za stolne strateške igre, igre na tabli, a cijela jedna vitrina posvećena je nagrađenim izlošcima sa prethodnih minijaturističkih natjecanja. Nekoliko vitrina bilo je posvećeno projektima koje Udruga već 23 godinu provodi poput Knjižnice i čitaonice UMS „Agram“, Radionice za izradu prostornih maketa i Radionice bojanja minijatura, ali i novih poput Agram Group Build, Agram Lego Sekcije i Back to Basics radionica bojanja za najmlađe.
Posebna čast nam je bila ugostiti našeg gosta izlagača, Ninoslava Luka minijaturista iz Poreča koji nam se predstavio svojom kolekcijom povijesnih diorama.
Tijekom prvog vikenda Izložbe, 21.-22.02.,održali smo 20. godišnje međunarodno natjecanje u bojanju minijatura Black Queen Hobby and Miniature Painting Competition!
Kako su natjecatelji pristizali i prijavljivali se na natjecanje, naše vrijedno osoblje je fotografiralo sve izloške prije nego li su ih rasporedili po kategorijama i pažljivo ih postavili u staklene vitrine. Niti jutarnja okrijepa nije usfalila zahvaljujući našim revnim volonterima.
U podne, sve vitrine su bile pune i natjecanje je moglo službeno početi.
Back To Basics radionice za najmlađe na Black Queen
Ove godine smo tijekom cijelog vikenda organizirali radionice bojanja minijatura za najmlađe koji su mogli po prvi puta obojati neku od naših vlastitih minijatura osmišljenih upravo za ovaj program!
PRODAJNI KUTAK
Tijekom vikenda ugostili smo naše sponzore sa njihovim prodajnim štandovima: Swood.si i Carta Magica.
OGLEDNE RADIONICE BOJANJA MINIJATURA
Prostor ZZTK omogućuje održavanje radionica tijekom vikenda u kino dvorani u podrumu, stoga smo tijekom vikenda organizirali i ogledne radionice. Rad predavača snimao se kamerom i projicirao na projekcijsko platno u dvorani. Veliko hvala našim domaćim i inozemnim predavačima: Anžetu Zorku (SLO), doc.dr.sc. Wintonu Afriću (HR), Ivanu Knezoviću (UMS Agram) i Petru Knezoviću (HR).
NATJECANJE U BRZOM BOJANJU MINIJATURA
U nedjelju, 22.2. smo organizirali natjecanje u brzom bojanju minijatura. Po prvi puta smo koristili minijature koje su naš dizajn. Sudionici su imali 60 minuta vremena da obojaju og čarobnjaka.
S time smo došli do samoga kraja ovog predivnog vikenda i sve što je preostalo je bila podjela nagrada i priznanja pobjednicima.
Tijekom vikenda 21.-22.2. održali smo i novo međunarodno natjecanje Agram Arena! Ovoga puta na redu je bila stolna strateška igra Necropolis 28 za koju su naši članovi osmislili dvodnevnu kampanju. Svaki sudionik je izradio svoju bandu vojnika, a velika većina i svoje vlastite table.
DOGAĐANJA RADNIM DANIMA ZA VRIJEME IZLOŽBE
Tijekom naredna dva tjedna, naši volonteri su radnim danima od 16:00 do 20:00, držali otvorene radionice bojanja minijatura. Postavljene su radne stanice za bojanje minijatura na kojoj su naši posjetitelji mogli bojati minijature koje smo priredili (ili svoje ukoliko su ih donijeli) koristeći naše materijale i alate.
BACK TO BASICS RADIONICE ZA NAJMLAĐE
Radnim danima od 17:00 do 18:00 održavali smo naše nove radionice za najmlađe u kojima su naši najmlađi polaznici bojali svoje prve minijature.
AGRAM LEGO SEKCIJA predavanje: FW-14b – Bolid F1 za budućnost
U srijedu 25.2.2026. u sklopu aktivnosti naše Agram Lego Sekcije, naš dežurni strojar Marko Paunović je održao predavanje na temu bolida Formule 1 iz 1992.. Ulaz na predavanje je bio besplatan, a po završetku su LEGO maketu bolida izradili članovi Lego sekcije
Tijekom drugog vikenda Izložbe, 28.02.-01.03., organizirali smo RADIONICU BOJANJA MINIJATURA – Grimdark stil.
Radionica se provodila kroz dva dana (cijeli vikend) i polaznici su bojali tri različite figure za igru Trench Crusade. Fokus ovih predavanja bilo je bojenje popularnim Grimdark stilom. Na radionici su bile predstavljene boje i pribor, priprema figura, nekoliko tehnika bojenja minijatura od osnovnih do naprednijih, te tehnike i trikovi za brzo i efikasno bojenje većih količina figura odjednom. U sklopu radionice korištene su akrilne boje na bazi vode.
U srijedu 04.03.2026. održana je godišnja sjednica Skupštine na kojoj smo odredili smjernice rada u 2026.
U nedjelju 08.03.2026. Izložba je završena, naši eksponati sigurno spremljeni, a Galerija počišćena.
Najbitniji dio svake godine prilikom održavanja ove Izložbe je socijalni aspekt, druženje naših članova kako međusobno tako i sa našim međunarodnim prijateljima koji nas posjećuju! Uz ovih par fotografija sa zajedničkih druženja, pozdravljamo vas do sljedeće godine!
Radionica se provodila kroz dva dana (cijeli vikend) i polaznici su bojali tri različite figure za igru Trench Crusade (prema izboru). Fokus ovih predavanja bilo je bojenje više minijatura odjednom prepoznatljivim GRIMDARK stilom, no znanja s radionice jednako su primjenjiva i na bojenje vojski za boardgame igre te kolekcija figura za pen&paper rpg-ove. Na radionici su bile predstavljene boje i pribor, priprema figura, nekoliko tehnika bojenja minijatura od osnovnih do naprednijih, te tehnike i trikovi za brzo i efikasno bojenje većih količina figura odjednom. U sklopu radionice bile su korištene akrilne boje na bazi vode te uljni efekti jednostavni za korištenje. Predavanja su prilagođena tako da voditelji posveti jednako vrijeme svim polaznicima i može se prilagoditi svim kategorijama minijaturista (od početnika do malo naprednijih).
Radionica je uključivalai sljedeće tematske cjeline:
1. Planiranje i priprema te sastavljanje minijatura
2. Obrada minijatura prije bojanja
3. Osnovne grimdark stila i izbor boja
4. Osnovne boje
5. Tehnike shadinga i highlighta
6. Naknadno podizanje gotovog paintjoba na višu razinu, uljni efekti
U srijedu 25.2. u sklopu naše Izložbe minijatura i maketa Agram 2026, naša Agram Lego Sekcija je odradila svoj četvrti projekt. Nakon Hogwartsa u 2024. te Leonarda i Orient Expressa u 2025., prvi projekt u 2026. bio je bolid Formule 1 sa početka 1990-ih.
Kao što je već tradicija kod naše Lego Sekcije, prije izgradnje modela, valjalo se malo educirati o temi. Ovoga puta naš dežurni strojar Marko Paunović održao je predavanje o bolidu FW14b, pobjedničkom bolidu iz 1992. tima Williams s kojim su postali svjetski konstruktorski prvaci, a kojeg je Nigel Mansel vozio do svjetske titule. U svojem predavanju, Marko je obradio teme aerodinamike, aktivnog ovjesa, mjenjača na volanu te ostalih inovacija koje je ovaj bolid uspješno instalirao.
Ulaz na predavanje bio je besplatan, a prijave nisu bile potrebne!
Izrada makete je rezervirana za članove Agram Lego Sekcije.
Ukoliko se želite uključiti u sljedeće projekte, javite se za više informacija na ums.agram@gmail.com .
Sljedeći projekt bit će u travnju, a tema će biti Gospodar Prstenova. Očekuju vas pregršt zabavnih predavanja.
In this series of articles, we will follow my work on a new diorama, another in the 1986 series. This time I have again decided to use a former country. Another version of the SFRY 1986.
So far I have finished making the base, painting the base, painting the interior of the vehicle and painting the figures. Now it's time to add the vegetation
The pines/trees were already fixed to the base before painting, so the first vegetation I added was tall shrubs that filled the volume of the base.
Then I added lower vegetation like tall grass and lower bushes.
Finally, I added some short grass, making sure when I was making the parking lot and path that there was no vegetation in the places where the wheels pass.
The paint on the base has just dried up, so next time I'll add the vegetation.
When the diorama is turned to the back, the volume of the forest is visible.
Before placing the vehicles and miniatures on the base, the diorama looks like this.
"
["content_hrv"]=>
string(3186) "
U ovoj seriji članaka pratit ćemo moj rad na novoj diorami, još jednoj u nizu serijala 1986. Ovaj put sam se opet odlučio za bivšu državu. Druga verzija SFRJ 1986..
Do sada sam završio s izradom baze, bojanjem baze, bojanjem interijera vozila i bojanjem figura. Sada je došlo vrijeme za dodavanje vegetacije
Borovi/drveće je već bilo fiksirano na bazu prije bojanja pa je prva sljedeća vegetacija bila visoko žbunje kojim sam popunio volumen baze.
Potom sam dodao niže raslinje poput visoke trave i nižeg grmlja.
Na kraju sam dodao i nisku travu pri čemu sam pazio kad sam radio ugibalište i puteljak da vegetacije ne bude na mjestima gdje prolaze kotači.
Kada se dioramu okrene, vidi se volumen vegetacije u šumi.
Prije postavljanja vozila i minijatura, diorama izgleda ovako:
include - APP/views/elements/latestBattleReports.ctp, line 8
View::_render() - CORE/cake/libs/view/view.php, line 736
View::element() - CORE/cake/libs/view/view.php, line 397
include - APP/views/home/index.ctp, line 50
View::_render() - CORE/cake/libs/view/view.php, line 736
View::render() - CORE/cake/libs/view/view.php, line 431
Controller::render() - CORE/cake/libs/controller/controller.php, line 909
Dispatcher::_invoke() - CORE/cake/dispatcher.php, line 207
Dispatcher::dispatch() - CORE/cake/dispatcher.php, line 171
[main] - APP/webroot/index.php, line 86
Notice (8): Undefined index: mask_dok [APP/views/elements/latestBattleReports.ctp, line 11]
include - APP/views/elements/latestBattleReports.ctp, line 11
View::_render() - CORE/cake/libs/view/view.php, line 736
View::element() - CORE/cake/libs/view/view.php, line 397
include - APP/views/home/index.ctp, line 50
View::_render() - CORE/cake/libs/view/view.php, line 736
View::render() - CORE/cake/libs/view/view.php, line 431
Controller::render() - CORE/cake/libs/controller/controller.php, line 909
Dispatcher::_invoke() - CORE/cake/dispatcher.php, line 207
Dispatcher::dispatch() - CORE/cake/dispatcher.php, line 171
[main] - APP/webroot/index.php, line 86
Notice (8): Undefined index: name_dok [APP/views/elements/latestBattleReports.ctp, line 26]
if (Configure::read() > 0) { include ($___viewFn);
$___viewFn = "/home/martin/apps/agram/app/views/elements/latestBattleReports.ctp"
$___dataForView = array(
"lang" => "dok",
"otherLangs" => array(
"eng",
"hrv"
),
"globalNav" => array(
array(),
array(),
array(),
array(),
array(),
array(),
array(),
array(),
array(),
array(),
array(),
array(),
array(),
array(),
array(),
array(),
array(),
array(),
array(),
array(),
array(),
array(),
array(),
array(),
array(),
array(),
array()
),
"breadCrumbs" => array(
array()
),
"pageContents" => array(
"home_who_we_are" => null
),
"userData" => null,
"announcements" => array(
array(),
array(),
array()
),
"cache" => array(
"time" => "+1 day",
"key" => "dok"
),
"form" => FormHelper
FormHelper::$helpers = array
FormHelper::$fieldset = array
FormHelper::$__options = array
FormHelper::$fields = array
FormHelper::$requestType = NULL
FormHelper::$defaultModel = NULL
FormHelper::$_inputDefaults = array
FormHelper::$_lastAction = ""
FormHelper::$base = ""
FormHelper::$webroot = "/"
FormHelper::$theme = NULL
FormHelper::$here = "/dok"
FormHelper::$params = array
FormHelper::$action = "index"
FormHelper::$plugin = NULL
FormHelper::$data = NULL
FormHelper::$namedArgs = NULL
FormHelper::$argSeparator = NULL
FormHelper::$validationErrors = NULL
FormHelper::$tags = array
FormHelper::$__tainted = NULL
FormHelper::$__cleaned = NULL
FormHelper::$Html = HtmlHelper object,
"text" => TextHelper
TextHelper::$helpers = NULL
TextHelper::$base = ""
TextHelper::$webroot = "/"
TextHelper::$theme = NULL
TextHelper::$here = "/dok"
TextHelper::$params = array
TextHelper::$action = "index"
TextHelper::$plugin = NULL
TextHelper::$data = NULL
TextHelper::$namedArgs = NULL
TextHelper::$argSeparator = NULL
TextHelper::$validationErrors = NULL
TextHelper::$tags = array
TextHelper::$__tainted = NULL
TextHelper::$__cleaned = NULL,
"stringer" => StringerHelper
StringerHelper::$helpers = array
StringerHelper::$base = ""
StringerHelper::$webroot = "/"
StringerHelper::$theme = NULL
StringerHelper::$here = "/dok"
StringerHelper::$params = array
StringerHelper::$action = "index"
StringerHelper::$plugin = NULL
StringerHelper::$data = NULL
StringerHelper::$namedArgs = NULL
StringerHelper::$argSeparator = NULL
StringerHelper::$validationErrors = NULL
StringerHelper::$tags = array
StringerHelper::$__tainted = NULL
StringerHelper::$__cleaned = NULL
StringerHelper::$Html = HtmlHelper object
StringerHelper::$Link = LinkHelper object
StringerHelper::$Text = TextHelper object,
"menu" => MenuHelper
MenuHelper::$helpers = array
MenuHelper::$base = ""
MenuHelper::$webroot = "/"
MenuHelper::$theme = NULL
MenuHelper::$here = "/dok"
MenuHelper::$params = array
MenuHelper::$action = "index"
MenuHelper::$plugin = NULL
MenuHelper::$data = NULL
MenuHelper::$namedArgs = NULL
MenuHelper::$argSeparator = NULL
MenuHelper::$validationErrors = NULL
MenuHelper::$tags = array
MenuHelper::$__tainted = NULL
MenuHelper::$__cleaned = NULL
MenuHelper::$Link = LinkHelper object,
"session" => SessionHelper
SessionHelper::$helpers = array
SessionHelper::$__active = true
SessionHelper::$valid = false
SessionHelper::$error = false
SessionHelper::$_userAgent = "f9a8355d006790ee743ededbb1f6e3bd"
SessionHelper::$path = "/"
SessionHelper::$lastError = NULL
SessionHelper::$security = "medium"
SessionHelper::$time = 1773314240
SessionHelper::$sessionTime = 1773326240
SessionHelper::$cookieLifeTime = false
SessionHelper::$watchKeys = array
SessionHelper::$id = NULL
SessionHelper::$host = NULL
SessionHelper::$timeout = NULL
SessionHelper::$base = ""
SessionHelper::$webroot = "/"
SessionHelper::$here = "/dok"
SessionHelper::$params = array
SessionHelper::$action = "index"
SessionHelper::$data = NULL
SessionHelper::$theme = NULL
SessionHelper::$plugin = NULL,
"html" => HtmlHelper
HtmlHelper::$tags = array
HtmlHelper::$_crumbs = array
HtmlHelper::$__includedScripts = array
HtmlHelper::$_scriptBlockOptions = array
HtmlHelper::$__docTypes = array
HtmlHelper::$helpers = NULL
HtmlHelper::$base = ""
HtmlHelper::$webroot = "/"
HtmlHelper::$theme = NULL
HtmlHelper::$here = "/dok"
HtmlHelper::$params = array
HtmlHelper::$action = "index"
HtmlHelper::$plugin = NULL
HtmlHelper::$data = NULL
HtmlHelper::$namedArgs = NULL
HtmlHelper::$argSeparator = NULL
HtmlHelper::$validationErrors = NULL
HtmlHelper::$__tainted = NULL
HtmlHelper::$__cleaned = NULL,
"link" => LinkHelper
LinkHelper::$helpers = array
LinkHelper::$lang = "dok"
LinkHelper::$defaultLang = "hrv"
LinkHelper::$base = ""
LinkHelper::$webroot = "/"
LinkHelper::$theme = NULL
LinkHelper::$here = "/dok"
LinkHelper::$params = array
LinkHelper::$action = "index"
LinkHelper::$plugin = NULL
LinkHelper::$data = NULL
LinkHelper::$namedArgs = NULL
LinkHelper::$argSeparator = NULL
LinkHelper::$validationErrors = NULL
LinkHelper::$tags = array
LinkHelper::$__tainted = NULL
LinkHelper::$__cleaned = NULL
LinkHelper::$Html = HtmlHelper object
LinkHelper::$Session = SessionHelper object
)
$loadHelpers = false
$cached = false
$loadedHelpers = array()
$lang = "dok"
$otherLangs = array(
"eng",
"hrv"
)
$globalNav = array(
array(
"Page" => array()
),
array(
"Page" => array()
),
array(
"Page" => array()
),
array(
"Page" => array()
),
array(
"Page" => array()
),
array(
"Page" => array()
),
array(
"Page" => array()
),
array(
"Page" => array()
),
array(
"Page" => array()
),
array(
"Page" => array()
),
array(
"Page" => array()
),
array(
"Page" => array()
),
array(
"Page" => array()
),
array(
"Page" => array()
),
array(
"Page" => array()
),
array(
"Page" => array()
),
array(
"Page" => array()
),
array(
"Page" => array()
),
array(
"Page" => array()
),
array(
"Page" => array()
),
array(
"Page" => array()
),
array(
"Page" => array()
),
array(
"Page" => array()
),
array(
"Page" => array()
),
array(
"Page" => array()
),
array(
"Page" => array()
),
array(
"Page" => array()
)
)
$breadCrumbs = array(
array(
"Page" => array()
)
)
$pageContents = array(
"home_who_we_are" => null
)
$userData = null
$announcements = array(
array(
"Announcement" => array()
),
array(
"Announcement" => array()
),
array(
"Announcement" => array()
)
)
$cache = array(
"time" => "+1 day",
"key" => "dok"
)
$form = FormHelper
FormHelper::$helpers = array
FormHelper::$fieldset = array
FormHelper::$__options = array
FormHelper::$fields = array
FormHelper::$requestType = NULL
FormHelper::$defaultModel = NULL
FormHelper::$_inputDefaults = array
FormHelper::$_lastAction = ""
FormHelper::$base = ""
FormHelper::$webroot = "/"
FormHelper::$theme = NULL
FormHelper::$here = "/dok"
FormHelper::$params = array
FormHelper::$action = "index"
FormHelper::$plugin = NULL
FormHelper::$data = NULL
FormHelper::$namedArgs = NULL
FormHelper::$argSeparator = NULL
FormHelper::$validationErrors = NULL
FormHelper::$tags = array
FormHelper::$__tainted = NULL
FormHelper::$__cleaned = NULL
FormHelper::$Html = HtmlHelper object
$text = TextHelper
TextHelper::$helpers = NULL
TextHelper::$base = ""
TextHelper::$webroot = "/"
TextHelper::$theme = NULL
TextHelper::$here = "/dok"
TextHelper::$params = array
TextHelper::$action = "index"
TextHelper::$plugin = NULL
TextHelper::$data = NULL
TextHelper::$namedArgs = NULL
TextHelper::$argSeparator = NULL
TextHelper::$validationErrors = NULL
TextHelper::$tags = array
TextHelper::$__tainted = NULL
TextHelper::$__cleaned = NULL
$stringer = StringerHelper
StringerHelper::$helpers = array
StringerHelper::$base = ""
StringerHelper::$webroot = "/"
StringerHelper::$theme = NULL
StringerHelper::$here = "/dok"
StringerHelper::$params = array
StringerHelper::$action = "index"
StringerHelper::$plugin = NULL
StringerHelper::$data = NULL
StringerHelper::$namedArgs = NULL
StringerHelper::$argSeparator = NULL
StringerHelper::$validationErrors = NULL
StringerHelper::$tags = array
StringerHelper::$__tainted = NULL
StringerHelper::$__cleaned = NULL
StringerHelper::$Html = HtmlHelper object
StringerHelper::$Link = LinkHelper object
StringerHelper::$Text = TextHelper object
$menu = MenuHelper
MenuHelper::$helpers = array
MenuHelper::$base = ""
MenuHelper::$webroot = "/"
MenuHelper::$theme = NULL
MenuHelper::$here = "/dok"
MenuHelper::$params = array
MenuHelper::$action = "index"
MenuHelper::$plugin = NULL
MenuHelper::$data = NULL
MenuHelper::$namedArgs = NULL
MenuHelper::$argSeparator = NULL
MenuHelper::$validationErrors = NULL
MenuHelper::$tags = array
MenuHelper::$__tainted = NULL
MenuHelper::$__cleaned = NULL
MenuHelper::$Link = LinkHelper object
$session = SessionHelper
SessionHelper::$helpers = array
SessionHelper::$__active = true
SessionHelper::$valid = false
SessionHelper::$error = false
SessionHelper::$_userAgent = "f9a8355d006790ee743ededbb1f6e3bd"
SessionHelper::$path = "/"
SessionHelper::$lastError = NULL
SessionHelper::$security = "medium"
SessionHelper::$time = 1773314240
SessionHelper::$sessionTime = 1773326240
SessionHelper::$cookieLifeTime = false
SessionHelper::$watchKeys = array
SessionHelper::$id = NULL
SessionHelper::$host = NULL
SessionHelper::$timeout = NULL
SessionHelper::$base = ""
SessionHelper::$webroot = "/"
SessionHelper::$here = "/dok"
SessionHelper::$params = array
SessionHelper::$action = "index"
SessionHelper::$data = NULL
SessionHelper::$theme = NULL
SessionHelper::$plugin = NULL
$html = HtmlHelper
HtmlHelper::$tags = array
HtmlHelper::$_crumbs = array
HtmlHelper::$__includedScripts = array
HtmlHelper::$_scriptBlockOptions = array
HtmlHelper::$__docTypes = array
HtmlHelper::$helpers = NULL
HtmlHelper::$base = ""
HtmlHelper::$webroot = "/"
HtmlHelper::$theme = NULL
HtmlHelper::$here = "/dok"
HtmlHelper::$params = array
HtmlHelper::$action = "index"
HtmlHelper::$plugin = NULL
HtmlHelper::$data = NULL
HtmlHelper::$namedArgs = NULL
HtmlHelper::$argSeparator = NULL
HtmlHelper::$validationErrors = NULL
HtmlHelper::$__tainted = NULL
HtmlHelper::$__cleaned = NULL
$link = LinkHelper
LinkHelper::$helpers = array
LinkHelper::$lang = "dok"
LinkHelper::$defaultLang = "hrv"
LinkHelper::$base = ""
LinkHelper::$webroot = "/"
LinkHelper::$theme = NULL
LinkHelper::$here = "/dok"
LinkHelper::$params = array
LinkHelper::$action = "index"
LinkHelper::$plugin = NULL
LinkHelper::$data = NULL
LinkHelper::$namedArgs = NULL
LinkHelper::$argSeparator = NULL
LinkHelper::$validationErrors = NULL
LinkHelper::$tags = array
LinkHelper::$__tainted = NULL
LinkHelper::$__cleaned = NULL
LinkHelper::$Html = HtmlHelper object
LinkHelper::$Session = SessionHelper object
$battleReports = array(
array(
"BattleReport" => array(),
"Game" => array(),
"BattleReportExperience" => array()
),
array(
"BattleReport" => array(),
"Game" => array(),
"BattleReportExperience" => array()
),
array(
"BattleReport" => array(),
"Game" => array(),
"BattleReportExperience" => array()
)
)
$battleReport = array(
"BattleReport" => array(
"id" => "16",
"title_eng" => "Kill Team - Blooded vs. Vespid Stingwings",
"title_hrv" => "Kill Team - Blooded vs. Vespid Stingwings",
"mask_eng" => "kill_team_-_blooded_vs_vespid_stingwings",
"mask_hrv" => "kill_team_-_blooded_vs_vespid_stingwings",
"game_id" => "1",
"fought" => "2025-02-28 16:00:00",
"created" => "2025-03-10 08:53:42",
"modified" => "2025-03-10 08:53:42"
),
"Game" => array(
"id" => "1",
"name_eng" => "GW - Warhammer 40.000",
"name_hrv" => "GW - Warhammer 40.000",
"description_eng" => "<p>
In the grim darkness of the far future, there is only war!</p>
<p>
<a href="http://img.photobucket.com/albums/v467/demonn/Agram-Sajt/40k03_zpsc9a73277.jpg" target="_blank"> <img alt="Click for enlarged picture" src="http://img.photobucket.com/albums/v467/demonn/Agram-Sajt/40k03_zpsc9a73277.jpg" width="600" /> </a> </p>
",
"description_hrv" => "<p>
Warhammer 40000 je strateška igra smještena u daleku budućnost Zemlje, u kojoj preuzimate zapovjedništvo nad vojskama minijatura kako bi prikazali oružane sukobe vojski budućnosti.</p>
<p>
Bitke se vode na stolu uobičajenih dimenzija 120 x 180 cm, na koji se zatim postavlja različit teren kako bi se dočarao izgled pravog bojišta. Nakon toga, u uobičajenom scenariju, na suprotne strane stola razmještaju se dvije vojske minijatura. Strateški dio igre je vrlo važan jer već samim razmještanjem jedinica na stol možete dobiti veći dio bitke.</p>
<p>
Sada, kada vaši vojnici preko bojnog polja gledaju u mrskog im neprijatelja, spremni ste poslati naredbu za juriš, ili se ukopati na poziciji i braniti ono što je vaše (vašu polovicu drvene ploče prekrivene umjetnim terenom). Kako ne bi nastala zbrka na bojnom polju, igra je podijeljena na poteze, a svaki potez je dodatno podijeljen u faze.<br />
</p>
<p>
<a href="http://img.photobucket.com/albums/v467/demonn/Agram-Sajt/40k03_zpsc9a73277.jpg" target="_blank"> <img alt="Click for enlarged picture" src="http://img.photobucket.com/albums/v467/demonn/Agram-Sajt/40k03_zpsc9a73277.jpg" width="600" /> </a> </p>"
),
"BattleReportExperience" => array(
array()
)
)
$memberString = " and "
$battleReportExperience = array(
"id" => "18",
"battle_report_id" => "16",
"member_id" => "96",
"army_id" => "33",
"intro_eng" => "<p>
This Friday, Luka and I had the opportunity to try out the third edition of the famous Warhammer skirmish game Kill Team, and along the way demonstrate the basics that have remained unchanged. Luka played a team of Vespid Stingwings, a highly mobile T'au unit, and I played the Blooded, a traitor squad that used to belong to the Astra Militarum (in my case they were named Glanton's Gang). The map, measuring 30x22 inches, was organized so that all terrain was outside of our deployment zones, which were 6 inches from the shorter edges. In the middle of the map, in a slight diagonal, 3 points of interest (objectives) are placed. All this resulted in a very symmetrical setup of operatives – all Vespids and the entire Blooded gang at the beginning of the game were mirrored hidden behind large pieces of terrain. All buildings with doors were 3 inches high, offering the operatives a Vantage point - the ability to keep one hit die as a success, and the well in the very center, 4 inches high, offers an even better Vantage point, where the operatives keep 2 dice.</p>
<p>
<a href="https://hosting.photobucket.com/95288841-8654-4bf7-8fc9-a4aa78dce87f/e4be55ea-8433-47c7-b28a-459533bba4bc.jpg" target="_blank"><img alt="Click for enlarged picture" src="https://hosting.photobucket.com/95288841-8654-4bf7-8fc9-a4aa78dce87f/e4be55ea-8433-47c7-b28a-459533bba4bc.jpg" width="600" /></a></p>
",
"intro_hrv" => "<p>
Ovaj smo petak Luka i ja imali priliku isprobati treću ediciju poznate Warhammer skirmish igre <em>Kill Team</em> te usput demonstrirati osnove koje su ostale nepromijenjene. Luka je igrao tim Vespid Stingwings, jako mobilne T'au jedinice, a ja sam igrao Blooded, izdajnički odred koji je nekad pripadao Astri Militarum (u mojem su slučaju dobili ime <em>Glantonova banda</em>). Mapa, veličine 30x22 inča, bila je organizirana tako da je sav teren bio van naših deployment zona, koje su iznosile 6 inča od kraćih rubova. Nasred mape, u blagoj dijagonali, postavljene su 3 točke interesa (objectives). Sve je ovo rezultiralo jako simetričnom postavom operativaca – svi su Vespidi i cijela Blooded banda na početku igre bili zrcaljeno skriveni iza velikih komada terena. Sve građevine s vratima bile su visoke 3 inča, što je operativcima nudilo Vantage point – mogućnost da jednu hit-kockicu zadrže kao uspješnu, a bušotina u samom centru, visoka 4 inča, nudi još bolji Vantage point, gdje operativci zadržavaju 2 kockice.</p>
<p>
<a href="https://hosting.photobucket.com/95288841-8654-4bf7-8fc9-a4aa78dce87f/e4be55ea-8433-47c7-b28a-459533bba4bc.jpg" target="_blank"><img alt="Click for enlarged picture" src="https://hosting.photobucket.com/95288841-8654-4bf7-8fc9-a4aa78dce87f/e4be55ea-8433-47c7-b28a-459533bba4bc.jpg" width="600" /></a></p>
",
"Member" => array(
"id" => "96",
"group_id" => "2",
"first_name" => "Antoni",
"last_name" => "Pastuović",
"first_name_mask" => "antoni",
"last_name_mask" => "pastuovic",
"username" => "antoni",
"password" => "*****",
"born" => "2005-04-04 18:52:00",
"created" => "2019-04-04 18:53:09"
),
"Army" => array(
"id" => "33",
"game_id" => "1",
"army_alignment_id" => null,
"name_eng" => "Imperial Guard",
"name_hrv" => "Imperial Guard",
"description_eng" => "",
"description_hrv" => ""
)
)
include - APP/views/elements/latestBattleReports.ctp, line 26
View::_render() - CORE/cake/libs/view/view.php, line 736
View::element() - CORE/cake/libs/view/view.php, line 397
include - APP/views/home/index.ctp, line 50
View::_render() - CORE/cake/libs/view/view.php, line 736
View::render() - CORE/cake/libs/view/view.php, line 431
Controller::render() - CORE/cake/libs/controller/controller.php, line 909
Dispatcher::_invoke() - CORE/cake/dispatcher.php, line 207
Dispatcher::dispatch() - CORE/cake/dispatcher.php, line 171
[main] - APP/webroot/index.php, line 86
Notice (8): Undefined index: name_dok [APP/views/elements/latestBattleReports.ctp, line 29]
if (Configure::read() > 0) { include ($___viewFn);
$___viewFn = "/home/martin/apps/agram/app/views/elements/latestBattleReports.ctp"
$___dataForView = array(
"lang" => "dok",
"otherLangs" => array(
"eng",
"hrv"
),
"globalNav" => array(
array(),
array(),
array(),
array(),
array(),
array(),
array(),
array(),
array(),
array(),
array(),
array(),
array(),
array(),
array(),
array(),
array(),
array(),
array(),
array(),
array(),
array(),
array(),
array(),
array(),
array(),
array()
),
"breadCrumbs" => array(
array()
),
"pageContents" => array(
"home_who_we_are" => null
),
"userData" => null,
"announcements" => array(
array(),
array(),
array()
),
"cache" => array(
"time" => "+1 day",
"key" => "dok"
),
"form" => FormHelper
FormHelper::$helpers = array
FormHelper::$fieldset = array
FormHelper::$__options = array
FormHelper::$fields = array
FormHelper::$requestType = NULL
FormHelper::$defaultModel = NULL
FormHelper::$_inputDefaults = array
FormHelper::$_lastAction = ""
FormHelper::$base = ""
FormHelper::$webroot = "/"
FormHelper::$theme = NULL
FormHelper::$here = "/dok"
FormHelper::$params = array
FormHelper::$action = "index"
FormHelper::$plugin = NULL
FormHelper::$data = NULL
FormHelper::$namedArgs = NULL
FormHelper::$argSeparator = NULL
FormHelper::$validationErrors = NULL
FormHelper::$tags = array
FormHelper::$__tainted = NULL
FormHelper::$__cleaned = NULL
FormHelper::$Html = HtmlHelper object,
"text" => TextHelper
TextHelper::$helpers = NULL
TextHelper::$base = ""
TextHelper::$webroot = "/"
TextHelper::$theme = NULL
TextHelper::$here = "/dok"
TextHelper::$params = array
TextHelper::$action = "index"
TextHelper::$plugin = NULL
TextHelper::$data = NULL
TextHelper::$namedArgs = NULL
TextHelper::$argSeparator = NULL
TextHelper::$validationErrors = NULL
TextHelper::$tags = array
TextHelper::$__tainted = NULL
TextHelper::$__cleaned = NULL,
"stringer" => StringerHelper
StringerHelper::$helpers = array
StringerHelper::$base = ""
StringerHelper::$webroot = "/"
StringerHelper::$theme = NULL
StringerHelper::$here = "/dok"
StringerHelper::$params = array
StringerHelper::$action = "index"
StringerHelper::$plugin = NULL
StringerHelper::$data = NULL
StringerHelper::$namedArgs = NULL
StringerHelper::$argSeparator = NULL
StringerHelper::$validationErrors = NULL
StringerHelper::$tags = array
StringerHelper::$__tainted = NULL
StringerHelper::$__cleaned = NULL
StringerHelper::$Html = HtmlHelper object
StringerHelper::$Link = LinkHelper object
StringerHelper::$Text = TextHelper object,
"menu" => MenuHelper
MenuHelper::$helpers = array
MenuHelper::$base = ""
MenuHelper::$webroot = "/"
MenuHelper::$theme = NULL
MenuHelper::$here = "/dok"
MenuHelper::$params = array
MenuHelper::$action = "index"
MenuHelper::$plugin = NULL
MenuHelper::$data = NULL
MenuHelper::$namedArgs = NULL
MenuHelper::$argSeparator = NULL
MenuHelper::$validationErrors = NULL
MenuHelper::$tags = array
MenuHelper::$__tainted = NULL
MenuHelper::$__cleaned = NULL
MenuHelper::$Link = LinkHelper object,
"session" => SessionHelper
SessionHelper::$helpers = array
SessionHelper::$__active = true
SessionHelper::$valid = false
SessionHelper::$error = false
SessionHelper::$_userAgent = "f9a8355d006790ee743ededbb1f6e3bd"
SessionHelper::$path = "/"
SessionHelper::$lastError = NULL
SessionHelper::$security = "medium"
SessionHelper::$time = 1773314240
SessionHelper::$sessionTime = 1773326240
SessionHelper::$cookieLifeTime = false
SessionHelper::$watchKeys = array
SessionHelper::$id = NULL
SessionHelper::$host = NULL
SessionHelper::$timeout = NULL
SessionHelper::$base = ""
SessionHelper::$webroot = "/"
SessionHelper::$here = "/dok"
SessionHelper::$params = array
SessionHelper::$action = "index"
SessionHelper::$data = NULL
SessionHelper::$theme = NULL
SessionHelper::$plugin = NULL,
"html" => HtmlHelper
HtmlHelper::$tags = array
HtmlHelper::$_crumbs = array
HtmlHelper::$__includedScripts = array
HtmlHelper::$_scriptBlockOptions = array
HtmlHelper::$__docTypes = array
HtmlHelper::$helpers = NULL
HtmlHelper::$base = ""
HtmlHelper::$webroot = "/"
HtmlHelper::$theme = NULL
HtmlHelper::$here = "/dok"
HtmlHelper::$params = array
HtmlHelper::$action = "index"
HtmlHelper::$plugin = NULL
HtmlHelper::$data = NULL
HtmlHelper::$namedArgs = NULL
HtmlHelper::$argSeparator = NULL
HtmlHelper::$validationErrors = NULL
HtmlHelper::$__tainted = NULL
HtmlHelper::$__cleaned = NULL,
"link" => LinkHelper
LinkHelper::$helpers = array
LinkHelper::$lang = "dok"
LinkHelper::$defaultLang = "hrv"
LinkHelper::$base = ""
LinkHelper::$webroot = "/"
LinkHelper::$theme = NULL
LinkHelper::$here = "/dok"
LinkHelper::$params = array
LinkHelper::$action = "index"
LinkHelper::$plugin = NULL
LinkHelper::$data = NULL
LinkHelper::$namedArgs = NULL
LinkHelper::$argSeparator = NULL
LinkHelper::$validationErrors = NULL
LinkHelper::$tags = array
LinkHelper::$__tainted = NULL
LinkHelper::$__cleaned = NULL
LinkHelper::$Html = HtmlHelper object
LinkHelper::$Session = SessionHelper object
)
$loadHelpers = false
$cached = false
$loadedHelpers = array()
$lang = "dok"
$otherLangs = array(
"eng",
"hrv"
)
$globalNav = array(
array(
"Page" => array()
),
array(
"Page" => array()
),
array(
"Page" => array()
),
array(
"Page" => array()
),
array(
"Page" => array()
),
array(
"Page" => array()
),
array(
"Page" => array()
),
array(
"Page" => array()
),
array(
"Page" => array()
),
array(
"Page" => array()
),
array(
"Page" => array()
),
array(
"Page" => array()
),
array(
"Page" => array()
),
array(
"Page" => array()
),
array(
"Page" => array()
),
array(
"Page" => array()
),
array(
"Page" => array()
),
array(
"Page" => array()
),
array(
"Page" => array()
),
array(
"Page" => array()
),
array(
"Page" => array()
),
array(
"Page" => array()
),
array(
"Page" => array()
),
array(
"Page" => array()
),
array(
"Page" => array()
),
array(
"Page" => array()
),
array(
"Page" => array()
)
)
$breadCrumbs = array(
array(
"Page" => array()
)
)
$pageContents = array(
"home_who_we_are" => null
)
$userData = null
$announcements = array(
array(
"Announcement" => array()
),
array(
"Announcement" => array()
),
array(
"Announcement" => array()
)
)
$cache = array(
"time" => "+1 day",
"key" => "dok"
)
$form = FormHelper
FormHelper::$helpers = array
FormHelper::$fieldset = array
FormHelper::$__options = array
FormHelper::$fields = array
FormHelper::$requestType = NULL
FormHelper::$defaultModel = NULL
FormHelper::$_inputDefaults = array
FormHelper::$_lastAction = ""
FormHelper::$base = ""
FormHelper::$webroot = "/"
FormHelper::$theme = NULL
FormHelper::$here = "/dok"
FormHelper::$params = array
FormHelper::$action = "index"
FormHelper::$plugin = NULL
FormHelper::$data = NULL
FormHelper::$namedArgs = NULL
FormHelper::$argSeparator = NULL
FormHelper::$validationErrors = NULL
FormHelper::$tags = array
FormHelper::$__tainted = NULL
FormHelper::$__cleaned = NULL
FormHelper::$Html = HtmlHelper object
$text = TextHelper
TextHelper::$helpers = NULL
TextHelper::$base = ""
TextHelper::$webroot = "/"
TextHelper::$theme = NULL
TextHelper::$here = "/dok"
TextHelper::$params = array
TextHelper::$action = "index"
TextHelper::$plugin = NULL
TextHelper::$data = NULL
TextHelper::$namedArgs = NULL
TextHelper::$argSeparator = NULL
TextHelper::$validationErrors = NULL
TextHelper::$tags = array
TextHelper::$__tainted = NULL
TextHelper::$__cleaned = NULL
$stringer = StringerHelper
StringerHelper::$helpers = array
StringerHelper::$base = ""
StringerHelper::$webroot = "/"
StringerHelper::$theme = NULL
StringerHelper::$here = "/dok"
StringerHelper::$params = array
StringerHelper::$action = "index"
StringerHelper::$plugin = NULL
StringerHelper::$data = NULL
StringerHelper::$namedArgs = NULL
StringerHelper::$argSeparator = NULL
StringerHelper::$validationErrors = NULL
StringerHelper::$tags = array
StringerHelper::$__tainted = NULL
StringerHelper::$__cleaned = NULL
StringerHelper::$Html = HtmlHelper object
StringerHelper::$Link = LinkHelper object
StringerHelper::$Text = TextHelper object
$menu = MenuHelper
MenuHelper::$helpers = array
MenuHelper::$base = ""
MenuHelper::$webroot = "/"
MenuHelper::$theme = NULL
MenuHelper::$here = "/dok"
MenuHelper::$params = array
MenuHelper::$action = "index"
MenuHelper::$plugin = NULL
MenuHelper::$data = NULL
MenuHelper::$namedArgs = NULL
MenuHelper::$argSeparator = NULL
MenuHelper::$validationErrors = NULL
MenuHelper::$tags = array
MenuHelper::$__tainted = NULL
MenuHelper::$__cleaned = NULL
MenuHelper::$Link = LinkHelper object
$session = SessionHelper
SessionHelper::$helpers = array
SessionHelper::$__active = true
SessionHelper::$valid = false
SessionHelper::$error = false
SessionHelper::$_userAgent = "f9a8355d006790ee743ededbb1f6e3bd"
SessionHelper::$path = "/"
SessionHelper::$lastError = NULL
SessionHelper::$security = "medium"
SessionHelper::$time = 1773314240
SessionHelper::$sessionTime = 1773326240
SessionHelper::$cookieLifeTime = false
SessionHelper::$watchKeys = array
SessionHelper::$id = NULL
SessionHelper::$host = NULL
SessionHelper::$timeout = NULL
SessionHelper::$base = ""
SessionHelper::$webroot = "/"
SessionHelper::$here = "/dok"
SessionHelper::$params = array
SessionHelper::$action = "index"
SessionHelper::$data = NULL
SessionHelper::$theme = NULL
SessionHelper::$plugin = NULL
$html = HtmlHelper
HtmlHelper::$tags = array
HtmlHelper::$_crumbs = array
HtmlHelper::$__includedScripts = array
HtmlHelper::$_scriptBlockOptions = array
HtmlHelper::$__docTypes = array
HtmlHelper::$helpers = NULL
HtmlHelper::$base = ""
HtmlHelper::$webroot = "/"
HtmlHelper::$theme = NULL
HtmlHelper::$here = "/dok"
HtmlHelper::$params = array
HtmlHelper::$action = "index"
HtmlHelper::$plugin = NULL
HtmlHelper::$data = NULL
HtmlHelper::$namedArgs = NULL
HtmlHelper::$argSeparator = NULL
HtmlHelper::$validationErrors = NULL
HtmlHelper::$__tainted = NULL
HtmlHelper::$__cleaned = NULL
$link = LinkHelper
LinkHelper::$helpers = array
LinkHelper::$lang = "dok"
LinkHelper::$defaultLang = "hrv"
LinkHelper::$base = ""
LinkHelper::$webroot = "/"
LinkHelper::$theme = NULL
LinkHelper::$here = "/dok"
LinkHelper::$params = array
LinkHelper::$action = "index"
LinkHelper::$plugin = NULL
LinkHelper::$data = NULL
LinkHelper::$namedArgs = NULL
LinkHelper::$argSeparator = NULL
LinkHelper::$validationErrors = NULL
LinkHelper::$tags = array
LinkHelper::$__tainted = NULL
LinkHelper::$__cleaned = NULL
LinkHelper::$Html = HtmlHelper object
LinkHelper::$Session = SessionHelper object
$battleReports = array(
array(
"BattleReport" => array(),
"Game" => array(),
"BattleReportExperience" => array()
),
array(
"BattleReport" => array(),
"Game" => array(),
"BattleReportExperience" => array()
),
array(
"BattleReport" => array(),
"Game" => array(),
"BattleReportExperience" => array()
)
)
$battleReport = array(
"BattleReport" => array(
"id" => "16",
"title_eng" => "Kill Team - Blooded vs. Vespid Stingwings",
"title_hrv" => "Kill Team - Blooded vs. Vespid Stingwings",
"mask_eng" => "kill_team_-_blooded_vs_vespid_stingwings",
"mask_hrv" => "kill_team_-_blooded_vs_vespid_stingwings",
"game_id" => "1",
"fought" => "2025-02-28 16:00:00",
"created" => "2025-03-10 08:53:42",
"modified" => "2025-03-10 08:53:42"
),
"Game" => array(
"id" => "1",
"name_eng" => "GW - Warhammer 40.000",
"name_hrv" => "GW - Warhammer 40.000",
"description_eng" => "<p>
In the grim darkness of the far future, there is only war!</p>
<p>
<a href="http://img.photobucket.com/albums/v467/demonn/Agram-Sajt/40k03_zpsc9a73277.jpg" target="_blank"> <img alt="Click for enlarged picture" src="http://img.photobucket.com/albums/v467/demonn/Agram-Sajt/40k03_zpsc9a73277.jpg" width="600" /> </a> </p>
",
"description_hrv" => "<p>
Warhammer 40000 je strateška igra smještena u daleku budućnost Zemlje, u kojoj preuzimate zapovjedništvo nad vojskama minijatura kako bi prikazali oružane sukobe vojski budućnosti.</p>
<p>
Bitke se vode na stolu uobičajenih dimenzija 120 x 180 cm, na koji se zatim postavlja različit teren kako bi se dočarao izgled pravog bojišta. Nakon toga, u uobičajenom scenariju, na suprotne strane stola razmještaju se dvije vojske minijatura. Strateški dio igre je vrlo važan jer već samim razmještanjem jedinica na stol možete dobiti veći dio bitke.</p>
<p>
Sada, kada vaši vojnici preko bojnog polja gledaju u mrskog im neprijatelja, spremni ste poslati naredbu za juriš, ili se ukopati na poziciji i braniti ono što je vaše (vašu polovicu drvene ploče prekrivene umjetnim terenom). Kako ne bi nastala zbrka na bojnom polju, igra je podijeljena na poteze, a svaki potez je dodatno podijeljen u faze.<br />
</p>
<p>
<a href="http://img.photobucket.com/albums/v467/demonn/Agram-Sajt/40k03_zpsc9a73277.jpg" target="_blank"> <img alt="Click for enlarged picture" src="http://img.photobucket.com/albums/v467/demonn/Agram-Sajt/40k03_zpsc9a73277.jpg" width="600" /> </a> </p>"
),
"BattleReportExperience" => array(
array()
)
)
$memberString = " and <a href="/dok/members/antoni.pastuovic">Antoni Pastuović</a> ()"
$battleReportExperience = array(
"id" => "18",
"battle_report_id" => "16",
"member_id" => "96",
"army_id" => "33",
"intro_eng" => "<p>
This Friday, Luka and I had the opportunity to try out the third edition of the famous Warhammer skirmish game Kill Team, and along the way demonstrate the basics that have remained unchanged. Luka played a team of Vespid Stingwings, a highly mobile T'au unit, and I played the Blooded, a traitor squad that used to belong to the Astra Militarum (in my case they were named Glanton's Gang). The map, measuring 30x22 inches, was organized so that all terrain was outside of our deployment zones, which were 6 inches from the shorter edges. In the middle of the map, in a slight diagonal, 3 points of interest (objectives) are placed. All this resulted in a very symmetrical setup of operatives – all Vespids and the entire Blooded gang at the beginning of the game were mirrored hidden behind large pieces of terrain. All buildings with doors were 3 inches high, offering the operatives a Vantage point - the ability to keep one hit die as a success, and the well in the very center, 4 inches high, offers an even better Vantage point, where the operatives keep 2 dice.</p>
<p>
<a href="https://hosting.photobucket.com/95288841-8654-4bf7-8fc9-a4aa78dce87f/e4be55ea-8433-47c7-b28a-459533bba4bc.jpg" target="_blank"><img alt="Click for enlarged picture" src="https://hosting.photobucket.com/95288841-8654-4bf7-8fc9-a4aa78dce87f/e4be55ea-8433-47c7-b28a-459533bba4bc.jpg" width="600" /></a></p>
",
"intro_hrv" => "<p>
Ovaj smo petak Luka i ja imali priliku isprobati treću ediciju poznate Warhammer skirmish igre <em>Kill Team</em> te usput demonstrirati osnove koje su ostale nepromijenjene. Luka je igrao tim Vespid Stingwings, jako mobilne T'au jedinice, a ja sam igrao Blooded, izdajnički odred koji je nekad pripadao Astri Militarum (u mojem su slučaju dobili ime <em>Glantonova banda</em>). Mapa, veličine 30x22 inča, bila je organizirana tako da je sav teren bio van naših deployment zona, koje su iznosile 6 inča od kraćih rubova. Nasred mape, u blagoj dijagonali, postavljene su 3 točke interesa (objectives). Sve je ovo rezultiralo jako simetričnom postavom operativaca – svi su Vespidi i cijela Blooded banda na početku igre bili zrcaljeno skriveni iza velikih komada terena. Sve građevine s vratima bile su visoke 3 inča, što je operativcima nudilo Vantage point – mogućnost da jednu hit-kockicu zadrže kao uspješnu, a bušotina u samom centru, visoka 4 inča, nudi još bolji Vantage point, gdje operativci zadržavaju 2 kockice.</p>
<p>
<a href="https://hosting.photobucket.com/95288841-8654-4bf7-8fc9-a4aa78dce87f/e4be55ea-8433-47c7-b28a-459533bba4bc.jpg" target="_blank"><img alt="Click for enlarged picture" src="https://hosting.photobucket.com/95288841-8654-4bf7-8fc9-a4aa78dce87f/e4be55ea-8433-47c7-b28a-459533bba4bc.jpg" width="600" /></a></p>
",
"Member" => array(
"id" => "96",
"group_id" => "2",
"first_name" => "Antoni",
"last_name" => "Pastuović",
"first_name_mask" => "antoni",
"last_name_mask" => "pastuovic",
"username" => "antoni",
"password" => "*****",
"born" => "2005-04-04 18:52:00",
"created" => "2019-04-04 18:53:09"
),
"Army" => array(
"id" => "33",
"game_id" => "1",
"army_alignment_id" => null,
"name_eng" => "Imperial Guard",
"name_hrv" => "Imperial Guard",
"description_eng" => "",
"description_hrv" => ""
)
)
$dateFought = "28<span class="superscript">th</span> February 2025"
include - APP/views/elements/latestBattleReports.ctp, line 29
View::_render() - CORE/cake/libs/view/view.php, line 736
View::element() - CORE/cake/libs/view/view.php, line 397
include - APP/views/home/index.ctp, line 50
View::_render() - CORE/cake/libs/view/view.php, line 736
View::render() - CORE/cake/libs/view/view.php, line 431
Controller::render() - CORE/cake/libs/controller/controller.php, line 909
Dispatcher::_invoke() - CORE/cake/dispatcher.php, line 207
Dispatcher::dispatch() - CORE/cake/dispatcher.php, line 171
[main] - APP/webroot/index.php, line 86