
Bojanje vatre
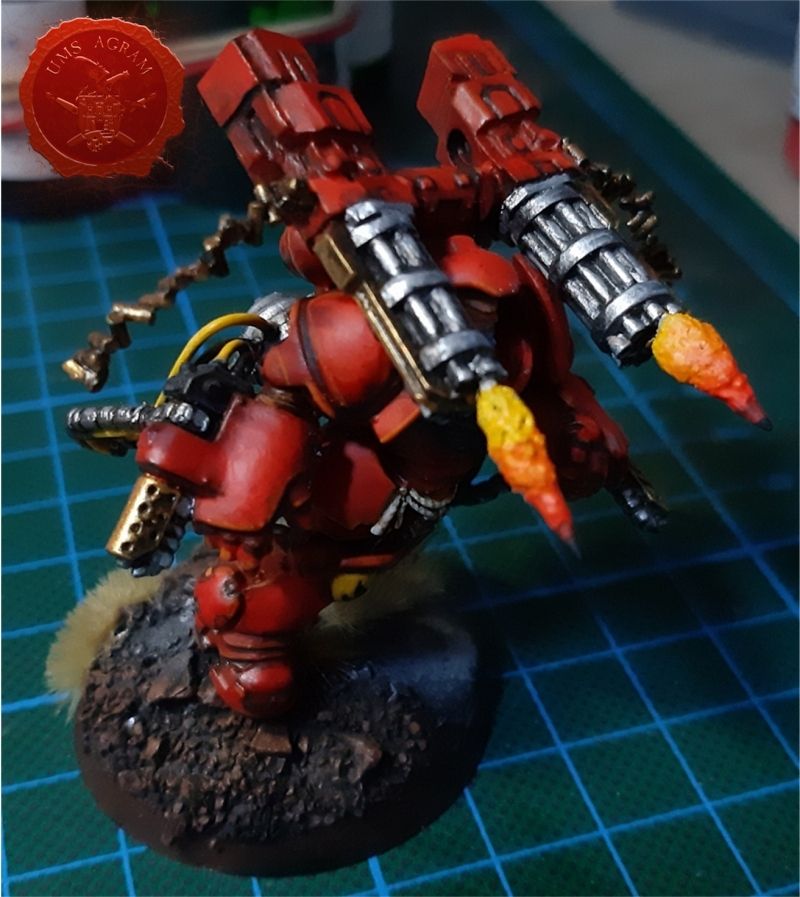
U današnjem tutorialu sam pobojao bljesak koji se dogodi prilikom pucnja iz nekakve strojice ili puške.
Tri stvari je ovdje važno imati na umu:
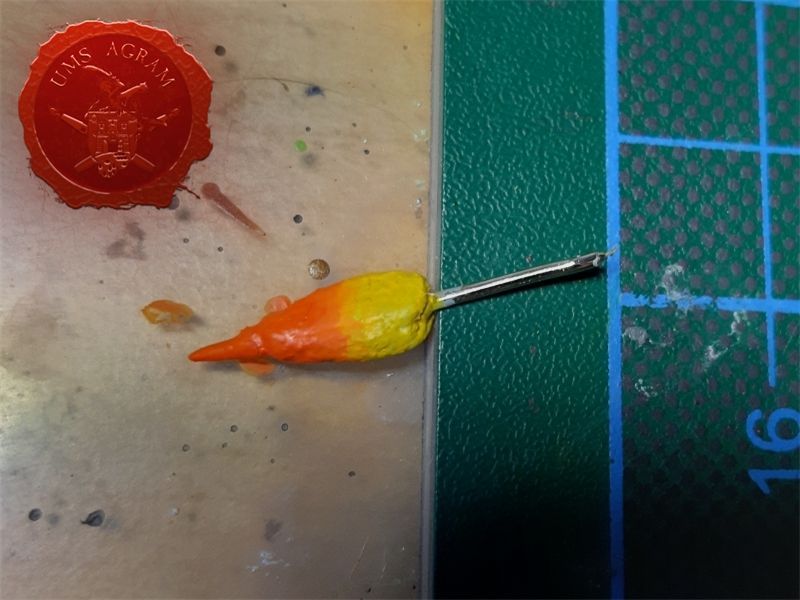
1) Važno je znati da je boja crvenija, tj. tamnija što je potisni zapaljeni barut hladniji, stoga će nam dio bljeska koji je neposredno pred cijevi biti žut, i postepeno će ići prema crvenoj i crnoj prema vrhu.
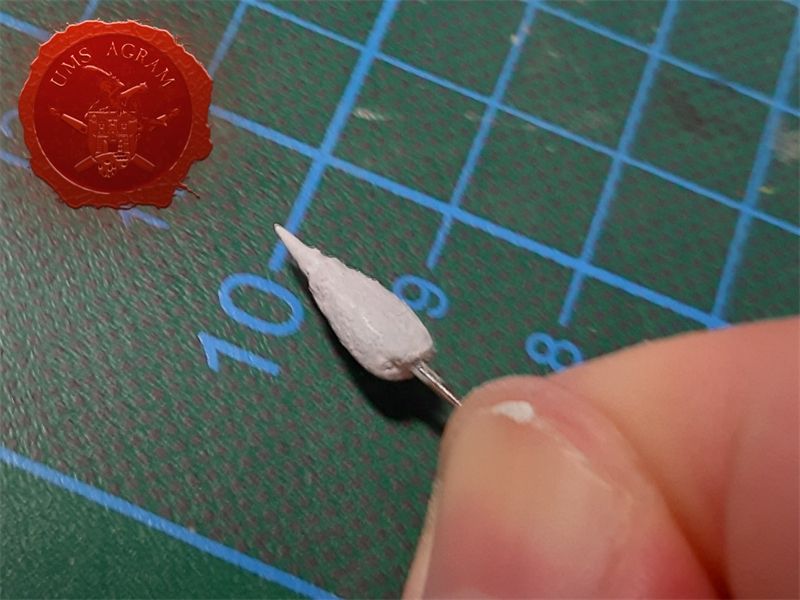
2) Počinjemo od bijelog undercoat-a, iz razloga što ako krenemo od crnog, a radimo većinom sa žutim, narandžastim i crvenim bojama (koje u 99% slučajeva JAKO slabo pokrivaju, čak i nerazrjeđene), ćemo utrošiti znatno više vremena za isti rezultat.
3) Postepeni prijelazi tehnikom glaze-anja.
Glaze je jako razrijeđena i dosta prozirna boja. Postoji više načina da se ovakvi prijelazi postignu, ja sam koristio Lahmian Medium tvrtke Games Workshop/Citadel kojim se i Vallejo i Scale 75 boje jako dobro daju razrjeđivati, a i u slučaju Vallejo Game Color boja, matirati.
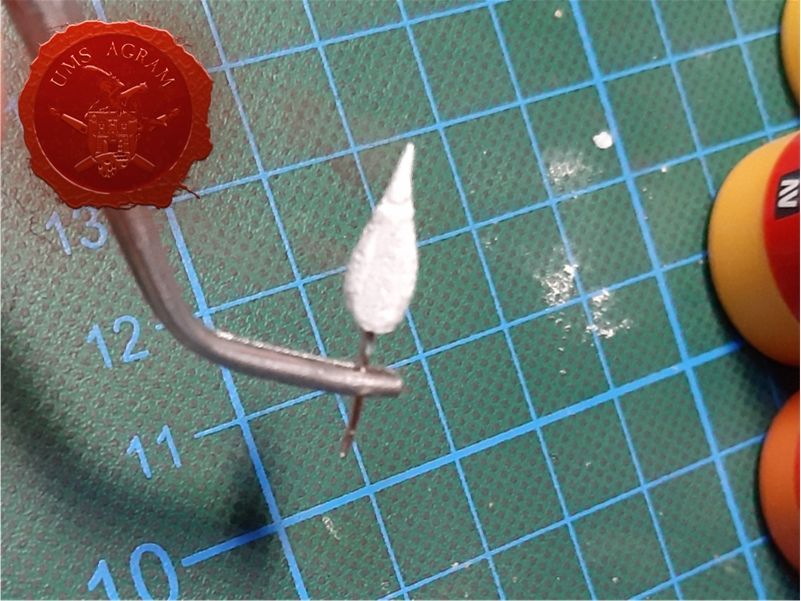
Krećemo sa bijelim undercoat-om, ja sam koristio White od Scale75 razrijeđenu Lahmian medium-om, te ju u 3 sloja nanio dok nisam dobio potpuno prekrivanje. Ovdje je važno naglasiti da se ne kreće sa slijedećim slojem dok se prethodni ne posuši. U ovu svrhu može poslužiti kućno sušilo za kosu ili sličan uređaj za ubrzanje postupka sušenja.
Zatim nastavljamo sa 1-2 nijanse žute boje, jedna nešto hladnija od druge, ja sam koristio redom Sun Yellow i Gold Yellow od Vallejo Game Color.
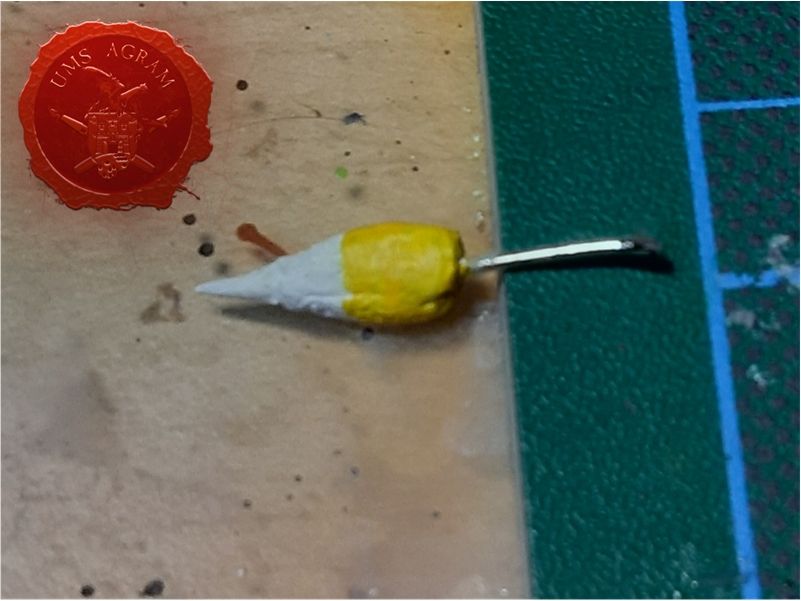
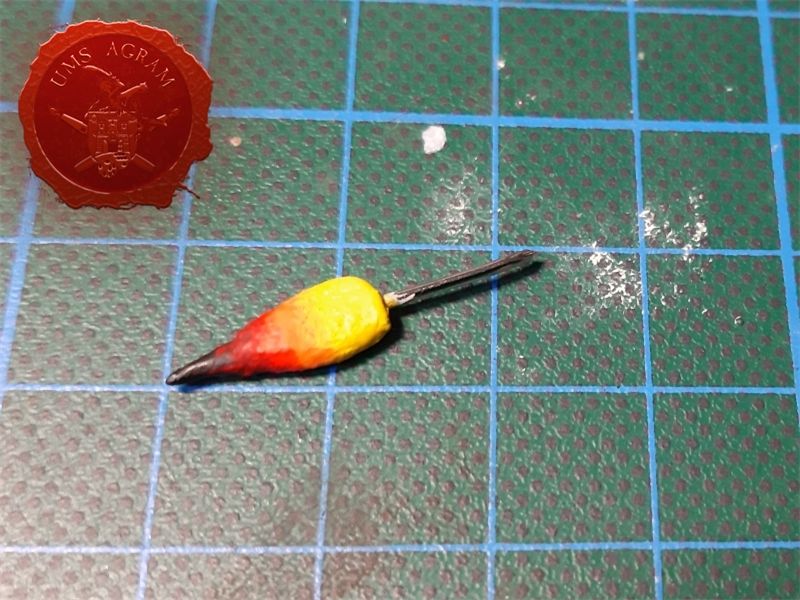
Važno je prilikom svakog prijelaza napraviti glaze međutona svake dvije boje i pobojati mjesto na bljesku gdje želimo napraviti prijelaz.

Ovdje je važno naglasiti da glaze, tj. dosta razrijeđena boja još slabije pokriva, te se i nešto sporije suši, što nam omogućuje da se igramo sa prijelazom prema jednoj ili drugoj boji, ovisno gdje na kraju taj prijelaz želimo imati i njegovu širinu, te intenzitet, jer kod glaze-anja na mjestu gdje nam kist napusti površinu, tamo i najviše pigmenta ostane.
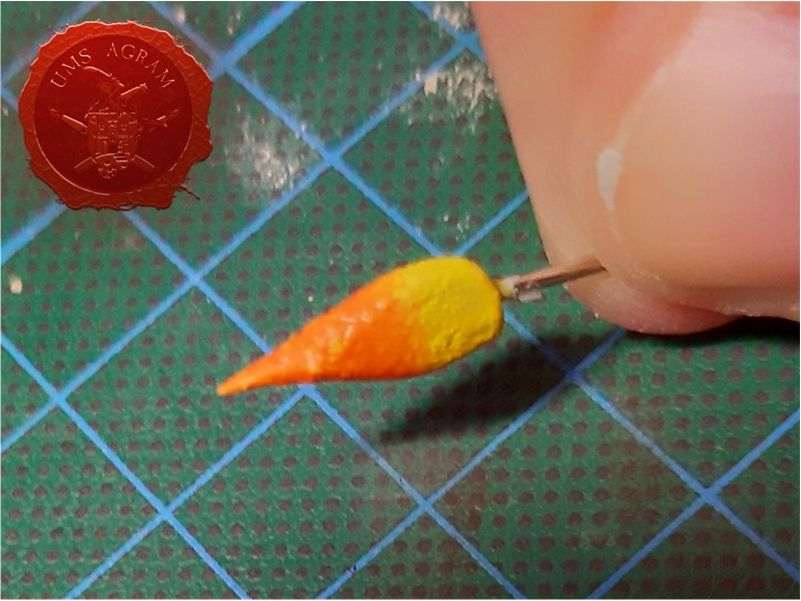
Sljedeće dvije boje su narandžaste, jedna žuća, te jedna crvenija, ja sam redom koristio Orange Fire (Vallejo Game Color), te Clear Orange (Vallejo Model Color).
Zadnje dvije boje su crvena (Scale 75 Antares Red), te crna (Scale 75 Black).
Još jednom napominjem miješati boje, razrjeđivati međutonove radi boljih prijelaza i ne žuriti, pogotovo ako prethodni sloj boje nije u potpunosti suh.
Najnoviji članci
-
Principi pigmentacije: Efektni pigmenti i efektne boje - kad boja nije samo boja
array(2) { ["Article"]=> array(10) { ["id"]=> string(3) "519" ["member_id"]=> string(3) "108" ["title_eng"]=> string(95) "Pigmentation principles: Pigments and paints with effects – when a color is not only a color " ["title_hrv"]=> string(80) "Principi pigmentacije: Efektni pigmenti i efektne boje - kad boja nije samo boja" ["mask_eng"]=> string(89) "pigmentation_principles_pigments_and_paints_with_effects_when_a_color_is_not_only_a_color" ["mask_hrv"]=> string(79) "principi_pigmentacije_efektni_pigmenti_i_efektne_boje_-_kad_boja_nije_samo_boja" ["content_eng"]=> string(10326) "Dunja Singer, 13.07.2026.So far in this series, we've talked about pigments that provide color by absorbing and reflecting light. There is, however, a whole group of pigments that don't work on this principle — or complement it in subtle ways. These pigments are collectively called effect pigments, and they are responsible for metallic sheens, pearlescent effects, color changes with viewing angle, and many other visual effects that classic pigments can't reproduce.
1. What are effect pigments and how do they differ from classic ones?
Classical pigments are solid particles that absorb certain wavelengths of visible light and reflect others. The color we see is relatively independent of the angle from which we view it and the intensity of the light source — red remains red whether we view it straight on or at an angle. Effect pigments impart color or visual effect by mechanisms that are dependent on geometry — the angle of incidence of light and the angle of view. As a result, their appearance changes with changes in the angle, intensity, or direction of light. It is this dynamism that makes them visually appealing and functionally different from classical pigments. Effect pigments are mostly lamellar — thin, plate-like particles that are oriented parallel to the substrate in the paint film. This orientation is crucial to their visual effect.
2. Metallic pigments
Metallic pigments are tiny metal flakes — most often made of aluminum, copper, or bronze — that reflect light like small mirrors. Thanks to their lamellar shape and metallic surface, they achieve high reflectivity and a characteristic metallic sheen that cannot be achieved with classic pigments. Aluminum flakes give a silver metallic effect. They can be uncolored (the natural silver color of aluminum) or colored with interference coatings — then they are called colored metallics and change color with the viewing angle. Copper and bronze flakes give a warm golden or reddish-golden glow, depending on the alloy composition. They are often used in decorative paints, tampons, and miniature paints. Characteristics of metallic pigments:
• High reflectance — specular reflection that gives a metallic sheen
• Dependence on particle orientation — poor dispersion or application gives an uneven effect
• Sensitivity to oxidation — copper and bronze can darken over time without a protective coating
• Electrical conductivity — aluminum flakes are conductive, which is relevant in some applications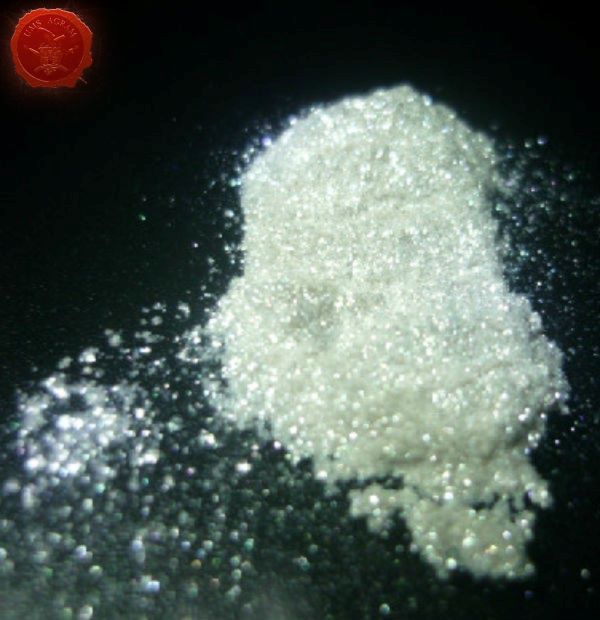
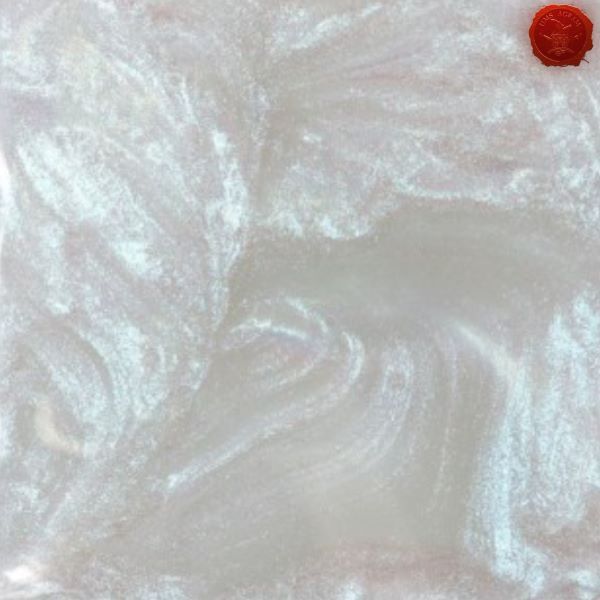
3. Mica and pearlescent pigments
Mica is a natural mineral that can be cleaved into extremely thin, transparent flakes. The paint industry uses synthetic and natural mica flakes, usually coated with thin layers of metal oxides — most commonly titanium dioxide (TiO₂) or iron oxide. The effect is created by the interference of light: light is reflected on the upper and lower surfaces of a thin oxide layer, and these two reflections mutually enhance or cancel each other depending on the thickness of the layer and the wavelength of the light. By controlling the thickness of the oxide layer, almost any color of the spectrum can be achieved. The thickness of the layer of just a few hundred nanometers determines whether the particle will be gold, blue, green or red. The pearlescent (pearlescent) effect is created when multiple layers of mica of different thicknesses interfere with each other — the result is a deep, multi-layered shine that resembles pearl or shell surfaces. Unlike metallics, mica is not metallic — its particles are transparent and light passes through them. Because of this, mica simultaneously provides a glossy effect and a certain level of transparency, which metallic pigments cannot.
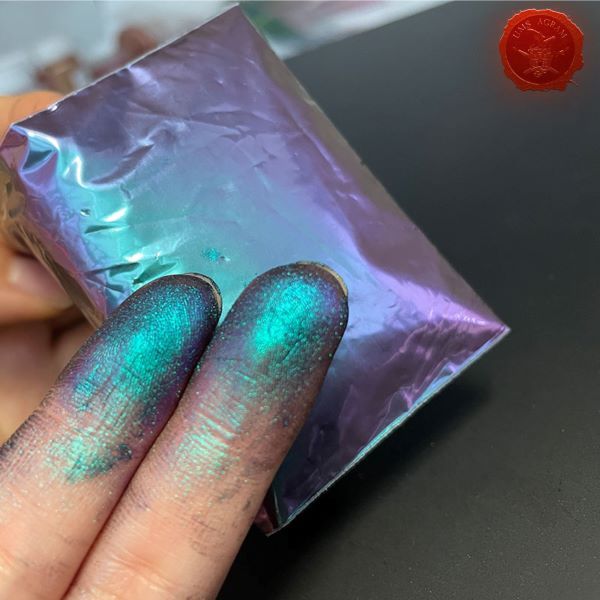
4. Holographic and chrome pigments
Holographic pigments contain micron-sized diffraction gratings — surfaces with an extremely regular microstructure that decompose white light into spectral colors. The result is a characteristic rainbow effect that changes rapidly and dramatically with the viewing angle. Each particle is actually a small prismatic element. Chromic (chameleon) pigments are a more advanced version — multilayer structures that display two or more specific colors depending on the viewing angle, unlike the holographic effect that displays the entire spectrum. A typical example is a pigment that appears gold at a right angle and green at a 45° angle. These pigments are particularly challenging to apply — the irregular orientation of the particles in the paint film destroys the effect, so they require careful application and a compatible binder.
5. Thermochromic and photochromic pigments
Thermochromic pigments change color with temperature. The mechanism can be different: some use liquid crystals that change structure at a certain temperature, others are based on chemical compounds that reversibly change structure (leuco dyes). Most commercial thermochromic pigments change color at a certain “transition” temperature — below it they have one color, above it another (usually becoming colorless or pale). Photochromic pigments change color upon exposure to UV radiation. Indoors (without UV) they are colorless or pale; in sunlight they become colored. The mechanism is also reversible — the color is restored when the UV source is removed. They are used in sun-darkening glasses, safety inks, and decorative applications. Both types of pigments have limited durability — the color change cycles gradually degrade the active component. They are not suitable for permanent applications exposed to strong UV radiation or high temperatures.
6. Fluorescent pigments
Fluorescent pigments absorb light — including UV radiation invisible to the eye — and re-emit it as visible light of a longer wavelength. This process, which we described in the diagram of the interaction of light and matter, is called fluorescence. The result is a characteristic “glowing” color that appears brighter than a normally colored surface — because the pigment not only reflects visible light but also adds emitted light from the UV part of the spectrum. This effect is called daylight fluorescence because it is also visible in ordinary daylight, which contains a UV component. Fluorescent pigments are organic compounds — as a rule, they have poor lightfastness. The UV radiation that activates them also degrades them, so fluorescent colors lose their intensity relatively quickly when exposed to sunlight.
7. Phosphorescent pigments
Phosphorescence is similar to fluorescence in that the pigment absorbs energy and emits it as visible light — but unlike fluorescence, the emission persists after the light source is removed. Phosphorescent materials "store" energy in excited electronic states that are slowly discharged, emitting light for minutes or hours. Modern phosphorescent pigments are based mainly on strontium aluminate (SrAl₂O₄) activated with europium and dysprosium. These pigments are significantly more durable and brighter than the older zinc sulfide pigments that have been used for decades, and do not contain radioactive components like earlier "glow-in-the-dark" materials. Phosphorescent pigments are inorganic, which means they have good light fastness and chemical stability. Their color is typically white or slightly yellowish in daylight, and green or blue-green in the dark.
8. Practical application and disadvantages of effect pigments
Effect pigments require more care when applying than classic pigments. A few key points:
• Particle orientation is crucial.
• The substrate affects the effect.
• The binder must be compatible.
• Coverage is limited.
• Dispersion requires attention. As described in the first article in this series, poor dispersion leads to an uneven effect. With metallic and mica pigments, poor dispersion is visible as shiny dots instead of a uniform shine.Conclusion
Effect pigments extend the possibilities of color far beyond what classical absorption and reflection can achieve. From the metallic luster of aluminum flakes to the pearlescent reflection of interference mica, from the dramatic color change of holographic pigments to the quiet luminescence of phosphorescents — each of these pigments is based on a different physical principle. Understanding these principles helps in selecting the right pigment for the desired effect and in avoiding common application mistakes.
" ["content_hrv"]=> string(10399) "Dosad smo u ovoj seriji govorili o pigmentima koji daju boju apsorpcijom i refleksijom svjetlosti. Postoji, međutim, cijela skupina pigmenata koji ne funkcioniraju na tom principu — ili ga nadopunjuju na neuočljive načine. Ove pigmente zajednički nazivamo efektnim pigmentima, i oni su odgovorni za metalne sjajeve, biserni odsjaj, promjenu boje s kutom gledanja i mnoge druge vizualne efekte koje klasični pigmenti ne mogu reproducirati.
1. Što su efektni pigmenti i po čemu se razlikuju od klasičnih
Klasični pigmenti su čvrste čestice koje apsorbiraju određene valne duljine vidljive svjetlosti i reflektiraju ostale. Boja koju vidimo relativno je neovisna o kutu iz kojeg gledamo i o jakosti izvora svjetlosti — crvena boja ostaje crvena bez obzira gledamo li je ravno ili pod kutom. Efektni pigmenti daju boju ili vizualni efekt mehanizmima koji su ovisni o geometriji — o kutu upada svjetlosti i kutu gledanja. Zbog toga se njihov izgled mijenja s promjenom kuta, jakosti ili smjera svjetlosti. Upravo ta dinamičnost čini ih vizualno privlačnima i funkcionalno drukčijima od klasičnih pigmenata. Efektni pigmenti uglavnom su pločasti (lamelarni) oblika — tanke, pločaste čestice koje se u filmu boje oričentiraju paralelno s podlogom. Ta orijentacija ključna je za njihov vizualni učinak.
2. Metalik pigmenti
Metalik pigmenti su sitne metalne ljušице — najčešće od aluminija, bakra ili bronce — koje reflektiraju svjetlost poput malih ogledala. Zahvaljujući lamelarnom obliku i metalnoj površini, postižu visoku refleksiju i karakterističnu metalnu blistavost koja se ne može postići klasičnim pigmentima. Aluminijske ljušice daju srebrni metalik efekt. Mogu biti neobojen (prirodna srebrna boja aluminija) ili obojene interferentnim premazima — tada se nazivaju obojeni metalici i mijenjaju boju s kutom gledanja. Bakarne i brončane ljušice daju topli zlatni ili crvenkasto-zlatni odsjaj, ovisno o sastavu legure. Često se koriste u dekorativnim bojama, tamponima i bojama za minijature. Karakteristike metalik pigmenata:
• Visoka refleksija — specijarna (zrcalna) refleksija koja daje metalnu blistavost
• Ovisnost o orijentaciji čestica — loša disperzija ili nanošenje daje neravnomjeran efekt
• Osjetljivost na oksidaciju — bakar i bronca mogu potamniti s vremenom bez zaštitnog premaza
• Električna vodljivost — aluminijske ljušice su vodljive, što je relevantno u nekim primjenama3. Mica i perlescentni pigmenti
Mica je prirodni mineral koji se može cijepati u iznimno tanke, providne listiće. U industriji boja koriste se sintetski i prirodni listici mice, obično prevučeni tankim slojevima metalnih oksida — najčešće titan-dioksida (TiO₂) ili oksida željeza. Efekt nastaje interferencijom svjetlosti: svjetlost se reflektira na gornjoj i donjoj površini tankog oksidnog sloja, a te se dvije refleksije međusobno pojačavaju ili poništavaju ovisno o debljini sloja i valnoj duljini svjetlosti. Kontrolom debljine oksidnog sloja može se postići gotovo svaka boja spektra. Debljina sloja od samo nekoliko stotina nanometara određuje hoće li čestica biti zlatna, plava, zelena ili crvena. Perlescentni (biserasti) efekt nastaje kada više slojeva mice različitih debljina međusobno interferiraju — rezultat je duboki, višeslojni sjaj koji podsjeća na biserne ili školjkaste površine. Za razliku od metalika, mica nije metalna — njezine čestice su prozirne i svjetlost prolazi kroz njih. Zbog toga mica istovremeno daje i efekt sjaja i određenu razinu prozirnosti, što metalik pigmenti ne mogu.
4. Holografski i kromski pigmenti
Holografski pigmenti sadrže mikronske difrakcijske rešetke — površine s izuzetno pravilnom mikrostrukturom koja razlaže bijelu svjetlost na spektralne boje. Rezultat je karakteristični dugini efekt koji se brzo i dramatično mijenja s kutom gledanja. Svaka čestica zapravo je mali prizmatski element. Kromski (chameleon) pigmenti su naprednija inačica — višeslojne strukture koje prikazuju dvije ili više određenih boja ovisno o kutu gledanja, za razliku od holografskog efekta koji prikazuje cijeli spektar. Tipičan primjer je pigment koji izgleda zlatno pod pravim kutom i zeleno pod kutom od 45°. Ovi pigmenti posebno su zahtjevni za primjenu — neredovita orijentacija čestica u filmu boje uništava efekt, pa zahtijevaju pažljivo nanošenje i kompatibilno vezivo.
5. Termokromni i fotokromni pigmenti
Termokromni pigmenti mijenjaju boju s promjenom temperature. Mehanizam može biti različit: neki koriste tekuće kristale koji mijenjaju strukturu pri određenoj temperaturi, drugi se temelje na kemijskim spojevima koji reverzibilno mijenjaju strukturu (leukobojila). Većina komercijalnih termokromnih pigmenata mijenja boju pri određenoj „prijelaznoj“ temperaturi — ispod nje imaju jednu boju, iznad nje drugu (obično postaju bezbojna ili blijeda). Fotokromni pigmenti mijenjaju boju izlaganjem UV zračenju. U zatvorenom prostoru (bez UV) su bezbojna ili blijeda; na suncu postaju obojeni. Mehanizam je takoer reverzibilan — boja se vraća uklanjanjem UV izvora. Koriste se u naočalama koje se tamne na suncu, sigurnosnim tintama i dekorativnim primjenama. Oba tipa pigmenata imaju ograničenu trajnost — ciklusi promjene boje postupno degradiraju aktivnu komponentu. Nisu pogodni za trajne primjene izložene jakom UV zračenju ili visokim temperaturama.
6. Fluorescentni pigmenti
Fluorescentni pigmenti apsorbiraju svjetlost — uključujići UV zračenje nevidljivo oku — i ponovno je emitiraju kao vidljivo svjetlo više valne duljine. Ovaj proces, koji smo opisali u dijagramu interakcije svjetlosti i tvari, naziva se fluorescencija. Rezultat je karakteristična „sijajuća“ boja koja izgleda svjetlija od obično obojene površine — jer pigment ne samo reflektira vidljivu svjetlost nego i dodaje emitiranu svjetlost iz UV dijela spektra. Taj efekt se naziva dnevna fluorescencija (daylight fluorescence) jer se vidi i na običnom dnevnom svjetlu koje sadrži UV komponentu. Fluorescentni pigmenti su organski spojevi — u pravilu imaju lošu svjetlostalnost. UV zračenje koje ih aktivira istovremeno ih i degradira, pa fluorescentne boje relativno brzo gube intenzitet izložene suncu.
7. Fosforescenti pigmenti
Fosforescencija je slična fluorescenciji u tome što pigment apsorbira energiju i emitira je kao vidljivo svjetlo — ali za razliku od fluorescencije, emisija traje i nakon uklanjanja izvora svjetlosti. Fosforescenti materijali „pohrane“ energiju u pobuđenim elektroničnim stanjima koja se sporo prazne, emitirajći svjetlo minutama ili satima. Suvremeni fosforescenti pigmenti temelje se uglavnom na stroncijevom aluminatu (SrAl₂O₄) aktiviranom europijem i disprozijumom. Ovi pigmenti znatno su trajniji i svjetliji od starijih cinkovih sulfidnih pigmenata koji su se koristili desetljećima, i ne sadrže radioaktivne komponente kao raniji „svijetleci u mraku“ materijali. Fosforescenti pigmenti su anorganski, što znači da imaju dobru svjetlostalnost i kemijsku stabilnost. Boja im je u pravilu bijela ili blago žutača pod dnevnim svjetlom, a zelena ili plavo-zelena u mraku.
8. Praktična primjena i mane efektnih pigmenata
Efektni pigmenti zahtijevaju više pažnje pri primjeni nego klasični pigmenti. Nekoliko ključnih napomena:
• Orijentacija čestica je ključna.
• Podloga utječe na efekt.
• Vezivo mora biti kompatibilno.
• Pokrivnost je ograničena.
• Disperzija zahtijeva pažnju. Kao što je opisano u prvom tekstu ove serije, loša disperzija dovodi do neravnomjernog efekta. Kod metalik i mica pigmenata loša disperzija vidljiva je kao sjajne točkice umjesto ravnomjernog sjaja.Zaključak
Efektni pigmenti proširuju mogućnosti boje daleko izvan onoga što klasična apsorpcija i refleksija mogu postići. Od metalnog sjaja aluminijskih ljušica do bisernog odsjaja interference mice, od dramatične promjene boje holografskih pigmenata do tihe luminiscencije fosforescenata — svaki od ovih pigmenata temelji se na drukčijem fizikalnom principu. Razumijevanje tih principa pomaže pri odabiru pravog pigmenta za željeni efekt i pri izbjegavanju uobičajenih grešaka pri primjeni.
" ["created"]=> string(19) "2026-07-13 07:43:54" ["modified"]=> string(19) "2026-07-13 07:43:54" } ["Member"]=> array(10) { ["id"]=> string(3) "108" ["group_id"]=> string(1) "2" ["first_name"]=> string(5) "Dunja" ["last_name"]=> string(6) "Singer" ["first_name_mask"]=> string(5) "dunja" ["last_name_mask"]=> string(6) "singer" ["username"]=> string(5) "Dunja" ["password"]=> string(40) "772414a5d6b32309f32f46e9009f1e550809c62d" ["born"]=> string(19) "2006-01-01 00:00:00" ["created"]=> NULL } } -
Nastupili smo na: Isle of Wonders 2026. na Cresu
array(2) { ["Article"]=> array(10) { ["id"]=> string(3) "518" ["member_id"]=> string(3) "104" ["title_eng"]=> string(33) "We attended: Isle of Wonders 2026" ["title_hrv"]=> string(48) "Nastupili smo na: Isle of Wonders 2026. na Cresu" ["mask_eng"]=> string(32) "we_attended_isle_of_wonders_2026" ["mask_hrv"]=> string(46) "nastupili_smo_na_isle_of_wonders_2026_na_cresu" ["content_eng"]=> string(3139) "Ili Said, 06.07.2026.On June 27-29 we attended the Isle of Wonders convention held on the island of Cres.


I took part in their miniature painting competition which boasted over 50 works. I'm proud to say I managed to snag a Highly Commended medal!


" ["content_hrv"]=> string(3158) "
27.-29. lipnja nastupili smo na konvenciji Isle of Wonders koja se održala na otoku Cresu.
Natjecala sam se na njihovom natjecanju u bojanju minijatura. Ukupno je bilo preko 50 radova, a ja sam uspjela osvojiti "highly commended" medalju!
" ["created"]=> string(19) "2026-07-06 12:50:47" ["modified"]=> string(19) "2026-07-06 12:50:47" } ["Member"]=> array(10) { ["id"]=> string(3) "104" ["group_id"]=> string(1) "2" ["first_name"]=> string(3) "Ili" ["last_name"]=> string(4) "Said" ["first_name_mask"]=> string(3) "ili" ["last_name_mask"]=> string(4) "said" ["username"]=> string(3) "Ili" ["password"]=> string(40) "b08a0b9827a3452ce5b82e0dc97847f4beafd9fa" ["born"]=> string(19) "2006-01-01 00:00:00" ["created"]=> NULL } } -
Nastupili smo na: 13. Trofeju San Giusto 2026.
array(2) { ["Article"]=> array(10) { ["id"]=> string(3) "517" ["member_id"]=> string(2) "35" ["title_eng"]=> string(40) "We attended: 13. Trofeo San Giusto 2026." ["title_hrv"]=> string(46) "Nastupili smo na: 13. Trofeju San Giusto 2026." ["mask_eng"]=> string(37) "we_attended_13_trofeo_san_giusto_2026" ["mask_hrv"]=> string(43) "nastupili_smo_na_13_trofeju_san_giusto_2026" ["content_eng"]=> string(6970) "Marko Paunović, 06.07.2026.On June 20-21 we attended 13th Trofeo San Giusto in Trieste, Italy.


It was held in Palazzo Vivante in the heart of Trieste and gathered miniature painters from Spain, Italy, France, England, Germany, Austria and I was the only participant in the miniature painting part of the competition from Croatia


As always we awarded the best of show prize as voted by our members. This time the prize went to Mr Alessandro Baialardo from Italy. And I managed to walk away with a gold, a silver and four bronze medals in Standard categories.
" ["content_hrv"]=> string(7180) "
20. i 21. lipnja nastupili smo na 13. Trofeo San Giusto u Trstu u Italiji.
Natjecanje se održavalo u predivnoj palači Vivante u samom centru Trsta i okupilo je minijaturiste iz Španjolse, Italije, Francuske, Engleske, Njemačke, Austrije, a ja sam bio jedini na minijaturističkom dijelu natjecanja koji je branio boje Hrvatske.
Kao i uvijek na velikim natjecanjima, pripala mi je čast da dodijelim Best of Show nagradu po izboru članova UMS Agram. Ovoga puta, nagrada je otišla u ruke g. Alessandra Baialarda iz Italije koji je dobio naš ekskluzivni trofej Crne kraljice, monografiju o Udruzi te bocu Teranina. Na kraju uspio sam osvojiti zlato, srebro i četiri bronce u Standardnim kategorijama.
" ["created"]=> string(19) "2026-07-06 10:37:44" ["modified"]=> string(19) "2026-07-06 10:37:44" } ["Member"]=> array(10) { ["id"]=> string(2) "35" ["group_id"]=> string(1) "1" ["first_name"]=> string(5) "Marko" ["last_name"]=> string(9) "Paunović" ["first_name_mask"]=> string(5) "marko" ["last_name_mask"]=> string(8) "paunovic" ["username"]=> string(5) "marko" ["password"]=> string(40) "3bd37b326d19d1880d3b93a4b32e8fb3a90fa122" ["born"]=> string(19) "2033-03-07 20:35:00" ["created"]=> string(19) "2009-06-02 20:37:03" } } -
Nastupili smo na: Zagreb Scale Model Show 2026
array(2) { ["Article"]=> array(10) { ["id"]=> string(3) "516" ["member_id"]=> string(3) "100" ["title_eng"]=> string(41) "We attended: Zagreb Scale Model Show 2026" ["title_hrv"]=> string(46) "Nastupili smo na: Zagreb Scale Model Show 2026" ["mask_eng"]=> string(40) "we_attended_zagreb_scale_model_show_2026" ["mask_hrv"]=> string(45) "nastupili_smo_na_zagreb_scale_model_show_2026" ["content_eng"]=> string(3835) "Mario Grgurev, 06.07.2026.On June 6-7 we attended Zagreb Scale Model Show 2026.

It was held in Zagreb's Family Mall and we organized our Back to Basics Miniature Painting Workshops.


As always we awarded the best of show prize as voted by our members. This time the prize went to Mr Tihomir Bregar.
" ["content_hrv"]=> string(3945) "
6. i 7. lipnja nastupili smo na Zagreb Scale Model Showu 2026.
Ove godine održao se kroz dva dana u zagrebačkom Family Mallu. Tijekom oba dana održavali smo naše Back to Basics radionice bojanja minijatura.
Kao i uvijek, na većim natjecanjima dodijelili smo Best of Show nagradu po izboru naših članova, a ovaj put ona je otišla u ruke Tihomira Bregara.
" ["created"]=> string(19) "2026-07-06 10:20:45" ["modified"]=> string(19) "2026-07-10 11:26:10" } ["Member"]=> array(10) { ["id"]=> string(3) "100" ["group_id"]=> string(1) "2" ["first_name"]=> string(5) "Mario" ["last_name"]=> string(7) "Grgurev" ["first_name_mask"]=> string(5) "mario" ["last_name_mask"]=> string(7) "grgurev" ["username"]=> string(9) "lepimario" ["password"]=> string(40) "11e0b1ecc2c467637dfa513774d2426f3b925264" ["born"]=> string(19) "2045-01-21 09:02:00" ["created"]=> string(19) "2022-01-21 09:02:32" } } -
Izrada diorama mumije
array(2) { ["Article"]=> array(10) { ["id"]=> string(3) "515" ["member_id"]=> string(3) "102" ["title_eng"]=> string(25) "Making of MUMMY dioramas " ["title_hrv"]=> string(21) "Izrada diorama mumije" ["mask_eng"]=> string(24) "making_of_mummy_dioramas" ["mask_hrv"]=> string(21) "izrada_diorama_mumije" ["content_eng"]=> string(8860) "Sebastian Søgård, 17.06.2026.I recently was approached by the Historical Museum of Oslo to make three miniature dioramas for their exhibition MUMMY - a display of ancient Egyptian artefacts and mummies. Their requirements were that each of the three dioramas would portray a part of the life of one of the mummies from the exhibition, Dismut, a temple guardian’s daughter. Her Life, her Death and her Afterlife. In addition, they gave the maximum size of the display. This left me a lot of freedom for interpretation and to make the dioramas in my own way and style. In this article I’ll take you through part of my process for developing the three concepts. For a more detailed breakdown of the steps it took to complete the dioramas, see the videos.

My first focus was on the miniatures required. I searched online 3D-file shops to see what was already available. I knew this would be one of my limitations as there was no time or budget to 3D design all objects and characters required for all three dioramas. I found a pack of ancient Egyptian field workers, and so the Life diorama was created with this pack in mind - a tranquil scene by the Nile River, with workers harvesting wheat as Dismut observes from a higher vantage point. This diorama was also an opportunity to include some of the animals featured in the exhibition, so I found a cat and a mouse STL (and later a crocodile as well). As Dismut is not a famous pharaoh, there were obviously no STLs available of her, so I commissioned two 3D sculpts of her, giving me the chance to have her in the exact positions I needed for Life and Afterlife. In Death she would only appear as a mummified figure, easily available online.
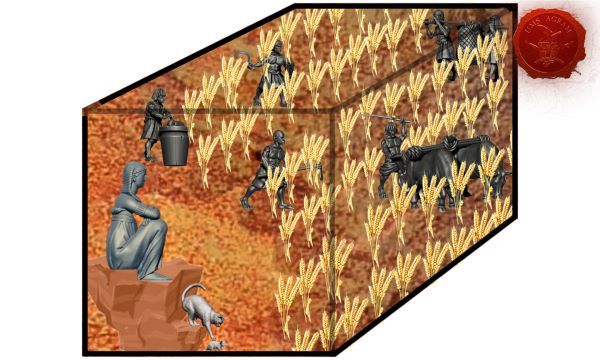
I wanted the diorama to read from left to right, as the three dioramas would be displayed one next to the other, so as well as reading the specific Life diorama from left to right, I also wanted the entire display of all three dioramas to lead from left to right. I decided that from left to right the dioramas would also go from light to dark, Life being the lightest in tone and colour and Afterlife the darkest, reflecting the dioramas’ subjects. I decided on the scale for the entire display, around 50mm for humans, as this would be small enough to fit all the elements I needed, but large enough to fill up the dioramas with the amount of elements I found as STL’s and save me some time on not having to paint too many tiny details. I adjusted all STL’s to this scale, and found some realistic wheat plants online at the correct scale as well. And so the concept sketch for the Life diorama came together.

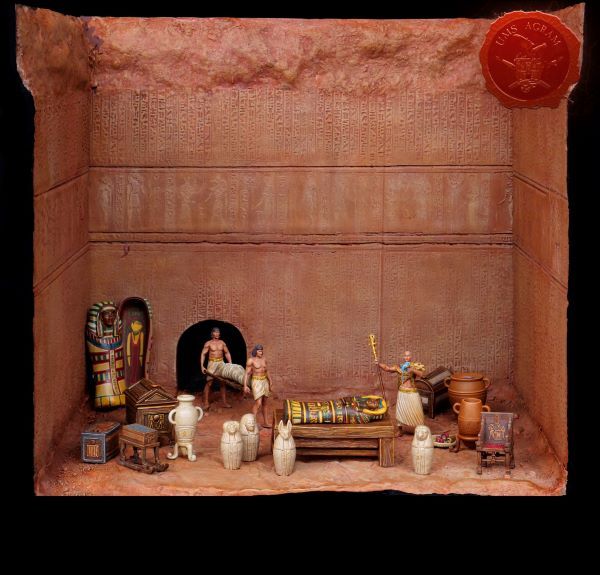
I knew that the Death diorama would be a burial ritual underground. I found a STL pack of several of the objects found in Tutankhamun’s grave, a burial ritual STL pack with two workers carrying a mummy and an ancient Egyptian priest. This would give me the scene. As the dioramas were going to have to be made as cubes, closed on all sides with walls, except for the front, as opposed to the open dioramas on display bases that we are used to, a part of planning each scene was also figuring out how to make the two sides and back panel a natural part of the dioramas. In Life this was an impossible task as no outdoor area is a cube, but I decided on making each side a rocky cliff and hoping the illusion of the scene would make the unaturally geometrical shape of the landscape become less visible. For Death my solution was a roller with Egyptian hieroglyphs. With this I could fill out each wall with historically accurate symbols and this way create interest in the surroundings of the scene as well. And for Afterlife, as this is already a “supernatural” scene, the walls would be bricks, extending the typical art found in Egyptian tombs portraying the Egyptian afterlife of Duat, into a 3D space. Generally I found a lot of inspiration and direction for this entire project from ancient Egyptian art and wall paintings.

The Afterlife diorama would have to have an Osiris character, the Egyptian God of the Dead, overseeing Dismut’s journey to Duat. As all STLs I could find of him had warrior poses, I instead commissioned a seated Osiris figure, as well as the scale that would measure Dismut’s heart against a feather, and thus if she is worthy of the Afterlife. I found a STL of Thoth, taking notes, and thought it suitable for the God judging the dead - in this case Dismut.
After the concepts were approved by the museum, so started a several months long process of getting the MDF walls for the cubes, cutting, carving and gluing XPS foam at the correct angles, sizes and shapes, painting around 40 miniature characters and objects, with airbrush and brush, creating and painting the landscapes, pouring epoxy resin for the Nile River as well as many other smaller and larger tasks. Of the many ideas that came during the making of the dioramas (not reflected in the concept sketches), one that I think especially contributed to the overall look of the final display, was the fact that I decided that each diorama would have its own main colour. Yellow for Life, sun and desert, Red for Death, underground an earthy, and Blue for Afterlife, cold and melancholic. This would differentiate the dioramas from each other even when being viewed from a distance, as well as give a natural progression from warm to cold, another way to add contrast and make the dioramas read in my preferred direction, from left to right. This was achieved most obviously through the choice of oil colours used to shade the three dioramas. Apart from that, the acrylic paints chosen are the same for all three dioramas, giving a cohesion of colour as well as being based on the available pigments they would have had at the time in Ancient Egypt - mineral pigments like lapis lazuli, red and ochre, soot for black, copper compounds for blue and green and synthetic pigments like Egyptian blue.
The final result is displayed here and will also be on display at Oslo’s Historical Museum for the foreseeable future. If you visit the city, make sure to stop by and have a look at the final display.

" ["content_hrv"]=> string(8826) "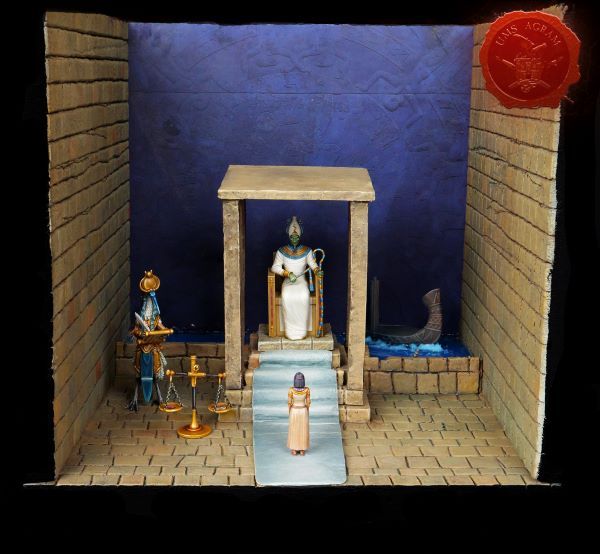
Nedavno me kontaktirao Povijesni muzej u Oslu da izradim tri minijaturne diorame za njihovu izložbu MUMIJA - prikaz drevnih egipatskih artefakata i mumija. Njihovi zahtjevi bili su da svaka od tri diorame prikazuje dio života jedne od mumija s izložbe, Dismut, kćeri čuvara hrama. Njezin život, smrt i zagrobni život. Osim toga, dali su maksimalnu veličinu prikaza. To mi je ostavilo puno slobode za interpretaciju i izradu diorama na moj vlastiti način i stil. U ovom članku provest ću vas kroz dio svog procesa razvoja triju koncepata. Za detaljniji pregled koraka potrebnih za dovršetak diorama pogledajte videozapise.
Moj prvi fokus bio je na potrebnim minijaturama. Pretražio sam online trgovine s 3D datotekama kako bih vidio što je već dostupno. Znao sam da će to biti jedno od mojih ograničenja jer nije bilo vremena ni proračuna za 3D dizajn svih predmeta i likova potrebnih za sve tri diorame. Pronašao sam skupinu drevnih egipatskih poljskih radnika, pa je diorama Život nastala imajući tu skupinu na umu - mirna scena uz rijeku Nil, s radnicima koji žanju pšenicu dok Dismut promatra s više točke. Ova diorama bila je i prilika za uključivanje nekih životinja predstavljenih na izložbi, pa sam pronašao mačku i miša u STL-u (a kasnije i krokodila). Budući da Dismut nije poznati faraon, očito nije bilo dostupnih STL-ova za nju, pa sam naručio dvije 3D skulpture, što mi je dalo priliku da je imam u točnim položajima koji su mi bili potrebni za Život i Zagrobni život. U Smrti bi se pojavila samo kao mumificirana figura, lako dostupna online.
Želio sam da se diorama čita slijeva nadesno, budući da bi se tri diorame prikazale jedna pored druge, pa sam, osim što se specifična diorama Života čita slijeva nadesno, također želio da cijeli prikaz sve tri diorame ide slijeva nadesno. Odlučio sam da će diorame slijeva nadesno ići od svijetlog prema tamnom, pri čemu će Život biti najsvjetliji po tonu i boji, a Zagrobni život najtamniji, odražavajući subjekte diorama. Odlučio sam se za mjerilo za cijeli prikaz, oko 50 mm za ljude, jer bi to bilo dovoljno malo da stanu svi potrebni elementi, ali dovoljno veliko da ispuni diorame količinom elemenata koje sam pronašao kao STL-ove i uštedi mi vrijeme jer ne bih morao slikati previše sitnih detalja. Prilagodio sam sve STL-ove ovom mjerilu i pronašao sam neke realistične biljke pšenice na internetu u ispravnom mjerilu. I tako je nastala konceptualna skica za dioramu Života.
Znao sam da će diorama Smrt biti pogrebni ritual pod zemljom. Pronašao sam STL paket nekoliko predmeta pronađenih u Tutankamonovoj grobnici, STL paket pogrebnog rituala s dva radnika koji nose mumiju i drevnim egipatskim svećenikom. To bi mi dalo scenu. Budući da su diorame morale biti izrađene kao kocke, zatvorene sa svih strana zidovima, osim sprijeda, za razliku od otvorenih diorama na izložbenim postoljima na koje smo navikli, dio planiranja svake scene bio je i smišljanje kako učiniti dvije strane i stražnju ploču prirodnim dijelom diorama. U filmu Život to je bio nemoguć zadatak jer nijedno vanjsko područje nije kocka, ali odlučio sam svaku stranu napraviti kao stjenovitu liticu i nadao se da će iluzija scene učiniti neprirodno geometrijski oblik krajolika manje vidljivim. Za Smrt moje rješenje bio je valjak s egipatskim hijeroglifima. S tim sam mogao ispuniti svaki zid povijesno točnim simbolima i na taj način stvoriti interes i za okolinu scene. A za Zagrobni život, budući da je ovo već „natprirodna“ scena, zidovi bi bili od cigli, proširujući tipičnu umjetnost pronađenu u egipatskim grobnicama koje prikazuju egipatski zagrobni život Duata u 3D prostor. Općenito sam pronašao mnogo inspiracije i smjernica za cijeli ovaj projekt u drevnoj egipatskoj umjetnosti i zidnim slikama.
Diorama zagrobnog života morala bi imati lik Ozirisa, egipatskog boga mrtvih, koji nadgleda Dismutovo putovanje u Duat. Budući da su svi STL-ovi koje sam mogao pronaći o njemu imali ratničke poze, umjesto toga sam naručio sjedeću figuru Ozirisa, kao i vagu koja bi mjerila Dismutovo srce u odnosu na pero, te time utvrdila je li dostojna zagrobnog života. Pronašao sam STL Thotha, bilježio i smatrao sam da je prikladan za Boga koji sudi mrtvima - u ovom slučaju Dismuta.
Nakon što je muzej odobrio koncepte, započeo je višemjesečni proces nabave MDF zidova za kocke, rezanja, rezbarenja i lijepljenja XPS pjene pod ispravnim kutovima, veličinama i oblicima, oslikavanja oko 40 minijaturnih likova i predmeta airbrushom i kistom, stvaranja i oslikavanja pejzaža, izlijevanja epoksidne smole za rijeku Nil, kao i mnogih drugih manjih i većih zadataka. Od mnogih ideja koje su se pojavile tijekom izrade diorama (koje nisu odražene u skicama koncepta), jedna za koju mislim da je posebno doprinijela ukupnom izgledu konačnog prikaza bila je činjenica da sam odlučio da će svaka diorama imati svoju glavnu boju. Žuta za život, sunce i pustinju, crvena za smrt, podzemlje i zemljanost, a plava za zagrobni život, hladnu i melankoličnu. To bi razlikovalo diorame jednu od druge čak i kada se gledaju iz daljine, kao i dalo prirodan prijelaz od toplog prema hladnom, još jedan način dodavanja kontrasta i da se diorame čitaju u mom željenom smjeru, slijeva nadesno. To je najočitije postignuto odabirom uljanih boja korištenih za sjenčanje triju diorama. Osim toga, akrilne boje odabrane su iste za sve tri diorame, što daje koheziju boja, a ujedno se temelji na dostupnim pigmentima koje su imali u to vrijeme u drevnom Egiptu - mineralni pigmenti poput lapis lazulija, crvene i oker boje, čađa za crnu, spojevi bakra za plavu i zelenu te sintetički pigmenti poput egipatske plave.
Konačni rezultat je ovdje izložen i bit će izložen u Povijesnom muzeju u Oslu u doglednoj budućnosti. Ako posjetite grad, svakako navratite i pogledajte konačni postav.
" ["created"]=> string(19) "2026-06-17 08:34:19" ["modified"]=> string(19) "2026-06-17 08:34:19" } ["Member"]=> array(10) { ["id"]=> string(3) "102" ["group_id"]=> string(1) "2" ["first_name"]=> string(9) "Sebastian" ["last_name"]=> string(8) "Søgård" ["first_name_mask"]=> string(9) "sebastian" ["last_name_mask"]=> string(4) "sgrd" ["username"]=> string(5) "norge" ["password"]=> string(40) "4dea770e7045a97695c7dc529698e85f5dadbded" ["born"]=> string(19) "2003-01-21 09:03:00" ["created"]=> string(19) "2022-01-21 09:03:12" } }


Najnoviji izvještaji s bojišta
- Kill Team - Blooded vs. Vespid Stingwings 28.02.2025., GW - Warhammer 40.000, i Antoni Pastuović (Imperial Guard)
- Dark Angels protiv T'au Battlereport 22.04.2022., GW - Warhammer 40.000, Borna Pleše (Space Marines) i Kristijan Kliska (Tau Empire)
- Sisters of Battle protiv Ultramarines 17.11.2021., GW - Warhammer 40.000, i Nino Marasović (Space Marines)