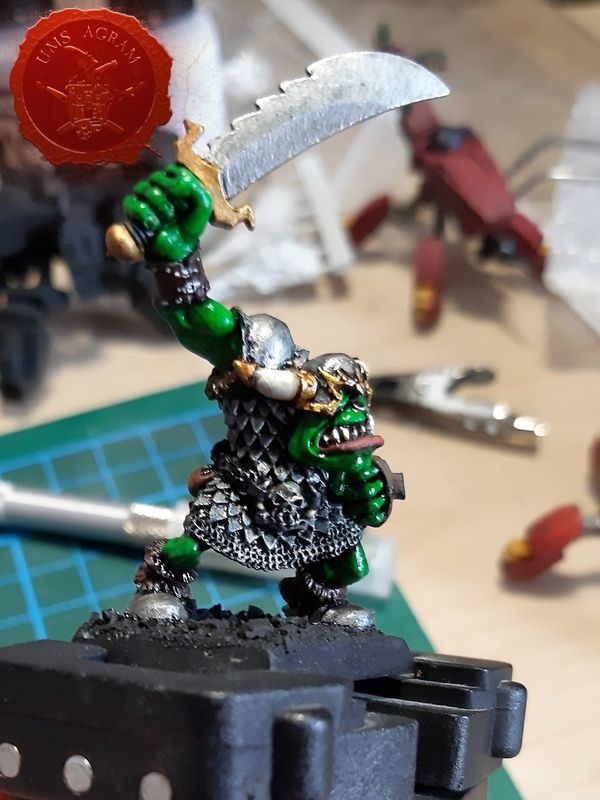
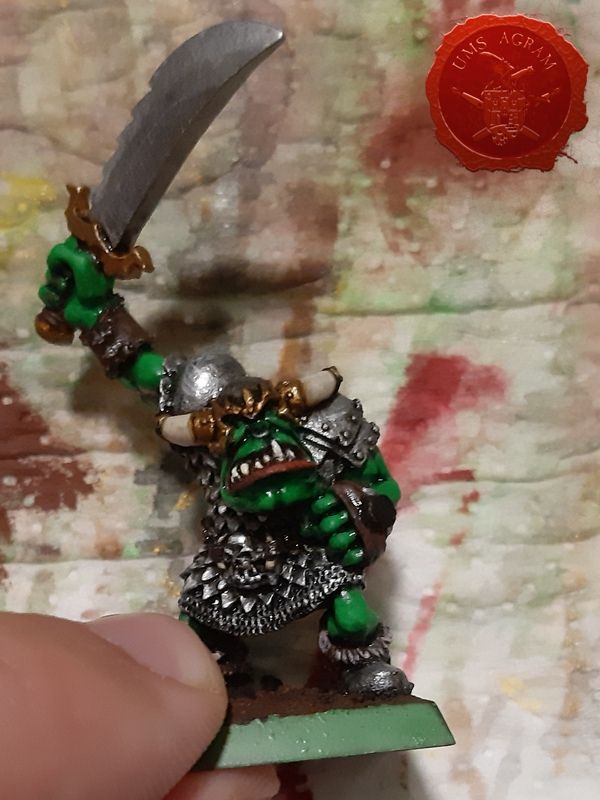
Old School Ork

Goran Krunić, 17th October 2020

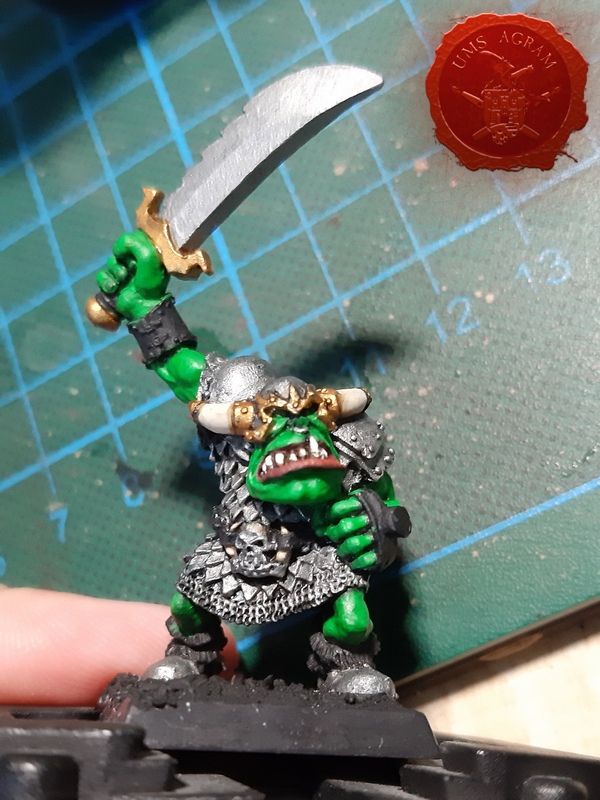
In today's article, I am going to show you how to paint an Orc Champion for Warhammer Fantasy Battles/Age of Sigmar.

NOTE: Do not glue the shield to the miniature until both the miniature and the shield are painted.

Preparation:

Take a sharp modelling knife and modelling or similar files in order to remove the excess material resulting from the casting process of the miniature (flash), and mould lines which are the result of the casting material accumulating on the join between the mould halves during the casting process.

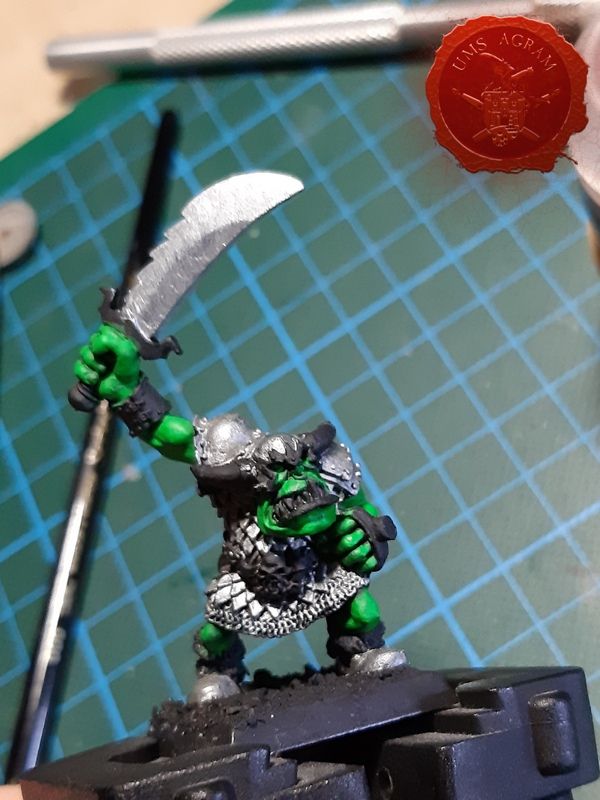
Take a black, the more matte, the better spray (I have user Cosmos Matte Black), and spray the miniature by utilising light, even motions until the entire surface of the miniature is covered, taking care not to obscure the details of the miniature among the layers of applied paint, alternatively, the primer paint can also be brushed on, I would use Scale75 Black for that purpose.

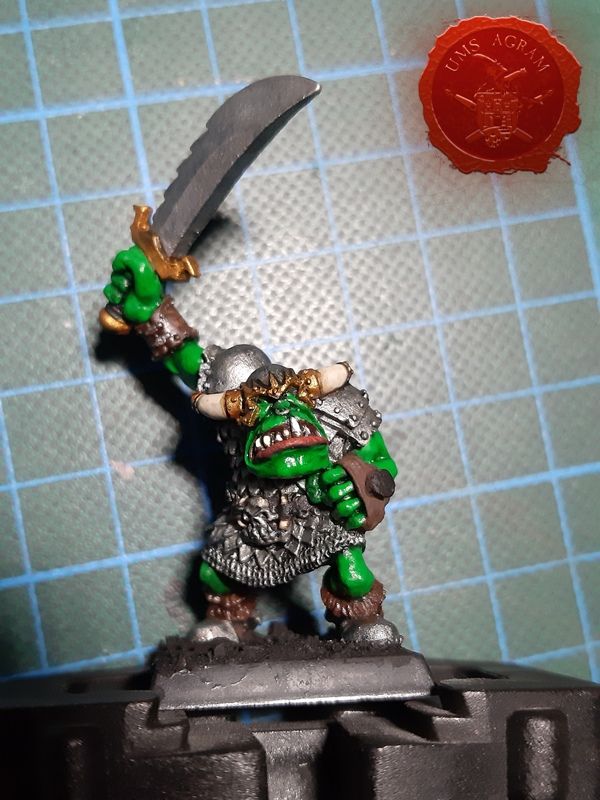
Dilute a middle dark shade of green (I have user Irati Green by Scale75) using Citadel's Lahmian Medium, and apply it over 2 to 3 coats (allow the paint to dry in between layers) until you attain even coverage of the skin surfaces.

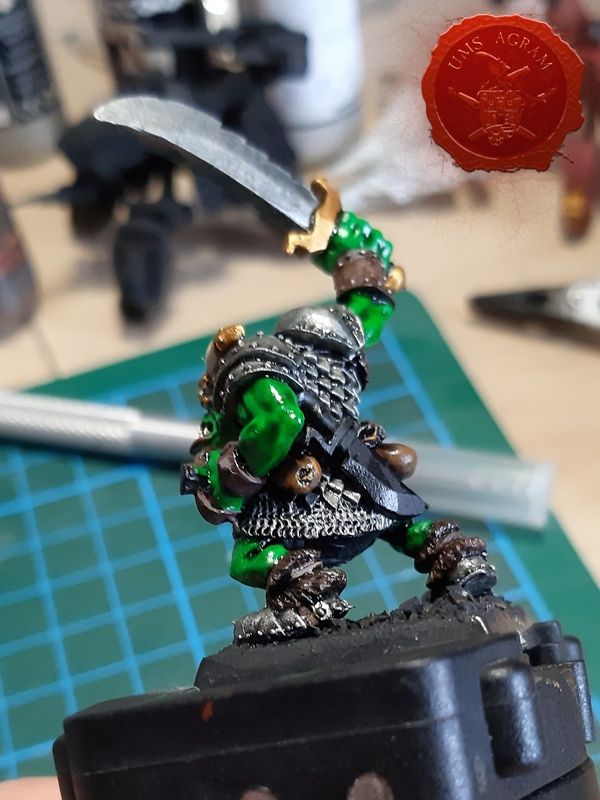
Using a middle dark metallic silver paint (Ironbreaker by Citadel, Steel from Vallejo Model Air, Heavy Metal from Scale75 etc.), paint the metallic surfaces on the miniature (this includes the armour, the sword blade, the helmet, the armor on the shoulders, the ring in the nose, the blade of the knife on the back and the shoes)*.

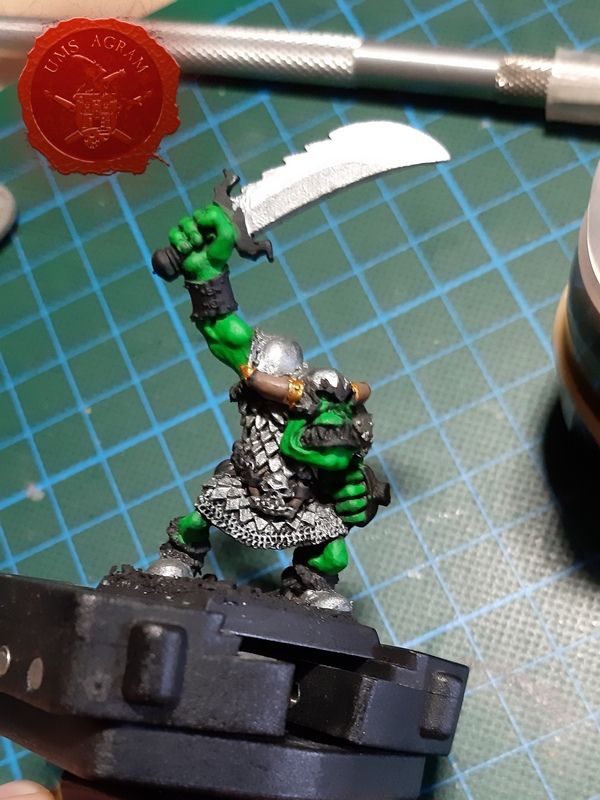
Using a yellowish bronze paint (I have user Dwarven Gold from Scale75), paint the tips of the helmet horns, the joins of the helmet horns with the helmet itself, the edge of the helmet above the face of the miniature, and the hilt and crossguard of the sword and knife on the back**.

Using a middle dark shade of brown paint (Beasty Brown from Vallejo Game Color, Brown Leather from Scale75 etc.), paint the horns of the helmet, and the horns of the belt buckle.

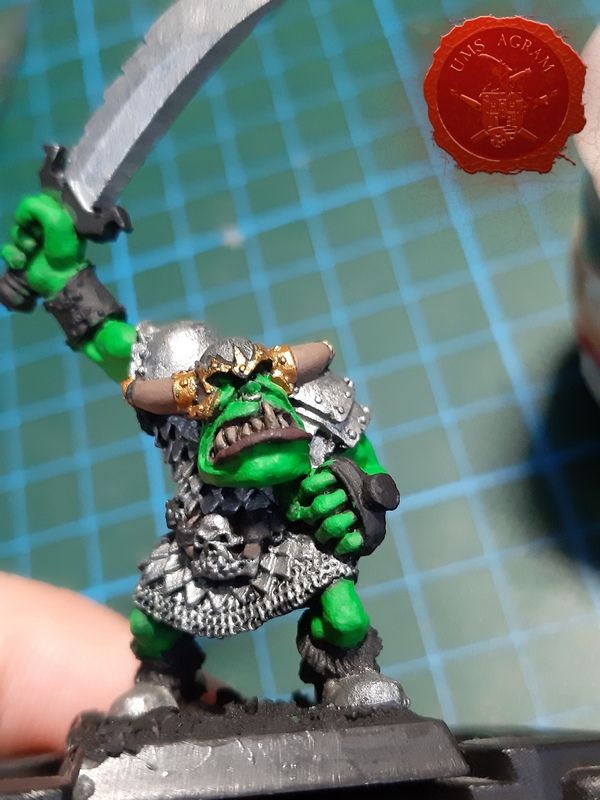
Using a pale brown paint (I have used Walnut from Scale75), paint the teeth of the miniature.

Using in sequence reddish and orange brown paints in 3 to 5 shades, gradually lighten the teeth of the miniature (I have used Blackert Brown, Peanut Butter, Cokum Copper, Hykey Yellow from Scale75 Fantasy & Games, and finally Off White from Vallejo Game Color).

The same procedure as in the previous step can also be used for the helmet horns, although a shade such as Bonewhite from Vallejo Game Color or similar was used to finish them off.

Using a darker and more muted shade of red (I have used Deep Red from Scale75), paint the lower lip of the miniature and the visible part of the inside of the mouth. Then, gradually, going from Blood Red to Aldeberan Red by Scale75 highlight the details of the lip using a paintbrush, simulating the look of a dried lip.

Using the Biel-Tan Green Shade (wash) from Citadel, apply a single, thicker coat on the skin areas of the miniature, taking care for it not to gather in the recesses, because it can leave stains that look bad.

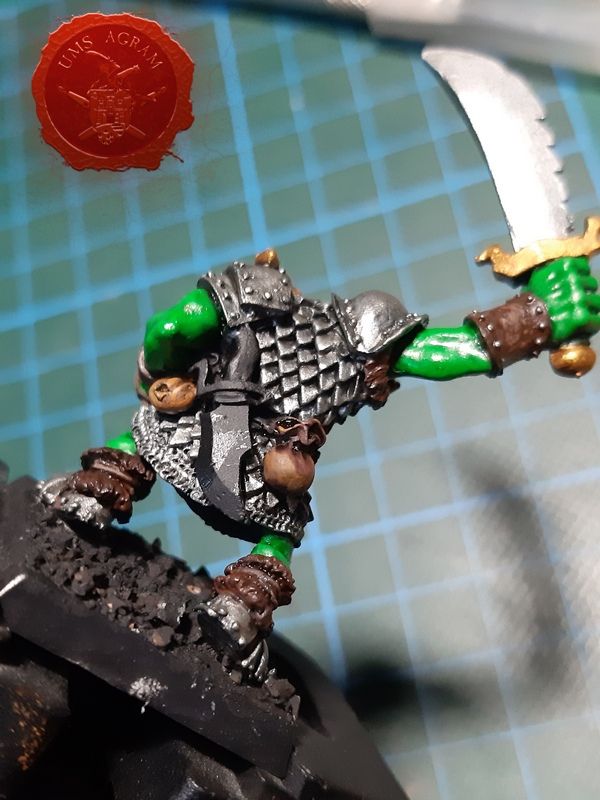
Using Nuln Oil Shade (wash) from Citadel, apply a single, thicker coat on the metallic parts of the miniature (see above for the list *), also taking care for it not to gather in the recesses, or in one single point.

Using Agrax Earthshade Shade (wash) from Citadel, apply a single, thicker coat on the bronze parts of the miniature (see above for the list **), also taking care, as in the previous two steps for it not to gather either in the recesses, or in a single point.

Using a lighter bronze paint (I have used Viking Gold from Scale75), highlight the more pronounced parts of the bronze parts of the miniature (see above for the list **), taking care for a smaller portion of the previously painted darker layers to remain visible.

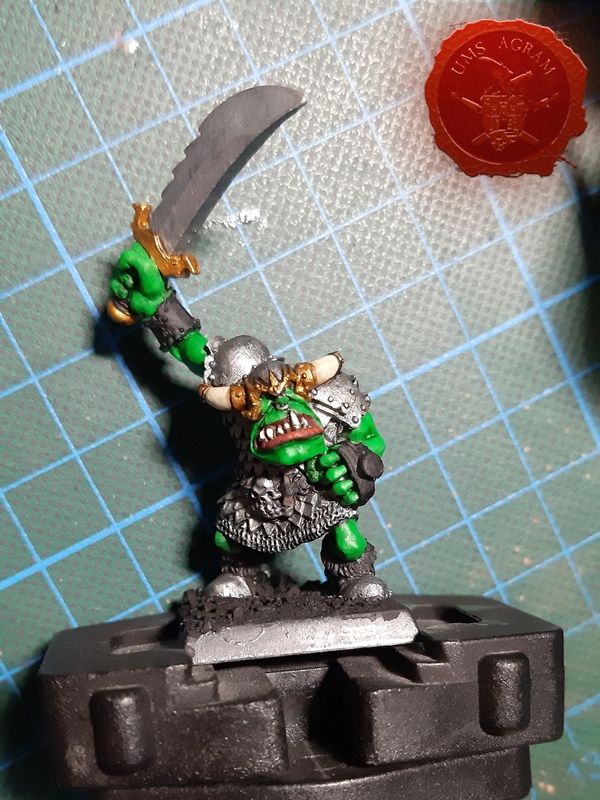
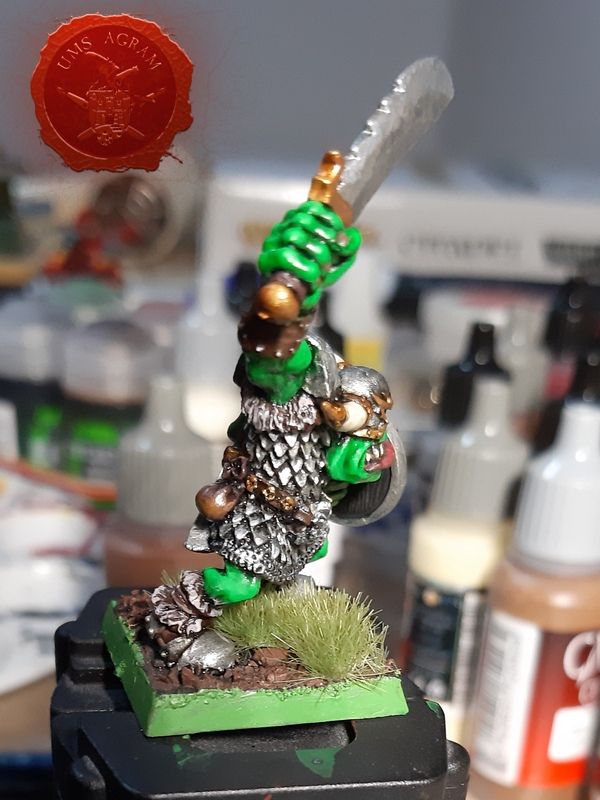
Using a darker brown shade (I have used Charred Brown from Vallejo Game Color), paint the fur parts of the miniature (above the shoes, and the outer part of the sleeve on the miniature's right hand).

Mix a middle grey shade (I have used Wolf Grey from Vallejo Game Color) to the paint from the previous step, and highlight from the middle to the top of the hairs of the fur parts.

Mix in a lighter grey shade in the mix from the previous step (I have used Ghost Grey from Vallejo Game Color), and highlight the last third and the tips of the hairs of the fur parts.

Using a middle shade of brown paint (I have used Brown Leather from Scale75), paint the leather parts of the miniature, these include the laces of the furs above the shoes, the bags on the belt on the back, the belt, the armlet on the right hand, and the shield handle on the left hand***.

Using Agrax Earthshade Shade (wash) from Citadel, apply a single, thicker coat on the leather parts of the miniature (see above for the list ***), taking care for it to not gather in the recesses.

Using reddish and yellowish shades of brown paint (e.g. Red and Orange Leather from Scale75, Scrufulous Brown from Vallejo Game Color etc.), create dot and similar patterns on the leather parts of the miniature, this will give plausibility to the leather, I also advise to Google reference images for corresponding leather parts.

Using a middle dark metallic silver paint, paint the studs on the armlet on the right hand, and the buckle on the armlet on the right hand.

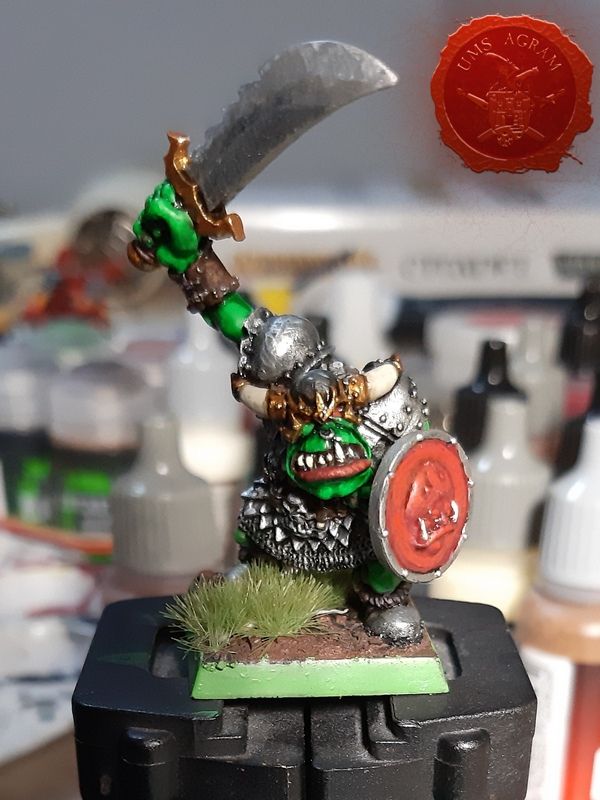
Using a middle dark metallic silver paint (I have used Heavy Metal from Scale75), paint the edge of the shield.

Using a dark red paint (I have used Deep Red from Scale75), paint the inner part of the shield (the frowning Sun).

Using gradually lighter shades of red paint (Blood Red, Aldebaran Red from Scale75 etc.), highlight the bumps on the Sun on the shield.

Using the same procedure as for the teeth of the miniature, paint the teeth of the Sun on the shield.

Conclusion:

I have created a relatively simple base for the miniature, where I have used middle and fine grained sand from Gale Force 9, which I have mixed in a 2 to 1 ratio of fine to middle grained, as well as chincilla sand, which fills in any gaps left by the previous step.

I have also applied some static grass which I have obtained from the company called Gamer's Grass, with arbitrary paint depending on the desired look, season etc.

To conclude, since we are talking about a miniature from the 4th or the 5th edition of Warhammer Fantasy Battles, a base edge painted in a middle light shade of green is inevitable, I have used Goblin Green from Vallejo Game Color.

Click for enlarged picture

Click for enlarged picture

Click for enlarged picture

Click for enlarged picture

Click for enlarged picture

Click for enlarged picture

Click for enlarged picture

Click for enlarged picture

Click for enlarged picture

Click for enlarged picture

Click for enlarged picture

Click for enlarged picture

Click for enlarged picture

Click for enlarged picture

Click for enlarged picture

Latest articles

  • Miniature Painting Workshop - Kitbashing and Converting
              array(2) {
      ["Article"]=>
      array(10) {
        ["id"]=>
        string(3) "455"
        ["member_id"]=>
        string(2) "35"
        ["title_eng"]=>
        string(55) "Miniature Painting Workshop - Kitbashing and Converting"
        ["title_hrv"]=>
        string(54) "Radionica bojanja minijatura - Kitbashing i converting"
        ["mask_eng"]=>
        string(55) "miniature_painting_workshop_-_kitbashing_and_converting"
        ["mask_hrv"]=>
        string(54) "radionica_bojanja_minijatura_-_kitbashing_i_converting"
        ["content_eng"]=>
        string(3840) "

    Click for enlarged picture

    Click for enlarged picture

    Click for enlarged picture

    Click for enlarged picture

    Click for enlarged picture

    Click for enlarged picture

    Click for enlarged picture

    Click for enlarged picture

    Click for enlarged picture

    Click for enlarged picture

    Click for enlarged picture

    Click for enlarged picture

    " ["content_hrv"]=> string(5445) "

    Click for enlarged picture

    U subotu i nedjelju, 17. i 18.5. održali smo novu vikend radionicu bojanja minijatura. Ovog puta tema je bilo konvertiranje i kitbashanje.

    Radionica se provodila kroz dva dana (cijeli vikend) i bila je fokusirana na izradu dvije (do tri) vlastite minijature od raznih dijelova (više različitih minijatura) uz dodatak modeliranja dijelova uz pomoć modelarskih masa (Green Stuff). Sastojala se od dva dijela, teorijskog i praktičnog dijela. Tijekom radionice polaznici su se upoznali s alatima, materijalima i tehnikama za izvođenje jednostavnih i kompleksnih konverzija, uključujući uporabu masa za modeliranje.

    Click for enlarged picture

    Click for enlarged picture

    Click for enlarged picture

    Teorijski dio uključuje savjete za planiranje, nabavu dijelova i smisleno sklapanje personaliziranih minijatura da bi polaznici naučili izbjeći početničke greške i podigli svoje vještine na viši nivo.
    U praktičnom dijelu, uz pomoć voditelja primijenila su se stečena znanja na vlastitu konverziju.

    Click for enlarged picture

    Click for enlarged picture

    Click for enlarged picture

    Praktični dio Radionice se odvijao na sljedeći način:
    Prvo, predavač sjedi za svojim stolom te objašnjava i demonstrira pojedini korak na svojem primjerku dok polaznici slušaju, gledaju, ali i postavljaju pitanja. Potom, polaznici sjedaju za svoje stolove i primjenjuju stečeno znanje. Predavač potom kruži između polaznika i provjerava kako svakom polazniku ide. Na taj način, može se prilagoditi svakom polazniku ponaosob.

    Click for enlarged picture

    Click for enlarged picture

    Click for enlarged picture

    U nedjelju od 16:00 svi polaznici su dobili profesionalni feedback na urađene radove od Ane Polanšćak iz Gardens of Hecate.

    Click for enlarged picture

    Click for enlarged picture

    " ["created"]=> string(19) "2025-05-18 18:27:11" ["modified"]=> string(19) "2025-05-18 18:27:11" } ["Member"]=> array(10) { ["id"]=> string(2) "35" ["group_id"]=> string(1) "1" ["first_name"]=> string(5) "Marko" ["last_name"]=> string(9) "Paunović" ["first_name_mask"]=> string(5) "marko" ["last_name_mask"]=> string(8) "paunovic" ["username"]=> string(5) "marko" ["password"]=> string(40) "3bd37b326d19d1880d3b93a4b32e8fb3a90fa122" ["born"]=> string(19) "2033-03-07 20:35:00" ["created"]=> string(19) "2009-06-02 20:37:03" } }
    Marko Paunović, 18th May 2025
  • March to Hren28 week 7
              array(2) {
      ["Article"]=>
      array(10) {
        ["id"]=>
        string(3) "454"
        ["member_id"]=>
        string(2) "96"
        ["title_eng"]=>
        string(22) "March to Hren28 week 7"
        ["title_hrv"]=>
        string(24) "March to Hren28 tjedan 7"
        ["mask_eng"]=>
        string(22) "march_to_hren28_week_7"
        ["mask_hrv"]=>
        string(24) "march_to_hren28_tjedan_7"
        ["content_eng"]=>
        string(2791) "

    Our team is preparing to perform at the Turnip28 tournament called H.R.E.N.28 in Slovenia in July. Ana, Mario, Domagoj, Seb and Antoni assemble their armies and paint, and we follow them on their way!

    Click for enlarged picture

    ANTONI: „As for my latest pair of Fodder models, one carries a flag and the other carries a nest on its shoulders. The flag is made from a thin piece of copper that is clamped around a brass rod, secured with superglue, and then bent to look like fabric in the wind.

    Click for enlarged picture

    The nest is made of a mixture of green stuff and milliput that I cut lines into. I put two chicken eggs from the Tamiya farm animal set inside and secured them with a drop of superglue. The other models have all sorts of new heads, from simple medieval helmets to gas cylinder caps. To make it easier to see what they are doing, most of them have candles on their caps. “

    Click for enlarged picture

    MARIO: „As an unexpected addition to my army, I found an old pipe in the apartment and decided to turn it into a cannon. I had the legs from some bird monsters on the sprue and they turned out great for the conversion. My other toadie (which is supposed to be for Brutes) is a small knight and I wanted to give him some creature to stand out on to compensate. I found a stork from Muller, added the head of the pterodactyl I found on the floor of the Sferakon, and redid the legs. There are more things on the bird coming soon, but I have to decide which ones.“

    Click for enlarged picture

    " ["content_hrv"]=> string(2837) "

    Naša ekipa se sprema za nastup na Turnip28 turniru pod nazivom H.R.E.N.28 u Sloveniji u srpnju. Ana, Mario, Domagoj, Seb i Antoni slažu svoje vojske i farbaju, a mi ih pratimo na njihovom putu!

    Click for enlarged picture

    ANTONI: „Što se tiče par najnovijih Fodder modela, jedan nosi zastavicu, a drugi nosi gnijezdo na ramenima. Zastavica je napravljena od tankog komada bakra koji je kliještima stisnut oko mjedenog štapića, učvršćen superljepilom te potom savijen da izgleda kao tkanina na vjetru.

    Click for enlarged picture

    Gnijezdo je napravljeno od mješavine green stuffa i milliputa u koju sam urezao crte. Unutra sam ubacio dva kokošja jaja iz Tamiya seta domaćih životinja i učvrstio ih kapljicom superljepila. Ostali su modeli dobili svakakve nove glave, od običnih srednjovjekovnih kaciga do poklopaca od plinskih boca. Kako bi bolje vidjeli što rade, većina ih ima svijeće na kapama. “

    Click for enlarged picture

    MARIO: „Kao neočekivani dodatak mojoj vojsci, našao sam staru lulu u stanu i odlučio pretvoriti ju u top. Imao sam noge od nekih ptičjih čudovišta na sprue-u i ispale su super za konverziju. Moj drugi toadie (koji bi trebao biti za Brutes) je mali vitez i želio sam mu dati neko biće na kojem će se istaknuti za kompenzaciju. Našao sam rodu iz Mullera, dodao glavu pterodaktila kojeg sam našao na podu Sferakona i prepravio noge. Uskoro dolazi još stvari na pticu, ali se moram odlučiti koje.“

    Click for enlarged picture

    " ["created"]=> string(19) "2025-05-18 18:10:57" ["modified"]=> string(19) "2025-05-18 18:10:57" } ["Member"]=> array(10) { ["id"]=> string(2) "96" ["group_id"]=> string(1) "2" ["first_name"]=> string(6) "Antoni" ["last_name"]=> string(10) "Pastuović" ["first_name_mask"]=> string(6) "antoni" ["last_name_mask"]=> string(9) "pastuovic" ["username"]=> string(6) "antoni" ["password"]=> string(40) "5dfa823ee30df1936c1792d4c8348a4bcf4c64e2" ["born"]=> string(19) "2005-04-04 18:52:00" ["created"]=> string(19) "2019-04-04 18:53:09" } }
    Antoni Pastuović, 18th May 2025
  • Scratchbuilding Star Wars Crates
              array(2) {
      ["Article"]=>
      array(10) {
        ["id"]=>
        string(3) "453"
        ["member_id"]=>
        string(3) "102"
        ["title_eng"]=>
        string(32) "Scratchbuilding Star Wars Crates"
        ["title_hrv"]=>
        string(41) "Izrada kontejnera za diorame u SW setingu"
        ["mask_eng"]=>
        string(32) "scratchbuilding_star_wars_crates"
        ["mask_hrv"]=>
        string(41) "izrada_kontejnera_za_diorame_u_sw_setingu"
        ["content_eng"]=>
        string(4962) "

    Click for enlarged picture

    In this article I’ll explain how I scratchbuild crates for the Star Wars Universe, to use on bases or in dioramas. It’s pretty simple and fun, and the required tools and barrier to entry is really low. These are the tools and materials I have at my disposal when I start the build.

    Click for enlarged picture

    My materials are two polystyrene sheets of different thicknesses. I choose the 1mm and the 0.25mm for this build, as well as square tubes of polystyrene 7.9mm X 7.9mm and a ruler. These are produced by Evergreen, and are widely available in hobby stores around the world. The tools I use are plastic cement (preferably with a brush), a hobby knife and a nail file.

    Click for enlarged picture

    I cut off a tip of the square tube, trying to make the length as equal to the width as possible, so 7.9mm. Now I have a cube.

    Click for enlarged picture

    Then I cut out smaller details for panels and parts (called greeblies in Star Wars lingo) from both the thinner and the thicker polystyrene sheets. Here I cut out as many as possible, to give myself options when assembling the crates.

    Click for enlarged picture

    An important aesthetic detail of the Star Wars universe is notches, and so I cut notches into several of my panels, like in this illustration.

    Another stylistic factor of SW is that very few things are symmetrical. So I chose to make all sides of my crates different, varying the panelling and details, using both thick and thin polystyrene for variation in depth. Here are some examples of different sides of my crates.

    Click for enlarged picture

    The larger crate is created only using the polystyrene sheets, and not from the square tube. So I measured and cut out five equal sides (the bottom is open) of the 1mm thick polystyrene and glued them together to form a cube. I used the thinner polystyrene to cut out and create lids for all my crates as well. Everything is glued together using plastic cement which creates a strong bond relatively fast by melting the plastics together. Because of this I now have sturdy crates that I can then use the nail file to polish and clean up - making sure all sides of the bigger crate are flush, that all crates are flat at the bottom, and file down all the hard corners of the crates into more rounded shapes.

    Click for enlarged picture

    I test out the placement of the crates on my base, and make sure the scale works, before I finish the base.

    Click for enlarged picture

    " ["content_hrv"]=> string(4921) "

    Click for enlarged picture

    U ovom ću članku objasniti kako izrađujem sanduke za Star Wars svemir, za korištenje na bazama ili u dioramama. Prilično je jednostavno i zabavno, a potrebni alati i prepreka za ulazak su stvarno niski. Ovo su alati i materijali koje imam na raspolaganju kada počnem graditi.

    Click for enlarged picture

    Moji materijali su dvije polistirenske ploče različitih debljina. Odabrao sam 1 mm i 0,25 mm za ovu konstrukciju, kao i kvadratne cijevi od polistirena 7,9 mm X 7,9 mm i ravnalo. Njih proizvodi Evergreen i dostupni su u hobi trgovinama diljem svijeta. Alati koje koristim su plastični cement (po mogućnosti s četkom), hobi nož i turpija za nokte.

    Click for enlarged picture

    Odrezao sam vrh četvrtaste cijevi, pokušavajući da duljina bude što jednaka širini, dakle 7,9 mm. Sada imam kocku.

    Click for enlarged picture

    Zatim sam izrezao manje detalje za panele i dijelove (koji se u žargonu Ratova zvijezda nazivaju greeblies) i od tanjih i od debljih polistirenskih ploča. Ovdje sam izrezao što je više moguće, kako bih imao mogućnosti pri sastavljanju sanduka.

    Click for enlarged picture

    Važan estetski detalj Star Wars svemira su urezi, pa sam izrezao ureze u nekoliko svojih ploča, kao na ovoj ilustraciji.

    Još jedan stilski faktor SW-a je da je vrlo malo stvari simetrično. Stoga sam odlučio napraviti različite strane svojih sanduka, mijenjajući obloge i detalje, koristeći debeli i tanki polistiren za varijacije u dubini. Evo nekoliko primjera različitih strana mojih sanduka.

    Click for enlarged picture

    Veći sanduk izrađen je samo od polistirenskih ploča, a ne od četvrtaste cijevi. Tako sam izmjerio i izrezao pet jednakih stranica (dno je otvoreno) polistirena debljine 1 mm i zalijepio ih da formiraju kocku. Koristio sam tanji polistiren za izrezivanje i izradu poklopaca za sve svoje sanduke. Sve je zalijepljeno plastičnim cementom koji relativno brzo stvara čvrstu vezu topljenjem plastike. Zbog toga sada imam čvrste sanduke koje zatim mogu upotrijebiti turpiju za poliranje i čišćenje - pazeći da su sve strane većeg sanduka u ravnini, da su sve sanduke ravne na dnu i isturpijam sve tvrde kutove sanduka u zaobljenije oblike.

    Click for enlarged picture

    Prije nego što dovršim bazu, testiram položaj sanduka na svojoj bazi i uvjeravam se da vaga radi.

    Click for enlarged picture

    " ["created"]=> string(19) "2025-05-12 09:59:09" ["modified"]=> string(19) "2025-05-12 09:59:09" } ["Member"]=> array(10) { ["id"]=> string(3) "102" ["group_id"]=> string(1) "2" ["first_name"]=> string(9) "Sebastian" ["last_name"]=> string(8) "Søgård" ["first_name_mask"]=> string(9) "sebastian" ["last_name_mask"]=> string(4) "sgrd" ["username"]=> string(5) "norge" ["password"]=> string(40) "4dea770e7045a97695c7dc529698e85f5dadbded" ["born"]=> string(19) "2003-01-21 09:03:00" ["created"]=> string(19) "2022-01-21 09:03:12" } }
    Sebastian Søgård, 12nd May 2025
  • March to Hren28 week 6
              array(2) {
      ["Article"]=>
      array(10) {
        ["id"]=>
        string(3) "452"
        ["member_id"]=>
        string(2) "96"
        ["title_eng"]=>
        string(22) "March to Hren28 week 6"
        ["title_hrv"]=>
        string(24) "March to Hren28 tjedan 6"
        ["mask_eng"]=>
        string(22) "march_to_hren28_week_6"
        ["mask_hrv"]=>
        string(24) "march_to_hren28_tjedan_6"
        ["content_eng"]=>
        string(3113) "

    Our team is preparing to perform at the Turnip28 tournament called H.R.E.N.28 in Slovenia in July. Ana, Mario, Domagoj, Seb and Antoni assemble their armies and paint, and we follow them on their way!

    Click for enlarged picture

    ANTONI: „My cult, Feast of Charybdis, is based on one or two of these Scuttlers (my plan is to make only one) that jump out of the mud, i.e. deployment is anywhere on the board and they have to make a charge. Also, their melee must end so that they or the target end up out of action, so the fight repeats until someone dies. The cult now allows all units to bury and jump out from turn to turn. I want it to end up looking like a walking island that rose out of the mud, so the top next to the tower will have some vegetation, and everything else will be muddy.

    Click for enlarged picture

    The second unit I worked on is the blackpowder Fodder. They are the most numerous unit in Turnip (12) and rely on having as many of them as possible at all times. My idea is for them to look unmistakably like line infantry, but each one has a gimmick that sets them apart from the others, e.g. an underwater mine for a head, a barrel with a relic on its back. Since they consider the radish a sacred manifestation of "Root", their uniforms will be a pale purple, their helmets and weapons rusty.“

    Click for enlarged picture

    Click for enlarged picture

    MARIO: „This week, I did some minor converting as well as finishing work on the Proboscis which I managed to prime as well.“

    Click for enlarged picture

    " ["content_hrv"]=> string(3109) "

    Naša ekipa se sprema za nastup na Turnip28 turniru pod nazivom H.R.E.N.28 u Sloveniji u srpnju. Ana, Mario, Domagoj, Seb i Antoni slažu svoje vojske i farbaju, a mi ih pratimo na njihovom putu!

    Click for enlarged picture

    ANTONI: „Moj kult, Feast of Charybdis, bazira se na jednom do dva ovakva Scuttlera (moj plan je samo jednog napravit) koji iskaču iz blata, tj. deployment je bilo gdje na boardu i moraju napravit charge. Također, njihov melee mora završiti tako da oni ili meta završe out of action, znači fight se ponavlja dok netko ne pogine. Kult sada dozvoljava svim jedinicama da se iz turna u turn zakopavaju i iskaču. Želim da mi na kraju izgleda kao hodajući otočić koji se podigao iz blata, pa će vrh pored tornja imati malo vegetacije, a sve ostalo će biti blatno.“

    Click for enlarged picture

    Drugi unit na kojem sam radio su blackpowder Fodder. Oni su najmnogobrojnija jedinica u Turnipu (12) i oslanjaju se na to da ih je što više u svakom trenutku. Moja ideja je da nedvojbeno izgledaju kao line infantry, ali da svaki ima neki gimmick koji ga razlikuje od drugih npr. podvodna mina umjesto glave, bačva s relikvijom na leđima. S obzirom da smatraju rotkvicu svetom manifestacijom "Roota", odore će im biti blijede ljubičaste boje, kacige i oružja zahrđala.“

    Click for enlarged picture

    Click for enlarged picture

    MARIO: „Ovaj tjedan malo sam konvertirao, ali i dovršio Proboscisa kojeg sam čak i prajmao.“

    Click for enlarged picture

    " ["created"]=> string(19) "2025-05-12 09:51:35" ["modified"]=> string(19) "2025-05-12 09:51:35" } ["Member"]=> array(10) { ["id"]=> string(2) "96" ["group_id"]=> string(1) "2" ["first_name"]=> string(6) "Antoni" ["last_name"]=> string(10) "Pastuović" ["first_name_mask"]=> string(6) "antoni" ["last_name_mask"]=> string(9) "pastuovic" ["username"]=> string(6) "antoni" ["password"]=> string(40) "5dfa823ee30df1936c1792d4c8348a4bcf4c64e2" ["born"]=> string(19) "2005-04-04 18:52:00" ["created"]=> string(19) "2019-04-04 18:53:09" } }
    Antoni Pastuović, 12nd May 2025
  • We took part in: Sferakon 2025
              array(2) {
      ["Article"]=>
      array(10) {
        ["id"]=>
        string(3) "451"
        ["member_id"]=>
        string(3) "100"
        ["title_eng"]=>
        string(30) "We took part in: Sferakon 2025"
        ["title_hrv"]=>
        string(33) "Sudjelovali smo na: Sferakon 2025"
        ["mask_eng"]=>
        string(29) "we_took_part_in_sferakon_2025"
        ["mask_hrv"]=>
        string(32) "sudjelovali_smo_na_sferakon_2025"
        ["content_eng"]=>
        string(1600) "

    Click for enlarged picture

    Click for enlarged picture

    Click for enlarged picture

    Click for enlarged picture

    Click for enlarged picture

    " ["content_hrv"]=> string(2123) "

    Click for enlarged picture

    UMS "Agram" je ove godine na svom štandu u subotu 10.5. organizirao interaktivne Back to Basics radionice bojanja minijatura prilagođene svim uzrastima (od 8-99). Radionice za do tri polaznika su u trajanju od sat vremena.

    Click for enlarged picture

    Prijave nisu bile potrebne već po principu first come, first served. U pauzama između radionica, naši volonteri pokazivali su i demonstrirali razne minijaturističke tehnike.

    Click for enlarged picture

    Click for enlarged picture

    Click for enlarged picture

    " ["created"]=> string(19) "2025-05-12 09:42:06" ["modified"]=> string(19) "2025-05-12 09:42:06" } ["Member"]=> array(10) { ["id"]=> string(3) "100" ["group_id"]=> string(1) "2" ["first_name"]=> string(5) "Mario" ["last_name"]=> string(7) "Grgurev" ["first_name_mask"]=> string(5) "mario" ["last_name_mask"]=> string(7) "grgurev" ["username"]=> string(9) "lepimario" ["password"]=> string(40) "11e0b1ecc2c467637dfa513774d2426f3b925264" ["born"]=> string(19) "2003-01-21 09:02:00" ["created"]=> string(19) "2022-01-21 09:02:32" } }
    Mario Grgurev, 12nd May 2025

All articles

Latest battle-reports

All battle-reports