March to Hren28 – Armies by UMS Agram members

Marko Paunović, 6th August 2025

Over the past few months, our team has been preparing for the Turnip28 invitational event called H.R.E.N.28 in Slovenia in July. Since the event was a success, we owe you photos of the armies that Mario, Domagoj, Seb and Antoni assembled and painted while we followed them on their journey!

Click for enlarged picture

MARIO: „Hugo the tiny, first captain of the Crow knights was maybe born small, but that didn't stop him from having great dreams. After the taming of the swamp bird, he now reigns over his underlings in despite of the jokes the warband tells of the "Tiny stout". He follows Boletus on his quest, but always biding his time for an inevitable coup. The model is based on a "fat knight" 3D print, which is scaled to around 30-ish%. The bird is a plastic stork toy with an added head from a toy pteranodon a friend found on a floor of a Con in Zagreb. The toilet is just a natural progression of the idea.

Followers of the cult of the roaming Proboscis and Boletus' vision. They, along with the lesser fodder, believe in staying alive only by the power of the beast of the swamps. So they listen to Boletus when he said to stay within it's shade at all costs, lest they fall behind and starve. I wanted to make a warband of wandering knights, with all their stuff on them, and the narrative of them trailing an "always moving" beast was perfect. The banners in my warband often represent not only the colors of the cult, but also their ever-moving lifestyle. Brutes made from Perry's foot knights and official torsos from Max.

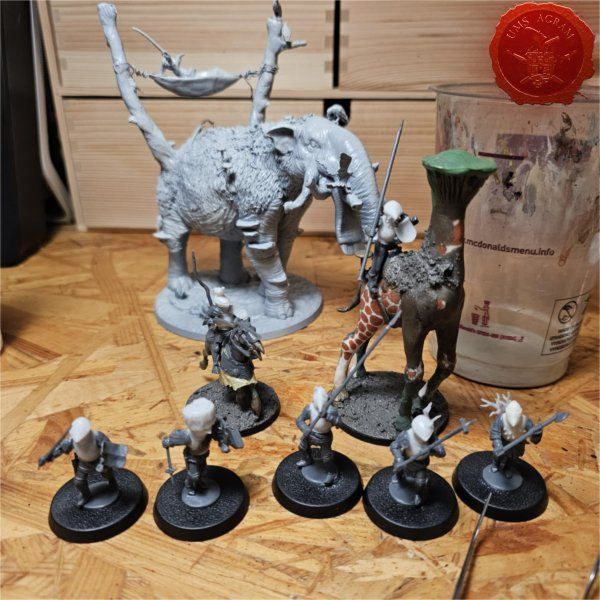
Set upon his rotting steed, Boletus leads the warband, even though no one remembers how it started. It seems he and the monster were always there, the crows and scavengers alike just trailing the monster's wake. He almost never speaks, and even when he does, it's mostly a whisper. Sometimes it even seems as if the monster listens to him. The mount is a childrens toy baby giraffe, with legs reposed a bit and a mushroom for a head (I got heavily inspired by the official art from the mercenary book). And the rider is a mix of Perry minis limbs and an official torso print. I did a bad job with GS blending and tried to hide it with it looking like the skin falls off, I think it looks good (all considered).

The great Proboscis! The beast's call can be heard through the marshes, at night or day. It seldom rests, and it is seldom peaceful. The Proboscis is called many things, but none know from where it came. Boletus says that it is thawed from ancient ice and corrupted after the apocalypse, but some among the company doubt these words. Yet all in the warband know that it is the beast that keeps them fed, if they stay from it's mouth and preferably out of it's sight. The leftovers of it's meals feed them, and they follow it wherever it roams. This creature is a 3D print of a Platybelodon, to which I added fur, 4 additional trunks, dead trees and mud. I liked the idea of a sassy snob which would get comfortable on it's back, and am glad it turned out well in the end. Really satisfied with this model, and it performed admirably in my battles(when it didn't die due to my horrible dice rolls).

Knights of the Beet. Boletus hired these bastards recently, to help with some "muscle", after the beast decided the last horsemen the had were a tasty snack. He didn't know of their own agenda though. As the followers of the Beet cult, they are already converting some of the party to their vegetal religion. For they know that with time (and luck), all in the "ever marching" warband will march to the Beet. The idea for these horsemen was the first to come up when I decided to represent them all camping and living on the go. This is, in a way, a medieval parody of the way cyclists live when bikepacking - carrying all of their stuff on horses, drying the clothes on the sun etc. The models are Perry mounted men-at-arms with added official turnip torsos.“

Click for enlarged picture

Click for enlarged picture

Click for enlarged picture

Click for enlarged picture

Click for enlarged picture

Click for enlarged picture

Click for enlarged picture

Click for enlarged picture

Click for enlarged picture

Click for enlarged picture

SEBASTIAN: „These are the Fiber-nacci’s Fallow Forshippers - the 0.618th. My (finally) painted Turnip28 army. Done in the typical muddy shades of brown for Cist. Tried to give some color with their shells while still keeping the earthy, realistic tones. Knights of Shellwood cult, the sluggish Snail Knight, the shooty Snail Gunner, the wormy Toff and the rest of this empty-shelled army slumped their way into Hren28!“

Click for enlarged picture

Click for enlarged picture

Click for enlarged picture

Click for enlarged picture

ANTONI: „Starting off with my hollow, stuffed, blackpowder Fodder and my ruthless Toff, suzerain Wort (who got himself trampled by bastards after his unit abandoned him, and later drowned). I went with The Feast of Charybdis, worshipping the holy raddish (Wort only got the job because he looks like one). Huge thanks to everyone involed in HREN28 for making it such a magical experience!

The very marrow of my cult: The Scuttlers! They are extremely shy, hiding in their citadel atop a walking island. While the crab itself is a toy, the tower and the barnacles are sculpted/kitbashed (and then coated with texture paste and mud). The Citadel's handler is the genius Lord Bum, a slightly-larger-than-average goose and a master strategist. His constant triangulations enable the crab to rise from the silt exactly where it is needed ...30% of the time.

My most dangerous and elite turnip unit: The Cannonards Stump Gun. The danger they pose is mostly directed towards themselves, as they've blown up each time I have deployed them. No matter, the thrill of rolling 3d6 attacks more than makes up for the head-losing chaos.“

Click for enlarged picture

Click for enlarged picture

Click for enlarged picture

Click for enlarged picture

Click for enlarged picture

Click for enlarged picture

Click for enlarged picture

Click for enlarged picture

Click for enlarged picture

Click for enlarged picture

Domagoj: „I had a blast painting my mushroom rootlings, led by snobs finally pulled out the big pile of unpainted models - and I could not have imagined a better place to bring my friends gifts to have some fun! I called it the Alemakers legacy - based on mushrooms that are fermenting sweet mashes into alcohol. The core of the band is two units of blackbowder mushroom rootlings led by Lord Fermi, kindly gifted by @gardensofhecate (and thank u for resparking my interest in the hobby), looking for new ways to spread their spores.

The second noble to join the fray was Baron Colguts, lover of rootbeer, leading a feisty troupe of rootlings into battle - his oversized sword replacing his pistol since they have about the same range. Got this mini as a total surprise from @colecifer_xxviii who surprised me how spontaneous and kind hobbyists can be.

The third and final snob is the birdfrog arrived from @uollas_uolsh who is cooler than cool - hope he likes his model representing the key ingrident in beer making! Sir Hops with the big heavy frog cannon - for how can u make beer without adding hops?“

Click for enlarged picture

Click for enlarged picture

Click for enlarged picture

Click for enlarged picture

Click for enlarged picture

For more photos check our social networks!

And please follow our artists:

Mario

Sebastian

Antoni

Domagoj

Latest articles

  • SFRJ 1986 v2 Diorama part 5
              array(2) {
      ["Article"]=>
      array(10) {
        ["id"]=>
        string(3) "492"
        ["member_id"]=>
        string(2) "35"
        ["title_eng"]=>
        string(27) "SFRJ 1986 v2 Diorama part 5"
        ["title_hrv"]=>
        string(29) "Diorama SFRJ 1986 v2– dio 5"
        ["mask_eng"]=>
        string(27) "sfrj_1986_v2_diorama_part_5"
        ["mask_hrv"]=>
        string(26) "diorama_sfrj_1986_v2_dio_5"
        ["content_eng"]=>
        string(3653) "

    In this series of articles, we will follow my work on a new diorama, another in the 1986 series. This time I have again decided to use a former country. Another version of the SFRY 1986.

    Click for enlarged picture

    So far I have finished making the base, painting the base, painting the interior of the vehicle and painting the figures. Now it's time to add the vegetation

    Click for enlarged picture

    The pines/trees were already fixed to the base before painting, so the first vegetation I added was tall shrubs that filled the volume of the base.

    Click for enlarged picture

    Then I added lower vegetation like tall grass and lower bushes.

    Click for enlarged picture

    Finally, I added some short grass, making sure when I was making the parking lot and path that there was no vegetation in the places where the wheels pass.

    Click for enlarged picture

    The paint on the base has just dried up, so next time I'll add the vegetation.

    Click for enlarged picture

    When the diorama is turned to the back, the volume of the forest is visible.

    Click for enlarged picture

    Before placing the vehicles and miniatures on the base, the diorama looks like this.

    Click for enlarged picture

    " ["content_hrv"]=> string(3186) "

    U ovoj seriji članaka pratit ćemo moj rad na novoj diorami, još jednoj u nizu serijala 1986. Ovaj put sam se opet odlučio za bivšu državu. Druga verzija SFRJ 1986..

    Click for enlarged picture

    Do sada sam završio s izradom baze, bojanjem baze, bojanjem interijera vozila i bojanjem figura. Sada je došlo vrijeme za dodavanje vegetacije

    Click for enlarged picture

    Borovi/drveće je već bilo fiksirano na bazu prije bojanja pa je prva sljedeća vegetacija bila visoko žbunje kojim sam popunio volumen baze.

    Click for enlarged picture

    Potom sam dodao niže raslinje poput visoke trave i nižeg grmlja.

    Click for enlarged picture

    Na kraju sam dodao i nisku travu pri čemu sam pazio kad sam radio ugibalište i puteljak da vegetacije ne bude na mjestima gdje prolaze kotači.

    Click for enlarged picture

    Kada se dioramu okrene, vidi se volumen vegetacije u šumi. 

    Click for enlarged picture

    Prije postavljanja vozila i minijatura, diorama izgleda ovako:

    Click for enlarged picture

    " ["created"]=> string(19) "2026-01-19 10:46:08" ["modified"]=> string(19) "2026-01-19 11:00:21" } ["Member"]=> array(10) { ["id"]=> string(2) "35" ["group_id"]=> string(1) "1" ["first_name"]=> string(5) "Marko" ["last_name"]=> string(9) "Paunović" ["first_name_mask"]=> string(5) "marko" ["last_name_mask"]=> string(8) "paunovic" ["username"]=> string(5) "marko" ["password"]=> string(40) "3bd37b326d19d1880d3b93a4b32e8fb3a90fa122" ["born"]=> string(19) "2033-03-07 20:35:00" ["created"]=> string(19) "2009-06-02 20:37:03" } }
    Marko Paunović, 19th January 2026
  • SFRJ 1986 v2 Diorama part 4
              array(2) {
      ["Article"]=>
      array(10) {
        ["id"]=>
        string(3) "491"
        ["member_id"]=>
        string(2) "35"
        ["title_eng"]=>
        string(27) "SFRJ 1986 v2 Diorama part 4"
        ["title_hrv"]=>
        string(29) "Diorama SFRJ 1986 v2– dio 4"
        ["mask_eng"]=>
        string(27) "sfrj_1986_v2_diorama_part_4"
        ["mask_hrv"]=>
        string(26) "diorama_sfrj_1986_v2_dio_4"
        ["content_eng"]=>
        string(2405) "

    In this series of articles, we will follow my work on a new diorama, another in the 1986 series. This time I have again decided to use a former country. Another version of the SFRY 1986.

    Click for enlarged picture

    After the base and the vehicles, I started painting the miniatures. Two policemen and a truck driver. The first step was the base color – black and then white..

    Click for enlarged picture

    After that, I started with the basic colors, concentrating a little more on the truck driver..

    Click for enlarged picture

    Considering the year and location of the action, I decided that his jacket should have the logo from the 1984 Sarajevo Winter Olympics..

    Click for enlarged picture

    Then I threw myself at the policemen..

    Click for enlarged picture

    The paint on the base has just dried up, so next time I'll add the vegetation.

    " ["content_hrv"]=> string(2360) "

    U ovoj seriji članaka pratit ćemo moj rad na novoj diorami, još jednoj u nizu serijala 1986. Ovaj put sam se opet odlučio za bivšu državu. Druga verzija SFRJ 1986..

    Click for enlarged picture

    Nakon baze i vozila, bacio sam se na bojanje minijatura. Dva milicajca i vozač kamiona. Prvi korak je bila temeljna boja – crna pa bijela.

    Click for enlarged picture

    Nakon toga, krenuo sam s osnovnim bojama, malo više se koncentrirajući na vozača kamiona.

    Click for enlarged picture

    S obzirom na godinu i mjesto radnje, odlučio sam se da mu jakna ima logo od ZOI Sarajevo 1984.

    Click for enlarged picture

    Zatim sam se bacio na milicajce.

    Click for enlarged picture

    Taman se tako nekako osušila i boja na bazi pa ću sljedeći puta obraditi i dodavanje vegetacije.

    " ["created"]=> string(19) "2026-01-19 10:35:45" ["modified"]=> string(19) "2026-01-19 10:35:45" } ["Member"]=> array(10) { ["id"]=> string(2) "35" ["group_id"]=> string(1) "1" ["first_name"]=> string(5) "Marko" ["last_name"]=> string(9) "Paunović" ["first_name_mask"]=> string(5) "marko" ["last_name_mask"]=> string(8) "paunovic" ["username"]=> string(5) "marko" ["password"]=> string(40) "3bd37b326d19d1880d3b93a4b32e8fb3a90fa122" ["born"]=> string(19) "2033-03-07 20:35:00" ["created"]=> string(19) "2009-06-02 20:37:03" } }
    Marko Paunović, 19th January 2026
  • SFRJ 1986 v2 Diorama part 3
              array(2) {
      ["Article"]=>
      array(10) {
        ["id"]=>
        string(3) "490"
        ["member_id"]=>
        string(2) "35"
        ["title_eng"]=>
        string(27) "SFRJ 1986 v2 Diorama part 3"
        ["title_hrv"]=>
        string(29) "Diorama SFRJ 1986 v2– dio 3"
        ["mask_eng"]=>
        string(27) "sfrj_1986_v2_diorama_part_3"
        ["mask_hrv"]=>
        string(26) "diorama_sfrj_1986_v2_dio_3"
        ["content_eng"]=>
        string(3113) "

    In this series of articles, we will follow my work on a new diorama, another in the 1986 series. This time I have again decided to use a former country. Another version of the SFRY 1986.

    Click for enlarged picture

    As I announced last time, it's time to get down to the vehicles. The first thing I did was disassemble the models and take out the interiors of all three vehicles.

    Click for enlarged picture

    As you can see in the picture, the interior of the vehicle is poorly or not at all painted, so a lot of attention and time was spent there. I painted the upholstery in shades of gray, or brown on the Tristač. I brought out the details on the dashboard and around the gearbox.

    Click for enlarged picture

    There was something missing from the start on the Fićo, but I couldn't figure out what it was until Kruno pointed out to me that the flashing lights were missing. I fixed that with a small 3mm clear LED that I painted in Tamiya Clear Blue with a silver edge.

    Click for enlarged picture

    This completes the painting of the vehicles’ interior.

    Click for enlarged picture

    The finishing touches are the decorations in the truck's cabin.

    Click for enlarged picture

    Next time we will continue with painting the figures.

    " ["content_hrv"]=> string(3080) "

    U ovoj seriji članaka pratit ćemo moj rad na novoj diorami, još jednoj u nizu serijala 1986. Ovaj put sam se opet odlučio za bivšu državu. Druga verzija SFRJ 1986..

    Click for enlarged picture

    Kao što sam najavio prošli put, vrijeme je da se bacim na vozila. Prvo što sam napravio jest da sam rastavio modele i izvadio unutrašnjost sva tri vozila

    Click for enlarged picture

    Kako je vidljivo na slici, unutrašnjost vozila je slabo ili nikako obojana stoga je tu otišlo mnogo pažnje i vremena. Tapecirunge sam obojao u sive nijanse, odnosno u smeđe na tristaču. Izvukao sam detalje na komandnim pločama te oko mjenjača.

    Click for enlarged picture

    Na fićeku mi je otpočetka nešto falilo, ali nisam mogao skužiti što dok mi Kruno nije skrenuo pažnju da fali rotirka. Nju sam sredio pomoću jedne male 3mm prozirne LED koju sam obojao u Tamiya Clear Blue sa srebrnim rubom.

    Click for enlarged picture

    Time je završeno bojanje unutrašnjosti vozila.

    Click for enlarged picture

    Završni detalji su ukrasi u kabini kamiona.

    Click for enlarged picture

    Sljedeći put nastavljamo sa bojanjem figura.

    " ["created"]=> string(19) "2026-01-19 10:28:32" ["modified"]=> string(19) "2026-01-19 10:28:32" } ["Member"]=> array(10) { ["id"]=> string(2) "35" ["group_id"]=> string(1) "1" ["first_name"]=> string(5) "Marko" ["last_name"]=> string(9) "Paunović" ["first_name_mask"]=> string(5) "marko" ["last_name_mask"]=> string(8) "paunovic" ["username"]=> string(5) "marko" ["password"]=> string(40) "3bd37b326d19d1880d3b93a4b32e8fb3a90fa122" ["born"]=> string(19) "2033-03-07 20:35:00" ["created"]=> string(19) "2009-06-02 20:37:03" } }
    Marko Paunović, 19th January 2026
  • SFRJ 1986 v2 Diorama part 2
              array(2) {
      ["Article"]=>
      array(10) {
        ["id"]=>
        string(3) "489"
        ["member_id"]=>
        string(2) "35"
        ["title_eng"]=>
        string(27) "SFRJ 1986 v2 Diorama part 2"
        ["title_hrv"]=>
        string(29) "Diorama SFRJ 1986 v2– dio 2"
        ["mask_eng"]=>
        string(27) "sfrj_1986_v2_diorama_part_2"
        ["mask_hrv"]=>
        string(26) "diorama_sfrj_1986_v2_dio_2"
        ["content_eng"]=>
        string(3226) "

    In this series of articles, we will follow my work on a new diorama, another in the 1986 series. This time I have again decided to use a former country. Another version of the SFRY 1986.

    Click for enlarged picture

    Last time I explained how I created the terrain, and this time I'll be painting the terrain. The terrain itself consists of several parts: an asphalt road, a turnoff and path, and the terrain in the forest.

    Click for enlarged picture

    Since I wanted all the surfaces to have similar tones, I decided to paint without a base color, applying the main color immediately. The paint I applied was very thin so it stayed wet for a long time, which allowed me to mix the base colors and get a uniform tone.

    Click for enlarged picture

    After applying the basic tones, I started shading. I also used the same principle, using quite diluted tones to create unevenness in certain parts of the surface.

    Click for enlarged picture

    Then I added a layer that I could most simply call wash. A very diluted darker shade of color.

    Click for enlarged picture

    I applied the final shades using another technique, the simplest one – dry brush.

    Click for enlarged picture

    While these paints were drying, I was simultaneously disassembling and painting the interior of the car and truck, as well as the figures, which will be the subject of future articles.

    " ["content_hrv"]=> string(3277) "

    U ovoj seriji članaka pratit ćemo moj rad na novoj diorami, još jednoj u nizu serijala 1986. Ovaj put sam se opet odlučio za bivšu državu. Druga verzija SFRJ 1986..

    Click for enlarged picture

    Prošli put sam objasnio kako sam izradio teren, a ovaj put ću se baviti bojanjem terena. Sami teren se sastoji od nekoliko dijelova: asfaltna cesta, ugibalište i puteljak te teren u šumi.

    Click for enlarged picture

    S obzirom da sam htio da sve površine imaju slične tonove, odlučio sam se bojati bez temeljne boje, nanoseći odmah glavni ton. Boju koju sam nanosio bila je jako razvodnjena tako da je dugo bila mokra i to mi je omogućavalo miješanje osnovnih tonova i dobivanje ujednačene tonove.

    Click for enlarged picture

    Nakon nanošenja osnovnih tonova, krenuo sam sa nijansiranjem. Također sam radio istim principom, dosta razvodnjene tonove kako bih dobio neujednačenost pojedinih dijelova površine.

    Click for enlarged picture

    Potom sam dodao sloj koji bih najjednostavnije mogao nazvati wash. Jako razvodnjenu tamniju nijansu boje.

    Click for enlarged picture

    Završne nijanse sam nanio drugom tehnikom, najjednostavnijom – dry brush.

    Click for enlarged picture

    Dok su se ove boje sušile, paralelno sam rastavio i bojao unutrašnjost automobila i kamiona te figura što će biti tema sljedećih članaka.

    " ["created"]=> string(19) "2026-01-19 09:32:11" ["modified"]=> string(19) "2026-01-19 09:32:11" } ["Member"]=> array(10) { ["id"]=> string(2) "35" ["group_id"]=> string(1) "1" ["first_name"]=> string(5) "Marko" ["last_name"]=> string(9) "Paunović" ["first_name_mask"]=> string(5) "marko" ["last_name_mask"]=> string(8) "paunovic" ["username"]=> string(5) "marko" ["password"]=> string(40) "3bd37b326d19d1880d3b93a4b32e8fb3a90fa122" ["born"]=> string(19) "2033-03-07 20:35:00" ["created"]=> string(19) "2009-06-02 20:37:03" } }
    Marko Paunović, 19th January 2026
  • SFRJ 1986 v2 Diorama part 1
              array(2) {
      ["Article"]=>
      array(10) {
        ["id"]=>
        string(3) "488"
        ["member_id"]=>
        string(2) "35"
        ["title_eng"]=>
        string(27) "SFRJ 1986 v2 Diorama part 1"
        ["title_hrv"]=>
        string(29) "Diorama SFRJ 1986 v2– dio 1"
        ["mask_eng"]=>
        string(27) "sfrj_1986_v2_diorama_part_1"
        ["mask_hrv"]=>
        string(26) "diorama_sfrj_1986_v2_dio_1"
        ["content_eng"]=>
        string(3178) "

    In this series of articles, we will follow my work on a new diorama, another in the 1986 series. This time I have again decided to use a former country. Another version of the SFRY 1986.

    Click for enlarged picture

    As always, everything starts with an idea. This time, the idea came from a model of an Agrokomerc truck that Bojan brought me from Serbia (where it was published as part of a magazine). The design itself changed a bit over time (the first few months of planning). Initially, it was supposed to be just a truck at a roadside stop. Then the idea came to include the Police. And then I got two police vehicles. Fić and Tristač. Basically, this is the first drawing that started it all.

    Click for enlarged picture

    The base for the diorama came from Moson, from Buco. A fantastic combination of MDF and Styrodur that allows you to remove the diorama itself, but also to lower the terrain below the base level. I removed the Styrodur base, modeled it a little to get different terrain height levels. I modeled the road from a cork board, and assembled the rest of the terrain from DAS clay and wooden bark.

    Click for enlarged picture

    Once everything was dry I added texture. Two or three sizes of sand and that was it.

    Click for enlarged picture

    And when that layer was dry, I used a drill to fix the trees to the back of the base. Since all the trees had tall trunks, I decided to leave them as is and not move them during the painting process.

    Click for enlarged picture

    That's it for this week. We already have a nice outline of the diorama, and next time we'll continue with painting the base.

    " ["content_hrv"]=> string(3151) "

    U ovoj seriji članaka pratit ćemo moj rad na novoj diorami, još jednoj u nizu serijala 1986. Ovaj put sam se opet odlučio za bivšu državu. Druga verzija SFRJ 1986..

    Click for enlarged picture

    Kao i uvijek, sve počinje idejom. Ovoga puta, ideja se izrodila iz makete Agrokomercovog kamiona kojeg mi je Bojan dofurao iz Srbije (gdje je izašao u sklopu nekog časopisa). Sami dizajn se malo mijenjao tijekom vremena (prvih par mjeseci planiranja). Otpočetka, trebao je to biti samo kamion na nekom ugibalištu pored ceste. Onda se rodila ideja da stavim i Miliciju. A onda sam nabavio i dva milicijska vozila. Fiću i Tristača. Uglavnom, ovo je prvi crtež od kojeg je sve krenulo.

    Click for enlarged picture

    Baza za dioramu je došla s Mosona, od Buce. Fantastičan spoj MDFa i stirodura koji omogućava vađenje same diorame, ali i upuštanje terena ispod razine baze. Izvadio sam stirodurnu podlogu, malo je izmodelirao da dobijem razne razine visine terena. Cestu sam izmodelirao iz ploče pluta, a ostatak terena složio od DAS glinamola i drvenih kora.

    Click for enlarged picture

    Kada se sve osušilo dodao sam teksturu. Dvije ili tri veličine pijeska i to je to.

    Click for enlarged picture

    A kada se i taj sloj osušio, bušilicom sam fiksirao drveće na stražnji dio baze. S obzirom da su sva stable imala visoka debla, odlučio sam ih ostaviti tako i ne micati ih za process bojanja.

    Click for enlarged picture

    To je to za ovaj tjedan. Imamo već lijepe obrise diorame, a sljedeći puta nastavljamo sa bojanjem baze.

    " ["created"]=> string(19) "2026-01-19 09:18:40" ["modified"]=> string(19) "2026-01-19 09:18:40" } ["Member"]=> array(10) { ["id"]=> string(2) "35" ["group_id"]=> string(1) "1" ["first_name"]=> string(5) "Marko" ["last_name"]=> string(9) "Paunović" ["first_name_mask"]=> string(5) "marko" ["last_name_mask"]=> string(8) "paunovic" ["username"]=> string(5) "marko" ["password"]=> string(40) "3bd37b326d19d1880d3b93a4b32e8fb3a90fa122" ["born"]=> string(19) "2033-03-07 20:35:00" ["created"]=> string(19) "2009-06-02 20:37:03" } }
    Marko Paunović, 19th January 2026

All articles

Latest battle-reports

All battle-reports