
Announcements archive
2026
July
-
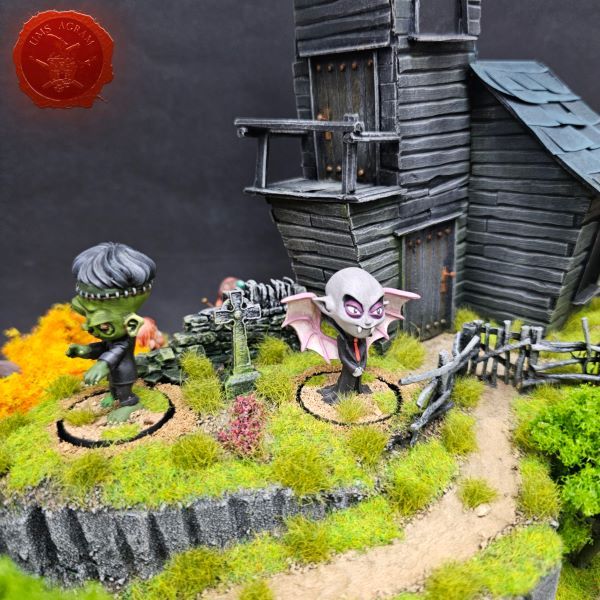
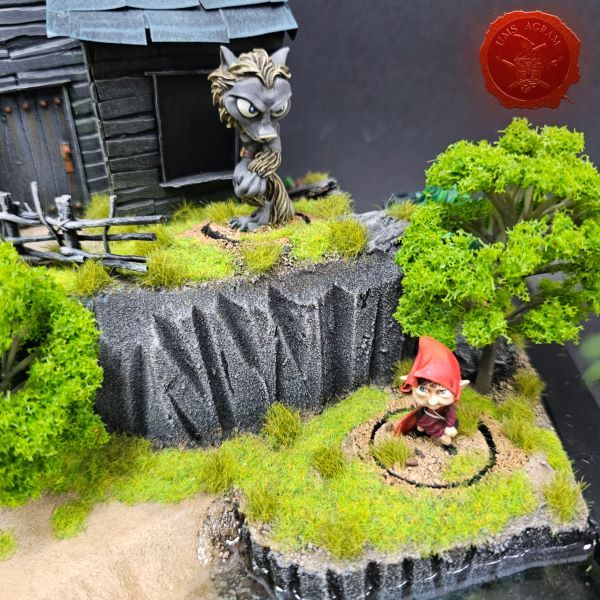
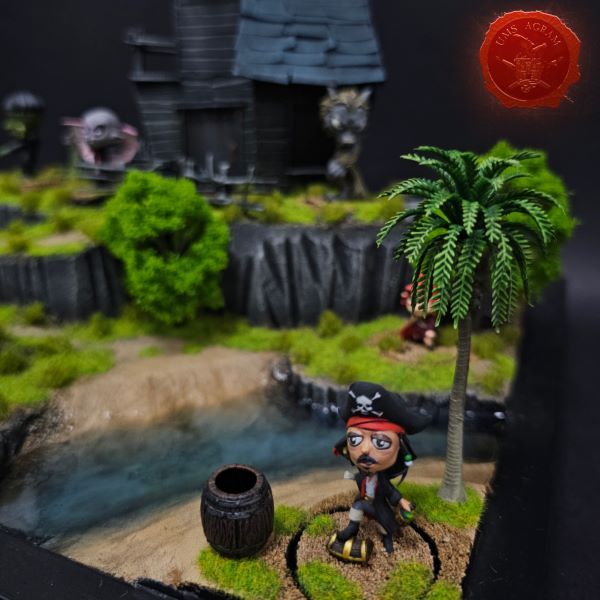
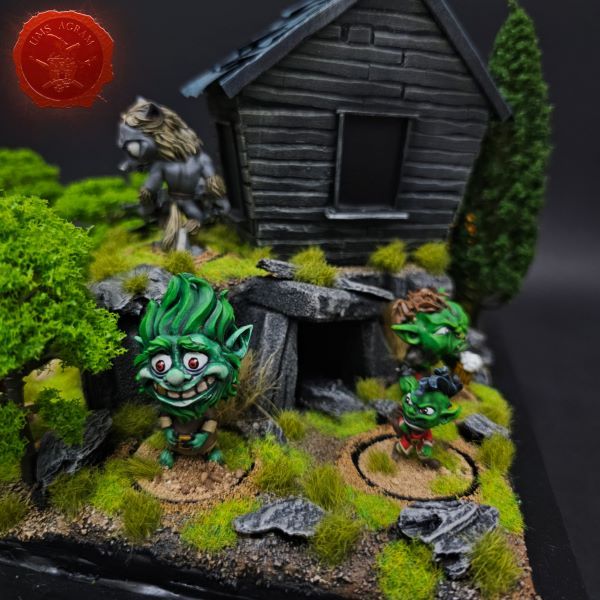
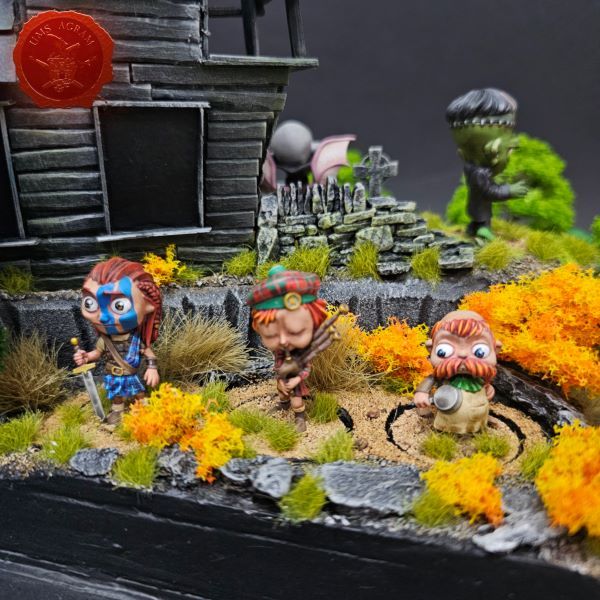
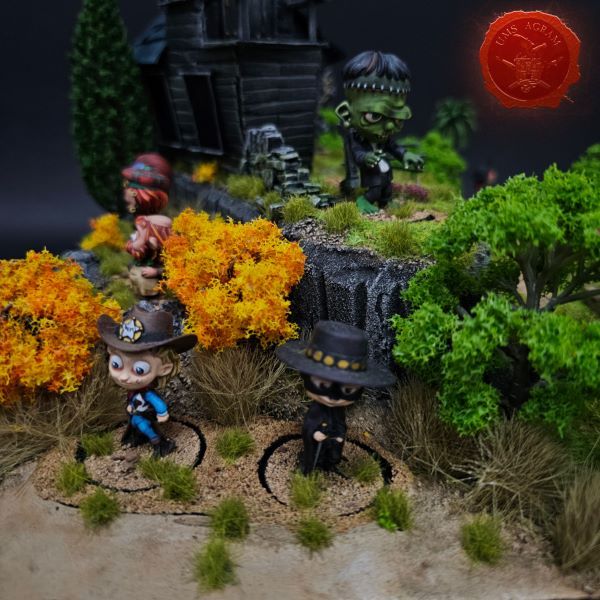
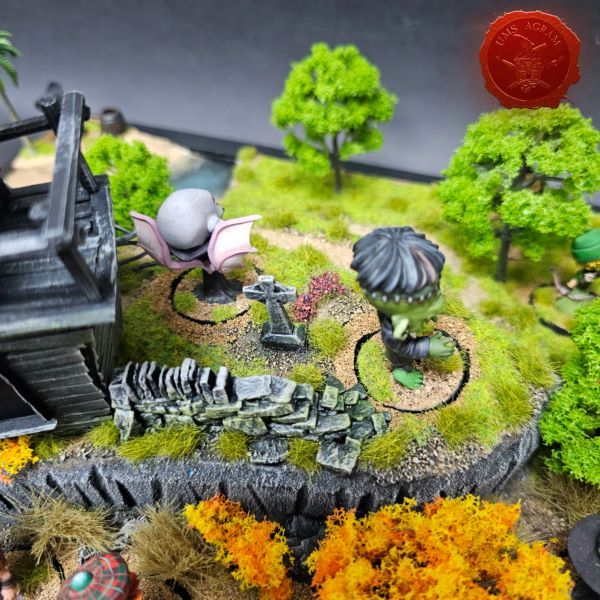
AGRAMERS - second range of UMS "Agram" minis is here
15th July 2026, posted by Marko Paunović in NewsNotice (8): Undefined index: member_id [APP/views/elements/archive.ctp, line 46]
Notice (8): Undefined index: id [APP/views/elements/archive.ctp, line 47]
- edit_Announcement
May
-
UMS Agram at Zagreb Scale Model Show 2026
Event date: 6th June 2026, 10:00h - 7th June 2026, 18:00h 26th May 2026, posted by Marko Paunović in Events - edit_Announcement
April
-
Miniature Painting Workshop - 75mm Dwarf
14th April 2026, posted by Marko Paunović in Workshop announcements - edit_Announcement
March
-
Miniature Painting Workshop in Bjelovar
26th March 2026, posted by Dalibor Čavić in Workshop announcements - edit_Announcement -
Back to Basics Workshops in Libraries of Zagreb in 2026
26th March 2026, posted by Krunoslav Belinić in Workshop announcements - edit_Announcement
February
-
Back to Basics Workshops @ Exhibition of Miniatures and Tabletop Scenery Agram 2026
17th February 2026, posted by Krunoslav Belinić in Workshop announcements - edit_Announcement -
Agram Lego Section - F1 Williams FW14B
17th February 2026, posted by Krunoslav Belinić in Workshop announcements - edit_Announcement -
Events @ Black Queen H&MPC 2026
6th February 2026, posted by Marko Paunović in Workshop announcements - edit_Announcement -
Exhibition of Miniatures and Tabletop Scenery Agram 2026
Event date: 19th February 2026, 18:00h - 8th March 2026, 00:00h 2nd February 2026, posted by Marko Paunović in Events - edit_Announcement
January
-
Miniature Painting Workshop - GRIMDARK - Trench Crusade
30th January 2026, posted by Marko Paunović in Workshop announcements - edit_Announcement -
Wednesdays' Hobby Corner 2026
7th January 2026, posted by Krunoslav Belinić in Workshop announcements - edit_Announcement
2025
December
-
Winter Holidays in Agram
12nd December 2025, posted by Krunoslav Belinić in Workshop announcements - edit_Announcement
November
-
AGRAM ARENA 2026 - Leaving Asphodel Necropolis Campaign
Event date: 21nd February 2026, 08:00h - 22nd February 2026, 06:00h 19th November 2025, posted by Antoni Pastuović in Events - edit_Announcement -
Black Queen Hobby and Miniature Painting Competition 2026
Event date: 21nd February 2026, 08:00h - 22nd February 2026, 18:00h 19th November 2025, posted by Marko Paunović in Events - edit_Announcement -
UMS Agram at Slovenian State Championship 2025 in Ljubljana
Event date: 22nd November 2025, 10:00h - 22nd November 2025, 16:00h 10th November 2025, posted by Domagoj Krpan in Events - edit_Announcement
October
-
Fireball Figurines - our new sponsor
28th October 2025, posted by Domagoj Krpan in News - edit_Announcement -
Advent in Agram 2025
Event date: 19th November 2025, 18:00h - 17th December 2025, 21:52h 6th October 2025, posted by Krunoslav Belinić in Events - edit_Announcement -
UMS Agram at ModelMania 2025
Event date: 25th October 2025, 10:00h - 25th October 2025, 14:00h 6th October 2025, posted by Mario Grgurev in Events - edit_Announcement
September
-
B2B Workshops in Zagreb City Libraries
15th September 2025, posted by Krunoslav Belinić in Workshop announcements - edit_Announcement -
Agramers, our chibi line of minis, get a paint job!
15th September 2025, posted by Krunoslav Belinić in News - edit_Announcement -
Back to Basics workshops in Zagreb City Libraries 2025
5th September 2025, posted by Marko Paunović in Workshop announcements - edit_Announcement -
UMS Agram @ Days of Technical Culture 2025
Event date: 19th September 2025, 17:00h - 20th September 2025, 14:00h 5th September 2025, posted by Marko Paunović in Events - edit_Announcement
August
-
Miniature Painting Workshop - Contrast Paints
12nd August 2025, posted by Marko Paunović in Workshop announcements - edit_Announcement
July
-
UMS Agram on Serbus Zagreb on OTV
18th July 2025, posted by Krunoslav Belinić in News - edit_Announcement
June
-
Agramers - first range of UMS "Agram" minis is here
26th June 2025, posted by Marko Paunović in News - edit_Announcement
April
-
B2B Workshops at Sferakon 2025
30th April 2025, posted by Mario Grgurev in Workshop announcements - edit_Announcement -
Miniature Painting Workshop - Kitbashing and Converting
10th April 2025, posted by Marko Paunović in Workshop announcements - edit_Announcement -
Agram Lego Section - Orient Express
1nd April 2025, posted by Marko Paunović in Workshop announcements - edit_Announcement
March
-
B2B Workshop at 2.DDI in Nedelišće
12nd March 2025, posted by Krunoslav Belinić in Workshop announcements - edit_Announcement
February
-
Annual Assembly 2025
Event date: 5th March 2025, 18:00h - 5th March 2025, 20:00h 14th February 2025, posted by Marko Paunović in Events - edit_Announcement -
Agram Lego Section - Leonardo da Vinc
13th February 2025, posted by Mario Grgurev in Workshop announcements - edit_Announcement
January
-
Events @ Black Queen H&MPC 2025
27th January 2025, posted by Krunoslav Belinić in News - edit_Announcement -
Workshops @ Black Queen H&MPC 2025
27th January 2025, posted by Krunoslav Belinić in Workshop announcements - edit_Announcement -
Miniature Painting Workshop - DND/Frostgrave Monsters, Demons and Cultists
24th January 2025, posted by Marko Paunović in Workshop announcements - edit_Announcement -
Miniature Painting Workshop - DND/Frostgrave Monsters, Demons and Cultists
24th January 2025, posted by Marko Paunović in Workshop announcements - edit_Announcement -
Exhibition of Miniatures and Tabletop Scenery 2025
Event date: 20th February 2025, 18:00h - 9th March 2025, 00:00h 15th January 2025, posted by Ana Polanšćak in Events - edit_Announcement -
Wednesdays' Hobby Corner 2025
3th January 2025, posted by Krunoslav Belinić in Workshop announcements - edit_Announcement
2024
November
-
Black Queen Hobby and Miniature Painting Competition 2025
Event date: 22nd February 2024, 08:00h - 23th February 2024, 18:00h 20th November 2024, posted by Marko Paunović in Events - edit_Announcement
October
-
Advent in Agram 2024
31nd October 2024, posted by Marko Paunović in Workshop announcements - edit_Announcement -
UMS Agram Appearances in October Events in Zagreb
Event date: 5th October 2024, 09:00h - 26th October 2024, 16:00h 3th October 2024, posted by Domagoj Krpan in Events - edit_Announcement
September
-
Back To Basics workshops in Zagreb Libraries
24th September 2024, posted by Martin Vrkljan in Workshop announcements - edit_Announcement
August
-
Miniature Painting Workshop - Dragon Busts
1nd August 2024, posted by Marko Paunović in Workshop announcements - edit_Announcement -
Summer Painting Workshop 2024
1nd August 2024, posted by Marko Paunović in Workshop announcements - edit_Announcement
May
-
UMS Agram Appearances at Shows in May and June
23th May 2024, posted by Domagoj Krpan in News - edit_Announcement
April
-
Miniature Painting Workshop - Bretonnia
5th April 2024, posted by Marko Paunović in Workshop announcements - edit_Announcement
March
-
UMS Agram on Instagram
31nd March 2024, posted by Domagoj Krpan in News - edit_Announcement -
Agram Lego Section - Hogwarts build and lectures
Event date: 3th April 2024, 18:00h - 24th April 2024, 20:00h 22nd March 2024, posted by Mario Grgurev in Events - edit_Announcement
February
-
Wargaming Demos @ Black Queen 2024
Event date: 24th February 2024, 13:00h - 25th February 2024, 15:30h 18th February 2024, posted by Ana Polanšćak in Events - edit_Announcement -
Carta Magica @ Black Queen 2024
12nd February 2024, posted by Martin Vrkljan in News - edit_Announcement -
The Bigbear Miniatures and Zone Miniatures @ Black Queen 2024
12nd February 2024, posted by Krunoslav Belinić in News - edit_Announcement -
3D Sculpting 101 @ Black Queen 2024
Event date: 25th February 2024, 14:00h - 25th February 2024, 15:30h 12nd February 2024, posted by Krunoslav Belinić in Events - edit_Announcement -
ATOM Paints Demo @ Black Queen 2024
Event date: 25th February 2024, 10:00h - 25th February 2024, 11:30h 12nd February 2024, posted by Marko Paunović in Events - edit_Announcement -
Sculpting 101 @ Black Queen 2024
Event date: 24th February 2024, 15:00h - 24th February 2024, 16:30h 12nd February 2024, posted by Ana Polanšćak in Events - edit_Announcement -
Bust 101 Workshop @ Black Queen 2024
Event date: 24th February 2024, 13:00h - 24th February 2024, 14:30h 12nd February 2024, posted by Marko Paunović in Events - edit_Announcement -
Back to Basics Workshops for the kids @ Black Queen 2024
Event date: 24th February 2024, 13:00h - 25th February 2024, 13:00h 2nd February 2024, posted by Krunoslav Belinić in Events - edit_Announcement -
Speed Painting Contest @ Black Queen 2024
Event date: 25th February 2024, 12:00h - 25th February 2024, 13:30h 2nd February 2024, posted by Marko Paunović in Events - edit_Announcement
January
-
Wednesdays' Hobby Corner 2024
24th January 2024, posted by Krunoslav Belinić in Workshop announcements - edit_Announcement -
Exhibition of Miniatures and Tabletop Scenery "Agram 2024"
Event date: 22nd February 2024, 18:00h - 10th March 2024, 10:00h 19th January 2024, posted by Marko Paunović in Events - edit_Announcement -
Miniature Painting Workshop - D&D / Frostgrave crew
14th January 2024, posted by Martin Vrkljan in Workshop announcements - edit_Announcement -
Black Queen Hobby & Miniature Painting Competition 2024
Event date: 24th February 2024, 08:00h - 25th February 2024, 18:00h 5th January 2024, posted by Marko Paunović in Events - edit_Announcement
2023
December
-
Season's Greetings from UMS Agram
20th December 2023, posted by Marko Paunović in News - edit_Announcement -
Christmas fair
Event date: 20th December 2023, 06:00h - 20th December 2023, 08:00h 11th December 2023, posted by Martin Vrkljan in Events - edit_Announcement -
Advent in Agram - Stiren/Plasticard Workshop: Candy Cane
4th December 2023, posted by Krunoslav Belinić in Workshop announcements - edit_Announcement
November
-
Signed partnership certificate with Back To Basics project, Kranj 19.11.2023.
27th November 2023, posted by Marko Paunović in News - edit_Announcement -
Christmas Raffle 2023
Event date: 20th December 2023, 20:00h - 20th December 2023, 22:00h 23th November 2023, posted by Marko Paunović in Events - edit_Announcement -
Miniature Photography Workshop
20th November 2023, posted by Marko Paunović in Workshop announcements - edit_Announcement -
miniature painting school @ Infogamer by Reboot
5th November 2023, posted by Ana Polanšćak in Workshop announcements - edit_Announcement
October
-
Advent in Agram 2023
23th October 2023, posted by Marko Paunović in Workshop announcements - edit_Announcement -
UMS Agram @ ModelMania 2023
Event date: 4th November 2023, 10:00h - 4th November 2023, 17:00h 5th October 2023, posted by Martin Vrkljan in Events - edit_Announcement -
UMS Agram @ 12th Days of Technical Culture
Event date: 14th October 2023, 10:00h - 14th October 2023, 14:00h 1nd October 2023, posted by Martin Vrkljan in Events - edit_Announcement
September
-
UMS Agram Library - opens again
2nd September 2023, posted by Domagoj Krpan in News - edit_Announcement
August
-
Miniature Painting Workshop - Dragon Busts
24th August 2023, posted by Marko Paunović in Workshop announcements - edit_Announcement
April
-
Diorama Workshop - Vignette inside a frame
20th April 2023, posted by Marko Paunović in Workshop announcements - edit_Announcement
February
-
Black Queen H&MPC 2023
Event date: 25th February 2023, 00:00h - 26th February 2023, 16:00h 16th February 2023, posted by Marko Paunović in Events - edit_Announcement -
Exhibition of Miniatures and Tabletop Scenery Agram 2023
7th February 2023, posted by Marko Paunović in News - edit_Announcement
January
-
UMS Agram @ The Winter Championship 2023
Event date: 3th February 2023, 12:00h - 5th February 2023, 16:00h 24th January 2023, posted by Ana Polanšćak in Events - edit_Announcement -
Miniature Painting Workshop - Batchpainting: Ork Boyz
12nd January 2023, posted by Marko Paunović in Workshop announcements - edit_Announcement -
Wednesdays' Hobby Corner 2023
2nd January 2023, posted by Krunoslav Belinić in Workshop announcements - edit_Announcement
2022
November
-
Advent in Agram 2022 December Events
25th November 2022, posted by Marko Paunović in Workshop announcements - edit_Announcement -
Exhibition of Miniatures and Tabletop Scenery Agram 2023
Event date: 23th February 2023, 18:00h - 12nd March 2023, 13:00h 7th November 2022, posted by Marko Paunović in Events - edit_Announcement -
Black Queen H&MPC 2023
Event date: 25th February 2023, 08:00h - 26th February 2023, 18:00h 7th November 2022, posted by Marko Paunović in Events - edit_Announcement
October
-
UMS Agram @ Days of Technical Culture 2022
Event date: 29th October 2022, 10:00h - 29th October 2022, 13:00h 12nd October 2022, posted by Krunoslav Belinić in Events - edit_Announcement -
Warhammer 40.000 Demo/Gaming Days
Event date: 22nd October 2022, 10:00h - 22nd October 2022, 13:00h 11th October 2022, posted by Domagoj Krpan in Events - edit_Announcement -
Made with Love - Miniaturists
4th October 2022, posted by Goran Krunić in News - edit_Announcement
September
-
Advent in Agram
9th September 2022, posted by Marko Paunović in Workshop announcements - edit_Announcement
August
-
Miniature Painting Workshop - Zombicide
16th August 2022, posted by Ana Polanšćak in Workshop announcements - edit_Announcement -
New membership fees in Euros from 1.1.2023.
9th August 2022, posted by Goran Krunić in News - edit_Announcement
June
-
Sunhold: The First Triumvirate
Event date: 2nd July 2022, 10:00h - 2nd July 2022, 18:30h 24th June 2022, posted by Ana Polanšćak in Events - edit_Announcement
May
-
Agram Members' Interview on AFK Show on GameHubTV
2nd May 2022, posted by Marko Paunović in News - edit_Announcement
April
-
Weekend Diorama Workshop
22nd April 2022, posted by Martin Vrkljan in Workshop announcements - edit_Announcement -
Appearance at the AFK show on GameHub TV
21nd April 2022, posted by Marko Paunović in News - edit_Announcement
March
-
Terrain Workshops
28th March 2022, posted by Marko Paunović in Workshop announcements - edit_Announcement -
UMS Agram Annual Award for 2021
3th March 2022, posted by Goran Krunić in News - edit_Announcement
February
-
Addition to the seller's court @ BQ H&MPC 2022
17th February 2022, posted by Marko Paunović in News - edit_Announcement -
Exhibition of Miniatures and Tabletop Scenery Agram 2022
Event date: 24th February 2022, 18:00h - 13th March 2022, 11:59h 11th February 2022, posted by Marko Paunović in Events - edit_Announcement -
Miniature Painting Workshop - Painting Eyes
11th February 2022, posted by Marko Paunović in Workshop announcements - edit_Announcement -
Speed Painting Contest @ BQ H&MPC 2022
Event date: 27th February 2022, 13:00h - 27th February 2022, 14:00h 10th February 2022, posted by Martin Vrkljan in Events - edit_Announcement -
Electronics 101 @ BQ H&MPC 2022
8th February 2022, posted by Marko Paunović in Workshop announcements - edit_Announcement -
Back to Basics: Fireman bust @ BQ H&MPC 2022
8th February 2022, posted by Marko Paunović in Workshop announcements - edit_Announcement -
Seller's court @ BQ H&MPC 2022
8th February 2022, posted by Marko Paunović in News - edit_Announcement -
3D Sculpting @ BQ H&MPC 2022
7th February 2022, posted by Marko Paunović in Workshop announcements - edit_Announcement
January
-
Anatomy of the Eye @ BQ H&MPC
25th January 2022, posted by Marko Paunović in Workshop announcements - edit_Announcement -
Atmospheric NMM @ BQ H&MPC 2022
25th January 2022, posted by Matija Koružnjak in Workshop announcements - edit_Announcement -
TrashBash Workshop @ BQ H&MPC 2022
25th January 2022, posted by Ana Polanšćak in Workshop announcements - edit_Announcement -
President Milanović received the winners of the State Award of Technical Culture "Faust Vrančić" and the award of the Croatian Association of Technical Culture
20th January 2022, posted by Goran Krunić in News - edit_Announcement -
Wednesday's Hobby Corner
4th January 2022, posted by Marko Paunović in Workshop announcements - edit_Announcement -
Dates of Workshops in 2022
3th January 2022, posted by Marko Paunović in Workshop announcements - edit_Announcement
2021
December
-
Season's Greetings!
22nd December 2021, posted by Marko Paunović in News - edit_Announcement
November
-
Cherry Tree and UMS Agram
24th November 2021, posted by Goran Krunić in News - edit_Announcement -
Black Queen H&MPC 2022
Event date: 26th February 2022, 08:00h - 27th February 2022, 18:00h 22nd November 2021, posted by Marko Paunović in Events - edit_Announcement -
Matija Koružnjak wins first place
12nd November 2021, posted by Goran Krunić in News - edit_Announcement -
Dates for the BLACK QUEEN Hobby & Miniature Painting Competition 2022 are set!
7th November 2021, posted by Marko Paunović in News - edit_Announcement
October
-
Basic Miniature Painting Workshop 2021
29th October 2021, posted by Marko Paunović in Workshop announcements - edit_Announcement
September
-
Terrain Building Workshop 2021
29th September 2021, posted by Marko Paunović in Workshop announcements - edit_Announcement -
Miniature Painting Workshop 1 on 1
27th September 2021, posted by Marko Paunović in Workshop announcements - edit_Announcement -
Gardens of Hecate - empire of miniatures by Ana Polanšćak
27th September 2021, posted by Goran Krunić in News - edit_Announcement -
UMS Agram @ Days of Technical Culture 2021
Event date: 25th September 2021, 09:00h - 25th September 2021, 14:00h 20th September 2021, posted by Marko Paunović in Events - edit_Announcement -
UMS Agram @ CK21
11th September 2021, posted by Goran Krunić in News - edit_Announcement
August
-
UMS Agram @ Kup Zagreb 2021
28th August 2021, posted by Ana Polanšćak in News - edit_Announcement -
Miniature Painting Workshop - Hellboy Bust
25th August 2021, posted by Marko Paunović in Workshop announcements - edit_Announcement
July
-
UMS Agram Group Build 2021
23th July 2021, posted by Marko Paunović in Workshop announcements - edit_Announcement -
UMS Agram recepient of the Annual Award of the Croatian Community of Technical Culture
22nd July 2021, posted by Marko Paunović in News - edit_Announcement -
Cooperation with the Magic Omens store
21nd July 2021, posted by Marko Paunović in News - edit_Announcement
May
-
Miniature Painting Workshop - Krieger Bust
6th May 2021, posted by Marko Paunović in Workshop announcements - edit_Announcement
April
-
MPC Spring Painting Competition 2021
Event date: 18th April 2021, 14:41h - 30th June 2021, 23:59h 18th April 2021, posted by Marko Paunović in Events - edit_Announcement -
Hobby Corner on Wednesday 2021
2nd April 2021, posted by Marko Paunović in Workshop announcements - edit_Announcement
March
-
Agram Atmosphere 2021
Event date: 1nd April 2021, 10:39h - 1nd December 2021, 22:39h 31nd March 2021, posted by Marko Paunović in Events - edit_Announcement
February
-
Grand Opening of the annual Exhibition of Miniatures and Tabletop Scenery Agram 2021
Event date: 18th February 2021, 18:00h - 18th February 2021, 20:00h 14th February 2021, posted by Marko Paunović in Events - edit_Announcement -
Speed Painting Contests @ Black Queen H&MPC 2021
Event date: 27th February 2021, 15:30h - 28th February 2021, 14:00h 13th February 2021, posted by Marko Paunović in Events - edit_Announcement -
Green Stuff World sponsors Black Queen Hobby and Miniature Painting Competition 2021
9th February 2021, posted by Marko Paunović in News - edit_Announcement -
Carta Magica @ Black Queen 2021
9th February 2021, posted by Marko Paunović in News - edit_Announcement -
Using Colours to Create Atmosphere @ Black Queen H&MPC
3th February 2021, posted by Marko Paunović in Workshop announcements - edit_Announcement -
Airbrushing 101 @ Black Queen H&MPC
3th February 2021, posted by Marko Paunović in Workshop announcements - edit_Announcement -
Diluting Paint 101 @ Black Queen H&MPC
3th February 2021, posted by Jure Cukar in Workshop announcements - edit_Announcement
January
-
Historic Miniatures 101 @ Black Queen H&MPC
26th January 2021, posted by Dalibor Čavić in Workshop announcements - edit_Announcement -
Vegetation 101 @ Black Queen H&MPC
21nd January 2021, posted by Marko Paunović in Workshop announcements - edit_Announcement -
Sculpting 101 @ Black Queen H&MPC
17th January 2021, posted by Ana Polanšćak in Workshop announcements - edit_Announcement -
Miniature Painting Workshop - Animals: Wargs, Horses and Birds
14th January 2021, posted by Marko Paunović in Workshop announcements - edit_Announcement -
Black Queen Hobby and Miniature Painting Competition 2021
Event date: 27th February 2021, 08:00h - 28th February 2021, 18:00h 10th January 2021, posted by Marko Paunović in Events - edit_Announcement -
Exhibition of Miniatures and Tabletop Scenery "Agram 2021"
Event date: 18th February 2021, 08:00h - 7th March 2021, 00:00h 4th January 2021, posted by Marko Paunović in Events - edit_Announcement
2020
December
-
Season's Greetings from UMS Agram
21nd December 2020, posted by Marko Paunović in News - edit_Announcement -
Annual Award of UMS Agram
18th December 2020, posted by Dejan Pavlović in News - edit_Announcement -
Prize giveaway - RESULTS
8th December 2020, posted by Marko Paunović in News - edit_Announcement
October
-
Prize giveaway
30th October 2020, posted by Marko Paunović in News - edit_Announcement -
Miniature Painting Workshop - Joker Bust
25th October 2020, posted by Marko Paunović in News - edit_Announcement -
Black Queen H&MPC 2021 dates confirmed
12nd October 2020, posted by Marko Paunović in News - edit_Announcement -
Miniature Painters Croatia - Winter Painting Competition 2020
Event date: 9th October 2020, 10:00h - 1nd December 2020, 23:59h 8th October 2020, posted by Marko Paunović in Events - edit_Announcement -
Winner of our raffle on Miniature Painters Croatia FB Group
5th October 2020, posted by Marko Paunović in News - edit_Announcement -
Gallery of miniatures done by Miniature Painters Croatia FB group members
3th October 2020, posted by Marko Paunović in News - edit_Announcement -
UMS Agram @ Days of Technical Culture 2020
Event date: 17th October 2020, 09:00h - 17th October 2020, 14:00h 1nd October 2020, posted by Marko Paunović in Events - edit_Announcement
September
-
Wednesday's Hobby Corner 2020
25th September 2020, posted by Marko Paunović in Workshop announcements - edit_Announcement -
FB group Miniature Painters Croatia reaches 250 members
25th September 2020, posted by Marko Paunović in News - edit_Announcement -
Miniature Painting Workshop - Non Metallic Metal
20th September 2020, posted by Marko Paunović in News - edit_Announcement
August
-
Miniature Painting Workshops - Autumn 2020
24th August 2020, posted by Marko Paunović in Workshop announcements - edit_Announcement -
Gardens of Hecate - first Croatian miniature painting craft
14th August 2020, posted by Marko Paunović in News - edit_Announcement
July
-
Slice of Life - short Croatian SF Film
20th July 2020, posted by Marko Paunović in News - edit_Announcement -
Miniature Painters Croatia - Spring Painting Competition 2020 Results
2nd July 2020, posted by Marko Paunović in News - edit_Announcement
June
-
Miniature Painters Croatia – Spring Painting Competition 2020 Gallery
15th June 2020, posted by Marko Paunović in News - edit_Announcement -
Questionnaire from the Faculty of Philosophy in Zagreb
14th June 2020, posted by Marko Paunović in News - edit_Announcement -
Covid-19 measures in UMS Agram
4th June 2020, posted by Marko Paunović in News - edit_Announcement
May
-
Hobby articles and step-by-step tutorials on our webpage
15th May 2020, posted by Marko Paunović in News - edit_Announcement
March
-
Step by step tutorials during the COVID-19 crisis
27th March 2020, posted by Marko Paunović in News - edit_Announcement -
UMS Agram is closed for business indefinitely due to Covid-19 outbreak
19th March 2020, posted by Marko Paunović in News - edit_Announcement -
Days of Open Doors 2020 @ UMS Agram
14th March 2020, posted by Marko Paunović in Workshop announcements - edit_Announcement
February
-
Carta Magica @ Black Queen 2020
21nd February 2020, posted by Marko Paunović in News - edit_Announcement -
21. General Assembly of UMS Agram
Event date: 4th March 2020, 18:00h - 4th March 2020, 21:00h 21nd February 2020, posted by Marko Paunović in Events - edit_Announcement -
Layering and Texturing 101 @ Black Queen 2020
12nd February 2020, posted by Marko Paunović in Workshop announcements - edit_Announcement
January
-
Miniature Painting Workshop - Resin and Weathering
Event date: 22nd February 2020, 10:00h - 23th February 2020, 18:00h 27th January 2020, posted by Marko Paunović in Events - edit_Announcement -
Painting Faces 101 @ Black Queen 2020
Event date: 1nd March 2020, 14:00h - 1nd March 2020, 16:00h 27th January 2020, posted by Marko Paunović in Events - edit_Announcement -
Exhibition of Miniatures and Tabletop Scenery "Agram 2020"
Event date: 20th February 2020, 18:00h - 8th March 2020, 00:00h 27th January 2020, posted by Marko Paunović in Events - edit_Announcement -
Miniature Painting Workshop - 1 on 1
Event date: 22nd January 2020, 18:00h - 27th May 2020, 20:00h 27th January 2020, posted by Martin Vrkljan in Events - edit_Announcement -
Miniature Painting Workshop - 1 on 1
Event date: 22nd January 2020, 18:00h - 27th May 2020, 20:00h 27th January 2020, posted by Martin Vrkljan in Events - edit_Announcement -
MPC Meetup
Event date: 22nd January 2020, 20:00h - 27th May 2020, 22:00h 27th January 2020, posted by Marko Paunović in Events - edit_Announcement -
Appologies
7th January 2020, posted by Marko Paunović in News - edit_Announcement
2019
December
-
Basing 101 - Vegetation Workshop @ Black Queen 2020
14th December 2019, posted by Marko Paunović in Workshop announcements - edit_Announcement
November
-
Miniature and Bits Fleamarket @ Black Queen H&MPC
Event date: 1nd March 2020, 10:00h - 1nd March 2020, 00:00h 30th November 2019, posted by Marko Paunović in Events - edit_Announcement -
WEATHERING 101 - X-Wing and GASLANDS Models
18th November 2019, posted by Marko Paunović in Workshop announcements - edit_Announcement -
Inq28 Miniature Conversion Workshop at BQ2020
3th November 2019, posted by Ana Polanšćak in Workshop announcements - edit_Announcement
October
-
Miniature Painting Workshops @ Black Queen Hobby and Miniature Painting Competition 2020
29th October 2019, posted by Marko Paunović in News - edit_Announcement -
Miniature Photography Workshop
23th October 2019, posted by Marko Paunović in Workshop announcements - edit_Announcement -
Black Queen Hobby and Miniature Painting Competition 2020
Event date: 29th February 2020, 10:00h - 1nd March 2020, 18:00h 17th October 2019, posted by Marko Paunović in Events - edit_Announcement -
Agram Arena Winter 2019
Event date: 30th November 2019, 10:00h - 8th December 2019, 14:00h 16th October 2019, posted by Marko Paunović in Events - edit_Announcement
September
-
New date, venue and format for our Black Queen Hobby and Miniature Painting Competition
29th September 2019, posted by Marko Paunović in News - edit_Announcement -
Miniature Painting Workshop - 1 on 1
Event date: 2nd October 2019, 18:00h - 11th December 2019, 20:00h 13th September 2019, posted by Marko Paunović in Events - edit_Announcement
August
-
Miniature Painting Workshop - OSL & Leather
Event date: 21nd September 2019, 10:00h - 22nd September 2019, 18:00h 1nd August 2019, posted by Marko Paunović in Events - edit_Announcement
June
-
AAS 2019 Schedule
30th June 2019, posted by Marko Paunović in News - edit_Announcement
May
-
UMS Agram @ Sferakon 2019
Event date: 11th May 2019, 00:00h - 11th May 2019, 19:00h 4th May 2019, posted by Marko Paunović in Events - edit_Announcement
April
-
Day of Open Doors at UMS Agram 2019
Event date: 18th May 2019, 09:00h - 18th May 2019, 19:00h 23th April 2019, posted by Marko Paunović in Events - edit_Announcement -
Miniature Painting Workshop - Weathering
11th April 2019, posted by Marko Paunović in Workshop announcements - edit_Announcement -
Black Queen Hobby and Miniature Painting Competition 2019
Event date: 6th July 2019, 09:00h - 7th July 2019, 14:00h 9th April 2019, posted by Marko Paunović in Events - edit_Announcement -
Agram Arena Summer 2019
Event date: 6th July 2019, 09:00h - 13th July 2019, 19:00h 9th April 2019, posted by Marko Paunović in Events - edit_Announcement -
Office working hours for administrative jobs
4th April 2019, posted by Marko Paunović in News - edit_Announcement
March
-
Annual Award by UMS Agram for Andrija Jurišić
25th March 2019, posted by Marko Paunović in News - edit_Announcement
February
-
20th General Assembly of UMS Agram
Event date: 3th March 2019, 10:00h - 3th March 2019, 12:00h 15th February 2019, posted by Marko Paunović in Events - edit_Announcement
January
-
New UMS Agram promo banners
24th January 2019, posted by Marko Paunović in News - edit_Announcement -
Exhibition of Miniatures and Tabletop Scenery "Agram 2019"
Event date: 21nd February 2019, 18:00h - 10th March 2019, 00:00h 17th January 2019, posted by Marko Paunović in Events - edit_Announcement -
Miniature Painting Workshop - Kitbashing & Converting
Event date: 23th February 2019, 10:00h - 24th February 2019, 18:00h 7th January 2019, posted by Marko Paunović in Events - edit_Announcement -
Miniature Painting Workshop - 1 on 1
Event date: 6th February 2019, 18:00h - 29th May 2019, 20:00h 7th January 2019, posted by Martin Vrkljan in Events - edit_Announcement
2018
June
-
Annual Award by HZTK for our president Marko Paunović
4th June 2018, posted by Andrija Jurišić in News - edit_Announcement -
Agram Arena Summer 2018
4th June 2018, posted by Marko Paunović in News - edit_Announcement
May
-
Days of Open Doors 2018
28th May 2018, posted by Marko Paunović in News - edit_Announcement -
Diorama Workshop - Electronics
22nd May 2018, posted by Martin Vrkljan in News - edit_Announcement -
Agram @ Sferakon 2018
Event date: 12nd May 2018, 12:00h - 12nd May 2018, 21:00h 7th May 2018, posted by Marko Paunović in Events - edit_Announcement
April
-
Diorama Workshop - Electronics
Event date: 19th May 2018, 10:00h - 20th May 2018, 18:00h 23th April 2018, posted by Marko Paunović in Events - edit_Announcement -
Days of Open Doors 2018
Event date: 26th May 2018, 09:00h - 26th May 2018, 17:00h 9th April 2018, posted by Marko Paunović in Events - edit_Announcement
March
-
Hobby corner on wednesdays
Event date: 14th March 2018, 18:00h - 14th March 2018, 22:00h 11th March 2018, posted by Marko Paunović in Events - edit_Announcement -
Miniature Flea Market
Event date: 4th April 2018, 18:00h - 4th April 2018, 22:00h 11th March 2018, posted by Marko Paunović in Events - edit_Announcement -
Infinity Escalation League 2018
6th March 2018, posted by Marko Paunović in News - edit_Announcement -
UMS Agram appearance on Z1 Television
1nd March 2018, posted by Marko Paunović in News - edit_Announcement
February
-
Miniature Painting Workshop - Army Batch Painting
25th February 2018, posted by Marko Paunović in News - edit_Announcement -
Opening of the Exhibition of Miniatures and Tabletop Scenery Agram 2018
23th February 2018, posted by Marko Paunović in News - edit_Announcement -
19th General Assembly of UMS "Agram" Members
Event date: 3th March 2018, 10:00h - 3th March 2018, 00:00h 20th February 2018, posted by Marko Paunović in Events - edit_Announcement -
Exhibition of Miniatures and Tabletop Scenery 2018
Event date: 22nd February 2018, 18:00h - 11th March 2018, 00:00h 20th February 2018, posted by Marko Paunović in Events - edit_Announcement
January
-
Miniature Painting Workshop - Army Batch Painting
22nd January 2018, posted by Marko Paunović in News - edit_Announcement -
Activities by UMS Agram in the second half of 2017
18th January 2018, posted by Marko Paunović in News - edit_Announcement -
Exhibition of Miniatures and Tabletop Scenery Agram 2018
Event date: 22nd February 2018, 18:00h - 11th March 2018, 00:00h 18th January 2018, posted by Marko Paunović in Events - edit_Announcement -
Miniature Swapmeet on wednesday
Event date: 7th February 2018, 18:00h - 7th February 2018, 22:00h 18th January 2018, posted by Marko Paunović in Events - edit_Announcement
2017
October
-
Tabletop Scenery For Beginners
16th October 2017, posted by Andrija Jurišić in News - edit_Announcement
March
-
Article about UMS "Agram" in Večernji list
9th March 2017, posted by Marko Paunović in News - edit_Announcement -
Membership price rise
6th March 2017, posted by Marko Paunović in News - edit_Announcement -
Gaming for everyone!
6th March 2017, posted by Marko Paunović in News - edit_Announcement -
Minutes of the 18th general assembly of UMS "Agram"
6th March 2017, posted by Marko Paunović in News - edit_Announcement
February
-
Miniature Photography Class
27th February 2017, posted by Marko Paunović in Courses announcements - edit_Announcement -
Terrain Workshop - demonstration
9th February 2017, posted by Marko Paunović in Workshop announcements - edit_Announcement
January
-
18. General Assembly of UMS "Agram" members
Event date: 5th March 2017, 10:00h - 5th March 2017, 12:30h 26th January 2017, posted by Marko Paunović in Events - edit_Announcement -
Miniature Painting Workshop - Metallics Special
Event date: 25th February 2017, 10:00h - 26th February 2017, 18:00h 21nd January 2017, posted by Marko Paunović in Events - edit_Announcement -
New titles in our Library
6th January 2017, posted by Ana Polanšćak in News - edit_Announcement
2016
November
-
Letter of appology from ZZTK for the ruination of our Cities of Death gaming board
23th November 2016, posted by Marko Paunović in News - edit_Announcement -
Announcement regarding the venue in November
6th November 2016, posted by Marko Paunović in News - edit_Announcement -
Terrain Workshop Autumn 2016
5th November 2016, posted by Marko Paunović in Workshop announcements - edit_Announcement -
UMS Agram @ Infogamer 2016
Event date: 8th November 2016, 11:00h - 13th November 2016, 20:00h 1nd November 2016, posted by Marko Paunović in Events - edit_Announcement
October
-
Promo/demo Team UMS Agram kitted out
15th October 2016, posted by Marko Paunović in News - edit_Announcement -
Painting Miniatures for Beginners
14th October 2016, posted by Marko Paunović in Workshop announcements - edit_Announcement -
Terrain Workshop 2016 in progress
8th October 2016, posted by Marko Paunović in Workshop announcements - edit_Announcement
September
-
Days of Technical Culture
Event date: 1nd October 2016, 10:00h - 1nd October 2016, 17:00h 5th September 2016, posted by Marko Paunović in Events - edit_Announcement -
Terrain Workshop
Event date: 8th October 2016, 22:00h - 5th November 2016, 14:00h 5th September 2016, posted by Marko Paunović in Events - edit_Announcement -
Miniature Painting Workshop
Event date: 19th November 2016, 09:00h - 20th November 2016, 14:00h 5th September 2016, posted by Martin Vrkljan in Events - edit_Announcement -
Agram Arena Winter 2016
Event date: 3th December 2016, 08:24h - 4th December 2016, 20:24h 4th September 2016, posted by Marko Paunović in Events - edit_Announcement
August
-
Event reports in Figure Painter Magazine and Initiative Magazine
28th August 2016, posted by Marko Paunović in News - edit_Announcement -
Malifaux Som'er's End V Tournament, 24.sept.2016.
Event date: 24th September 2016, 09:00h - 24th September 2016, 17:00h 28th August 2016, posted by Marko Paunović in Events - edit_Announcement -
Infinity Tournament #03 v2.0
Event date: 22nd October 2016, 09:00h - 22nd October 2016, 16:58h 28th August 2016, posted by Marko Paunović in Events - edit_Announcement -
Agram Arena Summer 2016 Video Report
12nd August 2016, posted by Marko Paunović in News - edit_Announcement
June
-
Terrain Workshop 2016
18th June 2016, posted by Marko Paunović in Workshop announcements - edit_Announcement -
Week of Associations 2016 in Zagreb
10th June 2016, posted by Marko Paunović in News - edit_Announcement -
Malifaux Spring League 2016
Event date: 10th June 2016, 00:00h - 24th July 2016, 18:00h 5th June 2016, posted by Marko Paunović in Events - edit_Announcement
May
-
Days of Open Doors 2016
26th May 2016, posted by Marko Paunović in News - edit_Announcement -
Malifaux BAYOU BASH V Tournament, 14. May 2016
Event date: 14th May 2016, 09:00h - 14th May 2016, 17:30h 6th May 2016, posted by Marko Paunović in Events - edit_Announcement -
Hobby Corner @ DOVU 2016
6th May 2016, posted by Marko Paunović in Workshop announcements - edit_Announcement
April
-
Bolt Action Demo Day
Event date: 9th April 2016, 10:00h - 9th April 2016, 13:00h 2nd April 2016, posted by Marko Paunović in Events - edit_Announcement
March
-
Infinity Tournament #03
Event date: 18th June 2016, 09:00h - 18th June 2016, 19:00h 22nd March 2016, posted by Marko Paunović in Events - edit_Announcement -
Malifaux MALIFOOL'S DAY V Tournament, 26.mar.2016.
Event date: 26th March 2016, 09:00h - 26th March 2016, 17:00h 11th March 2016, posted by Marko Paunović in Events - edit_Announcement
February
-
Another article by one of our members in an international magazine - Wyrd Chronicles!
18th February 2016, posted by Andrija Jurišić in News - edit_Announcement -
Agram Arena Summer 2016
Event date: 9th July 2016, 09:00h - 24th July 2016, 19:00h 13th February 2016, posted by Marko Paunović in Events - edit_Announcement
January
-
Issues #31, #32 and #33 of Figure Painter Magazine are out
27th January 2016, posted by Marko Paunović in News - edit_Announcement -
Malifaux LOST LOVE V Tournament, 13.feb.2016.
Event date: 13th February 2016, 09:00h - 13th February 2016, 16:30h 25th January 2016, posted by Marko Paunović in Events - edit_Announcement -
Malifaux Winter League 2016
Event date: 1nd February 2016, 09:00h - 1nd April 2016, 16:30h 25th January 2016, posted by Marko Paunović in Events - edit_Announcement -
UMS "Agram" General Assembly 2016
Event date: 5th March 2016, 10:00h - 5th March 2016, 12:30h 22nd January 2016, posted by Marko Paunović in Events - edit_Announcement -
Hobby Corner on Wednesdays
Event date: 27th January 2016, 18:00h - 2nd March 2016, 22:00h 21nd January 2016, posted by Marko Paunović in Events - edit_Announcement -
Our Ana Polanšćak gets interviewed by the Fallout Podcast guys!
19th January 2016, posted by Marko Paunović in News - edit_Announcement -
Exhibition of Miniatures and Tabletop Scenery Agram 2016
Event date: 23th February 2016, 17:00h - 5th March 2016, 12:00h 11th January 2016, posted by Marko Paunović in Events - edit_Announcement
2015
December
-
Seasonal greetings!
20th December 2015, posted by Marko Paunović in News - edit_Announcement -
Pre-christmas hobby corner on wednesday
Event date: 23th December 2015, 18:00h - 23th December 2015, 22:00h 19th December 2015, posted by Marko Paunović in Events - edit_Announcement -
Malifaux available in Carta Magica ! ! !
10th December 2015, posted by Marko Paunović in News - edit_Announcement
November
-
X Wing @ AAW 2015
Event date: 6th December 2015, 09:00h - 6th December 2015, 17:00h 23th November 2015, posted by Marko Paunović in Events - edit_Announcement -
Saga - demo day
Event date: 28th November 2015, 10:30h - 28th November 2015, 14:00h 22nd November 2015, posted by Marko Paunović in Events - edit_Announcement -
Hostel Bureau Zagreb - our new sponsor
18th November 2015, posted by Marko Paunović in News - edit_Announcement -
No Ma'am Painting Competition 2015 - voting has started!
17th November 2015, posted by Marko Paunović in News - edit_Announcement
October
-
Our regular
29th October 2015, posted by Marko Paunović in News - edit_Announcement -
Figure Painter Magazine no 28, 29 & 30 - OUT NOW
23th October 2015, posted by Marko Paunović in News - edit_Announcement -
UMS "Agram" @ Infogamer by Reboot 2015
Event date: 11th November 2015, 23:00h - 15th November 2015, 19:00h 20th October 2015, posted by Marko Paunović in Events - edit_Announcement -
Wednesday's Hobby corner in November
20th October 2015, posted by Marko Paunović in Workshop announcements - edit_Announcement -
Agram Arena Winter 2015
Event date: 5th December 2015, 09:00h - 6th December 2015, 19:00h 11th October 2015, posted by Marko Paunović in Events - edit_Announcement -
Wednesday's Hobby Corner
4th October 2015, posted by Marko Paunović in Workshop announcements - edit_Announcement
September
-
Plaster base and diorama workshop
20th September 2015, posted by Marko Paunović in Workshop announcements - edit_Announcement -
Wargaming school, autumn 2015
20th September 2015, posted by Marko Paunović in Courses announcements - edit_Announcement -
Terrain Workshop - Autumn 2015
5th September 2015, posted by Marko Paunović in Workshop announcements - edit_Announcement
August
-
No Ma'am is back!
Event date: 1nd August 2015, 12:00h - 15th November 2015, 12:00h 2nd August 2015, posted by Marko Paunović in Events - edit_Announcement -
Malifaux Som'er's End IV Tournament, 29 sept.2015
Event date: 26th September 2015, 09:00h - 26th September 2015, 19:00h 2nd August 2015, posted by Marko Paunović in Events - edit_Announcement -
Malifaux Summer League 2015
Event date: 1nd August 2015, 00:00h - 26th September 2015, 12:00h 2nd August 2015, posted by Marko Paunović in Events - edit_Announcement
July
-
Figure Painter Magazine no 27 - AVAILABLE FOR DOWNLOAD
23th July 2015, posted by Marko Paunović in News - edit_Announcement -
Summer School of Technical Skills 2015
21nd July 2015, posted by Marko Paunović in News - edit_Announcement
June
-
Figure Painter Magazine no 26 - AVAILABLE FOR DOWNLOAD
23th June 2015, posted by Marko Paunović in News - edit_Announcement
May
-
Agram Arena Summer 2015 - Registrations Now Open
31nd May 2015, posted by Marko Paunović in News - edit_Announcement -
Figure Painter Magazine no 25 - AVAILABLE FOR DOWNLOAD
21nd May 2015, posted by Marko Paunović in News - edit_Announcement -
Wargaming school in UMS "Agram"
Event date: 23th May 2015, 10:30h - 13th June 2015, 13:00h 21nd May 2015, posted by Marko Paunović in Events - edit_Announcement -
ITS 2015 Infinity tournament in Ljubljana, Slovenia
20th May 2015, posted by Marko Paunović in News - edit_Announcement -
Sferakon 2015 in pictures
19th May 2015, posted by Marko Paunović in News - edit_Announcement -
NEW - Airbrush and compressor available for use and borrowing!
12nd May 2015, posted by Marko Paunović in News - edit_Announcement -
Day of Open Doors
Event date: 30th May 2015, 09:00h - 30th May 2015, 19:00h 6th May 2015, posted by Marko Paunović in Events - edit_Announcement
April
-
Tabletop Scenery Workshop
Event date: 9th May 2015, 10:00h - 30th May 2015, 14:00h 26th April 2015, posted by Marko Paunović in Events - edit_Announcement -
Figure Painter Magazine no 24 - AVAILABLE FOR DOWNLOAD
21nd April 2015, posted by Marko Paunović in News - edit_Announcement -
Tabletop Scenery 101
Event date: 22nd April 2015, 19:00h - 22nd April 2015, 22:00h 9th April 2015, posted by Martin Vrkljan in Events - edit_Announcement -
Another article by one of our members in an international magazine
2nd April 2015, posted by Ana Polanšćak in News - edit_Announcement
March
-
Figure Painter Magazine no 23 - OUT NOW
21nd March 2015, posted by Marko Paunović in News - edit_Announcement -
UMS "Agram" Annual Award 2014.
5th March 2015, posted by Marko Paunović in News - edit_Announcement
February
-
Warhammer 40000 Spring Equinox 2015 tournament
Event date: 21nd March 2015, 09:00h - 21nd March 2015, 19:00h 27th February 2015, posted by Marko Paunović in Events - edit_Announcement -
Figure Painter Magazine no 22 - AVAILABLE FOR DOWNLOAD
20th February 2015, posted by Marko Paunović in News - edit_Announcement -
Agram Arena Summer 2015
Event date: 11th July 2015, 09:00h - 19th July 2015, 18:00h 14th February 2015, posted by Marko Paunović in Events - edit_Announcement -
Infinity Tournament #01
Event date: 14th March 2015, 09:00h - 14th March 2015, 19:00h 8th February 2015, posted by Marko Paunović in Events - edit_Announcement -
UMS "Agram" General Assembly
Event date: 7th March 2015, 10:00h - 7th March 2015, 12:30h 6th February 2015, posted by Marko Paunović in Events - edit_Announcement
January
-
Kings Of War Demo Day
Event date: 28th February 2015, 10:00h - 28th February 2015, 15:00h 25th January 2015, posted by Marko Paunović in Events - edit_Announcement -
Agram Atmosfera Malifaux - Winter League 2015
Event date: 1nd February 2015, 00:00h - 28th March 2015, 12:00h 23th January 2015, posted by Marko Paunović in Events - edit_Announcement -
Lost Love IV Malifaux Tournament
Event date: 14th February 2015, 09:00h - 14th February 2015, 17:00h 23th January 2015, posted by Marko Paunović in Events - edit_Announcement -
Exhibition of Miniatures and Tabletop Scenery Agram 2015
Event date: 22nd February 2015, 10:00h - 4th March 2015, 22:00h 23th January 2015, posted by Marko Paunović in Events - edit_Announcement -
Figure Painter Magazine no 21 - AVAILABLE FOR DOWNLOAD
22nd January 2015, posted by Marko Paunović in News - edit_Announcement -
Firestorm Armada Demo Day
Event date: 31nd January 2015, 10:00h - 31nd January 2015, 15:00h 20th January 2015, posted by Marko Paunović in Events - edit_Announcement -
Wolf Design - Our new sponsor!
15th January 2015, posted by Marko Paunović in News - edit_Announcement -
Warhammer wargaming school starts in two weeks time!!
6th January 2015, posted by Marko Paunović in Courses announcements - edit_Announcement -
Infinity - Demo Day
Event date: 3th January 2015, 11:00h - 3th January 2015, 15:00h 1nd January 2015, posted by Marko Paunović in Events - edit_Announcement
2014
December
-
Seasonal greetings!
23th December 2014, posted by Marko Paunović in News - edit_Announcement -
Figure Painter Magazine no 20 - AVAILABLE FOR DOWNLOAD
19th December 2014, posted by Marko Paunović in News - edit_Announcement -
Warhammer Agram Xtreem tournament
Event date: 4th January 2014, 07:30h - 4th January 2014, 14:00h 10th December 2014, posted by Marko Paunović in Events - edit_Announcement -
Our friends in HUVM are celebrating the centenary of the WW1
9th December 2014, posted by Marko Paunović in News - edit_Announcement -
New books in UMS "Agram" library
9th December 2014, posted by Ana Polanšćak in News - edit_Announcement
November
-
UMS Agram Warhammer 40.000 Winter Special
Event date: 3th January 2014, 08:30h - 3th January 2014, 19:00h 30th November 2014, posted by Marko Paunović in Events - edit_Announcement -
UMS Agram @ Days of Boardgames 2014
30th November 2014, posted by Marko Paunović in News - edit_Announcement -
Agram Atmosfera 2014 leagues are finished! Results are in!
21nd November 2014, posted by Marko Paunović in News - edit_Announcement -
Figure Painter Magazine no 19 - AVAILABLE FOR DOWNLOAD
17th November 2014, posted by Marko Paunović in News - edit_Announcement -
AAW 2014 - Registrations now open and Changes to the Rulespack
13th November 2014, posted by Marko Paunović in News - edit_Announcement -
UMS Agram WHFB Autumn Skirmish final standings
8th November 2014, posted by Marko Paunović in News - edit_Announcement -
UMS Agram @ Reboot/Infogamer 2014
7th November 2014, posted by Marko Paunović in News - edit_Announcement -
Agram Atmosfera 2014 - WHFB League Finalists
3th November 2014, posted by Marko Paunović in News - edit_Announcement
October
-
Warhammer 40.000 tournament at Reboot/Infogamer Fair
30th October 2014, posted by Marko Paunović in News - edit_Announcement -
Warhammer Fantasy Battles tournament at Reboot/Infogamer Fair
29th October 2014, posted by Marko Paunović in News - edit_Announcement -
Malifaux tournament at Reboot/Infogamer Fair
21nd October 2014, posted by Marko Paunović in News - edit_Announcement -
Figure Painter Magazine no 18 - AVAILABLE FOR DOWNLOAD
17th October 2014, posted by Marko Paunović in News - edit_Announcement -
Agram Atmosfera 2014 - 40k League Finalists
13th October 2014, posted by Marko Paunović in News - edit_Announcement -
Warhammer school @ Free For All Saturday
6th October 2014, posted by in News - edit_Announcement -
Agram Atmosfera 2014 - WHFB League Semifinals
5th October 2014, posted by Marko Paunović in News - edit_Announcement -
Agram Atmosfera 2014 - 40K League Semifinals
2nd October 2014, posted by Marko Paunović in News - edit_Announcement
September
-
Results of Topor Masters Invitational 2014
28th September 2014, posted by Marko Paunović in News - edit_Announcement -
Malifaux Fall League 2014
Event date: 1nd October 2014, 00:00h - 15th November 2014, 23:59h 28th September 2014, posted by Marko Paunović in Events - edit_Announcement -
Topor Masters Invitational
26th September 2014, posted by Marko Paunović in News - edit_Announcement -
Figure Painter Magazine no 17 - AVAILABLE FOR DOWNLOAD
17th September 2014, posted by Marko Paunović in News - edit_Announcement -
Agram Arena Winter 2014
Event date: 6th December 2014, 09:00h - 7th December 2014, 19:00h 15th September 2014, posted by Marko Paunović in Events - edit_Announcement -
UMS "Agram" at the Model cup Crna Kraljica
15th September 2014, posted by Andrija Jurišić in News - edit_Announcement -
Free For All Saturday
11th September 2014, posted by Marko Paunović in News - edit_Announcement -
Agram Atmosfera 2014 - WHFB & 40K League Playoffs
10th September 2014, posted by Marko Paunović in News - edit_Announcement
August
-
Malifaux Som'er's End III Tournament, 27.sept.2014.
Event date: 27th September 2014, 09:00h - 27th September 2014, 19:00h 30th August 2014, posted by Marko Paunović in Events - edit_Announcement -
Have some old books you don't need?
30th August 2014, posted by Ana Polanšćak in News - edit_Announcement -
Through the Breach RPG campaign starts
28th August 2014, posted by Marko Paunović in News - edit_Announcement -
Figure Painter Magazine no 16 - AVAILABLE FOR DOWNLOAD
17th August 2014, posted by Marko Paunović in News - edit_Announcement -
Malifaux Summer League 2014
Event date: 13th August 2014, 00:00h - 24th September 2014, 12:00h 12nd August 2014, posted by Marko Paunović in Events - edit_Announcement
July
-
Figure Painter Magazine no 15 - AVAILABLE FOR DOWNLOAD
16th July 2014, posted by Marko Paunović in News - edit_Announcement
June
-
Figure Painter Magazine no 14 - OUT NOW
17th June 2014, posted by Marko Paunović in News - edit_Announcement -
UMS "Agram" helping the victims of the recent floods in Croatia
12nd June 2014, posted by Marko Paunović in News - edit_Announcement -
Wyrd Weekend and Days of Open Doors 2014
7th June 2014, posted by Marko Paunović in News - edit_Announcement
May
-
Soon in our Library
29th May 2014, posted by Ana Polanšćak in News - edit_Announcement -
Help UMS "Agram" help the flood victims - June 7 2014! YOUR TIME TO ACT!
27th May 2014, posted by Marko Paunović in News - edit_Announcement -
Sferakon 2014 report
19th May 2014, posted by Marko Paunović in News - edit_Announcement -
Figure Painter Magazine no 13 - OUT NOW
16th May 2014, posted by Marko Paunović in News - edit_Announcement -
The Conclusion of Executive Board of ZZTK regarding the destruction of the City of Death gaming board
15th May 2014, posted by Martin Vrkljan in News - edit_Announcement -
UMS Agram @ Sferakon 2014
Event date: 17th May 2014, 16:00h - 17th May 2014, 22:00h 13th May 2014, posted by Marko Paunović in Events - edit_Announcement -
Our site was down
10th May 2014, posted by Marko Paunović in News - edit_Announcement
April
-
Malifaux BAYOU BASH III Tournament, 06.June2014
Event date: 7th June 2014, 09:00h - 8th June 2014, 17:00h 30th April 2014, posted by Marko Paunović in Events - edit_Announcement -
UMS Agram @ Days of Open Doors
Event date: 6th June 2014, 09:00h - 7th June 2014, 14:00h 30th April 2014, posted by Marko Paunović in Events - edit_Announcement -
Malifaux Spring League 2014
Event date: 1nd May 2014, 08:00h - 30th June 2014, 20:00h 28th April 2014, posted by Marko Paunović in Events - edit_Announcement -
Happy Easter!
20th April 2014, posted by Marko Paunović in News - edit_Announcement -
Figure Painter Magazine no 12 - OUT NOW
16th April 2014, posted by Marko Paunović in News - edit_Announcement -
Sponsors of our Agram Arena Summer 2014
4th April 2014, posted by Marko Paunović in News - edit_Announcement
March
-
The Final Finding of the City of Death Taskforce
25th March 2014, posted by Marko Paunović in News - edit_Announcement -
Malifaux MALIFOOL'S DAY III Tournament, 29.mar.2014.
Event date: 29th March 2014, 09:00h - 29th March 2014, 17:00h 18th March 2014, posted by Marko Paunović in Events - edit_Announcement -
Figure Painter Magazine no 11 - OUT NOW
16th March 2014, posted by Marko Paunović in News - edit_Announcement -
Agram Arena Summer 2014
13th March 2014, posted by Marko Paunović in News - edit_Announcement
February
-
Exhibition of Miniatures and Tabletop Scenery Agram 2014
Event date: 26th February 2014, 18:00h - 9th March 2014, 10:00h 28th February 2014, posted by Marko Paunović in Events - edit_Announcement -
Destruction of our award winning gaming board City of Death
21nd February 2014, posted by Marko Paunović in News - edit_Announcement -
Figure Painter Magazine no 10 - OUT NOW
16th February 2014, posted by Marko Paunović in News - edit_Announcement -
15. General Assembly of UMS "Agram" members
Event date: 9th March 2014, 10:00h - 9th March 2014, 13:30h 15th February 2014, posted by Marko Paunović in Events - edit_Announcement -
Exhibition of miniatures and tabletop scenery Agram 2014
13th February 2014, posted by Marko Paunović in News - edit_Announcement -
Donation of books and White Dwarf magazines to Library of UMS "Agram"
9th February 2014, posted by Ana Polanšćak in News - edit_Announcement -
Warhammer Wargaming School
2nd February 2014, posted by in News - edit_Announcement
January
-
Malifaux LOST LOVE III Tournament, 15.feb.2014.
Event date: 15th February 2014, 21:00h - 15th February 2014, 19:00h 30th January 2014, posted by Marko Paunović in Events - edit_Announcement -
UMS Agram @ KSET
Event date: 26th January 2014, 16:00h - 26th January 2014, 22:00h 27th January 2014, posted by Marko Paunović in Events - edit_Announcement -
Article about UMS "Agram" in Figure Painter Magazine #09
16th January 2014, posted by Marko Paunović in News - edit_Announcement -
UMS Agram @ KSET, Jan.26 2014
12nd January 2014, posted by Marko Paunović in News - edit_Announcement -
Malifaux Winter League 2014
Event date: 8th January 2014, 00:00h - 26th March 2014, 12:00h 2nd January 2014, posted by Marko Paunović in Events - edit_Announcement
2013
December
-
Blast from the Past vol.4
26th December 2013, posted by Andrija Jurišić in News - edit_Announcement -
Merry Christmas and a happy New Year!
18th December 2013, posted by Marko Paunović in News - edit_Announcement -
Closing Ceremony of the Days of Donji Grad 2013
17th December 2013, posted by Marko Paunović in News - edit_Announcement -
The Hobbit Strategy Battle Game Presentation, December 21 2013
Event date: 21nd December 2013, 13:00h - 21nd December 2013, 19:00h 16th December 2013, posted by Dejan Pavlović in Events - edit_Announcement -
Agram Arena Winter 2013 Report in Figure Painter Magazine #8
15th December 2013, posted by Marko Paunović in News - edit_Announcement -
December Horrors III Malifaux Tournament @ AAW2013
8th December 2013, posted by Marko Paunović in News - edit_Announcement -
Malifaux Agram Fall League final results
7th December 2013, posted by Marko Paunović in News - edit_Announcement
November
-
UMS Agram @ Infogamer 2013
21nd November 2013, posted by Marko Paunović in News - edit_Announcement -
Ana Polanšćak winns second place in Not Quite Dead Yet category of Rotten Harvest 2013
20th November 2013, posted by Marko Paunović in News - edit_Announcement -
Agram Arena Winter announcement in Figure Painter Magazine
15th November 2013, posted by Marko Paunović in News - edit_Announcement -
Malifaux December Horrors Doubles Tournament @ AAW2013
Event date: 7th December 2013, 09:30h - 7th December 2013, 20:00h 14th November 2013, posted by Marko Paunović in Events - edit_Announcement -
UMS Agram @ Infogamer
Event date: 15th November 2013, 15:00h - 17th November 2013, 21:00h 4th November 2013, posted by Marko Paunović in Events - edit_Announcement
October
-
Prizes for AAW 2013 start to roll in
18th October 2013, posted by Marko Paunović in News - edit_Announcement -
New terrain in UMS "Agram" for Infinity, the game
18th October 2013, posted by Marko Paunović in News - edit_Announcement -
Agram Arena Winter 2013
Event date: 7th December 2013, 09:00h - 8th December 2013, 20:00h 13th October 2013, posted by Marko Paunović in Events - edit_Announcement -
Winner of No Ma'am 2013 Wyrd painting competition
11th October 2013, posted by Marko Paunović in News - edit_Announcement -
Malifaux Fall League 2013
Event date: 14th October 2013, 00:00h - 30th November 2013, 23:59h 11th October 2013, posted by Marko Paunović in Events - edit_Announcement -
New terrain in UMS "Agram"
8th October 2013, posted by Martin Vrkljan in News - edit_Announcement
September
-
Kerr&King - new sponsor of UMS "Agram"
24th September 2013, posted by Marko Paunović in News - edit_Announcement -
UMS Agram @ Day of Donji Grad 2013
23th September 2013, posted by Marko Paunović in News - edit_Announcement -
Blast from the Past vol.3
18th September 2013, posted by Andrija Jurišić in News - edit_Announcement -
Blast from the Past vol.2
17th September 2013, posted by Marko Paunović in News - edit_Announcement -
Blast from the Past vol.1
17th September 2013, posted by Marko Paunović in News - edit_Announcement -
UMS Agram @ Days of Donji Grad
Event date: 23th September 2013, 13:00h - 23th September 2013, 20:00h 17th September 2013, posted by Marko Paunović in Events - edit_Announcement -
UMS Agram @ 8. Zagreb's Model Cup
14th September 2013, posted by Marko Paunović in News - edit_Announcement -
Agram Arena Winter add in FPM#5
14th September 2013, posted by Marko Paunović in News - edit_Announcement -
UMS Agram in Večernji list
12nd September 2013, posted by Marko Paunović in News - edit_Announcement -
UMS Agram @ Days of Technical Culture on Bundekfest 2013
11th September 2013, posted by Marko Paunović in News - edit_Announcement -
Agram Arena Winter 2013 - Coming soon!
7th September 2013, posted by Marko Paunović in News - edit_Announcement -
Malifaux Som'er's End II Tournament
Event date: 28th September 2013, 09:30h - 28th September 2013, 17:30h 5th September 2013, posted by Marko Paunović in Events - edit_Announcement -
UMS Agram WHFB League 2013 - playoffs
Event date: 1nd September 2013, 00:01h - 13th December 2013, 23:59h 2nd September 2013, posted by Marko Paunović in Events - edit_Announcement
August
-
UMS Agram @ Bundekfest
Event date: 9th September 2013, 17:00h - 9th September 2013, 20:00h 31nd August 2013, posted by Marko Paunović in Events - edit_Announcement -
UMS Agram @ Zagreb Modelling Cup Crna Kraljica 2013
Event date: 14th September 2013, 10:00h - 14th September 2013, 19:00h 30th August 2013, posted by Marko Paunović in Events - edit_Announcement -
Wargaming school starts 31st of August
25th August 2013, posted by Marko Paunović in Courses announcements - edit_Announcement -
Liburnicon 2013 comes to a close
25th August 2013, posted by Marko Paunović in News - edit_Announcement -
UMS Agram @ Liburnicon
Event date: 23th August 2013, 10:00h - 24th August 2013, 19:35h 21nd August 2013, posted by Marko Paunović in Events - edit_Announcement -
Agram Arena Summer 2013 Report in Figure Painter Magazine #4
14th August 2013, posted by Marko Paunović in News - edit_Announcement -
Wyrd NO MA'AM miniature painting competition
Event date: 12nd August 2013, 19:18h - 15th September 2013, 23:59h 12nd August 2013, posted by Marko Paunović in Events - edit_Announcement -
UMS Agram project mentioned in Wyrd Chronicles vol.7
6th August 2013, posted by Marko Paunović in News - edit_Announcement -
Malifaux Summer League 2013
Event date: 3th August 2013, 00:00h - 28th September 2013, 23:59h 1nd August 2013, posted by Marko Paunović in Events - edit_Announcement
July
-
40k MEGAFIGHT - 3.8.2013.
Event date: 3th August 2013, 10:00h - 3th August 2013, 19:00h 27th July 2013, posted by Marko Paunović in Events - edit_Announcement -
New Sponsor of UMS "Agram"
23th July 2013, posted by Marko Paunović in News - edit_Announcement
April
-
Agram Arena Summer 2013 rulespack changes and new sponsors
30th April 2013, posted by Marko Paunović in News - edit_Announcement
March
-
Agram Arena Summer 2013
27th March 2013, posted by Marko Paunović in News - edit_Announcement
2012
December
-
Last call for Arena!
3th December 2012, posted by in News - edit_Announcement
November
-
Are you ready for Arena?
20th November 2012, posted by in News - edit_Announcement -
Agram Arena Winter 2012
8th November 2012, posted by in News - edit_Announcement
June
-
New exciting news - Agram Arena Summer!!!
23th June 2012, posted by Dejan Pavlović in News - edit_Announcement -
13th summer school of technical skills @ Novi Vinodolski
Event date: 22nd June 2012, 15:47h 22nd June 2012, posted by Dejan Pavlović in Events - edit_Announcement -
Infamy Miniatures new sponsor for AAS2012
5th June 2012, posted by Marko Paunović in News - edit_Announcement
May
-
Agram Arena Summer 2012
23th May 2012, posted by in News - edit_Announcement
2011
October
-
Agram Arena Winter 2011!
23th October 2011, posted by in News - edit_Announcement
July
-
Ready for Agram Arena?
1nd July 2011, posted by Martin Vrkljan in News - edit_Announcement
June
-
An Open (Video) Letter to Games Workshop
13th June 2011, posted by Martin Vrkljan in News - edit_Announcement
May
-
Agram Arena Summer 2011
14th May 2011, posted by in News - edit_Announcement -
Agram Arena Summer 2011
13th May 2011, posted by in News - edit_Announcement
January
-
Agram Arena Winter report
24th January 2011, posted by in News - edit_Announcement
2010
November
-
Are you ready for Arena?
28th November 2010, posted by in News - edit_Announcement -
Agram Arena Winter 2010 update!
9th November 2010, posted by in News - edit_Announcement
October
-
Agram Arena Winter 2010!
25th October 2010, posted by in News - edit_Announcement
July
-
New Website!
17th July 2010, posted by Martin Vrkljan in News - edit_Announcement -
Agram Arena Summer 2010
17th July 2010, posted by Marko Paunović in News - edit_Announcement
Latest articles
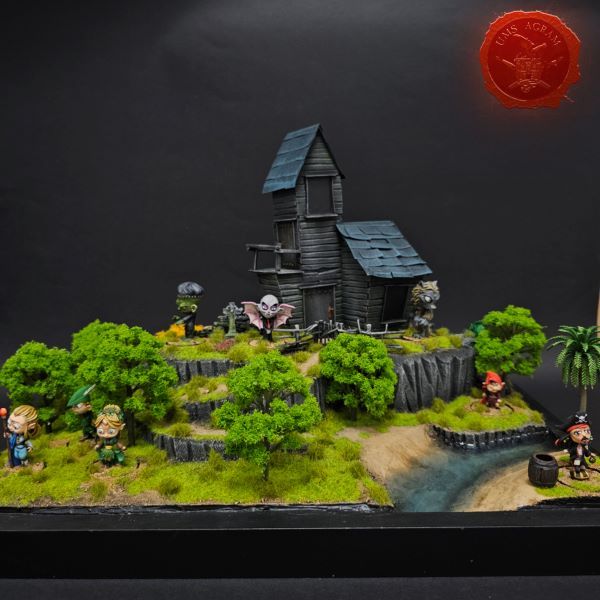
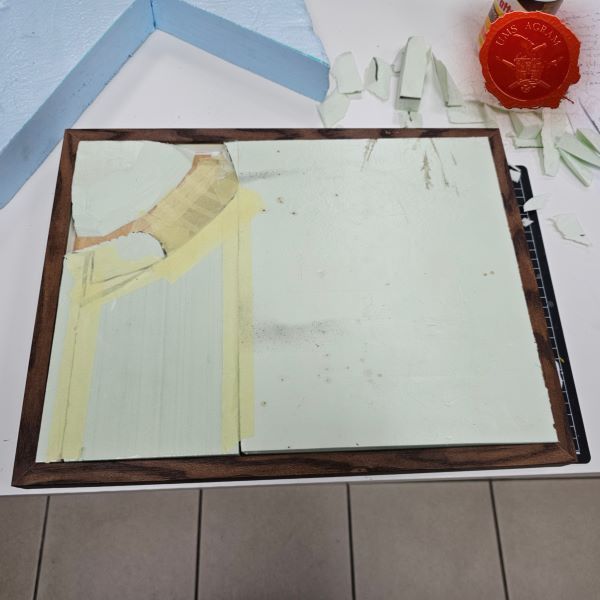
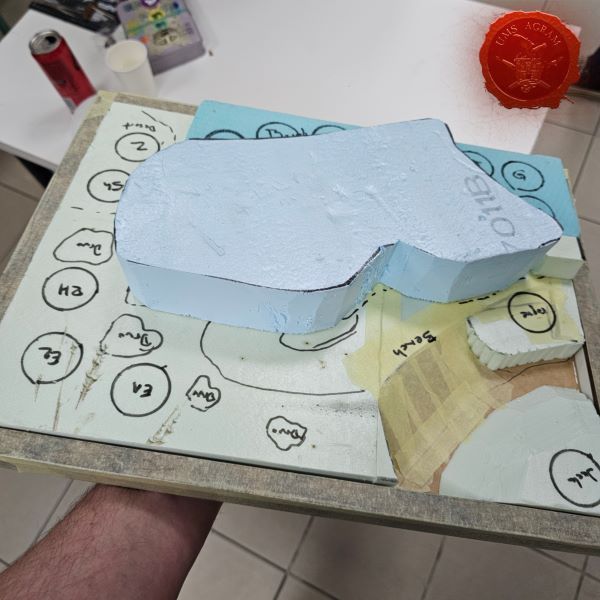
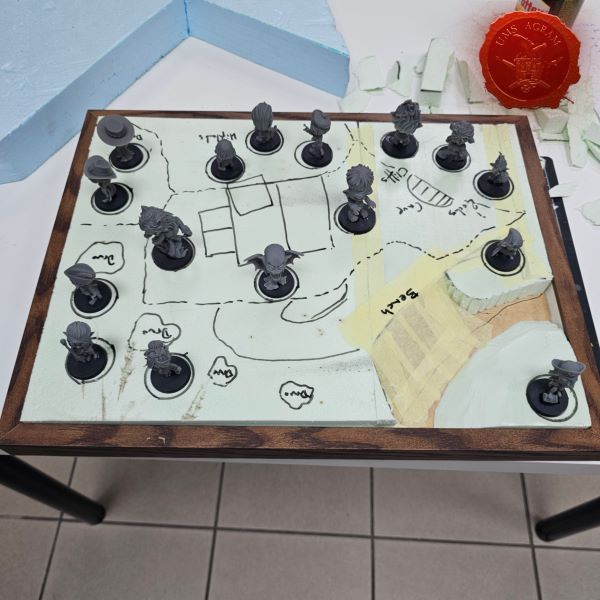
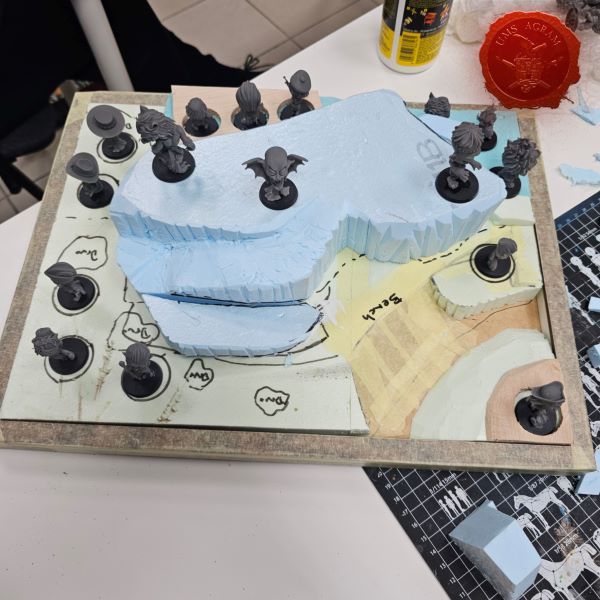
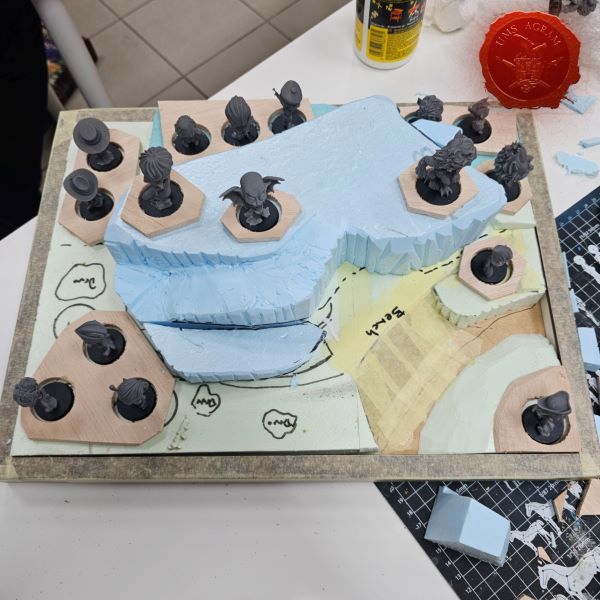
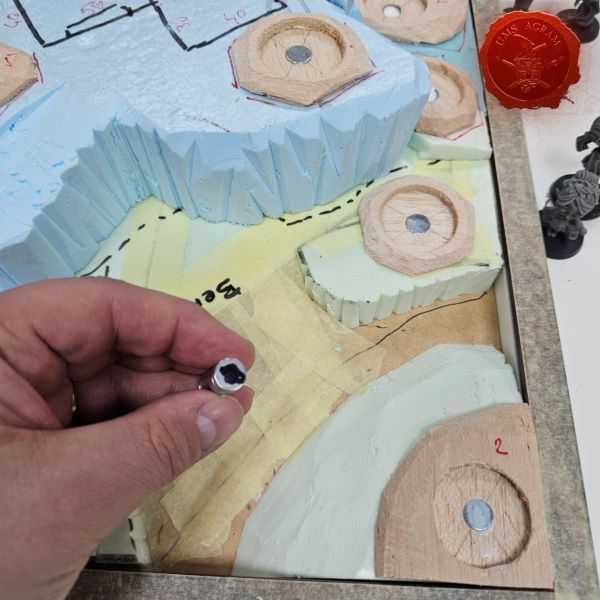
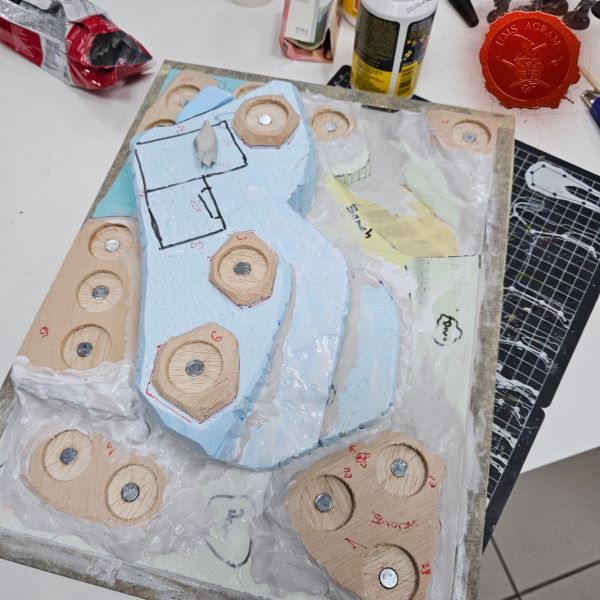
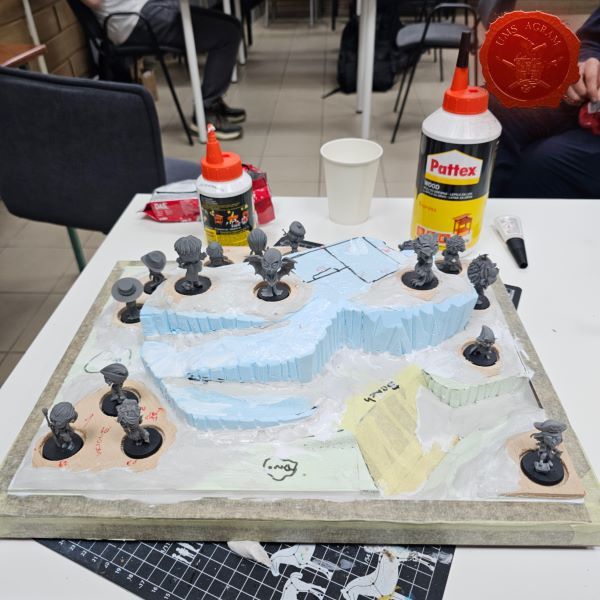
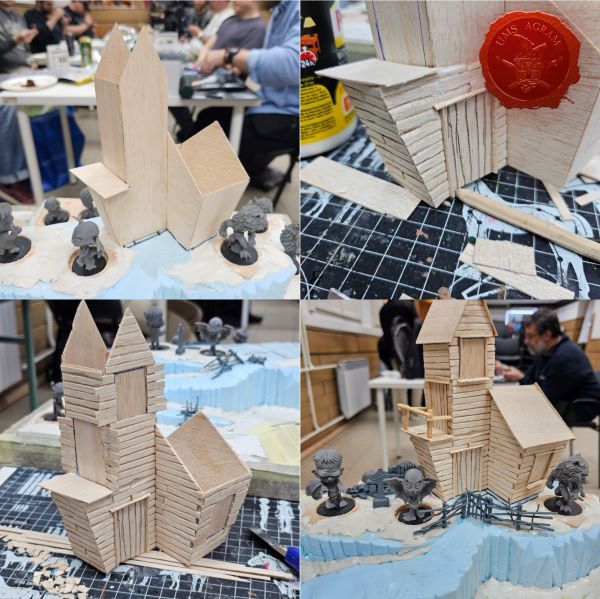
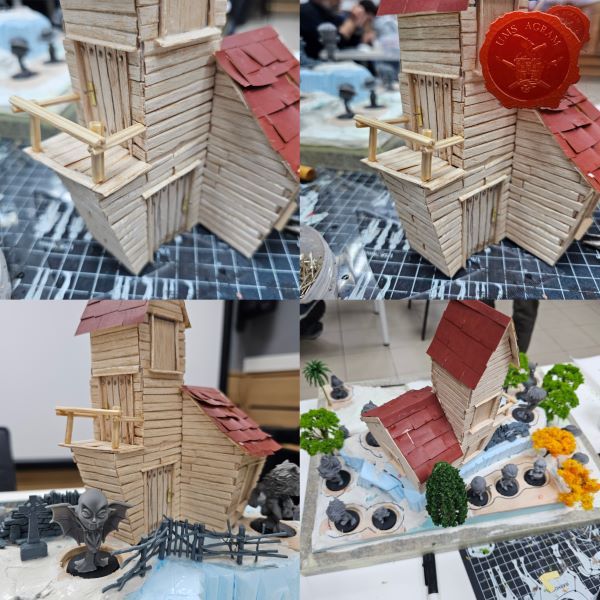
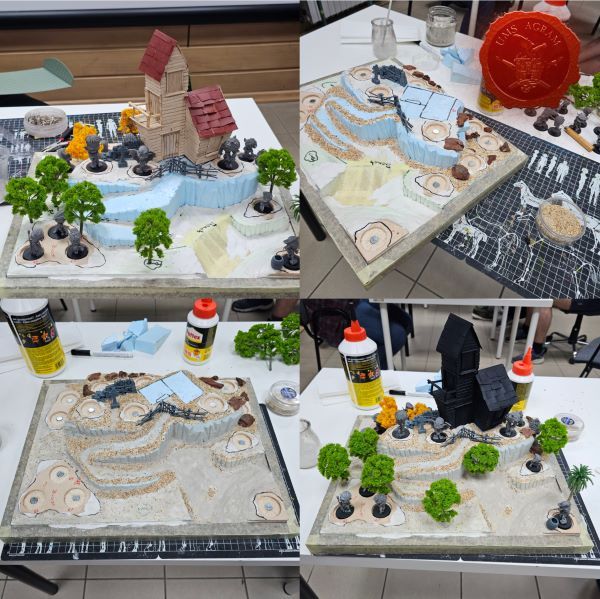
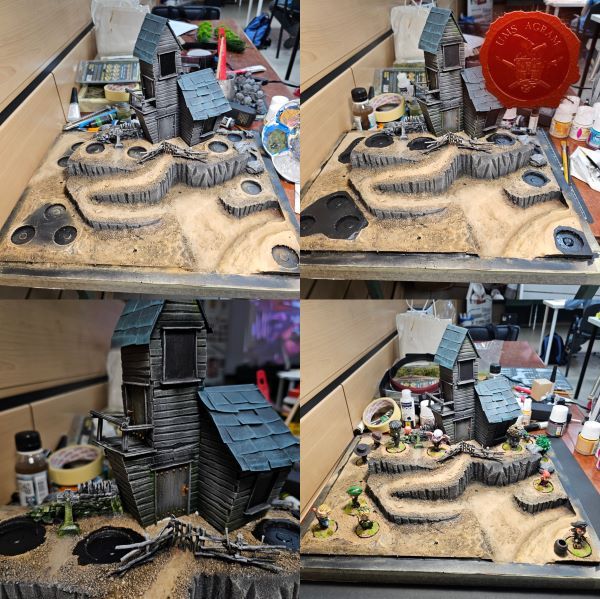
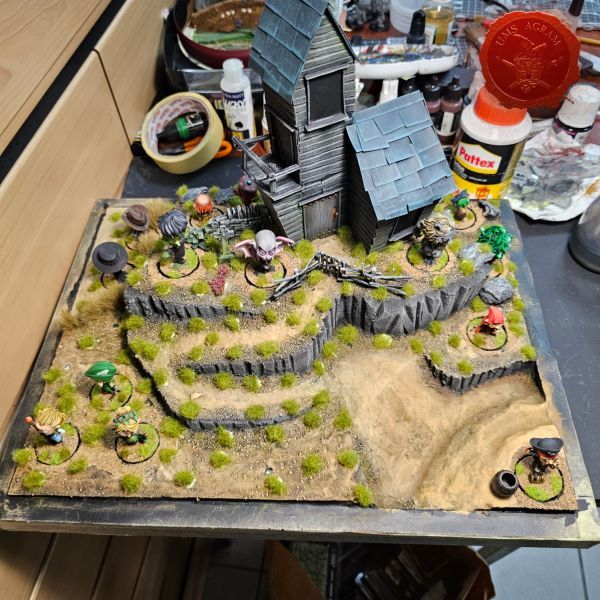
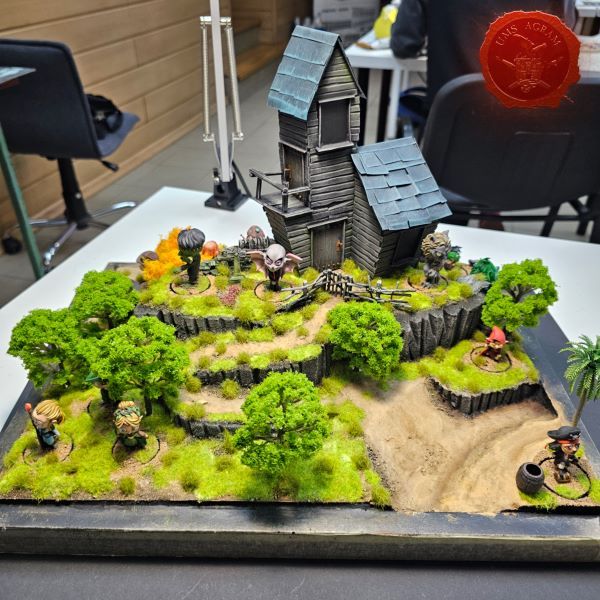
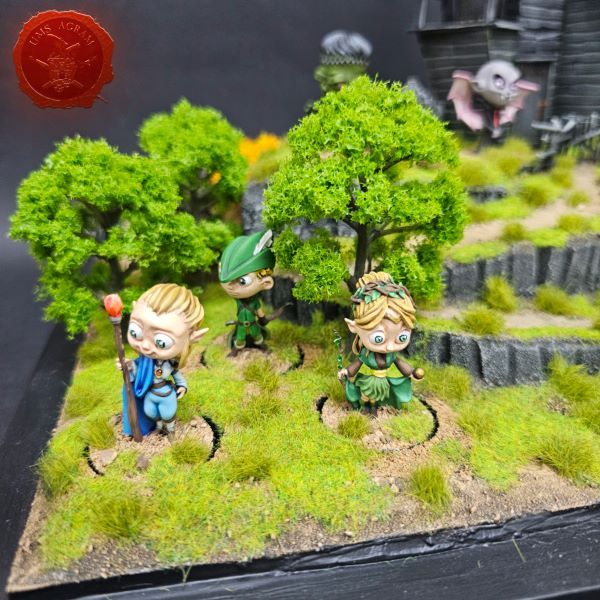
- Building a display base for Agramers v.2 Marko Paunović, 15th July 2026
- Pigmentation principles: Binders and solvents - what holds the paint in place and what allows it to flow Dunja Singer, 13th July 2026
- Pigmentation principles: Density, viscosity and opacity - three different things we call the same name Dunja Singer, 13th July 2026
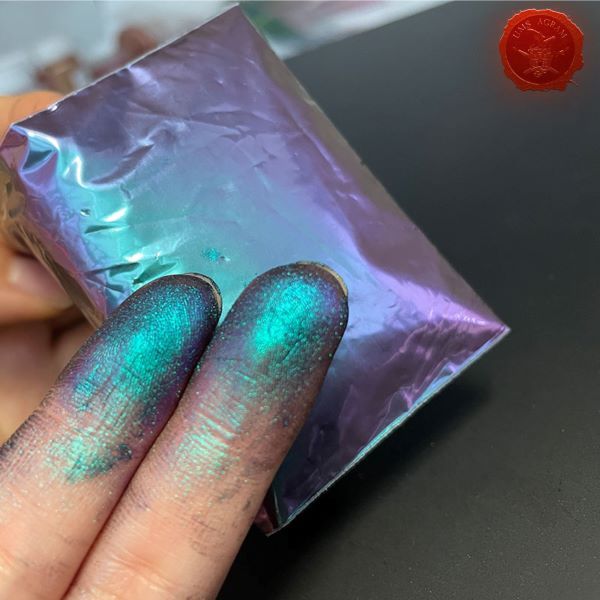
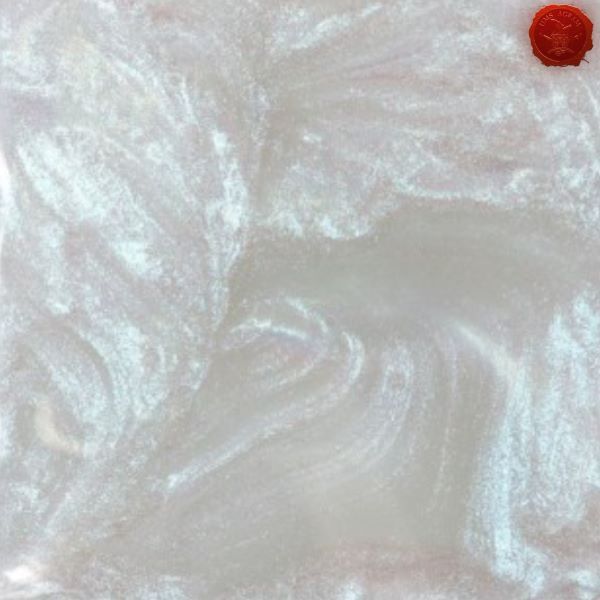
- Pigmentation principles: Pigments and paints with effects – when a color is not only a color Dunja Singer, 13th July 2026
- We attended: Isle of Wonders 2026 Ili Said, 6th July 2026


Latest battle-reports
- Kill Team - Blooded vs. Vespid Stingwings 28th February 2025, GW - Warhammer 40.000, and Antoni Pastuović (Imperial Guard)
- 22nd April 2022, GW - Warhammer 40.000, Borna Pleše (Space Marines) and Kristijan Kliska (Tau Empire)
- 17th November 2021, GW - Warhammer 40.000, and Nino Marasović (Space Marines)