The Bust Saga (part 2)

Goran Krunić, 15th April 2021

Click for enlarged picture

If you are a bit older and from Zagreb, you probably remember Saga o Pičekima? If not, the joke will elude you. Well, hopefully beside the Croatian pun, you will like the rest of this saga. Goran and Marko will take you on a miniature painting journey while they build and paint one and the same bust for their Admin Challenge. Why call it a saga? Because everyone who knows them knows this will take a while to finish.... They chose a bust by Crecy Models that comes in two options – as King Ladislav Jagellone and as Grand Master of Teutonic Order Ulrich von Jungingen. Goran and Marko will do different versions...

Click for enlarged picture

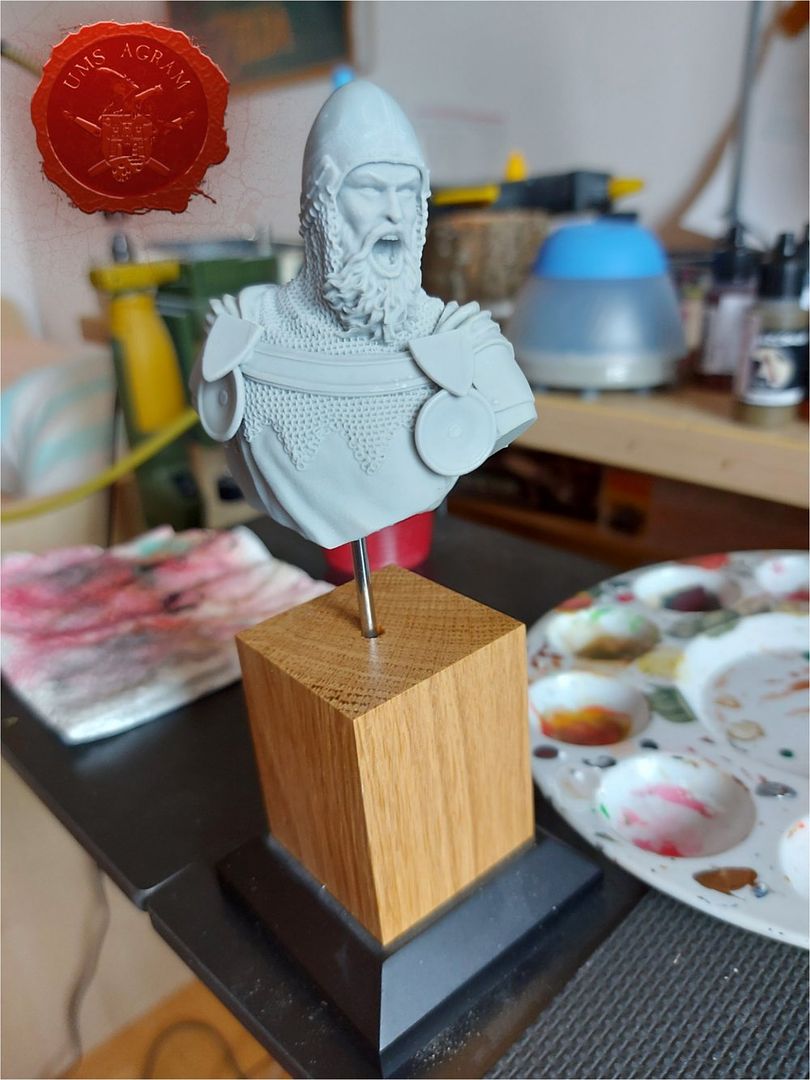
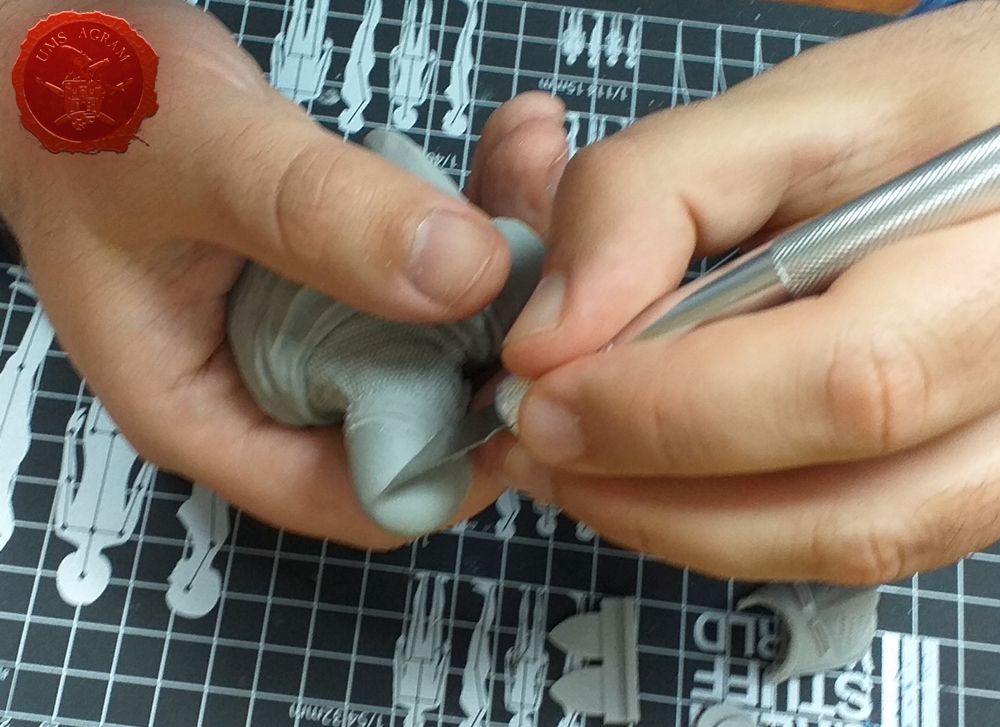
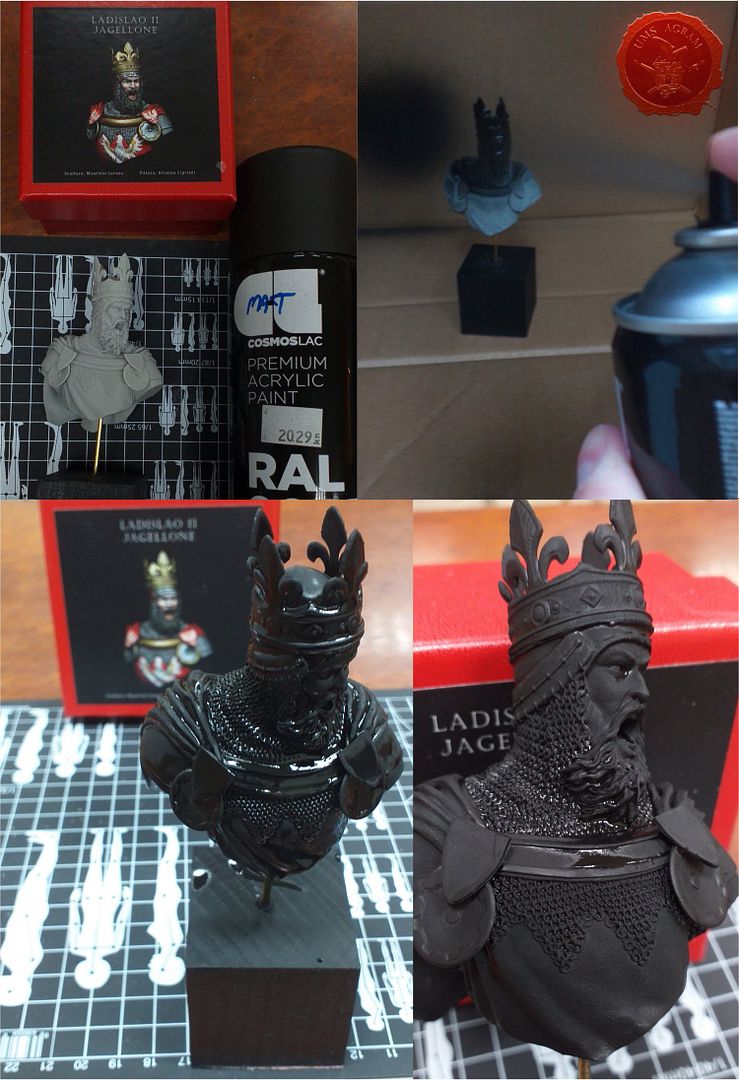
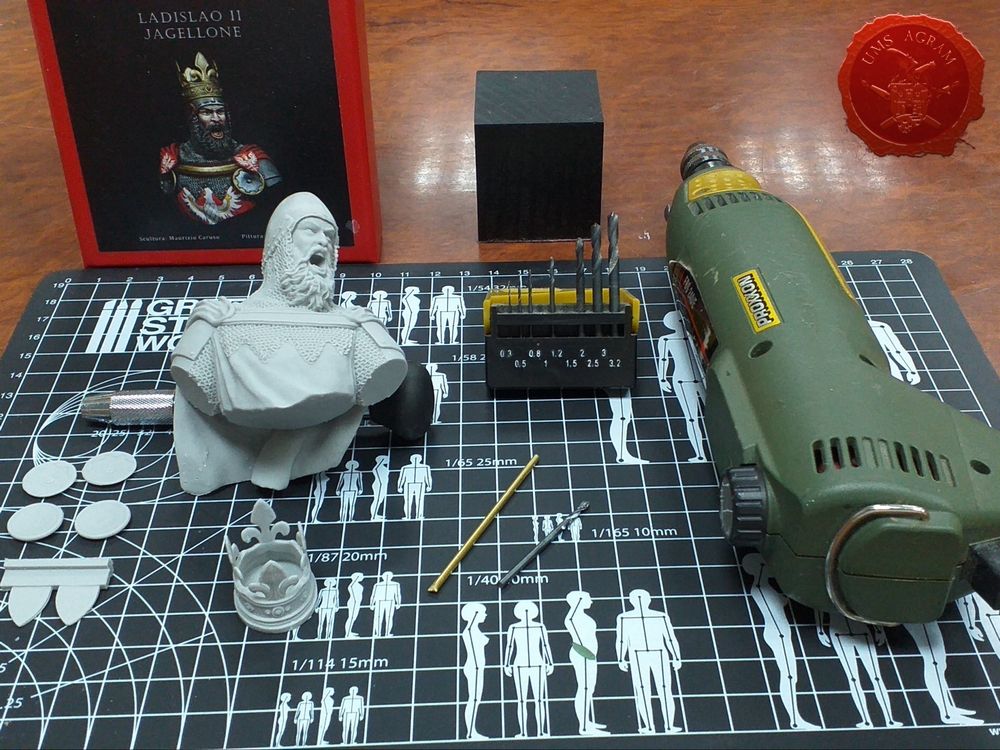
GORAN: The first thing I did today, while still at home, was attaching the bust to a plinth. I cut a piece of steel rod 3mm thick and 5-6cm long, for which I then drilled holes in the bust and on the stand. I drilled both the bust and the stand several times, due to insufficient depth and insufficient vertical drilling angle.
Click for enlarged picture

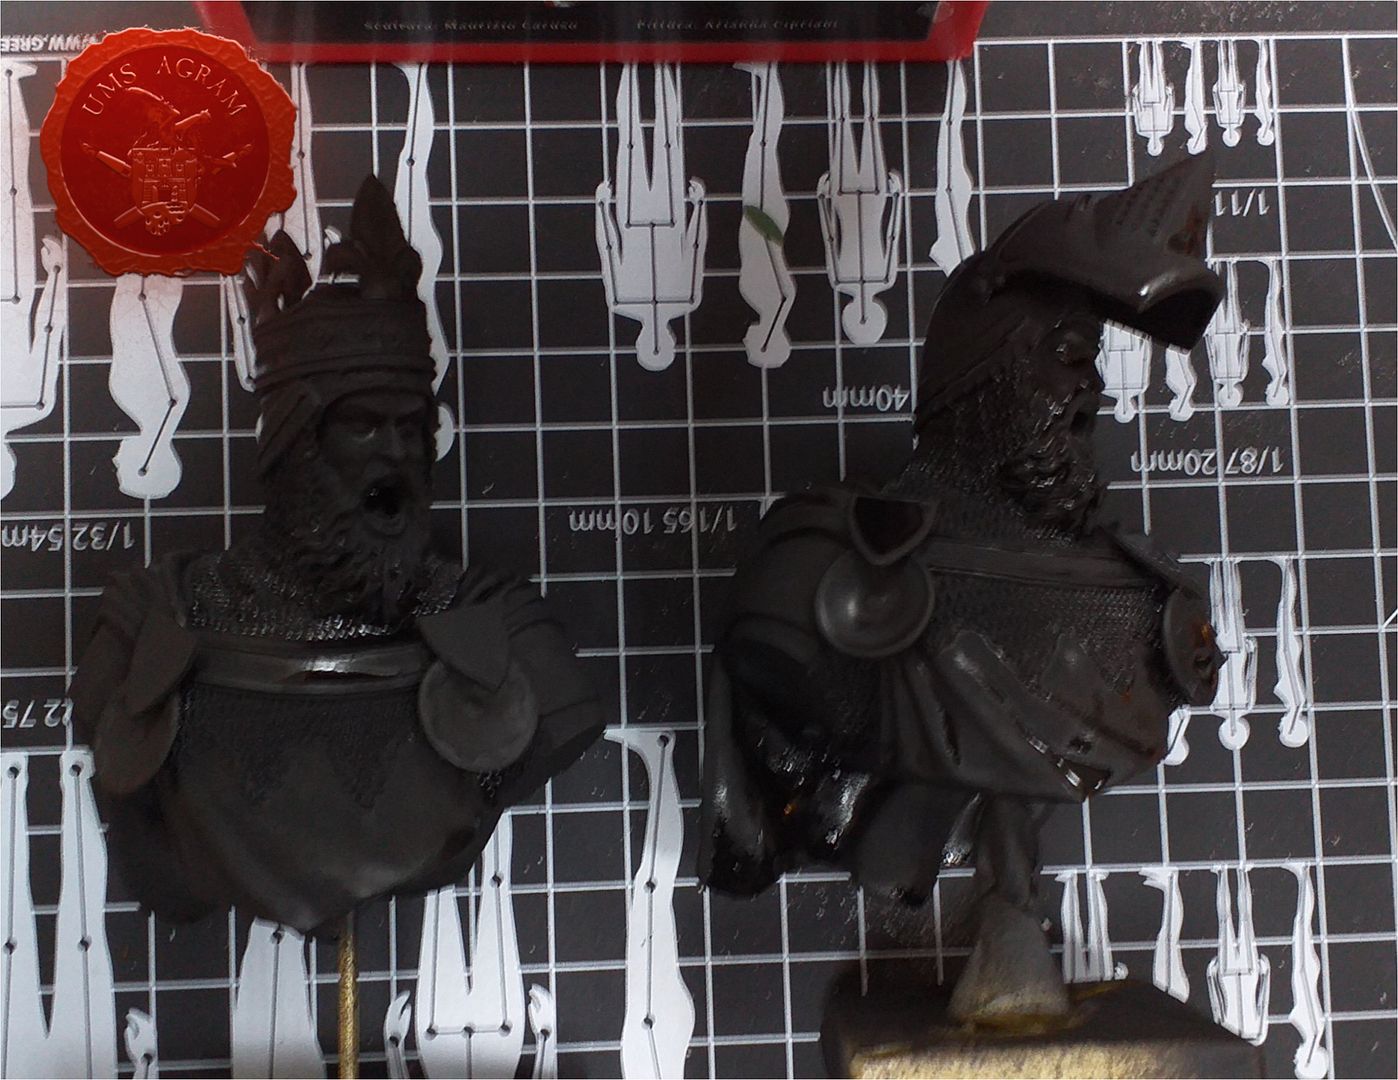
MARKO: Unlike Goran, I fixed my bust to a makeshift base with a makeshift pin so I skipped wrapping the bust in masking tape (he will explain the process) and immediately started spraying. Luckily, I found some old cardboard box in which we could spray at will with an open window for ventilation. We used black spray that I brought from Slunj. It's so matte it's gray: D
Click for enlarged picture

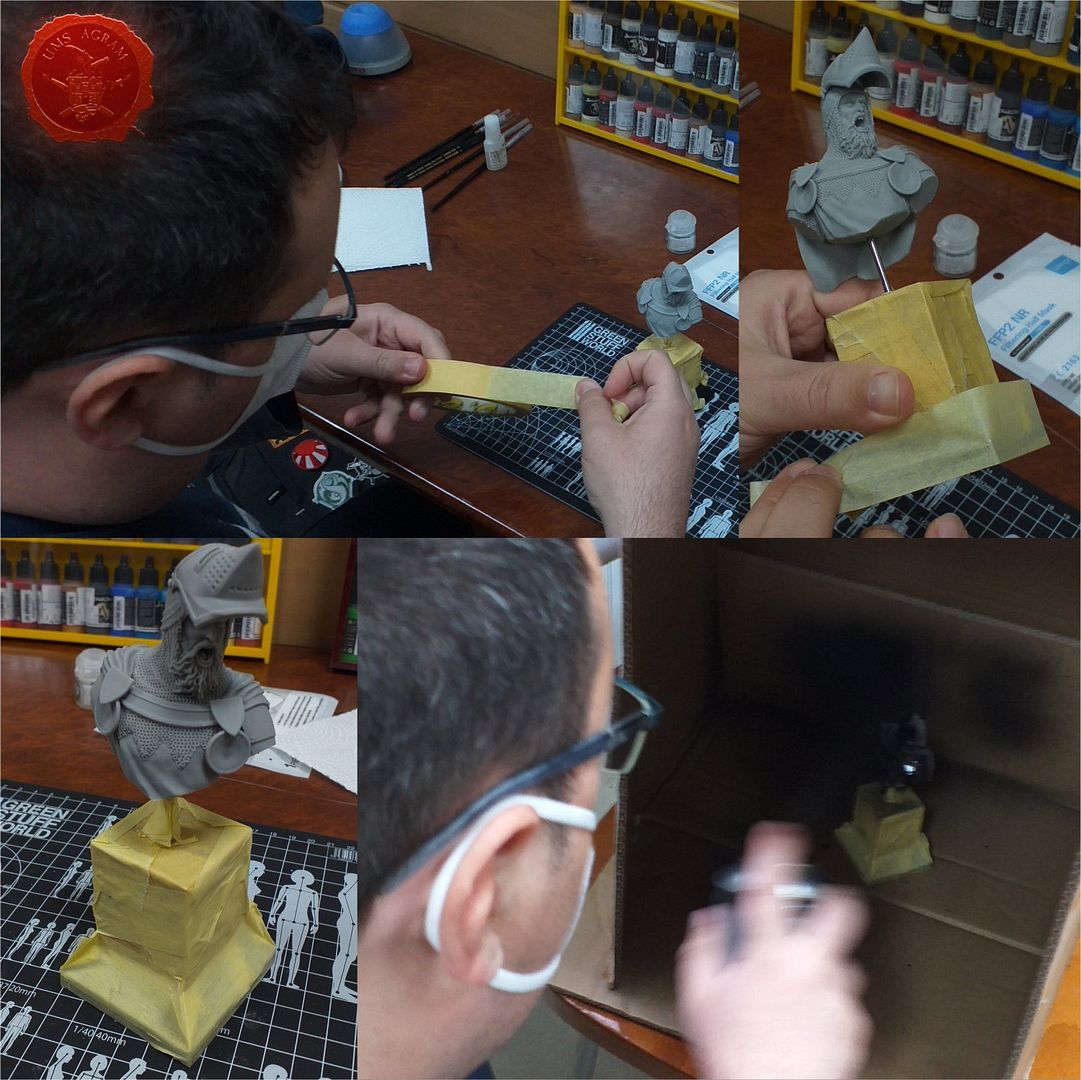
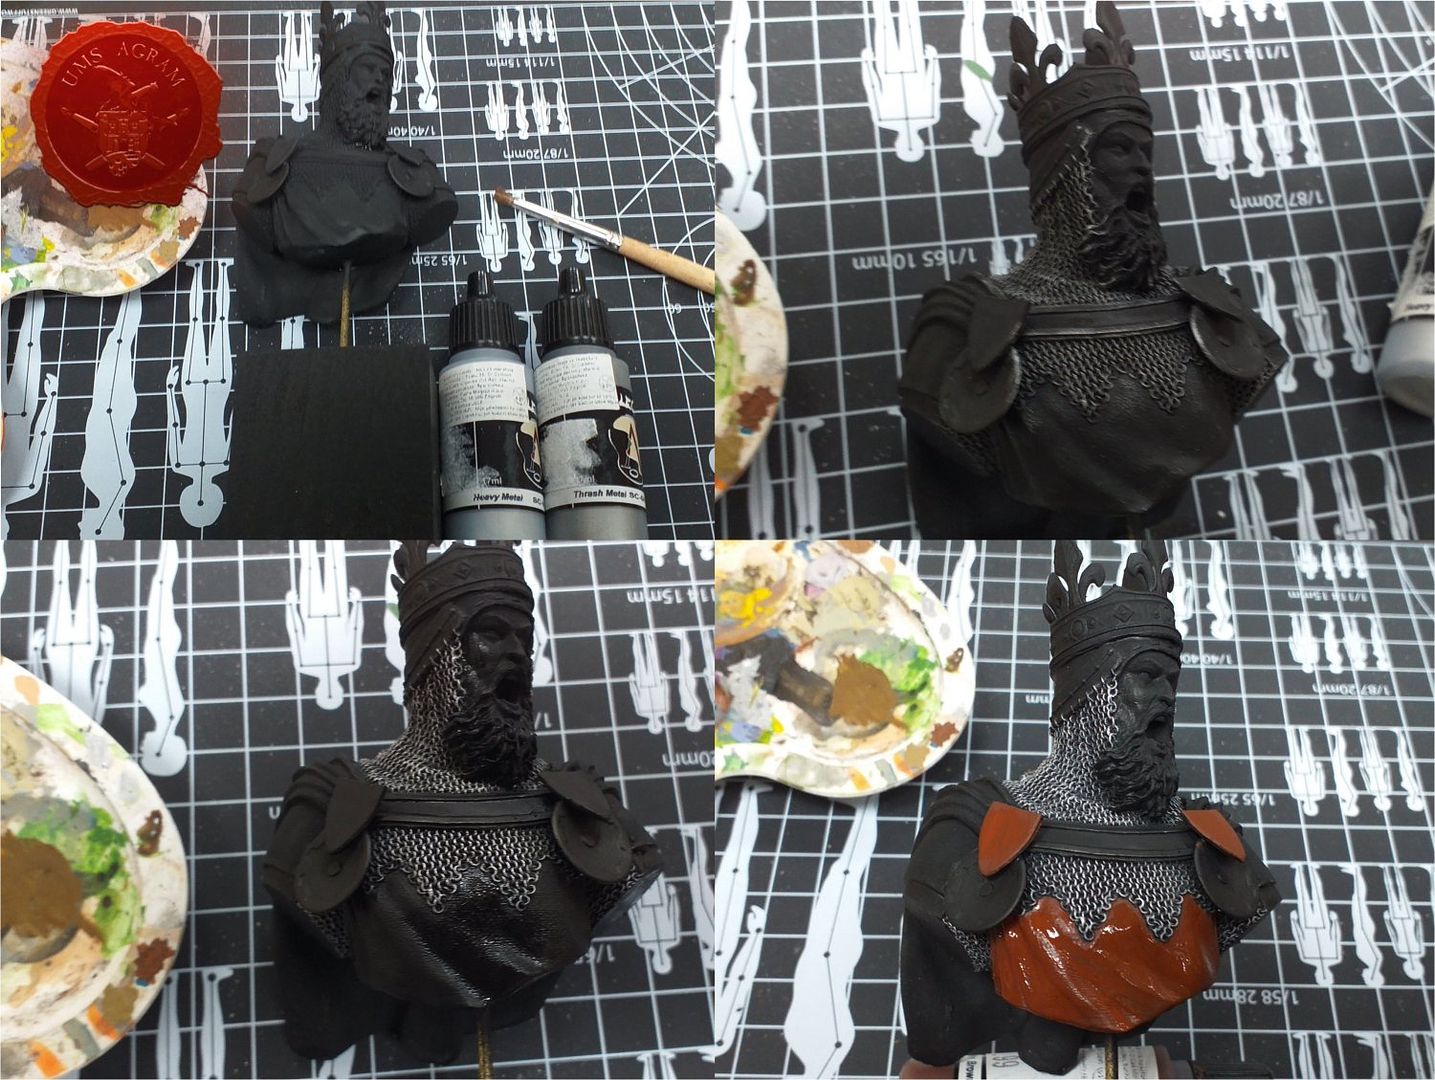
GORAN: Then, immediately after arriving at the hobby corner, I began to protect both the stand and the exposed part of the bar with masking tape. The reason is that I don't want the stand and the bar to turn black when applying the black primer. I applied the basic black layer of paint with even movements, at a distance of 25-30 cm from the miniature, in a box that Marko found and which served excellently to protect the surrounding inventory from paint stains.
Click for enlarged picture

Click for enlarged picture

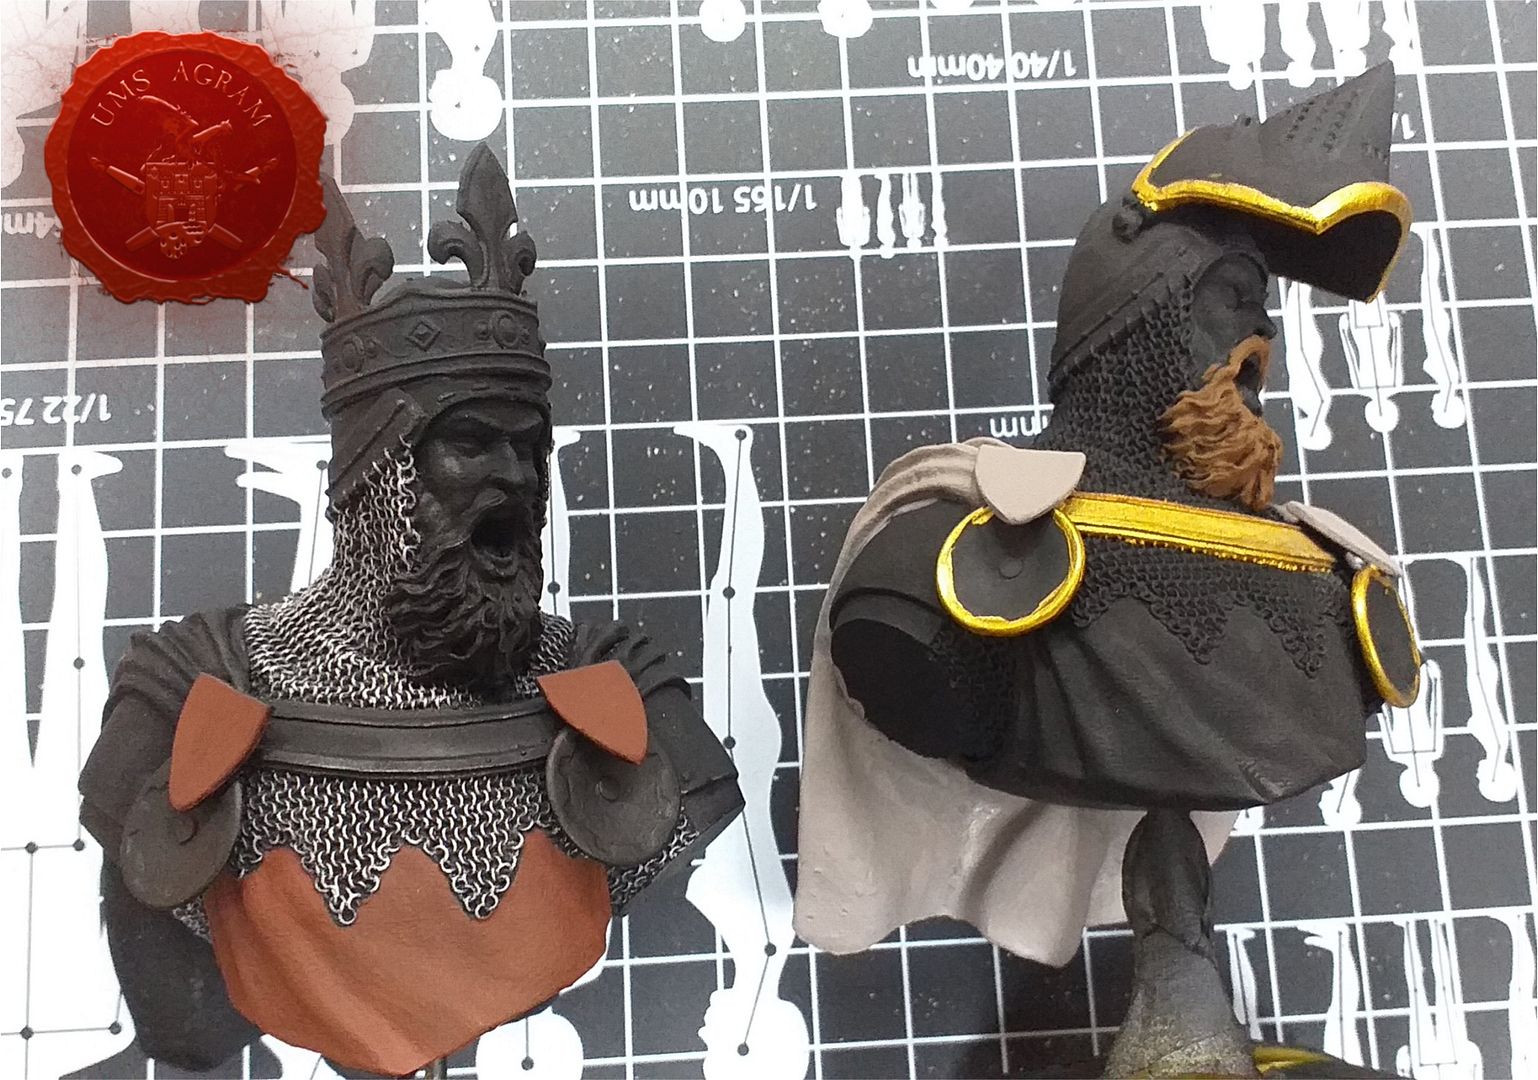
MARKO: The first thing I set out to paint were the messiest parts - in this case chainmail. Two silver colors (S75 Heavy Metal and Trash Metal). I drybrushed first with a darker shade and then with a lighter one. Then I covered everything I messed up over the line with black paint. When it dried, I ran a mixture of brown and red over the robe and shield (cloak holder). These parts will go red as on the boxart. The cloak will certainly not be red. I will still see what color I will put it in (I have to explore a little the coats of arms and colors of Ladislav Jagellone)…
Click for enlarged picture

GORAN: Then I set out to put the basecoat on the Grand Master of the Teutonic Knights. Since I don't have much experience with combining colors or coloring such large scale miniatures, I decided to try to work out the "official" color scheme available on their website as closely as possible (https://crecymodels.com/catalogue/grand- master-ulrich-von-jungingen /). I started with gold details, first I painted the upper rim of the bar on the chest armor in Scale75 Dwarven Gold, and the rest of that part, as well as the edges of the round cloak clasps, and the outer edge of the raised visor in Scale75 Elven Gold.
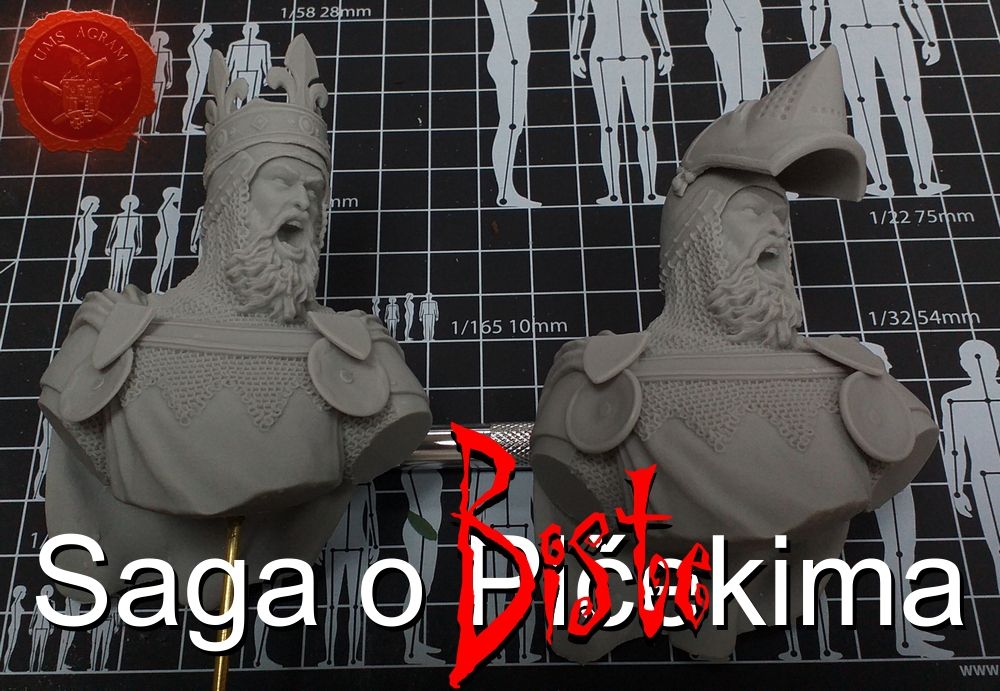
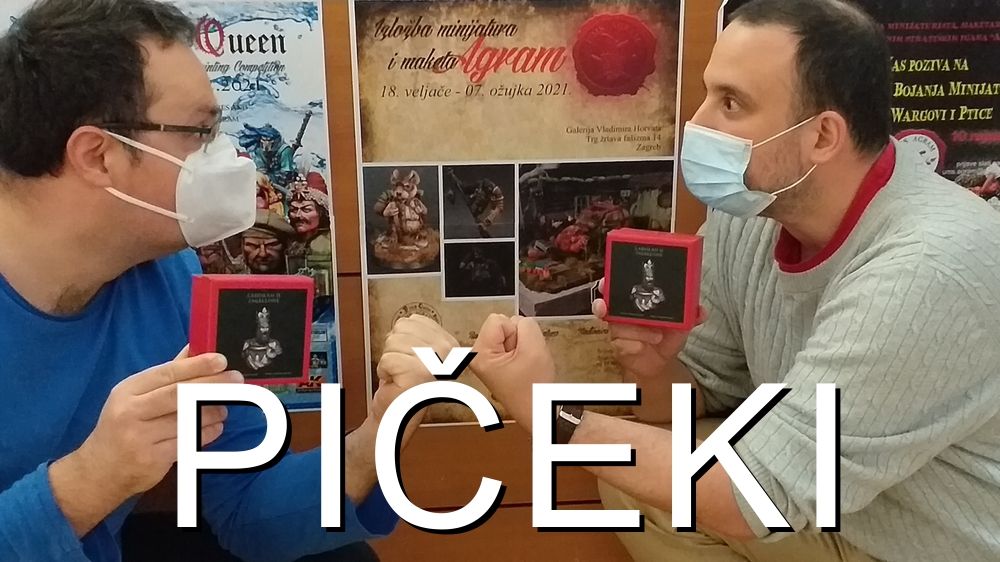
Click for enlarged picture
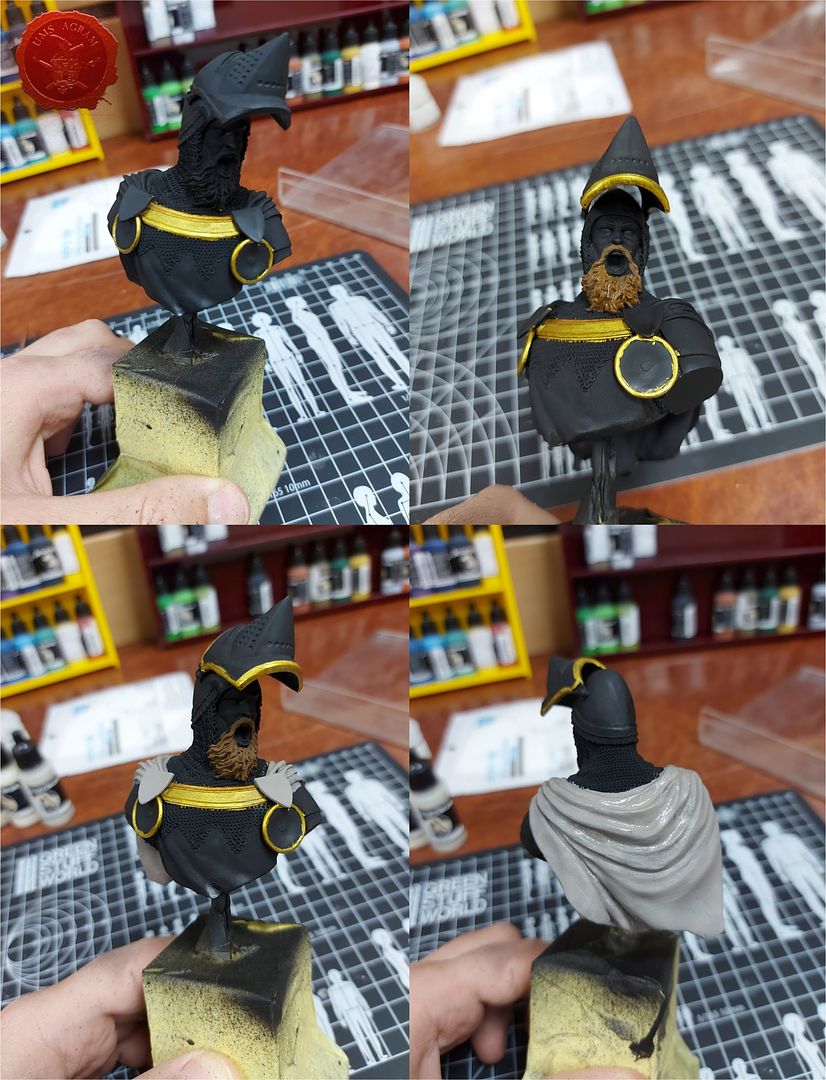
After that I started to paint the beard in Dubai Brown color by Scale75, it is not bad to mention here that some browns (like this one) and gray (Rainy Brown) have a weak consistency, so I do not recommend diluting them at all. Then I went to paint the cloak, the largest surface on this figure, in the aforementioned Rainy Gray, along with the shields above the round cloak buckles. The problem with “whiter” colors is that, due to the finer pigment, their coverage is weaker, so the recommendation of "internet wisdom" is to start with a medium to lighter gray color. All in all, I am satisfied with what has been achieved, although, knowing my patience, ie lack of it, I am most afraid of the cloak and the mentioned shields, since it will require effort because it is a lighter color.

Click for enlarged picture

Latest articles

  • Back to Basics Workshops in Medveščak Library
              array(2) {
      ["Article"]=>
      array(10) {
        ["id"]=>
        string(3) "476"
        ["member_id"]=>
        string(2) "64"
        ["title_eng"]=>
        string(47) "Back to Basics Workshops in Medveščak Library"
        ["title_hrv"]=>
        string(68) "Back to Basics radionice bojanja minijatura u Knjižnici Medveščak"
        ["mask_eng"]=>
        string(45) "back_to_basics_workshops_in_medvescak_library"
        ["mask_hrv"]=>
        string(65) "back_to_basics_radionice_bojanja_minijatura_u_knjiznici_medvescak"
        ["content_eng"]=>
        string(5094) "

    Click for enlarged picture

    During October and November, we held our Back to Basics miniature painting workshops for the youngest at the Zagreb City Libraries.

    Click for enlarged picture

    Click for enlarged picture

    The first set of three workshops was held in the Youth Department of the Medveščak Library on October 2, 9 and 11, 2025.

    Click for enlarged picture

    Click for enlarged picture

    During the workshops, our youngest participants painted chibi figures from the UMS Agram line and made a castle from upcycled materials.

    Click for enlarged picture

    Click for enlarged picture

    Click for enlarged picture

    Click for enlarged picture

    Click for enlarged picture

    Click for enlarged picture

    Click for enlarged picture

    Click for enlarged picture

    More photos can be found on our social media.

    Click for enlarged picture

    " ["content_hrv"]=> string(5118) "

    Click for enlarged picture

    Tijekom listopada i studenog u Knjižnicama Grada Zagreba smo održali naše Back to Basics radionice bojanja minijatura za najmlađe. 

    Click for enlarged picture

    Click for enlarged picture

    Prvi set od tri radionice održan je u Odjelu za mlade Knjižnice Medveščak 2., 9. i 11.10.2025. 

    Click for enlarged picture

    Click for enlarged picture

    Tijekom radionica naši najmlađi polaznici su bojali chibi figure iz linije UMS Agram te izrađivali dvorac od upcycle materijala.

    Click for enlarged picture

    Click for enlarged picture

    Click for enlarged picture

    Click for enlarged picture

    Click for enlarged picture

    Click for enlarged picture

    Click for enlarged picture

    Click for enlarged picture

    Više fotografija potražite na našim socijalnim mrežama!

    Click for enlarged picture

    " ["created"]=> string(19) "2025-10-13 09:20:17" ["modified"]=> string(19) "2025-10-13 09:20:17" } ["Member"]=> array(10) { ["id"]=> string(2) "64" ["group_id"]=> string(1) "1" ["first_name"]=> string(9) "Krunoslav" ["last_name"]=> string(8) "Belinić" ["first_name_mask"]=> string(9) "krunoslav" ["last_name_mask"]=> string(7) "belinic" ["username"]=> string(5) "Kruno" ["password"]=> string(40) "eb3fda45fbec0258e90d809803b10491c548b22f" ["born"]=> string(19) "2015-01-18 09:19:00" ["created"]=> string(19) "2015-01-18 09:20:39" } }
    Krunoslav Belinić, 13th October 2025
  • Gaslands - Tutorial II
              array(2) {
      ["Article"]=>
      array(10) {
        ["id"]=>
        string(3) "475"
        ["member_id"]=>
        string(2) "35"
        ["title_eng"]=>
        string(22) "Gaslands - Tutorial II"
        ["title_hrv"]=>
        string(37) "Gaslands - bojanje autića - nastavak"
        ["mask_eng"]=>
        string(22) "gaslands_-_tutorial_ii"
        ["mask_hrv"]=>
        string(36) "gaslands_-_bojanje_autica_-_nastavak"
        ["content_eng"]=>
        string(5350) "

    Click for enlarged picture

    In this article I will briefly describe how I painted another set of three cars for Gaslands. Same as last time, I started with a black undercoat.

    Click for enlarged picture

    As I decided to keep the colour of the vehicles matt black, I left it at that and proceeded to paint the windshields. Using much the same method I used for the yellow crew, I applied the chosen paint scheme. Unlike blue windshields with the yellow crew, here I decided to use the yellow/red combo.

    Click for enlarged picture

    I then added chrome.

    Click for enlarged picture

    In the end, I added metallic details such as guns etc.

    Click for enlarged picture

    It was time to add the decals. I first painted all the surfaces with gloss varnish. Then I added the decals and after they set properly, I covered everything with Ultra Matt Varnish..

    Click for enlarged picture

    And thus ended the painting process.

    Click for enlarged picture

    GALLERY OF THE TWO FINISHED CREWS

    Click for enlarged picture

    Click for enlarged picture

    Click for enlarged picture

    Click for enlarged picture

    Click for enlarged picture

    Click for enlarged picture

    Click for enlarged picture

    " ["content_hrv"]=> string(5419) "

    Click for enlarged picture

    U ovom ću  članku opisati kako sam obojao drugi set od tri autića za Gaslands demo partije. Kao i prošli puta, krenuo sam s crnim undercoatom. 

    Click for enlarged picture

    S obzirom da sam odlučio da ovaj crew bude mat crn, farbanje karoserija sam tu prekinuo i počeo sam sa staklima. Slično kao i prošli put, koristio sam sličnu shemu, ali u drugim bojama. Za razliku od plavih refleksija na žutim autima, na crnima sam se odlučio za žuto/crvenu kombinaciju. 

    Click for enlarged picture

    Dodao sam krom.

    Click for enlarged picture

    I na kraju dodao metalne dijelove poput oružja.

    Click for enlarged picture

    Na ovim autima, odlučio sam dodati i naljepnice. Prvo sam na površine s naljepnicama stavio gloss lak. Potom sam postavio naljepnicce i nakon što su se dobro osušile sam te iste površine prekrio mat lakom. 

    Click for enlarged picture

    Time sam završio posao...

    Click for enlarged picture

    GALERIJA ZAVRŠENIH RADOVA!

    Click for enlarged picture

    Click for enlarged picture

    Click for enlarged picture

    Click for enlarged picture

    Click for enlarged picture

    Click for enlarged picture

    Click for enlarged picture

    " ["created"]=> string(19) "2025-10-13 07:21:57" ["modified"]=> string(19) "2025-10-13 07:21:57" } ["Member"]=> array(10) { ["id"]=> string(2) "35" ["group_id"]=> string(1) "1" ["first_name"]=> string(5) "Marko" ["last_name"]=> string(9) "Paunović" ["first_name_mask"]=> string(5) "marko" ["last_name_mask"]=> string(8) "paunovic" ["username"]=> string(5) "marko" ["password"]=> string(40) "3bd37b326d19d1880d3b93a4b32e8fb3a90fa122" ["born"]=> string(19) "2033-03-07 20:35:00" ["created"]=> string(19) "2009-06-02 20:37:03" } }
    Marko Paunović, 13th October 2025
  • GASLANDS - tutorial
              array(2) {
      ["Article"]=>
      array(10) {
        ["id"]=>
        string(3) "474"
        ["member_id"]=>
        string(2) "35"
        ["title_eng"]=>
        string(19) "GASLANDS - tutorial"
        ["title_hrv"]=>
        string(43) "GASLANDS - bojanje autića za postapoc igru"
        ["mask_eng"]=>
        string(19) "gaslands_-_tutorial"
        ["mask_hrv"]=>
        string(42) "gaslands_-_bojanje_autica_za_postapoc_igru"
        ["content_eng"]=>
        string(2790) "

    Click for enlarged picture

    In this article I will briefly describe how I painted a set of three cars for Gaslands. I started with a black undercoat and then applied a silver (Leadbelcher) spray as the base color.

    Click for enlarged picture

    Then I used the Rust effect from Dirty Down. Once the effect was dry, I sprayed the cars with a clear matte varnish to protect the layer of rust (which is activated when exposed to moisture). After the spray dried, I applied the Scratches and Heavy Chipping effect from Ammo by Mig Jimenez with a brush. After about fifteen minutes of drying, I sprayed the cars in yellow and let it dry for about 15 minutes. I used a brush to apply water over the cars and used a stiff brush, wooden skewer and cotton swab to remove the excess paint that was activated due to the Scratches and Heavy Chipping effects.

    Click for enlarged picture

    Then came the painting. First I covered all the details that would not be yellow in black. Then I used blue to draw out the reflections on the glass. Added the metal details (engines and weapons). And finally added the chrome effects (using GSW paint). For the very end I left the engine shine effects.

    Click for enlarged picture

    The painting of the cars for Gaslands is now complete.

    Click for enlarged picture

    " ["content_hrv"]=> string(2794) "

    Click for enlarged picture

    U ovom članku ću ukratko opisati kako sam bojao set od tri autića za Gaslands. Krenuo sam sa crnim undercoatom na kojeg sam stavio srebrni (Leadbelcher) sprej kao osnovnu boju.

    Click for enlarged picture

    Potom sam koristio Rust efekt od tvrtke Dirty Down. Kada se posušio efekt, autiće sam posprejao bezbojnim mat lakom da zaštitim sloj hrđe (koja se aktivira u doticaju sa vlagom). Nakon što se sprej osušio, kistom sam nanio Scratches i Heavy Chipping efekt od Ammo by Mig Jimenez. Nakon petnaestak minuta sušenja, autiće sam posprejao u žuto i ostavio da se osuši cca 15 minuta. Kistom sam premazao vodu preko autića i tvrdim kistom, drvenim ražnjićem i štapićem za uši sam uklonio višak boje koji se aktivirao zbog Scratches i Heavy Chipping efekata.

    Click for enlarged picture

    Zatim je uslijedilo bojanje. Prvo sve detalje koji neće biti žuti sam prekrio u crnu boju. Zatim sam izvukao plavom bojom refleksije na staklima. Dodao metalne detalje (motori i oružja). I na kraju dodao krom efekte (koristeći boju tvrtke GSW). Za sami kraj ostavio sam efekte sjaja motora.

    Click for enlarged picture

    TIme je završeno bojanje autića za Gaslands.

    Click for enlarged picture

    " ["created"]=> string(19) "2025-10-02 07:39:25" ["modified"]=> string(19) "2025-10-02 07:39:25" } ["Member"]=> array(10) { ["id"]=> string(2) "35" ["group_id"]=> string(1) "1" ["first_name"]=> string(5) "Marko" ["last_name"]=> string(9) "Paunović" ["first_name_mask"]=> string(5) "marko" ["last_name_mask"]=> string(8) "paunovic" ["username"]=> string(5) "marko" ["password"]=> string(40) "3bd37b326d19d1880d3b93a4b32e8fb3a90fa122" ["born"]=> string(19) "2033-03-07 20:35:00" ["created"]=> string(19) "2009-06-02 20:37:03" } }
    Marko Paunović, 2nd October 2025
  • UMS Agram at CK2025
              array(2) {
      ["Article"]=>
      array(10) {
        ["id"]=>
        string(3) "473"
        ["member_id"]=>
        string(2) "64"
        ["title_eng"]=>
        string(19) "UMS Agram at CK2025"
        ["title_hrv"]=>
        string(42) "UMS Agram na CK2025 u Stubičkim toplicama"
        ["mask_eng"]=>
        string(19) "ums_agram_at_ck2025"
        ["mask_hrv"]=>
        string(41) "ums_agram_na_ck2025_u_stubickim_toplicama"
        ["content_eng"]=>
        string(2737) "

    Click for enlarged picture

    Click for enlarged picture

    Click for enlarged picture

    Click for enlarged picture

    Click for enlarged picture

    Click for enlarged picture

    Click for enlarged picture

    Click for enlarged picture

    For more photos check our social media!

    " ["content_hrv"]=> string(2864) "

    U subotu, 27.9.2025. naši članovi su nastupili na CK2025 u Stubičkim toplicama.

    Click for enlarged picture

    Click for enlarged picture

    Click for enlarged picture

    Click for enlarged picture

    Click for enlarged picture

    Click for enlarged picture

    Click for enlarged picture

    Click for enlarged picture

    Za više fotografija posjetite naše socijalne mreže!

    " ["created"]=> string(19) "2025-10-02 07:28:26" ["modified"]=> string(19) "2025-10-02 07:28:26" } ["Member"]=> array(10) { ["id"]=> string(2) "64" ["group_id"]=> string(1) "1" ["first_name"]=> string(9) "Krunoslav" ["last_name"]=> string(8) "Belinić" ["first_name_mask"]=> string(9) "krunoslav" ["last_name_mask"]=> string(7) "belinic" ["username"]=> string(5) "Kruno" ["password"]=> string(40) "eb3fda45fbec0258e90d809803b10491c548b22f" ["born"]=> string(19) "2015-01-18 09:19:00" ["created"]=> string(19) "2015-01-18 09:20:39" } }
    Krunoslav Belinić, 2nd October 2025
  • UMS Agram at Days of Technical Culture 2025
              array(2) {
      ["Article"]=>
      array(10) {
        ["id"]=>
        string(3) "472"
        ["member_id"]=>
        string(2) "96"
        ["title_eng"]=>
        string(43) "UMS Agram at Days of Technical Culture 2025"
        ["title_hrv"]=>
        string(41) "UMS Agram na 14. danima tehničke kulture"
        ["mask_eng"]=>
        string(43) "ums_agram_at_days_of_technical_culture_2025"
        ["mask_hrv"]=>
        string(39) "ums_agram_na_14_danima_tehnicke_kulture"
        ["content_eng"]=>
        string(6577) "

    Click for enlarged picture

    Click for enlarged picture

    Click for enlarged picture

    Click for enlarged picture

    Click for enlarged picture

    Click for enlarged picture

    Click for enlarged picture

    Click for enlarged picture

    Click for enlarged picture

    Click for enlarged picture

    Click for enlarged picture

    Click for enlarged picture

    Click for enlarged picture

    Click for enlarged picture

    Click for enlarged picture

    Click for enlarged picture

    Click for enlarged picture

    Click for enlarged picture

    Click for enlarged picture

    Click for enlarged picture

    For more photos check our social media!

    " ["content_hrv"]=> string(7407) "

    19. i 20.9. nastupili smo na XIV danima tehničke kulture u Kulturnom centru Dubrava. Dani je organizirala Zagrebačka zajednica tehničke kulture.

    Click for enlarged picture

    Click for enlarged picture

    Na Dane smo došli sa izložbenim prostorom i prostorom za radionice.

    Click for enlarged picture

    Click for enlarged picture

    Click for enlarged picture

    Click for enlarged picture

    Click for enlarged picture

    U sklopu nastupa organizirali smo:

    - predstavljanje Agramera, linije chibi minijatura 

    Click for enlarged picture

    Click for enlarged picture

    - promociju knjige Tabletop Scenery for Beginners 

    Click for enlarged picture

    A s ponosom objavljujemo i da smo za naš rad u 2024. primili godišnju nagradu tehničke kulture dr. Oton Kučera

    Click for enlarged picture

    Click for enlarged picture

    Click for enlarged picture

    Također smo organizirali i besplatne:

    - pokazne demonstracije minijaturističkih tehnika - sculpting i bojanje minijatura u petak 

    Click for enlarged picture

    Click for enlarged picture

    Click for enlarged picture

    Click for enlarged picture

    Click for enlarged picture

    - Back to Basics radionice bojanja minijatura za najmlađe u subotu

    Click for enlarged picture

    Click for enlarged picture

    Za više fotografija posjetite naše socijalne mreže!

    " ["created"]=> string(19) "2025-09-23 08:18:45" ["modified"]=> string(19) "2025-09-23 08:20:36" } ["Member"]=> array(10) { ["id"]=> string(2) "96" ["group_id"]=> string(1) "2" ["first_name"]=> string(6) "Antoni" ["last_name"]=> string(10) "Pastuović" ["first_name_mask"]=> string(6) "antoni" ["last_name_mask"]=> string(9) "pastuovic" ["username"]=> string(6) "antoni" ["password"]=> string(40) "5dfa823ee30df1936c1792d4c8348a4bcf4c64e2" ["born"]=> string(19) "2005-04-04 18:52:00" ["created"]=> string(19) "2019-04-04 18:53:09" } }
    Antoni Pastuović, 23th September 2025

All articles

Latest battle-reports

All battle-reports