Agram Group Build Project #1 (part 3)

Marko Paunović, 30th September 2021

Click for enlarged picture

In this series of articles, we will follow our Goran, Kruno and Marko in the making of a diorama set in New York / Gotham in the mid-1980s. Diorama is being built as part of a new UMS "Agram" project called Agram Group Build, which was created after the trio discussed joint projects to be done on Wednesdays and how cool it would be to gather more people to work on something together… This gave birth to the idea of Group Builds... The idea is for everyone to do something on each of these three projects - the main rule (except that there are no rules) is not to mess with other people's work. That we all participate and make some kind of Frankenstein monster ...

Click for enlarged picture

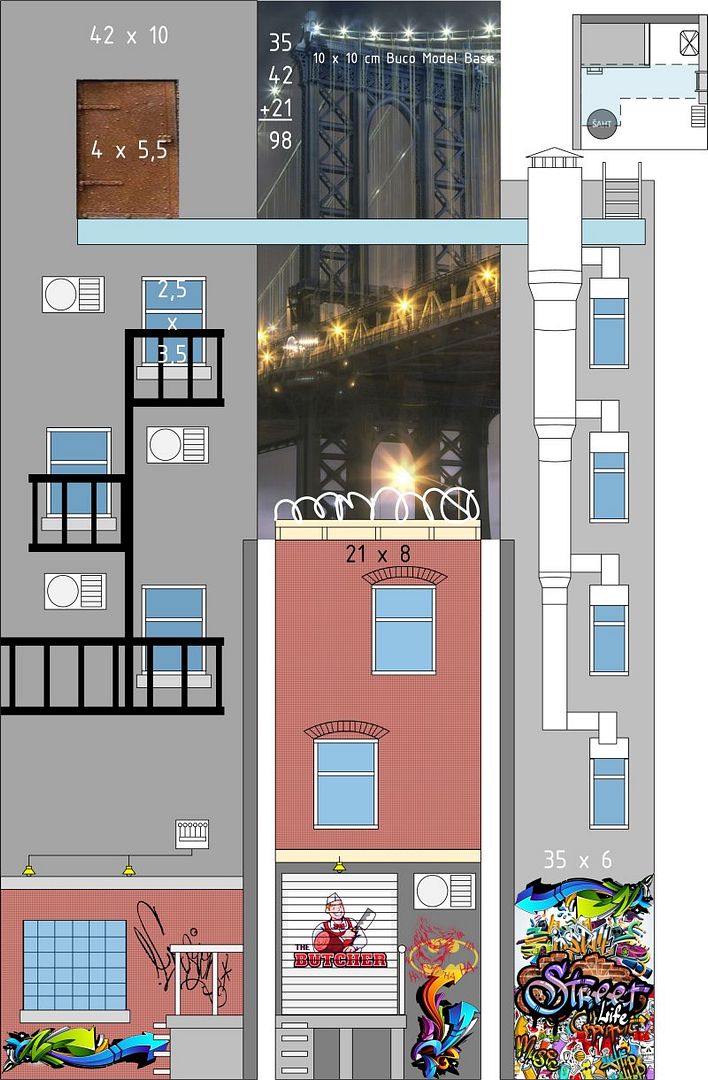
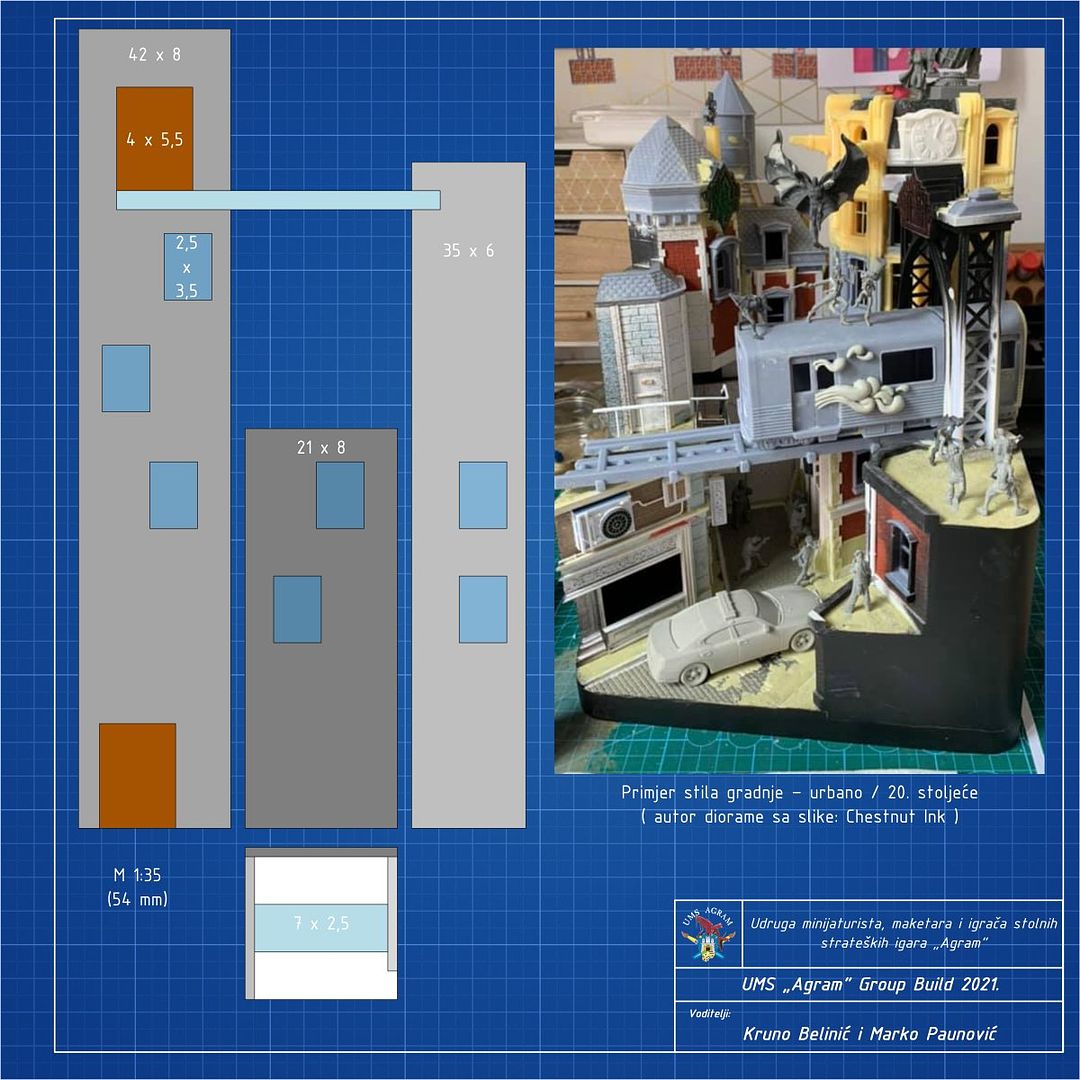
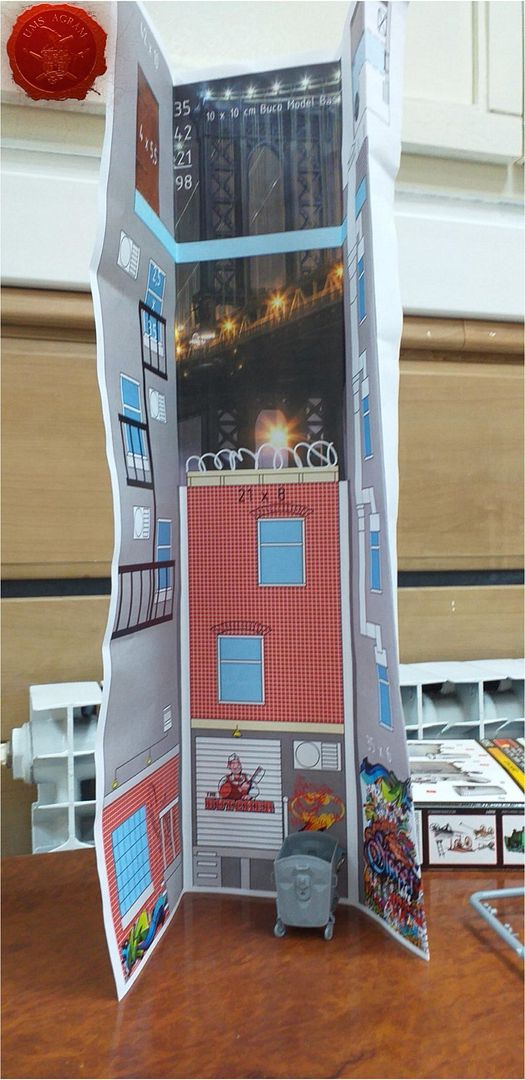
MARKO: For this meeting, only I had homework, and that was to include all the agreed changes in the draft, which I did and brought a couple of printed copies of the new draft. Each time we meet, we analyze the design a little and add new details. At this stage, this is important because a good design will result in a quality mould for casting walls that must have well-designed holes for windows and doors to make our job easier after casting, and before adding all the details. Of the changes I made, the most important was to reduce the width of the platform for the entrance to the butcher's shop so that a garbage container would fit next to it and the right wall. I also designed a walkway between the left and right buildings so that the ventilation pipes fit. Also, elements of window panes that Kruno drew last time have been added.
Click for enlarged picture
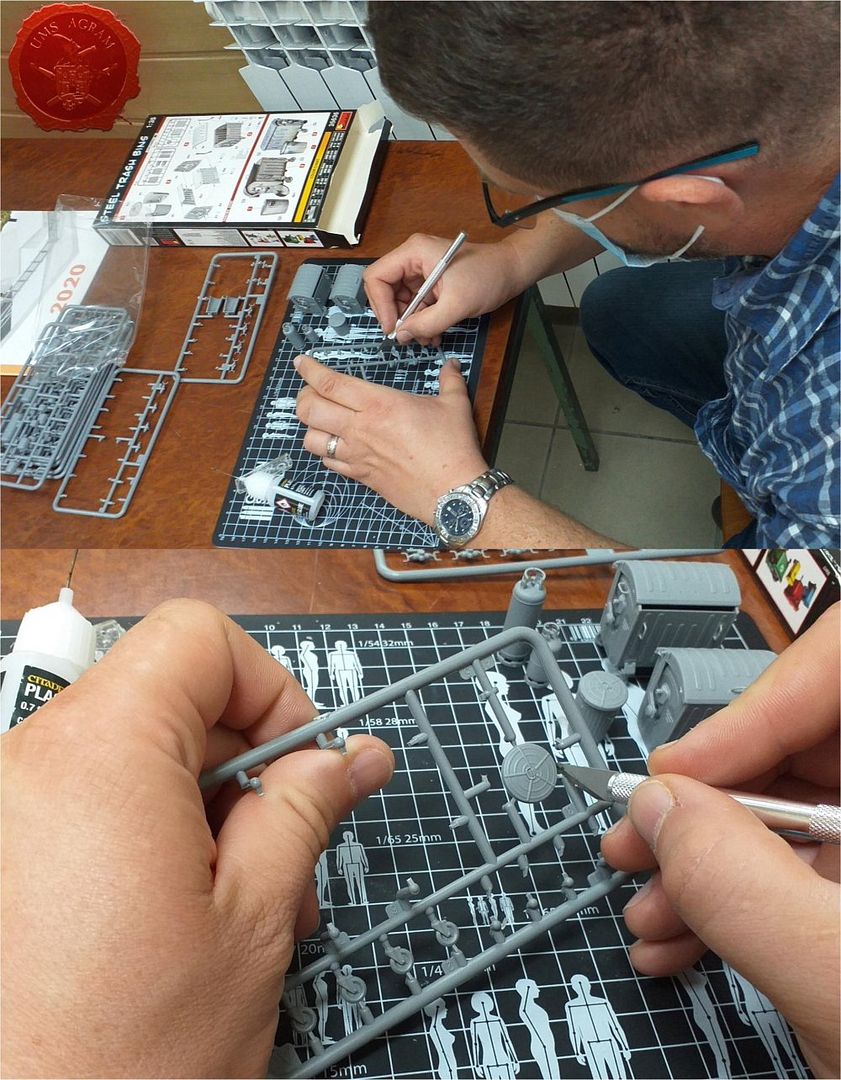
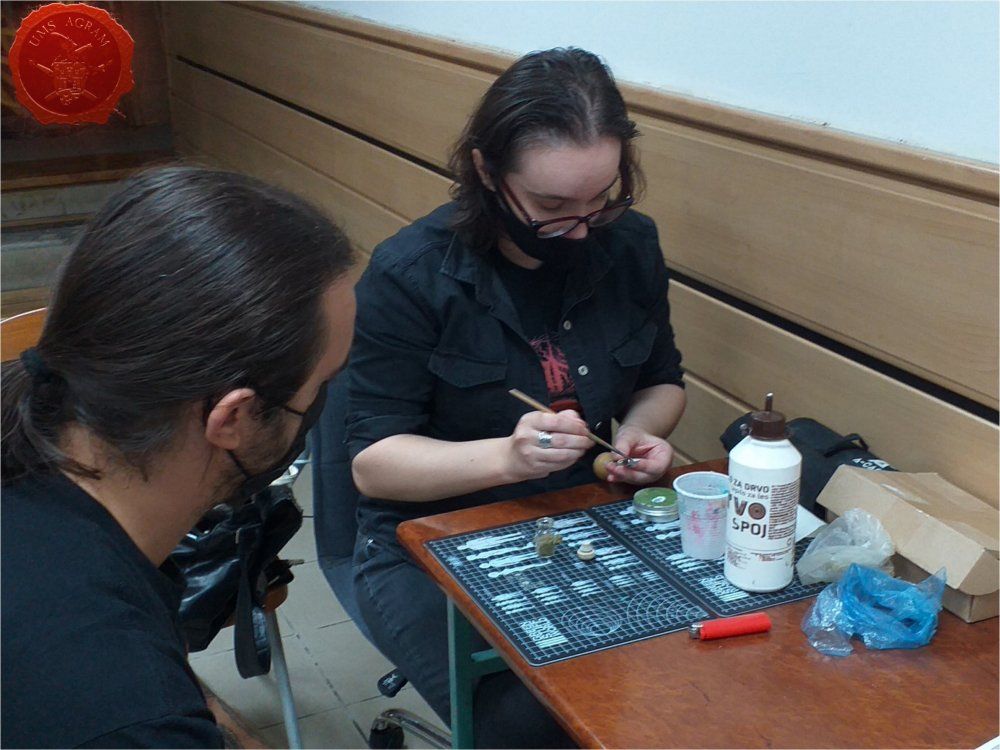
And then we persuaded a new member of the group, Dalibor, to continue building trash cans and gas bottles, and we turned to Ana's lecture on sculpting, which Domagoj won at the last competition of the Miniature Painters Croatia group.
Click for enlarged picture

DOMAGOJ: First of all, I would like to thank Agram for organizing the MPC competition where I won a greenstuffing workshop with my mentor Ana Polanščak.
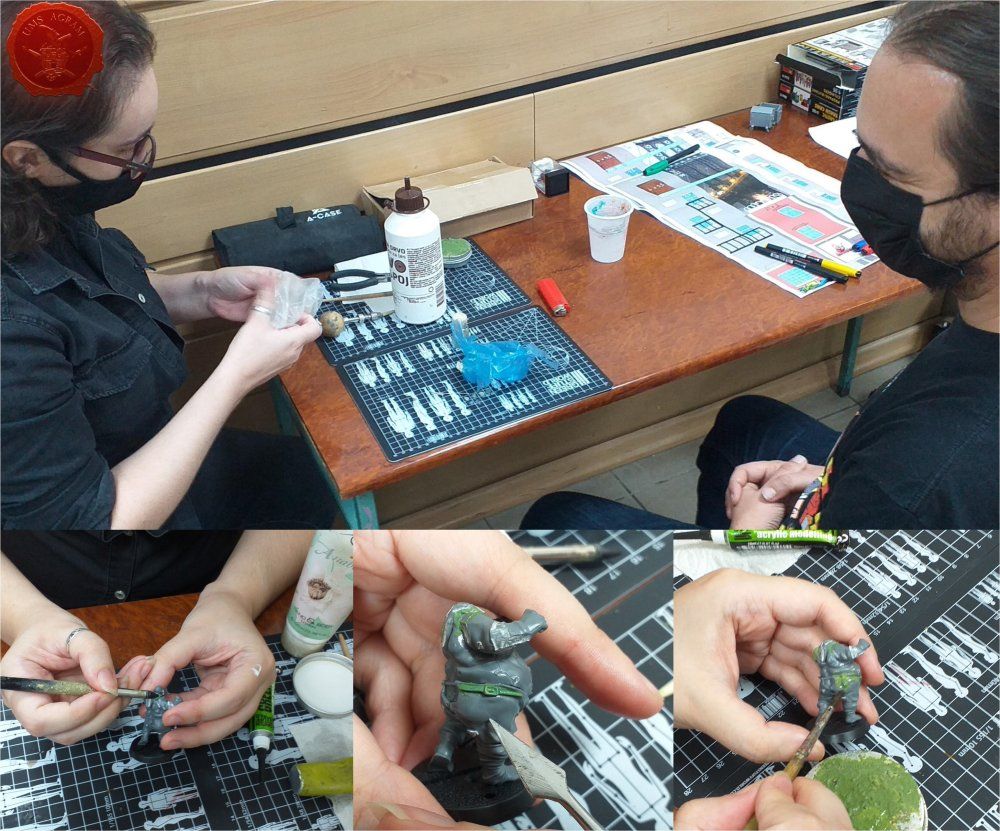
The first topic we went through at the workshop was blending parts of the miniatures with greenstuff. During conversions, we often have holes and gaps that we fill with greenstuff. It is important to blend the joint well, most simply by using a lubricated silicone brush, so that the transition is imperceptible. On my first conversion, I had difficulty drawing textures, such as the edge on armor, textiles, etc., and Ana demonstrated to me how I can easily get the desired effect with a metal tool from the image.
We used the same tool for modeling belts and belt buckles. With a thin and long strip of greenstuff, we placed the belt in the desired position, and we straightened it and removed the excess material with a metal tool. When we were happy with the belt, we let it harden, and then added a small amount of greenstuff to it. With a metal tool, we leveled and shaped the additional material into a rectangle, and carefully drew and shaped the inside of the buckle.
Click for enlarged picture
Impressed by the results provided by the metal tool, I asked Ana how we can model simple objects. I was interested in how to make simple handbags, and Ana showed me how to make rectangular handbags, like compartments on a bandolier. Unlike the straps, which we shape on the figurine, these bags are modeled on the desktop. After obtaining a rectangular shape, we cut a line that separates the lid from the base of the bag. We make a slight indentation on the lid and add a very small amount of material, to simulate the shots held by the lid and the pressure it creates on the lid of the bag.
Round bags, pouches, are modeled on the figure itself. We start with the basic form by preparing the material into a teardrop shape. When we set the bag in the desired position, we do the separation of the upper and lower part of the bag, to simulate the place where the bag is attached to the figure. Using this location as a reference, we draw and shape the folds and creases in the material, which are narrowest at the site of fixation, and widest at the ends of the bag. We carefully flatten the bag itself, in order to get the effect of tightening it to the body. The upper part of the bag, on which the opening is, is also shaped. We can draw the opening so that it looks like the opening of the bag is outwards, or we can draw the folds to let it be known that this part of the material is not as taut as the lower part of the bag. Finally, we can add a greenstuff to model the rope or strap that holds the bag in place.
Ana's instructions were very useful and I hope to try modeling on my own as soon as possible.
Click for enlarged picture

Feel free to contact us here if you are interested! We are every Wednesday from 8 pm to 10 pm in KD ZZTK on Trg žrtava fašizma 14.

Latest articles

  • Roman Shield Freehand
              array(2) {
      ["Article"]=>
      array(10) {
        ["id"]=>
        string(3) "385"
        ["member_id"]=>
        string(2) "35"
        ["title_eng"]=>
        string(21) "Roman Shield Freehand"
        ["title_hrv"]=>
        string(37) "Iscrtavanje rimskog štita (freehand)"
        ["mask_eng"]=>
        string(21) "roman_shield_freehand"
        ["mask_hrv"]=>
        string(34) "iscrtavanje_rimskog_stita_freehand"
        ["content_eng"]=>
        string(3759) "

    I will use this article to describe the process of drawing a Roman shield for 54mm miniatures. I won’t be going into the process of painting the basic colours of the shield, just concentrating rather on the freehand itself.

    Click for enlarged picture

    I found the design that I liked on the internet. I planned to recreate that design with minor changes. The first step was to draw the basic shape with a graphite pen.

    Click for enlarged picture

    Then, using a darkest shade follow the lines drawn by pen to make the basic shapes. Once, done, fill those shapes with the same paint.

    Click for enlarged picture

    Check your reference and correct if need be.

    Click for enlarged picture

    Afterwards, using the ligher shade begin drawing smaller shapes within the darker areas to get the contours of your design.

    Click for enlarged picture

    Start by drawing the simplest shapes so your hand picks up the motions subconsciously finish with the more complex (wings). Watch out that your shapes (wings for instance) have the same number of elements (feathers).

    Click for enlarged picture

    Next layer was the first highlight. Similar to the previous step, start drawing the simplest shapes.

    Click for enlarged picture

    When you finish with this step, check if you are happy with the depth of your freehand. I wasn’t so I continued with the work.

    Click for enlarged picture

    Using a wash, I added further shadows simulating and accentuating the curvature of the shield.

    Click for enlarged picture

    In the end, I added the final highlights.

    Click for enlarged picture

    " ["content_hrv"]=> string(3834) "

    U ovom ću članku ukratko opisati proces kojim sam iscrtao rimski štit u 54mm mjerilu. Ovdje neću objašnjavati bojanje same crvene površine štita, već samo kako sam izradio freehand.

    Click for enlarged picture

    Na internetu sam pronašao dizajn koji mi se svidio i kojeg ću uz manje modifikacije pokušati replicirati. Prvi korak je bio iscrtavanje osnovnih oblika običnom olovkom.

    Click for enlarged picture

    Zatim, najtamnijom bojom prateći linije iscrtane olovkom nacrtajte osnovne oblike te potom popunite bojom oblike.

    Click for enlarged picture

    Pogledajte vaš dizajn i prema potrebi korigirajte oblik.

    Click for enlarged picture

    Potom, svjetlijom nijansom krenite iscrtavati manje oblike unutar tamnijih ploha kako biste dodali obrise vašeg dizajna.

    Click for enlarged picture

    Krenite sa jednostavnijim oblicima i kad vam iscrtavanje “uđe” u ruku, završite sa složenijim (krila). Pri tome, pazite da imate jednak broj elemenata (npr. Pera) po svakom obliku (krilu).

    Click for enlarged picture

    Sljedeći sloj je prvi highlight. Slično kao i u prethodnom koraku, krenite sa iscrtavanjem sa jednostavnijim oblicima.

    Click for enlarged picture

    Kad završite, provjerite da li ste zadovoljni sa “dubinom” vašeg freehanda. Ja nisam bio sasvim pa sam nastavio sa radom.

    Click for enlarged picture

    Koristeći wash, dodao sam dodatne sjene – simulirajući i naglašavajući zakrivljenost površine štita.

    Click for enlarged picture

    I na kraju sam dodao završne highlighte.

    Click for enlarged picture

    " ["created"]=> string(19) "2024-05-16 06:59:04" ["modified"]=> string(19) "2024-05-16 06:59:04" } ["Member"]=> array(10) { ["id"]=> string(2) "35" ["group_id"]=> string(1) "1" ["first_name"]=> string(5) "Marko" ["last_name"]=> string(9) "Paunović" ["first_name_mask"]=> string(5) "marko" ["last_name_mask"]=> string(8) "paunovic" ["username"]=> string(5) "marko" ["password"]=> string(40) "3bd37b326d19d1880d3b93a4b32e8fb3a90fa122" ["born"]=> string(19) "2033-03-07 20:35:00" ["created"]=> string(19) "2009-06-02 20:37:03" } }
    Marko Paunović, 16th May 2024
  • How to pin a bust
              array(2) {
      ["Article"]=>
      array(10) {
        ["id"]=>
        string(3) "384"
        ["member_id"]=>
        string(2) "64"
        ["title_eng"]=>
        string(17) "How to pin a bust"
        ["title_hrv"]=>
        string(38) "Kako pričvrstiti bistu na drvenu bazu"
        ["mask_eng"]=>
        string(17) "how_to_pin_a_bust"
        ["mask_hrv"]=>
        string(37) "kako_pricvrstiti_bistu_na_drvenu_bazu"
        ["content_eng"]=>
        string(2518) "

    In this text I will describe the process of pinning a bust to a wooden plinth

    Click for enlarged picture

    You will need: sanding paper, pin, pen, ruler, pin vice (or electric drill), clippers and superglue.

    Click for enlarged picture

    Sand the bottom of the bust to get an even surface

    Click for enlarged picture

    Mark the two spots for pinning on the bottom of the bust. (Two pins make it easier to center the bust on the plinth)

    Click for enlarged picture

    Drill the two holes in the bust (use a pin vice or an electric drill)

    Click for enlarged picture

    Place the pins and glue them with superglue.

    Click for enlarged picture

    Repeat the process on the plinth - first marking then drilling the two holes for the pins.

    Click for enlarged picture

    Before placing the bust, dry fit the pins.

    Click for enlarged picture

    Glue the bust.

    " ["content_hrv"]=> string(2542) "

    U ovom ću članku opisati kako pričvrstiti bistu na drveno postolje.

    Click for enlarged picture

    Za to će vam biti potrebno: šmirgl papir, spajalica, olovka, metar, buštilica, kliješta i superljepilo. 

    Click for enlarged picture

    Pošmirglajte donju površinu biste.

    Click for enlarged picture

    Označite dva mjesta za postavljanje zatika (pina). Spajanje preko dva zatika olakšava centriranje biste na bazu.

    Click for enlarged picture

    Bušilicom izbušite dvije rupe.

    Click for enlarged picture

    Postavite zatike i zalijepite ih.

    Click for enlarged picture

    Ponovite proces i na drvenoj bazi, prvo označite mjesta, zatim ih izbušite.

    Click for enlarged picture

    Prije postavljanja biste na bazu, provjerite da sve odgovara.

    Click for enlarged picture

    Zalijepite bistu na drveno postolje.

    " ["created"]=> string(19) "2024-05-09 17:09:00" ["modified"]=> string(19) "2024-05-09 17:09:00" } ["Member"]=> array(10) { ["id"]=> string(2) "64" ["group_id"]=> string(1) "2" ["first_name"]=> string(9) "Krunoslav" ["last_name"]=> string(8) "Belinić" ["first_name_mask"]=> string(9) "krunoslav" ["last_name_mask"]=> string(7) "belinic" ["username"]=> string(5) "Kruno" ["password"]=> string(40) "eb3fda45fbec0258e90d809803b10491c548b22f" ["born"]=> string(19) "2015-01-18 09:19:00" ["created"]=> string(19) "2015-01-18 09:20:39" } }
    Krunoslav Belinić, 9th May 2024
  • Forbidden Psalm Demo 03
              array(2) {
      ["Article"]=>
      array(10) {
        ["id"]=>
        string(3) "383"
        ["member_id"]=>
        string(2) "56"
        ["title_eng"]=>
        string(23) "Forbidden Psalm Demo 03"
        ["title_hrv"]=>
        string(55) "Demonstracija stolne strateške igre Forbidden Psalm 03"
        ["mask_eng"]=>
        string(23) "forbidden_psalm_demo_03"
        ["mask_hrv"]=>
        string(54) "demonstracija_stolne_strateske_igre_forbidden_psalm_03"
        ["content_eng"]=>
        string(3448) "

    We continue preparations for our traditional Agram Arena Summer - TURM2024 with demo games of Forbidden Psalm, the game that will be played in July at the Arena. In this game, our Ana, the organizer of TURM, sets up a game for Seb and Domagoj, and this time she lets them pick their own crews!

    Click for enlarged picture

    Another game at Ana's, but this time Seb and I didn't play with premade warbands... we chose minis and did the whole warband creation process! The scenario we played was setting up mortsafes and looting tombs. I was extremely lucky with my magician and found 3 treasures in the first tomb, one of which was a relic.

    Click for enlarged picture

    Seb had a little less luck with the treasure, which got him into trouble with the skeletons. As I started the game with a few lucky rolls, I decided to invest in positive karma and help him with the mobs. At the end of the third move, Corpse Collector appeared, a large monster that we decided to defeat with joint forces.

    Click for enlarged picture

    To slow his progress, I summoned a Skeletal Warrior, an affiliated gang member, behind his back. Karma paid off because my gang member, Vid, defeated the Collector with a lucky mace hit and earned another relic!

    Click for enlarged picture

    Click for enlarged picture

    Click for enlarged picture

    Click for enlarged picture

    Click for enlarged picture

    Click for enlarged picture

    I think we've mastered the rules and independent play quite well, and I'm looking forward to Turm!

    " ["content_hrv"]=> string(3496) "

    Nastavljamo sa pripremama za našu tradicionalnu Agram Arenu Summer – TURM2024 demo partijama Forbidden Psalma, igre koja će se igrati u srpnju na Areni. U ovoj partiji, naša Ana, organizatorica TURMa, organizira partiju za Seba i Domagoja, ali ih prepušta same sebima i pri izboru svojih vojski!

    Click for enlarged picture

    Jos jedan game kod Ane, ali ovaj put Seb i ja nismo igrali s premade warbandama… odabrali smo minije i odradili cijeli warband creation proces! Scenario koji smo igrali je postavljanje mortsafeova i pljackanje grobnica. Imao sam izuzetne srece sa svojim madjionicarem i u prvoj grobnici nasao 3 blaga, od kojih je jedno bila relikvija.

    Click for enlarged picture

    Seb je imao nesto manje srece sa blagom, sto ga je dovelo u nevolju s kosturima. Kako sam igru krenuo s nekoliko sretnih rollova, odlucio sam se investirati u pozitivnu karmu i pomoci mu oko mobova. Na kraju treceg poteza pojavio se Corpse Collector, veliko cudoviste koje smo odlucili savladati zajednickim snagama.

    Click for enlarged picture

    Kako bi usporio njegov napredak, iza ledja sam mu prizvao Skeletalnog ratnika, pridruzenog clana bande. Karma se isplatila jer je clan moje bande, Vid, sretnim pogotkom buzdovana savladao Collectora i zaradio jos jednu relikviju! 

    Click for enlarged picture

    Click for enlarged picture

    Click for enlarged picture

    Click for enlarged picture

    Click for enlarged picture

    Click for enlarged picture

    Mislim da smo poprilicno dobro savladali pravila i samostalnu igru, i veselim se Turmu!

    " ["created"]=> string(19) "2024-04-28 18:58:05" ["modified"]=> string(19) "2024-04-28 18:58:05" } ["Member"]=> array(10) { ["id"]=> string(2) "56" ["group_id"]=> string(1) "2" ["first_name"]=> string(7) "Domagoj" ["last_name"]=> string(5) "Krpan" ["first_name_mask"]=> string(7) "domagoj" ["last_name_mask"]=> string(5) "krpan" ["username"]=> string(7) "Domagoj" ["password"]=> string(40) "fbad52c567fc2f837e1625e28f8b6c4aaa707d8a" ["born"]=> string(19) "2035-05-07 22:33:00" ["created"]=> string(19) "2014-05-07 22:33:57" } }
    Domagoj Krpan, 28th April 2024
  • AGRAM LEGO SECTION - Fourth Lecture and Final Part of the Build
              array(2) {
      ["Article"]=>
      array(10) {
        ["id"]=>
        string(3) "382"
        ["member_id"]=>
        string(2) "35"
        ["title_eng"]=>
        string(63) "AGRAM LEGO SECTION - Fourth Lecture and Final Part of the Build"
        ["title_hrv"]=>
        string(57) "AGRAM LEGO SEKCIJA - Četvrto predavanje i kraj izgradnje"
        ["mask_eng"]=>
        string(63) "agram_lego_section_-_fourth_lecture_and_final_part_of_the_build"
        ["mask_hrv"]=>
        string(56) "agram_lego_sekcija_-_cetvrto_predavanje_i_kraj_izgradnje"
        ["content_eng"]=>
        string(1505) "

    Click for enlarged picture

    Click for enlarged picture

    Click for enlarged picture

    Click for enlarged picture

    Click for enlarged picture

    Click for enlarged picture

    " ["content_hrv"]=> string(3228) "

    U srijedu 24.4. u sklopu naše Agram Lego Sekcije i službeno smo završili sa serijom predavanja  paralelno sa izradom LEGO makete dvorca Hogwarts!

    Posljednje predavanje u ovoj seriji je počelo u 18:00 i trajalo je otprilike sat vremena u kojem je naš Marko prenio sva iskustva sa putovanja u Billund i posjete Legolandu i Lego House-u.

    Click for enlarged picture

    Ulaz na predavanja je besplatan i otvoren za sve te prijave nisu potrebne.

    Click for enlarged picture

    Click for enlarged picture

    Izrada makete je rezervirana za članove Agram Lego Sekcije. Ukoliko se želite uključiti u sljedeće projekte, javite se za više informacija na ums.agram@gmail.com .

    Click for enlarged picture

    Za kraj, ekipa je provela struju, odn. rasvjetu kroz cijelu maketu. 

    Click for enlarged picture

    A rezultat je bio magičan!

    Click for enlarged picture

    " ["created"]=> string(19) "2024-04-24 20:13:19" ["modified"]=> string(19) "2024-04-24 20:13:19" } ["Member"]=> array(10) { ["id"]=> string(2) "35" ["group_id"]=> string(1) "1" ["first_name"]=> string(5) "Marko" ["last_name"]=> string(9) "Paunović" ["first_name_mask"]=> string(5) "marko" ["last_name_mask"]=> string(8) "paunovic" ["username"]=> string(5) "marko" ["password"]=> string(40) "3bd37b326d19d1880d3b93a4b32e8fb3a90fa122" ["born"]=> string(19) "2033-03-07 20:35:00" ["created"]=> string(19) "2009-06-02 20:37:03" } }
    Marko Paunović, 24th April 2024
  • AGRAM LEGO SECTION - Third Lecture and Part Three of the Build
              array(2) {
      ["Article"]=>
      array(10) {
        ["id"]=>
        string(3) "381"
        ["member_id"]=>
        string(3) "100"
        ["title_eng"]=>
        string(62) "AGRAM LEGO SECTION - Third Lecture and Part Three of the Build"
        ["title_hrv"]=>
        string(59) "AGRAM LEGO SEKCIJA - Treće predavanje i nastavak izgradnje"
        ["mask_eng"]=>
        string(62) "agram_lego_section_-_third_lecture_and_part_three_of_the_build"
        ["mask_hrv"]=>
        string(58) "agram_lego_sekcija_-_trece_predavanje_i_nastavak_izgradnje"
        ["content_eng"]=>
        string(3101) "

    Click for enlarged picture

    Click for enlarged picture

    Click for enlarged picture

    Click for enlarged picture

    Click for enlarged picture

    Click for enlarged picture

    Click for enlarged picture

    Click for enlarged picture

    Click for enlarged picture

    Click for enlarged picture

    Click for enlarged picture

    Click for enlarged picture

    Click for enlarged picture

    " ["content_hrv"]=> string(4750) "

    U srijedu 17.4. u sklopu naše Agram Lego Sekcije nastavili smo sa serijom predavanja o arhitekturi paralelno sa izradom LEGO makete dvorca Hogwarts!

    Predavanje je počelo u 18:00 i trajalo je otprilike sat vremena uz živu diskusiju o dvorcu Hogwarts, odnosno o stvarnim lokacijama na kojima su filmovi snimani te koji su poslužili kao reference i inspiracija J.K.Rowling prilikom pisanja knjiga o Harryu Potteru.

    Click for enlarged picture

    Ulaz na predavanja je besplatan i otvoren za sve te prijave nisu potrebne.

    Click for enlarged picture

    Click for enlarged picture

    Click for enlarged picture

    Click for enlarged picture

    Izrada makete je rezervirana za članove Agram Lego Sekcije. Ukoliko se želite uključiti u izgradnju, javite se za više informacija na ums.agram@gmail.com .

    Click for enlarged picture

    Click for enlarged picture

    Click for enlarged picture

    Click for enlarged picture

    Click for enlarged picture

    Click for enlarged picture

    Click for enlarged picture

    Click for enlarged picture

    " ["created"]=> string(19) "2024-04-18 05:39:50" ["modified"]=> string(19) "2024-04-18 20:27:39" } ["Member"]=> array(10) { ["id"]=> string(3) "100" ["group_id"]=> string(1) "2" ["first_name"]=> string(5) "Mario" ["last_name"]=> string(7) "Grgurev" ["first_name_mask"]=> string(5) "mario" ["last_name_mask"]=> string(7) "grgurev" ["username"]=> string(9) "lepimario" ["password"]=> string(40) "11e0b1ecc2c467637dfa513774d2426f3b925264" ["born"]=> string(19) "2003-01-21 09:02:00" ["created"]=> string(19) "2022-01-21 09:02:32" } }
    Mario Grgurev, 18th April 2024

All articles

Latest battle-reports

All battle-reports