Online services for designing your miniatures

Dalibor Čavić, 31nd August 2023

In my travels through the endless Internet, I came across several sites for creating miniatures. And some of them came across me as well (via Facebook ads). Considering that I am currently in the Star Wars phase, I tried two such sites where I successfully created several characters from this famous franchise.

Click for enlarged picture

These are Eldritch Foundry and TitanCraft and they are primarily intended for creating D'n'D miniatures, but they have lightsaber options so they can be used for SW as well. Also worth mentioning is the Hero Forge, which I haven't tried because I haven't found the option to add a lightsaber.

I will not explain the character creation process in particular, because the matter is quite intuitive and clear. Each of these two sites has a handful of options such as body, head, clothing, items, base, pose, etc. Almost every one has sub-options, so the combinations are practically endless. I think the figure can be created and purchased without registration, but I definitely recommend registering - it's fast and free. Registration allows you to create a base of characters that do not have to be purchased, i.e. that can be saved for later and subsequently refined. Even after purchase. The problem is that if you want to move your character's little finger after purchase, it is a new figure that has to be paid for (Eldritch Foundry). For a 3d printed figure this is as clear as "good day", but it is also true for STLs. And now I have practically revealed to you that you can download your creations on both sites as STL or order as a 3d printed miniature.

In the rest of this article, I will list some good and bad sides of each site. I repeat, I am writing from the point of view of someone who is interested in Star Wars. Fans of D'n'D, fantasy, sci-fi, and even steampunk will find more for themselves. I also haven't spent much time trying out these two creators. This means that some of my criticisms may not be appropriate - maybe I just haven't learned how to do something.
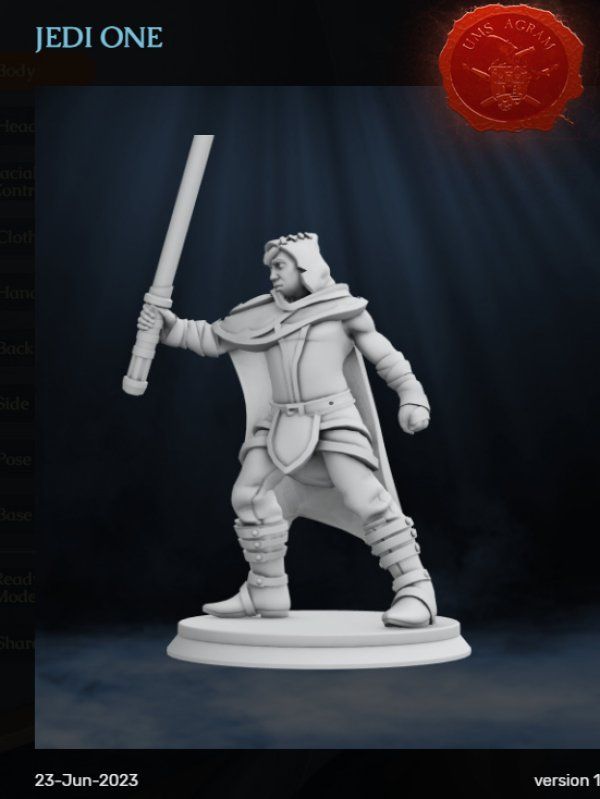
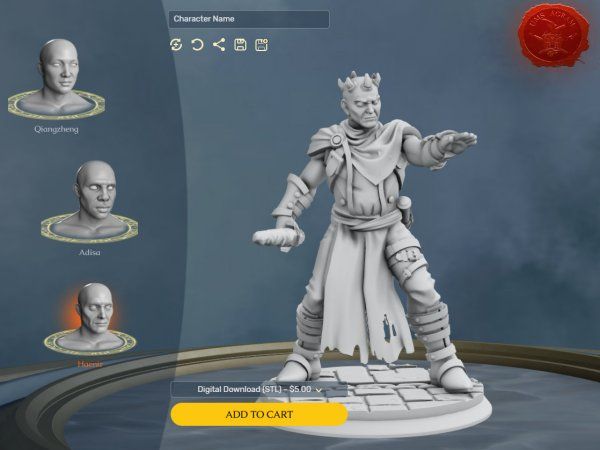
Eldritch Foundry

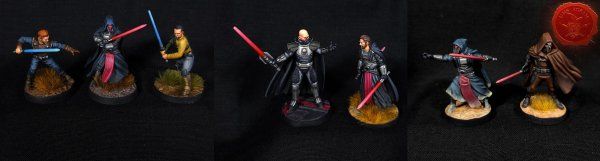
There are definitely more options and sub-options. In addition to the humanoid, I also managed to create a character of the Zabrak type (Darth Maul). From the lightsaber, there is a regular, dual, t-hilt guard (Kylo Ren) and something I would call pulsating while they called it "unstable beam".

If you don't like it, you don't have to put together characters from scratch, there are ready-made ones divided into groups such as casters, fighters, cyberpunk, etc. If you still decide on your character, and you don't want to deal with every detail, there are outfits for scourers, warriors , monks, etc. There are also predefined poses (cast, defend, duel, mount) that you can modify yourself if you want.

Click for enlarged picture

I'm not sure what scale they come in (by default these characters). However, there is a scaling option with a ruler, so you will easily adjust the scale of the figure according to your needs. And if you take STL, you will be able to additionally correct it in the slicer.

A bunch of options can be turned off. Don't want your character to have hair? No problem, turn off the currently active hair option and you get a character without hair. However, I have not found that the bases can be turned off. The issue has been resolved so that when you purchase the STL you will receive 3 files. One is a figure with a base, the other is the figure itself, and the third is the base itself. But this is not clear until you buy the first STL from this site. Even customer support confuses you. To my inquiry about the separation of the bases, I received the answer that it is impossible, even though the purchased STL refutes them.

Click for enlarged picture

Eldritch Foundry is slightly more expensive than its competitor, which will be described below. The 3d printed figure costs a whopping $25 (I didn't check how much shipping is), while the STL price is $5. However, they recently started a promotional campaign, so many YouTube content creators give a code for a 15% discount. Another disadvantage is that their conversion of US dollars to euros is 1:1 (the conversion rate at the time of writing the article is $1 = €0.91). But not to end with the negative sides, there are monthly ($15/month) and annual options ($10/month) with the possibility of unlimited download of your creations, which is great for those who need a lot of characters and who print a lot.
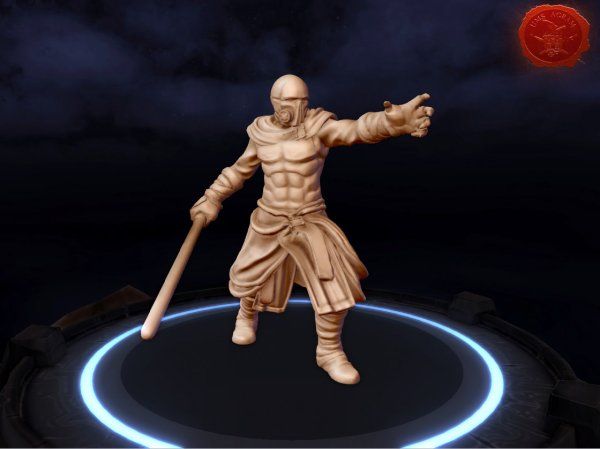
TitanCraft

In principle, both described sites are very similar, but there are several differences. The TitanCraft service offers slightly fewer options and sub-options than its predecessor, but this number is still enough for a huge amount of creations. It seems slightly less inspected and the sculpts are of lower quality. However, these differences compared to Eldritch Foundry are measured in shades. Be sure to register to save your creations, but also for one detail that will be described in the finance section.

I personally like using this site because the lightsaber they offer is much more realistically proportioned (the one on EF seems too thick although the difference is not as obvious when the figures are printed). Unfortunately, I was only able to find one type of lightsaber (eg no double bladed).

Click for enlarged picture

What's great about TitanCraft is about to be described. 3d prints are cheaper than EF ($15), while the STL download is free. What's the problem? Well, there is. Items cost (usually $0.75 per item). Of course, some items are also free, so you can put together a character that will be free to download. I managed to assemble characters for 2-3$. It's a great thing that once an item is purchased, it remains yours on your profile, i.e. you can use it for free for the next character. That's why I mentioned above that it's good to register (although I'm not sure if shopping can even go without registration). This is a great thing if, for example, you want to change the pose of the same character. Or, for example, you can use a breastplate purchased once on another character for free.

There is no subscription like EF, but for $360 you can buy a commercial license that includes free access to all items and permission to sell prints. If you subscribe to the newsletter during registration, you will also receive a one-time coupon for a 10% discount. Unfortunately, I didn't find an option to buy items without using them and put them in one of my libraries, but they are bought when downloading the STL of the character you created.

Click for enlarged picture

I note once again that the article presents my views and my (modest) experience with these two sites. This means that some options may exist, but I have not been able to discover them.

Latest articles

  • SFRJ 1986 v2 Diorama part 5
              array(2) {
      ["Article"]=>
      array(10) {
        ["id"]=>
        string(3) "492"
        ["member_id"]=>
        string(2) "35"
        ["title_eng"]=>
        string(27) "SFRJ 1986 v2 Diorama part 5"
        ["title_hrv"]=>
        string(29) "Diorama SFRJ 1986 v2– dio 5"
        ["mask_eng"]=>
        string(27) "sfrj_1986_v2_diorama_part_5"
        ["mask_hrv"]=>
        string(26) "diorama_sfrj_1986_v2_dio_5"
        ["content_eng"]=>
        string(3653) "

    In this series of articles, we will follow my work on a new diorama, another in the 1986 series. This time I have again decided to use a former country. Another version of the SFRY 1986.

    Click for enlarged picture

    So far I have finished making the base, painting the base, painting the interior of the vehicle and painting the figures. Now it's time to add the vegetation

    Click for enlarged picture

    The pines/trees were already fixed to the base before painting, so the first vegetation I added was tall shrubs that filled the volume of the base.

    Click for enlarged picture

    Then I added lower vegetation like tall grass and lower bushes.

    Click for enlarged picture

    Finally, I added some short grass, making sure when I was making the parking lot and path that there was no vegetation in the places where the wheels pass.

    Click for enlarged picture

    The paint on the base has just dried up, so next time I'll add the vegetation.

    Click for enlarged picture

    When the diorama is turned to the back, the volume of the forest is visible.

    Click for enlarged picture

    Before placing the vehicles and miniatures on the base, the diorama looks like this.

    Click for enlarged picture

    " ["content_hrv"]=> string(3186) "

    U ovoj seriji članaka pratit ćemo moj rad na novoj diorami, još jednoj u nizu serijala 1986. Ovaj put sam se opet odlučio za bivšu državu. Druga verzija SFRJ 1986..

    Click for enlarged picture

    Do sada sam završio s izradom baze, bojanjem baze, bojanjem interijera vozila i bojanjem figura. Sada je došlo vrijeme za dodavanje vegetacije

    Click for enlarged picture

    Borovi/drveće je već bilo fiksirano na bazu prije bojanja pa je prva sljedeća vegetacija bila visoko žbunje kojim sam popunio volumen baze.

    Click for enlarged picture

    Potom sam dodao niže raslinje poput visoke trave i nižeg grmlja.

    Click for enlarged picture

    Na kraju sam dodao i nisku travu pri čemu sam pazio kad sam radio ugibalište i puteljak da vegetacije ne bude na mjestima gdje prolaze kotači.

    Click for enlarged picture

    Kada se dioramu okrene, vidi se volumen vegetacije u šumi. 

    Click for enlarged picture

    Prije postavljanja vozila i minijatura, diorama izgleda ovako:

    Click for enlarged picture

    " ["created"]=> string(19) "2026-01-19 10:46:08" ["modified"]=> string(19) "2026-01-19 11:00:21" } ["Member"]=> array(10) { ["id"]=> string(2) "35" ["group_id"]=> string(1) "1" ["first_name"]=> string(5) "Marko" ["last_name"]=> string(9) "Paunović" ["first_name_mask"]=> string(5) "marko" ["last_name_mask"]=> string(8) "paunovic" ["username"]=> string(5) "marko" ["password"]=> string(40) "3bd37b326d19d1880d3b93a4b32e8fb3a90fa122" ["born"]=> string(19) "2033-03-07 20:35:00" ["created"]=> string(19) "2009-06-02 20:37:03" } }
    Marko Paunović, 19th January 2026
  • SFRJ 1986 v2 Diorama part 4
              array(2) {
      ["Article"]=>
      array(10) {
        ["id"]=>
        string(3) "491"
        ["member_id"]=>
        string(2) "35"
        ["title_eng"]=>
        string(27) "SFRJ 1986 v2 Diorama part 4"
        ["title_hrv"]=>
        string(29) "Diorama SFRJ 1986 v2– dio 4"
        ["mask_eng"]=>
        string(27) "sfrj_1986_v2_diorama_part_4"
        ["mask_hrv"]=>
        string(26) "diorama_sfrj_1986_v2_dio_4"
        ["content_eng"]=>
        string(2405) "

    In this series of articles, we will follow my work on a new diorama, another in the 1986 series. This time I have again decided to use a former country. Another version of the SFRY 1986.

    Click for enlarged picture

    After the base and the vehicles, I started painting the miniatures. Two policemen and a truck driver. The first step was the base color – black and then white..

    Click for enlarged picture

    After that, I started with the basic colors, concentrating a little more on the truck driver..

    Click for enlarged picture

    Considering the year and location of the action, I decided that his jacket should have the logo from the 1984 Sarajevo Winter Olympics..

    Click for enlarged picture

    Then I threw myself at the policemen..

    Click for enlarged picture

    The paint on the base has just dried up, so next time I'll add the vegetation.

    " ["content_hrv"]=> string(2360) "

    U ovoj seriji članaka pratit ćemo moj rad na novoj diorami, još jednoj u nizu serijala 1986. Ovaj put sam se opet odlučio za bivšu državu. Druga verzija SFRJ 1986..

    Click for enlarged picture

    Nakon baze i vozila, bacio sam se na bojanje minijatura. Dva milicajca i vozač kamiona. Prvi korak je bila temeljna boja – crna pa bijela.

    Click for enlarged picture

    Nakon toga, krenuo sam s osnovnim bojama, malo više se koncentrirajući na vozača kamiona.

    Click for enlarged picture

    S obzirom na godinu i mjesto radnje, odlučio sam se da mu jakna ima logo od ZOI Sarajevo 1984.

    Click for enlarged picture

    Zatim sam se bacio na milicajce.

    Click for enlarged picture

    Taman se tako nekako osušila i boja na bazi pa ću sljedeći puta obraditi i dodavanje vegetacije.

    " ["created"]=> string(19) "2026-01-19 10:35:45" ["modified"]=> string(19) "2026-01-19 10:35:45" } ["Member"]=> array(10) { ["id"]=> string(2) "35" ["group_id"]=> string(1) "1" ["first_name"]=> string(5) "Marko" ["last_name"]=> string(9) "Paunović" ["first_name_mask"]=> string(5) "marko" ["last_name_mask"]=> string(8) "paunovic" ["username"]=> string(5) "marko" ["password"]=> string(40) "3bd37b326d19d1880d3b93a4b32e8fb3a90fa122" ["born"]=> string(19) "2033-03-07 20:35:00" ["created"]=> string(19) "2009-06-02 20:37:03" } }
    Marko Paunović, 19th January 2026
  • SFRJ 1986 v2 Diorama part 3
              array(2) {
      ["Article"]=>
      array(10) {
        ["id"]=>
        string(3) "490"
        ["member_id"]=>
        string(2) "35"
        ["title_eng"]=>
        string(27) "SFRJ 1986 v2 Diorama part 3"
        ["title_hrv"]=>
        string(29) "Diorama SFRJ 1986 v2– dio 3"
        ["mask_eng"]=>
        string(27) "sfrj_1986_v2_diorama_part_3"
        ["mask_hrv"]=>
        string(26) "diorama_sfrj_1986_v2_dio_3"
        ["content_eng"]=>
        string(3113) "

    In this series of articles, we will follow my work on a new diorama, another in the 1986 series. This time I have again decided to use a former country. Another version of the SFRY 1986.

    Click for enlarged picture

    As I announced last time, it's time to get down to the vehicles. The first thing I did was disassemble the models and take out the interiors of all three vehicles.

    Click for enlarged picture

    As you can see in the picture, the interior of the vehicle is poorly or not at all painted, so a lot of attention and time was spent there. I painted the upholstery in shades of gray, or brown on the Tristač. I brought out the details on the dashboard and around the gearbox.

    Click for enlarged picture

    There was something missing from the start on the Fićo, but I couldn't figure out what it was until Kruno pointed out to me that the flashing lights were missing. I fixed that with a small 3mm clear LED that I painted in Tamiya Clear Blue with a silver edge.

    Click for enlarged picture

    This completes the painting of the vehicles’ interior.

    Click for enlarged picture

    The finishing touches are the decorations in the truck's cabin.

    Click for enlarged picture

    Next time we will continue with painting the figures.

    " ["content_hrv"]=> string(3080) "

    U ovoj seriji članaka pratit ćemo moj rad na novoj diorami, još jednoj u nizu serijala 1986. Ovaj put sam se opet odlučio za bivšu državu. Druga verzija SFRJ 1986..

    Click for enlarged picture

    Kao što sam najavio prošli put, vrijeme je da se bacim na vozila. Prvo što sam napravio jest da sam rastavio modele i izvadio unutrašnjost sva tri vozila

    Click for enlarged picture

    Kako je vidljivo na slici, unutrašnjost vozila je slabo ili nikako obojana stoga je tu otišlo mnogo pažnje i vremena. Tapecirunge sam obojao u sive nijanse, odnosno u smeđe na tristaču. Izvukao sam detalje na komandnim pločama te oko mjenjača.

    Click for enlarged picture

    Na fićeku mi je otpočetka nešto falilo, ali nisam mogao skužiti što dok mi Kruno nije skrenuo pažnju da fali rotirka. Nju sam sredio pomoću jedne male 3mm prozirne LED koju sam obojao u Tamiya Clear Blue sa srebrnim rubom.

    Click for enlarged picture

    Time je završeno bojanje unutrašnjosti vozila.

    Click for enlarged picture

    Završni detalji su ukrasi u kabini kamiona.

    Click for enlarged picture

    Sljedeći put nastavljamo sa bojanjem figura.

    " ["created"]=> string(19) "2026-01-19 10:28:32" ["modified"]=> string(19) "2026-01-19 10:28:32" } ["Member"]=> array(10) { ["id"]=> string(2) "35" ["group_id"]=> string(1) "1" ["first_name"]=> string(5) "Marko" ["last_name"]=> string(9) "Paunović" ["first_name_mask"]=> string(5) "marko" ["last_name_mask"]=> string(8) "paunovic" ["username"]=> string(5) "marko" ["password"]=> string(40) "3bd37b326d19d1880d3b93a4b32e8fb3a90fa122" ["born"]=> string(19) "2033-03-07 20:35:00" ["created"]=> string(19) "2009-06-02 20:37:03" } }
    Marko Paunović, 19th January 2026
  • SFRJ 1986 v2 Diorama part 2
              array(2) {
      ["Article"]=>
      array(10) {
        ["id"]=>
        string(3) "489"
        ["member_id"]=>
        string(2) "35"
        ["title_eng"]=>
        string(27) "SFRJ 1986 v2 Diorama part 2"
        ["title_hrv"]=>
        string(29) "Diorama SFRJ 1986 v2– dio 2"
        ["mask_eng"]=>
        string(27) "sfrj_1986_v2_diorama_part_2"
        ["mask_hrv"]=>
        string(26) "diorama_sfrj_1986_v2_dio_2"
        ["content_eng"]=>
        string(3226) "

    In this series of articles, we will follow my work on a new diorama, another in the 1986 series. This time I have again decided to use a former country. Another version of the SFRY 1986.

    Click for enlarged picture

    Last time I explained how I created the terrain, and this time I'll be painting the terrain. The terrain itself consists of several parts: an asphalt road, a turnoff and path, and the terrain in the forest.

    Click for enlarged picture

    Since I wanted all the surfaces to have similar tones, I decided to paint without a base color, applying the main color immediately. The paint I applied was very thin so it stayed wet for a long time, which allowed me to mix the base colors and get a uniform tone.

    Click for enlarged picture

    After applying the basic tones, I started shading. I also used the same principle, using quite diluted tones to create unevenness in certain parts of the surface.

    Click for enlarged picture

    Then I added a layer that I could most simply call wash. A very diluted darker shade of color.

    Click for enlarged picture

    I applied the final shades using another technique, the simplest one – dry brush.

    Click for enlarged picture

    While these paints were drying, I was simultaneously disassembling and painting the interior of the car and truck, as well as the figures, which will be the subject of future articles.

    " ["content_hrv"]=> string(3277) "

    U ovoj seriji članaka pratit ćemo moj rad na novoj diorami, još jednoj u nizu serijala 1986. Ovaj put sam se opet odlučio za bivšu državu. Druga verzija SFRJ 1986..

    Click for enlarged picture

    Prošli put sam objasnio kako sam izradio teren, a ovaj put ću se baviti bojanjem terena. Sami teren se sastoji od nekoliko dijelova: asfaltna cesta, ugibalište i puteljak te teren u šumi.

    Click for enlarged picture

    S obzirom da sam htio da sve površine imaju slične tonove, odlučio sam se bojati bez temeljne boje, nanoseći odmah glavni ton. Boju koju sam nanosio bila je jako razvodnjena tako da je dugo bila mokra i to mi je omogućavalo miješanje osnovnih tonova i dobivanje ujednačene tonove.

    Click for enlarged picture

    Nakon nanošenja osnovnih tonova, krenuo sam sa nijansiranjem. Također sam radio istim principom, dosta razvodnjene tonove kako bih dobio neujednačenost pojedinih dijelova površine.

    Click for enlarged picture

    Potom sam dodao sloj koji bih najjednostavnije mogao nazvati wash. Jako razvodnjenu tamniju nijansu boje.

    Click for enlarged picture

    Završne nijanse sam nanio drugom tehnikom, najjednostavnijom – dry brush.

    Click for enlarged picture

    Dok su se ove boje sušile, paralelno sam rastavio i bojao unutrašnjost automobila i kamiona te figura što će biti tema sljedećih članaka.

    " ["created"]=> string(19) "2026-01-19 09:32:11" ["modified"]=> string(19) "2026-01-19 09:32:11" } ["Member"]=> array(10) { ["id"]=> string(2) "35" ["group_id"]=> string(1) "1" ["first_name"]=> string(5) "Marko" ["last_name"]=> string(9) "Paunović" ["first_name_mask"]=> string(5) "marko" ["last_name_mask"]=> string(8) "paunovic" ["username"]=> string(5) "marko" ["password"]=> string(40) "3bd37b326d19d1880d3b93a4b32e8fb3a90fa122" ["born"]=> string(19) "2033-03-07 20:35:00" ["created"]=> string(19) "2009-06-02 20:37:03" } }
    Marko Paunović, 19th January 2026
  • SFRJ 1986 v2 Diorama part 1
              array(2) {
      ["Article"]=>
      array(10) {
        ["id"]=>
        string(3) "488"
        ["member_id"]=>
        string(2) "35"
        ["title_eng"]=>
        string(27) "SFRJ 1986 v2 Diorama part 1"
        ["title_hrv"]=>
        string(29) "Diorama SFRJ 1986 v2– dio 1"
        ["mask_eng"]=>
        string(27) "sfrj_1986_v2_diorama_part_1"
        ["mask_hrv"]=>
        string(26) "diorama_sfrj_1986_v2_dio_1"
        ["content_eng"]=>
        string(3178) "

    In this series of articles, we will follow my work on a new diorama, another in the 1986 series. This time I have again decided to use a former country. Another version of the SFRY 1986.

    Click for enlarged picture

    As always, everything starts with an idea. This time, the idea came from a model of an Agrokomerc truck that Bojan brought me from Serbia (where it was published as part of a magazine). The design itself changed a bit over time (the first few months of planning). Initially, it was supposed to be just a truck at a roadside stop. Then the idea came to include the Police. And then I got two police vehicles. Fić and Tristač. Basically, this is the first drawing that started it all.

    Click for enlarged picture

    The base for the diorama came from Moson, from Buco. A fantastic combination of MDF and Styrodur that allows you to remove the diorama itself, but also to lower the terrain below the base level. I removed the Styrodur base, modeled it a little to get different terrain height levels. I modeled the road from a cork board, and assembled the rest of the terrain from DAS clay and wooden bark.

    Click for enlarged picture

    Once everything was dry I added texture. Two or three sizes of sand and that was it.

    Click for enlarged picture

    And when that layer was dry, I used a drill to fix the trees to the back of the base. Since all the trees had tall trunks, I decided to leave them as is and not move them during the painting process.

    Click for enlarged picture

    That's it for this week. We already have a nice outline of the diorama, and next time we'll continue with painting the base.

    " ["content_hrv"]=> string(3151) "

    U ovoj seriji članaka pratit ćemo moj rad na novoj diorami, još jednoj u nizu serijala 1986. Ovaj put sam se opet odlučio za bivšu državu. Druga verzija SFRJ 1986..

    Click for enlarged picture

    Kao i uvijek, sve počinje idejom. Ovoga puta, ideja se izrodila iz makete Agrokomercovog kamiona kojeg mi je Bojan dofurao iz Srbije (gdje je izašao u sklopu nekog časopisa). Sami dizajn se malo mijenjao tijekom vremena (prvih par mjeseci planiranja). Otpočetka, trebao je to biti samo kamion na nekom ugibalištu pored ceste. Onda se rodila ideja da stavim i Miliciju. A onda sam nabavio i dva milicijska vozila. Fiću i Tristača. Uglavnom, ovo je prvi crtež od kojeg je sve krenulo.

    Click for enlarged picture

    Baza za dioramu je došla s Mosona, od Buce. Fantastičan spoj MDFa i stirodura koji omogućava vađenje same diorame, ali i upuštanje terena ispod razine baze. Izvadio sam stirodurnu podlogu, malo je izmodelirao da dobijem razne razine visine terena. Cestu sam izmodelirao iz ploče pluta, a ostatak terena složio od DAS glinamola i drvenih kora.

    Click for enlarged picture

    Kada se sve osušilo dodao sam teksturu. Dvije ili tri veličine pijeska i to je to.

    Click for enlarged picture

    A kada se i taj sloj osušio, bušilicom sam fiksirao drveće na stražnji dio baze. S obzirom da su sva stable imala visoka debla, odlučio sam ih ostaviti tako i ne micati ih za process bojanja.

    Click for enlarged picture

    To je to za ovaj tjedan. Imamo već lijepe obrise diorame, a sljedeći puta nastavljamo sa bojanjem baze.

    " ["created"]=> string(19) "2026-01-19 09:18:40" ["modified"]=> string(19) "2026-01-19 09:18:40" } ["Member"]=> array(10) { ["id"]=> string(2) "35" ["group_id"]=> string(1) "1" ["first_name"]=> string(5) "Marko" ["last_name"]=> string(9) "Paunović" ["first_name_mask"]=> string(5) "marko" ["last_name_mask"]=> string(8) "paunovic" ["username"]=> string(5) "marko" ["password"]=> string(40) "3bd37b326d19d1880d3b93a4b32e8fb3a90fa122" ["born"]=> string(19) "2033-03-07 20:35:00" ["created"]=> string(19) "2009-06-02 20:37:03" } }
    Marko Paunović, 19th January 2026

All articles

Latest battle-reports

All battle-reports