Stegadon Conversion – part 3

Mario Grgurev, 9th July 2024

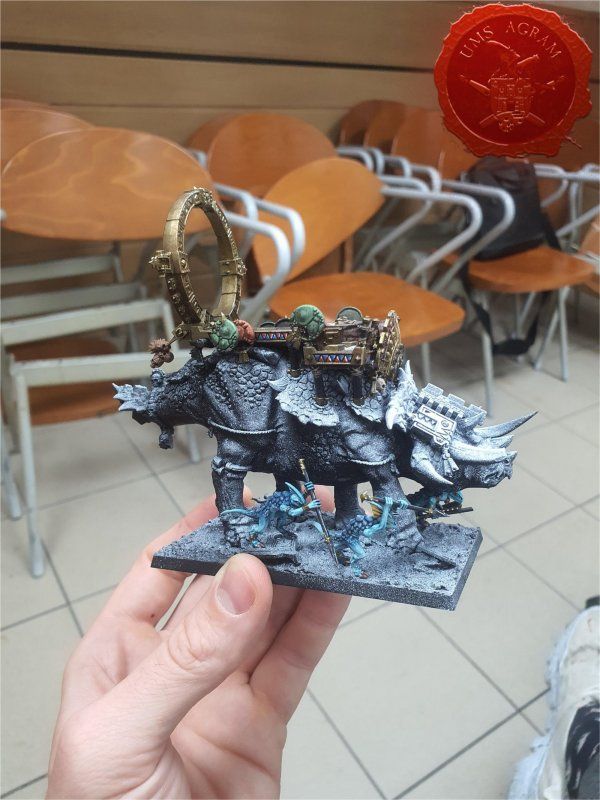
In this article, we continue with the conversion of a stegadon kit to a Mazdamundi. In the last part I talked about assembling the model in its final form, today I describe the process of painting Skinks and construction on the stegadon.

Click for enlarged picture

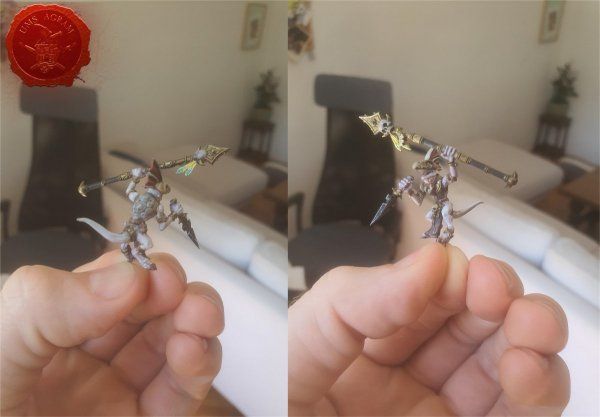
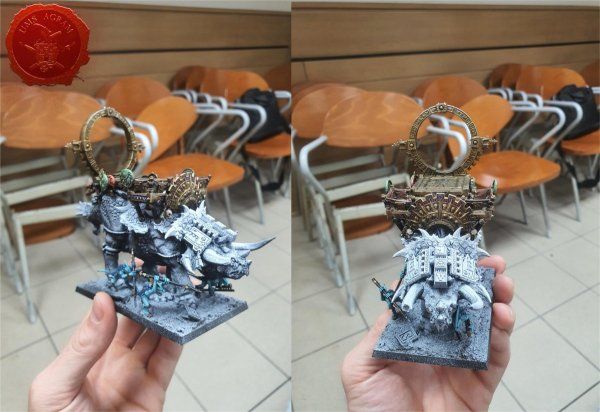
I say processes because I managed without any coherent plan for the final look, I just wanted it to look similar to old fantasy lore. The skinks were secondary to me, I intended to paint them as classic - blue, blue-green, but it occurred to me to make albino skinks as carriers of Slann messages. The construction itself is somewhat "fancy" in my opinion, because it transports the supreme leader, the decision fell on the golden one.

Click for enlarged picture

I painted most of the parts separately, for the skinks I looked for tutorials on the internet and generally decided on the classic tutorials from GW for choosing the colors on the bottoms. I also watched the GW official tutorial for the albino skinks, but decided to go with the 2-brush blending approach for all of them. My favorite technique, I have the most control and the most successful transitions. I use very few shade colors in general when I paint, this is no exception.

Click for enlarged picture

The structure on which the armchair and skinks sit is relatively basic, a pile of gold that is shaded and then highlighted with a combination of gold and silver. The shields are painted in 3 layers using the layering method from darkest to lightest. The decorations have been painted several times (due to mistakes) from dark red/blue to lighter and with small edge highlights of white at the end.

Click for enlarged picture

Latest articles

  • WW2 Monastery Scene – Reflections on the Diorama Composition
              array(2) {
      ["Article"]=>
      array(10) {
        ["id"]=>
        string(3) "407"
        ["member_id"]=>
        string(2) "35"
        ["title_eng"]=>
        string(62) "WW2 Monastery Scene – Reflections on the Diorama Composition"
        ["title_hrv"]=>
        string(79) "Diorama samostana u Drugom svjetskom ratu – razmatranja o kompoziciji diorame"
        ["mask_eng"]=>
        string(58) "ww2_monastery_scene_reflections_on_the_diorama_composition"
        ["mask_hrv"]=>
        string(75) "diorama_samostana_u_drugom_svjetskom_ratu_razmatranja_o_kompoziciji_diorame"
        ["content_eng"]=>
        string(7244) "

    In this series of articles, I will follow the creation of a diorama of a monastery set at the end of the Second World War when the Americans had already invaded Germany, which shows a company in the middle of a rest. These articles do not actually follow the chronological creation, but are arranged according to some thematic units.

    Click for enlarged picture

    After reading the title, you're probably wondering what this guy is going to be talking about? Rightfully so. Probably, even I would not understand what the writer wants to say if I read such a title. Probably some philosophy. And yes, you are right. But there is a reason why I am writing this text, so please be patient and give me a chance.

    Namely, judging by a large number, and participating in an even larger number of competitions, I noticed that a lot of modelers have problems with the believability of the story of their diorama. Either they get lost in a pile of details (a kind of horror vacui), or the scene is much too big for the story it's telling (the exact opposite of horror vacui). Also, in a large number of works there is no "good" interaction between the actors or between the actors and the scene. Well, it all looks like Scotty just beamed them up in the middle of the scene.

    This prompted me to write this article to describe the creative process of creating the diorama and its transformation as I completed individual elements. The fact that when I wrote previous articles that I found a sufficient number of photos of the entire diorama with elements in various stages of the project also helped.


    How did I come up with the idea for this diorama? For my birthday, Mario and Seb gave me two models. One was an ambulance Jeep (Mario) and the other an American armored Greyhound (Seb). This prompted me to plan a diorama that will contain those two models. Soon the FB feed reminded me of a scene from RT Diorama that seemed perfect to me. A jeep coming into the square, and an armored personnel carrier between two buildings peeking out of the rubble with half the building collapsed on top of it. Fantastic! Buy Marko. When the package arrived, unfortunately, Seb's armored car didn't fit between the two buildings, so he was out of the game. At the Zagreb Cup, I visited the Hobby Chest stand and found the SDKFZ 223 model there. Darko allowed me to open the box and measure the width of the vehicle. It turned out to be 5mm narrower than the passage. Fantastic. What's even better is that I found two sets of Americans with him just to complete my diorama.

    Click for enlarged picture

    The figures I got were: two lying down, two lying down and playing cards, one sitting on his helmet reading something (newspaper), one standing and looking into the distance, one Jeep driver and one riding in a Jeep. Everything is super usable except maybe the one that drives. I scattered the team around the field as it seemed to me that it might work.

    Click for enlarged picture

    In the meantime, I had the idea to put together a MiniArt piano and set it up to play. With a bit of conversion (cutting and hand rotation) I succeeded in my plan. This required a new arrangement of pieces. The one standing will be on the hood of the battleship and will be looking towards the back of the diorama (down the road), and the others will be concentrated around the fountain. The statues will be part of the ruins.

    Click for enlarged picture

    At one of the hobby corners on Wednesdays, someone from the team commented that my first floor was a little empty. I dismissed the idea, but it kept bugging me. Until I realized he was right. A series of figures followed and the only one that passed was the one standing and looking into the distance. But that makes me lose crew interaction with the wreck of the battleship. So I tested how it would look like the one reading the newspaper on it. I was not unhappy with the result. The bench, on the other hand, looked too big, so I decided to fill the part not occupied by the soldier with smaller statues. They were taken out and prepared for "liberation". Let's say the Jeep driver arrives to pick them up.

    Click for enlarged picture

    By setting the texture, the story more or less remained the same. There I had to position the bench as well as one lying down to fit into the volume added with DAS clay.

    Click for enlarged picture

    In the meantime, I assembled the ambulance Jeep (the one in the pictures before was a "placeholder" from another diorama). The ambulance Jeep has a scalameria carrying a stretcher. This gave me the idea to add statues to the stretcher. But it also turned Jeep in the other direction. He leaves with the statues.

    Click for enlarged picture

    I was finally satisfied with the story. In fact, the turning of the Jeep and the lack of interaction of the rest of the team with the driver who releases the statues gives the impression of alienation and lack of morale in extreme conditions. Everyone does their own thing even though they are together in a small space.

    Click for enlarged picture

    I hope that this journey through the making of a diorama gave you at least a little insight into the process of diorama composition. Each part must make sense and be clear about why it is there. Next time, we start with painting.

    " ["content_hrv"]=> string(6915) "

    U ovoj seriji članaka pratit ću izradu diorame samostana smještenu potkraj drugog svjetskog rata kada su Amerikanci upali već u Njemačku, a koja prikazuje četu usred odmora. Ovi članci zapravo ne prate kronološki izradu, već su poredani po nekim tematskim cjelinama.

    Click for enlarged picture

    Pročitavši naslov, vjerojatno se pitate o čemu će sad ovaj trabunjati? S pravom. Vjerojatno ni meni ne bi bilo jasno što pisac hoće reći da pročitam takav naslov. Vjerojatno neka filozofija. I da, u pravu ste. Ali postoji razlog zašto pišem ovaj tekst stoga molim vas za strpljenje i da mi pružite šansu.

    Naime, sudeći na velikom broju, a sudjelujući na još većem broju natjecanja, primjetio sam da dosta maketara ima problema sa uvjerljivošću priče njihove diorame. Ili se zgube u hrpi detalja (svojevrsni horror vacui), ili pak scena bude puno prevelika za priču koja priča (sušta suprotnost od horrora vacui). Također, na velikom broju radova nema “dobre” interakcije između aktera ili pak između aktera i scene. Pa to sve skupa izgleda kao da ih je Scotty upravo teleportirao usred scene.

    To me potaknulo na pisanje ovoga članka kako bih opisao kreativni process nastanka diorame i njegove transformacije kako sam dovršavao pojedine elemente. Pomogla je i činjenica da kad sam pisao prethodne članke da sam našao dovoljan broj fotografija cjelokupne diorame sa elementima u raznim fazama projekta.


    Kako sam došao na ideju za ovu dioramu? Za rođendan su mi Mario i Seb poklonili dvije makete. Jedna je bila ambulantni Jeep (Mario), a druga američko oklopno vozilo Greyhound (Seb). To me potaknulo na planiranje diorame koja će sadržavati te dvije makete. Ubrzo me FB feed podsjetio na scenu od RT Diorame koja mi se činila savršena. Jeep koji dolazi na trg, a oklopnjak između dvije zgrade viri iz ruševina sa pola zgrade srušeno na njemu. Fantastično! Kupuj Marko. Kad je paket stigao, na žalost, Sebov oklopnjak nije stao između dvije zgrade pa je ispao iz igre. Na kupu Zagreb posjetio sam štand Hobby Chest-a i tamo pronašao maketu SDKFZ 223. Darko mi je dozvolio da otvorim kutiju i izmjerim širinu vozila. Ispalo je da je 5mm uži od prolaza. Fantastično. Što je još bolje kod njega sam našao i dva seta amerikanaca taman da mi popune dioramu.

    Click for enlarged picture

    Figure koje sam nabavio su dvojica koji leže, dvojica koji su u poluležećem stavu i kartaju, jedan koji sjedi na svojem šljemu i čita nešto (novine), jedan koji stoji i gleda u daljinu, jedan vozač Jeepa i jedan koji se vozi u Jeepu. Sve je super iskoristivo osim možda ovog koji se vozi. Ekipu sam razbacao po terenu kako mi se činilo da bi moglo funkcionirati.

    Click for enlarged picture

    U međuvremenu mi je pala ideja da složim jedan klavir od MiniArta i ovog koji se vozi da postavim da svira. Uz malo konvertiranja (rezanje i rotacija ruku) uspio sam u naumu. To je zahtjevalo novi raspored figura. Ovaj što stoji bit će na haubi oklopnjaka i gledat će prema zadnjem dijelu diorame (niz cestu), a ovi ostali će biti koncentrirani oko fontane. Kipovi će biti dio ruševina.

    Click for enlarged picture

    Na jednom od hobby kutaka srijedom, netko od ekipe je komentirao da mi je prvi kat malo prazan. Odbacio sam ideju, ali me je i dalje kopkala. Dok nisam shvatio da je u pravu. Uslijedila je rošada figura i jedina koja je pasala je ova koja stoji i gleda u daljinu. Ali time gubim interakciju ekipe sa olupinom oklopnjaka. Pa sam isprobao kako bi izgledalo ovaj koji čita novine na njemu. Nisam bio nezadovoljan rezultatom. Klupa s druge strane, je izgledala preveliko stoga sam odlučio da dio koji ne okupira vojnik zapunim manjim kipovima. Izvadili su ih van i pripremili za „oslobođenje“. Recimo da vozač Jeepa stiže po njih.

    Click for enlarged picture

    Postavljanjem teksture priča je manje-više ostala ista. Tu sam morao pozicionirati i klupu kao i jednog koji leži da paše u volumen dodan DAS glinamolom.

    Click for enlarged picture

    U međuvremenu složio sam i ambulantni Jeep (ovaj na slikama prije bio je „placeholder“ sa druge diorame). Ambulantni Jeep ima skalameriju koja nosi nosila. To mi je dalo ideju da dodam i kipove na nosila. Ali i okrenulo Jeep u drugi smjer. Odlazi sa kipovima.

    Click for enlarged picture

    Bio sam konačno zadovoljan pričom. Dapače, okretanje Jeepa i manjak interakcije ostatka ekipe sa vozačem koji oslobađa kipove baš daje na tom dojmu otuđenosti i manjka morala u ekstremnim uvjetima. Svako radi svoje iako su zajedno na malom prostoru.

    Click for enlarged picture

    Nadam se da vam je ovo putovanje nastankom diorame barem malo dočaralo proces kompozicije diorame. Svaki dio mora imati smisla i biti jasan zašto je tamo. Sljedeći put, krećemo sa bojanjem.

    " ["created"]=> string(19) "2024-08-22 08:35:07" ["modified"]=> string(19) "2024-08-22 09:06:50" } ["Member"]=> array(10) { ["id"]=> string(2) "35" ["group_id"]=> string(1) "1" ["first_name"]=> string(5) "Marko" ["last_name"]=> string(9) "Paunović" ["first_name_mask"]=> string(5) "marko" ["last_name_mask"]=> string(8) "paunovic" ["username"]=> string(5) "marko" ["password"]=> string(40) "3bd37b326d19d1880d3b93a4b32e8fb3a90fa122" ["born"]=> string(19) "2033-03-07 20:35:00" ["created"]=> string(19) "2009-06-02 20:37:03" } }
    Marko Paunović, 22nd August 2024
  • WW2 Monastery Scene – Adding Texture
              array(2) {
      ["Article"]=>
      array(10) {
        ["id"]=>
        string(3) "406"
        ["member_id"]=>
        string(2) "35"
        ["title_eng"]=>
        string(38) "WW2 Monastery Scene – Adding Texture"
        ["title_hrv"]=>
        string(64) "Diorama samostana u Drugom svjetskom ratu – dodavanje teksture"
        ["mask_eng"]=>
        string(34) "ww2_monastery_scene_adding_texture"
        ["mask_hrv"]=>
        string(60) "diorama_samostana_u_drugom_svjetskom_ratu_dodavanje_teksture"
        ["content_eng"]=>
        string(3809) "

    In this series of articles, I will follow the creation of a diorama of a monastery set at the end of the Second World War when the Americans had already invaded Germany, which shows a company in the middle of a rest. These articles do not actually follow the chronological creation, but are arranged according to some thematic units.

    Click for enlarged picture

    In addition to the miniatures and models (Jeep and SDKFZ 223), the creation of which I will not describe separately in this series of articles, the addition of the floor and ceiling as well as the positioning of the fountain completed the construction of the scenic part of the diorama. (in the next article, I will deal more with composition, ideas and incorporating various parts/figures into the story of the diorama itself.) Before painting, all that remained was to add texture. The picture below shows all the materials and bits I used for the texture.

    Click for enlarged picture

    For the texture mixture, I used three to four types of sprinkles of various granulations, which I mixed with a mixture of water and PVA glue. The final consistency of the mixture is like a paste. You don't want it to be too thin so it doesn't leak everywhere.

    Click for enlarged picture

    Click for enlarged picture

    I glued the larger parts, such as bricks and tiles, with superglue and then applied the rest of the mixture with a brush. Also, I then glued a few bricks and tiles onto the mixture (just pushed it in while the mixture was wet and let it dry).

    Click for enlarged picture

    Click for enlarged picture

    Finally, I added the German SDKFZ 223 and laid the rest of the beams, tiles, bricks and other stone material on it. As with the rest of the diorama, I glued those parts together with superglue. I then mixed in more texture compound and covered certain areas of the vehicle. (before you ask, yes the vehicle is fixed and it will be complicated to paint it.)

    Click for enlarged picture

    Click for enlarged picture

    " ["content_hrv"]=> string(3690) "

    U ovoj seriji članaka pratit ću izradu diorame samostana smještenu potkraj drugog svjetskog rata kada su Amerikanci upali već u Njemačku, a koja prikazuje četu usred odmora. Ovi članci zapravo ne prate kronološki izradu, već su poredani po nekim tematskim cjelinama.

    Click for enlarged picture

    Pored minijatura i maketa (Jeep i SDKFZ 223) čiju izradu neću zasebno opisivati u ovoj seriji članaka, dodavanjem poda i plafona kao i pozicioniranjem fontane završena je izgradnja scenskog dijela diorame. (u sljedećem članku ću se baviti više kompozicijom, idejama i ukomponiravanjem raznih dijelova/figura u samu priču diorama.) Prije bojanja ostalo je samo dodati teksturu. Na slici niže, prikazani su svi materijali i bitsi koje sam koristio za teksturu.

    Click for enlarged picture

    Za smjesu teksture koristio sam tri do četiri vrste posipa razne granulacije koje sam pomiješao sa smjesom vode i PVA ljepila. Konačna konzistencija smjese je poput paste. Ne želite da vam bude prerijetka kako vam ne bi curila posvuda.

    Click for enlarged picture

    Click for enlarged picture

    Veće dijelove, poput cigli i crijepova sam zalijepio superljepilom te sam onda kistom nanio ostatak smjese. Također, nekolicinu cigli i crijepova sam onda naknadno zalijepio na smjesu (samo ugurao dok je smjesa bila mokra i pustio da se osuši).

    Click for enlarged picture

    Click for enlarged picture

    Na kraju sam dodao njemački SDKFZ 223 i na njega položio ostatak greda, crijepova, cigli i ostalog kamenog materijala. Kao i s ostatkom diorame, te dijelove sam zalijepio superljepilom. Potom sam umiješao još smjese za teksturu i pokrio određene dijelove vozila. (prije nego što pitate, da, vozilo je fiksirano i da bit će komplicirano bojati ga.)

    Click for enlarged picture

    Click for enlarged picture

    " ["created"]=> string(19) "2024-08-22 07:47:28" ["modified"]=> string(19) "2024-08-22 07:47:28" } ["Member"]=> array(10) { ["id"]=> string(2) "35" ["group_id"]=> string(1) "1" ["first_name"]=> string(5) "Marko" ["last_name"]=> string(9) "Paunović" ["first_name_mask"]=> string(5) "marko" ["last_name_mask"]=> string(8) "paunovic" ["username"]=> string(5) "marko" ["password"]=> string(40) "3bd37b326d19d1880d3b93a4b32e8fb3a90fa122" ["born"]=> string(19) "2033-03-07 20:35:00" ["created"]=> string(19) "2009-06-02 20:37:03" } }
    Marko Paunović, 22nd August 2024
  • WW2 Monastery Scene – Making a Wooden Ceiling/Floor
              array(2) {
      ["Article"]=>
      array(10) {
        ["id"]=>
        string(3) "405"
        ["member_id"]=>
        string(2) "35"
        ["title_eng"]=>
        string(53) "WW2 Monastery Scene – Making a Wooden Ceiling/Floor"
        ["title_hrv"]=>
        string(73) "Diorama samostana u Drugom svjetskom ratu – izrada drvenog plafona/poda"
        ["mask_eng"]=>
        string(48) "ww2_monastery_scene_making_a_wooden_ceilingfloor"
        ["mask_hrv"]=>
        string(68) "diorama_samostana_u_drugom_svjetskom_ratu_izrada_drvenog_plafonapoda"
        ["content_eng"]=>
        string(6366) "

    In this series of articles, I will follow the creation of a diorama of a monastery set at the end of the Second World War when the Americans had already invaded Germany, which shows a company in the middle of a rest. These articles do not actually follow the chronological creation, but are arranged according to some thematic units.

    Click for enlarged picture

    In this article, we start with "serious" work on the diorama. The base of the diorama is a plaster scene produced by RT Diorama. Most of the parts are made of plaster, although the set also includes laser-cut MDF parts (window and door frames), resin 3D prints (hinges, statues) and stained-glass windows in the form of printed foil. I added two more to that set. One is a fountain (also a mix of plaster casting with resin 3D printed details) and the other is 3D printed resin statues. The monastery set has great details, but also one rather big drawback. The inside of the walls is smooth - without texture or detail. Therefore, I started thinking about how to remove this deficiency. The first thing I decided was to add a ceiling (ground floor) or a floor (first floor).

    Click for enlarged picture

    After a bit of research, I decided that these buildings would be best suited to a wooden structure (beams) with a wooden plank floor/ceiling. I decided to make the beams from 5 mm thick balsa, which I cut into 5 x 5 mm beams about 10 cm long. When I cut them out, I beveled the edges with a scalpel.

    Click for enlarged picture

    Click for enlarged picture

    Click for enlarged picture

    Click for enlarged picture

    I glued the beams at a right angle to get the structure. Then I made the shape of the floor/ceiling out of 2mm thick balsa. Then I cut 5 mm wide boards (approx. 5 cm long) from the same balsa, cut the edges and arranged them in the desired pattern/arrangement.

    Click for enlarged picture

    Click for enlarged picture

    Click for enlarged picture

    Click for enlarged picture

    Click for enlarged picture

    Click for enlarged picture

    Click for enlarged picture

    Click for enlarged picture

    I will fill the space between the beams or the floor and ceiling boards with rubble. I concluded that the fastest process would be to fill only the visible holes with DAS clay and then add the rubble texture in the texturing process.

    Click for enlarged picture

    Click for enlarged picture

    Finally, I decided to use the remaining beams and planks and place them when parts of the ruins. I got the volume before the texture using DAS air-drying clay.

    Click for enlarged picture

    " ["content_hrv"]=> string(6278) "

    U ovoj seriji članaka pratit ću izradu diorame samostana smještenu potkraj drugog svjetskog rata kada su Amerikanci upali već u Njemačku, a koja prikazuje četu usred odmora. Ovi članci zapravo ne prate kronološki izradu, već su poredani po nekim tematskim cjelinama.

    Click for enlarged picture

    U ovom članku počinjemo sa “ozbiljnim” radom na diorami. Osnova diorama je gipsana scena koju proizvodi RT Diorama. Većinom su dijelovi iz gipsa, iako u setu dolaze i laserski rezani MDF dijelovi (okviri prozora i vrata), rezinski 3D printovi (pante, kipovi) te vitraji u obliku printane folije. Na taj set dodao sam jos dva. Jedan je fontana (također miks gipsanog odljevka sa rezinskim 3D printanim detaljima), a drugi su 3D printani rezinski kipovi. Set samostana ima super detalje, ali i jedan dosta veliki nedostatak. Unutarnja strana zidova je glatka – bez teksture i detalja. Stoga sam se bacio na razmišljanje kako ukloniti taj nedostatak. Prvo što sam odlučio jest dodati plafon (prizemlja) odnosno pod (prvog kata).

    Click for enlarged picture

    Nakon malo istraživanja, odlučio sam da bi ovim zgradama najbolje odgovarala drvena konstrukcija (grede) sa podom/plafonom od drvenih dasaka. Grede sam odlučio izraditi iz 5mm debele balze koju sam narezao u 5 x 5 mm grede duljine cca 10ak cm. Kad sam ih izrezao, skalpelom sam zakosio rubove.

    Click for enlarged picture

    Click for enlarged picture

    Click for enlarged picture

    Click for enlarged picture

    Grede sam zalijepio pod pravim kutom da dobijem konstrukciju. Potom sam od 2mm debele balze izradio oblik poda/plafona. Potom sam od iste balze izrezao 5mm široke daske (duljine cca 5 cm), zarezao rubove i složio ih u željeni uzorak/raspored.

    Click for enlarged picture

    Click for enlarged picture

    Click for enlarged picture

    Click for enlarged picture

    Click for enlarged picture

    Click for enlarged picture

    Click for enlarged picture

    Click for enlarged picture

    Prostor između greda odnosno daski poda i plafona zapunit ću šutom. Zaključio sam da bi najbrži proces bio da popunim samo vidljive rupe sa DAS glinamolom i onda u procesu teksturiranja dodam teksturu šute.

    Click for enlarged picture

    Click for enlarged picture

    Za kraj, odlučio sam iskoristiti preostale grede i daske te ih postaviti kad dijelove ruševine. Volumen prije teksture sam dobio koristeći DAS glinamol.

    Click for enlarged picture

    " ["created"]=> string(19) "2024-08-22 07:33:51" ["modified"]=> string(19) "2024-08-22 07:33:51" } ["Member"]=> array(10) { ["id"]=> string(2) "35" ["group_id"]=> string(1) "1" ["first_name"]=> string(5) "Marko" ["last_name"]=> string(9) "Paunović" ["first_name_mask"]=> string(5) "marko" ["last_name_mask"]=> string(8) "paunovic" ["username"]=> string(5) "marko" ["password"]=> string(40) "3bd37b326d19d1880d3b93a4b32e8fb3a90fa122" ["born"]=> string(19) "2033-03-07 20:35:00" ["created"]=> string(19) "2009-06-02 20:37:03" } }
    Marko Paunović, 22nd August 2024
  • WW2 Monastery Scene – stretcher with statues
              array(2) {
      ["Article"]=>
      array(10) {
        ["id"]=>
        string(3) "404"
        ["member_id"]=>
        string(2) "35"
        ["title_eng"]=>
        string(46) "WW2 Monastery Scene – stretcher with statues"
        ["title_hrv"]=>
        string(64) "Diorama samostana u Drugom svjetskom ratu – nosila sa kipovima"
        ["mask_eng"]=>
        string(42) "ww2_monastery_scene_stretcher_with_statues"
        ["mask_hrv"]=>
        string(60) "diorama_samostana_u_drugom_svjetskom_ratu_nosila_sa_kipovima"
        ["content_eng"]=>
        string(6102) "

    In this series of articles, I will follow the creation of a diorama of a monastery set at the end of the Second World War when the Americans had already invaded Germany, which shows a company in the middle of a rest. These articles do not actually follow the chronological creation, but are arranged according to some thematic units.

    Click for enlarged picture

    If you look at the picture above, a soldier in a Jeep is taking away the statues. Given that the model of the Jeep that I will actually put on the dioramas (this one is just a placeholder with another dioramas) is an ambulatory one - so it comes with a scalameri for an ambulatory stretcher, I imagined that I would place the statues on those stretchers. This caused several problems that needed to be addressed. First, the number of statues should be increased. I had three statues (from the RT Diorama set). Another problem is that it would deform under the weight of the stretcher (at least the fabric part). How to solve problems? Let's start with the first one:

    Click for enlarged picture

    I needed to copy the statues. By the way, if you follow my articles and/or works, you will know that I love working with Siligum. This time I didn't have it at hand, so Kruno jumped in and lent me Blue Stuff – a thermoplastic compound used to make moulds. It is necessary to heat the water (to boiling) and immerse the mixture for a few minutes.

    Click for enlarged picture

    When it warms up, it is mixed to model. I pushed the mould over the statues and hoped for a good outcome.

    Click for enlarged picture

    It turned out relatively well. The statues were easily pulled out of the new mold and, most importantly, no part broke in the process.

    Click for enlarged picture

    To make casts, I will use modeling plaster. Considering the fine details, I mixed it a little watery to make it easier to fill the mold. That way I sacrificed a bit of hardness in exchange for better reproduction.

    Click for enlarged picture

    Click for enlarged picture

    After about an hour of drying per batch (normally it dries for about 30 minutes, but due to the increased water content, extra time was needed), I took the castings out of the mold. And I have to admit, I wasn't thrilled. Compared to molds made of Siligum, here the "resolution" of the mold is significantly lower. The time for forming the mold is very short (as soon as the temperature drops a little, it becomes very rubbery and somewhat elastic, which is not good at all for flat parts, such as statues). With that alone, another problem arises, the lower part of the mold (when it is turned) I could not straighten at all (which when I use Siligum is not a problem to do). This in turn causes problems when pouring plaster (which is watery, if you remember) so it is quite fiddly to get the mold to be horizontal. Actually the only positive side of Blue Stuff is the fact that if you reheat it, you can mold something else. If you need that mold for several projects - then any advantage over Siligum is lost. After removing from the mold, it was necessary to remove excess material. Since the plaster was quite watery, this was no problem.

    Click for enlarged picture

    And now we come to the solution of the second problem - the sagging of the fabric. I have to thank the Crown for the great solution! How would you carry a bunch of heavy statues on a stretcher without risking the fabric tearing? Simply put a couple of boards over the stretcher so that the statues stand on the boards! The best solutions are the most common and the simplest.

    Click for enlarged picture

    And finally, I fixed the statues in motion with the ropes that I described in the last article, on one of the stretchers. I used a chain for the second stretcher.

    Click for enlarged picture

    " ["content_hrv"]=> string(5984) "

    U ovoj seriji članaka pratit ću izradu diorame samostana smještenu potkraj drugog svjetskog rata kada su Amerikanci upali već u Njemačku, a koja prikazuje četu usred odmora. Ovi članci zapravo ne prate kronološki izradu, već su poredani po nekim tematskim cjelinama.

    Click for enlarged picture

    Ako promotrite sliku gore, vojnik u Jeepu odvozi kipove. S obzirom da je maketa Jeepa koju ću zapravo staviti na diorama (ovaj je samo placeholder sa jedne druge diorama) ambulantna – pa dolazi sa skalamerijom za ambulantna nosila, zamislio sam da kipove postavljam po tim nosilima. To je uzrokovalo nekoliko problema koje je trebalo riješiti. Prvo, broj kipova bi se trebao povećati. Imao sam tri kipa (iz seta od RT Diorama). Drugi problem je taj što bi se pod težinom nosila deformirala (barem tkaneni dio). Kako riješiti probleme? Krenimo sa prvim:

    Click for enlarged picture

    Potrebno mi je bilo kopirati kipove. Inače, ukoliko pratite moje članke i/ili radove, znat ćete da to obožavam raditi sa Siligumom. Ovoga puta nije mi bio pri ruci pa je uletio Kruno koji mi je posudio Blue Stuff – termoplastičnu smjesu koja se koristi za izradu kalupa. Potrebno je ugrijati vodu (do kipljenja) i uroniti smjesu na par minuta.

    Click for enlarged picture

    Kad se zagrije, smjesa se da modelirati. Utisnuo sam kipove i nadao se dobrom ishodu.

    Click for enlarged picture

    Ispalo je relativno dobro. Lagano su se kipovi izvukli iz novog kalupa i najbitnije nijedan dio nije puknuo u procesu.

    Click for enlarged picture

    Za izradu odljevaka, koristit ću modelarski gips. S obzirom na sitne detalje, zamiješao sam ga malo vodenastog kako bi lakše popunio kalup. Na taj način sam žrtvovao malo tvrdoće u zamjenu za bolju reprodukciju.

    Click for enlarged picture

    Click for enlarged picture

    Nakon cca sat vremena sušenja po seriji (inače se suši 30ak minuta, ali zbog povećanog udjela u vodi, ekstra vrijeme je bilo potrebno), izvadio sam odljevke iz kalupa. I moram priznati nisam bio oduševljen. U usporedbi sa kalupima od Siliguma, ovdje je „rezolucija“ kalupa bitno niža. Vrijeme za oblikovanje kalupa je jako kratko (čim malo padne temperatura postane jako gumenast i pomalo elastičan što nikako nije dobro za ravne dijelove, poput kipova). Samim time, dolazi do još jednog problema, donji dio kalupa (kad se okrene) nisam mogao nikako izravnati (što kad koristim Siligum nije problem za napraviti). To pak uzrokuje probleme prilikom ulijevanja gipsa (koji je vodenast, ako se sjećate) pa je dosta petljavo dobiti da kalup bude vodoravan. Zapravo jedina pozitivna strana Blue Stuffa je činjenica da ako ga ponovno zagrijete, možete kalupirati nešto drugo. Ukoliko vam taj kalup treba za više projekata – onda se gubi svaka prednost nad Siligumom. Nakon vađenja iz kalupa, bilo je potrebno maknuti viškove materijala. S obzirom da je gips bio podosta vodenast, to nije bio nikakav problem.

    Click for enlarged picture

    I sada dolazimo do rješenja drugog problema – progib tkanine. Moram se ovim putem zahvaliti Kruni na super rješenju! Kako bi mi prenosili hrpu teških kipova na nosilima, a da ne riskiramo da se tkanina podere? Jednostavno, staviti par dasaka po preko nosila tako da kipovi stoje na daskama! Najbolja rješenja su najčešće i najjednostavnija.

    Click for enlarged picture

    I za kraj fiksiranje kipova u vožnji sam odradio sa užadi koju sam opisao u prošlom članku, na jednim nosilima. Za druga nosila koristio sam lanac.

    Click for enlarged picture

    " ["created"]=> string(19) "2024-08-21 08:42:39" ["modified"]=> string(19) "2024-08-21 08:42:39" } ["Member"]=> array(10) { ["id"]=> string(2) "35" ["group_id"]=> string(1) "1" ["first_name"]=> string(5) "Marko" ["last_name"]=> string(9) "Paunović" ["first_name_mask"]=> string(5) "marko" ["last_name_mask"]=> string(8) "paunovic" ["username"]=> string(5) "marko" ["password"]=> string(40) "3bd37b326d19d1880d3b93a4b32e8fb3a90fa122" ["born"]=> string(19) "2033-03-07 20:35:00" ["created"]=> string(19) "2009-06-02 20:37:03" } }
    Marko Paunović, 21nd August 2024
  • WW2 Monastery Scene – making a rope
              array(2) {
      ["Article"]=>
      array(10) {
        ["id"]=>
        string(3) "403"
        ["member_id"]=>
        string(2) "35"
        ["title_eng"]=>
        string(37) "WW2 Monastery Scene – making a rope"
        ["title_hrv"]=>
        string(59) "Diorama samostana u Drugom svjetskom ratu – izrada užeta"
        ["mask_eng"]=>
        string(33) "ww2_monastery_scene_making_a_rope"
        ["mask_hrv"]=>
        string(54) "diorama_samostana_u_drugom_svjetskom_ratu_izrada_uzeta"
        ["content_eng"]=>
        string(2284) "

    In this series of articles, I will follow the creation of a diorama of a monastery set at the end of the Second World War when the Americans had already invaded Germany, which shows a company in the middle of a rest. These articles do not actually follow the chronological creation, but are arranged according to some thematic units.

    Click for enlarged picture

    We continue with the details for the diorama. This time, we're doing rope. For this you need the thinnest copper wire you can find. Like the chain, I found the wire at a hobby store for jewelry making. Cut a certain length and fold it into four equal parts (this will be approximately the length of your rope).

    Click for enlarged picture

    The next step is to snort. Considering that I needed relatively short pieces of rope, I snorted by hand (on one side with pliers, and on the other I put a stick through to fix). The snorting process goes relatively quickly. Note: if you need a long piece of rope, I recommend that you fix one end in a clamp, and insert the other end into an electric drill/mill (instead of a drill bit) and turn it on at the lowest number of turns. You will have your rope very quickly.

    Click for enlarged picture

    Finally, cut off the ends and that's it. In the next article I will show what I used the ropes made like this for.

    Click for enlarged picture

    " ["content_hrv"]=> string(2284) "

    U ovoj seriji članaka pratit ću izradu diorame samostana smještenu potkraj drugog svjetskog rata kada su Amerikanci upali već u Njemačku, a koja prikazuje četu usred odmora. Ovi članci zapravo ne prate kronološki izradu, već su poredani po nekim tematskim cjelinama.

    Click for enlarged picture

    Nastavljamo dalje sa detaljima za dioramu. Ovoga puta, radimo uže. Za to vam je potrebna najtanja bakrena žica koju možete naći. Poput lančića, i žicu sam našao u hobby dućanu za izradu nakita. Odrežite određenu duljinu i presavinite ju na četiri jednaka dijela (to će biti otprilike duljina vašeg užeta).

    Click for enlarged picture

    Sljedeći korak je frkanje. S obzirom da sam imao potrebu za relativno kratkim komadima užeta, frkao sam ručno (s jedne strane kliještima, a na kroz drugu sam provukao štap da fiksiram). Proces frkanja relativno brzo ide. Napomena: ukoliko trebate dosta dugački komad užeta, preporučam da jedan kraj fiksirate u stegu, a drugi uvučete u električnu bušilicu/glodalicu (umjesto svrdla) i uključite na najmanjem broju okreta. Jako brzo ćete imati vaše uže.

    Click for enlarged picture

    Na kraju, odrežite krajeve i to je to. U sljedećem članku ću pokazati za što sam koristio ovako napravljenu užad.

    Click for enlarged picture

    " ["created"]=> string(19) "2024-08-21 08:18:06" ["modified"]=> string(19) "2024-08-21 08:18:06" } ["Member"]=> array(10) { ["id"]=> string(2) "35" ["group_id"]=> string(1) "1" ["first_name"]=> string(5) "Marko" ["last_name"]=> string(9) "Paunović" ["first_name_mask"]=> string(5) "marko" ["last_name_mask"]=> string(8) "paunovic" ["username"]=> string(5) "marko" ["password"]=> string(40) "3bd37b326d19d1880d3b93a4b32e8fb3a90fa122" ["born"]=> string(19) "2033-03-07 20:35:00" ["created"]=> string(19) "2009-06-02 20:37:03" } }
    Marko Paunović, 21nd August 2024

All articles

Latest battle-reports

All battle-reports