PIRATE'S COVE GAMING BOARD – pt.2

Marko Paunović, 22nd August 2020

This article finds the second and final part of the step by step tutorial of the building process of a gaming board for a board game called Pirate's Cove that my club's (terrain workshop did a couple of years ago.

Click for enlarged picture

The Design:

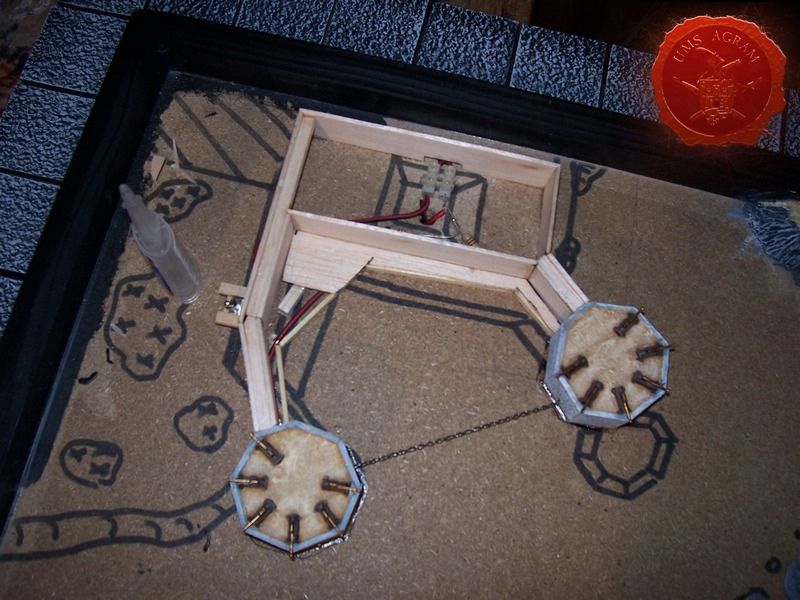
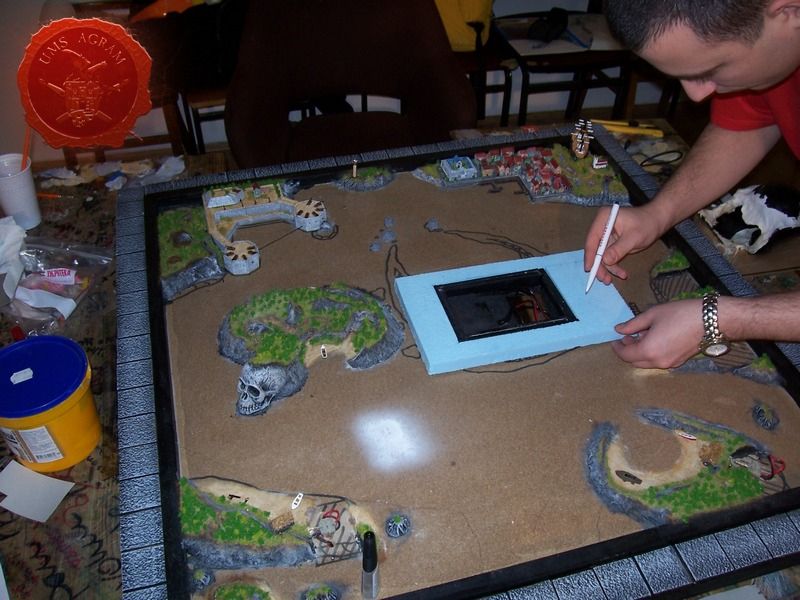
In the previous article, Andrija and I made the basic outline of the board with the frame, ran the wires underneath the board and made all the ships. The next thing, before the actual build, would be to have all the electronics installed so the terrain could be built around it. Before installment, we needed to check all the calculations and agree on the final layout of all the features.

Click for enlarged picture

Electronics:

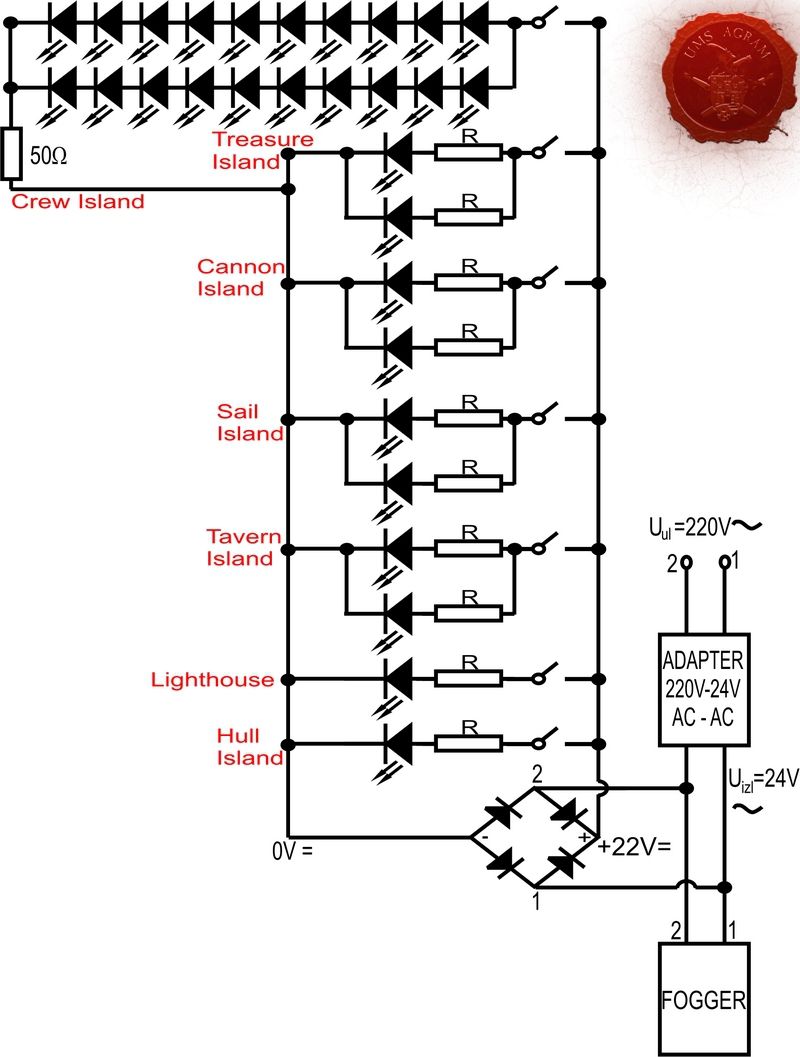
In this model we decided to fit the smoke generator (hereinafter - fogger), and in every house an LED would be built in order to evoke the effect of burning lamps or candles. As the power source for the board we chose the electricity from the grid which meant 220V AC current (in Croatia). Therefore the alternating current must be mentioned here, since the fogger is powered via the adapter from the city grid. The adapter which goes with the fogger changes AC 220V current to 24V AC also. (NOTE: If the device transforms the current from 220V AC to 24V DC for example, it is then called the transformer - author's note).

The advantage of using city power grid (ie adapters and transformers) is that there is no concern about the consumption of electricity, namely, no batteries which could be spent.

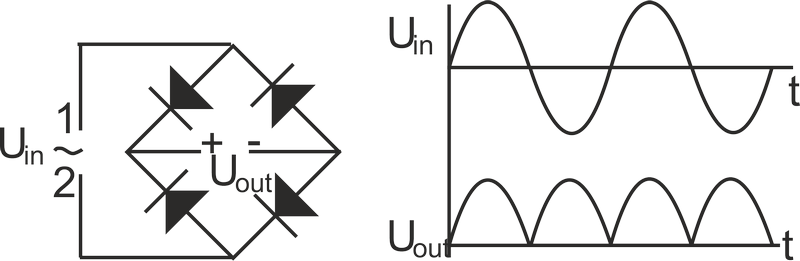
Since the LEDs are working exclusively on DC, it was necessary to connect the LED circuitry in parallel with the fogger. Apart from the fogger branch, we needed to extract one branch to go through Graetz bridge which would be connected to all the LED circuitry. As explained in a previous issue, Graetz combination (ie single-phase full-wave rectifier) only corrects the voltage, but it does not ''straighten'' it. In order to straighten the voltage it is necessary to add an RC circuit. In this gaming board, that was not necessary to make because the local electrical grid works on frequency f = 50 Hz (meaning that the voltage is sinusoidal and makes 50 cycles per second). Using a single-phase full-wave rectifier that frequency doubles, so the frequency is 100Hz. The human eye does not notice the higher frequency of 20Hz. What does this mean exactly? That our LED will be flashing 100 times per second, but you will not notice it. Indeed, it will look as if the LED were constantly lit. It should be noted that Graetz circuit losses of approximately 10% and that voltage 24V DC will therefore be around 22V DC.

Click for enlarged picture

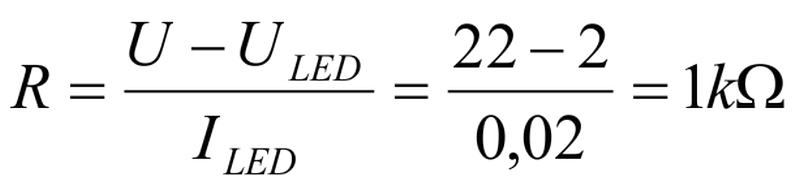
The calculation of the LED circuits is relatively simple because there is a lot of repetition. Each branch (except Crew Island) looks the same and as far as the resistance calculation runs as follows:

Click for enlarged picture

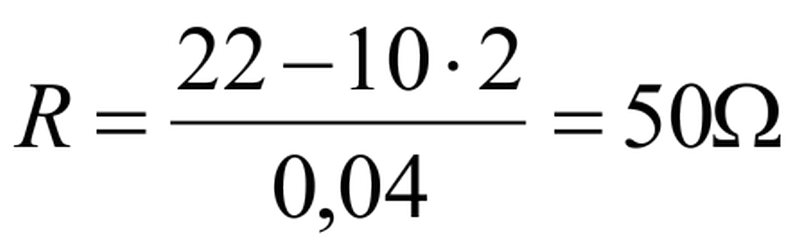
and for Crew Island:

Click for enlarged picture

Here we calculate the electrical power in each branch :

Click for enlarged picture

which is relatively high power. It is no surprise when one considers the fact that the resistor reduces the voltage for 20V! This information is important when choosing the resistor, because when you buy it, you will need to emphasize that you are looking for such a powerful resistor. For the Crew Island two resistors of 50Ω and 0.04 W are required

Click for enlarged picture

This result is also not surprising because the resistor reduces the voltage for only 2V, and through it flows a current of 20mA.

We now return to the beginning - the adapter, which in this case has Imax=1200mA. The next step is to add all the currents in the branches.

Click for enlarged picture

So, to run all the LEDs you need 240mA which leaves 960mA for fogger to work, which after testing with a multimeter showed that is enough. If it were not,the calculation should be revised.

Finally, the elements needed for this project are:
• Fogger (with adapter AC 220V → 24V AC)
• 2 pairs of male-female Jack's
• Graetz bridge
• 7 switches
• 10 R = 1kΩ resistor R, P = 0.5 W
• 2 R = 50Ω resistor
• 27 LEDs (yellow, 3mm)
• 2 LEDs (red, 5mm → Treasure Island, the eyes of the skull)
• 1 LED (red, 3mm → Tavern Island, the upper floor tavern)
• a minimum of 10m of wire.

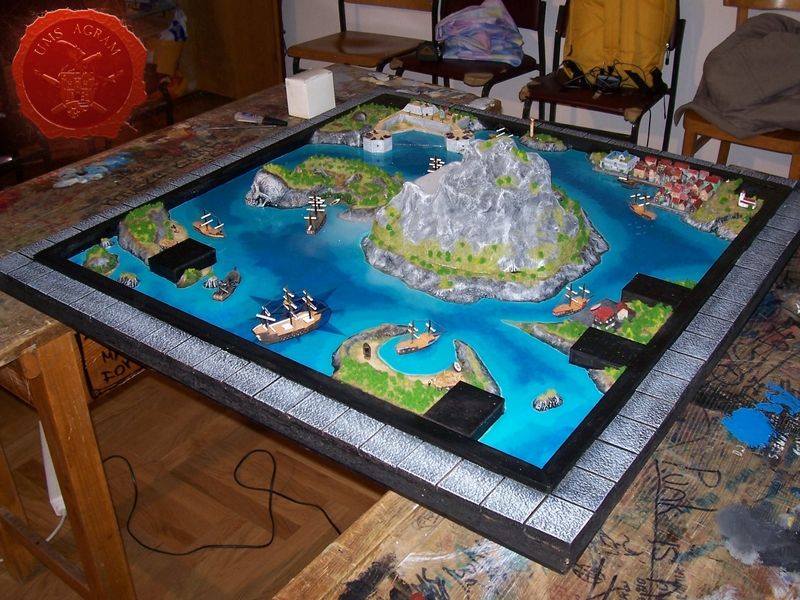
The Continuation of the Build

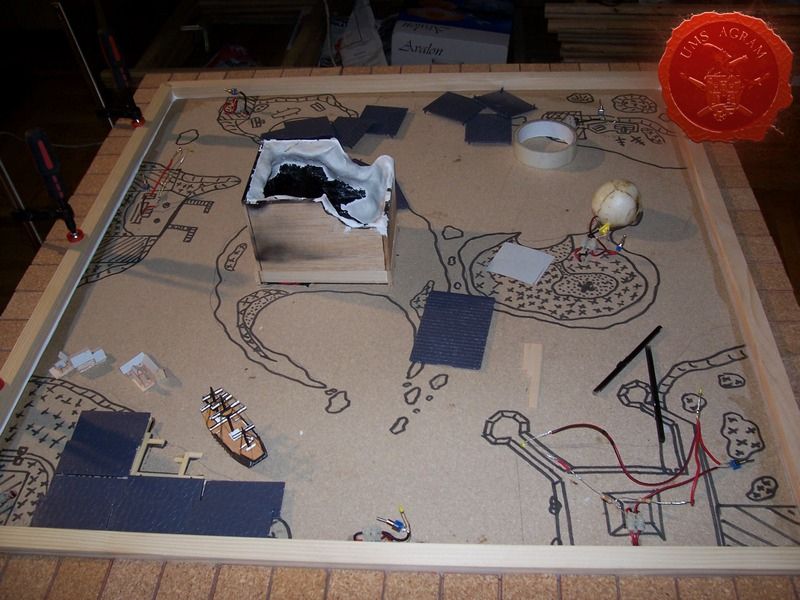
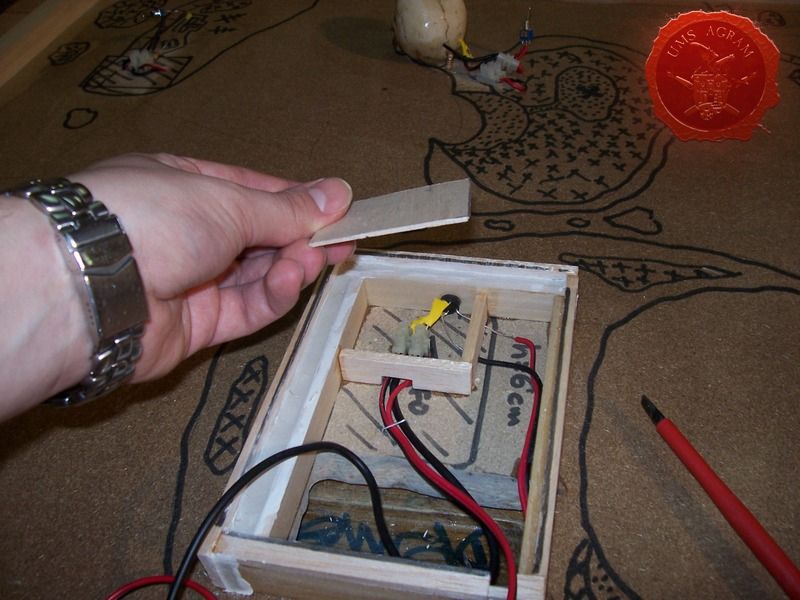
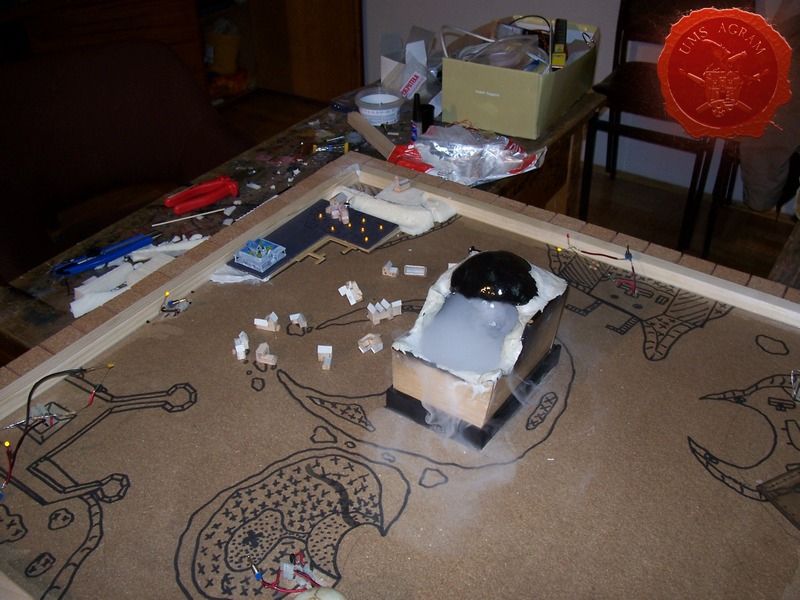
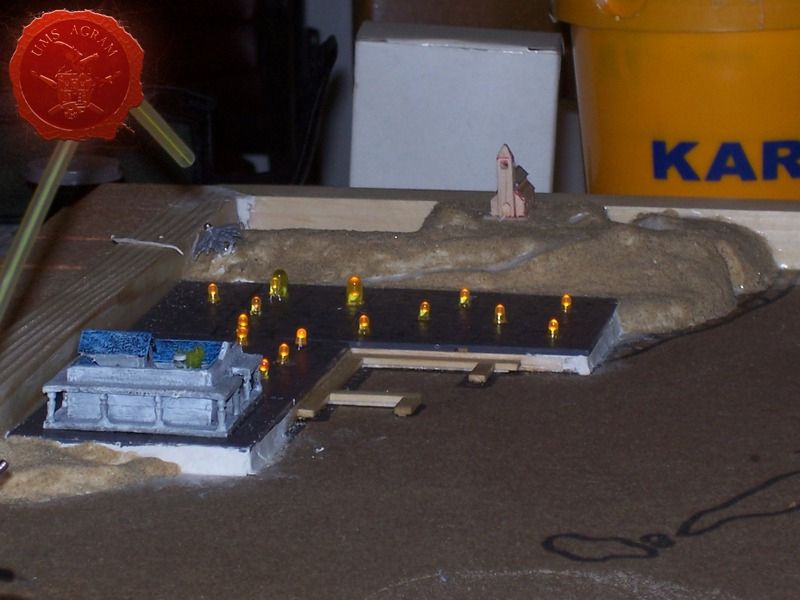
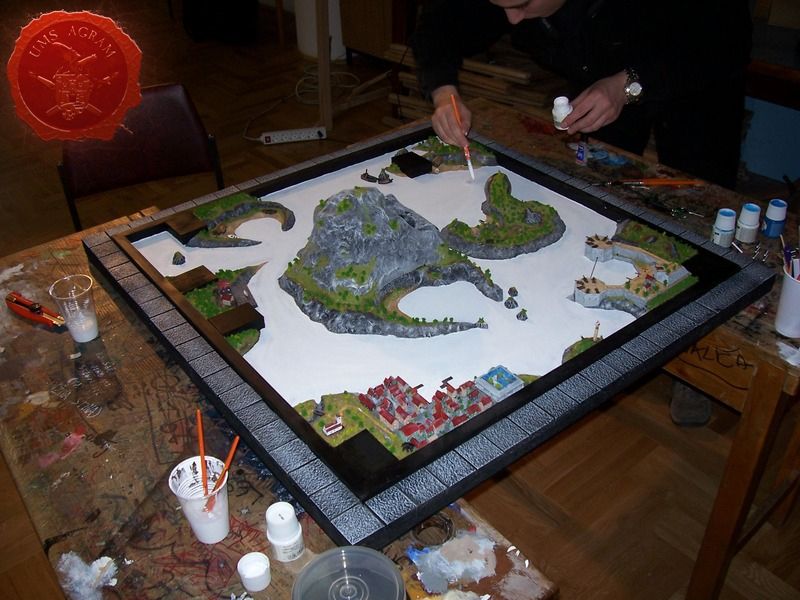
Once the electronics were installed and the Graetz bridge was prodected inside a box that was made from balsa wood, we did a test run. The LEDs indeed did not flicker, the volcano produced the fog and we could proceed with the terrain build.

Click for enlarged picture

Click for enlarged picture

Click for enlarged picture

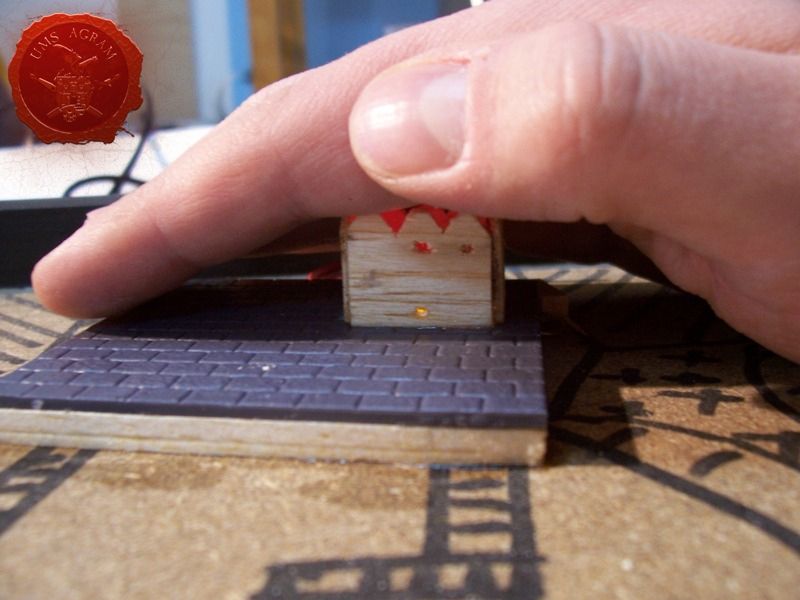
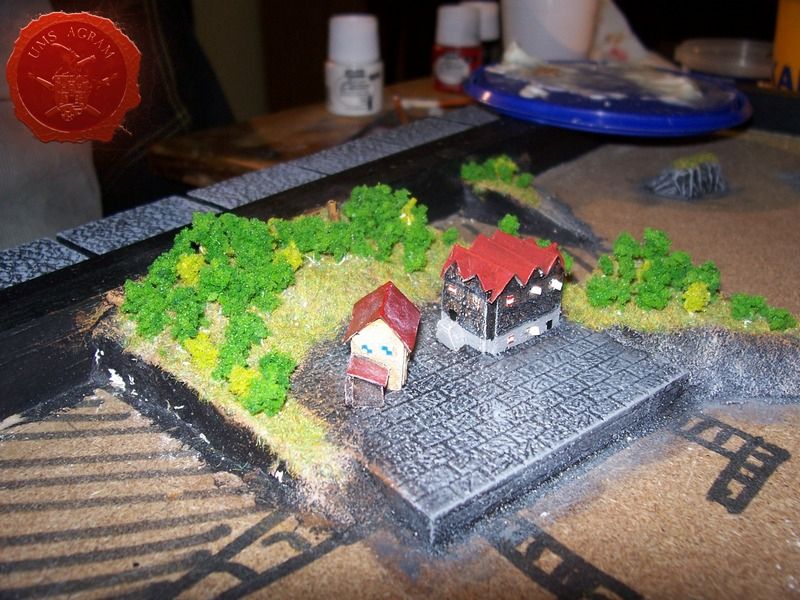
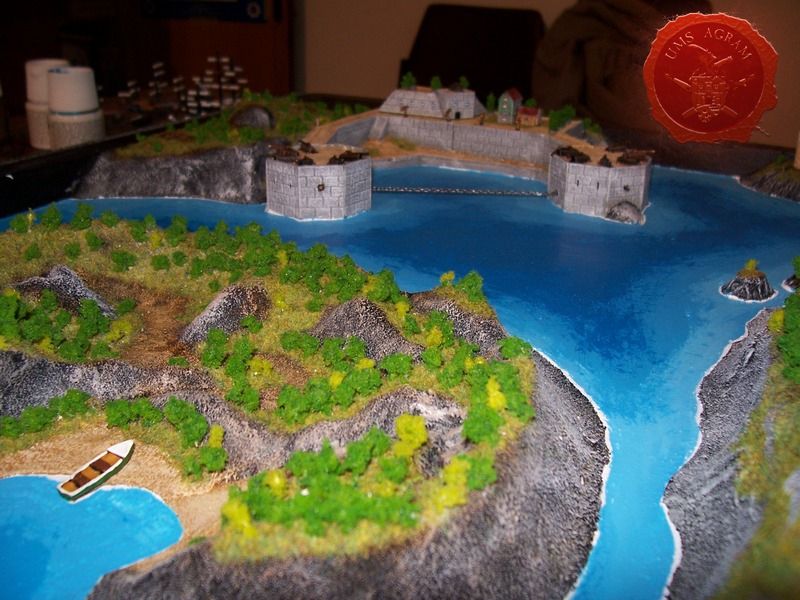
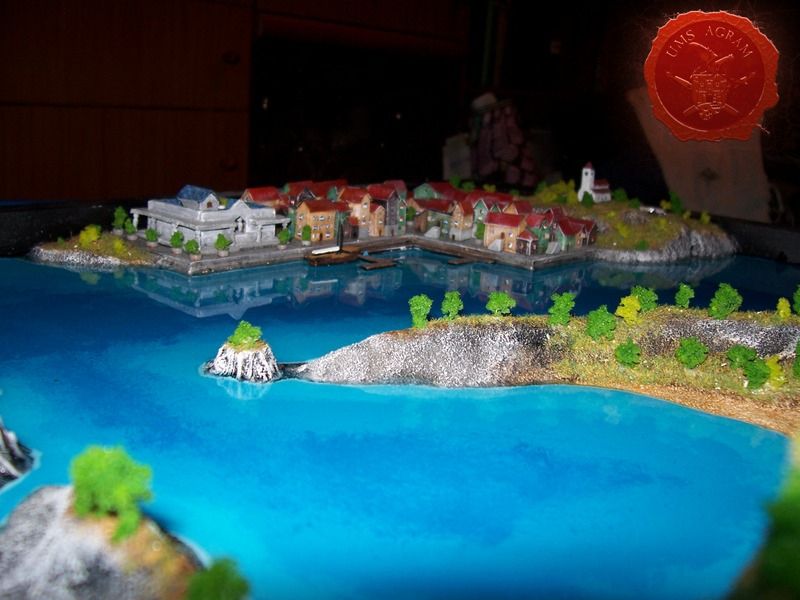
The first island we tackled was Crew Island. We decided to have a small sea town with a town hall and a church with a graveyard on a hill. The streets of the town were made from plastic pieces of a 1/72 medieval castle. The buildings were built by Andrija from 1,5mm thick balsa wood and thin card. The window shutters were about 1x1mm in size and were each cut from a piece of paper. We placed most of the buildings on top of 3mm yellow LEDs that were drilled through the bottom of the plastic street construction.

Click for enlarged picture

Click for enlarged picture

Click for enlarged picture

Click for enlarged picture

Click for enlarged picture

Click for enlarged picture

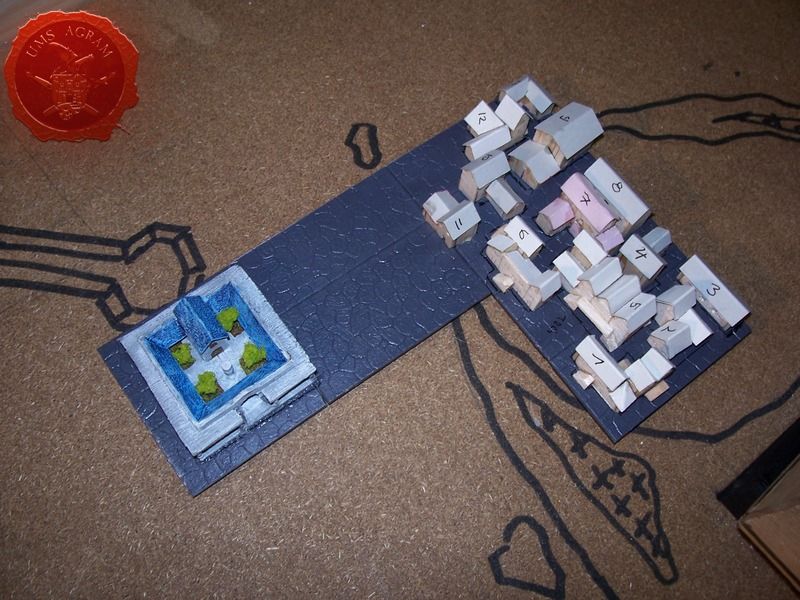
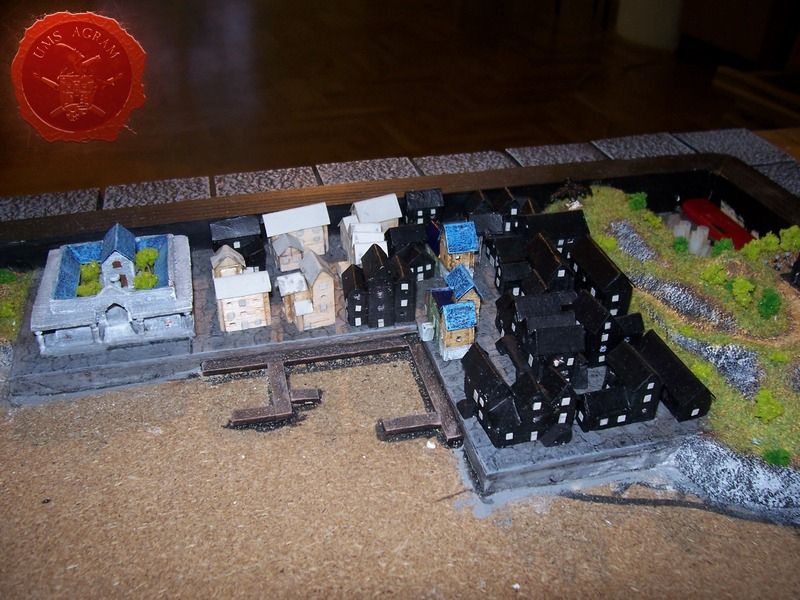
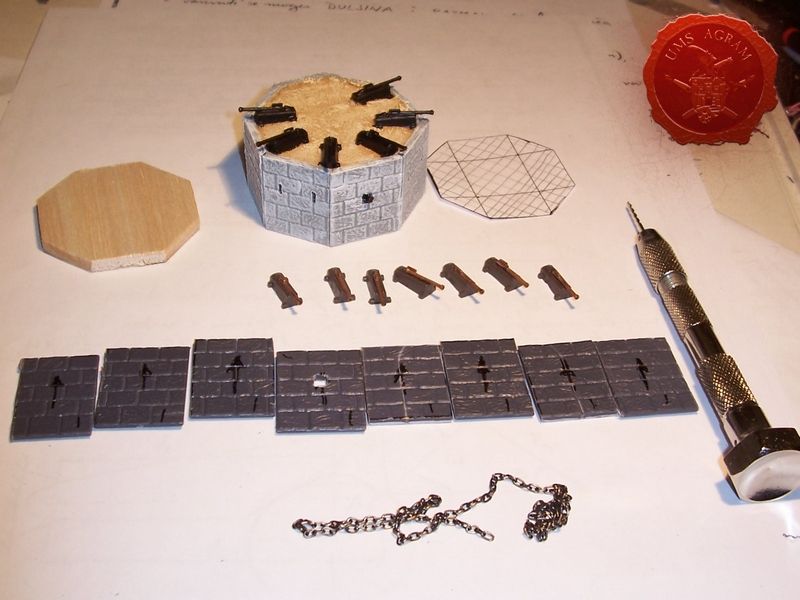
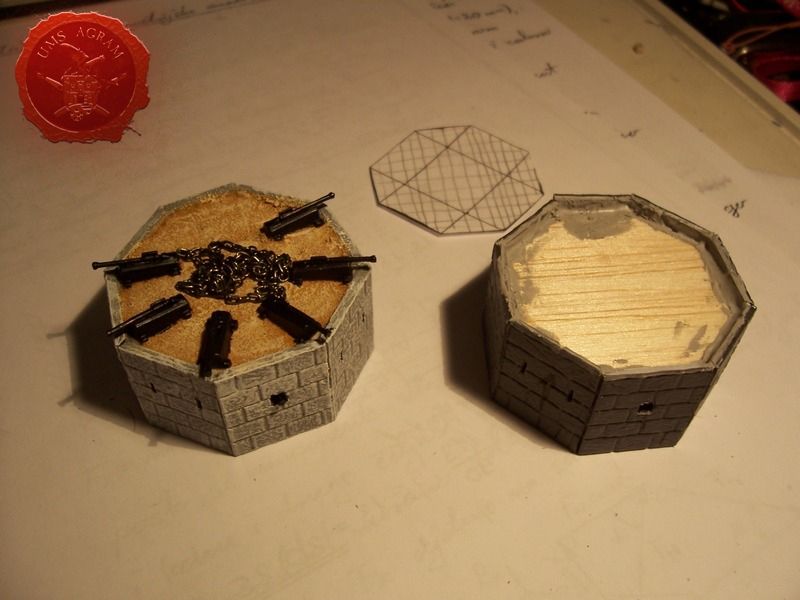
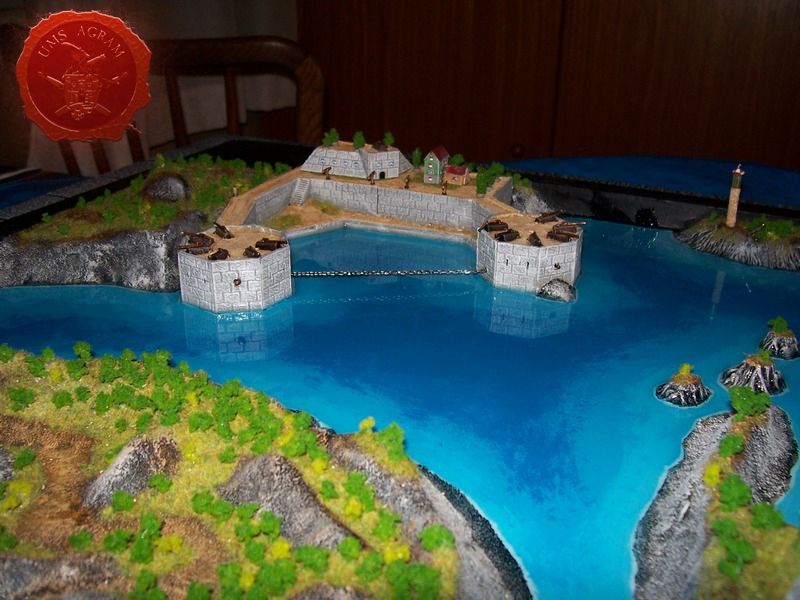
The fortress on Gun Island was done from the same medieval castle plastic kit. Sides of the octogonal bastions were carefully cut using a scalpel blade. The guns were salvaged from a Revell plastic ship. To finish the job, we placed a chain at the port entrance.

Click for enlarged picture

Click for enlarged picture

Click for enlarged picture

Click for enlarged picture

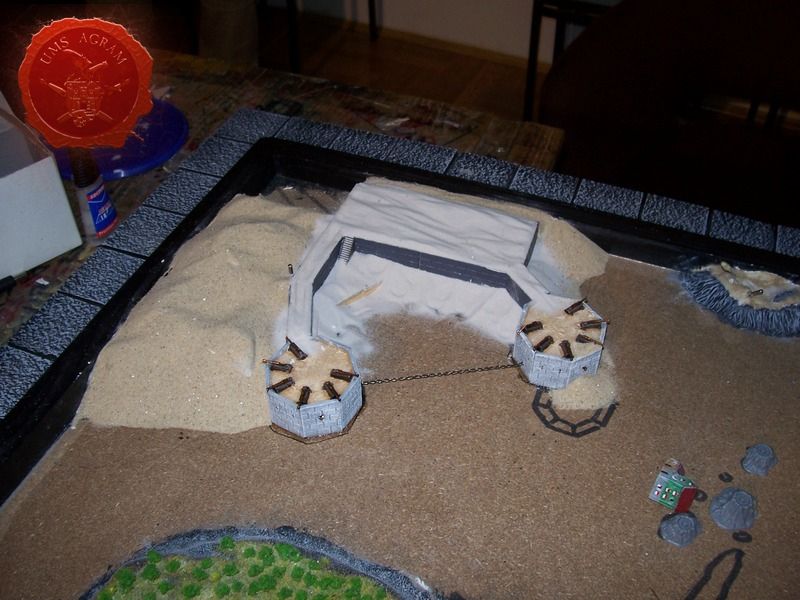
The body of all the islands was made from 2cm thick HD styrofoam. The beaches, cliffs and the rest of the features were modelled from air drying clay (DAS). The piers were done from 2mm thick balsa wood. Once the clay and PVA glue were dry, the islands were coated in watered down PVA glue. The top surfaces were sprinkled over with coarser sand while the beaches were covered with smallest grain sand we could find. In this case, it was chinchilla sand from a local pet shop.

Click for enlarged picture

Click for enlarged picture

Click for enlarged picture

Click for enlarged picture

Click for enlarged picture

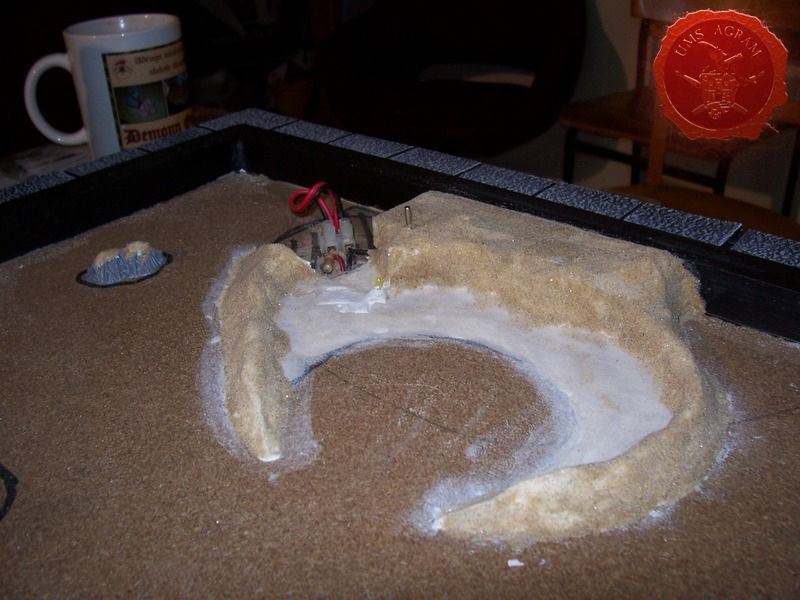
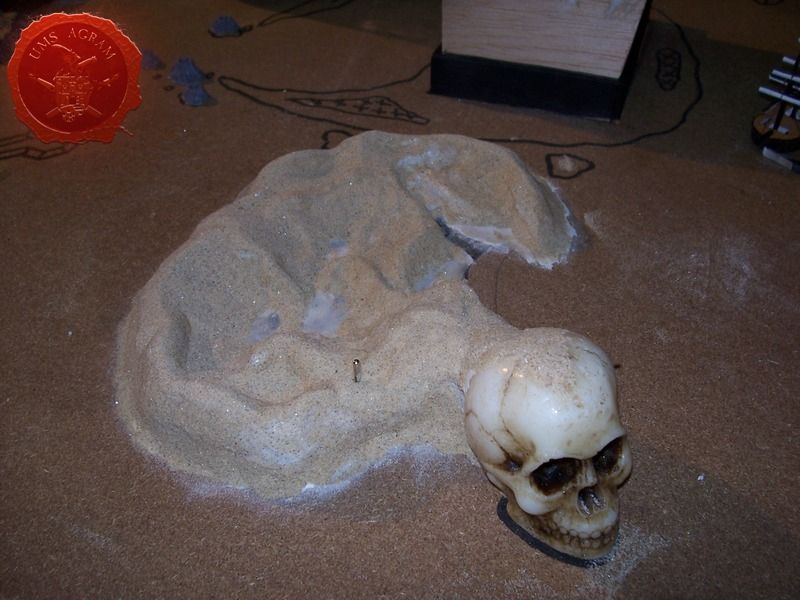
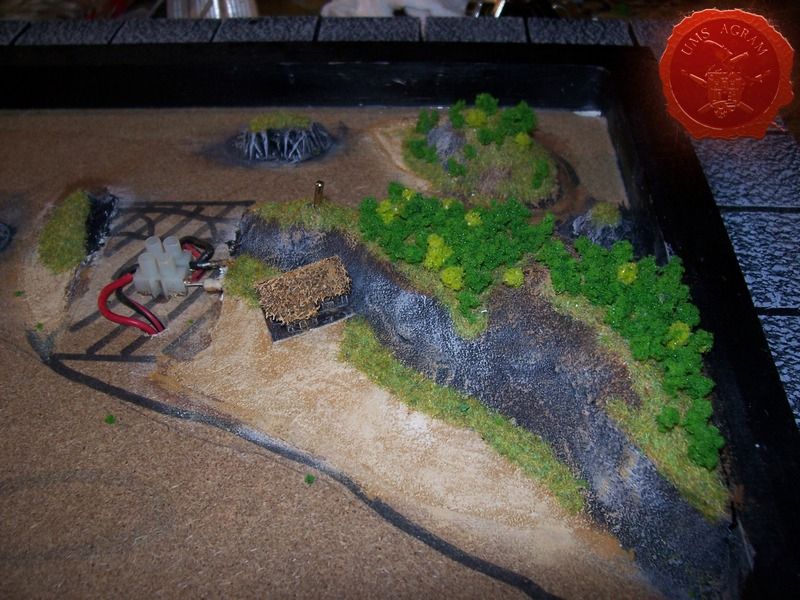
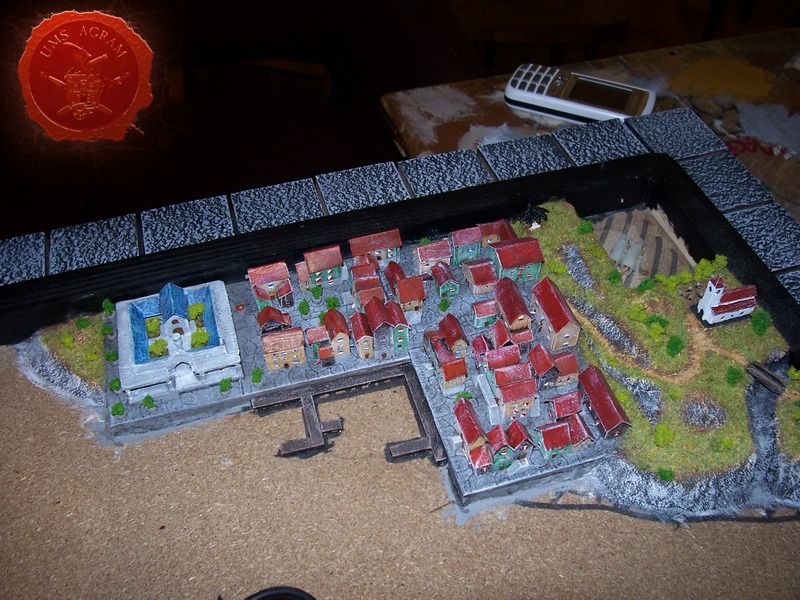
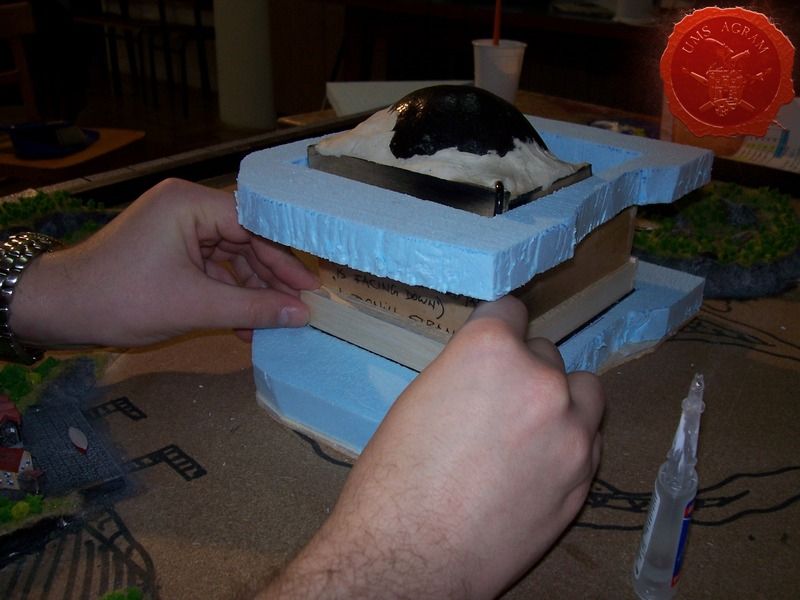
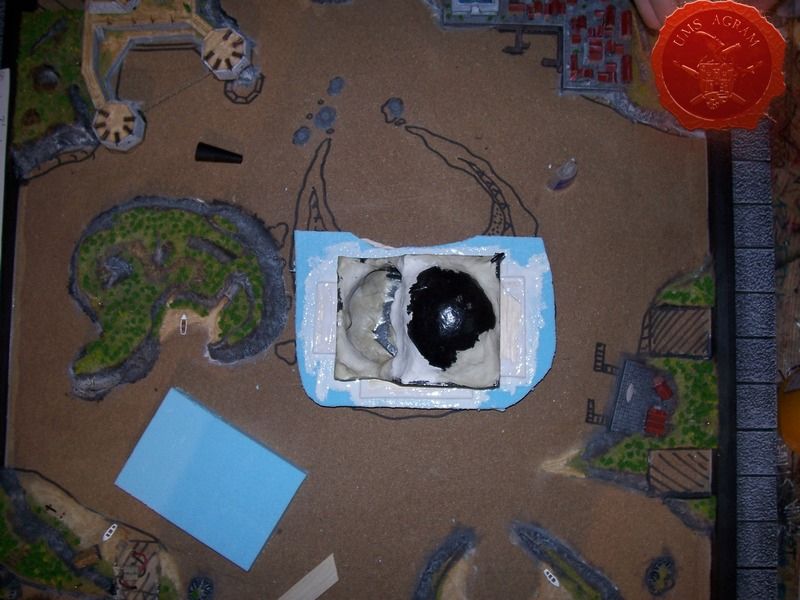
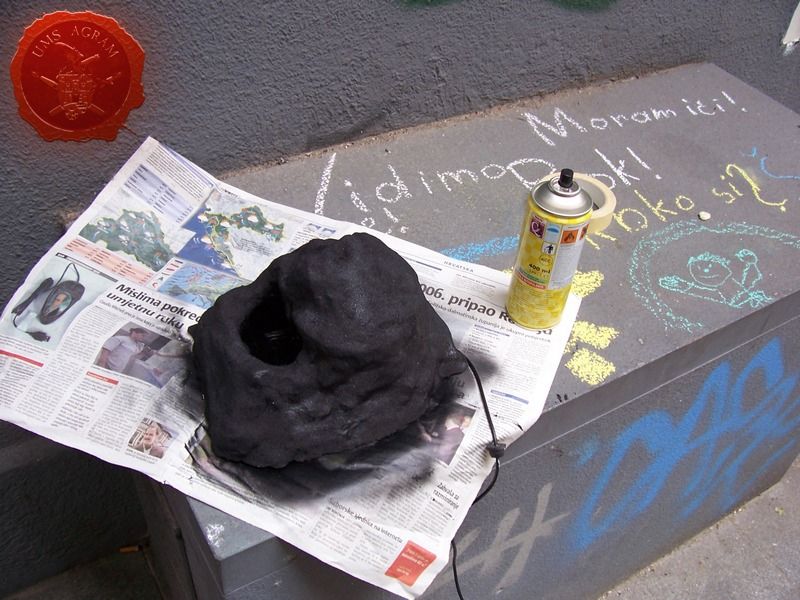
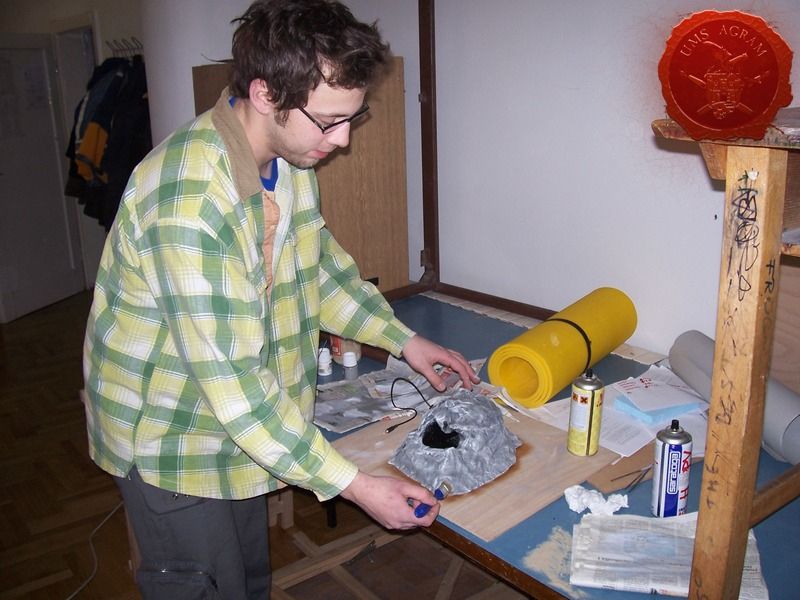
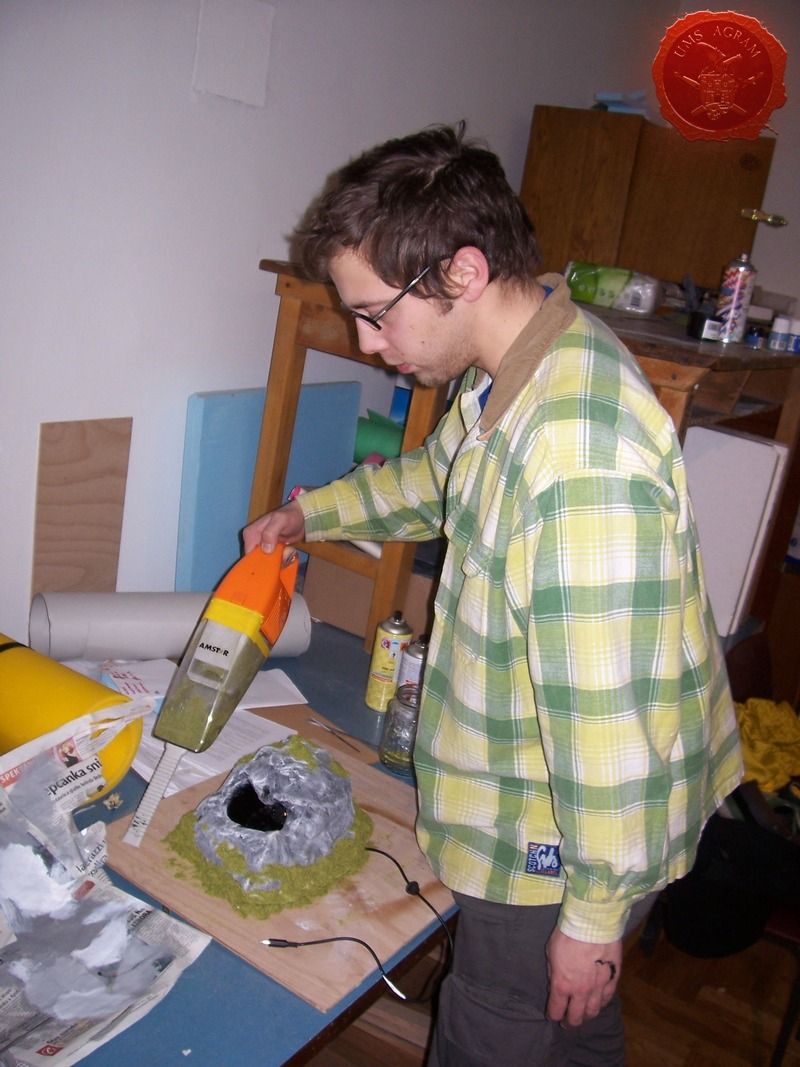
With this, most of the islands were done. All that was left was to do the Pirate's Cove island and make a removable volcano. We had to make the volcano removable to make it possible to fill and empty the vessel for the water that the fogger uses to make fog. If we left the board in one piece, it would have been impossible to empty the tank which would eventually cause the formation of calk or something even worse. Again, the body of the island was built by HD styrofoam. Using styrofoam boards made it possible to have a straight cut between the island and the removable volcano. Once the island part of styrofoam was dry, the tank was placed in its spot and around it another layer of styrofoam was placed and glued to the tank from the top side. Once it was dry, we made the island and volcano features following the same procedure as we did for the rest of the islands using DAS air drying clay. Once it was dry, we textured it with sand (two different sizes).

Click for enlarged picture

Click for enlarged picture

Click for enlarged picture

Click for enlarged picture

Click for enlarged picture

Click for enlarged picture

Click for enlarged picture

Click for enlarged picture

Click for enlarged picture

Click for enlarged picture

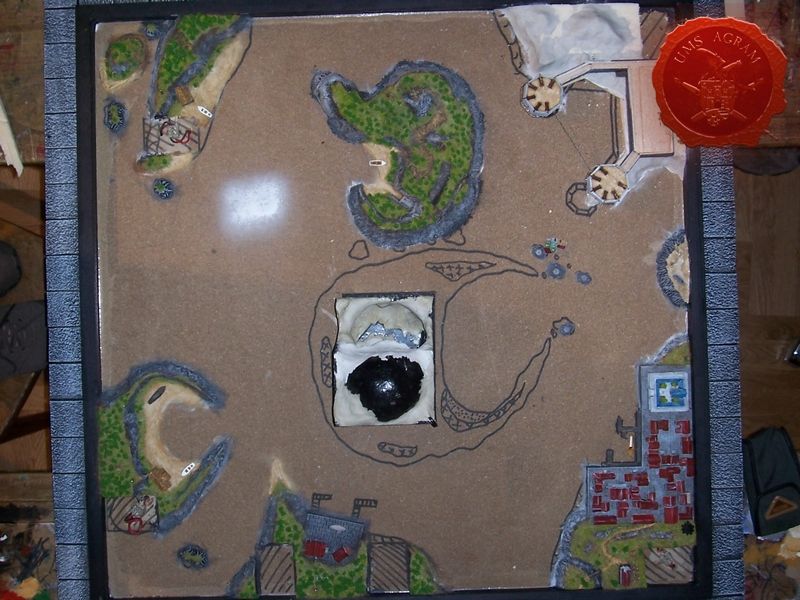
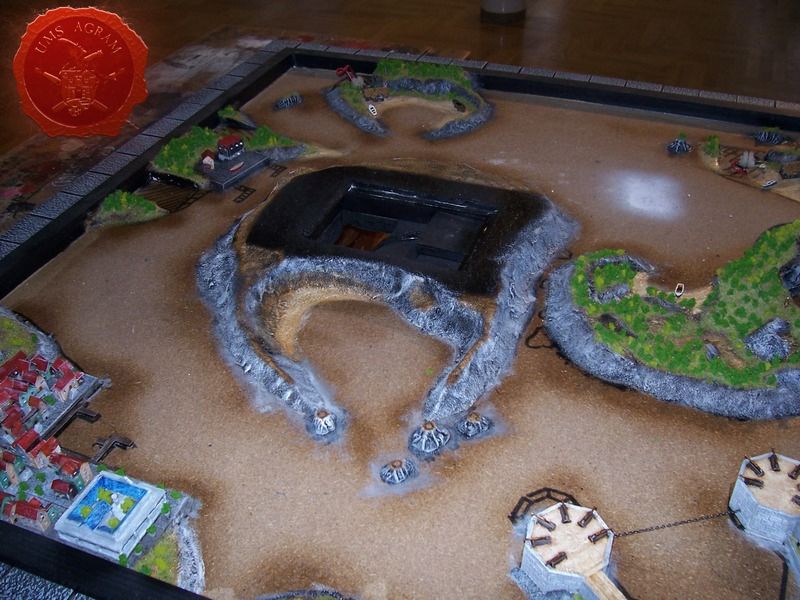
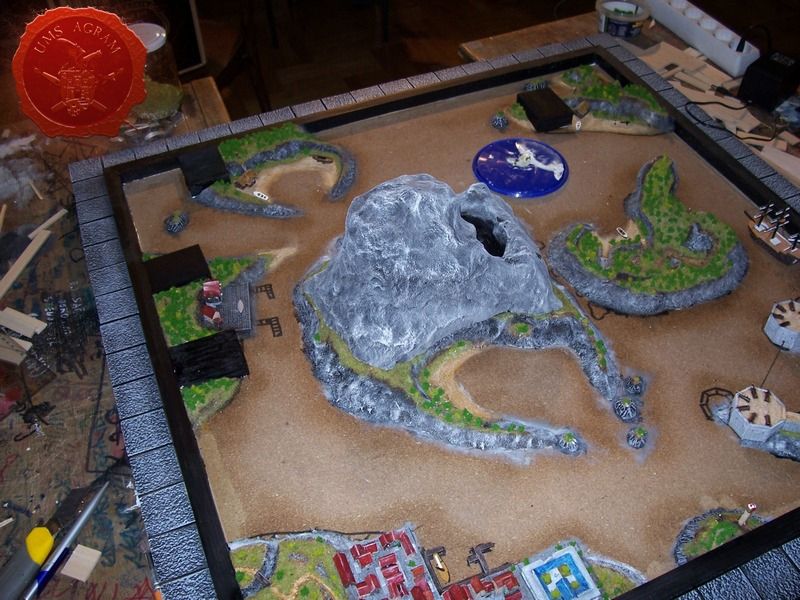
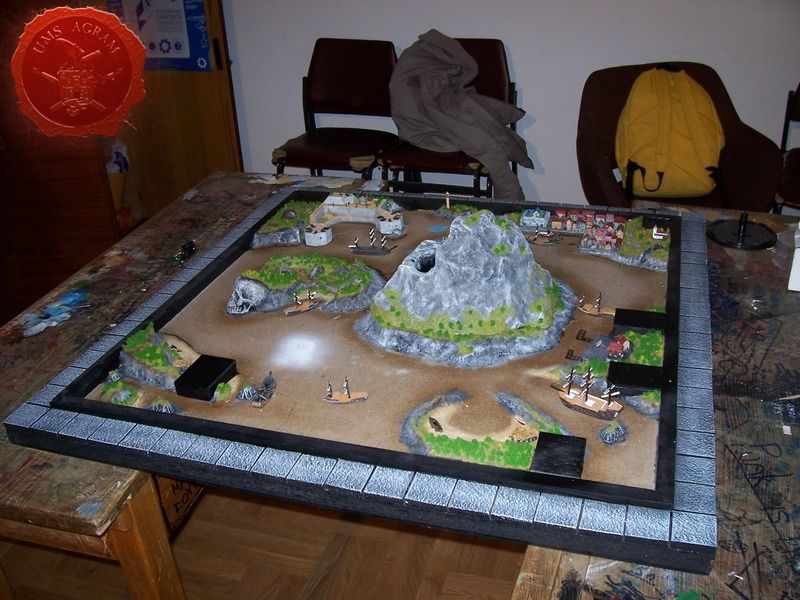
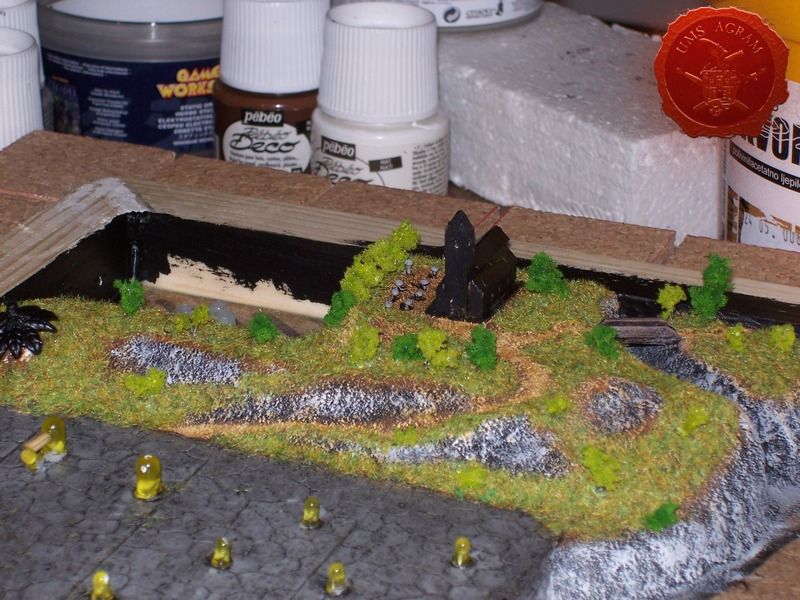
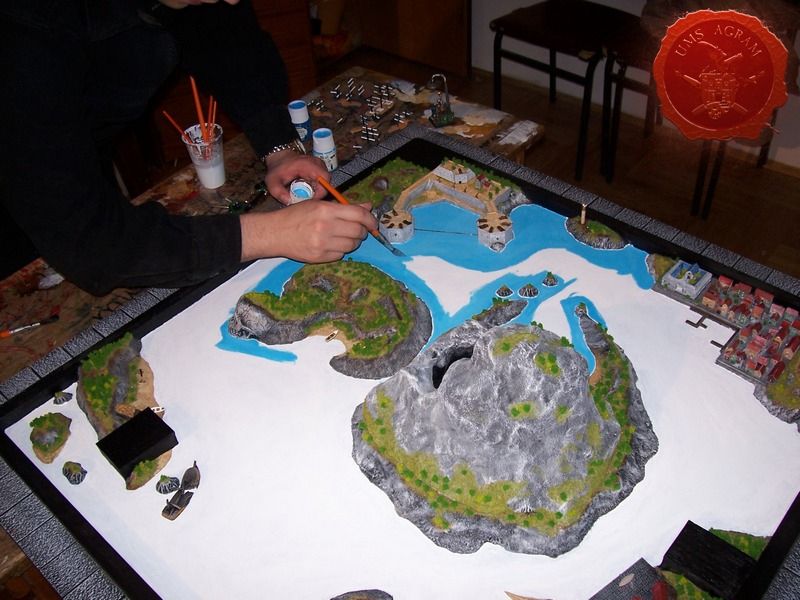
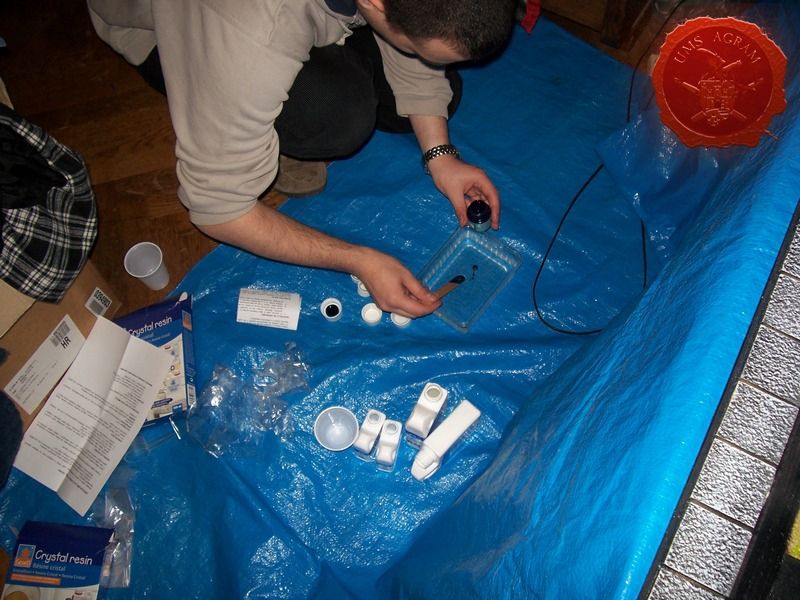
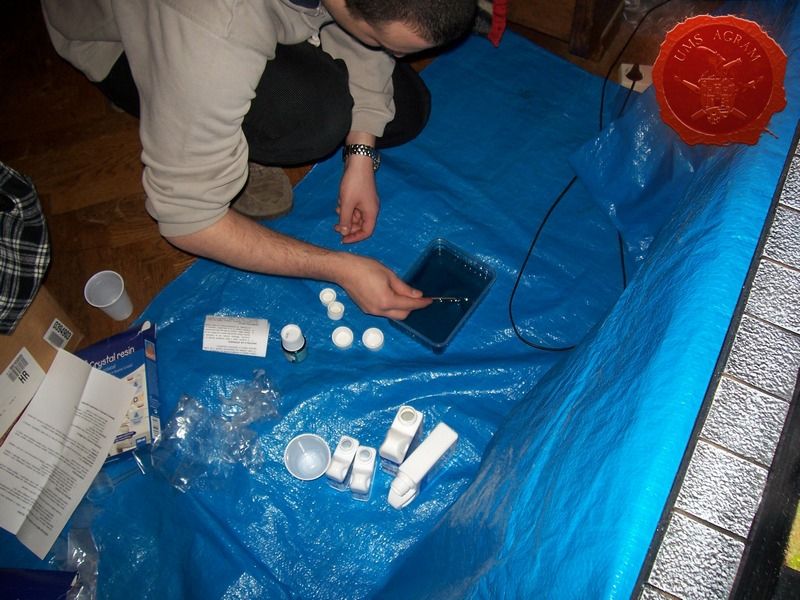
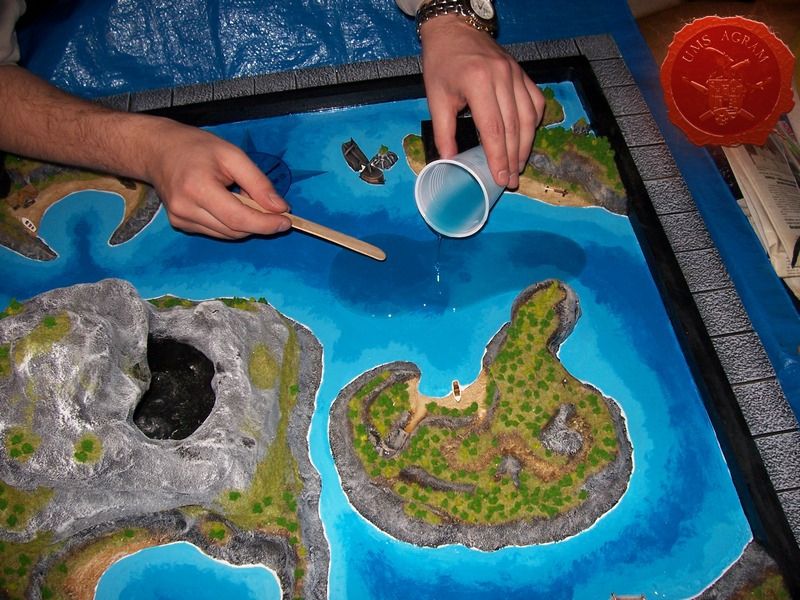
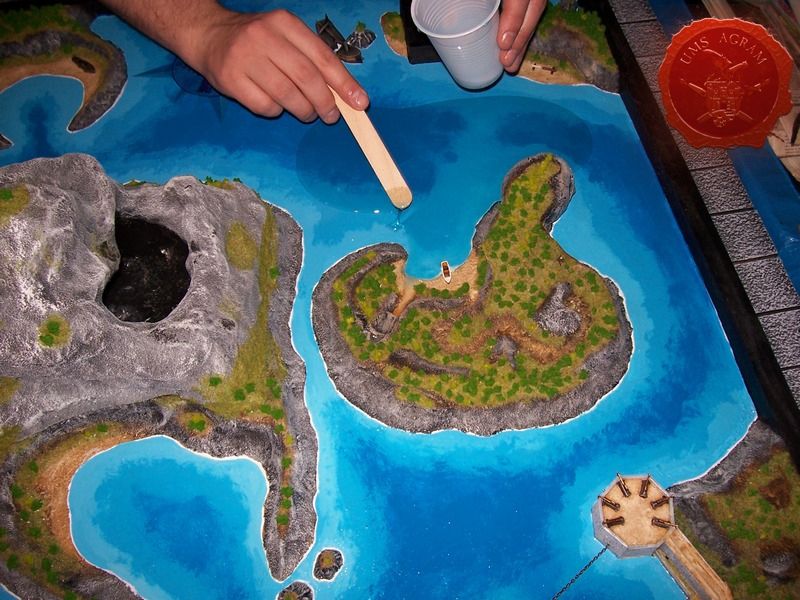
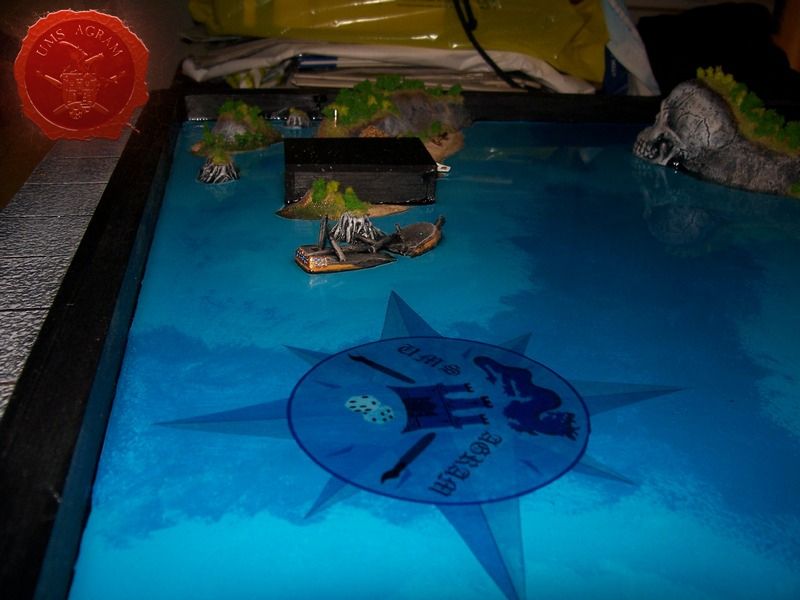
The islands were painted using Pebeo Deco colours (Black, Brown, Ochre, Ash, White and Grey) and flocked using static grass. The trees were made from twisted wire trees bought on Ebay. When the islands were done, I painted the seas. As I wanted the blue to be really bright, I used a white undercoat that was hand painted using a large brush as I didn't want to risk botching up the rest of the work by accidental spillage by using sprey/air brush. After it was done, I mixed several shades of blue (by mixing Pebeo Deco White and Blue). Each progressive layer had more Blue in it. Before pouring in the resin, we decided to make a compass with a club sign. The painted design on a piece of paper was simply cut out and glued using watered down PVA glue. All that was needed was to mix the resin and pour it in carefully. For this, we used Gedeo Crystal Resin. A quick calculation revealed that we needed 600ml of resin in order to make the water 1,5-2mm deep. Carefully we mixed the two part resin (mixing ratio is 2:1 vol which makes it easy to work with). Once the mixture was fully mixed I added a couple of drops of Pebeo Vitrail Sky Blue colour. Be careful when mixing, because you can easily overdo it and be left with too dark a resin.

Click for enlarged picture

Click for enlarged picture

Click for enlarged picture

Click for enlarged picture

Click for enlarged picture

Click for enlarged picture

Click for enlarged picture

Click for enlarged picture

Click for enlarged picture

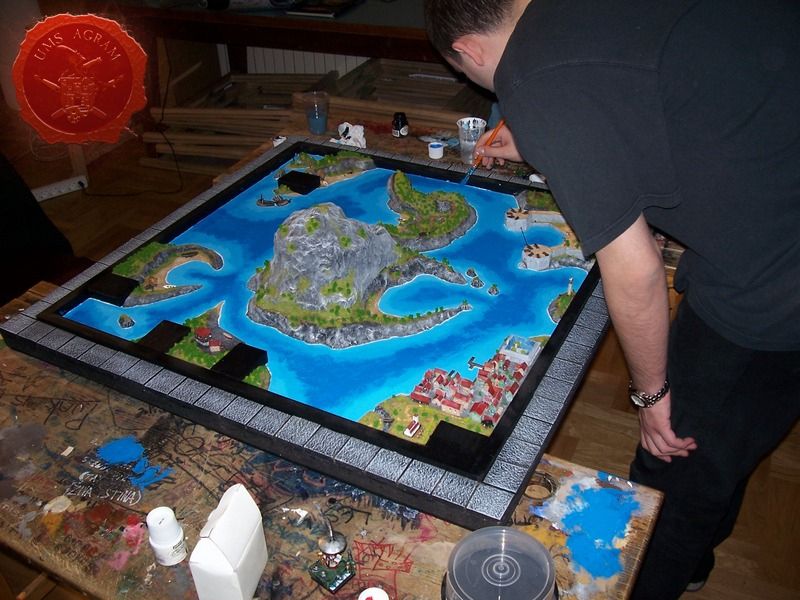
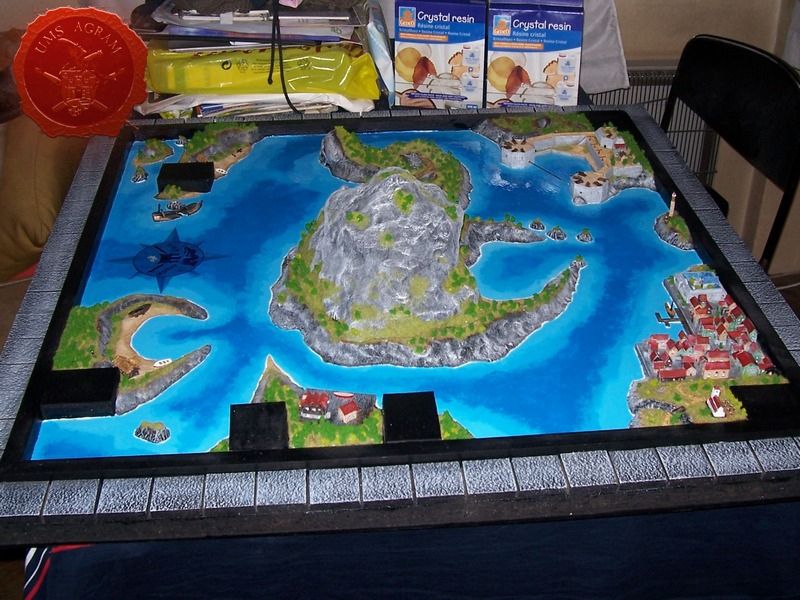
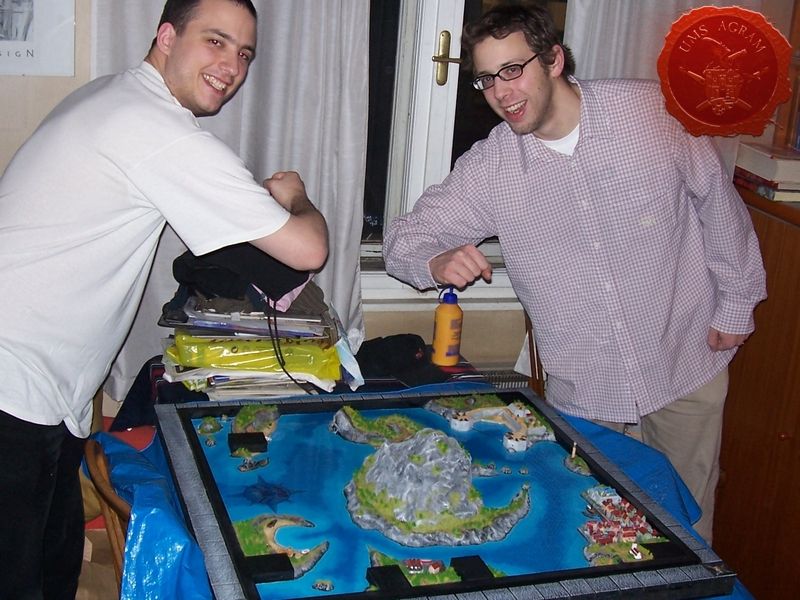
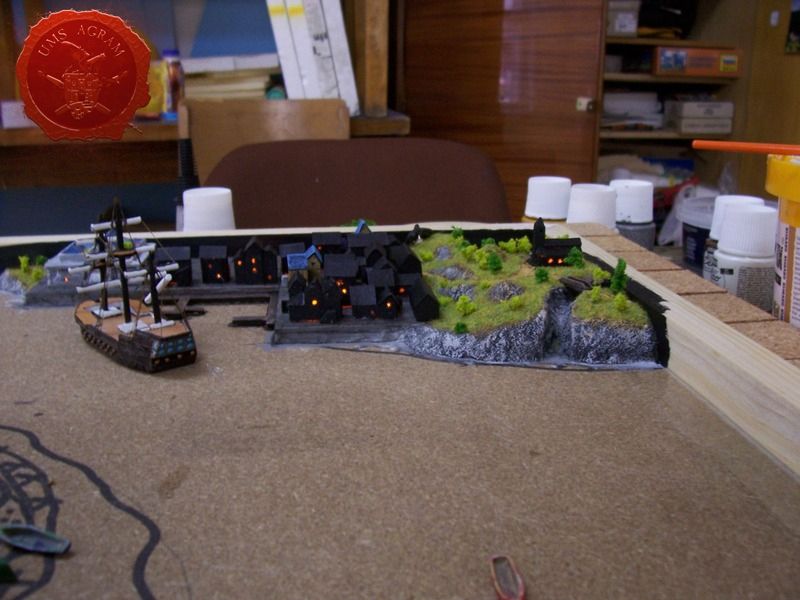
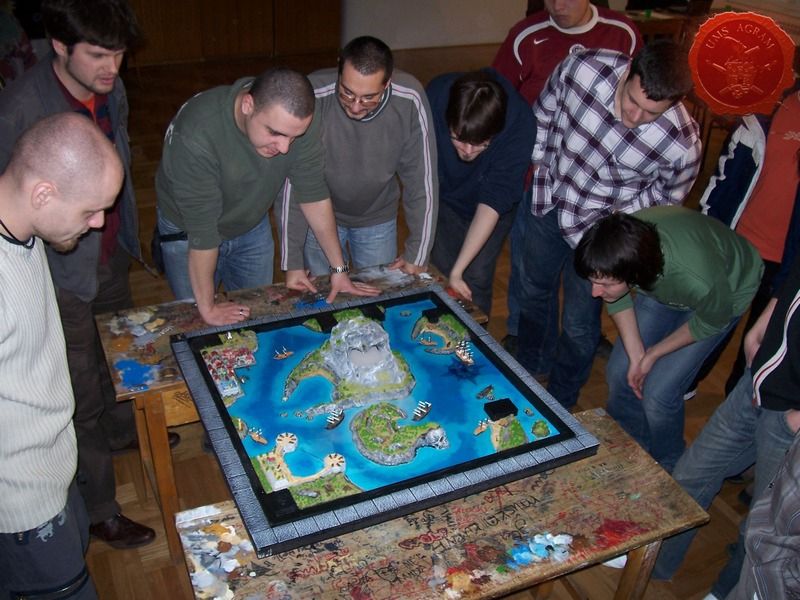
After a drying period of about 24 hours, the board was done and we could present it to the guys from the club!

Click for enlarged picture

Click for enlarged picture

Click for enlarged picture

Click for enlarged picture

Click for enlarged picture

Latest articles

  • Back to Basics Workshops in Medveščak Library
              array(2) {
      ["Article"]=>
      array(10) {
        ["id"]=>
        string(3) "476"
        ["member_id"]=>
        string(2) "64"
        ["title_eng"]=>
        string(47) "Back to Basics Workshops in Medveščak Library"
        ["title_hrv"]=>
        string(68) "Back to Basics radionice bojanja minijatura u Knjižnici Medveščak"
        ["mask_eng"]=>
        string(45) "back_to_basics_workshops_in_medvescak_library"
        ["mask_hrv"]=>
        string(65) "back_to_basics_radionice_bojanja_minijatura_u_knjiznici_medvescak"
        ["content_eng"]=>
        string(5094) "

    Click for enlarged picture

    During October and November, we held our Back to Basics miniature painting workshops for the youngest at the Zagreb City Libraries.

    Click for enlarged picture

    Click for enlarged picture

    The first set of three workshops was held in the Youth Department of the Medveščak Library on October 2, 9 and 11, 2025.

    Click for enlarged picture

    Click for enlarged picture

    During the workshops, our youngest participants painted chibi figures from the UMS Agram line and made a castle from upcycled materials.

    Click for enlarged picture

    Click for enlarged picture

    Click for enlarged picture

    Click for enlarged picture

    Click for enlarged picture

    Click for enlarged picture

    Click for enlarged picture

    Click for enlarged picture

    More photos can be found on our social media.

    Click for enlarged picture

    " ["content_hrv"]=> string(5118) "

    Click for enlarged picture

    Tijekom listopada i studenog u Knjižnicama Grada Zagreba smo održali naše Back to Basics radionice bojanja minijatura za najmlađe. 

    Click for enlarged picture

    Click for enlarged picture

    Prvi set od tri radionice održan je u Odjelu za mlade Knjižnice Medveščak 2., 9. i 11.10.2025. 

    Click for enlarged picture

    Click for enlarged picture

    Tijekom radionica naši najmlađi polaznici su bojali chibi figure iz linije UMS Agram te izrađivali dvorac od upcycle materijala.

    Click for enlarged picture

    Click for enlarged picture

    Click for enlarged picture

    Click for enlarged picture

    Click for enlarged picture

    Click for enlarged picture

    Click for enlarged picture

    Click for enlarged picture

    Više fotografija potražite na našim socijalnim mrežama!

    Click for enlarged picture

    " ["created"]=> string(19) "2025-10-13 09:20:17" ["modified"]=> string(19) "2025-10-13 09:20:17" } ["Member"]=> array(10) { ["id"]=> string(2) "64" ["group_id"]=> string(1) "1" ["first_name"]=> string(9) "Krunoslav" ["last_name"]=> string(8) "Belinić" ["first_name_mask"]=> string(9) "krunoslav" ["last_name_mask"]=> string(7) "belinic" ["username"]=> string(5) "Kruno" ["password"]=> string(40) "eb3fda45fbec0258e90d809803b10491c548b22f" ["born"]=> string(19) "2015-01-18 09:19:00" ["created"]=> string(19) "2015-01-18 09:20:39" } }
    Krunoslav Belinić, 13th October 2025
  • Gaslands - Tutorial II
              array(2) {
      ["Article"]=>
      array(10) {
        ["id"]=>
        string(3) "475"
        ["member_id"]=>
        string(2) "35"
        ["title_eng"]=>
        string(22) "Gaslands - Tutorial II"
        ["title_hrv"]=>
        string(37) "Gaslands - bojanje autića - nastavak"
        ["mask_eng"]=>
        string(22) "gaslands_-_tutorial_ii"
        ["mask_hrv"]=>
        string(36) "gaslands_-_bojanje_autica_-_nastavak"
        ["content_eng"]=>
        string(5350) "

    Click for enlarged picture

    In this article I will briefly describe how I painted another set of three cars for Gaslands. Same as last time, I started with a black undercoat.

    Click for enlarged picture

    As I decided to keep the colour of the vehicles matt black, I left it at that and proceeded to paint the windshields. Using much the same method I used for the yellow crew, I applied the chosen paint scheme. Unlike blue windshields with the yellow crew, here I decided to use the yellow/red combo.

    Click for enlarged picture

    I then added chrome.

    Click for enlarged picture

    In the end, I added metallic details such as guns etc.

    Click for enlarged picture

    It was time to add the decals. I first painted all the surfaces with gloss varnish. Then I added the decals and after they set properly, I covered everything with Ultra Matt Varnish..

    Click for enlarged picture

    And thus ended the painting process.

    Click for enlarged picture

    GALLERY OF THE TWO FINISHED CREWS

    Click for enlarged picture

    Click for enlarged picture

    Click for enlarged picture

    Click for enlarged picture

    Click for enlarged picture

    Click for enlarged picture

    Click for enlarged picture

    " ["content_hrv"]=> string(5419) "

    Click for enlarged picture

    U ovom ću  članku opisati kako sam obojao drugi set od tri autića za Gaslands demo partije. Kao i prošli puta, krenuo sam s crnim undercoatom. 

    Click for enlarged picture

    S obzirom da sam odlučio da ovaj crew bude mat crn, farbanje karoserija sam tu prekinuo i počeo sam sa staklima. Slično kao i prošli put, koristio sam sličnu shemu, ali u drugim bojama. Za razliku od plavih refleksija na žutim autima, na crnima sam se odlučio za žuto/crvenu kombinaciju. 

    Click for enlarged picture

    Dodao sam krom.

    Click for enlarged picture

    I na kraju dodao metalne dijelove poput oružja.

    Click for enlarged picture

    Na ovim autima, odlučio sam dodati i naljepnice. Prvo sam na površine s naljepnicama stavio gloss lak. Potom sam postavio naljepnicce i nakon što su se dobro osušile sam te iste površine prekrio mat lakom. 

    Click for enlarged picture

    Time sam završio posao...

    Click for enlarged picture

    GALERIJA ZAVRŠENIH RADOVA!

    Click for enlarged picture

    Click for enlarged picture

    Click for enlarged picture

    Click for enlarged picture

    Click for enlarged picture

    Click for enlarged picture

    Click for enlarged picture

    " ["created"]=> string(19) "2025-10-13 07:21:57" ["modified"]=> string(19) "2025-10-13 07:21:57" } ["Member"]=> array(10) { ["id"]=> string(2) "35" ["group_id"]=> string(1) "1" ["first_name"]=> string(5) "Marko" ["last_name"]=> string(9) "Paunović" ["first_name_mask"]=> string(5) "marko" ["last_name_mask"]=> string(8) "paunovic" ["username"]=> string(5) "marko" ["password"]=> string(40) "3bd37b326d19d1880d3b93a4b32e8fb3a90fa122" ["born"]=> string(19) "2033-03-07 20:35:00" ["created"]=> string(19) "2009-06-02 20:37:03" } }
    Marko Paunović, 13th October 2025
  • GASLANDS - tutorial
              array(2) {
      ["Article"]=>
      array(10) {
        ["id"]=>
        string(3) "474"
        ["member_id"]=>
        string(2) "35"
        ["title_eng"]=>
        string(19) "GASLANDS - tutorial"
        ["title_hrv"]=>
        string(43) "GASLANDS - bojanje autića za postapoc igru"
        ["mask_eng"]=>
        string(19) "gaslands_-_tutorial"
        ["mask_hrv"]=>
        string(42) "gaslands_-_bojanje_autica_za_postapoc_igru"
        ["content_eng"]=>
        string(2790) "

    Click for enlarged picture

    In this article I will briefly describe how I painted a set of three cars for Gaslands. I started with a black undercoat and then applied a silver (Leadbelcher) spray as the base color.

    Click for enlarged picture

    Then I used the Rust effect from Dirty Down. Once the effect was dry, I sprayed the cars with a clear matte varnish to protect the layer of rust (which is activated when exposed to moisture). After the spray dried, I applied the Scratches and Heavy Chipping effect from Ammo by Mig Jimenez with a brush. After about fifteen minutes of drying, I sprayed the cars in yellow and let it dry for about 15 minutes. I used a brush to apply water over the cars and used a stiff brush, wooden skewer and cotton swab to remove the excess paint that was activated due to the Scratches and Heavy Chipping effects.

    Click for enlarged picture

    Then came the painting. First I covered all the details that would not be yellow in black. Then I used blue to draw out the reflections on the glass. Added the metal details (engines and weapons). And finally added the chrome effects (using GSW paint). For the very end I left the engine shine effects.

    Click for enlarged picture

    The painting of the cars for Gaslands is now complete.

    Click for enlarged picture

    " ["content_hrv"]=> string(2794) "

    Click for enlarged picture

    U ovom članku ću ukratko opisati kako sam bojao set od tri autića za Gaslands. Krenuo sam sa crnim undercoatom na kojeg sam stavio srebrni (Leadbelcher) sprej kao osnovnu boju.

    Click for enlarged picture

    Potom sam koristio Rust efekt od tvrtke Dirty Down. Kada se posušio efekt, autiće sam posprejao bezbojnim mat lakom da zaštitim sloj hrđe (koja se aktivira u doticaju sa vlagom). Nakon što se sprej osušio, kistom sam nanio Scratches i Heavy Chipping efekt od Ammo by Mig Jimenez. Nakon petnaestak minuta sušenja, autiće sam posprejao u žuto i ostavio da se osuši cca 15 minuta. Kistom sam premazao vodu preko autića i tvrdim kistom, drvenim ražnjićem i štapićem za uši sam uklonio višak boje koji se aktivirao zbog Scratches i Heavy Chipping efekata.

    Click for enlarged picture

    Zatim je uslijedilo bojanje. Prvo sve detalje koji neće biti žuti sam prekrio u crnu boju. Zatim sam izvukao plavom bojom refleksije na staklima. Dodao metalne detalje (motori i oružja). I na kraju dodao krom efekte (koristeći boju tvrtke GSW). Za sami kraj ostavio sam efekte sjaja motora.

    Click for enlarged picture

    TIme je završeno bojanje autića za Gaslands.

    Click for enlarged picture

    " ["created"]=> string(19) "2025-10-02 07:39:25" ["modified"]=> string(19) "2025-10-02 07:39:25" } ["Member"]=> array(10) { ["id"]=> string(2) "35" ["group_id"]=> string(1) "1" ["first_name"]=> string(5) "Marko" ["last_name"]=> string(9) "Paunović" ["first_name_mask"]=> string(5) "marko" ["last_name_mask"]=> string(8) "paunovic" ["username"]=> string(5) "marko" ["password"]=> string(40) "3bd37b326d19d1880d3b93a4b32e8fb3a90fa122" ["born"]=> string(19) "2033-03-07 20:35:00" ["created"]=> string(19) "2009-06-02 20:37:03" } }
    Marko Paunović, 2nd October 2025
  • UMS Agram at CK2025
              array(2) {
      ["Article"]=>
      array(10) {
        ["id"]=>
        string(3) "473"
        ["member_id"]=>
        string(2) "64"
        ["title_eng"]=>
        string(19) "UMS Agram at CK2025"
        ["title_hrv"]=>
        string(42) "UMS Agram na CK2025 u Stubičkim toplicama"
        ["mask_eng"]=>
        string(19) "ums_agram_at_ck2025"
        ["mask_hrv"]=>
        string(41) "ums_agram_na_ck2025_u_stubickim_toplicama"
        ["content_eng"]=>
        string(2737) "

    Click for enlarged picture

    Click for enlarged picture

    Click for enlarged picture

    Click for enlarged picture

    Click for enlarged picture

    Click for enlarged picture

    Click for enlarged picture

    Click for enlarged picture

    For more photos check our social media!

    " ["content_hrv"]=> string(2864) "

    U subotu, 27.9.2025. naši članovi su nastupili na CK2025 u Stubičkim toplicama.

    Click for enlarged picture

    Click for enlarged picture

    Click for enlarged picture

    Click for enlarged picture

    Click for enlarged picture

    Click for enlarged picture

    Click for enlarged picture

    Click for enlarged picture

    Za više fotografija posjetite naše socijalne mreže!

    " ["created"]=> string(19) "2025-10-02 07:28:26" ["modified"]=> string(19) "2025-10-02 07:28:26" } ["Member"]=> array(10) { ["id"]=> string(2) "64" ["group_id"]=> string(1) "1" ["first_name"]=> string(9) "Krunoslav" ["last_name"]=> string(8) "Belinić" ["first_name_mask"]=> string(9) "krunoslav" ["last_name_mask"]=> string(7) "belinic" ["username"]=> string(5) "Kruno" ["password"]=> string(40) "eb3fda45fbec0258e90d809803b10491c548b22f" ["born"]=> string(19) "2015-01-18 09:19:00" ["created"]=> string(19) "2015-01-18 09:20:39" } }
    Krunoslav Belinić, 2nd October 2025
  • UMS Agram at Days of Technical Culture 2025
              array(2) {
      ["Article"]=>
      array(10) {
        ["id"]=>
        string(3) "472"
        ["member_id"]=>
        string(2) "96"
        ["title_eng"]=>
        string(43) "UMS Agram at Days of Technical Culture 2025"
        ["title_hrv"]=>
        string(41) "UMS Agram na 14. danima tehničke kulture"
        ["mask_eng"]=>
        string(43) "ums_agram_at_days_of_technical_culture_2025"
        ["mask_hrv"]=>
        string(39) "ums_agram_na_14_danima_tehnicke_kulture"
        ["content_eng"]=>
        string(6577) "

    Click for enlarged picture

    Click for enlarged picture

    Click for enlarged picture

    Click for enlarged picture

    Click for enlarged picture

    Click for enlarged picture

    Click for enlarged picture

    Click for enlarged picture

    Click for enlarged picture

    Click for enlarged picture

    Click for enlarged picture

    Click for enlarged picture

    Click for enlarged picture

    Click for enlarged picture

    Click for enlarged picture

    Click for enlarged picture

    Click for enlarged picture

    Click for enlarged picture

    Click for enlarged picture

    Click for enlarged picture

    For more photos check our social media!

    " ["content_hrv"]=> string(7407) "

    19. i 20.9. nastupili smo na XIV danima tehničke kulture u Kulturnom centru Dubrava. Dani je organizirala Zagrebačka zajednica tehničke kulture.

    Click for enlarged picture

    Click for enlarged picture

    Na Dane smo došli sa izložbenim prostorom i prostorom za radionice.

    Click for enlarged picture

    Click for enlarged picture

    Click for enlarged picture

    Click for enlarged picture

    Click for enlarged picture

    U sklopu nastupa organizirali smo:

    - predstavljanje Agramera, linije chibi minijatura 

    Click for enlarged picture

    Click for enlarged picture

    - promociju knjige Tabletop Scenery for Beginners 

    Click for enlarged picture

    A s ponosom objavljujemo i da smo za naš rad u 2024. primili godišnju nagradu tehničke kulture dr. Oton Kučera

    Click for enlarged picture

    Click for enlarged picture

    Click for enlarged picture

    Također smo organizirali i besplatne:

    - pokazne demonstracije minijaturističkih tehnika - sculpting i bojanje minijatura u petak 

    Click for enlarged picture

    Click for enlarged picture

    Click for enlarged picture

    Click for enlarged picture

    Click for enlarged picture

    - Back to Basics radionice bojanja minijatura za najmlađe u subotu

    Click for enlarged picture

    Click for enlarged picture

    Za više fotografija posjetite naše socijalne mreže!

    " ["created"]=> string(19) "2025-09-23 08:18:45" ["modified"]=> string(19) "2025-09-23 08:20:36" } ["Member"]=> array(10) { ["id"]=> string(2) "96" ["group_id"]=> string(1) "2" ["first_name"]=> string(6) "Antoni" ["last_name"]=> string(10) "Pastuović" ["first_name_mask"]=> string(6) "antoni" ["last_name_mask"]=> string(9) "pastuovic" ["username"]=> string(6) "antoni" ["password"]=> string(40) "5dfa823ee30df1936c1792d4c8348a4bcf4c64e2" ["born"]=> string(19) "2005-04-04 18:52:00" ["created"]=> string(19) "2019-04-04 18:53:09" } }
    Antoni Pastuović, 23th September 2025

All articles

Latest battle-reports

All battle-reports