Building a Gaming Board – pt 2.

Marko Paunović, 27th September 2020

In the previous asrticle, I've started work on my winter themed Frostgrave board. So far, I've covered the cutting of the plywood, making a frame, building volume with HD styrofoam, adding cliffs and river banks and I've finished the article with texture application.

Click for enlarged picture

I'm at about the half way mark with the building of this board and the main idea of this build is to have a single board for my Malifaux games which means I would require a 90x90cm (3'x3') board. I decided to go with a frozen river, with a couple of crossings. I'd also wanted at least one road and several paths that wouldn't have been (entirely) covered with snow. I'd also wanted to add some levels to my board so it wouldn't be just flat. Two or three levels would have been perfect. Since this wouldn't be a fixed terrain board, I'd still needed plenty of flat areas to place the scenery before my games. In this issue, I'll be painting the board's three separate kinds of surfaces (ground, cliffs and river), followed by adding the river which will be the most tricky and most time consuming part of the build. After the river sets, I'll add vegetation, roots, grass tufts and alike. I'll also add a couple of fir/pine trees. In the end, I'll add ice surfaces (ice and icicles) as well as cover the entire board with snow.

Planning

Most of the planning was done in the last issue. The main needs and wants were decided and all that was left was to micro-manage some issues like when to paint, when to pour the resin and how to add the snow. During the build last issue, as always no matter how good you plan things, there were some things that weren't accounted for that might pose some troubles and problems later during the build. First of those were how to gather all the loose texturing material without simply chucking it all away in the yard. Also, pouring in the resin and adding the snow needed careful planning in order not to accidentally mess and ruin previous work. For instance, if I opted to put static grass, I'd need to put it before pouring in the resin to prevent stray static fibres from getting accidentally stuck in the resin while it cured. Also, protection of details (like river, cliffs and tufts/static grass) would be crucial before adding the snow to prevent snow from completely covering them.

Click for enlarged picture

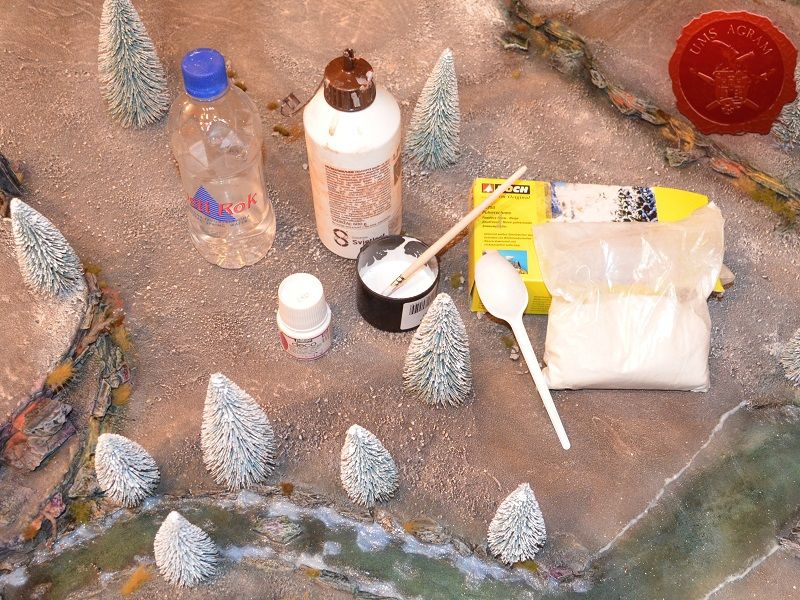
After a short think, I came up with this list of tools and materials that I would need to finish this board:
- glues - PVA 1kg, 1x10g Superglue
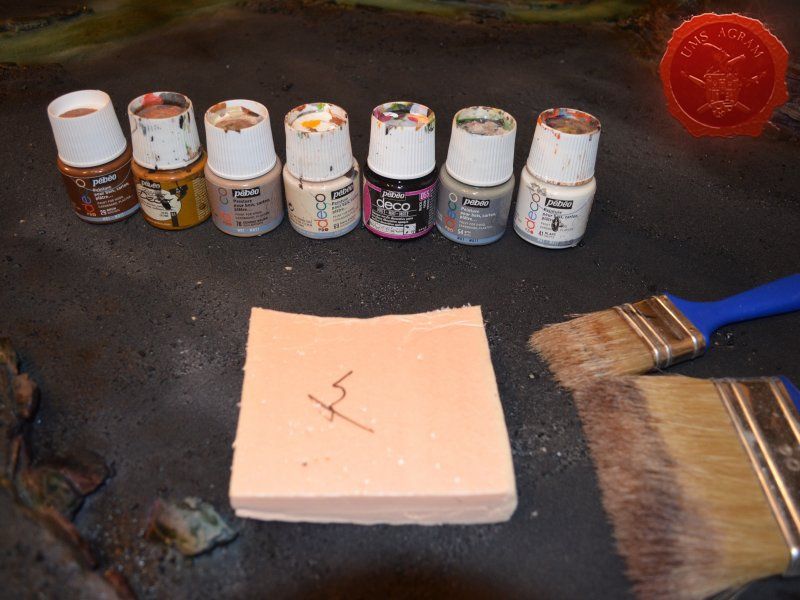
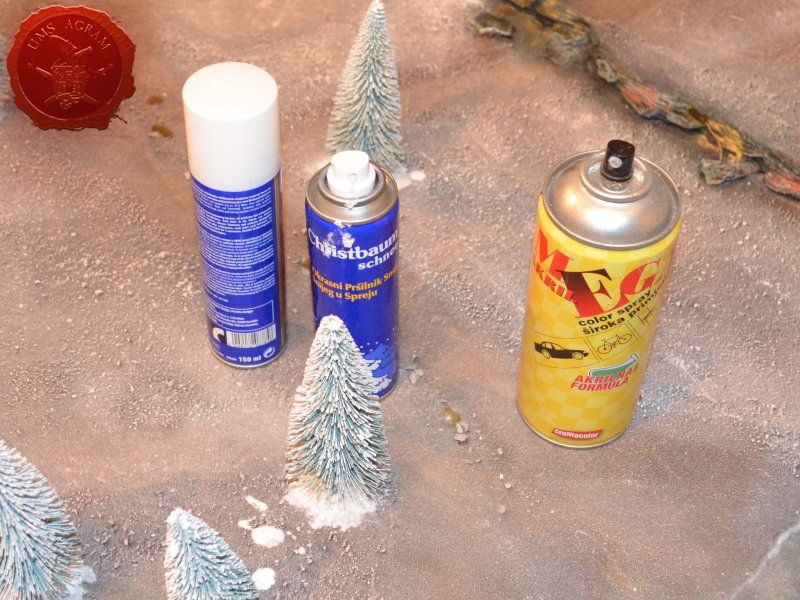
- paints and spreys - 6 Pebeo Deco Paints (Black, White, Grey, Brown, Ochre and Ash), one black, ash, off white and pure white matt acrylic spreys and one clear matt acrylic sprey
- large brushes No 90, No 40
- airbrush
- brush size 16
- several roots
- static grass tufts and scatter (three to four sorts)
- Clear Water gel by Ammo by Mig Jimenez
- Resin (Gedeo Crystal Resin)
- Pebeo Vitrail Sky Blue paint
- 20-ish pine trees
- NOCH icicles
- NOCH snow products (2 packages)
- NOCH ice crystals
- snow foam in a sprey can
- scalpel blade
- scissors
- masking tape
- thin card (several pieces)
- portable hand-held vacuum cleaner

Preparation work

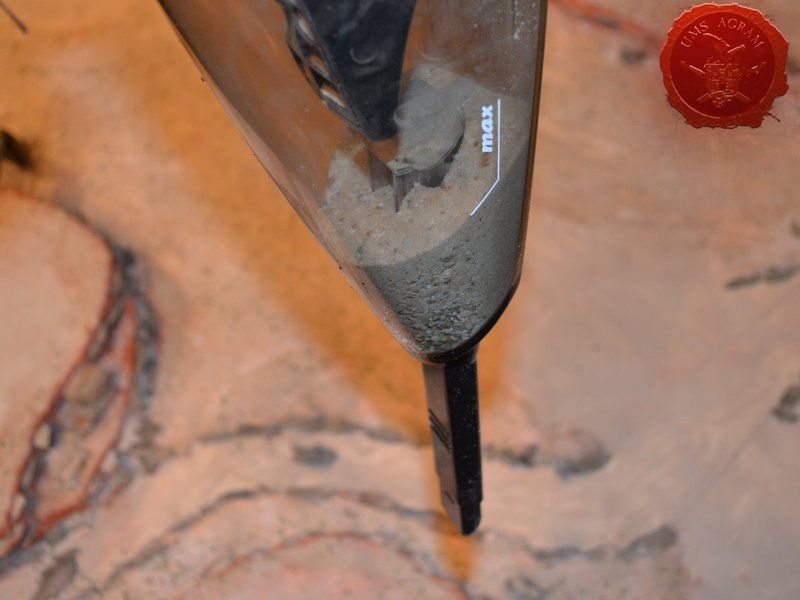
As mentioned before, last issue I left the entire table covered with texture material – sand and gravel. As I didn't make a mixture of water, PVA glue and sand/gravel, opting to first put PVA glue and sprinkle the texture over it, it was now necessary to remove the excess sand, gravel and pebbles from the board. Normally, when doing terrain, I would suggest usine a large cardboard lid and simply turn over the terrain over it. However, my board is 90 x 90 cm with well over 5kg now and I didn't have a large enough receptical to gather all the leftover texturing material. Simply turning it over the floor of my garage was also out of the question. To gather all (or most) of the texturing material, I used a small hand held battery powered vacuum cleaner that housekeepers use for collecting breadcrums in the kitchen. A couple of minutes of vacuuming, removed most of the excess material. Rest was lost alas when I turned the board over in my back yard. But I did manage to salvage almost an entire jar worth of basing material.
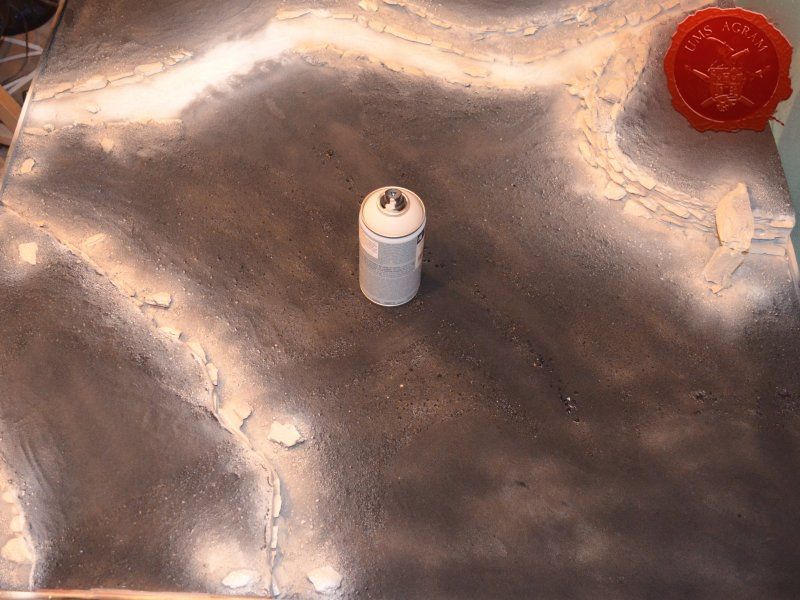
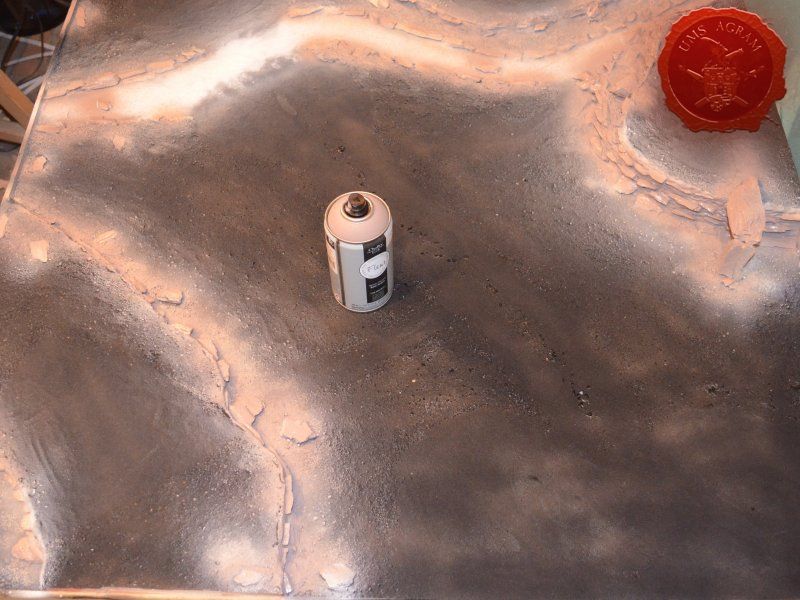
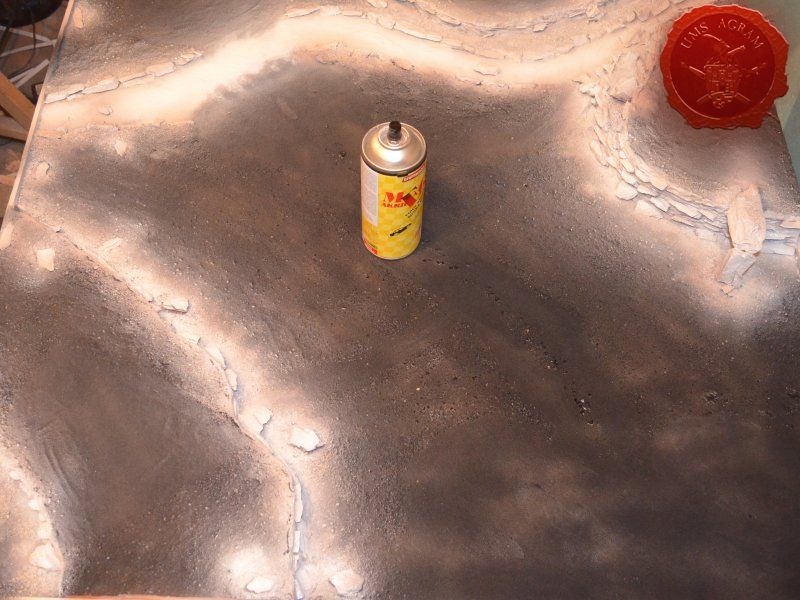
Click for enlarged picture

Click for enlarged picture

Undercoat

When the excess texture material was removed, I could proceed with the painting. First step as always was to undercoat the board. This time, I would use four different spreys to do the undercoating. All the main textures (apart from the cliffs and the river) were undercoated black. Rest of the surfaces, notably: cliffs, boulders and river) was first undercoated white followed by a layer of off white and ash spreys. When these were dry, I then overspreyed those surfaces lightly with pure white sprey again. In the end, I turned back to black sprey to repair the sloppy spreying in places.

Click for enlarged picture

Click for enlarged picture

Click for enlarged picture

Click for enlarged picture

Click for enlarged picture

Click for enlarged picture

Click for enlarged picture

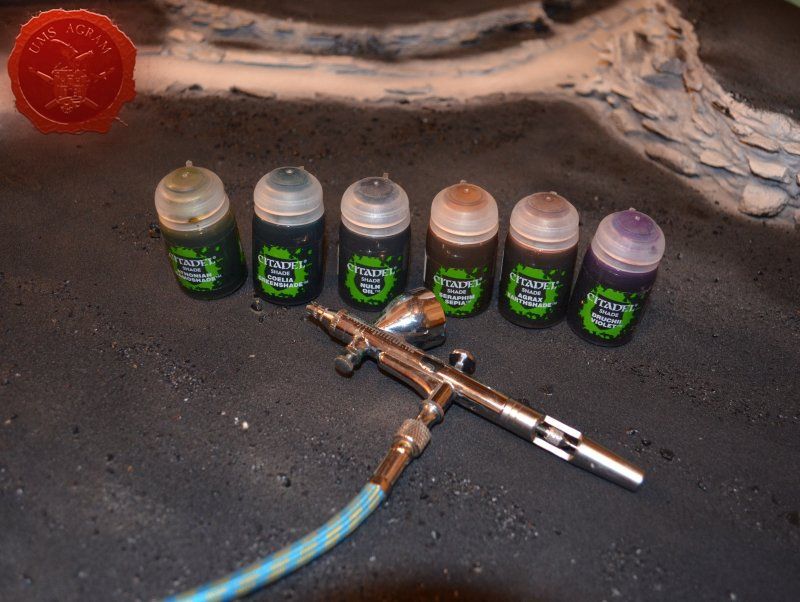
Airbrushing the washes

The next step in painting was to airbrush some washes to the riverbed and all the stone parts (cliffs, river banks and boulders). I used these washes: • Coelia Greenshade • Athonian Camoshade • Druchii Violet • Nuln Oil • Seraphim Sepia • Agrax Earthshade

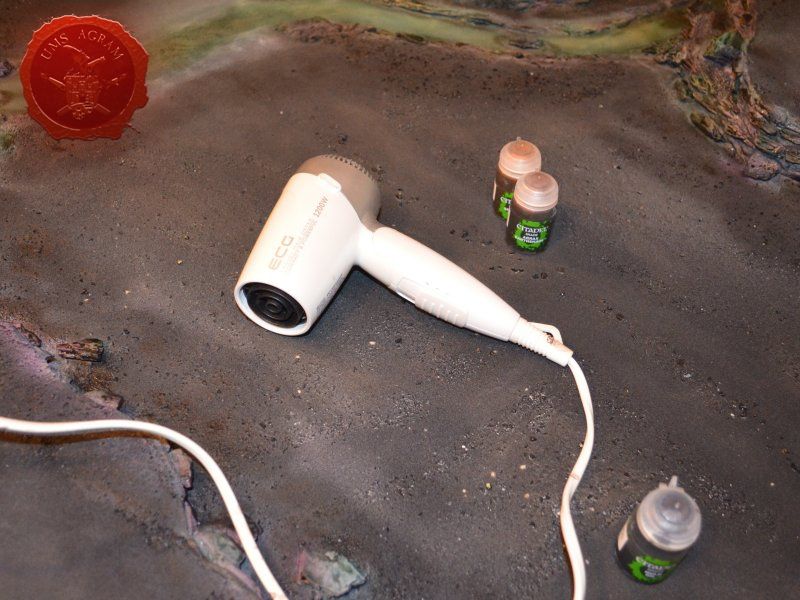
For the riverbed, I used only the Coelia Greenshade, Athonian Camoshade and Nuln Oil. On the stone parts, I used all of them with repeats of Nuln Oil and Coelia Greenshade. As these colours were washes, the drying period between the layers was long. To shorten this period, I used an old hair dryer to speed up the drying process. Remember to always airbrush (and sprey from sprey cans) in a well ventilated areas!

Click for enlarged picture

Click for enlarged picture

Click for enlarged picture

Click for enlarged picture

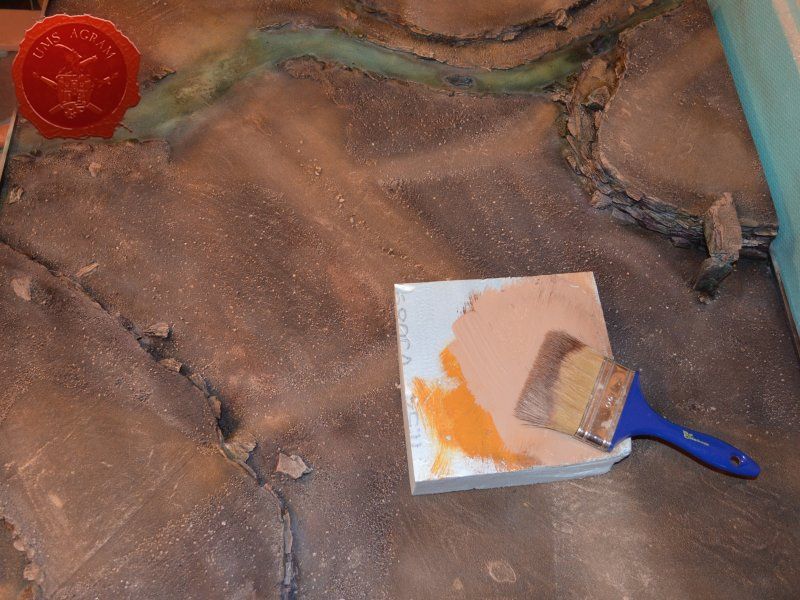
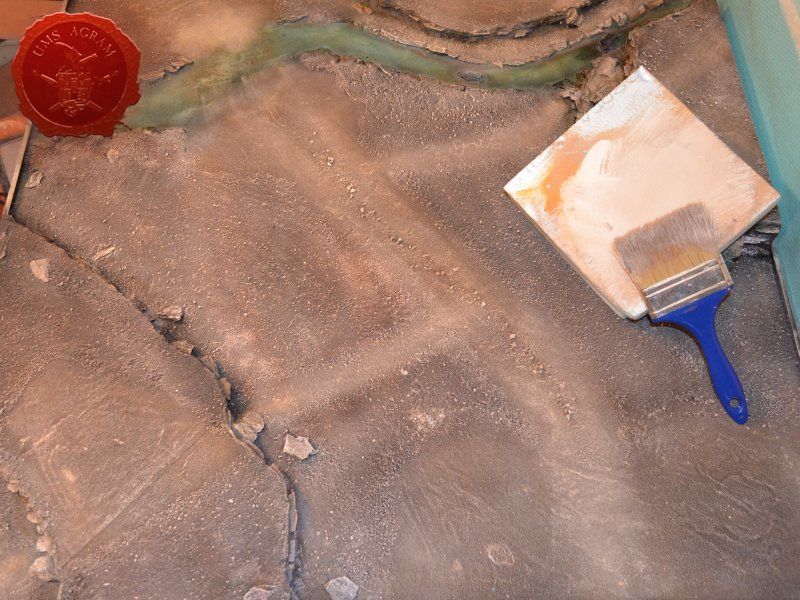
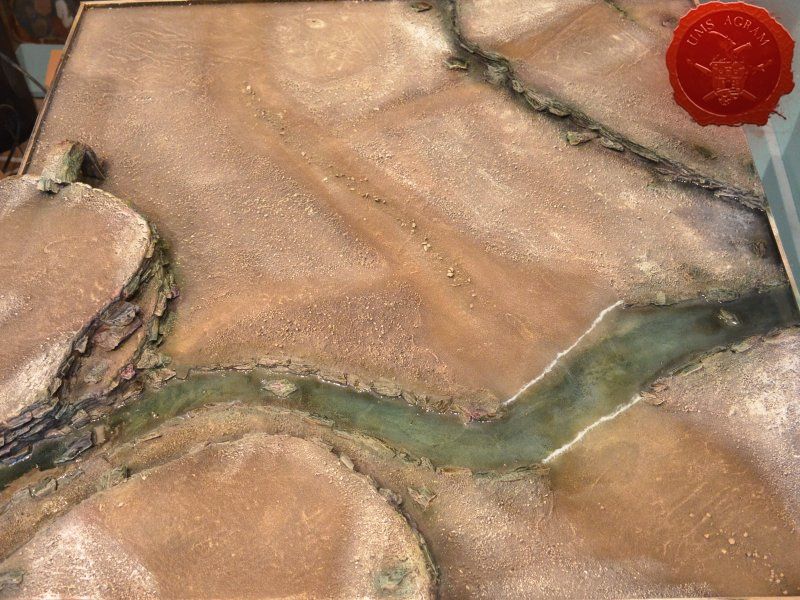
Painting the texture

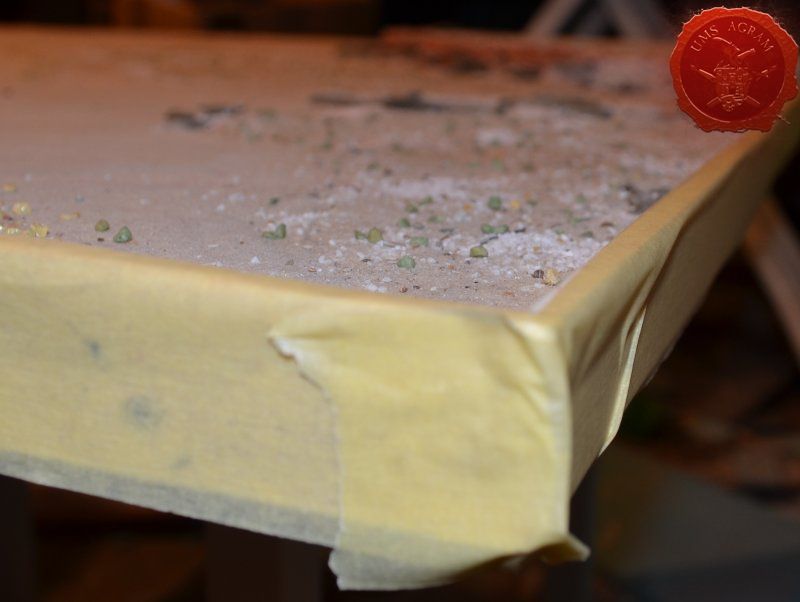
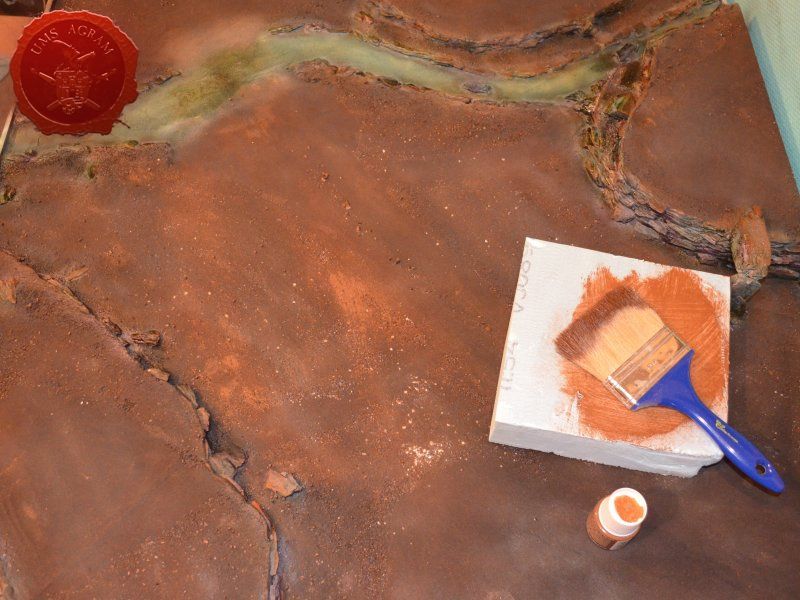
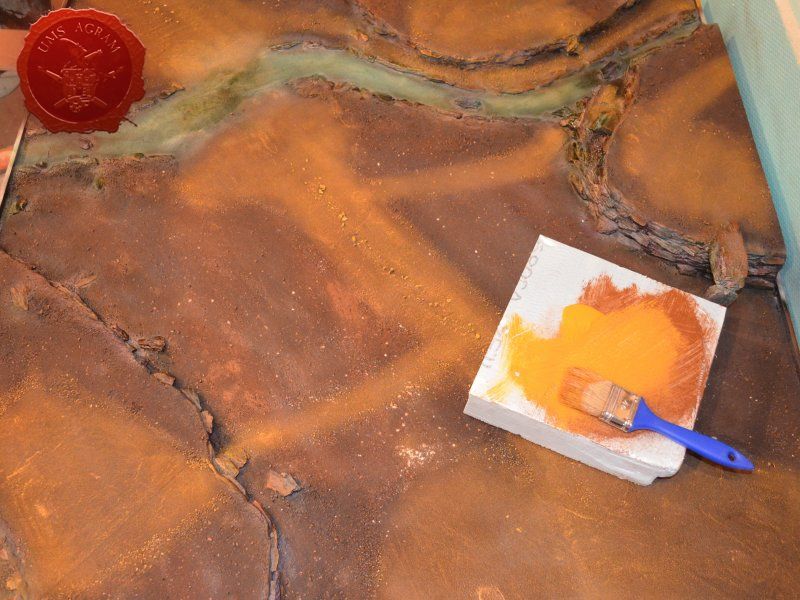
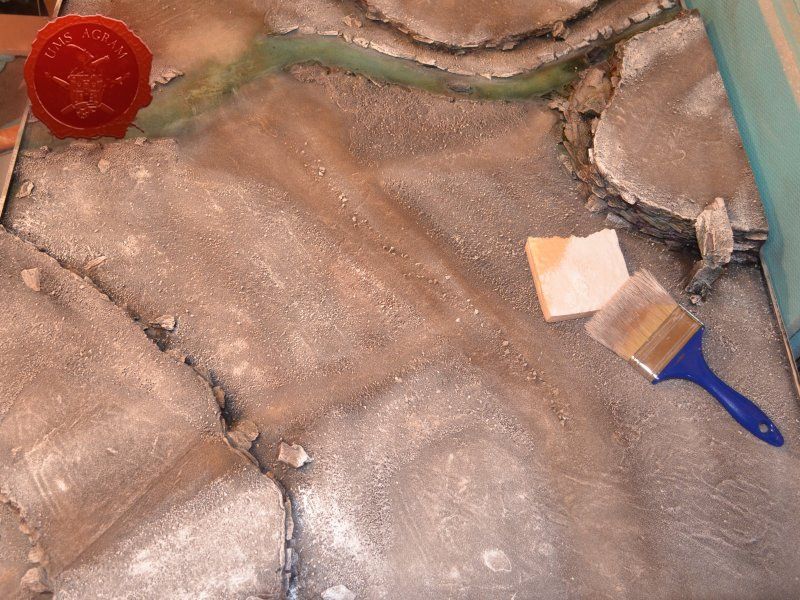
When I was done with applying the washes to the cliffs and the river, it was time to paint the rest of the surfaces on my board. Apart from the river and the cliffs, there were two distinct surfaces to paint. One was the normal ground, the other road and paths. I decided to paint all those surfaces with an initial layer of drybrushed Pebeo Brown. To apply it, I used the biggest brush I could find – size 90. Once the layer was dry, I applied a layer of Pebeo Ochre to the road and paths only. Again, when this layer was dry, I painted the entire surface with a drybrushed layer of Pebeo Ash. The difference in the layers due to the Ochre colouration on the paths and road is still visible. At this point, I would normally stop painting. Maybe adding a final highlight of pure Pebeo Antique White to the most raised surfaces only. However, most of this board would be covered with snow, so I decided to push the colour even whiter. I added two more layers to all the surfaces. First was with the afore mentioned Pebeo Antique White and the latter was done with pure Pebeo White. Note that the difference between the normal ground texture and the paths/road surface is still visible. Also, you may notice that the paintjob was not as tidy as it could have been. The reason behind this was two-fold. First, I was rushing the job a little. Second, I didn't go back as I would normally, only because I was aware that most of the surfaces would be covered with snow in the end. A careful reader/viewer may notice some white-ish marks in the road that mark the spots where some pebbles were glued that got knocked of during painting. These I also did not go back to repair. I would simply cover those places with either snow or grass tufts to save time.
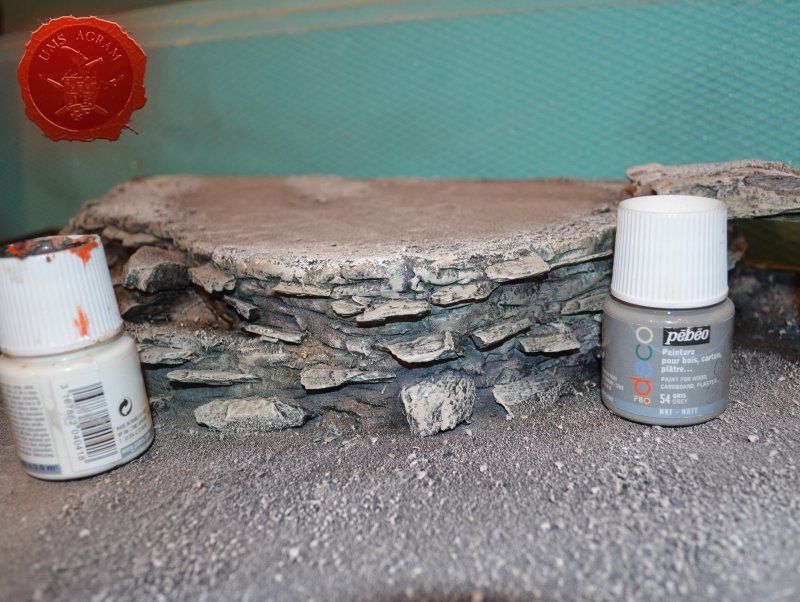
Click for enlarged picture

Click for enlarged picture

Click for enlarged picture

Click for enlarged picture

Click for enlarged picture

Click for enlarged picture

Painting the cliffs

Painting the cliffs was relatively simple. I just drybrushed some Pebeo Grey followed by Pebeo White. I then realised, that these layers covered almost the entire airbrushed washes effects. So I decided to turn back to my airbrush and re-apply those layers, using Coelia Greenshade, Athonian Camoshade, Druchii Violet and Nuln Oil. This time, I did not wait for the layers to dry. Instead I opted for the washes to mix freely due to the pressure applied from the airbrush.

Click for enlarged picture

Click for enlarged picture

Making the river

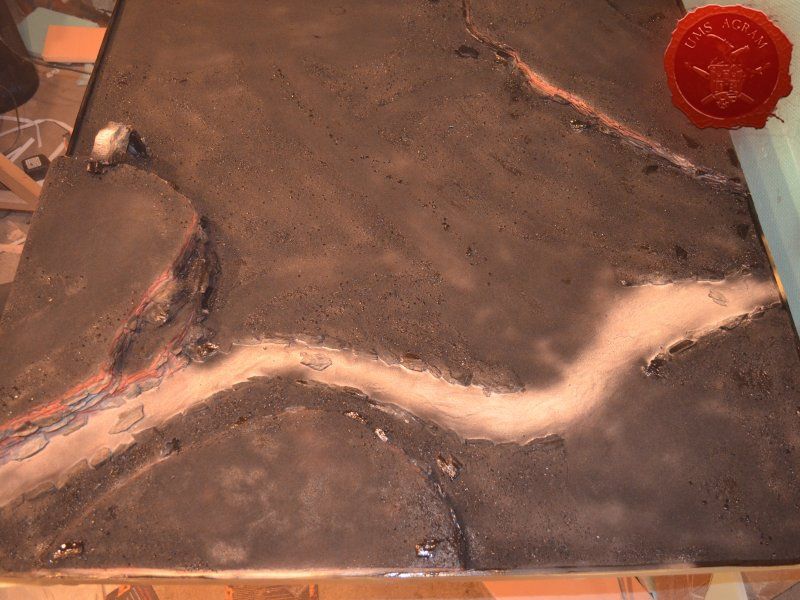
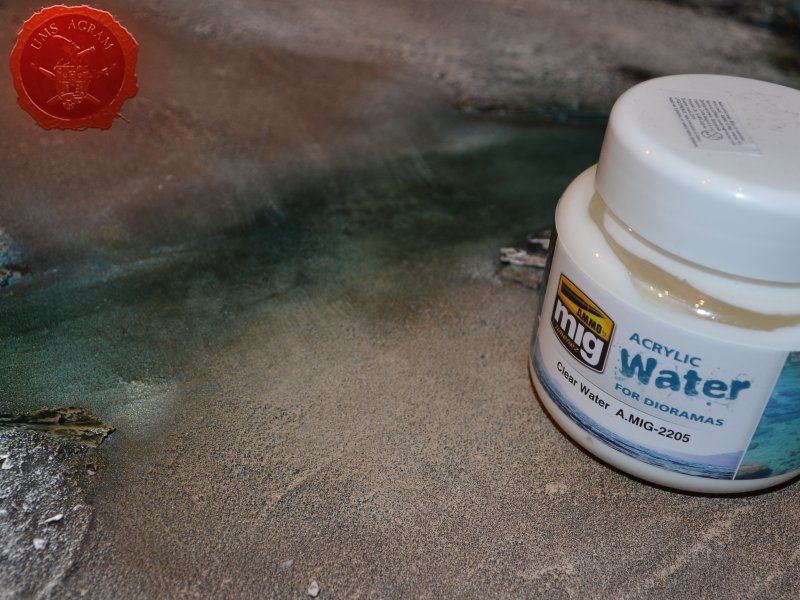
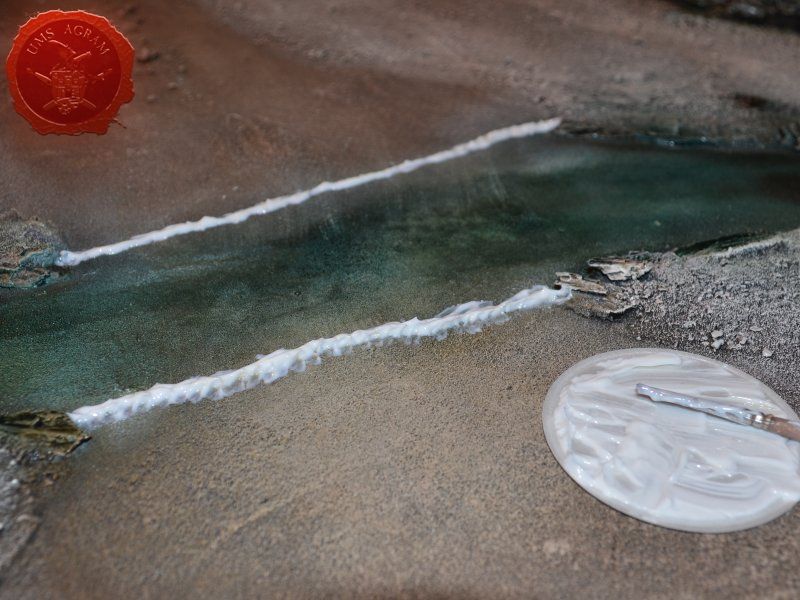
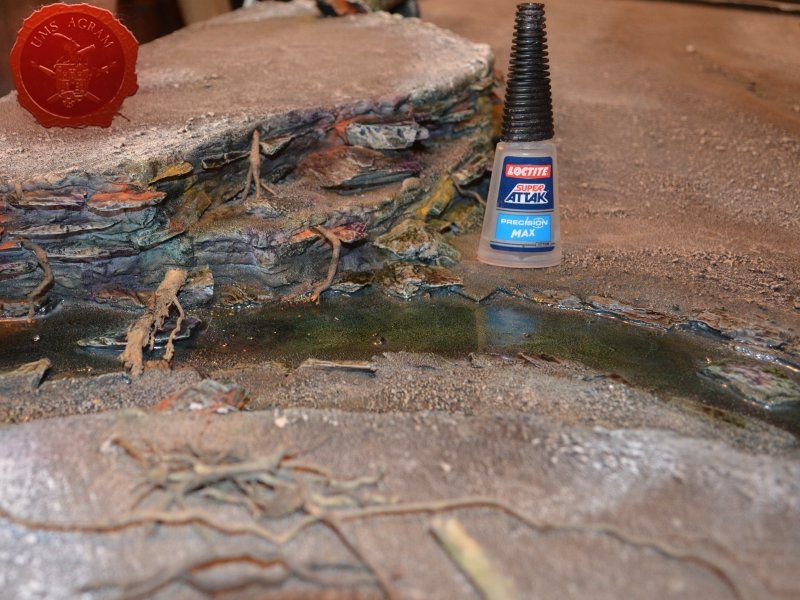
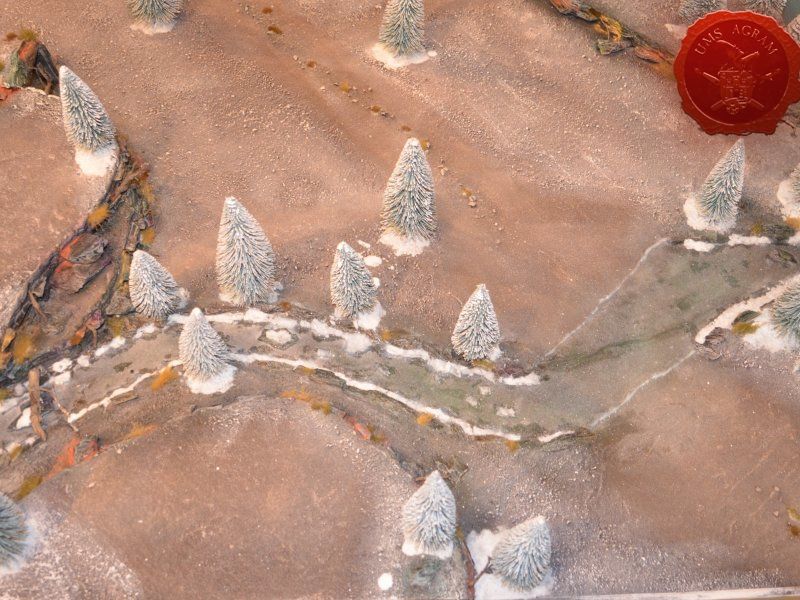
After the paintjob, it was time to make the river. Most of the river had river banks made from schist in the last issue. However, there was a part that had a low crossing which didn't have any elevation from the rest of the riverbank. To make the river bed one whole, I needed to model some sort of an embankment to prevent the resin from spreading to the road. The job fell on Clear Water gel by Ammo by MIG. It is a white paste that dries clear. Using a small brush, I made a small embankment that was 2-3mm high and I left it to dry over night.

Unfortunately, that night the rain started to fall and the temperature dropped down significantly. This caused the effect not to dry completely. It still remained white. As I was chasing a deadline, I decided to proceed with the resin pouring despite it not being clear. I could always cover this part with snow at a later point.

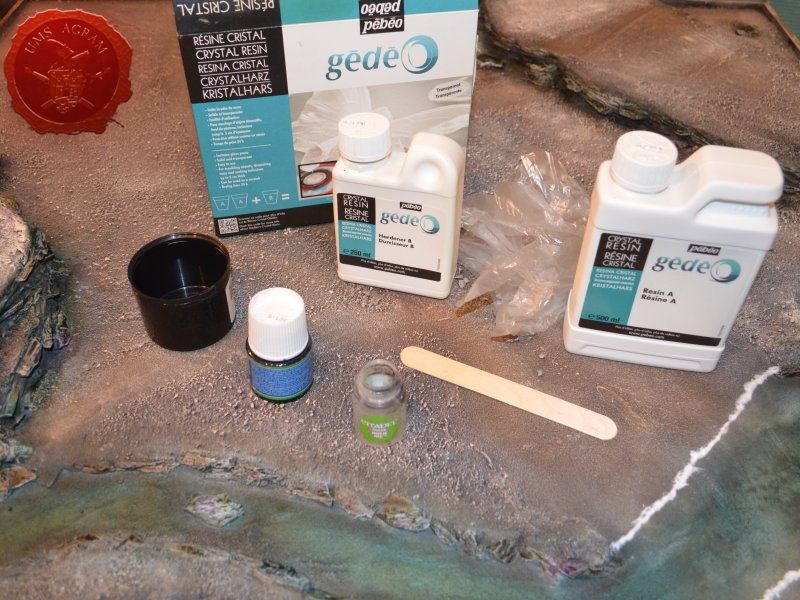
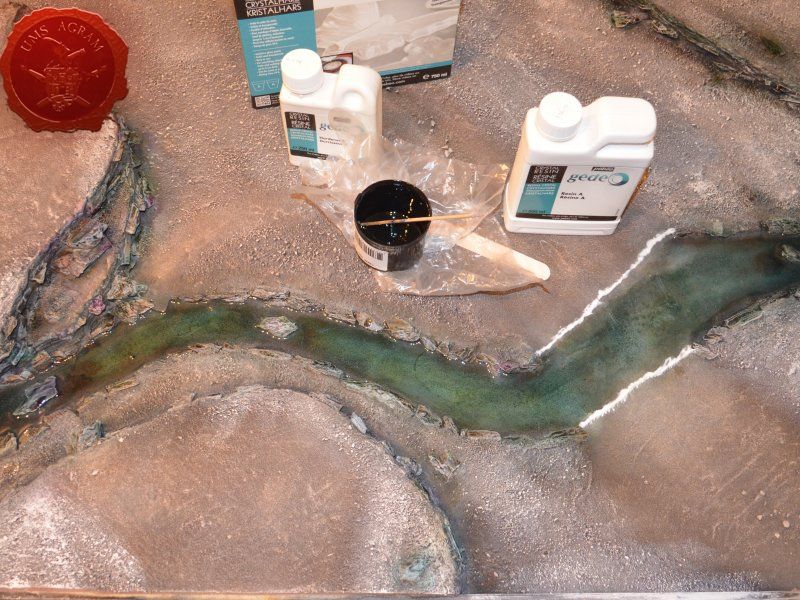
For the river, I opted to use Gedeo Crystal Resin. A quick calculation based on rough estimations of the river being 5cm wide and 90cm long coupled with my wish for the river to be 1-2mm deep, produced the result that I needed 45-90ml of resin. The Gedeo Crystal Resin is my resin of choice, mostly because it is a two component resin that is mixed in 2:1 volume ratio. This makes it really easy to use in almost all volumes neccessary. During the airbrushing, I spent all of my Nuln Oil. Fortunately, I saved the 24ml bottle. Using two fills of resin (48ml) and one fill of hardener (24ml) ensured that I hade 72ml of resin. Almost perfect for my river. To slightly tint the resin, I used Pebeo Vitrail Sky Blue colour. Remember to add the colour after you mixed the resin and the hardener to ensure the resin sets properly.

Also, the resin mixture is quite volatile and can even produce some heat as the curing is an exothermic reaction so the use of protective gloves is recommended.
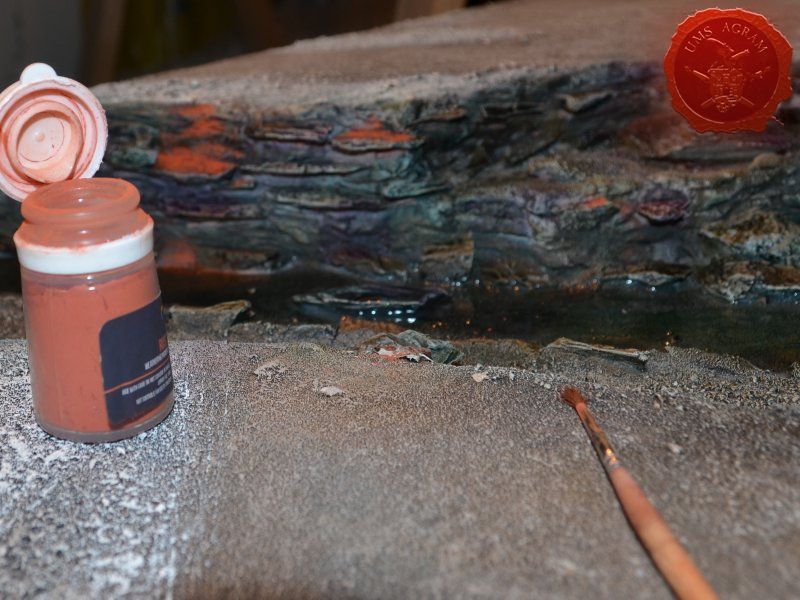
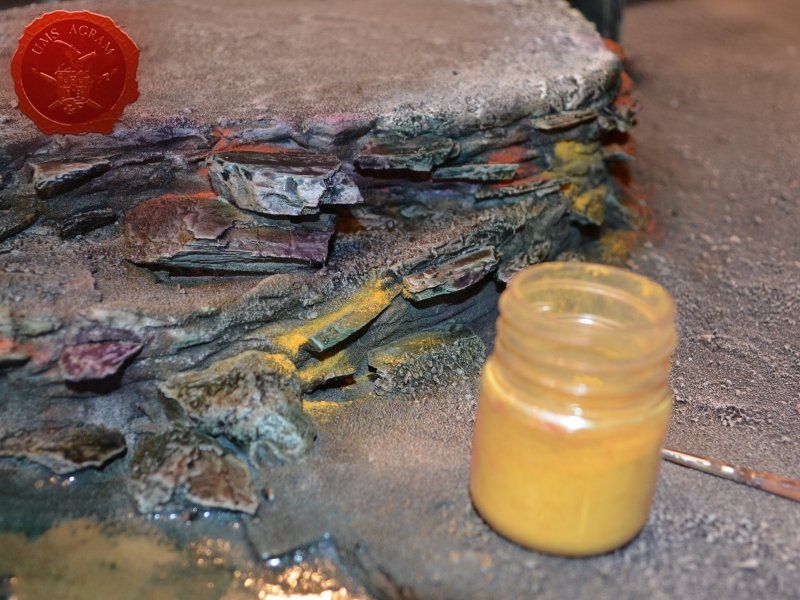
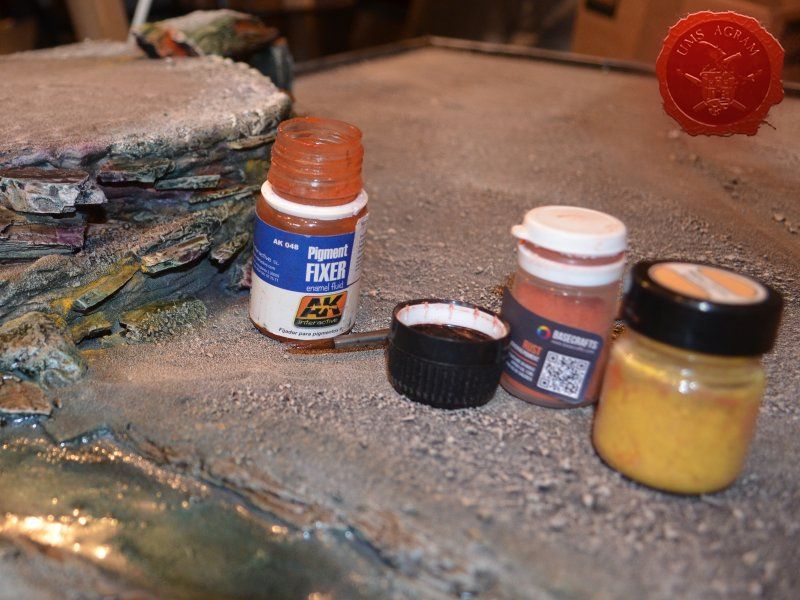
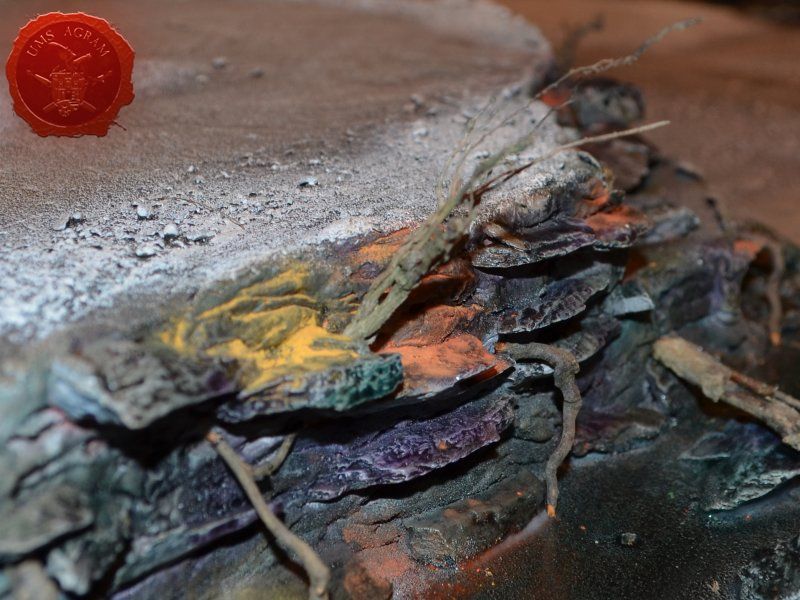
Click for enlarged picture

Click for enlarged picture

Click for enlarged picture

Click for enlarged picture

Click for enlarged picture

Click for enlarged picture

Adding pigments

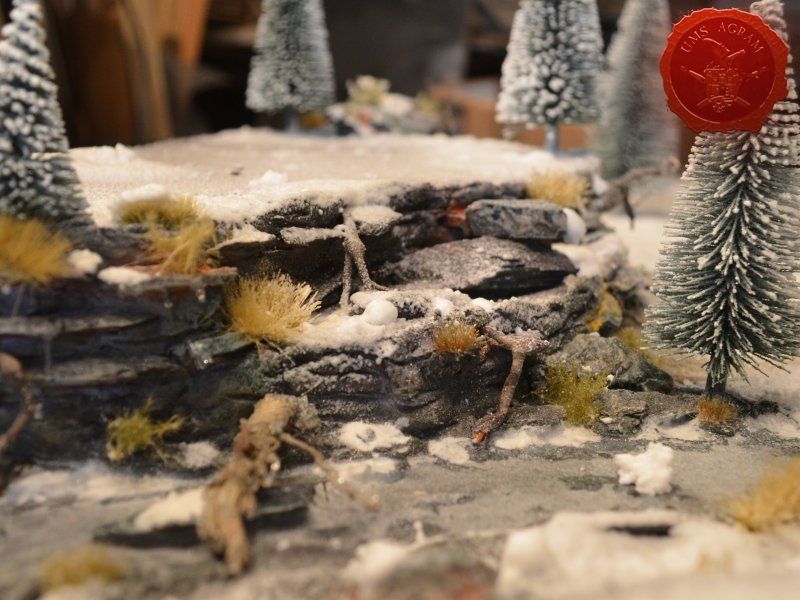
At this point I still was not satisfied with the look of my cliffs so I decided to add some pigments to it. Using rust and ochre pigments applied randomly throughout the cliffs, I added some subtle tones. In places those were not so subtle. I fixed the pigments using AK Interactive Pigment Fixer using a large brush (size 16).
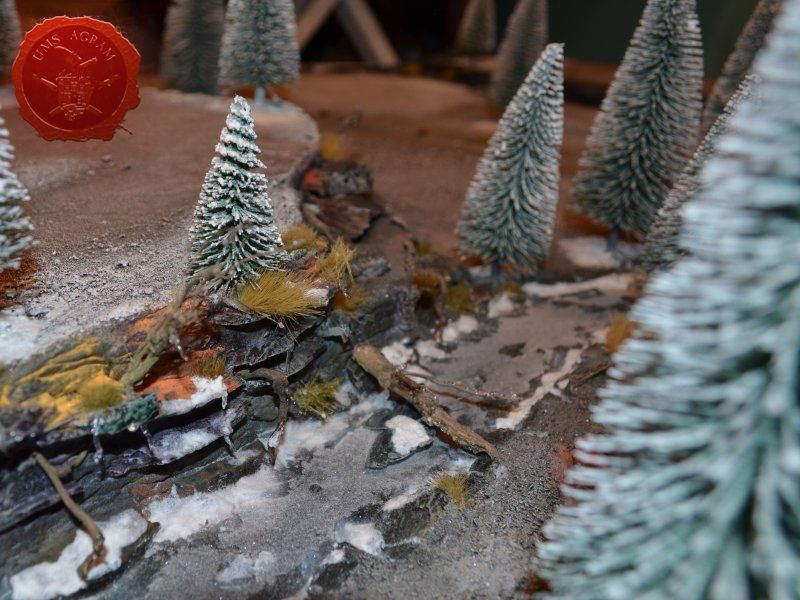
Click for enlarged picture

Click for enlarged picture

Click for enlarged picture

Roots on the cliffs

To add some further variety to the cliffs, I decided to add some roots. If you remember from last issue, I went on a hike to the hills where I gathered some stones I used to make cliffs with. On the same hike, I also gathered some roots from an overturned tree stump. These, when washed, make excellent trees, dried shrubs and even roots in our small scale. Using super glue I fixed them in desired places making sure I glued their both ends. This way, they wouldn't be so easy to dislocate during gaming. Alternatively, you can always pin them using a really thin wire.

Click for enlarged picture

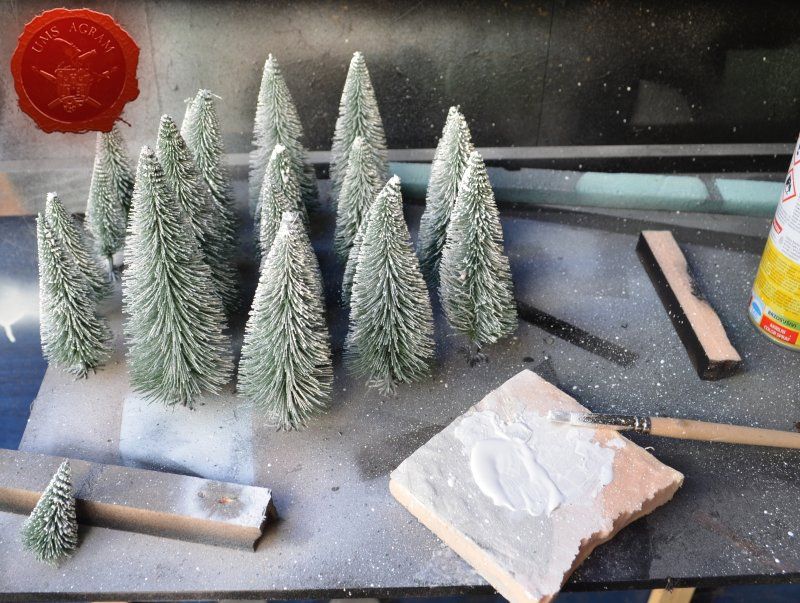
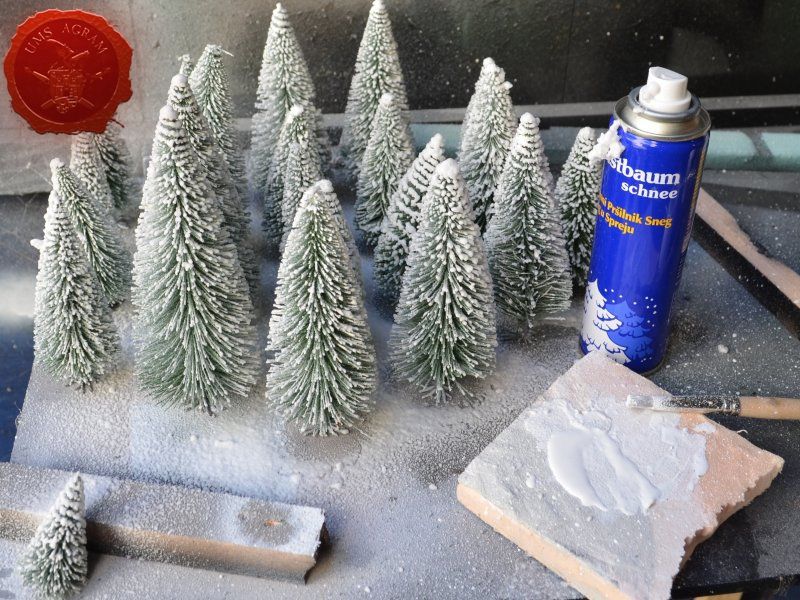
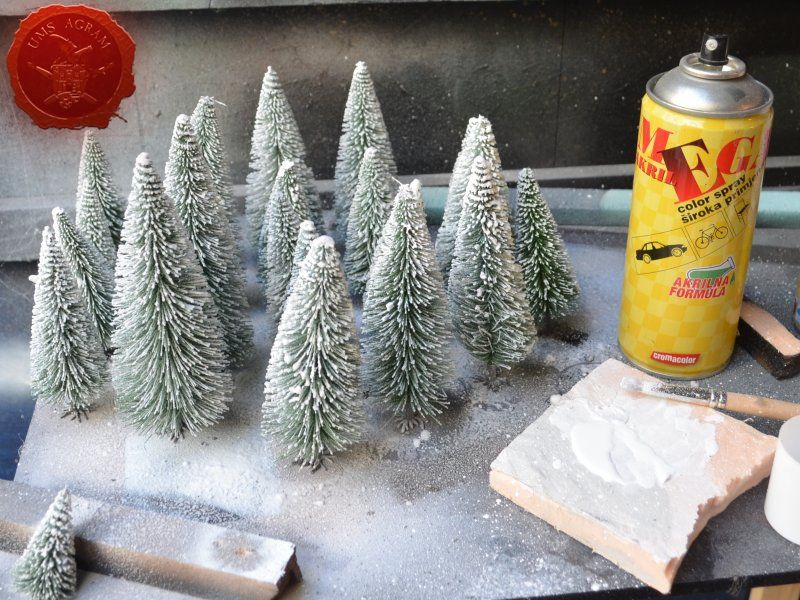
Adding snow to the pine/fir trees

Next step was to add the trees. I decided I would use NOCH fir/pine trees that come in a bag of 50. I would plant 20 of them to my board. Before gluing them to the board, I decided to paint them white and add some snow. First I spreyed them using a white matt acrylic sprey. This was still not white enough for me, so I used Pebeo White applied with a size 16 brush cut for drybrushing. Be careful, this is a messy procedure and you'll get spreyed white as my T-shirt will attest. When the white colour was dry, I spreyed the trees with snow foam from a sprey can. This added some volume to the snowy effect that I was going for. When the foam was dry, I spreyed the trees with clear acrylic mat sprey to add some strength to the bond between the trees and the snow foam.

Click for enlarged picture

Click for enlarged picture

Click for enlarged picture

Click for enlarged picture

Click for enlarged picture

Low branches

While the snow was drying on the fir/pine trees I decided to add some more medium to low vegetation to my board. Once again, I turned to the roots gathered on my hike to the hills. I used some cool looking roots that had at least two to three branches to make some low branches that are growing from the cliffs of my board. I glued them arbitrarily around the cliffs, just making sure they do not get in the way of gaming. To glue them in place I used some super glue. If you are worried that the branches might get knocked off, you can always pin them using wire/paperclips to the cliffs.
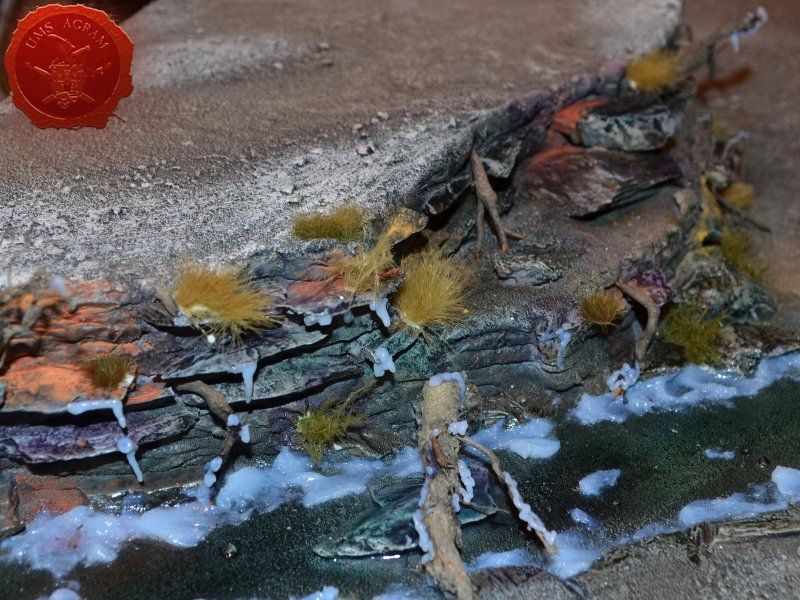
Click for enlarged picture

Ice on the river

With the resin now totally cured, I had to add some ice on the riverbanks. Fortunately, during Iron Painter, I discovered a cool product used by railroad modellers to add ice to their rivers. It is made by a german company called NOCH. Their Ice Crystals comes in a rubbery tube and is some sort of paste that can be applied directly from the tube to a frozen lake, a wintery pond, to the street or to windows and subsequently be easily modelled with a brush. Once dry it gives the shimmering effect of ice. I used a large brush (size 16) to apply it to my river banks. I made sure that the layer wasn't uniform making it narrower and wider, lower and higher and I even placed a couple of pieces inside the river.

Also, once dry, you can add some Clear Water gel from Ammo by Mig to form a stream if you wish. I decided not to as I wanted my river not to be rapids.

Click for enlarged picture

Icicles

Another NOCH product I discovered while doing Iron Painter back in 2017 was the NOCH Icicles tube. This is really easy to use product that comes out of the rubber tube as a small worm. It is obviously some sort of resin that dries clear and has quite high a rigidity. Perfect for making icicles. I decided to use them only around the river on the cliffs and low branches. This way, the branches when covered with the NOCH Icicles, not only would they look frozen, but would be more rigid which will prevent breakage during gaming.
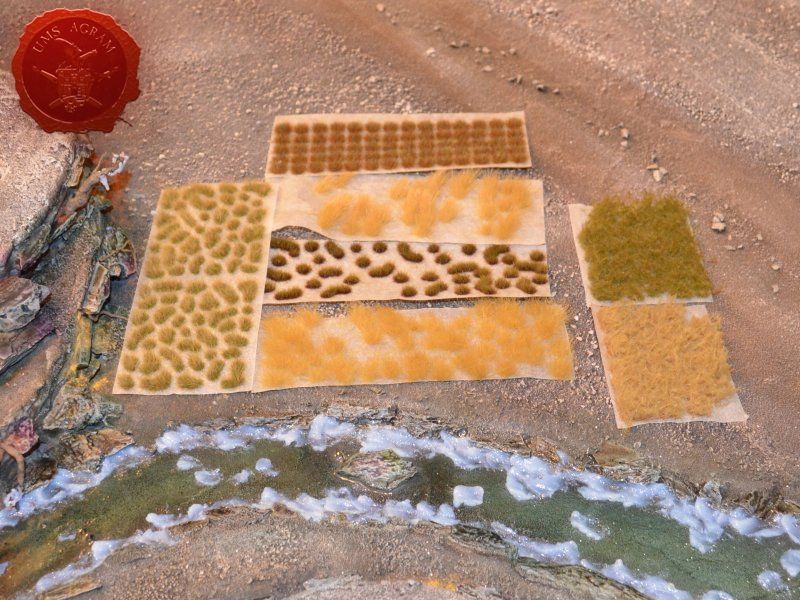
Click for enlarged picture

Low vegetation

Since the majority of the board would be covered with snow, I decided not to use generic static grass, but opted for a slightly more expenisve tufts. The tufts I used are from Gamer's Grass and they come in a number of colouration, height and size. I used 12mm, 6mm and 4mm long tufts in beige, winter, dry and autumn colouration, as well as spikey variant which added quite some character to the cliffs underneath which I glued them using PVA glue.

Click for enlarged picture

Click for enlarged picture

Click for enlarged picture

Gluing the pines

Depending on the sort of trees you have, you can fix them to your board in several ways. First, and the easiest, is to glue the trees using PVA glue. Since my trees had the roots made in the bottom, I chose this method. Not only do they provide wide enough an area for the glue to work, the fact that the roots were modelled made them realistic enough to use as is. However, some trees come on a circular base (about 2cm in diametre). If you use those, my advice would be to remove the circular base and add a wire pin (using a pin vice or a dremel). This will provide added strenght to the bond. Around the tree, I would then suggest planting some low vegetation (or snow in this case) to hide the fact that there is no root present.

Click for enlarged picture

Adding the snow

The last thing to add to this board will be the snow. My initial plan was to cover the entire board (minus the river, most of the cliffs, roads and paths) with several layers of NOCH snow products glued by a thick layer of PVA glue. However, that seemed like a waste of material (both the snow product and PVA glue) so I decided only to use the NOCH snow underneath the trees. I applied a thick layer of PVA glue around the trees and using a large spoon sprinkled the snow product. Also, at this time I used a watered down mixture of PVA glue, water and white paint to cover some of the ice surfaces on the river. Those areas were also covered with snow product.

Rest of the surfaces, I sprinkled with snow foam from a sprey can. In all, I used two sprey cans. Around the sensitive areas like river, cliffs and tufts I used some thin card to protect them from the sprey. Once dry, I spreyed some clear matt sprey to add strenght to the effect. This way, I saved both money and time as this is truly a fast method. Eventually, due to gaming on the board, I expect some of the snow to peel of. However, the snow foam from a sprey can costs less than 2 USD so the cost of repairing isn't high.

Click for enlarged picture

Click for enlarged picture

Click for enlarged picture

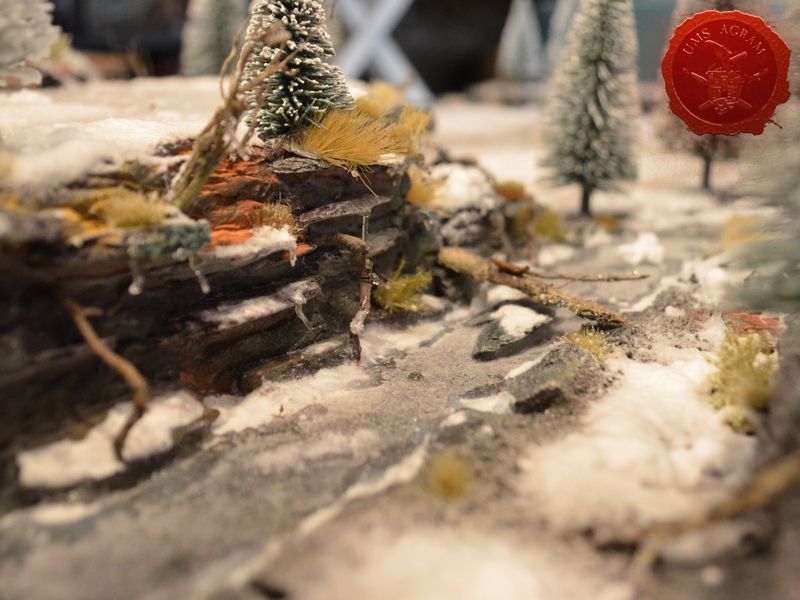
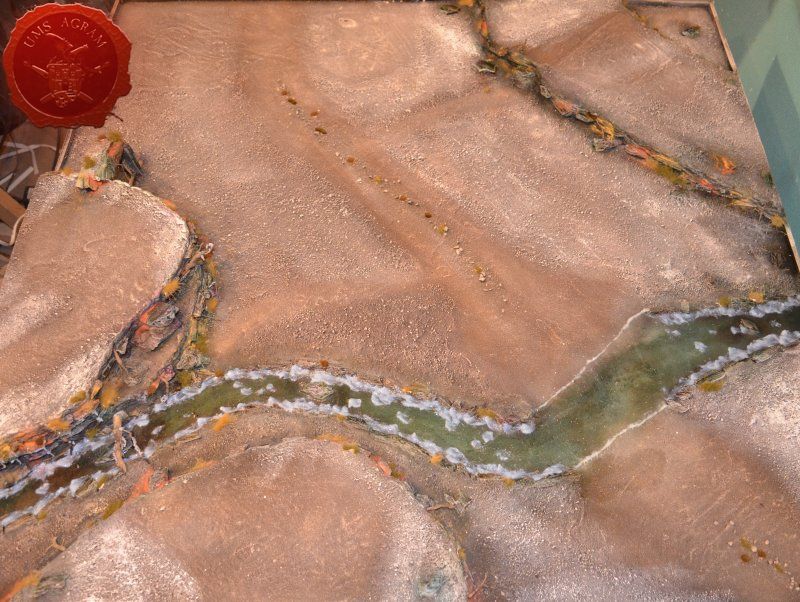
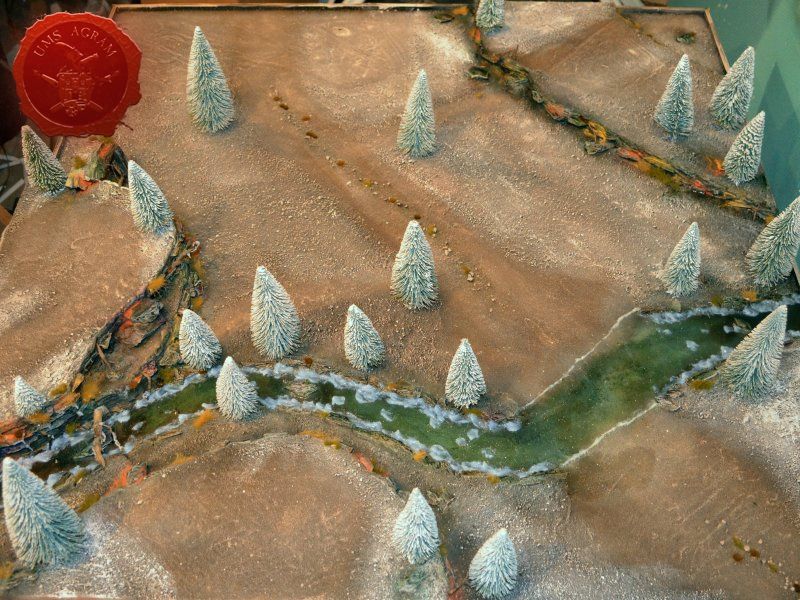
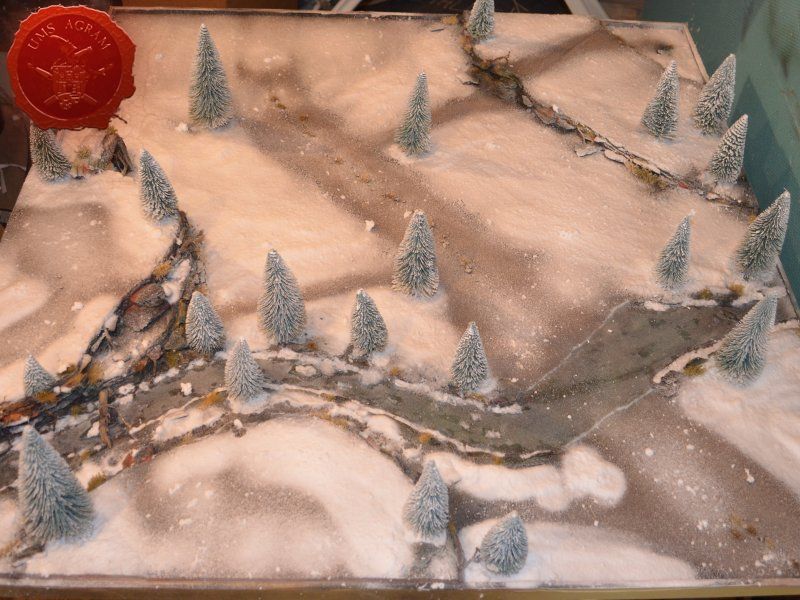
The finished product

After a couple of weeks of building on and off, my board was finished. In total, it cost less than 100USD with all the materials used (over half of which is resin and fir/pine trees).

Click for enlarged picture

Click for enlarged picture

Click for enlarged picture

Latest articles

  • We Visited: SVET V MALEM, Pivka 2025
              array(2) {
      ["Article"]=>
      array(10) {
        ["id"]=>
        string(3) "459"
        ["member_id"]=>
        string(2) "64"
        ["title_eng"]=>
        string(36) "We Visited: SVET V MALEM, Pivka 2025"
        ["title_hrv"]=>
        string(45) "Posjetili smo: SVET V MALEM, Pivka, Slovenija"
        ["mask_eng"]=>
        string(34) "we_visited_svet_v_malem_pivka_2025"
        ["mask_hrv"]=>
        string(42) "posjetili_smo_svet_v_malem_pivka_slovenija"
        ["content_eng"]=>
        string(3383) "

    Click for enlarged picture

    Click for enlarged picture

    Click for enlarged picture

    Click for enlarged picture

    Click for enlarged picture

    Click for enlarged picture

    Click for enlarged picture

    Click for enlarged picture

    Click for enlarged picture

    Click for enlarged picture

    for better photos check out our social media.

    " ["content_hrv"]=> string(3993) "

    Click for enlarged picture

    U subotu, 24.5.2025. zaputili smo se u Pivku u Sloveniji na tradicionalno međunarodno natjecanje Svet v Malem. Kao i proteklih godina i ovaj puta se održalo u Parku vojaške zgodovine u Pivki smještenom u bivšoj vojnoj kasarni.

    Click for enlarged picture

    Iskoristili smo priliku i družili se sa našim slovenskim, talijanskim, srpskim, ali i hrvatskim prijateljima te saznali o osnivanju nove udruge u Rijeci pod nazivom: Udruga Argola.

    Click for enlarged picture

    Click for enlarged picture

    Click for enlarged picture

    Click for enlarged picture

    Natjecanje je bilo na dosta visokom nivou, a naši članovi su osvojili nekoliko medalja.

    Click for enlarged picture

    Click for enlarged picture

    Click for enlarged picture

    Click for enlarged picture

    Za više fotografija u punoj rezoluciji, pogledajte naše socijalne mreže.

    " ["created"]=> string(19) "2025-07-01 10:19:21" ["modified"]=> string(19) "2025-07-01 10:21:21" } ["Member"]=> array(10) { ["id"]=> string(2) "64" ["group_id"]=> string(1) "1" ["first_name"]=> string(9) "Krunoslav" ["last_name"]=> string(8) "Belinić" ["first_name_mask"]=> string(9) "krunoslav" ["last_name_mask"]=> string(7) "belinic" ["username"]=> string(5) "Kruno" ["password"]=> string(40) "eb3fda45fbec0258e90d809803b10491c548b22f" ["born"]=> string(19) "2015-01-18 09:19:00" ["created"]=> string(19) "2015-01-18 09:20:39" } }
    Krunoslav Belinić, 1nd July 2025
  • We visited: Kontrast Miniature Painting Festival
              array(2) {
      ["Article"]=>
      array(10) {
        ["id"]=>
        string(3) "458"
        ["member_id"]=>
        string(2) "35"
        ["title_eng"]=>
        string(48) "We visited: Kontrast Miniature Painting Festival"
        ["title_hrv"]=>
        string(66) "Posjetili smo: Kontrast – Festival Bojanja Minijatura u Poljskoj"
        ["mask_eng"]=>
        string(47) "we_visited_kontrast_miniature_painting_festival"
        ["mask_hrv"]=>
        string(61) "posjetili_smo_kontrast_festival_bojanja_minijatura_u_poljskoj"
        ["content_eng"]=>
        string(13173) "

    This year, our member Ivan Knezović and his brothers, Petar and Filip, (popularly called the Knezović Clan) visited the Kontrast international miniature painting competition in Poland. And this is his report.

    Click for enlarged picture

    One of the largest miniature painting competitions in the world has been taking place in Warsaw since 2021. The Knezović clan visited Kontrast for the first time in 2023. The event was great and we enjoyed almost 1500 works, many of which were made by masters at the highest artistic level. We decided to visit Warsaw again in 2025, after completing enough works to justify the 12-hour drive one way.

    Click for enlarged picture

    Click for enlarged picture

    We came to Kontrast as a kind of UMS Agram emissaries, and we handed out flyers for Black Queen 2026 and met a number of other enthusiasts, and we hope that some of them will visit Zagreb. We also brought home the Best of Show medal for the work that impressed us the most. We awarded the UMS Agram Best of Show to Dimosthenis Xylas, a miniaturist from Athens, for his dwarf. The work impressed us with its phenomenal atmosphere, smooth transitions, the play of multiple light sources, the level of quality on each individual element, and the convincing textures of the metal. Also, we simply love dwarfs.

    Click for enlarged picture

    The number of phenomenal works was large, because in 2025 more than 1700 works were exhibited in 2 classes - Standard for beginners and hobbyists and Master for professionals and those who have already proven themselves at international competitions (everyone who won gold in Standard will compete in Master in the future).

    Click for enlarged picture

    Click for enlarged picture

    Click for enlarged picture

    Petar won silver in the Master in 2023 and exhibited his works in the Master in 2025, while Filip and I did not have such good results and entered our works in the Standard.

    One of the works that particularly stood out was Captain Titus from the game Space Marine 2 in a huge scale, it seems to me to be 1/4. It may not be the best, but it is a work that all visitors noticed.

    Click for enlarged picture

    One of the works that impressed us was a truly enormous diorama of Khorne Chaos Space Marines vs. Ultramarines. The diorama is huge, but each model is painted to a very high standard and contains about 30 models in various sizes. It is an imitation of a famous painting depicting a battle in Warhammer 40k.

    Click for enlarged picture

    Going through every work that impressed us would make this article too long, and words convey much less than photographs. Luckily, Filip came with a very good camera, so I leave some pictures for the readers to enjoy.

    Click for enlarged picture

    Click for enlarged picture

    Click for enlarged picture

    Click for enlarged picture

    Click for enlarged picture

    Click for enlarged picture

    Click for enlarged picture

    Click for enlarged picture

    Click for enlarged picture

    Click for enlarged picture

    Click for enlarged picture

    Click for enlarged picture

    Our results were beyond expectations. Petar did not return with a medal, because during the 2 years he worked mostly on orders. He painted more than 400 models, but almost all of them were orders. In 3 days he painted the Durgin Paint Forge Orca. The model is really excellent, but the competition was great. With a few more days of work he would definitely be in the running for a medal. I think he can be satisfied with his work and next time aim for a medal with 6 days of painting.

    Click for enlarged picture

    Jure Cukar, for whom we carried 3 models, won 1 silver in the Standard class.Filip won 2 silvers in the Standard class for his lizards (dioramas) and for his ambient soldier (single model up to 54 mm).

    Click for enlarged picture

    I came to Kontrast with 5 exhibits. I came back with results that I did not expect even in my most optimistic dreams, because this is a truly huge competition with numerous top artists. I entered all my works in the Standard class.

    For my Midori bust, I won gold in the Standard Historical and Realism category and an award from Alternity Miniatures, the company whose bust it is a product.

    For my cat Albert, I won silver in the Standard Storytelling category.

    For Dwarf Lord, I won gold in the Standard category for models larger than 54 millimeters.

    Click for enlarged picture

    For my dwarf adventurers, I won gold in the Standard Diorama category, a medal from Verko's Vault (miniature museum in Las Vegas) and what I really didn't expect, Best of Standard – the award for the best work of all works in the Standard category.

    Click for enlarged picture

    Finally, and this is perhaps the greatest recognition for my work, I won silver in the Master category for my Infinity regiment. Namely, all competitors submitted their works in only one class, either Standard or Master. However, the judges reserved the possibility of moving the model from Standard to Master.

    Click for enlarged picture

    All in all, Kontrast is a great experience. I hope we will visit Warsaw again, if not in 2026 then in 2027. In the meantime, I hope our Black Queen will also visit some of the new people we met in Poland.

    " ["content_hrv"]=> string(13263) "

    Ove godine naš član Ivan Knezović je sa svojom braćom, Petrom i Filipom, (popularno nazvanima Klan Knezović) posjetio međunarodno natjecanje u bojanju minijatura Kontrast u Poljskoj. A ovo je njegov izvještaj!

    Click for enlarged picture

    Jedno od najvećih natjecanja u bojenju minijatura na svijetu odvija se u Varšavi od 2021. godine. Klan Knezović je posjetio Kontrast prvi puta 2023. godine. Događaj je bio sjajan te smo uživali u gotovo 1500 radova, od kojih su mnogi rađeni od strane majstora na najvišoj umjetničkoj razini. Odlučili smo i 2025., nakon što smo dovršili dovoljno radova da opravdamo vožnju od 12 sati u jednom smijeru ponovno posjetiti Varšavu.

    Click for enlarged picture

    Click for enlarged picture

    Na Kontrast smo došli kao svojevrsni izaslanici UMS Agrama te smo podijelili letke za Black Queen 2026. te upoznali veći broj drugih entuzijasta te se nadamo da će neki posjetiti Zagreb. Donijeli smo i Best of Show medalju za rad koji nas se najviše dojmio. UMS Agram Best of Show dodijelili smo Dimosthenisu Xylasu, minijaturistu iz Atene za njegovog patuljka. Rad nas je dojmio fenomenalnom atmosferom, glatkim prijelazima, igrom više izvora svjetla, razinom kvalitete na svakom pojedinom elementu i uvjerljivim teksturama metala. Također, jednostavno volimo patuljke.

    Click for enlarged picture

    Broj fenomenalnih radova bio je velik, jer je 2025. bilo izloženo više od 1700 radova u 2 klase - Standard za početnike i hobiste te Master za profesionalce i one koji su se već iskazali na međunarodnim natjecanjima (svi koji su u Standardu osvojili zlato ubuduće se natječu u Masteru).

    Click for enlarged picture

    Click for enlarged picture

    Click for enlarged picture

    Petar je 2023. osvojio srebro u Masteru te je i 2025. izlagao radove u Masteru, a ja i Filip nismo imali tako dobre rezultate te smo svoje radove prijavili u Standard.

    Od radova koji su se posebno isticali bio je kapetan Titus iz igre Space Marine 2 u ogromnoj skali, od oka čini mi se da je 1/4. Možda nije najbolji, ali je rad koji su svi posjetitelji primijetili.

    Click for enlarged picture

    Jedan od radova koji nas se dojmio je i zbilja ogromna diorama Khorne Chaos Space Marinaca protiv Ultramarinaca. Diorama je ogromna, ali svaki model pobojen je na vrlo visokoj razini te sadrži oko 30 modela u različitim veličinama. Imitacija je poznatog slikarskog prikaza bitki u Warhammeru 40k.

    Click for enlarged picture

    Proći svaki rad koji nas se dojmio oduljilo bi ovaj članak, a riječi prenose puno manje nego fotografije. Srećom, Filip je došao s vrlo dobrim foto aparatom te ostavljam neke slike za uživanje čitateljima.

    Click for enlarged picture

    Click for enlarged picture

    Click for enlarged picture

    Click for enlarged picture

    Click for enlarged picture

    Click for enlarged picture

    Click for enlarged picture

    Click for enlarged picture

    Click for enlarged picture

    Click for enlarged picture

    Click for enlarged picture

    Click for enlarged picture

    Naši rezultati bili su iznad očekivanja. Petar se nije vratio s medaljom, jer je kroz 2 godine radio većinom na narudžbama. Pobojio je više od 400 modela, ali gotovo sve su bile narudžbe. U 3 dana pobojio je Durgin Paint Forge orka. Model je zbilja izvrstan, ali konkurencija je bila velika. S još nekoliko dana rada zasigurno bi ušao u konkurenciju za medalju. Mislim da može biti zadovoljan samim radom i sljedeći put ciljati na medalju sa 6 dana bojenja.

    Click for enlarged picture

    Jure Cukar, za koga smo nosili 3 modela osvojio je 1 srebro u Standard klasi. Filip je osvojio 2 srebra u Standard klasi za svoje guštere (diorama) i za svojeg ambientalnog vojnika (single model do 54 mm).

    Click for enlarged picture

    Ja sam na Kontrast došao s 5 izložaka. Vratio sam s rezultatima koje nisam očekivao niti u najoptimističnijim snovima, jer se radi o zbilja ogromnom natjecanju s brojnim vrhunskim umjetnicima. Sve svoje radove prijavio sam u Standard klasu.

    Za svoju Midori bistu osvojio sam zlato u Standard Historical and Realism kategoriji te nagradu Alternity Miniaturesa, tvrtke čija je bista proizvod.

    Za svojeg mačka Alberta osvojio sam srebro u Standard Storytelling kategoriji.

    Za Dwarf Lorda osvojio sam zlato u Standard kategoriji za modele veće od 54 milimetra.

    Click for enlarged picture

    Za svoje patuljke avanturiste osvojio sam zlato u Standard Diorama kategoriji, medalju Verko's Vaulta (muzej minijatura u Las Vegasu) te ono što stvarno nisam očekivao, Best of Standard – nagradu za najbolji rad od svih radova u Standard kategoriji.

    Click for enlarged picture

    Na kraju, a ovo je možda najveće priznanje za moje radove, osvojio sam srebro u Master kategoriji za svoj Infinity regiment. Naime, svi natjecatelji svoje radove prijavljivali su samo u jednu klasu, ili Standard ili Master. No, suci su pridržali mogućnost pomicanja modela iz Stanarda u Master.

    Click for enlarged picture

    Sve u svemu Kontrast je sjajno iskustvo. Nadam se da ćemo ponovno posjetiti Varšavu, ako ne 2026. onda 2027. U međuvremenu, nadam se da će i naš Black Queen posjetiti i neki od novih ljudi koje smo upoznali u Poljskoj.

    " ["created"]=> string(19) "2025-06-05 07:30:52" ["modified"]=> string(19) "2025-06-05 07:39:16" } ["Member"]=> array(10) { ["id"]=> string(2) "35" ["group_id"]=> string(1) "1" ["first_name"]=> string(5) "Marko" ["last_name"]=> string(9) "Paunović" ["first_name_mask"]=> string(5) "marko" ["last_name_mask"]=> string(8) "paunovic" ["username"]=> string(5) "marko" ["password"]=> string(40) "3bd37b326d19d1880d3b93a4b32e8fb3a90fa122" ["born"]=> string(19) "2033-03-07 20:35:00" ["created"]=> string(19) "2009-06-02 20:37:03" } }
    Marko Paunović, 5th June 2025
  • Dalibor's Trip Tip: Plzen and Prag
              array(2) {
      ["Article"]=>
      array(10) {
        ["id"]=>
        string(3) "456"
        ["member_id"]=>
        string(2) "95"
        ["title_eng"]=>
        string(34) "Dalibor's Trip Tip: Plzen and Prag"
        ["title_hrv"]=>
        string(37) "Daliborove preporuke u Plzenu i Pragu"
        ["mask_eng"]=>
        string(32) "dalibors_trip_tip_plzen_and_prag"
        ["mask_hrv"]=>
        string(37) "daliborove_preporuke_u_plzenu_i_pragu"
        ["content_eng"]=>
        string(4691) "

    Click for enlarged picture

    A quick report because I literally had 10-15 minutes to look at this model, take pictures of it and listen to some details about the city it represents. So, if your trip brings you to Plzeň in western Bohemia, I recommend you look for this beautiful model of the old city center in a scale of 1:200. The model is approximately 2x2 meters in size and is located on the ground floor of the city hall, which is located on the main square opposite the Cathedral of St. Bartholomew.

    Click for enlarged picture

    Click for enlarged picture

    Click for enlarged picture

    Regarding our hobby, and while you're here, I believe it's also worth visiting the General Patton Museum, the Puppet Museum, and the Colors of Warriors hobby shop. Unfortunately, due to work and previously scheduled obligations, I wasn't able to see them, and therefore didn't get to take any pictures. But at least, besides the excellent beer, I have an additional reason to visit this beautiful Czech city again. So here are some more photos of the model of Plzen.

    Click for enlarged picture

    Click for enlarged picture

    And if you happen to be in Prague, be sure to visit the toy store Hračky u Zlatého lva. Yes, toys, I know. But you will enjoy classic wooden toys, dolls and metal model cars. Although it is not large by some general standards, the store is spread over 2 floors with a small note: if you are looking for transformers, WH 40k, minions and other modern wonders there, you will be quite disappointed. I was not.

    Click for enlarged picture

    Click for enlarged picture

    Click for enlarged picture

    Click for enlarged picture

    " ["content_hrv"]=> string(4615) "

    Click for enlarged picture

    Jedan brzinski izvještaj jer sam imao doslovno 10-15 minuta pogledati ovu maketu, poslikati ju i poslušati neke detalje o gradu kojeg predstavlja. Dakle, ako vas put dovede u Plzeň u zapadnoj Češkoj, preporučam da potražite ovi prekrasnu maketu stare gradske jezgre u mjerilu 1:200. Maketa je otprilike veličine 2x2 metra i nalazi se u prizemlju gradske uprave, a koja se nalazi na glavnom trgu nasuprot katedrale Sv. Bartolomeja.

    Click for enlarged picture

    Click for enlarged picture

    Click for enlarged picture

    Vezano uz naš hobi, a dok ste ovdje, vjerujem da se još isplati posjetiti Muzej generala Pattona, Muzej lutaka i hobby shop Colours of Warriors. Ja ih, nažalost, radi posla i ranije isplaniranih obaveza nisam uspio vidjeti, a samim time niti poslikati. Ali bar, osim izvrsnog piva, imam dodatni razlog opet posjetiti ovaj lijepi češki grad. Stoga još malo fotki makete Plzena.

    Click for enlarged picture

    Click for enlarged picture

    A ako vas put slučajno nanese u Prag, obavezno posjetiti trgovinu igračaka Hračky u Zlatého lva. Da, hrački, I know. Ali ćete zato uživati u klasičnim drvenim igračkama, lutkama i metalnim modelima autića. Iako nije velika za neke generalne pojmove trgovina se prostire na 2 etaže uz malu napomenu: ako ćete tamo tražiti transformerse, WH 40k, minione i ostala moderna čudesa prilično ćete se razočarati. Ja nisam.

    Click for enlarged picture

    Click for enlarged picture

    Click for enlarged picture

    Click for enlarged picture

    " ["created"]=> string(19) "2025-06-04 06:50:54" ["modified"]=> string(19) "2025-06-04 06:50:54" } ["Member"]=> array(10) { ["id"]=> string(2) "95" ["group_id"]=> string(1) "2" ["first_name"]=> string(7) "Dalibor" ["last_name"]=> string(7) "Čavić" ["first_name_mask"]=> string(7) "dalibor" ["last_name_mask"]=> string(5) "cavic" ["username"]=> string(6) "Tvrtko" ["password"]=> string(0) "" ["born"]=> string(19) "2019-04-04 18:51:00" ["created"]=> string(19) "2019-04-04 18:51:50" } }
    Dalibor Čavić, 4th June 2025
  • Miniature Painting Workshop - Kitbashing and Converting
              array(2) {
      ["Article"]=>
      array(10) {
        ["id"]=>
        string(3) "455"
        ["member_id"]=>
        string(2) "35"
        ["title_eng"]=>
        string(55) "Miniature Painting Workshop - Kitbashing and Converting"
        ["title_hrv"]=>
        string(54) "Radionica bojanja minijatura - Kitbashing i converting"
        ["mask_eng"]=>
        string(55) "miniature_painting_workshop_-_kitbashing_and_converting"
        ["mask_hrv"]=>
        string(54) "radionica_bojanja_minijatura_-_kitbashing_i_converting"
        ["content_eng"]=>
        string(3840) "

    Click for enlarged picture

    Click for enlarged picture

    Click for enlarged picture

    Click for enlarged picture

    Click for enlarged picture

    Click for enlarged picture

    Click for enlarged picture

    Click for enlarged picture

    Click for enlarged picture

    Click for enlarged picture

    Click for enlarged picture

    Click for enlarged picture

    " ["content_hrv"]=> string(5445) "

    Click for enlarged picture

    U subotu i nedjelju, 17. i 18.5. održali smo novu vikend radionicu bojanja minijatura. Ovog puta tema je bilo konvertiranje i kitbashanje.

    Radionica se provodila kroz dva dana (cijeli vikend) i bila je fokusirana na izradu dvije (do tri) vlastite minijature od raznih dijelova (više različitih minijatura) uz dodatak modeliranja dijelova uz pomoć modelarskih masa (Green Stuff). Sastojala se od dva dijela, teorijskog i praktičnog dijela. Tijekom radionice polaznici su se upoznali s alatima, materijalima i tehnikama za izvođenje jednostavnih i kompleksnih konverzija, uključujući uporabu masa za modeliranje.

    Click for enlarged picture

    Click for enlarged picture

    Click for enlarged picture

    Teorijski dio uključuje savjete za planiranje, nabavu dijelova i smisleno sklapanje personaliziranih minijatura da bi polaznici naučili izbjeći početničke greške i podigli svoje vještine na viši nivo.
    U praktičnom dijelu, uz pomoć voditelja primijenila su se stečena znanja na vlastitu konverziju.

    Click for enlarged picture

    Click for enlarged picture

    Click for enlarged picture

    Praktični dio Radionice se odvijao na sljedeći način:
    Prvo, predavač sjedi za svojim stolom te objašnjava i demonstrira pojedini korak na svojem primjerku dok polaznici slušaju, gledaju, ali i postavljaju pitanja. Potom, polaznici sjedaju za svoje stolove i primjenjuju stečeno znanje. Predavač potom kruži između polaznika i provjerava kako svakom polazniku ide. Na taj način, može se prilagoditi svakom polazniku ponaosob.

    Click for enlarged picture

    Click for enlarged picture

    Click for enlarged picture

    U nedjelju od 16:00 svi polaznici su dobili profesionalni feedback na urađene radove od Ane Polanšćak iz Gardens of Hecate.

    Click for enlarged picture

    Click for enlarged picture

    " ["created"]=> string(19) "2025-05-18 18:27:11" ["modified"]=> string(19) "2025-05-18 18:27:11" } ["Member"]=> array(10) { ["id"]=> string(2) "35" ["group_id"]=> string(1) "1" ["first_name"]=> string(5) "Marko" ["last_name"]=> string(9) "Paunović" ["first_name_mask"]=> string(5) "marko" ["last_name_mask"]=> string(8) "paunovic" ["username"]=> string(5) "marko" ["password"]=> string(40) "3bd37b326d19d1880d3b93a4b32e8fb3a90fa122" ["born"]=> string(19) "2033-03-07 20:35:00" ["created"]=> string(19) "2009-06-02 20:37:03" } }
    Marko Paunović, 18th May 2025
  • March to Hren28 week 7
              array(2) {
      ["Article"]=>
      array(10) {
        ["id"]=>
        string(3) "454"
        ["member_id"]=>
        string(2) "96"
        ["title_eng"]=>
        string(22) "March to Hren28 week 7"
        ["title_hrv"]=>
        string(24) "March to Hren28 tjedan 7"
        ["mask_eng"]=>
        string(22) "march_to_hren28_week_7"
        ["mask_hrv"]=>
        string(24) "march_to_hren28_tjedan_7"
        ["content_eng"]=>
        string(2791) "

    Our team is preparing to perform at the Turnip28 tournament called H.R.E.N.28 in Slovenia in July. Ana, Mario, Domagoj, Seb and Antoni assemble their armies and paint, and we follow them on their way!

    Click for enlarged picture

    ANTONI: „As for my latest pair of Fodder models, one carries a flag and the other carries a nest on its shoulders. The flag is made from a thin piece of copper that is clamped around a brass rod, secured with superglue, and then bent to look like fabric in the wind.

    Click for enlarged picture

    The nest is made of a mixture of green stuff and milliput that I cut lines into. I put two chicken eggs from the Tamiya farm animal set inside and secured them with a drop of superglue. The other models have all sorts of new heads, from simple medieval helmets to gas cylinder caps. To make it easier to see what they are doing, most of them have candles on their caps. “

    Click for enlarged picture

    MARIO: „As an unexpected addition to my army, I found an old pipe in the apartment and decided to turn it into a cannon. I had the legs from some bird monsters on the sprue and they turned out great for the conversion. My other toadie (which is supposed to be for Brutes) is a small knight and I wanted to give him some creature to stand out on to compensate. I found a stork from Muller, added the head of the pterodactyl I found on the floor of the Sferakon, and redid the legs. There are more things on the bird coming soon, but I have to decide which ones.“

    Click for enlarged picture

    " ["content_hrv"]=> string(2837) "

    Naša ekipa se sprema za nastup na Turnip28 turniru pod nazivom H.R.E.N.28 u Sloveniji u srpnju. Ana, Mario, Domagoj, Seb i Antoni slažu svoje vojske i farbaju, a mi ih pratimo na njihovom putu!

    Click for enlarged picture

    ANTONI: „Što se tiče par najnovijih Fodder modela, jedan nosi zastavicu, a drugi nosi gnijezdo na ramenima. Zastavica je napravljena od tankog komada bakra koji je kliještima stisnut oko mjedenog štapića, učvršćen superljepilom te potom savijen da izgleda kao tkanina na vjetru.

    Click for enlarged picture

    Gnijezdo je napravljeno od mješavine green stuffa i milliputa u koju sam urezao crte. Unutra sam ubacio dva kokošja jaja iz Tamiya seta domaćih životinja i učvrstio ih kapljicom superljepila. Ostali su modeli dobili svakakve nove glave, od običnih srednjovjekovnih kaciga do poklopaca od plinskih boca. Kako bi bolje vidjeli što rade, većina ih ima svijeće na kapama. “

    Click for enlarged picture

    MARIO: „Kao neočekivani dodatak mojoj vojsci, našao sam staru lulu u stanu i odlučio pretvoriti ju u top. Imao sam noge od nekih ptičjih čudovišta na sprue-u i ispale su super za konverziju. Moj drugi toadie (koji bi trebao biti za Brutes) je mali vitez i želio sam mu dati neko biće na kojem će se istaknuti za kompenzaciju. Našao sam rodu iz Mullera, dodao glavu pterodaktila kojeg sam našao na podu Sferakona i prepravio noge. Uskoro dolazi još stvari na pticu, ali se moram odlučiti koje.“

    Click for enlarged picture

    " ["created"]=> string(19) "2025-05-18 18:10:57" ["modified"]=> string(19) "2025-05-18 18:10:57" } ["Member"]=> array(10) { ["id"]=> string(2) "96" ["group_id"]=> string(1) "2" ["first_name"]=> string(6) "Antoni" ["last_name"]=> string(10) "Pastuović" ["first_name_mask"]=> string(6) "antoni" ["last_name_mask"]=> string(9) "pastuovic" ["username"]=> string(6) "antoni" ["password"]=> string(40) "5dfa823ee30df1936c1792d4c8348a4bcf4c64e2" ["born"]=> string(19) "2005-04-04 18:52:00" ["created"]=> string(19) "2019-04-04 18:53:09" } }
    Antoni Pastuović, 18th May 2025

All articles

Latest battle-reports

All battle-reports