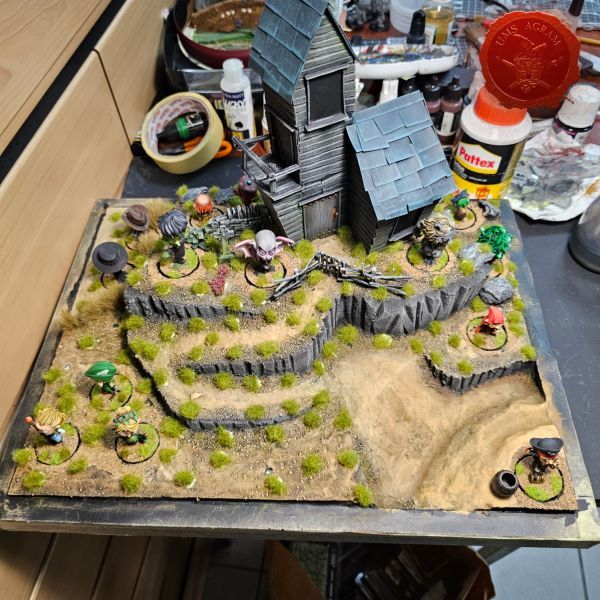
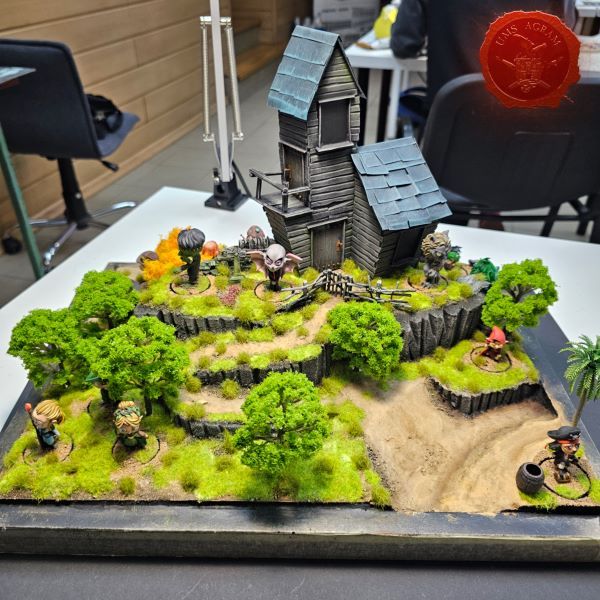
DISPLAY BASE FOR CHAOS ARMY

Tomislav Petrović, 20th July 2021

Since my brother went to Krems this year (editor's note: 2005) for the second time for the Austrian Championship, and the display base is one of the conditions for the community there to participate in the tournament, here's how I put in the effort and made one.

Click for enlarged picture

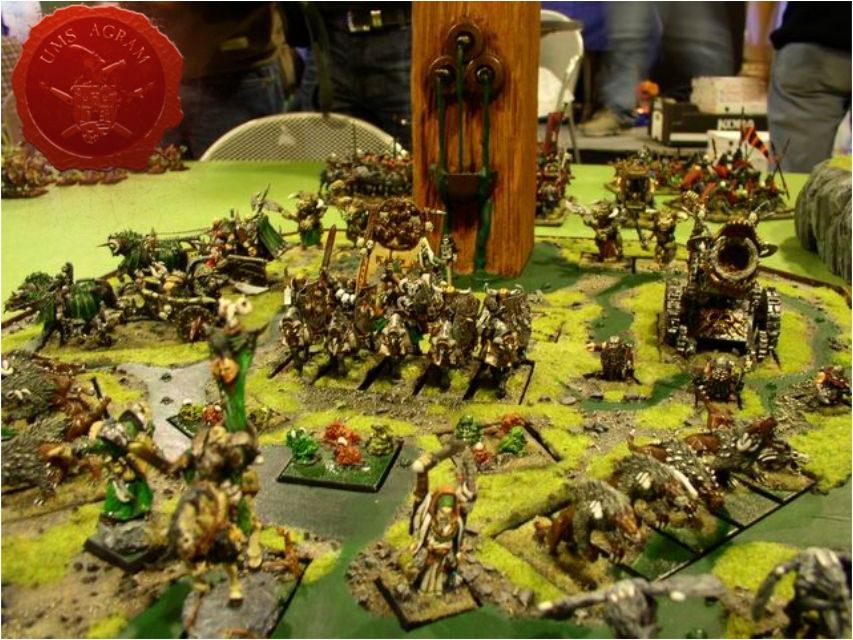
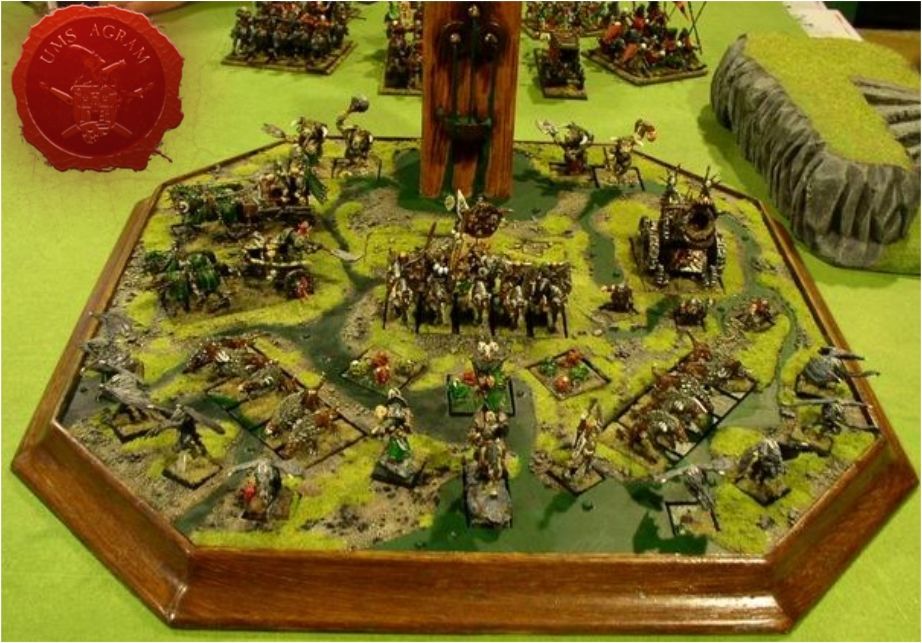
To clarify one thing, display bases (hereinafter DB) that are made in such a way that a certain surface is flocked, painted, maybe some extra features, and the figures are placed on it is for me a halfassed solution - in short, a lot of work for something that looks average. I consider a DB to be da bomb when each unit or individual figure has its own slot in which it is placed so that the surface of the base of the figure is flush with the surface of the DB.

Dissatisfied with the fact that the DB created in this way is useful while the list for which it was made is current, I decided to make a display base that will be applicable to each list (at least its main part), and only the surface will change - when you go deeper into the text , you will understand what I meant.

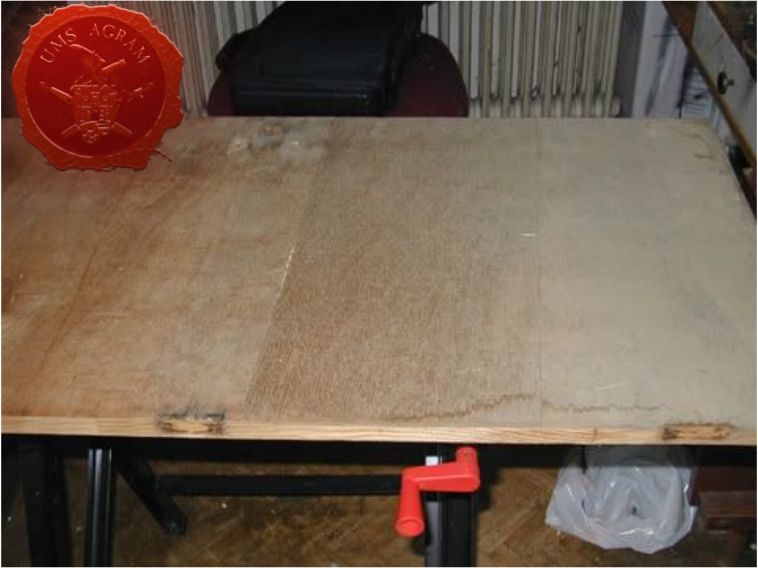
1. Found a suitable board (2 cm thick)

Click for enlarged picture

2. Since my rectangular shape is too ordinary, I decided to complicate things a bit and make a non-real octagon (by that I mean 4 sides of the same length). I made a draft and transferred it to the board:

Click for enlarged picture

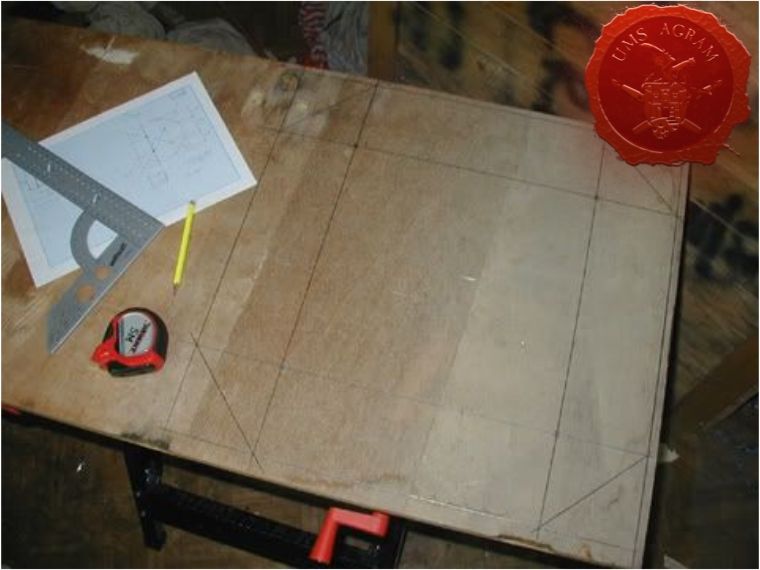
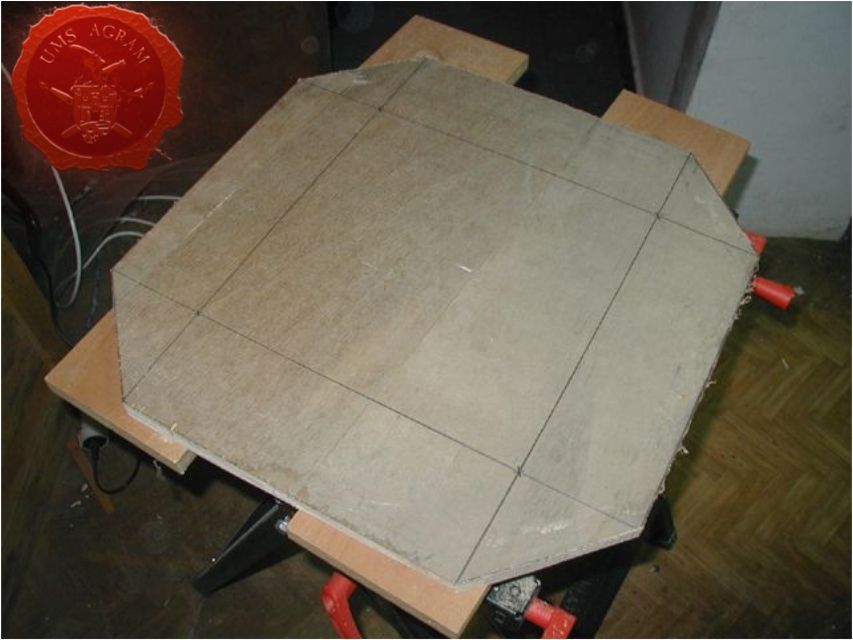
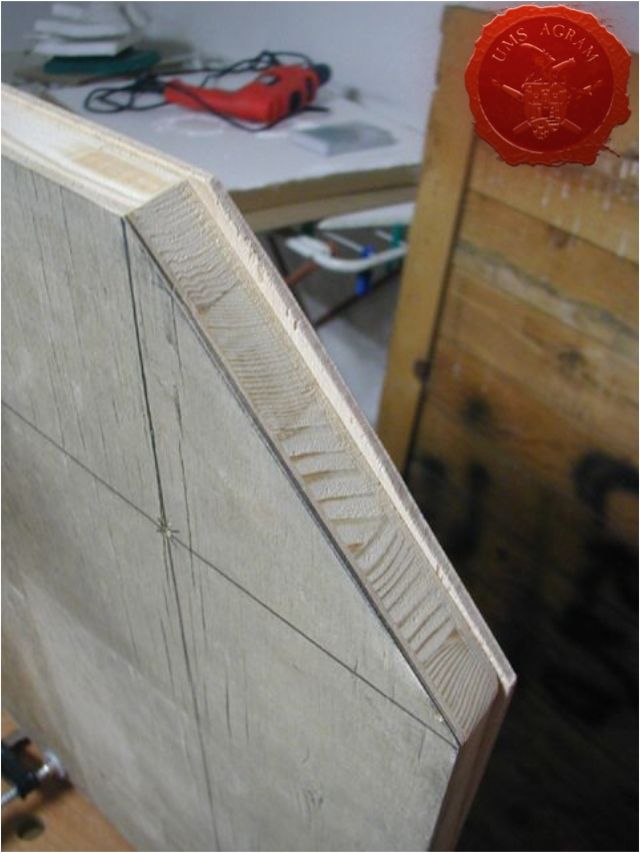
3. I got rid of the excess with a jigsaw, so now the DB has a shape in which the angles are under 150 degrees, 4 sides 30 cm long, and the other four 14 cm + a couple of millimeters, which will later be removed by planing and grinding.

Tip: Never cut the board to the desired dimension but leave 2-4 mm due to the above procedures later:

Click for enlarged picture

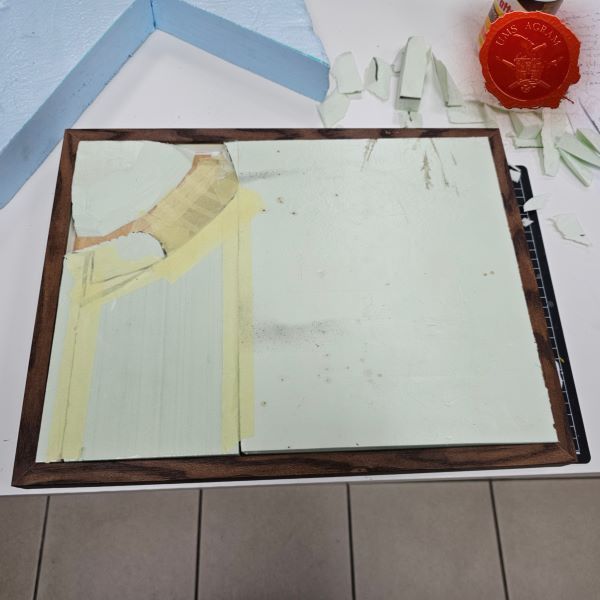
4. I also cut a 4 mm thick plywood board to the same shape (the figure bases are 4 mm thick):

Click for enlarged picture

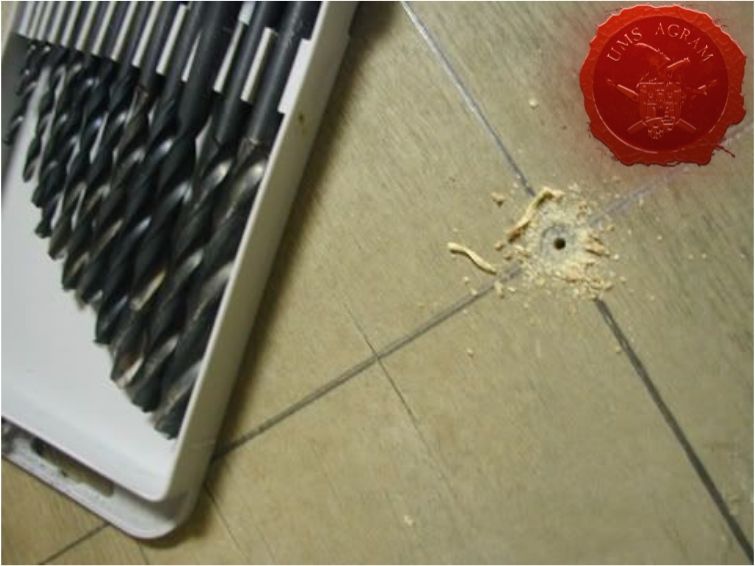
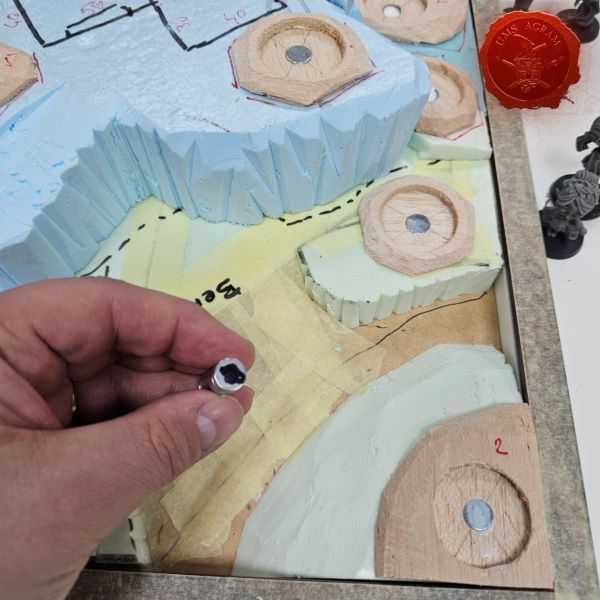
5. I made 4 holes in the board and plywood with a drill, which will later be fitted with screws that will fix the plywood to the main board:

Click for enlarged picture

Click for enlarged picture

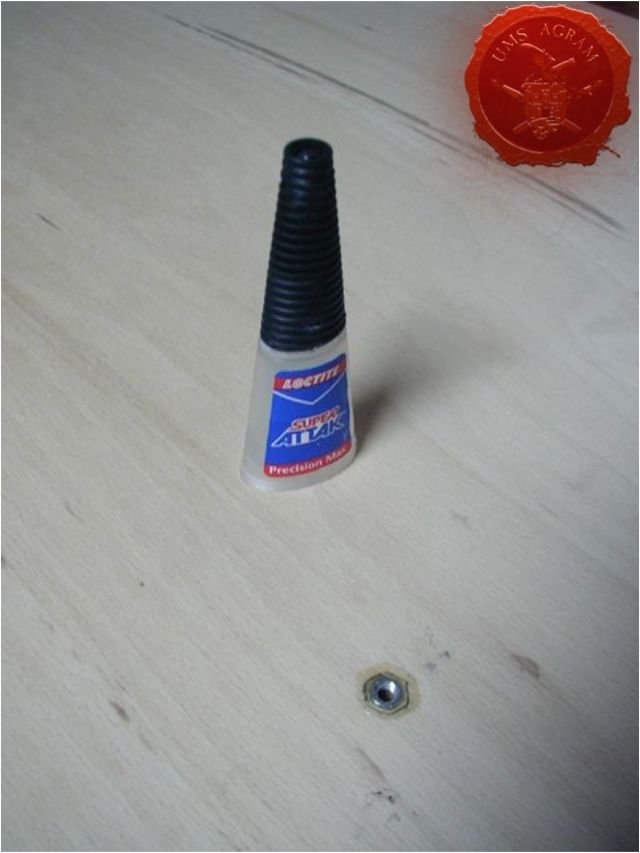
6. Then I widened the holes on the plywood so that the nut would fit in them. I used screws fi = 5 mm and the nut for them is 4 mm thick so it won’t protrude beyond the plywood. After that, the joint between the nut and the plywood is well sanded with super glue, making sure that the glue does not go on the thread because it could later interfere with the screw:

Tip: Since the nut in the board must be fixed, it is desirable to drill a 1 mm smaller hole, and then drive it into the board with a hammer and brutal force.

Click for enlarged picture

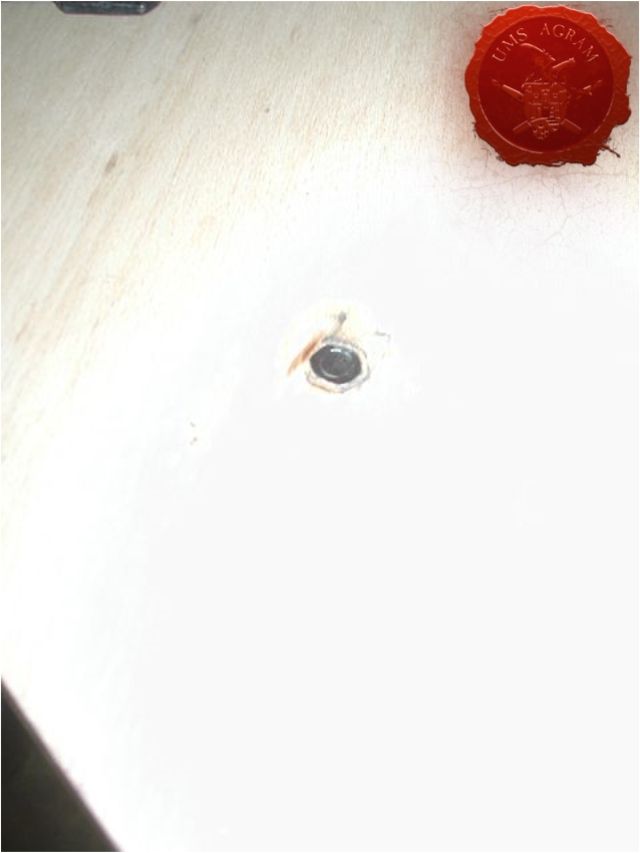
7. After the nut is fixed, for the first time the plywood and the main plate are connected with screws in order to determine how long the screw needs to be and to remove the excess:

Click for enlarged picture

It looks like this:

Click for enlarged picture

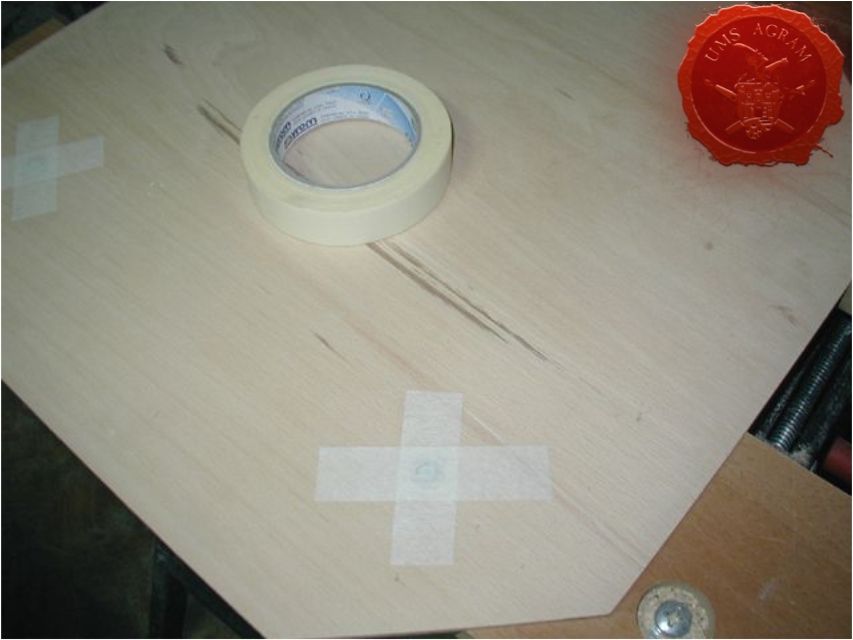
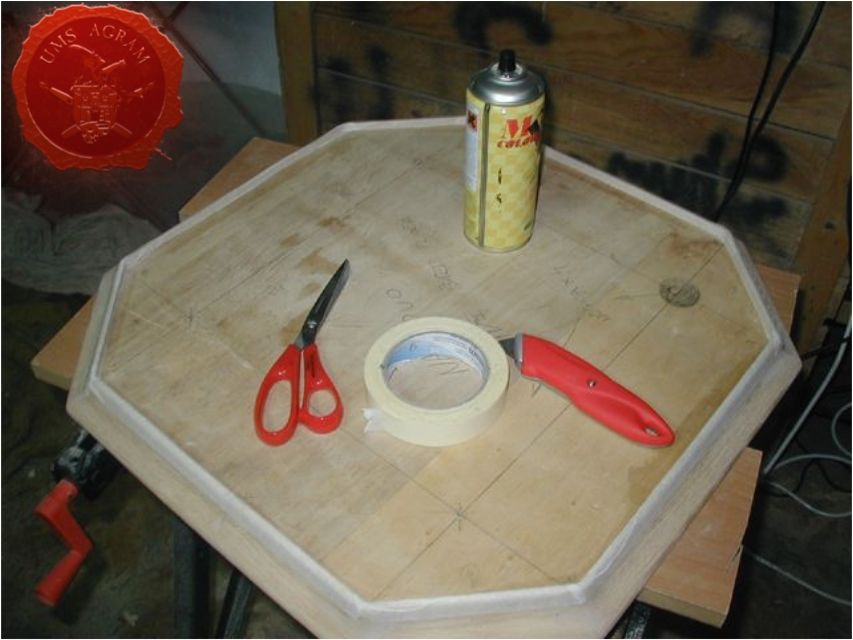
8. After the screw was shortened to the appropriate length, I covered the nuts on the top of the plywood board with masking tape so that I could texture that surface later.

Click for enlarged picture

9. After that I joined the boards and due to the inaccuracy in cutting the boards and drilling the holes the edges looked like this:

Click for enlarged picture

10. In order to achieve that the edges match, the excess needs to be planed, and then finely sanded. After this procedure the condition is as follows:

Click for enlarged picture

11. After processing the edges with a vibrating grinder, I sanded all the surfaces on the plywood and the main board:

Click for enlarged picture

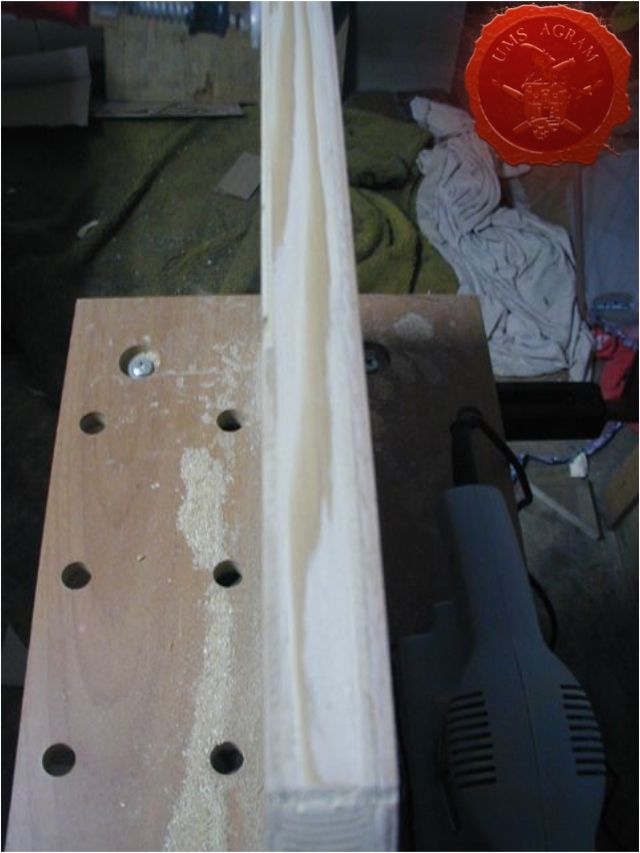
12. The next and most demanding step is to place the decorative moldings on the edges of the board. I took 3x3 cm high / wide corner skirting boards for parquet length of 2 m. The skirting board is coated with wood fix, joined to the board, and then I additionally fastened it with nails:

Click for enlarged picture

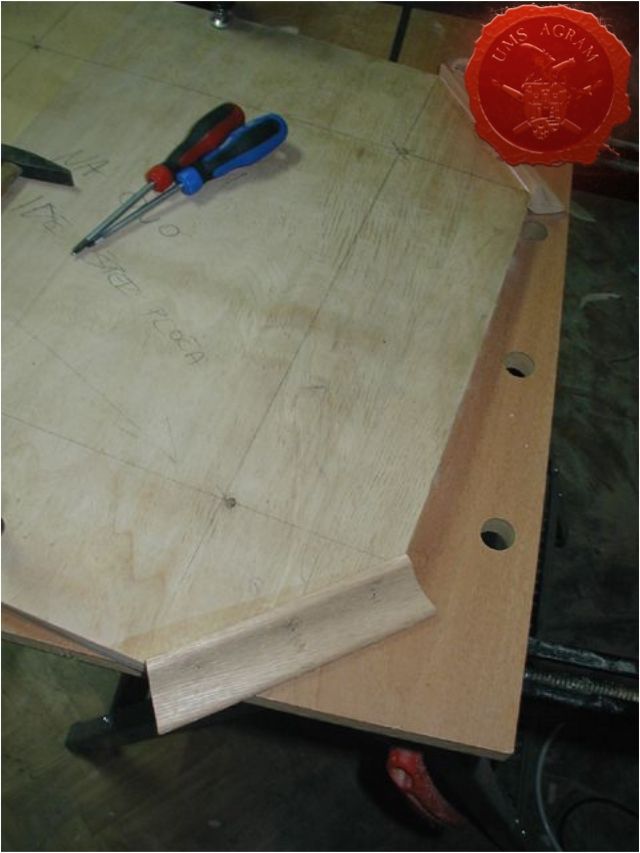
13. After installing the moldings the whole thing looks like this:

Click for enlarged picture

14. As the angle on the legs of the molding is not right, but it is cut obliquely, it happened that I have a "groove" on the lower side between the molding itself and the plate. This proved to be a happy coincidence because knowing your brother (a man is able to tear a steel ball) any extra fixation comes in handy. I filled the grooves with hot glue using a gun (I guess you know which tool I'm talking about):

Click for enlarged picture

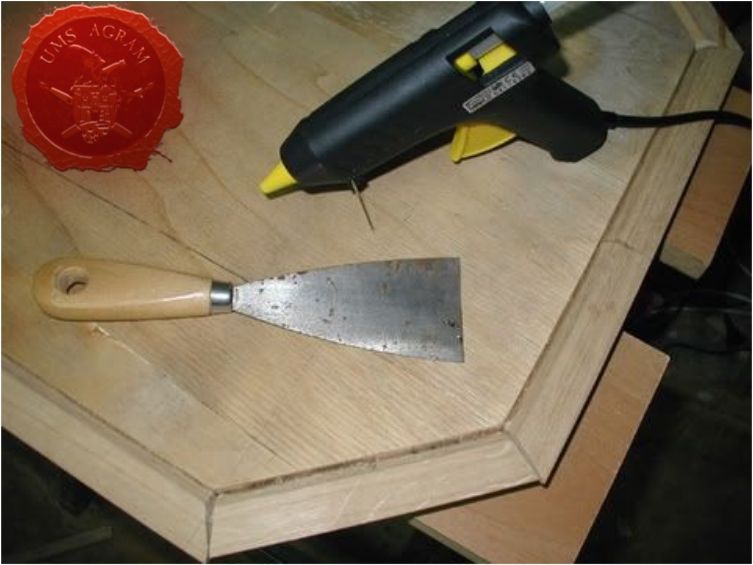
15. As I approached the plane of the board and molding any excess glue that might protrude over that plane I straightened with a spatula while the glue was hot and liquid. After gluing, the underside of the board looks like this:

Click for enlarged picture

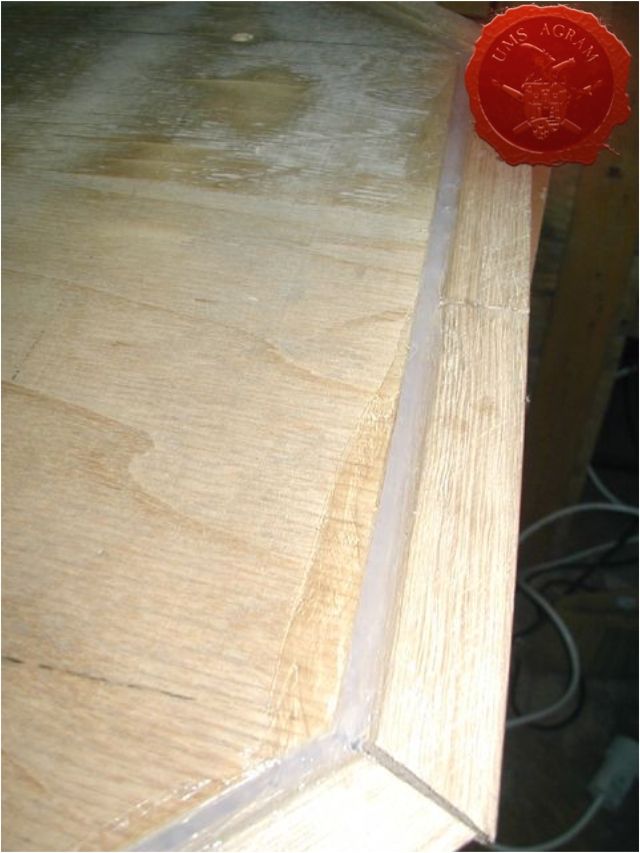
16. Since I don't have the right tools (saw stand)), I had to determine the angles of 150 degrees between the moldings by eye only, and especially because I'm not a carpenter, the next thing happened:

Click for enlarged picture

17. I sanded the joints to get rid of the protruding parts, and I cracked the cracks between the moldings using carpentry putty and left it to dry overnight. The next day I sanded the putty with fine sandpaper to make a perfect transition between the two strips and the putty and so that after painting everything together I would not see the difference between the putty and the wooden part.:

Click for enlarged picture

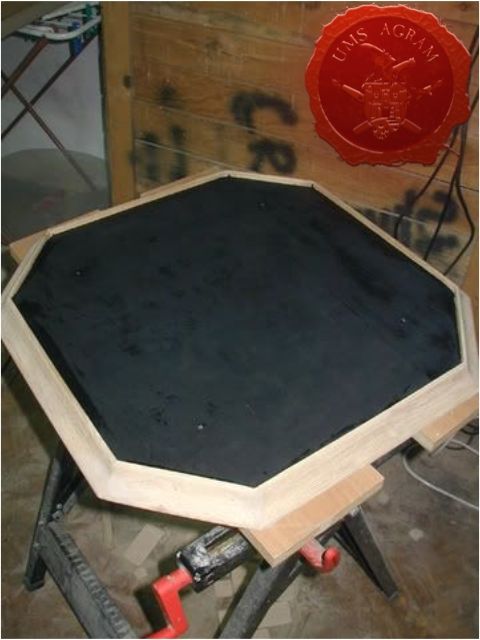
18. Now it's time to paint. I protected the moldings with protective tape:

Click for enlarged picture

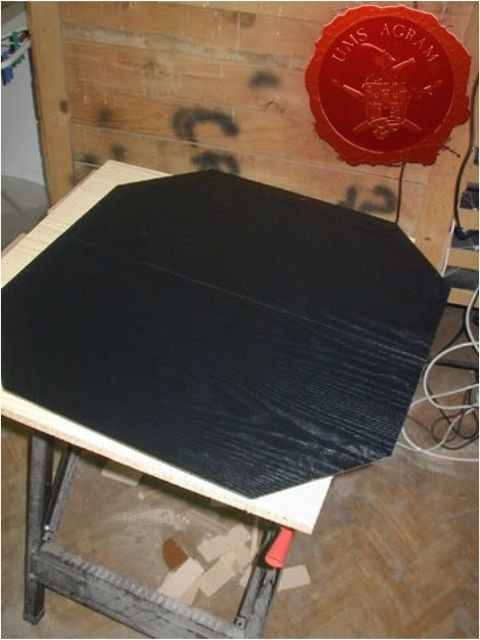
19. Then I painted the board between the moldings with black matt spray and left it to dry:

Click for enlarged picture

20. After that, it was time to paint the moldings. I protected the previously painted black surface with a protective tape:

Click for enlarged picture

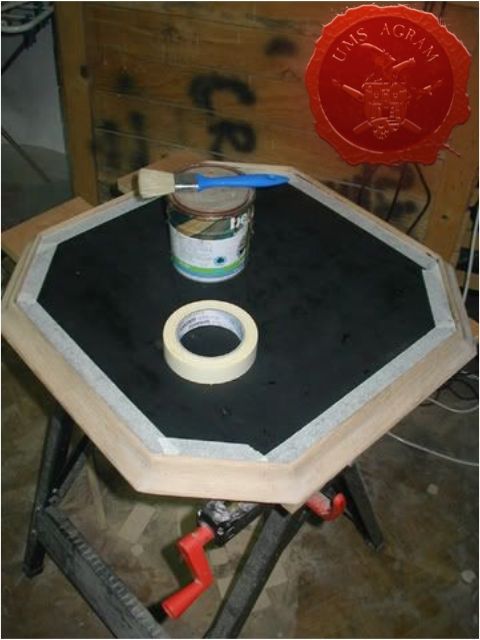
21. I used brown wood paint with integrated varnish which, in addition to protecting, also gives a gloss effect. I took a darker shade (rosewood) because the darker color covers the putty better.

Tip: Apply the first coat only on putty parts and wait for the paint to dry well. After that, in the second painting, paint the complete moldings. Two or three coats of well-smeared coat should be enough for a nice coverage - of course, between each coat you should wait for the previous one to dry well:

Click for enlarged picture

22. A few more small details and the main board is ready. I bought wood wallpaper for the underside of the DB - black wallpaper with rings - it definitely looks the most convincing and least cheap:

Click for enlarged picture

23. After installing the wallpaper, the underside of the DB looks like this:

Click for enlarged picture

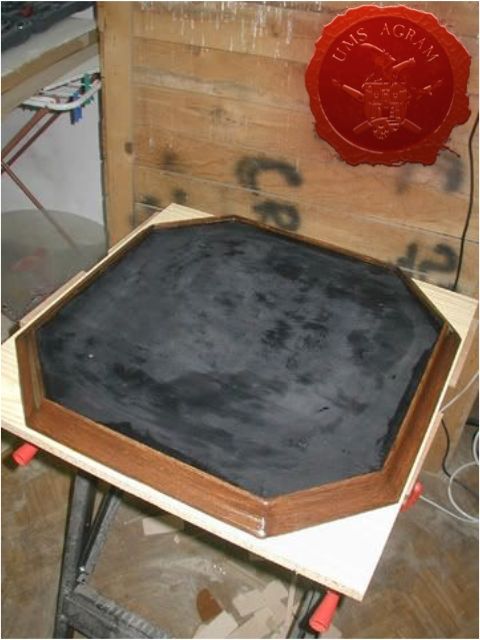
24. The final job on the DB main panel is varnishing the screws and black so that the metal head of the screw does not look ugly on the black wallpaper:

Click for enlarged picture

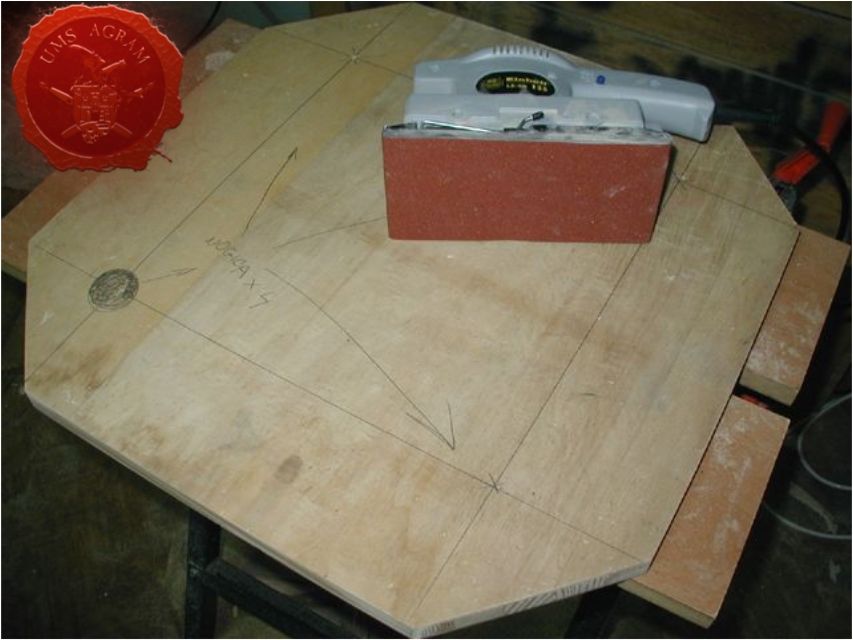
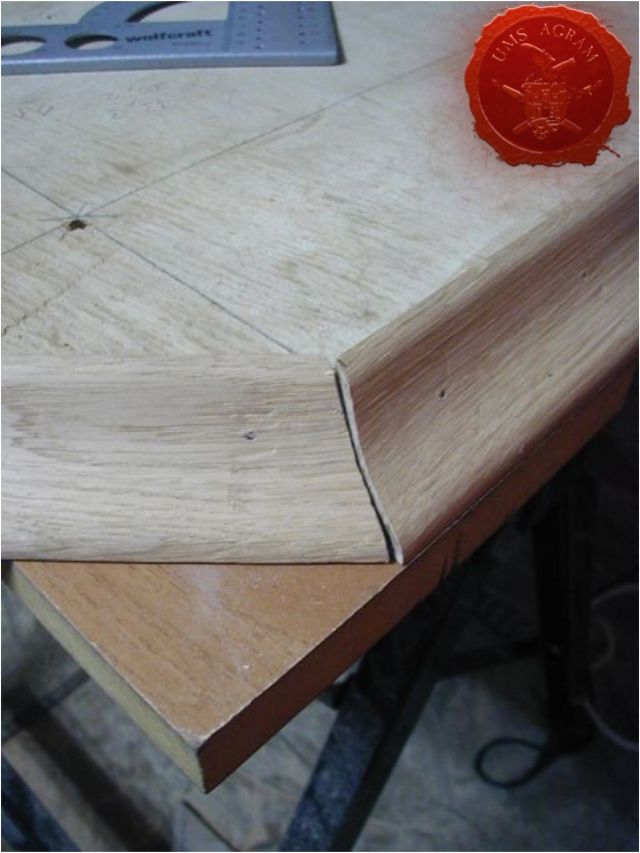
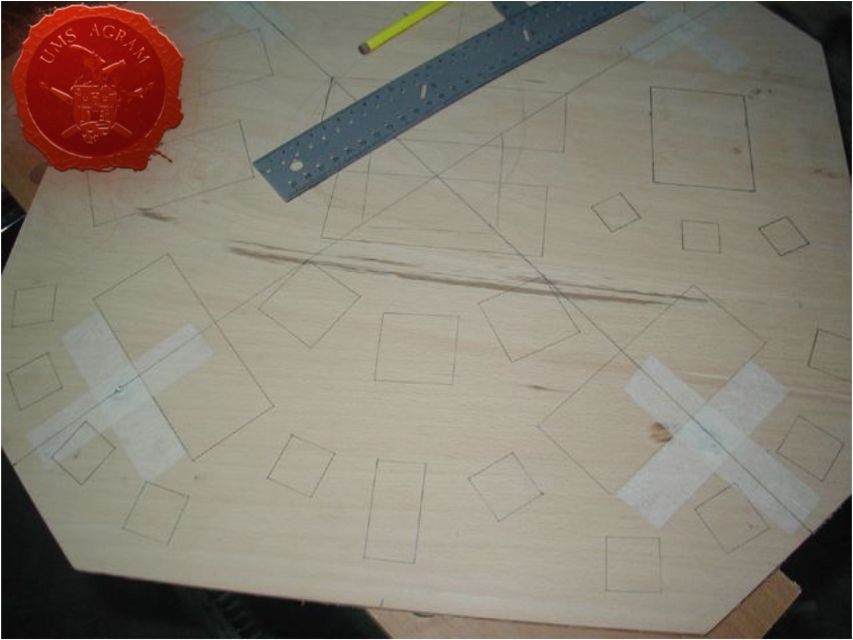
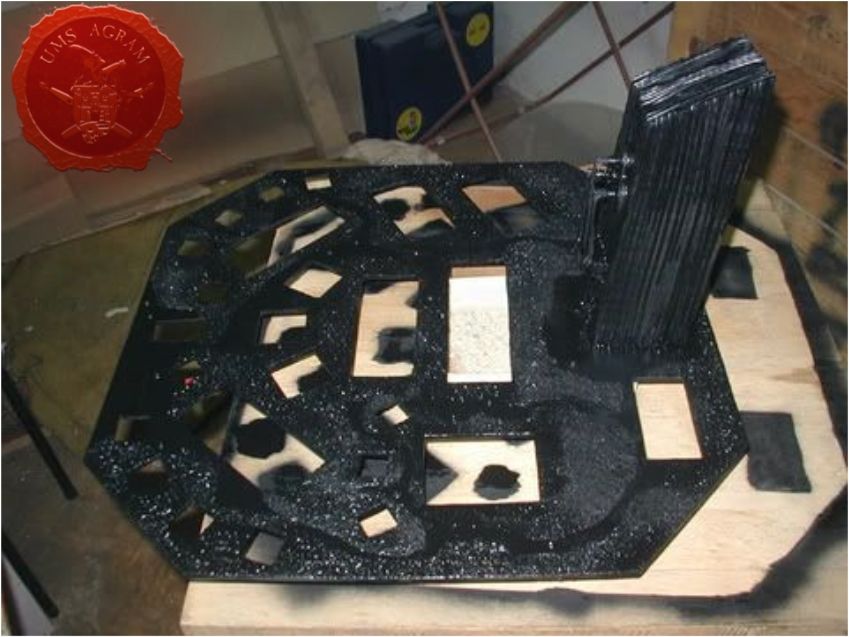
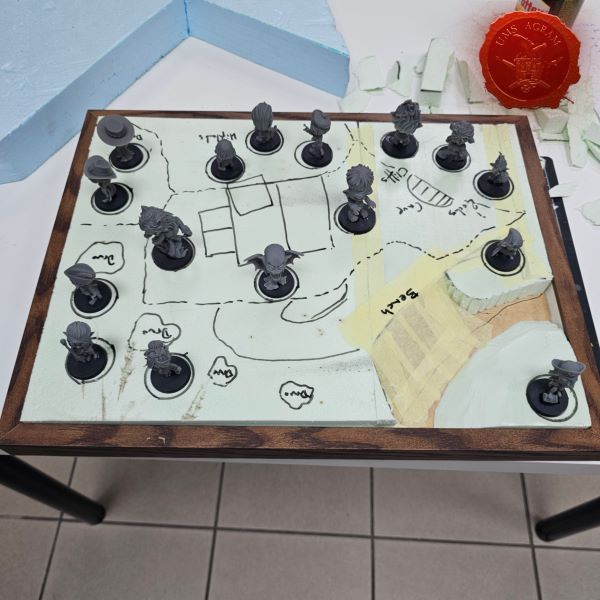
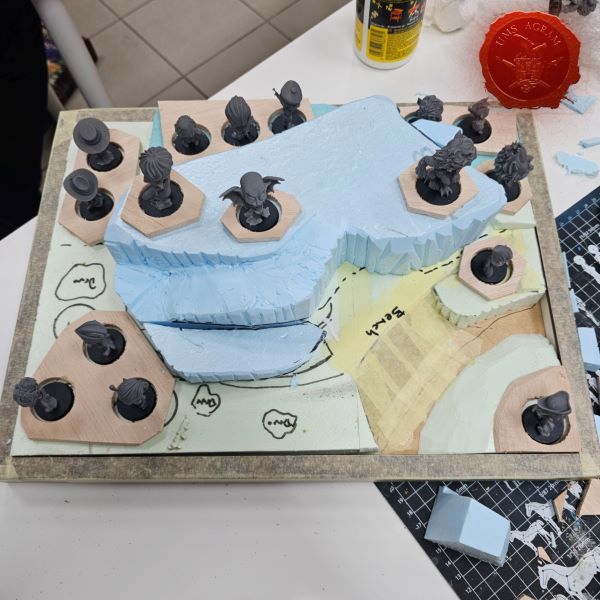
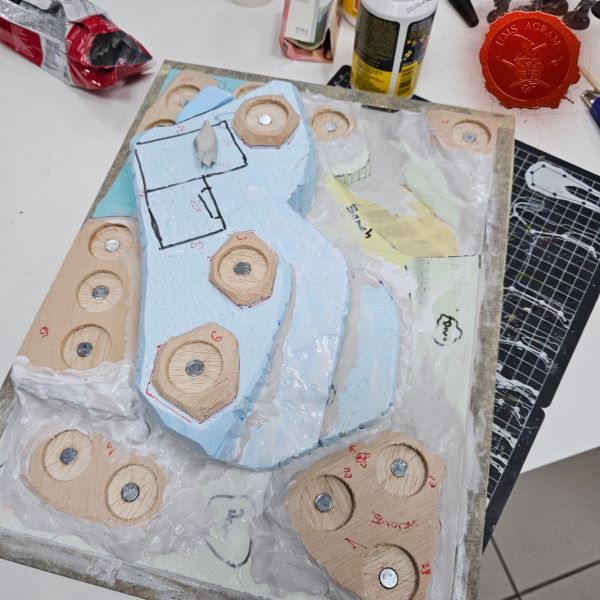
25. Now it's the plywood board's turn. I placed the unite on it and marked the parts to be removed according to them:

Click for enlarged picture

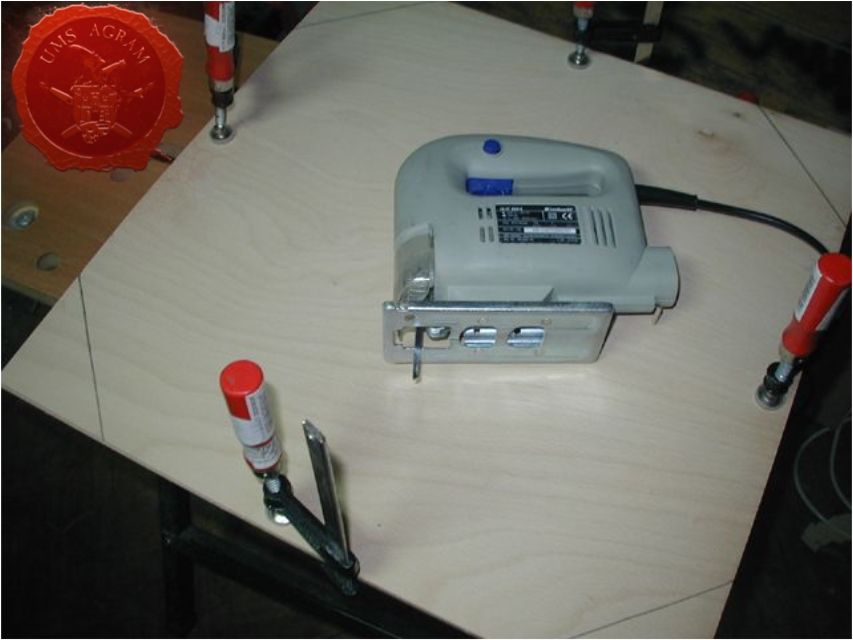
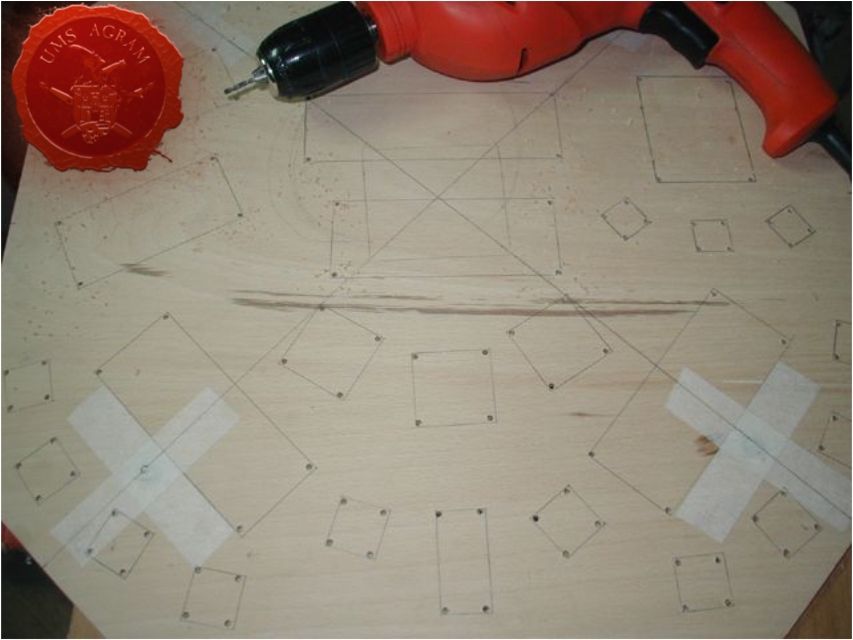
26. After that, I drilled holes in the corners for cutting with a jigsaw:

Click for enlarged picture

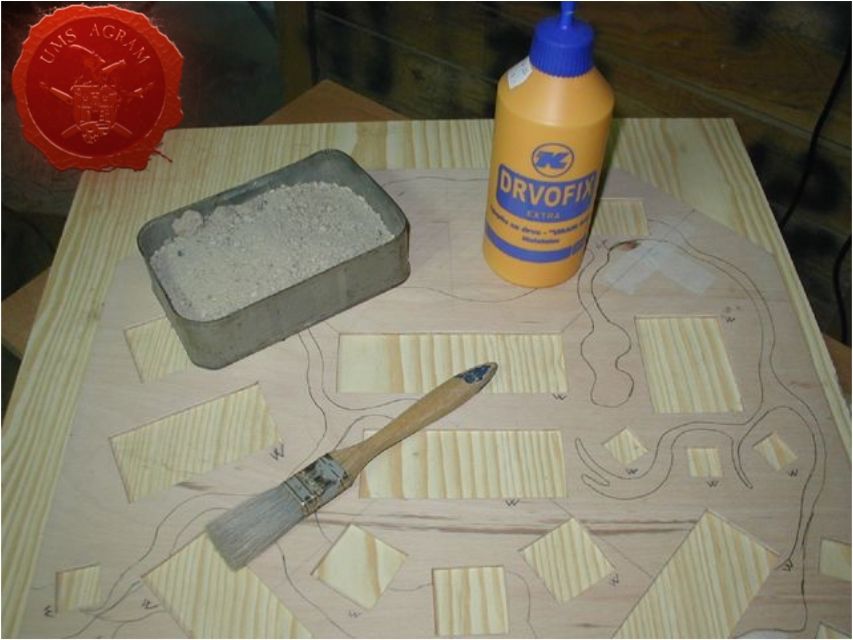
27. After cutting the excess and sanding the plywood looks like this:

Tip: When cutting, it is good to make sure and make a 1 mm bigger hole for the bases, because if you cut too small a hole later, it is a real pain to grind the part that bothers you so that the base fits nicely into the hole.

Click for enlarged picture

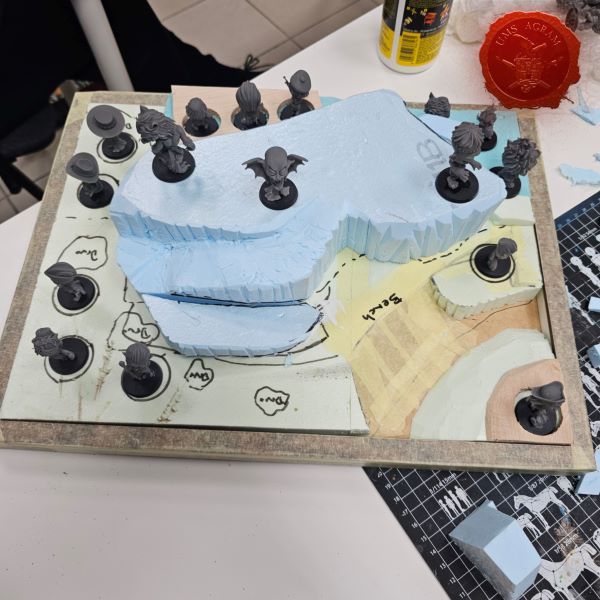
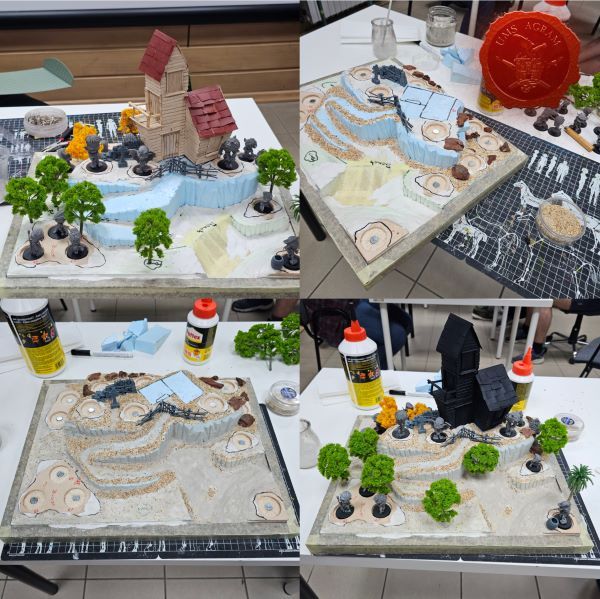
28. The next step is to text the plywood. I will not talk too much about this because the procedure is the same as when texturing the most ordinary terrain:

Click for enlarged picture

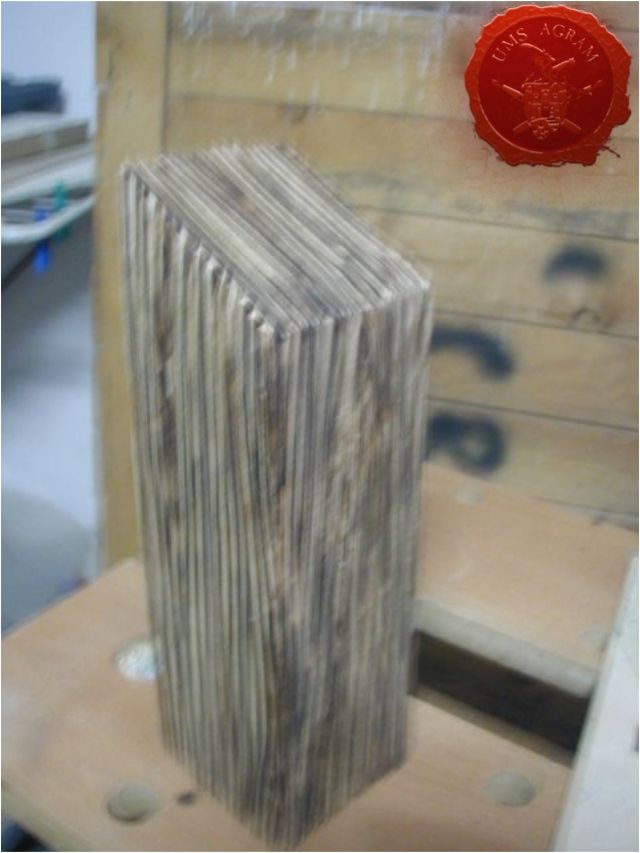
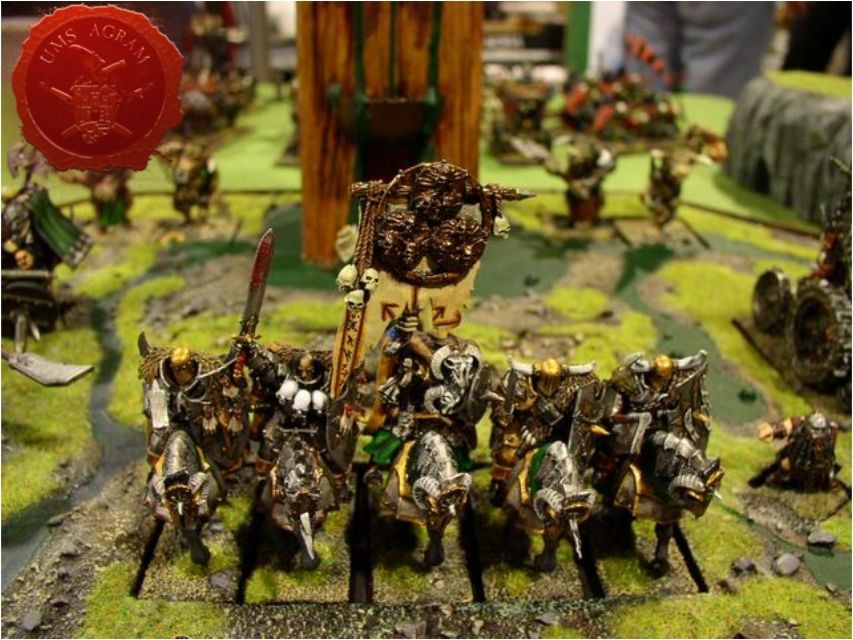
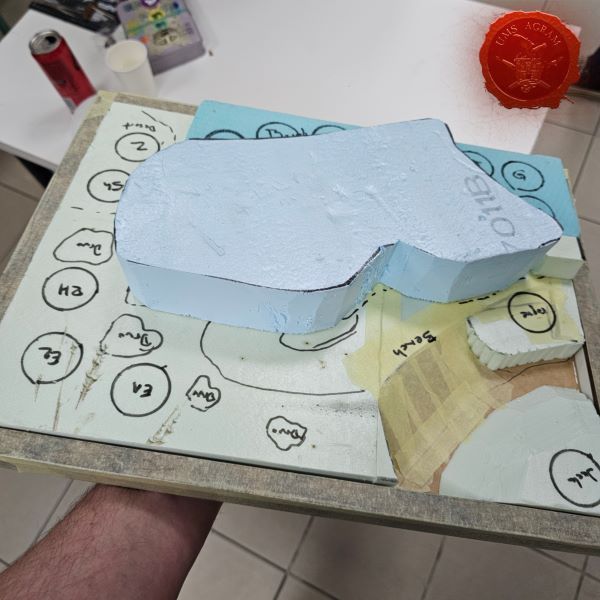
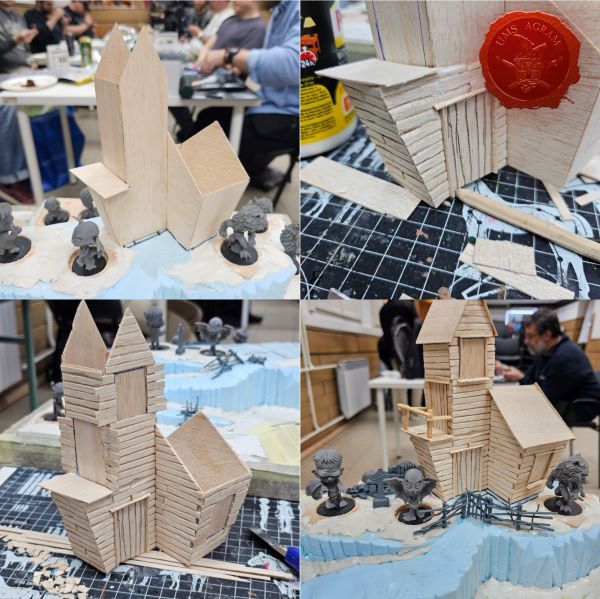
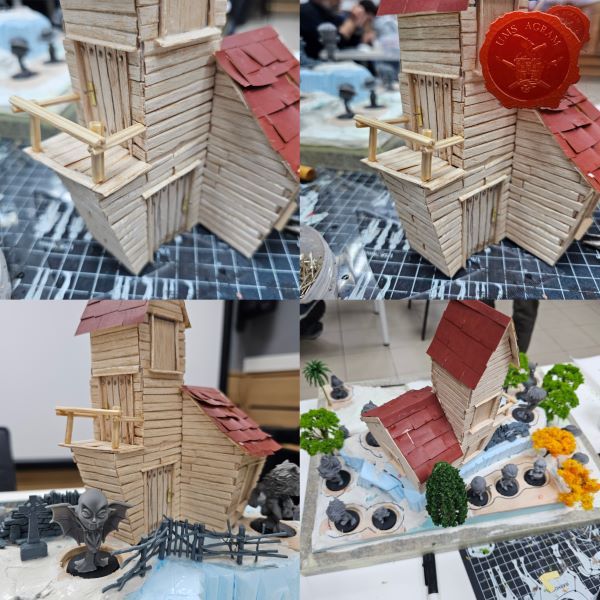
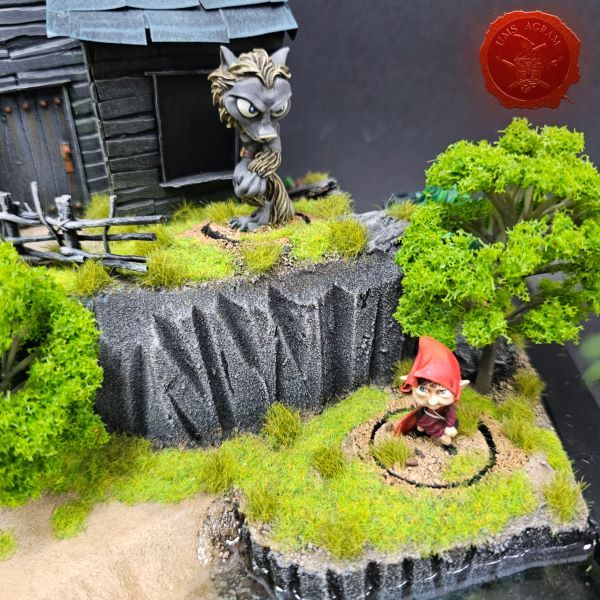
29. Since the Austrians also demand some extra feature on the DB, we decided to make a monolith dedicated to the nurgle god. I cut it out of a piece of wood, processed it by planing and grinding, and then made indentations with a flexor. The flexor may be an unorthodox tool for making models (especially if they are made of wood), but it is very effective. The dead-line that hung dangerously on my back at that stage of making DB makes all sorts of ideas fall through in order to speed up the work:

Click for enlarged picture

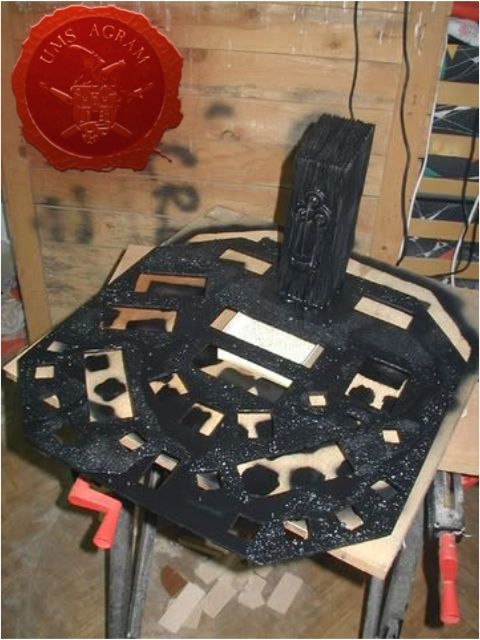
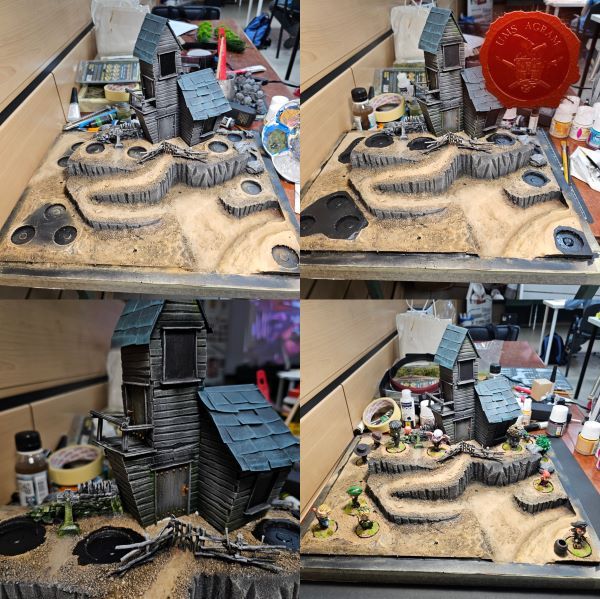
30. Later we decorated the monolith with, for a nurgle, the characteristic three circles arranged in a triangle using large screw plates, added waterlogging heads from chaos tank sprue, added a tray made of half a plug of Ax dezic, a hot glue gun made slime leaking waterlogged from the mouth into the tray and then overflowing over the edge and dripping down the monolith to the base. Relatively simple special feature, and yet in the spirit of the military. I fixed the monolith with wood fix and plywood nails and when everything was in place I undercoated with black matt spray:

Click for enlarged picture

Click for enlarged picture

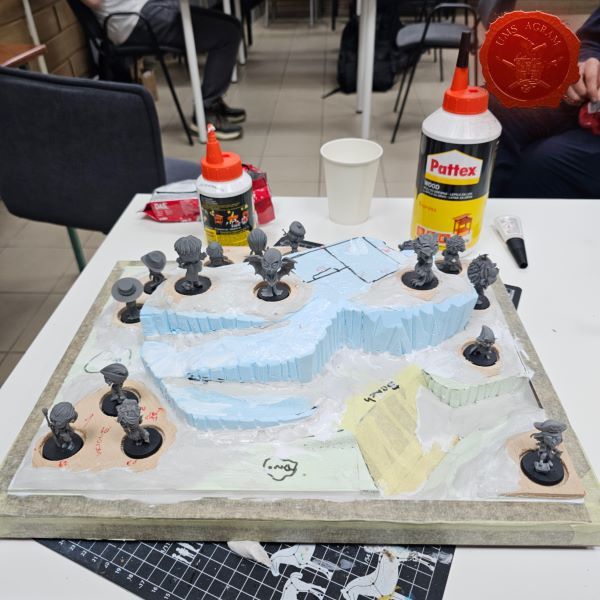
That in short (well, not very short) would be that.

The point is that one day, when the list is changed, this plywood is replaced with another plywood, which will be cut according to a template that matches the new list, with maybe some new feature instead of a monolith to refresh the impression a bit, and the base itself to be further usable.

I hope that the text is clear enough and that there are enough pictures and that those who will one day want to make their DB, but are not sure where to start and how to finish the job will benefit from this text.

P.S.

Still, a few words of warning because not everything is as simple as the text suggests.

FIRST

Click for enlarged picture

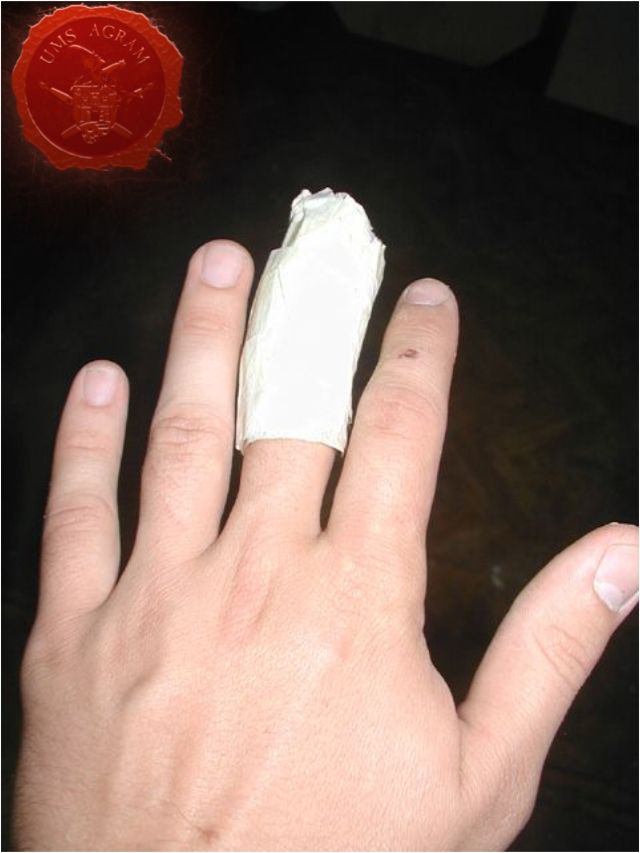
The circular saw is a dangerous tool, and I definitely have no luck with it. A year ago, he almost tore off my left index finger. This time, fortunately, she was excluded, but even then she showed her insidious nature (a sharp knife that looks benign while static).

SECOND :

Click for enlarged picture

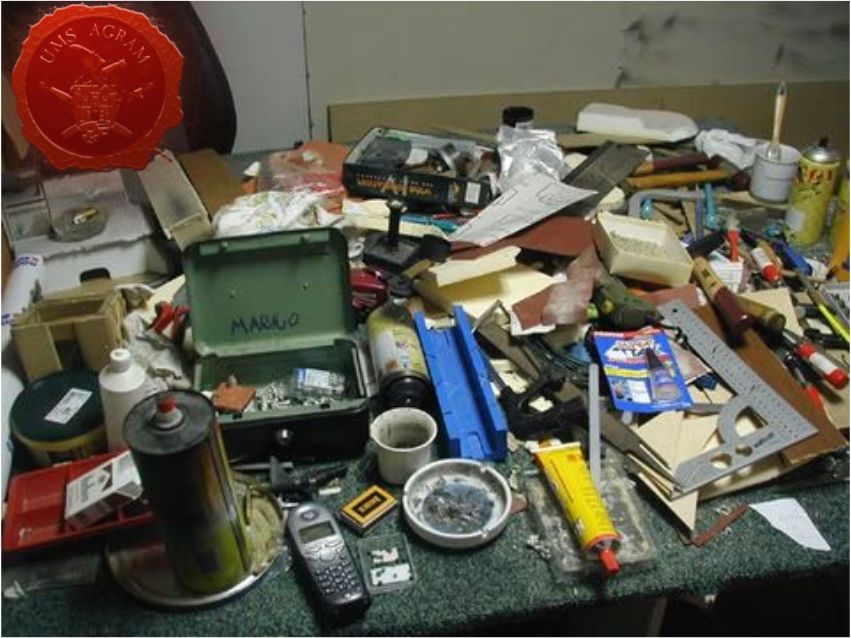
I don’t know about you, but the mess I leave behind in creative ecstasy is, to put it mildly, terrifying. I think I’ll avoid the basement for a while because I get depressed every time I see how much cleaning awaits me.

Ok, I’m finally done writing.

Click for enlarged picture

Click for enlarged picture

Click for enlarged picture

Latest articles

  • Miniature Painting Workshop - Contrast Paints
              array(2) {
      ["Article"]=>
      array(10) {
        ["id"]=>
        string(3) "471"
        ["member_id"]=>
        string(2) "35"
        ["title_eng"]=>
        string(45) "Miniature Painting Workshop - Contrast Paints"
        ["title_hrv"]=>
        string(42) "Radionica bojanja minijatura - kontrastice"
        ["mask_eng"]=>
        string(45) "miniature_painting_workshop_-_contrast_paints"
        ["mask_hrv"]=>
        string(42) "radionica_bojanja_minijatura_-_kontrastice"
        ["content_eng"]=>
        string(7360) "

    Click for enlarged picture

    Click for enlarged picture

    Click for enlarged picture

    Click for enlarged picture

    Click for enlarged picture

    Click for enlarged picture

    Click for enlarged picture

    Click for enlarged picture

    Click for enlarged picture

    Click for enlarged picture

    Click for enlarged picture

    Click for enlarged picture

    Click for enlarged picture

    Click for enlarged picture

    Click for enlarged picture

    Click for enlarged picture

    Click for enlarged picture

    Click for enlarged picture

    Click for enlarged picture

    Click for enlarged picture

    Click for enlarged picture

    Click for enlarged picture

    Click for enlarged picture

    " ["content_hrv"]=> string(9549) "

    Vikend radionica bojanja minijatura održana je u subotu 13. i 14.09. u Kino dvorani ZZTK. Tema je bila korištenje kontras/speed paint boja na većem broju minijatura.

    Click for enlarged picture

    Radionica se provodila kroz dva dana (cijeli vikend) i polaznici su bojili nekoliko (2-3) različitih figura koristeći Contrast boje za brzo bojanje minijatura. Fokus ovih predavanja bio je bojenje više minijatura odjednom, no znanja s radionice jednako su primjenjiva i na bojenje vojski za boardgame igre te kolekcija figura za pen&paper rpg-ove. Svaki polaznik je složio dvije do tri figure iz našeg fundusa, ali po prvi puta im je omogućeno i donođšenje vlastitih figura za rad na njima. Na radionici su bile predstavljene boje i pribor, priprema figura, nekoliko tehnika bojenja minijatura od osnovnih do naprednijih, te tehnike i trikovi za brzo i efikasno bojenje većih količina figura odjednom. U sklopu radionice bile su korištene akrilne boje na bazi vode s posebnom pažnjom posvećenom Contrast bojama. Predavanja su bila prilagođena tako da je voditelji posvetiti jednako vrijeme svim polaznicima i mogao se prilagoditi svim kategorijama minijaturista (od početnika do malo naprednijih).

    Click for enlarged picture

    Radionica se odvijala na sljedeći način:
    Prvo, predavač sjedi za svojim stolom te objašnjava i demonstrira pojedini korak u bojanju minijature/makete na svojem primjerku. Njegov rad se preko kamere i projektora prikazuje na platnu što polaznici slušaju, gledaju, ali i postavljaju pitanja.
    Potom, polaznici primjenjuju stečeno znanje. Voditelj kruži između polaznika i provjerava kako svakom polazniku ide. Na taj način, može se prilagoditi svakom polazniku ponaosob.

    Click for enlarged picture

    Click for enlarged picture

    Click for enlarged picture

    Click for enlarged picture

    Radionica je uključivala sljedeće tematske cjeline:

    1. Planiranje i priprema te sastavljanje minijatura
    2. Obrada minijatura prije bojanja
    3. Stavljanje bazne boje (sprejanjem).
    4. Osnovni slojevi korištenjem Contrast boja
    5. Dodatno detaljiziranje i highlighti
    6. Naknadno podizanje gotovog paintjoba na višu razinu
    7. Baziranje minijatura

    Click for enlarged picture

    Click for enlarged picture

    Click for enlarged picture

    Click for enlarged picture

    Click for enlarged picture

    Click for enlarged picture

    Click for enlarged picture

    Click for enlarged picture

    Click for enlarged picture

    Click for enlarged picture

    Click for enlarged picture

    Click for enlarged picture

    Click for enlarged picture

    Click for enlarged picture

    Click for enlarged picture

    Click for enlarged picture

    Click for enlarged picture

    " ["created"]=> string(19) "2025-09-16 09:53:51" ["modified"]=> string(19) "2025-09-16 09:53:51" } ["Member"]=> array(10) { ["id"]=> string(2) "35" ["group_id"]=> string(1) "1" ["first_name"]=> string(5) "Marko" ["last_name"]=> string(9) "Paunović" ["first_name_mask"]=> string(5) "marko" ["last_name_mask"]=> string(8) "paunovic" ["username"]=> string(5) "marko" ["password"]=> string(40) "3bd37b326d19d1880d3b93a4b32e8fb3a90fa122" ["born"]=> string(19) "2033-03-07 20:35:00" ["created"]=> string(19) "2009-06-02 20:37:03" } }
    Marko Paunović, 16th September 2025
  • Agram Group Build #Project2 – part 6.
              array(2) {
      ["Article"]=>
      array(10) {
        ["id"]=>
        string(3) "470"
        ["member_id"]=>
        string(2) "35"
        ["title_eng"]=>
        string(40) "Agram Group Build #Project2 – part 6. "
        ["title_hrv"]=>
        string(38) "Agram Group Build #Projekt2 – dio 6."
        ["mask_eng"]=>
        string(33) "agram_group_build_project2_part_6"
        ["mask_hrv"]=>
        string(32) "agram_group_build_projekt2_dio_6"
        ["content_eng"]=>
        string(3109) "

    From 2021, the Association also organizes group projects for its members in which several members participate at once. The program called Agram Group Build was created after our members discussed joint projects on Wednesdays and how it would be convenient to gather more people on Wednesdays at our Hobby corner to work on a common "something"... #Project2 presents a dieselpunk diorama of a flying island with a fast food stand and several docks for flying cars, and the wonderful art of Alejandro Burdisi serves as a template. The main effects on the diorama will be LED lighting, but also the application of the tensegrity principle.

    Click for enlarged picture

    Recently, we received new LEDs as well as 3D prints of bits and figures that will go on our diorama. The cars will get a new drive that looks fantastic. For each vehicle, we printed "wheels" in their size.

    Click for enlarged picture

    In addition, we also got some fun on the truck. But also luggage for the vehicles… When everything is placed on the platform (although not where it will actually go), it already looks fantastic!

    Click for enlarged picture

    Click for enlarged picture

    Click for enlarged picture

    And when the blue micro LED is put into operation!

    Click for enlarged picture

    " ["content_hrv"]=> string(3106) "

    Od 2021. Udruga za svoje članove organizira i grupne projekte na kojima sudjeluje više članova odjednom. Program pod nazivom Agram Group Build je nastao nakon što su naši članovi srijedama razgovarali o zajedničkim projektima i kako bi bilo zgodno okupiti više ljudi srijedama na našem Hobby kutku srijedom i to oko rada na zajedničkom „nečemu”… Projekt #2 predstavlja dieselpunk dioramu letećeg otoka sa štandom za fast food i nekoliko dokova za leteće automobile, a kao predložak služi nam predivan art Alejandra Burdisija. Glavni efekti na diorami biti će LED rasvjeta, ali i primjena tensegrity principa.

    Click for enlarged picture

    U proteklom periodu došle su nam nove LEDice kao i 3D printovi bitseva i figura koji idu na našu dioramu. Auti će dobiti novi pogon koji izgleda fantastično. Za svako vozilo isprintali smo „kotače“ u njihovoj veličini.

    Click for enlarged picture

    Pored toga još smo dobili i zabavu na kamionu. Ali i prtljagu za vozila… Kad se sve stavi na platformu (doduše ne na mjesto gdje će zapravo ići), već izgleda fantastično!

    Click for enlarged picture

    Click for enlarged picture

    Click for enlarged picture

    A kad se u pogon stavi i plava mikro LEDica!

    Click for enlarged picture

    " ["created"]=> string(19) "2025-09-12 07:09:45" ["modified"]=> string(19) "2025-09-12 07:09:45" } ["Member"]=> array(10) { ["id"]=> string(2) "35" ["group_id"]=> string(1) "1" ["first_name"]=> string(5) "Marko" ["last_name"]=> string(9) "Paunović" ["first_name_mask"]=> string(5) "marko" ["last_name_mask"]=> string(8) "paunovic" ["username"]=> string(5) "marko" ["password"]=> string(40) "3bd37b326d19d1880d3b93a4b32e8fb3a90fa122" ["born"]=> string(19) "2033-03-07 20:35:00" ["created"]=> string(19) "2009-06-02 20:37:03" } }
    Marko Paunović, 12nd September 2025
  • Agram Group Build #Project2 – part 5.
              array(2) {
      ["Article"]=>
      array(10) {
        ["id"]=>
        string(3) "469"
        ["member_id"]=>
        string(2) "35"
        ["title_eng"]=>
        string(40) "Agram Group Build #Project2 – part 5. "
        ["title_hrv"]=>
        string(38) "Agram Group Build #Projekt2 – dio 5."
        ["mask_eng"]=>
        string(33) "agram_group_build_project2_part_5"
        ["mask_hrv"]=>
        string(32) "agram_group_build_projekt2_dio_5"
        ["content_eng"]=>
        string(2775) "

    From 2021, the Association also organizes group projects for its members in which several members participate at once. The program called Agram Group Build was created after our members discussed joint projects on Wednesdays and how it would be convenient to gather more people on Wednesdays at our Hobby corner to work on a common "something"... #Project2 presents a dieselpunk diorama of a flying island with a fast food stand and several docks for flying cars, and the wonderful art of Alejandro Burdisi serves as a template. The main effects on the diorama will be LED lighting, but also the application of the tensegrity principle.

    Click for enlarged picture

    It's been a while since the last article. In the meantime, we've done the calculations for the electricity, but also confirmed the practical calculations. We decided on 6 circuits - each of which is powered by its own Cr2032 battery at 3V. In addition, we decided to create a parallel power supply for all circuits via a single transformer from 220 V AC to 3 V DC. The switch will determine which power supply is used. In theory, it sounds feasible, but it needs to be tested.

    Click for enlarged picture

    According to the sketch, the most loaded circuit is the one from the flying car, which has as many as 9 LEDs in it. Therefore, we put together a circuit with all nine LEDs on the test board - four blue, two white, two red and one green and connected everything to one Cr 2032 battery.

    Click for enlarged picture

    Everything worked so we decided to let them burn overnight. All the LEDs burned for about 10 hours. Which is satisfactory for group performances – because they will certainly burn for the duration of the performance. And for the exhibition, it will still be necessary to connect the diorama to a 220 V transformer.

    " ["content_hrv"]=> string(2802) "

    Od 2021. Udruga za svoje članove organizira i grupne projekte na kojima sudjeluje više članova odjednom. Program pod nazivom Agram Group Build je nastao nakon što su naši članovi srijedama razgovarali o zajedničkim projektima i kako bi bilo zgodno okupiti više ljudi srijedama na našem Hobby kutku srijedom i to oko rada na zajedničkom „nečemu”… Projekt #2 predstavlja dieselpunk dioramu letećeg otoka sa štandom za fast food i nekoliko dokova za leteće automobile, a kao predložak služi nam predivan art Alejandra Burdisija. Glavni efekti na diorami biti će LED rasvjeta, ali i primjena tensegrity principa.

    Click for enlarged picture

    Prošlo je dosta vremena od zadnjeg članka. U međuvremenu smo odradili proračune za struju, ali i potvrdili praktično proračune. Odlučili smo se na 6 strujnih krugova – svaki od kojih je pokretan svojom Cr2032 baterijom na 3V. Pored toga, odlučili smo da napravimo i paralelno napajanje svih strujnih krugova preko jednog transformatora sa 220 V izmjenično na 3 V istosmjerno. Prekidač će određivati koje napajanje se koristi. U teoriji zvuči izvedivo, ali potrebno je to i testirati.

    Click for enlarged picture

    Prema planu, najopterećeniji strujni krug je onaj iz letećeg auta koji u sebi ima čak 9 LEDica. Stoga smo na testnoj ploči složili strujni krug sa svih devet LEDica – četiri plave, dvije bijele, dvije crvene i jednom zelenom te sve spojili na jednu Cr 2032 bateriju.

    Click for enlarged picture

    Sve je radilo pa smo odlučili pustiti ih da gore preko noći. Sve LEDice su gorile cca 10 sati. Što je zadovoljavajuće za udružne nastupe – jer će sigurno gorjeti dok traje nastup. A za izložbu će ipak biti potrebno spojiti dioramu na transformator na 220 V.

    " ["created"]=> string(19) "2025-09-04 11:59:44" ["modified"]=> string(19) "2025-09-04 11:59:44" } ["Member"]=> array(10) { ["id"]=> string(2) "35" ["group_id"]=> string(1) "1" ["first_name"]=> string(5) "Marko" ["last_name"]=> string(9) "Paunović" ["first_name_mask"]=> string(5) "marko" ["last_name_mask"]=> string(8) "paunovic" ["username"]=> string(5) "marko" ["password"]=> string(40) "3bd37b326d19d1880d3b93a4b32e8fb3a90fa122" ["born"]=> string(19) "2033-03-07 20:35:00" ["created"]=> string(19) "2009-06-02 20:37:03" } }
    Marko Paunović, 4th September 2025
  • Seb's Top Tip - paintRack app
              array(2) {
      ["Article"]=>
      array(10) {
        ["id"]=>
        string(3) "468"
        ["member_id"]=>
        string(3) "102"
        ["title_eng"]=>
        string(29) "Seb's Top Tip - paintRack app"
        ["title_hrv"]=>
        string(36) "Sebov Top Tip - aplikacija paintRack"
        ["mask_eng"]=>
        string(28) "sebs_top_tip_-_paintrack_app"
        ["mask_hrv"]=>
        string(36) "sebov_top_tip_-_aplikacija_paintrack"
        ["content_eng"]=>
        string(5168) "
    Here's a little tip for hobbyists that have been useful for me lately.

    It's a phone app called paintRack. 

    Click for enlarged picture

    It's an app made specifically for our hobby, and has many useful features. 
     
    Among these features are the Library where I register every paint color I own and from which paint brand. This gives me a good overview and I can always refer to it when I'm planning a project. 
     
    Sets is where I write down my color schemes for different projects, so I'll remember them if I ever have to reproduce them again in the future. 
     
    Click for enlarged picture
     
    Color tools is my most used feature. If there's a paint I don't own and I want to know the closest color possible within my paints, I find it and open it in color tools. Someone recommended me Vallejo's Light Brown, but since my local hobby shop doesn't sell Vallejo, I check which other color from for example Citadel or AK is a close match. The feature even provides you with a number showing how close of a match it is. A 0.00 is a perfect match. The closest one here is a 4.10 which is decent.
     
    Click for enlarged picture
     
    The color tools also has another useful feature where you can upload any image and select any part of that image, and it provides you with the closest color match. Either from your own paints or all existing paint ranges (you can choose which paint brands you want it to show you).
     
    Click for enlarged picture
     
    The last useful thing I want to mention about the paintRack app is something I only discovered recently, as I'm integrating more use of AI in my work and hobby. From the app you can export your library list of paints as a file. In my case I have all my paints registered in the app, so this provides me with an extensive list of all colors I have access to. This list I upload to an AI, and this lets me have a very useful conversation with it about color schemes and paint ideas.
     

    Click for enlarged picture

    " ["content_hrv"]=> string(5462) "
    Evo malog savjeta za hobiste koji mi je u posljednje vrijeme bio koristan.

    To je aplikacija za telefon pod nazivom paintRack. 

    Click for enlarged picture

    To je aplikacija napravljena posebno za naš hobi i ima mnogo korisnih značajki. 
     
    Među tim značajkama je i Biblioteka u kojoj registriram svaku boju koju posjedujem i od koje marke boje. To mi daje dobar pregled i uvijek se mogu pozvati na to kada planiram projekt. 
     
    Setovi su mjesto gdje zapisujem svoje sheme boja za različite projekte, tako da ću ih zapamtiti ako ih ikada budem morao ponovno reproducirati u budućnosti. 
     
    Click for enlarged picture
     
    Alati za boje su moja najčešće korištena značajka. Ako postoji boja koju ne posjedujem i želim znati najbližu moguću boju unutar svojih boja, pronađem je i otvorim je u alatima za boje. Netko mi je preporučio Vallejo's Light Brown, ali budući da moja lokalna trgovina hobijima ne prodaje Vallejo, provjerim koja je druga boja, na primjer iz Citadel ili AK, bliska podudarnost. Značajka vam čak daje broj koji pokazuje koliko je blizu podudaranja. 0,00 je savršeno podudaranje. Najbliže ovdje je 4,10, što je pristojno.
     
    Click for enlarged picture
     
    Alati za boje također imaju još jednu korisnu značajku gdje možete prenijeti bilo koju sliku i odabrati bilo koji dio te slike, a ona vam pruža najbliže podudaranje boja. Bilo iz vaših vlastitih boja ili svih postojećih raspona boja (možete odabrati koje marke boja želite da vam prikaže).
     
    Click for enlarged picture
     
    Posljednja korisna stvar koju želim spomenuti o aplikaciji paintRack nešto je što sam tek nedavno otkrio, jer sve više integriram korištenje umjetne inteligencije u svoj posao i hobi. Iz aplikacije možete izvesti popis boja iz svoje biblioteke kao datoteku. U mom slučaju, sve moje boje su registrirane u aplikaciji, tako da mi to pruža opsežan popis svih boja kojima imam pristup. Ovaj popis prenosim na umjetnu inteligenciju, a to mi omogućuje vrlo koristan razgovor s njom o shemama boja i idejama za boje.
     
    Click for enlarged picture
    " ["created"]=> string(19) "2025-08-07 11:39:24" ["modified"]=> string(19) "2025-08-07 11:39:24" } ["Member"]=> array(10) { ["id"]=> string(3) "102" ["group_id"]=> string(1) "2" ["first_name"]=> string(9) "Sebastian" ["last_name"]=> string(8) "Søgård" ["first_name_mask"]=> string(9) "sebastian" ["last_name_mask"]=> string(4) "sgrd" ["username"]=> string(5) "norge" ["password"]=> string(40) "4dea770e7045a97695c7dc529698e85f5dadbded" ["born"]=> string(19) "2003-01-21 09:03:00" ["created"]=> string(19) "2022-01-21 09:03:12" } }
    Sebastian Søgård, 7th August 2025
  • WE VISITED: Bayerisches Armeemuseum in Ingolstadt
              array(2) {
      ["Article"]=>
      array(10) {
        ["id"]=>
        string(3) "467"
        ["member_id"]=>
        string(2) "64"
        ["title_eng"]=>
        string(49) "WE VISITED: Bayerisches Armeemuseum in Ingolstadt"
        ["title_hrv"]=>
        string(52) "POSJETILI SMO: Bayerisches Armeemuseum u Ingolstadtu"
        ["mask_eng"]=>
        string(48) "we_visited_bayerisches_armeemuseum_in_ingolstadt"
        ["mask_hrv"]=>
        string(51) "posjetili_smo_bayerisches_armeemuseum_u_ingolstadtu"
        ["content_eng"]=>
        string(9159) "

    This summer, Željko visited Ingolstadt, and its Bayerisches Armeemuseum is full of military history (albeit with a short gap for obvious reasons).

    Click for enlarged picture

    The Bavarian Military Museum in Ingolstadt is one of the largest military history museums in Europe. The collections focus on Bavaria in its European context and cover the period from the late Middle Ages to the present day.

    Click for enlarged picture

    Click for enlarged picture

    Click for enlarged picture

    Click for enlarged picture

    Click for enlarged picture

    Click for enlarged picture

    Click for enlarged picture

    Click for enlarged picture

    Click for enlarged picture

    Click for enlarged picture

    Click for enlarged picture

    One of the museum's exhibits is a collection of tin soldier figures. In addition to individual figures and sets, there are also large dioramas of the Battle of Zusmarshausen in 1648, the Battle of Leuthen in 1757, and the Battle of Leipzig in 1813. 

    Click for enlarged picture

    Click for enlarged picture

    Click for enlarged picture

    Click for enlarged picture

    Click for enlarged picture

    Click for enlarged picture

    Click for enlarged picture

    Click for enlarged picture

    Click for enlarged picture

    Click for enlarged picture

    Click for enlarged picture

    Click for enlarged picture

    Click for enlarged picture

    For more and better photos, check out our social media.

    " ["content_hrv"]=> string(9151) "

    Ovog ljeta Željko je posjetio Ingolstadt, a u njemu Bayerisches Armeemuseum prepun vojne povijesti (doduše sa kratkom rupom zbog poznatih razloga).

    Click for enlarged picture

    Bavarski vojni muzej u Ingolstadtu jedan je od najvećih muzeja vojne povijesti u Europi. Zbirke se usredotočuju na Bavarsku u njezinu europskom kontekstu i pokrivaju razdoblje od kasnog srednjeg vijeka do danas.

    Click for enlarged picture

    Click for enlarged picture

    Click for enlarged picture

    Click for enlarged picture

    Click for enlarged picture

    Click for enlarged picture

    Click for enlarged picture

    Click for enlarged picture

    Click for enlarged picture

    Click for enlarged picture

    Click for enlarged picture

    Jedan od postava muzeja je i zbirka figura kositrenih vojnika. Uz pojedinačne figure i setove prikazane su i velike diorame bitke kod Zusmarshausena 1648., bitke kod Leuthena 1757. i bitke kod Leipziga 1813. godine. 

    Click for enlarged picture

    Click for enlarged picture

    Click for enlarged picture

    Click for enlarged picture

    Click for enlarged picture

    Click for enlarged picture

    Click for enlarged picture

    Click for enlarged picture

    Click for enlarged picture

    Click for enlarged picture

    Click for enlarged picture

    Click for enlarged picture

    Click for enlarged picture

    Za više fotografija u boljoj rezoluciji posjetite naše socijalne mreže.

    " ["created"]=> string(19) "2025-08-07 08:21:24" ["modified"]=> string(19) "2025-08-07 08:21:24" } ["Member"]=> array(10) { ["id"]=> string(2) "64" ["group_id"]=> string(1) "1" ["first_name"]=> string(9) "Krunoslav" ["last_name"]=> string(8) "Belinić" ["first_name_mask"]=> string(9) "krunoslav" ["last_name_mask"]=> string(7) "belinic" ["username"]=> string(5) "Kruno" ["password"]=> string(40) "eb3fda45fbec0258e90d809803b10491c548b22f" ["born"]=> string(19) "2015-01-18 09:19:00" ["created"]=> string(19) "2015-01-18 09:20:39" } }
    Krunoslav Belinić, 7th August 2025

All articles

Latest battle-reports

All battle-reports