Necron Destroyer

Tomislav Petrović, 21nd July 2021

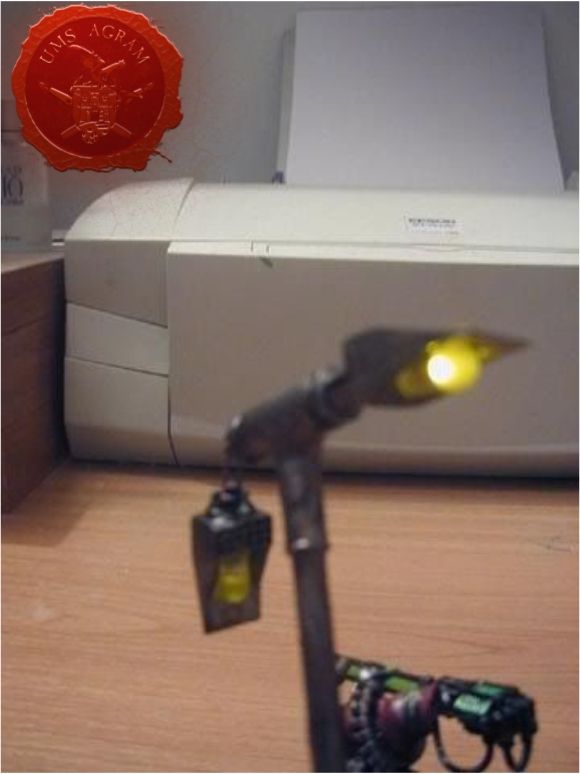
On the necron itself, I didn’t perform anything special as far as converting was concerned except adjusting the pose and cutting the left hand holding the rifle. The base is a little more complex. The stone slabs are made of balsa, the barrels are from GW’s 40k accessories sprue, a bit of slime glue, a bit of thick mesh for the fence windows. The light pole is made of Patton 1:35 tank tubes with a combination of Lego bricks, some parts of Apache 1:48 and some other little things.

Click for enlarged picture

In the last picture, you can see another feature of this miniature, ie the light pole lamps are bright to point out, or to be precise, the broken lamp hanging on the wires is flashing, and the other whole is just lit. In the vertical barrel there is a 1.5 V LR1 (SN) battery, in the reclining barrel there is a circuit that controls the oscillating diode, and below the "ground" there is a circuit that allows the second diode with a voltage characteristic of 3V to light connected to 1.5V. There is a microswitch on the lighting pole itself, which turns the diodes on and off as desired.

The most common comments on my luminous necron were, "How could you?"

I guess most people are not up to digging on the net and looking for schemes, spending money on electricity. elements, burns from a soldering iron, etc., but in case there is someone interested in adding light effects to their miniatures or a private collection of terrain, here are a few pictures and some useful tips.

Click for enlarged picture

Click for enlarged picture

Click for enlarged picture

To assemble an assembly that allows the LED to light or flash, you need the following elements:

Click for enlarged picture

-LED (light emitting diode) of 3V diameter according to your wishes (there are 3mm, 5mm ...)
-electrolytic capacitor of 100 microfarads and 63V
-capacitor depending on the flicker speed you want to achieve (0.01 microfarad gives a flicker frequency of 1Hz, 0.001 microfarads of 10Hz, etc.)
-voltage converter ICL7660 or ICL 7660S (integrated circuit)
-housing for voltage converter
-insulated wire for connecting elements
-1.5 V battery


-tools: pliers cutters, soldering iron, soldering wire, not necessary but sometimes a voltmeter / ammeter comes in handy.

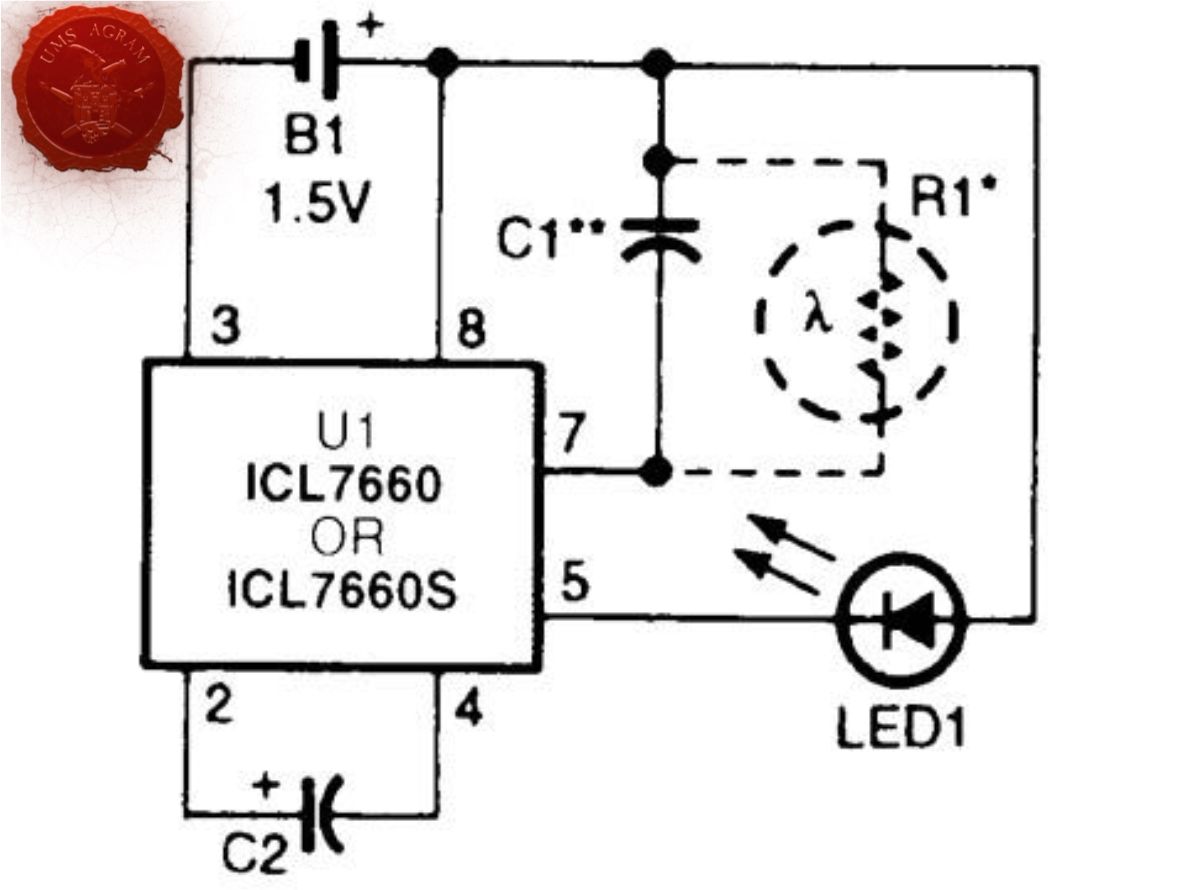
These elements are connected according to the following scheme:

Click for enlarged picture

VOLTAGE CONVERTER (ICL 7660 or ICL 7660S):

The first thing to know is how to determine which pin is on the voltage converter - Place it in front of you so that the point / hole on the top of the integrator is on the left. The integrator has eight pins and they go in this order: bottom row from left to right 1-4, top row from right to left 5-8. ()

Another important thing about integrators is that they are very sensitive to high temperatures. Since the soldering iron develops approx. 180-420 C, direct soldering to the integrator pins will probably burn it out. Instead, obtain an integrator housing with eight pin holes and solder everything to the housing pins, and when the soldering is complete, insert the integrator into the housing.

ELECTROLYTIC CAPACITOR (C2):

It has its two legs, one of which is + pole and the other-pole. Minus the pole is marked on the el. capacitor. It is very important to connect it exactly as it is drawn in the diagram, ie + half of the condom on pin 2 of the integrator, and - half of the condo on pin 4 of the integrator. This is important because electrolytic capacitors, unlike ordinary ones, are precharged to a certain voltage (in our case to 63V) and in the case of a wrong connection when they are connected to the power supply, they explode.

CAPACITOR (C1):

Unlike electrolytic ones, ordinary ones are not precharged, they have an air gap and not electrolytes, and it doesn't matter which pin you connect to pin 7 and which to pin 8. Take care only of the oscillation frequency you want to achieve.

LED:

LEDs are semiconductor elements that emit light when they are powered. The advantage of LEDs over light bulbs is that they consume much less electricity and do not burn out. The LED has two electrodes, the anode is longer (+), and the cathode is shorter (-). The anode is connected to the positive pole of the source and the cathode to the negative. In the case of a reverse connection, nothing will most likely happen to the LED, but it will not light up either.

Similar to integrated circuits and LEDs, they are sensitive to high temperatures and can burn out during prolonged soldering. I advise you to stick the pliers to the electrode you are currently soldering (between the tip of the LED and the place you are soldering) when soldering the LEDs. In this way, the pliers will serve you not only to hold but also to dissipate heat.

The diagram still shows an element marked R1 and is drawn intermittently. It’s a photodiode and it serves to keep the LED from shining in daylight - for some sort of battery saving. Feel free to take it out of the circuit, but rather add a switch between pin 3 and the half of the battery so that you can turn off and turn on the LEDs as desired.

This circuit allows the LEDs to vibrate at a certain frequency. If you want your LED to light up constantly, simply remove capacitor C1 from the circuit and connect everything else.

The advantage of this circuit is that it allows the LEDs provided for a 3V power supply to be lit only at 1.5V. This in turn gives a greater choice of suitably small batteries.

In the end for those who put in the effort and read the entire post to the end, this seems harder and more complicated than it really is. I tried to write explanations so that the circuit can be assembled by someone who has no idea what a capacitor is, for example. Honestly, I don't fully understand some things either (what exactly does C2 do in the circle: -k). My point is, if you have never done anything like this, it is still enough to buy the elements and connect them as shown in the picture and to illuminate for example the landing drop for 40k.

Latest articles

  • We visited: Warhammer World - pt.1
              array(2) {
      ["Article"]=>
      array(10) {
        ["id"]=>
        string(3) "503"
        ["member_id"]=>
        string(2) "35"
        ["title_eng"]=>
        string(34) "We visited: Warhammer World - pt.1"
        ["title_hrv"]=>
        string(40) "Posjetili smo: Warhammer World – dio 1"
        ["mask_eng"]=>
        string(32) "we_visited_warhammer_world_-_pt1"
        ["mask_hrv"]=>
        string(35) "posjetili_smo_warhammer_world_dio_1"
        ["content_eng"]=>
        string(7283) "

    Click for enlarged picture

    For any Warhammer hobbyist, a visit to Warhammer World in Nottingham is a pilgrimage of sorts. It is the epicenter of the entire Games Workshop culture - a combination of global corporate headquarters, visitor center, exhibition space, gaming hall, specialty store and themed bar, all gathered in one location. It should also be taken into account that the large gaming hall hosts Grand Tournaments for all games published by Games Workshop, and since our Ivan found himself in WHW on 18.4.2026. there was a WH40k tournament on the schedule, so the experience of the exhibition, Bugman Bar, WHW store, workshops, and gaming hall was also enhanced by the grand tournament that took place that day. This series follows his adventures…

    Click for enlarged picture

    Click for enlarged picture

    1. Historical Context

    1.1. The Founding of Games Workshop

    Games Workshop was founded in 1975 in London, at 15 Bolingbroke Road. The founders were John Peake, Ian Livingstone and Steve Jackson (not to be confused with the American game designer of the same name). Initially, the company was not at all related to miniatures - they produced wooden boards for traditional games such as backgammon, manchala, mill and go. The same year, the Owl and Weasel newsletter was launched, which would later, in June 1977, evolve into the now legendary White Dwarf magazine. During the second half of the 1970s, Games Workshop became the main European distributor of the American role-playing game Dungeons & Dragons, and by the end of the decade it had also started publishing its own titles. A key turning point came in 1978/1979, when Games Workshop financed the establishment of Citadel Miniatures in Newark-on-Trent (Nottinghamshire). Citadel produced metal figurines used in GW's games, and the "Citadel" brand remains synonymous with Games Workshop miniatures to this day.

    Click for enlarged picture

    Click for enlarged picture

    1.2. The Move to Nottingham and "Lead Belt"

    The move of Games Workshop from London to Nottingham was not a one-off, but a gradual process linked to the person of Bryan Ansell. Ansell became director of Games Workshop in 1985, bought the company from Jackson and Livingstone in the late 1980s, and refocused it from role-playing games to tabletop strategy products. It was he who physically moved the company from London to Nottinghamshire to bring it closer to Citadel Miniatures. The final consolidation took place in October 1997, when all of Games Workshop's UK operations were moved to their current headquarters in Lenton, a suburb of Nottingham. This location still houses the corporate headquarters, design studio, White Dwarf magazine editorial office, European distribution centre and online sales centre. The concentration of miniatures manufacturers in the wider Nottinghamshire area has led to the area now being referred to in hobby circles as the "Lead Belt". Most of the companies that make up that belt today - Warlord Games, Mantic Games, Perry Miniatures, Wargames Foundry and others - were founded by former Games Workshop employees, which speaks of an ecosystem that has developed around one company for decades.

    Click for enlarged picture

    1.3. Warhammer as a product

    Warhammer Fantasy Battle was first published in 1983 by Bryan Ansell, Rick Priestley and Richard Halliwell. The game literally saved Citadel from stagnation and launched the expansion of ranges of fantasy miniatures.

    Click for enlarged picture

    Click for enlarged picture

    Warhammer 40,000 (40k) was launched in 1987 under the original title Rogue Trader, with Rick Priestley as the main author. Over six generations of rules, the game has become the leading sci-fi wargaming franchise in the world and is now the core product of Games Workshop. The 10th edition of the rules is currently in circulation.

    Click for enlarged picture

    Click for enlarged picture

    You can find more photos on our social networks.

    " ["content_hrv"]=> string(7416) "

    Click for enlarged picture

    Za svakog hobista koji se bavi Warhammerom, posjet Warhammer Worldu u Nottinghamu predstavlja svojevrsno hodočašće. Riječ je o središnjem mjestu cjelokupne Games Workshop kulture - kombinaciji globalnog korporativnog sjedišta, posjetiteljskog centra, izložbenog prostora, igračke dvorane, specijalizirane trgovine i tematskog bara, sve okupljeno na jednoj lokaciji. Također treba uzeti u obzir da se u velikoj igraćoj dvorani održavaju Grand Turniri za sve igre koje izdaje Games Workshop, a budući da se naš Ivan našao u WHW 18.4.2026. na rasporedu je bio WH40k turnir, pa je samom doživljaju izložbe, Bugman Bara, WHW dućana, radionica, i igraće hale doprinio i veliki turnir koji se odvijao taj dan. Ovaj serijal prati njegove dogodovštine…

    Click for enlarged picture

    Click for enlarged picture

    1. Povijesni kontekst

    1.1. Osnutak Games Workshopa

    Games Workshop osnovan je 1975. godine u Londonu, na adresi 15 Bolingbroke Road. Osnivači su bili John Peake, Ian Livingstone i Steve Jackson (ne treba ga miješati s istoimenim američkim game dizajnerom). U početku tvrtka uopće nije bila vezana uz minijature - proizvodili su drvene ploče za tradicionalne igre poput backgammona, manchale, mlina i goa. Iste godine pokrenut je i newsletter Owl and Weasel, koji će kasnije, u lipnju 1977., evoluirati u danas legendarni časopis White Dwarf. Tijekom druge polovice 1970-ih Games Workshop postaje glavni europski distributer američke role-playing igre Dungeons & Dragons, da bi krajem desetljeća počeo izdavati i vlastite naslove. Ključna prekretnica dogodila se 1978./1979. godine, kada Games Workshop financira osnivanje Citadel Miniatures u mjestu Newark-on-Trent (Nottinghamshire). Citadel je proizvodio metalne figurice koje su se koristile u GW-ovim igrama, a brand "Citadel" do danas je ostao sinonim za Games Workshop minijature.

    Click for enlarged picture

    Click for enlarged picture

    1.2. Preseljenje u Nottingham i "Lead Belt"

    Preseljenje Games Workshopa iz Londona u Nottingham nije bilo jednokratno, već postupan proces vezan uz osobu Bryana Ansella. Ansell je 1985. godine postao direktor Games Workshopa, otkupio je tvrtku od Jacksona i Livingstonea krajem 1980-ih, te je preusmjerio s role-playing igara prema proizvodima za stolne strateške igre. Upravo on je tvrtku fizički preselio iz Londona u Nottinghamshire kako bi je približio Citadel Miniatures. Konačna konsolidacija dogodila se u listopadu 1997. godine, kada su sve britanske operacije Games Workshopa premještene u današnje sjedište u Lentonu, predgrađu Nottinghama. Na toj se lokaciji i danas nalaze korporativno sjedište, dizajn studio, redakcija časopisa White Dwarf, distribucijski centar za Europu te online prodajni centar. Koncentracija proizvođača minijatura u širem području Nottinghamshirea dovela je do toga da se čitav kraj danas u hobi krugovima naziva "Lead Belt" (Olovni pojas). Većina tvrtki koje danas čine taj pojas - Warlord Games, Mantic Games, Perry Miniatures, Wargames Foundry i druge - osnovana je od strane bivših zaposlenika Games Workshopa, što govori o ekosustavu koji se desetljećima razvijao oko jedne tvrtke.

    Click for enlarged picture

    1.3. Warhammer kao proizvod

    Warhammer Fantasy Battle prvi je put objavljen 1983. godine, a autori su Bryan Ansell, Rick Priestley i Richard Halliwell. Igra je doslovno spasila Citadel od stagnacije i pokrenula širenje fantasy linija figurica.

    Click for enlarged picture

    Click for enlarged picture

    Warhammer 40,000 (40k) lansiran je 1987. godine pod izvornim nazivom Rogue Trader, a glavni autor bio je Rick Priestley. Tijekom šest generacija pravila, igra je postala vodeća sci-fi wargaming franchise na svijetu i danas predstavlja središnji proizvod Games Workshopa. Trenutno je u opticaju 10. izdanje pravila.

    Click for enlarged picture

    Click for enlarged picture

    Više fotografija možete naći na našim socijalnim mrežama.

    " ["created"]=> string(19) "2026-04-27 11:05:27" ["modified"]=> string(19) "2026-04-27 11:05:27" } ["Member"]=> array(10) { ["id"]=> string(2) "35" ["group_id"]=> string(1) "1" ["first_name"]=> string(5) "Marko" ["last_name"]=> string(9) "Paunović" ["first_name_mask"]=> string(5) "marko" ["last_name_mask"]=> string(8) "paunovic" ["username"]=> string(5) "marko" ["password"]=> string(40) "3bd37b326d19d1880d3b93a4b32e8fb3a90fa122" ["born"]=> string(19) "2033-03-07 20:35:00" ["created"]=> string(19) "2009-06-02 20:37:03" } }
    Marko Paunović, 27th April 2026
  • Back to Basics Workshops in Library Medvescak
              array(2) {
      ["Article"]=>
      array(10) {
        ["id"]=>
        string(3) "502"
        ["member_id"]=>
        string(2) "64"
        ["title_eng"]=>
        string(45) "Back to Basics Workshops in Library Medvescak"
        ["title_hrv"]=>
        string(81) "Back to Basics radionice bojenja minijatura za najmlađe u Knjižnici Medveščak"
        ["mask_eng"]=>
        string(45) "back_to_basics_workshops_in_library_medvescak"
        ["mask_hrv"]=>
        string(77) "back_to_basics_radionice_bojenja_minijatura_za_najmlade_u_knjiznici_medvescak"
        ["content_eng"]=>
        string(5303) "

    In April 2026 we held our Back To Basics miniature painting workshops for the youngest in Medveščak Library.

    Click for enlarged picture

    The workshops were completely FREE for all participants!

    Click for enlarged picture

    Click for enlarged picture

    The Back to Basics method is a method of making models and miniatures that focuses on a fun process intended for younger ages, but everyone is welcome! In three separate sessions on Thursdays, participants (aged 7+) painted miniatures of their choice (knight, princess, king, wizard and barbarian). 

    Click for enlarged picture

    Click for enlarged picture

    Click for enlarged picture

    Click for enlarged picture

    Click for enlarged picture

    1st session: Painting miniatures of choice, Thursday, 09.04. - from 18:00 to 19:00

    2nd session: Painting a miniature of your choice, Thursday, 16.04. - from 18:00 to 19:00

    3rd session: Painting a miniature of your choice, Thursday, 23.04. - from 18:00 to 19:00

    Click for enlarged picture

    Click for enlarged picture

    Click for enlarged picture

    Click for enlarged picture

    Click for enlarged picture

    Click for enlarged picture

    " ["content_hrv"]=> string(6834) "

    U travnju 2026. održali smo naše Back To Basics radionice za najmlađe u Knjižnici Medveščak.

    Click for enlarged picture

    Radionice su bile BESPLATNE za sve polaznike!

    Click for enlarged picture

    Click for enlarged picture

    Back to Basics metoda je metoda izrade maketa i minijatura kojoj je fokus na zabavnom procesu namjenjenom mlađim uzrastima, ali svi su dobrodošli! U tri zasebna termina četvrtkom, polaznici (od 7+) su bojali minijature po izboru (vitez, princeza, kralj, čarobnjak i barbarin).

    Click for enlarged picture

    Click for enlarged picture

    Click for enlarged picture

    Click for enlarged picture

    Click for enlarged picture

    1. termin: Bojenje minijature po izboru, četvrtak, 09.04. - od 18:00 do 19:00

    2. termin: Bojenje minijature po izboru, četvrtak, 16.04. - od 18:00 do 19:00

    3. termin: Bojenje minijature po izboru, četvrtak, 23.04. - od 18:00 do 19:00

    Click for enlarged picture

    Click for enlarged picture

    Click for enlarged picture

    Click for enlarged picture

    Click for enlarged picture

    Click for enlarged picture

    " ["created"]=> string(19) "2026-04-24 08:13:42" ["modified"]=> string(19) "2026-04-24 08:13:42" } ["Member"]=> array(10) { ["id"]=> string(2) "64" ["group_id"]=> string(1) "1" ["first_name"]=> string(9) "Krunoslav" ["last_name"]=> string(8) "Belinić" ["first_name_mask"]=> string(9) "krunoslav" ["last_name_mask"]=> string(7) "belinic" ["username"]=> string(5) "Kruno" ["password"]=> string(40) "eb3fda45fbec0258e90d809803b10491c548b22f" ["born"]=> string(19) "2015-01-18 09:19:00" ["created"]=> string(19) "2015-01-18 09:20:39" } }
    Krunoslav Belinić, 24th April 2026
  • Freehand for Sons of Horus Spartana
              array(2) {
      ["Article"]=>
      array(10) {
        ["id"]=>
        string(3) "501"
        ["member_id"]=>
        string(2) "35"
        ["title_eng"]=>
        string(35) "Freehand for Sons of Horus Spartana"
        ["title_hrv"]=>
        string(41) "Freehand Proces za Sons of Horus Spartana"
        ["mask_eng"]=>
        string(35) "freehand_for_sons_of_horus_spartana"
        ["mask_hrv"]=>
        string(41) "freehand_proces_za_sons_of_horus_spartana"
        ["content_eng"]=>
        string(6110) "

    This week, our Miha is working on the "Freehand" technique on Spartan for Sons of Horus for the game Horus Heresy.

    I'll explain my process a bit and give some tips if you're interested in trying this technique yourself.

    The first step is to find some references, something that we will use as inspiration and a guide for the colors later. It is important to emphasize that we are not trying to copy the drawing 1:1, but rather use it as a starting point and then add our own details.

    Click for enlarged picture

    I used a drawing by Richard Bagnall as inspiration, of course you can use your own sketches.   

    The second step is to define the space and create guides. I recommend using white paint as we will cover these guidelines later. It is important to define the surface we are working with and the important parts of the drawing through the guidelines.

    Click for enlarged picture

    Then we move from the background colors to the foreground colors, in this case reds, then blacks, then golds. Don't worry too much about making it perfect at first, just mark where each color goes and start building a blend from darker to lighter.

    Click for enlarged picture

    Click for enlarged picture

    After that, the process of adding details where needed and marking the edges of zones to create light begins. Here I started working on the face, which I later changed the most with more detailed eyes and I tried to make the nose stand out more.

    Click for enlarged picture

    The last step is very long and requires a lot of effort. It's about fixing and adding more details where needed, when painting something detailed in such a small area mistakes will happen, just let it dry a bit and fix it. In the picture you can see how the red has transferred to my face, I fixed that later. I also added more details by using lighter shades of paint in certain areas.

    Click for enlarged picture

    Click for enlarged picture

    This was the final result, I still tried to add some things, but every time I changed something intentionally, something would change by accident. It's important to know when to accept that a freehand is finished. Your first one won't be perfect, but through practice you will get better and better.

    One tip I will give you is to always have an object in your photo that can serve to show the viewer the size of your drawing. Most people I have shown the final image to thought it was a much larger drawing. I like to use coins.

    Click for enlarged picture

    Now, to show you how easy it is to start freehand and what can be achieved through practice, I'll give you two pictures, one of the brushes and paints I used for this project, and the other of some of my other freehands. I'm sure you'll notice the progress over time.

    Click for enlarged picture

    Click for enlarged picture

    Thank you for reading, I hope I have encouraged you to try the freehand technique on your models.

    " ["content_hrv"]=> string(6228) "

    Naš Miha se ovoga tjedna bavi „Freehand“ tehnikom na Spartanu za Sons of Horus za igru Horus Heresy.

    Malo ću objasniti moji proces i dati neke savjete ako ste zainteresirani sami probati ovu tehniku.

    Prvi korak je pronaći neki reference, nešto što ćemo koristiti kao inspiraciju i voditelj za boje kasnije. Važno je naglasiti da ne pokušavamo prekopirati crtež 1:1, nego ga koristimo kao početak pa dalje nadodajemo svoje detalje.

    Click for enlarged picture

    Koristio sam crtež od Richard Bagnall-a kao inspiraciju, naravno možete i svoje sketcheve koristiti. 

    Drugi korak je odrediti prostor i napraviti vodilice. Savjetujem korištenje bijele boje kako ćemo ove vodilice prekriti kasnije. Važno da odredimo površinu s kojom radimo i važne dijelove crteža kroz vodilice.

    Click for enlarged picture

    Nakon toga krećemo od boja u pozadini prema bojama naprijed, u ovom slučaju to su crvene, pa crne, pa zlato. U početku se nemojte previše brinuti da ispadne savršeno, nego samo da označite gdje koje boje idu i da počnete graditi blend od tamnije prema svjetlijoj.

    Click for enlarged picture

    Click for enlarged picture

    Nakon toga počinje proces dodavanja detalja gdje su potrebni i označavanje rubova zona kako bi stvorili svjetlost. Ovdje sam započeo raditi na licu, koje sam najviše kasnije mijenjao s detaljnijim očima i pokušavao sam više istaknuti nos.

    Click for enlarged picture

    Zadnji korak je jako dugačak i zahtjeva dosta truda. To je popravljanje i dodavanje još detalje gdje je potrebno, kada bojate nešto detaljno na ovako malom prostoru dogodit će se greške, jednostavno pustite da se malo osuši i popravite. U slici možete vidjeti kako mi je crvena prešla na lice, to sam kasnije popravio. Također sam dodao još detalja koristeći svjetlije nijanse boja na određenim dijelovima.

    Click for enlarged picture

    Click for enlarged picture

    Ovo je bio finalni rezultat, još sam pokušao nadodati neke stvari, ali svaki put kad bi nešto mijenjao namjerno, nešto bi se promijenilo slučajno. Važno je znati kada treba prihvatiti da je freehand gotov. Prvi vam neće biti savršen, ali kroz vježbu ćete postati sve bolji i bolji.

    Jedan savjet koji ću vam dati je da uvijek imate neki objekt u fotografiji koji može služiti da se gledatelju prikaže veličina vašeg crteža. Većina kojoj sam pokazao finalu sliku su mislili da je to dosta veći crtež. Ja volim koristiti kovanice.

    Click for enlarged picture

    Sada, da prikažem koliko je lagano krenuti s freehandom i što se može postići kroz vježbu, ću vam dati dvije slike, jedna su kistovi i boje koje sam koristio za ovaj projekt, a druga su neki drugi moji freehandovi. Siguran sam da ćete primjetiti napredak s vremenom.

    Click for enlarged picture

    Click for enlarged picture

    Hvala vam na čitanju, nadam se da sam vas potaknuo da probate freehand tehniku na svojim modelima.

    " ["created"]=> string(19) "2026-04-20 07:42:58" ["modified"]=> string(19) "2026-04-20 07:42:58" } ["Member"]=> array(10) { ["id"]=> string(2) "35" ["group_id"]=> string(1) "1" ["first_name"]=> string(5) "Marko" ["last_name"]=> string(9) "Paunović" ["first_name_mask"]=> string(5) "marko" ["last_name_mask"]=> string(8) "paunovic" ["username"]=> string(5) "marko" ["password"]=> string(40) "3bd37b326d19d1880d3b93a4b32e8fb3a90fa122" ["born"]=> string(19) "2033-03-07 20:35:00" ["created"]=> string(19) "2009-06-02 20:37:03" } }
    Marko Paunović, 20th April 2026
  • Miniature Painting Workshop in Bjelovar
              array(2) {
      ["Article"]=>
      array(10) {
        ["id"]=>
        string(3) "500"
        ["member_id"]=>
        string(2) "95"
        ["title_eng"]=>
        string(39) "Miniature Painting Workshop in Bjelovar"
        ["title_hrv"]=>
        string(40) "Radionica bojanja minijatura u Bjelovaru"
        ["mask_eng"]=>
        string(39) "miniature_painting_workshop_in_bjelovar"
        ["mask_hrv"]=>
        string(40) "radionica_bojanja_minijatura_u_bjelovaru"
        ["content_eng"]=>
        string(6765) "

    Click for enlarged picture

    At the end of March and beginning of April, we held our first miniature painting workshop in Bjelovar. We held them in cooperation with the "Petar Preradović" National Library from Bjelovar, to which we would like to once again thank for the opportunity to demonstrate our hobby to young people in this city.

    Click for enlarged picture

    The first, introductory workshop was led by our Dalibor Čavić, the original creator of this series of workshops. He showed the attendees some of his work and explained the theory behind basic miniature painting in an interesting one-hour lecture.

    Click for enlarged picture

    Click for enlarged picture

    Click for enlarged picture

    Click for enlarged picture

    Due to Dalibor's illness, our Dean Vuković stepped in to lead the second workshop. The second session was reserved for the practical application of the acquired knowledge.

    Click for enlarged picture

    Click for enlarged picture

    Click for enlarged picture

    Eight participants had the opportunity to paint miniatures provided by the Association, but some decided to paint their own miniatures, which Dean naturally made possible.

    Click for enlarged picture

    Click for enlarged picture

    Click for enlarged picture

    Click for enlarged picture

    Click for enlarged picture

    Click for enlarged picture

    Click for enlarged picture

    Click for enlarged picture

    Click for enlarged picture

    See you soon again in Bjelovar!

    " ["content_hrv"]=> string(6737) "

    Click for enlarged picture

    Krajem ožujka i početkom travnja održali smo prve radionice bojanja minijatura u Bjelovaru. Održali smo ih u suradnji sa Narodnom knjižnicom "Petar Preradović" iz Bjelovara kojoj se ovim putem još jednom zahvaljujemo na prilici da demonstriramo naš hobi mladima u ovom nama bliskom gradu.

    Click for enlarged picture

    Prvu, uvodnu radionicu je vodio naš Dalibor Čavić, idejni začetnik ovog serijala radionica. Prisutnima je pokazao neke od svojih radova i objasnio teoriju iza osnovnog bojanja minijatura u zanimljivom jednosatnom predavanju.

    Click for enlarged picture

    Click for enlarged picture

    Click for enlarged picture

    Click for enlarged picture

    Za vođenje druge radionice, uskočio je naš Dean Vuković zbog bolesti Dalibora. Drugi termin bio je rezerviran za praktičnu primjenu stečenih znanja.

    Click for enlarged picture

    Click for enlarged picture

    Click for enlarged picture

    Osam polaznika imalo je priliku bojati minijature koje je Udruga osigurala, ali neki su odlučili bojati i vlastite minijature što im je voditelj naravno omogućio.

    Click for enlarged picture

    Click for enlarged picture

    Click for enlarged picture

    Click for enlarged picture

    Click for enlarged picture

    Click for enlarged picture

    Click for enlarged picture

    Click for enlarged picture

    Click for enlarged picture

    Vidimo se uskoro opet u Bjelovaru!

    " ["created"]=> string(19) "2026-04-14 08:05:13" ["modified"]=> string(19) "2026-04-14 08:05:13" } ["Member"]=> array(10) { ["id"]=> string(2) "95" ["group_id"]=> string(1) "2" ["first_name"]=> string(7) "Dalibor" ["last_name"]=> string(7) "Čavić" ["first_name_mask"]=> string(7) "dalibor" ["last_name_mask"]=> string(5) "cavic" ["username"]=> string(6) "Tvrtko" ["password"]=> string(0) "" ["born"]=> string(19) "2019-04-04 18:51:00" ["created"]=> string(19) "2019-04-04 18:51:50" } }
    Dalibor Čavić, 14th April 2026
  • Hobby Stores in Japan
              array(2) {
      ["Article"]=>
      array(10) {
        ["id"]=>
        string(3) "499"
        ["member_id"]=>
        string(2) "35"
        ["title_eng"]=>
        string(21) "Hobby Stores in Japan"
        ["title_hrv"]=>
        string(23) "Hobby trgovine u Japanu"
        ["mask_eng"]=>
        string(21) "hobby_stores_in_japan"
        ["mask_hrv"]=>
        string(23) "hobby_trgovine_u_japanu"
        ["content_eng"]=>
        string(8238) "

    Last year our Ili went to Japan and was kind enough to write a short story about the hobby stores she visited while there.

    Click for enlarged picture

    I was 3 weeks in Japan and being a geeky (and admittedly an Otaku), of course I spent most of my time there at the famous Akihabara.

    Click for enlarged picture

    Click for enlarged picture

    Akihabara Electric Town or simply Akihabara is a district in central Tokyo that is famous for its many electronics shops and has also gained recognition as the center of Japan's otaku culture. You can find everything ranging from practical electronics models or parts to gaming and anime merchandise and of course model kits and miniatures.

    Click for enlarged picture

    What my partner and I didn’t expect is that all stores here are at least 5 floors and the most I know have even 10 floors! Above is probably the most famous building in Akihabara, the Akihabara Radio Kaikan. The building is 46.5 m high, is ten levels from the ground floor and has two basement levels. The current building primarily hosts stores selling otaku goods.

    Click for enlarged picture

    While above photos are inside Akihabara Radio Kaikan, but these are how most buildings/stores in Akhabara look like.

    Click for enlarged picture

    Click for enlarged picture

    Since we are about building and painting miniature models, the place you MUST visit is VOLKS AKIHABARA HOBBY PARADISE 2 (Hobby Paradise 2) - it is a dream destination for every hobbyist. This massive seven-floor store is filled with everything from character goods and figures to model kits, tools, paints, and more.

    On the topic of Volks, it began as a small hobby shop in 1972. In the late 1990s they produced the first Dollfie dolls, and in 1999 the first Super Dollfie doll was created by Akihiro Enku. In November 2005, Volks USA opened their first American Tenshi no Sumika store in Los Angeles, California.

    Click for enlarged picture

    We are going to talk a bit about Dollfie. Dollfie dolls were customization tools such as pre-rooted hair and stick-on eye decals. Later, complete dolls were released. There are various body types, male and female, with several forms and skin tones for both as well as a line of child-sized dolls. The company also produces tools and materials to customize and maintain dolls.

    Click for enlarged picture

    Click for enlarged picture

    Click for enlarged picture

    Basically they are almost like customising and painting miniature but on a bigger scale. This is a hobby I have had since 2005 (but only become very active in 2017).

    Click for enlarged picture

    Click for enlarged picture

    Volks store in Osaka - Volks Osaka Showroom.

    Click for enlarged picture

    Click for enlarged picture

    One place you need to visit if you're into retro gaming is SUPER POTATO! They have 6 stores total, one is in Akihabara, Tokyo and the one in Nipponbashi, Osaka is a lot bigger and has more things to offer. All the photos I shared above are from the Osaka branch. Super Potato had been referred by many as "a museum as much as a shop" based on how visitors serendipitously interact with the games on display.

    Click for enlarged picture

    And a cliche as they say, you always leave Japan with more luggage (or bags). We came to Japan with just one piece of luggage and 2 backpacks on us.

    " ["content_hrv"]=> string(8311) "

    Prošle godine naša Ili je bila u Japanu i bila je toliko ljubazna da je napisala kratku priču o hobby trgovinama koje je posjetila dok je bila tamo.

    Click for enlarged picture

    Bila sam 3 tjedna u Japanu i, budući da sam geeky (i priznajem otaku), naravno da sam većinu vremena provela tamo u poznatoj Akihabari.

    Click for enlarged picture

    Click for enlarged picture

    Akihabara Electric Town ili jednostavno Akihabara je četvrt u središnjem Tokiju poznata po brojnim trgovinama elektronikom, a stekla je i priznanje kao središte japanske otaku kulture. Možete pronaći sve, od praktičnih modela ili dijelova elektronike do igraće i anime robe, pa sve do kompleta modela i minijatura.

    Click for enlarged picture

    Ono što moj partner i ja nismo očekivali jest da sve trgovine ovdje imaju barem 5 katova, a većina koje poznajem ima čak 10 katova! Iznad je vjerojatno najpoznatija zgrada u Akihabari, Akihabara Radio Kaikan. Zgrada je visoka 46,5 m, nalazi se na deset katova od prizemlja i ima dva podrumska kata. U sadašnjoj zgradi se uglavnom nalaze trgovine koje prodaju otaku robu.

    Click for enlarged picture

    Iako su gornje fotografije unutar Akihabara Radio Kaikana, ovako izgleda većina zgrada/trgovina u Akhabari.

    Click for enlarged picture

    Click for enlarged picture

    Budući da se bavimo izradom i bojanjem minijaturnih modela, mjesto koje MORATE posjetiti je VOLKS AKIHABARA HOBBY PARADISE 2 (Hobby Paradise 2) - to je destinacija iz snova za svakog hobista. Ova ogromna trgovina na sedam katova puna je svega, od robe s likovima i figurama do maketa, alata, boja i još mnogo toga.

    Što se tiče Volksa, započeo je kao mala hobi trgovina 1972. Krajem 1990-ih proizveli su prve Dollfie lutke, a 1999. Akihiro Enku stvorio je prvu Super Dollfie lutku. U studenom 2005. Volks USA otvorio je svoju prvu američku trgovinu Tenshi no Sumika u Los Angelesu u Kaliforniji.

    Click for enlarged picture

    Pisat ću malo o Dollfieju. Dollfie lutke bile su alati za prilagodbu poput unaprijed ukorijenjene kose i naljepnica za oči koje se samoljepe. Kasnije su izdane i gotove lutke. Postoje različiti tipovi tijela, muški i ženski, s nekoliko oblika i tonova kože za oboje, kao i linija lutaka dječje veličine. Tvrtka također proizvodi alate i materijale za prilagodbu i održavanje lutaka.

    Click for enlarged picture

    Click for enlarged picture

    Click for enlarged picture

    U osnovi su gotovo kao prilagodba i bojanje minijatura, ali u većoj skali. Ovo je hobi koji prakticiram od 2005. (ali sam postala vrlo aktivna tek 2017.).

    Click for enlarged picture

    Click for enlarged picture

    Volks trgovina u Osaki - Volks Osaka Showroom.

    Click for enlarged picture

    Click for enlarged picture

    Jedno mjesto koje morate posjetiti ako volite retro igre je SUPER POTATO! Imaju ukupno 6 trgovina, jedna je u Akihabari u Tokiju, a ona u Nipponbashiju u Osaki je puno veća i ima više toga za ponuditi. Sve fotografije koje sam podijelila gore su iz podružnice u Osaki. Super Potato su mnogi nazivali "muzejem koliko i trgovinom" na temelju načina na koji posjetitelji slučajno komuniciraju s izloženim igrama.

    Click for enlarged picture

    I klišej kako kažu, uvijek napuštaš Japan s više prtljage (ili torbi). Mi smo u Japan došli samo s jednim komadom prtljage i dva ruksaka.

    " ["created"]=> string(19) "2026-04-08 08:51:21" ["modified"]=> string(19) "2026-04-08 08:51:21" } ["Member"]=> array(10) { ["id"]=> string(2) "35" ["group_id"]=> string(1) "1" ["first_name"]=> string(5) "Marko" ["last_name"]=> string(9) "Paunović" ["first_name_mask"]=> string(5) "marko" ["last_name_mask"]=> string(8) "paunovic" ["username"]=> string(5) "marko" ["password"]=> string(40) "3bd37b326d19d1880d3b93a4b32e8fb3a90fa122" ["born"]=> string(19) "2033-03-07 20:35:00" ["created"]=> string(19) "2009-06-02 20:37:03" } }
    Marko Paunović, 8th April 2026

All articles

Latest battle-reports

All battle-reports