RISE - the Necromancer project

Sebastian Søgård, 5th June 2024

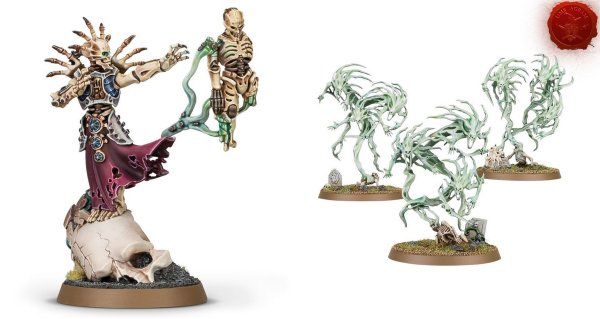
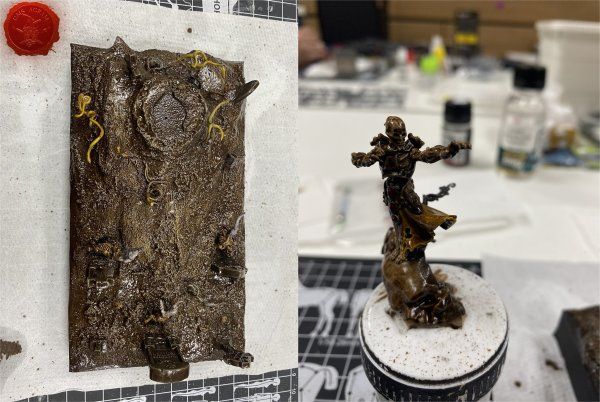
For a while I had this Ossiarch Bonereapers miniature, Mortisan Boneshaper, from Age of Sigmar, in my collection of gray plastic, not really knowing what to do with it. I liked the model, bought it to support a local hobby store I visited, but didn’t find any inspiration for it.

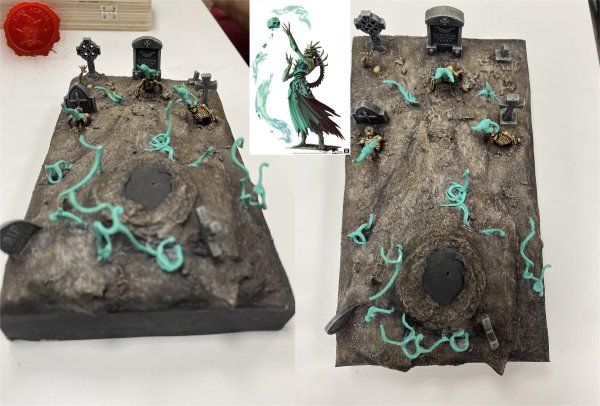
Until one day I saw a few kits at Carta Magica and my head started spinning around a new diorama idea - a Necromancer raising undead warriors from their graves. One of these kits was gravestone bits from Green Stuff World, the other was this Spirit Hosts kit, where I suddenly noticed the very fitting skeletons at the base that I never saw before. They were perfect for my idea.

Click for enlarged picture

I started by getting rid of all the spikes on the Boneshaper, as they’re too silly, big and unnecessary for my taste. I cut them off with my hobby knife and covered up the space this left with some brown stuff. I also covered up the very “warhammer-y”, fancy pattern on middle part of his armor, with brown stuff as well.

For the base, I started with a piece of XPS foam cut to the same size as the wooden plinth I knew I wanted to display it on. I superglued several pieces of bark on one side of the base, to elevate the area where my Mortisan Boneshaper, the focal point of the diorama, would be placed. I also mixed superglue with baking soda to create some textures here as well. Then I covered the bark and all the XPS foam with cheap, air-hardening modeling clay from DAS. At this point I also test-fitted all my elements - the graves, the skeletons and some small branches that would eventually serve as streaks of energy (I didn’t know that yet at this point). And I pushed the base of the Mortisan Boneshaper into the clay before it had hardened to make sure it will fit in the future (although I didn’t consider how much this kind of clay shrinks when it dries, so I eventually had to cut out more clay to make the base fit).

Click for enlarged picture

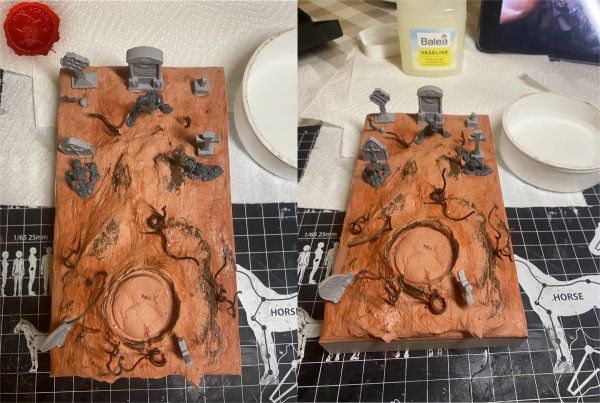
The next step was to blend the graves and skeletons into the rest of the landscape. For this I found that Standard Milliput is perfect. It’s easy to work with and shape, it doesn’t stick as much as brown or green stuff, and only requires a little water to blend it into the landscape.

Click for enlarged picture

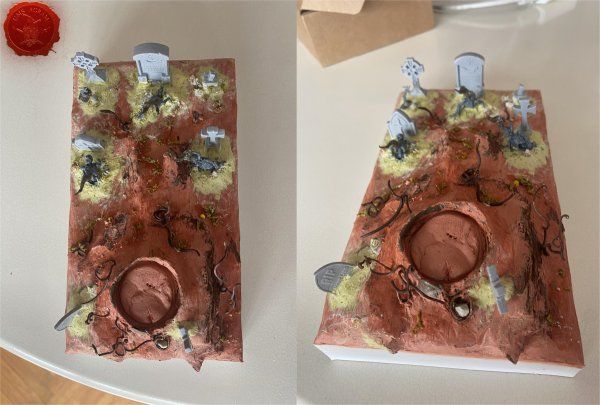
My painting plan for this diorama and the miniature, was to work with contrast paints and enamel washes, something I don’t do often, so it would serve as practice. For this reason, I zenithal primed both diorama and miniature, and then covered them in contrast colours. On the diorama, to get a lot of variation in colour tones, I used five different contrast colours, as I knew the later stage of drybrushing would bring them all together. I used warm colour tones for the rocks, landscape and skeletons - red, yellow, warm brown and green - while covering the gravestones in a colder blue colour (I like Citadel Contrast colour Gryph-Charger Grey a lot, as it is subtle, but gives a cold tint). Then I drybrushed everything with several lighter, neutral greys and browns.

Click for enlarged picture

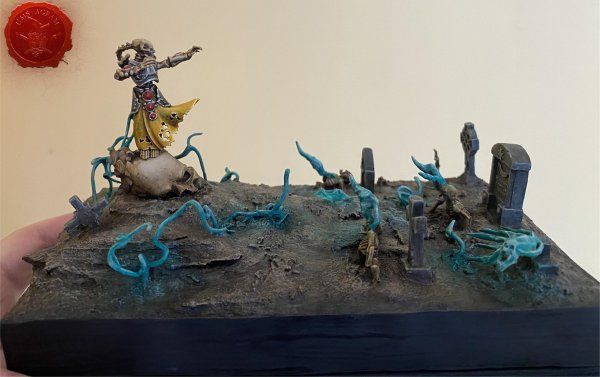
I was happy with how varied in colour the landscape looked after this, but as I had already decided on Streaking Grime enamel as the wash for the whole project, because of a successful test on a General Grievous mini earlier, I went ahead and covered everything in the enamel wash, waited for 15 minutes and began the laborious process of cleaning off most of it with make-up removal brushes from DM that I’ve grown quite fond of (they don’t leave cotton hairs as Q-tips do) and paper towels. On the miniature I was pleased with the result, as the Streaking Grime dirtied down the very flashy yellow colour on the dress, and gave an interesting worn feeling to the bones. Just as my Grievous test had showed me. But as I had never tested this technique on landscapes before, I made a miscalculation. In hindsight I would have left if without the wash, as the contrast colours had already added a nice contrast (duh?) to the diorama. Since the landscape had a lot of tiny textures, from the bark, superglue and baking soda, the enamel wash got stuck deep within the small crevices, and were impossible to get off. This left we with a darker, dirtier, less varied landscape than I wanted, and I took me a long time, and lots of boring steps I won’t get into here, to get some colour variation and interesting tones back into the diorama.

Click for enlarged picture

After highlighting the mini, the skeletons and the graves, it was time to tackle the energy streaks. What was first supposed to be regular branches, I decided to give a strong colour, pretend that they were streaks of energy coming up from the ground all around the Boneshaper as he’s doing his necromancy thing. I had several reasons for deciding on this - 1. the flashy, turquoise colour of the effect would add some nice colour back into a very brown diorama, 2. I hoped the energy streaks would add some dynamism and movement to the diorama, as well as help tell the story better and 3. it would give me a chance to add some subtle OSL in the project. I took inspiration from this artwork I found of the Mortisan Boneshaper.

So I base coloured the energy streaks with white. Then covered them all in two layers of the Citadel Technical paint Nihilakh Oxide.

Click for enlarged picture

Next step was again a Citadel Contrast paint, as this was my go to for the entire project. The one called Aeldari Emerald has a very strong, dark turquoise tone, and only needs one layer to cover anything light enough. So I gave the streaks a coat of this, and then proceeded to drybrush Celestra Grey and Ulthuan Grey in several layers on the streaks, and also on the ground around the streaks. Then another coat of Aeldari Emerald, with a watered down mix used to cover the ground around the streaks for the OSL. Then more drysbrushing, then back to some Nihilakh Oxide to bring in some more midtone again, as the darkness of the Aeldari Emerald became my shadow color, the Ulthuan Grey the brightest highlight, and so the Nihilakh Oxide became the midtone. I repeated these steps until I was happy with the outcome, as well as adding a Spirit Host painted in the same scheme. This was originally just a test model for the colour scheme, but it eventually found its way into the diorama.

Click for enlarged picture

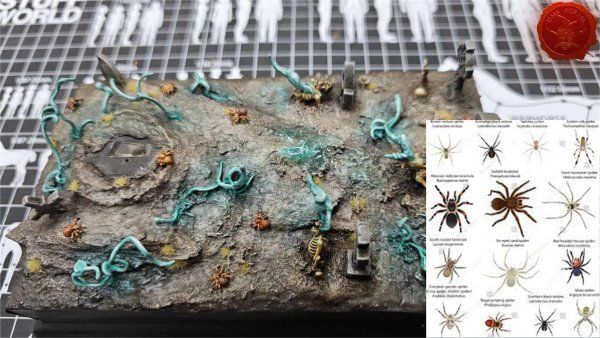
At this point I was quite happy with the diorama, but felt like something was missing. Some colour in the brown, dirt ground was still lacking, and since it’s a rather large diorama, I wanted to pack it with as much story as possible. I had recently bought some 3D printed spiders from Green Stuff World, and had the idea to paint them quite colourful, as well as have them running towards the necromancer, solving both problems; they would give some more colour to the ground, and help sell the “story” that the Boneshaper is controlling so much energy in this necromancy ritual, that all the spiders in the area are attracted to him. I found a picture of different spiders online, and decided on the one on the bottom line, second from left, as I thought the colour would complement the diorama nicely.

Click for enlarged picture

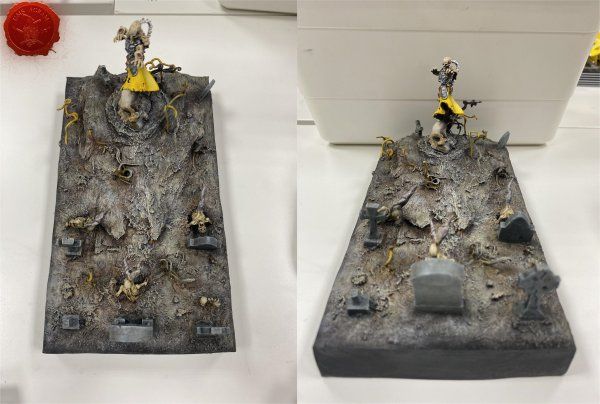
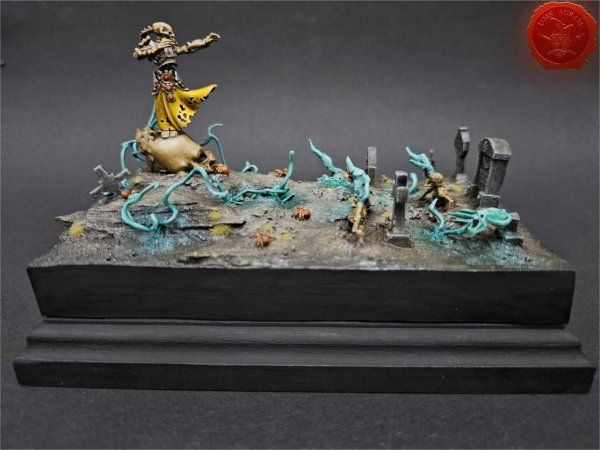
So after about a month of on-and-off work on the diorama, I had this result:

Click for enlarged picture

Latest articles

  • SFRJ 1986 v2 Diorama part 5
              array(2) {
      ["Article"]=>
      array(10) {
        ["id"]=>
        string(3) "492"
        ["member_id"]=>
        string(2) "35"
        ["title_eng"]=>
        string(27) "SFRJ 1986 v2 Diorama part 5"
        ["title_hrv"]=>
        string(29) "Diorama SFRJ 1986 v2– dio 5"
        ["mask_eng"]=>
        string(27) "sfrj_1986_v2_diorama_part_5"
        ["mask_hrv"]=>
        string(26) "diorama_sfrj_1986_v2_dio_5"
        ["content_eng"]=>
        string(3653) "

    In this series of articles, we will follow my work on a new diorama, another in the 1986 series. This time I have again decided to use a former country. Another version of the SFRY 1986.

    Click for enlarged picture

    So far I have finished making the base, painting the base, painting the interior of the vehicle and painting the figures. Now it's time to add the vegetation

    Click for enlarged picture

    The pines/trees were already fixed to the base before painting, so the first vegetation I added was tall shrubs that filled the volume of the base.

    Click for enlarged picture

    Then I added lower vegetation like tall grass and lower bushes.

    Click for enlarged picture

    Finally, I added some short grass, making sure when I was making the parking lot and path that there was no vegetation in the places where the wheels pass.

    Click for enlarged picture

    The paint on the base has just dried up, so next time I'll add the vegetation.

    Click for enlarged picture

    When the diorama is turned to the back, the volume of the forest is visible.

    Click for enlarged picture

    Before placing the vehicles and miniatures on the base, the diorama looks like this.

    Click for enlarged picture

    " ["content_hrv"]=> string(3186) "

    U ovoj seriji članaka pratit ćemo moj rad na novoj diorami, još jednoj u nizu serijala 1986. Ovaj put sam se opet odlučio za bivšu državu. Druga verzija SFRJ 1986..

    Click for enlarged picture

    Do sada sam završio s izradom baze, bojanjem baze, bojanjem interijera vozila i bojanjem figura. Sada je došlo vrijeme za dodavanje vegetacije

    Click for enlarged picture

    Borovi/drveće je već bilo fiksirano na bazu prije bojanja pa je prva sljedeća vegetacija bila visoko žbunje kojim sam popunio volumen baze.

    Click for enlarged picture

    Potom sam dodao niže raslinje poput visoke trave i nižeg grmlja.

    Click for enlarged picture

    Na kraju sam dodao i nisku travu pri čemu sam pazio kad sam radio ugibalište i puteljak da vegetacije ne bude na mjestima gdje prolaze kotači.

    Click for enlarged picture

    Kada se dioramu okrene, vidi se volumen vegetacije u šumi. 

    Click for enlarged picture

    Prije postavljanja vozila i minijatura, diorama izgleda ovako:

    Click for enlarged picture

    " ["created"]=> string(19) "2026-01-19 10:46:08" ["modified"]=> string(19) "2026-01-19 11:00:21" } ["Member"]=> array(10) { ["id"]=> string(2) "35" ["group_id"]=> string(1) "1" ["first_name"]=> string(5) "Marko" ["last_name"]=> string(9) "Paunović" ["first_name_mask"]=> string(5) "marko" ["last_name_mask"]=> string(8) "paunovic" ["username"]=> string(5) "marko" ["password"]=> string(40) "3bd37b326d19d1880d3b93a4b32e8fb3a90fa122" ["born"]=> string(19) "2033-03-07 20:35:00" ["created"]=> string(19) "2009-06-02 20:37:03" } }
    Marko Paunović, 19th January 2026
  • SFRJ 1986 v2 Diorama part 4
              array(2) {
      ["Article"]=>
      array(10) {
        ["id"]=>
        string(3) "491"
        ["member_id"]=>
        string(2) "35"
        ["title_eng"]=>
        string(27) "SFRJ 1986 v2 Diorama part 4"
        ["title_hrv"]=>
        string(29) "Diorama SFRJ 1986 v2– dio 4"
        ["mask_eng"]=>
        string(27) "sfrj_1986_v2_diorama_part_4"
        ["mask_hrv"]=>
        string(26) "diorama_sfrj_1986_v2_dio_4"
        ["content_eng"]=>
        string(2405) "

    In this series of articles, we will follow my work on a new diorama, another in the 1986 series. This time I have again decided to use a former country. Another version of the SFRY 1986.

    Click for enlarged picture

    After the base and the vehicles, I started painting the miniatures. Two policemen and a truck driver. The first step was the base color – black and then white..

    Click for enlarged picture

    After that, I started with the basic colors, concentrating a little more on the truck driver..

    Click for enlarged picture

    Considering the year and location of the action, I decided that his jacket should have the logo from the 1984 Sarajevo Winter Olympics..

    Click for enlarged picture

    Then I threw myself at the policemen..

    Click for enlarged picture

    The paint on the base has just dried up, so next time I'll add the vegetation.

    " ["content_hrv"]=> string(2360) "

    U ovoj seriji članaka pratit ćemo moj rad na novoj diorami, još jednoj u nizu serijala 1986. Ovaj put sam se opet odlučio za bivšu državu. Druga verzija SFRJ 1986..

    Click for enlarged picture

    Nakon baze i vozila, bacio sam se na bojanje minijatura. Dva milicajca i vozač kamiona. Prvi korak je bila temeljna boja – crna pa bijela.

    Click for enlarged picture

    Nakon toga, krenuo sam s osnovnim bojama, malo više se koncentrirajući na vozača kamiona.

    Click for enlarged picture

    S obzirom na godinu i mjesto radnje, odlučio sam se da mu jakna ima logo od ZOI Sarajevo 1984.

    Click for enlarged picture

    Zatim sam se bacio na milicajce.

    Click for enlarged picture

    Taman se tako nekako osušila i boja na bazi pa ću sljedeći puta obraditi i dodavanje vegetacije.

    " ["created"]=> string(19) "2026-01-19 10:35:45" ["modified"]=> string(19) "2026-01-19 10:35:45" } ["Member"]=> array(10) { ["id"]=> string(2) "35" ["group_id"]=> string(1) "1" ["first_name"]=> string(5) "Marko" ["last_name"]=> string(9) "Paunović" ["first_name_mask"]=> string(5) "marko" ["last_name_mask"]=> string(8) "paunovic" ["username"]=> string(5) "marko" ["password"]=> string(40) "3bd37b326d19d1880d3b93a4b32e8fb3a90fa122" ["born"]=> string(19) "2033-03-07 20:35:00" ["created"]=> string(19) "2009-06-02 20:37:03" } }
    Marko Paunović, 19th January 2026
  • SFRJ 1986 v2 Diorama part 3
              array(2) {
      ["Article"]=>
      array(10) {
        ["id"]=>
        string(3) "490"
        ["member_id"]=>
        string(2) "35"
        ["title_eng"]=>
        string(27) "SFRJ 1986 v2 Diorama part 3"
        ["title_hrv"]=>
        string(29) "Diorama SFRJ 1986 v2– dio 3"
        ["mask_eng"]=>
        string(27) "sfrj_1986_v2_diorama_part_3"
        ["mask_hrv"]=>
        string(26) "diorama_sfrj_1986_v2_dio_3"
        ["content_eng"]=>
        string(3113) "

    In this series of articles, we will follow my work on a new diorama, another in the 1986 series. This time I have again decided to use a former country. Another version of the SFRY 1986.

    Click for enlarged picture

    As I announced last time, it's time to get down to the vehicles. The first thing I did was disassemble the models and take out the interiors of all three vehicles.

    Click for enlarged picture

    As you can see in the picture, the interior of the vehicle is poorly or not at all painted, so a lot of attention and time was spent there. I painted the upholstery in shades of gray, or brown on the Tristač. I brought out the details on the dashboard and around the gearbox.

    Click for enlarged picture

    There was something missing from the start on the Fićo, but I couldn't figure out what it was until Kruno pointed out to me that the flashing lights were missing. I fixed that with a small 3mm clear LED that I painted in Tamiya Clear Blue with a silver edge.

    Click for enlarged picture

    This completes the painting of the vehicles’ interior.

    Click for enlarged picture

    The finishing touches are the decorations in the truck's cabin.

    Click for enlarged picture

    Next time we will continue with painting the figures.

    " ["content_hrv"]=> string(3080) "

    U ovoj seriji članaka pratit ćemo moj rad na novoj diorami, još jednoj u nizu serijala 1986. Ovaj put sam se opet odlučio za bivšu državu. Druga verzija SFRJ 1986..

    Click for enlarged picture

    Kao što sam najavio prošli put, vrijeme je da se bacim na vozila. Prvo što sam napravio jest da sam rastavio modele i izvadio unutrašnjost sva tri vozila

    Click for enlarged picture

    Kako je vidljivo na slici, unutrašnjost vozila je slabo ili nikako obojana stoga je tu otišlo mnogo pažnje i vremena. Tapecirunge sam obojao u sive nijanse, odnosno u smeđe na tristaču. Izvukao sam detalje na komandnim pločama te oko mjenjača.

    Click for enlarged picture

    Na fićeku mi je otpočetka nešto falilo, ali nisam mogao skužiti što dok mi Kruno nije skrenuo pažnju da fali rotirka. Nju sam sredio pomoću jedne male 3mm prozirne LED koju sam obojao u Tamiya Clear Blue sa srebrnim rubom.

    Click for enlarged picture

    Time je završeno bojanje unutrašnjosti vozila.

    Click for enlarged picture

    Završni detalji su ukrasi u kabini kamiona.

    Click for enlarged picture

    Sljedeći put nastavljamo sa bojanjem figura.

    " ["created"]=> string(19) "2026-01-19 10:28:32" ["modified"]=> string(19) "2026-01-19 10:28:32" } ["Member"]=> array(10) { ["id"]=> string(2) "35" ["group_id"]=> string(1) "1" ["first_name"]=> string(5) "Marko" ["last_name"]=> string(9) "Paunović" ["first_name_mask"]=> string(5) "marko" ["last_name_mask"]=> string(8) "paunovic" ["username"]=> string(5) "marko" ["password"]=> string(40) "3bd37b326d19d1880d3b93a4b32e8fb3a90fa122" ["born"]=> string(19) "2033-03-07 20:35:00" ["created"]=> string(19) "2009-06-02 20:37:03" } }
    Marko Paunović, 19th January 2026
  • SFRJ 1986 v2 Diorama part 2
              array(2) {
      ["Article"]=>
      array(10) {
        ["id"]=>
        string(3) "489"
        ["member_id"]=>
        string(2) "35"
        ["title_eng"]=>
        string(27) "SFRJ 1986 v2 Diorama part 2"
        ["title_hrv"]=>
        string(29) "Diorama SFRJ 1986 v2– dio 2"
        ["mask_eng"]=>
        string(27) "sfrj_1986_v2_diorama_part_2"
        ["mask_hrv"]=>
        string(26) "diorama_sfrj_1986_v2_dio_2"
        ["content_eng"]=>
        string(3226) "

    In this series of articles, we will follow my work on a new diorama, another in the 1986 series. This time I have again decided to use a former country. Another version of the SFRY 1986.

    Click for enlarged picture

    Last time I explained how I created the terrain, and this time I'll be painting the terrain. The terrain itself consists of several parts: an asphalt road, a turnoff and path, and the terrain in the forest.

    Click for enlarged picture

    Since I wanted all the surfaces to have similar tones, I decided to paint without a base color, applying the main color immediately. The paint I applied was very thin so it stayed wet for a long time, which allowed me to mix the base colors and get a uniform tone.

    Click for enlarged picture

    After applying the basic tones, I started shading. I also used the same principle, using quite diluted tones to create unevenness in certain parts of the surface.

    Click for enlarged picture

    Then I added a layer that I could most simply call wash. A very diluted darker shade of color.

    Click for enlarged picture

    I applied the final shades using another technique, the simplest one – dry brush.

    Click for enlarged picture

    While these paints were drying, I was simultaneously disassembling and painting the interior of the car and truck, as well as the figures, which will be the subject of future articles.

    " ["content_hrv"]=> string(3277) "

    U ovoj seriji članaka pratit ćemo moj rad na novoj diorami, još jednoj u nizu serijala 1986. Ovaj put sam se opet odlučio za bivšu državu. Druga verzija SFRJ 1986..

    Click for enlarged picture

    Prošli put sam objasnio kako sam izradio teren, a ovaj put ću se baviti bojanjem terena. Sami teren se sastoji od nekoliko dijelova: asfaltna cesta, ugibalište i puteljak te teren u šumi.

    Click for enlarged picture

    S obzirom da sam htio da sve površine imaju slične tonove, odlučio sam se bojati bez temeljne boje, nanoseći odmah glavni ton. Boju koju sam nanosio bila je jako razvodnjena tako da je dugo bila mokra i to mi je omogućavalo miješanje osnovnih tonova i dobivanje ujednačene tonove.

    Click for enlarged picture

    Nakon nanošenja osnovnih tonova, krenuo sam sa nijansiranjem. Također sam radio istim principom, dosta razvodnjene tonove kako bih dobio neujednačenost pojedinih dijelova površine.

    Click for enlarged picture

    Potom sam dodao sloj koji bih najjednostavnije mogao nazvati wash. Jako razvodnjenu tamniju nijansu boje.

    Click for enlarged picture

    Završne nijanse sam nanio drugom tehnikom, najjednostavnijom – dry brush.

    Click for enlarged picture

    Dok su se ove boje sušile, paralelno sam rastavio i bojao unutrašnjost automobila i kamiona te figura što će biti tema sljedećih članaka.

    " ["created"]=> string(19) "2026-01-19 09:32:11" ["modified"]=> string(19) "2026-01-19 09:32:11" } ["Member"]=> array(10) { ["id"]=> string(2) "35" ["group_id"]=> string(1) "1" ["first_name"]=> string(5) "Marko" ["last_name"]=> string(9) "Paunović" ["first_name_mask"]=> string(5) "marko" ["last_name_mask"]=> string(8) "paunovic" ["username"]=> string(5) "marko" ["password"]=> string(40) "3bd37b326d19d1880d3b93a4b32e8fb3a90fa122" ["born"]=> string(19) "2033-03-07 20:35:00" ["created"]=> string(19) "2009-06-02 20:37:03" } }
    Marko Paunović, 19th January 2026
  • SFRJ 1986 v2 Diorama part 1
              array(2) {
      ["Article"]=>
      array(10) {
        ["id"]=>
        string(3) "488"
        ["member_id"]=>
        string(2) "35"
        ["title_eng"]=>
        string(27) "SFRJ 1986 v2 Diorama part 1"
        ["title_hrv"]=>
        string(29) "Diorama SFRJ 1986 v2– dio 1"
        ["mask_eng"]=>
        string(27) "sfrj_1986_v2_diorama_part_1"
        ["mask_hrv"]=>
        string(26) "diorama_sfrj_1986_v2_dio_1"
        ["content_eng"]=>
        string(3178) "

    In this series of articles, we will follow my work on a new diorama, another in the 1986 series. This time I have again decided to use a former country. Another version of the SFRY 1986.

    Click for enlarged picture

    As always, everything starts with an idea. This time, the idea came from a model of an Agrokomerc truck that Bojan brought me from Serbia (where it was published as part of a magazine). The design itself changed a bit over time (the first few months of planning). Initially, it was supposed to be just a truck at a roadside stop. Then the idea came to include the Police. And then I got two police vehicles. Fić and Tristač. Basically, this is the first drawing that started it all.

    Click for enlarged picture

    The base for the diorama came from Moson, from Buco. A fantastic combination of MDF and Styrodur that allows you to remove the diorama itself, but also to lower the terrain below the base level. I removed the Styrodur base, modeled it a little to get different terrain height levels. I modeled the road from a cork board, and assembled the rest of the terrain from DAS clay and wooden bark.

    Click for enlarged picture

    Once everything was dry I added texture. Two or three sizes of sand and that was it.

    Click for enlarged picture

    And when that layer was dry, I used a drill to fix the trees to the back of the base. Since all the trees had tall trunks, I decided to leave them as is and not move them during the painting process.

    Click for enlarged picture

    That's it for this week. We already have a nice outline of the diorama, and next time we'll continue with painting the base.

    " ["content_hrv"]=> string(3151) "

    U ovoj seriji članaka pratit ćemo moj rad na novoj diorami, još jednoj u nizu serijala 1986. Ovaj put sam se opet odlučio za bivšu državu. Druga verzija SFRJ 1986..

    Click for enlarged picture

    Kao i uvijek, sve počinje idejom. Ovoga puta, ideja se izrodila iz makete Agrokomercovog kamiona kojeg mi je Bojan dofurao iz Srbije (gdje je izašao u sklopu nekog časopisa). Sami dizajn se malo mijenjao tijekom vremena (prvih par mjeseci planiranja). Otpočetka, trebao je to biti samo kamion na nekom ugibalištu pored ceste. Onda se rodila ideja da stavim i Miliciju. A onda sam nabavio i dva milicijska vozila. Fiću i Tristača. Uglavnom, ovo je prvi crtež od kojeg je sve krenulo.

    Click for enlarged picture

    Baza za dioramu je došla s Mosona, od Buce. Fantastičan spoj MDFa i stirodura koji omogućava vađenje same diorame, ali i upuštanje terena ispod razine baze. Izvadio sam stirodurnu podlogu, malo je izmodelirao da dobijem razne razine visine terena. Cestu sam izmodelirao iz ploče pluta, a ostatak terena složio od DAS glinamola i drvenih kora.

    Click for enlarged picture

    Kada se sve osušilo dodao sam teksturu. Dvije ili tri veličine pijeska i to je to.

    Click for enlarged picture

    A kada se i taj sloj osušio, bušilicom sam fiksirao drveće na stražnji dio baze. S obzirom da su sva stable imala visoka debla, odlučio sam ih ostaviti tako i ne micati ih za process bojanja.

    Click for enlarged picture

    To je to za ovaj tjedan. Imamo već lijepe obrise diorame, a sljedeći puta nastavljamo sa bojanjem baze.

    " ["created"]=> string(19) "2026-01-19 09:18:40" ["modified"]=> string(19) "2026-01-19 09:18:40" } ["Member"]=> array(10) { ["id"]=> string(2) "35" ["group_id"]=> string(1) "1" ["first_name"]=> string(5) "Marko" ["last_name"]=> string(9) "Paunović" ["first_name_mask"]=> string(5) "marko" ["last_name_mask"]=> string(8) "paunovic" ["username"]=> string(5) "marko" ["password"]=> string(40) "3bd37b326d19d1880d3b93a4b32e8fb3a90fa122" ["born"]=> string(19) "2033-03-07 20:35:00" ["created"]=> string(19) "2009-06-02 20:37:03" } }
    Marko Paunović, 19th January 2026

All articles

Latest battle-reports

All battle-reports